

Harvest Right Home Freeze Dryer Owner's Manual
1
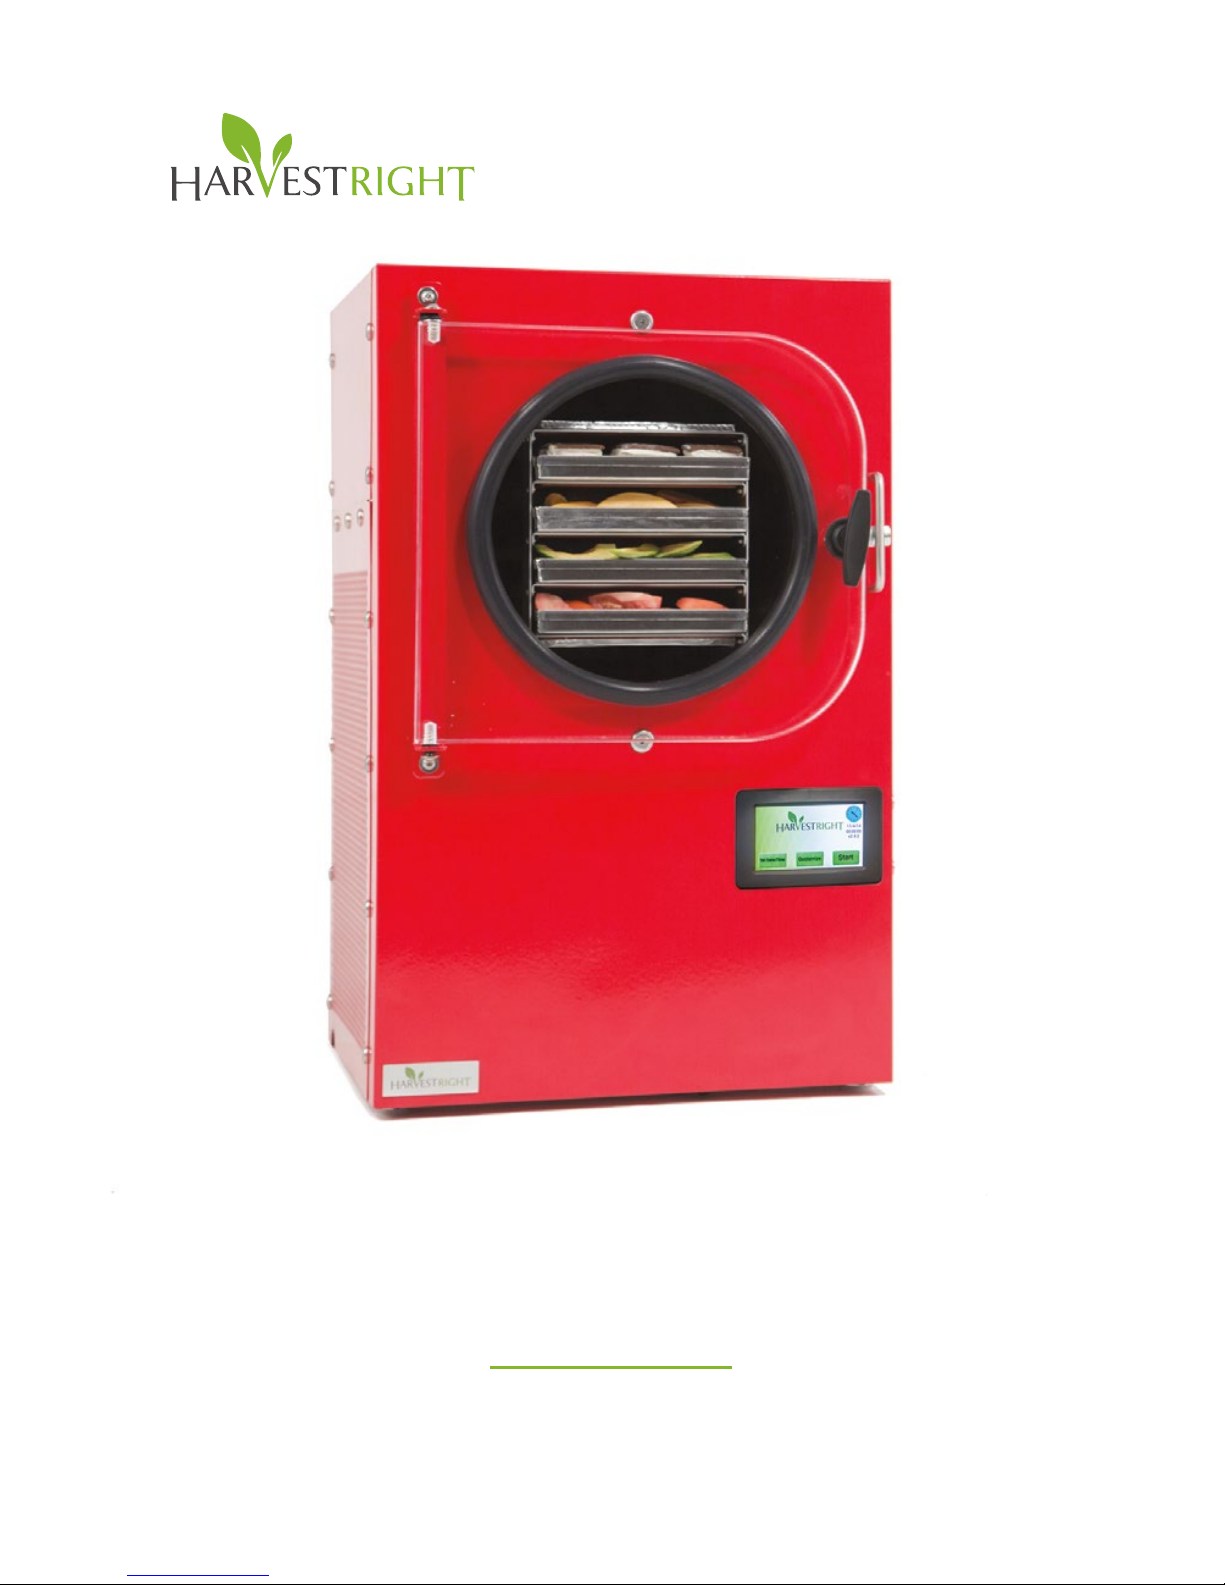
Home Freeze Dryer
OWNER’S MANUAL
The Essential Guide for Every
Home Freeze Dryer Owner

HarvestRight.com | 1-800-700-55082
CONTENTS
QUICK SETUP ........................................................................................ 4
Vacuum Pump Maintenance Schedule......................................................7
IMPORTANT SAFEGUARDS .................................................................... 8
Safety Information ........................................................................................8
Never Operate the Freeze Dryer if it Appears Damaged ....................9
Be Careful About What You Put in Your Freeze Dryer ........................9
Vacuum Pump Runs Hot .............................................................................. 9
Recommended Operating Temperatures ................................................ 9
UNPACKING ........................................................................................ 10
Unpacking Your Freeze Dryer .................................................................. 10
Returns ........................................................................................................... 10
GENERAL INFORMATION BEFORE YOU BEGIN....................................... 12
Major Components ......................................................................................12
Freeze Dryer Assembly ...............................................................................13
Using the “Customize” Settings ............................................................... 16
Why Freeze Dry? .......................................................................................... 17
How to Freeze Dry .......................................................................................18
What Can be Freeze Dried? .......................................................................18
setup overview ............................................................................... 19
oPERATIONAL OVERVIEW ................................................................... 20
Main Points of Operation ..........................................................................20
The Freeze Dry Process .............................................................................20
Packaging and Storing Freeze-Dried Foods .........................................20
Pretreating Foods ........................................................................................20
Opening During Operation ........................................................................21
How Do I Know If My Food is Dry? .......................................................... 21
A CLOSED SYSTEM.............................................................................. 22
What is a Closed System? ..........................................................................22
Possible Leak Points on the Vacuum Pump .......................................... 22
Possible Leak Points on the Freeze Dryer.............................................22
3
Care + Cleaning ............................................................................... 23
Vacuum Pump Maintenance ..................................................................... 23
Cleaning the Interior and Exterior of Your Freeze Dryer .................25
Cleaning Cautions ....................................................................................... 25
Moving or Long Absences ......................................................................... 25
YOUR FIRST BATCH ............................................................................. 26
Final Check .................................................................................................... 26
Start Simple ..................................................................................................26
TROUBLESHOOTING ............................................................................ 27
Frequently Asked Questions ...............................................................27
Mist Coming Out of Pump Handle ..........................................................30
Pump isn’t Turning On During the Dry Cycle ......................................30
WARRANTY ........................................................................................ 30
FREEZE DRY TIMES ............................................................................. 32
TOUCH SCREEN INDEX ........................................................................ 34

HarvestRight.com | 1-800-700-55084
For a video tutorial, go to:
https://youtu.be/s0AfFFqMG08
1. Once your freeze dryer is
unpacked, make certain that the
bottom front feet are adjusted such
that the unit slopes from front to
back (the front of the freeze dryer
should be ¼ inch to ½ inch higher
than the back).
2. Make sure the rubber gasket is
clean both inside and out. Remove
gasket and run under water in order
to remove lint/dirt.
3. Make sure the inside surface of the
acrylic door is clean.
4. Follow the instructions for the vacuum
pump, add the right amount of oil (cover
the small circle in the center of the sight
glass window. See page 7, Figure 5).
5. Make sure the brass cap located
near the port where your vacuum hose
connects is hand tight. See Figure 1, A.
6. Connect the large clear hose to the
vacuum pump and tighten hand tight,
then, if necessary, with a crescent
wrench, tighten an additional ¼
turn. See Figure 1, B. Do not add
any additional Teon tape, or any
type of adhesive, when installing
the vacuum hose. It almost always
creates a vacuum leak!
7. Plug the vacuum pump power cord
into the receptacle on the back of
the freeze dryer.
8. Make sure the power switch on
the vacuum pump is on (located on
the back of the vacuum pump).
9. Place the black insulator door pad
through the rubber gasket to plug
the gap between the shelving unit
and the back edge of the gasket.
Make sure your shelving unit is
pulled forward close to the rubber
door gasket so the pad will snuggly
t between the door and the shelf.
10. Secure the door latch to create
a good seal. There shouldn’t be any
gaps between the black circular
gasket and the door. If the door is not
latched tight, there will be a vacuum
leak which could damage your
vacuum pump, cause an oil spurt, and
FREEZE DRYER QUICK START GUIDE
Figure 1 - Vacuum Pump Connections
(A) Hand tighten vacuum hose (B) Connect large clear
tube, tighten with crescent wrench.

5
void the vacuum pump warranty. The
door latch is a two-staged handle.
Make sure you turn the handle as far
to the right as possible.
11. Make sure to close the drain
valve on the freeze dryer (located on
the left side of your freeze dryer). If
the drain valve is not closed, there
will be a vacuum leak which could
damage your vacuum pump, cause an
oil spurt, and void the vacuum pump
warranty.
12. As described in steps 6-11, it is
your responsibility to make sure
your door is closed properly, that the
drain valve is closed, and that the
hose connecting the vacuum pump
to the freeze dryer is connected
properly. If your freeze dryer doesn’t
pull a vacuum, an oil spurt will make
a mess as it may spray a cup (or
more) of oil out of the pump. Again,
it is your responsibility to make sure
that you have a good vacuum seal.
13. Turn on the freeze dryer (on the
back of your freeze dryer press the
switch to the “up” position). Next,
in order to perform a quick test and
assure that your freeze dryer is set
up properly, please complete the
following steps. To accomplish this
task, your freeze dryer chamber
must be free of any moist material,
water, or condensation. It needs to
be completely dry.
• Press “Start” on the touchscreen.
You will then be reminded to
“Please close drain valve.” Ensure
that this valve is closed.
• Initially, you will see “Freezing for
9 hours” appear on the display.
Now, press the small blue clock in
the top right corner of the display.
This will automatically turn your
vacuum pump on (the initial
vacuum will be a bit loud, but will
quickly settle to a hum that isn’t
too noticeable.)
• When the vacuum pump rst
turns on, the display will read
“>2500 mTorr”. Within 10-20
minutes the display will no longer
read “>2500 mTorr”, but will begin
to show a lower number (starting
with 2500 and moving down). This
number represents the vacuum
pressure inside the freeze dryer.
A lower number represents a
stronger vacuum pressure.
• Eventually, the pressure will go
from 2500 down to 500 mTorr,
and possibly lower. If you see
that this is the case, it means that
your freeze dryer has been set up
properly and you are ready to start
your rst batch. If you are unable
to achieve a vacuum of 500 mTorr,
Figure 2 - Freeze Dryer LCD Display

HarvestRight.com | 1-800-700-55086
or lower, after 30 minutes (or if the
screen still says “>2500 mTorr”)
check steps 2-11 of this Quick Start
Guide to assure that there are no
air leaks at any location on your
freeze dryer.
• Once you are able to see a
pressure of 500 or lower, you are
ready to start your rst batch.
Turn off your freeze dryer and
open the drain valve. This will
release the pressure and allow the
door to be opened so that you can
begin freeze drying your desired
product. Now that the pressure
has been released, close the drain
valve again (or you will not be able
to achieve a vacuum when the
freeze dryer is running.)
• If you are still unable to complete
this test, call Customer Support at
1-800-865-5584 for assistance in
setting up your freeze dryer.
14. Prepare the material that you
want to freeze dry and place it on
the trays, one layer thick, so that
it can be uniformly warmed by the
shelving unit. Food that is pre-frozen
should go into a cold chamber; To
accomplish this, run the freeze cycle
for 30 minutes before taking your
food out of the freezer and putting it
in the freeze dryer.
15. Turn the freeze dryer on. The
screen will now prompt you to press
‘Proceed’ or ‘Cancel’ within a limited
amount of time. Press ‘Cancel’. This
will return you to the home screen.
16. Place the trays in the shelving
unit inside the freeze dryer; insert
the black pad; close the door and
press “Start.”
17. The material will be frozen in
the freeze dryer for 9 hours. The
vacuum pump should then come on.
If it doesn’t, make sure it is plugged
into the back of the freeze dryer.
Make sure the power switch located
on the back of the vacuum pump is
turned on.
18. When the vacuum pump comes
on it should reduce the pressure in
the food chamber within about 10
minutes. If you can still open the door
after 30 seconds, turn off the vacuum
pump, release the pressure in the
food chamber by opening the drain
valve, open the door, and check the
cleanliness of the rubber gasket. Close
the door and turn the vacuum pump
on. Wait for 1 minute and verify that the
door cannot be opened. If your door is
out of adjustment the gasket may not
be able to make contact with the door.
Readjusting the door may be necessary.
19. Once the food is frozen, and
when adequate vacuum pressure is
reached (500 mTorr), the heaters on
the shelves turn on and stay on for
a few minutes, then they will turn
off when the pressure rises to 600
mTorr. Gradually the pressure will
again go down to 500 mTorr; the
heaters will turn on and the pressure
will rise to 600 mTorr when the
heaters will again shut off. This cycle
repeats until the food is dry.
7
*The number of batches is contingent on the food you freeze dry, the thickness, length of batches, etc.
20. Toward the end of the freeze
dry cycle, the heaters will stay on
for six hours and then the process is
complete. The freeze dryer will beep
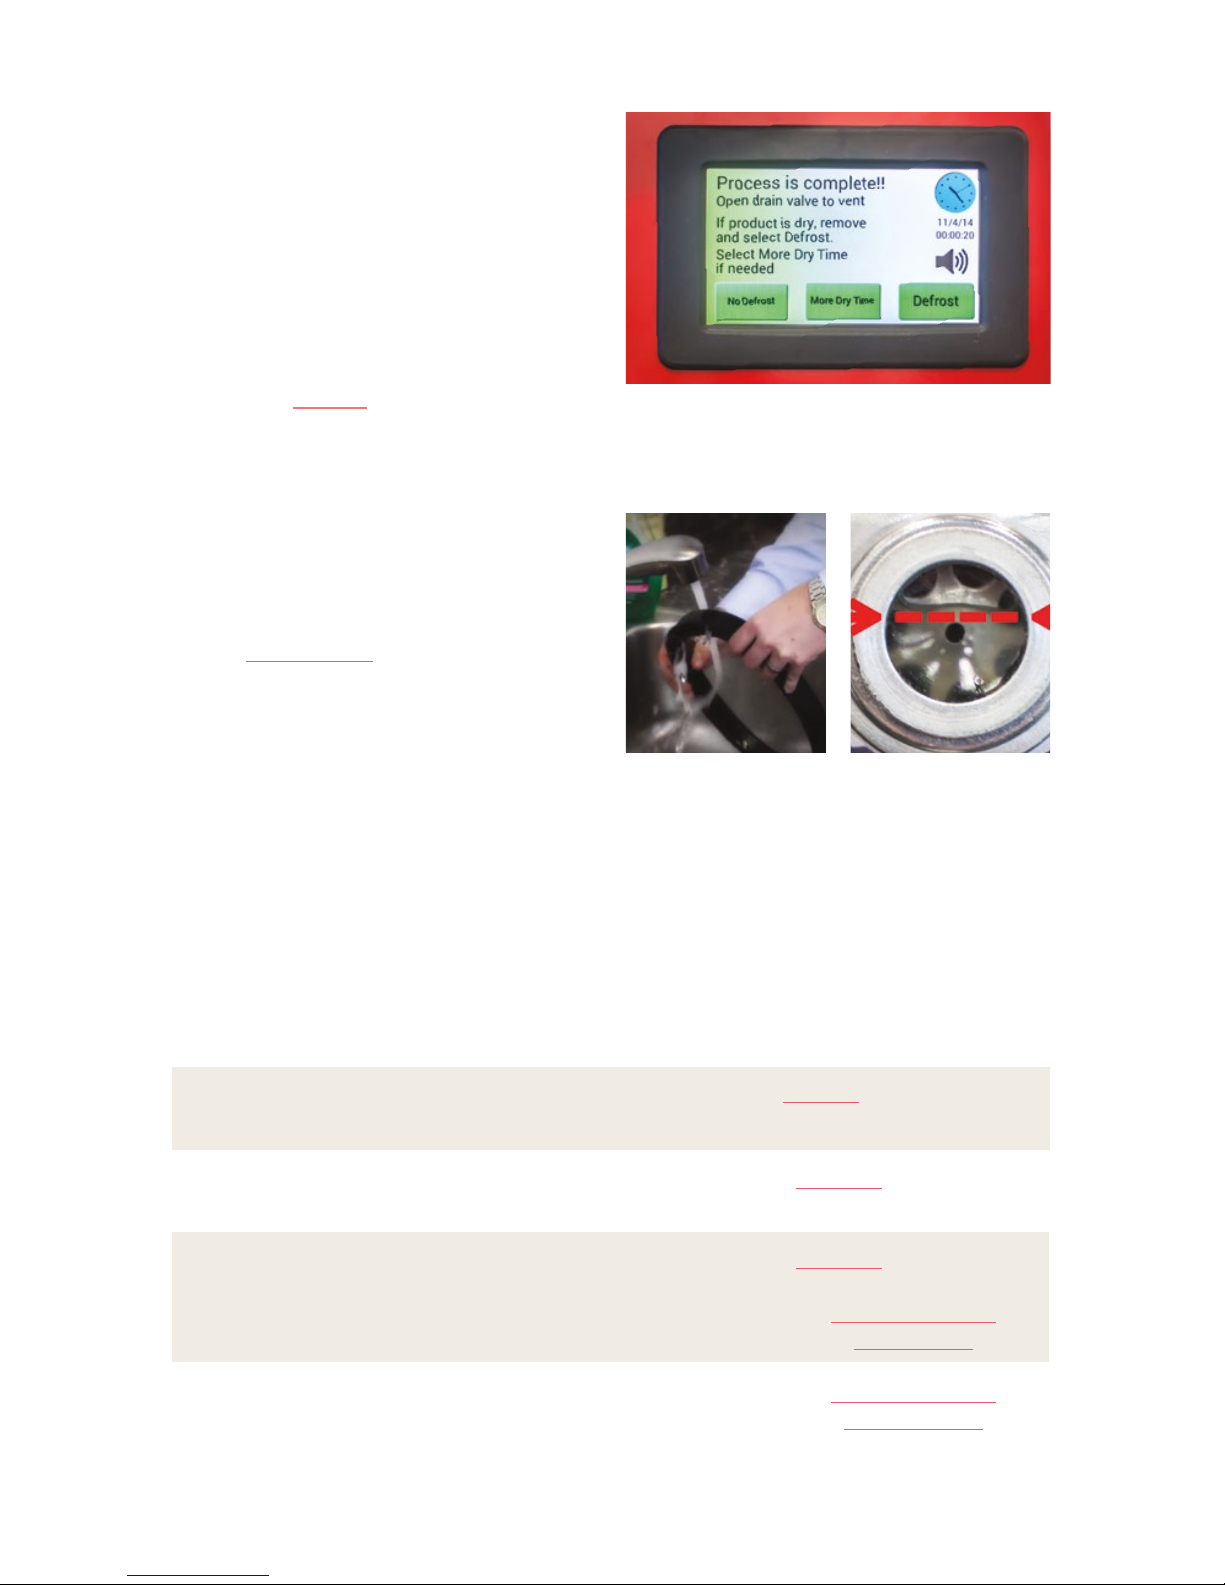
when it is nished. See Figure 3.
For additional questions and setup
instructions, refer to the detailed Harvest
Right Owner’s Manual and User Guide,
beginning on page 8.
CHECKLIST: BEFORE EACH BATCH
• Drain valve closed
• Door clean
• Black rubber gasket (door seal)
clean. See Figure 4.
• Water drained from vacuum pump
oil (see page 27, How do I extend
the life of my vacuum pump oil?)
• Black insulator door pad in place
• Door closed, compressed tight,
and handle turned completely to
the right.
• Assure that oil level is above the
small circle in sight glass. See
Figure 5.
Figure 3 - Freeze Dryer LCD Display
Complete message.
Figure 5 - Vacuum
Pump Sight Glass
Fill oil above the small
circle in the center.
Figure 4 - Rinse
Rubber Gasket
Remove door rubber
gasket to rinse.
VACUUM PUMP MAINTENANCE SCHEDULE
MAINTENANCE
Drain off 1-2 tbsp of oil
Change oil
Power ush
Remove pump cover assembly
FREQUENCY
Beginning of every batch
Approx. 5-6 batches
*
Approx. 10-12 batches
*
Approx. 30-36 batches
*
INSTRUCTIONS
See pg 27, “How do I extend the
life of my vacuum pump oil?”
See pg 23, “Vacuum Pump
Maintenance, Oil Change”
See pg 24, “Vacuum Pump
Maintenance, Power Flush”
https://youtu.be/
ILVBXqg9oc8
https://youtu.be/
bOGTh9n3NpA

HarvestRight.com | 1-800-700-55088
IMPORTANT INFORMATION
Read all instructions carefully
before using your Harvest Right
Home Freeze Dryer. Following
these instructions will help prevent
injuries, damage to the freeze
dryer, and will ensure that you
have the best possible experience
with your freeze dryer. Save these
instructions.
1.1 SAFETY INFORMATION
When using this appliance always
exercise basic safety precautions,
including the following:
• Use this product only for its
intended purpose as instructed in
this Owner’s Manual.
• ⚠WARNING Do not use an
extension cord when plugging
your freeze dryer into your power
source. Many extension cords
cannot handle a sufcient draw
of power and may melt or deform
causing a re or other damage.
• Do not use surge protectors or
plug your freeze dryer into a GFI
outlet. These sources are very
sensitive and may cause your
freeze dryer to unnecessarily trip
the power breaker.
• Do not allow children to climb,
stand on the freeze dryer, or hang
on the door or shelves. They could
damage the freeze dryer and
injure themselves.
IMPORTANT SAFEGUARDS
• After your freeze dryer is in
operation, do not touch the cold
surfaces during the freezing
cycle, particularly when hands
are damp or wet. Skin may
adhere to these extremely cold
surfaces.
• Do not store or use gasoline
or other ammable vapors and
liquids in the vicinity of this or
any other appliance.
• Keep ngers out of “pinch point
areas”. Clearances between the
doors and closing mechanism
are necessarily small. Be careful
closing doors when children are
in the area.
• Unplug your freeze dryer before
cleaning or making repairs. We
strongly advise that all service be
done by a qualied individual.
• Refrigerants: All refrigeration
products contain refrigerants,
which under federal law must
be removed prior to product
disposal. If you choose to dispose
of an old refrigeration product,
check with the company handling
the disposal about what to do.
• This appliance is not intended
for use by small children or
inrm persons without capable,
adult supervision. Small children
should be supervised when using
the appliance.
• Do not use a wet or damp cloth
when cleaning the plug at the end

9
of the power cord. Remove any
dust or foreign matter from the
power plug pins. A dirty power
plug can increase the risk of re.
• Do not block vent air holes. If the
air holes are blocked, the freeze
dryer could overheat.
• Never unplug your freeze dryer by
pulling on the power cord. Always
grip the power plug rmly and
pull straight out from the outlet.
Pulling on the power cord could
cause a re and/or electric shock.
A damaged power cord must be
replaced by the manufacturer, a
certied service agent or qualied
certied service personnel.
• Use caution when putting your
hands under the appliance. Any
sharp edges may cause personal
injury.
• Do not insert the power plug
with wet hands. It may cause
electric shock.
• In general, power consumption
will average 8-10 amps of power
and spike near 16 amps. Usage of a
dedicated 20 amp circuit will help
prevent power outages and allow
for proper freeze drying.
1.2 NEVER OPERATE THE FREEZE
DRYER IF IT APPEARS DAMAGED
If it is dropped or damaged in any
way, call Harvest Right Customer
Support at 1-800-865-5584
immediately for examination, repair,
electrical or mechanical adjustment,
or possible replacement of parts.
1.3 BE CAREFUL ABOUT WHAT YOU PUT
IN YOUR FREEZE DRYER
This product is designed to freeze
dry materials or products that
contain water. Freeze drying other
materials voids the warranty and
may damage the freeze dryer.
1.4 VACUUM PUMP RUNS HOT
Use caution when running your
freeze dryer as the vacuum pump that
sits external to the unit will run hot.
Keep your vacuum pump out of reach
of children as it may cause injury if
handled improperly. Your high quality
vacuum pump is built to run hot. Use
care and caution in order to prevent
injury. Average operating temperature
is 160 degrees Fahrenheit.
1.5 RECOMMENDED OPERATING
TEMPERATURES
Your Harvest Right Freeze Dryer is
designed to work in a wide variety
of temperatures, but extreme heat
and cold will affect performance.
The recommended temperature
range for operation is 35-90 degrees
Fahrenheit. The most efcient
temperature range is between 45-80
degrees Fahrenheit.
Although safe, operating your
freeze dryer in temperatures
above 90 degrees Fahrenheit could
affect batch times and have an
adverse effect on the condensing
unit (freezer). As the temperature
rises where your freeze dryer
operates, so does the length of time
it takes to nish batches of food.
This happens because with hotter

HarvestRight.com | 1-800-700-550810
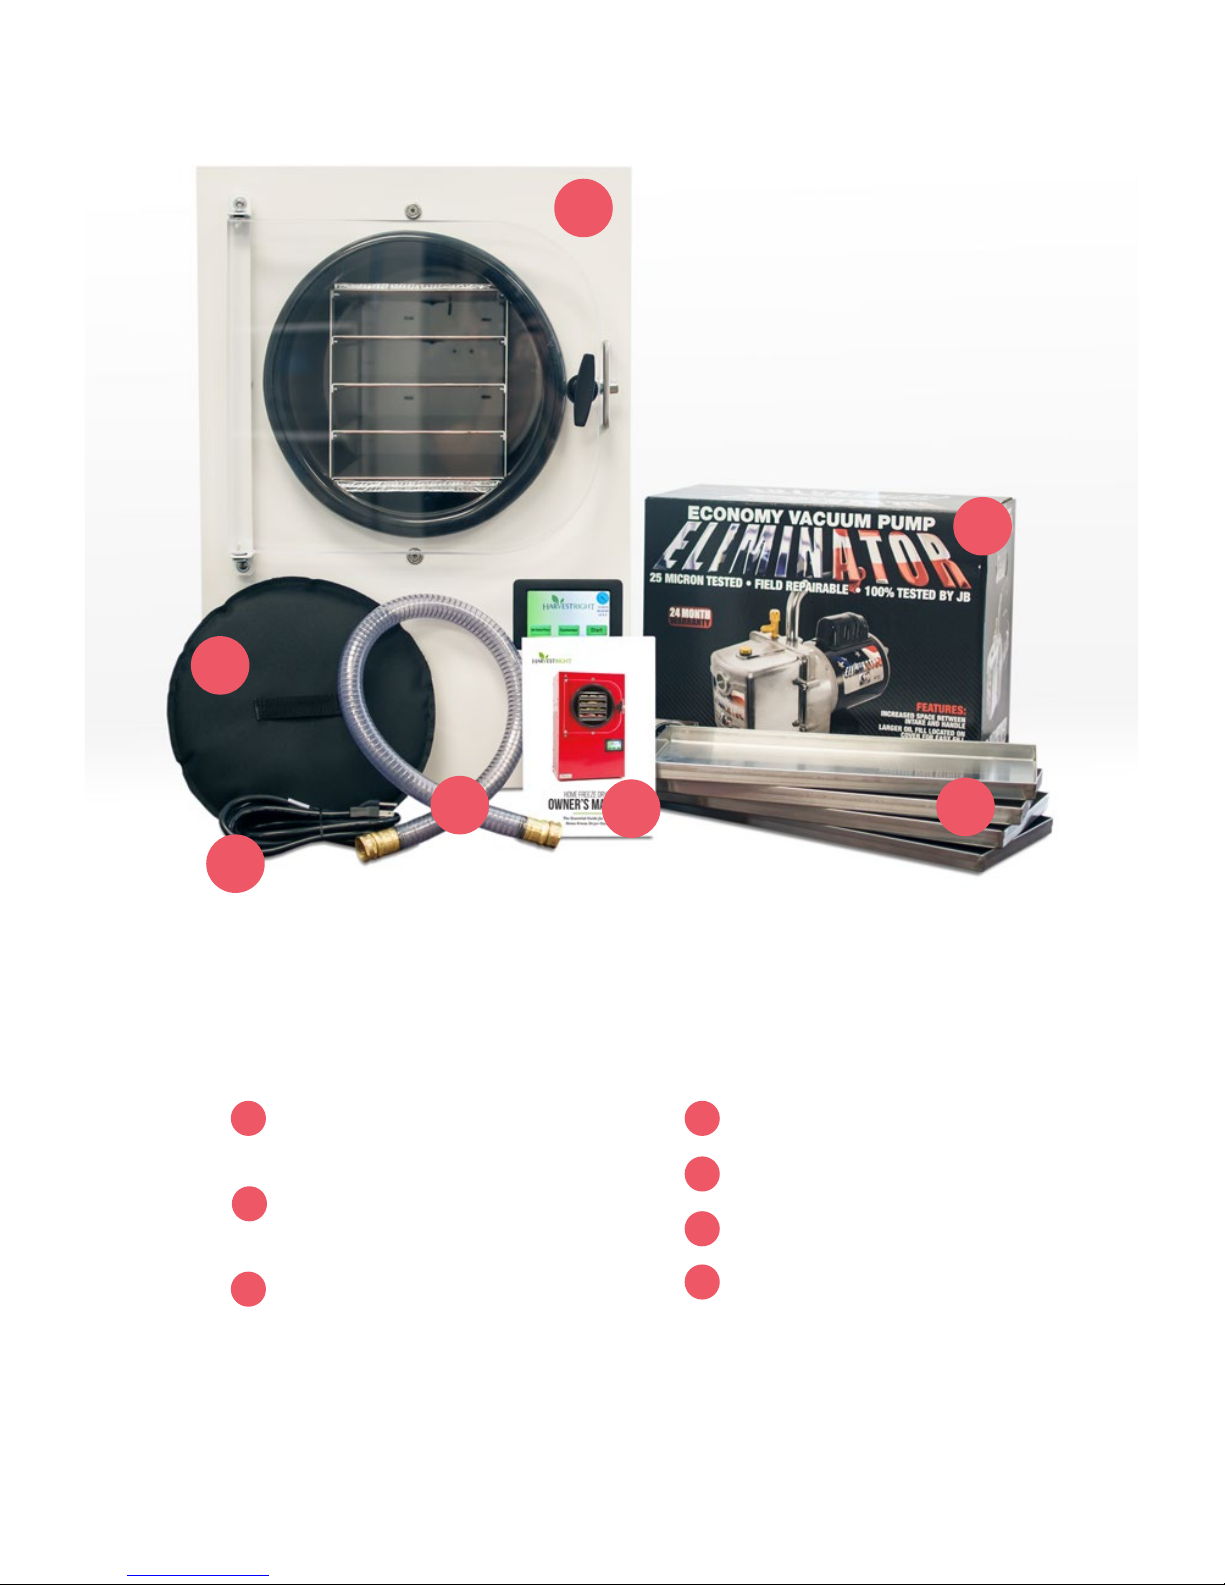
2.1 UNPACKING YOUR FREEZE DRYER
You should have received the
following items: see image on page 11.
• Harvest Right Home Freeze Dryer
• Vacuum pump with oil demister
• Power cord
• Vacuum hose
• Vacuum pump oil
• Shelving unit
• 4 food trays
• Owner’s Manual
• Black insulator door pad
• Other materials, not listed here,
may have been included.
1. Remove Harvest Right Freeze
Dryer, vacuum pump, vacuum hose
and power cord.
2. Inspect all items to ensure no
damage occurred during shipping.
3. If any damage has occurred, call
Harvest Right Customer Support
immediately at 1-800-865-5584.
operating temperatures it is harder
to reach the extreme cold required
for freeze drying.
For example: a batch that normally
takes 24 hours to nish in a 75°F
environment could take over
40 hours to complete in hot
temperatures.
UNPACKING
4. Remove the vacuum pump from
its packaging and place it beside or
behind the freeze dryer.
5. Unwind power cord.
2.2 RETURNS
Units may be returned if they have
not been used. The customer will
be charged a 15% restocking fee and
incur all shipping charges. Harvest
Right will issue a refund upon
examination of the unused freeze
dryer. If Harvest Right determines
that the returned unit has been
used, the freeze dryer will be sent
back to the customer, in which case
the customer will incur the cost of
freight for the returned unit.
CAUTION: Do not lift freeze dryer
from bottom of door. Doing this may
cause misalignment and inability to
achieve proper vacuum. Always lift
your freeze dryer appliance from the
base. Lifting the freeze dryer by the
door voids the warranty.
11
A
• Vacuum hose
• 4 food trays
• Owner’s Manual
• Black insulator door pad
What is in the box
You should have received the
following items:
• Harvest Right Home Freeze
Dryer with shelving unit
• Vacuum pump with oil demister
and vacuum pump oil
• Power cord
A
b
c
d
e
f
g
B
C
g
D
e
F
Other materials, not listed here, may have been included.

HarvestRight.com | 1-800-700-550812
before you begin...
3.1 MAJOR COMPONENTS
Harvest Right Home Freeze Dryer
• Power Switch: Located on the back
of the freeze dryer. Depressing the
toggle switch to the up position
turns the power on.
• Vacuum Chamber: This circular
chamber includes a shelving unit
for the food trays.
• Trays: You should have received
four of these to hold the food
items to be freeze dried.
• Power Unit and display: The
freeze dryer is powered by
plugging the power cord into
the back of the freeze dryer (one
receptacle is for the power cord
and the other is for powering the
vacuum pump) and a functioning
110-120 volt power outlet in the
wall of your house or garage.
• Vacuum Pump: Follow
the instructions from the
manufacturer of the vacuum
pump to get the vacuum pump
ready for operation. Connect the
vacuum hose to the connection
on the side of the freeze dryer
and to the appropriate tting on
the vacuum pump. The vacuum
hose should be hand-tightened,
and then tightened additionally
(1/4 turn), if needed, using a
crescent wrench, open-end
wrench, or pipe wrench. Be
sure to tighten both ends of
the vacuum hose to properly
connect the freeze dryer to the
vacuum pump. Plug the vacuum
pump power cord into the
receptacle on the back panel of
the freeze dryer. Make sure to
add the right amount of oil to the
vacuum pump as specied in the
manufacturer’s instructions (see
image on page 7, gure 5). Make
sure the vacuum pump “on/off”
switch is set to the “on” position.
It will not receive power until
the freeze dryer completes the
circuit at the appropriate time in
the freeze drying process.
• Oil Demister: This attaches to the
rear of the handle on the vacuum
pump and the holes in the white
cap point upward.
• Drain Line: This is a clear tube
beneath the left rear of the freeze
dryer. You will need to pull this
tube out from beneath the freeze
dryer. It should easily t in the
notch provided. This tube should
be un-coiled and the open end
placed in a 5-gallon bucket, drain
or similar container, to collect
the water that is removed from
the food during freeze drying and
collects as ice on the sides of the
vacuum chamber. Generally two
people can easily tilt the freeze
dryer and reach beneath it to pull
out the drain hose.
• Before you start a freeze drying
GENERAL INFORMATION

13
cycle make sure the valve on
the drain tube is closed (the
small handle on the valve is
perpendicular to the direction
of the drain tube). If the drain
valve is not closed, there will be a
vacuum leak which could damage
your vacuum pump and void the
vacuum pump warranty.
3.2 FREEZE DRYER ASSEMBLY
1.
Wait 24 hours before running
your freeze dryer in order to
facilitate proper settling within the
refrigerator condensing unit. Waiting
24 hours will allow the oil in the
condensing unit to settle so that the
freeze dryer can get cold enough.
2. The ideal location for operating
your freeze dryer is a cool, dry, clean
location. Operating your freeze dryer
in temperatures higher than 80
degrees Fahrenheit may cause cycle
times to take longer.
3. Place the freeze dryer on a level,
stable surface and adjust the leveling
feet so that the front end of the
freeze dryer is about ¼ to ½ inch
taller than the rear. This allows
the water that accumulates in the
chamber of the freeze dryer to exit
through the drain hole in the rear
of the vacuum chamber. Make sure
the translucent (clear) drain line is
placed in a 5-gallon bucket, a drain,
or an equivalent container to catch
the water. Make sure the drain valve
is tilted slightly down and not at on
the table or cart.
4. Connect the freeze dryer power
cord to the receptacle on the rear
panel and to a 110 to 120 volt ac
power supply (most homes power
outlets provide this power).
5. Connect the power cord on the
vacuum pump to the receptacle on
the rear panel of the freeze dryer.
6. Make sure the power switch on
the vacuum pump is in the “on”
position. The power button is
located above the power cord on the
rear of vacuum pump. The control
circuit in the freeze dryer will
control when to turn “on” and “off”
the vacuum pump.
7. Connect the large clear hose to
the freeze dryer (see Figure 6) and to
the vacuum pump (see image on page
4, gure 1, B) and tighten hand tight,
then, if necessary, with a crescent
wrench tighten an additional ¼ turn.
8. Make sure all other caps and ports
on the vacuum pump are closed
tightly (hand tightened only).
9. Install oil de-mister. This attaches
to the rear of the handle on the
Figure 6 - Freeze Dryer Connection for Vacuum
Pump Large Clear Tube
See Figure 1 on pg 4.

HarvestRight.com | 1-800-700-550814
vacuum pump and the holes in the
white cap point upward. Tighten
snuggly so that the white cap faces
upward. Suggestion: Place a small
sock or cloth over the white cap. This
will help control possible oil misting
and oil spurts.
10. Pull off the rubber gasket that
comes into contact with the acrylic
door and clean with water inside
and out. Assure that there are no
particulates inside the gasket. If the
gasket is not clean inside and out,
the freeze dryer may have a hard
time pulling a low vacuum. They are
generally clean. Just look to make
sure. Do not stretch the gasket
apart too far while trying to clean
the inside. Stretching too far could
damage the gasket creating a crack
that prevents achieving a proper seal.
11. Ensure that the acrylic door has
a tight t against the rubber gasket
by examining the door in the fully
closed position. Check to make sure
there are no small gaps or spaces
between the acrylic door and the
rubber seal. You will see a thin line
around the entire gasket as it presses
up against the door. If there is a gap
at any portion of the seal between
the door and rubber gasket, call
Harvest Right Customer Support at
1-800-865-5584 for assistance.
12. You are now ready to load freeze
drying material onto trays. It is
best to freeze dry materials that are
somewhat similar in moisture content.
13. Place the trays that have the
material on them in the shelving
unit. Make sure the trays are fully
supported by the heated shelf with no
part of the tray extending out of the
shelving unit. The trays are heated by
the shelving unit and must t well in
order to receive the appropriate heat
to drive off the moisture.
14. Place the black insulator door
pad in the opening of the vacuum
chamber (within the opening of the
black rubber gasket). This insulates
the acrylic door from the extreme
cold in the chamber and prevents the
cold from forming ice on the door.
15. Close the acrylic door and turn
the door latch clockwise as far as it
will go. This will compress the door
closed against the rubber gasket.
Visually check the seal to make sure
the door is sealed properly to the
gasket. If the door is not latched tight,
there will be a vacuum leak which
might damage your vacuum pump
and void the vacuum pump warranty.
16. Close the drain valve. In the
closed position, the drain valve is
perpendicular to the hose.
17. Power on your unit (press the
switch on the back of your freeze
dryer to the up position). Now, press
the “Start” button. You will then
be reminded to “Please close drain
valve...” Once you have done this, the
word “Freezing…” will be displayed
on the touch screen.
 Loading...