

Harvest Maid FD-1000 Owner’s Manual

®
Welcome to the fun and exciting world of food dehydration,
and thank you for choosing NESCO _ American Harvest <_
-- "The world's fastest, most even drying dehydrators." R___
Our long history of developing and manufacturingfood dehydrators and accessories
enables us to bring to you the best in patented drying technology.
If you have any questions regarding your food dehydrator and/or food dehydration,
please contact our Customer Satisfaction Department at 800-288-4545.
Our associates will be happy to assist you.
Table of Contents
Important Safeguards ................................... 2
Product Information
• FD-50 & FD-50T Snackmaster ' Pro:"...... 3
• FD-60 Snackmaster 'Express'" ................. 5
• FD-1000 & FD-1010 GardenmasteF _...... 7
General Drying Guidelines .......................... 9
Fruits .......................................................... 13
Printed in the U.S.A.
Bolger Concept to Print
_PII" I N K 10% Pos_
Vegetables .................................................. 19
Jerky ........................................................... 23
Herbs .......................................................... 26
Crafts ......................................................... 30
Breakfast Recipes ....................................... 36
Desserts, Cookies & Candies .................... 38
Condiments, Dressing, Stuffing,
Sauces, Salads, Soups & Snacks .............. 42
Accessories ................................................. 47
Index .......................................................... 49
Warranty ..................................................... 51
About Your Warranty .................................. 52
mportant Safeguards
mThis product is designed for household use onlym
When using electrical appliances, basic safety precautions should always be
followed, including the following:
1. Read all instructions.
2. Do not touch hot surfaces.
3. To protect against electrical hazards, do not immerse power unit or any part
of the dehydrator cord or plug, in water or any other liquid.*
4. Close supervision is necessary when any appliance is used by or near children.
5. Unplug from outlet when not in use and before cleaning. Allow the unit to
cool before putting on and taking off parts.
6. Do not operate any appliance with a damaged cord or plug, or after the
appliance malflmctions, or has been damaged in any manner. Return appliance
to the nearest authorized service facility for examination, repair, or adjustment.
7. The use of accessory attachments not recommended by the appliance manufac-
turer may cause hazards.
8. Sharp utensils should not be used inside the dehydrator.
9. Do not let cord hang over edge of table or counter, or touch hot surfaces.
10. Do not use outdoors. Always dehydrate indoors on a fiat surface to allow
sufficient air flow. Never place base on carpet, towel, newspaper, etc., which
can block air flow to the bottom of base and cause failure. Never cover entire
unit with anything, as that will cause failure. The dehydrator needs an open,
breathable space to flmction properly.
11. Do not place on or near a hot gas or electrical burner, or in heated oven.
12. Do not use this appliance for other than its intended use.
*The power unit is located in the base piece on the FD-50, FD-50T, FD-1000 and FD-1010. On
the FD-60, the power unit is located in the top piece.
SaveTheseinstructions
NOTE: This appliance has a polarized plug (one blade is wider than the other).
As a safety feature, this plug will fit on a polarized outlet only one way. If the
plug does not fit fully in the outlet, reverse the plug. If it still does not fit,
contact a qualified electrician. Do not attempt to defeat this safety feature.
Short Cord Instructions -- a short power supply cord is provided to reduce
the risk resulting from becoming entangled in or tripping over a longer cord.
Extension cords may be used if care is exercised in their use. If an extension
cord is used, the marked electrical rating of the cord should be at least as great
as the electrical rating of the appliance. The longer cord should be arranged
so that it will not drape over the table top where it can be pulled on by
children or tripped over unintentionally.
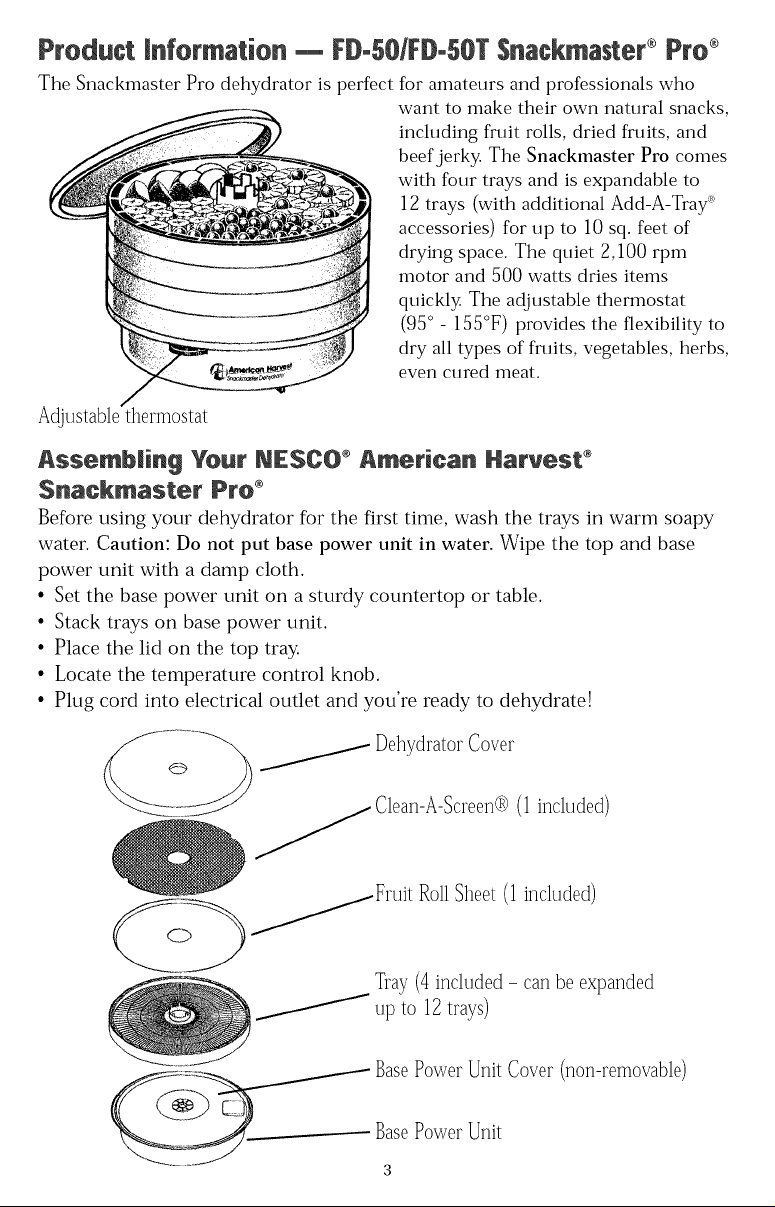
Product information _ FD-S0/FD-SOTSnackmaster®Pro®
Tile Snackmaster Pro dehydrator is perfect for amateurs and professionals who
want to make their own natural snacks,
including fruit rolls, dried fruits, and
beef jerky. The Snackmaster Pro comes
with four trays and is expandable to
12 trays (with additional Add-A-Tray :_'
accessories) for up to 10 sq. feet of
drying space. The quiet 2,100 rpm
motor and 500 watts dries items
quickly. The adjustable thermostat
(95 ° - 155°F) provides the flexibility to
dry all types of fruits, vegetables, herbs,
even cured meat.
Assembaing Your NE_SCO_ American Har_est ®
$nackmaster Pro ®
Before using your dehydrator for the first time, wash the trays in warm soapy
water. Caution: Do not put base power unit in water. Wipe the top and base
power unit with a damp cloth.
• Set the base power unit on a sturdy countertop or table.
• Stack trays on base power unit.
• Place the lid on the top tray.
• Locate the temperature control knob.
• Plug cord into electrical outlet and you're ready to dehydrate!
4i> 0 0v
induded)
/ Clean-A-Screen_) (1
%ay (4 included - can be expanded
up to ]2 trays)
__ BasePowerUnit Cover (non-removable)
Base
Power Unit
3

FD-50/FD-50T Product Information (continued)
Useand Care
Trays
Your dehydrator trays are easy to clean. Simply soak tile trays in warm water with a
mild detergent for several minutes. A soft-bristle brash will loosen food particles
that resist softening by soaking. Don't clean trays with any metal objects or scour-
ing pads as they tend to damage the surface of the trays. Trays can be washed on
the top rack of your dishwasher if you remove them before the drying cycle.
Caution: Remove trays before the beginning of the drying cycle of your dish-
washer.
Cov@r
The cover for the Snackmaster can be washed in warm soapy water or wiped clean
with a soft cloth or sponge. Wash top after it has been removed from the rest of the
machine. Don't use scouring pads, abrasive cleaners, or sharp utensils. Do not
wash the cover in the dishwasher.
Base Pewer Unit
Caution: Be sure the unit is unplugged before cleaning the base power unit.
Use a damp cloth or towel to remove dried food particles from the base power unit.
Avoid dripping any liquid into electrical parts. CAUTION: DO NOT IMMERSE IN
WATER. Don't use scouring pads, abrasive cleaners, or sharp utensils. Do NOT
remove the base power unit cover!
Precautiens
Follow these safety rules when dehydrating food:
• When drying liquids, sauces, or pur_es, use a Fruit Roll Sheet, available from
NESCO _>American Harvest.
• When dryingjerky, place a fruit roll sheet on the bottom tray. The Fruit Roll
Sheet will catch drips and make cleaning easier.
• Wash hands thoroughly prior to handling food.
• Clean all utensils and containers with a mild solution of detergent, bleach and
water before using.
• Make sure all counter surfaces and cutting boards are thoroughly cleaned in the
manner above before using. Wooden or plastic cutting boards should be thor-
oughly disinfected.
• Keep foods in the refrigerator before preparing for drying. Store dried foods in
refrigerator or freezer.
• After opening sealed containers of dried food, use food as soon as possible.
• Store opened containers of dried food tightly sealed in the refrigerator to main-
tain freshness and quality.
• Do not spray vegetable oil directly onto the surface of the trays.
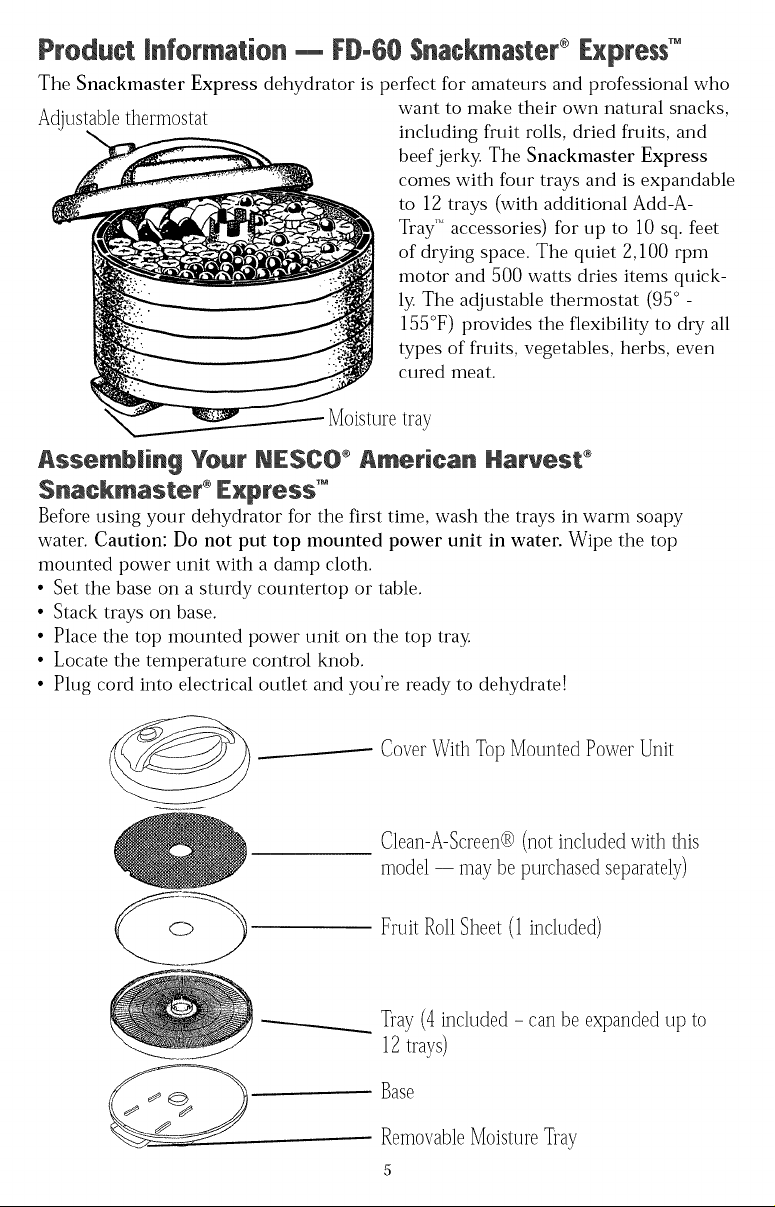
Product information _ FD-60 $nackmaster®ExpressTM
Tile Snackmaster Express dehydrator is perfect for amateurs and professional who
Adjustablethermostat want to make their own natural snacks,
Assembling Your NESCO _ American Har_est ®
$nacRmaster ®Express TM
Before using your dehydrator for tile first time, wash tile trays in warm soapy
water. Caution: Do not put top mounted power unit in water. Wipe the top
mounted power unit with a damp cloth.
• Set the base on a sturdy countertop or table.
• Stack trays on base.
• Place the top mounted power unit on the top tray.
• Locate the temperature control knob.
• Plug cord into electrical outlet and you're ready to dehydrate!
including fruit rolls, dried fruits, and
beef jerky. The Snackmaster Express
comes with four trays and is expandable
to 12 trays (with additional Add-A-
Tray_' accessories) for up to 10 sq. feet
of drying space. The quiet 2,100 rpm
motor and 500 watts dries items quick-
ly. The adjustable thermostat (95° -
155°F) provides the flexibility to dry all
types of fruits, vegetables, herbs, even
cured meat.
tray
_ ..__._---_-- Cover With Top Mounted Power Unit
i
Clean-A-Screen@(not includedwith this
model -- may be purchasedseparately)
Fruit R011Sheet(1included)
Tray(4 included - can be expandedup to
12 trays)
Base
......RemovableMoistureTray
FD-60 Product Information (continued)
Useand Care
Your dehydrator trays are easy to clean. Simply soak the trays in warm water with
a mild detergent for several minutes. A soft-bristle brash will loosen food particles
that resist softening by soaking. Don't clean trays with any metal objects or scour-
ing pads as they tend to damage the surface of the trays. Trays can be washed on
the top rack of your dishwasher if you remove them before the drying cycle.
Caution: Remove trays before the beginning of the drying cycle of your
dishwasher.
Base and Moisture Tray
Tile base and removable moisture tray for tile Snackmaster Express can be washed
in warm soapy water or wiped clean with a soft cloth or sponge. Wash both after
they have been removed from the rest of the machine. Don't use scouring pads,
abrasive cleaners, or sharp utensils. Do not wash the base and removeahle
moisture tray in the dishwasher.
Top Meunted Pewer Unit
Caution: Be sure the unit is unplugged before cleaning the top mounted power
unit. Use a damp cloth or towel to remove dried food particles from the top
mounted power unit of the dehydrator. Avoid dripping any liquid into electrical
parts. CAUTION: DO NOT IMMERSEIN WATER.Don't use scouring pads, abra-
sive cleaners, or sharp utensils. Do NOT disassemble any part of the power unit.
Precautiens
Follow these safety rules when dehydrating food:
• When drying liquids, sauces, or pur_es, use a Fruit Roll Sheet, available from
NESCO _>American Harvest.
• When dryingjerky, place a fruit roll sheet on the base. The Fruit Roll Sheet will
catch drips and make cleaning easier.
• Wash hands thoroughly prior to handling food.
• Clean all utensils and containers with a mild solution of detergent, bleach and
water before using.
• Make sure all counter surfaces and cutting boards are thoroughly cleaned in the
manner above before using. Wooden or plastic cutting boards should be thor-
oughly disinfected.
• Keep foods in the refrigerator before preparing for drying. Store dried foods in
refrigerator or freezer.
• After opening sealed containers of dried food, use food as soon as possible.
• Store opened containers of dried food tightly sealed in the refrigerator to main-
tain freshness and quality.
• Do not spray vegetable oil directly onto the surface of the trays.
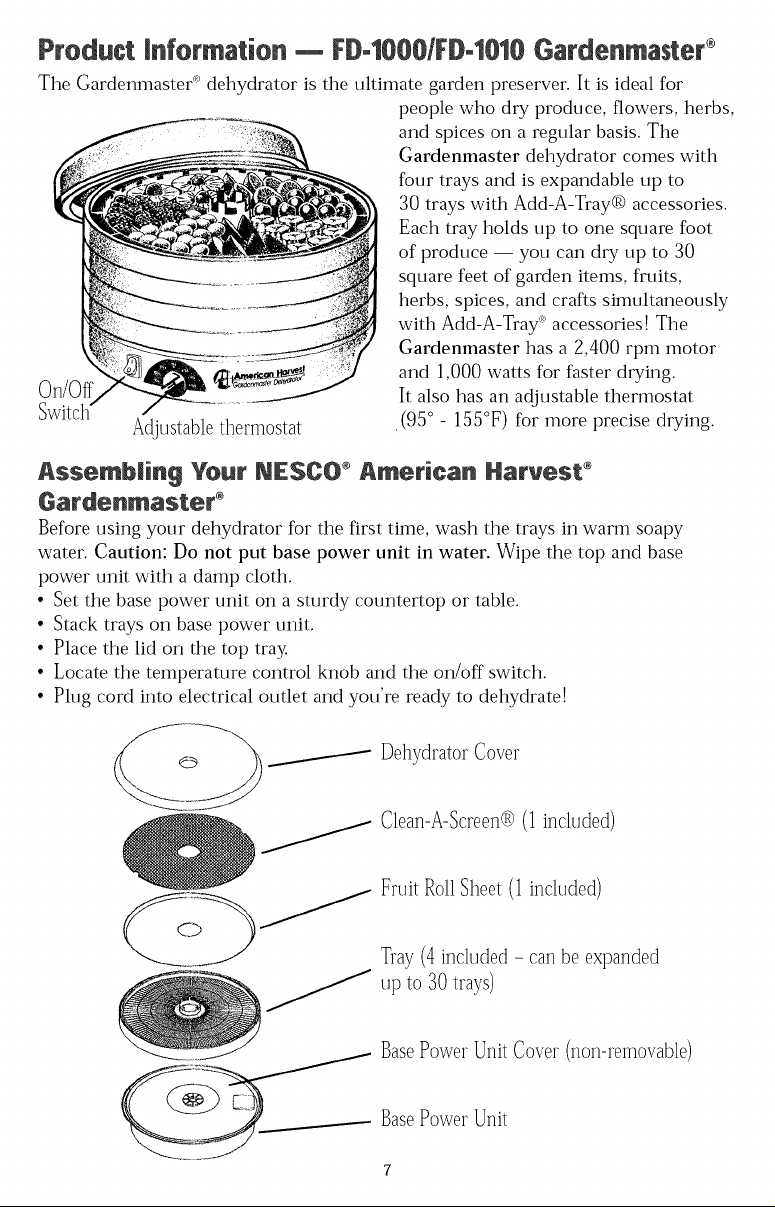
Product information FD-IOOO/FD-1010Gardenmaster ®
Tile GardenmasteF _ dehydrator is tile ultimate garden preserver. It is ideal for
people who dry produce, flowers, herbs,
and spices on a regular basis. The
Gardenmaster dehydrator comes with
four trays and is expandable up to
30 trays with Add-A-Tray( R) accessories.
Each tray holds up to one square foot
of produce -- you can dry up to 30
square feet of garden items, fruits,
herbs, spices, and crafts simultaneously
with Add-A-Tray _' accessories! The
Gardenmaster has a 2,400 rpm motor
and 1,000 watts for faster drying.
On/Off It also has an adjustable thermostat
Switch" ,(95° - 155°F) for more precise drying.
&ssembaing Yeur NESCO &merican Haruest ®
Before using your dehydrator for the first time, wash the trays in warm soapy
water. Caution: Do not put base power unit in water. Wipe the top and base
power unit with a damp cloth.
• Set the base power unit on a sturdy countertop or table.
• Stack trays on base power unit.
• Place the lid on the top tray.
• Locate the temperature control knob and the on/off switch.
• Plug cord into electrical outlet and you're ready to dehydrate!
Adjustablethermostat
Clean-A-Screen@ (1 included)
Fruit R0]]Sheet (] included)
up to 30 trays)
.... BasePower Unit Cover (n0n-rem0vable)
_> G _ BasePower Unit
7
FD-IOOO/FD-1010Product Information (continued)
Useand Care
Trays
Your dehydrator trays are easy to clean. Simply soak tile trays in warm water with a
mild detergent for several minutes. A soft-bristle brash will loosen food particles
that resist softening by soaking. Don't clean trays with any metal objects or scour-
ing pads as they tend to damage the surface of the trays. Trays can be washed on
the top rack of your dishwasher if you remove them before the drying cycle.
Caution: Remove trays before the beginning of the drying cycle of your dish-
washer.
Cov@r
Do not submerge the cover of the Gardenmaster dehydrator in water. Wipe clean
with a soft cloth or sponge. Don't use scouring pads, abrasive cleaners, or sharp
utensils. Do not wash the cover in the dishwasher.
Base Pewer Unit
Caution: Be sure the unit is unplugged before cleaning the base power unit.
Use a damp cloth or towel to remove dried food particles from the base power unit
of the dehydrator. Avoid dripping any liquid into electrical parts. CAUTION: DO
NOT IMMERSEIN WATER. Don't use scouring pads, abrasive cleaners, or sharp
utensils. Do NOT remove the base power unit cover.
Precautiens
Follow these safety rules when dehydrating food:
• When drying liquids, sauces, or pur_es, use a Fruit Roll Sheet, available from
NESCO _>American Harvest.
• When dryingjerky, place a fruit roll sheet on the base. The Fruit Roll Sheet will
catch drips and make cleaning easier.
• Wash hands thoroughly prior to handling food.
• Clean all utensils and containers with a mild solution of detergent, bleach and
water before using.
• Make sure all counter surfaces and cutting boards are thoroughly cleaned in the
manner above before using. Wooden or plastic cutting boards should be thor-
oughly disinfected.
• Keep foods in the refrigerator before preparing for drying. Store dried foods in
refrigerator or freezer.
• After opening sealed containers of dried food, use food as soon as possible.
• Store opened containers of dried food tightly sealed in the refrigerator to main-
tain freshness and quality.
• Do not spray vegetable oil directly onto the surface of the trays.
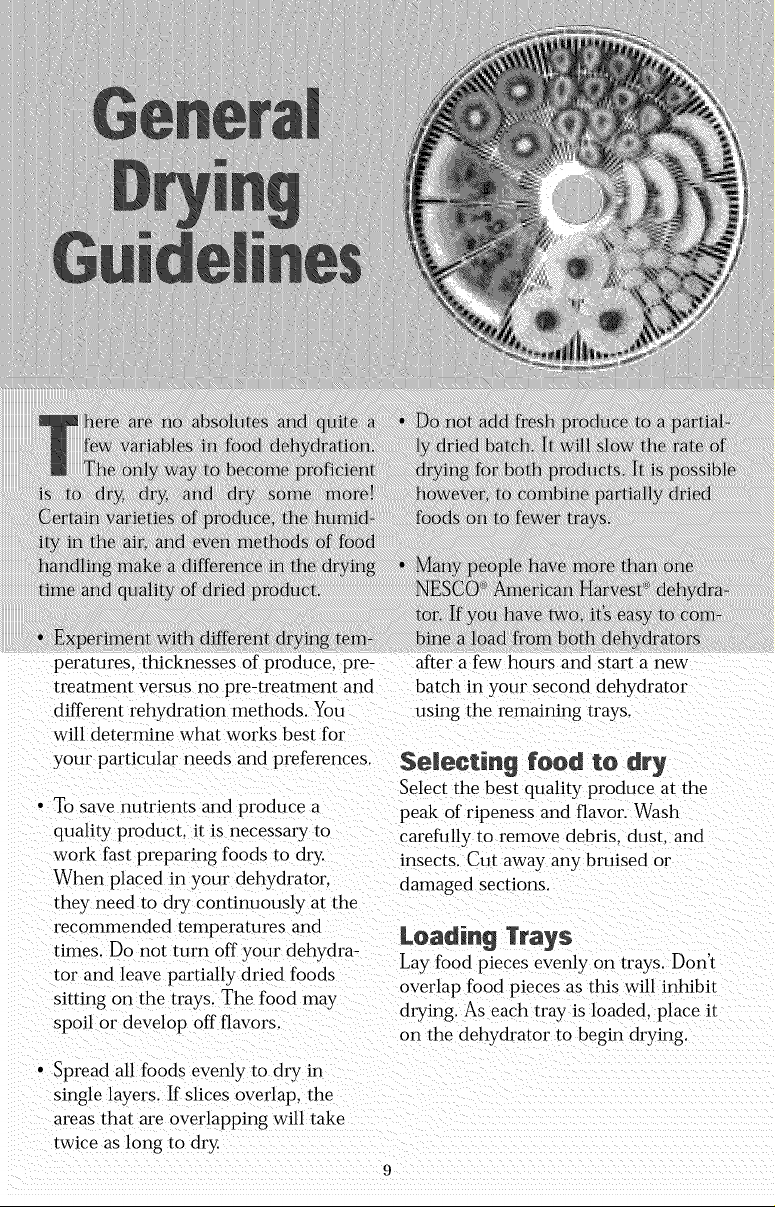
• Experiment w_th d_fferenf dFyklg tem-
peratures, thicknesses of produce, pre-
treatment versus no pre-treatment and
after a few hours and start a new
batch in your second dehydrator
different rehydration methods. You using the remaining trays.
will determine what works best for
your particular needs and preferences. Se_eGting good to dFy
Select the best quality produce at the
• To save nutrients and produce a peak of ripeness and flavor. Wash
quality product, it is necessary to
work fast preparing foods to dry.
When placed in your dehydrator.
carefully to remove debris, dust. and
insects. Cut away any bruised or
damaged sections.
they need to dry continuously at the
recommended temperatures and
times. Do not turn off your dehydra-
tor and leave partially dried foods
sitting on the trays. The food may
spoil or develop off flavors.
Lay food pieces evenly on trays. Don't
overlap food pieces as this will inhibit
drying. As each tray is loaded, place it
on the dehydrator to begin drying.
• Spread all foods evenly to dry in
single layers. If slices overlap, the
areas that are overlapping will take
twice as long to dry .......
9
Drying Time
Because of the unique design of the
patented Converga-Flow _ system of
your NESC@ '_American HarvesU dehy-
drator, you'll be surprised at how quick-
ly most foods dry.
Drying times may vary, depending on
the type and amount of food, thickness
and evenness of the slices, percentage
of water in the food, humidity, tempera-
ture of air, altitude and the model of
NESC@' American Harvest® dehydra-
tor you are using. Drying times may
also vary greatly from one area of the
country to another and from day to day,
depending on the climactic conditions.
Keep records to help you predict
future drying times for specific foods.
to a minimum during the first stages of
drying when they tend to multiply.
Nuts and seeds are high in oil, and if
higher temperatures are used, they will
tend to become rancid, developing off
flavors. The best drying temperature
for them is from 90 ° to 100°F (30° to
40°C).
Herbs and spices are most flavorflfl
when they first open and should be
harvested while very fresh, before they
begin to blossom. Because the aromatic
oils are very sensitive, temperatures
should be 90 ° to 100°F (30° to 40°C)
for drying. Herbs generally dry in an
hour or two. Take care not to load
trays too heavily as this will prolong the
drying time.
Drying Temperature
Foods dried in the NESCO<'_American
Harvest Gardenmaster <_dehydrator gen-
erally dry more quickly than in other
models. Fruits, fruit rolls, and vegeta-
bles should be dried at 130° to 140°F
(55° to 60°C). By drying foods in this
temperature range you will minimize
the loss of heat-sensitive vitamins A and
C. Because, all foods sweat when they
first begin to dry, the temperature may
be set higher than 140°F (60°C) during
the first couple of hours of drying. The
actual temperature of the food will
remain 15° to 20°F (6° to 8°C) lower
than the air temperature for the first
couple of hours.
Meats and fish should be dried on the
highest temperature setting of your
dehydrator. Since meats and fish do not
contain vitamins A or C, these higher
temperatures do not affect nutritional
value. These temperatures also keep
bacteria and other spoilage micro-
organisms, common to meats and fish,
Dried flowers, herbs and spices used
for potpourri should be dried at temper-
atures ranging from 90 ° to 100°F (30°
to 40°C.). These low temperatures
maintain aroma and colors.
Use these guidelines for the foundation
of your dehydrating techniques. Expand
on them as you gain skill and confi-
dence with experience.
Testing for Dryness
Food must be carefully monitored near
the end of the dehydration process to
prevent overdrying. Overdried foods
lose quality in texture, nutrition and
taste. To test for dryness, remove a piece
of food, allow it to cool, and feel with
your fingers to determine dryness:
• Fruits should be pliable and leathery
with no pockets of moisture. To check
if fruit is dry, tear a piece in half and
watch for moisture beads along the
tear. If there aren't any, it is sufficient-
ly dry for long term storage.
10
• Fruit rolls should be leathery
with no sticky spots.
• Jerky should be tough but not brittle.
• Dried fish should be tough. If the fish
is high in fat, it may appear moist due
to the high oil content.
• Vegetables should be tough or crisp.
Packaging
Some pieces may dry in a shorter time
than others and should be removed and
placed in an airtight container while
allowing the rest of the pieces to remain
in the dehydrator until sufficiently dry.
Package all dried foods promptly to
prevent contamination by insects and
to prevent stickiness and rehydration
caused by humidity. Store dried foods
in airtight, moisture proof containers.
Home vacuum packaging devices are
ideal for packaging dried foods. They
extend the shelf life of dried foods 3 to
4 times. Home vacuum packaging can
be done in bags or glass jars. Manu-
facturers' bags, designed for use in
home vacuum-packaging, are moisture
proof and airtight. Glass jars are vacu-
um sealed using a lid with a rubber
gasket. Only glass jars which have been
tempered for canning should be used.
Other storage jars may explode under
the pressure of vacuum packaging. Be
sure to follow the manufacturers'
instructions.
Plastic freezer bags can be used. Plastic
storage bags not labeled for use in the
freezer generally are not airtight nor
moisture-proof and should not be used
to store dried foods.
Since most packaging materials are
transparent, store packaged dried foods
in a plastic or metal container which
will not allow the light to penetrate. Do
not store fruits and vegetables together
in the same storage container because
flavor and moisture may transfer.
Fruit rolls are best if removed while still
warm. Wrap in plastic wrap and place
in airtight moisture-proof containers for
storage.
Onions and tomatoes are especially
prone to absorb moisture from the air
and should be packaged immediately
after removing from the dehydrator.
If foods are insufficiently dried, or are
exposed to moisture from faulty packag-
ing, they can lose quality and nutrition,
and can even mold during storage.
All dehydrated foods should be labeled
with the name of the product, date
dried, and quantity or weight. Clear
labeling allows you to rotate foods so
that you minimize waste and nutrient
lOSS.
Bag sealers can also be used to package
dehydrated foods. Bag sealers do not
remove air within the package, but the
bags are moisture-proof and airtight.
Squeeze the pouch tightly against the
food to remove as much air as possible
before sealing.
Sterag÷
The storage area should be cool, dry,
and as dark as possible. The darker and
cooler the storage area, the longer the
dried foods will last with good quality
and nutritive value. For every 18°F
(10°C) drop in storage temperature, the
shelf life of dehydrated foods increases
3 to 4 times.
11
The ideal storage temperature for
dehydrated food is 60°F (15°C) to
below freezing. The ideal storage place
is your freezer or refrigerator, particu-
larly for storing low acid foods such as
meats, fish, and vegetables.
Fruits or vegetables may also be rehy-
drated in liquids other than water,
including fmitjuices, cider, vegetable
juices, milk, consomme, etc. Refrigerate
these foods while they are soaking to
reduce any risk of spoilage.
All fruits dried with skins intact should
be packaged and frozen for a minimum
of 48 hours to prevent any possibility of
insect infestation.
Record Keeping
Recording the following information
can be helpflfl in improving your dehy-
drating techniques and determining
quantities of food to dry each season.
• Date dried
• Quantity dried, including weight
of produce before and after drying
• Drying time, temperature, and
humidity
• Packaging: size of containers and
packaging materials used
• Storage temperature
• Length of storage time before use
By labeling storage containers with
the contents and date dried, you can
keep track of your supply, rotate as
needed and avoid mix-ups.
Rehydrating Dried Food
Eat dehydrated foods dry or rehydrate
for use in recipes. Rehydrate by
placing dried foods in a container (with
enough water to cover food) and soak-
ing for 30 minutes to 2 hours Boiling
water rehydrates foods more quickly
than cold water or water at room tem-
perature.
Do not add seasonings, especially salt or
sugar during rehydration because they
slow the rehydration process.
Cooking Dried Food
After rehydrating food, cook it as you
would normally. If foods are cooked
before they are flflly rehydrated, they
will cook in a shriveled state and will
not be plump. Most fruits and vegeta-
bles will rehydrate to about 80% of their
fresh state. Consequently they are a
little more chewy than a fresh or
frozen fruit or vegetable, even when
rehydrated.
Dried food used in cooking will absorb
additional liquid, so adjust the recipe
accordingly by adding more water:
• Vegetables - add ] additional cup of
water for one cup dried food.
• Stewed fruits - add 2 additional cups
of water for each cup of fruit, allow to
stand for ] hour, and simmer until
tender.
• Pies or fillings - use ] additional cup
of water per ] cup of fruit - less, if
you desire a thicker consistency.
Note: When using fruits in baking or
for ice cream, they may be softened by
covering with boiling water and allow-
ing them to stand for 5 minutes. Drain,
then chop or blend, depending upon
use.
12
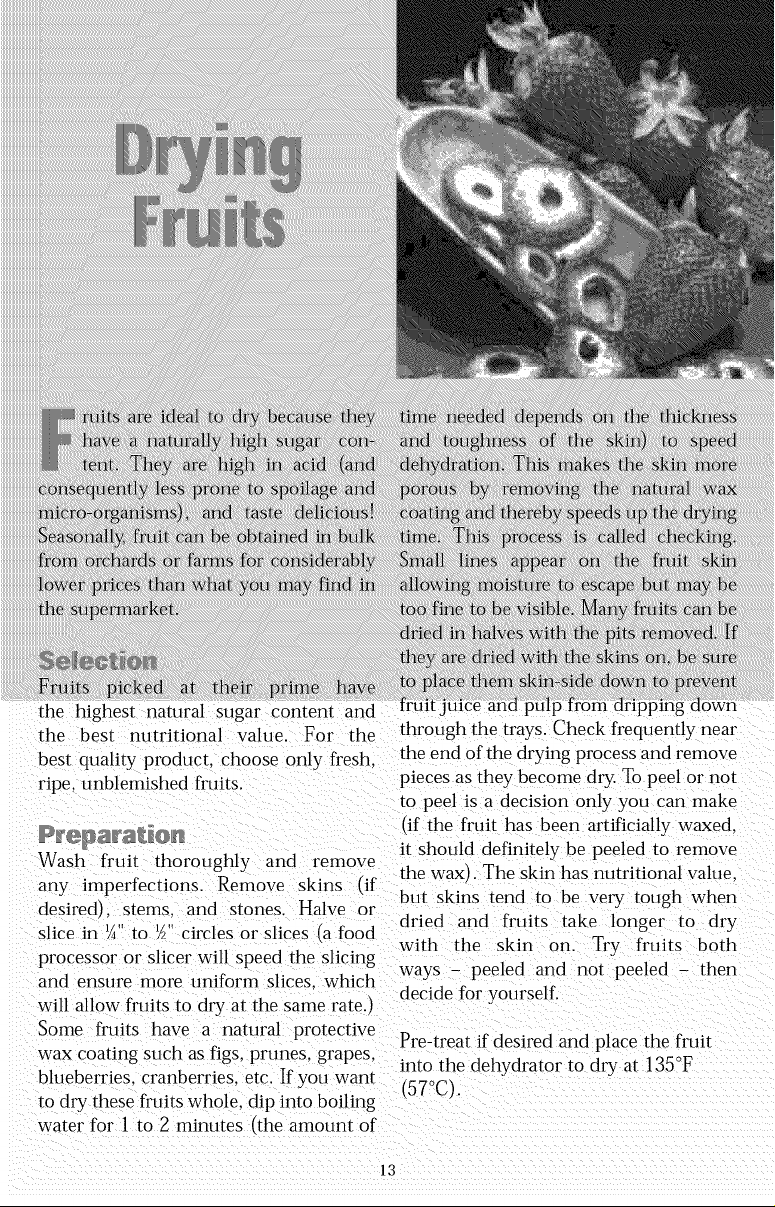
the highest natural sugar content and
the best nutritional value. For the
best quality product, choose only frestu
ripe, unblemished fruits.
through file trays. Check frequently near
the end of the drying process and remove
pieces as thev become dry. To peel or not
own
to peel is a decision only you can make
(if the fruit has been artificially waxed.
Wash fruit thoroughly and
remove
it should definitely be peeled to remove
any unperfections. Remove skins (if the wax). The skin has nutritional value.
desired), stems, and stones. Halve or but skins tend to be very tough when
slice in ¼" to _" circles or slices (a food
processor or slicer will speed the slicing
and ensure more uniform slices, which
will allow fruits to dry at the same rate.)
Some fruits have a natural protective
wax coating such as figs, prunes, grapes,
blueberries, cranberries, etc. If you want
dried and fruits take longer to dry
with the skin on. Try fruits both
ways - peeled and not peeled - then
decide for yourself.
Pre-treat if desired and place the fruit
into the dehydrator to dry at 135°F
(57°C).
to dry these fruits whole, dip into boiling
water for 1 to 2 minutes (the amount of
13
Pre-treatment isn't necessary for most
fruits. The majority of fruits are simply
sliced and dried. However, some fruits
tend to oxidize more than others.
Oxidation causes browning of cut food
surfaces when fruit is dried, This causes
a loss in flavor and vitamins A and C.
Pre-treatment minimizes oxidation, and
gives you a superior-quality, better tast-
ing product with less vitamin loss.
Apples, pears, peaches and apricots are
better when pre-treated. They are more
appetizing, have a longer shelf life, and
higher nutritional value when pre-treated
prior to drying. Place cut fruits that tend
to brown in a holding solution of ascor-
bic acid to reduce browning during
preparation. Do not keep cut fruit in a
holding solution for more than an hour.
Pre-treatments can vary from soaking in
fruit juice, ascorbic acid mixtures, syrup
blanching, steaming, to sulfating. The
results of each of these methods also
vary. Experiment and decide for yourself
which one you like best.
Use one of the following methods of
pre-treatment.
Slice fruit directly into juice or ascorbic
acid mixture. Soak 5 minutes and place
on trays. Fruits can also be dipped in
honey or a honey/fruit juice mixture.
SyH@ B_aH@iH_
Fruit which has been syrup blanched is
sweeter because it absorbs some of the
sugar from the blanching solution. It also
tends to be stickier, even though it is
rinsed prior to drying.
Prepare a sugar syrup by mixing 1 cup
sugar, 1 cup white corn syrup, and
2 cups water. Boil and add prepared fruit
Simmer for 10 minutes over low heat.
Remove and allow to stand in the hot
syrup 30 to 45 minutes. Drain the fruit,
rinse lightly with cold water, and place
on drying trays.
Soaking fruits in a solution of sodium
bisulfite slows oxidation and reduces
browning, as well as the loss of vitamins
A and C. Sodium bisulfite may be
obtained from wine-making supply
houses. Sulfating isn't recommended
for use if individuals are on restricted
sodium diets or have asthmatic or
respiratory conditions. Dissolve 1 table-
spoon sodium bisulfite in 1 gallon water.
Soak 5 to 10 minutes. Rinse.
Fruit juices containing ascorbic acid may
be used as a natural pre-treatment to
reduce browning. Although there will
still be some loss of color, pineapple,
orange, lemon, or lime juice can be used.
Ascorbic acid mixtures, available from
your supermarket can also be used.
Follow the directions on the package.
After fruits have been prepared for dry-
ing, garnish with spices, gelatin powders
or coconut to give fruits a snappy flavor.
Granola, chopped nuts, poppy seeds,
sesame seeds, or sunflower seeds can
also be sprinkled on fruits. These adhere
best to fresh fruits if the fruits have first
been dipped in a fruit juice or honey.
Use your imagination for other dips
or sprinkles.
14
Moisturewilltendtoequalizethrough-
outacontainerofdriedfruitwhenleft
atroomtemperatureforseveraldays.
If some pieces are drier than others,
the conditioning process will allow the
moisture to equalize. If any condensa-
tion appears on the lid of the container,
fruits are insufficiently dried. Return
to the dryer and check periodically
for dryness.
• Place a cup of dried apple slices in
the blender with a cup of water for
instant applesauce.
• Strawberries are perfect for malts,
shakes and sundaes.
• Cantaloupe and watermelon slices
become candy-like when dried.
• Dehydrate lemon and orange slices
and powder for use in recipes calling
for grated rind.
• Dehydrate grapes to make raisins that
taste better and plump up in recipes
better than store bought raisins.
• Dry banana slices until crisp, then
powder in blender and use for flavor-
ing in recipes.
• Slice bananas 1/4" thick and dip into a
glaze of 1/4 cup of honey mixed with
1/4 cup water. Drain. Place on trays
and dry. For variety add 1/8 teaspoon
cinnamon to the glaze before dipping
bananas.
Fruit rolls, also known as fruit leathers,
are a favorite snack for young and old
alike. It is a chewy fruit product made
from pur6ed fresh fruit which has been
dried and rolled into snack sized pieces.
Fruit rolls are easy to make and cost
less than those bought at the store.
Almost any fruit will make an excellent
fruit roll. Most fruits can also be com-
bined with others.
Some fruits, such as apples, are high in
pectin and fiber and have an excellent
texture when dried. The combinations
are limitless. Use your imagination and
have t!!!
Use fresh fruits in season. You can also
use slightly overripe fruits, irregularly
shaped fruits, or slightly bruised fruits
which would be unsuitable for canning
or drying.
Some fruits, such as citrus, should be
used in combination with other fruits
because they have so much liquid and
very little pulp. If you find that a fruit is
too runny, combine it with apple, apple-
sauce or a similar fruit which will give
it more substance.
When fresh fruits are not available,
canned fruits (either sweetened or
un-sweetened) can be used. Simply
drain the liquid, and pour the fruit into
the blender. Applesauce can be taken
directly from the container for wonder-
tiff fruit rolls. Frozen fruits can also be
used, although they tend to be a bit
more runny. Simply thaw and follow
directions for using fresh fruits.
15
Washfruitsandcutawayanybraised
orspoiledportions.Pur_efruitina
blenderuntilit isverysmooth.In some
blenders with some fruits, you may
want to add a little juice or water to
start the blending process.
Fruits generally need no added
sweetening, but if fruits are under ripe
or particularly tart, you may add light
corn syrup or honey. Add 1 or more
tablespoons sweetening for each quart
of pur_e, depending on your preference
(sugar added to fruit leather tends to
become brittle during storage}.
For added variety, sprinkle different
garnishes on fruit rolls before they are
dried. Try coconut chopped dates, nuts,
raisins, granola, poppy seeds, sesame
seeds or sunflower seeds. When these
garnishes are used, fruit rolls should
always be stored in the refrigerator
or freezer.
WFmr_,_iitWW_eHWW_eeii_}es
S_'awb_'_'y RJ_Hd,adb Lead_e_ _
1 cup rhubarb
¼ cup water
2 cups strawberries
cup honey
Combine 1/4 cup water and 1 cup
rhubarb. Simmer on stove over medium
high heat for 5 minutes. Add 2 cups
strawberries and 1/2 cup honey. Pur_e to
smooth consistency in blender. Pour on
a Fruit Roll sheet and dry.
Boyse_,_e_'_'y Lead_e_r
1 quart of boysenberries.
Pur_e boysenberries in a blender. Strain
through cheesecloth to remove seeds.
Place on Fruit Roll sheet and dry.
Spread home made or store bought
yogurt on a lightly sprayed Fruit Roll
sheet (approximately 1/4" thick.) Dry at
130 ° F (55 ° C) for approximately 12 to
14 hours. Experiment until you find the
brand which dries most evenly.
Place a Fruit Roll sheet on dehydrator
tray and spray lightly with a vegetable
spray to prevent sticking. Pur_e should
be about ]/4 to 3/8" thick and evenly
spread and dry at 130 ° - 140°F ( 55 °-
60 °C) until fruit feels leather-like and
is pliable, approximately 4 to 8 hours.
There should be no sticky spots on top
or underneath the fruit Remove the
leather while it is still warm, roll, cut
into smaller sized pieces (if desired}
and wrap in plastic wrap.
Individually wrapped pieces of fruit
leather should be stored in larger air-
tight and moisture proof containers.
See Packaging, page 11.
App_esa_ce Leat_e_ _
2 lbs. apples, peeled, cored and quartered
¼ cup lemon juice
cup sugar
1 teaspoon cinnamon
Simmer apples in a saucepan with 1/2
cup water until softened (about 15-20
minutes). Place lemon juice in blender
and gradually add the apples. Pur_e.
Add sugar and cinnamon. Mix well,
pour on a Fruit Roll sheet and dry. If
you are going to rehydrate into apple-
sauce, measure pur_e when putting it
on tray.
To rehydrate, add 1 cup of water to each
cup of leather.
16
 Loading...