

Page 1
HAVE A QUESTION? CALL THE HART HELP DESK at 800-252-2818, or EMAIL US AT [email protected]
Copyright 2012 by Hart Systems, LLC
HART ID =
317-01
AUDITOR’S REFERENCE GUIDE
AUDITOR’S REFERENCE GUIDE
SYSTEM
SYSTEM
VERSION
03
RECEIVE COMPONENTS/SUPPLIES
RECEIVE COMPONENTS/SUPPLIES
SET UP ACCESS POINTS
SET UP ACCESS POINTS
HART DEVICE
HART DEVICE
SET UP SCANNERS
SET UP SCANNERS
SCANNER FUNCTIONS
SCANNER FUNCTIONS
HOW TO ACCESS REPORTS
HOW TO ACCESS REPORTS
REPORT DESCRIPTIONS
REPORT DESCRIPTIONS
CLOSE THE INVENTORY
CLOSE THE INVENTORY
SHIP EQUIPMENT
SHIP EQUIPMENT
TIPS/TROUBLESHOOTING
TIPS/TROUBLESHOOTING
HART HELP DESK INFORMATION
HART HELP DESK INFORMATION
Page 2

HAVE A QUESTION? CALL THE HART HELP DESK at 800-252-2818, or EMAIL US AT [email protected]
RECEIVE COMPONENTS/SUPPLIES
RECEIVE COMPONENTS/SUPPLIES
You will receive one or more equipment boxes containing all of
the necessary components for the Audit.
♦ The box will be sealed with tape. Cut the tape with a
knife, do not rip tape off.
♦ When opening the boxes, be careful. Try not to rip or
damage the box. You will use the same boxes to return the
components to Hart Systems.
♦ Inside one equipment box, you will find:
○ Scanners
○ Access Point
○ Scanner chargers
USB Modems - (1) Verizon and (1) AT&T. Use the air
card that has best coverage for your area.
NOTE: The scanners will have 15+ hours of battery life.
However, if you need to change a battery during
Inventory, place the discharged battery in the plastic
bag provided and return to Hart along with the
equipment.
NEVER! THROW THE BATTERIES OUT!
♦ Remove the Scanners from the foam insert, then remove
the foam insert itself and continue with the following
“layers”.
Page - 1
Page 3

HAVE A QUESTION? CALL THE HART HELP DESK at 800-252-2818, or EMAIL US AT [email protected]
You will also receive the following:
♦ A Shipping Instructions envelope, containing labels and
documents used to ship the box back to Hart Systems
when the audit is complete.
Hart Systems also provides the following to complete your
audit/inventory:
♦ Auditor’s Reference Guide - this can be printed from the
Website.
♦ Hart Control ID Bar Code - you will need this form to set-
up the scanners for your store.
♦ This form should be printed from the Hart Website for
the store you are auditing/inventorying.
♦ Under Inventory Functions, select Wireless Control ID
♦ Internet Password flyer. You will use this flyer to access
Internet reports. This password can be supplied by your
corporate office.
If any of the equipment is missing, contact the Hart Help Desk
immediately at 800-252-2818.
Page - 2
Page 4

HAVE A QUESTION? CALL THE HART HELP DESK at 800-252-2818, or EMAIL US AT [email protected]
SET UP ACCESS POINT
SET UP ACCESS POINT
WiFi Connectivity Overview
The Hart Systems NexGen Inventory System provides instant
communications at the end of each item. The Internet reports are
updated in real-time.
Each location was provided two Access Points. One Access Point
should provide sufficient coverage for Inventory. The other access
point can be used as a back-up unit. If you use both Access Points,
please keep them at least 150 feet apart from each other.
VERY IMPORTANT!!!
1. For optimum range, place the Access Point in the the middle
of the store and as high as reasonably possible.
2. Try to avoid any known areas with difficult cell coverage.
3. In the event that the location has no cell coverage, please call
the Hart Help Desk for further instructions.
The CradlePoint routers (“Access Points”) can be connected
anywhere in the facility with an accessible power outlet.
To set-up the Access Point:
1. Clear a flat surface area with access to a power outlet.
2. Place the following items in the area:
♦ Access Point.
♦ USB Air Cards
3. Connect the power adapter for the Access Point into the port on
the back and then plug into an available outlet.
4. Insert the USB Aircard into the USB port in the back of the
Access Point.
♦ You received TWO (2) USB Aircard types for the main
Access Point - one for Verizon and one for AT&T; you should
use the Aircard for the respective carrier that has the best
coverage in your area.
Page - 3
Page 5
HAVE A QUESTION? CALL THE HART HELP DESK at 800-252-2818, or EMAIL US AT [email protected]
♦ Do not attempt to use both Aircards in one or both of the
Access Points.
Page - 4
VERY IMPORTANT!!!
1. For optimum range, place the Access Point as high as rea-
sonably possible.
2. Try to avoid any known areas with difficult cell coverage.
3. In the event that the location has no cell coverage, call the
Hart Help Desk for further instructions.
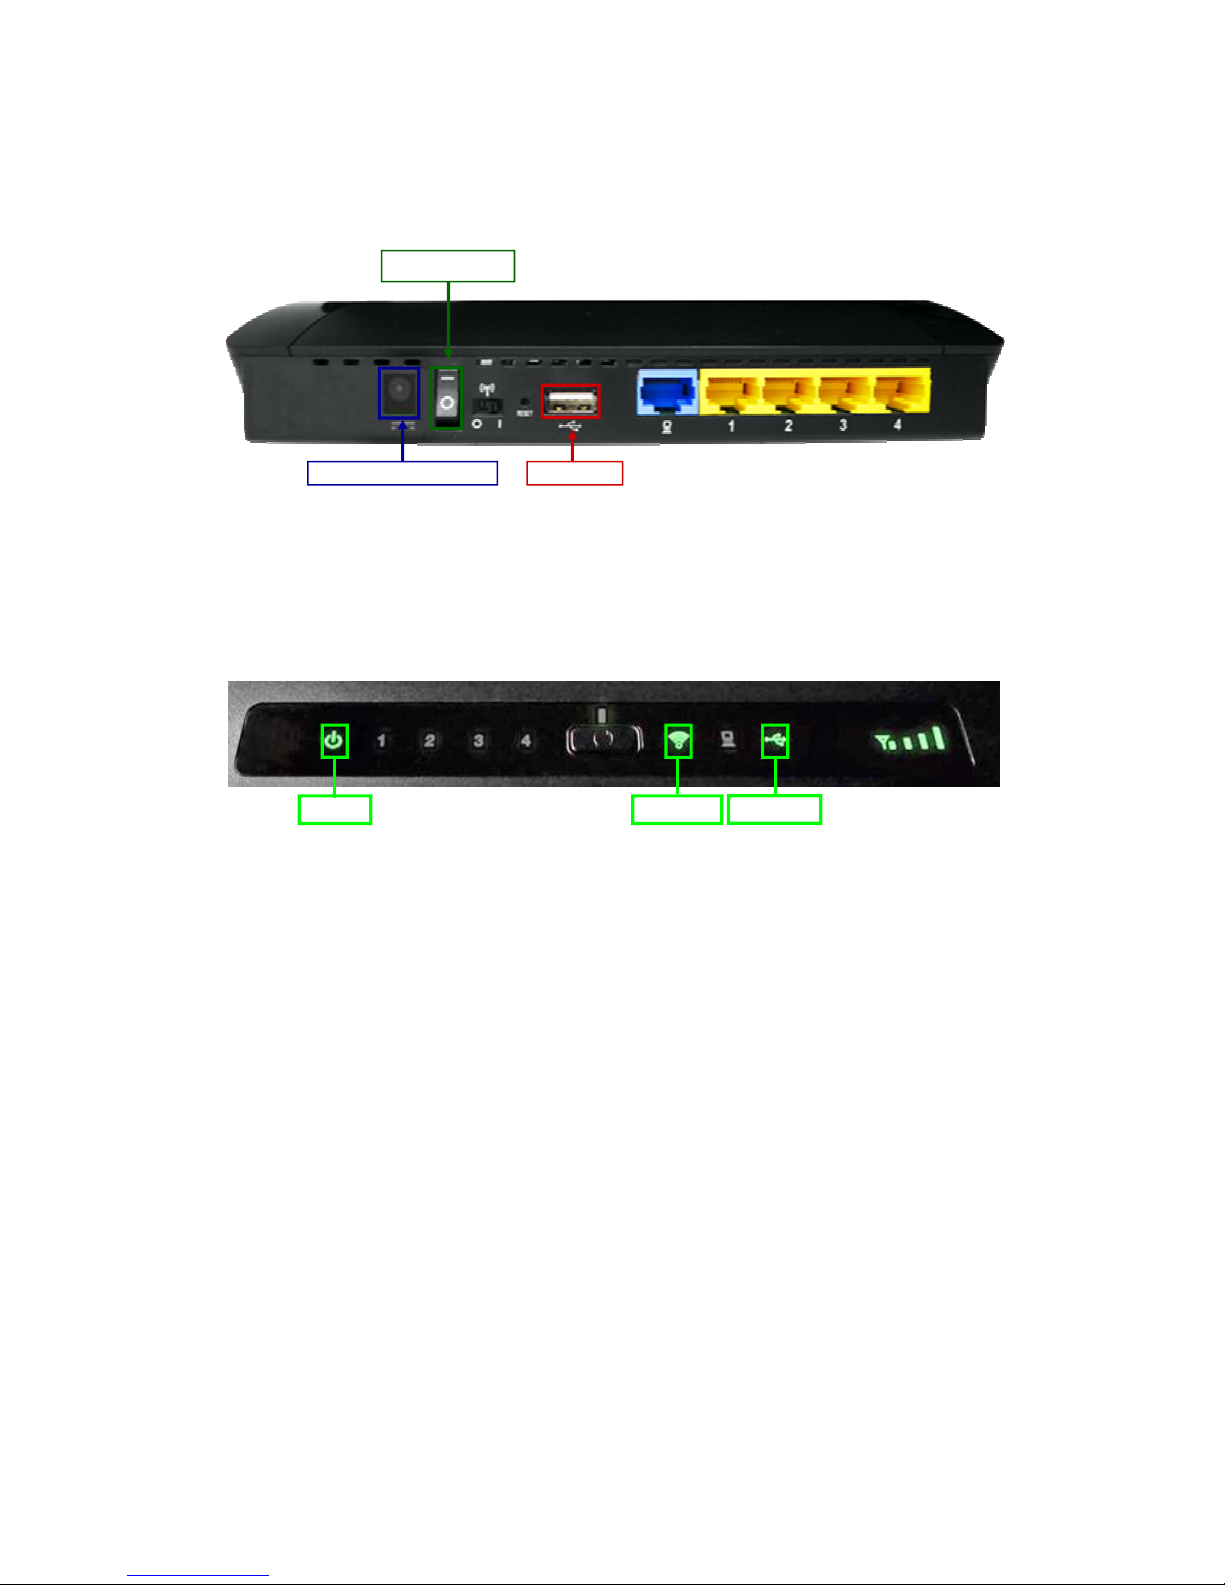
Power Switch
Power Adapter Port USB Port
5. Once the Access Point, has been connected to the power outlet
and the USB Aircard has been connected, the Power Status,
(green), USB Port 3 (blue or green) and Wireless indicator (green)
should be lit (see below).
The access point is now ready to use!
♦ The Access Point must be connected in order to transmit.
Remember to connect the access point before scanning any
live Inventory data.
Power
USB Port
Wireless
Page 6
HAVE A QUESTION? CALL THE HART HELP DESK at 800-252-2818, or EMAIL US AT [email protected]
Page - 5
HART DEVICE
HART DEVICE --
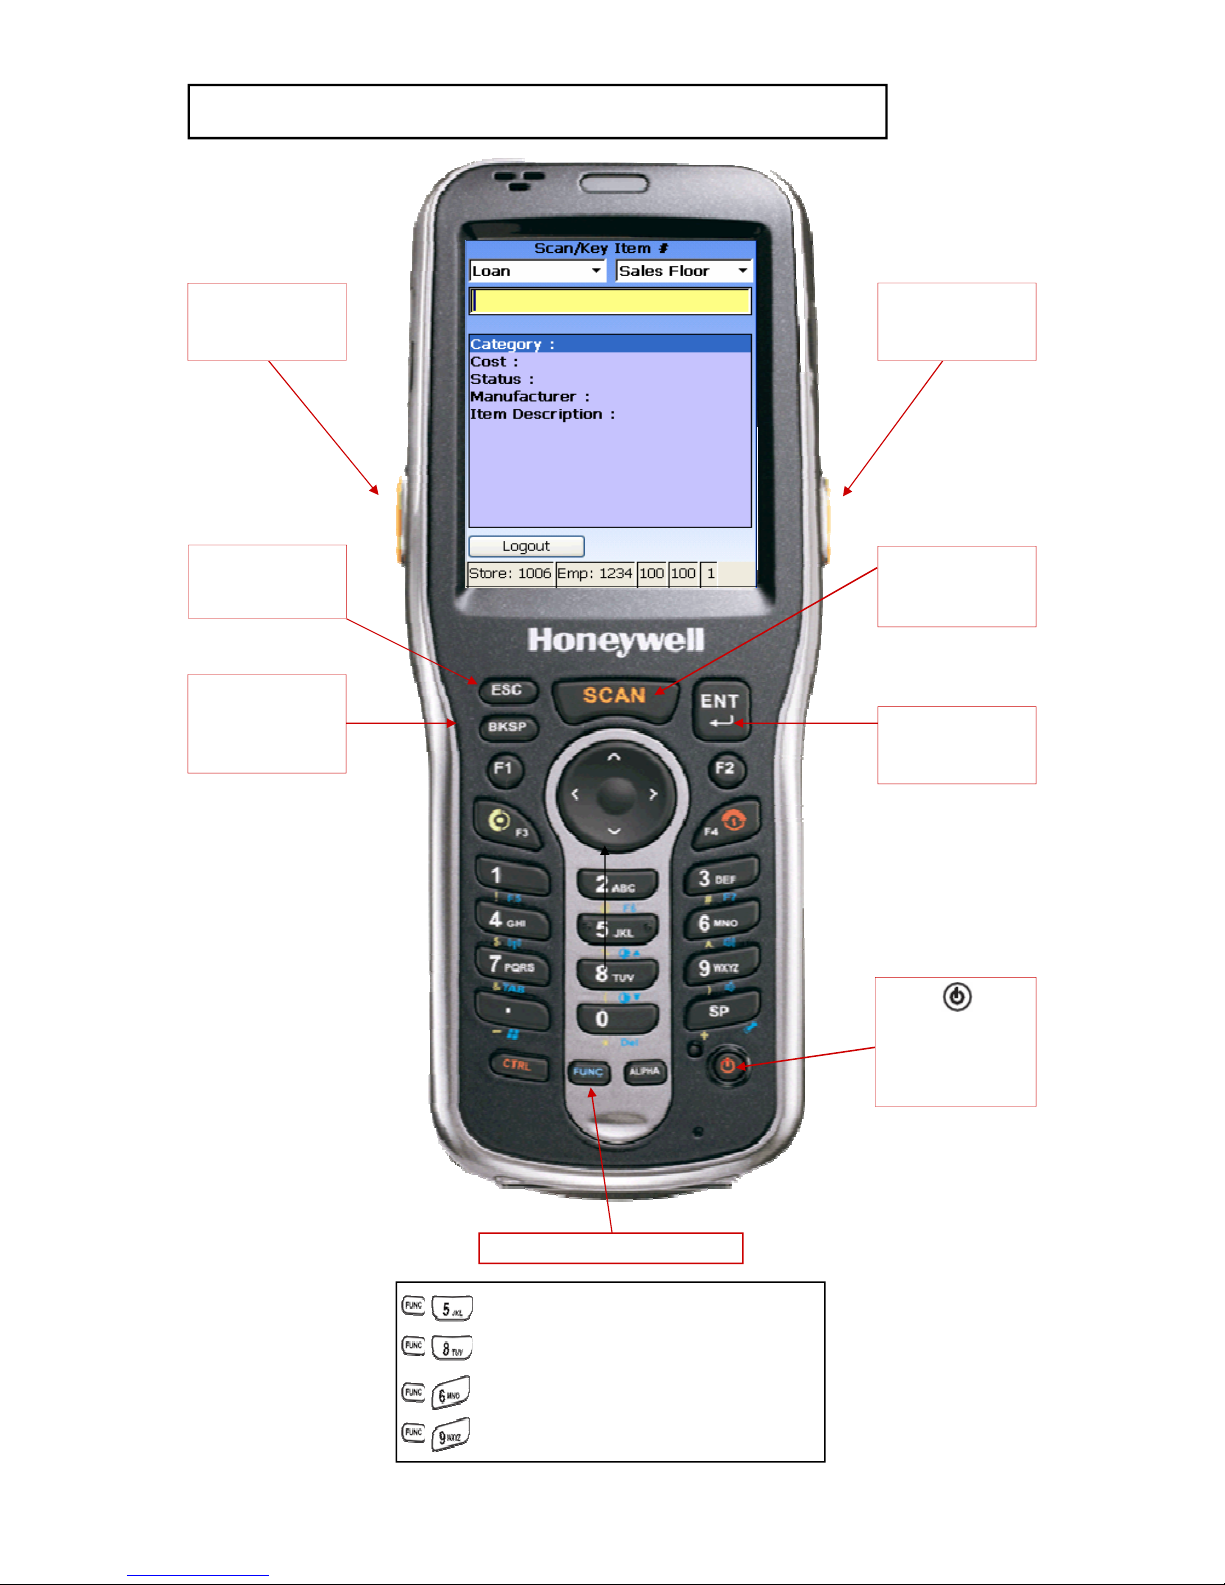
IMPORTANT KEYS
IMPORTANT KEYS
= Increases screen brightness.
= Decreases screen brightness.
= Increases volume.
= Decreases volume.
FUNC (Function) Key
Auxiliary
Scan Button
Auxiliary
Scan Button
“SCAN”
Press to scan
bar codes.
“ESC”
Used to clear an
entire field.
“ENTER”
Used to accept all
entries.
(Power Key)
Used to power
the scanner
on and off.
“BKSP”
Used to clear an
entry, one position
at a time.
Page 7
HAVE A QUESTION? CALL THE HART HELP DESK at 800-252-2818, or EMAIL US AT [email protected]
Page - 6
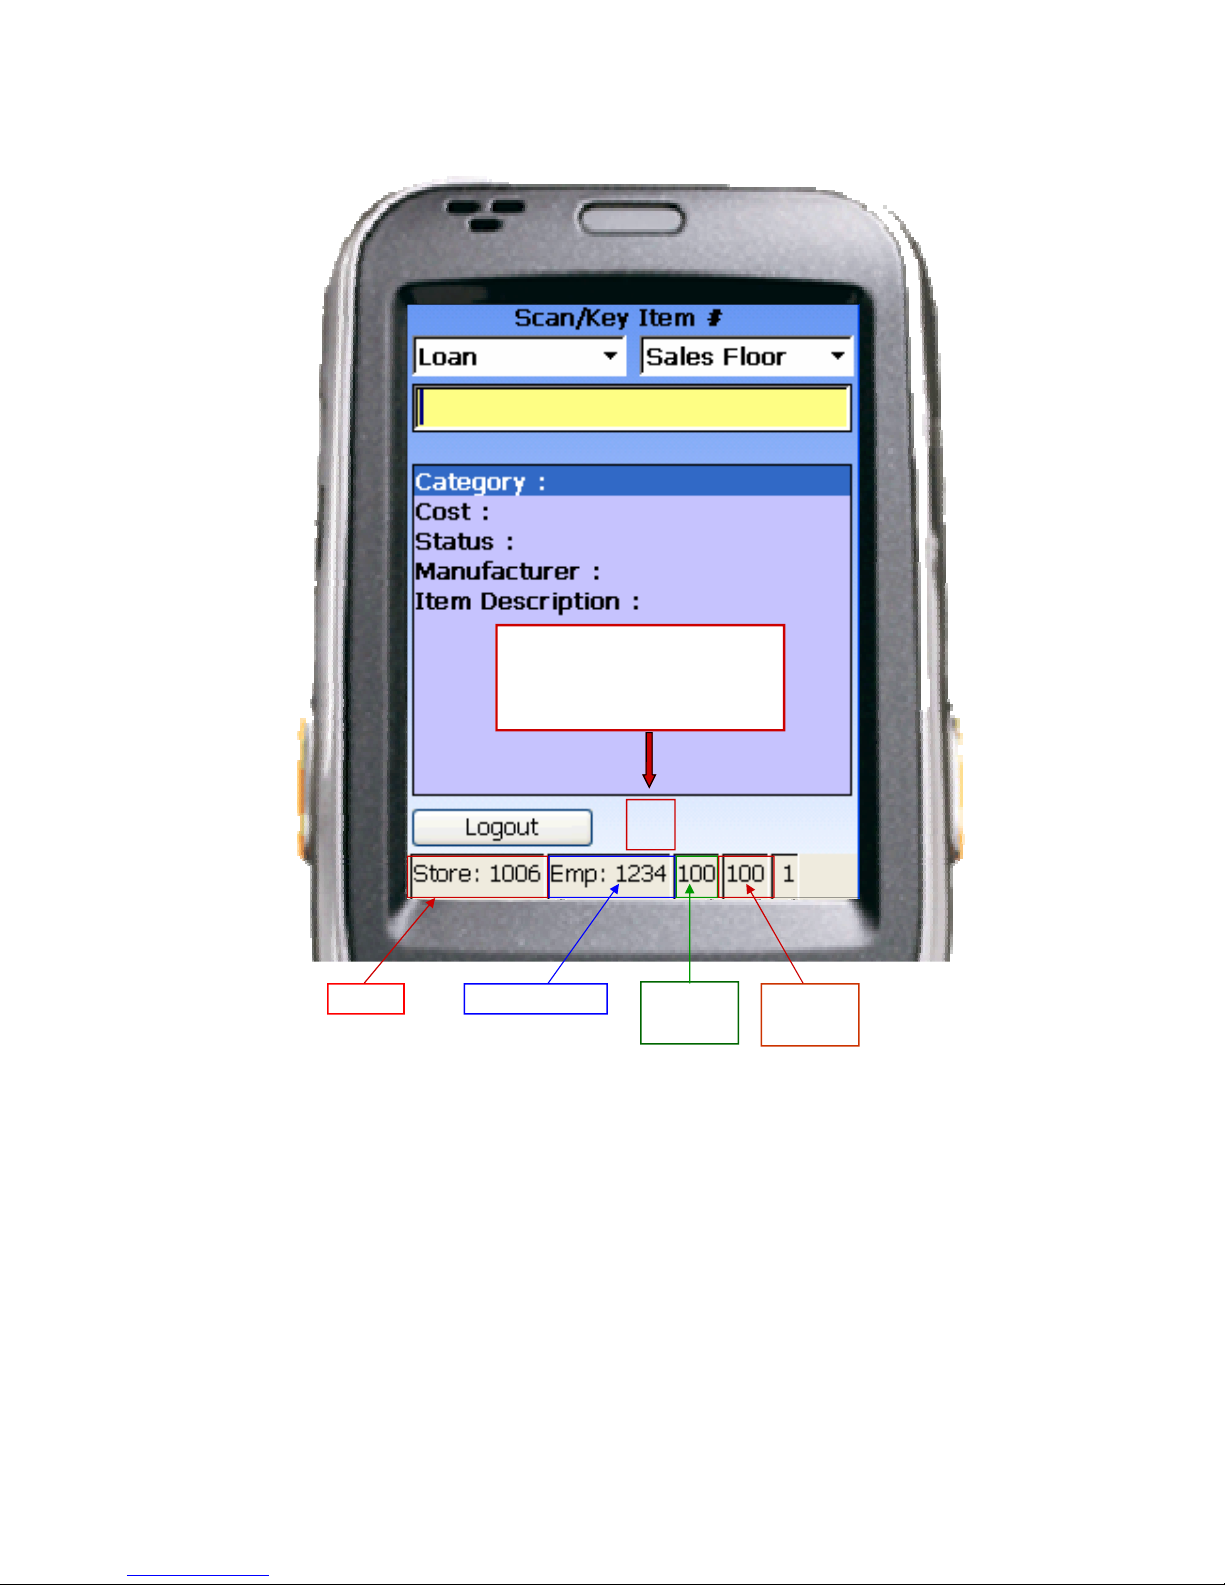
Signal
Strength
Store#
Employee ID
Battery
Strength
Pending Items Indicator
P = Scanner contains
items to be
transmitted to Hart.
P1
Page 8
HAVE A QUESTION? CALL THE HART HELP DESK at 800-252-2818, or EMAIL US AT [email protected]
SET UP SCANNERS
SET UP SCANNERS
♦ Now that the access point is up and running, you can start
registering the scanners.
Set Up Scanners:
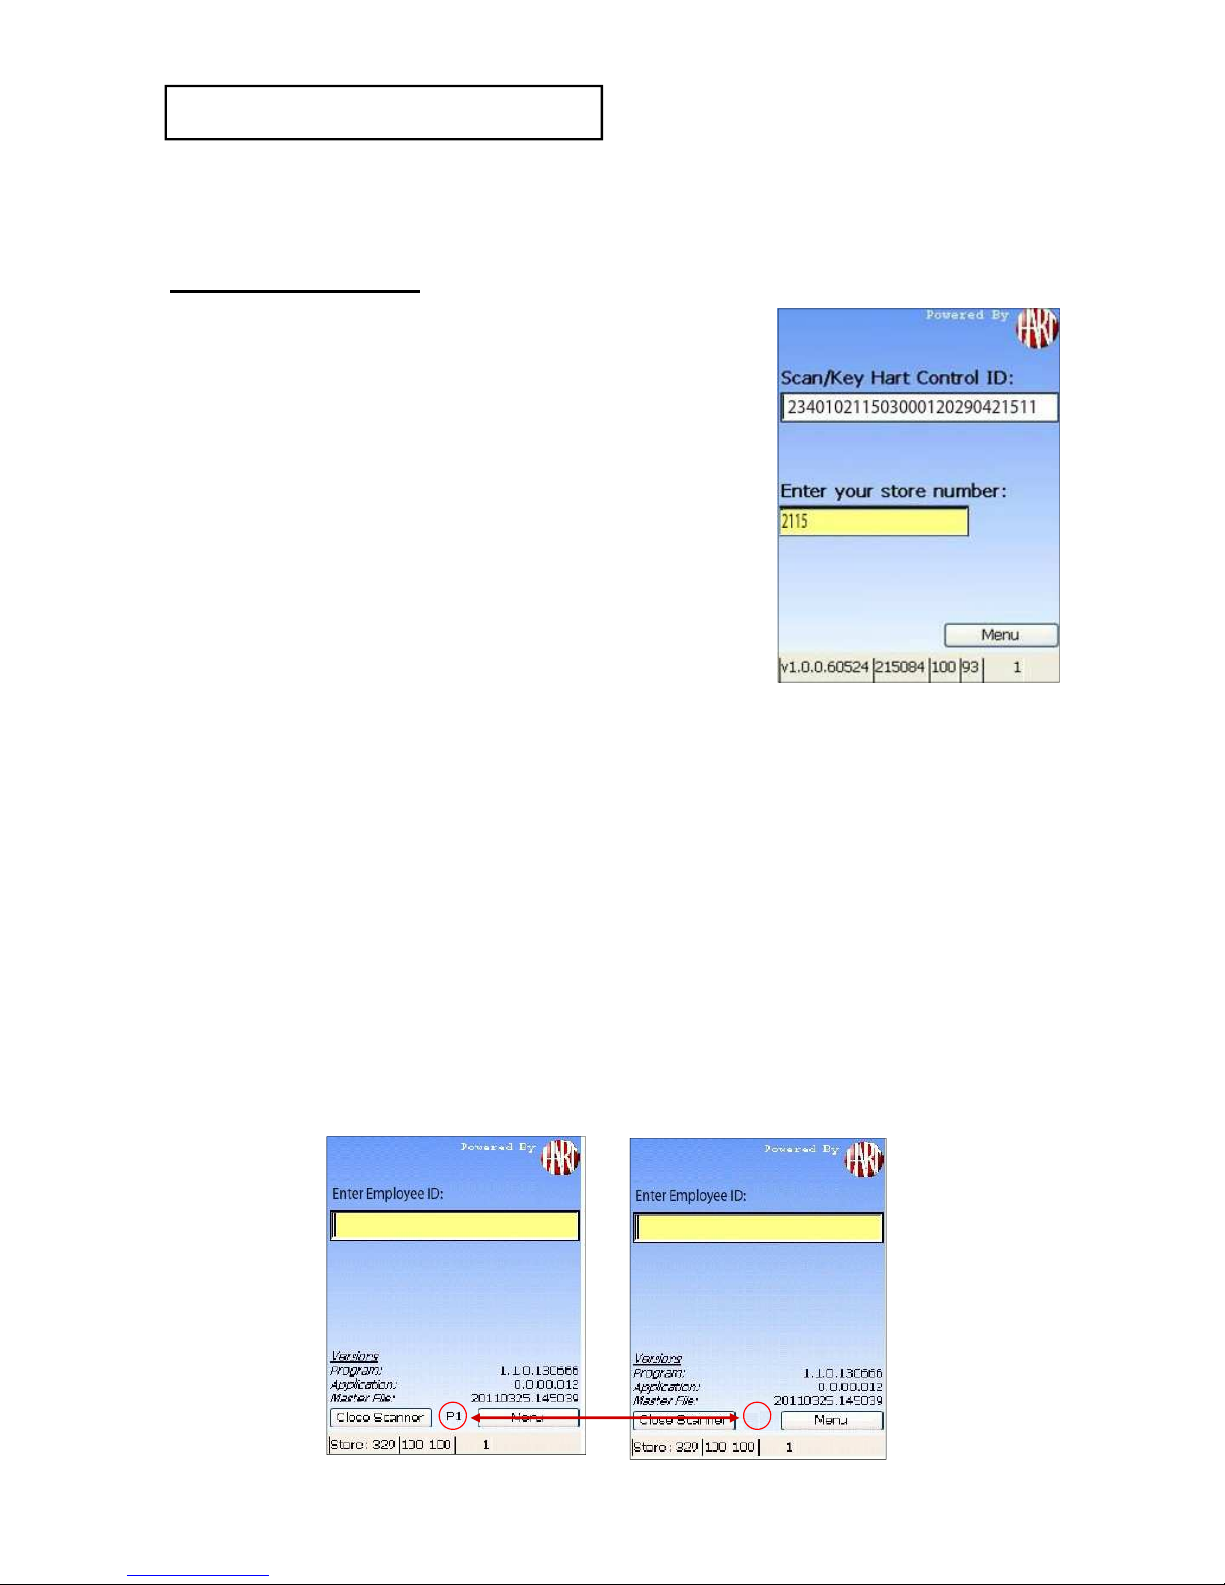
1. Scan the Hart Control ID bar code.
2. Key your Store Number and press
ENT (Enter).
3. The scanners will register shortly
after pressing ENT and will
automatically pick-up any Master File
updates. Be sure to Press the
Continue button to finish the
registration.
4. The “Enter Employee ID” screen will be displayed.
5. Repeat steps 1 and 2 for all scanners.
6. Look on the Hart website to
verify the Scanners
have Registered Successfully:
After entering the store number, the “P” should disappear
from the bottom of the screen.
If the “P” still appears, it could mean your Access Point is
not connected, or the Scanners are out of range of the
access point.
Page - 7
Page 9
HAVE A QUESTION? CALL THE HART HELP DESK at 800-252-2818, or EMAIL US AT [email protected]
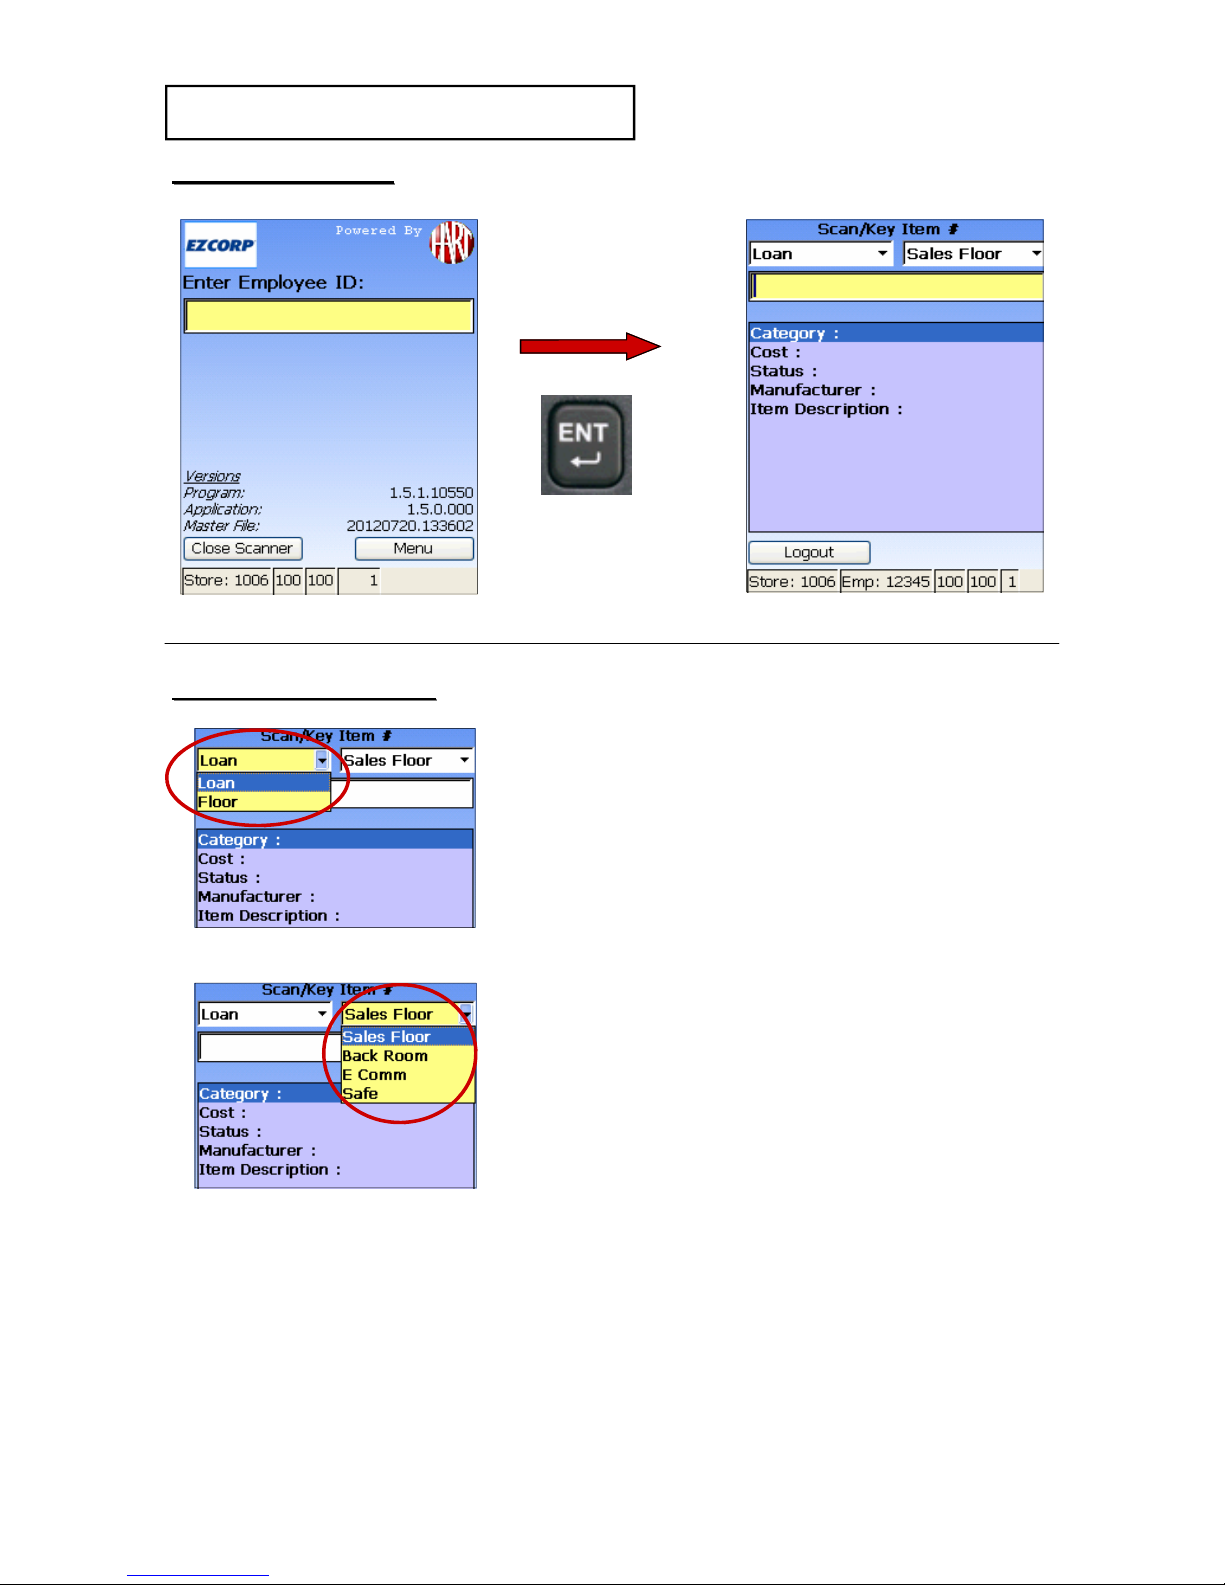
After entering the Employee ID, Confirm
that the scanner is set for the correct
STATUS, Loan or Floor.
You must also set the scanner for the
AREA of the store you are scanning:
Sales Floor
Back Room
E Comm
Safe
Then you can scan the item #.
ENTER ITEM SCREEN
ENTER ITEM SCREEN
Page - 8
**The file must be available for your store before you register
the scanners.**
After the file has been sent, check the Hart Website Overview for
your store to make sure Audit File Status says “Available”
Key the Employee ID and
press ENT (Enter).
SET UP SCANNER
SET UP SCANNER
SCANNER FUNCTIONS
SCANNER FUNCTIONS
Page 10
HAVE A QUESTION? CALL THE HART HELP DESK at 800-252-2818, or EMAIL US AT [email protected]
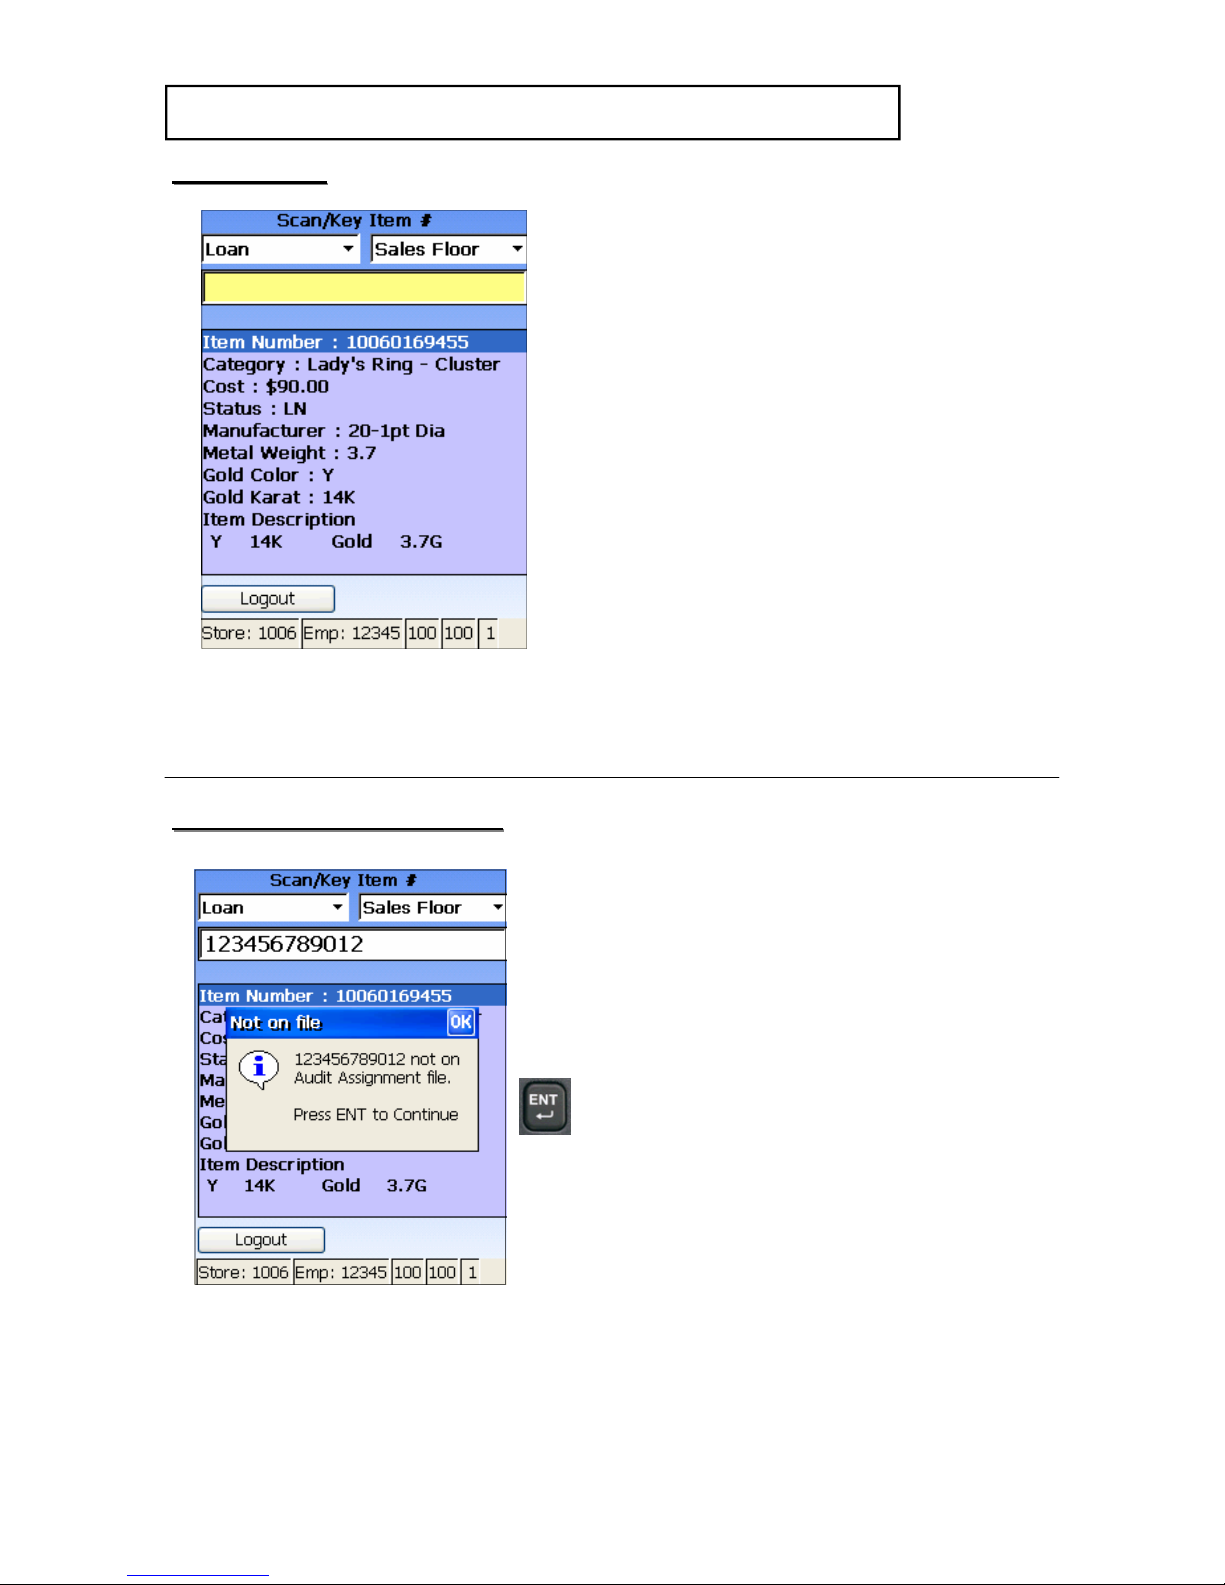
1. After scanning the item that is part of
the audit, the following information for
each item will be displayed:
Category:
Cost:
Status:
Manufacturer:
Metal Weight:
Gold Color:
Gold Karat:
Item Description:
SCAN ITEMS
SCAN ITEMS
SCANNER FUNCTIONS
SCANNER FUNCTIONS --
Continued
Continued
AUDIT ASSIGNENT ITEM#’s
AUDIT ASSIGNENT ITEM#’s
1. The scanner will alert you if a scanned
item is not on the Audit Assignment
File.
• All special messages can be
acknowledged by pressing ENT
(Enter).
You may only scan items that are
part of the current audit assignment.
Page - 9
REMINDER: CONFIRM THAT YOUR SCANNER IS SET TO THE CORRECT
STATUS AND AREA DURING THE AUDIT/INVENTORY!!!
Page 11
HAVE A QUESTION? CALL THE HART HELP DESK at 800-252-2818, or EMAIL US AT [email protected]
INCORRECT KEYING
INCORRECT KEYING
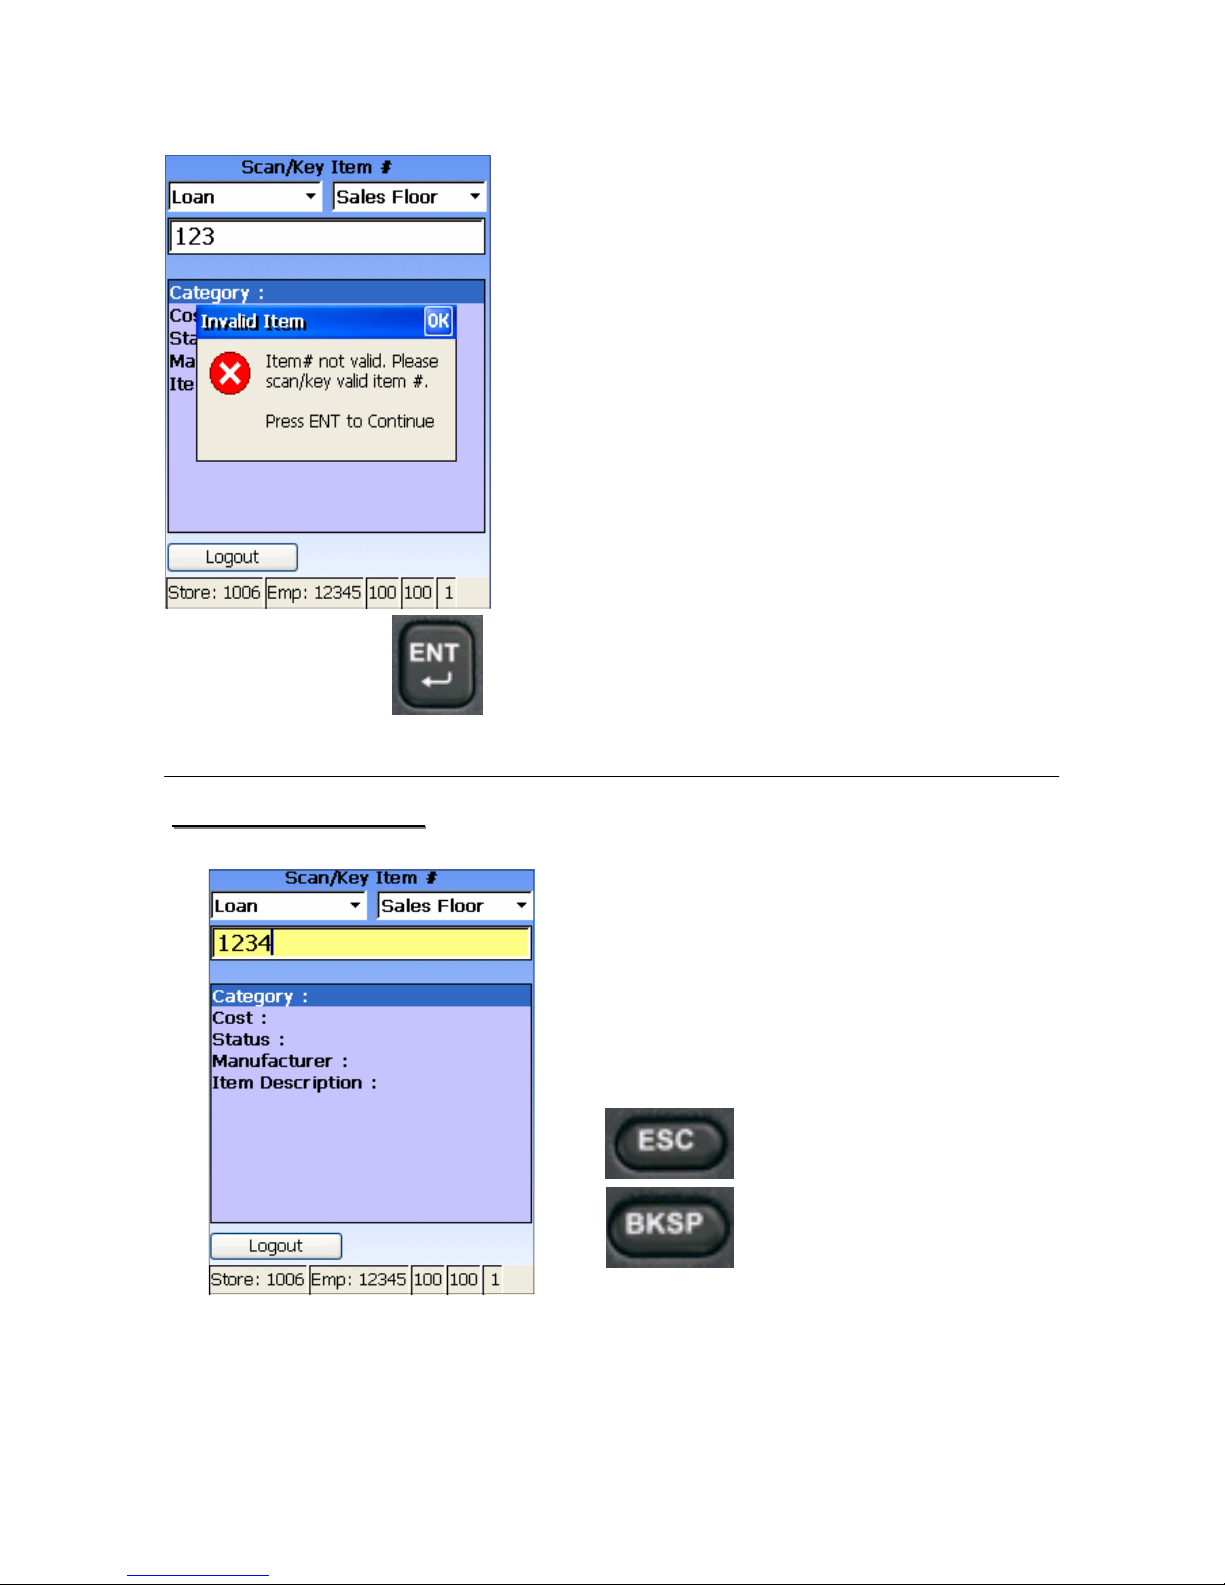
If you keyed information incorrectly,
make corrections by pressing ESC
(Escape) to clear the entire field or
BKSP (Backspace) to clear the filed one
character at a time.
1. You can only scan or key valid EZ Corp
Item #s.
2. If the scanner makes a “special” sound,
Follow the instructions on the scanner
screen.
Page - 10
1. If an item is scanned more than once
with the same scanner, the scanner will
alert you and you must confirm that you
wish to rescan the item.
♦ The latest scan of the item is consid-
ered the “accepted” scan. These items
will be reported on the Re-scanned
Item Report on the Internet.
Page 12
HAVE A QUESTION? CALL THE HART HELP DESK at 800-252-2818, or EMAIL US AT [email protected]
STATUS
STATUS——
FLOOR/LOAN
FLOOR/LOAN
PENDING TRANSMISSIONS
PENDING TRANSMISSIONS ——
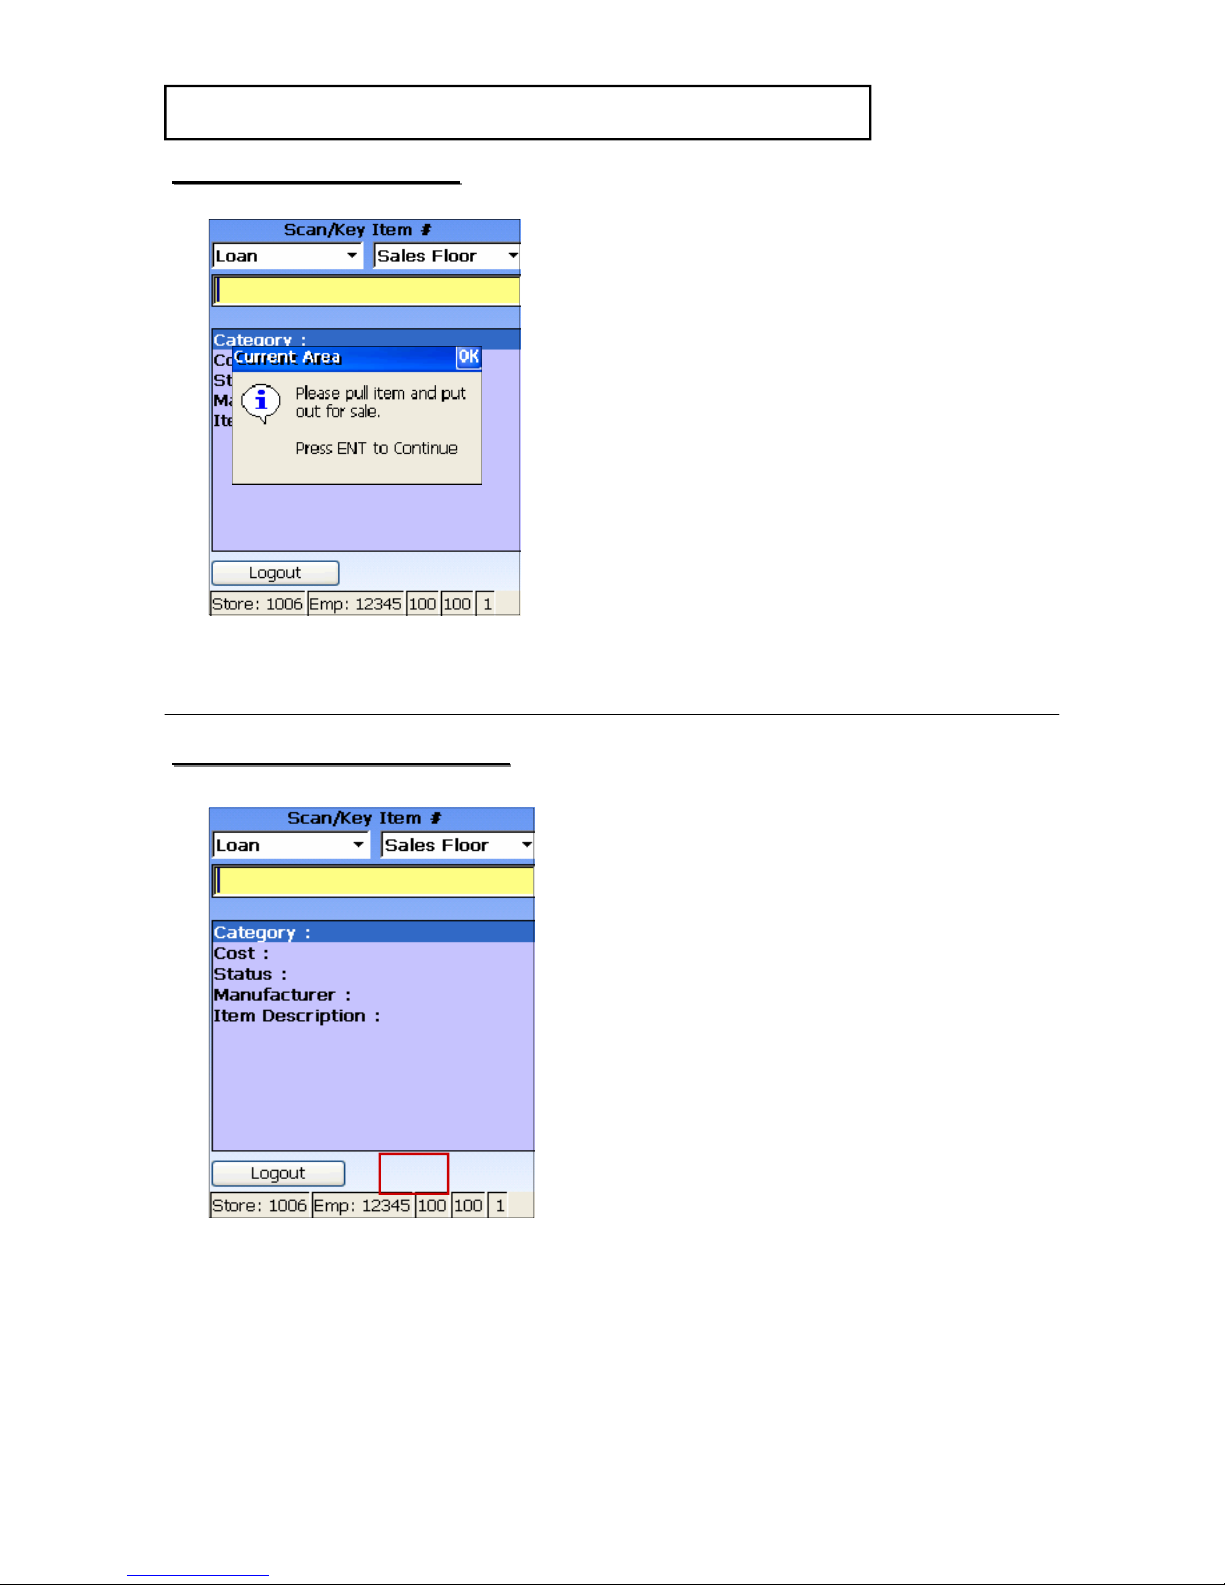
When you have scanned more than TEN
items. check the indicator at the Scan
Item # Screen.
If a “P” displays with a number next to
it, this indicates that there are
pending transmissions.
If you find that number is not decreasing,
bring the scanner closer to the access
point. If you still cannot transmit, check
the access point.
SCANNER FUNCTIONS
SCANNER FUNCTIONS --
Continued
Continued
VERY IMPORTANT!
VERY IMPORTANT!
The scanner will also alert you if an item
is scanned while the scanner is set to
“Loan” status and the item should be put
out for sale as inventory.
The scanner will also alert you if the item
is not for sale and should be taken off the
sales floor.
For both of these conditions, these items
will be reported on the Drop Not Pulled
Report.
VERY IMPORTANT: Make sure the
scanner is set to the proper STATUS.
Page - 11
P12
Page 13
HAVE A QUESTION? CALL THE HART HELP DESK at 800-252-2818, or EMAIL US AT [email protected]
END AUDITOR SCANNING SESSION
END AUDITOR SCANNING SESSION
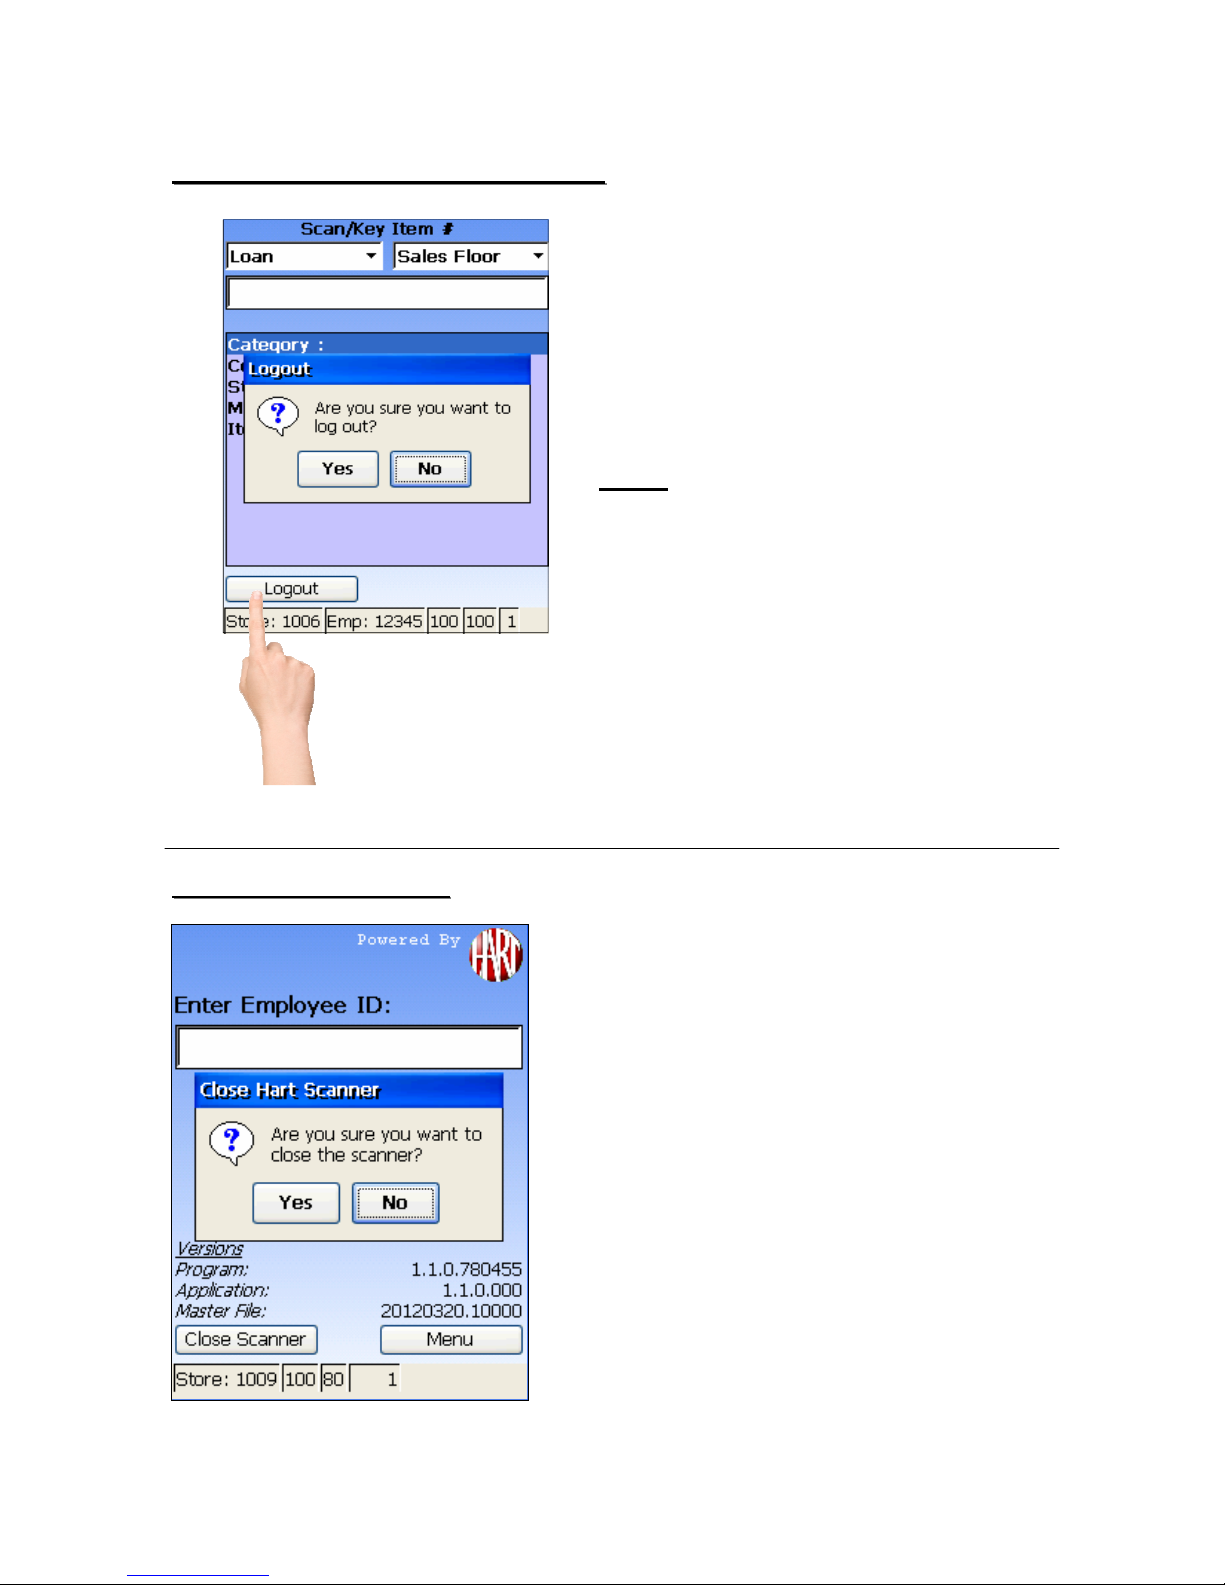
When an Auditor has completed their
scanning assignments, they should log
out and return the scanner to the Control
Desk.
At the Enter Item screen screen press
the Logout button on the TouchScreen
to log out, and the scanner will return to
the Enter Employee ID screen.
NOTE: If there are any Pending item
#s (P...) in the scanner (for
example, Employee is logging
out while out of range of the
access point) the scanner
must be brought back into
range before the Employee
can log out.
CLOSE OUT SCANNER
CLOSE OUT SCANNER
If a scanner is not needed again for this
AUDIT, the scanner must be closed
out.
1. From the Enter Employee ID screen,
press the Close Scanner button, on
the TouchScreen to close the scanner.
2. From the scanner instructions. The
scanner will return to the Scan Hart ID
screen.
Page - 12
Page 14
HAVE A QUESTION? CALL THE HART HELP DESK at 800-252-2818, or EMAIL US AT [email protected]
HOW TO ACCESS REPORTS
HOW TO ACCESS REPORTS
♦ Throughout your inventory, you can obtain detailed information by viewing
various reports via the Hart web site.
ACCESSING THE REPORTS ONLINE
1. Log onto www.hartsystems.com.
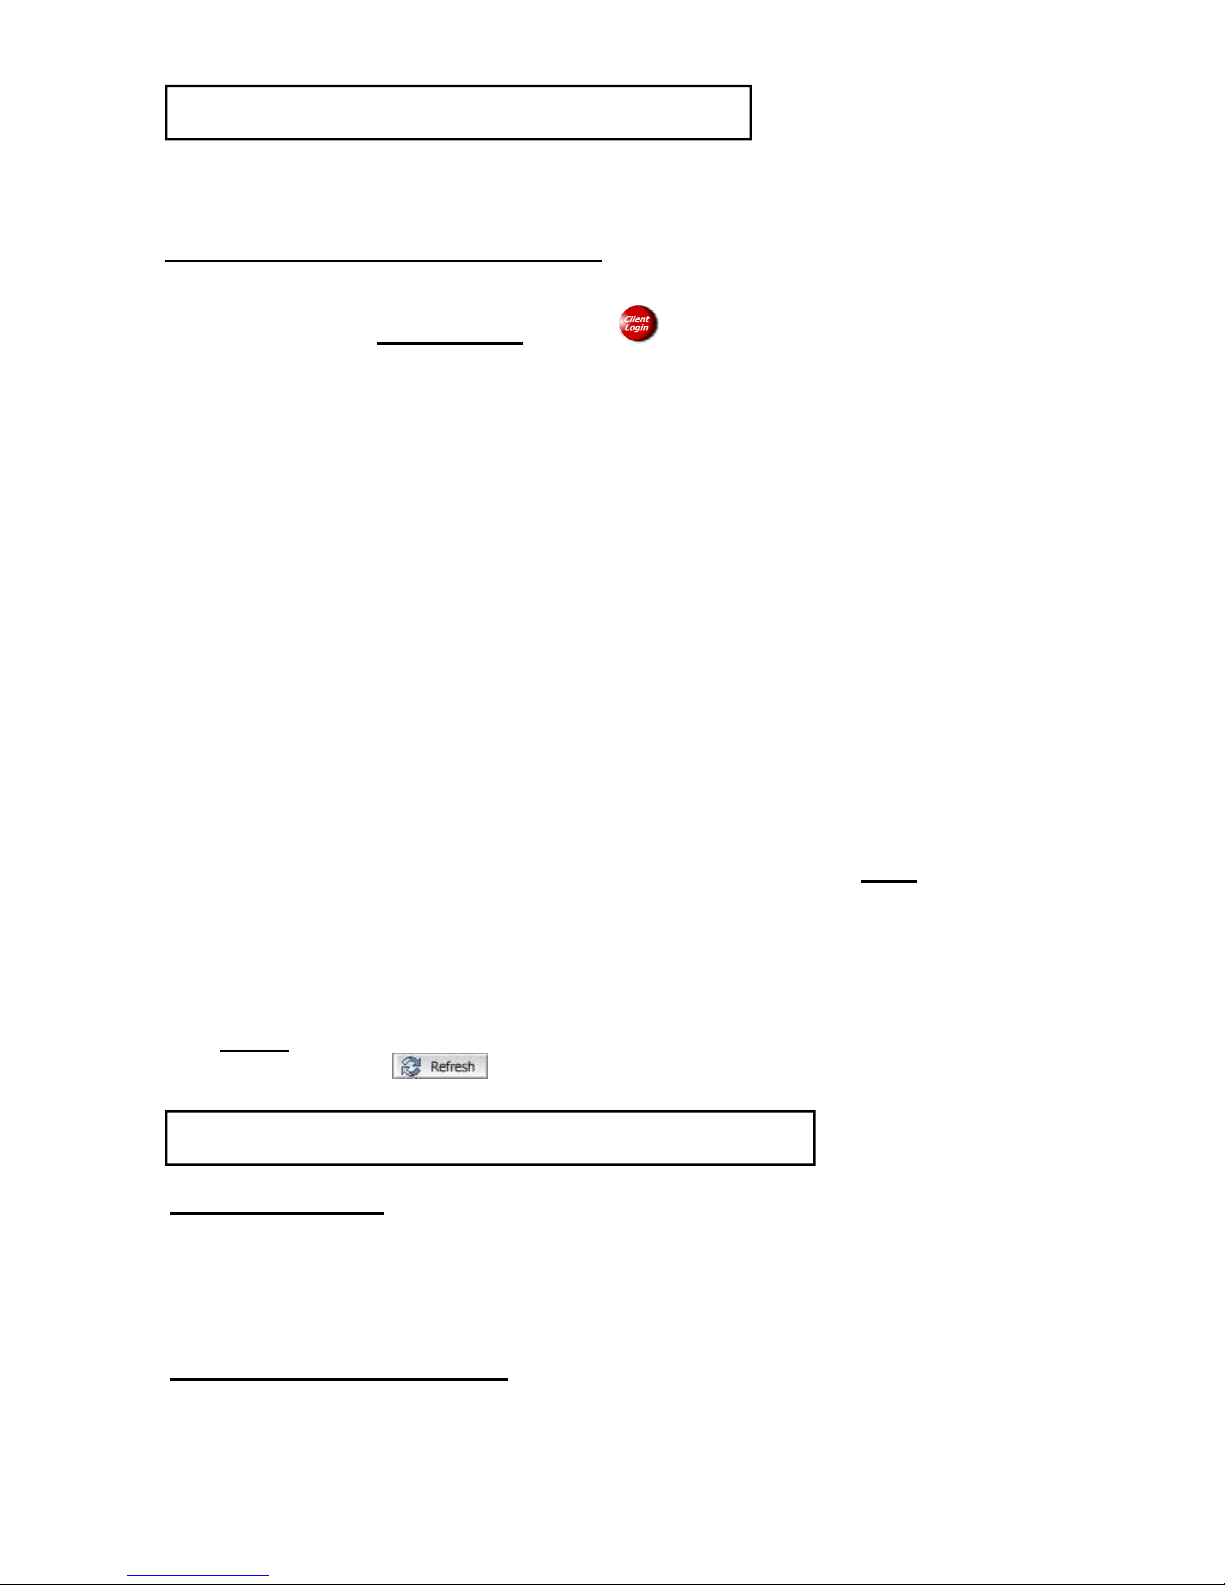
2. Click on the “Client Login” button , on the upper right side of the
screen.
3. Enter your User Name and Password (both entries must be in lowercase)
and press ENTER or click on the OK button. Your User Name and
Password will be provided to you prior to your inventory.
4. Click in the “Enter Store Number” field and enter your store number.
5. Press TAB to advance to the “Enter Password” field. Enter your store-
specific password and press ENTER or click on the OK button.
6. You will now be connected to the “Inventory Overview” for your store.
Your store number and store name will be displayed on the top. Clicking
on any of the underlined items will “drill-down” to more details in that
category.
7. You can access additional reports for your store by clicking on “ALL
Reports”, located at the upper left corner of the screen, and making your
selection from the drop-down menu.
8. On the upper right hand side of the report screen is a button to format the
report for printing. Click on this link if you wish to print any of the
reports.
9. To exit out of one report, click on the “CLOSE” button at the top of the
screen and that will bring you back to the “Inventory Overview”.
NOTE: To “Refresh” a report you are currently viewing, simply click on
the button at the top right of the screen.
Page - 13
REPORT DESCRIPTIONS
REPORT DESCRIPTIONS
DEVICE ACTIVITY
♦ This report displays the date/time, device number, function (registered,
close inventory or sent data) total units and the employee using the
device.
RESCANNED ITEM REPORT
♦ This report displays any items that were scanned more than once. It dis
plays the item #, employee, scanner status, Date/Time, device, area and
units. NOTE: The latest scan of the item is the accepted scan.
Page 15

HAVE A QUESTION? CALL THE HART HELP DESK at 800-252-2818, or EMAIL US AT [email protected]
REPORT DESCRIPTIONS Continued
REPORT DESCRIPTIONS Continued
DROP NOT PULLED REPORT
♦ This report displays the Item #, Scanner Status, Date/Time of scan,
category, cost, current status, the MFG and the Item Description for all
items that were scanned in the incorrect STATUS.
♦ Report displays all items that displayed a warning message.
JEWELRY SUMMARY REPORT
♦ This report will display the Item #, Scanner Status, Date/Time of scan,
category, cost, current status, the MFG, Item Description, Type and weight
for each piece of jewelry scanned.
♦ Report displays totals on the bottom.
SCANNED ITEM# REPORT
♦ This report displays the Item #, Transaction #, scanner status, Date/Time
of scan, category, cost, current status of item, area, MFG and the item
description.
♦ Report displays total cost and total item #s on the bottom.
MISSING ITEM# REPORT
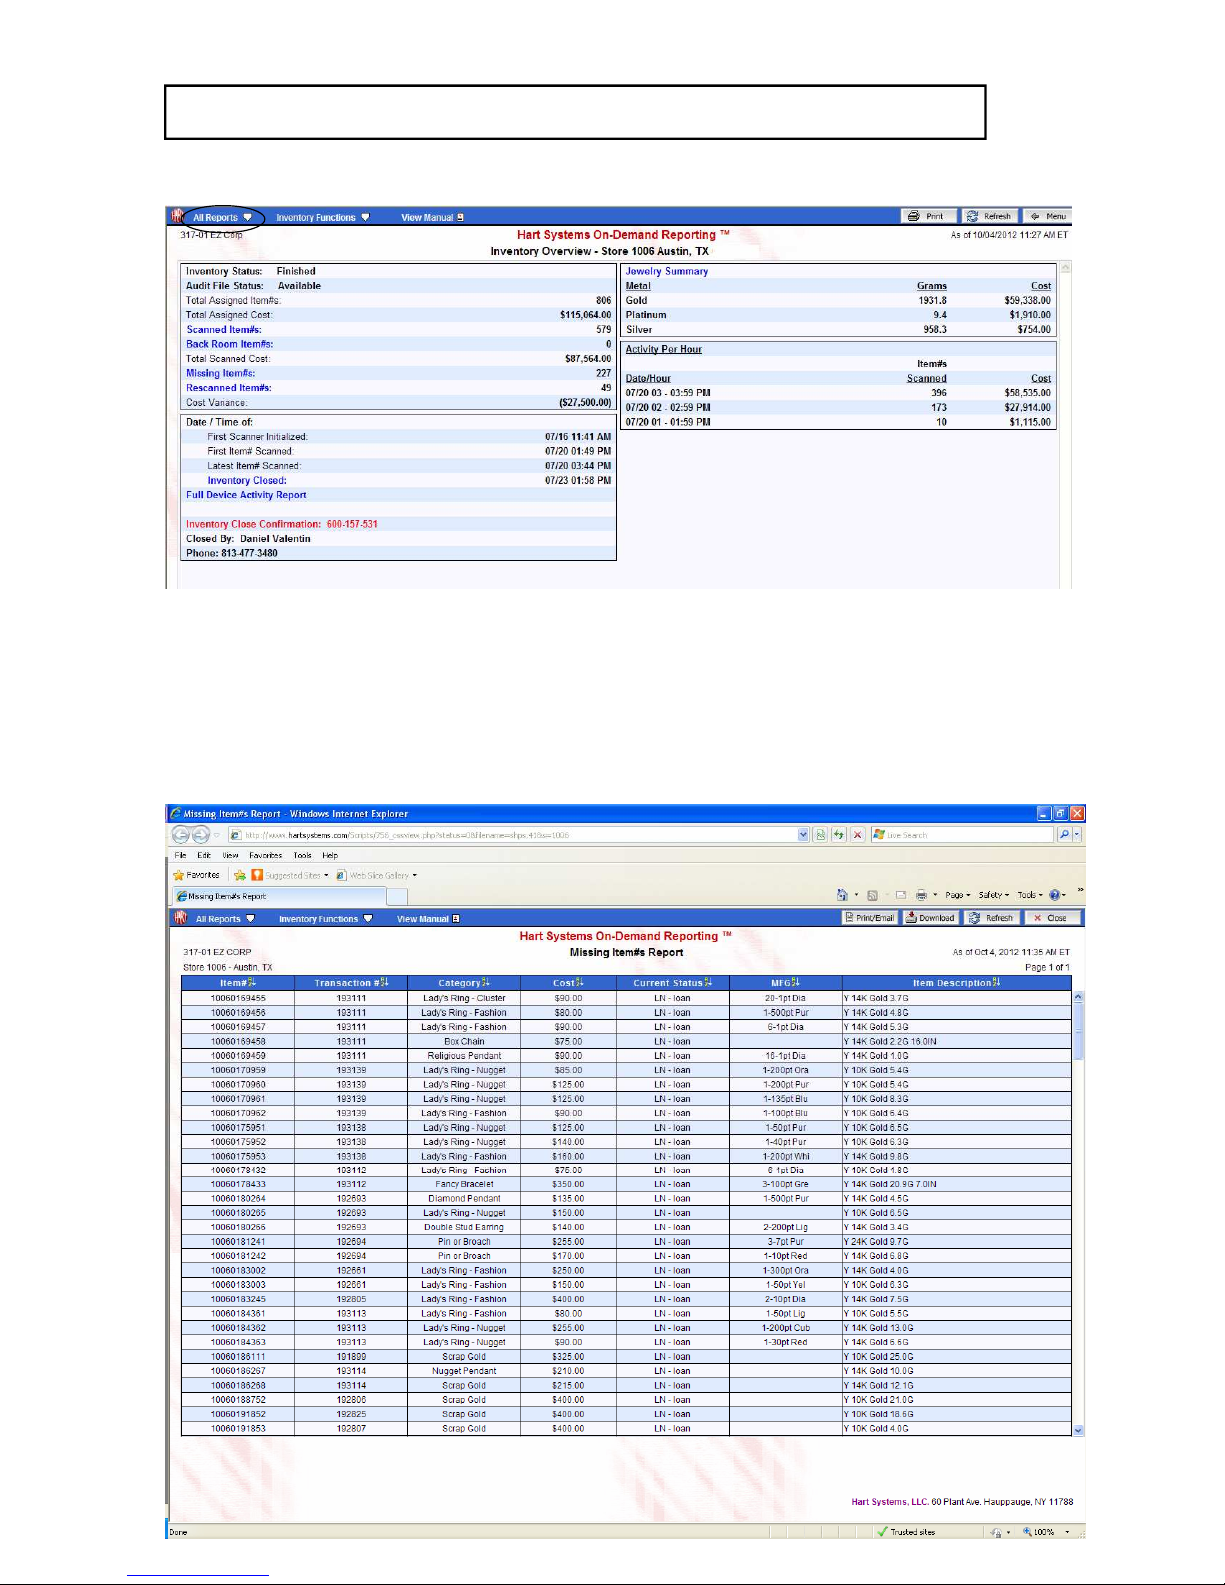
♦ This is the most important report, since it lists all of the items that are
Missing that should be part of the audit. These items have not been
scanned and Sent to Hart. See sample on following page.
♦ This report lists the item #, transaction #, category, cost, current status,
the MFG and item description.
Remember: Items that have been scanned but have not yet been sent to Hart
may still appear as “Missing” on this report; therefore, be certain
that all scanners are not displaying any “Ps”.
BACK ROOM ITEMS REPORT
♦ This report lists all items that were scanned with the scanner area set to
Back Room. Report lists the Item #, Transaction #, Scanner Status, Date/
Time, Category, Cost, Current Status, Area, MFG, desc.
NOTE: All Hart Internet Reports can be downloaded to a CSV file, or printed
as a PDF. Click on the appropriate buttons on the top right of each
report to print or download.
Page - 14
Page 16
HAVE A QUESTION? CALL THE HART HELP DESK at 800-252-2818, or EMAIL US AT help@hartsystems.com
REPORTS
REPORTS --
Overview & Missing Items
Overview & Missing Items
Inventory Overview
♦ Drill down on any of the blue, bolded reports, or click on the All Reports
Drop down menu to see a complete list of reports.
♦ The Inventory Overview will indicate the Audit File Status. If the file is avail-
able, status will say “Available”. If file is not available, status will say “Not
Available”.
Page - 15
Page 17

HAVE A QUESTION? CALL THE HART HELP DESK at 800-252-2818, or EMAIL US AT [email protected]
CLOSE THE INVENTORY
CLOSE THE INVENTORY
♦ Once you have finished scanning all of the merchandise that is
part of the audit and have sent all of your data to Hart, you can
prepare to close the inventory.
♦ You should review reports via the Hart web site and reconcile your
inventory results.
• You should review the Missing Item # report and make
sure you are comfortable with the items on this report.
♦ After you are satisfied that you counted the items associated with
the audit, review the Inventory Overview, via the Hart website (on
the left).
• From this report, fill in the required information on the Hart
Control ID Form. This is your official documentation of this
inventory.
You are now ready to Close the Inventory.
♦ CLOSE THE SCANNERS
• After the audit is complete the scanners contain no PENDING
transmissions, you should close out the scanners.
○ Your must confirm there are no Pending transmissions in
the scanners (“P” on screen), then you can close out the
scanner.
○ Scanner will return to the Scan/Key Control ID screen, and
it is ready for the next audit.
♦ CLOSE THE INVENTORY
1. At the Inventory Overview screen- Select Inventory
Functions from the Blue Menu bar and click on CLOSE
INVENTORY.
Page - 16
Page 18

HAVE A QUESTION? CALL THE HART HELP DESK at 800-252-2818, or EMAIL US AT [email protected]
CLOSE THE INVENTORY
CLOSE THE INVENTORY --
Continued
Continued
♦ CLOSE THE INVENTORY
2. Follow the instructions and prompts that are displayed.
○ A message will be displayed asking you to confirm
that your missing Item # list is correct.
○ If you have confirmed, then click “Yes” and continue.
○ If you would like to continue verifying, click “No”.
3. Once the close inventory process has been completed,
click the refresh button on the Inventory Overview and the
inventory status will be displayed as Finished and your
Inventory Close Confirmation Number for the inventory
will be available.
4. Write the Inventory Close Confirmation Number on the
Hart Control ID form.
Page - 17
Page 19

HAVE A QUESTION? CALL THE HART HELP DESK at 800-252-2818, or EMAIL US AT [email protected]
SHIP EQUIPMENT
SHIP EQUIPMENT
♦ Do NOT write on any of the original Hart boxes.
♦ Before packing the boxes, remove and read the shipping
instructions. The Shipping Instructions are in a clear envelope,
affixed to the inside flap of Box U.
♦ All of the equipment will be shipped in the original boxes.
♦ Apply the shipping labels to the covers of the two boxes, as
specified in the Shipping Instructions.
• First, place the Access Points back in the foam. Be careful
with the antennas.
• Second, place the removable foam insert into the box behind
the cradles.
• Second, place the scanners into the foam cavities.
• Third, place any paperwork in the box.
• Finally, remember to include all batteries, whether used or
unused and chargers. Place the batteries in the plastic
bag(s) provided and place with the equipment.
• Tape up the boxes.
♦ Refer to your shipping instructions for more information.
NOTE: It is very important that the equipment is shipped
back to Hart Systems, according to the agreed upon
shipping schedule. If you have any questions
regarding the shipping of the equipment, please
contact the Hart Help Desk at (800) 252-2818 or (631)
439-8200.
Be sure to retain your copies of the shipping receipts
OR record your tracking numbers, before the
equipment has been shipped back to Hart. You may
need to refer to them at a later time to provide proof
of shipment.
Page - 18
Page 20

Page 21
TIPS/TROUBLESHOOTING
TIPS/TROUBLESHOOTING
PROBLEM/QUESTION SOLUTION
What are the major talking points for
Auditors?
1. Listen for any error messages.
2. Focus, and pay close attention for
accuracy.
3. Log-Off w he n fin ished wit h
assignments, or taking a break.
What if I scan an item twice? 1. The later scan of the item will be
the accepted scan.
2. Totals will not accumulate.
What if the Internet is not updating
after I scan an item?
1. If there are any P’s displaying, than
move closer to the Access Point.
2. If after moving closer to the Access
Point, check the connections to the
access point. It’s possible it was
disconnected.
3. Make sure to REFRESH the
Inventory Overview screen.
What if I scan something that is not
part of the audit?
1. The scanner will advise you that
the item is not on the Audit
Assignment File.
2. Press ENT to continue.
How do I know if a scanner has
transmitted successfully?
If there are not any “Ps” present, the
data has been sent. To verify, view the
online reports.
I’m trying to scan an Item # and can’t
get a read even though I’m putting the
imager close to the bar code.
Don’t scan too close to the bar
code. The Imager work’s best
4-6 inches from the product.
Can I use the touch screen to answer
Window’s pop-up messages?
Yes, you can use the touch screen or
the ENT button to answer Window’s
messages.
EXHIBIT A
Hart Control
ID FORM
This form is the official documentation of this
audit. Make sure that it is completed with the
most current information at the END of the audit.
Follow the instructions printed on the form.
Copyright 2012, Hart Systems, LLC
Page 22

Page 23
CONTACTING THE HART HELP DESK
CONTACTING THE HART HELP DESK
IF YOU HAVE ANY QUESTIONS, CONTACT THE
HART SYSTEMS HELP DESK.
(800) 252-2818
OR
(631) 439-8200
Our Help Desk Staff can be reached by calling the above numbers.
♦ If your call is answered by our Receptionist, please ask for “The
Help Desk”.
♦ If your call is answered by our Automated System, please Enter
“1” for “The Help Desk”.
You can also contact the Hart Help Desk via e-mail:
When sending an email, please remember to include your:
♦ Company Name
♦ Store Location #
♦ Personal Name
♦ Phone Number
♦ A Brief Message, describing your question or issue.
The Help Desk will respond to your email within 10 minutes.
AUXILIARY HELP DESK NUMBER
If for any reason our primary Help Desk Number is not working, please
use our Cellular Phone number to reach the Help Desk. This number is
516-639-3103.
EXHIBIT B
Copyright 2012, Hart Systems, LLC
Page 24

 Loading...