

Hartke KILO 1000WATT, KILO Owner's Manual

Samson Technologies Corp.
45 Gilpin Avenue
Hauppauge, New York 11788-8816
Phone: 1-800-3-SAMSON (1-800-372-6766)
Fax: 631-784-2201
www.samsontech.com
©2012, V2.1
Important Safety Information
AVIS
RISQUE DE CHOC ÉLECTRONIQUE -
CAUTION: TO REDUCE THE RISK OF ELECTRIC SHOCK, DO NOT
REMOVE COVER (OR BACK). NO USER-SERVICEABLE PARTS
INSIDE. REFER SERVICING TO QUALIFIED SERVICE PERSONNEL.
This lightning ash with arrowhead symbol within an equilateral triangle is
intended to alert the user to the presence of non-insulated “dangerous voltage” within the product’s enclosure that may be of sucient magnitude to
constitute a risk of electric shock.
The exclamation point within an equilateral triangle is intended to alert the
user to the presence of important operating and maintenance instructions
in the literature accompanying the appliance.
NE PAS OUVRIR
If you want to dispose this product, do not mix it with general household waste. There is a
separate collection system for used electronic products in accordance with legislation that
requires proper treatment, recovery and recycling.
Private household in the 25 member states of the EU, in Switzerland and Norway may return their used
electronic products free of charge to designated collection facilities or to a retailer (if you purchase a similar
new one).
For Countries not mentioned above, please contact your local authorities for a correct method of disposal.
By doing so you will ensure that your disposed product undergoes the necessary treatment, recovery and
recycling and thus prevent potential negative effects on the environment and human health.

Important Safety Information
1. Read these instructions.
2. Keep these instructions.
3. Heed all warnings.
4. Follow all instructions.
5. This apparatus shall not be exposed
to dripping or splashing liquid and
no object lled with liquid, such as
a vase, should be placed on the apparatus.
6. Clean only with a dry cloth.
7. Do not block any of the ventilation
openings. Install in accordance with
the manufacturer's instructions.
8. Do not install near any heat sources
such as radiators, heat registers,
stoves, or other apparatuses (including ampliers) that produce heat.
9. Only use attachments/accessories
specied by the manufacturer.
10. Unplug this apparatus during lightning storms or when not in use for
long periods of time.
11. Do not override the intended purpose of the polarized or groundingtype plug. A polarized plug has
two blades, with one wider than
the other. A grounding-type plug
has two blades and a third grounding prong. The wide blade, or third
prong, is provided for your safety.
If the provided plug does not t
your outlet, consult an electrician to
replace the obsolete outlet.
12. Protect the power cord from being
walked on or pinched, particularly at
the prongs, convenience receptacles,
the point where they exit from the
apparatus.
13. Use only with the cart
stand, tripod bracket,
or table specied by
the manufacture, or
sold with the ap-
14. Refer all servicing to qualied service
15. POWER ON/OFF SWITCH: For prod-
16. MAINS DISCONNECT: The plug
17. FOR UNITS EQUIPPED WITH EXTER-
18. MULTIPLE-INPUT VOLTAGE: This
paratus. When a cart is used, utilize
caution when moving the cart/apparatus combination to avoid injury
from tip-over.
personnel. Servicing is required if the
apparatus has been damaged in any
way, such as power-supply cord or
plug breakage, damage due to liquid
or objects falling onto the apparatus, exposure to rain or moisture, or
if the apparatus does not operate
normally, or has been dropped.
ucts with a power switch, the power
switch DOES NOT break the connection from the mains.
should remain readily operable.
For rack-mount or installation
where plug is not accessible, an
all-pole mains switch with a contact
separation of at least 3mm in each
pole shall be incorporated into the
electrical installation of the rack or
building.
NALLY ACCESSIBLE FUSE RECEPTACLE: Replace fuse with same type
and rating only.
equipment may require the use of a
dierent line cord, attachment plug,
or both, depending on the available
power source at installation. Connect
this equipment only to the power
source indicated on the equipment
rear panel. To reduce the risk of re
or electric shock, refer servicing
to qualied service personnel or
equivalent.

Kilo • 1000 Watt Bass Amplier
Table of Contents
Introduction. . . . . . . . . . . . . . . . . . . . . . . . . . . . . . . . . . . . . . . . . . . . .6
Features . . . . . . . . . . . . . . . . . . . . . . . . . . . . . . . . . . . . . . . . . . . . . . . 7
Front Panel Controls. . . . . . . . . . . . . . . . . . . . . . . . . . . . . . . . . . . . . . . .8
Rear Panel . . . . . . . . . . . . . . . . . . . . . . . . . . . . . . . . . . . . . . . . . . . . . 11
Setting Up and Using the Kilo. . . . . . . . . . . . . . . . . . . . . . . . . . . . . . . . . 14
Choosing the Correct Speaker Cabinets . . . . . . . . . . . . . . . . . . . . . . . . . . 16
About Compression . . . . . . . . . . . . . . . . . . . . . . . . . . . . . . . . . . . . . . . 17
About Equalization . . . . . . . . . . . . . . . . . . . . . . . . . . . . . . . . . . . . . . . 18
Suggested Kilo EQ Settings . . . . . . . . . . . . . . . . . . . . . . . . . . . . . . . . . . 19
Specications . . . . . . . . . . . . . . . . . . . . . . . . . . . . . . . . . . . . . . . . . . . 20
Block Diagram . . . . . . . . . . . . . . . . . . . . . . . . . . . . . . . . . . . . . . . . . . 21
Notes . . . . . . . . . . . . . . . . . . . . . . . . . . . . . . . . . . . . . . . . . . . . . . . . 22
ENGLISH
FRANÇAISDEUTSCHEESPAÑOLITALIANO
5

Introduction
Congratulations on the purchase of your new Hartke Kilo Bass Amplier! We know you
don’t like reading owner’s manuals, but we suggest you take some time to go through
these pages (we’ll make it as painless as possible, we promise) to fully understand how
we’ve implemented a number of unique features.
The Hartke Kilo raises the standard for bass amplication. It provides 500 watts at 2
ohms of power per side in stereo mode, and a massive 1,000 watts at 4 ohms in the
bridged mono mode. To sculpt your sound, the Kilo has an all-tube class-A preamp,
and logically arranged tone controls. The Kilo oers a classic tone stack three-band EQ,
with Hartke’s variable Shape circuit. For additional tone shaping, there is a 10-band
Graphic Equalizer, as well as selectable Deep and Brite EQ curves. To add some “dirt” to
your sound, there is a variable tube Overdrive circuit, and to round out the dynamics,
there is a fast and articulate Compressor circuit.
To connect your amplier to speaker cabinets, the Kilo has both ¼” and Speakon®
output jacks. The Kilo also provides an abundance of connections and signal routing
features, including multi-point direct output switching, stereo Eects Loop, front and
rear panel tuner outputs, and footswitch jacks to remotely control the Mute, Overdrive,
EFX send, and Graphic EQ functions.
You’ll nd the Kilo to be an ideal choice for every situation—from recording studios, to
small clubs, to giant stadiums. In this manual, you’ll nd a detailed description of the
features of your Hartke Kilo bass amplier, as well as step-by-step instructions for its
setup and use, and full specications.
If your Kilo was purchased in the United States you’ll also nd a warranty card
enclosed. Don’t forget to ll it out and mail it! This will enable you to receive online
technical support, and allow us to send you updated information about this and other
Samson products. With proper care, your Kilo will operate trouble-free for many years.
We recommend you record your serial number in the space provided below for future
reference.
Serial number: _______________________________
Date of purchase: _______________________________
Should your unit ever require servicing, a Return Authorization (RA) number must
be obtained before shipping your unit to Samson. Without this number, the unit will
not be accepted. Please call Samson at 1-800-3SAMSON (1-800-372-6766) for an RA
number prior to shipping your unit. Please retain the original packing materials and, if
possible, return the unit in its original carton. If your Kilo was purchased outside of the
United States, contact your local distributor for warranty details and service information. Also, be sure to check out our website (www.samsontech.com) for information
about our full product line.
6
Kilo • 1000 Watt Bass Amplier
Features
The Hartke Kilo bass amplier oers classic tone, enhanced exibility, and an abundance of power along with all the newest concepts in bass amplication design. Here
are some of its unique features:
• Stereo power amps oer 500 watts of power per side into a 2 ohm speaker load,
and an immense 1000 watts delivered to a 4 ohm speaker system in bridged mono
mode.
• Class-A all tube (3 x 12AX7) high-voltage preamp circuit provides excellent tone.
• Classic 3-band tone stack equalizer with variable Shape control allows you to create
a broad range of tonal colors for your bass instrument.
• Selectable Deep and Brite EQ curves provide further control over shaping your bass
sound.
• Variable compressor adds real “punch” to your bass sound, and allows you to
smooth out volume dierences between notes.
• Ten-band constant-q graphic equalizer allows you to visually shape the tonal colors
of your instrument. The independent level control lets you adjust the overall level of
the signal. A dedicated front panel switch and a footswitch jack allow you to preset
an equalization curve.
• Variable tube overdrive can be set to deliver anything from warmth to your tone to
all out fuzz.
• Multi-point direct output with level control allows you to select where in the signal
path the audio will be routed to the direct output jack.
• Speakon® and ¼” parallel output connectors for connecting speaker cabinets.
• Stereo Eect loop send and return jacks that allow you to connect to professional
outboard eects processors. A dedicated front panel switch and footswitch jack allow you to send signals to your eects without interruption of your performance.
• Separate left and right channel Preamp Out and Amplier In jacks for additional
signal routing, and to connect supplemental amps to power extra cabinets.
• Rugged three rackspace construction with solid die cast front panel and oversized
front panel handles make the Kilo eminently road-worthy.
ENGLISH
FRANÇAISDEUTSCHEESPAÑOLITALIANO
7

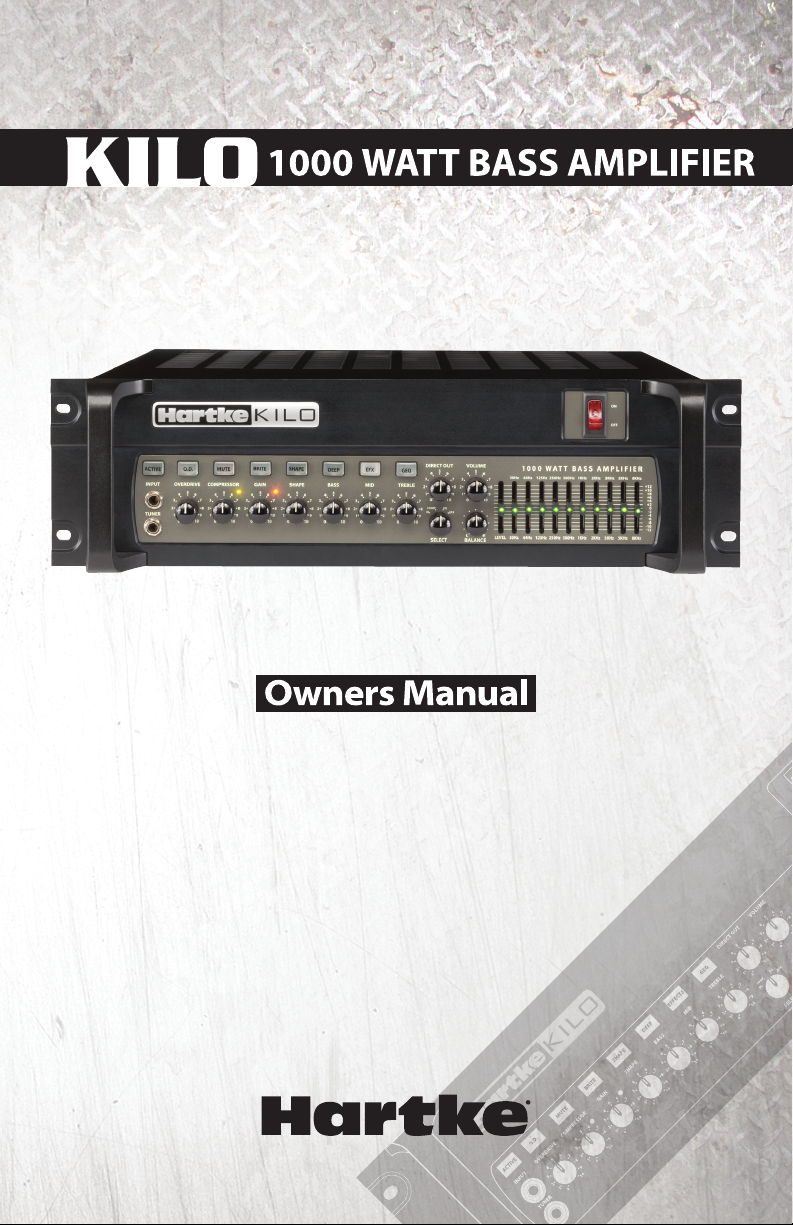
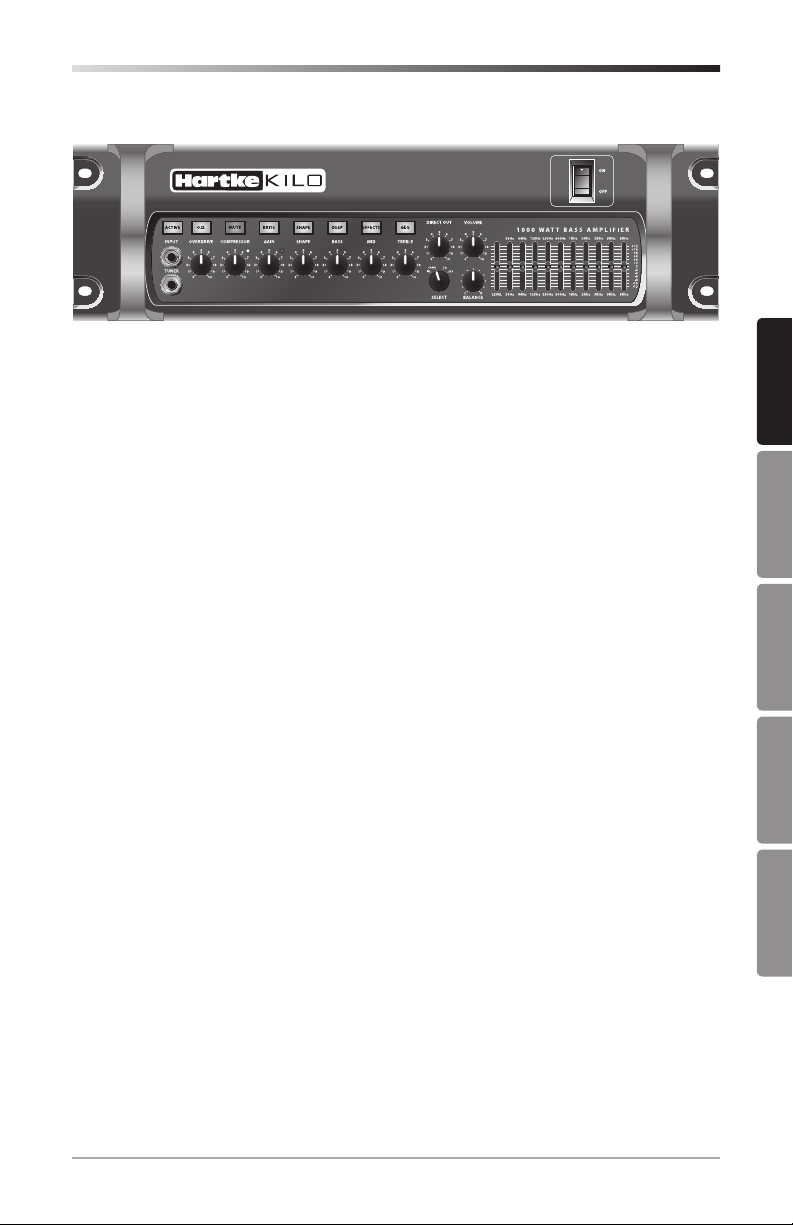
123
8
111213
262415 17 19
Front Panel Controls
10
7
456
1. INPUT – Connect your bass guitar here using a standard ¼” unbalanced instru-
ment cable.
2. TUNER Output – Use this jack to connect to an electronic tuner using a ¼” TRS
cable. The TUNER output is always active, even when the MUTE switch is engaged,
which allows you to tune your instrument silently. This output may also be used as
a line level direct output feed.
3. ACTIVE Switch – When selected, this green backlit switch reduces the input sen-
sitivity by 15dB to accommodate the higher output signal of basses with built-in
active electronics.
4. OVERDRIVE – When the O.D. switch is selected (see #5), this control knob adjusts
the amount of harmonic content and overdrive to the input signal. Slowly turning
this knob allows you to add a little tube warmth, some edgy dirt, or all-out fuzz.
5. O.D. Switch – When selected, this green backlit switch engages the OVERDRIVE
control. A footswitch can be connected to the amplier to switch the OVERDRIVE
on and o (the front panel switch is disengaged when the footswitch is plugged
in).
6. COMPRESSOR – This knob determines the amount of compression by adjusting
the threshold level. The compressor allows you to control the overall dynamic
range of your performance by reducing sudden peaks, and increasing the sustain
of the instrument. At the fully counterclockwise position, no compression is applied. As the knob is turned clockwise an increasing amount of compression is
applied. For more information, see the “About Compression” section on page 17 of
this manual.
7. Compressor Light – Provides a visual indicator of the status of the compression
circuitry. This red LED lights when the input signal crosses the threshold level and
activates the compressor circuit.
9
14 16 1820212223 25
8

Kilo • 1000 Watt Bass Amplier
Front Panel Controls
8. MUTE Switch – When engaged, this orange backlit switch mutes all of the out-
puts exept the front and rear panel TUNER outputs. A footswitch can be connected to the amplier to control muting (the front panel switch is disengaged when
the footswitch is plugged in).
9. GAIN – This control adjusts the amount of level provided to the tube preamp
stage. The Peak light (see #10) will illuminate if the input signal is clipping the
preamp stage, which indicates unwanted distortion. Turn the GAIN control down
until the Peak light lights only occasionally.
10. Peak Light – This red light illuminates when clipping occurs in the preamp signal
path. If you notice that the Peak light is continuously lighting, turn the GAIN control down until the Peak light lights only occasionally.
11. BRITE Switch – When pressed, this green backlit switch boosts the high frequency
output by 6 dB.
12. SHAPE – The Shape circuit applies a pre-set equalization curve with a slight lift in
the low frequencies, a cut in the mids, or a slight lift in the highs, depending on
its setting. The SHAPE control knob is used to set the center cut frequency for the
Shape circuit.
13. SHAPE Switch – This green backlit switch is used to engage the Shape circuit (see
#12). For additional control on stage, the SHAPE switch can be controlled using a
footswitch (the front panel switch is disengaged when the footswitch is plugged
in).
14. BASS – As part of the passive tone stack equalizer, this control is used to adjust
the low frequency response.
15. DEEP Switch – When engaged, this green backlit switch boosts the low frequency
response of the signal.
16. MID – As part of the passive tone stack equalizer, this control is used to adjust the
mid-range frequency response.
17. EFX Switch – When selected, this green backlit switch sends the signal to the rear
panel EFFECTS SEND jack, allowing you to globally turn on and o the signal from
your outboard eects for added tone control. A footswitch can be connected to
control the EFX switch (the front panel switch is disengaged when the footswitch
is plugged in).
18. TREBLE – As part of the passive tone stack equalizer, this control is used to adjust
the high frequency response.
19. GEQ Switch – When this green backlit switch is pressed, the graphic equalizer
circuitry is operational. When the switch is disengaged, the circuity is bypassed.
This switch allows you to set up a custom equalization curve with the graphic EQ
sliders, which can then be activated with the press of a single button. A footswitch
can be connected to control the GEQ switch (the front panel switch is disengaged
when the footswitch is plugged in).
ENGLISH
FRANÇAISDEUTSCHEESPAÑOLITALIANO
9

Front Panel Controls
20. DIRECT OUT – Adjusts the level of the signal at the DIRECT OUTPUT jack.
21. Direct Out SELECT – This switch allows you to select where in the signal chain the
DIRECT OUTPUT signal orginates. The signal can be chosen directly from the input,
after the compressor, after the graphic EQ, or after the eects return. This enables
you to decide what type of signal to send to the front of house.
22. VOLUME – This is the overall volume control. For best signal-to-noise ratio, keep
the output of your bass at or near maximum, and adjust the amp’s volume to the
desired level.
23. BALANCE – This control knob adjusts the level dierence between the left and
right ampliers. If you are using two dierent cabinets (for example a 115 and
410), you may want to drive one a little harder than the other to balance your
sound. In the center (12 o’clock) position, both amplier channels are at equal
power. The BALANCE control has no eect when the Kilo is running in bridge
mode.
24. Graphic EQ LEVEL – When the GEQ switch (see #19) is selected, this slider con-
trols the output volume control for the Graphic EQ. This can be used to boost the
signal for a solo, or compensate for level changes due to tone shaping.
25. Graphic EQ – These sliders allow you to “draw” the tonal response of the system
by adding or subtracting 12 dB of signal to ten dierent constant-q frequency
areas (30Hz, 64Hz, 125Hz, 250Hz, 500Hz, 1kHz, 2kHz, 3kHz, 5kHz, and 8kHz), aecting the main output signal of the Kilo. When a slider is at its center detent position, the selected frequency area is not boosted nor cut (it is said to be at). When
a slider is moved up, the selected frequency area is boosted, and when it is moved
down, the selected frequency area is attenuated.
26. POWER Switch – Use this to power the Kilo on or o. The internal power LED
lights whenever the Kilo is powered on.
10
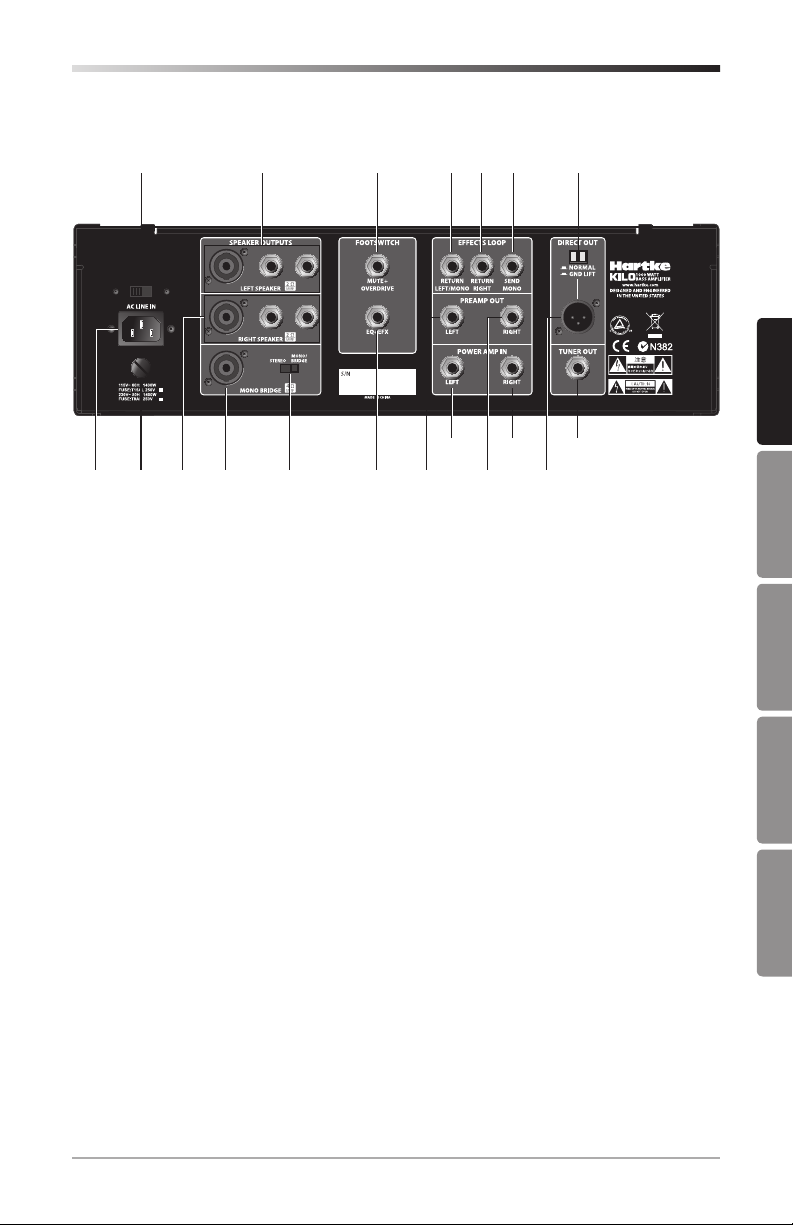
Kilo • 1000 Watt Bass Amplier
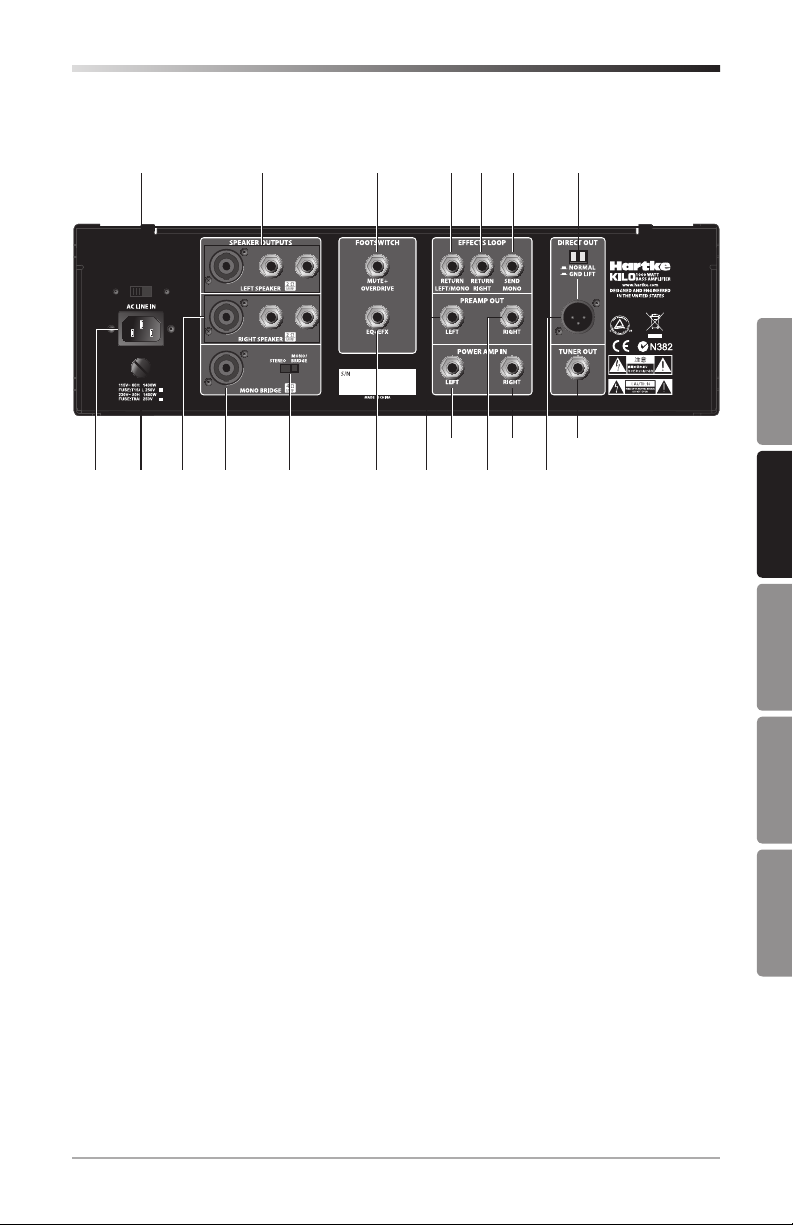
Rear Panel
1
4 8
10 11 12 17
15 16 19
2
3 6
1. Voltage Selection Switch – This switch is used to set the Kilo operation voltage.
Be sure to check that the switch is set correctly for your country.
2. AC Inlet – Connect the supplied standard 3-pin “IEC” plug here. You should never
remove the ground pin of the AC plug.
3. Fuse – This contains the fuse for your amplier. Be sure to conrm and install the
properly rated fuse when replacing. Fuse ratings are 15 amp for 115 vac and 8
amp for 230 vac.
4. LEFT SPEAKER OUTPUTS – Use these outputs to connect speakers to the left am-
plier output. The amplier provides both ¼” and Speakon® output connectors,
wired in parallel. It is recommended to use the Speakon® jack whenever possible.
The total impedance of the speakers connected to all of the jacks must not be less
than 2 ohms.
5. RIGHT SPEAKER OUTPUTS – Use these outputs to connect speakers to the right
amplier output. The amplier provides both ¼” and Speakon® output connectors,
wired in parallel. It is recommended to use the Speakon® jack whenever possible.
The total impedance of the speakers connected to all of the jacks must not be less
than 2 ohms.
6. MONO BRIDGE OUTPUTS – Connect a Speakon® connector cable here when
operating in Bridge mode. The total impedance load of the speakers connected to
the output must not be less than 4 ohms.
7. STEREO/MONO BRIDGE Switch – This switch is used to set the amplier to oper-
ate in either Stereo or Mono Bridge mode.
8. MUTE+OVERDRIVE FOOTSWITCH – Connect a two-button footswitch, terminat-
ing to a ¼” TRS connector (Tip = MUTE, Ring = OVERDRIVE) to this jack to control
the MUTE and OVERDRIVE select switches. The front panel switch is disengaged
when the footswitch is plugged in.
7 9
135 14 18
ENGLISH
FRANÇAISDEUTSCHEESPAÑOLITALIANO
11

Rear Panel
9. EQ+EFX FOOTSWITCH – Connect a two-button footswitch, terminating to a ¼”
TRS connector (Tip = EQ, Ring = EFX) to this jack to control the GEQ and EFX select
switches. The front panel switch is disengaged when the footswitch is plugged in.
10. EFFECTS RETURN LEFT/MONO – Use this ¼” unbalanced jack to return low im-
pedance (600 ohm) signals to the left side amplier from a professional outboard
eects processor. When the amplier is in Mono Bridge mode, this jack feeds the
power amplier input.
11. EFFECTS RETURN RIGHT – Use this ¼” unbalanced jack to return low impedance
(600 ohm) signals to the right side amplier from a professional outboard eects
processor. When the amplier is in Mono Bridge mode, this jack is inactive.
12. EFFECTS SEND MONO – Use this ¼” unbalanced jack to send low impedance (100
ohm) signal, to a professional outboard eects processor such as a reverb, echo,
chorus, anger, or harmonizer device. Output level is approximately 0 dB to +4 dB,
and is post-EQ and post-compression, but is unaected by the master VOLUME
control. You can also use the EFFECTS SEND jack to route signal to an external mixing console or amplier with an input sensitivity of +4 dB.
13. PREAMP OUT LEFT – This output jack is fed from the left preamp (after the eects
return), and may be used with an external power amplier, to connect to a mixing console, or to any other line level device. Use a standard ¼” instrument cable
when connecting to external devices.
14. PREAMP OUT RIGHT – This output jack is fed from the right preamp (after the
eects return), and may be used with an external power amplier, to connect to
a mixing console, or to any other line level device. Use a standard ¼” instrument
cable when connecting to external devices.
15. POWER AMP IN LEFT – This line level input connects directly to the left internal
power amp, and can be used with external preamps, or to connect a CD/MP3
player. Use a standard ¼” instrument cable when connecting devices to this input.
The internal signal path is interrupted when a cable is connected to the POWER
AMP IN jack. When the amplier is in Mono Bridge mode, the POWER AMP IN LEFT
and POWER AMP IN RIGHT jacks mix together for a mono feed to the power amplier input.
16. POWER AMP IN RIGHT – This line level input connects directly to the right inter-
nal power amp and can be used with external preamps, or to connect a CD/MP3
player. Use a standard ¼” instrument cable when connecting devices to this input.
The internal signal path is interrupted when a cable is connected to the POWER
AMP IN jack. When the amplier is in Mono Bridge mode, the POWER AMP IN LEFT
and POWER AMP IN RIGHT jacks mix together for a mono feed to the power amplier input.
17. DIRECT OUT GROUND LIFT Switch – When pressed in (the “GND LIFT” position),
pin 1 is removed from the chassis. This should be used only when a ground loop
hum or buzz is heard. Otherwise, leave it in the out (“NORMAL”) position.
12

Kilo • 1000 Watt Bass Amplier
Rear Panel
18. DIRECT OUT Jack – Use this electronically balanced XLR jack to route signal from
the Kilo to a professional mixing console, as a tap to a main PA system via a mic
input on the console, or to an external amplier. The DIRECT OUT knob (on the
front panel) controls the signal level at this jack. You can also use the DIRECT OUT
jack to route signal to an external amplier with a -10 dB input sensitivity.
19. TUNER OUT Jack – Use this jack to connect to an electronic tuner using a ¼” TRS
cable. The TUNER output is always active, even when the MUTE switch is engaged,
which allows you to tune your instrument silently. This output may also be used as
a line level direct output feed.
ENGLISH
FRANÇAISDEUTSCHEESPAÑOLITALIANO
13

Setting Up and Using the Kilo
Setting up your Hartke Kilo Bass Amplier is a simple procedure, which takes only a
few minutes.
1. Remove all packing materials (save them in case your unit requires servicing in
the future) and decide where the amplier is to be physically placed. To avoid
potential overheating, be sure that the top and side panels are unobstructed and
that there is proper ventilation around the entire unit.
2. Begin by hooking up your bass cabinet(s) to the Speakon® or ¼” unbalanced
speaker output connectors on the rear panel. It is never a good idea to power up
any amplier that is not connected to loudspeakers. Any appropriately rated bass
cabinets with a total minimum impedance of 2 ohms (that is, 2 ohms or greater)
can be used (per side) in Stereo mode, or a minimum impedance of 4 ohms in
Mono Bridge mode. In order to ensure correct phase correlation when using the
¼” outputs, the tip of the amplier’s speaker jack should be connected to the
“+” (hot) input of your loudspeaker, and the sleeve of the amplier’s speaker jack
should be connected to the “-” (ground) input of your loudspeaker. When using
the Speakon® outputs, the +1 output should be connected to the “+” (hot) input
of your loudspeaker, and the -1 output should be connected to the “-“ (ground)
input of your loudspeaker.
3. Next, connect the 3-pin AC plug into any grounded AC socket. Don’t turn the
amplier on just yet, though.
4. Use a standard instrument cable to connect your bass to the Kilo’s INPUT jack on
the front panel (if your bass has active circuitry, press the ACTIVE switch to ensure
that the preamp will not overload). On the front panel of the Kilo, set the VOLUME
control to “0” (fully counterclockwise) and set the GAIN knob to “5” (12 o’clock) position. Set the COMPRESSOR knob counterclockwise until it is in the “0” position,
and set the BASS, MID, and TREBLE knobs to the “5” position.
5. Press the Power switch on the front panel to turn on the amplier.
6. Set the output of your bass to its maximum level. Then, while playing, slowly turn
the Kilo’s master VOLUME control up until the desired level is reached. If you hear
distortion, even at a low master VOLUME setting, lower the GAIN control or back
o the output of your bass. If the problem persists, check for a faulty cable.
7. When you have settled on a GAIN and master VOLUME level, the next step is to
adjust the three band EQ controls to taste. For more information, see the “About
Equalization” section on page 18 of this manual.
8. Next, experiment with the Kilo’s graphic equalizer. Begin by setting each of the
ten sliders to their at (“0”) center detent position. Then press in the GEQ switch
(the switch will light green) so that the graphic equalizer is activated. Finally,
move each slider, in turn, as you play your bass. Again, when you get a graphic
equalization setting that complements your instrument and playing style, it’s a
good idea to write it down for future use.
14

Kilo • 1000 Watt Bass Amplier
Setting Up and Using the Kilo
9. Now try out the Kilo’s compression circuitry. Activate by turning the COMPRESSOR
knob clockwise. As you rotate the knob, the input signal from your bass becomes
more compressed. You’ll hear peak signals (such as string slaps and pulls) begin
to sound increasingly “squashed” relative to the lower-level signals produced by
standard playing. The result will be a decreased dynamic range, but an overall leveling of signal throughout the full pitch range of your instrument. The Compressor light will light red when compression is being applied.
10. If you’re using an external signal processor, turn the amplier o momentarily and
connect a standard audio cable from the Kilo’s EFFECTS SEND jack to your eects
processor input, and a second standard audio cable between the EFFECTS RETURN LEFT/MONO jack and your eects processor output. If you are using a stereo
eect, connect the left output of your eects processor to the EFFECTS RETURN
LEFT/MONO input, and the right output of the processor to the EFFECTS RETURN
RIGHT input. Then turn the amp back on and play your bass while adjusting the
controls of your outboard eects processor. For best results, set both the input
and output gain of all connected eects processor(s) to 0 dB (unity gain), so that
there is no increase or decrease in level whether the eects are switched in or out.
ENGLISH
FRANÇAISDEUTSCHEESPAÑOLITALIANO
15
Choosing the Correct Speaker Cabinets
When choosing a speaker cabinet to use with your Hartke Kilo, there are many specications to consider (impedance, power handling, frequency response, etc). While most
specs are pretty straight forward, many people have diculty understanding impedance. Basically, impedance is the amount of current that will ow through a speaker
at a certain voltage. It is measured in Ohms. The actual impedance of a speaker is not
constant across all frequencies. So, for convenience we use the term “nominal impedance”, which refers to the impedance that a speaker presents to an amplier at a reference frequency.
A typical speaker has an impedance rating of 4, 8, or 16 Ohms. Generally, the lower the
impedance of a speaker, the more power will be developed by a given amplier. For
example, a 4 Ohm speaker will extract more power from your amplier than an 8 Ohm
speaker. If you connect a speaker with an impedance lower than the rating of the amplier’s output, the amplier can overheat and damage the power output section. It is
important to learn how to connect multiple speaker cabinets safely without damaging
the speakers or the amplier in this way.
As a general rule, amplier speaker output jacks and speaker cabinet input jacks are
considered “parallel” connections, and will follow the rules described in this section.
When speakers are connected in parallel, the impedance is reduced. The formula to
calculate the total impedance of your speaker system is:
1/Rt = 1/R1 + 1/R2 + 1/R3 + … 1/Rn. Where “R” is the impedance of a speaker cabinet.
If all speakers have the same impedance, the total impedance will be equal to the
impedance of a single speaker divided by the total number of speakers. For example, if
you have two 4 Ohm speakers connected in parallel, the total impedance is 4 divided
by 2, or 2 Ohms. You must be careful when connecting speakers in parallel to an
amplier. The impedance can quickly fall below safe levels. This is especially true when
connecting speakers in parallel to a bridged amplier.
Typical Impedance Calculations
16Ω + 16Ω = 8Ω
8Ω + 16Ω = 5.3Ω
8Ω + 8Ω = 4Ω
8Ω + 16Ω + 16Ω = 4Ω
16Ω + 16Ω + 16Ω + 16Ω = 4Ω
4Ω + 8Ω = 2.7Ω
4Ω + 4Ω = 2Ω
The Hartke Kilo has two independent ampliers capable of 500 watts, to which you
can connect speakers with a minimum impedance of 2 Ohms. The ampliers can be
bridged together to deliver 1000 watts of power to a minimum 4 Ohm speaker load.
When choosing speakers, make sure that they can match or exceed the output
power of the amplier, or you can damage the speakers.
16

Kilo • 1000 Watt Bass Amplier
About Compression
The dynamic range of a sound is the dierence between its loudest and softest levels.
For example, as you play your bass, you’ll probably nd that some notes (such as notes
played on the upper frets of the lowest string) are considerably louder than others.
The function of the compression circuitry in the Kilo Bass Amplier is to reduce overall
dynamic range by automatically reducing the level of the loudest sounds you play so
that they are closer in level to softer ones. The end result is a smooth, even sound.
The front-panel COMPRESSOR control determines the amount of
compression (peak signal reduction) by adjusting the threshold.
Threshold is the limit above which compression is applied. As you
turn the COMPRESSOR control clockwise, the threshold level is
lowered. The compression ratio is set to around 2:1, which means that
any input signal over the threshold level will be halved.
The Kilo compression circuit follows the incoming signal, and will
adjust the compression ratio down when you play notes with fast attack to avoid
“squashing” your sound. This is useful when playing fast staccato passages, as it will
cause all the notes to sound at the same level, even if the signal is above the threshold
level.
The Kilo provides a front-panel compression LED indicator that visually indicates when
the audio signal crosses the threshold level and activates the compressor circuit. When
unlit, no compression is being applied. When the indicator lights red, compression is
being applied to the incoming signal.
Compression has three main uses. First, as described above, it “evens” out the notes
played by your bass so that they all are at virtually equal levels. Second, it adds “punch”
to a sound. Since all levels are nearly the same, you can play with greater force without
worrying about the loudest notes distorting. Finally, it serves to protect your loudspeakers from damage as a result of brief (transient) high output levels, which might
otherwise be caused by slapping, nger-popping or other performance techniques.
Whether or not you need to use compression with your Kilo will be a matter of personal taste and playing style. Experiment and see if you like the eect. If you usually
play at low volume levels, you’ll nd that even with the COMPRESSOR knob turned
up, the compression circuitry may have no audible eect. In general, if you don’t need
compression, leave it o.
ENGLISH
FRANÇAISDEUTSCHEESPAÑOLITALIANO
17
About Equalization
The Hartke Kilo Bass Amplier gives you enormous control over shaping the sound
of your bass, using a process called equalization. To understand how this works, it’s
important to know that every naturally occurring sound consists of a broad range of
pitches (frequencies) combined together in a unique way. This blend is what gives
every sound its distinctive tonal color.
The rst section of the Kilo’s EQ controls is a three-band tube tone
stack equalizer. The tone stack EQ is a xed bandwidth EQ, with no
frequency control. It is a little dierent than normal boost and cut
hi- bass and treble controls as there is no theoretical “at” setting. When the three
knobs (labeled BASS, MID, and TREBLE) are at their center (12 o’clock) position, the
response is set to a preset equalization curve that has been tailored for the bass guitar.
The BASS and MID controls are somewhat interactive, so as you raise and lower the
MID knob, the center frequency of the BASS control will shift. The TREBLE control is
arranged to be independent from the BASS and MID controls, so that you can raise the
high frequencies without aecting the low end. You should experiment with the EQ
knobs and your particular bass to dial up the best sound.
In addition to the three EQ controls, the Kilo also includes BRITE
and DEEP switches. The BRITE switch adds an overall boost to the
high-end frequency response. This button works in conjunction
with the GAIN knob (similar to the Loudness button on a stereo).
As you raise the GAIN, the overall boost is diminished. When the GAIN is set to “10”
(turned fully clockwise), the BRITE switch has no eect on the audio. The DEEP switch
shifts the position of the low frequency and mid scoop to enhance the low end (“booty”) of the bass guitar. The SHAPE switch and knob apply an adjustable notch (scoop)
lter to the specied frequency area, so that you can customize the eect of the EQ
curve that best complements your particular bass instrument. Moving the SHAPE control clockwise causes the notch lter to be applied to higher frequencies, while moving
the knob counterclockwise causes it to be applied to lower frequencies.
The ten-band constant-q graphic equalizer provides ten
sliders, each corresponding to a single narrow frequency
band. This allows you to “draw” the desired tonal response
from your system. When a slider is in its center (detent)
position (“0”), it is having no effect. When it is moved
above center (towards “+12”), the particular frequency
area is being boosted. When it is moved below center (towards “-12”), the frequency
area is being attenuated. Normally, you will adjust the three-band EQ controls before
“fine-tuning” your EQ with the graphic equalizer.
In many instances, the best way to deal with equalization is to think in terms of which
frequency areas you need to attenuate, as opposed to which ones you need to boost.
Be aware that boosting a frequency area also have the effect of boosting the overall
signal; specifically, too much low frequency EQ boost can actually cause overload
distortion, or even harm a connected speaker. In general, if you’re going to apply a fair
amount of low frequency EQ boost, it’s a good idea to keep compression on, if only to
protect your speakers from potential damage.
18

Kilo • 1000 Watt Bass Amplier
Suggested Kilo EQ Settings
Since the Hartke Kilo provides so many
options for ne-tuning your bass
sound, you may feel daunted when
rst plugging in your instrument.
Don’t be! While there is no right or
wrong way to go about shaping your
tone, we have provided a few jumping
o points to assist in nding the settings that work best for your playing
style.
You may nd that these settings need
some additional tweaking, as each
sound is very much dependent upon
your particular instrument, type of
strings, and playing style. Try using the
graphic EQ to addtionally adjust for
these sonic dierences.
Whenever you get a really good EQ
setting for a particular instrument or
song, write it down (you’d be amazed
how easy it is to forget these things)!
Harmonic Rock
Motown
ENGLISH
Fretless Growl
FRANÇAISDEUTSCHEESPAÑOLITALIANO
Raging Drive
Hardcore
Classic R&B
Funky Slap
19

Specications
Input Sensitivity 100 k Ohms, 20 mv
Preamp Tubes 3 x 12AX7
Rated Output Power 1000 Watts Mono-Bridged @ 4 Ohms
750 Watts Mono-Bridged @ 8 Ohms
2 x 500 Watts @ 2 Ohms
2 x 350 Watts @ 4 Ohms
2 x 200 Watts @ 8 Ohms
Total Harmonic Distortion less than 0.5%
Signal to Noise Ratio approx. 78 dB
Equalizer
Passive Tone Controls Bass, MID, and TREBLE
Graphic EQ ±12 dB, center detent
@ 30 Hz, 64 Hz, 125 Hz, 250 Hz, 500 Hz, 1 kHz,
2 kHz, 3 kHz, 5 kHz, 8 kHz
Graphic EQ Level ±12 dB, center detent
BRIGHT Switch +6 dB @ 2kHz
BASS Switch +2.5 dB @ 50Hz
COMPRESSION RATIO 10:1
FOOTSWITCH Jacks MUTE+OVERDRIVE: Tip = Mute, Ring = EQ
EQ+EFX: Tip = EQ, Ring = EFX
Send Output Level 0 dBm
Return Input Level 0 dBm
Dimensions 19” x 18” x 5.25”
482 mm x 460 mm x 132 mm
Weight 40 lbs
18 kgs
20
Kilo • 1000 Watt Bass Amplier
Footswitch
Mute & O.D.
Tip = Mute
Ring = O.D.
Footswitch
FX & GEQ
Tip = GEQ
Ring = FX
Graphic EQ
Mute
O.D.
GEQ
FX
Footswitch
Footswitch
Tone Controls
12AX7
Treble
Mid
Bass
Ground
Lift
Mute
Footswitch
Speaker L
500 watts
2 Ohms min.
Block Diagram
Mono/Bridge
1000 watts
4 Ohms min.
Amp 500W
Speaker R
500 watts
2 Ohms min.
Amp 500W
Balance
ENGLISH
Stereo
Bridge Mono
FRANÇAISDEUTSCHEESPAÑOLITALIANO
Bright
Gain
Clip
Compressor
O.D.
Footswitch
12AX7
Active
Input
Front Tuner Out
Direct Out Level
Direct Out
Select
Footswitch
Mute
Footswitch
FX Send
FX Return Left/Mono
Rear Tuner Out
FX Return Right
Pre out Right
Pre out Left
Master
Volume
Amp in Left
Amp in Right
21

Consignes de sécurité importantes
1. Veuillez lire toutes les instructions.
2. Conserver ces instructions.
3. Respectez toutes les mises en garde.
4. Suivez les instructions.
5. Veillez à ne pas exposer cet appareil
aux projections liquides. Évitez de
placer un verre, un vase, etc., contenant un liquide sur l’appareil.
6. Nettoyez avec un tissu sec.
7. Veillez à ne pas obstruer les fentes
prévues pour la ventilation de
l’appareil. Installez l’appareil selon les
instructions du fabricant.
8. Veillez à ne pas installer près d’une
source de chaleur (radiateurs, etc.) ou
de tout équipement susceptible de
générer de la chaleur (amplicateurs
de puissance par exemple).
9. Utilisez uniquement les xations/
accessoires fournis par le fabricant.
10. Déconnectez l’appareil du secteur en
présence d’orage ou lors de périodes
prolongées sans utilisation.
11. Ne retirez pas la terre du cordon sec-
teur ou de la prise murale. Les ches
canadiennes avec polarisation (avec
une lame plus large) ne doivent pas
être modiées. Si votre prise murale
ne correspond pas au modèle fourni,
consultez votre électricien.
12. Protégez le cordon secteur contre
tous les dommages possibles (pincement, tension, torsion,, etc.). Veillez à
ce que le cordon secteur soit libre, en
particulier à sa sortie du boîtier.
13. N’utilisez qu’avec un chariot, un
support, un trépied, une étagère ou
une table spéciés par le fabricant ou
vendus avec l’appareil.
Lorsqu’un chariot est
utilisé, prenez les précautions nécessaires
lors du déplacement
du chariot an d’éviter tout accident.
14. Conez toutes les réparations à un
personnel qualié. Vous devez faire
contrôler ce produit s’il a été endommagé de quelque façon que ce soit,
comme lorsque le câble d’alimentation ou la prise ont été endommagés, qu’un liquide a été renversé ou
que des objets sont tombés sur ou
dans l’appareil, que l’appareil a été
exposé à la pluie ou à l’humidité, qu’il
ne fonctionne pas normalement, ou
qu’il a subi une chute.
15. INTERRUPTEUR SECTEUR : Il ne découple PAS l’appareil du secteur. Le
risque d’électrocution reste présent.
Déconnectez par la che secteur.
16. DÉCONNECTION DU SECTEUR : La
che secteur doit rester facilement
accessible. Pour les installations en
Rack, ou si la che secteur n’est pas
accessible, installez un interrupteur
secteur bipolaire (phase et neutre)
en amont du Rack.
17. APPAREILS AVEC FUSIBLE EXTERNE:
Remplacez le fusible par un autre
absolument identique.
18. APPAREILS MULTI TENSION : Ces
équipements peuvent nécessiter
un cordon ou une che secteur
diérents, ou les deux, selon la zone
géographique. Connectez cet appareil uniquement à une source secteur
telle qu’indiqué en face arrière. Pour
réduire les risques d’électrocution,
consultez l’entretien et les réparations à un personnel qualié.

Kilo • 1000 Watt Bass Amplier
Table des matières
Introduction. . . . . . . . . . . . . . . . . . . . . . . . . . . . . . . . . . . . . . . . . . . . 24
Généralités. . . . . . . . . . . . . . . . . . . . . . . . . . . . . . . . . . . . . . . . . . . . . 25
Face avant . . . . . . . . . . . . . . . . . . . . . . . . . . . . . . . . . . . . . . . . . . . . . 26
Face arrière . . . . . . . . . . . . . . . . . . . . . . . . . . . . . . . . . . . . . . . . . . . . 29
Mise en œuvre et utilisation du Kilo . . . . . . . . . . . . . . . . . . . . . . . . . . . . . 32
Sélection des enceintes. . . . . . . . . . . . . . . . . . . . . . . . . . . . . . . . . . . . . 34
À propos de la compression. . . . . . . . . . . . . . . . . . . . . . . . . . . . . . . . . . 35
À propos de l’égalisation . . . . . . . . . . . . . . . . . . . . . . . . . . . . . . . . . . . . 36
Réglages d’égalisation conseillés. . . . . . . . . . . . . . . . . . . . . . . . . . . . . . . 37
Caractéristiques techniques. . . . . . . . . . . . . . . . . . . . . . . . . . . . . . . . . . 38
Synoptique . . . . . . . . . . . . . . . . . . . . . . . . . . . . . . . . . . . . . . . . . . . . 39
ENGLISH
FRANÇAISDEUTSCHEESPAÑOLITALIANO
23

Introduction
Merci d’avoir choisi cet amplicateur basse Hartke Kilo ! Nous savons que vous n’aimez
pas lire les modes d’emploi, mais prenez quand même le temps de lire ces quelques
pages (nous avons essayé d’écrire un mode d’emploi agréable à lire) pour comprendre
en détail les fonctions de cet amplicateur.
L’ampli Hartke Kilo devient la référence en amplication basse. Il délivre 500 Watts
dans 2 Ohms par canal en stéréo, et 1.000 Watts dans 4 Ohms en mode bridgé mono.
Pour scuplter votre son, le Kilo est équipé d’un préampli tout à lampes congurées en
Classe A, et de réglages de timbre organisés de façon ergonomique. Le Kilo vous ore
un réglage de timbre classique à trois bandes, avec en plus le circuit variable Shape
Hartke. Pour vous aider encore plus à modeler votre son, vous disposez d’un égaliseur
graphique à 10 bandes, et de courbes d’égalisation commutables Deep et Brite. Pour
donner du mordant à votre son, vous disposez d’un circuit d’Overdrive variable à
lampe. Pour gérer la dynamique du signal, vous disposez d’un circuit de compression
rapide et précis.
Pour connecter l’amplicateur aux enceintes, le Kilo est équipé d’embases Jack
6,35mm et Speakon®. Le Kilo est également équipé de connexions et de fonctions
de routage du signal multiples et complètes, dont une sortie directe multi-point, une
boucle d’eets stéréo, des sorties pour accordeur en faces avant et arrière, et des Jacks
pour pédalier, permettant au bassiste de gérer au pied le Mute, l’Overdrive, les eets,
et l’égaliseur graphique.
Le Kilo est l’ampli idéal pour toutes les situations — en studio, en club, dans les stades
du monde entier. Dans ces pages, vous trouverez une description détaillée des caractéristiques de l’ampli basse Hartke Kilo, ainsi que les instructions pas-à-pas de mise en
œuvre et d’utilisation, ainsi que les caractéristiques techniques complètes.
Si le Kilo a été acheté aux USA, vous trouverez une carte d’enregistrement. N’oubliez
pas de la remplir et de nous l’envoyer pour pouvoir bénécier de l’assistance technique
en ligne et recevoir les dernières informations sur les produits Hartke et Samson. Avec
un entretien adapté et une ventilation susante, votre amplicateur vous donnera
satisfaction pendant de très nombreuses années. Prenez le temps de noter le numéro
de série et la date d’achat pour toute référence ultérieure.
Numéro de série : _______________________________
Date d’achat : _______________________________
REMARQUE : Pour faire réparer votre amplicateur, vous devez tout d’abord obtenir
un numéro de retour. Sans ce numéro, nous ne pouvons pas accepter l’appareil. Aux
États-Unis, vous pouvez appeler Samson. Appelez Samson au 1-800-3SAMSON (1-800372-6766) pour obtenir un numéro de retour avant d’envoyer le produit. Si vous avez
acheté ce produit dans un autre pays, contactez votre revendeur pour obtenir de plus
amples informations sur la garantie
24
Kilo • 1000 Watt Bass Amplier
Généralités
L’ampli basse Hartke Kilo vous ore le GROS son, une polyvalence extrême, une
puissance abondante, ainsi que les plus récentes avancées technologiques en matière
d’amplicateurs basse. Voici quelques-unes de ces fonctions :
• Amplication stéréo de 500 Watts par canal dans 2 Ohms, et une puissance
incroyable de 1000 Watts dans 4 Ohms en mode bridgé mono.
• Circuit préampli tout à lampes haute tension en Classe-A (3 x 12AX7) orant un son
de très haute qualité.
• Circuit de timbre classique à 3 bandes avec réglage variable de Shape vous permettant d’obtenir une vaste palette de sons pour votre basse.
• Courbes de correction sélectionnables (Deep ou Brite) vous permettant d’aner
votre son.
• Compresseur variable donnant beaucoup de “punch” à votre son de basse, et vous
permettant d’obtenir un niveau de sortie homogène.
• Égaliseur graphique 10 bandes à largeur constante vous permettant de modier
visuellement la réponse de votre instrument. Le réglage de niveau indépendant
vous permet de régler le niveau général du signal. Une touche spécique en face
avant et un contacteur au pied vous permettent d’activer la courbe d’égalisation.
• Saturation variable à lampe allant d’un son chaud à une distorsion totalement
débridée.
• Sortie directe multi-point avec réglage de niveau vous permettant de sélectionner
le point de prélèvement de la sortie directe.
• Sorties haut-parleurs parallèles en Speakon® et en Jack 6,35 mm.
• Départs et retours de boucle d’eets stéréo pour la connexion de processeurs de
traitements externes professionnels. Une touche en face avant et un contacteur au
pied sur le pédalier vous permettent d’aecter le signal de votre basse au circuit de
traitement externe sans interruption dans votre jeu.
• Sortie Preamp Out et entrée Amplier In pour des routages supplémentaires du
signal et l’utilisation d’amplicateurs de puissance et d’enceintes supplémentaires.
• Boîtier indestructible au format Rack 3 unités avec face avant moulée et poignées
prévues pour emporter sans problèmes le Kilo en tournée.
ENGLISH
FRANÇAISDEUTSCHEESPAÑOLITALIANO
25

123
8
111213
262415 17 19
Face avant
10
7
456
1. INPUT – Connectez votre basse à l’aide d’un cordon instrument standard en Jacks
6,35 mm asymétriques.
2. Sortie TUNER – Utilisez ce Jack pour connecter un accordeur avec un câble en
Jacks 6,35 mm. La sortie TUNER est toujours active, même lorsque vous appuyez
sur la touche MUTE, ce qui vous permet de vous accorder en silence. Cette sortie
peut également être utilisée comme sortie directe à niveau ligne.
3. Touche ACTIVE – Cette touche s’allume en vert et réduit la sensibilité d’entrée de
15dB. Elle permet l’utilisation de basses à électronique active.
4. OVERDRIVE – Lorsque la touche O.D. est sélectionnée (voir n° 5), ce bouton
contrôle le contenu harmonique et la saturation du signal d’entrée. Le réglage
vous permet d’ajouter de la chaleur à lampe, du mordant ou de la distorsion.
5. Touche O.D. – La touche s’allume en vert et active le bouton OVERDRIVE. Vous
pouvez connecter un pédalier à l’ampli pour activer/désactiver l’OVERDRIVE (la
touche de façade est inopérante lorsque le pédalier est connecté à l’ampli).
6. COMPRESSOR – Ce bouton règle le seuil de la compression. Le compresseur vous
permet de contrôler la dynamique générale de votre jeu en réduisant les pointes
de signal et en accroissant le Sustain de l’instrument. En position minimale,
aucune compression n’est appliquée. Tournez le bouton vers la droite pour augmenter la compression appliquée. Pour de plus amples informations, consultez le
chapitre “À propos de la compression” en page 17 de ce mode d’emploi.
7. Témoin COMPRESSOR – Témoin visuel de statut du compresseur. Cette Led
8. Touche MUTE – Lorsque la touche est active, cette touche rétro-éclairée orange
rouge s’allume lorsque le signal d’entrée passe le seuil et active le compresseur.
coupe toutes les sorties sauf les sorties TUNER des faces avant et arrière. Vous
pouvez connecter un pédalier pour contrôler la coupure (la touche de façade est
inopérante dans ce cas).
9
14 16 1820212223 25
26

Kilo • 1000 Watt Bass Amplier
Face avant
9. GAIN – Ce bouton détermine le niveau en entrée de l’étage préamplicateur à
lampe. La Led Peak s’allume (voir n° 10) lorsque le niveau du signal écrête le préampli, ce qui génère de la distorsion. Baissez le réglage de GAIN jusqu’à ce que la
Led Peak ne s’allume que sur les passages les plus forts.
10. Témoin Peak – La Led Peak s’allume lorsque le niveau du signal écrête le préam-
pli. Si la Led reste allumée, réduisez le réglage de GAIN jusqu’à ce que la Led Peak
ne s’allume que de temps en temps, sur les passages les plus forts.
11. Touche BRITE – Lorsqu’elle est active, cette touche rétro-éclairée verte accentue
le niveau de 6 dB.
12. SHAPE – Le circuit Shape applique une égalisation xe au signal, avec une légère
bosse dans le bas et le haut du spectre et des médiums creusés, selon le réglage.
Le bouton SHAPE détermine la fréquence centrale du circuit Shape.
13. Touche SHAPE – Cette touche rétro-éclairée verte active/désactive le circuit
Shape (voir n° 12). Vous pouvez contrôler le circuit SHAPE au pied en connectant
un pédalier à l’ampli (la touche de face avant est désactivée lorsque le pédalier est
connecté).
14. BASS – Réglage passif de timbre des fréquences basses.
15. Touche DEEP – Cette touche rétro-éclairée verte active/désactive le circuit et
accentue la réponse dans le bas du spectre du signal.
16. MID – Réglage passif de timbre des fréquences médiums ; ce réglage détermine la
fréquence du ltre médium.
17. Touche EFX – Lorsqu’elle est active, cette touche rétro-éclairée verte transmet le
signal au Jack de départ EFFECTS SEND de la face arrière, vous permettant d’activer/désactiver le signal de vos eets externes. Vous pouvez contrôler le circuit EFX
au pied en connectant un pédalier à l’ampli (la touche de face avant est désactivée lorsque le pédalier est connecté).
18. TREBLE – Réglage passif de timbre des hautes fréquences.
19. Touche GEQ – Lorsqu’elle est active, cette touche rétro-éclairée verte, indique
que l’égaliseur graphique est activé. Lorsque la touche est désactivée le circuit
est bypassé. Cette touche vous permet de créer une courbe d’égalisation spécique avec les curseurs de l’égaliseur graphique, et que vous pouvez activer/
désactiver avec une seule touche. Vous pouvez contrôler le circuit GEQ au pied en
connectant un pédalier à l’ampli (la touche de face avant est désactivée lorsque le
pédalier est connecté).
20. DIRECT OUT – Détermine le niveau de la sortie DIRECT OUTPUT.
21. Touche Direct Out – Cette touche détermine où est prélevé le signal de la sortie
DIRECT OUTPUT. Le signal peut être prélevé directement depuis l’entrée, après le
compresseur, après l’égaliseur graphique, ou après le retour d’eets. Ceci vous permet de sélectionner le signal transmis à la console de façade.
ENGLISH
FRANÇAISDEUTSCHEESPAÑOLITALIANO
27

Face avant
22. VOLUME – Réglage général de volume. Pour obtenir le meilleur rapport signal/
bruit, baissez le niveau de sortie de votre basse au maximum, et réglez le volume
de l’ampli selon le niveau sonore recherché.
23. BALANCE – Ce bouton règle le niveau entre l’amplicateur gauche et l’amplica-
teur droit. Si vous utilisez deux enceintes séparées, (par exemple une 115 et une
410), vous pouvez doser le niveau entre les deux, selon le son recherché. En position centrale, les deux amplicateurs sont alimentés à puissance égale. Le réglage
de BALANCE est inopérant lorsque le Kilo est en mode bridgé.
24. Graphic EQ LEVEL – Lorsque la touche GEQ est active (voir n° 19), ce curseur
contrôle le niveau de sortie de l’égaliseur graphique. Ceci peut vous permettre
d’accentuer le niveau du signal lors d’un solo, ou de compenser les variations de
niveau dues aux variations de réglages de timbre et d’égalisation.
25. Égaliseur graphique – Ces curseurs vous permettent de “dessiner” la courbe
de correction avec plus ou moins 12 dB de gain/atténuation sur le signal sur
10bandes de fréquences à largeur de bande constante (30Hz, 64Hz, 125Hz,
250Hz, 500Hz, 1kHz, 2 kHz, 3 kHz, 5 kHz, et 8 kHz), aectant le signal de la sortie
principale du Kilo. En position centrale crantée, les curseurs sont inopérants sur le
signal (la réponse est plate). Lorsque vous montez un curseur, vous accentuez le
niveau du signal sur cette fréquence et inversement.
26. Interrupteur POWER – Place le Kilo sous/hors tension. La Led d’alimentation
indique que le Kilo est sous tension.
28
Kilo • 1000 Watt Bass Amplier
Face arrière
1
4 8
10 11 12 17
15 16 19
2
3 6
1. Sélecteur de tension – Permet de sélectionner la tension d’alimentation du Kilo.
Placez le sélecteur sur la position correspondant à votre tension secteur.
2. Embase secteur – Connectez le cordon secteur fourni à 3 broches à cette embase.
Ne supprimez jamais la terre du cordon secteur.
3. Fusible – Contient le fusible. Remplacez un fusible uniquement par un autre abso-
lument identique. 15 A en 115 Vca et 8 A en 230 Vca.
4. SORTIES LEFT SPEAKER – Utilisez ces sorties pour connecter les enceintes à la
sortie de l’amplicateur gauche. Les sorties sont au format Jack 6,35 mm et Speakon® câblées en parallèle. Il est conseillé d’utiliser les sorties Speakon®. L’impédance totale des enceintes connectées à ces sorties ne doit jamais être inférieure
à 2 Ohms.
5. SORTIES RIGHT SPEAKER – Utilisez ces sorties pour connecter les enceintes à la
sortie de l’amplicateur droit. Les sorties sont au format Jack 6,35 mm et Speakon® câblées en parallèle. Il est conseillé d’utiliser les sorties Speakon®. L’impédance totale des enceintes connectées à ces sorties ne doit jamais être inférieure
à 2 Ohms.
6. SORTIES MONO BRIDGE – Connectez un câble en Speakon® à cette sortie pour
utiliser le mode Bridgé. L’impédance totale des enceintes connectées à ces sorties
ne doit jamais être inférieure à 4 Ohms.
7. Touche STEREO/MONO BRIDGE – Cette touche congure les étages de sortie en
mode Stéréo ou Mono Bridgé.
8. MUTE+OVERDRIVE FOOTSWITCH – Connectez un pédalier à deux contacteurs
au pied avec une che Jack 6,35 mm stéréo (pointe = MUTE, bague = OVERDRIVE)
pour contrôler les fonctions MUTE et OVERDRIVE. La touche de face avant est
désactivée lorsque le pédalier est connecté.
7 9
135 14 18
ENGLISH
FRANÇAISDEUTSCHEESPAÑOLITALIANO
29
 Loading...