

Hartke KILO Owner's Manual


Important Safety Information
AVIS
RISQUE DE CHOC ÉLECTRONIQUE -
CAUTION: TO REDUCE THE RISK OF ELECTRIC SHOCK, DO NOT
REMOVE COVER (OR BACK). NO USER-SERVICEABLE PARTS
INSIDE. REFER SERVICING TO QUALIFIED SERVICE PERSONNEL.
This lightning ash with arrowhead symbol within an equilateral triangle is
intended to alert the user to the presence of non-insulated “dangerous voltage” within the product’s enclosure that may be of sucient magnitude to
constitute a risk of electric shock.
The exclamation point within an equilateral triangle is intended to alert the
user to the presence of important operating and maintenance instructions
in the literature accompanying the appliance.
NE PAS OUVRIR
If you want to dispose this product, do not mix it with general household waste. There is a
separate collection system for used electronic products in accordance with legislation that
requires proper treatment, recovery and recycling.
Private household in the 25 member states of the EU, in Switzerland and Norway may return their used
electronic products free of charge to designated collection facilities or to a retailer (if you purchase a similar
new one).
For Countries not mentioned above, please contact your local authorities for a correct method of disposal.
By doing so you will ensure that your disposed product undergoes the necessary treatment, recovery and
recycling and thus prevent potential negative effects on the environment and human health.

Important Safety Information
1. Read these instructions.
2. Keep these instructions.
3. Heed all warnings.
4. Follow all instructions.
5. This apparatus shall not be exposed
to dripping or splashing liquid and
no object lled with liquid, such as
a vase, should be placed on the apparatus.
6. Clean only with a dry cloth.
7. Do not block any of the ventilation
openings. Install in accordance with
the manufacturer's instructions.
8. Do not install near any heat sources
such as radiators, heat registers,
stoves, or other apparatuses (including ampliers) that produce heat.
9. Only use attachments/accessories
specied by the manufacturer.
10. Unplug this apparatus during lightning storms or when not in use for
long periods of time.
11. Do not override the intended purpose of the polarized or groundingtype plug. A polarized plug has
two blades, with one wider than
the other. A grounding-type plug
has two blades and a third grounding prong. The wide blade, or third
prong, is provided for your safety.
If the provided plug does not t
your outlet, consult an electrician to
replace the obsolete outlet.
12. Protect the power cord from being
walked on or pinched, particularly at
the prongs, convenience receptacles,
the point where they exit from the
apparatus.
13. Use only with the cart
stand, tripod bracket,
or table specied by
the manufacture, or
sold with the ap-
14. Refer all servicing to qualied service
15. POWER ON/OFF SWITCH: For prod-
16. MAINS DISCONNECT: The plug
17. FOR UNITS EQUIPPED WITH EXTER-
18. MULTIPLE-INPUT VOLTAGE: This
paratus. When a cart is used, utilize
caution when moving the cart/apparatus combination to avoid injury
from tip-over.
personnel. Servicing is required if the
apparatus has been damaged in any
way, such as power-supply cord or
plug breakage, damage due to liquid
or objects falling onto the apparatus, exposure to rain or moisture, or
if the apparatus does not operate
normally, or has been dropped.
ucts with a power switch, the power
switch DOES NOT break the connection from the mains.
should remain readily operable.
For rack-mount or installation
where plug is not accessible, an
all-pole mains switch with a contact
separation of at least 3mm in each
pole shall be incorporated into the
electrical installation of the rack or
building.
NALLY ACCESSIBLE FUSE RECEPTACLE: Replace fuse with same type
and rating only.
equipment may require the use of a
dierent line cord, attachment plug,
or both, depending on the available
power source at installation. Connect
this equipment only to the power
source indicated on the equipment
rear panel. To reduce the risk of re
or electric shock, refer servicing
to qualied service personnel or
equivalent.

Kilo • 1000 Watt Bass Amplier
Table of Contents
Introduction. . . . . . . . . . . . . . . . . . . . . . . . . . . . . . . . . . . . . . . . . . . . .6
Features . . . . . . . . . . . . . . . . . . . . . . . . . . . . . . . . . . . . . . . . . . . . . . . 7
Front Panel Controls. . . . . . . . . . . . . . . . . . . . . . . . . . . . . . . . . . . . . . . .8
Rear Panel . . . . . . . . . . . . . . . . . . . . . . . . . . . . . . . . . . . . . . . . . . . . . 11
Setting Up and Using the Kilo. . . . . . . . . . . . . . . . . . . . . . . . . . . . . . . . . 14
Choosing the Correct Speaker Cabinets . . . . . . . . . . . . . . . . . . . . . . . . . . 16
About Compression . . . . . . . . . . . . . . . . . . . . . . . . . . . . . . . . . . . . . . . 17
About Equalization . . . . . . . . . . . . . . . . . . . . . . . . . . . . . . . . . . . . . . . 18
Suggested Kilo EQ Settings . . . . . . . . . . . . . . . . . . . . . . . . . . . . . . . . . . 19
Specications . . . . . . . . . . . . . . . . . . . . . . . . . . . . . . . . . . . . . . . . . . . 20
Block Diagram . . . . . . . . . . . . . . . . . . . . . . . . . . . . . . . . . . . . . . . . . . 21
Notes . . . . . . . . . . . . . . . . . . . . . . . . . . . . . . . . . . . . . . . . . . . . . . . . 22
Samson Technologies Corp.
45 Gilpin Avenue
Hauppauge, New York 11788-8816
Phone: 1-800-3-SAMSON (1-800-372-6766)
Fax: 631-784-2201
www.samsontech.com
©2011, V1.1

Introduction
Congratulations on the purchase of your new Hartke Kilo Bass Amplier! We know you
don’t like reading owner’s manuals, but we suggest you take some time to go through
these pages (we’ll make it as painless as possible, we promise) to fully understand how
we’ve implemented a number of unique features.
The Hartke Kilo raises the standard for bass amplication. It provides 500 watts at 2
ohms of power per side in stereo mode, and a massive 1,000 watts at 4 ohms in the
bridged mono mode. To sculpt your sound, the Kilo has an all-tube class-A preamp,
and logically arranged tone controls. The Kilo oers a classic tone stack three-band EQ,
with Hartke’s variable Shape circuit. For additional tone shaping, there is a 10-band
Graphic Equalizer, as well as selectable Deep and Brite EQ curves. To add some “dirt” to
your sound, there is a variable tube Overdrive circuit, and to round out the dynamics,
there is a fast and articulate Compressor circuit.
To connect your amplier to speaker cabinets, the Kilo has both ¼” and Speakon®
output jacks. The Kilo also provides an abundance of connections and signal routing
features, including multi-point direct output switching, stereo Eects Loop, front and
rear panel tuner outputs, and footswitch jacks to remotely control the Mute, Overdrive,
EFX send, and Graphic EQ functions.
You’ll nd the Kilo to be an ideal choice for every situation—from recording studios, to
small clubs, to giant stadiums. In this manual, you’ll nd a detailed description of the
features of your Hartke Kilo bass amplier, as well as step-by-step instructions for its
setup and use, and full specications.
If your Kilo was purchased in the United States you’ll also nd a warranty card
enclosed. Don’t forget to ll it out and mail it! This will enable you to receive online
technical support, and allow us to send you updated information about this and other
Samson products. With proper care, your Kilo will operate trouble-free for many years.
We recommend you record your serial number in the space provided below for future
reference.
Serial number: _______________________________
Date of purchase: _______________________________
Should your unit ever require servicing, a Return Authorization (RA) number must
be obtained before shipping your unit to Samson. Without this number, the unit will
not be accepted. Please call Samson at 1-800-3SAMSON (1-800-372-6766) for an RA
number prior to shipping your unit. Please retain the original packing materials and, if
possible, return the unit in its original carton. If your Kilo was purchased outside of the
United States, contact your local distributor for warranty details and service information. Also, be sure to check out our website (www.samsontech.com) for information
about our full product line.
6
Kilo • 1000 Watt Bass Amplier
Features
The Hartke Kilo bass amplier oers classic tone, enhanced exibility, and an abundance of power along with all the newest concepts in bass amplication design. Here
are some of its unique features:
• Stereo power amps oer 500 watts of power per side into a 2 ohm speaker load,
and an immense 1000 watts delivered to a 4 ohm speaker system in bridged mono
mode.
• Class-A all tube (3 x 12AX7) high-voltage preamp circuit provides excellent tone.
• Classic 3-band tone stack equalizer with variable Shape control allows you to create
a broad range of tonal colors for your bass instrument.
• Selectable Deep and Brite EQ curves provide further control over shaping your bass
sound.
• Variable compressor adds real “punch” to your bass sound, and allows you to
smooth out volume dierences between notes.
• Ten-band constant-q graphic equalizer allows you to visually shape the tonal colors
of your instrument. The independent level control lets you adjust the overall level of
the signal. A dedicated front panel switch and a footswitch jack allow you to preset
an equalization curve.
• Variable tube overdrive can be set to deliver anything from warmth to your tone to
all out fuzz.
• Multi-point direct output with level control allows you to select where in the signal
path the audio will be routed to the direct output jack.
• Speakon® and ¼” parallel output connectors for connecting speaker cabinets.
• Stereo Eect loop send and return jacks that allow you to connect to professional
outboard eects processors. A dedicated front panel switch and footswitch jack allow you to send signals to your eects without interruption of your performance.
• Separate left and right channel Preamp Out and Amplier In jacks for additional
signal routing, and to connect supplemental amps to power extra cabinets.
• Rugged three rackspace construction with solid die cast front panel and oversized
front panel handles make the Kilo eminently road-worthy.
7

123
8
111213
262415 17 19
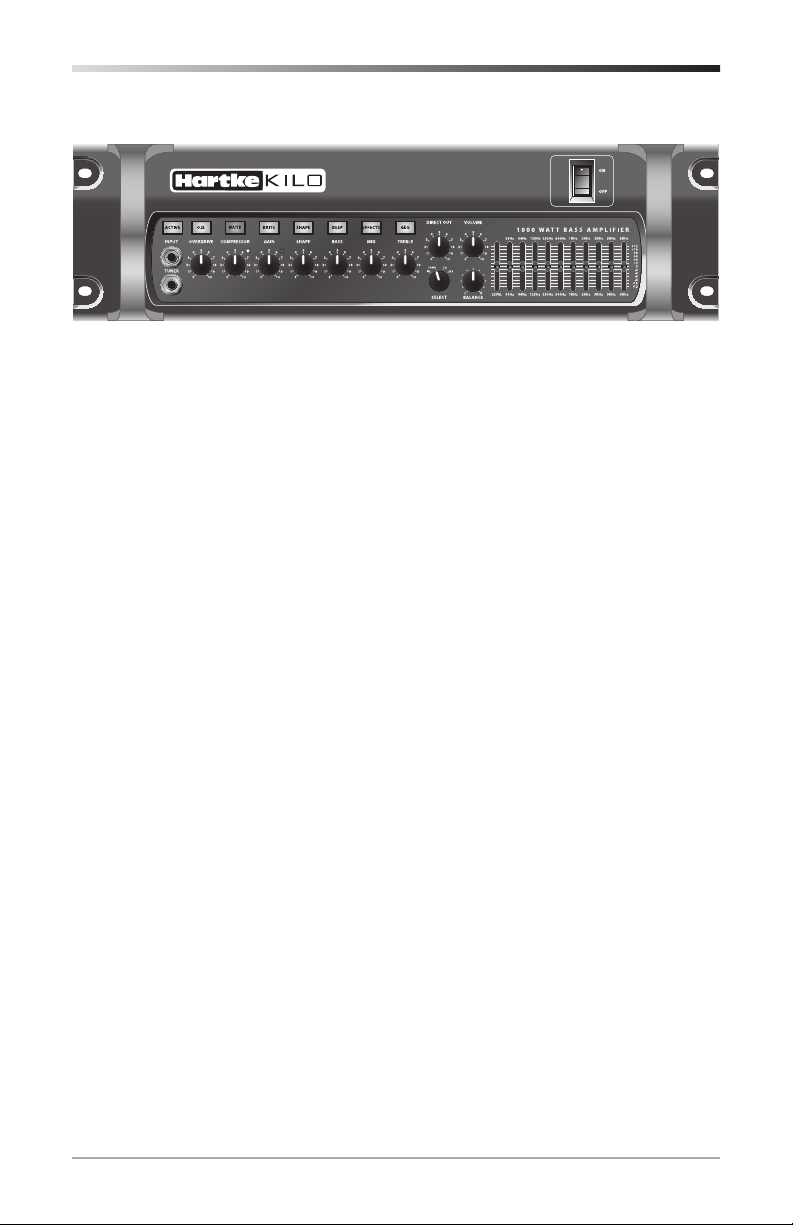
Front Panel Controls
10
7
456
1. INPUT – Connect your bass guitar here using a standard ¼” unbalanced instru-
ment cable.
2. TUNER Output – Use this jack to connect to an electronic tuner using a ¼” TRS
cable. The TUNER output is always active, even when the MUTE switch is engaged,
which allows you to tune your instrument silently. This output may also be used as
a line level direct output feed.
3. ACTIVE Switch – When selected, this green backlit switch reduces the input sen-
sitivity by 15dB to accommodate the higher output signal of basses with built-in
active electronics.
4. OVERDRIVE – When the O.D. switch is selected (see #5), this control knob adjusts
the amount of harmonic content and overdrive to the input signal. Slowly turning
this knob allows you to add a little tube warmth, some edgy dirt, or all-out fuzz.
5. O.D. Switch – When selected, this green backlit switch engages the OVERDRIVE
control. A footswitch can be connected to the amplier to switch the OVERDRIVE
on and o (the front panel switch is disengaged when the footswitch is plugged
in).
6. COMPRESSOR – This knob determines the amount of compression by adjusting
the threshold level. The compressor allows you to control the overall dynamic
range of your performance by reducing sudden peaks, and increasing the sustain
of the instrument. At the fully counterclockwise position, no compression is applied. As the knob is turned clockwise an increasing amount of compression is
applied. For more information, see the “About Compression” section on page 17 of
this manual.
7. Compressor Light – Provides a visual indicator of the status of the compression
circuitry. This red LED lights when the input signal crosses the threshold level and
activates the compressor circuit.
9
14 16 1820212223 25
8
 Loading...