

Hartke Kickback HS1200 BASS COMBO Owner's Manual [en, fr, de, es, it]
KICKBACK
Hartke
KICKBACK 15
o
POWER
HEADPHONESDIRECT OUT HIGHMIDLOWSHAPE
INOUT
VOLUME
INPUT
SHAPE
1K 90 -15 +15
-15
+15 -15 +15
0 0
0
0
0dB
Hartke SystemsHS1200 BASS AMPLIFIER 120 WATTS
Transient Attack
®
HS1200 BASS COMBO
Caution: To reduce the hazard of electrical shock, do
not remove cover or back.
No user serviceable parts inside. Please refer all servicing to qualified personnel.
WARNING: To reduce the risk of fire or electric shock, do not expose this unit to rain or moisture.
The lightning flash with an arrowhead symbol within an equilateral triangle, is intended to alert the user to the
presence of uninsulated "dangerous voltage" within the products enclosure that may be of sufficient magnitude to constitute a risk of electric shock to persons.
The exclamation point within an equilateral triangle is intended to alert the user to the presence of important
operating and maintenance (servicing) instructions in the literature accompanying the product.
Important Safety Instructions
1. Please read all instructions before operating the unit.
2. Keep these instructions for future reference.
3. Please heed all safety warnings.
4. Follow manufacturers instructions.
5. Do not use this unit near water or moisture.
6. Clean only with a damp cloth.
7. Do not block any of the ventilation openings. Install in accordance with the manufacturers instructions.
8. Do not install near any heat sources such as radiators, heat registers, stoves, or other apparatus (includ
ing amplifiers) that produce heat.
9. Do not defeat the safety purpose of the polarized or grounding-type plug. A polarized plug has two
blades with one wider than the other. A grounding type plug has two blades and a third grounding
prong. The wide blade or third prong is provided for your safety. When the provided plug does not fit
your outlet, consult an electrician for replacement of the obsolete outlet.
10. Protect the power cord from being walked on and pinched particularly at plugs, convenience recep
tacles and at the point at which they exit from the unit.
11. Unplug this unit during lightning storms or when unused for long periods of time.
12. Refer all servicing to qualified personnel. Servicing is required when the unit has been damaged in
any way, such as power supply cord or plug damage, or if liquid has been spilled or objects have fallen
into the unit, the unit has been exposed to rain or moisture, does not operate normally, or has been
dropped.
-
-

Table of Contents
ENGLISH
Introduction. . . . . . . . . . . . . . . . . . . . . . . . . . . . . . . . . . . . . . . . . . . . . . . . . . . . . . . . . . . . . . . . . . . . . . . . . . .4
Kickback Features . . . . . . . . . . . . . . . . . . . . . . . . . . . . . . . . . . . . . . . . . . . . . . . . . . . . . . . . . . . . . . . . . . . . .5
Guided Tour - Front Panel . . . . . . . . . . . . . . . . . . . . . . . . . . . . . . . . . . . . . . . . . . . . . . . . . . . . . . . . . . . . . .6
Guided Tour - Rear Panel . . . . . . . . . . . . . . . . . . . . . . . . . . . . . . . . . . . . . . . . . . . . . . . . . . . . . . . . . . . . . . .8
Setting Up and Using Your Kickback Amplifier . . . . . . . . . . . . . . . . . . . . . . . . . . . . . . . . . . . . . . . . . .9
Using Equalization. . . . . . . . . . . . . . . . . . . . . . . . . . . . . . . . . . . . . . . . . . . . . . . . . . . . . . . . . . . . . . . . 11-13
The Effect of the Shape Control . . . . . . . . . . . . . . . . . . . . . . . . . . . . . . . . . . . . . . . . . . . . . . . . . . . . . . .14
Specifications . . . . . . . . . . . . . . . . . . . . . . . . . . . . . . . . . . . . . . . . . . . . . . . . . . . . . . . . . . . . . . . . . . . . . . . .59
FRANÇAIS
Introduction. . . . . . . . . . . . . . . . . . . . . . . . . . . . . . . . . . . . . . . . . . . . . . . . . . . . . . . . . . . . . . . . . . . . . . . . . .15
Fonctions du Kickback. . . . . . . . . . . . . . . . . . . . . . . . . . . . . . . . . . . . . . . . . . . . . . . . . . . . . . . . . . . . . . . .16
Visite guidée — Face avant . . . . . . . . . . . . . . . . . . . . . . . . . . . . . . . . . . . . . . . . . . . . . . . . . . . . . . . . . . .17
Visite guidée — Face arrière . . . . . . . . . . . . . . . . . . . . . . . . . . . . . . . . . . . . . . . . . . . . . . . . . . . . . . . . . .19
Mise en oeuvre et utilisation du Kickback. . . . . . . . . . . . . . . . . . . . . . . . . . . . . . . . . . . . . . . . . . . . . .20
Utilisation de l'égalisation . . . . . . . . . . . . . . . . . . . . . . . . . . . . . . . . . . . . . . . . . . . . . . . . . . . . . . . . 22-24
Effets de la fonction Shape sur le son. . . . . . . . . . . . . . . . . . . . . . . . . . . . . . . . . . . . . . . . . . . . . . . . . .25
Caractéristiques techniques. . . . . . . . . . . . . . . . . . . . . . . . . . . . . . . . . . . . . . . . . . . . . . . . . . . . . . . . . . .60
DEUTSCHE
Einleitung . . . . . . . . . . . . . . . . . . . . . . . . . . . . . . . . . . . . . . . . . . . . . . . . . . . . . . . . . . . . . . . . . . . . . . . . . . . .26
Kickback Features . . . . . . . . . . . . . . . . . . . . . . . . . . . . . . . . . . . . . . . . . . . . . . . . . . . . . . . . . . . . . . . . . . . .27
Geführter Rundgang - Vorderseite . . . . . . . . . . . . . . . . . . . . . . . . . . . . . . . . . . . . . . . . . . . . . . . . . . . .28
Geführter Rundgang - Rückseite . . . . . . . . . . . . . . . . . . . . . . . . . . . . . . . . . . . . . . . . . . . . . . . . . . . . . .30
Kickback-Verstärker einrichten und einsetzen . . . . . . . . . . . . . . . . . . . . . . . . . . . . . . . . . . . . . 31-32
Kickback-Verstärker einrichten und einsetzen . . . . . . . . . . . . . . . . . . . . . . . . . . . . . . . . . . . . . . . . .32
EQ einsetzen . . . . . . . . . . . . . . . . . . . . . . . . . . . . . . . . . . . . . . . . . . . . . . . . . . . . . . . . . . . . . . . . . . . . . 33-35
Wirkung des Shape-Reglers . . . . . . . . . . . . . . . . . . . . . . . . . . . . . . . . . . . . . . . . . . . . . . . . . . . . . . . . . . .36
Technische Daten . . . . . . . . . . . . . . . . . . . . . . . . . . . . . . . . . . . . . . . . . . . . . . . . . . . . . . . . . . . . . . . . . . . .61
ESPAÑOL
Introducción . . . . . . . . . . . . . . . . . . . . . . . . . . . . . . . . . . . . . . . . . . . . . . . . . . . . . . . . . . . . . . . . . . . . . . . . .37
Características del Kickback . . . . . . . . . . . . . . . . . . . . . . . . . . . . . . . . . . . . . . . . . . . . . . . . . . . . . . . . . . .38
Recorrido guiado - Panel frontal. . . . . . . . . . . . . . . . . . . . . . . . . . . . . . . . . . . . . . . . . . . . . . . . . . . . . . .39
Recorrido guiado - Panel trasero . . . . . . . . . . . . . . . . . . . . . . . . . . . . . . . . . . . . . . . . . . . . . . . . . . . . . .41
Manejo de su amplificador Kickback . . . . . . . . . . . . . . . . . . . . . . . . . . . . . . . . . . . . . . . . . . . . . . 42-43
Uso de la ecualización . . . . . . . . . . . . . . . . . . . . . . . . . . . . . . . . . . . . . . . . . . . . . . . . . . . . . . . . . . . . 44-46
El efecto del control Shape. . . . . . . . . . . . . . . . . . . . . . . . . . . . . . . . . . . . . . . . . . . . . . . . . . . . . . . . . . . .47
Especificaciones técnicas . . . . . . . . . . . . . . . . . . . . . . . . . . . . . . . . . . . . . . . . . . . . . . . . . . . . . . . . . . . . .62
ITALIANO
Introduzione . . . . . . . . . . . . . . . . . . . . . . . . . . . . . . . . . . . . . . . . . . . . . . . . . . . . . . . . . . . . . . . . . . . . . . . . .48
Caratteristiche. . . . . . . . . . . . . . . . . . . . . . . . . . . . . . . . . . . . . . . . . . . . . . . . . . . . . . . . . . . . . . . . . . . . . . . .49
Tour guidato - Pannello frontale. . . . . . . . . . . . . . . . . . . . . . . . . . . . . . . . . . . . . . . . . . . . . . . . . . . . . . .50
Tour guidato - Pannello posteriore . . . . . . . . . . . . . . . . . . . . . . . . . . . . . . . . . . . . . . . . . . . . . . . . . . . .52
Configurare e utilizzare l'amplificatore Kickback . . . . . . . . . . . . . . . . . . . . . . . . . . . . . . . . . . . . . . .53
Usare l'Equalizzazione . . . . . . . . . . . . . . . . . . . . . . . . . . . . . . . . . . . . . . . . . . . . . . . . . . . . . . . . . . . . 55-57
Effetto del controllo Shape. . . . . . . . . . . . . . . . . . . . . . . . . . . . . . . . . . . . . . . . . . . . . . . . . . . . . . . . . . . .58
Specifiche. . . . . . . . . . . . . . . . . . . . . . . . . . . . . . . . . . . . . . . . . . . . . . . . . . . . . . . . . . . . . . . . . . . . . . . . . . . .63
Copyright 2005 - 2009, Samson Technologies Corp.
Printed December, 2009 v1.0
Samson Technologies Corp.
45 Gilpin Avenue
Hauppauge, New York 11788-8816
Phone: 1-800-3-SAMSON (1-800-372-6766)
Fax: 631-784-2201
www.samsontech.com

Introduction
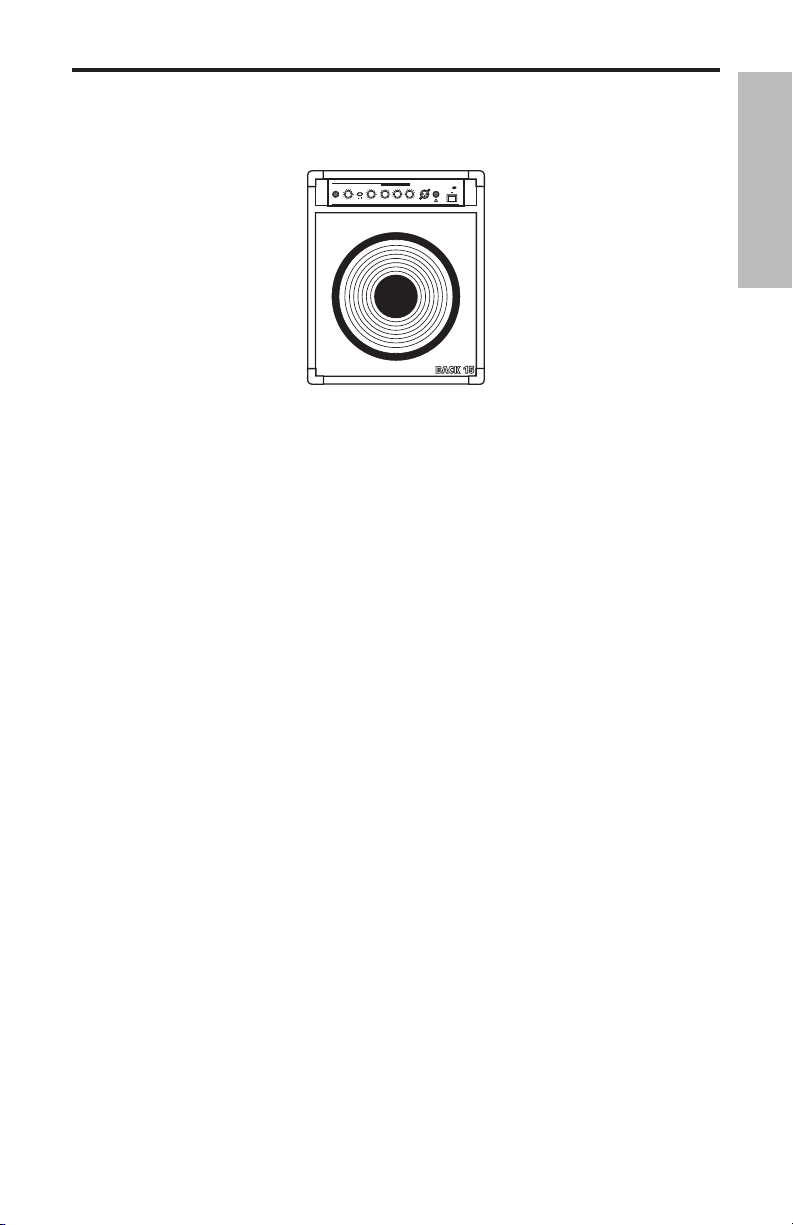
Congratulations on your purchase of the Hartke HS1200 KickBack™ Combo
Bass Amplifier! Although we designed this amp for easy operation, we suggest you take some time out first to go through these pages so you can fully
understand how we’ve implemented a number of unique features. Your
ENGLISH
Kickback™ combo features the Hartke HS1200 amplifier, with 120 watts of
clean power along with a matched 8-ohm 12” bass speaker, or 8-ohm 15”
bass speaker. The specially designed cabinet which can be used either flat
on the floor or in its “KickBack” position for increased high-end clarity and
directionality. Optimized for use with electric bass instruments, you’ll find
the HS1200 to be the perfect system for use in small venues (such as club
dates); in addition, its dedicated headphone output makes it an excellent
practice amp. In these pages, you’ll find a detailed description of the many
features of the HS1200 KickBack™ Bass Amplifier, as well as a guided tour
through its front and rear panels, step-by-step instructions for setting up and
using the unit, additional information about equalization and the use of a
unique Shape control, and full specifications. You’ll also find a warranty card
enclosed—please don’t forget to fill it out and mail it so that you can receive
online technical support and so we can send you updated information about
this and other Hartke and Samson products in the future.
SPECIAL NOTE: Should your HS1200 ever require servicing, a Return
Authorization (RA) number is necessary. Without this number, the unit
will not be accepted. Please call Samson at 1-800-372-6766 for a Return
Authorization number prior to shipping. Please retain the original packing
materials and, if possible, return the unit in its original carton and packing
materials.
4
Kickback Features
Hartke
KICKBACK 15
o
POWER
HEADPHONESDIRECT OUT HIGHMIDLOWSHAPE
INOUT
VOLUME
INPUT
SHAPE
1K 90 -15 +15
-15
+15 -15 +15
0 0
0
0
0dB
Hartke SystemsHS1200 BASS AMPLIFIER 120 WATTS
Transient Attack
®
The HS1200 offers advanced design in state-of-the-art bass amplification at an
extremely affordable price. Here are some of its main features
• Power to spare—a full 120 watts into 8 ohms.
• Bipolar design for clean, crisp sound—as well as our Transient Attack® circuitry,
which ensures that every nuance of your bass performance is reproduced
faithfully.
• Three bands of high-quality equalization, allowing you to create a broad range
of tonal colors for your bass instrument.
• A unique contour filtering system called “Shape.” This activates an equalization
curve specially designed to enhance the sound of the electric bass. In addition,
a Shape control enables you to continuously sweep a filter through various frequency areas in order to customize the effect of the Shape curve to the specific
tonal characteristics of your particular bass instrument.
ENGLISH
• A separate headphone output which automatically mutes the speaker output,
allowing the HS1200 to be used as a high-quality practice amp. In addition, a
front-panel Direct Out enables the HS1200 to be easily interfaced with external
sound reinforcement or recording mixing consoles.
• A feedback-type input that accommodates a broad range of input levels (up
to 15 volts), so that you can use the HS1200 with pretty much any kind of bass,
from passive models to those with active circuitry.
• Included is a matched Hartke 12” 8-ohm,
specially designed “KickBack™” cabinet. When used in the “KickBack™” position,
the HS1200 acts like an onstage “wedge” monitor, adding high frequency clarity and directionality to the sound.
or 8-ohm 15”, speaker mounted in a
• Rugged construction, metal screen speaker cover and carpeted exterior serve
to make the HS1200 eminently road-worthy.
5
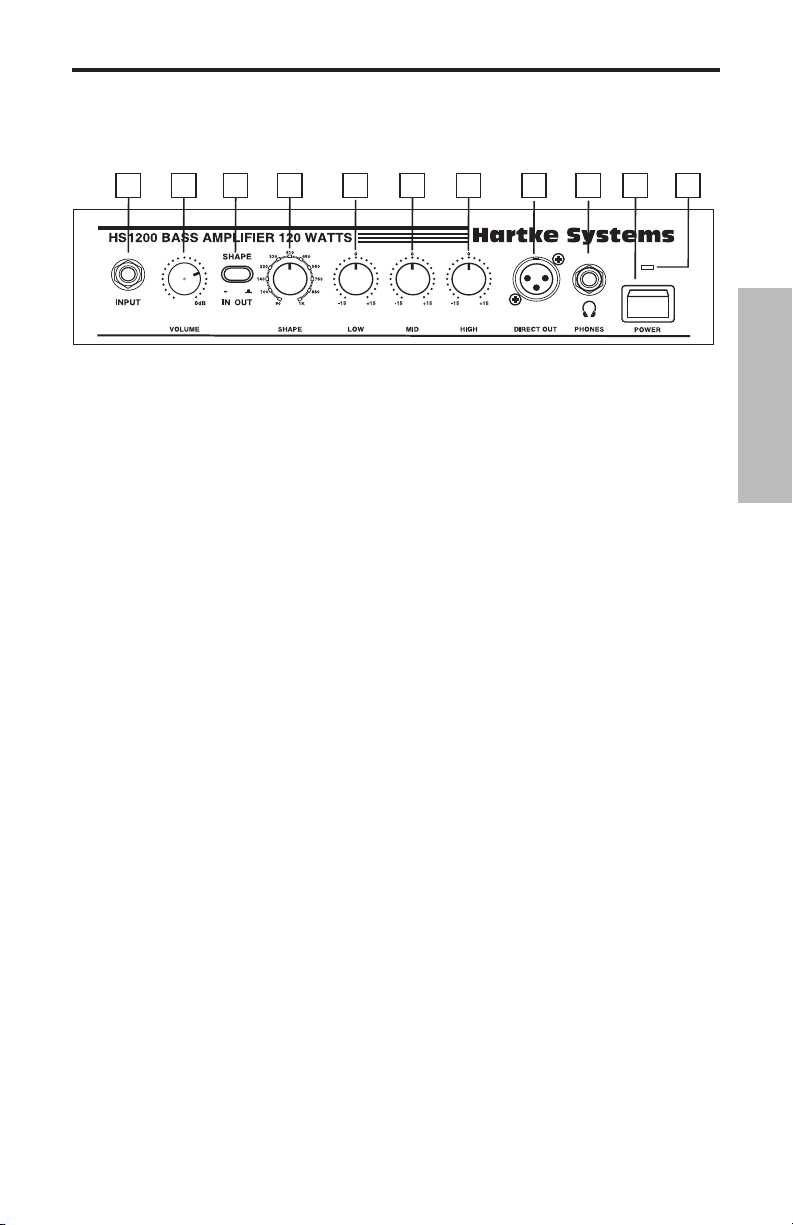
Guided Tour - Front Panel
o
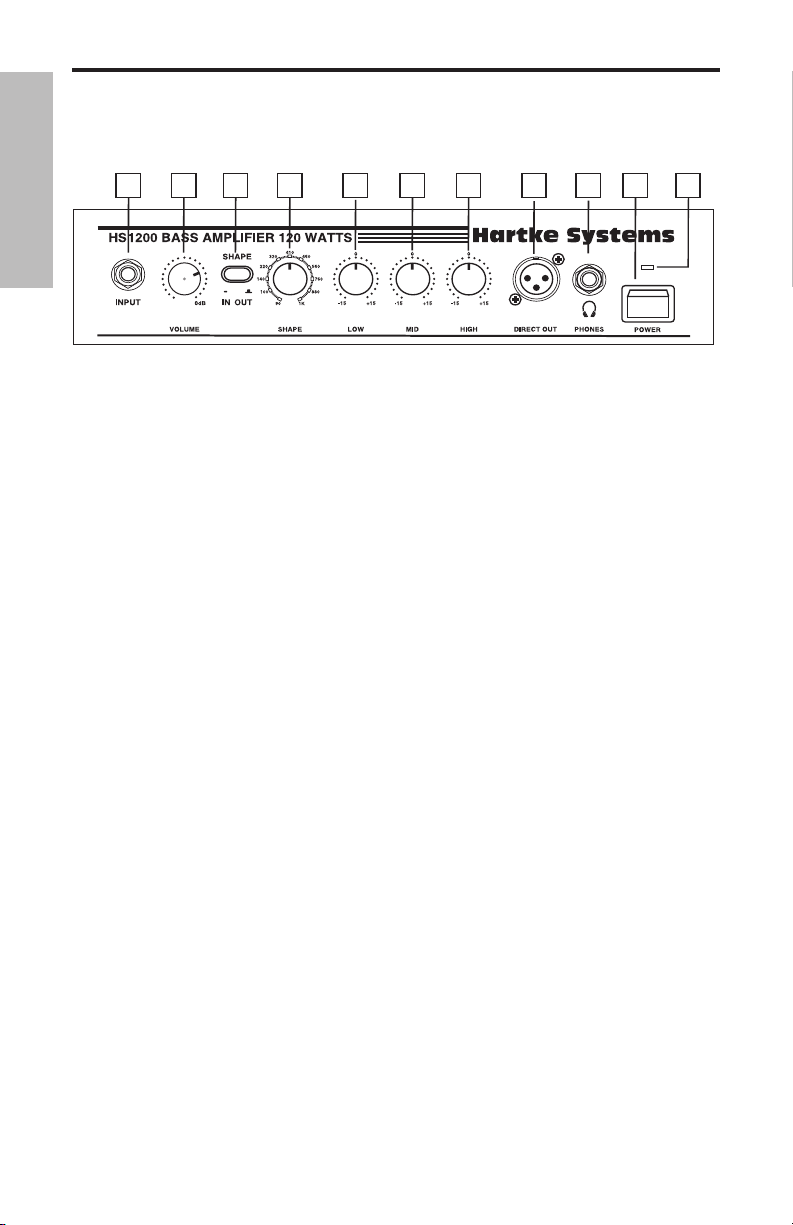
2 31 4 5 6 7 10 1198
ENGLISH
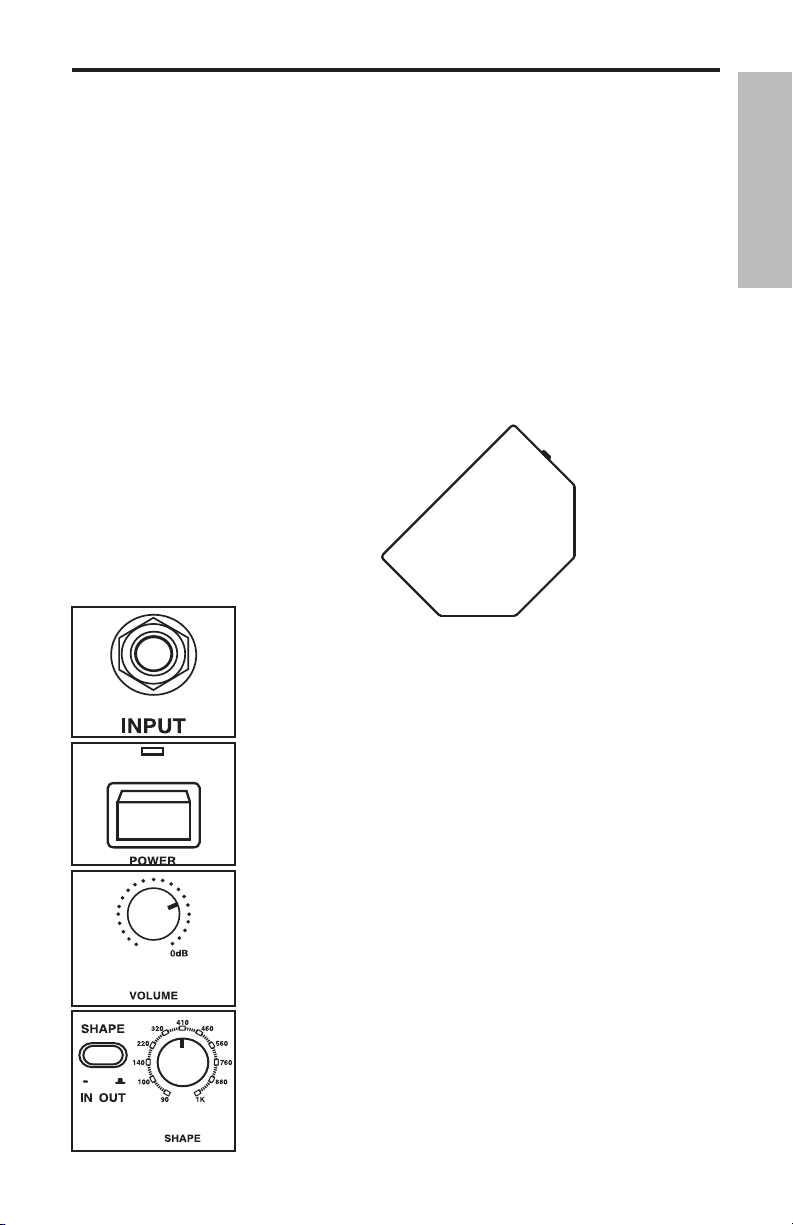
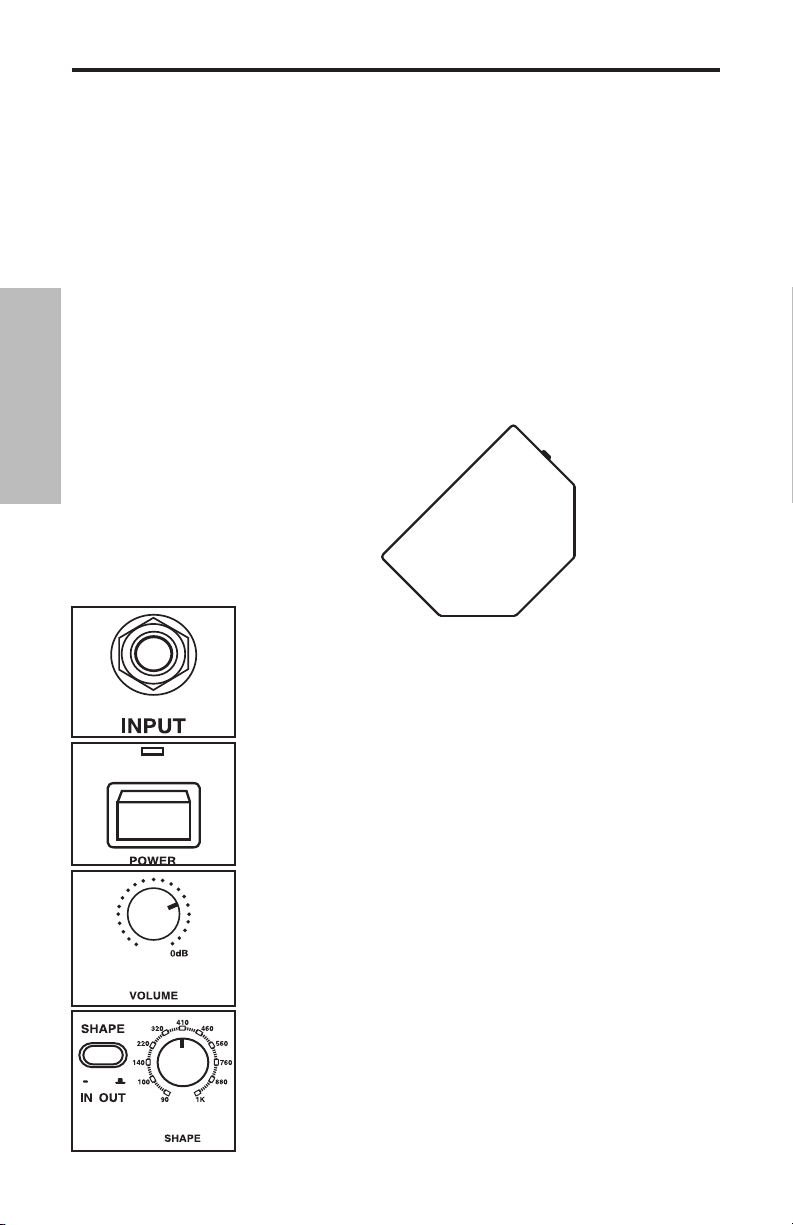
1. Input jack - Connect your bass guitar to the HS1200 here. This standard 1/4” unbal-
anced jack provides a wide range high impedance input and is specially designed to
handle a broad range of bass pickup signals up to 15 volts (allowing you to use any
kind of bass, including those models that contain active circuitry).
2. Volume control - This is the overall volume control. For best signal-to-noise ratio,
keep the output of your bass at or near maximum and adjust the HS1200 Volume to
the desired level.
3. Shape switch - When pressed in, the HS1200 activates a special equalization curve
that is designed to enhance the sound of your bass instrument. When out, Shape is
inactive. For more information, see the “Effect of the Shape Control” section on page
14 in this manual.
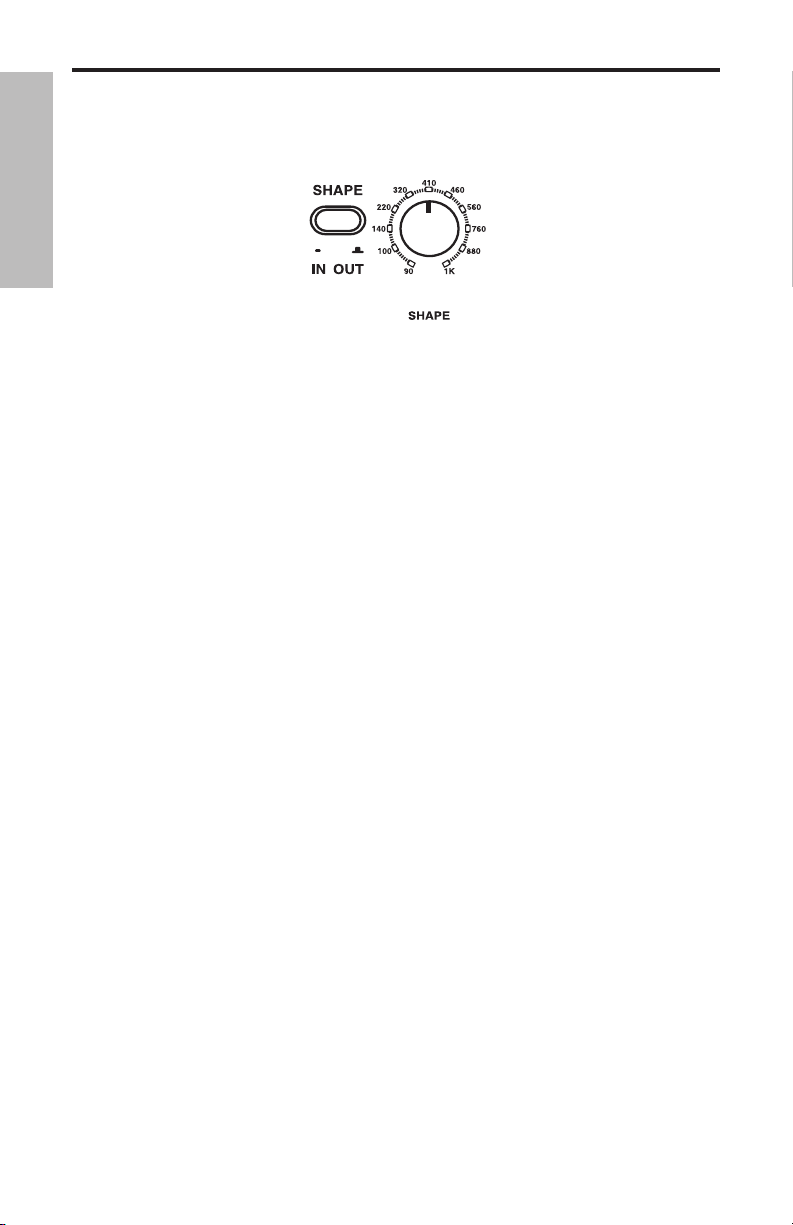
4. Shape control - When the Shape switch (see #3 above) is pressed in, this control is
active. It applies a 20 dB filter to the specified frequency area so that you can customize the effect of the Shape curve to best complement your particular bass instrument.
Moving the Shape control clockwise causes the notch filter to be applied to higher frequencies while moving it counterclockwise causes it to be applied to lower frequencies. At the fully clockwise position, the filter is applied to the 1 kHz frequency area; at
the fully counterclockwise position, the filter is applied to the 80 Hz frequency area.
For more information, see the “Effect of the Shape Control” section on page 14 in this
manual.
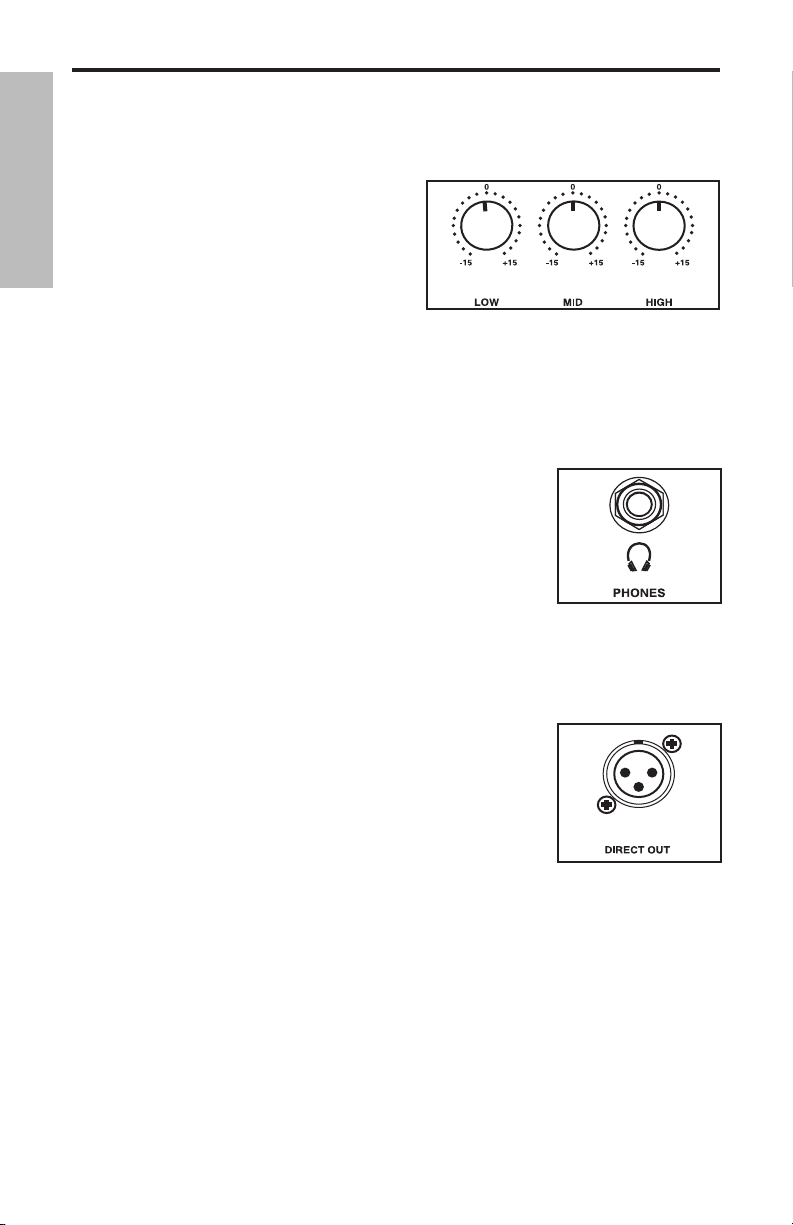
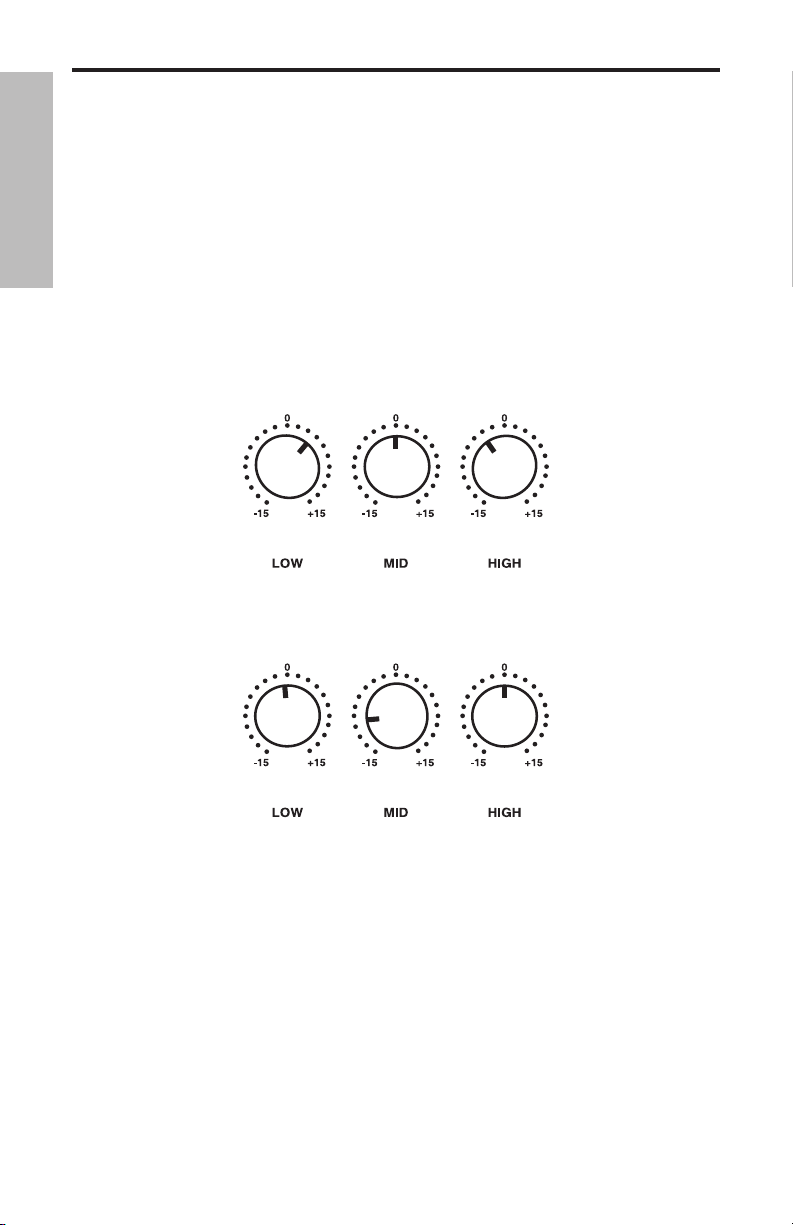
5. Low EQ control - This control provides approximately 15 db of cut or boost at 100
Hz, with a peak (bell) curve. When the knob is at the 12 o’clock (“0”) position, there
is no boost or attenuation (that is, flat response). As it is turned clockwise from the
“0” position, the frequency area is boosted; as it is turned counterclockwise from the
“0” position, the frequency area is attenuated. For more information, see the “About
Equalization” section on page 11 in this manual.
6. Mid EQ control - This control provides approximately 15 db of cut or boost at 300
Hz, with a peak (bell) curve. When the knob is at the 12 o’clock (“0”) position, there
is no boost or attenuation (that is, flat response). As it is turned clockwise from the
“0” position, the frequency area is boosted; as it is turned counterclockwise from the
“0” position, the frequency area is attenuated. For more information, see the “About
Equalization” section on page 11 in this manual.
6

Guided Tour - Front Panel
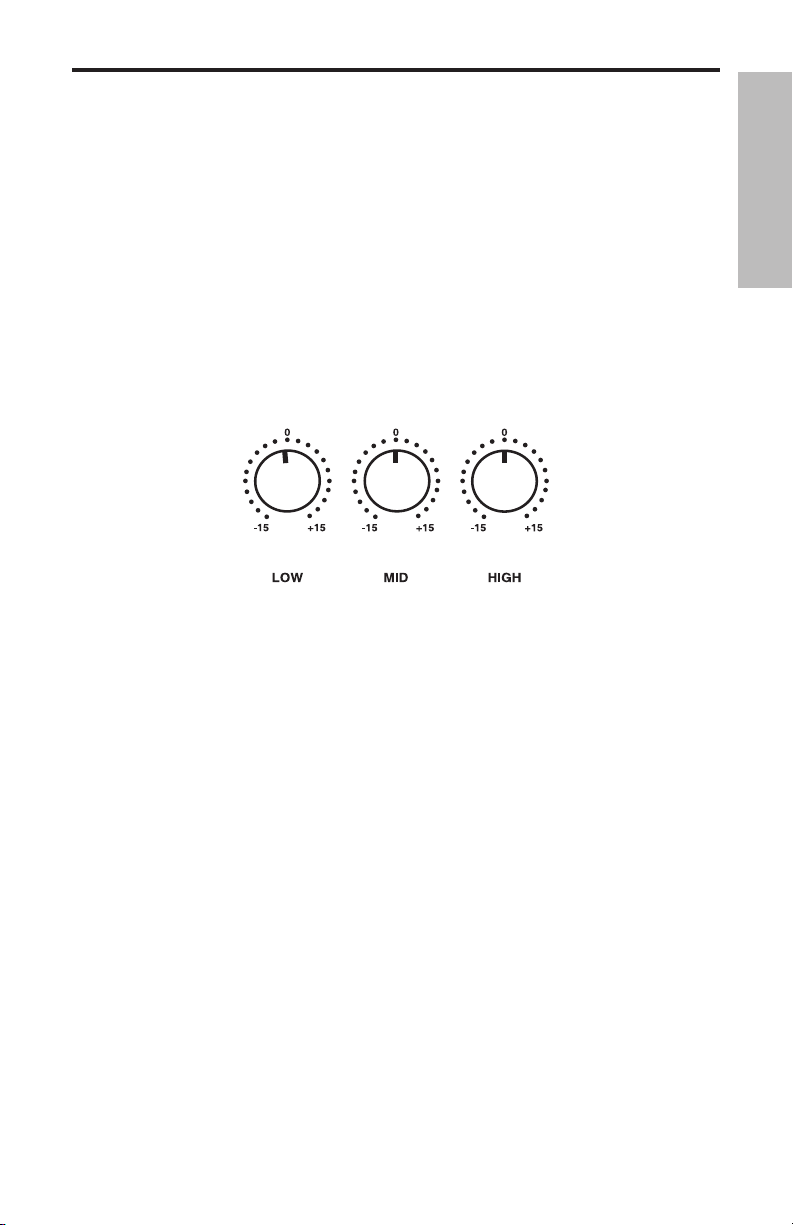
7. High EQ control - This shelving control provides approximately 15 db of cut or
boost at 5 kHz. When the knob is at the 12 o’clock (“0”) position, there is no boost or
attenuation (that is, flat response). As it is turned clockwise from the “0” position, the
frequency area is boosted; as it is turned counterclockwise from the “0” position, the
frequency area is attenuated. For more information, see the “About Equalization” section on page 11 in this manual.
8. Direct output - This standard male XLR connector provides a miclevel pre-EQ (and
pre-Volume) balanced low-impedance output from the HS1200. You’ll usually use
this to connect the HS1200 signal to a Direct Injection (DI) box or to an XLR mic input
when interfacing with external sound reinforcement or recording mixing consoles.
The signal from this output adds approximately 6 dB of gain to the input level.
9. Headphones jack - Connect any standard stereo headphone (600 ohms or less) to
this standard 1/4” stereo jack. When a plug is inserted into the headphone jack, the
HS1200 speaker output is muted, enabling you to use the unit as a practice amplifier. The level of the signal sent to the headphones is determined by the setting of
the Volume knob—when set to the point where a connected speaker would clip, the
headphones will clip.
10. Power switch - Use this to power the HS1200 on or off.
11. Power LED - Lights whenever the HS1200 is powered on.
ENGLISH
WARNING: Because the HS1200 is capable of generating extremely high headphone
signal levels,always start with the Volume knob at minimum and then slowly turn it
up. In particular, a clicking sound is an indication of distortion and possible damage
to the headphones (and/or your hearing!); don’t let things get to that point!
7
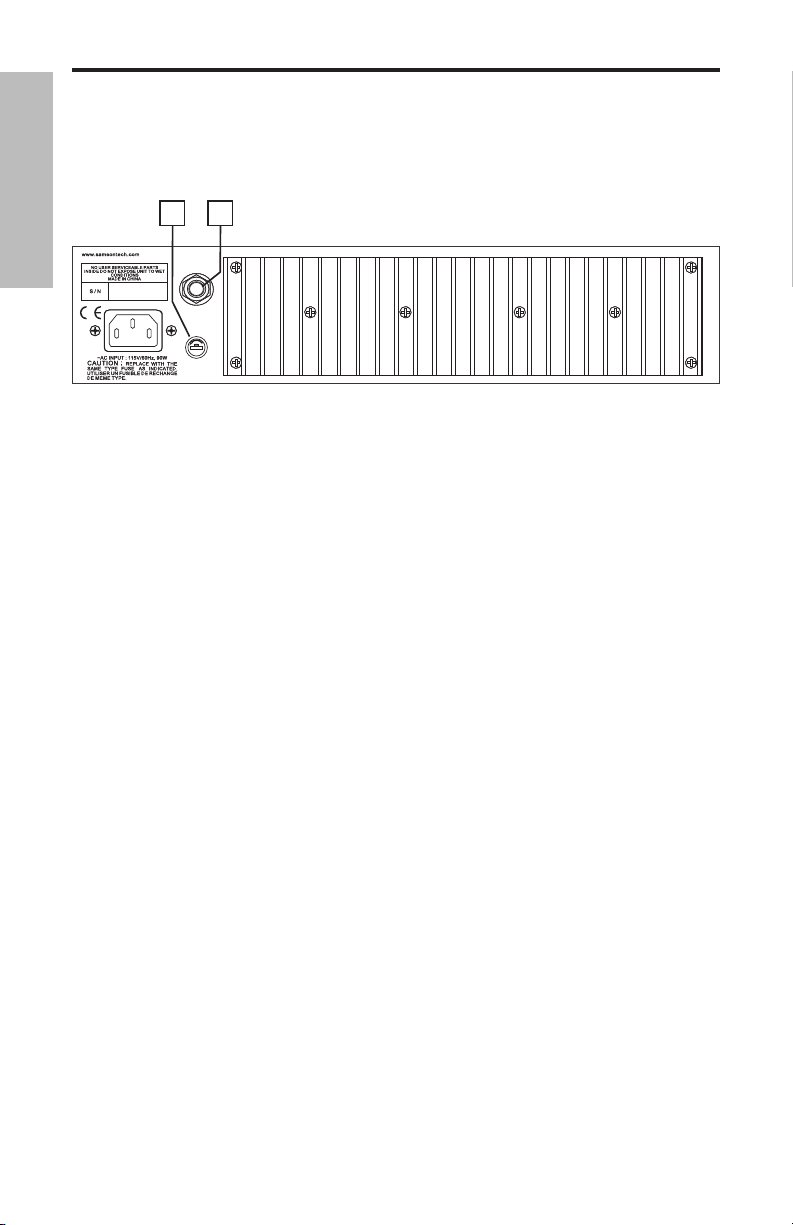
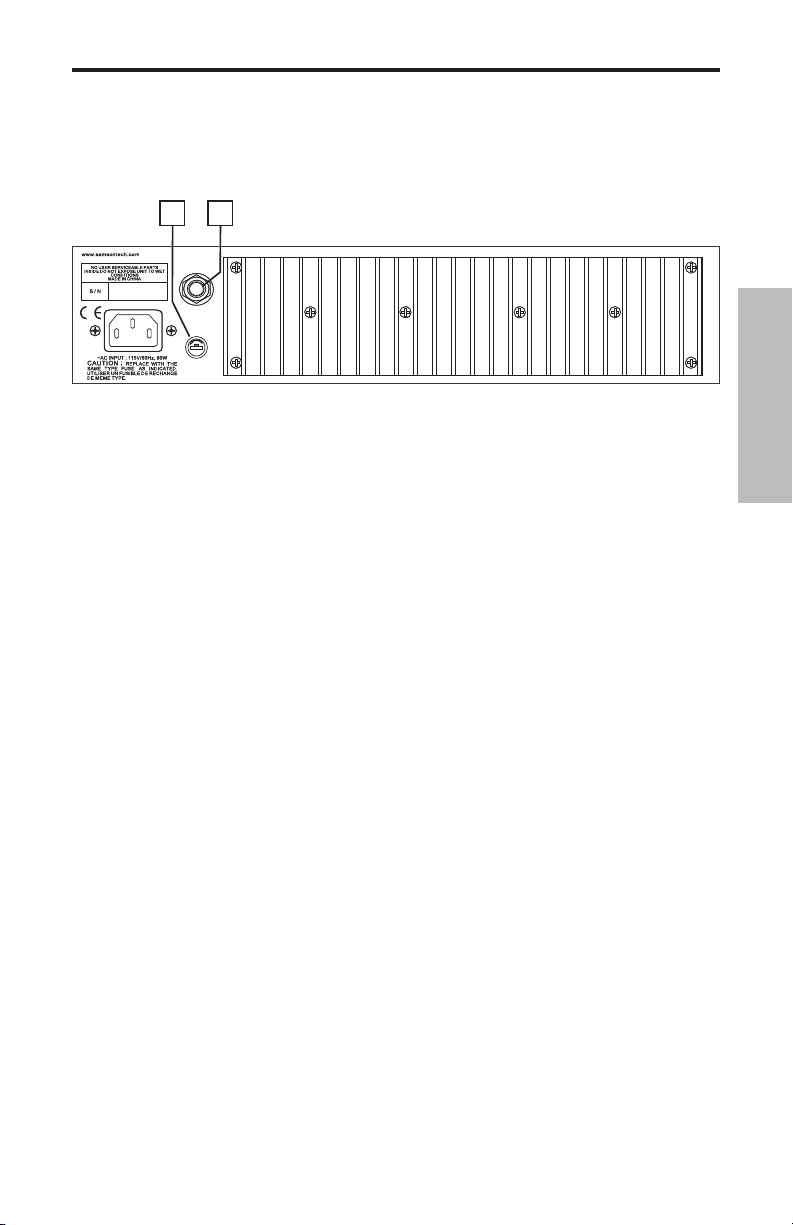
Guided Tour - Rear Panel
FUSE
ENGLISH
1. Fuse holder - Insert a 3 amp, 250 volt fuse here for 115 volt operation. We recom-
mend the use of slow-blow fuses.
2. Speaker output - The internal speaker is normally connected to this standard
unbalanced 1/4” jack; if desired, external 8 ohm speakers can be substituted, though
this is not recommended.
WARNING: Because of the high power levels and low frequency content of the signal
generated by the HS1200, we recommend the use of the provided internal speaker
only. If you do wish to connect an external speaker, use only appropriately rated 8
ohm speaker cabinets that are specifically designed for bass instruments.
8
Setting Up and Using Your Kickback Amplifier
o
Setting up your Hartke Systems HS1200 KickBack™ Bass
Amplifier is a simple procedure, which takes only a few
minutes:
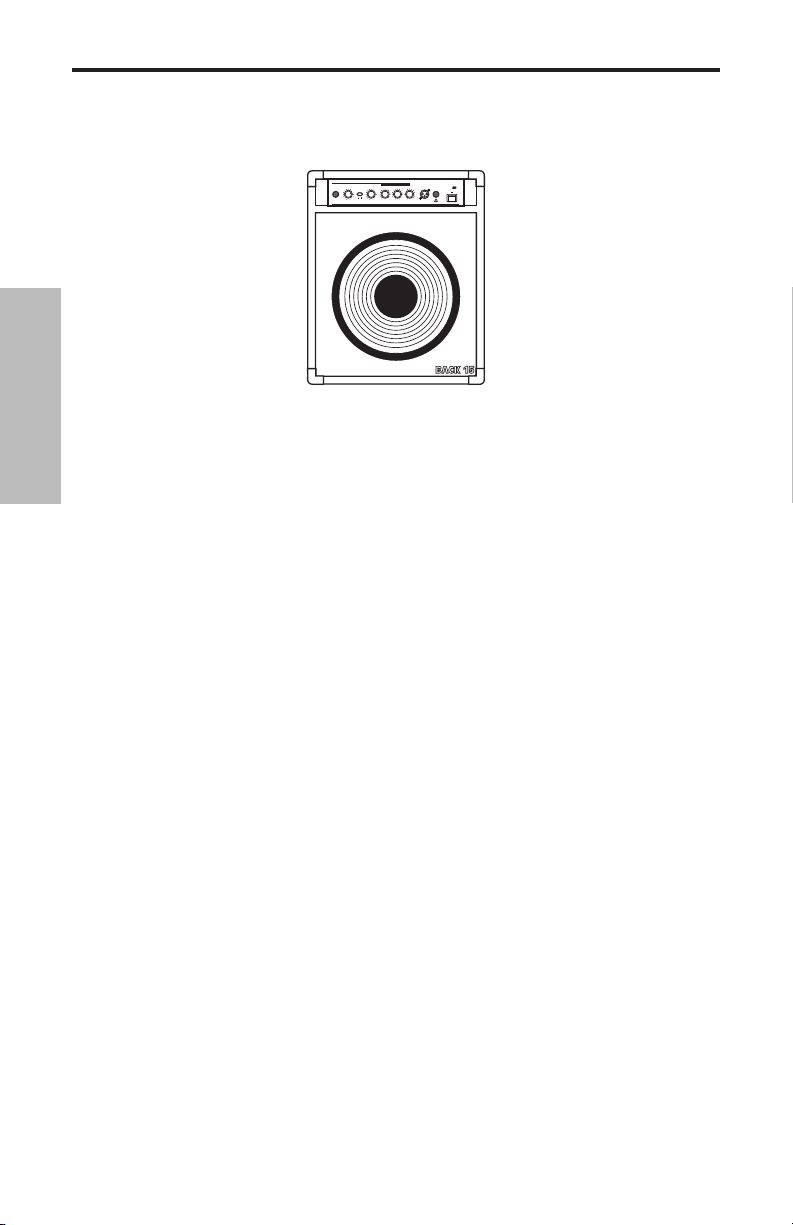
1. Remove all packing materials (save them in case of need
for future service) and decide where the amplifier is to be
physically placed. To avoid potential overheating problems,
make sure that the rear panel is unobstructed and that
there is good ventilation around the entire unit. The HS1200
may be used flat on the floor or in its “KickBack™” position
(for increased high frequency clarity and directionality), as
shown in the illustration below:
2. The HS1200 is shipped with a rear panel connector
between the speaker output (see #2 on page 6 of this
manual) and the built-in speaker input; check to make sure
this is in place; if not, plug it in. If you are using an external
speaker cabinet, make a connection between it and the 1/4”
unbalanced Speaker output connector on the rear panel.
Any appropriately rated external bass cabinet with an
impedance load of 8 ohms can be used, though we recommend the use of the specially designed internal speaker. It
is never a good idea to power up any amplifier that is not
connected to a loudspeaker.
3. Next, connect the 3-pin AC plug into any grounded AC
socket. Don’t turn the HS1200 on just yet, though.
4. Use a standard music instrument cable to connect your
bass to the Input jack on the front panel. On the front panel
of the HS1200, turn the Volume control to its minimum
(fully counterclockwise) position, set all three EQ controls
to their “0” (12 o’clock) position, and start with the Shape
switch out (that is, off).
5. Press the front panel Power switch in order to turn on the
HS1200; the LED above it will light up.
ENGLISH
9
Setting Up and Using Your Hartke Kickback
Amplifier
6. Set the output of your bass to maximum
and then, while playing, slowly turn the
HS1200 Volume control up until the desired
ENGLISH
level is achieved. If you hear distortion even
at low amplifier Volume settings, back off
the output of your bass (or check for a faulty
cable).
7. Press in the Shape switch and turn the Shape knob both
clockwise and counterclockwise to hear the effect of the
Shape curve and filter on the sound of your bass. Leave the
Shape knob at the point where it best complements your
particular instrument and playing style.
8. Adjust the three equalization controls to taste (when you
get a great setting that complements your instrument and
playing style, it’s a good idea to write it down for future use).
9. Test the headphone output by turning the Volume control
to its minimum (fully counterclockwise) position and then
connect a standard stereo headphone to the front-panel
Headphones jack. While playing your bass, slowly turn the
Volume control up—you should hear sound from the headphones and none from the connected speaker. We recommend the use of large size headphones (those with large
transducers) for optimum bass reproduction.
10. If you need to connect the HS1200 to a live sound reinforcement or recording mixing console, plug a standard
female XLR jack into the front-panel Direct Out output and
connect it to a Direct Injection (DI) box or to an XLR miclevel input on the mixer. (See #8 on page 6 in this manual for
more information on the use of the HS1200 Direct Out).
If you encounter difficulty with any aspect of setting up or
using your HS1200, you can call Samson Technical Support
(1-800-372-6766) between 9 AM and 5 PM EST.
10
Using Equalization
The Hartke Systems Transient Attack® HS1200 Bass Amplifier gives you enormous
control over shaping the sound of your bass, using a process called equalization.
To understand how this works, it’s important to know that every naturally occurring sound consists of a broad range of pitches, or frequencies, combined together
in a unique way. This blend is what gives every sound its distinctive tonal color. EQ
controls allow you to alter a sound by boosting or attenuating specific frequency
areas—they operate much like the bass and treble controls on your hi-fi amp, but with
much greater precision. The HS1200 provides you with three bands of equalization.
Each EQ knob (labeled Low, Mid, and High, respectively) affects a different frequency
area (100 Hz, 300 Hz, and 5 kHz, respectively) and provides approximately 15 db of
boost and attenuation.
We carefully selected these frequency areas because they have maximum impact on
bass signals. For example, the Low (100 Hz) control affects the very lowest audible
frequencies (in fact, most humans cannot hear below 20 Hz), while the High (5 kHz)
control affects the “twang” of a bass string. When an EQ knob is in its center detented
position (“0”), it is having no effect. When it is moved right of center, the particular
frequency area is being boosted; when it is moved left of center, the frequency area is
being attenuated. Turning all EQ controls up the same amount will have virtually the
same effect as simply turning up the Volume; conversely, turning them all down the
same amount will have virtually the same effect as turning down the Volume. Both
approaches are pointless (after all, that’s why we gave you a Volume control!)
ENGLISH
11
Using Equalization
In many instances, the best way to deal with equalization is to think in terms of which
frequency areas you need to attenuate, as opposed to which ones you need to boost.
Be aware that boosting a frequency area also has the effect of boosting the overall
signal; specifically, too much Low EQ boost can actually cause overload distortion or
ENGLISH
even harm a connected speaker.
The specific EQ you will apply to your bass signal is very much dependent upon your
particular instrument and personal taste and playing style. However, here are a few
general suggestions:
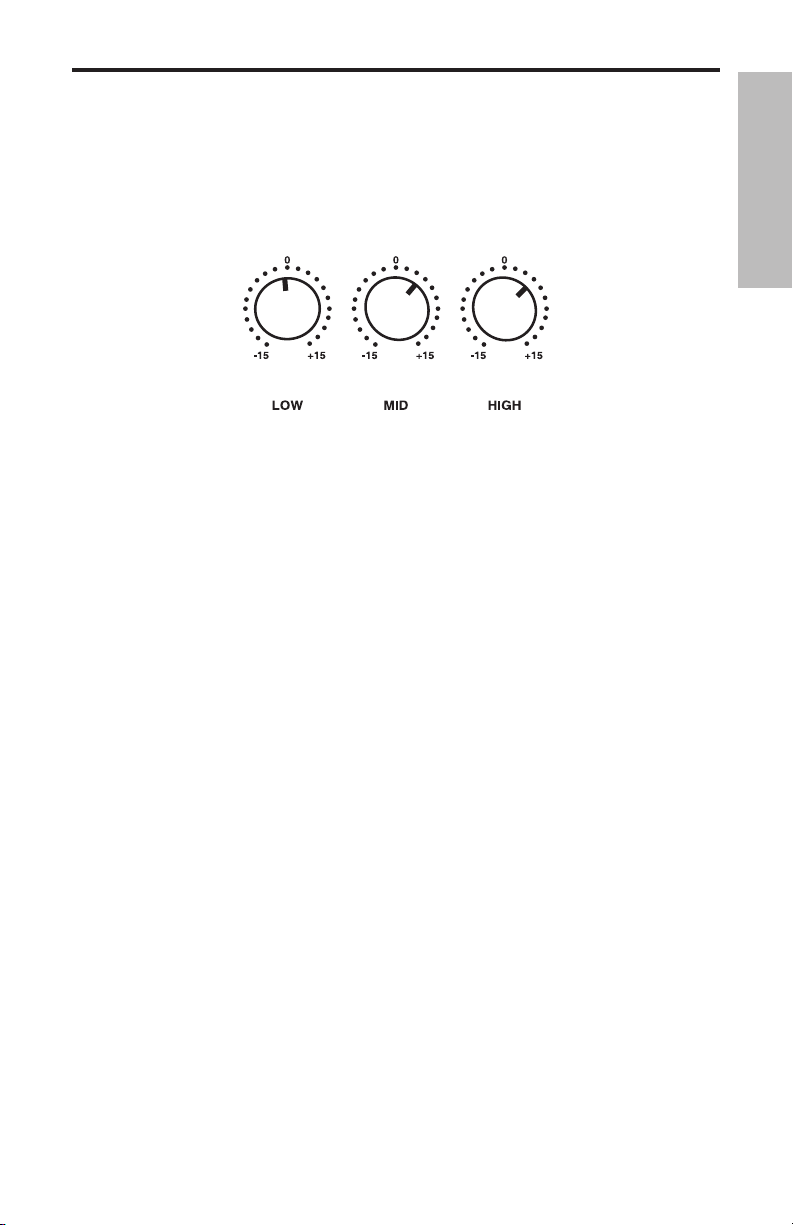
• For that super-deep reggae or Motown sound, boost the Low EQ slightly while
attenuating the High control (leave the Mid control flat or slightly attenuated):
• To remove boxiness and make your instrument sound more “hi-fi,” try attenuating the
Mid frequency control while leaving the Low and High settings flat: Using
Equalization
12
Using Equalization
• For a twangy, cutting sound, try boosting the High and Mid frequencies (putting
new roundwound strings on your bass will help a lot also!):
Whenever you get a really good EQ setting for a particular instrument or song, write it
down (you’d be amazed how easy it is to forget these things!).
As you experiment with the EQ controls of the HS1200, don’t forget that your bass also
provides EQ controls in the form of its tonal settings—this can be particularly effective
in instruments that have active circuitry. Also, try various EQ settings with and without
the Shape switch in and with the Shape control (which imposes a filter) at different
settings.
For more information, see the “Effect of the Shape Control” section on the next page.
ENGLISH
Finally, bear in mind that the physical position of the HS1200 will also affect its frequency response; when in its normal flat on the floor position (that is, with the speaker
facing directly forward), there may be increased bass response due to the reinforcing
of low frequency components by the floor itself. In contrast, when using the HS1200
in its “KickBack™” position (where the HS1200 acts much like a “wedge” stage monitor),
you’ll hear increased highs due to the directionality of high frequency components.
13
The Effect of the Shape Control
ENGLISH
The HS1200’s unique Shape control enables the sound of your bass instrument to be
enhanced at the touch of a button. When the front panel Shape switch is pressed in, a
special equalization curve is activated that is designed to improve the sound of most
electric bass instruments. This curve provides moderate boost at certain frequency
areas and deep attenuation at other frequency areas. Furthermore, the front panel
Shape control adds a lter to a selected frequency area within the Shape curve. As
the Shape knob is turned clockwise, the lter is imposed on higher frequency areas;
as it is turned counterclockwise, the lter is imposed on lower frequency areas. At the
fully clockwise position, the lter is applied to the 1 kHz frequency area; at the fully
counterclockwise position, the lter is applied to the 80 Hz frequency area.
Even when Shape is activated, the front-panel EQ controls remain operational. When
all three EQ controls are set to their “0” (at) position, they add no boost or attenuation to the preset Shape curve. However, when any EQ controls are turned left or right
of their 12 o’clock (“0”) position, their boost or attenuation eect is superimposed
upon the preset Shape curve. In this way, you can customize the sound of the HS1200
further still to complement your particular bass instrument and playing style.
Note that, when the Shape switch is out, the EQ controls operate on the “at” signal
coming from your bass (that is, there is no preset equalization curve imposed).
14

Introduction
Merci d'avoir choisi le combo basse Hartke HS1200 KickBack™ ! Bien que
nous ayons conçu cet amplificateur avec un but de simplicité d'utilisation,
nous vous conseillons de prendre le temps de lire ces quelques pages pour
comprendre les fonctions uniques de cet ampli. Ce combo Kickback™ est
équipé d'un amplificateur Hartke HS1200, avec une puissance de 120 Watts
et un son exceptionnellement clair, associé à un haut-parleur adapté de 31
cm (12 pouces) et 8 Ohms, ou de 38 cm (15 pouces) et 8 Ohms. Le baffle de
conception spéciale peut être utilisé droit sur le sol ou en position inclinée,
ce qui favorise la dispersion des hautes fréquences. Optimisé pour la guitare
basse, le HS1200 est l'ampli parfait pour les petits concerts (en piano-bar,
par exemple ). De plus, sa sortie casque en fait l'ampli par excellence pour le
travail personnel. Dans ces pages, vous trouverez une description détaillée de
l'ampli basse HS1200 KickBack™, une visite guidée des faces avant et arrière,
des explications pas-à-pas sur la mise en oeuvre et l'utilisation de l'appareil,
des informations supplémentaires sur l'égalisation et l'utilisation de la fonction Shape, et les caractéristiques détaillées. Vous trouverez également une
carte d'enregistrement — n'oubliez pas de remplir cette carte et de nous la
renvoyer pour bénéficier de notre assistance technique téléphonique (ou en
ligne), pour recevoir les mises à jour sur ce produit ou sur d'autres produits
Hartke et Samson.
REMARQUE : Si vous devez faire réparer votre HS1200, vous devez obtenir
un numéro d'autorisation de retour. Sans ce numéro, le produit ne sera pas
accepté. Appelez Samson au 1-800-372-6766 pour obtenir un numéro d'autorisation de retour avant tout envoi. Conservez l'emballage original, et si possible, renvoyez le produit dans le carton et l'emballage d'origine.
FRANÇAIS
15
Fonctions du Kickback
Hartke
KICKBACK 15
o
POWER
HEADPHONESDIRECT OUT HIGHMIDLOWSHAPE
INOUT
VOLUME
INPUT
SHAPE
1K 90 -15 +15
-15
+15 -15 +15
0 0
0
0
0dB
Hartke SystemsHS1200 BASS AMPLIFIER 120 WATTS
Transient Attack
®
Le HS1200 fait appel à des circuits électroniques avancés spécifiques à l'amplification basse, pour un prix de vente qui reste tout à fait abordable. Voici quelques
unes des fonctions principales de l'amplificateur :
FRANÇAIS
• Puissant — 120 Watts dans 8 Ohms.
• Conception bipolaire pour un son clair et précis, et circuit Transient Attack®,
vous garantissant que chaque nuance de votre jeu sera reproduite avec fidélité.
• Égalisation haute qualité à trois bandes, vous permettant de créer une vaste
palette de sonorités pour votre basse.
• Filtre de contour unique “Shape”. Ce circuit active une courbe d'égalisation
conçue spécifiquement pour la basse électrique. De plus, le bouton Shape
vous permet de modifier la fréquence du filtre pour adapter la courbe du filtre
Shape aux caractéristiques sonores de votre propre instrument.
• Une sortie casque séparée coupe automatiquement la sortie haut-parleu
qui permet d'utiliser le HS1200 comme ampli de travail personnel de haute
qualité. De plus, la sortie Direct Out de la face avant vous permet de connecter
le HS1200 à n'importe quelle console de sonorisation ou d'enregistrement.
• L'entrée spéciale permet la connexion de tous types de niveaux d'entrée (jus
qu'à 15 Volts), ce qui vous permet d'utiliser le HS1200 avec n'importe quel type
de basse, passive ou active.
• Haut-parleur Hartke de 31 cm (12 pouces) et 8 Ohms,
et 8 Ohms, installé dans un baffle spécial “KickBack™”. Lorsque vous l'utilisez
en position inclinée, le HS1200 fonctionne comme un retour de scène bain de
pied, vous permettant d'apprécier la réponse et la clarté dans les hautes fréquences.
ou de 38 cm (15 pouces)
• Construction ultra robuste, protection de haut-parleur en métal et finition en
moquette pour les concerts et les tournées.
16
r, ce
-
Visite guidée — Face avant
o
2 31 4 5 6 7 10 1198
1. Input - Connectez votre basse au HS1200 par cette entrée. Ce Jack 6,35 mm asymé-
trique autorise la connexion d'une large plage d'impédances d'entrée et permet une
tension d'entrée maximum de 15 Volts (vous pouvez connecter n'importe quel type
de basse, active ou passive).
2. Volume - Réglage de volume général. Pour obtenir le meilleur rapport signal/bruit,
réglez le volume de votre basse au maximum et réglez le volume du HS1200.
3. Touche Shape - Lorsque la touche est enfoncée, le HS1200 active une courbe
d'égalisation spéciale conçue pour améliorer le son de votre basse. Lorsque la touche
est relâchée, la fonction Shape est inactive. Consultez la section, “Effets du réglage
Shape” en page 11 de ce mode d'emploi.
4. Bouton Shape - Lorsque la touche (voir n° 3 ci-dessus) est enfoncée, ce réglage
est actif. Il applique un filtre de 20 sur la fréquence sélectionnée, ce qui vous permet
de personnaliser l'effet de la courbe Shape à votre guitare basse. Plus vous tournez le
bouton Shape vers la droite, plus le ltre aecte les hautes fréquences ; plus vous le
tournez vers la gauche, plus il aecte les basses fréquences. Lorsqu'il est en position
maximum, le ltre est appliqué à la bande de fréquences autour de 1 kHz ; lorsqu'il
est en position minimum, il est appliqué à la bande de fréquences autour de 80 Hz.
Consultez la section, “Effets du réglage Shape” en page 11 de ce mode d'emploi.
5. Low EQ - Ce réglage permet jusqu'à 15 dB (environ) d'atténuation/accentuation à
100 Hz, avec une courbe de réponse en cloche. Lorsque le bouton est placé sur la position centrale (“0”), aucune modification n’est apportée au signal (la réponse est plate).
Tournez-le à droite du repère “0” pour accentuer les fréquences, ou à gauche du repère
“0” pour les atténuer. Pour plus d’informations, consultez la section sur l’égalisation à
la page 11 de ce mode d’emploi.
6. Mid EQ - Ce réglage permet jusqu'à 15 dB (environ) d'atténuation/accentuation à
300 Hz, avec une courbe de réponse en cloche. Lorsque le bouton est placé sur la position centrale (“0”), aucune modification n’est apportée au signal (la réponse est plate).
Tournez-le à droite du repère “0” pour accentuer les fréquences, ou à gauche du repère
“0” pour les atténuer. Pour plus d’informations, consultez la section sur l’égalisation à
la page 11 de ce mode d’emploi.
FRANÇAIS
17

Visite guidée — Face avant
7. High EQ - Ce réglage permet jusqu'à 15 dB (environ) d'atténuation/accentuation à
5 kHz, avec une courbe de réponse de type Baxendall. Lorsque le bouton est placé sur
la position centrale (“0”), aucune modification n’est apportée au signal (la réponse est
plate). Tournez-le à droite du repère “0” pour accentuer les fréquences, ou à gauche du
repère “0” pour les atténuer. Pour plus d’informations, consultez la section sur l’égalisation à la page 11 de ce mode d’emploi.
8. Sortie Direct - Cette embase XLR mâle symétrique basse impédance porte le signal
à niveau micro pré-égalisation (et pré-volume) du HS1200. Utilisez cette sortie pour la
connexion du HS1200 à un boîtier de Direct (DI) ou à l'entrée micro XLR d'une console
de sonorisation ou d'enregistrement. Le niveau de ce signal est supérieur d'environ
6 dB au niveau d'entrée.
FRANÇAIS
9. Embase casque (Headphones) - Connectez votre casque stéréo (600 Ohms maxi-
mum) à cette sortie stéréo en Jack 6,35 mm. Lorsque vous insérez une fiche dans cette
embase, le haut-parleur du HS1200 est coupé, ce qui vous permet de travailler au
casque sans déranger votre entourage. Le niveau de la sortie casque varie avec la position du bouton de volume — une position excessive qui entraînerait une saturation
du haut-parleur entraînera de la même façon une saturation du casque.
10. Interrupteur secteur Power - Utilisez cet interrupteur pour placer le HS1200 sous
ou hors tension.
11. Témoin d'alimentation à Led - S'allume lorsque le HS1200 est sous tension.
ATTENTION : Le HS1200 peut générer des niveaux sonores dans le casque qui peuvent être extrêmement élevés : Commencez toujours par régler le bouton de volume
au minimum et montez progressivement le niveau. Les bruits de "clic" indiquent la
présence d'une distorsion et de dommages possibles au casque (et/ou à votre audition !). Veillez à ne JAMAIS utiliser des niveaux sonores excessifs !
18
Visite guidée — Face arrière
FUSE
1. Porte fusible - Insérez un fusible de 3 Ampères, 250 Volts, pour l'utilisation avec
une tension secteur de 115 Volt. Utilisez des fusibles à fusion lente.
2. Sortie haut-parleur - En utilisation normale, le haut-parleur interne est connecté à
cette sortie Jack 6,35 mm mono. Si vous le souhaitez, vous pouvez remplacer ce hautparleur par une enceinte externe de 8 Ohms, bien que cela ne soit pas recommandé.
ATTENTION : Du fait du niveau de sortie élevé et du caractère basse fréquence du
signal généré par le HS1200, nous recommandons l'utilisation exclusive du hautparleur interne. Si vous souhaitez connecter une enceinte externe, veillez à ce que
son impédance soit de 8 Ohms. Utilisez une enceinte prévue pour l'utilisation avec
un amplificateur basse.
FRANÇAIS
19
Mise en oeuvre et utilisation du Kickback
o
La procédure de configuration de votre combo basse
Hartke HS1200 KickBack™ est très simple et ne prend que
quelques minutes :
1. Retirez l’ampli de son emballage (conservez-le pour tout
retour en atelier) et choisissez son emplacement. Pour
éviter tout problème de surchauffe, veillez à ce que la face
arrière ne soit pas obstruée et que l’amplificateur soit suffisamment ventilé. Le HS1200 peut être utilisé à plat sur le
sol ou en position inclinée (position “KickBack™”), ce qui
permet d'améliorer la dispersion sonore et la réponse dans
les hautes fréquences (comme indiqué ci-dessous):
FRANÇAIS
2. Le HS1200 dispose d'un connecteur (face arrière) permettant de connecter le haut-parleur interne à la sortie de l'ampli (section n° 2 en page 5 de ce mode d'emploi). Vérifiez
que la fiche soit complètement insérée dans l'embase. Si
vous utilisez une enceinte externe, connectez-la à la sortie
de l'amplificateur par un Jack 6,35 mm mono. Utilisez une
enceinte basse de puissance suffisante et d'impédance de 8
Ohms. Il est cependant recommandé d'utiliser uniquement
le haut-parleur interne. Veillez à ne jamais placer l'ampli
sous tension s'il n'est pas connecté à une enceinte ou au
haut-parleur interne.
3. Connectez ensuite la fiche secteur à une prise secteur
avec terre. Ne placez pas encore le HS1200 sous tension.
4. Utilisez un câble instrument pour relier votre basse à
l'entrée Input de la face avant. En face avant du HS1200,
tournez le bouton de volume au minimum, réglez les trois
boutons d'égalisation en position “0” (au centre) et désactivez la fonction Shape (touche relâchée).
5. Appuyez sur l'interrupteur Power situé à l'avant du
combo HS1200 pour le placer sous tension. La Led s'allume
alors.
20
 Loading...