

Page 1
INPUT 1 INPUT 2
20dBU 20dBU
DIRECT OUT
BALANCED
<100Ω –20dBu
Hartke
0
1
2
3
456
7
8
9
10
90
100
115
145
215
320
450
770
850
900
1K
1
2
3
4
5
6
7
8
9
MIN MAX
-12
-9
-6
-30+3
+6
+9
+12
-15 +15
-12
-9
-6
-30+3
+6
+9
+12
-15 +15
-12
-9
-6
-30+3
+6
+9
+12
-15 +15
-12
-9
-6
-30+3
+6
+9
+12
-15 +15
VOLUME SHAPE INTENSITY LOW MID LOW MID HIGH HIGH
HA3000
CLIP
PROTECT
POWER
HIGH
Hartke
AUDIO MUTE
INPUT 1 INPUT 1
–20dBU –20dBU
0
1
2
3
456
7
8
9
10
1
2
3
456
7
8
9
MIN
MAX
VOLUME SHAPE INTENSITY D BASS LOW MID LOW
FREQ
BANDWIDTH
HA4000
90
100
115
145
215
320
450
770
850
900
1K 40
50
63
85
125
158
224
354
395
398
400 300
354
500
790
1.1K
1.6K
2.5K
5K
5.2K
5.8K
6K
+6dB
0 +12
–15 +15
–15 +15
00
–15 +15
0
–15 +15
0
MID HIGH FREQ BANDWIDTH
CLIP
PROTECT
POWER
Hartke
MODEL HA4000
MODEL HA3000
BASS
AMPLIFIER
HA4000/HA3000
OWNERS MANUAL
Page 2

2
Produced by On The Right Wavelength for Samson Technologies Corp.
Copyright 1998, Samson Technologies Corp.
Printed September, 1998
Samson Technologies Corp.
575 Underhill Blvd.
P.O. Box 9031
Syosset, NY 11791-9031
Phone: 1-800-3-SAMSON (1-800-372-6766)
Fax: 516-364-3888
Table of Contents
ENGLISH
Introduction 3
HA3000 / HA4000 Features 4
Guided Tour 5
HA3000 Front Panel 5
HA3000 Rear Panel 6
HA4000 Front Panel 7
HA4000 Rear Panel 9
Setting Up and Using Your HA3000 / HA4000 11
Using Equalization and Shape 13
Specifications 45
FRANÇAIS
Introduction 15
Caractéristiques 16
Visite guidée 17
Face avant du HA3000 17
Face arrière du HA3000 18
Face avant du HA4000 19
Face arrière du HA4000 21
Paramétrage et utilisation de votre HA3000 / HA4000 23
Spécifications 45
DEUTSCHE
Einleitung 25
Systemmerkmale 26
Übersicht 27
Vorderseite des HA3000 27
Rückseite des HA3000 28
Vorderseite des HA4000 29
Rückseite des HA4000 31
Einstellung und Bedienung Ihres HA3000 / HA4000 33
Technische Daten 45
ESPAÑOL
Introducción 35
Características 36
Visita Guiada 37
Cara delantera del HA3000 37
Cara trasera del HA3000 38
Cara delantera del HA4000 39
Cara trasera del HA4000 41
Instalación y utilización de su HA3000 / HA4000 43
Especificaciones 45
Page 3

Introduction
We know you don’t like reading owners manuals, but you’ve just purchased one of the
finest bass amplifiers around, and we want to tell you about it! So, before you plug in and
start popping and slapping, we’d like to suggest you take just a few moments out to scan
these pages. We’ll make it as painless as possible, we promise—and, who knows, you
might just pick up a tip or two.
Both the HA3000 and HA4000 are optimized for use with electric bass instruments.
The two models differ in their power ratings—the HA3000 provides 300 watts of power
(into 4 ohms), while the HA4000 provides 400 watts of power (into 4 ohms)—and the
HA4000 also provides a number of advanced features, such as parametric equalization
and a dedicated subwoofer output. You’ll find either to be an ideal bass amplifier for live
performance use in medium and large-size venues and in recording environments as well.
In these pages, you’ll find a detailed description of the many features of the HA3000 and
HA4000 Bass Amplifiers, as well as a guided tour through their front and rear panels,
step-by-step instructions for setting up and using the amp, additional information about
equalization and a unique Shape control, plus full specifications. You’ll also find a
warranty card enclosed—please don’t forget to fill it out and mail it so that you can receive
online technical support and so we can send you updated information about this and other
Hartke and Samson products in the future.
SPECIAL NOTE: Should your Hartke HA3000 or HA4000 Bass Amplifier ever require
servicing, a
Return Authorization (RA) number is necessary. Without this number, the unit
will not be accepted. If purchased in the United States, please call Samson at
1-800-372-6766 for a Return Authorization number prior to shipping. Please retain the
original packing materials and, if possible, return the unit in its original carton and packing
materials. If purchased outside of the United States, contact your local distributor for
servicing information.
3
ENGLISH
Page 4

HA3000 / HA4000 Features
The Hartke HA3000 and HA4000 offer all the newest concepts in state-of-the-art bass
amplification. Here are some of their main features:
• Power to spare—in the case of the HA3000, 300 watts into 4 ohms, and, in the case of
the HA4000, a whopping 400 watts into 4 ohms.
• Two independent inputs that accommodate both passive and active bass guitars.
It is almost impossible to overload the input of your HA3000 or HA4000!
• Dual speaker outputs so you can connect two 8 ohm speaker cabinets without the
need for daisy-chaining.
• Protection relay circuitry that protects connected speakers from dangerous overloading
and also prevents “thumps” when powering on or off.
• Fan-cooled to avoid thermal and overheating problems.
• Dual effect loop send and return jacks (one pair post-eq and the other pre-eq) that
allow you to connect to professional outboard effects processors.
• Electronically balanced XLR Direct and Preamp outputs provide a convenient means of
routing signal to professional mixing consoles in both live performance and recording
environments. In addition, an unbalanced 1/4" Line output allows you to connect
slave amplifiers.
• Ground lift switch helps prevent hum or buzz from entering the Direct Out and Preamp
Out signals.
• Four bands of high-quality equalization, allowing you to create a broad range of tonal
colors for your bass instrument. In the HA4000, the two mid-bands are fully
parametric, with sweepable center frequency and adjustable bandwidth control.
In addition, the HA4000 provides a fifth, “DBASS” (Deep Bass) band—a harmonic
enhancer which adds extremely low frequencies to your bass signal.
• A unique contour filtering system called “Shape” which activates a multi-band
equalization curve and notch filter specially designed to enhance the sound of the
electric bass. Front-panel Shape and Intensity controls allow you to continuously
sweep the filter through various frequency areas in order to customize the effect of
the curve to the specific tonal characteristics of your particular bass instrument.
• In the HA4000, a unique dedicated “SBASS” (Sub Bass) output provides subharmonic
line-level signal for connection to an external amplifier driving a subwoofer.
• In the HA4000, a front-panel Audio Mute control and rear-panel Mute footswitch input
allow you to temporarily silence all outputs—except the dedicated Tuner output—while
tuning your bass.
• Side handle for convenient, easy transporting.
• Rugged construction make both the HA3000 and HA4000 eminently roadworthy.
4
ENGLISH
Page 5
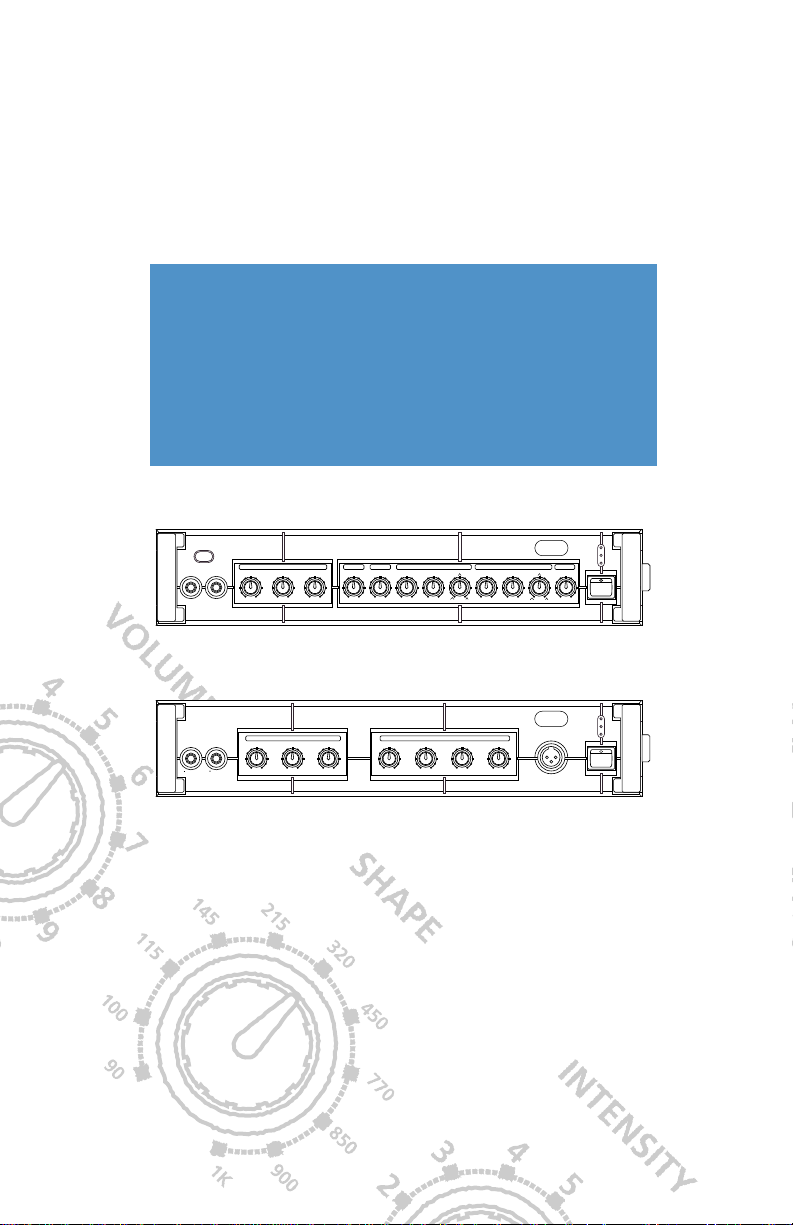
Guided Tour - HA3000 Front Panel
1. Inputs - Connect your bass guitar to one of these standard 1/4" unbalanced jacks.
If your bass has passive electronics (that is, if it has no battery), connect it to Input 1, which
is designed to handle low-level signals. If your bass has active electronics (that is, if it has
a battery), connect it to Input 2, which employs a 10 dB pad and is designed to handle
hotter bass pickup signals.
2. Volume control - This is the overall volume control. For best signal-to-noise ratio, keep
the output of your bass at or near maximum and set the HA3000 Volume to the desired
level.
3. Shape control - In conjunction with the Intensity control (see #4 below), this control
applies a specialized 20 dB notch filter to the specified frequency area so that you can
customize the effect of the Shape curve to best complement your particular bass
instrument. Moving the Shape control clockwise causes the notch filter to be applied to
higher frequencies, while moving it counterclockwise causes it to be applied to lower
frequencies. At the fully clockwise position, the filter is applied to the 1 kHz frequency
area; this will act to attenuate mid-range frequencies and give your bass a deep, low tone.
At the fully counterclockwise position, the filter is applied to the 90 Hz frequency area; this
will act to attenuate low frequencies and give your bass a biting, trebly sound. For more
information, see the “Using Equalization and Shape” section on page 11 in this manual.
4. Intensity control - Determines the degree to which the Shape curve (set with the
Shape control; see #3 above) affects the signal; the higher the Intensity, the greater the
effect of the notch filter. When set to 0, the Shape curve has no effect.
5. EQ controls - These four controls provides approximately 15 dB of cut or boost at each
of four frequency areas: 80 Hz (Low), 220 Hz (Low Mid), 770 Hz (High Mid), and 5 kHz
(High). When the equivalent knob is at the 12 o’clock (“0”) position, there is no boost or
attenuation (flat response). As it is turned clockwise from the “0” position, the
corresponding frequency area is boosted; as it is turned counterclockwise from the “0”
position, the corresponding frequency area is attenuated. For more information, see the
“Using Equalization and Shape” section on page 11 in this manual.
6. Direct Out - This standard balanced XLR jack provides an instrument-level output
signal which is pre-EQ, pre-Shape and pre-Volume. This is generally used to send “dry”
signal from the HA3000 to a PA system or recording mixing console.
7. Status LEDs - The bottom “Power” LED lights whenever the HA3000 is powered on
(see #8 below). The top “Clip” LED lights whenever the output signal rises to an
unacceptably high distortion level. The center “Protection” LED goes on for approximately
five seconds when the HA3000 is powered on and fades slowly when it is powered off.
While it is lit, all connected speakers are muted via mechanical relay, thus preventing any
“thump” from occurring.
8. Power switch - Use this to power the HA3000 on or off.
5
ENGLISH
1
INPUT 1 INPUT 2
20dBU 10dBU
2
Hartke
VOLUME SHAPE INTENSITY LOW MID LOW MID HIGH HIGH
456
3
7
8
2
1
9
0
10
4
3
320
5
4
215
450
145
115
100
90
6
770
3
850
2
1
900
1K
MIN MAX
-30+3
7
-6
8
-9
-12
9
-15 +15
5
-30+3
-30+3
-30+3
-6
+6
+9
-9
-12
+12
-15 +15
+6
+6
-6
-6
+9
-9
-12
+12
-15 +15
+6
+9
+9
-9
-12
+12
+12
-15 +15
6
HA3000
DIRECT OUT
BALANCED
<100Ω –20dBu
7
8
CLIP
PROTECT
POWER
Page 6
6
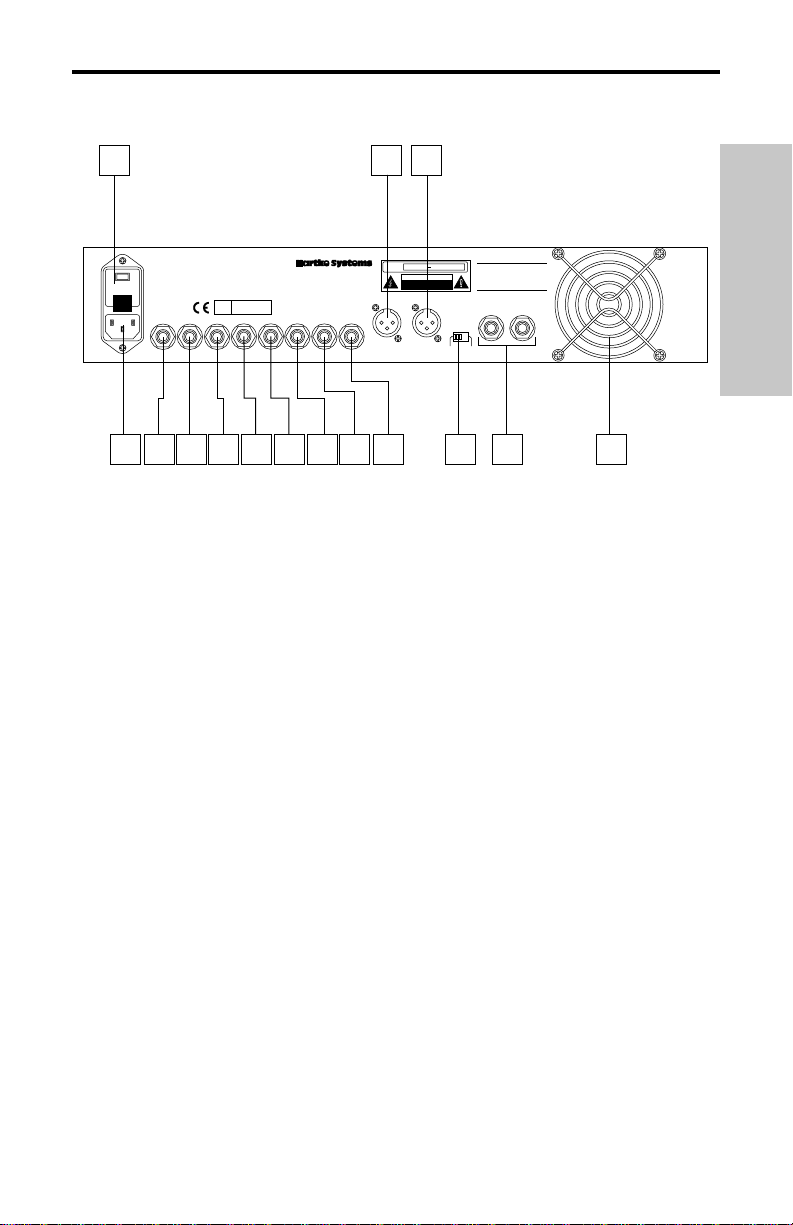
1. Fuse holder - Holds a 5A/250V fuse for 115 volt operation or a 2.5A/250V fuse for
230 volt operation
2. AC input - Connect the supplied standard 3-pin “IEC” plug here.
3. Send Pre - Use this 1/4" unbalanced jack to send signal to a professional outboard
effects processor.* Output level is approximately 0 dB to +4 dB and is pre-EQ and
pre-Shape but post-Volume control.
4. Return Pre - Use this 1/4" unbalanced jack to return signal from a professional
outboard effects processor.* Signal is returned before the EQ and Shape controls but
after the Volume control.
5. Send Post - Use this 1/4" unbalanced jack to send signal to a professional outboard
effects processor.* Output level is approximately 0 dB to +4 dB and is post-EQ,
post-Shape, and post-Volume control.
6. Return Post- Use this 1/4" unbalanced jack to return signal from a professional
outboard effects processor.* Signal is returned after the EQ, Shape and Volume controls.
7. Line Out - This standard unbalanced 1/4" jack provides a line-level (+4 dBu) post-EQ,
post-Shape and post-Volume output signal from the HA3000. You’ll usually use this to
connect the HA3000 to additional slave amplifiers.
8. Preamp Out - This standard balanced XLR jack provides a -20 dBu level post-EQ,
post-Shape and post-Volume output signal from the HA3000. This is generally used to
send the sound of the HA3000 (that is, the equalized, shaped signal) to a PA system or
recording mixing console.
9. Ground Lift switch - Used to reduce any hum or buzz that may be present in the
Direct Out and Preamp Out signals (see #6 on page 3 and #8 above). When set to the
right, “Float” position, chassis ground is removed from XLR pin 1.
10. Speaker outputs - Connect any 4, 8, or 16 ohm bass cabinet(s) to these standard
unbalanced 1/4" jacks. WARNING: Because of the high power levels and low
frequency content of the signal generated by the HA3000, use only appropriately
rated speaker cabinets (at least 300 watts at 4 ohms) that are specifically designed
for bass instruments. The minimum impedance of all connected speakers must not
go below 4 ohms (i.e., don’t plug in two 4-ohm cabinets!).
11. Fan
- This variable speed fan provides vital cooling to your HA3000 (the hotter the
amp gets, the faster the fan blows!). Make sure that it is kept free of all obstructions and
that cool, fresh air is accessible at all times. Also, try to ensure that the HA3000 is used in
a dust-free environment.
* In-line effects (such as footpedals) intended for low signal levels should be placed
between your bass and the front panel HA3000 Input and not connected with the rear
panel Send/Return jacks.
Guided Tour - HA3000 Rear Panel
ENGLISH
9
1
2
3
4
6
5
7
8
10
11
CAUTION
TO PREVENT SHOCK,DO NOT OPEN. NO USER SERVICEABLE PARTS INSIDE. REFER SERVICING TO QUALIFIED
FUSE
SERVICE PERSONNEL. TO PREVENT FIRE OR SHOCK
7A/250V(115V)
HAZARD. DO NOT EXPOSE TO RAIN OR MOISTURE.
3.5A/250V(230V)
CAUTION; REPLACE WITH THE
SAME TYPE FUSE AS INDICATED.
UTILISER UN FUSIBLE DE RECHANGE
DE MEME TYPE.
SEND PRE
<50Ω 0dBu
RETURN PRE
10KΩ 0dBu
S / N
SEND POST
<50Ω 0dBu
~AC INPUT
115/230V, 50/60Hz
RETURN POST
10KΩ 0dBu
Distributed Exclusively by
Samson Technologies Corp.
MODEL HA3000 (300 WATTS)
8Ω = 180 WATTS
4Ω = 300 WATTS
LINE OUT
<50Ω +4dBu
POWER
RATING
115V/230V 50HZ/60Hz 500W
CAUTION
RISK OF ELECTRIC SHOCK
DO NOT OPEN
PRE AMP OUT
BALANCED
<100Ω –20dBu
CHASSIS GROUND
LIFT REMOVES
CHASSIS GROUND
FROM XLR PIN1
GROUND
FRAME FLOAT
AVIS;
RISQUE DE CHOC ELECTRIQUE
NE PAS OUVRIR
DO NOT EXPOSE THIS EQUIPMENT
TO RAIN OR MOISTURE.
SPEAKER OUTPUT
300WATT RMS/4ohms
MADE IN KOREA
Page 7
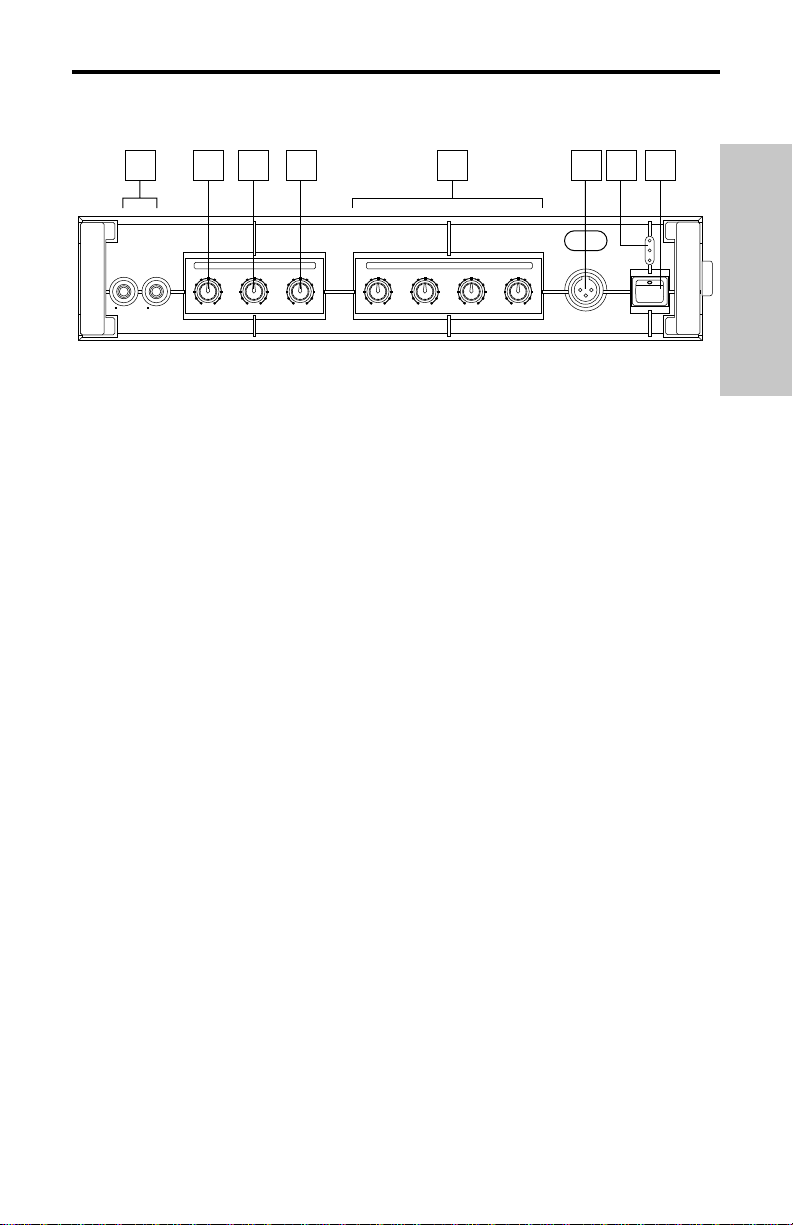
Guided Tour - HA4000 Front Panel
1. Audio Mute switch - When pressed in (down), all of the HA4000 outputs except the
rear-panel Tuner Out (see #8 on page 8) are temporarily silenced, muting the audio signal
and allowing you to easily tune your bass between songs. To restore audio signal to all
outputs (including the Tuner Out, which is always active), simply press the Audio Mute
switch again so it it in its “out” (up) position. A similar function can be provided by a
footswitch (see #3 on page 7).
2. Inputs - Connect your bass guitar to one of these standard 1/4" unbalanced jacks.
If your bass has passive electronics (that is, if it has no battery), connect it to Input 1, which
is designed to handle low-level signals. If your bass has active electronics (that is, if it has
a battery), connect it to Input 2, which employs a 10 dB pad and is designed to handle
hotter bass pickup signals.
3. Volume control - This is the overall volume control. For best signal-to-noise ratio, keep
the output of your bass at or near maximum and set the HA4000 Volume to the desired
level.
4. Shape control - In conjunction with the Intensity control (see #5 below), this control
applies a specialized 20 dB notch filter to the specified frequency area so that you can
customize the effect of the Shape curve to best complement your particular bass
instrument. Moving the Shape control clockwise causes the notch filter to be applied to
higher frequencies, while moving it counterclockwise causes it to be applied to lower
frequencies. At the fully clockwise position, the filter is applied to the 1 kHz frequency
area; this will act to attenuate mid-range frequencies and give your bass a deep, low tone.
At the fully counterclockwise position, the filter is applied to the 90 Hz frequency area; this
will act to attenuate low frequencies and give your bass a biting, trebly sound. For more
information, see the “Using Equalization and Shape” section on page 11 in this manual.
5. Intensity control - Determines the degree to which the Shape curve (set with the
Shape control; see #4 above) affects the signal; the higher the Intensity, the greater the
effect of the notch filter. When set to 0, the Shape curve has no effect.
7
ENGLISH
1
AUDIO MUTE
INPUT 1 INPUT 2
–20dBU –10dBU
2
3
4
Hartke
VOLUME SHAPE INTENSITY DBASS LOW MID LOW
320
456
215
450
145
3
2
1
0
770
7
115
850
8
9
100
900
90
1K 40
10
6
5
456
3
7
8
2
1
9
MIN
MAX
+6dB
0 +12
7
00
–15 +15
–15 +15
BANDWIDTH
FREQ
158
125
224
85
354
63
395
50
398
400 300
8 9
HA4000
MID HIGH FREQ BANDWIDTH
0
1.6K
1.1K
2.5K
790
5K
500
5.2K
354
5.8K
6K
–15 +15
–15 +15
10
CLIP
PROTECT
POWER
HIGH
0
10
Page 8

Guided Tour - HA4000 Front Panel
6. DBASS control - This unique harmonic enhancer adds ultra-low frequencies (“Deep
Bass”) to the output of the HA4000. As you move the knob clockwise, more and more of
this signal is added (up to 12 dB). When set to 0, no Deep Bass signal is added.
7. Low EQ control - This control provides approximately 15 dB of cut or boost at 140 Hz,
with a peak (bell) curve. When the knob is at the 12 o’clock (“0”) position, there is no
boost or attenuation (flat response). As it is turned clockwise from the “0” position, the
frequency area is boosted; as it is turned counterclockwise from the “0” position, the
frequency area is attenuated. For more information, see the “Using Equalization and
Shape” section on page 11 in this manual.
8. Mid Low and Mid High EQ controls - These controls provide two bands of fully
parametric equalization for total customization of the HA4000 to match your instrument,
selected speaker, and style of playing. Approximately 15 dB of cut or boost are available
for each band. When the “Mid Low” or “Mid High” knob is at the 12 o’clock (“0”) position,
there is no boost or attenuation (that is, flat response). As it is turned clockwise from the
“0” position, the selected frequency area is boosted; as it is turned counterclockwise from
the “0” position, the selected frequency area is attenuated. The frequency of the Mid Low
control can be swept between 40 and 400 Hz, while the frequency of the Mid High control
can be swept between 300 Hz and 6 kHz. Each band also has an associated bandwidth
control. As this is turned clockwise, the width of the equalization curve is narrowed and
only a small frequency range is affected; as it is turned counterclockwise, the width of the
equalization curve is expanded and a greater frequency range is affected. For more
information on the use of these controls, see the “Using Equalization and Shape” section
on page 11 in this manual.
9. High EQ control - This shelving control provides approximately 15 dB of cut or boost
at 5 kHz. When the knob is at the 12 o’clock (“0”) position, there is no boost or attenuation
(flat response). As it is turned clockwise from the “0” position, the frequency area is
boosted; as it is turned counterclockwise from the “0” position, the frequency area is
attenuated. For more information, see the “Using Equalization and Shape” section on
page 11 in this manual.
10. Status LEDs - The bottom “Power” LED lights whenever the HA4000 is powered on
(see #11 below). The top “Clip” LED lights whenever the output signal rises to an
unacceptably high distortion level. The center “Protection” LED goes on for approximately
five seconds when the HA4000 is powered on and fades slowly when it is powered off.
While it is lit, all connected speakers are muted via mechanical relay, thus preventing any
“thump” from occurring.
11. Power switch - Use this to power the HA4000 on or off.
8
ENGLISH
Page 9
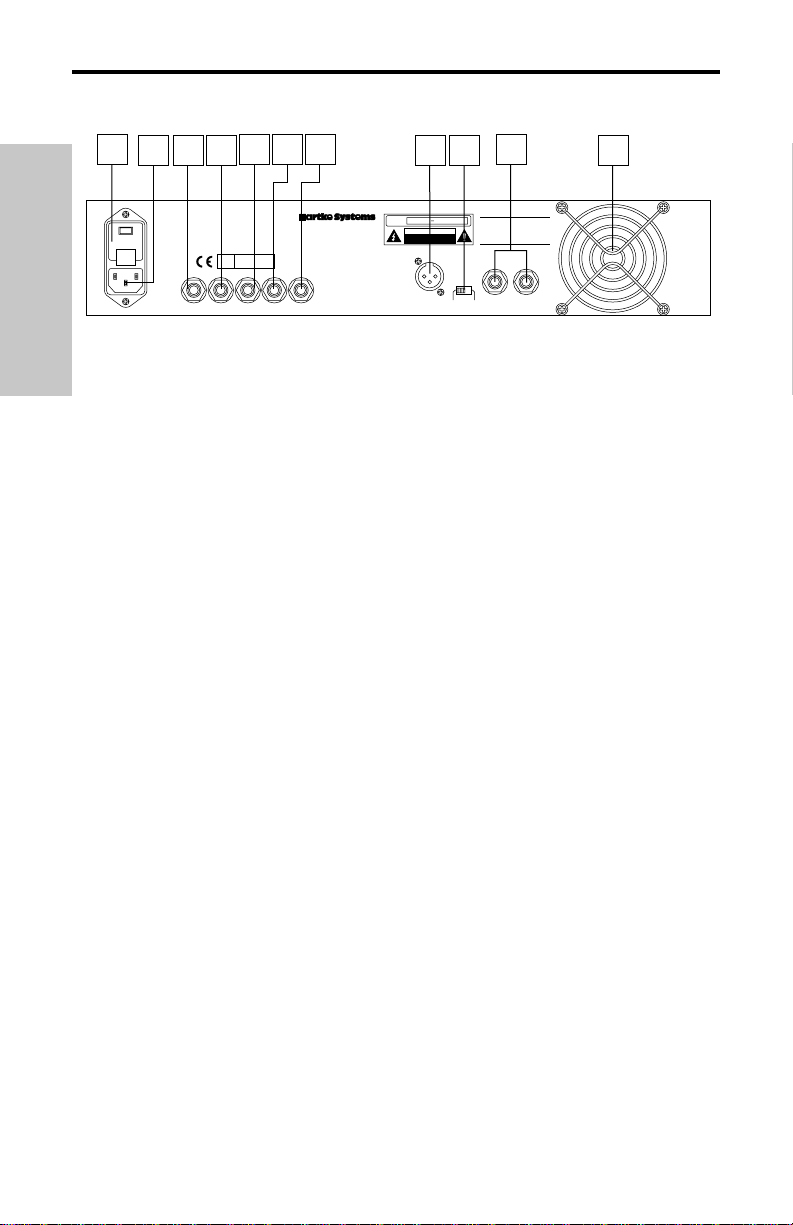
Guided Tour - HA4000 Rear Panel
1. Fuse holder - Holds a 8A/250V fuse for 115 volt operation or a 4A/250V fuse for
230 volt operation
2. AC input - Connect the supplied standard 3-pin “IEC” plug here.
3. Mute Footswitch - Connect a standard single-pole latched (maintained contact)
footswitch to this 1/4" unbalanced jack here. To activate the footswitch, press in the frontpanel Audio Mute switch (see #1 on page 5) so that it is in the “in” (down) position, then
step on the footswitch. When you next step on the footswitch, all of the HA4000 outputs
except the rear-panel Tuner Out (see #8 on page 8) are temporarily silenced, muting audio
signal and allowing you to easily tune your bass between songs. To restore audio signal to
all outputs (including the Tuner Out, which is always active), simply step on the footswitch
again. To disable the footswitch, press the front-panel Audio Mute switch so that it is in the
“out” (up) position
4. Send Pre - Use this 1/4" unbalanced jack to send signal to a professional outboard
effects processor.* Output level is approximately 0 dB to +4 dB and is pre-EQ and
pre-Shape but post-Volume control.
5. Return Pre- Use this 1/4" unbalanced jack to return signal from a professional outboard
effects processor.* Signal is returned before the EQ and Shape controls but after the
Volume control.
6. Send Post - Use this 1/4" unbalanced jack to send signal to a professional outboard
effects processor.* Output level is approximately 0 dB to +4 dB and is post-EQ,
post-Shape, and post-Volume control.
7. Return Post- Use this 1/4" unbalanced jack to return signal from a professional
outboard effects processor.* Signal is returned after the EQ, Shape and Volume controls.
* In-line effects (such as footpedals) intended for low signal levels should be placed
between your bass and the front panel HA4000 Input and not connected with the rear
panel Send/Return jacks.
9
ENGLISH
1
CAUTION
TO PREVENT SHOCK,DO NOT OPEN. NO USER SERVICE-
FUSE
ABLE PARTS INSIDE. REFER SERVICING TO QUALIFIED
8A/250V(115V)
SERVICE PERSONNEL. TO PREVENT FIRE OR SHOCK
4A/250V(230V)
HAZARD. DO NOT EXPOSE TO RAIN OR MOISTURE.
CAUTION; REPLACE WITH THE
SAME TYPE FUSE AS INDICATED.
UTILISER UN FUSIBLE DE RECHANGE
DE MEME TYPE.
SEND PRE
<50Ω 0dBu
RETURN PRE
10KΩ 0dBu
S / N
~AC INPUT
115/230V, 50/60Hz
MUTE FOOT
SWITCH
2 3 4 5 6
SEND POST
<50Ω 0dBu
RETURN POST
10KΩ 0dBu
Distributed Exclusively by
Samson Technologies Corp.
MODEL HA4000 (400 WATTS)
8Ω = 290 WATTS
4Ω = 400 WATTS
S BASS OUT
TUNER OUT
<50Ω +4dBu
<50Ω 20dBu
8 9 10
7
LINE OUT
<50Ω +4dBu
11
DIRECT OUT
BALANCED
<100Ω –20dBu
POWER
RATING
12
115V/230V 50HZ/60Hz 740W
CAUTION
RISK OF ELECTRIC SHOCK
DO NOT OPEN
PRE AMP OUT
BALANCED
<100Ω –20dBu
CHASSIS GROUND
CHASSIS GROUND
LIFT REMOVES
FROM XLR PIN1
GROUND
FRAME FLOAT
AVIS;
RISQUE DE CHOC ELECTRIQUE
NE PAS OUVRIR
DO NOT EXPOSE THIS EQUIPMENT
TO RAIN OR MOISTURE.
SPEAKER OUTPUT
400WATT RMS/4ohms
13 14 15
MADE IN KOREA
Page 10

Guided Tour - HA4000 Rear Panel
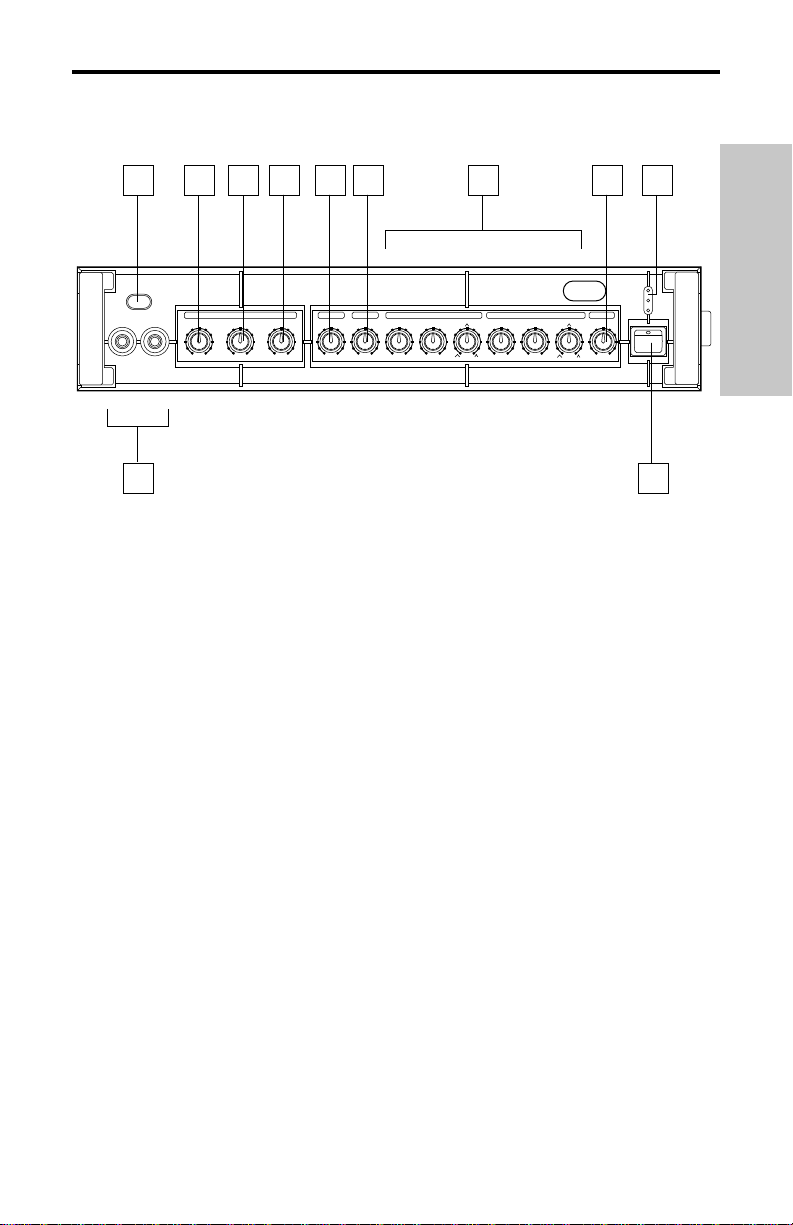
8. Tuner Out - This standard unbalanced 1/4" jack provides an instrument-level pre-EQ,
pre-Shape and pre-Volume output signal from the HA4000 suitable for connection to any
standard bass tuner. This output is always active, regardless of the setting of the
front-panel Audio Mute switch (see #1 on page 5) or the status of the Mute Footswitch
(see #3 on page 7).
9. SBASS Out - This standard unbalanced 1/4" jack provides a line-level (+4 dBu)
pre-EQ and pre-Shape (but post-Volume control) output signal which contains
subharmonic information from the HA4000. WARNING: Because of the extremely low
frequency signal output from this jack, this should only be connected to a separate
amplifier (one with a volume control) that is driving a subwoofer. Connecting the
SBASS output to an amplifier driving a standard speaker—even one designed for
bass—may cause irreparable damage to the speaker.
10. Line Out -
This standard unbalanced 1/4" jack provides a line-level (+4 dBu) post-EQ,
post-Shape and post-Volume output signal from the HA4000. You’ll usually use this to
connect the HA3000 to additional slave amplifiers.
11. Direct Out - This standard balanced XLR jack provides an instrument-level output
signal which is pre-EQ, pre-Shape and pre-Volume. This is generally used to send “dry”
signal from the HA4000 to a PA system or recording mixing console.
12. Preamp Out - This standard balanced XLR jack provides a -20 dBu level post-EQ,
post-Shape and post-Volume output signal from the HA4000. This is generally used to
send the sound of the HA4000 (that is, the equalized, shaped signal) to a PA system or
recording mixing console.
13. Ground Lift switch - Used to reduce any hum or buzz that may be present in the
Direct Out and Preamp Out signals (see #11 and #12 above). When set to the right,
“Float” position, chassis ground is removed from XLR pin 1.
14. Speaker outputs - Connect any 4, 8, or 16 ohm bass cabinet(s) to these standard
unbalanced 1/4" jacks. WARNING: Because of the high power levels and low
frequency content of the signal generated by the HA4000, use only appropriately
rated speaker cabinets (at least 400 watts at 4 ohms) that are specifically designed
for bass instruments. The minimum impedance of all connected speakers must not
go below 4 ohms (i.e., don’t plug in two 4-ohm cabinets!).
15. Fan
- This variable speed fan provides vital cooling to your HA4000 (the hotter the
amp gets, the faster the fan blows!). Make sure that it is kept free of all obstructions and
that cool, fresh air is accessible at all times. Also, try to ensure that the HA4000 is used in
a dust-free environment.
10
ENGLISH
Page 11
11
Setting Up and Using Your
HA3000 / HA4000
Setting up your Hartke Systems HA3000 or HA4000 is a simple procedure which takes
only a few minutes:
1. Remove all packing materials (save them in case of need for future service) and decide
where the amplifier is to be physically placed (we recommend you avoid putting it directly
on top of your bass speakers). To avoid potential overheating problems, make sure that
the rear panel is unobstructed and that there is good ventilation around the entire unit.
2. Begin by hooking up your bass cabinet or cabinets, using the 1/4"
unbalanced Speaker output connectors on the rear panel; it is never
a good idea to power up any amplifier that is not connected to
loudspeakers. We recommend the use of a single 4 ohm cabinet or
two 8 ohm cabinets. Any appropriately rated bass cabinet with a
minimum impedance of 4 ohms (that is, 4 ohms or greater) can be
used. In order to ensure correct phase correlation, the tip of the HA 3000 / HA4000
speaker jack should be connected to the “+” (hot) input of your loudspeaker, and the
sleeve of the speaker jack should be connected to the “-” (ground) input of your
loudspeaker.
3. Connect the supplied 3-pin “IEC” plug to the rear panel AC connector
and plug the other end into any grounded AC socket—but don’t turn the
amplifier on just yet. Because of the relay protection circuitry built into the
HA3000 / HA4000, you can even plug it into the same power strip that
other audio devices (such as a mixing console) are connected to.
You can then turn on all devices at once with the single power strip on-off
switch, with no danger of damaging connected speakers by generating
“thumps.”
CAUTION: Do not use an adapter to defeat the third
grounding pin on the AC plug or severe electric shock may
result!
4. Use a standard music instrument cable to connect your bass
to one of the Input jacks on the front panel. If your bass has
passive electronics (that is, if it has no battery), connect it to
Input 1, which is designed to handle low-voltage signals. If your
bass has active electronics (that is, if it has a battery), connect it
to Input 2, which has a 10 dB pad and is designed to handle hotter bass pickup signals.
5. On the front panel of the HA3000 / HA4000, turn the Volume and Intensity controls to
their minimum (fully counterclockwise) position and all EQ controls to their “0” (12 o’clock)
position. If you’re using an HA4000, set the DBASS control to its minimum (fully
counterclockwise) position.
6. Press the front panel Power switch in order to turn on your HA3000 /
HA4000. The Power LED will immediately light, and the Protection LED
will go on for approximately five seconds, and then switch off (you’ll hear a
click when it does).
WARNING: Hartke amplifiers can deliver very high power levels. Driven to full
power, they can damage connected loudspeakers, regardless of brand, size, or
configuration. Care should be taken not to strain connected loudspeakers as this
can cause permanent damage and will degrade the performance of the entire
system. If you see connected loudspeakers moving excessively, turn your system
down immediately or use the equalization and/or Intensity controls to reduce the
amount of subharmonic (extremely low frequency) signal.
ENGLISH
SPEAKER OUTPUT
400WATT RMS/4ohms
INPUT 1 INPUT 2
–20dBU –10dBU
Page 12

12
Setting Up and Using Your
HA3000 / HA4000
7. Set the output of your bass to maximum and then, while playing, slowly turn the Volume
control up until the desired level is achieved. It’s nearly impossible to overload the HA3000
or HA4000 input, so if you hear distortion even at low Volume settings, check for a faulty
cable (if it’s good, simply back off the output of your bass) or, if your bass has active
electronics, a low or dead battery.
8. Experiment by setting the Intensity control to its 12 o’clock
position and then turn the Shape knob both clockwise and
counterclockwise to hear the effect of the Shape curve and filter
on the sound of your bass. Leave the Intensity and Shape
knobs at the point where they best complement your particular
instrument and playing style. For more information on the use of these controls, see page
11 in this manual.
9. Adjust the equalization controls to taste (when you get a great setting that complements
your instrument and playing style, it’s a good idea to write it down for future use). For more
information on the use of these controls, see page 11 in this manual.
10. If you need to connect the HA3000 / HA4000 to a PA system or a recording mixing
console, turn it off temporarily and then connect a cable between either the Direct Out or
Preamp Out output and the mixer. (See #6 on page 3, #10 on page 8, #8 on page 4, or
#12 on page 8 for more information). If you hear any hum or buzz in the signal, try
changing the setting of the rear-panel Ground Lift switch.
11. If you need to connect the HA3000 / HA4000 to an external slave amplifier, turn it off
temporarily and then connect a cable between the Line Out output and a -20 dBu input on
the external amplifier. (See #7 on page 4, or #11 on page 8 for more information).
12. If you’re using a professional external signal processor
that has line-level inputs and outputs, turn your HA3000 /
HA4000 off momentarily and then connect a standard audio
cable between one of the rear panel Send jacks and your
effects processor input and another standard audio cable
between one of the Return jacks and your effects processor output (if required, multiple
effects processors can be daisy-chained together, output to input). Use the Pre Send if
you want the signal to be sent pre-EQ and pre-Shape; use the Post Send if you want the
signal to be sent post-EQ and post-Shape. Use the Pre Return if you want the signal to be
returned pre-EQ and pre-Shape; use the Post Return if you want the signal to be returned
post-EQ and post-Shape. If required, both the Pre and Post sends and returns can be
used simultaneously, though in matched pairs only (severe feedback and speaker damage
can result if you use a Post Send and a Pre Return!). Once all Send and Return
connections are made, turn the HA3000 / HA4000 back on and play your bass while
adjusting the controls of your effects processor(s). For best results, set both the input and
output gain of all connected effects processor(s) to 0 dB (unity gain), so that there is no
increase or decrease in level whether the effects are switched in or out.
13. If you’re using an HA4000 and want to use a Mute Footswitch and/or tuner, turn the
power off temporarily and then connect it to the appropriate rear-panel jack (see #3 on
page 7 and #8 on page 8 for more information). If you want to use the SBASS out to send
subharmonic signal to an external amplifier driving a subwoofer, turn the power off
temporarily before making the connection (see #9 on page 8 for more information).
If you encounter difficulty with any aspect of setting up or using your Hartke HA3000 or
HA4000, call Samson Technical Support (1-800-372-6766) between 9 AM and 5 PM EST.
ENGLISH
SHAPE INTENSITY
320
215
145
115
100
90
4
450
770
3
850
2
1
900
1K
MIN MAX
SEND PRE
<50Ω 0dBu
RETURN PRE
10KΩ 0dBu
SEND POST
<50Ω 0dBu
5
6
7
8
9
RETURN POST
10KΩ 0dBu
Page 13
13
Using Equalization and Shape
The Hartke Systems HA3000 and HA4000 Bass Amplifiers give you enormous control
over shaping the sound of your bass, using a process called equalization. To understand
how this works, it’s important to know that every naturally occurring sound consists of a
broad range of pitches, or
frequencies, combined together in a unique way. This blend is
what gives every sound its distinctive tonal color. The HA3000 / HA4000 EQ controls allow
you to alter a sound by boosting or attenuating specific frequency areas—they operate
much like the bass and treble controls on your hi-fi amp, but with much greater precision.
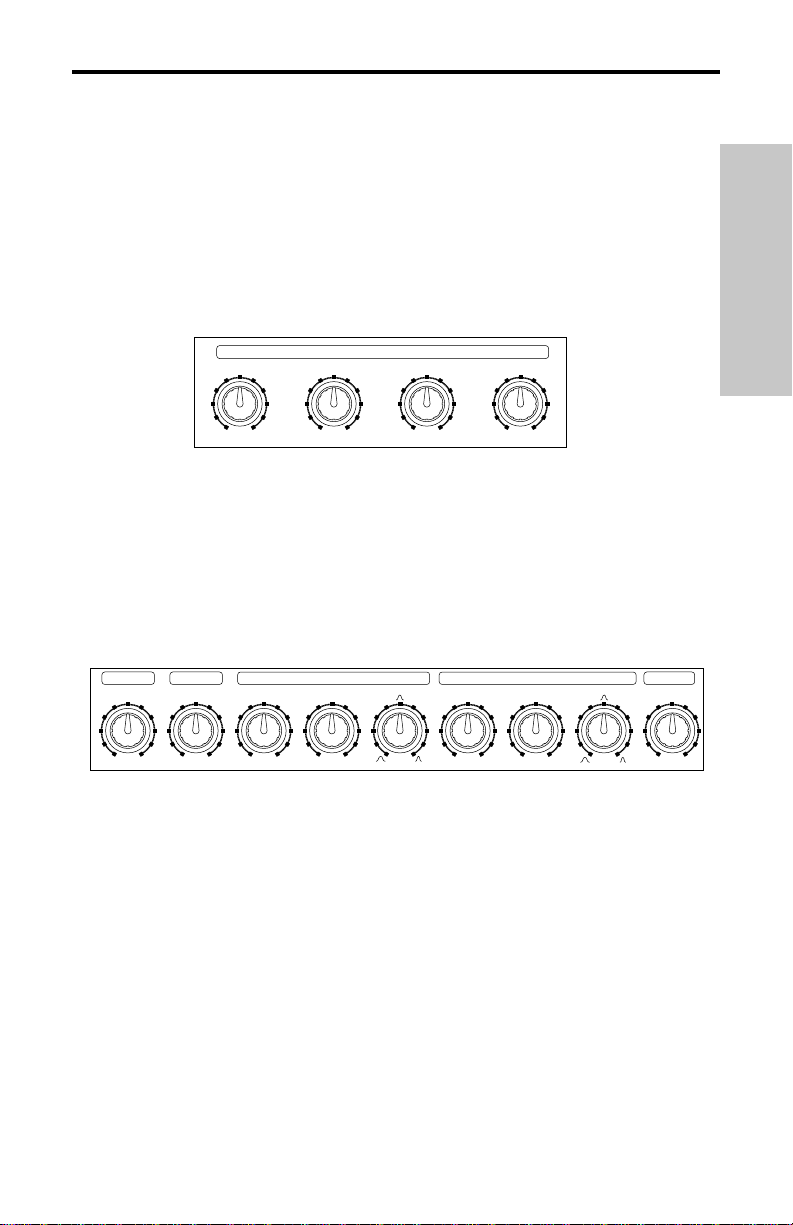
The HA3000 offers four bands of equalization. Each EQ knob (labeled
Low, Mid Low,
Mid High and High, respectively) affects a different frequency area (80 Hz, 220 Hz, 770 Hz
and 5 kHz, respectively) and provides approximately 15 dB of boost and attenuation.
We carefully selected these frequency areas because they have maximum impact on bass
signals. For example, the Low (80 Hz) control affects the very lowest audible frequencies
(in fact, most humans cannot hear below 20 Hz), while the High (5 kHz) control affects the
“twang” of a bass string.
The HA4000 also provides four bands of equalization, plus a special “DBASS” (for “Deep
Bass”) band, which adds ultra-low subharmonic frequencies to the sound. As you move its
knob clockwise, more and more of this signal is added (up to 12 dB). The
Low and High
EQ knobs affect the frequency areas of 140 Hz and 5 kHz, respectively. However, the two
mid bands—Mid Low and Mid High—are fully parametric, which means that you can not
only choose the frequency you want affected (between 40 Hz and 400 Hz in the case of
Mid Low, and between 300 Hz and 6 kHz in the case of Mid High), but you can also set
something called
bandwidth for each frequency area. As you turn the Bandwidth knob
clockwise, the width of the equalization curve is narrowed and only a small frequency
range is affected; as it is turned counterclockwise, the width of the equalization curve is
expanded and a greater frequency range is affected. Narrower bandwidths give you finer
equalization control, while wider bandwidths give you broader control—kind of like a painter
choosing between a fine brush or a wide brush. As with the HA3000, all four bands of
equalization can be boosted or attenuated by approximately 15 dB.
HA3000 equalization controls
HA4000 equalization controls
ENGLISH
LOW MID LOW MID HIGH HIGH
-30+3
-6
-9
-12
-15 +15
-30+3
-6
+6
+9
-9
-12
+12
-15 +15
-30+3
+6
-6
+9
-9
-12
+12
-15 +15
-30+3
+6
-6
-15 +15
+6
+9
+12
+9
-9
-12
+12
DBASS LOW MID LOW
+6dB
0 +12
00
–15 +15
–15 +15
85
63
50
BANDWIDTH
FREQ
158
125
224
354
395
398
40
400 300
–15 +15
MID HIGH FREQ BANDWIDTH
0
1.6K
1.1K
2.5K
790
500
5K
5.2K
354
5.8K
6K
HIGH
0
–15 +15
Page 14

14
In both the HA3000 and HA4000, when an EQ knob is in its center detented position (“0”),
it is having no effect. When it is moved right of center, the particular frequency area is
being boosted; when it is moved left of center, the frequency area is being attenuated.
Turning all EQ controls up the same amount will have virtually the same effect as simply
turning up the Volume; conversely, turning them all down the same amount will have
virtually the same effect as turning down the Volume. Both approaches are pointless
(after all, that’s why we gave you a Volume control!)
In many instances, the best way to deal with equalization is to think in terms of which
frequency areas you need to attenuate, as opposed to which ones you need to boost.
Be aware that boosting a frequency area also has the effect of boosting the overall signal;
specifically, too much Low EQ boost (and, in the case of the HA4000, especially too much
“DBASS” band boost) can cause overload distortion or even damage connected speakers.
If you’re using an HA4000, it’s best to attenuate mid-range frequencies with relatively
narrow bandwidths.
In addition, a unique Shape control employs a
notch filter to remove specific frequency areas.
At the same time, it overlays a special equalization
curve that is designed to improve the sound of
electric bass instruments. This curve provides boost at certain frequency areas and
attenuation at other frequency areas. As the Shape knob is turned clockwise, the notch
filter is imposed on higher frequency areas; as it is turned counterclockwise, the filter is
imposed on lower frequency areas. At the fully clockwise position, the filter is applied to
the 1 kHz frequency area, making for a deep, rich tone; at the fully counterclockwise
position, the filter is applied to the 90 Hz frequency area, making for a bright, twangy tone.
The associated Intensity control allows you to set the depth of the Shape curve; the higher
the Intensity, the greater the effect of the notch filter. Note that, when Intensity is set to 0,
the Shape curve has no effect.
The specific EQ (and/or Shape) you will apply to your bass signal is very much dependent
upon your particular instrument and personal taste and playing style. However, here are a
few general suggestions:
• For that super-deep reggae or Motown sound, boost the Low EQ (and, in the HA4000,
the DBASS band) slightly while attenuating the High EQ. Set the Shape control to
approximately 850 Hz, with an Intensity of 5 or 6.
• To remove boxiness and make your instrument sound more “hi-fi,” try attenuating the
Mid Low and Mid High EQ controls (in the HA4000, set the frequencies to 354 Hz and
1.1 kHz, respectively, with both bandwidth controls at about 3 o’clock) and set the
Shape control to approximately 320 Hz, with an Intensity of 6 or 7.
• For a twangy, cutting sound, try boosting the High EQ (putting new roundwound strings
on your bass will help a lot also!) and set the Shape control to approximately 145 Hz,
with an Intensity of 4 or 5.
• Whenever you get a really good EQ (and/or Shape) setting for a particular instrument
or song,
write it down (you’d be amazed how easy it is to forget these things!).
As you experiment with the EQ and Shape controls of your Hartke HA3000 or HA4000,
don’t forget that your bass also provides significant EQ control in the form of its pickup and
tonal settings—this can be particularly effective in instruments that have active circuitry.
Using Equalization and Shape
ENGLISH
SHAPE INTENSITY
320
215
450
145
770
115
850
100
900
90
1K
5
4
3
2
1
MIN MAX
6
7
8
9
Page 15

Introduction
Nous savons que vous n'aimez pas lire les modes d'emploi, mais nous tenions à vous dire
que vous venez d'acheter un des meilleurs amplis de basse du marché ! Bref, avant de
brancher votre basse et de jouer et de slapper, nous vous suggérons de prendre quelques
instants et de parcourir ces pages. Nous avons essayé de les rendre le moins arides
possible, nous vous le promettons — et qui sait, vous y découvrirez peut-être une astuce
ou deux !
Le HA3000 et le HA4000 ont été tous deux optimisés pour la basse électrique, et diffèrent
par la puissance—le HA3000 offre 300 watts (sous 4 ohms), là où le HA4000 en donne
400 (toujours sous 4 ohms)—et par le fait que le HA4000 possède un certain nombre de
caractéristiques et fonctions avancées, dont un égaliseur paramétrique et une sortie
spéciale pour subwoofer. Vous vous apercevrez vite que ces amplis de basse conviennent
aussi bien aux concerts (en salles grandes ou moyennes) qu'à une utilisation en studio.
Vous trouverez dans ces pages une description détaillée des principales fonctions des
HA3000 et HA4000, ainsi qu'une "visite guidée" de leurs faces avant et arrière, des
instructions "pas par pas" pour configurer et utiliser l'ampli, ainsi que les spécifications
complètes. Vous trouverez également une carte de garantie—n'oubliez pas de la remplir
et de la poster : vous pourrez dès lors accéder à notre support technique online, et nous
vous enverrons des informations actualisées sur ces produits et d'autres, signés Hartke et
Samson.
NOTE SPECIALE : Si votre ampli basse Hartke HA3000 ou HA4000 devait retourner en
S.A.V, un numéro d'Autorisation de Retour (RA) est nécessaire. Sans ce numéro,
l'appareil sera refusé. Consultez votre importateur, et veuillez conserver l'emballage
d'origine, ce qui vous permettra de renvoyer l'appareil dans son carton original.
15
FRANÇAIS
Page 16

Caractéristiques
Les Hartke HA3000 et HA4000 offrent tous les concepts nouveaux dans l'amplification de
basse haut de gamme. Voici quelques-unes de leurs principales caractéristiques:
• De la puissance en réserve—300 watts sous 4 ohms pour le HA3000, 400 watts pour le
HA4000.
• Deux entrées indépendantes accueillant aussi bien une basse passive qu'active. Il est
presque impossible de faire saturer l'entrée du HA3000 ou du HA4000 !
• Une sortie haut-parleur doublée, ce qui vous permet de connecter deux enceintes de
8 ohms sans devoir les chaîner entre elles.
• Circuits de protection par relais, évitant toute surcharge dangereuse aux haut-parleurs,
et supprimant les "clocs" lors de l'allumage ou de l'extinction de l'amplificateur.
• Ventilateur pour éviter toute surchauffe.
• Une paire de prises d'entrée/sortie pour boucles d'effet (l'une avant, l'autre après
égalisation), permettant de relier des processeurs d'effet externes.
• Les sorties XLR Direct Out et Preamp Out permettent d'envoyer le signal de l'ampli vers
une console dans les meilleures conditions, que ce soit en concert ou en studio.
Une sortie Line Out supplémentaire permet d'envoyer la modulation à d'éventuels
amplificateurs esclaves.
• Un commutateur de levage de masse permet d'éviter tout ronronnement ou
bourdonnement sur les sorties Direct Out et Preamp Out.
• Un égaliseur quatre bandes de haute qualité permet la création de sons de basse très
variés. Sur le HA4000, les deux bandes médium sont complètement paramétriques,
avec fréquence centrale et largeur de bande variables. De plus, le HA4000 offre une
cinquième bande, “DBASS” (Deep Bass)—un enhancer qui ajoute des sousharmoniques au signal de votre basse.
• Un système de filtre de Contour exclusif, nommé “Shape”, activant une courbe
d'égalisation multibande et un filtre de type "notch", spécialement conçus pour améliorer le son d'une basse électrique. Les potentiomètres Shape et Intensity permettent de
balayer différentes régions de fréquence avec le filtre, ce qui permet d'adapter l'effet du
filtre aux caractéristiques tonales spécifiques du son de votre basse.
• Sur le HA4000, une sortie dédiée “SBASS” (Sub Bass) permet de récupérer, au niveau
ligne, les signaux sous-harmoniques évoqués plus haut, afin de pouvoir les envoyer sur
un subwoofer.
• Sur le HA4000, une commande Audio Mute et une entrée Mute pour un commutateur
au pied permet de couper momentanément toutes les sorties, sauf la sortie
accordeur—ce qui vous permet d'accorder votre basse tranquillement.
• Poignée latérale pour un transport facile et commode.
• Leur construction robuste rend les HA3000 et HA4000 idéaux pour les tournées.
16
FRANÇAIS
Page 17

Visite guidée : Face avant du HA3000
1. Entrées - Branchez votre basse sur une de ces deux prises jack standard. Si votre
basse possède une électronique passive (autrement dit, si elle n'a pas de pile), reliez-la à
l'entrée 1, conçue pour accepter des signaux de bas niveau. Si votre basse possède une
électronique active (autrement dit, si elle a une pile), reliez-la à l'entrée 2, équipée d'un
atténuateur de 10 dB et par conséquent plus apte à accueillir des niveaux assez élevés.
2. Potentiomètre Volume - Il s'agit du réglage de Volume général. Pour obtenir le
meilleur rapport signal/bruit, réglez le niveau de sortie de votre basse au maximum
(ou presque), puis ajustez le potentiomètre Volume sur le HA3000 pour obtenir le niveau
d'écoute désiré.
3. Potentiomètre Shape - Utilisé conjointement avec le potentiomètre Intensity (voir le
point 4. ci-après), ce potentiomètre permet de mettre en œuvre un filtre de type "Notch"
(creux de 20 dB) dans la bande de fréquence spécifiée. Vous pouvez ainsi adapter l'effet
de la courbe Shape au son de votre basse. Tourner le potentiomètre Shape dans le sens
des aiguilles d'une montre fait agir le filtre notch dans les fréquences médium/aiguës
(autour de 1 kHz en bout de course), ce qui "creusera" les médiums et donnera un son
grave et profond—dans le sens inverse, il agit dans les graves (autour de 90 Hz en bout de
course), ce qui donnera un son plus "maigre", aigu et mordant.
4. Potentiomètre Intensity - Permet de déterminer l'action de la courbe Shape (réglée
avec le potentiomètre Shape, voir point 3. ci-avant) sur le signal ; plus la valeur d'Intensity
est élevée, plus le filtre notch agit sur la courbe de réponse de l'amplificateur. Si le
potentiomètre est réglé sur "0", le filtre Shape n'agit pas sur la courbe.
5. Potentiomètres EQ - Ces quatre potentiomètres permettent d'atténuer ou d'amplifier
de 15 dB les bandes de fréquence situées autour des valeurs suivantes : 80 Hz (Low),
220 Hz (Low Mid), 770 Hz (High Mid), and 5 kHz (High). Si le potentiomètre est à midi
(position “0”), l'égaliseur correspondant n'a aucune action (réponse plate). Si vous le
tournez dans le sens des aiguilles d'une montre depuis la position “0”, la bande de
fréquence correspondante sera amplifiée ; dans le sens inverse, elle sera atténuée.
6. Sortie directe (Direct Out) - Cette prise XLR symétrique permet de récupérer un signal
instrument au niveau ligne, prélevé avant égaliseur, avant Shape et avant potentiomètre de
Volume. Elle sert généralement à envoyer un signal "sec" depuis le HA3000 vers une sono
ou une console de mixage.
7. LED Status - La LED du bas, “Power”, s'allume dès que le HA3000 est mis sous
tension (voir point 8. ci-après). La LED du haut, “Clip”, s'allume dès que le niveau du signal
de sortie est trop élevé, ce qui provoque une importante distorsion. La LED centrale,
“Protection”, s'allume pendant environ cinq secondes lors de la mise sous tension du
HA3000, et s'éteint progressivement lorsque le HA3000 est mis hors tension. Lorsqu'elle
est allumée, tous les haut-parleurs sont coupés par relais mécanique, ce qui évite
l'apparition de "clocs".
8. Interrupteur secteur (Power) - Sert à allumer ou à éteindre le HA3000.
17
FRANÇAIS
9
1
2
3
4
6
5
7
8
10
11
FUSE
7A/250V(115V)
3.5A/250V(230V)
~AC INPUT
115/230V, 50/60Hz
CAUTION
TO PREVENT SHOCK,DO NOT OPEN. NO USER SERVICEABLE PARTS INSIDE. REFER SERVICING TO QUALIFIED
SERVICE PERSONNEL. TO PREVENT FIRE OR SHOCK
HAZARD. DO NOT EXPOSE TO RAIN OR MOISTURE.
CAUTION; REPLACE WITH THE
SAME TYPE FUSE AS INDICATED.
UTILISER UN FUSIBLE DE RECHANGE
DE MEME TYPE.
S / N
SEND PRE
SEND POST
RETURN PRE
<50Ω 0dBu
<50Ω 0dBu
10KΩ 0dBu
RETURN POST
10KΩ 0dBu
Distributed Exclusively by
Samson Technologies Corp.
MODEL HA3000 (300 WATTS)
8Ω = 180 WATTS
4Ω = 300 WATTS
LINE OUT
<50Ω +4dBu
POWER
RATING
115V/230V 50HZ/60Hz 500W
CAUTION
RISK OF ELECTRIC SHOCK
DO NOT OPEN
PRE AMP OUT
BALANCED
<100Ω –20dBu
CHASSIS GROUND
LIFT REMOVES
CHASSIS GROUND
FROM XLR PIN1
GROUND
FRAME FLOAT
AVIS;
RISQUE DE CHOC ELECTRIQUE
NE PAS OUVRIR
DO NOT EXPOSE THIS EQUIPMENT
TO RAIN OR MOISTURE.
SPEAKER OUTPUT
300WATT RMS/4ohms
MADE IN KOREA
Page 18

18
1. Porte-fusible - Utilisez un fusible de2.5A/250V si la tension secteur est de 230 Volts,
et de 5A/250V si la tension est de 115 Volts.
2. Prise secteur - C'est ici qu'il faut brancher le cordon IEC 3 broches fourni.
3. Send Pre - Ce jack asymétrique 1/4" sert à envoyer un signal à un processeur d'effets
externe.* Le niveau de sortie est compris entre 0 dB et +4 dB. Le signal est prélevé avant
égaliseur, avant Shape, mais après potentiomètre de Volume.
4. Return Pre - Ce jack asymétrique 1/4" sert à faire revenir un signal provenant d'un
processeur d'effets externe.* Le signal revient avant égaliseur, avant Shape, mais après
potentiomètre de Volume.
5. Send Post - Ce jack asymétrique 1/4" sert à envoyer un signal à un processeur
d'effets externe.* Le niveau de sortie est compris entre 0 dB et +4 dB. Le signal est
prélevé après égaliseur, Shape et potentiomètre de Volume.
6. Return Post- Ce jack asymétrique 1/4" sert à faire revenir un signal provenant d'un
processeur d'effets externe.* Le signal revient après égaliseur, Shape et potentiomètre de
Volume.
7. Sortie Line Out - Ce jack asymétrique 1/4" permet de récupérer le signal amplifié par
le HA3000 au niveau ligne (soit +4 dBu), prélevé après égaliseur, Shape et potentiomètre
de Volume. Il sert le plus souvent à relier des amplificateurs supplémentaires au HA3000.
8. Sortie Preamp Out - Cette embase XLR symétrique permet de récupérer le signal
amplifié par le HA3000 à un niveau de -20 dBu, prélevé après égaliseur, Shape et
potentiomètre de Volume. Elle sert le plus souvent à envoyer le son après traitements
dans le HA3000 (égalisé et "Shapé") dans une sono ou une console d'enregistrement.
9. Commutateur Ground Lift - Sert à éliminer toute ronflette ou bourdonnement présent
dans les signaux Direct Out et Preamp Out (voir point 6. page 13 et point 8. ci-avant).
Lorsque le commutateur est basculé sur la droite, en position “Float”, la masse du châssis
est déconnectée de la broche 1 de la prise XLR.
10. Sorties Speaker - Reliez n'importe quelle enceinte de 4, 8, ou 16 Ohms à ces jacks
1/4" asymétriques. ATTENTION : À cause des hauts niveaux de puissance atteints et
des basses fréquences reproduites par le HA3000, n'utilisez que des enceintes
appropriées (données pour au moins 300 watts pour 4 ohms), spécialement
prévues pour les amplificateurs de basse. L'impédance résultante de toutes les
enceintes connectées ne doit pas tomber en dessous de 4 ohms (autrement dit, ne
branchez pas simultanément deux enceintes de 4 ohms !).
11. Ventilateur
- Ce ventilateur à vitesse variable permet de refroidir le HA3000, ce qui
est vital : plus l'amplificateur chauffe, plus le ventilateur tourne vite ! Assurez-vous que les
prises d'air ne sont pas obstruées et qu'elles peuvent aspirer suffisamment d'air frais.
Essayez d'utiliser le HA3000 dans un environnement pas trop poussiéreux.
* Les pédales d'effets, prévues pour traiter des signaux de bas niveau, doivent être
insérées entre le jack de sortie de votre basse et l'entrée en face avant du HA3000.
Ne les branchez pas sur les jacks Send/Return.
Visite guidée : Face arrière du HA3000
FRANÇAIS
9
1
2
3
4
6
5
7
8
10
11
FUSE
7A/250V(115V)
3.5A/250V(230V)
~AC INPUT
115/230V, 50/60Hz
CAUTION
TO PREVENT SHOCK,DO NOT OPEN. NO USER SERVICEABLE PARTS INSIDE. REFER SERVICING TO QUALIFIED
SERVICE PERSONNEL. TO PREVENT FIRE OR SHOCK
HAZARD. DO NOT EXPOSE TO RAIN OR MOISTURE.
CAUTION; REPLACE WITH THE
SAME TYPE FUSE AS INDICATED.
UTILISER UN FUSIBLE DE RECHANGE
DE MEME TYPE.
S / N
SEND PRE
SEND POST
RETURN PRE
<50Ω 0dBu
<50Ω 0dBu
10KΩ 0dBu
RETURN POST
10KΩ 0dBu
Distributed Exclusively by
Samson Technologies Corp.
MODEL HA3000 (300 WATTS)
8Ω = 180 WATTS
4Ω = 300 WATTS
LINE OUT
<50Ω +4dBu
POWER
RATING
115V/230V 50HZ/60Hz 500W
CAUTION
RISK OF ELECTRIC SHOCK
DO NOT OPEN
PRE AMP OUT
BALANCED
<100Ω –20dBu
CHASSIS GROUND
LIFT REMOVES
CHASSIS GROUND
FROM XLR PIN1
GROUND
FRAME FLOAT
AVIS;
RISQUE DE CHOC ELECTRIQUE
NE PAS OUVRIR
DO NOT EXPOSE THIS EQUIPMENT
TO RAIN OR MOISTURE.
SPEAKER OUTPUT
300WATT RMS/4ohms
MADE IN KOREA
Page 19

Visite guidée : Face avant du HA4000
1. Commutateur Audio Mute - Lorsqu'il est activé (enfoncé), toutes les sorties du
HA4000 sont coupées, sauf la sortie pour accordeur, Tuner Out, située en face arrière
(voir page 18, point 8.) ce qui vous permet d'accorder tranquillement votre basse entre les
morceaux. Pour rétablir l'audio sur toutes les sorties (la sortie Tuner Out, elle, est toujours
active), il suffit d'appuyer encore une fois sur la touche Audio Mute (non enfoncée). Cette
fonction peut aussi être commandée via une pédale au pied (voir 3., page 17).
2. Entrées - Branchez votre basse sur une de ces deux prises jack standard. Si votre
basse possède une électronique passive (autrement dit, si elle n'a pas de pile), reliez-la à
l'entrée 1, conçue pour accepter des signaux de bas niveau. Si votre basse possède une
électronique active (autrement dit, si elle a une pile), reliez-la à l'entrée 2, équipée d'un
atténuateur de 10 dB et par conséquent plus apte à accueillir des niveaux assez élevés.
3. Potentiomètre Volume - Il s'agit du réglage de Volume général. Pour obtenir le
meilleur rapport signal/bruit, réglez le niveau de sortie de votre basse presque au
maximum, et ajustez le Volume sur le HA4000 pour obtenir le niveau d'écoute désiré.
4. Potentiomètre Shape - Utilisé conjointement avec le potentiomètre Intensity control
(voir 5. ci-après), ce potentiomètre permet de mettre en œuvre un filtre de type "Notch" de
20 dB dans la bande de fréquence spécifiée. Vous pouvez ainsi adapter l'effet de la courbe
Shape au son de votre basse. Tourner le potentiomètre Shape dans le sens des aiguilles
d'une montre fait agir le filtre notch dans les fréquences médium/aiguës (autour de 1 kHz
en bout de course), ce qui "creusera" les médiums et donnera un son grave et profond—
dans le sens inverse, il agit dans les graves (autour de 90 Hz en bout de course), ce qui
donnera un son plus "maigre", aigu et mordant.
5. Potentiomètre Intensity - Permet de déterminer l'action de la courbe Shape (réglée
avec le potentiomètre Shape, voir point 4. ci-avant) sur le signal ; plus la valeur d'Intensity
est élevée, plus le filtre notch agit sur la courbe de réponse de l'amplificateur. Si le
potentiomètre est réglé sur "0", le filtre Shape n'agit pas sur la courbe.
19
FRANÇAIS
1
AUDIO MUTE
INPUT 1 INPUT 2
–20dBU –10dBU
2
3
4
Hartke
VOLUME SHAPE INTENSITY DBASS LOW MID LOW
320
456
215
450
145
3
2
1
0
770
7
115
850
8
9
100
900
90
1K 40
10
6
5
456
3
7
8
2
1
9
MIN
MAX
+6dB
0 +12
7
00
–15 +15
–15 +15
BANDWIDTH
FREQ
158
125
224
85
354
63
395
50
398
400 300
8 9
HA4000
MID HIGH FREQ BANDWIDTH
0
1.6K
1.1K
2.5K
790
5K
500
5.2K
354
5.8K
6K
–15 +15
–15 +15
10
CLIP
PROTECT
POWER
HIGH
0
10
Page 20

Visite guidée : Face avant du HA4000
6. Potentiomètre DBASS - Cet enhancer exclusif permet d'ajouter des fréquences
sous-harmoniques (“Deep Bass”) au son de basse passant par le HA4000. Plus vous
tournez le potentiomètre dans le sens des aiguilles d'une montre, plus vous ajoutez de
"Deep Bass" au signal (jusqu'à 12 dB). S'il est en position "0", aucun signal "Deep Bass"
n'est ajouté.
7. Potentiomètre Low EQ - Ce potentiomètre permet d'atténuer/amplifier (±15 dB) les
fréquences situées aux alentours de 140 Hz , courbe en cloche (Peak). Si le
potentiomètre est à midi (position “0”), l'égaliseur n'a aucune action (réponse plate).
Si vous le tournez dans le sens des aiguilles d'une montre depuis la position “0”, la bande
de fréquence correspondante sera amplifiée ; dans le sens inverse, elle sera atténuée.
8. Potentiomètres Mid Low and Mid High EQ - Ces potentiomètres permettent d'ac-
céder à deux bandes d'égalisation totalement paramétriques, ce qui permet de modifier
le son du HA4000 en fonction de votre instrument, du haut-parleur sélectionné et du style
de jeu. Vous disposez d'environ 15 dB d'atténuation ou d'amplification pour chaque
bande. Si le potentiomètre “Mid Low” ou “Mid High” est à midi (position “0”), l'égaliseur
correspondant n'a aucune action (réponse plate). Si vous le tournez dans le sens des
aiguilles d'une montre depuis la position “0”, la bande de fréquence correspondante sera
amplifiée ; dans le sens inverse, elle sera atténuée. La fréquence centrale de la bande
“Mid Low” peut varier entre 40 and 400 Hz, et celle de “Mid High”, entre 300 Hz et 6 kHz.
Chaque bande possède également un potentiomètre permettant de définir la largeur de la
bande. À mesure que vous le tournez dans le sens des aiguilles d’une montre, la largeur
de la bande corrigée diminue, l’égalisation devient de plus en plus sélective ; en sens
inverse, la largeur de la bande corrigée augmente.
9. Potentiomètre High EQ - Ce potentiomètre permet d'atténuer/amplifier (±15 dB) les
fréquences situées aux alentours de 5 kHz , courbe en plateau (Shelve). Si le
potentiomètre est à midi (position “0”), l'égaliseur n'a aucune action (réponse plate).
Si vous le tournez dans le sens des aiguilles d'une montre depuis la position “0”, la bande
de fréquence correspondante sera amplifiée ; dans le sens inverse, elle sera atténuée.
10. LED Status - La LED du bas, “Power”, s'allume dès que le HA4000 est mis sous
tension (voir 11. ci-après). La LED du haut, “Clip”, s'allume dès que le niveau du signal de
sortie est trop élevé, ce qui provoque une importante distorsion. La LED centrale,
“Protection”, s'allume pendant environ cinq secondes lors de la mise sous tension du
HA4000, et s'éteint progressivement lorsque le HA4000 est mis hors tension. Lorsqu'elle
est allumée, tous les haut-parleurs sont coupés par relais mécanique, ce qui évite
l'apparition de "clocs".
11. Interrupteur secteur (Power) - Sert à allumer ou à éteindre le HA4000.
20
FRANÇAIS
Page 21

Visite guidée : Face arrière du HA4000
1. Porte-fusible - Utilisez un fusible de4A/250V si la tension secteur est de 230 Volts,
et de 8A/250V si la tension est de 115 Volts.
2. Prise secteur - C'est ici qu'il faut brancher le cordon IEC 3 broches fourni.
3. Prise Mute Footswitch - Reliez à cette prise jack 1/4" une pédale footswitch standard
à simple commutation (contact permanent). Pour activer la commande via pédale, il faut
appuyer sur le commutateur Audio Mute, situé en face avant (voir 1. page 15), de façon à
l’enfoncer, puis appuyer sur la pédale de footswitch. La prochaine fois que vous appuierez
sur le footswitch, toutes les sorties du HA4000, à part la sortie Tuner Out, située en face
arrière (voir 8. page 18) seront provisoirement coupées, ce qui vous permettra d’accorder
tranquillement votre basse entre les morceaux. Pour rétablir l'audio sur toutes les sorties
(la sortie Tuner Out, elle, est toujours active), il suffit d'appuyer à nouveau sur la pédale
Footswitch. Pour désactiver la pédale, il suffit d’appuyer sur le commutateur Audio Mute
en face avant, de façon à le mettre en position non enfoncée.
4. Send Pre - Ce jack asymétrique 1/4" sert à envoyer un signal à un processeur d'effets
externe.* Le niveau de sortie est compris entre 0 dB et +4 dB. Il est prélevé avant
égaliseur, avant Shape, mais après potentiomètre de Volume.
5. Return Pre - Ce jack asymétrique 1/4" sert à faire revenir un signal provenant d'un
processeur d'effets externe.* Il revient avant égaliseur, avant Shape, mais après
potentiomètre de Volume.
6. Send Post - Ce jack asymétrique 1/4" sert à envoyer un signal à un processeur d'effets
externe.* Le niveau de sortie est compris entre 0 dB et +4 dB. Il est prélevé après
égaliseur, Shape et potentiomètre de Volume.
7. Return Post- Ce jack asymétrique 1/4" sert à faire revenir un signal provenant d'un
processeur d'effets externe.* Il revient après égaliseur, Shape et potentiomètre de
Volume.
* Les pédales d'effets, prévues pour traiter des signaux de bas niveau, doivent être
insérées entre le jack de sortie de votre basse et l'entrée en face avant du HA4000.
Ne les branchez pas sur les jacks Send/Return.
21
FRANÇAIS
1
CAUTION
TO PREVENT SHOCK,DO NOT OPEN. NO USER SERVICE-
FUSE
ABLE PARTS INSIDE. REFER SERVICING TO QUALIFIED
8A/250V(115V)
SERVICE PERSONNEL. TO PREVENT FIRE OR SHOCK
4A/250V(230V)
HAZARD. DO NOT EXPOSE TO RAIN OR MOISTURE.
CAUTION; REPLACE WITH THE
SAME TYPE FUSE AS INDICATED.
UTILISER UN FUSIBLE DE RECHANGE
DE MEME TYPE.
SEND PRE
<50Ω 0dBu
RETURN PRE
10KΩ 0dBu
S / N
~AC INPUT
115/230V, 50/60Hz
MUTE FOOT
SWITCH
2 3 4 5 6
SEND POST
<50Ω 0dBu
RETURN POST
10KΩ 0dBu
Distributed Exclusively by
Samson Technologies Corp.
MODEL HA4000 (400 WATTS)
8Ω = 290 WATTS
4Ω = 400 WATTS
S BASS OUT
TUNER OUT
<50Ω +4dBu
<50Ω 20dBu
8 9 10
7
LINE OUT
<50Ω +4dBu
11
DIRECT OUT
BALANCED
<100Ω –20dBu
POWER
RATING
12
115V/230V 50HZ/60Hz 740W
CAUTION
RISK OF ELECTRIC SHOCK
DO NOT OPEN
PRE AMP OUT
BALANCED
<100Ω –20dBu
CHASSIS GROUND
CHASSIS GROUND
LIFT REMOVES
FROM XLR PIN1
GROUND
FRAME FLOAT
AVIS;
RISQUE DE CHOC ELECTRIQUE
NE PAS OUVRIR
DO NOT EXPOSE THIS EQUIPMENT
TO RAIN OR MOISTURE.
SPEAKER OUTPUT
400WATT RMS/4ohms
13 14 15
MADE IN KOREA
Page 22

Visite guidée : Face arrière du HA4000
8. Sortie accordeur Tuner Out - Ce jack asymétrique 1/4" permet de récupérer le signal
de l’instrument, prélevé dans le HA4000 avant égalisation, Shape et potentiomètre de
Volume. Il convient à la connexion de tout accordeur de basse standard. Cette sortie est
toujours active, quelle que soit la position du commutateur Audio Mute (voir 1. page 15)
ou le statut de la pédale de Footswitch (voir 3. page 17).
9. Sortie SBASS Out - Ce jack asymétrique 1/4" permet de récupérer, au niveau ligne
(soit +4 dBu), prélevé avant égaliseur et Shape mais après potentiomètre de Volume, le
signal contenant les informations subharmoniques générées par le HA4000.
ATTENTION : Ce jack ne doit être relié qu’à un amplificateur séparé, muni de son
propre réglage de niveau, alimentant un subwoofer. Si vous reliez la sortie SBASS
à un amplificateur alimentant une enceinte standard—même conçue pour les
basses—vous risquez d’endommager définitivement ladite enceinte.
10. Sortie Line Out
- Ce jack asymétrique 1/4" permet de récupérer le signal amplifié par
le HA 4000 au niveau ligne (soit +4 dBu), prélevé après égaliseur, Shape et potentiomètre
de Volume. Il sert le plus souvent à relier des amplificateurs supplémentaires au HA4000.
11. Sortie directe (Direct Out) - Cette prise XLR symétrique permet de récupérer un
signal instrument au niveau ligne, prélevé avant égaliseur, avant Shape et avant
potentiomètre de Volume. Elle sert généralement à envoyer un signal "sec" depuis le
HA4000 vers une sono ou une console de mixage.
12. Sortie Preamp Out - Cette embase XLR symétrique permet de récupérer le signal
amplifié par le HA 4000 à un niveau de -20 dBu, prélevé après égaliseur, Shape et
potentiomètre de Volume. Elle sert le plus souvent à envoyer le son après traitements
dans le HA 4000 (égalisé et "Shapé") dans une sono ou une console d'enregistrement.
13. Commutateur Ground Lift - Sert à réduire toute ronflette ou bourdonnement présent
dans les signaux Direct Out et Preamp Out (voir points 11. et 12. ci-avant). Lorsque le
commutateur est basculé sur la droite, en position “Float”, la masse du châssis est
déconnectée de la broche 1 de la prise XLR.
14. Sorties Speaker - Reliez n'importe quelle enceinte de 4, 8, ou 16 Ohms à ces jacks
1/4" asymétriques. ATTENTION : À cause des hauts niveaux de puissance atteints et
des basses fréquences reproduites par le HA4000, n'utilisez que des enceintes
appropriées (données pour au moins 400 watts pour 4 ohms), spécialement
prévues pour les amplificateurs de basse. L'impédance résultante de toutes les
enceintes connectées ne doit pas tomber en dessous de 4 ohms (autrement dit, ne
branchez pas simultanément deux enceintes de 4 ohms !).
15. Ventilateur
- Ce ventilateur à vitesse variable permet de refroidir le HA4000, ce qui
est vital : plus l'amplificateur chauffe, plus le ventilateur tourne vite ! Assurez-vous que les
prises d'air ne sont pas obstruées et qu'elles peuvent aspirer suffisamment d'air frais.
Essayez d'utiliser le HA3000 dans un environnement pas trop poussiéreux.
22
FRANÇAIS
Page 23

23
Paramétrage et utilisation de votre
HA3000 / HA4000
Installer votre ampli de basse Hartke Systems HA3000 or HA4000 est une procédure
simple, qui ne vous prendra que quelques minutes :
1. Rangez tous les éléments d’emballage de votre ampli (vous serez toujours content de
les retrouver ultérieurement, si votre ampli nécessite un retour en S.A.V.) et déterminez
son emplacement (nous vous recommandons d’éviter de le placer directement sur vos
enceintes de basse) Pour éviter toute surchauffe, assurez-vous que le panneau arrière est
bien dégagé, et que l’air peut circuler librement autour de l’appareil.
2. Commencez par connecter vos enceintes à l’ampli, en les
branchant sur les connecteurs jacks 1/4" repérés Speaker en face
arrière ; il n’est en effet jamais recommandé de mettre sous tension
un amplificateur non relié à des haut-parleurs. Nous vous
recommandons d’utiliser deux enceintes de 8 ohms, ou une seule de
4 ohms, mais vous pouvez utiliser toute enceinte prévue pour les
basses et d’une impédance supérieure ou égale à 4 ohms. Pour assurer une bonne mise
en phase électrique, la pointe du jack de connexion, côté HA3000/HA4000, doit
correspondre au “+” (point chaud) sur votre enceinte, et le corps du jack, au “-” (masse).
3. Connectez le cordon secteur 3 fils “IEC” fourni à l’embase secteur en
face arrière, mais ne mettez pas encore l’amplificateur sous tension.
Grâce au circuit de protection par relais incorporé au HA3000 / HA4000,
vous pouvez alimenter l’ampli par la même multiprise que d’autres
appareils audio (comme une console de mixage, par exemple). Vous
pourrez ensuite mettre sous tension tous ces appareils d’un coup, sans risquer
d’endommager vos haut-parleurs par un “cloc” de mise sous tension.
ATTENTION : N’utilisez jamais d’adaptateur empêchant la mise à la terre de l’ampli !
Vous risqueriez l’électrocution !
4. Avec un cordon jack standard, reliez votre basse à l’une des
deux entrées disponibles en face avant. Si votre basse possède
une électronique passive (autrement dit, si elle n'a pas de pile),
reliez-la à l'entrée 1, conçue pour accepter des signaux de bas
niveau. Si votre basse possède une électronique active (autrement
dit, si elle a une pile), reliez-la à l'entrée 2, équipée d'un atténuateur de 10 dB et par conséquent plus apte à accueillir des niveaux assez élevés.
5. Sur la face avant du HA3000 / HA4000, réglez les potentiomètres de Volume et
d’Intensity au minimum (à fond dans le sens inverse des aiguilles d’une montre) et tous
les potentiomètres d’égaliseurs en position “0” (midi). Dans le cas du HA4000, réglez
également le potentiomètre DBASS au minimum.
6. Allumez votre HA3000 / HA4000 en appuyant sur l’interrupteur secteur.
La LED Power s’allume immédiatement, ainsi que la LED Protection, qui
restera allumée pendant environ cinq secondes, avant de s’éteindre (vous
entendrez alors un léger déclic).
7. Réglez le niveau de sortie de votre basse au maximum puis, tout en jouant, tournez
doucement le potentiomètre de Volume jusqu’à atteindre le niveau d’écoute désiré. Il est
pratiquement impossible de surcharger l’entrée du HA3000 ou HA4000 : par conséquent,
si vous percevez de la distorsion même pour de faibles réglages de Volume, vérifiez si
votre câble n’est pas défectueux (s’il est correct, baissez quand même le niveau de sortie
de votre basse) ou, dans le cas d’une basse active, si la pile alimentant son électronique
n’est pas usée.
FRANÇAIS
SPEAKER OUTPUT
400WATT RMS/4ohms
INPUT 1 INPUT 2
–20dBU –10dBU
Page 24

24
Paramétrage et utilisation de votre
HA3000 / HA4000
8. Le potentiomètre Intensity se trouvant en position “midi”,
essayez de tourner le potentiomètre Shape dans les deux sens,
afin de juger de l’effet produit sur le son de votre basse par la
courbe de réponse du circuit et le filtre. Laissez les potentiomètres Intensity et Shape à la position où leur effet convient le
mieux aux particularités de votre instrument et de votre jeu.
9. Réglez les égaliseurs selon votre goût (si vous trouvez une combinaison convenant
bien au son de votre instrument, il est judicieux de noter les réglages correspondants, afin
de pouvoir les rétablir facilement par la suite).
10. Si vous devez relier votre HA3000 / HA4000 à une sono ou à une console d’enregistrement, éteignez-le provisoirement, puis reliez sa sortie Direct Out ou Preamp Out à la
console. (Reportez-vous aux points 6. page 13, 10. page 18, 8. page 14, ou 12. page 18
pour plus d’informations). Si vous entendez un bourdonnement ou une ronflette dans le
signal, essayez de modifier la position du commutateur de levée de masse, en face
arrière.
11. Si vous désirez connecter au HA3000 / HA4000 un amplificateur externe esclave,
éteignez-le provisoirement, puis reliez sa sortie Line Out à une entrée de l’amplificateur
externe travaillant à -20 dBu (Reportez-vous aux points 7. page 14, ou 11. page 18 pour
plus d’informations).
12. Si vous utilisez un processeur professionnel de signal
externe pourvu d’entrées/sorties au niveau ligne, éteignez
provisoirement votre HA3000 / HA4000, puis reliez d’une
part un des jacks Send situés sur la face arrière de l’ampli
à l’entrée du processeur d’effets, et d’autre part, un des jacks Return à la sortie du
processeur d’effets. Si nécessaire, vous pouvez chaîner plusieurs processeurs
(configuration “en marguerite”, ou daisy-chain). Choisissez le jack Pre Send si vous
désirez que le signal soit prélevé avant égalisation et Shape ; choisissez le jack Post Send
si vous désirez que le signal soit prélevé après égalisation et Shape. Choisissez le jack
Pre Return si vous désirez que le signal revienne avant l’égaliseur et le circuit Shape ;
choisissez le jack Post Return si vous désirez que le signal revienne après l’égaliseur et le
circuit Shape. Si nécessaire, vous pouvez utiliser simultanément les deux départs/retours
Pre et Post, mais en faisant attention de toujours utiliser les départs/retours d’une même
paire (vous risquez un bouclage électronique, donc d’endommager vos haut-parleurs, si
vous utilisez par exemple le départ Post Send et le retour Pre Return !). Une fois toutes
ces connexions de départ/retour effectuées, remettez le HA3000 / HA4000 sous tension,
puis jouez sur votre basse tout en procédant au réglage de votre (vos) processeur(s)
d’effets. Pour obtenir les meilleurs résultats, réglez les gains d’entrée/sortie de votre (vos)
processeur(s) sur 0 dB (gain unitaire), de façon à ce qu’aucune saute de niveau
n’intervienne lorsque vous les activerez/désactiverez.
13. Dans le cas d’un HA4000, si vous désirez utiliser une pédale de Footswitch pour le
Mute et/ou un accordeur, débranchez provisoirement l’ampli, puis connectez la pédale
et/ou l’accordeur au(x) jack(s) appropriés en face arrière (voir les points 3. page 17 et 8.
page 18 pour plus d’informations). Si vous désirez utiliser la sortie SBASS pour envoyer le
signal subharmonique à un amplificateur externe alimentant un subwoofer, alors
débranchez provisoirement l’ampli avant de procéder aux connexions (voir le point 9. page
18 pour plus d’informations).
Si vous rencontrez la moindre difficulté à configurer ou utiliser votre Hartke HA3000 ou
HA4000, veuillez contacter votre revendeur Samson.
FRANÇAIS
SHAPE INTENSITY
320
215
450
145
115
770
100
850
900
90
1K
4
3
2
1
MIN MAX
5
6
7
8
9
<50Ω 0dBu
SEND PRE
RETURN PRE
10KΩ 0dBu
SEND POST
<50Ω 0dBu
RETURN POST
10KΩ 0dBu
Page 25

Einleitung
Wir wissen, daß Sie nicht gerne Benutzerhandbücher lesen, aber Sie haben gerade einen
der vornehmsten Baß-Verstärker erworben, und wir möchten Ihnen einiges über ihn
erzählen! Bevor Sie ihn anschließen und anfangen zu spielen, sollten Sie einige Minuten
dem Durchlesen dieser Seiten widmen. Wir versuchen es so angenehm wie möglich zu
gestalten - und, wer weiß, Sie können vielleicht einige Tips ausfindig machen.
Der HA3000 und HA4000 können insbesondere mit elektrischen Baß-Instrumenten
benutzt werden. Die beiden Modelle unterscheiden sich in ihrer Leistungsstärke - der
HA3000 hat eine Leistung von 300 Watt (bei 4 Ohm), während der HA4000 eine Leistung
von 400 Watt (bei 4 Ohm) besitzt - weiterhin ist der HA4000 mit weiteren Merkmalen
besetzt, wie eine parametrische Equalization-Funktion und einen Subwoofer-Ausgang.
Beide Geräte sind sind ideale Baß-Verstärker für Live-Auftritte in mittelgroßen und großen
Räumen, sowie für Aufnahmen.
In diesen Seiten werden Sie eine ausführliche Beschreibung der Merkmale Ihres
Baß-Gitarrenverstärkers finden, sowie eine Übersicht der Vorder- und Rückseiten,
schrittweise Anweisungen zum Aufbau und zur Bedienung des Verstärkers und eine
Einzigartigkeit der Hartke-Produkte. Vergessen Sie nicht die ebenfalls mitgelieferte
Garantiekarte auszufüllen und zurückzuschicken, um technische Unterstützung zu
genießen, und Informationen über die neuen Hartke- und Samson-Produkte zu
bekommen.
Bemerkung: Sollte Ihr Hartke HA3000 oder HA4000 Baß-Verstärker eine Wartung
brauchen, wenden Sie sich an Ihren Fachhändler oder Kundendienst. Verwahren Sie die
ursprünglichen Verpackungsmaterialien, falls Sie sie jemals wieder gebrauchen sollten.
25
DEUTSCHE
Page 26

Systemmerkmale
Der Hartke HA3000 und HA4000 besitzen die allerneuesten Konzepte eines
leistungsfähigen Baß-Verstärkers. Hier folgen einige der Merkmale:
- Leistung - bezüglich des HA3000, 300 Watt bei 4 Ohm, bezüglich des HA4000 ganze
400 Watt bei 4 Ohm.
- Zwei unabhängige Eingänge, die für passive und aktive Baß-Gitarren vorgesehen ist.
Es ist geradezu unmöglich den Eingang Ihres HA3000/HA4000 zu überladen.
- Doppelte Lautsprecher-Ausgänge, an denen Sie zwei 8 Ohm-Lautsprecher ohne
Schleifenverbindung anschließen können.
- Eingebauter Schutzkreis, der die angeschlossenen Lautsprecher vor gefährlicher
Überladung und Schaltgeräusche beim Ein- und Ausschalten schützt.
- Kühlender Ventilator zur Verhinderung von thermalen Problemen und Überhitzung.
- Send und Return-Buchsen des doppelten Einschleifswegs (ein Paar Post-EQ, ein
anderes Pre-EQ), die Ihnen erlauben fachmännische externe Effektprozessoren
anzuschließen.
- Elektronisch symmetrierter XLR Direct- und Preamp-Ausgänge, die Ihnen ermöglichen
Signale auf einfachem Wege zu fachmännischen Mischpulten bei Live-Auftritten und
Aufnahmen zu führen. Dazu erlaubt ein Line-Ausgang zusätzliche Slave-Verstärker
anzuschließen.
- Eine Erde-Entkopplungstaste verhindert ein Brummen oder Summen in den Signalen
der Direct Out- und Preamp Out-Ausgängen.
- Vier hochqualifizierte Equalization-Bänder, die Ihnen ermöglichen eine Reihe von
Klangfarben für Ihr Baß-Instrument zu schaffen. Bei dem HA4000 sind die zwei
Mid-Bänder völlig parametrisch und mit einer beweglichen zentralen Frequenz und
einstellbarem Bandbreiten-Regler besetzt. Dazu besitzt der HA4000 einen fünften
DBASS (Deep Bass)-Band, der eine harmonische Anhebung ermöglicht und extrem
tiefe Frequenzen Ihrem Baß-Signal zufügt.
- Ein einzigartiges Filtersystem, genannt « Shape », aktiviert eine MehrbandEqualizationkurve und einen Filter, der speziell zur Anhebung elektrischer Baßklänge
vorgesehen ist. Die auf der Vorderseite befindlichen Shape- und Intensitätsregler
ermöglichen Ihnen ununterbrochen den Filter durch verschiedene Frequenzbereiche zu
bewegen, um den Effekt der Kurve den Klangeigenschaften Ihres besonderen
Baß-Instrumentes anzupassen.
- Ein einzigartiger « SBASS » (Sub Bass)-Ausgang ermöglichen durch einen
subharmonischen Linepegel-Signal den HA4000 mit einem externen einen Subwoofer
antreibenden Verstärker zu verbinden.
- Ein auf der Vorderseite befindlicher Audio Mute-Schalter und auf der Rückseite befindlicher Mute-Fußschaltereingang ermöglichen Ihnen zeitweilig alle Ausgänge, mit
Ausnahme des Tuner-Ausgangs abzuschalten, während Sie Ihren Baß stimmen.
- Seitenhalterungen für einen bequemen und einfachen Transport.
- Beste Qualitätskonstruktion, die den HA3000 und HA4000 reisefähig machen.
26
DEUTSCHE
Page 27

Übersicht: Vorderseite des HA3000
1. Eingänge - Verbinden Sie Ihren Baß mit einem der unsymmetriertem 6,35 mm Standard
Anschlüssen. Wenn Ihr Baß eine passive Elektronik besitzt (d.h. wenn er nicht durch Batterie
angetrieben wird), verbinden Sie ihn mit dem Eingang Input 1, der für schwächere Signale
vorgesehen ist. Wenn Ihr Baß eine aktive Elektronik besitzt (wenn er mit Hilfe einer Batterie
angetrieben wird), verbinden Sie ihn mit dem Eingang Input 2, der einen 10 dB Dämpfer
besitzt und zur Handhabung von Signalen mit stärkerem Pegel genutzt wird.
2. Lautstärkeregler - Dies ist der Hauptlautstärkeregler. Für einen besseren Signal
/Rauschabstand, stellen Sie den Ausgangspegel Ihres Verstärkers auf sein Maximum oder
nah heran, und regulieren Sie die Lautstärke des HA3000 auf den gewünschten Pegel ein.
3. Shape-Regler - In Verbindung mit dem Intensitätsregler (s. unter Nr 4) benutzt dieser
Regler einen speziellen 20 dB Notch-Filter in dem eingestellten Frequenzbereich, so daß Sie
den Shapekurven-Effekt Ihrem Baß-Instrument anpassen können. Wenn der Shape-Regler im
Uhrzeigersinn gedreht wird, wird der Notch-Filter in höheren Frequenzen angewendet. Wenn
er im Gegenuhrzeigersinn bewegt wird, wird der Filter in tieferen Frequenzen angewendet.
Wenn der Regler ganz nach rechts gedreht wird, wird der Filter in einem Frequenzbereich von
1kHz angewendet. Dies hat zur Folge die mittleren Frequenzen abzuschwächen und vertiefte
und widerstandsfähige Bässe zu erzeugen. Wenn er völlig nach links gedreht wird, wird der
Filter in einem Frequenzbereich von 90 Hz angewendet; dies hat zur Folge die tieferen
Frequenzen zu dämpfen und Ihrem Baß einen bissigen und gellenden Klang zu geben.
4. Intensitäts-Regler - Bestimmt die Stärke des Signals, auf dem die Shape-Kurve gewirkt
hat (Bedienung mit dem Shape-Regler, s. unter Nr 3 oben). Je größer die Intensität, desto
größer der Effekt des Notch-Filters. Wenn er auf 0 eingestellt ist, hat die Shape-Kurve
keinen Effekt.
5. EQ-Regler - Diese vier Regler ermöglichen eine Anhebung von ungefähr 15 dB in vier
Frequenzbereichen: 80 Hz (Low), 220 Hz (Low Mid), 770 Hz (High Mid) und 5 kHz (High).
Wenn der Regler in die 12-Uhr-Position (« 0 ») eingestellt ist, wird keine Anhebung oder
Abschwächung verursacht (flache Antwort). Wenn er von der « 0 »-Position im Uhrzeigersinn
herumgedreht wird, wird der Frequenzbereich angehoben; wenn sie im Gegenuhrzeigersinn
herumgedreht wird, wird der Frequenzbereich abgeschwächt.
6. Direct Out-Ausgang - Dieser Standard-XLR-Ausgang greift das InstrumentenpegelAusgangssignal vor der EQ-, Shape- und Volumen-Funktion ab. Dieser Regler dient dem
Senden « trockener » HA3000-Signale zu einem Audio-System oder Aufnahme-/Mischpult.
7. Status-LEDs - Die untere « Power »-LED leuchtet auf, sobald der HA3000 eingeschaltet
ist (s. unter Nr 8 unten). Die obere « Clip »-LED leuchtet, wenn das Ausgangssignal einen
unzulässig hohen Verzerrungspegel erreicht. Die mittlere « Protection »-LED leuchtet
ungefähr 5 Sekunden auf, wenn der HA3000 eingeschaltet ist und leuchtet leicht auf, wenn er
ausgeschaltet wird. Während sie leuchtet, werden alle angeschlossenen Lautsprecher durch
mechanische Übertragung stummgeschaltet, damit sich kein Schaltgeräusch ereignet.
8. Netzschalter - Dient dem Ein-/Ausschalten des HA3000.
27
DEUTSCHE
9
1
2
3
4
6
5
7
8
10
11
FUSE
7A/250V(115V)
3.5A/250V(230V)
~AC INPUT
115/230V, 50/60Hz
CAUTION
TO PREVENT SHOCK,DO NOT OPEN. NO USER SERVICEABLE PARTS INSIDE. REFER SERVICING TO QUALIFIED
SERVICE PERSONNEL. TO PREVENT FIRE OR SHOCK
HAZARD. DO NOT EXPOSE TO RAIN OR MOISTURE.
CAUTION; REPLACE WITH THE
SAME TYPE FUSE AS INDICATED.
UTILISER UN FUSIBLE DE RECHANGE
DE MEME TYPE.
S / N
SEND PRE
SEND POST
RETURN PRE
<50Ω 0dBu
<50Ω 0dBu
10KΩ 0dBu
RETURN POST
10KΩ 0dBu
Distributed Exclusively by
Samson Technologies Corp.
MODEL HA3000 (300 WATTS)
8Ω = 180 WATTS
4Ω = 300 WATTS
LINE OUT
<50Ω +4dBu
POWER
RATING
115V/230V 50HZ/60Hz 500W
CAUTION
RISK OF ELECTRIC SHOCK
DO NOT OPEN
PRE AMP OUT
BALANCED
<100Ω –20dBu
CHASSIS GROUND
LIFT REMOVES
CHASSIS GROUND
FROM XLR PIN1
GROUND
FRAME FLOAT
AVIS;
RISQUE DE CHOC ELECTRIQUE
NE PAS OUVRIR
DO NOT EXPOSE THIS EQUIPMENT
TO RAIN OR MOISTURE.
SPEAKER OUTPUT
300WATT RMS/4ohms
MADE IN KOREA
Page 28

28
1. Sicherungsfach - Benutzen Sie eine 5A/250V-Sicherung für einen 115V-Vorgang oder
eine 2,5A/250V-Sicherung für einen 230V-Vorgang.
2. Netzanschluß - Schließen Sie hier den mitgelieferten Netzverbinder « IEC » an.
3. Send Pre - Benutzen Sie diesen unsymmetrierten 6,35 mm-Anschluß, um Signale zu
einem externen Effektprozessors zu senden.* Der Ausgangspegel schwankt zwischen
ungefähr 0 dB und 4 dB, der vor den EQ- und Shape-Regelungen, aber nach den
Volumen-Regelungen eingestellt wird.
4. Return Pre - Benutzen Sie diesen unsymmetrierten 6,35-Anschluß, um das Signals von
einem externen Effektprozessors zurückführen.* Das Signal wird vor den EQ- und
Shape-Regelungen, aber nach der Volumen-Regelung zurückgeführt.
5. Send Post - Benutzen Sie diesen unsymmetrierten 6,35-Anschluß, um Signale zu einem
externen Effektprozessors zu senden.* Der Ausgangspegel schwankt zwischen ungefähr 0
dB und 4 dB, der vor den EQ-, Shape und Volumen-Regelungen eingestellt wird.
6. Return Post - Benutzen Sie diesen unsymmetrierten 6,35-Anschluß, um das Signals von
einem externen Effektprozessors zurückführen.* Das Signal wird vor den EQ- , Shape- und
Volumen-Regelungen zurückgeführt.
7. Line Out-Ausgang - Unsymmetrierter 6,35 mm-Anschluß mit einem Pegel von +4 dBu,
dessen Ausgangssignal nach der EQ- und Shape-Funktion und nach der
Lautstärke-Regelung vom HA3000 zurückgeführt wird. Benutzen Sie diesen Ausgang zum
Senden des HA3000-Tons (als « equalized » und « shaped » bezeichnet) mit einer
Audio-Anlage oder einem Mischpult.
8. Preamp Out-Ausgang - Symmetrierter XLR-Anschluß mit einem Pegel von -20 dBu,
dessen Ausgangssignal nach der EQ- und Shape-Funktion und nach der
Lautstärke-Regelung vom HA3000 zurückgeführt wird. Benutzen Sie diesen Ausgang zum
Senden des HA3000-Tons (als « equalized » und « shaped » bezeichnet) mit einer
Audio-Anlage oder einem Mischpult.
9. Erde-Entkopplungstaste - Dient der Unterdrückung von Brumm- und Summgeräuschen,
die in den Direct- und Pre Amp-Ausgangssignalen vorhanden sein können (s. unter Nr 6 auf
S.23 und unter Nr 8 oben). Wenn diese Taste rechts in die « Float »-Position eingestellt ist,
ist die Erdung des Chassis von dem Pin 1 des XLR abgeschaltet.
10. Lautsprecher-Ausgänge - Verbinden Sie 4, 8 oder 16 Ohm-Lautsprecher mit diesem
unsymmetriertem 6,35 mm Ausgang.
WARNUNG: Benutzen Sie wegen der hohen
Netzpegel und niedrigen Frequenzen des von dem HA3000 produziertem Signals nur
Lautsprecher mit mindestens 300 Watt bei 4 Ohm, die für Bass-Instrumente
vorgesehen sind. Die minimale Impedanz aller angeschlossenen Lautsprecher darf
nicht unter 4 Ohm liegen (d.h. verbinden Sie nicht zwei 4-Ohm Lautsprecher!).
11. Ventilator
- Dieser mit verschiedenen Geschwindigkeiten vorgesehener Ventilator kühlt
Ihren HA3000 (Je wärmer die Verstärker werden, desto stärker bläst der Ventilator).
Versichern Sie sich, daß er frei steht, und daß kühle und frische Luft jederzeit zur Verfügung
steht. Versuchen Sie auch Ihren HA3000 in einer rauchfreien Umgebung zu benutzen.
* Die Effektpedale, die Signale mit schwachem Pegel behandeln, müssen zwischen dem Ausgang
Ihres Basses und dem Eingang des HA3000 angeschlossen werden. Sie dürfen nicht mit den
Abgang-/Rückführungsanschlüsse auf der Rückseite verbunden werden.
Übersicht: Rückseite des HA3000
DEUTSCHE
9
1
2
3
4
6
5
7
8
10
11
FUSE
7A/250V(115V)
3.5A/250V(230V)
~AC INPUT
115/230V, 50/60Hz
CAUTION
TO PREVENT SHOCK,DO NOT OPEN. NO USER SERVICEABLE PARTS INSIDE. REFER SERVICING TO QUALIFIED
SERVICE PERSONNEL. TO PREVENT FIRE OR SHOCK
HAZARD. DO NOT EXPOSE TO RAIN OR MOISTURE.
CAUTION; REPLACE WITH THE
SAME TYPE FUSE AS INDICATED.
UTILISER UN FUSIBLE DE RECHANGE
DE MEME TYPE.
S / N
SEND PRE
SEND POST
RETURN PRE
<50Ω 0dBu
<50Ω 0dBu
10KΩ 0dBu
RETURN POST
10KΩ 0dBu
Distributed Exclusively by
Samson Technologies Corp.
MODEL HA3000 (300 WATTS)
8Ω = 180 WATTS
4Ω = 300 WATTS
LINE OUT
<50Ω +4dBu
POWER
RATING
115V/230V 50HZ/60Hz 500W
CAUTION
RISK OF ELECTRIC SHOCK
DO NOT OPEN
PRE AMP OUT
BALANCED
<100Ω –20dBu
CHASSIS GROUND
LIFT REMOVES
CHASSIS GROUND
FROM XLR PIN1
GROUND
FRAME FLOAT
AVIS;
RISQUE DE CHOC ELECTRIQUE
NE PAS OUVRIR
DO NOT EXPOSE THIS EQUIPMENT
TO RAIN OR MOISTURE.
SPEAKER OUTPUT
300WATT RMS/4ohms
MADE IN KOREA
Page 29

Übersicht: Vorderseite des HA4000
1. Audio Mute-Schalter - Wenn dieser heruntergedrückt wird, sind alle HA4000-
Ausgänge, mit Ausnahme des Tuner Out-Ausgangs auf der Rückseite (s. unter Nr 8 auf
S.28) zeitweilig stummgeschaltet, was Ihnen erlaubt Ihren Bass zwischen den Songs zu
stimmen. Um das Audio-Signal an allen Ausgängen wiederherzustellen (der Tuner
Out-Ausgang, der schon aktiv ist, miteingeschlossen), drücken Sie einfach den Audio
Mute-Schalter in die « Out »-Position (nach oben). Eine ähnliche Funktion ist bei einem
Fußschalter vorhanden (s. unter Nr 3 auf S.27).
2. Eingänge - Verbinden Sie Ihren Baß mit einem der unsymmetriertem 6,35 mm Standard
Anschlüssen. Wenn Ihr Baß eine passive Elektronik besitzt (d.h. wenn sie nicht durch
Batterie angetrieben wird), verbinden Sie ihn mit dem Eingang Input 1, der für schwächere
Signale vorgesehen ist. Wenn Ihr Baß eine aktive Elektronik besitzt (wenn sie mit Hilfe
einer Batterie angetrieben wird), verbinden Sie ihn mit dem Eingang Input 2, der einen
10 dB Dämpfer besitzt und zur Handhabung von Signalen mit stärkerem Pegel genutzt
wird.
3. Lautstärkeregler - Dies ist der Hauptlautstärkeregler. Für einen besseren
Signal/Rauschabstand, stellen Sie den Ausgangspegel Ihres Verstärkers auf sein
Maximum oder nah heran, und regulieren Sie die Lautstärke des HA4000 auf den
gewünschten Pegel ein.
4. Shape-Regler - In Verbindung mit dem Intensitätsregler (s. unter Nr 5) benutzt dieser
Regler einen speziellen 20 dB Notch-Filter in dem eingestellten Frequenzbereich, so daß
Sie den Shapekurven-Effekt Ihrem Bass-Instrument anpassen können. Wenn der ShapeRegler im Uhrzeigersinn gedreht wird, wird der Notch-Filter in höheren Frequenzen
angewendet. Wenn er im Gegenuhrzeigersinn bewegt wird, wird der Filter in tieferen
Frequenzen angewendet. Wenn der Regler ganz nach rechts gedreht wird, wird der Filter
in einem Frequenzbereich von 1kHz angewendet. Dies hat zur Folge die mittleren
Frequenzen abzuschwächen und vertiefte und widerstandsfähige Bässe zu erzeugen.
Wenn er völlig nach links gedreht wird, wird der Filter in einem Frequenzbereich von 90 Hz
angewendet; dies hat zur Folge die tieferen Frequenzen zu dämpfen und Ihrer Baß-Gitarre
einen bissigen und gellenden Klang zu geben.
29
DEUTSCHE
1
AUDIO MUTE
INPUT 1 INPUT 2
–20dBU –10dBU
2
3
4
Hartke
VOLUME SHAPE INTENSITY DBASS LOW MID LOW
320
456
215
450
145
3
2
1
0
770
7
115
850
8
9
100
900
90
1K 40
10
6
5
456
3
7
8
2
1
9
MIN
MAX
+6dB
0 +12
7
00
–15 +15
–15 +15
BANDWIDTH
FREQ
158
125
224
85
354
63
395
50
398
400 300
8 9
HA4000
MID HIGH FREQ BANDWIDTH
0
1.6K
1.1K
2.5K
790
5K
500
5.2K
354
5.8K
6K
–15 +15
–15 +15
10
CLIP
PROTECT
POWER
HIGH
0
10
Page 30

Übersicht: Vorderseite des HA4000
5. Intensitäts-Regler - Bestimmt die Stärke des Signals, auf dem die Shape-Kurve
gewirkt hat (Bedienung mit dem Shape-Regler, s. unter Nr 4 oben). Je größer die
Intensität, desto größer der Effekt des Notch-Filters. Wenn er auf 0 eingestellt ist, hat die
Shape-Kurve keinen Effekt.
6. DBASS-Regler - Diese einzigartige harmonische Anhebungs-Funktion fügt ultra-tiefe
Frequenzen (« Depp Bass ») zu den Ausgängen des HA4000 hinzu. Wenn Sie ihn im
Uhrzeigersinn drehen, werden immer mehr von dem Signal hinzugefügt (bis zu 12 dB).
Wenn er auf 0 eingestellt wird, wird kein Deep Bass-Signal hinzugefügt.
7. Low EQ-Regler - Dieser Regler ermöglicht eine Abschwächung von ungefähr 15 dB
und eine Anhebung von 100 Hz mit einer Kurve in Glockenform. Wenn der Regler in die
12-Uhr-Position (« 0 ») eingestellt ist, wird keine Anhebung oder Abschwächung
verursacht (flache Antwort). Wenn er von der « 0 »-Position im Uhrzeigersinn
herumgedreht wird, wird der Frequenzbereich angehoben; wenn sie im
Gegenuhrzeigersinn herumgedreht wird, wird der Frequenzbereich abgeschwächt.
8. Mid Low und Mid High EQ-Regler - Diese Regler ermöglichen durch zwei völlig
parametrische Equalization-Bänder einen optimalen Gebrauch des HA4000, um Ihr
Instrument, die ausgewählten Lautsprecher und die Spielart anzupassen. Jedes Band
kann um ungefähr 15 angehoben werden. Wenn der « Mid Low » oder « Mid High »Regler von der « 0 »-Position im Uhrzeigersinn herumgedreht wird, wird der
Frequenzbereich angehoben; wenn er im Gegenuhrzeigersinn herumgedreht wird, wird
der Frequenzbereich abgeschwächt. Die Frequenz der Mid Low-Funktion schwankt
zwischen 40 und 400 Hz, während die der Mid High-Funktion zwischen 300 Hz und 6kHz
schwanken kann. Jedes Band besitzt außerdem einen Bandwidth(Bandbreite)-Regler.
Wenn Sie den Bandwidth-Regler im Uhrzeigersinn drehen, wird die Breite der
Equalization-Kurve verengt, und auf nur einen kleinen Teil der Frequenz wird eingewirkt.
Wenn der Regler im Gegenuhrzeigersinn gedreht wird, wird die Breite der
Equalization-Kurve erweitert, und es wird auf einen größeren Teil der Frequenz
eingewirkt.
9. High EQ-Regler - Dieser Shelving-Regler ermöglicht eine 15 dB Abschwächung oder
eine 5 kHz Anhebung. Wenn der Regler in die 12-Uhr-Position (« 0 ») eingestellt ist, wird
keine Anhebung oder Abschwächung verursacht (flache Antwort). Wenn sie von der
« 0 »-Position im Uhrzeigersinn herumgedreht wird, wird der Frequenzbereich
angehoben; wenn er im Gegenuhrzeigersinn herumgedreht wird, wird der
Frequenzbereich abgeschwächt.
10. Status-LEDs - Die untere « Power »-LED leuchtet auf, sobald der HA3000
eingeschaltet ist (s. unter Nr 11 unten). Die obere « Clip »-LED leuchtet, wenn das
Ausgangssignal einen unzulässig hohen Verzerrungspegel erreicht. Die mittlere
« Protection »-LED leuchtet ungefähr 5 Sekunden auf, wenn der HA3000 eingeschaltet
ist und leuchtet leicht auf, wenn er ausgeschaltet wird. Während sie leuchtet, werden alle
angeschlossenen Lautsprecher durch mechanische Übertragung stummgeschaltet, damit
sich kein Schaltgeräusch ereignet.
11. Netzschalter - Dient dem Ein-/Ausschalten des HA4000.
30
DEUTSCHE
Page 31

Übersicht: Rückseite des HA4000
1. Sicherungsfach - Benutzen Sie eine 5A/250V-Sicherung für einen 115V-Vorgang oder
eine 2,5A/250V-Sicherung für einen 230V-Vorgang.
2. Eingang - Schließen Sie hier den mitgelieferten Netzverbinder « IEC » an.
3. Mute-Fußschalter - Verbinden Sie einen normalen einpoligen kontakthaltenden
Fußschalter mit diesem unsymmetrierten 6,35 mm-Anschluß. Zur Aktivierung des
Fußschalters, schalten Sie den auf der Vorderseite befindlichen Audio Mute-Schalter
(s. unter Nr 1 auf S.25) in die « In »-Stellung (nach untern), und betätigen Sie den
Fußschalter. Sobald sie den Fußschalter betätigen, werden alle HA4000-Ausgänge mit
Ausnahme des auf der Rückseite befindlichen Tuner Out-Ausgangs (s; unter Nr 8 auf
S.28) stummgeschaltet, und erlauben Ihnen Ihren Baß zwischen den Songs zu stimmen.
Zur Wiederherstellung des Audio-Signals an allen Ausgängen (der Tuner Out-Ausgang,
der immer aktiv ist, mitinbegriffen), betätigen Sie einfach erneut den Fußschalter. Zur
Abschaltung der Fußschalter-Funktion, schalten Sie den Audio Mute-Schalter in die
« Out »-Position (nach oben).
4. Send Pre - Benutzen Sie diesen unsymmetrierten 6,35-Buchsenanschluß zum Senden
von Signalen zu einem externen Effektprozessors.* Der Ausgangspegel schwankt
zwischen ungefähr 0 dB und 4 dB, der vor den EQ- und Shape-Regelungen, aber nach
den Volumen-Regelungen eingestellt wird.
5. Return Pre - Benutzen Sie diesen unsymmetrierten 6,35-Buchsenanschluß zur
Rückführung des Signals eines externen Effektprozessors.* Das Signal wird vor den EQund Shape-Regelungen, aber nach den Volumen-Regelung zurückgeführt.
6. Send Post - Benutzen Sie diesen unsymmetrierten 6,35-Buchsenanschluß zum Senden
von Signalen zu einem externen Effektprozessors.* Der Ausgangspegel schwankt
zwischen ungefähr 0 dB und 4 dB, der vor den EQ-, Shape und Volumen-Regelungen
eingestellt wird.
7. Return Post - Benutzen Sie diesen unsymmetrierten 6,35-Buchsenanschluß zur
Rückführung des Signals eines externen Effektprozessors.* Das Signal wird vor den EQ- ,
Shape- und Volumen-Regelungen zurückgeführt.
* Die Effektpedale, die Signale mit schwachem Pegel behandeln, müssen zwischen dem Ausgang Ihres
Basses und dem Eingang des HA4000 angeschlossen werden. Sie dürfen nicht mit den Abgang/Rückführungsanschlüsse auf der Rückseite verbunden werden.
31
DEUTSCHE
1
CAUTION
TO PREVENT SHOCK,DO NOT OPEN. NO USER SERVICE-
FUSE
ABLE PARTS INSIDE. REFER SERVICING TO QUALIFIED
8A/250V(115V)
SERVICE PERSONNEL. TO PREVENT FIRE OR SHOCK
4A/250V(230V)
HAZARD. DO NOT EXPOSE TO RAIN OR MOISTURE.
CAUTION; REPLACE WITH THE
SAME TYPE FUSE AS INDICATED.
UTILISER UN FUSIBLE DE RECHANGE
DE MEME TYPE.
SEND PRE
<50Ω 0dBu
RETURN PRE
10KΩ 0dBu
S / N
~AC INPUT
115/230V, 50/60Hz
MUTE FOOT
SWITCH
2 3 4 5 6
SEND POST
<50Ω 0dBu
RETURN POST
10KΩ 0dBu
Distributed Exclusively by
Samson Technologies Corp.
MODEL HA4000 (400 WATTS)
8Ω = 290 WATTS
4Ω = 400 WATTS
S BASS OUT
TUNER OUT
<50Ω +4dBu
<50Ω 20dBu
8 9 10
7
LINE OUT
<50Ω +4dBu
11
DIRECT OUT
BALANCED
<100Ω –20dBu
POWER
RATING
12
115V/230V 50HZ/60Hz 740W
CAUTION
RISK OF ELECTRIC SHOCK
DO NOT OPEN
PRE AMP OUT
BALANCED
<100Ω –20dBu
CHASSIS GROUND
CHASSIS GROUND
LIFT REMOVES
FROM XLR PIN1
GROUND
FRAME FLOAT
AVIS;
RISQUE DE CHOC ELECTRIQUE
NE PAS OUVRIR
DO NOT EXPOSE THIS EQUIPMENT
TO RAIN OR MOISTURE.
SPEAKER OUTPUT
400WATT RMS/4ohms
13 14 15
MADE IN KOREA
Page 32

Übersicht: Rückseite des HA4000
8. Tuner Out-Ausgang - Dieser unsymmetrierter 6,35 mm-Ausgang greift das
Instrumentpegel-Ausgangssignal vor der EQ-, Shape- und Volumen-Funktion ab, so daß
der HA4000 zum Anschluß jedes Baß-Tuners geeignet ist. Dieser Ausgang ist immer
aktiv, selbst wenn der Audio-Stummschalter auf der Vorderseite (s. unter Nr 1 auf S.25)
oder der Stumm-Fußschalter (S. unter Nr 3 auf S.27) betätigt wird.
9. SBASS Out-Ausgang - Dieser unsymmetrierter 6,35 mm-Ausgang greift das
Linepegel-Ausgangssignal (+ 4dBu), welches subharmonische Informationen des HA4000
beinhaltet, vor der EQ- und der Shape-Funktion (aber nach der Volumen-Funktion) ab.
WARNUNG: Wegen des extrem tiefen Frequenzsignals dieses Ausgangs, sollte es
nur an einem einen Subwoofer antreibenden Verstärker (mit Lautstärke-Regler)
angeschlossen werden. Die Verbindung des SBASS-Ausgangs mit einem einen
normalen Lautsprecher antreibenden Verstärker, selbst einen, der für Baßtöne
vorgesehen ist, könnte zu einer Beschädigung des Lautsprechers führen.
10. Line Out-Ausgang
- Unsymmetrierter 6,35 mm-Anschluß mit einem Pegel von
+4 dBu, dessen Ausgangssignal nach der EQ- und Shape-Funktion und nach der
Lautstärke-Regelung vom HA3000 zurückgeführt wird. Dieser Ausgang wird zur
Verbindung mit einem zusätzlichen Slave-Verstärker genutzt.
11. Direct Out-Ausgang - Dieser Standard-XLR-Ausgang greift das
Instrumentenpegel-Ausgangssignal vor der EQ-, Shape- und Volumen-Funktion ab.
Dieser Regler dient dem Senden « trockener » HA3000-Signale zu einem Audio-System
oder Aufnahme-/Mischpult.
12. Preamp Out-Ausgang - Symmetrierter XLR-Anschluß mit einem Pegel von -20 dBu,
dessen Ausgangssignal nach der EQ- und Shape-Funktion und nach der
Lautstärke-Regelung vom HA4000 zurückgeführt wird. Benutzen Sie diesen Ausgang
zum Senden des HA4000-Tons (als « equalized » und « shaped » bezeichnet) mit einer
Audio-Anlage oder einem Mischpult.
13. Erde-Entkopplungstaste - Dient der Unterdrückung von Brumm- und
Summgeräuschen, die in den Direct- und Pre Amp-Ausgangssignalen vorhanden sein
können (s. unter Nr 11 und Nr 12 oben). Wenn diese Taste rechts in die „Float“-Position
eingestellt ist, ist die Erdung des Chassis von dem Pin 1 des XLR abgeschaltet.
14. Lautsprecher-Ausgänge - Verbinden Sie jede 4, 8 oder 16 Ohm-Lautsprecher mit
diesem unsymmetriertem 6,35 mm Ausgang. WARNUNG: Benutzen Sie wegen der
hohen Netzpegel und niedrigen Frequenzen des von dem HA3000 produziertem
Signals nur Lautsprecher mit mindestens 300 Watt bei 4 Ohm, die für BassInstrumente vorgesehen sind. Die minimale Impedanz aller angeschlossenen
Lautsprecher darf nicht unter 4 Ohm liegen (d.h. verbinden Sie nicht zwei 4-Ohm
Lautsprecher!).
15. Ventilator
- Dieser mit verschiedenen Geschwindigkeiten vorgesehener Ventilator
kühlt Ihren HA4000 (Je wärmer die Verstärker werden, desto stärker bläst der Ventilator).
Versichern Sie sich, daß er frei steht, und daß kühle und frische Luft jederzeit zur
Verfügung steht. Versuchen Sie auch Ihren HA4000 in einer rauchfreien Umgebung zu
benutzen.
32
DEUTSCHE
Page 33

33
Einstellung und Bedienung Ihres
HA3000 / HA4000
Die Einstellungen Ihres Hartke System HA3000 oder HA4000 sind sehr einfach und dauern
nur einige Minuten.
1. Entnehmen Sie alle Verpackungsmaterialien (verwahren Sie diese zur Rücksendung, falls
Ihr Gerät eine Wartung braucht), und suchen Sie einen geeigneten Standort zur Aufstellung
Ihres Verstärkers (wir empfehlen Ihnen, ihn nicht direkt auf Ihren Baß-Verstärker zu stellen).
Zur Unterbindung von Überhitzungsproblemen, versichern Sie sich, daß die Rückseite des
Verstärkers frei steht, um eine gute Durchlüftung zu erlauben.
2. Beginnen Sie mit der Verbindung Ihres Baß-Lautsprechers oder Lautsprecher, indem Sie die unsymmetrierten 6,35 mmLautsprecherausgangsverbindungen benutzen. Es ist niemals eine gute
Idee einen nicht an einem Lautsprecher angeschlossenen Verstärker
einzuschalten. Wir empfehlen die Benutzung eines einzelnen 4 OhmLautsprechers oder zwei 8 Ohm-Lautsprecher. Jeder Baß-Lautsprecher mit minimum 4 Ohm
oder mehr kann benutzt werden. Zur Sicherung der korrekten Phasenkorrelation, sollte die
Spitze des HA3000/HA4000 Lautsprecher-Anschlusses mit den « + » (hochaktiv)-Eingang
Ihres Lautsprechers und die Buchse des Lautsprecheranschlusses mit den « - » (Erde)Eingang Ihres Lautsprechers verbunden werden.
3. Verbinden Sie den mitgelieferten Netzverbinder « IEC » mit dem auf der
Rückseite befindlichen Netzanschluß und das andere Ende mit einem
geerdeten Anschluß - schalten Sie noch nicht den Verstärker an. Dank des in
den HA3000/HA4000 eingebauten Schutzkreises-Relais können Sie ihn mit
dem gleichen Netzkabel anderer angeschlossenen Audio-Geräten (wie z.B.
ein Mischpult) verbinden. Sie können alle Geräte mit Hilfe des Off/On-Schalters des einzelnen Netzkabels einschalten, ohne befürchten zu müssen die angeschlossenen Lautsprecher
durch Schaltgeräusche zu beschädigen.
ACHTUNG: Benutzen Sie zur Erdung einzig und
allein das Netzkabel, um Elektroschocks zu vermeiden.
4. Benutzen Sie zum Anschluß Ihres Basses an die
Eingangsbuchsen auf der Vorderseite ein normales
Instrumentkabel. Wenn Ihr Baß passive Elektronik besitzt (d.h
ohne Batterie), verbinden Sie ihn mit dem Eingang Input 1,
welcher für Niederspannungs-Signale vorgesehen ist. Wenn Ihr
Baß aktive Elektronik besitzt (d.h mit Batterie), verbinden Sie ihn
mit dem Eingang Input 2, der einen 12 dB-Dämpfer besitzt und für
höhere Pickup-Signale des Basses vorgesehen ist.
5. Drehen Sie die auf der Vorderseite des HA3000/HA4000 befindlichen Lautstärke- und
Intensitätsregler ganz herunter (ganz nach links) und die EQ-Regler auf die mittlere Position
(12 Uhr-Position). Wenn Sie eine HA4000 benutzen, drehen Sie den DBASS-Regler ganz
herunter (ganz nach links).
6. Betätigen Sie zum Einschalten des HA3000/HA4000 den auf der
Vorderseite befindlichen Netzschalter (Power). Die Power-LED wird
aufleuchten, sowie die Protection-LED. Diese wird aber nur 5 Sekunden lang
leuchten, bevor sie wieder ausgeht. (Sie werden dabei ein Klickgeräusch
vernehmen.)
7. Stellen Sie den Ausgang Ihres Basses auf sein Maximum, und während Sie spielen
drehen Sie den Lautstärke-Regler langsam bis Sie den gewünschten Pegel erreichen. Es ist
fast unmöglich den HA3000- oder HA4000-Eingang zu überladen. Wenn Sie eine Verzerrung
selbst bei schwachen Lautstärke-Einstellungen hören, suchen Sie nach einem fehlerhaftem
Kabel (falls es fehlerfrei ist, stellen Sie den Ausgang Ihres Basses etwas zurück), oder nach
einer schwachen oder leeren Batterie, wenn Ihr Baß eine aktive Elektronik besitzt.
DEUTSCHE
SPEAKER OUTPUT
400WATT RMS/4ohms
INPUT 1 INPUT 2
–20dBU –10dBU
Page 34

34
Einstellung und Bedienung Ihres
HA3000 / HA4000
8. Unternehmen Sie einige Versuche, indem Sie den Intensitäts-Regler auf seine mittlere
Poistion (12 Uhr-Position) einstellen, und dann der Shape-Regler nach rechts und links
drehen, um den Effekt der Shape-Kurve und des Filters auf den Klang Ihres Basses zu hören.
Stellen Sie den Intensitäts- und Shape-Regler auf die beste Ihrem Instrument und Ihrer
Spielart angepaßten Position ein.
9. Stellen Sie die EQ-Regler nach Wunsch ein (wenn Sie eine gute
Ihrem Instrument und Ihrer Spielart angepaßten Einstellung finden,
wäre es ratsam diese für eine späterer Benutzung
aufzuschreiben!).
10. Wenn Sie den HA3000/HA4000 mit einem Audio-System oder Aufnahme-/Mischpult
verbinden möchten, schalten Sie ihn zeitweilig aus, und verbinden Sie dann mit Hilfe eines
Kabels den Direct-Ausgang (Out) oder Preamp-Ausgang (Out) mit dem Mischpult. (Siehe für
weitere Informationen unter Nr 6 auf S.23, Nr 10 auf S.28, Nr 8 auf S.24 oder Nr 12 auf S.28).
Wenn Sie ein Summen oder Brummen in dem Signal hören, versuchen Sie die Einstellung
der Erde-Entkopplundstaste zu verändern.
11. Wenn Sie den HA3000/HA4000 an einen externen Slave-Verstärkers anschließen
möchten, verbinden Sie mit Hilfe eines Kabels den Line Out-Ausgang mit einem
-20 dBu-Eingang des Externen Verstärkers. (Für weitere Informationen siehe unter Nr 7 auf
S.24 oder Nr 11 auf S.28.)
12. Wenn Sie einen fachmännischen externen
Signalprozessors mit Linepegel-Eingängen und -Ausgängen
benutzen, schalten Sie zeitweilig Ihnen HA3000/HA4000 aus,
und verbinden Sie mit Hilfe eines normalen Audio-Kabels eine
der Send-Buchsen der Rückseite mit einem EffektprozessorEingang und eine der Return-Buchsen mit einem Effektprozessor-Ausgang (falls nötig können
Multi-Effektprozessoren auch aneinander geschaltet werden, Ausgang an Eingang).
Benutzen Sie den Pre Send, wenn das Signal vor der EQ- und Shape-Funktion gesendet
werden soll; benutzen Sie den Post Send, wenn das Signal nach der EQ- und ShapeFunktion gesendet werden soll. Benutzen Sie den Return, wenn das Signal vor der EQ- und
Shape-Funktion zurückgeführt werden soll; benutzen Sie den Post Return, wenn wenn das
Signal nach der EQ- und Shape-Funktion zurückgeführt werden soll. Falls nötig können die
Pre und Post Send und Pre und Post Return gleichzeitig benutzt werden, jedoch nur paarweise (wichtige Feedback- und Lautsprecherbeschädigungen können hevortreten, wenn Sie
einen Post Send und einen Pre Return gleichzeitig benutzen!). Sobald alle Send und Return
Verbindungen vorgenommen worden sind, schalten Sie den HA3000/HA4000 ein, und
spielen Sie auf Ihrem Baß während Sie die Regler der(des) Effektprozessor(en) einstellen.
Stellen Sie den Eingang- und Ausgangs-Gain aller verbundenen Effektprozessoren auf 0 dB
(Unity Gain), so daß keine Anhebung oder Abschwächung des Pegels bewirkt wird, ob die
Effekte ein- oder ausgeschaltet sind.
13. Wenn Sie einen HA4000 verwenden und einen Mute Fußschalter und/oder einen Tuner
benutzen möchten, schalten sie ihn zeitweilig aus, und verbinden Sie die letzteren dann mit
den passenden Anschlüßen auf der Rückseite (Für weitere Informationen siehe unter Nr 3
S.27 und Nr 8 auf S.28). Wenn Sie den SBASS-Ausgang zur Sendung von subharmonischen
Signalen zu einem externen einen Subwoofer antreibenden Verstärker benutzen möchten,
schalten Sie das Gerät zeitweilig aus, bevor Sie die jeweiligen Verbindungen unternehmen
(Für weitere Informationen siehe unter Nr 9 auf S.28)
Wenn Sie irgendwelche Probleme bei dem Aufbau oder der Benutzung Ihres Hartke HA3000
oder HA4000 haben, wenden Sie sich an Ihren nächsten Samson-Fachhändler.
DEUTSCHE
SHAPE INTENSITY
320
215
145
115
100
90
4
450
770
3
850
2
1
900
1K
MIN MAX
SEND PRE
<50Ω 0dBu
RETURN PRE
10KΩ 0dBu
SEND POST
<50Ω 0dBu
5
6
7
8
9
RETURN POST
10KΩ 0dBu
Page 35

Introducción
Sabemos que a usted no le gusta leer las instrucciones de uso, pero queremos decirle
que acaba de comprar ¡uno de los mejores amplificadores de bajo del mercado! En
resumen, antes de conectar su bajo y de tocar y slapear, le sugerimos tomarse un
momento y recorrer estas páginas. Hemos intentado hacerlas lo menos áridas posible,
se lo aseguramos - ¡y quién sabe, tal vez usted descubrirá en ellas una astucia o dos!
El HA3000 y el HA4000, ambos, han sido optimados para el bajo eléctrico,y difieren en la
potencia—el HA3000 presenta 300 watts (bajo 4 ohms), ahí en donde el HA4000
proporciona 400 watts (siempre bajo 4 ohms)—y por el hecho de que el HA4000 posee
una cierta cantidad de características y funciones avanzadas, entre las cuales un
ecualizador paramétrico y una salida especial para subwoofer. Usted distinguirá
rápidamente que estos amplificadores de bajo convienen tanto para conciertos (en salas
grandes o medianas) como para un uso en estudio.
Usted encontrará en estas páginas una descripción detallada de las principales funciones
de los HA3000 y HA4000, así como una "visita guiada" de sus caras delantera y trasera,
de las instrucciones "paso por paso" para configurar y utilizar el amplificador, así como las
especificaciones completas. Encontrará igualmente una tarjeta de garantía-no olvide
llenarla y enviarla por correo: entónces usted podrá acceder a nuestro soporte técnico
online, y le enviaremos las informaciones actualizadas sobre estos productos y otros, de
la firma Hartke y Samson.
NOTA ESPECIAL : Si su amplificador bajo Hartke HA3000 o HA4000 debiera regresar por
Servicio Postventa, un numéro de
Autorización de Regreso (RA) es necesario. Sin este
número, el aparato será rechazado. Consulte a su importador y procure conservar el
embalaje de origen, lo que le permitirá regresar el aparato en su caja original.
35
ESPAÑOL
Page 36

Características
Los Hartke HA3000 y HA4000 presentan todos los conceptos nuevos dentro de la
amplificación de bajo de alta calidad. A continuación damos algunas de sus características
principales:
• De la potencia en reserva—300 watts bajo 4 ohms para el HA3000, 400 watts para el
HA4000.
• Dos entradas independientes que reciben tanto un bajo pasivo como uno activo. ¡Es
casi imposible hacer saturar la entrada del HA3000 o del HA4000 !
• Una salida altavoz duplicada, lo que le permite conectar dos bocinas de 8 ohms sin
tener que encadenarlas entre ellas.
• Circuitos de protección por relé, evitando cualquier sobrecarga peligrosa en los
altavoces y suprimiendo los "clocs" en el momento del encendido o apagado del
amplificador.
• Ventilador para evitar cualquier sobrecalentamiento.
• Un par de tomas de entrada/salida para bucles de efecto (una antes, la otra después
de la igualación), que permiten unir procesadores de efectos externos.
• Las salidas XLR Direct Out y Preamp Out que permiten enviar la señal del amplificador
hacia una consola en las mejores condiciones, ya sea en concierto o en estudio. Una
salida Line Out suplementaria permite enviar la modulación a posibles amplificadores
esclavos.
• Un conmutador de levantamiento de tierra permite evitar cualquier ronroneo o zumbido
sobre las salidas Direct Out y Preamp Out.
• Un ecualizador cuatro bandas de alta calidad permite la creación de sonidos de bajo
muy variados. Sobre el HA4000, las dos bandas medianas están completamente
paramétricas, con frecuencia central y amplitud de banda variables. Además, el
HA4000 presenta una quinta banda, “DBASS” (Deep Bass)—un enhancer que agrega
subarmónicas a la señal de su bajo.
• Un sistema de filtro de Contour exclusivo, llamado “Shape”, que activa una curva de
igualación multibanda y un filtro de tipo "notch", especialmente concebidos para
mejorar el sonido de un bajo eléctrico. Los potenciómetros Shape e Intensity permiten
barrer diferentes regiones de frecuencia con el filtro, lo que permite adaptar el efecto
del filtro a las características tonales específicas del sonido de su bajo.
• En el HA4000, una salida llamada “SBASS” (Sub Bass) permite recuperar, a nivel
línea, las señales subarmónicas evocadas más alto, con el fin de poder enviarlas a un
subwoofer.
• En el HA4000, un mando Audio Mute y una entrada Mute para un conmutador en el pie
permite cortar momentáneamente todas las salidas, excepto la salida de afinación—lo
que le permite afinar su bajo tranquilamente.
• Asa lateral para un transporte fácil y cómodo.
• Su construcción robusta hace a los HA3000 y HA4000 ideales para las giras.
36
ESPAÑOL
Page 37

Visita Guiada: Cara delantera del HA3000
1. Entradas - Conecte su bajo a una de estas dos tomas jack standard. Si su bajo posee
una electrónica pasiva (dicho de otra manera, si no tiene pila), unalo a la entrada 1,
concebida para aceptar señales de bajo nivel. Si su bajo posee una electrónica activa
(dicho de otra manera, si tiene una pila), unalo a la entrada 2, equipada de un atenuador
de 10 dB y en consecuencia, más apta para recibir niveles bastante elevados.
2. Potenciómetro Volume - Se trata del ajuste de Volumen general. Para obtener la
mejor relación señal/ruido, ajuste el nivel de salida de su bajo al máximo (o casi), luego
ajuste el potenciómetro Volume para obtener el nivel de escucha deseado.
3. Potenciómetro Shape - Utilizado conjuntamente con el potenciómetro Intensity (ver el
punto 4), este potenciómetro permite poner en práctica un filtro de tipo "Notch" (hueco de
20 dB) en la banda de frecuencia especificada. De esta manera, usted puede adaptar el
efecto de la curva Shape al sonido de su bajo. El girar el potenciómetro Shape en el
sentido de las manecillas de un reloj, hace accionar el filtro notch en las frecuencias
medianas/agudas (alrededor de 1 kHz hasta el fondo), lo que "surcará" las medianas y
dará un sonido grave y profundo—en el sentido contrario, éste actúa en los graves
(alrededor de 90 Hz hasta el fondo), lo que dará un sonido más "escaso", agudo y
mordente.
4. Potenciómetro Intensity - Permite determinar la acción de la curva Shape (ajustada
con el potenciómetro Shape, ver punto 3) sobre la señal; entre más elevado es el valor de
Intensity, más actúa el filtro notch sobre la curva de respuesta del amplificador. Si el
potenciómetro es ajustado sobre "0", el filtro Shape no actúa sobre la curva.
5. Potenciómetros EQ - Estos cuatro potenciómetros permiten atenuar o amplificar hasta
por 15 dB las bandas de frecuencia situadas alrededor de los valores siguientes: 80 Hz
(Low), 220 Hz (Low Mid), 770 Hz (High Mid), y 5 kHz (High). Si el potenciómetro está hacia
arriba (posición “0”), el ecualizador correspondiente no tiene ninguna acción (respuesta sin
relieve). Si usted lo gira en el sentido de las manecillas de un reloj desde la posición “0”, la
banda de frecuencia correspondiente será amplificada; en el sentido contrario, ésta será
atenuada.
6. Salida directa (Direct Out) - Esta toma XLR simétrica permite recuperar una señal
instrumento a nivel línea, extraída antes ecualizador, antes Shape y antes potenciómetro
de Volume. Esta sirve, en general, para enviar una señal "seca" a partir del HA3000 hacia
una sonorización o una consola de mezcla.
7. LED Status - La LED de abajo, “Power”, se prende en cuanto el HA3000 se pone bajo
tensión (ver punto 8). La LED de arriba, “Clip”, se prende en cuanto el nivel de la señal de
salida es demasiado elevado, lo que provoca una considerable distorsión. La LED central,
“Protection”, se prende aproximadamente durante cinco segundos en el momento de
poner bajo tensión el HA3000, y se apaga progresivamente en cuanto el HA3000 se pone
fuera de tensión. Mientras que ésta está prendida, todos los altavoces son cortados por
relé mecánico, lo que evita la aparición de "clocs".
8. Interruptor sector (Power) - Sirve para prender o apagar el HA3000.
37
ESPAÑOL
9
1
2
3
4
6
5
7
8
10
11
FUSE
7A/250V(115V)
3.5A/250V(230V)
~AC INPUT
115/230V, 50/60Hz
CAUTION
TO PREVENT SHOCK,DO NOT OPEN. NO USER SERVICEABLE PARTS INSIDE. REFER SERVICING TO QUALIFIED
SERVICE PERSONNEL. TO PREVENT FIRE OR SHOCK
HAZARD. DO NOT EXPOSE TO RAIN OR MOISTURE.
CAUTION; REPLACE WITH THE
SAME TYPE FUSE AS INDICATED.
UTILISER UN FUSIBLE DE RECHANGE
DE MEME TYPE.
S / N
SEND PRE
SEND POST
RETURN PRE
<50Ω 0dBu
<50Ω 0dBu
10KΩ 0dBu
RETURN POST
10KΩ 0dBu
Distributed Exclusively by
Samson Technologies Corp.
MODEL HA3000 (300 WATTS)
8Ω = 180 WATTS
4Ω = 300 WATTS
LINE OUT
<50Ω +4dBu
POWER
RATING
115V/230V 50HZ/60Hz 500W
CAUTION
RISK OF ELECTRIC SHOCK
DO NOT OPEN
PRE AMP OUT
BALANCED
<100Ω –20dBu
CHASSIS GROUND
LIFT REMOVES
CHASSIS GROUND
FROM XLR PIN1
GROUND
FRAME FLOAT
AVIS;
RISQUE DE CHOC ELECTRIQUE
NE PAS OUVRIR
DO NOT EXPOSE THIS EQUIPMENT
TO RAIN OR MOISTURE.
SPEAKER OUTPUT
300WATT RMS/4ohms
MADE IN KOREA
Page 38

38
1. Portafusible - Utilise un fusible de 2.5A/250V si la tensión sector es de 230 Volts,
y de 5A/250V si la tensión es de 115 Volts.
2. Toma sector - Es aquí donde hay que conectar el cordón IEC 3 hilos proporcionado.
3. Send Pre - Este jack asimétrico 1/4" sirve para enviar una señal a un procesador de
efectos externo.* El nivel de salida está comprendido entre 0 dB y +4 dB. La señal es
extraída antes ecualizador, antes Shape, pero después potenciómetro de Volume.
4. Return Pre - Este jack asimétrico 1/4" sirve para hacer regresar una señal proveniente
de un procesador de efectos externos.* La señal regresa antes ecualisador, antes
Shape, pero después potenciómetro de Volume.
5. Send Post - Este jack asimétrico 1/4" sirve para enviar una señal a un procesador de
efectos externo.* El nivel de salida está comprendido entre 0 dB y +4 dB. La señal es
extraída después ecualizador, Shape y potenciómetro de Volume.
6. Return Post- Este jack asimétrico 1/4" sirve para hacer regresar una señal
proveniente de un procesador de efectos externo.* La señal regresa después
ecualizador, Shape y potenciómetro de Volume.
7. Salida Line Out - Este jack asimétrico 1/4" permite recuperar la señal amplificada por
el HA3000 a nivel línea (es decir +4 dBu), extraída después ecualizador, Shape y
potenciómetro de Volume. La mayoría de las veces sirve para unir amplificadores
suplementarios al HA3000.
8. Salida Preamp Out - Este soporte XLR simétrico permite recuperar la señal
amplificada por el HA3000 a un nivel de -20 dBu, extraído después ecualizador, Shape y
potenciómetro de Volume. Sirve, la mayoría de las veces, para enviar el sonido después
de tratamientos en el HA3000 a una sonorización o una consola de grabación.
9. Conmutador Ground Lift - Sirve para eliminar cualquier ronquido o zumbido presente
en las señales Direct Out y Preamp Out (ver punto 6. página 33 y punto 8, antes
mencionados). Cuando el conmutador está volteado hacia la derecha, en posición “Float”,
la tierra del chasis es desconectada del hilo 1 de la toma XLR.
10. Salidas Speaker - Una usted cualquier bocina de 4, 8, o 16 Ohms a estos jacks 1/4"
asimétricos.
ATENCION : A causa de los altos niveles de potencia alcanzados y de
las bajas frecuencias reproducidas por el HA3000, utilise únicamente bocinas
apropiadas (proporcionadas para por lo menos 300 watts para 4 ohms), especialmente previstas para los amplificadores de bajo. La impedancia resultante de todas
las bocinas conectadas no debe caer abajo de 4 ohms (dicho de otra manera, ¡no
conecte simultáneamente dos bocinas de 4 ohms !).
11. Ventilador
- Este ventilador de velocidad variable permite enfriar el HA3000, lo que
es vital : ¡entre más calienta el amplificador, más rápido gira el ventilador! Asegúrese que
las tomas de aire no están obstruídas y que pueden aspirar suficiente aire fresco. Intente
utilizar el HA3000 dentro de un ambiente sin demasiado polvo.
* Los pedales de efectos, previstos para tratar señales de bajo nivel, deben de ser
insertados entre el jack de salida de su bajo y la entrada en cara delantera del HA3000.
No los conecte sobre los jacks Send/Return.
Visita Guiada - Cara trasera del HA3000
ESPAÑOL
9
1
2
3
4
6
5
7
8
10
11
FUSE
7A/250V(115V)
3.5A/250V(230V)
~AC INPUT
115/230V, 50/60Hz
CAUTION
TO PREVENT SHOCK,DO NOT OPEN. NO USER SERVICEABLE PARTS INSIDE. REFER SERVICING TO QUALIFIED
SERVICE PERSONNEL. TO PREVENT FIRE OR SHOCK
HAZARD. DO NOT EXPOSE TO RAIN OR MOISTURE.
CAUTION; REPLACE WITH THE
SAME TYPE FUSE AS INDICATED.
UTILISER UN FUSIBLE DE RECHANGE
DE MEME TYPE.
S / N
SEND PRE
SEND POST
RETURN PRE
<50Ω 0dBu
<50Ω 0dBu
10KΩ 0dBu
RETURN POST
10KΩ 0dBu
Distributed Exclusively by
Samson Technologies Corp.
MODEL HA3000 (300 WATTS)
8Ω = 180 WATTS
4Ω = 300 WATTS
LINE OUT
<50Ω +4dBu
POWER
RATING
115V/230V 50HZ/60Hz 500W
CAUTION
RISK OF ELECTRIC SHOCK
DO NOT OPEN
PRE AMP OUT
BALANCED
<100Ω –20dBu
CHASSIS GROUND
LIFT REMOVES
CHASSIS GROUND
FROM XLR PIN1
GROUND
FRAME FLOAT
AVIS;
RISQUE DE CHOC ELECTRIQUE
NE PAS OUVRIR
DO NOT EXPOSE THIS EQUIPMENT
TO RAIN OR MOISTURE.
SPEAKER OUTPUT
300WATT RMS/4ohms
MADE IN KOREA
Page 39

Visita Guiada: Cara delantera del HA4000
1. Conmutador Audio Mute - Cuando está activado (hundido), todas las salidas del
HA4000 están cortadas, salvo la salida de afinación, Tuner Out, situada en la cara trasera
(ver página 38, punto 8.) lo que permite afinar tranquilamente su bajo entre fragmentos de
música. Para restablecer el audio sobre todas las salidas (la salida Tuner Out, ésta, está
siempre activa), basta con apoyar un vez sobre la tecla Audio Mute (no hundida).
Esta función también puede ser accionada vía un pedal al pie (ver 3., página 37).
2. Entradas -Conecte su bajo sobre una de las dos tomas jack standard. Si su bajo posee
una electrónica pasiva (dicho de otra manera, si ésta no tiene pila), unalo a la entrada 1,
concebida para aceptar señales de bajo nivel. Si su bajo posee una electrónica activa
(dicho de otra manera, si ésta tiene una pila), unalo a la entrada 2, equipada de un
atenuador de 10 dB, y en consecuencia más apta para recibir niveles bastante elevados.
3. Potenciómetro Volume - Se trata de un ajuste de Volumen general. Para obtener la
mejor relación señal/ruido, ajuste el nivel de salida de su bajo casi al máximo, y ajuste el
Volumen sobre el HA4000 para obtener el nivel de escucha deseado.
4. Potenciómetro Shape - Utilizado conjuntamente con el potenciómetro Intensity control
(ver 5. a continuación), este potenciómetro permite poner en práctica un filtro de tipo
"Notch" de 20 dB en la banda de frecuencia especificada. Así usted puede adaptar el
efecto de la curva Shape al sonido de su bajo. Girar el potenciómetro Shape en el sentido
de las manecillas de un reloj , haceaccionar el filtro notch en las frecuencias
medianas/agudas (alrededor de 1 kHz hasta el fondo), lo que"surcará" los medios y dará
un sonido grave y profundo—en el sentido contrario, éste actúa en los graves (alrededor
de 90 Hz hasta el fondo), lo que dará un sonido más "escaso", agudo y mordente.
5. Potenciómetro Intensity - Permite determinar la acción de la curva Shape (ajustada
con el potenciómetro Shape, ver punto 4, antes mencionado) sobre la señal ; entre más
elevado es el valor de Intensity, más actúa el filtro notch sobre la curva de respuesta del
amplificador. Si el potenciómetro es ajustado en "0", el filtro Shape no actúa sobre la
curva.
39
ESPAÑOL
1
AUDIO MUTE
INPUT 1 INPUT 2
–20dBU –10dBU
2
3
4
Hartke
VOLUME SHAPE INTENSITY DBASS LOW MID LOW
320
456
215
450
145
3
2
1
0
770
7
115
850
8
9
100
900
90
1K 40
10
6
5
456
3
7
8
2
1
9
MIN
MAX
+6dB
0 +12
7
00
–15 +15
–15 +15
BANDWIDTH
FREQ
158
125
224
85
354
63
395
50
398
400 300
8 9
HA4000
MID HIGH FREQ BANDWIDTH
0
1.6K
1.1K
2.5K
790
5K
500
5.2K
354
5.8K
6K
–15 +15
–15 +15
10
CLIP
PROTECT
POWER
HIGH
0
10
Page 40

Visita Guiada: Cara delantera del HA4000
6. Potenciómetro DBASS - Este enhancer exclusivo permite agregar frecuencias
subharmónicas (“Deep Bass”) al sonido de bajo que pasa por el HA4000. Entre más gire
el potenciómetro en el sentido de las manecillas de un reloj, más "Deep Bass" agrega
usted a la señal (hasta 12 dB). Si éste se encuentra en posición "0", ninguna señal
"Deep Bass" es agregada.
7. Potenciómetro Low EQ - Este potenciómetro permite atenuar/amplificar (±15 dB) las
frecuencias ubicadas cerca de 140 Hz , curva en campana (Peak). Si el potenciómetroestá hacia arriba (posición “0”), el ecualizador no tiene ninguna acción
(respuesta sin relieve). Si usted lo gira en el sentido de las manecillas de un reloj a partir
de la posición “0”, la banda de frecuencia correspondiente sera amplificada ; en el sentido
contrario ésta será atenuada.
8. Potenciómetros Mid Low y Mid High EQ - Estos potenciómetros permiten acceder a
dos bandas de igualación totalmente paramétricas, lo que permite modificar el sonido del
HA4000 en función de su instrumento, altavoz seleccionado y estilo de tocar. Dispone
aproximadamente de 15 dB de atenuación o de amplificación para cada banda. Si el
potenciómetro “Mid Low” o “Mid High” está hacia arriba (posición “0”), el correspondiente
ecualizador no tiene ninguna acción (respuesta sin relieve). Si usted lo gira en el sentido
de las manecilas de un reloj desde la posición “0”, la banda de frecuencia
correspondiente será amplificada ; en el sentido contrario ésta será atenuada. La
frecuencia central de la banda “Mid Low” puede variar entre 40 y 400 Hz, y la de
“Mid High”, entre 300 Hz y 6 kHz. Cada banda posee igualmente un potenciómetro que
permite definir la amplitud de la banda. A medida que usted lo gira en el sentido de las
manecillas de un reloj, la amplitud de la banda corregida disminuye, la igualación se
vuelve cada vez más selectiva ; en sentido contrario, la amplitud de la banda corregida
aumenta.
9. Potenciómetro High EQ - Este potenciómetro permite atenuar/amplificar (±15 dB) las
frecuencias situadas cerca de 5 kHz , curva en plató (Shelve). Si el potenciómetro está
hacia arriba (posición “0”), el ecualizador no tiene ninguna acción (respuesta sin relieve).
Si lo gira en el sentido de las manecillas de un reloj desde la posición “0”, la banda de
frecuencia correspondiente será amplificada ; en el sentido contrario, ésta será atenuada.
10. LED Status - La LED de abajo, “Power”, se prende desde que el HA4000 se pone
bajo tensión (ver 11. a continuación). La LED de arriba, “Clip”, se prende desde que el
nivel de la señal de salida es demasiado elevado, lo que provoca una considerable
distorsión. La LED central, “Protection”, se prende durante cinco segundos
aproximadamente en el momento de la puesta bajo tensión del HA4000, y se apaga
progresivamente cuando el HA4000 se pone fuera de tensión. Cuando está prendido,
todos los altavoces son cortados por relé mecánico, lo que evita la aparición de "clocs".
11. Interruptor sector (Power) - Sirve para prender o apagar el HA4000.
40
ESPAÑOL
Page 41

Visita Guiada - Cara trasera del HA4000
1. Portafusible - Utilise un fusible de4A/250V si la tensión sector es de 230 Volts, y de
8A/250V si la tensión es de 115 Volts.
2. Toma sector - Es aquí donde se tiene que conectar el cordón IEC 3 hilos suministrado.
3. Toma Mute Footswitch - A esta toma jack 1/4" una un pedal footswitch standard de
simple conmutación (contacto permanente). Para activar el mando vía pedal, se debe
apoyar sobre el conmutador Audio Mute, situado en la cara delantera (ver 1. página 35),
de manera de hundirlo, luego apoyar sobre el pedal de footswitch. La próxima vez que
usted apoyará sobre el footswitch, todas las salidas del HA4000, a excepción de la salida
Tuner Out, ubicada en la cara trasera (ver 8, página 38) estarán provisionalmente
cortadas, lo que le permitirá afinar tranquilamente su bajo entre los ragmentos musicales.
Para establecer el audio sobre todas las salidas (la salida Tuner Out, ésta, está siempre
activa), basta con apoyar de nuevo sobre el pedal Footswitch. Para desactivar el pedal,
sólo apoyar sobre el conmutador Audio Mute de cara delantera, de manera de ponerlo en
posición no hundida.
4. Send Pre - Este jack asimétrico 1/4" sirve para enviar una señal a un procesador de
efectos externo.* El nivel de salida está comprendido entre 0 dB y +4 dB. Este está
extraído antes ecualizador, antes Shape, pero después potenciómetro de Volume.
5. Return Pre - Este jack asimétrico 1/4" sirve para hacer regresar una señal que
proviene de un procesador de efectos externo.* Este regresa antes ecualizador, antes
Shape, pero después potenciómetro de Volume.
6. Send Post - Este jack asimétrico 1/4" sirve para enviar una señal a un procesador de
efectos externo.* El nivel de salida está comprendido entre 0 dB y +4 dB. Este está
extraído después ecualizador, Shape y potenciómetro de Volume.
7. Return Post- Este jack asimétrico 1/4" sirve para hacer regresar una señal que
proviene de un procesador de efectos externo.* Este regresa después de ecualizador,
Shape y potenciómetro de Volume.
* Los pedales de efectos, previstos para tratar señales de bajo nivel, deben de ser
insertados entre el jack de salida de su bajo y la entrada de cara delantera del HA4000.
No los conecte a los jacks Send/Return.
41
ESPAÑOL
1
CAUTION
TO PREVENT SHOCK,DO NOT OPEN. NO USER SERVICE-
FUSE
ABLE PARTS INSIDE. REFER SERVICING TO QUALIFIED
8A/250V(115V)
SERVICE PERSONNEL. TO PREVENT FIRE OR SHOCK
4A/250V(230V)
HAZARD. DO NOT EXPOSE TO RAIN OR MOISTURE.
CAUTION; REPLACE WITH THE
SAME TYPE FUSE AS INDICATED.
UTILISER UN FUSIBLE DE RECHANGE
DE MEME TYPE.
SEND PRE
<50Ω 0dBu
RETURN PRE
10KΩ 0dBu
S / N
~AC INPUT
115/230V, 50/60Hz
MUTE FOOT
SWITCH
2 3 4 5 6
SEND POST
<50Ω 0dBu
RETURN POST
10KΩ 0dBu
Distributed Exclusively by
Samson Technologies Corp.
MODEL HA4000 (400 WATTS)
8Ω = 290 WATTS
4Ω = 400 WATTS
S BASS OUT
TUNER OUT
<50Ω +4dBu
<50Ω 20dBu
8 9 10
7
LINE OUT
<50Ω +4dBu
11
DIRECT OUT
BALANCED
<100Ω –20dBu
POWER
RATING
12
115V/230V 50HZ/60Hz 740W
CAUTION
RISK OF ELECTRIC SHOCK
DO NOT OPEN
PRE AMP OUT
BALANCED
<100Ω –20dBu
CHASSIS GROUND
CHASSIS GROUND
LIFT REMOVES
FROM XLR PIN1
GROUND
FRAME FLOAT
AVIS;
RISQUE DE CHOC ELECTRIQUE
NE PAS OUVRIR
DO NOT EXPOSE THIS EQUIPMENT
TO RAIN OR MOISTURE.
SPEAKER OUTPUT
400WATT RMS/4ohms
13 14 15
MADE IN KOREA
Page 42

Visita Guiada - Cara trasera del HA4000
8. Salida de afinación Tuner Out - Este jack asimétrico 1/4" permite recuperar la señal
del instrumento, extraído en el HA4000 antes ecualizador, Shape y potenciómetro de
Volume. Este conviene para la conexión de cualquier afinador de bajo standard. Esta
salida está siempre activa, cualquiera que sea la posición del conmutador Audio Mute
(ver 1, página 35) o la posición del pedal de Footswitch (ver 3. pág. 7).
9. Salida SBASS Out - Este jack asimétrico 1/4" permite recuperar, a nivel línea
(es decir +4 dBu), extraído antes ecualizador y Shape pero después potenciómetro de
Volume, la señal que contiene las informaciones subarmónicas generadas por el HA4000.
ATENCION : Este jack sólo debe ser unido a un amplificador separado, provisto de
su propio ajuste de nivel, que alimente un subwoofer. Si usted une la salida SBASS
a un amplificador que alimente una bocina standard—incluso concebida para los
bajos—corre el riesgo de dañar definitivamente dicha bocina.
10. Salida Line Out
- Este jack asimétrico 1/4" permite recuperar la señal amplificada por
el HA 4000 a nivel línea (es decir +4 dBu), extraído después ecualizador, Shape y
potenciómetro de Volume. Este sirve, la mayoría de las veces, para unir amplificadores
suplementarios al HA4000.
11. Salida directa (Direct Out) - Esta toma XLR simétrica permite recuperar una señal
instrumento a nivel línea, extraída antes ecualizador, antes Shape y antes potenciómetro
de Volume. Esta sirve, generalmente, para enviar una señal "seca" a partir del HA4000
hacia una sonorización o una consola de mezcla.
12. Salida Preamp Out - Este soporte XLR simétrico permite recuperar la señal
amplificada por el HA 4000 a un nivel de -20 dBu, extraído después ecualizador, Shape
y potenciómetro de Volume. Este sirve, la mayoría de las veces, para enviar el sonido
después de tratamientos en el HA 4000 (igualado y "Shapeado") en una sonorización o
una consola de grabación.
13. Conmutador Ground Lift - Sirve para reducir cualquier ronquido o zumbido presente
en las señales Direct Out y Preamp Out (ver puntos 11. y 12, antes mencionados).
Cuando el conmutador está volteado hacia la derecha, en posición “Float”, la tierra del
chasis es desconectada del hilo 1 de la toma XLR.
14. Salidas Speaker - Una usted cualquier bocina de 4, 8, o 16 Ohms a estos jacks 1/4"
asimétricos. ATENCION : A causa de los altos niveles de potencia alcanzados y de
las bajas frecuencias reproducidas por el HA4000, utilise sólo bocinas apropiadas
(proporcionadas para por lo menos 400 watts para 4 ohms), especialmente
concebidas para los amplificadores de bajo. La impedancia resultante de todas las
bocinas conectadas no debe caer por abajo de 4 ohms (dicho de otra manera, ¡no
conecte simultáneamente dos bocinas de 4 ohms !).
15. Ventilador
- Este ventilador de velocidad variable permite enfriar el HA4000, lo que
es vital : ¡entre más caliente el amplificador, más rápido gira el ventilador ! Asegúrese que
las tomas de aire no están obstruídas y que éstas pueden aspirar suficientemente aire
fresco. Trate de utilizar el HA4000 dentro de un ambiente sin demasiado polvo.
42
ESPAÑOL
Page 43

43
Instalación y utilización de su
HA3000 / HA4000
Instalar su amplificador de bajo Hartke Systems HA3000, o bién HA4000, es un
procedimiento sencillo, que le tomará sólo agunos minutos :
1. Acomode todos los elementos de embalaje de su amplificador (usted estará siempre
contento de encontrarlos posteriormente si su amplificador necesita un regreso por
Servicio Postventa) y determine su lugar (le aconsejamos evitar colocarlo directamente
sobre sus bocinas de bajo). Para evitar cualquier sobrecalentamiento, asegúrese que el
tablero trasero está bien despejado, y que el aire puede circular libremente alrededor del
aparato.
2. Comience por conectar sus bocinas al amplificador,
conectándolas sobre los conectores jacks 1/4" identificados Speaker
en cara trasera ; en efecto, nunca se recomienda poner bajo tensión
un amplificador no unido a altavoces. Le recomendamos utilizar dos
bocinas de 8 ohms, o una sola de 4 ohms, pero puede utilizar
cualquier bocina prevista para los bajos y de una impedancia
superior o igual a 4 ohms. Para asegurar una buena puesta en fase eléctrica, la punta del
jack de conexión, lado HA3000/HA4000, debe corresponder al “+” (punto caliente) sobre
su bocina, y el cuerpo del jack, al “-” (tierra).
3. Conecte el cordón sector 3 hilos “IEC” suministrado al soporte sector
en cara trasera, pero aún no ponga el amplificador bajo tensión. Gracias
al circuito de protección por relé incorporado al HA3000 / HA4000, usted
puede alimentar el amplificador por la misma multitoma que para otros
aparatos audio (como una consola de mezcla, por ejemplo). Enseguida
podría poner bajo tensión todos esos aparatos al mismo tiempo, sin correr
riesgo de dañar sus altavoces por un “cloc” de puesta bajo tensión.
ATENCION : ¡Nunca utilise adaptador que impida la puesta de tierra
del amplificador ! ¡Correría el riesgo de electrocución !
4. Con un cordón jack standard, una usted su bajo a una de las
dos entradas disponibles en cara delantera. Si su bajo posee
una electrónica pasiva (dicho de otra manera, si éste no tiene
pila), unalo a la entrada 1, concebida para aceptar señales de
bajo nivel. Si su bajo posee una electrónica activa (dicho de
otra manera, si éste tiene una pila), unalo a la entrada 2,
equipada de un atenuador de 10 dB y en consecuencia más
apta para recibir niveles bastante elevados.
5. Sobre la cara delantera del HA3000 / HA4000, ajuste los potenciómetros de Volume e
Intensity al mínimo (hasta el fondo en sentido contrario a las manecillas de un reloj) y
todos los potenciómetros de ecualizadores en posición “0” hacia arriba). En el caso del
HA4000, ajuste igualmente el potenciómetro DBASS al mínimo.
6. Prenda su HA3000 / HA4000 apoyando sobre el interruptor sector.
La LED Power se enciende inmediatamente, así como la LED Protection,
que quedará prendida durante cinco segundos aproximadamente, antes
de apagarse (escuchará entónces un ligero disparador).
7. Ajuste al máximo el nivel de salida de su bajo, luego al mismo tiempo
que toca, gire lentamente el potenciómetro de Volume hasta alcanzar el nivel de escucha
deseado. Es prácticamente imposible sobrecargar la entrada del HA3000 o HA4000 : en
consecuencia, si percibe distorsión incluso hasta en débiles ajustes de Volumen, verifique
si su cable no está defectuoso (si es correcto, aún cuando baje el nivel de salida de su
bajo) o, en el caso de un bajo activo, si la pila que alimenta su electrónica no está usada.
ESPAÑOL
SPEAKER OUTPUT
400WATT RMS/4ohms
INPUT 1 INPUT 2
–20dBU –10dBU
Page 44

44
Instalación y utilización de su
HA3000 / HA4000
8. El potenciómetro Intensity encontrándose en posición “hacia
arriba”, intente girar el potenciómetro Shape en los dos sentidos,
con el fin de juzgar el efecto producido sobre el sonido de su
bajo por la curva de respuesta del circuito y filtro. Deje los
potenciómetros Intensity y Shape en la posición en donde su
efecto conviene más a las particularidades de su instrumento y de su forma de tocar.
9. Ajuste los ecualizadores de acuerdo a su gusto (si usted encuentra una combinación
que conviene bien al sonido de su instrumento, está bien que anote los ajustes
correspondientes, con el fin de poderlos restablecer facilmente más tarde).
10. Si usted debe unir su HA3000 / HA4000 a una sonorización o una consola de
grabación, apáguelo provisionalmente, luego una su salida Direct Out o Preamp Out a la
consola. (Remitase a los puntos 6, página 33, 10. página 38, 8. página 34, o 12, página 38
para más informaciones). Si usted escucha un zumbido o un ronquido en la señal, intente
modificar la posición del conmutador de levantamiento de tierra, en cara trasera.
11. Si usted desea conectar al HA3000 / HA4000 un amplificador externo esclavo,
apáguelo provisionalmente, luego una su salida Line Out a una entrada del amplificador
externo que trabaja a-20 dBu (Remítase a los puntos 7 página 34, o 11 página 38 para
más informaciones).
12. Si utiliza un procesador profesional de señal externa
provisto de entradas/salidas a nivel línea, apague provisionalmente su HA3000 / HA4000, luego una usted por una
parte uno de los jacks Send situados sobre la cara trasera
del amplificador a la entrada del procesador de efectos, y
por otra parte, uno de los jacks Return a la salida del procesador de efectos. Si es
necesario, puede encadenar varios procesadores (configuración “en margarita”, o
daisy-chain). Escoja el jack Pre Send si desea que la señal sea extraída antes igualación y
Shape ; escoja el jack Post Send si desea que la señal sea extraída después igualación y
Shape. Escoja el jack Pre Return si usted desea que la señal regrese antes ecualizador y
el circuito Shape ; escoja el jack Post Return si desea que la señal regrese después
ecualizador y el circuito Shape. Si es necesario; puede utilizar simultáneamente los dos
salidas/retornos Pre y Post, pero tenga cuidado de utilizar siempre los salidas/retornos de
un mismo par (corre el riesgo de un cierre electrónico, en consecuencia dañaría sus
altavoces, ¡si emplea, por ejemplo, el salida Post Send y el retorno Pre Return!). Una vez
efectuadas todas esas conexiones de salida y retorno, vuelva a poner el HA3000 /
HA4000 bajo tensión, luego toque su bajo procediendo al ajuste de su (sus)
procesador(es) de efectos. Para obtener mejores resultados, ajuste las ganancias de
entrada/salida de su (sus) procesador(es) sobre 0 dB (ganancia unitaria), de manera que
ninguno salte de nivel en el momento en que usted los activara/desactivara.
13. En el caso de un HA4000, si desea utilizar un pedal de Footswitch para el Mute y/o un
afinador, desconecte provisionalmente el amplificador, luego conecte el pedal y/o el afinador al ( a los) jack(s) apropiados en cara trasera (ver los puntos 3 página 37, y 8
página 38 para más informaciones). Si desea emplear la salida SBASS para enviar la
señal subarmónica a un amplificador externo que alimenta a un subwoofer, entónces
desconecte provisionalmente el amplificador antes de proceder a las conexiones
(ver el punto 9 página 38 para más informaciones).
Si encuentra la mínima dificultad para configurar o utilizar su Hartke HA3000 o HA4000,
sírvase contactar a su revendedor Samson.
ESPAÑOL
SHAPE INTENSITY
320
215
450
145
115
770
100
850
900
90
1K
4
3
2
1
MIN MAX
5
6
7
8
9
SEND PRE
<50Ω 0dBu
RETURN PRE
10KΩ 0dBu
SEND POST
<50Ω 0dBu
RETURN POST
10KΩ 0dBu
Page 45

1. Rated Output Power (@ 1 kHz, 4 ohm, 5% THD)
HA3000 350 Wrms
HA4000 450 Wrms
2. Total Harmonic Distortion (@ 1 dB below rated output, 1 kHz typical)
HA3000 < 0.1%
HA4000 < 0.1%
3. Rated Input Level (@ 1 kHz)
Input 1 -20 dBu
Input 2 -10 dBu
4. Signal To Noise Ratio (re: 1 Wrms @ 1 kHz)
HA3000 approx. 68 dB
HA4000 approx. 78 dB
5a. Equalizer (HA3000)
Low (80 Hz) ±15 dB
Mid Low (220 Hz) ±15 dB
Mid High (770 Hz) ±15 dB
High (5 kHz) ±15 dB
5b. Equalizer (HA4000)
“DBASS” (70 Hz) 0 -> +12 dB
Low (140 Hz) ±15 dB
Mid Low (sweepable, 40 Hz - 400 Hz) ±15 dB
Mid High (sweepable, 300 Hz - 6 kHz) ±15 dB
High (5 kHz) ±15 dB
6. Shape Effect (Intensity control @ Max.) > 20 dB
7. Shape Range Sweepable, 90 Hz - 1 kHz
Specifications
45
 Loading...