

HARTJE TREKKING BIKE, CITY BIKE, TANDEM User Manual

TREKKING BIKE
CITY BIKE
TANDEM
ATB
USER MANUAL
COVERING OPERATION, SETTINGS, MAINTENANCE AND SERVICING
DIN EN ISO 4210 / DIN EN 82079-1
93564_01_Victoria_GB
Sales:
Hermann Hartje KG
Tel. +49 (0) 4251 - 811-500
info@hartje.de
www.hartje.de

Warranty (Guarantee specifications)
The Victoria Bike you have purchased is a high-quality product. We are therefore able to offer you the
following guarantee which is effective from the purchase date:
- On aluminium frames and unsprung aluminium forks: 5-year guarantee on frame and fork breakage
- On steel frames and unsprung steel forks: 5-year guarantee on frame and fork breakage
During the guarantee period, product defects are resolved by replacement or repair at no charge. Guarantee repair services
may be carried out only by a bicycle dealer specified by us.
The guarantee is only valid for the first owner and cannot be transferred to a subsequent owner.
Proof of purchase (invoice/dated sales document identifying the bicycle) is required for this.
The guarantee is invalidated if the bike is used for races and competitions.
This guarantee covers complete bikes, which have been fully assembled and adjusted by a dealer we have authorised.
This guarantee is voided if the bicycle is not used as specified, is inadequately maintained, incorrectly repaired, converted
or modified.
Text: Copyright of Hermann Hartje KG, Hoya. Reproduction without our consent is prohibited.
2
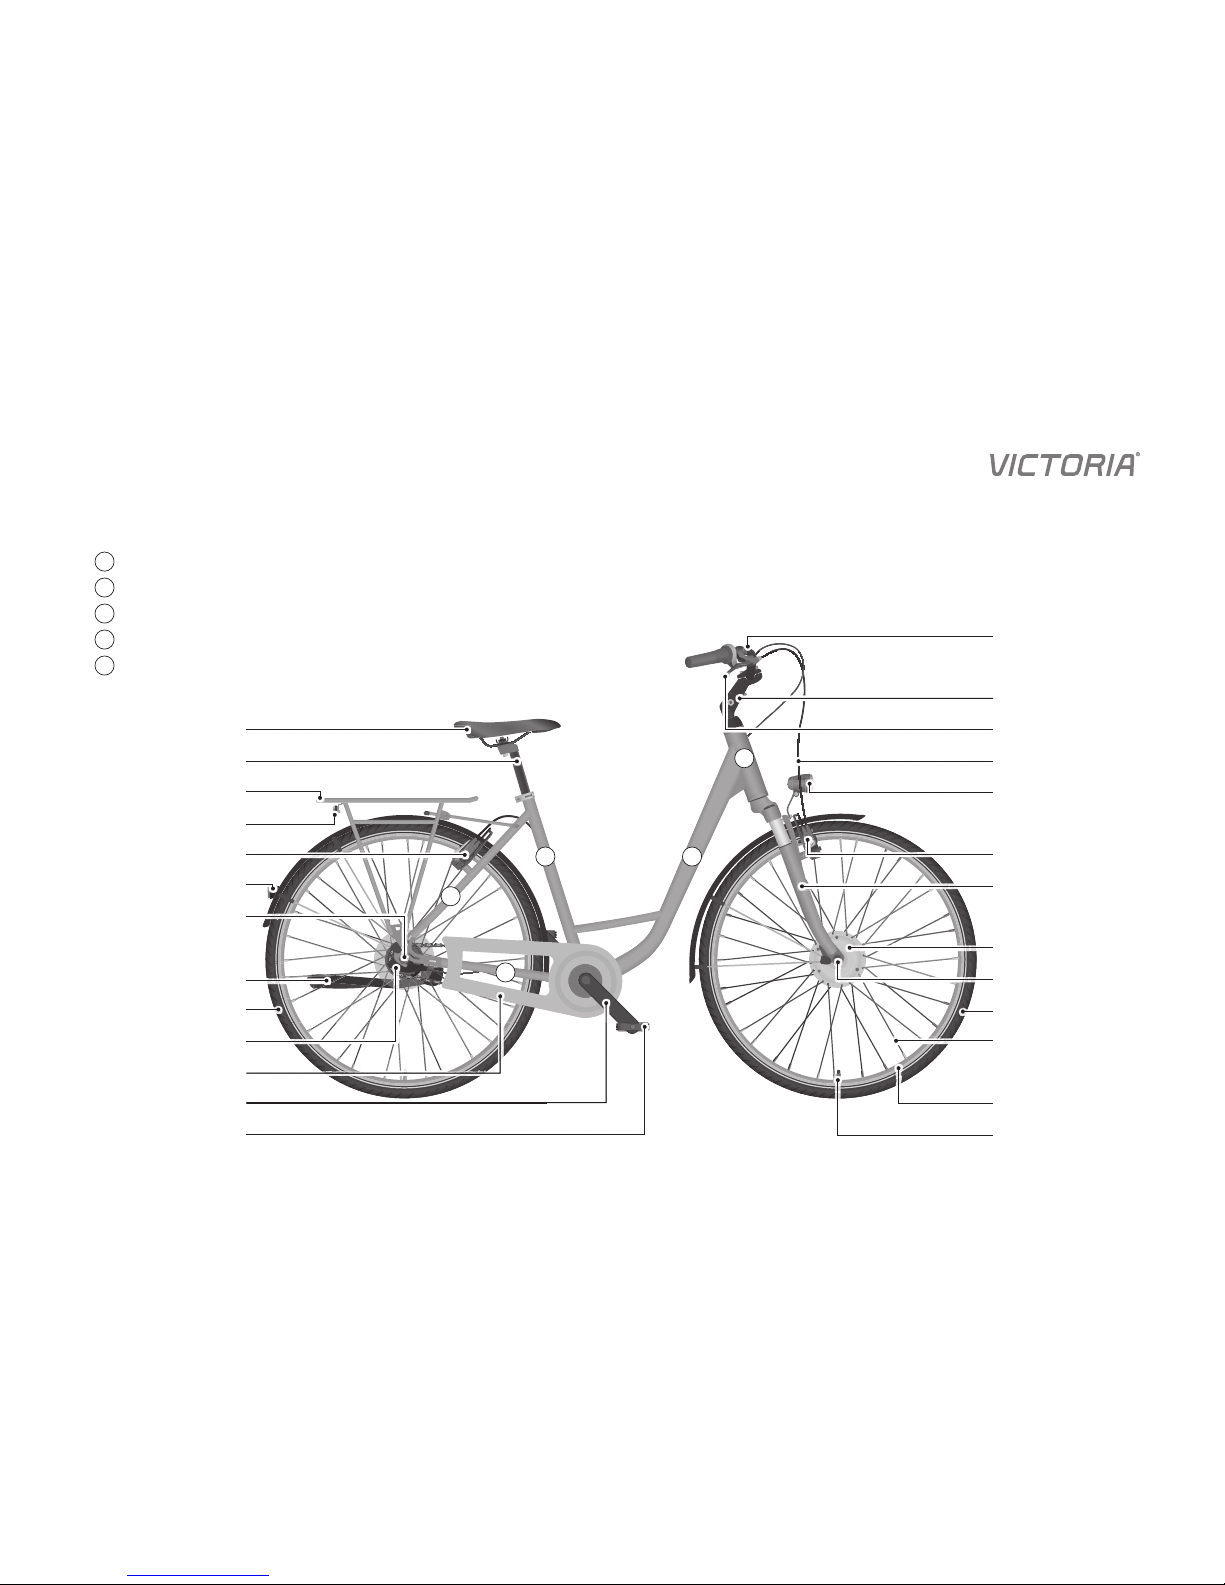
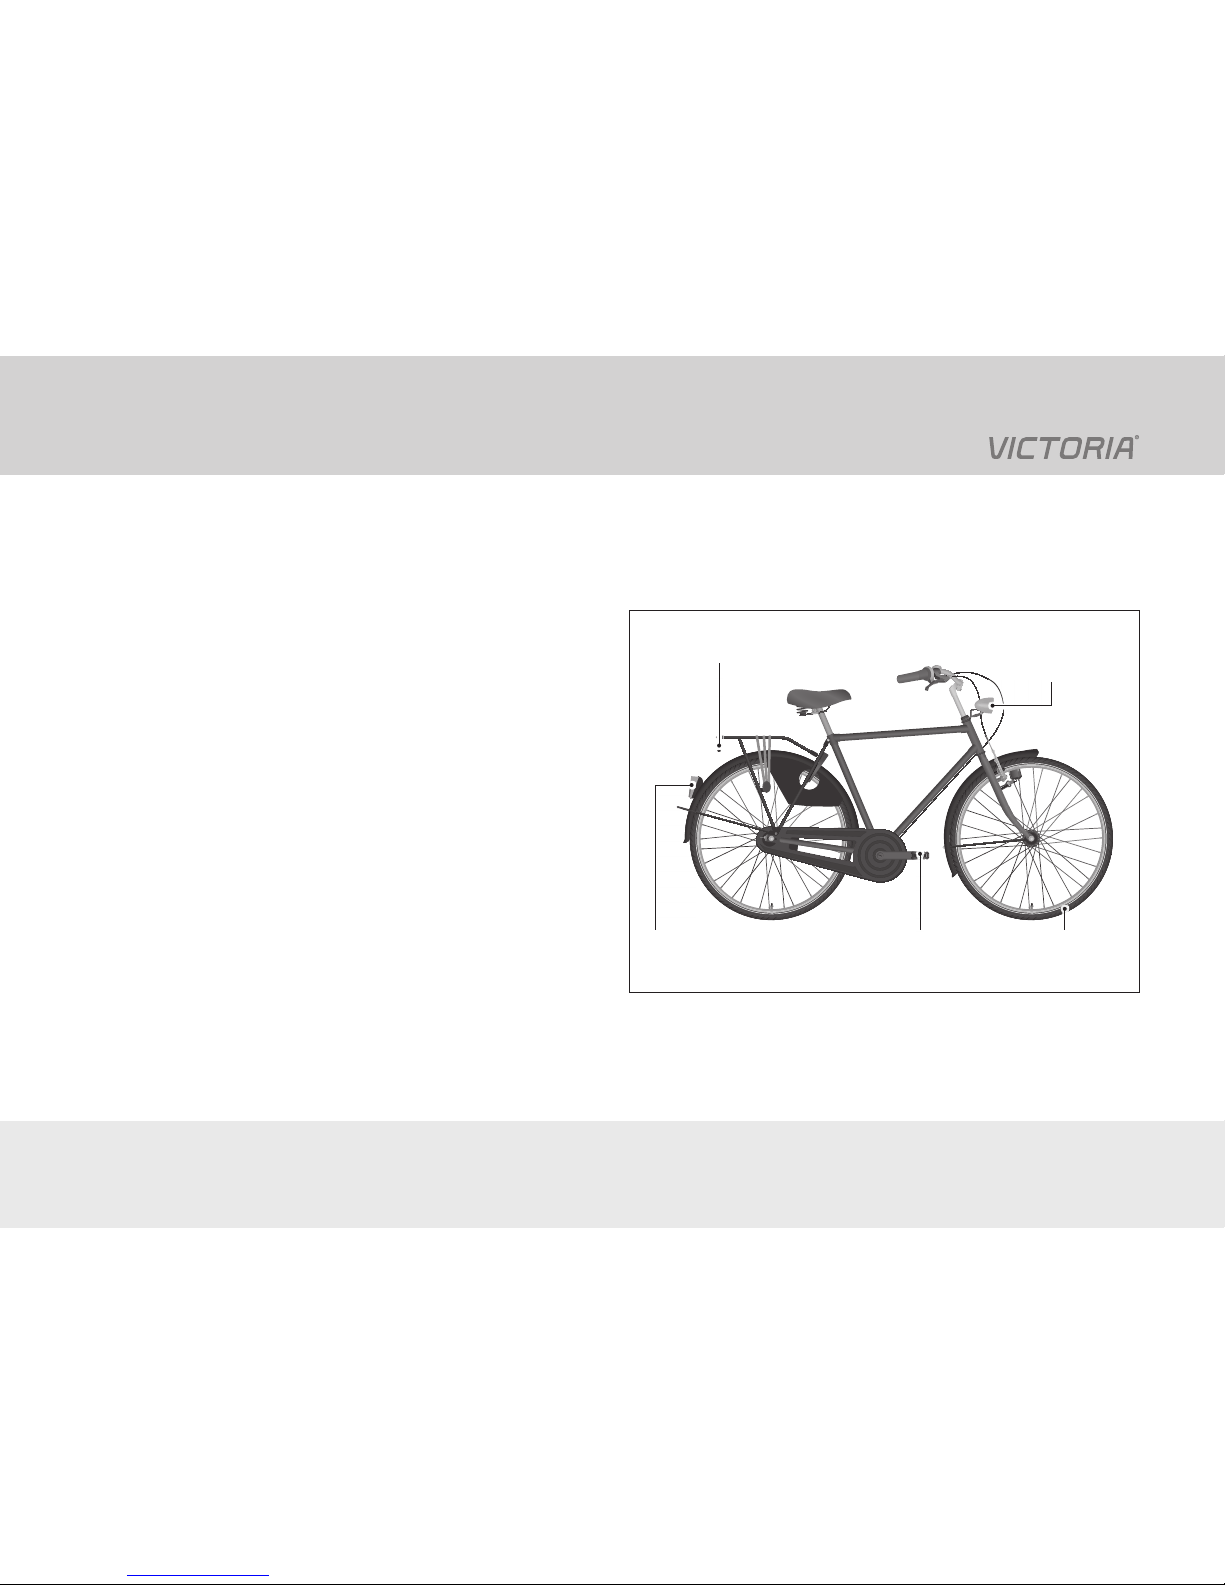
Frame:
1
Head tube
2
Main frame tube
3
Rear frame chain stay
4
Rear frame seat stay
5
Seat tube
Descriptions
NOTICE: The figure may vary depending on your model or the selected
configuration. Read the special notes regarding your configuration in the
following chapters.
1
2
3
4
5
Handlebars
Handlebar stem
Brake lever
Brake cable
Headlight
Front brake
Fork
Hub dynamo
Wheel nut
Front wheel
Spoke
Rim
Valve
Seat
Seat post
Baggage rack
Reflector/rear light
Rear brake
Reflector/rear light
Wheel nut
Stands
Rear wheel
Rear wheel hub
Chain protector
Pedal crank
Pedal
3

Legal notice
Responsible for sales and marketing
Hermann Hartje KG
Deichstraße 120 – 122
D-27318 Hoya/Weser
Tel. +49 (0) 4251 - 811-500
info@hartje.de
www.hartje.de
Text, content and layout
Prüfinstitut Hansecontrol GmbH
Schleidenstraße 1
D-22083 Hamburg
Tel. +49 (0) 40 300 3373-73 0
www.hermesworld.com
The user manual is a supplemental user manual for your
bicycle and covers the requirements and the domain of validity
of the DIN EN 4210 and DIN EN 82079-1 standards.
© Duplication, reproduction and translation as well as any
commercial exploitation, including excerpts, in printed or
electronic form, is permissible only with prior written approval.
Version 93564_01_Victoria_GB
4

5
Warranty (Guarantee specifications) 2
Descriptions 3
Legal notice 4
Table of contents 5
Safety 8
General notes and information 8
Please ensure you read this information 8
Validity 8
Categorisation of warning notes 8
Safety notes 9
Use 9
Road traffic 10
Modifications 12
Residual risks 13
Proper use 14
Fundamental information 15
Symbols and terms 15
Symbols on the products 15
Symbols in this manual 15
Terms 16
Written labels 16
Units 16
» Table of contents
Torques 17
Components 18
Screws 18
Notes 19
Road traffic 19
Bicycle helmet 19
Lights 19
Additional regulations 20
Carrying children 20
Use 22
Wear 22
Permissible total weight 23
Baggage rack 23
Baggage 24
Protection against theft 25
Transport 25
Disposal 26
Brake 27
Coaster brake 27
Hand brake 27
Brake types 28
Roller brake (cable operation) 28
Rim brakes 28
Disc brake (hydraulic) 30
Quick-release 32
Table of contents

6
» Table of contents
Lights 33
Models with detachable lights 33
Models with rechargeable batteries (e-bikes) 33
Models with hub dynamo 34
Headlight 34
Rear light 35
Suspension 36
Suspension seat post 36
Suspension fork 37
Adjustment options 37
Sitting position 38
Changing components 38
Tyre pressure 39
Valve types 39
Gear shift system 40
Derailleur gears 40
Installation 42
Detachable lights 42
Headlight 42
Rear light 42
Before each ride 43
Inspection instructions 43
Before cycling for the first time 44
After an accident 45
Operation 46
Brake 46
Hand brake 46
Coaster brake 47
Quick-release 48
Lights 49
E-bike 49
Models with hub dynamo 50
Detachable lights 51
Suspension fork 54
Lock-Out 54
Gear shift system 55
Gear hub 55
Derailleur gears 56
Derailleur gears/gear hub 58
Components 59
Bell 59
Stands 59
Frame lock 59
Baggage rack 60
Settings 61
Notes 61
Table of contents

7
Table of contents
Brake 62
Rim brakes with brake cable 62
Hydraulic rim brake 64
Hydraulic disc brake 65
Quick-release 66
Sitting position 67
Seat 67
Handlebars 67
Headlight 68
Suspension 69
Suspension fork 69
Suspension seat post 69
Tyre pressure 70
Gear shift system 72
Derailleur gears 72
“Nexus” gear hub 72
“NuVinci” gear hub 73
Cleaning and maintenance 75
Notes 75
Accessories required 76
Cleaning 76
Care instructions 77
Brake 77
Suspension 77
» Table of contents
Chain 78
Gear shift system 78
Maintenance 79
Notes 79
Inspection intervals 79
Maintenance intervals 79
Maintenance work 80
Screw connections 80
Frame and fork 80
Seat 81
Handlebars 81
Wheels 81
Hand brake 83
Coaster brake 86
Pedal drive 86
Chain tension 87
Lights 88
Bell 88
Suspension 88
Gear shift system 88
Inspection report 90
Bicycle passport 93
Handover document 95
8
Please ensure you read this information
Read all warnings and notes in this user manual with
care before you operate the bicycle for the first time.
Keep the manual at hand so that it is available at all
times. Include the user manual when passing the
bicycle on to third parties.
Validity
This user manual is valid for the following 2016 bicycle models:
- Bicycles with a permit for use in road traffic:
Trekking, Urban, Retro, Holland (Limited/Classic 3),
Spezial.
- E-bikes (Pedelecs) with a permit for use in road traffic and
a separate user manual for the drive system:
e Holland, e Manufaktur, e Spezial, e Trekking, e Urban, e
Retro.
Categorisation of warning notes
The sense of the warning notes is to draw your attention to
potential hazards. Your complete attention is required for the
warning notes; the statements must be understood completely.
Failure to follow a warning note may result in injury to yourself
or other persons.
The warning notes alone cannot prevent dangers. Follow all
warning notes to avoid risks when using the bicycle.
There are warning notes in the following categories:
WARNING
The signal word “Warning” designates a hazard with
moderate degree of risk which may lead to death or
severe injury if not avoided.
CAUTION
The signal word “Caution” designates a hazard with
low degree of risk which may lead to minor or moderate
injury if not followed.
NOTICE
The signal word “Notice” warns against potential
damages to property.
Safety »
General notes and information
» Safety » General notes and information » Please ensure you read this information / Validity / Categorisation of warning notes
9
WARNING
Danger for children or for individuals with insufficient knowledge or abilities!
Improper use of the bicycle may result in the risk of
accident and injury.
• Please use the bicycle only if you are fully acquainted
with the operation of the bicycle and all of its functions.
• Do not allow persons with reduced physical, sensory
or mental abilities or a lack of experience or knowledge
to use the bicycle.
• Do not allow children to play with the bicycle.
• Do not allow children to clean, maintain or service the
bicycle.
• Do not allow small children to play with the packaging
film. They can become caught up in it when playing
and suffocate.
WARNING
Risk of accident and injury!
Braking distances can be increased or the bicycle could
slip on bends, e.g. in wet, dirty or snowy conditions or
where there are leaves on the ground.
• Adapt your speed and the manner in which you ride
to the weather conditions.
• Adapt your speed and the manner in which you ride
to the road you are riding on.
CAUTION
Risk of injury!
The bicycle has moving and rotating parts. Clothing
can become caught in rotating parts. If you are wearing
inappropriate footwear, your feet can slip from the
pedals.
• Wear tight-fitting clothing on the legs. Use trouser clips
where appropriate.
• Wear non-slip shoes with a stiff sole.
• Ensure no loose straps are hanging down, e.g. shoelaces or jacket belts.
Safety notes »
Use
» Safety notes » Use
10
NOTICE
Risk of damage!
Improper use can damage your bicycle.
• Do not use your bicycle to jump over ramps or mounds
of earth.
• Do not ride through deep water on your bicycle.
• Do not ride over land that could cause your bicycle
to become excessively dirty, e.g. over wet earth or
through a dusty environment.
• Do not ride over steps or other types of ledges,
e.g. kerbs or rocks.
Road traffic
WARNING
Risk of accident and injury!
There is a high risk of having an accident if the bicycle
is used in an improper manner or with disregard for regulations.
• Only use the bicycle in public road traffic if it is equipped
in accordance with the road traffic regulations in the
relevant country (see chapter “Notes » Road Traffic”).
• Only use your bicycle in road traffic if you are adhering
to the road traffic regulations applicable to that country.
• Follow the applicable country- and region-specific
regulations when using cycle paths and cycle routes.
Safety notes »
Use / Road traffic
» Safety notes » Use / Road traffic

11
Safety notes »
Road traffic
WARNING
Risk of accident and injury!
Low-visibility clothing can make it difficult for other road
users to see you, and they may react too late in dangerous situations.
• Always wear light clothing or sports apparel with reflective elements when cycling to ensure you are visible
to other road users.
WARNING
Risk of injury!
If you fail to wear head protection, an accident may
cause serious head injuries.
• Wear a bicycle helmet when riding your bicycle (see
chapter “Notes » Road Traffic » Bicycle helmet”).
WARNING
Risk of accident and injury!
If you do not concentrate on the road traffic, you will
endanger yourself and other road users.
• Do not allow yourself to become distracted when riding
your bicycle, e.g. by switching the light on.
• Do not use mobile devices when riding your bicycle,
e.g. smartphones.
• Do not use any entertainment devices when riding your
bicycle, e.g. MP3 players.
• Do not ride your bicycle if you have consumed alcohol,
drugs or medicines which may impair your ability to
ride.
» Safety notes » Road traffic
12
Safety notes »
Modifications
WARNING
Risk of accident and injury!
Additions and modifications to your bicycle using
incorrect accessories may endanger your safety. The
use of non-approved accessories can cause the bicycle
to malfunction.
• Always have modifications performed exclusively by
your specialist dealer.
• Allow the fitting of only those accessories that meet
the country-specific provisions governing road traffic
(see chapter “Notes » Road Traffic”).
• Fit only those accessories that correspond to the
standards and quality of the original equipment.
» Safety notes » Modifications

13
Residual risks
Residual risks
Despite compliance with all notes concerning dangers and
safety, use of the bicycle is associated with the following
unforeseeable residual risks:
Risk of accident and injury
• Dangerous situations may arise due to misconduct by other
road users.
• Unforeseeable road conditions may cause accidents and
injuries, e.g. slippery conditions caused by black ice.
• Components may malfunction or break due to unforeseeable material defects.
• Components may malfunction or break due to unforeseeable material fatigue.
• Components may malfunction or break due to unforeseeable manufacturing defects found in bicycle components.
» Residual risks

14
Neither the manufacturer nor the dealer will accept liability for
damage which occurs due to improper use or use which does
not comply with the intended purpose.
The warranty is rendered void in the event of improper use
of the bicycle and its components (see chapter “Warranty”).
The bicycle is intended exclusively for personal use.
The bicycle is intended for use by persons for whom the set-
tings have been adjusted for the correct sitting position according to their body size (see chapter “Settings » Sitting position”).
All models, with the exception of the models “Spezial 7.9” and
“Spezial 8.7” (a tandem) are intended for the transportation of
one person on paved streets and roads.
The models “Spezial 7.9” and “Spezial 8.7” (a tandem) are
intended for the transportation of one or two persons on paved
streets and roads.
The bicycle is not intended to be subjected to above-average
strain during use, e.g. the use of the bicycle in racing or competitive events is not considered to be in accordance with its
intended use (see chapter “Warranty”).
The bicycle is designed for use with a child seat if this is indicated in the bicycle passport (see chapter “Bicycle passport”).
The bicycle is designed for use with an optional baggage rack if this is indicated in the bicycle passport
(see chapter “Bicycle passport”).
To ensure proper use of the bicycle in road traffic, you must
know and understand the regulations which are in force in that
specific country.
To ensure proper use of the bicycle in road traffic, the bicycle
must comply with the regulations which are in force in that
specific country (see chapter “Notes » Road Traffic”).
• Only use your bicycle in the manner described in this user
manual. Other use is not considered to be proper use and
can lead to accident, injury or damage.
» Proper use
Proper use

15
Symbols on the products
The following symbols are located on the packaging, the
rechargeable battery or the charger.
Label for electrical devices that you must not dispose of with household or other garbage. You are
obligated by law to dispose of correspondingly
labelled products at suitable recycling points for
environmentally-friendly recycling.
Label for rechargeable batteries and batteries that
you must not dispose of with household or other
garbage. You are obligated by law to dispose of
correspondingly labelled products at suitable recycling points for environmentally-friendly recycling.
Label for waste materials intended for recycling.
Sort the packaging before you dispose of it. Dispose of cardboard and carton as waste paper and
foils via the recyclable material collection service.
Symbol confirming conformity with guidelines for
products corresponding to the requirements of the
European General Product Safety Directive.
Label for lighting components authorised for use
in road traffic. The respective test number (1234)
varies by product.
Symbols in this manual
1. Instructions for steps to be performed in
a particular order begin with a number.
• Steps to be performed in no particular order
begin with a dot.
– Lists begin with a so-called dash.
» Separates a chapter if the chapter is subordi-
nate to the previous one.
/ Separates a chapter if the chapter is not sub-
ordinate to the previous one.
| Separates a chapter if the chapter is
superordinated to the previous one.
NOTICE: Supplementary notes regarding steps to be
performed or use.
Fundamental information »
Symbols and terms
» Fundamental information » Symbols and terms » Symbols on the products / Symbols in this manual
16
Fundamental information »
Symbols and terms
Terms
Dropout: Connection between the rear frame seat stay and the
rear frame chain stay (see chapter “Descriptions”). The rear
wheel’s axle is tightly screwed into the dropout.
Brake arm: Contrary to the norm, in this user manual the
lever installed on the rear frame chain stay as a bracket
for the coaster brake is described as the brake arm
(see the term “brake lever” and the chapter “Maintenance
» Maintenance work » Coaster brake”).
Brake lever: Contrary to the norm, in this user manual the
lever attached to the handlebars to operate the rim brakes,
drum brakes and disc brakes is described as the brake lever
(see term “Brake arm” and the chapter “ Operation » Brake”).
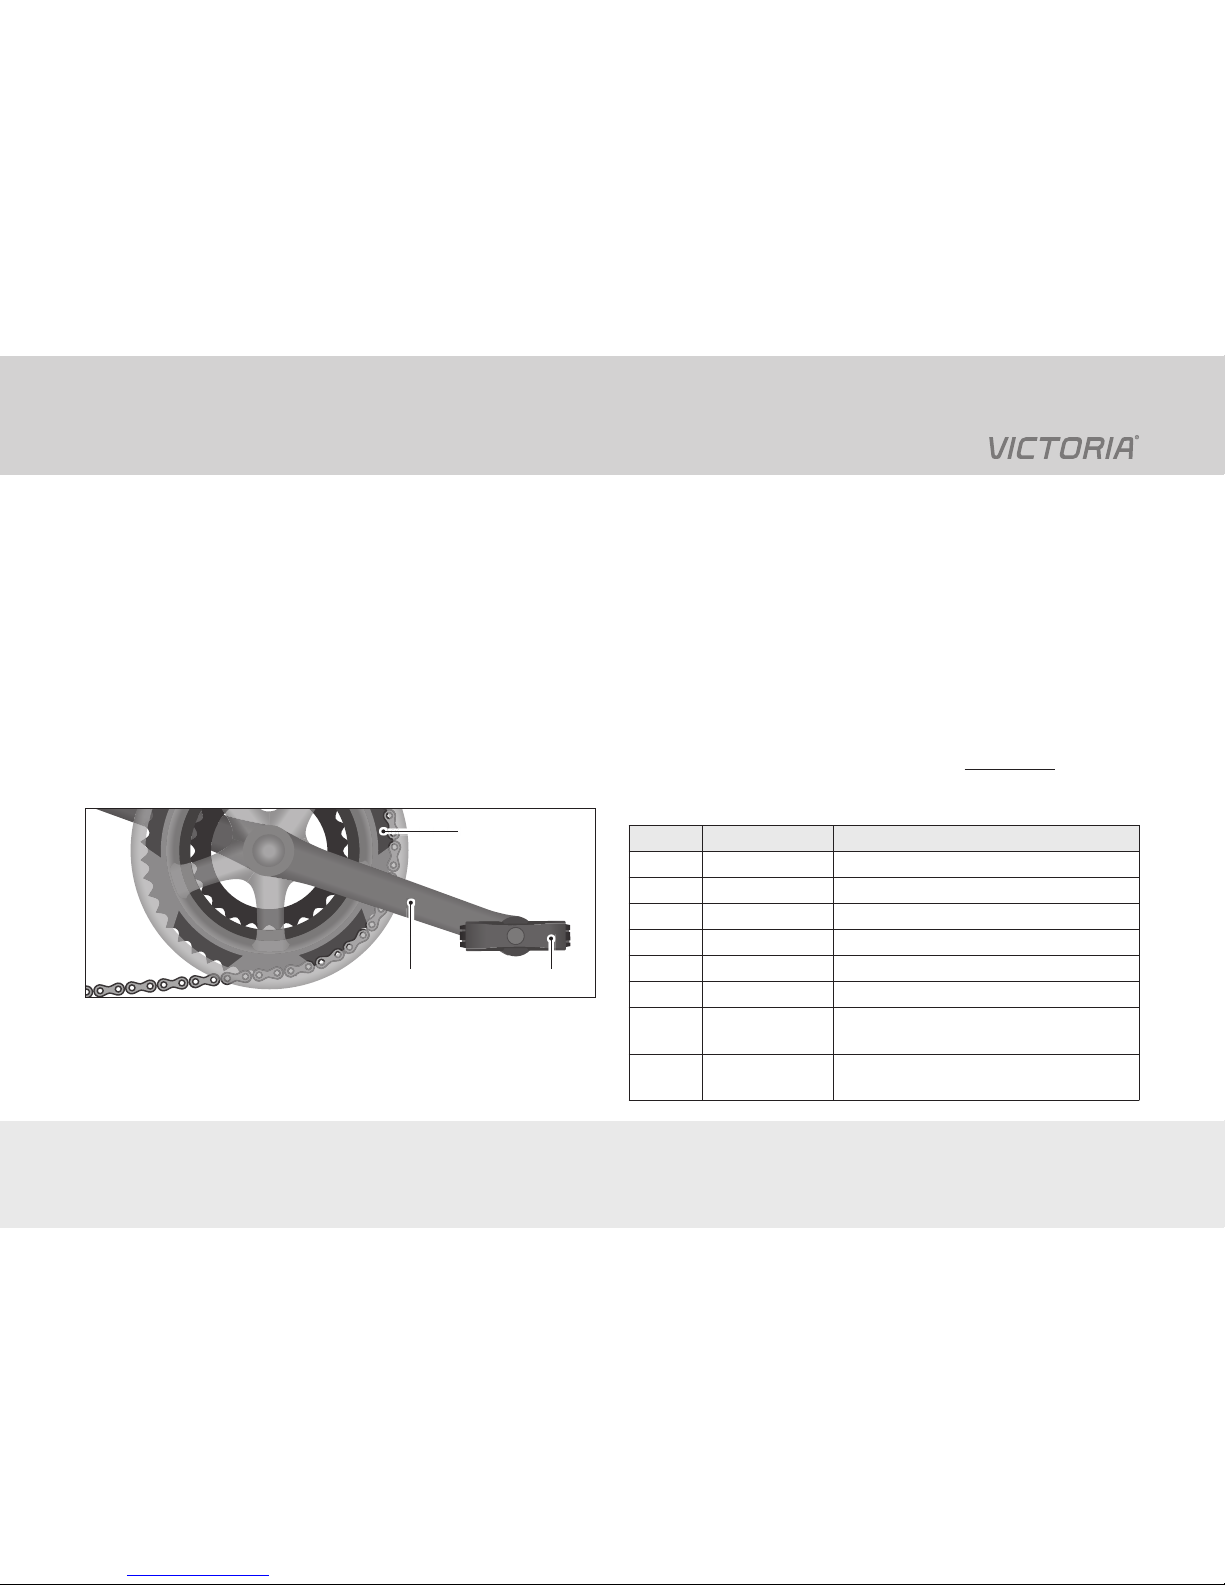
Pedal crank Pedal
Chain ring
Figure G-1: Pedal drive with pedal crank, pedal and chain ring
as an example of a derailleur with 3 chain rings.
Pressure point (hydraulic handbrake): The position of the
brake lever at which the brake begins to have a braking effect
(see chapter “Operation » Brake”).
Lock Out: See chapter “Notes » Suspension”.
Pedal drive: Assembly consisting of pedal, pedal crank and
chain ring.
Sag: See chapter “Notes » Suspension”.
Written labels
- Image captions and references in the text are rendered in
italics.
- Emphasis of passages in the text are underlined.
Units
Unit Meaning Unit for
1/s per second Revolutions
Bar Bar Pressure (obsolete)
g Gram Weight (=kg/1000)
kg Kilogram Weight (=g×1000)
kPa Kilopascal Pressure
Nm Newton meter Torque
psi pound per
square inch
Pressure (USA, obsolete)
" Inch Measurement unit (USA)
1 inch = 2.54 cm
» Fundamental information » Symbols and terms » Terms / Written labels / Units

17
Fundamental information »
Torques
WARNING
Risk of accident and injury!
Incorrectly tightened screws can lead to material fatigue.
When subjected to excessive strain, screws become
malleable and can rupture.
• If you notice loose screw connections, ask your specialist dealer to tighten them using a torque key.
• If you tighten screws yourself, use a torque key and
seek information from your specialist dealers about
the torque to use.
To tighten the screws you will require a torque key with the
appropriate adjustment settings.
• If you are inexperienced in tightening screws using torques,
take your bicycle to your specialist dealer so that they can
tighten loose screws in a technically correct manner.
The torque required depends on the material and diameter of
the screw and the material/method of assembly of the components.
• Verify if your bicycle has any aluminium parts (see chapter
“Bicycle Passport”).
• Note the specific torques required for aluminium.
• If torques are embossed or printed on the components,
use these torques.
Loose screws on the handlebar stem, on the brake, on the
bottom bracket or on the gear shift can indicate other defects.
• Take your bicycle to your specialist dealer to have any loose
screw connections on the handlebar stem, the brakes or the
gear shift tightened.
» Fundamental information » Torques
18
Fundamental information »
Torques
Components
This table does not list all components.
• Please seek information for other components and their
corresponding torques as appropriate.
Screw connection Torque in Nm
Pedal crank (steel/aluminium) 30 / 40
Pedal 40
Wheel nut front / rear (15 mm) 25 / 40
Wheel nut front (19 mm)* 40
Seat (adjustment screw) M5 / M6 4 / 5.5
Seat post clamp M6 / M8 14 / 20
Brake and switch lever on the handlebars 3
Handlebar stem
(expander bolt on the shaft stem)
8
*Models “e Retro 3.5” and “e Urban 3.1/3.4/3.5/3.6/3.8/5.1”
Screws
• For aluminium components, do not use the following
torques.
• For the handlebar stem, the brake, the bottom bracket or
the gear shift, do not use the following torques.
• Use the following torques only if you know the strength
category of the relevant screws.
Thread Torque according to the strength
category of the screws in Nm
8.8 10.9 12.9
M4 2.7 3.8 4.6
M5 5.5 8.0 9.5
M6 9.5 13.0 16.0
M8 23.0 32.0 39.0
M10 46.0 64.0 77.0
» Fundamental information » Torques » Components / Screws
19
• Seek information regarding the relevant applicable road
traffic regulations for the country or the region, e.g. from
bicycle associations or the Ministry of Transport.
• Ensure that you regularly obtain information regarding
changes to the content of the regulations in force.
• Ride carefully and with consideration for other road users.
• Ride in such a way that nobody suffers injury, is endangered,
incapacitated or disturbed.
• Use the cycle routes intended for bicycles according to
regulations.
• Use trailers or child seats strictly in accordance with the
regulations of the respective country or region.
Bicycle helmet
• For your safety: Wear a bicycle helmet even if you are not
required to do so by law.
• Seek information regarding changes to regulations on
bicycle helmets, e.g. from bicycle associations or from the
authorities.
• Wear a suitable bicycle helmet which has been tested in
accordance with norm DIN EN 1078 and bears the CE seal
of conformity.
Lights
NOTICE: The models “Spezial 1.5/1.9” may be used in
road traffic only with fitted detachable lights (see chapter
“Installation » Detachable lights”).
Rear reflector (red)
Rear light with
reflector (red)
Headlight with
reflector (white)
Reflective stripsReflectors on the
pedal (yellow)
Figure H-1: An example of lighting equipment required for riding
in road traffic.
Notes »
Road traffic
» Notes » Road traffic » Bicycle helmet / Lights

20
Notes »
Road traffic
When riding in road traffic, bicycles must be equipped with
headlights, rear lights, reflective pedals, side reflectors for
wheels and lighting strips; a white reflector at the front and
two red reflectors at the back (see Figure H-1). The light components must correspond to the requirements of the respective
country.
NOTICE: The light fittings required for road traffic use according
to the regulations of many countries must also be fitted during
the day and must be operational at all times.
Additional regulations
For use in road traffic, bicycles must be equipped with
two brakes, which operate independently of one another, and
a bell.
Carrying children
• Seek information from your specialist dealer on suitable
child seats, trailer and trailer systems for your bicycle
(see Figure H-2).
• Child seats, trailers and trailer systems must be installed
only by your specialist dealer.
• Read the user manual for the child seat, trailer or trailer
system.
• Obey the instructions concerning the maximum permitted
weight for the child seat, the trailer or the trailer system cited
in the respective user manual.
• Allow a child to ride in the child seat or child trailer only if the
child is younger than 8 years old and weighs less than 22 kg.
• Allow a child to ride in the child seat or child trailer only if
you are over 16 years old.
• Allow a child to ride in the child seat or child trailer only if
the child is wearing a suitable bicycle helmet which has
been tested according to the relevant norms and bears the
CE seal of conformity.
• Obey the country-specific regulations governing the use of
child seats, trailers and trailer systems.
• Before using a child seat, trailer or trailer system in road
traffic, ensure that you first become accustomed to the way
the bicycle rides and its braking performance with it.
• Practise mounting the bicycle and descending from it before
using it in road traffic.
• With your child, practice proper conduct while cycling.
• Adapt the way you ride the bicycle to suit the changed
handling of the bicycle during the ride.
» Notes » Road traffic » Additional regulations / Carrying children
21
Notes »
Road traffic
Child seat
• When a child seat is installed, ensure the seat suspension
is fully covered.
• When a child seat is installed ensure that all moving parts
are covered, e.g. using a spoke protector.
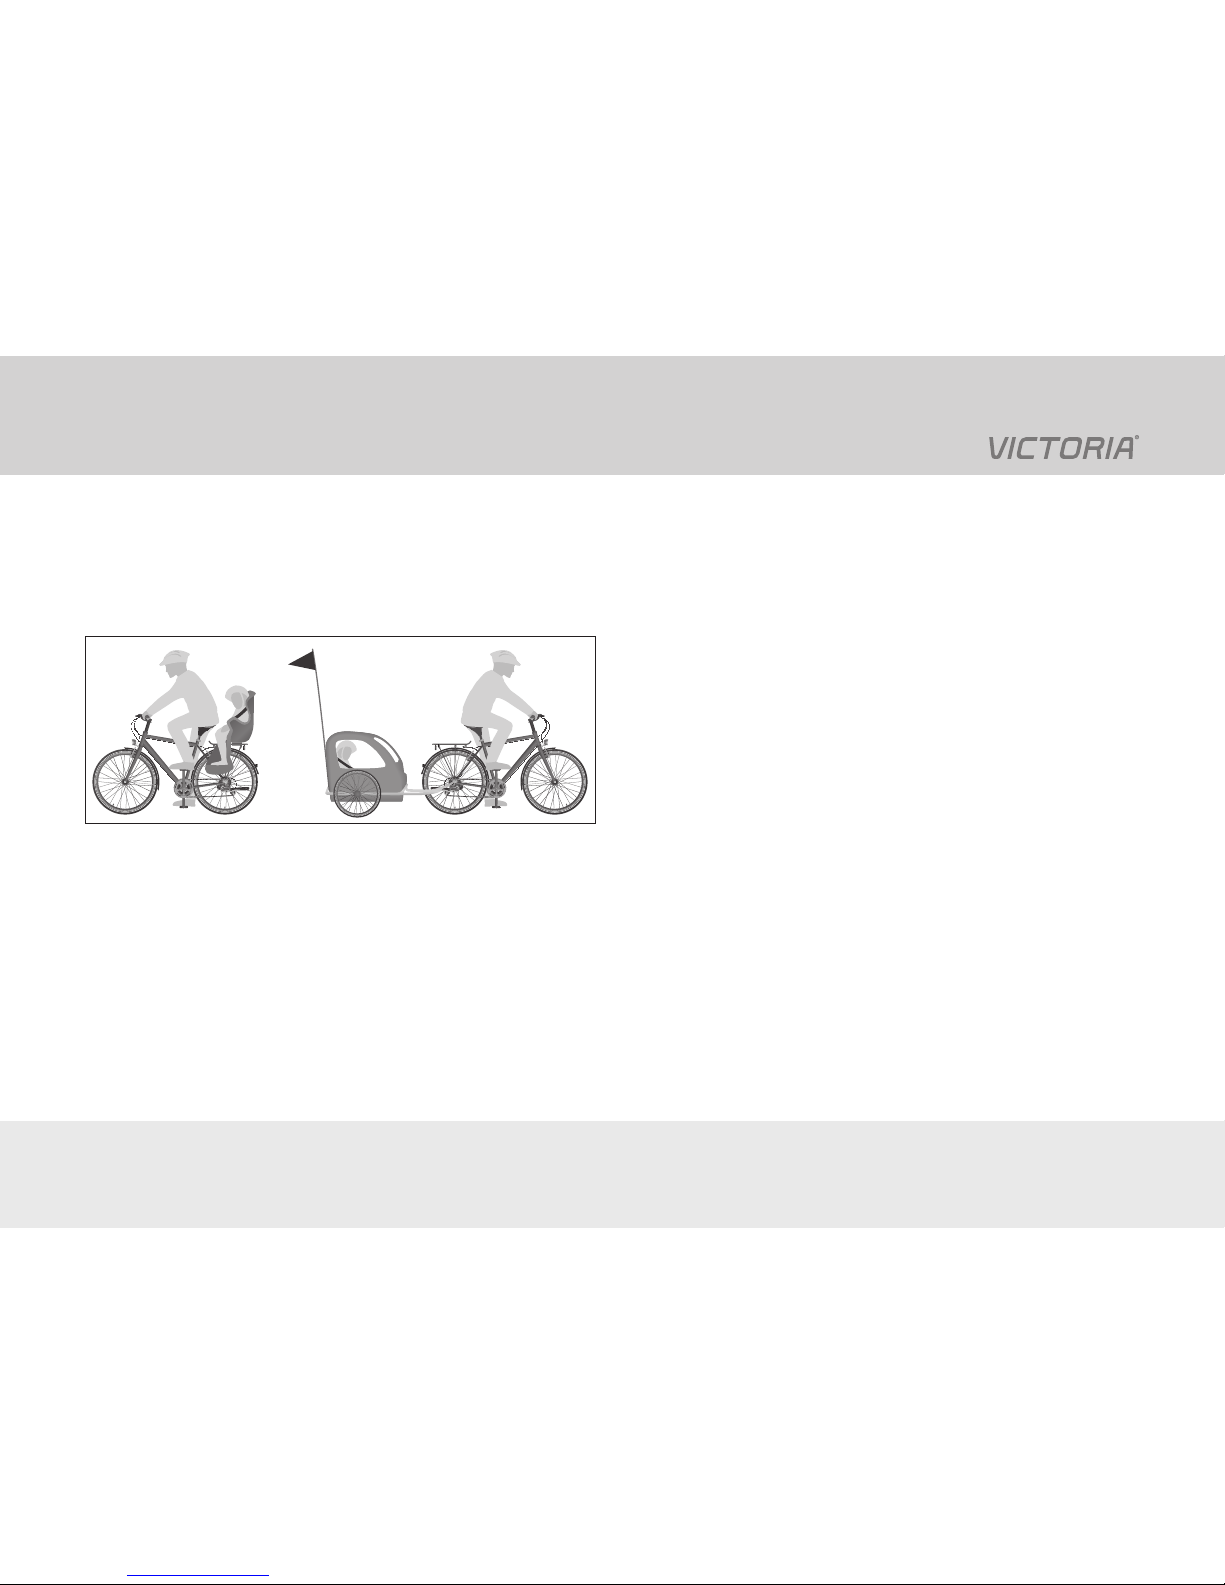
Figure H-2: Transporting children in a child seat with seat
protection (left) and in a child trailer with passenger compartment and the pennant flag required by law (right). The child is
strapped in.
Child trailer
• Keep in mind that your bicycle is significantly longer with
the trailer system attached.
• Transport a maximum of two children in the child trailer.
• Install on the trailer fully operational lights which correspond
to regulations.
• For the child’s safety, choose a trailer with a restraint system.
• Ensure that you equip the trailer with a luminous-coloured
pennant flag on a flexible flagpole with a minimum height of
1.5 m and install covers for the spokes and wheel housings.
• For maximum safety, select a model with a sturdy passenger
compartment and safety belts.
» Notes » Road traffic » Carrying children

22
Wear
WARNING
Risk of accident and injury!
If excessive wear and material fatigue have taken place,
and if screw connections have come loose, there is an
increased risk of accident and injury.
• Regularly check the condition of all components
(see chapter “Maintenance”).
• If any parts show signs of cracks or discolouration have
them checked by your specialist dealer immediately.
• Have your bicycle checked regularly by your specialist
dealer, especially if the bicycle is used intensively.
• Do not use the bicycle if you notice excessive wear or
loose screw connections.
As with all mechanical components, bicycle components are
subject to wear. High levels of strain and improper use exacerbate wear. Different materials wear differently.
• Consult your specialist dealer on the wear parts of your
bicycle.
• Regularly check the condition of all wear parts
(see chapter “Before each ride” and “Maintenance”).
• Maintain the wear parts on a regular basis
(see chapter “Cleaning and maintenance”).
Parts subject to wear due to their intended use
The following wear parts are subject to wear as a result of their
intended use and are therefore excluded from the warranty
(see chapter “Warranty”):
- Wheels
- Chain drive (Chain, chain rings, sprockets, chain tensioners
and guide rollers)
- Bottom bracket
- Gear shift cables
- Brake components
(see chapter “Notes » Brake”)
- Handle grips
Notes »
Use
» Notes » Use » Wear

23
Wear and tear dependent on manner of operation
The following wear parts can be subject to wear due to ageing
or intensive use.
- Frame
- Handlebars and handlebar stem
- Fork and suspension fork
Wear and tear to brakes
Brake pads and brake cables are subject to constant wear.
This causes the distance between the brake levers and the
handle grips to change.
• Check and maintain the brakes regularly (see chapter
“Before each ride » Inspection instructions” and “Maintenance » Maintenance work » Hand brake”).
Wear and tear to spokes, brake cables and gear
shift cables
Spokes, brake cables and gear shift cables stretch with continued use, and where wear and tear is detected they must be
adjusted or replaced.
• Check the spokes regularly (see chapter “Maintenance »
... » Wheels » Rims and spokes”).
• Check the gear shift system and the gear shift cables regularly (see chapter “Maintenance » ... » Gear shift system”).
• Check the brake cable regularly (see chapter
“Maintenance » ... » Hand brake » Brake cable”).
Permissible total weight
• If you own an e-bike, read the separate user manual on its
drive system to learn the permissible total weight.
• Determine the unladen weight of your bicycle by weighing
it, with all optional extra equipment attached as appropriate.
NOTICE: For best results, the weight should be determined
using suspended scales. If necessary, ask your specialist
dealer to determine the unladen weight of your bicycle.
Permissible total weight:
- Rim size 26 inches: 100 kg
- Rim size 28 inches
(with the exception of “Spezial 5.5 and 6.5”): 120 kg
- Models “Spezial 5.5 and 6.5”: 170 kg
- Models “Spezial 7.9 and 8.7” (Tandem): 190 kg
The actual total weight for bicycles is calculated as follows:
Bicycle + rider + baggage = total weight
Baggage rack
• Do not make any modifications to the baggage rack.
• If you wish to replace the baggage rack, consult your
specialist dealer.
Notes »
Use
» Notes » Use » Wear / Permissible total weight / Baggage rack
24
Maximum load
Rear baggage rack 25 kg
Bicycle basket (Models “Retro 3.6 and 5.4”) 5 kg
Front baggage rack (Model “Retro 5.6”) 10 kg
Baggage
WARNING
Risk of accident and injury!
If carried incorrectly, baggage can catch in the spokes
during the ride and cause accidents. Incorrectly secured
baggage can fall off the bicycle and endanger you and
other road traffic users.
• Do not hang objects from the handlebars, e.g. carrier
bags.
• Transport objects on the baggage rack only if you can
adequately secure the items to prevent them from slipping or falling off.
• Do not overload the baggage rack
(see chapter ”Notes
» Use » Baggage rack”).
• Use appropriate containers to transport objects,
e.g. sturdy bicycle bags.
• Ensure fasteners are not damaged, e.g. bungee cords
that show rips.
• Adapt the way you ride to suit the changed handling
of the bicycle.
Notes »
Use
» Notes » Use » Baggage rack / Baggage

25
Transporting baggage
• Position your load in such a way that it does not obscure
reflectors or lights.
• Apply the brakes sooner, expect a longer braking distance
and less responsive steering.
• Secure the baggage against slipping or falling off, e.g. using
bungee cords.
• Stow heavy objects in such a way that the principal weight
is as near as possible to the wheel hub, e.g. in the lower
area of the saddle bag.
• If you use fasteners, ensure that these cannot become
caught in moving parts, e.g. straps or cables.
Protection against theft
• Protect your bicycle against theft.
• For models with a frame lock: If you are not able to keep
watch over your bicycle, lock the frame lock (see chapter
“Operation » Components » Frame lock”).
NOTICE: The frame lock is not sufficient protection against
theft.
• As effective protection against theft, use a chain lock or steel
cable lock and attach the bicycle to a fixed object, e.g. to
a bicycle stand.
Transport
NOTICE
Risk of damage!
The bicycle can be damaged by incorrect attachment or
by using an unsuitable bicycle rack.
• Only use approved bicycle racks with which the bicycle
can be transported in an upright position.
• Find out how to use a bicycle rack, e.g. by consulting
your specialist dealer.
• Attach your bicycle carefully so that it can’t slip.
Models with disc brakes
Depending on your bicycle model, a transport restraint is
included in the bicycle’s packaging.
• Ask your specialist dealer to explain the use of the bicycle
restraint.
• Use the transport restraint when transporting the bicycle.
Notes »
Use
» Notes » Use » Baggage / Protection against theft / Transport

26
Disposal
• Read the explanation of the symbols printed on the packaging (see chapter “Fundamental information » Symbols
and terms”).
• Contact your specialist dealer or the appropriate authorities
for information on disposal.
Packaging
• Sort the packaging before you dispose of it. Cardboard and
cartons should be disposed of in the paper recycling, films
in the waste recycling.
Lubricants and cleaning products
Lubricants and cleaning products should not be disposed of
in the household rubbish, in sewers or in nature.
• Dispose of lubricants, cleaners and maintenance products
at a collection point for special waste.
• Read the instructions on the packaging.
Tyres and inner tubes
Tyres and inner tubes are not residual waste or household
rubbish.
• Dispose of tyres and inner tubes at a recycling depot or at
a recycling collection point run by your city or municipality.
Batteries
NOTICE: This chapter applies to the models
“Spezial 1.5/1.9”.
As a consumer, you are legally obliged to take all batteries and
rechargeable batteries to a recycling point run by your city/
your district or by a retailer so that they can be disposed of in
an environmentally-friendly manner, regardless of whether or
not they contain hazardous substances*.
*labelled with: Cd = cadmium, Hg = mercury, Pb = lead
Detachable lights
NOTICE: This chapter applies to the models
“Spezial 1.5/1.9”.
Waste equipment must not be disposed of in the household
rubbish! If the detachable lights can no longer be used, you
as a consumer are legally obliged to dispose of them as waste
equipment separately from your household rubbish, e.g. at a
municipal/district recycling point. This will guarantee that waste
equipment can be correctly recycled and any negative impact
on the environment can be avoided.
Bicycle
• Dispose of your bicycle at a scrap metal dealer.
Notes »
Use
» Notes » Use » Disposal
27
Your bicycle is fitted with two hand brakes on the front and rear
wheel which operate independently of one another.
Depending on your bicycle model, it is also equipped with a
coaster brake (see chapter “Notes » Brake » Coaster brake”).
The type of brakes on your bicycle depends on the model.
• You can find out about the brake types of your bicycle in the
bicycle passport (see chapter “Bicycle passport”).
• Read the following chapters on your brake types.
Coaster brake
When the brake is operated, a metallic ring is pressed into the
outside of the rear wheel hub shell, causing the wheel to slow
down (see chapter “Operation » Brake » Coaster brake”. Wear
and tear related to the construction of the bicycle will only occur
after a long period of use.
Hand brake
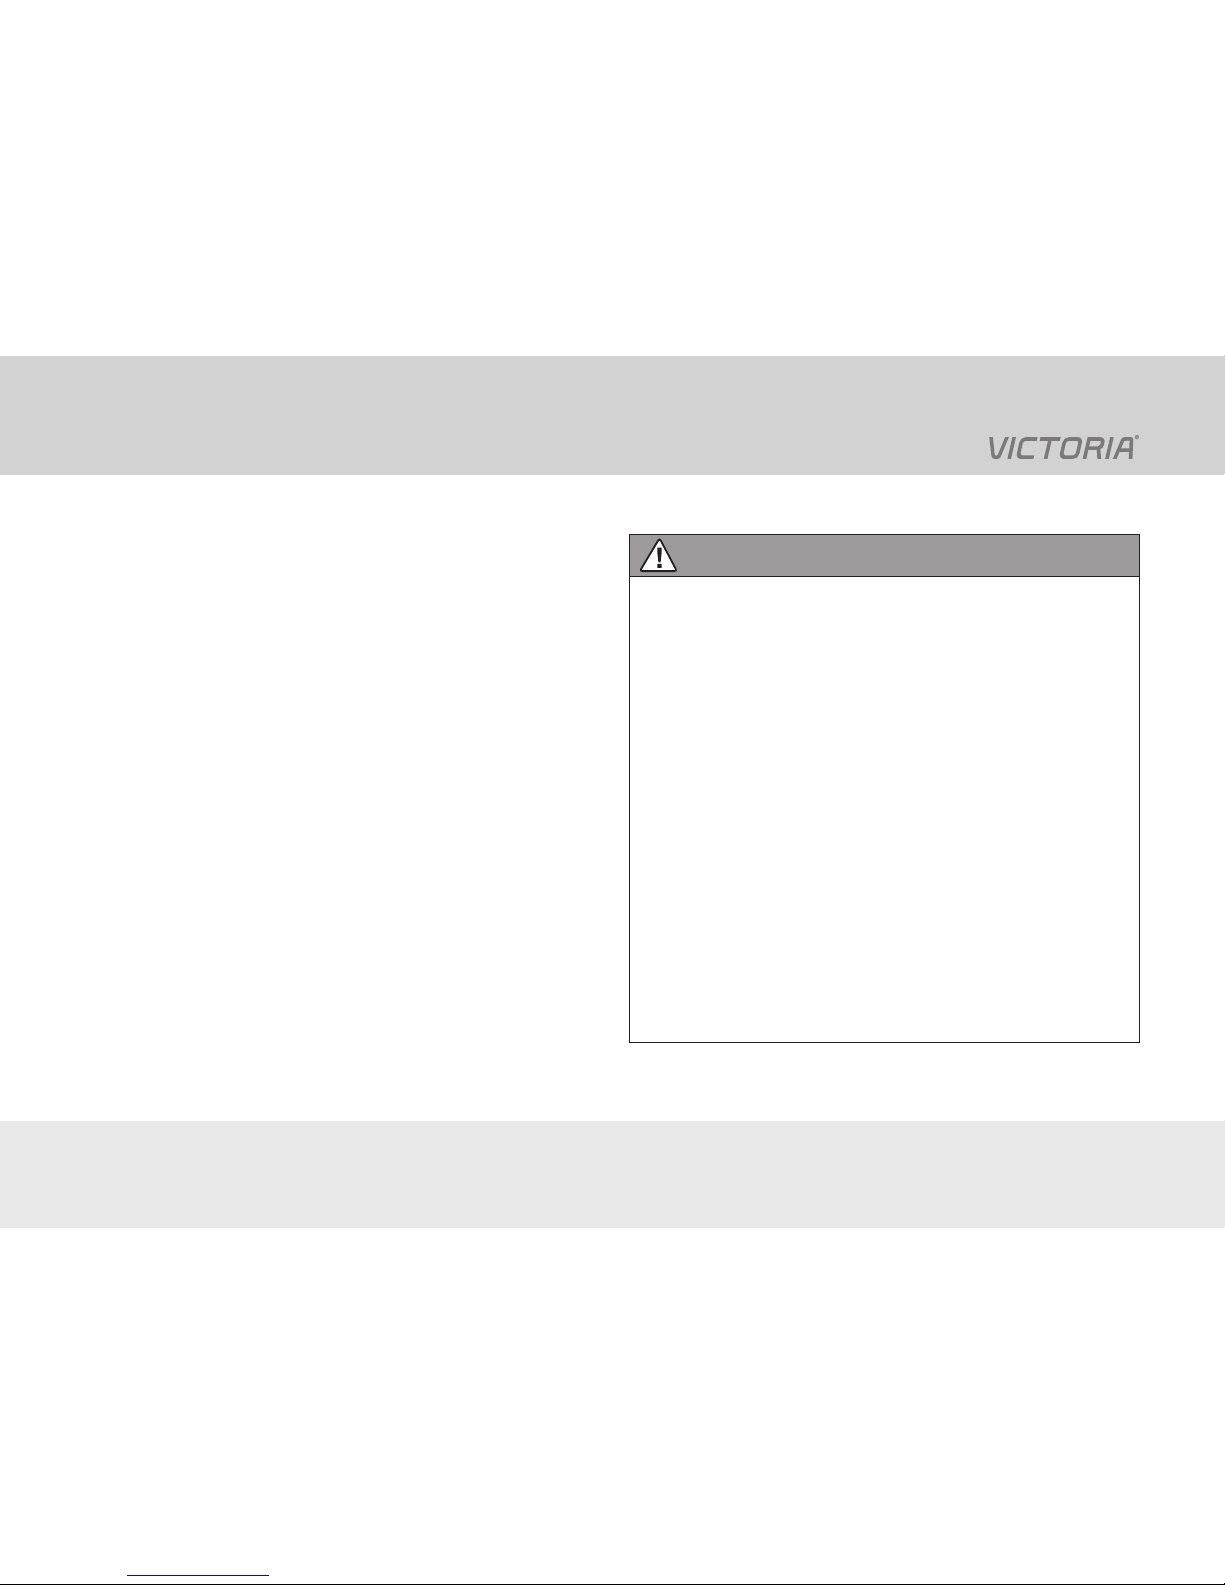
The type of hand brake on your bicycle depends on your
bicycle model (see Figure H-3 and Figure H-4). When
the brake lever is pulled, the braking force is transmitted
to the brake via the brake cable or the hydraulic line
(see chapter “Notes » Brake types”).
• Check the hand brakes regularly for wear and proper functioning (see chapter “Before each ride” and “Maintenance”).
Figure H-3: Hand brake with brake cable as a rim brake (left)
and as a roller brake (right).
Figure H-4: Hydraulic hand brake as a rim brake (left) and as
a disc brake (right).
Notes »
Brake
» Notes » Brake » Coaster brake / Hand brake
28
Notes »
Brake types
Roller brake (cable operation)
The roller brake is installed on the front or back wheel to the
side of the hub (see Figure H-3, right). When the brake is operated, brake pads are pressed into the hub shell via roller cams.
This subjects the brake pads and the hub shell to wear and tear.
Rim brakes
WARNING
Risk of accident and injury!
Worn rims can cause the tyres to come under pressure
and burst. The wheel can become blocked, causing an
accident.
• Ask your specialist dealer to inspect the rims at least
once a year.
WARNING
Risk of accident and injury!
Wet conditions can change the braking performance of
rim brakes.
• Practise braking in wet conditions away from road
traffic.
• Ride slowly in wet conditions.
Rim brakes with cable operation
The front rim brake is mounted on the fork (see Figure 3).
If your bicycle model is equipped with a rear rim brake, this
will be mounted on the rear frame seat stay (see chapter
“Descriptions”).
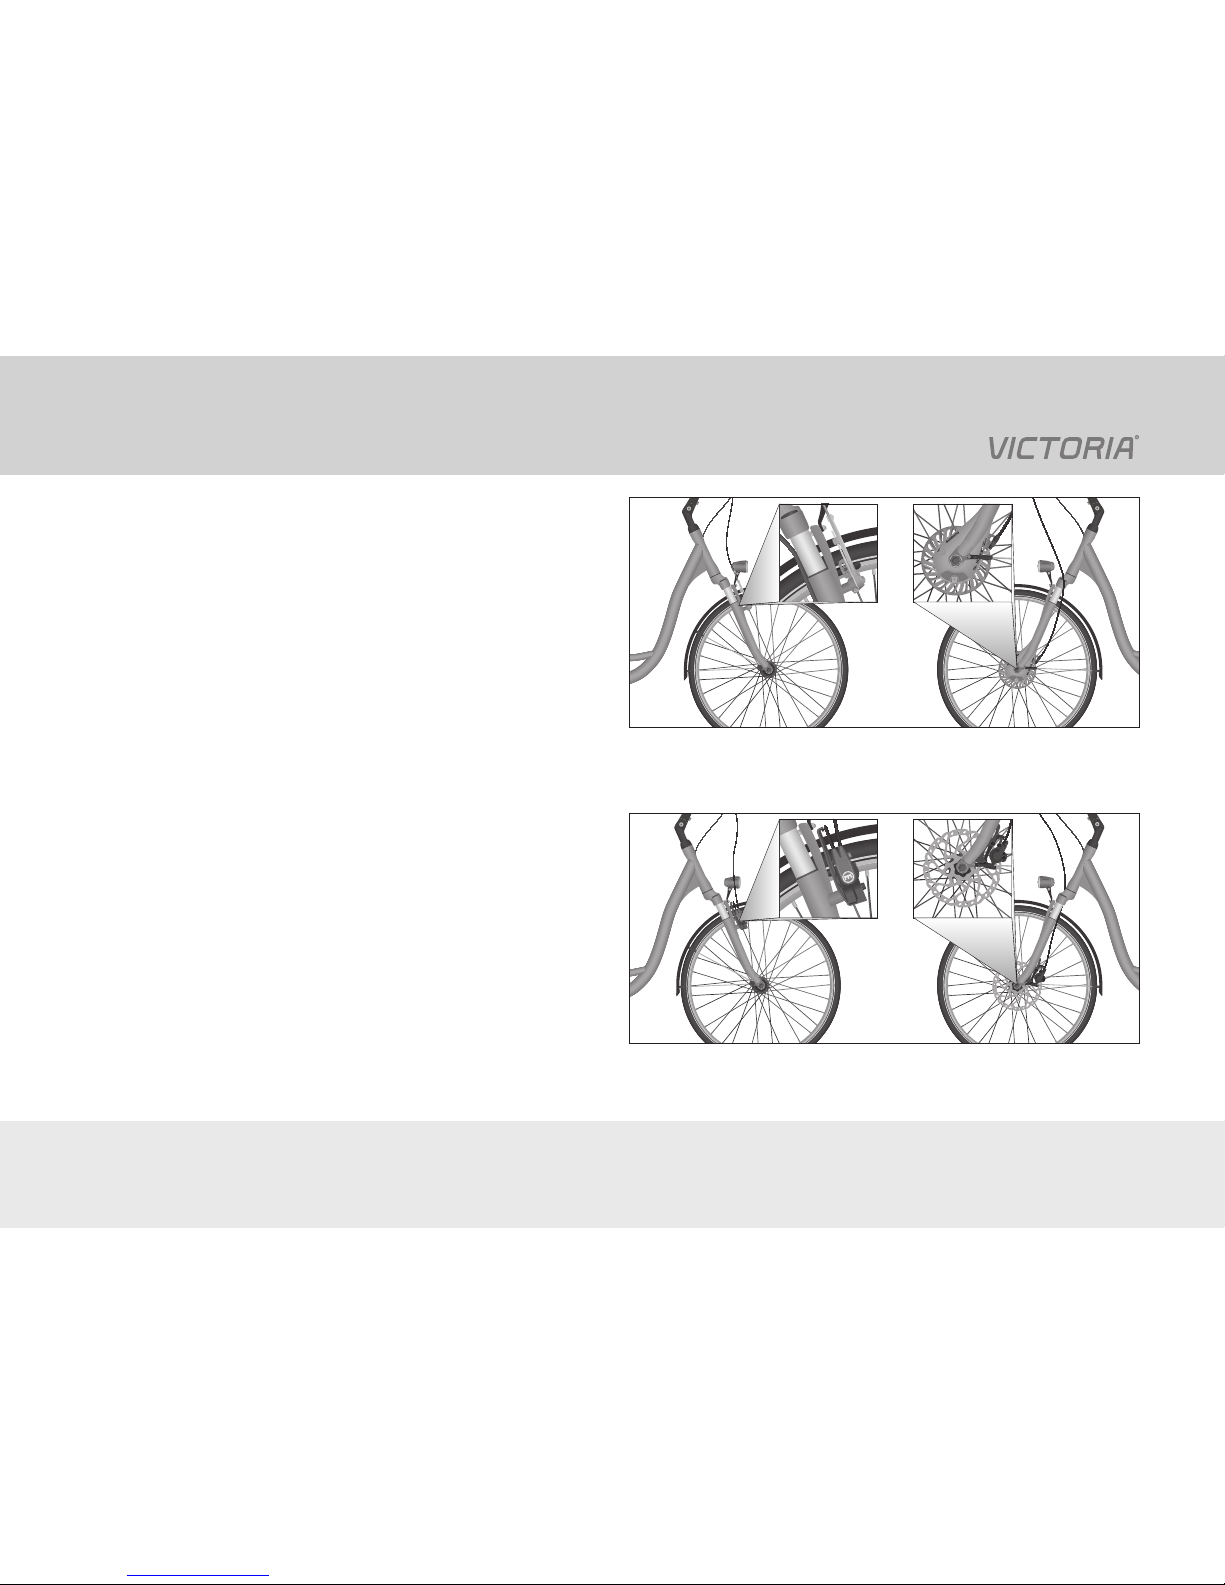
When the brake is operated, the brake cable pulls the brake
arms together and the brake shoes are pressed against
the rim (see Figure H-5 and chapter “Operation » Brake
» Hand brake”).
This process causes wear and tear to the brake cable, the
brake shoes and the rims.
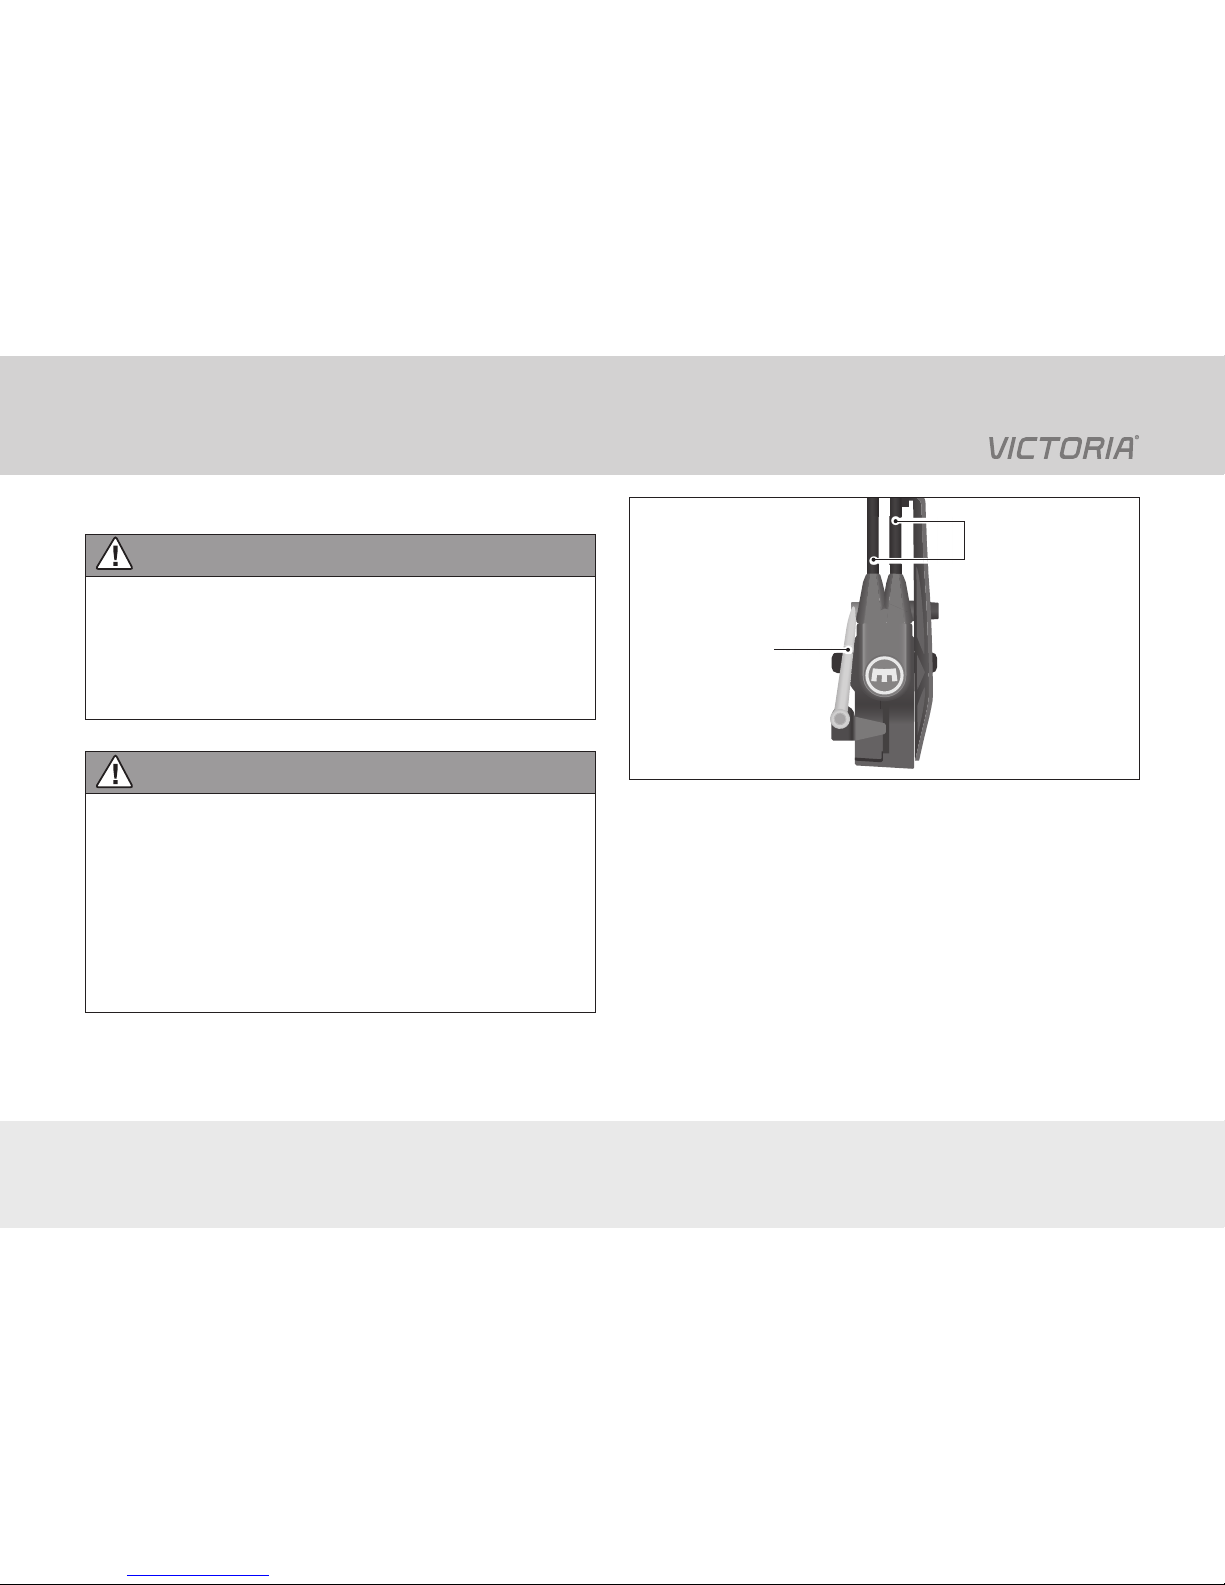
Brake cable
Brake arm
Rim
Brake shoe
Figure H-5: Front view of a rim brake with cable operation.
» Notes » Brake types » Roller brake (cable operation) / Rim brakes
29
Hydraulic rim brake
WARNING
Risk of accident and injury!
Bent or leaking hydraulic lines and open connections
compromise the braking operation.
• Do not use the bicycle if you notice damage or leaks.
• Have the brakes repaired by your specialist dealer.
WARNING
Risk of accident and injury!
If the fastener is not in an upward position, the brake
will fail.
• Before each ride, check that the fastener is in an
upward position (see Figure H-6).
• If the fastener is not in an upward position, do not use
the bicycle.
• Ask your specialist dealer to inspect the brakes.
Hydraulic lines
Fastener
Figure H-6: Hydraulic rim brake fastener.
When the brake is operated, the brake pistons within the
brake unit are pushed outwards by oil pressure.
The brake shoes are pressed down onto the rim
(see Figure H-7 and chapter “Operation » Brake » Hand brake”).
This process causes wear and tear to the brake shoes and
the rims.
Notes »
Brake types
» Notes » Brake types » Rim brakes
 Loading...