

Page 1
Seite/Page
28HH0707
Mobiler
2-Kanal-Babyruf
MBF 3333
Hartig+Helling GmbH+Co. KG
Wilhelm-Leithe-Weg 81,
44867 Bochum, Germany
http://www.hartig-helling.de
Service-Hotline
(0,14 Euro pro Minute aus dem deutschen Festnetz):
Telefon 01805 8855600
Telefax 01805 8855609
CE-Konformitätserklärung
Wir,
HARTIG+HELLING GMBH+CO. KG
WILHELM-LEITHE-WEG 81,
44867 BOCHUM, GERMANY
erklären, dass das Produkt
MBF 3333, Babyruf
den Schutzanforderungen entspricht, die in der Richtlinie des Rates
zur Angleichung der Rechtsvorschriften der Mitgliedsstaaten über die
elektromagnetische Verträglichkeit R&TTE (1999/5/EC) festgelegt sind.
Zur Beurteilung wurden folgende Normen herangezogen:
Radio: EN 300220-2 V2.1.1
EMC: EN 301489-1 V1.6.1
EN 301489-3 V1.4.1
Zur Beurteilung des Erzeugnisses hinsichtlich der Sicherheitsrichtlinie wurden
folgende Normen herangezogen:
Safety: EN 60065:2002
Die Prüfung wurde durchgeführt von:
BZT-ETS CERTIFICATION GMBH
Notified body ID-No.:
0681
EUROPEAN HARMONISED FREQUENCY BAND
01.03.2006 Geschäftsführer Markus Wix
Datum Rechtsgültige Unterschrift
(Stand: 1. Januar 2007)
Bedienungsanleitung
3
Operating instructions
9
Mode d’emploi
14
Istruzioni per l’uso
20
Manual de Instrucciones
25
Gebruiksaanwijzing
31
Instrukcja obsługi
37
Návod na obsluhu
43
Page 2

-3-
Sehr geehrter Kunde,
das von Ihnen gekaufte H+H-Babyrufgerät
MBF 3333 wurde nach den Vergaberichtlinien für
das Umweltzeichen „Der Blaue Engel“ gefertigt.
Dadurch unterliegt das MBF 3333, im Vergleich zu
herkömmlichen Babyrufgeräten, besonderen Richt
linien im Bezug auf Umwelt-, Gesundheits- und
Verbraucherschutz. Im Besonderen wurde bei der
Entwicklung auf eine extrem geringe Strahlungs
belastung und einen optimierten Energieverbrauch
geachtet. Weiterhin wird bei der für die Produktion
verwendeten Materialien genauestens auf Einhal
-
tung aller gesetzlichen Anforderungen geachtet.
MBF 3333 eignet sich ideal zur Überwachung klei
-
ner Kinder, Babys oder pflegebedürftiger Men
schen. Um Ihr Baby vor Elektrosmog zu schützen,
erfüllt dieses Babyrufgerät die hohen Anforderun
gen von „Der Blaue Engel“. Zusätzlich wird der Sender mit einem elektronischen Netzteil betrieben,
so dass im Gegensatz zu herkömmlichen Netzteilen für Ihr Baby keine Belastung durch das Netzteil
entsteht.
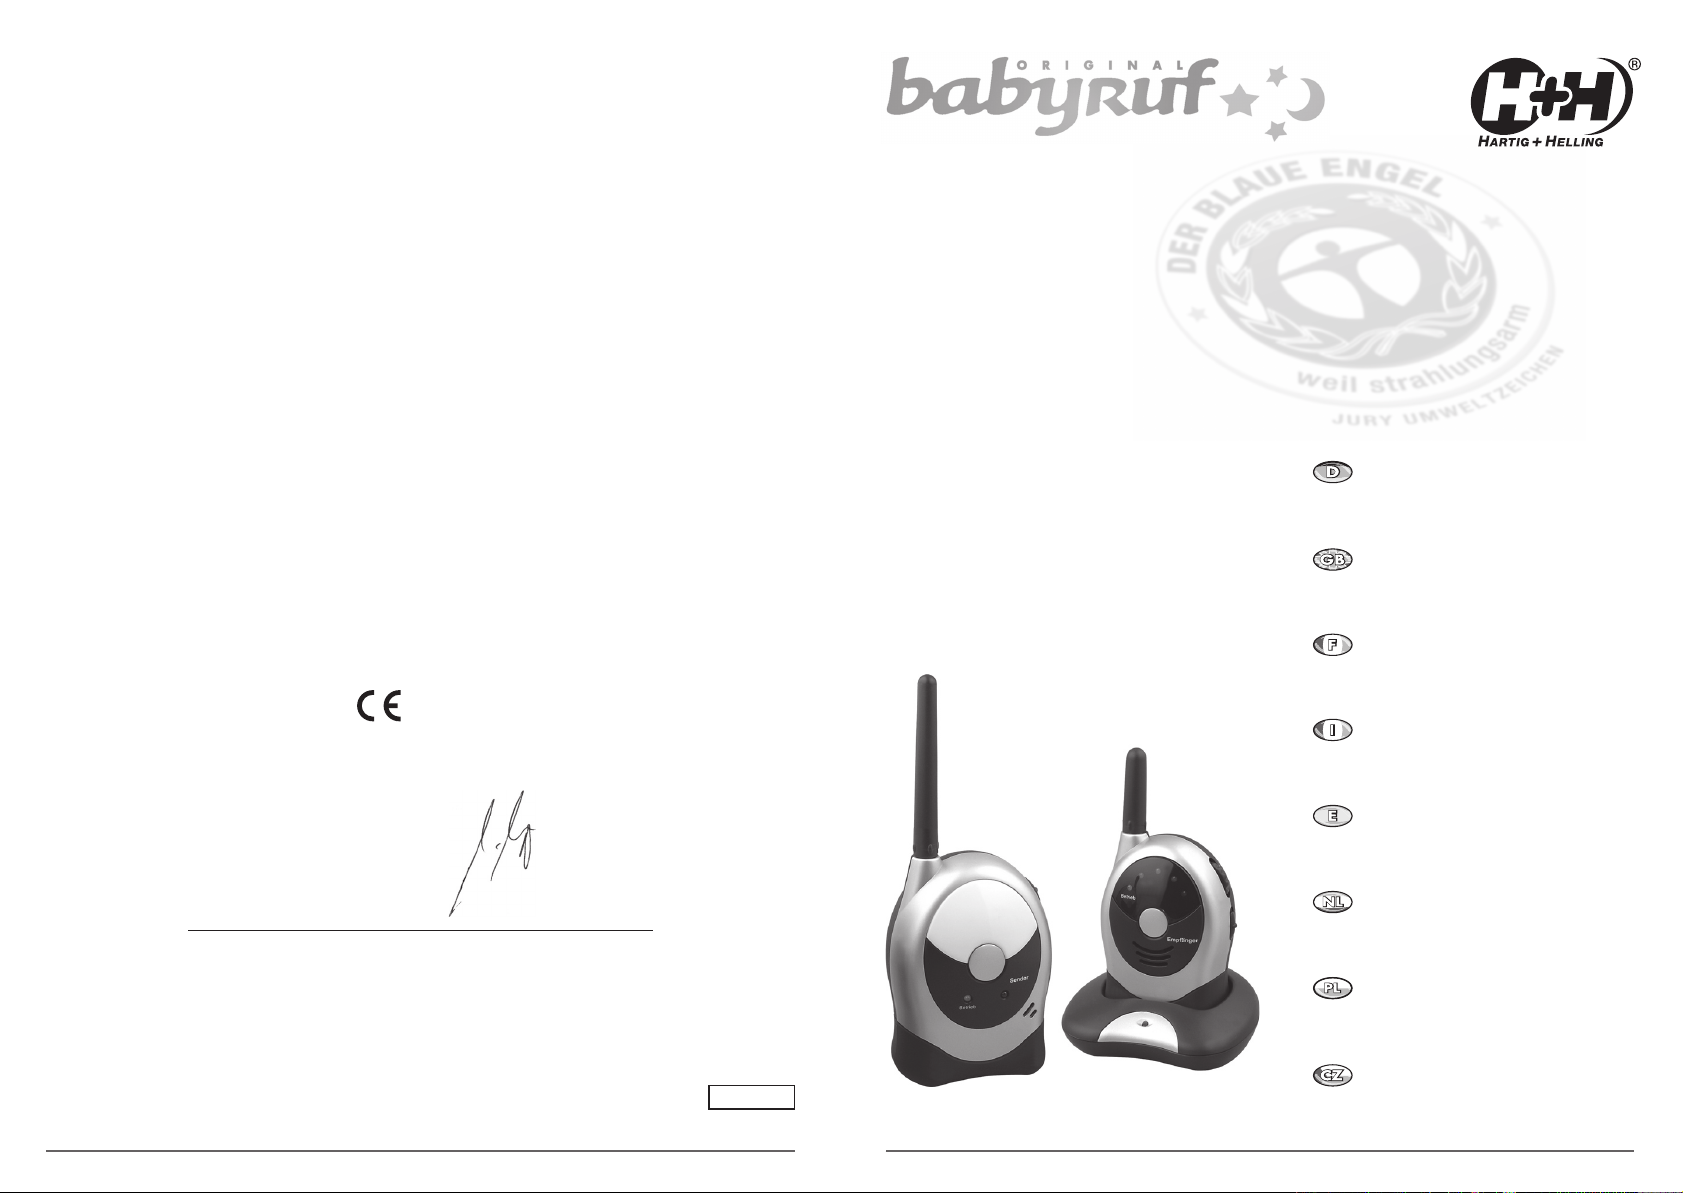
MBF 3333 besteht aus einem Sender, einem Emp
fänger, einem Akkupack für den Empfänger, einer
Ladeschale und zwei Netzteilen (230 V AC/50 Hz).
Ihr Babyrufgerät arbeitet auf zwei verschiedenen
Frequenzen (Kanäle) im 40-MHz-Frequenzbereich
und bietet somit den Komfort optimaler Übertragungsqualität. Sie können Sender und Empfänger
netzunabhängig mit Batterien/Akkus betreiben.
Der Sender wird mit vier Mignonbatterien/Akkus
AA (nicht im Lieferumfang enthalten), der Empfänger mit einem Akkupack (3,6 V DC, im Lieferumfang
enthalten) betrieben. Wenn Sie sich für den Betrieb
mit den beigefügten Netzteilen entscheiden, ist es
nicht erforderlich, die Batterien/Akkus aus den Ge
räten zu entfernen. Der Batterie- bzw. Akku-Betrieb
wird automatisch unterbrochen.
1. Lieferumfang
1 x Sender
1 x Empfänger
1 x spezieller Akkupack für den Empfänger
1 x Ladeschale für den Empfänger
1 x Netzteil für den Empfänger
1 x elektronisches Netzteil für den Sender
1 x Bedienungsanleitung
2. Besonderheiten
• Empfindlichkeitsschalter am Sender (High/Low)
• stufenlose Lautstärkereglung am Empfänger
• optische Empfangsanzeige
• 2 verschiedene Kanäle einstellbar
• optische Batterieüberwachung an Sender und Emp
-
fänger
Bedienungsanleitung
Inhalt
1. Lieferumfang .....................................................3
2. Besonderheiten ................................................3
3. Wichtige Hinweise ..............................................4
4. Sicherheitshinweise ...........................................4
5. Bedienelemente ................................................4
6. Inbetriebnahme des Senders ..............................4
6.1 Empfindlichkeitsumschaltung .........................4
7. Inbetriebnahme des Empfängers .........................5
7.1 Leuchtdiodenkette ........................................5
8. Funktionsprüfung ..............................................5
9. Reichweite ........................................................5
9.1 Reichweitenalarm .........................................5
10. Gürtelclips/Aufhängevorrichtung .........................5
11. Einlegen der Batterien für den Sender .................5
12. Einlegen des Akkupacks für den Empfänger .........5
13. Batterieüberwachung ........................................6
14. Laden des Akkupacks im Empfänger ....................6
15. Laden der Akkus des Senders .............................6
16. 40-MHz-Technik ................................................6
17. Pilotton ............................................................6
18. Hinweise zur ökologischen Nutzung .....................6
19. Tipps und Tricks für den Störungsfall ....................6
20. Wichtige Informationen ......................................7
21. Entsorgungshinweis ...........................................7
22. Pflege und Gewährleistung .................................7
23. Technische Daten ..............................................7
Page 3

-4-
-5-
Hinweis! Der Begriff Empfindlichkeit bezeichnet die Ansprechschwelle des Senders. Sie sollte individuell den
örtlichen Gegebenheiten angepasst sein.
7. Inbetriebnahme des Empfängers
Stellen Sie den Empfänger in dem Raum auf, in dem Sie
sich aufhalten werden oder befestigen Sie ihn mit ent
sprechendem Montagematerial an der Wand.
Den Empfänger können Sie entweder mit dem beilie
genden Netzteil über die Ladeschale oder mit dem beiliegenden Akkupack betreiben.
Zum Akkubetrieb legen Sie bitte, wie unter „Einlegen des
Akkupacks für den Empfänger“ beschrieben, den Akkupack in das Batteriefach. Für den Netzbetrieb schließen
Sie das Netzteil an die Buchse (15) der Ladeschale an
und setzen Sie den Empfänger auf die Ladeschale.
Hinweis! Für den Netzbetrieb ist es zwingend erforder
-
lich, dass der Akkupack im Gerät verbleibt. Ohne einge
legten Akkupack kann der Empfänger nicht über die Ladeschale betrieben werden.
Mit dem Kanalwahlschalter (13) wählen Sie den Über
tragungskanal (1 oder 2). Grundsätzlich müssen Sender
und Empfänger für den Betrieb auf den gleichen Kanal
(1 oder 2) eingestellt werden.
Durch Drehen des Lautstärkereglers (12) nach oben wird
das Gerät eingeschaltet. Nach dem Einschalten leuchtet die LED (9) auf und zeigt Ihnen die Betriebsbereit
-
schaft an. Durch weiteres Drehen des Lautstärkereg
lers (12) können Sie dann die Lautstärke nach Belieben
einstellen.
Über die beiliegende Bestellkarte können Sie
zusätzliche Original-Netzteile sowie spezielle
Akkupacks erwerben.
7.1 Leuchtdiodenkette
Der Empfänger verfügt über eine Leuchtdiodenkette
(11). Sobald ein Geräusch übertragen wird, nehmen Sie
dieses nicht nur akustisch wahr, sondern auch optisch
über die Leuchtdiodenkette. Je stärker das empfangene
Geräusch ist, umso mehr Dioden leuchten auf.
8. Funktionsprüfung
Es ist sehr wichtig, die Funktion der Babyrufanlage vor
dem ersten Einsatz zu überprüfen. Stellen Sie dazu Ihren
Sender in den gewünschten Raum und schalten z. B. ein
Radio auf Zimmerlautstärke ein.
Danach stellen Sie mit dem Empfindlichkeitsschalter
(4) den Sender auf die gewünschte Ansprechempfind
lichkeit. Zum Schluss gehen Sie mit Ihrem Empfänger
einmal durch Ihre Räumlichkeiten und stellen die ge
-
wünschte Lautstärke ein.
9. Reichweite
Aufgrund der physikalischen Ausbreitungsbedingungen von Funkwellen müssen Sie die Reichweite Ihres
Babyrufgerätes in Ihrer Umgebung durch Ausprobieren
ermitteln. Bei optimalen Bedingungen erzielen Sie eine
Reichweite bis zu 200 Metern. Die tatsächliche Reichweite hängt aber im Wesentlichen von den örtlichen Ge
-
gebenheiten ab. Hierbei sind z. B. der Standort des Sen
ders, die Art der Bebauung oder die atmosphärischen
Bedingungen zu berücksichtigen. Zusätzlich kann die
Reichweite eingeschränkt sein, wenn Sie den Empfän
-
ger in Ihren Händen halten und ihn verschließen.
9.1 Reichweitenalarm
Wenn sich der Empfänger außerhalb der Reichweite des
Senders befindet, wird Ihnen das durch ein akustisches
Reichweitensignal am Empfänger signalisiert, das ca.
55 Sekunden nach Abbruch der Verbindung zum Sen
der ausgelöst wird. Der Reichweitenalarm wird in einem
Rhythmus von ca. 35 Sekunden ständig wiederholt.
Der akustische Reichweitenalarm des Empfängers wird
auch dann ausgelöst, wenn:
• der Sender ausgeschaltet ist,
• der Sender auf einen anderen Kanal als der Empfän
-
ger eingestellt ist,
• Sender oder Empfänger im Akku- oder Batteriebetrieb
mit entleerten Akkus/Batterien arbeiten.
10. Gürtelclips/Aufhängevorrichtung
Sender und Empfänger können mit dem auf der Rückseite befindlichen Gürtelclips am Gürtel befestigt oder
mit der Aufhängevorrichtung (mit geeignetem Befestigungsmaterial) an eine Wand montiert werden.
11. Einlegen der Batterien für den Sender
Der Sender kann auch mit herkömmlichen Batterien betrieben werden!
1. Zum Einlegen bzw. Wechseln der Akkus/Batterien
öffnen Sie das Batteriefach des Senders, indem Sie
die Verriegelung nach unten drücken und gleichzei
-
tig den Batteriefachdeckel nach unten wegschieben.
2. Entnehmen Sie die entleerten Akkus/Batterien aus
dem Gerät.
3. Legen Sie nun aufgeladene Akkus oder neue Batte
rien unter Beachtung der Polarität (+/-) in die dafür
vorgesehenen Mulden (siehe Gehäuseprägung).
4. Schließen Sie nun das Batteriefach, indem Sie den
Batteriefachdeckel wieder auf das Gehäuse schieben.
12. Einlegen des Akkupacks für den Empfänger
Zum Einlegen bzw. Wechseln des Akkupacks öffnen Sie
das Batteriefach des Empfängers, indem Sie die Verrie
gelung nach unten drücken und gleichzeitig den Batteriefachdeckel nach unten wegschieben. Legen Sie nun
• Pilottonfunktion zum störungsfreien Empfang
• Reichweitenalarm
• erfüllt die hohen Anforderungen von „Der Blaue Engel“
• Netzteil des Senders ist Elektrosmog-reduziert
3. Wichtige Hinweise
• Vor Gebrauch des Babyrufgerätes die Bedienungsanleitung lesen!
• Die Bedienungsanleitung ist ein Teil des Produkts. Sie
enthält wichtige Hinweise zur Inbetriebnahme und
Handhabung des Gerätes.
• Heben Sie die beigefügte Bedienungsanleitung stets
zum Nachlesen auf!
• Sie muss bei Weitergabe an dritte Personen mit ausge
-
händigt werden.
4. Sicherheitshinweise
Bei Schäden, die durch Nichtbeachten der Anleitung
verursacht werden, erlischt der Garantieanspruch! Für
Folgeschäden, die daraus resultieren, übernehmen wir
keine Haftung! Bei Sach- oder Personenschäden, die
durch unsachgemäße Handhabung oder Nichtbeachtung der Sicherheitshinweise verursacht werden, übernehmen wir keine Haftung. In solchen Fällen erlischt je
-
der Garantieanspruch.
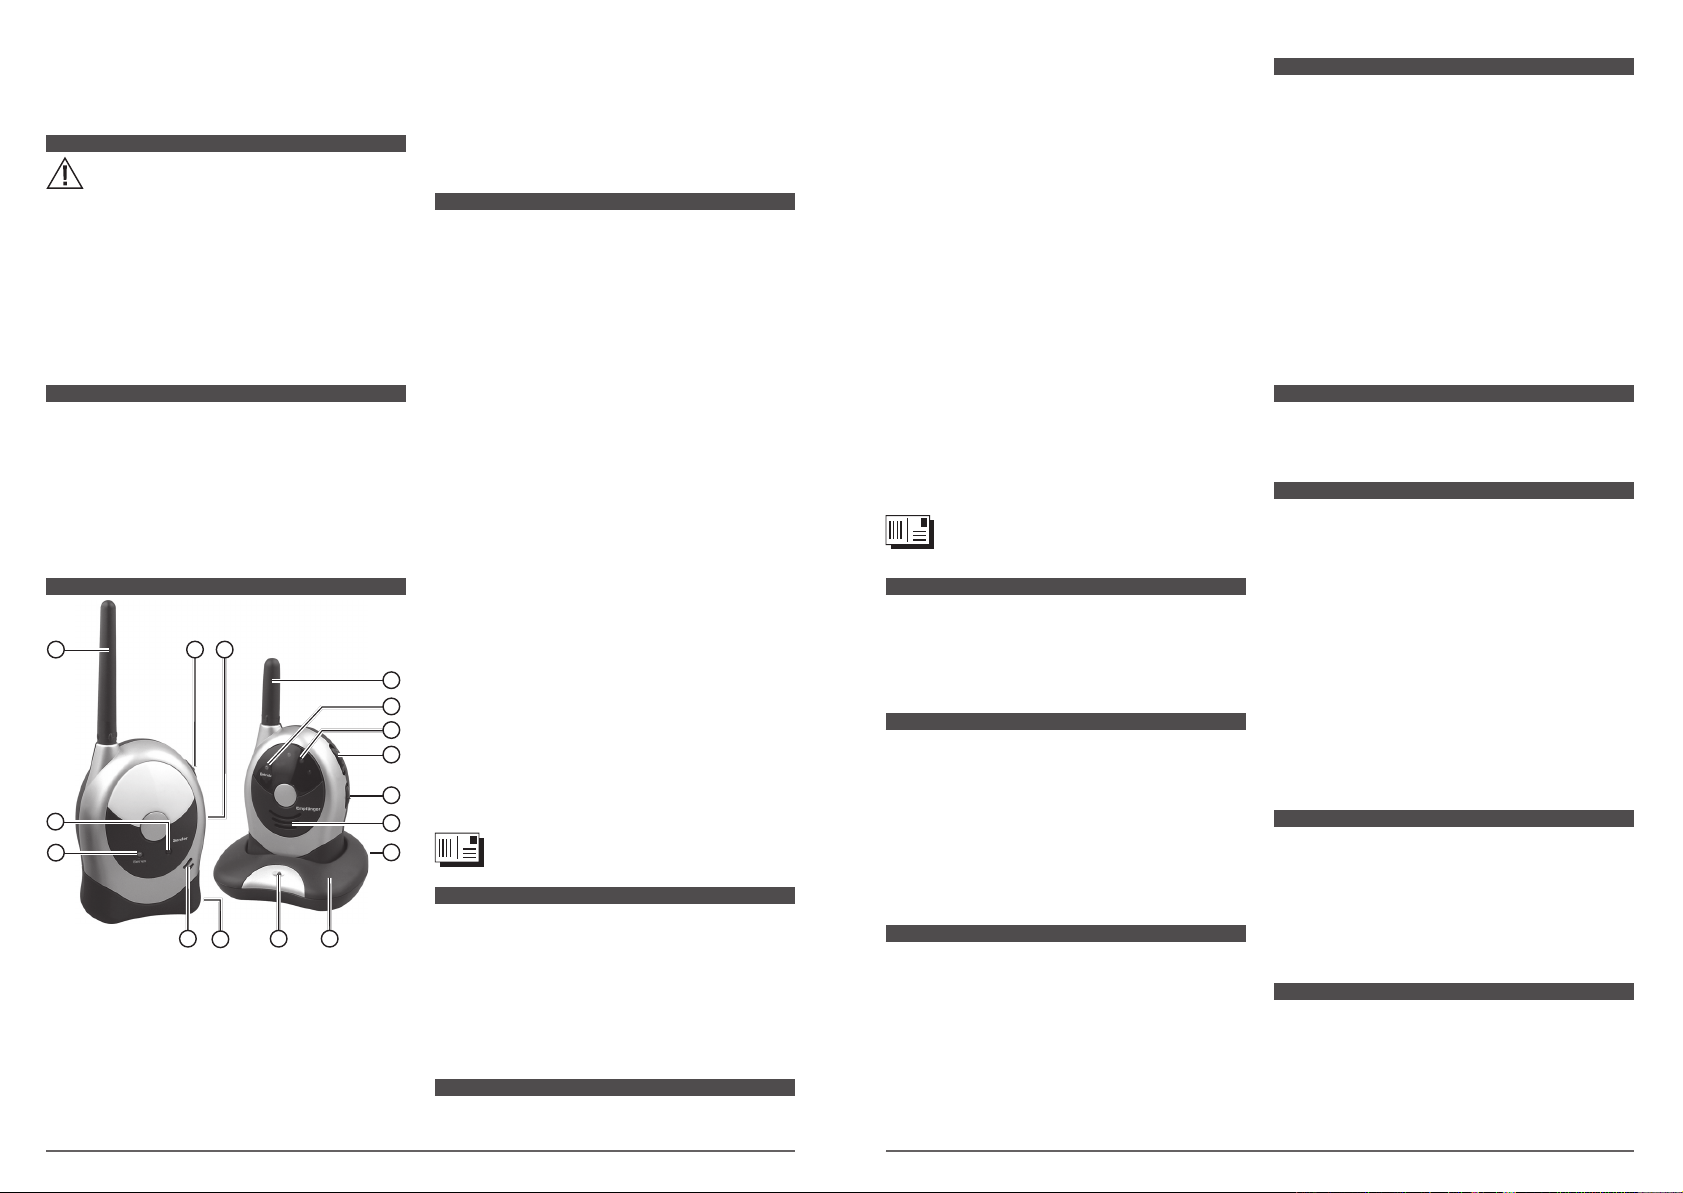
5. Bedienelemente
1
2
3
4 5
6
7
8
9
10
12
13
16 14
15
11
1. Antenne des Senders
2. Betriebsanzeige
3. Sendeanzeige
4. Empfindlichkeitsschalter
5. Aus/Kanalwahlschalter
6. Mikrofon
7.
Netzbuchse
8. Antenne des Empfängers
9. Betriebsanzeige
10. Lautsprecher
11.
Optische Empfangsanzeige
12. Aus/Ein/Lautstärkeregler
13. Kanalwahlschalter
14.
Ladeschale
15.
Netzbuchse
16. Ladekontrollanzeige
6. Inbetriebnahme des Senders
Um eine optimale Übertragung zu gewährleisten, stellen Sie den Sender senkrecht in dem zu überwachen
den Raum auf oder befestigen ihn mit entsprechendem
Montagematerial an der Wand.
Sie können den Sender entweder mit dem beiliegenden
Netzteil (TO TRANSMITTER) oder mit vier Mignonzellen
(nicht im Lieferumfang enthalten) betreiben. Zum Batte
riebetrieb legen Sie bitte, wie unter „Einlegen der Batterien für den Sender“ beschrieben, vier Mignonzellen AA
in das Batteriefach. Für den Netzbetrieb schließen Sie
das Netzteil mit der Beschriftung TO TRANSMITTER an
die Buchse (7) des Senders an.
Hinweis! Achten Sie darauf, dass insbesondere auch
das Netzteil möglichst weit von Ihrem Kind entfernt ist
und nutzen Sie die komplette Anschlusslänge aus.
Mit dem Schiebeschalter (5) wird sowohl das Gerät ein
-
geschaltet als auch einer der beiden Übertragungskanä
-
le gewählt. In der Stellung 1 überträgt das Gerät auf Ka
nal 1 und in der Stellung 2 auf Kanal 2.
Die Betriebsbereitschaft wird Ihnen durch die aufleuch
tende LED (2) angezeigt.
Sobald ein Geräusch vom Sender wahrgenommen wird,
leuchtet die LED (3) für die Dauer der Übertragung auf.
Hinweis! Aus Sicherheitsgründen und zur optimalen
Geräuschübertragung empfehlen wir Ihnen, einen Mindestabstand von 1,0 Meter zwischen Sender und dem
Bett Ihres Kindes nicht zu unterschreiten. Die Vordersei
-
te des Gerätes sollte möglichst in Richtung der zu über
-
wachenden Person (z. B. Ihr Baby) zeigen. Darüber hi
naus ist darauf zu achten, dass die Geräusche bzw. der
Schall nicht durch Hindernisse unterbrochen werden.
Über die beiliegende Bestellkarte können Sie
zusätzliche Original-Netzteile erwerben.
6.1 Empfindlichkeitsumschaltung
Mit dem Empfindlichkeitsschalter (4) an der rechten Seite des Senders wird die Mikrofonempfindlichkeit einge
stellt.
MIC LOW = Sender auf geringe Empfindlichkeit einge
-
stellt
MIC HIGH = Sender auf hohe Empfindlichkeit eingestellt
Page 4

-6-
-7-
• Zur Gewährleistung optimaler Übertragungs-/Empfangsmöglichkeiten Sender und Empfänger aufrecht
stellen.
• Wenn der Empfänger zu nahe am Sender steht und
seine Lautstärke hoch ist, kann ein Pfeifton entstehen
(Feedback, akustische Rückkopplung). Um das zu ver
meiden, sollte die Distanz zwischen Sender und Empfänger vergrößert werden.
• Zu schwache Akkus/Batterien können beim Empfän
ger zu Rauschen oder zum Auslösen des Reichweitenalarms führen.
• Beachten Sie bitte, dass es im 40-MHz-Frequenzbe
reich keinen generellen Schutz gegen Mithören gibt.
20. Wichtige Informationen
• Bitte benutzen Sie nur die Original-Netzteile zum Betrieb der Geräte. Sollte eines der Netzteile einmal de
-
fekt sein, wenden Sie sich bitte an Ihren Fachhänd
ler. Bei der Verwendung anderer Netzteile kann es bei
Nichtbeachtung von Polung (+/-) und Spannungshöhe
zu erheblichen Beschädigungen an den Geräten kom
-
men.
• Ein defektes Netzteil kann nicht repariert werden, das
Anschlusskabel kann nicht ausgetauscht werden. Ent
-
sorgen Sie umgehend das Netzteil.
• Beim Herausziehen der Netzteile aus den Steckdosen
und aus dem Babyruf nicht an den Kabeln ziehen, son
-
dern die Netzteile an den Steckern bzw. Gehäusen an
-
fassen und abziehen, um einen Kabelbruch oder Ka
-
belabriss zu vermeiden.
• Platzieren Sie den Sender nicht in das Babybett oder
auf den Krabbelplatz.
• Stellen Sie die Geräte immer außerhalb der Reichweite
von kleinen Kindern auf.
• Die Geräte dürfen nicht umgebaut bzw. verändert wer
-
den, sie verlieren dadurch ihre Zulassung.
• Wenn eines oder beide Geräte mit Batterien/Akkus be
trieben werden, werden Empfangs- und Sendeleistung
gegenüber dem Betrieb mit Netzteilen etwas verrin
-
gert.
• Es sind zwei Netzteile beigefügt, damit Sie den Sender
und Empfänger an jede Steckdose (230 Volt/50 Hz)
anschließen können.
• Im Falle einer längeren Betriebsunterbrechung emp
fehlen wir, die Batterien/Akkus zu entfernen, da leere
Batterien/Akkus kristallisieren und Schäden verursa
-
chen können.
21. Entsorgungshinweis
Altgeräte, die mit dem abgebildeten Symbol gekennzeichnet sind, dürfen nicht mit dem Haus
-
müll entsorgt werden.
Verbrauchte Batterien und
Akkumulatoren (Akkus), die
mit einem der abgebilde-
ten Symbole gekennzeichnet sind, dürfen nicht mit dem
Hausmüll entsorgt werden.
Sie müssen sie bei einer Sammelstelle für Altgeräte,
Altbatterien bzw. Sondermüll (informieren Sie sich bitte
bei Ihrer Gemeinde) oder bei Ihrem Händler, bei dem Sie
sie gekauft haben, abgeben. Diese sorgen für eine um
-
weltfreundliche Entsorgung.
22. Pflege und Gewährleistung
Trennen Sie das Gerät vor dem Reinigen gegebenenfalls
von anderen Komponenten und verwenden Sie bitte kei
ne aggressiven Reiniger.
Das Gerät wurde einer sorgfältigen Endkontrolle unter
-
zogen. Sollten Sie trotzdem Grund zu einer Beanstan
-
dung haben, senden Sie uns das Gerät mit der Kaufquit
tung ein. Wir bieten eine Gewährleistung von 3 Jahren ab
Kaufdatum.
Für Schäden, die durch falsche Handhabung, unsach
gemäße Nutzung oder Verschleiß verursacht wurden,
übernehmen wir keine Haftung.
Technische Änderungen sind vorbehalten.
Keine Garantie auf Akkus/Akkupacks oder Batterien!
23. Technische Daten
Frequenzen
Trägerfrequenz Kanal 1: 40,670 MHz
Trägerfrequenz Kanal 2: 40,690 MHz
Hochfrequente Strahlung
maximale
Sendeleistung
(EIRP)
oberer
Grenzwert in mW
gemessener
Istwert in mW
1,25 0,0631
Niederfrequente Strahlung
Frequenzbe
-
reich
magnetische Flussdichte*
oberer
Grenzwert in nT
gemessener
Istwert in nT
0,025-0,8 KHz 5/f 0,09
0,8-3 KHz 6,25 0,21
3-150 KHz
6,25 0,36
* bei einem Messabstand von 30 cm
Leistungsaufnahme des Senders
Modus
oberer
Grenzwert in W
gemessener
Istwert in W
Raumüberwachung
2 0,53
ausgeschaltet 1 0,38
Reichweitenkontrolle
Häufigkeit des Sendesignals: 1 x nach 55 Sekunden, da
nach alle 35 Sekunden
Dauer des Sendesignals: < 20 mS
den Akkupack unter Beachtung der Polarität (+/-) in die
dafür vorgesehenen Mulde (siehe Gehäuseprägung).
Schließen Sie nun den Batteriefachdeckel in umgekehrter Reihenfolge, bis er hörbar einrastet.
13. Batterieüberwachung
Wenn bei Akku-/Batteriebetrieb die Batteriespannung
nicht mehr ausreichend ist, wird Ihnen das sowohl am
Sender als auch am Empfänger angezeigt.
Bei zu geringer Betriebsspannung wechseln die Betriebsanzeigen (LED 2 am Sender und LED 9 am Empfänger)
ihre Farbe von grün auf rot.
14. Laden des Akkupacks im Empfänger
• Zum Laden des Akkupacks im Empfänger schließen
Sie bitte das entsprechende Netzteil an die Buchse
(15) der Ladestation an.
• Sobald Sie das Netzteil mit der Ladestation (14) und
dem Stromnetz verbunden haben und sich der Empfänger in der Ladestation befindet, blinkt die Ladeschale 5mal Grün/Rot auf. In dieser Zeit wird der
Akkupack überprüft. Danach beginnt die Ladung automatisch und wird Ihnen durch die rot blinkende LED
(16) an der Ladeschale angezeigt.
• Die Ladezeit beträgt bei einem völlig entleerten Akku
-
pack und ausgeschaltetem Gerät ca.12 Stunden.
• Wenn der Empfänger während des Ladevorganges
eingeschaltet ist, verdoppelt sich die Ladezeit.
• Sie können nach erfolgter Ladung das Gerät in der Ladestation (14) belassen. Eine Überladung des Akku
-
packs ist technisch ausgeschlossen.
• Die LED (16) schaltet bei ausgeschaltetem Empfänger
nach erfolgter Ladung automatisch auf grün um.
Hinweise! Tauschen Sie defekte Akkupacks nur gegen
originale Akkupacks aus. Es können keine normalen
Microakkus/-batterien AAA in diesem Babyrufgerät
geladen bzw. eingesetzt werden.
Speziell für die Nachtüberwachung empfehlen wir
Ihnen, beide Geräte über die mitgelieferten Netzteile
zu betreiben, damit eine einwandfreie Überwachung
gewährleistet ist. Im normalen Akkubetrieb kann sich je
nach Ladezustand in der Nacht der Reichweitenalarm
melden und Sie somit unnötigerweise wecken.
15. Laden der Akkus des Senders
Wenn Sie den Sender mit Akkus betreiben und diese
entleert sind, müssen Sie sie aus dem Gerät entfernen
und in einem separaten Ladegerät wieder aufladen, da
der Sender nicht über eine Ladefunktion verfügt.
16. 40-MHz-Technik
Die Anlage arbeitet im 40-MHz-Frequenzbereich, in dem
Störungen durch CB-Funker ausgeschlossen sind.
17. Pilotton
Die Funksicherheit und die Störfreiheit dieses Babyrufgerätes wird durch einen für Sie unhörbaren und in der
Praxis bewährten Pilotton zusätzlich verbessert. Dieser
Pilotton bewirkt, dass der Empfänger sich nur dann einschaltet, wenn Geräusche vom eigenen Sender, z. B.
dem zu überwachenden Baby, übertragen werden.
Für den seltenen Fall, dass Sie während der Übertra
-
gung durch andere Signalquellen aus dem 40-MHz-Fre
-
quenzbereich gestört werden, haben Sie die Möglich
-
keit, auf einen anderen Kanal umzuschalten.
18. Hinweise zur ökologischen Nutzung
• Bei der Benutzung von Akkus/Batterien können elektrische und magnetische Felder vollständig vermieden
werden.
• Bitte bei Nichtbenutzung des Babyrufgerätes die Netz
teile aus den Steckdosen entfernen, um elektrische,
magnetische und elektromagnetische Felder zu ver
meiden. Außerdem können dadurch Kosten eingespart werden, da Netzteile auch dann Strom verbrau
chen, wenn sie nur in einer Steckdose eingesteckt
sind.
Hinweise zu hochfrequenten und niederfrequenten Fel
dern:
In wissenschaftlichen Studien zu möglichen gesundheitlichen Gefahren durch hoch- und niederfrequente
elektromagnetische Felder konnte bisher kein eindeuti
ger Ursache-Wirkungs-Zusammenhang nachgewiesen
werden. Es gibt aus einigen Studien jedoch Hinweise auf
mögliche gesundheitliche Risiken. Aus Vorsorgegrün
den sollten alle technischen Möglichkeiten genutzt werden, um die Exposition gegenüber hochfrequenten und
niederfrequenten Feldern – gerade bei den als beson
-
ders empfindlich zu bewertenden Babys und Kleinkin
dern – so gering wie möglich zu halten.
19. Tipps und Tricks für den Störungsfall
• Wenn Sender oder Empfänger keine Funktion haben,
bitte einmal die Stromversorgung überprüfen.
• Wenn keine Übertragung zwischen Sender und Emp
-
fänger stattfindet, bitte einmal die Sende-/Empfangs
kanäle bei beiden Geräten überprüfen (nur bei einer
Übereinstimmung ist eine Verbindung möglich).
• Da das MBF 3333 auf Funkbasis arbeitet, ist nicht aus
-
zuschließen, dass Sie Gespräche anderer Funkteilneh
mer hören können und dass andere Funkteilnehmer
die Gespräche bzw. Geräusche, die von Ihrem Sender
abgegeben werden, ebenfalls empfangen können.
MBF 3333 benutzt jedoch Übertragungsfrequenzen,
die solche Störungen weitgehend ausschließen. Falls
Sie dennoch in Ausnahmefällen solche Störungen
feststellen sollten, schalten Sie auf den anderen Kanal
(Frequenz) um.
Page 5

-8-
-9-
Dear customer,
the H+H MBF 3333 baby alarm you have purchased
has been manufactured according to the guidelines
laid down for the aware of “Der Blaue Engel” envi
-
ronmental mark. The MBF 3333, by contrast to con
-
ventional baby alarms, is therefore subject to spe
cial guidelines regarding environmental, health and
consumer protection. In its development particular
consideration was given to ensuring an extremely
low radiation load and optimised energy consump
tion. Furthermore, particular attention was paid to
compliance with all the legal requirements when se
-
lecting the materials used for production.
The MBF 3333 is ideal for monitoring young children, babies or persons requiring care. To pro
tect your baby from electro-smog, this baby alarm
meets the stringent “Der Blaue Engel” require
ments. In addition, the transmitter is operated by an
electronic power pack so that unlike conventional
power packs no load is imposed by the power pack
on your baby.
The MBF 3333 consists of a transmitter, a receiv
er, a battery pack for the receiver, a charging tray
and two power packs (230 V AC/50 Hz). Your baby
alarm operates on two different frequencies (chan
nels) in the 40 MHz frequency range and therefore
provides the convenience of optimum transmis
sion quality. You may operate the transmitter and
receiver independently of the mains with batter
-
ies/rechargeable batteries. The transmitter is op
erated with four mignon AA batteries/rechargeable
batteries (not supplied), the receiver with a battery
pack (3.6 V DC, supplied). If you decide to operate
the alarm with the power packs supplied, it is not
necessary to remove the batteries/rechargeable
batteries from the units. The battery/rechargeable
battery operation is interrupted automatically.
1. Scope of supply
1 x transmitter
1 x receiver
1 x special battery pack for the receiver
1 x charging tray for the receiver
1 x electronic power pack for the transmitter
1 x power pack for the receiver
1 x operating instructions
2. Special features
• sensitivity switch on the transmitter (High/Low)
• infinite volume control on the receiver
• optical reception indicator
• 2 different channels can be set
• optical battery monitoring on the transmitter and re
-
ceiver
• pilot tone function for perfect reception
Betriebsspannung
Sender: 6 V DC, mit vier Mignonbatterien/-akkus (AA)
oder mit Netzteil
Empfänger: 3,6 V DC, mit Akkupack oder mit Netzteil (im
Lieferumfang enthalten)
max. Reichweite
200 Meter je nach örtlichen Gegebenheiten
Steckernetzteil
Sender: 9 V DC, 200 mA sekundär; 100-240 V AC/
50-60 Hz primär
Empfänger: 6 V DC, 300 mA sekundär; 230 V AC/50 Hz
primär
Aktuelle Produktinformationen finden Sie auf unserer InternetSeite http://www.hartig-helling.de
Operating instructions
Content
1. Scope of supply .................................................9
2. Special features ................................................9
3. Important points to note ...................................10
4. Safety guidelines .............................................10
5. Operating components .....................................10
6. Switching on the transmitter ..............................10
6.1 Sensitivity switching ..................................... 10
7. Switching on the receiver .................................. 10
7.1 LED chain ................................................... 11
8. Functional check ............................................. 11
9. Range ............................................................ 11
9.1 Range alarm ............................................... 11
10. Clips ............................................................... 11
11. Insertion of batteries for the transmitter .............. 11
12. Insertion of battery pack for the receiver ............ 11
13. Battery monitoring ...........................................11
14. Charging the battery pack in the receiver ........... 12
15. Charging the transmitter battery ........................ 12
16. 40 MHz technology ..........................................12
17. Pilot references ...............................................12
18. Notes on ecological use ................................... 12
19. Handy hints in case of faults ..............................12
20. Important information ......................................12
21. Notes on Disposal ............................................ 13
22. Care and warranty ........................................... 13
23. Technical data ................................................. 13
Page 6
-10-
-11-
You can operate the receiver either with the power pack
supplied, via the charging tray, or with the battery pack
supplied.
For battery operation insert the battery pack in the bat
tery compartment as described in “Insertion of battery
pack for the receiver”. For mains operation connect
the power pack to socket (15) on the charging tray and
place the receiver on the charging tray.
N. B. For mains operation it is absolutely essential for
the battery pack to remain in the unit. Without the bat
tery pack inserted the receiver cannot be operated by
means of the charging tray.
With channel selector switch (13) select the transmission
channel (1 or 2). In principle the transmitter and receiver
must be set to the same channel (1 or 2) for operation.
Switch on the alarm unit by rotating volume control (12)
upwards. After the unit is switched on LED (9) lights up
and indicates that the unit is ready for operation. By ro
tating volume control (12) further you can then set the
volume to any value.
You may also buy additional original power
packs and special battery packs using the enclosed order card.
7.1 LED chain
The receiver is equipped with an optical reception display (11) (light-emitting diode chain). As soon as a noise
has been transmitted, you will not only be able to hear
it, but also see it via the light-emitting diode chain. The
louder the noise received, the more diodes will flash.
8. Functional check
it is extremely important to check the baby monitoring device before using it for the first time. To carry out
a functional check, place your transmitter in the desired
location and switch a radio (for example) on at low vol
ume.
After this, adjust the transmitter to the desired respon
sivity level using the responsivity switch (4). Finally, walk
through the house with your receiver and adjust it to the
correct volume.
9. Range
The physical radio wave propagation conditions mean
that you will have to determine the range of your baby
monitoring device by trial and error. Under optimum con
-
ditions, the range will extend to 200 m. However, the ac
tual range significantly depends on the local conditions.
These include, for example, the position of the transmit
ter, the type of building or the atmospheric conditions.
The range can also be limited in the event that you hold
the receiver in your hands and seal it.
9.1 Range alarm
If the receiver is located outside the range of the transmitter, this will signalled to you by means of an acoustic
range signal on the receiver which is triggered approxi
mately 55 seconds after the break of connection to the
transmitter. The range alarm is repeated at an interval of
approx. 35 seconds.
The acoustic range alarm of the receiver is also triggered
when:
• the transmitter is switched off,
• the transmitter is set to a channel other than the re
-
ceiver,
• the transmitter or receiver is operating in rechargea
ble battery or battery mode with drained rechargeable
batteries/batteries.
10. Clips
Both transmitter and receiver can be attached to a belt
or the wall (with suitable materials) using the clips situated on the back of the two devices.
11. Insertion of batteries for the transmitter
The transmitter can also be operated with conventional
batteries!
1. To insert or change the rechargeable batteries/bat
teries open the transmitter battery compartment by
pressing down the lock whilst at the same time slid
-
ing the battery compartment cover downwards.
2. Remove the drained rechargeable batteries/batteries
from the unit.
3. Now insert charged rechargeable batteries or new
batteries in the groove provided, making a note of
the polarity (+/-) (see marking on housing). Now
close the battery compartment cover in reverse order
until it audibly engages.
4. Now close the battery compartment by sliding the
battery compartment cover back onto the housing.
12. Insertion of battery pack for the receiver
To insert or change the battery pack open the receiver
batterie compartment by pressing down the lock whilst
at the same time sliding the battery compartment cover
downwards. Now insert the battery pack in the groove
provided, making a note of the polarity (+/-) (see mark
ing on case). Now close the battery compartment cover
in reverse order until it audibly engages.
13. Battery monitoring
When the battery/storage battery voltage falls too low (in
the event that the device is being battery operated), this
will be displayed on both transmitter and receiver.
If the operating voltage is insufficient, the colour of the
operating display changes from green to red on both
transmitter (2) and receiver (9).
• range alarm
• meets the stringent “Der Blaue Engel” requirem
ents
• transmitter power pack is electro-smog reduced
3. Important points to note
• Read the operating guidelines before using the baby
monitoring device!
• The operating guidelines are a product component.
These contain important advice on operating and han
-
dling the device.
• Always keep the enclosed operating guidelines for fu
-
ture reference!
• These should always be handed on to third parties in
the event of a resale.
4. Safety guidelines
The warranty claim shall lapse in the event that damages resulting from a failure to observe the guidelines
occur! We shall not be held liable for any consequential
damage! We shall not be held liable in the event of any
material damage or personal injury resulting from incor
rect handling of the device or from a failure to observe
the safety guidelines. The warranty claim shall expire in
cases such as these.
5. Operating components
1
2
3
4 5
6
7
8
9
10
12
13
16 14
15
11
1. Transmitter aerial
2. On display
3. Transmitting display
4. Sensitivity switch
5. Off/channel selector switch
6. Microphone
7.
Mains socket
8. Receiver aerial
9. On display
10.
Speaker
11. Optical reception display
12. Off/On/Volume control
13.
Channel selector switch
14. Charging tray
15.
Mains socket
16. Charging control display
6. Switching on the transmitter
To guarantee optimum transmission, position the transmitter vertically in the room to be monitored or secure it
to the wall with suitable fittings.
You can operate the transmitter either with the power
pack supplied (TO TRANSMITTER) or with four mignon
batteries (not supplied). For battery operation insert four
AA mignon batteries in the batterie compartment as de
scribed in “Insertion of batteries for the transmitter”. For
mains operation connect the power pack with the letter
ing TO TRANSMITTER to socket (7) of the transmitter.
N.B. Make sure that the power pack in particular is lo
cated as far away from your child as possible and use
the full connection length.
Switch on the unit and select one of the two transmis
sion channels with sliding switch (5). In position 1 the
alarm unit transmits on channel 1 and in position 2 on
channel 2.
When LED (2) comes on this indicates to you that the
alarm is ready for operation.
As soon as a noise is heard from the transmitter LED (3)
lights up for the duration of the transmission.
N. B. For safety reasons and for optimum noise transmission we recommend that you do not exceed a mini
mum distance of 1.0 metre between the transmitter and
your child’s bed. The front of the unit should, if possible,
point in the direction of the person (e. g. your baby) to
be monitored. Also make sure that the noises and/or
sound are not interrupted by obstacles.
You can purchase additional original power
packs using the enclosed order card.
6.1 Sensitivity switching
Set the microphone sensitivity using sensitivity switch (4)
on the right side of the transmitter.
MIC LOW = transmitter set to low sensitivity
MIC HIGH = transmitter set to high sensitivity
N. B. The term sensitivity refers to the response thresh
old of the transmitter. It should be adapted individually
to the local conditions.
7. Switching on the receiver
Install the receiver in the room by placing it upright or securing it to the wall by suitable fixing means.
Page 7

-12-
-13-
• A faulty mains adapter cannot be repaired. The power
supply lead cannot be replaced, and the mains adapt
-
er should be disposed of immediately as a result.
• Avoid pulling on the lead when removing the mains
adapter from the socket and the baby monitoring de
vice, instead carefully plugging and unplugging them
from the socket or device in order to prevent damaging
the lead.
• Do not place the transmitter in the baby’s cot or crawl
-
ing pen.
• Always place the devices out of the reach of small chil
-
dren.
• If one or both devices are operated with batteries/stor
-
age batteries, reception and transmission perform
ance will not be as good as is the case with mains operation.
• Two mains adapters are enclosed in order to allow you
to plug both transmitter and receiver into their respec
-
tive sockets (230 volts/50 Hz).
• We recommend the removal of batteries/storage batteries in the event that the device has not been used
for a long time, as empty batteries/storage batteries
can crystallise and cause damage.
21. Notes on Disposal
Old units, marked with the symbol as illustrated,
may not be disposed of in the household rubbish.
Used rechargeable and
non-rechargeable batteries
which are marked with one
of the symbols illustrated may not be disposed of in the
household rubbish.
You must take them to a collection point for old units, old
batteries or special waste (enquire at your local author
ity) or the dealer from whom you bought them. These
agencies will ensure environmentally friendly disposal.
22. Care and warranty
Before cleaning the unit, disconnect it if necessary
from other components; do not use aggressive clean
ing agents.
The unit has been carefully checked for defects. If nev
ertheless you do have cause for complaint, please send
us the unit with your proof of purchase. We offer a
3 year
warranty from date of purchase.
We are not liable for damage arising from incorrect han
dling, improper use or wear and tear.
We reserve the right to make technical modifications.
We offer no guarantee on rechargeable batteries/battery
packs or batteries!
23. Technical data
Frequencies
Carrier frequency channel 1: 40.670 MHz
Carrier frequency channel 2: 40.690 MHz
High frequency radiation
maximum
transmitting
power (EIRP)
upper limit
value in mW
measured
actual
value in mW
1.25 0.0631
Low frequency radiation
frequency
range
magnetic flow density
*
upper limit
value in nT
measured actual
value in nT
0.025-0.8 KHz 5/f 0.09
0.8-3 KHz 6.25 0.21
3-150 KHz
6.25 0.36
* for a measured distance of 30 cm
Transmitter power consumption
mode
upper limit
value in W
measured
actual
value in W
room
monitoring
2 0.53
switched off
1 0.38
Range control
Frequency of transmitting signal: 1 x after 55 seconds,
then every 35 seconds
Duration of transmitting signal: < 20 mS
Operating voltage
Transmitter: 6 V DC, with four mignon batteries/re
chargeable batteries (AA) or with power pack
Receiver: 3.6 V DC, with battery pack or with power pack
(supplied)
Max. range
200 metres according to local conditions
Plug-in power pack
Transmitter: 9 V DC, 200 mA secondary; 100-240 V AC/
50-60 Hz primary
Receiver: 6 V DC, 300 mA secondary; 230 V AC/50 Hz
primary
You can find up-to-date product information on our website
http://www.hartig-helling.de
14. Charging the battery pack in the receiver
• To charge the battery pack in the receiver connect the
corresponding power pack to socket (15) of the charg
-
ing station.
• As soon as you have connected the power pack to
charging station (14) and the receiver is located in the
charging station, the charging tray will flash 5 green/
red. During this period the battery pack is tested.
Charging then commences automatically and this
will be indicated by the red slashing LED (16) on the
charging tray.
• The charging time for a fully drained battery pack, with
the unit switched off, is approximately 12 hours.
• If the receiver is switched on during the charging proc
-
ess, the charging time is doubled.
• After charging, you can leave the unit in the charging
station (14). It is technically impossible to over-charge
the battery pack.
• LED (16) automatically switches to green after charging when the receiver is switched off.
N. B. Do not replace defective battery packs with origi
nal battery packs. Micro AAA rechargeable batteries/
batteries cannot be charged or inserted in this baby
alarm.
We recommend, particularly for night monitoring, that
you operate both units by means of the power packs
supplied to ensure perfect monitoring. In normal bat
tery operation the range alarm will be triggered during
the night, according to the charging condition, and will
therefore wake you unnecessarily.
15. Charging the transmitter battery
If you are operating the transmitter with batteries, and
they are drained, you must remove them from the unit
and recharge them in a separate charger, because the
transmitter has no charging function of its own.
16. 40 MHz technology
The device operates within a 40 MHz frequency range,
which excludes interference from CB wireless operators.
17. Pilot references
The remote safety and fault-free nature of this baby
monitoring device is additionally improved with the aid of
an inaudible, proven pilot reference. This pilot reference
has the effect that the receiver only switches on in the
event that noises from the connecting transmitter, e. g.
the baby being monitored, are transferred.
In the unlikely event that you are disrupted by other sig
-
nals from the 40 MHz frequency range during trans
mission, you have the option to switch over to another
channel.
18. Notes on ecological use
• When using batteries, electrical and magnetic fields
can be totally avoided.
• When not using the baby alarm remove the power
packs from the sockets to avoid electrical, magnet
ic and electromagnetic fields. This will also save you
money because power packs consume current when
even they are merely inserted in a socket.
Notes on high frequency and low frequency fields:
In scientific studies of possible health hazards due to
high and low frequency electromagnetic fields, no clear
cause-effect relationship has so far been demonstrated.
However, some studies have indicated possible health
risks. As a precaution all possible technical means
should be used to minimise exposure to high and low
frequency fields – particularly in the case of babies and
infants considered highly sensitive.
19. Handy hints in case of faults
• If the transmitter or receiver does not function, check
the electricity supply initially.
• If no transfer between transmitter and receiver takes
place, please check the transmission/reception chan
nels on both devices (a connection is only possible if
they correlate).
• As MBF 3333 operates on a wireless (radio) basis, you
may be able to hear conversations on other wave
lengths, and, in turn, other listeners may be able to
receive the conversations or noises emitted by your
transmitter. However, MBF 3333 uses transfer fre
quencies which should ensure that interference of this
nature will not usually occur. If, however, the occa
sional interference does arise, switch over to the other
channel (frequency).
• Transmitter and receiver should be placed in an up
-
right position in order to guarantee optimum transmis
-
sion and reception.
• If the receiver is placed too close to the transmitter and
its volume is too high, a whistling tone can be generated (acoustic feedback). In order to avoid this, the
distance between transmitter and receiver should be
extended.
• Weak batteries or storage batteries can result in the re
-
ceiver emitting a crackling noise.
• Please note that no general protection exists against
third party listening within the 40 MHz frequency
range.
20. Important information
• Please use only the original mains adapters to operate the devices. If one of the mains adapters should
prove faulty, please consult your specialist dealer. If
other mains adapters are used, non-compatible polari
ties (+/-) and electrical voltages can result in serious
damage to the devices.
Page 8
-14-
-15-
• surveillance optique des piles sur l’émetteur et sur le
récepteur
• fonction pilote du son pour une réception sans trouble
• alarme de portée
• remplit les exigences élevées requises par « Der Blaue
Engel »
• le bloc d’alimentation à électrosmog réduit pour
l’émetteur
3. Consignes importantes
• Lire le mode d‘emploi avant d‘utiliser le babyphone
mobile !
• Le mode d‘emploi fait partie intégrante du produit. Il
contient des consignes importantes pour la mise en
service et la manipulation de l‘appareil.
• Conserver toujours ce mode d‘emploi pour consulta
-
tion ultérieure !
• Il doit accompagner l‘appareil si vous le donnez à un
tiers.
4. Consignes de sécurité
En cas de dommages survenant suite au non respect
des instructions, tout droit à la garantie est annulé !
Nous déclinons toute responsabilité pour les consé
quences en résultant ! Nous déclinons toute responsabilité pour les dommages matériels ou corporels résul
tant d‘une mauvaise manipulation ou du non respect
des instructions. Tout droit à la garantie est dans ce cas
annulé.
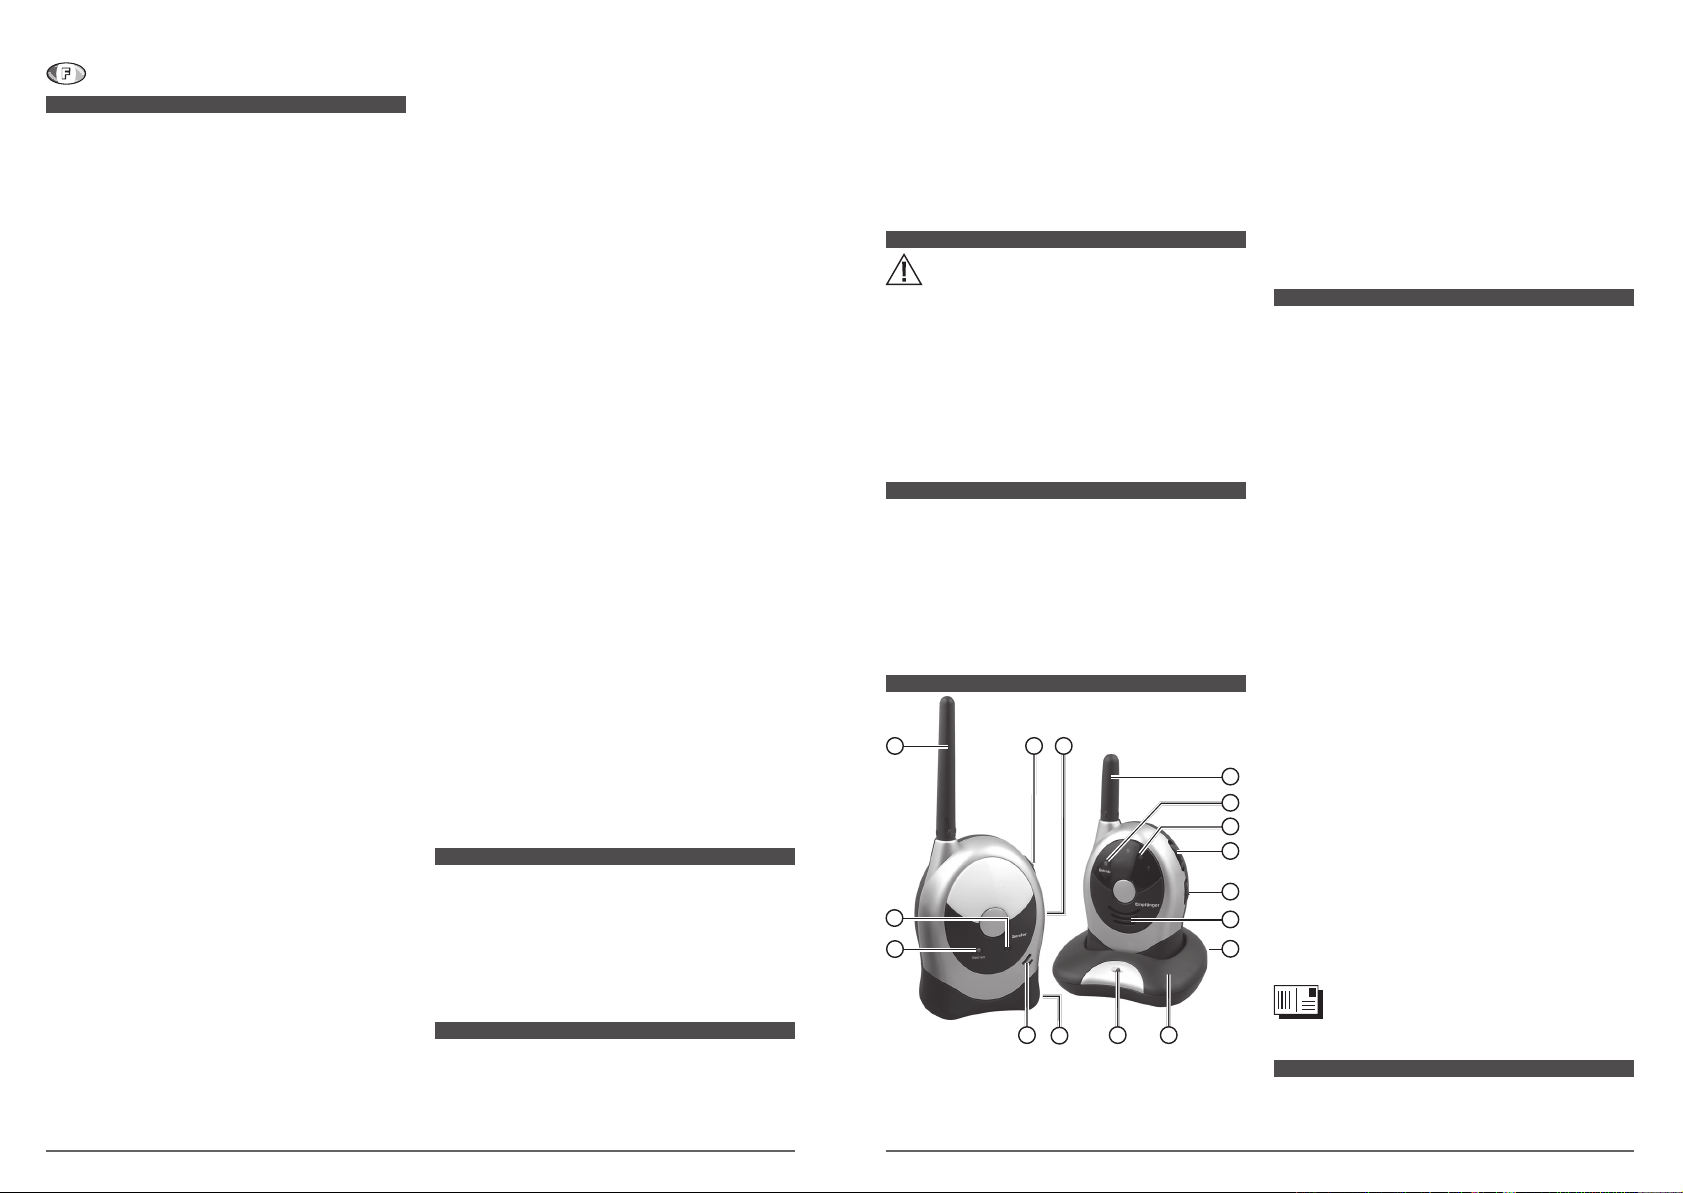
5. Éléments de commande
1
2
3
4 5
6
7
8
9
10
12
13
16 14
15
11
1. Antenne de l’émetteur
2. Signalisation de service
3. Affichage d’émission
4. Interrupteur de sensibilité
5. Interrupteur de sélection des canaux/arrêt
6. Microphone
7. Prise secteur
8. Antenne du récepteur
9. Signalisation de service
10.
Haut-parleur
11. Affichage optique de la réception
12. Arrêt/en marche/réglage du son
13.
Interrupteur sélection des canaux
14. Support chargement
15. Prise secteur
16. Contrôle lumineux chargement
6. Mise en service de l’émetteur
Afin de garantir une transmission optimale, poser l’émetteur verticalement dans la pièce à surveiller ou le fixer au
mur à l’aide des fixations appropriées.
Vous pouvez exploiter l’émetteur soit avec le bloc d’ali
mentation fourni (TO TRANSMITTER) soit avec quatre
piles mignon (non comprises dans la livraison). Pour une
exploitation avec les piles, introduire quatre piles mi
gnon AA tel que décrit dans « Introduire les piles dans
l’émetteur » dans le compartiment à piles. Pour une ex
ploitation à l’électricité, brancher le bloc d’alimentation
portant l’indication TO TRANSMITTER à la prise (7) de
l’émetteur.
Indication ! Veillez à placer le bloc d’alimentation aussi
loin que possible de votre enfant et utilisez toute la lon
gueur du raccordement.
Avec l’interrupteur glissant (5), il est possible d’acti
ver l’appareil et de sélectionner un des deux canaux de
transmission. En position 1, l’appareil transmet sur le ca
nal 1 et en position 2 sur le canal 2.
Lorsque la diode luminescente LED (2) s’allume l’appa
reil est prêt à l’emploi.
Dès qu’un bruit est perçu par l’émetteur la diode LED (3)
s’allume pendant la durée de transmission.
Indication ! Pour des raisons de sécurité et pour une
transmission optimale des bruits, nous vous recomman
dons de garder au moins une distance d’un mètre entre
l’émetteur et le lit de votre enfant. Le côté avant de l’ap
-
pareil est à placer si possible en direction de la person
ne à surveiller (votre bébé par ex.). Veillez également
à ce que les bruits ou l’écho ne soient pas interrompus
par des obstacles.
Vous pouvez commander des blocs d’alimentation originaux supplémentaires par le biais du
bon de commande ci-joint.
6.1 Connexion de sensibilité
Avec l’interrupteur de sensibilité (4) sur le côté droit de
l’émetteur la sensibilité du microphone est réglée.
MIC LOW = Émetteur mis sur sensibilité réduite
Très cher client,
le babyphone H+H MBF 3333 que vous avez acheté
a été fabriqué conformément aux directives d’ad
judication du label écologique « Der Blaue Engel ».
Ainsi, l’appareil MBF 3333 est conforme, contraire
-
ment aux babyphones conventionnels à des direc
tives particulières en matière d’environnement, de
santé et de protection du consommateur. Lors de la
conception une attention particulière a été portée
sur un rayonnement extrêmement minime et une
consommation en énergie optimale. De plus, toutes les directives légales en vigueur sont observées
avec précision pour les matériaux utilisés dans la
production.
MBF 3333 convient idéalement pour surveiller les
enfants en bas âge, les bébés ou les personnes nécessitant des soins. Afin de protéger votre bébé
contre l’électrosmog, cet appareil remplit les exi
gences élevées requises par « Der Blaue Engel ».
Par ailleurs, l’émetteur fonctionne avec un bloc
d’alimentation électronique, prévenant ainsi tou
te nuisance pour votre enfant, contrairement aux
blocs d’alimentation conventionnels.
MBF 3333 est composé d’un émetteur, d’un récepteur, d’un kit accus pour le récepteur, d’un sup
port chargement et de deux blocs d’alimentation
(230 V AC/50 Hz). Votre appareil émet sur deux fré
-
quences différentes (canaux) dans la plage de fré
-
quence 40 MHz et offre ainsi le confort d’une trans
mission optimale. Vous pouvez utiliser l’émetteur
et le récepteur sans les brancher au courant avec
des piles/accus. L’émetteur est exploité avec qua
-
tre piles mignon/accus AA (non compris dans la li
vraison), et le récepteur avec un kit accus (3,6 V DC
compris dans la livraison). Si vous décidez d’exploi
ter l’appareil avec les blocs d’alimentation fournis,
il n’est pas nécessaire de retirer les piles/accus.
L’exploitation avec les piles ou accus est automati
-
quement interrompue.
1. Contenu de la livraison
1 x émetteur
1 x récepteur
1 x kit accus spécial pour le récepteur
1 x support de chargement pour le récepteur
1 x bloc d’alimentation pour l’émetteur
1 x bloc d’alimentation pour le récepteur
1 x mode d’emploi
2. Particularités
• interrupteur de sensibilité sur l’émetteur (high/low)
• réglage par niveau du volume du son sur le récepteur
• affiche optique de réception
• 2 canaux différents programmables
Mode d’emploi
Contenu
1. Contenu de la livraison ..................................... 14
2. Particularités ..................................................14
3. Consignes importantes .................................... 15
4. Consignes de sécurité ...................................... 15
5. Éléments de commande ...................................15
6. Mise en service de l’émetteur ........................... 15
6.1 Connexion de sensibilité ..............................15
7. Mise en service du récepteur ............................16
7.1 Chaîne de diodes lumineuses .......................16
8. Vérification du fonctionnement ..........................16
9. Portée ............................................................16
9.1 Alarme de portée ........................................ 16
10. Clips ............................................................... 16
11. Introduire les piles dans l’émetteur ....................16
12. Introduire le kit accus dans le récepteur .............16
13. Surveillance des piles ....................................... 17
14. Charger le kit accus du récepteur ...................... 17
15. Charger les accus de l’émetteur ........................ 17
16. Technique 40 MHz ...........................................17
17. Signal pilote .................................................... 17
18. Indications pour une utilisation écologique ......... 17
19. Trucs et astuces en cas de dysfonction. .............17
20. Informations importantes ..................................18
21. Conseils pour l’élimination ................................18
22. Entretien et garantie .........................................18
23. Données techniques ........................................18
Page 9

-16-
-17-
MIC HIGH = Émetteur mis sur sensibilité élevée
Indication ! La notion de sensibilité désigne l’onde de
captage de l’émetteur. Elle est adaptée individuellement
selon les données présentes sur place.
7. Mise en service du récepteur
Placer le récepteur dans la pièce où vous vous trouverez
ou le fixer au mur avec les fixations adéquates.
Vous pouvez exploiter le récepteur avec le bloc d’ali
mentation fourni au moyen du support chargement soit
avec le kit d’accus également fourni.
Pour une exploitation avec accus, introduire le kit d’ac
cus tel que décrit dans « Introduire le kit accus dans le
récepteur » dans le compartiment à piles. Pour une ex
ploitation à l’électricité brancher le bloc d’alimentation
à la prise (15) du support chargement et poser le récep
-
teur sur celui-ci.
Indication ! Il est impératif de laisser le kit accus dans
l’appareil lors d’une exploitation à l’électricité, sans
accu introduit, le récepteur ne peut pas être exploité par
le biais du support chargement.
Avec l’interrupteur de sélection des canaux (13), choisir
le canal de transmission (1 ou 2). En principe l’émetteur
et le récepteur sont à programmer sur le même canal
pour permettre une exploitation (1 ou 2).
En tournant le régleur du volume du son (12) vers le
haut, l’appareil est activé. Lorsque la diode luminescen
te LED (9) s’allume, l’appareil est prêt à l’emploi.
En tournant le régleur du volume du son (12), il est pos
-
sible de mettre le son au volume souhaité.
Vous pouvez commander des blocs d’alimen-
tation originaux supplémentaires ainsi que des
kits d’accus spéciaux par le biais du bon de commande
ci-joint.
7.1 Chaîne de diodes lumineuses
Le récepteur dispose d‘un indicateur de réception optique (11) (chaîne de diodes lumineuses). Dès qu‘un bruit
est transmis, vous le percevez non seulement acousti
quement, mais aussi optiquement par la chaîne de diodes lumineuses. Plus le bruit perçu est fort, plus le nom
-
bre de diodes allumées augmente.
8. Vérification du fonctionnement
Il est très important de vérifier le bon état de fonctionnement du babyphone avant son utilisation. Posez pour ce
faire votre émetteur dans la pièce à surveiller et allumez
par ex. une radio au volume habituel de la pièce. Réglez
ensuite l‘émetteur sur la sensibilité souhaitée à l‘aide du
bouton de réglage de sensibilité (4). Plus vous tournez le
bouton de réglage vers le haut, plus l‘émetteur est sen
-
sible. Maintenant, déplacez-vous avec votre récepteur
d‘une pièce à l‘autre et réglez le volume souhaité.
9. Portée
En raison des conditions physiques de propagation des
ondes radio, vous devez déterminer la portée de votre
babyphone dans votre environnement par des essais.
Dans des conditions optimales, vous obtenez une portée
allant jusqu‘à 200 m. La portée effective dépend cepen
dant principalement des conditions locales. Il faut tenir
compte par exemple de l‘emplacement de l‘émetteur,
de la nature du bâtiment ou des conditions atmosphéri
ques. La portée peut par ailleurs être restreinte lorsque
vous avez le récepteur dans vos mains et l‘enfermez.
9.1 Alarme de portée
Lorsque le récepteur se trouve hors de portée de
l’émetteur, une alarme de portée acoustique retenti
ra au niveau du récepteur et sera déclenchée environ
55 secondes après l’interruption de la connexion avec
le récepteur. L’alarme de portée se répète toutes les
35 secondes environ.
L’alarme de portée acoustique du récepteur est égale
-
ment déclenchée lorsque :
• l’émetteur est désactivé,
• l’émetteur est programmé sur un autre canal que celui
du récepteur,
• l’émetteur ou le récepteur exploités avec un accu ou
des piles fonctionnent avec des accus/piles vides.
10. Clips
L‘émetteur et le récepteur peuvent être fixés avec le clip
se trouvant au dos de l‘appareil à la ceinture ou au dis
-
positif d‘accrochage (au mur avec le matériel appro
prié).
11. Introduire les piles dans l’émetteur
L’émetteur peut être également exploité avec des piles
normales !
1. Pour introduire ou remplacer les accus/piles, ouvrir
le compartiment à piles de l’émetteur en appuyant
sur le verrou vers le bas et en glissant le couvercle du
compartiment à pile vers le bas.
2. Retirer les accus/piles vides de l’appareil.
3. Introduire ensuite les accus chargés ou les nouvelles
piles en observant la polarité (+/-) dans l’endroit pré
-
vu à cet effet (voir la marque du boîtier).
4. Fermer le compartiment à piles en glissant simple
-
ment le couvercle sur le boîtier.
12. Introduire le kit accus dans le récepteur
Pour introduire ou remplacer le kit accus, ouvrir le compartiment à piles en appuyant sur le verrou vers le bas et
en glissant le couvercle du compartiment à pile vers le
bas. Introduire ensuite le kit accus en observant la pola
-
rité (+/-) dans l’endroit prévu à cet effet (voir la marque
du boîtier). Fermer le compartiment à piles dans le sens
contraire jusqu’à entendre un clic.
13. Surveillance des piles
Lorsque la tension n‘est plus suffisante en mode accu ou
pile, un voyant vous le signale sur l‘émetteur comme sur
le récepteur. En cas de tension de fonctionnement trop
faible, les voyants de fonctionnement (2) changent sur
l‘émetteur et sur le récepteur (9) de vert à rouge.
14. Charger le kit accus du récepteur
• Pour charger le kit accus dans le récepteur, veuillez
raccorder le bloc d’alimentation correspondant à la
prise (15) du chargeur.
• Dès que le bloc d’alimentation est raccordé au char
-
geur (14) et que le récepteur se trouve dans le char
-
geur, le support chargement clignote 5 fois vert/rou
ge. Durant cette période le kit accus est contrôlé puis
le chargement commence automatiquement, il est si
gnalisé par le clignotement rouge de la diode (16) sur
le support chargement.
• Le temps de chargement s’élève pour un kit ac
cus complètement vide et un appareil désactivé à
12 heures environ.
• Lorsque le récepteur est activé durant le processus de
chargement, le temps de chargement est le double.
• Vous pouvez laisser suite au chargement accompli,
l’appareil dans le chargeur (14). Une surcharge du kit
accus est techniquement exclue.
• La diode (16) se met au vert automatiquement quand
l’appareil est désactivé après un chargement accom
-
pli.
Indications ! Ne remplacer les kits accus défaillants
qu’avec des kits accus originaux. Il n’est pas possible de
charger ou d’utiliser des micro accus normaux ou des
micro piles AAA dans ce babyphone.
Nous recommandons en particulier pour la surveillance
nocturne d’exploiter les deux appareils avec les blocs
d’alimentation livrés afin d’assurer une surveillance sans
faille. Une exploitation normale avec accus peut, en
fonction de l’état de chargement, émettre un signal et
vous réveiller inutilement.
15. Charger les accus de l’émetteur
Lorsque vous utilisez l’émetteur avec des accus et
lorsque ceux-ci sont vides, veuillez les retirer impéra
tivement de l’appareil et les recharger dans un autre
chargeur car l’émetteur ne dispose pas de fonction de
chargement.
16. Technique 40 MHz
Le dispositif fonctionne sur la zone de fréquence
40 MHz, qui empêche les perturbations des radios CB.
17. Signal pilote
La sécurité radio et l‘absence de perturbations de ce
babyphone sont encore améliorées par un signal pilote
inaudible pour vous et qui a fait ses preuves dans la pra
-
tique. Ce signal pilote permet le déclenchement du ré
cepteur uniquement en cas de transmission de signaux
du propre émetteur, par ex. le bébé à surveiller.
Dans les cas rares où la transmission est perturbée par
d‘autres sources de signaux de la zone de fréquence de
40 MHz, vous avez la possibilité de changer de canal.
18. Indications pour une utilisation écologique
• Avec l’utilisation d’accus/de piles, les champs électri-
ques et magnétiques peuvent être complètement évi
-
tés.
• Lorsque le babyphone n’est pas utilisé, veuillez re-
tirer les blocs d’alimentation des prises afin d’éviter
les champs électriques, magnétiques et électroma
gnétiques. Par ailleurs, il est ainsi également possible
d’économiser les coûts puisque les blocs d’alimentation consomment de l’énergie quand ils sont uniquement connectés à une prise.
Indications sur les champs à hautes et à basses fré
quences :
Les études scientifiques menées sur les éventuels ris
-
ques pour la santé provoqués par les champs magné
tiques à hautes et à basses fréquences n’ont pas pu
prouver de relations évidentes de cause à effet. Quel
ques études néanmoins donnent des indications sur de
possibles risques pour la santé. Comme prévention, il
est donc recommandé d’utiliser toutes les méthodes
techniques pour réduire dans la mesure du possible une
exposition aux champs à basses et à hautes fréquen
ces – surtout chez les bébés et les enfants en bas âge à
considérer comme sensibles.
19. Trucs et astuces en cas de dysfonction
• Lorsque l‘émetteur ou le récepteur ne fonctionnent
pas, veuillez vérifier l‘alimentation en électricité.
• En l‘absence de transmission entre l‘émetteur et le ré
-
cepteur, veuillez vérifier les canaux d‘émission/de ré
ception des deux appareils (une liaison n‘est possible
que s‘ils sont tous deux réglés sur le même canal).
• Le MBF 3333 fonctionnant par signal radio, on ne peut
exclure la réception de conversations d‘autres partici
pants radio et inversement que d‘autres participants
captent des signaux ou conversations émis par votre
émetteur. MBF 3333 utilise cependant des fréquences
de transmission qui permettent d‘éviter au maximum
ces perturbations. Si malgré tout vous rencontrez ex-
Page 10

-18-
-19-
ceptionnellement ce type de perturbations, basculez
sur l‘autre canal (fréquence).
• Afin de garantir des possibilités optimales d‘émission/
réception, placez votre émetteur et votre récepteur
debout.
• Lorsque le récepteur est trop proche de l‘émetteur et
que le volume est trop fort, un sifflement peut se faire
entendre (Feedback, rétro-couplage acoustique). Afin
d‘éviter ce phénomène, augmentez la distance entre
l‘émetteur et le récepteur.
• Des accus trop faibles peuvent entraîner un grésille
-
ment du récepteur ou déclencher l‘alarme de portée.
• Veuillez noter que dans la plage de fréquence 40 MHz,
il n‘existe pas en général de protection contre l‘écoute
par des tiers.
20. Informations importantes
• Veuillez utiliser uniquement les adaptateurs réseau
d‘origine pour le fonctionnement des appareils. En cas
de dysfonctionnement de l‘un des adaptateurs réseau,
veuillez contacter votre revendeur spécialisé. En cas
d‘utilisation d‘autres adaptateurs réseau, le non res
-
pect de la polarité (+/-) et de la tension peuvent entraî
-
ner d‘importantes détériorations des appareils.
• Un adaptateur défectueux ne peut pas être réparé. Le
câble de connexion ne peut pas être échangé, l‘adap
-
tateur doit être éliminé sans délai.
• Pour débrancher les adaptateurs réseau des prises et
du babyphone, ne pas tirer sur les câbles mais saisir
les adaptateurs réseau au niveau de la prise ou du boî
-
tier et tirer afin d‘éviter de casser ou d‘arracher le câ
-
ble.
• Ne placez pas l‘émetteur dans le lit du bébé ou dans
son parc.
• Posez toujours les appareils hors de portée des jeunes
enfants.
• Lorsque l‘un des appareils ou les deux fonctionnent
sur accus, la puissance d‘émission et de réception est
légèrement inférieure par rapport à celle en fonction
-
nement avec les adaptateurs réseau.
• La livraison comprend deux adaptateurs réseau, afin
que vous puissiez brancher l‘émetteur et le récepteur
chacun à une prise (230 volts/50 Hz).
• En cas d‘interruption prolongée d‘utilisation, nous
vous recommandons de retirer les accus, les accus vi
-
des pouvant cristalliser et endommager l‘appareil.
21. Conseils pour l’élimination
Les vieux appareils marqués du symbole représenté sur la figure ne doivent pas être éliminés
avec les ordures ménagères.
Les piles et accumulateurs
usés qui sont marqués de
l’un des symboles représen
-
tés ne doivent pas être éliminés avec les ordures ména
-
gères.
Vous devez les apporter à un point de collecte pour
vieux appareils, piles usées ou déchets spéciaux (ren
seignez-vous auprès de votre mairie) ou les rapporter
chez le commerçant où vous les avez achetés. De cette
manière, ils seront éliminés en respectant l’environne
-
ment.
22. Entretien et garantie
Avant de nettoyer l’appareil, séparez-le des autres composants éventuels et n’utilisez pas de détergent agres
sif.
L’appareil a été soumis à un contrôle rigoureux en fin
de fabrication. Si vous avez néanmoins un motif de ré
clamation, renvoyez-nous l’appareil accompagné de la
quittance d’achat. Nous offrons une garantie de 3 ans à
compter de la date d’achat.
Nous n’acceptons aucune responsabilité pour des dé
gâts occasionnés par des erreurs de maniement, une
utilisation impropre de l’appareil ou pour son usure.
Nous nous réservons le droit de procéder à des modifi
cations techniques.
Aucune garantie n’est fournie pour les accus/kits accus
ou piles !
23. Données techniques
Fréquences
Fréquence de transmission canal 1: 40,670 MHz
Fréquence de transmission canal 2: 40,690 MHz
Radiation à haute fréquence
puissance
d’émission
maximale
(EIRP)
valeur limite
maximale en mW
valeur mesurée
réelle en mW
1,25 0,0631
Radiation à basse fréquence
plage de
fréquence
densité du flux magnétique*
valeur limite
maximale en nT
valeur mesurée
réelle en nT
0,025-0,8 KHz 5/f 0,09
0,8-3 KHz 6,25 0,21
3-150 KHz
6,25 0,36
* pour un intervalle de 30 cm
Puissance absorbée de l’émetteur
vode
valeur limite
maximale en W
valeur mesurée
réelle en W
surveillance
de la pièce
2 0,53
désactivée 1 0,38
Contrôle de la portée
Fréquence du signal d’émission : 1 fois après 55 secon
des ensuite toutes les 35 secondes
Durée du signal d’émission : < 20 mS
Tension d’exploitation
Émetteur : 6 V DC, avec quatre piles mignons/accus
(AA) ou avec un bloc d’alimentation
Récepteur : 3,6 V DC, avec kit accus ou bloc d’alimentation (compris dans la livraison)
Portée maximale
200 mètres en fonction des données sur place
Bloc d’alimentation
Émetteur : 9 V DC, 200 mA secondaire ; 100-240 V AC/
50-60 Hz primaire
Récepteur : 6 V DC, 300 mA secondaire ; 230 V AC/
50 Hz primaire
Vous pouvez trouver les informations produits les plus récentes
sur notre site Internet http://www.hartig-helling.de
Page 11

-20-
-21-
Gentile cliente,
l‘interfono baby H+H MBF 3333 da lei acquistato
è stato prodotto conformemente alle direttive del
marchio ambientale „Der Blaue Engel“. Pertanto il
MBF 3333 è conforme, rispetto agli apparecchi tra
dizionali, a particolari direttive in materia di tutela
dell‘ambiente, della salute e del consumatore. In
particolare durante la fase di sviluppo è stata pre
-
stata particolare attenzione ad un impatto estre
mamente ridotto delle radiazioni e ad un consumo
energetico ottimizzato. Anche per quanto riguarda
la scelta dei materiali utilizzati, in fase produttiva
abbiamo prestato la massima attenzione al severo
rispetto di tutti i requisiti di legge.
MBF 3333 è ideale per sorvegliare i bambini più pic
coli, i neonati o persone bisognose di cure. Questo
interfono baby è conforme alle severe norme „
Der
Blaue Engel“ per proteggere il vostro bambino dall‘elettrosmog. Il trasmettitore è inoltre dotato di
un alimentatore elettronico che, diversamente da
quelli tradizionali, non crea alcuna azione di distur
bo per il vostro bambino.
MBF 3333 è composto da un trasmettitore, un rice
vitore, un pacco batterie per il ricevitore, un caricatore e due alimentatori (230 V AC/50 Hz). Il vostro
interfono baby funziona su due frequenze (cana
li) diversi a 40 MHz e pertanto è in grado di offrire
una qualità di trasmissione ottimale e confortevo
le. Trasmettitore e ricevitore possono funzionare
senza l‘alimentazione di rete con pile/batterie. Il
trasmettitore funziona con quattro pile stilo AA (non
in dotazione) e il trasmettitore con un pacco batte
rie speciale (3,6 V DC in dotazione). Se si opta per
il funzionamento con gli alimentatori in dotazione,
non è necessario rimuovere le batterie/pile dall‘ap
-
parecchio. Il funzionamento a pile e/o batteria si in
-
terrompe automaticamente.
1. Dotazione standard
1 x trasmettitore
1 x ricevitore
1 x pacco batterie speciale per il ricevitore
1 x caricatore per il ricevitore
1 x alimentatore elettronico per il trasmettitore
1 x alimentatore elettronico per il ricevitore
1 x manuale istruzioni d‘uso
2. Caratteristiche speciali
• interruttore sensibilità sul trasmettitore (High/Low)
• regolazione graduale del volume sul ricevitore
• visualizzazione ricezione
• 2 diversi canali regolabili
• monitoraggio ottico delle batterie su trasmettitore e ri
-
cevitore
• funzione pilota per una ricezione indisturbata
• allarme raggio d‘azione
• conforme ai severi requisiti „Der Blaue Engel“
• alimentatore del trasmettitore che riduce l‘elettrosmog
3. Indicazioni importanti
• Prima di impiegare la ricetrasmittente per neonati leggere le istruzioni per l‘uso.
• Le istruzioni per l‘uso sono parte integrante del pro
-
dotto e contengono indicazioni importanti in merito al
-
l‘attivazione e alla gestione dell‘apparecchio.
• Conservare sempre le istruzioni per l‘uso fornite in do
-
tazione per un‘eventuale rilettura.
• È necessario fornire anche le istruzioni per l‘uso in ca
-
so di cessione a terzi.
4. Indicazioni di sicurezza
In caso di danni provocati dal mancato rispetto delle
istruzioni per l‘uso, viene annullato il diritto di garanzia. Non ci si assume nessuna responsabilità per i danni
secondari derivanti da questa condizione. Non ci si as
sume nessuna responsabilità in caso di danni a cose o
persone provocati da un uso improprio o dal mancato
rispetto delle indicazioni di sicurezza. In alcuni casi viene
annullato qualsiasi diritto di garanzia.
5. Comandi
1
2
3
4 5
6
7
8
9
10
12
13
16 14
15
11
1. Antenna del trasmettitore
2. Visualizzazione stato operativo
3. Visualizzazione trasmissione
4. Interruttore sensibilità
5. Selettore canale/off
6. Microfono
7. Presa di rete
8. Antenna del ricevitore
9. Visualizzazione stato operativo
10.
Altoparlante
11. Visualizzazione ottica di ricezione
12. Regolatore del volume/on/off
13. Selettore canale
14. Caricatore
15. Presa di rete
16. Visualizzazione controllo carica
6. Messa in funzione del trasmettitore
Per garantire una trasmissione ottimale, posizionare
verticalmente il trasmettitore nella stanza da sorveglia
re o fissarlo alla parete utilizzando il relativo materiale di
montaggio.
Si può far funzionare il trasmettitore sia con l‘alimenta
tore in dotazione (TO TRANSMITTER) o con le pile stilo
(non in dotazione). Per l‘uso con le pile, inserire le pile
stilo AA nel vano batterie seguendo le istruzioni riporta
te in „Inserimento delle pile nel trasmettitore“. Per l‘uso
collegato alla rete, collegare l‘alimentatore con la scritta
TO TRANSMITTER alla presa (7) del trasmettitore.
Note! Assicuratevi che l‘alimentatore sia fuori dalla por
tata del vostro bambino utilizzando tutta la lunghezza
del cavo.
L‘interruttore a scorrimento (5) consente sia di accen
dere l‘apparecchio che di selezionare uno dei due canali
di trasmissione. In posizione 1 l‘apparecchio trasmette
sul canale 1 e in posizione 2 sul canale 2.
Lo stato di pronto operativo viene visualizzato dal LED
(2) accesso.
Non appena il trasmettitore rileva un rumore, il LED (3) si
accende per tutta la durata della trasmissione.
Note! Per motivi di sicurezza e per una trasmissione ot
-
timale, si raccomanda di mantenere una distanza mini
ma di 1 metro tra il trasmettitore e il letto del bambino. Il
lato anteriore dell‘apparecchio deve essere rivolto pos
sibilmente verso la persona da sorvegliare (es. il vostro
bambino). Assicurarsi, inoltre, che i rumori e/o il suono
non vengano interrotti da ostacoli.
Con la scheda d‘ordine allegata è possibile
acquistare un alimentatore originale supple
-
mentare.
6.1 Commutazione sensibilità
L‘interruttore di sensibilità (4) sul lato destro del trasmettitore regola la sensibilità del microfono.
MIC LOW = trasmettitore impostato su una sensibilità
bassa
MIC HIGH = trasmettitore impostato su una sensibilità
alta
Note! Con il termine sensibilità si intende la soglia di risposta del trasmettitore. Deve essere adattata in base
alla condizioni locali.
Istruzioni per l’uso
Contenuto
1. Dotazione standard ..........................................20
2. Caratteristiche speciali ....................................20
3. Indicazioni importanti .......................................21
4. Indicazioni di sicurezza .....................................21
5. Comandi ......................................................... 21
6. Messa in funzione del trasmettitore ....................21
6.1 Commutazione sensibilità ............................ 21
7. Messa in funzione del ricevitore .........................22
7.1 Diodi luminosi .............................................22
8. Verifica del funzionamento ................................22
9. Portata ...........................................................22
9.1 Allarme raggio d‘azione ...............................22
10. Clip ................................................................22
11. Inserimento delle pile nel trasmettitore ...............22
12. Inserimento del pacco batterie nel ricevitore .......22
13. Monitoraggio batterie .......................................22
14. Carica del pacco batterie nel ricevitore ..............23
15. Carica delle pile del trasmettitore ......................23
16. Tecnologia a 40 MHz ........................................23
17. Suono pilota ....................................................23
18. Informazioni su un uso ecologico .......................23
19. Suggerimenti e trucchi per i casi d‘interf ............23
20. Informazioni importanti ..................................... 24
21.
Avvertenze
per lo smaltimento ..........................24
22. Manutenzione e garanzia .................................. 24
23. Dati tecnici ...................................................... 24
Page 12

-22-
-23-
7. Messa in funzione del ricevitore
Posizionare il ricevitore nella stanza in cui si vuole rimanere o fissarlo alla parete con il relativo materiale di
montaggio.
Come per il trasmettitore, si può fare funzionare anche il
ricevitore sia con l‘alimentatore in dotazione attraverso il
caricatore oppure con il pacco batterie in dotazione.
Per l‘uso con batterie, inserire il pacco batterie vano bat
terie seguendo le istruzioni riportate in „Inserimento del
pacco batterie nel ricevitore“. Per l‘uso collegato alla
rete, collegare l‘alimentatore alla presa (15) del caricato
re e inserire il ricevitore nel caricatore.
Note! Per l‘uso collegato alla rete è assolutamente ne
cessario che il pacco batterie non venga rimosso dall‘apparecchio in quanto senza pacco batterie il ricevito
-
re non può funzionare attraverso il caricatore.
Scegliere il canale di trasmissione (1 o 2) con il selet
tore del canale (13). Trasmettitore e ricevitore devono
essere impostati sullo stesso canale (1 o 2) per potere
funzionare.
Ruotare il regolatore del volume (12) verso l‘alto per ac
cendere l‘apparecchio. Una volta accesso, il LED (9) si
illumina a conferma dello stato di operatività. Ruotando
ulteriormente il regolatore del volume (12), si può impo
stare il volume a piacere.
Con la scheda d‘ordine allegata è possibile acquistare un alimentatore originale supplemen
-
tare come pure pacchi batterie speciali.
7.1 Diodi luminosi
Il ricevitore dispone di un‘indicazione visiva della ricezione (11) (serie di diodi luminosi). Non appena viene
trasmesso un rumore, non solo è possibile rilevarlo in
modo acustico, ma anche visivo grazie alla serie di diodi
luminosi. I diodi si illuminano a seconda dell‘intensità del
rumore ricevuto.
8. Verifica del funzionamento
Prima della prima attivazione della ricetrasmittente per
neonati è molto importante verificarne il corretto fun
zionamento. Per effettuare questa operazione disporre
il ricevitore nell‘ambiente desiderato ed accendere ad
esempio una radio a basso volume.
Successivamente impostare il trasmettitore sulla sensi
-
bilità di risposta desiderata con l‘interruttore della sensi
-
bilità (4). Infine attraversare eventuali ambienti con il ri
-
cevitore ed impostare l‘intensità del volume desiderata.
9. Portata
A causa delle condizioni fisiche di propagazione delle
onde radio è necessario stabilire la portata della ricetra
smittente per neonati facendo alcune prove nei propri
locali. In presenza di condizioni ottimali si ottiene una
portata max. di 200 m. La portata effettiva dipende comunque in sostanza dalle condizioni locali. È necessario prendere in considerazione ad es. la dislocazio
ne del trasmettitore, il tipo di costruzione o le condizioni
atmosferiche. Inoltre la portata può risultare limitata se
il ricevitore viene tenuto in mano ostacolandone il fun
-
zionamento.
9.1 Allarme raggio d‘azione
Quando il ricevitore si trova al di fuori del raggio di azione
del trasmettitore, viene emesso un segnale acustico di
avvertimento sul ricevitore dopo circa 55 secondi dall‘in
-
terruzione del collegamento con il trasmettitore. L‘allar
me del raggio d‘azione viene poi ripetuto continuamente
ad intervalli di 35 secondi.
L‘allarme acustico del raggio d‘azione del ricevitore vie
ne attivato quando:
• il trasmettitore è spento,
• il trasmettitore è impostato su un altro canale rispetto
al ricevitore,
• il trasmettitore o il ricevitore stanno funzionando in mo
-
dalità a pile o batteria con le pile/batterie scariche.
10. Clip
Il trasmettitore ed il ricevitore possono essere fissati alla
cintura con le clip presenti sul lato posteriore o collocati
a parete su un dispositivo di sospensione (con il materia
-
le di fissaggio adeguato).
11. Inserimento delle pile nel trasmettitore
Il trasmettitore può funzionare anche con le pile tradizionali!
1. Per inserire e/o sostituire le pile/batterie, aprire il
vano batterie del trasmettitore premendo il gancio di
blocco verso il basso e allontanando contempora
-
neamente il coperchio sempre verso il basso.
2. Rimuovere le batterie/pile scariche dall‘apparecchio.
3. Inserire solo batterie cariche o pile nuove rispettando
la polarità corretta (+/-) degli appositi alloggiamenti
(vedi la relativa indicazione).
4. Ora chiudere il vano batterie spostando il coperchio
nuovamente sul corpo dell‘apparecchio.
12. Inserimento del pacco batterie nel ricevitore
Per inserire e/o sostituire il pacco batterie, aprire il vano
batterie del ricevitore premendo il gancio di blocco verso
il basso e allontanando contemporaneamente il coper
chio sempre verso il basso. Inserire ora il pacco batterie
rispettando la polarità corretta (+/-) dell‘apposito al
loggiamento (vedi la relativa indicazione). Ora chiudere
il coperchio batterie seguendo la sequenza in ordine in
verso fino ad udire il clic di aggancio.
13. Monitoraggio batterie
Se il voltaggio delle batterie non è più sufficiente per il
funzionamento a batteria/accumulatore, questo stato
viene visualizzato sia sul trasmettitore sia sul ricevitore.
In presenza di una tensione di funzionamento troppo ri
dotta, il colore dell‘indicatore di funzionamento (2) nel
trasmettitore e (9) nel ricevitore cambia da verde a ros
-
so.
14. Carica del pacco batterie nel ricevitore
• Per caricare il pacco batterie nel ricevitore, collegare
il relativo alimentatore alla presa (15) della stazione di
carica.
• Non appena l‘alimentatore è collegato alla stazione di
carica (14) con il ricevitore inserito, questa lampeggia
per 5 volte con i colori verde/rosso. Significa che è in
corso il controllo del pacco batterie. Successivamente
la carica inizia automaticamente e viene indicata da un
LED (16) rosso lampeggiante sul caricatore.
• Il tempo di carica è di circa 12 ore per un pacco batte
-
rie completamente scarico ad apparecchio spento.
• Il tempo di carica raddoppia se il ricevitore rimane ac
-
cesso durante il ciclo di carica.
• A carica effettuata, l‘apparecchio può essere rimosso
dalla stazione di carica (14). E‘ tecnicamente escluso
un sovraccarico del pacco batterie.
• Il LED (16) diventa automaticamente di colore verde a
carica completata con il ricevitore spento.
Nota! Sostituire i pacchi batteria difettosi solo con pac
chi batteria originali. Su questo interfono baby non si
possono caricare e/o utilizzare batterie/ministilo AAA.
In caso di uso notturno si consiglia di far funzionare en
trambi gli apparecchi con gli alimentatori in dotazione
per garantire un controllo a regola d‘arte. Con il normale
funzionamento con batterie l‘allarme del raggio di azio
ne potrebbe essere emesso in base allo stato di carica e
svegliarvi inutilmente.
15. Carica delle pile del trasmettitore
Se si usa il trasmettitore con le pile e queste sono scariche, è necessario rimuoverle dall‘apparecchio e ricari
carle in un caricatore separato in quanto il trasmettitore
non è dotato di funzione di carica.
16. Tecnologia a 40 MHz
Il sistema opera nella gamma di frequenze di 40 MHz
con cui si escludono le eventuali interferenze dei ricetra
-
smettitori CB.
17. Suono pilota
La sicurezza radio e l‘esclusione di interferenze di questa ricetrasmittente per neonati garantiscono risultati
ancora migliori grazie al suono pilota non udibile e col
laudato nella pratica. Il suono pilota opera in modo che
il ricevitore si attivi solo nel momento in cui i rumori sono
trasmessi dal proprio trasmettitore ad es. dal neonato da
tenere sotto controllo.
Per quei rari casi in cui durante la trasmissione si verifichino interferenze ad opera di altre fonti di segnali ester
-
ne alla gamma di frequenze di 40 MHz, è possibile pas
-
sare ad un altro canale.
18. Informazioni su un uso ecologico
• Con l‘uso di pile/batterie si possono evitare completamente campi elettrici e magnetici.
• Si prega di scollegare l‘alimentatore dalle prese quan
-
do l‘interfono baby non viene utilizzato per impedi
re campi elettrici, magnetici ed elettromagnetici. Ciò
comporta anche un risparmio economico in quanto
gli alimentatori consumano corrente anche semplice
-
mente rimanendo inseriti nella presa.
Informazioni sui campi ad alta e bassa frequenza:
Gli studi scientifici sui possibili rischi per la salute causa
ti da campi elettromagnetici ad alta e bassa frequenza
non hanno fino ad ora dimostrato una relazione causa/
effetto evidente. Tuttavia alcuni studi riportano informa
-
zioni su possibili rischi per la salute. A titolo di preven
zione è necessario adottare tutte le misure tecniche per
ridurre al minimo l‘esposizione a campi ad alta e bassa
frequenza soprattutto per le persone particolarmente
sensibili come i bambini e i neonati.
19. Suggerimenti e trucchi per i casi d‘interf
• Se il trasmettitore o il ricevitore non funzionano, verifi-
care l‘alimentazione elettrica.
• Se non ha luogo nessuna comunicazione tra il trasmet
-
titore ed il ricevitore, controllare i canali di trasmissio
ne/ricezione su entrambi i dispositivi (il collegamento è
possibile solo in caso di uniformità dei canali).
• Dato che MBF 3333 opera su base radio, non si deve
escludere l‘eventualità di intercettare le comunicazioni
di altri utenti di sistemi radio o che altri utenti di sistemi
radio possano ricevere comunicazioni o rumori invia
ti dal proprio trasmettitore. MBF 3333 utilizza tuttavia
frequenze di trasmissione che escludono in gran parte
questo tipo di interferenze. Se ciononostante si rileva
-
no tali interferenze in casi del tutto eccezionali, passa
-
re all‘altro canale (frequenza).
• Per garantire condizioni ottimali di trasmissione/rice
zione disporre il trasmettitore ed il ricevitore in posizio
-
ne verticale.
• Se il ricevitore viene collocato troppo vicino al trasmet
titore ed il volume è elevato, può essere emesso un
suono sibilante (risposta, reazione acustica). Per evita
-
re questo problema, si dovrebbe aumentare la distan
-
za tra il trasmettitore ed il ricevitore.
• Batterie/Accumulatori troppo scariche/i possono ge
-
nerare rumori nel ricevitore.
• Si noti che non è presente nessun tipo di protezione
generica contro le intercettazioni nella gamma di fre
-
quenze da 40 MHz.
Page 13

-24-
-25-
20. Informazioni importanti
• Utilizzare esclusivamente i trasformatori originali per
l‘alimentazione dei dispositivi. Se uno dei trasforma
tori presentasse eventuali difetti, rivolgersi al proprio
rivenditore specializzato. Utilizzando altri trasformatori
si possono verificare gravi danni dei dispositivi in caso
non si rispettino le polarità (+/-) ed i valori della tensione.
• Non è possibile riparare i trasformatori difettosi. Non è
possibile sostituire il cavo di connessione ed è neces
-
sario smaltire immediatamente il trasformatore.
• Disinnestando i trasformatori dalle prese di corren
te e dalla ricetrasmittente per neonati non tirare i cavi,
ma afferrare i trasformatori per gli spinotti o i telai ed
estrarli per evitare eventuali rotture o lacerazioni dei
cavi.
• Non disporre il trasmettitore nel letto del neonato o
nell‘area in cui il bambino va a gattoni.
• Tenere sempre i dispositivi fuori dalla portata dei bam
-
bini.
• Se uno o entrambi i dispositivi sono alimentati con le
batterie, le prestazioni di ricezione e trasmissione ri
sultano leggermente ridotte rispetto all‘alimentazione
con i trasformatori.
• Sono forniti in dotazione due trasformatori per poter
collegare il trasmettitore ed il ricevitore a qualsiasi pre
-
sa di corrente (230 volt/50 Hz).
• In caso si interrompa il funzionamento per un periodo
prolungato di tempo, si consiglia di rimuovere le batte
rie/gli accumulatori perché le batterie/gli accumulatori
scariche/i sono soggette/i a cristallizzazione e possono provocare danni.
21.
Avvertenze per lo smaltimento
Le apparecchiature usate, contrassegnate dal
simbolo illustrato, non devono essere smaltite
tra i rifiuti domestici.
Le batterie usate e le pile ricaricabili contrassegnate da
uno dei simboli illustrati non
devono essere smaltite tra i rifiuti domestici.
Devono essere portate presso un centro di raccolta per
apparecchiature usate, batterie usate o rifiuti speciali
(informarsi presso il proprio comune) oppure presso il ri
venditore dal quale sono state acquistate. Presso questi
centri è possibile lo smaltimento ecologico.
22. Manutenzione e garanzia
Prima della pulizia scollegare l‘apparecchio da eventuali
altri componenti e non utilizzare detergenti aggressivi.
L‘apparecchio è stato sottoposto ad un accurato con
trollo finale. Se dovesse tuttavia sussistere motivo di
contestazione, inviarci l‘apparecchio con la ricevuta di
acquisto. Offriamo una garanzia di
3 anni dalla data di
acquisto.
Non ci assumiamo alcuna responsabilità per danni cau
-
sati da utilizzo scorretto o non appropriato o dall‘usura.
Con riserva di modifiche tecniche.
Pile, batterie e pacchi batteria non sono coperti da ga
-
ranzia!
23. Dati tecnici
Frequenze
Frequenza portante canale 1: 40,670 MHz
Frequenza portante canale 2: 40,690 MHz
Radiazioni ad alta frequenza
potenza
massima di
trasmissione
(EIRP)
valore limite
superiore in mW
valore reale
misurato in mW
1,25 0,0631
Radiazioni a bassa frequenza
range
frequenza
densità di flusso magnetico*
valore limite
superiore in nT
valore reale
misurato in nT
0,025-0,8 KHz 5/f 0,09
0,8-3 KHz 6,25 0,21
3-150 KHz
6,25 0,36
* ad una distanza di misurazione di 30 cm
Potenza assorbita del trasmettitore
modalità
valore limite
superiore in W
valore reale
misurato in W
controllo
stanza
2 0,53
disattivato 1 0,38
Controllo raggio d‘azione
Frequenza del segnale di trasmissione: 1 dopo 55 se
condi e successivamente ogni 35 secondi
Durata del segnale di trasmissione: < 20 mS
Tensione d‘esercizio
Trasmettitore: 6 V DC, con pile stilo/batterie (AA) o con
alimentatore
Ricevitore: 3,6 V DC, con pacco batterie o con alimenta
-
tore (in dotazione)
Raggio d‘azione max.
200 metri in base alle condizioni locali
Alimentatore a spina
Trasmettitore: 9 V DC, 200 mA secondaria;
100-240 V AC/ 50-60 Hz primaria
Ricevitore: 6 V DC, 300 mA secondaria; 230 V AC/ 50Hz
primaria
Informazioni aggiornate sul prodotto sono disponibili sul nostro
sito Internet http://www.hartig-helling.de
Estimado cliente,
el intercomunicador para bebés H+H MBF 3333 que
ha adquirido fue fabricado de acuerdo con las directivas de adjudicación del símbolo ambiental “Der
Blaue Engel”. Por ese motivo, a diferencia de los
intercomunicadores para bebés convencionales, el
MBF 3333 cumple con las directivas especiales en
referencia a la protección ambiental, de la salud y
del consumidor. En el desarrollo del producto, en
especial se consideró una carga de radiación ex
-
tremadamente baja y un consumo de energía op
timizado. Además, se observó que los materiales
utilizados para la producción respetaran todos los
requisitos legales con la mayor precisión.
MBF 3333 es ideal para la vigilancia de niños pequeños, bebés o personas que requieren de aten
-
ción y cuidado. Para proteger a su bebé del elec
trosmog, este intercomunicador para bebés
cumple con los más altos requisitos de “Der Blaue
Engel”. Además, como el emisor se opera con una
fuente de alimentación electrónica, a diferencia
de las fuentes de alimentación convencionales, en
este caso la fuente de alimentación no genera nin
guna carga para su bebé.
El intercomunicador MBF 3333 se compone de un
emisor, de un receptor, de un pack de acumuladores para el receptor, de un cargador y de dos fuen
tes de alimentación (230 V AC/ 50 Hz). Su intercomunicador para bebés trabaja en dos frecuencias
(canales) diferentes en el alcance de frecuencia de
40 MHz y ofrece así el confort de una óptima cali
dad de transmisión. Usted puede operar el emisor y
el receptor a baterías/ acumuladores, independien
temente de la fuente de alimentación. El emisor se
opera con cuatro baterías Mignon/ acumuladores
AA (que no se entregan con la compra del produc
-
to); el receptor trabaja con un pack de acumulado
res (3,6 V DC, que se entregan con la compra del
producto). Si Usted prefiere utilizar el equipo co
nectado a las fuentes de alimentación adjuntas, no
es necesario quitar los acumuladores/ baterías de
los aparatos. El funcionamiento de las baterías o
acumuladores se interrumpe automáticamente.
1. Con la compra se entrega
1 emisor
1 receptor
1 pack de acumuladores especial para el receptor
1 cargador para el receptor
1 fuente de alimentación electrónica para el emisor
1 fuente de alimentación para el receptor
1 manual del usuario
Manual de Instrucciones
Contiene
1. Con la compra se entrega .................................25
2. Particularidades ..............................................26
3. Advertencias importantes .................................26
4. Indicaciones de seguridad ................................26
5. Elementos de mando .......................................26
6. Puesta en funcionamiento del emisor .................26
6.1 Interruptor de sensibilidad ............................27
7. Puesta en funcionamiento del receptor ..............27
7.1 Cadena de diodos luminosa .........................27
8. Prueba funcional .............................................27
9. Alcance ..........................................................27
9.1 Alarma de alcance .......................................27
10. Clips ...............................................................28
11. Colocación de las baterías para el emisor ...........28
12. Colocación del pack de acumuladores (receptor) 28
13. Control de las baterías .....................................28
14. Carga del pack de acumuladores en el receptor ..28
15. Carga de los acumuladores del emisor ...............28
16. Técnica de 40 MHz ...........................................28
17. Función de señal de identificación .....................28
18. Indicaciones para un uso ecológico ...................28
19. Consejos y trucos en caso de fallo .....................29
20. Información importante ....................................29
21.
Instrucciones de eliminación .............................29
22. Cuidado y garantía ...........................................29
23. Datos técnicos ................................................30
Page 14

-26-
-27-
2. Particularidades
• interruptor de sensibilidad en el emisor (High/Low)
• regulación de progresión continua de la intensidad de
volumen en el receptor
• indicador óptico de recepción
• 2 canales regulables distintos
• control óptico del nivel de batería en el emisor y receptor
• función señal de identificación para una recepción sin
interferencias
• alarma de alcance
• cumple con los altos requisitos de “Der Blaue Engel”
• fuente de alimentación del emisor con electrosmog reducido
3. Advertencias importantes
• Lea las instrucciones de uso antes de la utilización del
interfono
• Las instrucciones de uso son parte del producto. Con
tienen indicaciones importantes para la puesta en funcionamiento y la utilización del aparato.
• Conserve las instrucciones de uso que se adjuntan pa
-
ra poder volverlas a consultar siempre que lo necesite.
• Si se cede el aparato, las instrucciones de uso se han
de entregar a la persona correspondiente.
4. Indicaciones de seguridad
La garantía no responde de los daños que surjan como
consecuencia de la no observancia del manual de ins
trucciones. No nos responsabilizamos de los daños
consecuenciales que se originen por ello. Tampoco nos
hacemos responsables de los daños materiales o per
sonales que fuesen causados por una manipulación inadecuada o por la no observancia de las indicaciones
de seguridad. En dichos casos se extingue cualquier
derecho de garantía.
5. Elementos de mando
1
2
3
4
5
6
7
8
9
10
12
13
16
14
15
11
1. Antena del emisor
2. Indicador de funcionamiento
3. Indicador de emisión
4. Interruptor de sensibilidad
5. Interruptor de apagado/ selección de canales
6. Micrófono
7. Ficha de red
8. Antena del receptor
9. Indicador de funcionamiento
10. Parlantes
11. Indicador óptico de recepción
12.
Regulador de apagado/ encendido/ intensidad de
volumen
13.
Interruptor de selección de canales
14. Cargador
15. Ficha de red
16. Indicador de control de carga
6. Puesta en funcionamiento del emisor
Para garantizar una emisión óptima, coloque el emisor
en forma vertical en la habitación que se desea vigilar
o fíjelo al muro con el material de montaje correspon
diente.
Usted puede utilizar el emisor o bien con la fuente de
alimentación adjunta (TO TRANSMITTER) o con cuatro
células Mignon (que no se entregan con la compra del
producto). Para el funcionamiento a baterías, coloque
las cuatro células Mignon AA en el compartimiento para
baterías, como se describe en “Colocación de las baterías para el emisor”. Para el funcionamiento mediante la
fuente de alimentación, conecte la fuente de alimentación con la inscripción TO TRANSMITTER a la ficha (7)
del emisor.
¡Indicación! Observe que especialmente la fuente de
red también esté lo más alejada posible de su niño y utilice toda la longitud del cable de conexión.
Con el interruptor deslizante (5) se enciende el aparato
y también se selecciona uno de los dos canales de emisión. En la posición 1, el aparato transmite por el canal 1,
y en la posición 2, por el canal 2.
La disponibilidad para funcionar se indica mediante el
LED (2) que se enciende.
Ni bien el emisor reconozca un ruido, el LED (3) perma
-
necerá encendido mientras dure la transmisión.
¡Indicación! Por motivos de seguridad y para una trans
misión óptima de los ruidos, le recomendamos dejar un
metro de distancia entre el emisor y la cuna o cama de
su niño como mínimo. La parte frontal del aparato debe
-
ría estar orientada, en lo posible, en dirección a la per
sona que debe ser vigilada (por ejemplo, su bebé). Además, se debe tener en cuenta que los ruidos o el sonido
no se vean interrumpidos por obstáculos.
Mediante la carta de pedido adjunta, usted
puede adquirir fuentes de alimentación originales adicionales.
6.1 Interruptor de sensibilidad
Con el interruptor de sensibilidad (4) ubicado en el lateral derecho del emisor, se regula la sensibilidad del
micrófono.
MIC LOW = emisor regulado a baja sensibilidad
MIC HIGH = emisor regulado a alta sensibilidad
¡Indicación! El concepto de sensibilidad se refiere al ni
-
vel de respuesta del emisor. Esta debe adaptarse indivi
-
dualmente a las circunstancias locales.
7. Puesta en funcionamiento del receptor
Coloque el receptor en la habitación en la que Usted
permanecerá o fíjelo al muro con el material de montaje
respectivo.
Usted puede utilizar el receptor de la misma manera que
el emisor, es decir, con la fuente de alimentación adjun
ta mediante el cargador o con el pack de acumuladores
adjunto.
Para el funcionamiento con acumuladores, coloque el
pack de acumuladores en el compartimiento para ba
terías, como se describe en “Colocación del pack de
acumuladores (receptor)”. Para el funcionamiento con
la fuente de alimentación, conecte la fuente de alimentación a la ficha (15) del cargador y coloque el receptor
en el cargador.
¡Indicación! Para el funcionamiento con fuente de ali
mentación, es obligatoriamente necesario que el pack
de acumuladores permanezca en el aparato; si el pack
de acumuladores no está colocado, el receptor no pue
-
de funcionar mediante el cargador.
Con el interruptor selector de canales (13), seleccione el
canal de transmisión (1 ó 2). En principio, para el funcio
namiento el emisor y el receptor deben estar regulados
en el mismo canal (1 ó 2).
Girando el regulador de intensidad de volumen (12) ha
-
cia arriba, se enciende el aparato. Luego del encendi
do, el LED (9) se enciende y le indica que el aparato está
listo para funcionar. Girando nuevamente el regulador de
intensidad de volumen (12), usted puede regular el volu
-
men como desee.
Mediante la carta de pedido adjunta, usted
puede adquirir fuentes de alimentación origi-
nales adicionales y packs de acumuladores especiales.
7.1 Cadena de diodos luminosa
El receptor dispone de un indicador óptico de recepción
(11) (cadena de diodos luminosos). Cuando se recibe un
sonido, usted no sólo lo detectará acústicamente, sino
también de forma óptica mediante la cadena de diodos
luminosos. Cuando más intenso sea el sonido recibido,
más diodos se iluminarán.
8. Prueba funcional
Es muy importante comprobar el funcionamiento del interfono antes de su primera utilización. Para ello, colo
que el emisor en la habitación deseada y conecte, p. ej.,
una radio al nivel acústico de casera.
A continuación coloque el emisor a la sensibilidad de
respuesta deseada con el interruptor de respuesta (4).
Por último, vaya con su receptor una vez por las distintas
estancias de su hogar y regule el volumen deseado.
9. Alcance
A causa de las condiciones físicas de difusión de las
ondas de radio, usted ha de determinar mediante prue
-
bas el alcance de su interfono para bebés en su entor
no. Con unas condiciones óptimas, logrará un alcance
de hasta 200 m. Sin embargo, el alcance real depende
en gran medida de las condiciones locales. Entre éstas
condiciones, son de consideración, por ejemplo, la ubi
-
cación del emisor, el tipo de edificación o las condicio
nes atmosféricas. Asimismo, el alcance puede verse
restringido cuando sujeta el receptor en su mano y lo
tapa.
9.1 Alarma de alcance
Si el receptor se encuentra fuera del alcance del emisor,
el receptor emite una señal sonora de alcance, que se
dispara aprox. 55 segundos después de que la conexión
al emisor se haya cortado. La alarma de alcance se repi
-
te en un ritmo de aprox. 35 segundos.
La alarma acústica de alcance del receptor se dispa
-
ra, si:
• el emisor está apagado,
Page 15

-28-
-29-
• el emisor está regulado en un canal diferente al del receptor,
• el emisor o el receptor trabajan con el acumulador o a
baterías y estos están descargados.
10. Clips
El emisor y el receptor se pueden fijar en el cinturón o en
dispositivo de suspensión (en una pared, con material
de fijación adecuado) con los clips que se encuentran
en su parte trasera.
11. Colocación de las baterías para el emisor
¡El emisor también puede funcionar con las baterías
convencionales!
1. Para colocar o cambiar el acumulador o las baterías,
abra el compartimiento para baterías del emisor, pre
sionando la traba hacia abajo y desplazando la tapa
del compartimiento para baterías simultáneamente
hacia abajo.
2. Quite los acumuladores/ las baterías descargadas
del aparato.
3. Ahora coloque los acumuladores cargados o las ba
terías nuevas en las cavidades previstas para ello,
observando la polaridad (+/-) (véase indicación en la
carcasa).
4. Luego cierre el compartimiento para baterías, desplazando la tapa sobre la carcasa.
12. Colocación del pack de acumuladores (receptor)
Para colocar o cambiar los acumuladores, abra el compartimiento para baterías del receptor, presionando la
traba hacia abajo y desplazando la tapa del compar
timiento para baterías simultáneamente hacia abajo.
Ahora coloque el pack de acumuladores en la cavidad
prevista para ello, observando la polaridad (+/-) (véase
indicación en la carcasa). Luego cierre la tapa del com
partimiento para baterías, siguiendo el procedimiento
inverso, hasta que escuche que se ha enganchado.
13. Control de las baterías
Cuando la tensión de las pilas ya no es suficiente en
modo de funcionamiento con pilas, se le indicará esta
situación tanto en el emisor como en el receptor.
En caso de una tensión baja de las pilas, el color del indicador de funcionamiento cambia de verde a rojo en el
emisor y (2) en el receptor (9).
14. Carga del pack de acumuladores en el receptor
• Para cargar el pack de acumuladores en el receptor,
conecte la fuente de alimentación respectiva con la fi
-
cha (15) de la estación de carga.
• Ni bien haya conectado la fuente de alimentación con
la estación de carga (14) y el receptor se encuentre en
la estación de carga, el cargador destella 5 veces en
verde/ rojo. En ese lapso se verifica el pack de acumuladores. Luego comienza la carga automáticamente,
que se indica mediante el LED (16) que destella en rojo
en el cargador.
• El tiempo de carga es de aprox. 12 horas, si el pack de
acumuladores está completamente vacío y el aparato
está apagado.
• Si el receptor está encendido durante el proceso de
carga, el tiempo de carga se duplica.
• Una vez que la carga haya finalizado, Usted puede de
-
jar el aparato en la estación de carga (14). Técnica
mente no es posible que se produzca una sobrecarga
del pack de acumuladores.
• El LED (16) cambia su color a verde automáticamente,
una vez que la carga haya finalizado y si el receptor es
-
tá apagado.
¡Indicación! Reemplace los packs de acumuladores
defectuosos únicamente con packs de acumuladores
originales. En este intercomunicador para bebés no es
posible cargar ni utilizar microacumuladores o microbaterías AAA normales.
Especialmente para la vigilancia nocturna le recomen
damos utilizar ambos aparatos con las fuentes de alimentación entregadas, para garantizar que el control
sea perfecto. En el funcionamiento normal con acumu
ladores, por la noche la alarma de alcance puede activarse de acuerdo con el estado de carga y despertarlo
sin necesidad alguna.
15. Carga de los acumuladores del emisor
Si usted utiliza el emisor con acumuladores y estos están descargados, debe quitarlos del aparato y cargarlos
nuevamente en un cargador separado, porque el emisor
no dispone de una función de carga.
16. Técnica de 40 MHz
El aparato funciona en el ámbito de frecuencia de
40 MHz, en el que se eliminan las interferencias de
radioaficionados.
17. Función de señal de identificación
La seguridad de la transmisión por radio de este interfono se mejora mediante una función probada en la prác
tica de señal de identificación, y que es inaudible por
usted. Esta función de señal de identificación actúa de
modo que el receptor sólo se activa cuando se trans
miten sonidos desde el propio emisor, p. ej., del bebé
a vigilar.
Para el caso poco corriente de que usted se vea pertur
-
bado durante la transmisión por otras fuentes de seña
-
les del ámbito de frecuencia de 40 MHz, tiene la posibili
-
dad de cambiar a otro canal.
18. Indicaciones para un uso ecológico
• Al utilizar acumuladores o baterías, es posible evitar
los campos eléctricos y magnéticos completamente.
• Cuando no utilice el intercomunicador para bebés,
desconecte las fuentes de alimentación de los tomacorrientes, para evitar campos eléctricos, magnéticos
y electromagnéticos. Además, de esta manera es po
-
sible ahorrar costos, porque las fuentes de alimenta
ción consumen corriente sólo por el hecho de estar
conectadas a un tomacorriente.
Indicaciones para campos de alta y baja frecuencia:
Los estudios científicos realizados hasta ahora sobre
los riesgos para la salud ocasionados por campos elec
tromagnéticos de alta y baja frecuencia, todavía no
han podido probar ninguna relación clara entre causa y
efecto. Sin embargo, estudios propios revelan indicios
de posibles riesgos para la salud. Como prevención,
se deben utilizar todas las posibilidades técnicas para
mantener la exposición frente a campos de alta y baja
frecuencia en el menor nivel posible, precisamente con
bebés y niños considerados especialmente sensibles.
19. Consejos y trucos en caso de fallo
• Cuando el emisor o el receptor no funcionan, com-
pruebe la alimentación de energía.
• Si no se establece la transmisión entre el emisor y el
receptor, compruebe los canales de emisión/ recep
ción de ambos aparatos (sólo se puede establecer
una conexión si ambos canales son coincidentes).
• Como el MBF 3333 funciona por radio, no se pue
-
de garantizar que no se escucharán conversacio
nes de otros usuarios de radio o que otros usuarios
de radio no puedan recibir las conversaciones o rui
dos que sean emitidos por su emisor. No obstante, el
MBF 3333 utiliza frecuencias de transmisión, que ex
-
cluyen en gran medida estas interferencias. Sin em
bargo, suponiendo que en casos excepcionales desee
comprobar dichas interferencias, pase al otro canal
(frecuencia).
• Para garantizar unas posibilidades óptimas de transmi
-
sión/ recepción, coloque el emisor y el receptor en po
-
sición vertical.
• Cuando el receptor está demasiado próximo al emi
sor y el volumen está alto puede que se oiga un pitido
(feedback/ retroacoplamiento acústico). Para evitarlo
se debe aumentar la distancia entre el emisor y el re
-
ceptor.
• Un juego de pilas/ pilas recargables demasiado gasta
-
das puede producir ruidos en el receptor.
• Tenga en cuanta que en el espacio de frecuencias de
40 MHz no existen ninguna protección general contra
las escuchas.
20. Información importante
• Utilice los bloques de alimentación originales para el
funcionamiento de los aparatos. Si un bloque de ali
mentación estuviese defectuoso, vaya a su distribuidor especializado. En caso de utilización de otros
bloques de alimentación, la no observancia de la polaridad (+/-) y del nivel de tensión puede llevar a daños
considerables en los aparatos.
• Un bloque de alimentación defectuoso no se puede
reparar. El cable de conexión no puede cambiarse,
con lo que el bloque de alimentación se ha de eliminar
inmediatamente.
• Al extraer los bloques de alimentación de las tomas de
corriente y del interfono, no tire de los cables, agarre
los bloques de alimentación por el enchufe o la carca
-
sa y tire de ellos para evitar una rotura o un estrangula
-
miento del cable.
• No coloque el emisor en la cuna o en el lugar por don
-
de gatea el bebé
• Coloque siempre el aparato fuera del alcance de los
niños pequeños.
• Cuando uno o los dos aparatos se hacen funcionar
con pilas/ pilas recargables, la potencia de recepción
y de emisión se ve ligeramente reducida respecto al
funcionamiento con bloques de alimentación.
• Se suministran dos bloques de alimentación, para que
pueda conectar el emisor y el receptor en cualquier
toma de corriente (230 Volt/ 50 Hz).
• En caso de no utilizar el aparato durante un tiempo
prolongado, recomendamos extraer las pilas/pilas recargables, ya que las pilas/ pilas recargables descar
-
gadas se cristalizan y originan daños.
21.
Instrucciones de eliminación
Los aparatos usados y marcados por el símbolo
que muestra la ilustración no deberán eliminarse
junto con la basura doméstica.
Las pilas y acumuladores
usados marcados con el
símbolo que muestra la ilus
-
taración no deberán eliminarse junto con la basura do
méstica.
Deberá entregarlos en un centro de reciclaje adecuado
para aparatos usados, pilas o baterías usadas o residuos
especiales (infórmese en su comunidad) o diríjase a su
distribuidor o al punto de venta donde adquirió el aparato, en pro de una eliminación del aparato respetuosa
con el medio ambiente.
22. Cuidado y garantía
Antes de limpiar el aparato desconéctelo, si procede, de
otros componentes y no utilice detergentes agresivos.
El aparato fue sometido a un cuidadoso control final. Si
hubiera cualquier motivo de reclamación, envíenos el
aparato junto con el recibo de compra. Ofrecemos una
garantía de 3 años a partir de la fecha de adquisición.
En caso de averías debidas a manipulación o uso indebido o desgaste, no adoptamos ninguna responsabilidad.
Nos reservamos todas las modificaciones técnicas.
¡No hay garantía sobre los acumuladores, packs de acu
-
muladores ni baterías!
Page 16

-30-
-31-
23. Datos técnicos
Frecuencias
Frecuencia portadora canal 1: 40,670 MHz
Frecuencia portadora canal 2: 40,690 MHz
Radiación de alta frecuencia
potencia
de emisión
máxima
(EIRP)
valor límite
máximo en mW
valor real
medido en mW
1,25 0,0631
Radiación de baja frecuencia
alcance de
frecuencia
densidad de flujo magnético*
valor límite
máximo in nT
valor real
medido en nT
0,025-0,8 KHz 5/ f 0,09
0,8-3 KHz 6,25 0,21
3-150 KHz
6,25 0,36
* a una distancia de medición de 30 cm
Consumo de potencia del emisor
modo
valor límite
máximo en W
valor real
medido en W
vigilancia en el
ambiente
2 0,53
apagada 1 0,38
Control de alcance
Frecuencia de la señal de emisión: 1 luego de 55 segun
dos, luego cada 35 segundos
Duración de la señal de emisión: < 20 mS
Tensión de trabajo
Emisor: 6 V DC, con cuatro baterías Mignon/ acumula
dores (AA) o con fuente de alimentación
Receptor: 3,6 V DC, con pack de acumuladores o con
fuente de alimentación (que se entrega con el producto)
Alcance máximo
200 metros de acuerdo con las circunstancias locales
Enchufe de fuente de alimentación
Emisor: 9 V DC, 200 mA secundario 100-240 V AC/
50-60 Hz primario
Receptor: 6 V DC, 300 mA secundario 230 V AC/ 50 Hz
primario
Encontrará informaciones de producto actualizadas en nuestra
página web http://www.hartig-helling.de
Zeer geachte cliënt,
het door u aangeschafte H+H-Babyfoonapparaat
MBF 3333 is vervaardigd volgens de concessienor
men voor het ecologische etiket “Der Blaue Engel”.
Hierdoor voldoet de MBF 3333, in tegenstelling tot
conventionele babyfoons, aan de bijzondere nor
men aangaande milieu-, gezondheids- en consumentenbescherming. In het bijzonder werd bij het
ontwerp gelet op een zeer geringe stralingsbelas
ting en een optimaal energieverbruik. Bovendien
werd bij de voor de fabricage gebruikte materialen
zeer nauwkeurig gelet op het nakomen van alle wettelijke bepalingen.
De MBF 3333 is ideaal geschikt voor het bewaken
van kleine kinderen, baby’s of personen die verple
ging behoeven. Om uw baby tegen elektrosmog te
beschermen, voldoet dit babyfoonapparaat aan de
hoge eisen van “Der Blaue Engel”. Bovendien werkt
de zender op een elektronische voedingsbron zodat, in tegenstelling tot conventionele voedingsbronnen, uw baby of de te verplegen persoon geen
hinder van de voedingsbron ondervindt.
De MBF 3333 bestaat uit een zender, een ontvan
ger, een accupack voor de ontvanger, een oplader en twee voedingsbronnen (230 V AC/50 Hz).
Uw babyfoonapparaat werkt op twee verschillen
-
de frequenties (kanalen) binnen het 40 MHz-fre
quentiebereik en biedt hierdoor het gemak van een
optimale signaalkwaliteit. U kunt zender en ont
vanger op batterijen/accu’s laten werken zonder
gebruikmaking van het stroomnet. De zender werkt
op vier mignonbatterijen/accu’s AA (niet bij de le
vering inbegrepen), de ontvanger op een accupack
(3,6 V DC, bij de levering inbegrepen). Indien u kiest
voor de werking m.b.v. de bijgeleverde voedings
bronnen, is het niet nodig de batterijen/accu’s uit
de apparaten te verwijderen. De batterij- resp. ac
-
cuwerking wordt automatisch uitgeschakeld.
1. Leveringspakket
1 x zender
1 x ontvanger
1 x speciaal accupack voor de ontvanger
1 x oplader voor de ontvanger
1 x elektronische voedingsbron voor de zender
1 x voedingsbron voor de ontvanger
1 x gebruiksaanwijzing
2. Bijzonderheden
• gevoeligheidsschakelaar op de zender (Hoog/Laag)
• fasenloze volumeregelaar op de ontvanger
• optische ontvangstaanduiding
• 2 verschillende instelbare kanalen
• optische batterijcontrole op de zender en de ontvan
-
ger
Gebruiksaanwijzing
Inhoud
1. Leveringspakket ..............................................31
2. Bijzonderheden ..............................................31
3. Belangrijke instructies ......................................32
4. Veiligheidsvoorschriften ...................................32
5. Bedieningselementen .....................................32
6. De ingebruikneming van de zender ....................32
6.1 Gevoeligheidsinstelling ................................32
7. De ingebruikneming van de ontvanger ...............33
7.1 Lichtdioden in serie .....................................33
8. Controle van de werking ...................................33
9. Zendbereik .....................................................33
9.1 Reikwijdtealarm ..........................................33
10. Clips ...............................................................33
11. Plaatsen van de batterijen voor de zender ..........33
12. Plaatsen van het accupack voor de ontvanger ....33
13. Batterijcontrole ...............................................34
14. Opladen van het accupack in de ontvanger ........34
15. Opladen van het accupack in de zender .............34
16. 40-MHz-band ..................................................34
17. Piloottoon .......................................................34
18. Raadgevingen voor een ecologisch gebruik ........34
19. Nuttige wenken bij storingen .............................34
20. Belangrijke informatie ......................................35
21. Afvoeraanwijzing .............................................35
22. Onderhoud en garantie ....................................35
23. Technische gegevens ......................................35
Page 17

-32-
-33-
• controletoonfunctie voor storingvrije ontvangst
• reikwijdtealarm
• voldoet aan de hoge eisen van “Der Blaue Engel”
• voedingsbron van de zender met gereduceerde elek
-
trosmog
3. Belangrijke instructies
• Gelieve voor ingebruikname van de babyfoon de handleiding te lezen!
• De handleiding maakt deel uit van het apparaat. Ze be
vat belangrijke instructies voor de ingebruikname en
de bediening van het apparaat.
• Bewaar de bijgeleverde handleiding zodat u ze later
nog kunt raadplegen!
• Bij het doorgeven van het apparaat aan derden, moet
ook de handleiding bijgeleverd worden.
4. Veiligheidsvoorschriften
Bij schade door het niet opvolgen van de handleiding
vervalt de garantie. Ook voor gevolgschade zijn wij niet
aansprakelijk! Bij materiële of persoonlijke schade, die
door een ondeskundig gebruik of door het niet opvol
gen van de veiligheidsvoorschriften veroorzaakt werd,
zijn wij niet aansprakelijk. In zulke gevallen vervalt elke
garantie.
5. Bedieningselementen
1
2
3
4 5
6
7
8
9
10
12
13
16 14
15
11
1. Zendantenne
2. Functieaanduiding
3. Zendaanduiding
4. Gevoeligheidsschakelaar
5. Uit/Kanaalkeuzeschakelaar
6. Microfoon
7.
Contactdoos
8. Ontvangstantenne
9. Functieaanduiding
10. Luidspreker
11. Optische ontvangstaanduiding
12. Uit/Aan/Volumeregelaar
13. Kanaalkeuzeschakelaar
14.
Oplader
15.
Contactdoos
16. Laadcontrolaanduiding
6. De ingebruikneming van de zender
Om een optimaal signaal te garanderen, plaatst u de
zender rechtopstaand in de te bewaken kamer of u be
vestigt deze met daarvoor geschikt montagemateriaal
aan de muur.
U kunt de zender zowel op de meegeleverde voedings
bron (TO TRANSMITTER) als op vier mignonbatterijen
(niet bij de levering inbegrepen) laten functioneren. Voor
het gebruik met batterijen dient u vier mignonbatterijen
AA in het batterijvak te plaatsen, zoals aangegeven onder “Plaatsen van de batterijen voor de zender”. Voor
gebruik op het lichtnet sluit u de voedingsbron met het
opschrift “TO TRANSMITTER” aan op de contactdoos
(7) van de zender.
Tip! Er vooral op letten dat de voedingsbron zich op een
zo groot mogelijke afstand van uw kind bevindt. Benut
hiervoor de volle lengte van het aansluitingssnoer.
M.b.v. de schuifregelaar (5) wordt zowel het apparaat
ingeschakeld als een van de beide kanalen gekozen. In
positie 1 loopt het signaal van de apparaat via kanaal 1
en in positie 2 via kanaal 2.
Het oplichtende indicatielampje (2) geeft aan wanneer
het apparaat gebruiksklaar is.
Zodra een geluid door de zender wordt waargenomen,
licht het lampje (3) tijdens de duur van de transmissie
op.
Tip! Uit veiligheidsredenen en voor een optimale ge
luidstransmissie raden wij u aan een minimumafstand
van 1,0 meter tussen de zender en het bed van uw kind
te bewaren. De voorzijde van het apparaat dient zoveel
mogelijk naar de te bewaken persoon (b.v. uw baby) te
zijn gericht. Bovendien moet men erop letten dat de ge
-
luiden niet door obstakels worden onderbroken.
Met behulp van de bijgeleverde bestelkaart
kunt u aanvullende originele voedingsbronnen
bijbestellen.
6.1 Gevoeligheidsinstelling
Met de gevoeligheidsschakelaar (4) aan de rechterzijde
van de zender wordt de gevoeligheid van de microfoon
ingesteld.
MIC LOW = zender op geringe gevoeligheid ingesteld
MIC HIGH = zender op hoge gevoeligheid ingesteld
Tip! Het begrip gevoeligheid heeft te maken met de ontvangstgevoeligheid van de zender. Deze dient aan de
plaatselijke omstandigheden te zijn aangepast.
7. De ingebruikneming van de ontvanger
Plaats de ontvanger in de kamer waarin u normalerwijze
aanwezig bent of bevestig deze met daarvoor geschikt
montagemateriaal aan de muur.
Precies zoals bij de zender kunt u de ontvanger zowel op
de meegeleverde voedingsbron via de oplader of op het
bijgeloten accupack laten functioneren.
Voor het gebruik van het accupack dient u dit in het bat
terijvak te plaatsen zoals omschreven onder “Plaatsen
van het accupack voor de ontvanger”. Voor gebruik op
het lichtnet sluit u de voedingsbron aan op de contact
-
doos (15) van de oplader en daarna plaatst u de ontvan
-
ger hierin.
Tip! Voor het gebruik op het lichtnet is het absoluut
noodzakelijk dat het accupack in het apparaat is geplaatst, zonder de plaatsing van het accupack kan de
ontvanger niet via de oplader functioneren.
Met de kanaalkeuzeschakelaar (13) kiest u het transmissiekanaal (1 of 2). In principe dienen zender en ontvanger voor een goed functioneren op hetzelfde kanaal
(1 of 2) te worden afgestemd.
Door de volumeregelaar (12) naar boven te draaien
wordt het apparaat ingeschakeld. Na het inschakelen
licht het indicatielampje (9) op, hetgeen betekent dat
het apparaat klaar is voor gebruik. Door de volumerege
laar (12) verder te draaien kunt u het geluidsvolume naar
keuze instellen.
Met behulp van de bijgeleverde bestelkaart
kunt u aanvullende originele voedingsbronnen
alsmede speciale accupacks bijbestellen.
7.1 Lichtdioden in serie
De ontvanger beschikt over een optische geluidsmelding (11) (ketting van bewegende lichtpuntjes). Van
zodra een geluid doorgezonden wordt, hoort u dit niet
alleen maar kunt u het ook zien via de ketting van bewegende lichtpuntjes. Hoe sterker het opgevangen geluid
is, hoe meer lichtpuntjes zullen oplichten.
8. Controle van de werking
Het is zeer belangrijk voor het eerste gebruik te testen of
de babyfoon correct werkt. Plaats de zender daartoe in
de te bewaken ruimte en schakel bv. een radio op nor
male geluidssterkte aan.
Stel dan de gevoeligheidsregelaar (4) op de zender op
de gewenste gevoeligheid in, ga met de ontvanger eens
door alle kamers en kies het gewenste volume.
9. Zendbereik
Wegens de fysische voortplantingscondities van radiogolven dient u het zendbereik van uw babyfoon in uw
omgeving zelf vast te stellen door het uit te testen. Bij
optimale omstandigheden krijgt u een zendbereik tot
200 m. Het daadwerkelijke zendbereik hangt vooral van
de plaatselijke omstandigheden af, bv. de plaats van de
zender, het soort bebouwing of de atmosferische om
standigheden. Bovendien kan het zendbereik beperkt
worden als u de ontvanger in uw handen houdt en om
-
sluit.
9.1 Reikwijdtealarm
Indien de ontvanger zich buiten het bereik van de zender
bevindt, dan wordt u dit medegedeeld d.m.v. een akoestisch signaal op de ontvanger, dat ca. 55 seconden na
de verbreking van de verbinding met de zender wordt
uitgezonden. Het reikwijdtealarm word met een frequen
-
tie van ca. 35 seconden voortdurend herhaald.
Het akoestische reikwijdtealarm van de ontvanger gaat
ook af, indien:
• de zender uitgeschakeld is,
• de zender op een ander kanaal dan de ontvanger is af
-
gestemd,
• de accu’s/batterijen van de zender of ontvanger bij het
functioneren op accu of batterijen leeg zijn.
10. Clips
De zender en de ontvanger kunnen met behulp van de
clips op de achterkant aan de broekriem bevestigd wor
den of met behulp van het geschikte montagemateriaal
aan een muur opgehangen worden.
11. Plaatsen van de batterijen voor de zender
De zender kan ook met conventionele batterijen functioneren!
1. Voor het plaatsen of verwisselen van de accu’s/bat
terijen opent u het batterijvak van de zender, waarna
u de vergrendeling naar beneden drukt en gelijktijdig
het afsluitlid van het batterijvak naar beneden wegschuift.
2. Verwijder de lege accu’s/batterijen uit het apparaat.
3. Plaats nu de opgeladen accu’s of de nieuwe batte
rijen, met inachtneming van de polariteit (+/-), in de
daarvoor bestemde insparingen (zie aanduiding in
de behuizing).
4. Sluit nu het batterijvak, waarna u het afsluitlid weer
over de behuizing schuift.
12. Plaatsen van het accupack voor de ontvanger
Voor het plaatsen of verwisselen van het accupack opent
u het batterijvak van de ontvanger, waarna u de vergren
deling naar beneden drukt en gelijktijdig het afsluitlid
van het batterijvak naar beneden wegschuift. Plaats nu
het accupack, met inachtneming van de polariteit (+/-),
Page 18

-34-
-35-
in de daarvoor bestemde insparingen (zie aanduiding in
de behuizing). Sluit nu het deksel van het batterijvak in
omgekeerde volgorde, totdat deze hoorbaar inklikt.
13. Batterijcontrole
Wanneer er bij gebruik met batterijen/accu’s onvoldoende batterijspanning is, wordt dat zowel op de zender als
op de ontvanger aangeduid.
Bij te lage batterijspanning verandert de kleur van de
aan/uit indicatie (2 bij de zender en 9 bij de ontvanger)
van groen in rood.
14. Opladen van het accupack in de ontvanger
• Voor het opladen van het accupack in de ontvanger
dient u de overeenkomstige voedingsbron aan het
contact (15) van het oplaadelement aan te sluiten.
• Zodra u de voedingsbron met het oplaadelement (14)
heeft verbonden en de ontvanger in het oplaadele
ment heeft geplaatst, blinkt de oplader 5 maal rood/
groen op. Gedurende dit tijdsinterval wordt het accu
pack gecheckt. Daarna begint automatisch het opladen en dit wordt aangegeven door het blinkende rode
indicatielampje (16) op het oplaadelement.
• De oplaadtijd bedraagt bij een volledig leeg accupack
en uitgeschakeld apparaat ca. 12 uren.
• Indien de ontvanger tijdens het opladen is ingeschakeld, dan is de oplaadtijd tweemaal zo lang.
• U kunt het apparaat na het opladen in het oplaadele
-
ment (14) laten staan. Een overbelading van het accu
-
pack is technisch uitgesloten.
• Het indicatielampje (16) schakelt bij een uitgescha
kelde ontvanger na het opladen automatisch over op
groen.
Tips! Vervang een defect accupack uitsluitend door een
origineel accupack. In dit babyfoonapparaat kunnen
geen normale microaccu’s/-batterijen AAA opgeladen
of gebruikt worden.
Speciaal voor de bewaking gedurende de nacht raden
wij u aan beide apparaten te laten functioneren m.b.v.
de meegeleverde voedingsbronnen, zodat een storings
-
vrije bewaking kan worden gegarandeerd. Bij het nor
maal functioneren op de accu’s kan, afhankelijk van het
niveau van de accu, het reikwijdtealarm afgaan waar
-
door u onnodig zou worden gewekt.
15. Opladen van het accupack in de zender
Indien de zender functioneert met accu’s en deze leeg
raken, dient u deze uit het apparaat te verwijderen en
deze in een separaat oplaadelement op te laden daar de
zender niet over een oplaadfunctie beschikt.
16. 40-MHz-band
Het apparaat werkt met radiogolven in de 40-MHz-frequentieband, waarin storingen door CB-zendontvangers
uitgesloten zijn.
17. Piloottoon
De zekere en storingsvrije werking van deze babyfoon
wordt nog verbeterd door een piloottoon, die door u niet
kan worden waargenomen en die in de praktijk zijn deug
delijkheid heeft bewezen. Deze piloottoon zorgt ervoor
dat de ontvanger slechts dan in werking treedt, als een
geluid van de eigen zender, bv. van de te bewaken baby,
doorgezonden wordt.
Indien u tijdens de zending eventueel toch door andere
signalen uit de 40-MHz-frequentieband zou gestoord
worden, dan kunt u op een ander kanaal overschakelen.
18. Raadgevingen voor een ecologisch gebruik
• Bij het gebruik van accu’s/batterijen kunnen elektri-
sche en magnetische velden volledig worden vermeden.
• Gelieve tijdens het niet gebruiken van het babyfoon
apparaat de voedingsbronnen uit de contactdozen te
nemen, teneinde elektrische, magnetische en elektro
magnetische velden te vermijden. Bovendien betekent
dit een kostenbesparing daar voedingsbronnen ook
stroom verbruiken wanneer deze zijn aangesloten op
een stopcontact.
Tips aangaande velden met hoge en lage frequentie:
In wetenschappelijke studies over mogelijke gevaren
voor de gezondheid als gevolg van velden met hoge en
lage frequentie kon tot nu toe geen duidelijk oorzaak/
gevolg-verband worden gelegd. Volgens enkele studies
echter bestaan er aanwijzingen voor mogelijke risico’s
voor de gezondheid. Uit voorzorg dienen alle technische
mogelijkheden benut te worden om de blootstelling aan
velden met hoge en lage frequentie – vooral bij de bijzonder kwetsbare baby’s en kleine kinderen – tot een
minimum te beperken.
19. Nuttige wenken bij storingen
• Als de zender of de ontvanger niet werkt, gelieve de
stroomtoevoer te controleren.
• Als er geen ontvangst is tussen zender en ontvanger,
gelieve de zend-/ontvangstkanalen bij beide appara
-
ten te controleren (enkel als ze op hetzelfde kanaal af
-
gestemd zijn is een verbinding mogelijk).
• Omdat MBF 3333 via radiogolven werkt, is het moge
lijk dat u gesprekken hoort via andere gelijkaardige
apparaten en dat andere gelijkaardige apparaten de
gesprekken of geluiden van uw zender kunnen ontvan
gen. MBF 3333 gebruikt echter zendfrequenties die
zulke storingen in hoge mate uitsluiten. Indien u eventueel toch zulke storingen zou vaststellen, schakelt u
dan op een ander kanaal (andere frequentie) over.
• Voor een optimale zending en ontvangst dient u de
zender en de ontvanger rechtop te plaatsen.
• Als de ontvanger zich te dicht bij de zender bevindt en
het volume te hoog staat, kunt u een fluittoon horen
(feedback of akoestische terugkoppeling). Om dat te
vermijden dient u de afstand tussen de zender en de
ontvanger te vergroten.
• Te zwakke batterijen/accu’s kunnen bij de ontvanger
geruis veroorzaken.
• Gelieve er rekening mee te houden dat in de 40-MHzfrequentieband meeluisteren niet volledig kan uitgesloten worden.
20. Belangrijke informatie
• Gelieve enkel de originele adapters te gebruiken samen met de apparaten. Als een van de adapters defect
is, gelieve uw vakhandelaar te raadplegen. Uw appa
raten kunnen ernstig beschadigd worden, als andere
adapters gebruikt worden en als er geen rekening ge
houden wordt met de polariteit (+/-) en de spanningshoogte.
• Een defecte adapter kan niet hersteld worden. De aan
sluitingskabel kan niet vervangen worden, zodat u de
adapter onmiddellijk dient te verwijderen.
• Gelieve bij het uittrekken van de adapters uit de stop
contacten en uit de babyfoon niet aan de kabels te
trekken, maar de adapters aan de stekker of aan de
behuizing vast te nemen en uit te trekken. Zo kunt u
vermijden dat de kabel breekt of afgetrokken wordt.
• Plaats de zender niet in het bedje of het park van uw
baby.
• Plaats de apparaten altijd buiten het bereik van kleine
kinderen.
• Gebruik van een of beide apparaten met batterijen/ac
-
cu’s vermindert enigszins het ontvangst- en zendver
-
mogen in vergelijking met het gebruik met adapters.
• Er worden twee adapters meegeleverd, zodat u zo
wel de zender als de ontvanger via het stopcontact
(230 Volt/50 Hz) kunt aansluiten.
• Als u de apparaten voor langere tijd niet gebruikt, ge
lieve de batterijen/accu’s te verwijderen, omdat lege
batterijen/accu’s kristalliseren en zo schade kunnen
veroorzaken.
21. Afvoeraanwijzing
Oude toestellen voorzien van het afgebeeld
symbool, mogen niet samen met het gewone
huisvuil worden afgevoerd.
Lege batterijen en accumulatoren (accu’s) die voorzien
zijn van één van de afgebeelde symbolen, mogen niet samen met het gewone
huisvuil worden afgevoerd.
U moet ze afgeven in een centraal ophaalpunt voor oude
toestellen, oude batterijen of speciaal afval (gelieve u te
informeren bij uw gemeente) of bij uw handelaar waar u
ze gekocht hebt. Deze zorgen voor een milieuvriende
-
lijke afvoer.
22. Onderhoud en garantie
Scheidt het apparaat voor het reinigen eventueel van
andere onderdelen en gebruikt u alstublieft geen agres
sieve reinigingsmiddelen.
Het apparaat is aan een zorgvuldige eindcontrole onder
worpen. Mocht u desondanks toch reden hebben om
het apparaat terug te sturen, stuurt u ons het apparaat
dan, samen met de kwitantie, op. Wij bieden een garan
tie van 3 jaar vanaf de aanschafdatum.
Voor schade die veroorzaakt is door verkeerd of onjuist
gebruik of door verslijting, zijn wij niet verantwoordelijk.
Technische wijzigingen voorbehouden.
Geen garantie op accu’s/accupacks of batterijen!
23. Technische gegevens
Frequenties
Overdrachtsfrequentie kanaal 1: 40,670 MHz
Overdrachtsfrequentie kanaal 2: 40,690 MHz
Hoogfrequente straling
maximale
zendsterkte
(EIRP)
bovenste
grenswaarde in mW
gemeten reële
waarde in mW
1,25 0,0631
Laagfrequente straling
frequentie
-
bereik
magnetische fluxdichtheid*
bovenste
grenswaarde in nT
gemeten reële
waarde in nT
0,025-0,8 KHz 5/f 0,09
0,8-3 KHz 6,25 0,21
3-150 KHz
6,25 0,36
* gemeten op een afstand van 30 cm
Potentieabsorbering van de zender
stand
bovenste
grenswaarde
in W
gemeten reële
waarde in W
kamerbewaking
2 0,53
uitgeschakeld 1 0,38
Reikwijdtecontrole
Frequentie van het zendsignaal: 1 x na 55 seconden,
daarna iedere 35 seconden
Duur van het zendsignaal: < 20 mS
Bedrijfsspanning
Zender: 6 V DC, met vier mignonbatterijen/accu’s (AA)
of met voedingsbron
Ontvanger: 3,6 V DC, met accupack of met voedings
-
bron (bij de levering inbegrepen)
Page 19

-36-
-37-
Max. reikwijdte
200 meter elk naar plaatselijke omstandigheden
Stopcontact
Zender: 9 V DC, 200 mA secundair; 100-240 V AC/
50-60 Hz primair
Ontvanger: 6 V DC, 300 mA secundair; 230 V AC/50 Hz
primair
Actuele productinformatie vindt u op onze internetsite
http://www.hartig-helling.de
Szanowny kliencie,
kupiona przez ciebie niania elektroniczna H+H o
oznaczeniu MBF 3333 została wyprodukowana
zgodnie z wymaganiami ekologicznego znaku
„Der Blaue Engel“ (znak produktu bezpiecznego
dla środowiska wydawany w Niemczech – przyp.
tłumacza). Dzięki temu urządzenie MBF 3333
podlega w odróżnieniu od dotychczasowych
niań elektronicznych, szczególnym zaleceniom
dotyczącym środowiska, ochronie zdrowia
i konsumentów. W szczególności w trakcie
projektowania zwrócono szczególną uwagę na
ekstremalnie niskie obciążenie promieniowaniem
i na optymalne zużycie energii. Ponadto zwrócona
została uwaga na użycie przy produkcji materiałów
spełniających wszystkie wymagania ustawowe.
Urządzenie MBF 3333 nadaje się idealnie do
nadzoru małych dzieci, niemowląt lub osób
wymagających opieki. W celu zapewnienia
ochrony dziecka przed elektrosmogiem, niania
elektroniczna spełnia wysokie wymagania stawiane
przez „Der Blaue Engel“. Dodatkowo nadajnik jest
użytkowany za pomocą zasilacza elektronicznego
tak, że w odróżnieniu od dotychczasowo
używanych zasilaczy, dziecko nie jest narażane na
promieniowanie z zasilacza.
Niania MBF 3333 składa się z nadajnika,
odbiornika, zestawu akumulatorowego dla
odbiornika, ładowarki i dwóch zasilaczy
(230 V AC/50 Hz). Niania pracuje na dwóch
różnych częstotliwościach i oferuje komfort
optymalnej jakości nadawania. Zarówno nadajnik
jak też odbiornik można użytkować niezależnie od
sieci zasilania za pomocą baterii/akumulatorów.
Nadajnik użytkowany jest przy użyciu czterech
baterii/akumulatorów typu mignon AA (brak w
dostawie), odbiornik użytkowany może być przy
użyciu zestawu akumulatorów (3,6 V DC, zawarty
w dostawie). W przypadku zdecydowania się na
użytkowanie z użyciem dołączonych zasilaczy, nie
zachodzi potrzeba usunięcia baterii/akumulatorów
z urządzeń. Tryb zasilania bateryjnego/
akumulatorowego zostaje automatycznie
przerwany.
1. Zakres dostawy
1 x nadajnik
1 x odbiornik
1 x specjalny zestaw akumulatorowy przeznaczony dla
odbiornika
1 x ładowarka do odbiornika
1 x elektroniczny zasilacz do nadajnika
1 x zasilacz do odbiornika
1 x instrukcja obsługi
Instrukcja obsługi
Zawartość
1. Zakres dostawy ................................................37
2. Cechy szczególne ...........................................38
3. Ważne wskazówki ...........................................38
4. Wskazówki bezpieczeństwa ..............................38
5. Elementy obsługi .............................................38
6. Uruchomienie nadajnika ...................................38
6.1 Przełączanie czułości ..................................39
7. Uruchomienie odbiornika ..................................39
7.1 Łańcuch z diod świecących ..........................39
8. Sprawdzanie działania ......................................39
9. Zasięg ............................................................39
9.1 Alarm zasięgu .............................................39
10. Uchwyt ...........................................................39
11. Wkładanie baterii do nadajnika ..........................39
12.
Wkładanie zestawu akumulatorowego do odbiornika .. 40
13. Kontrola baterii ................................................40
14.
Ładowanie zestawu akumulatorowego w odbiorniku 40
15. Ładowanie akumulatorów nadajnika ..................40
16. Technika 40-MHz .............................................40
17. Dźwięk pilotujący .............................................40
18.
Wskazówki dotyczące ekologicznego użytkowania ..40
19. Wskazówki w przypadku usterek ........................40
20. Ważne informacje ............................................41
21. Wskazówka dotycząca usuwania odpadów .........41
22. Pielęgnacja i gwarancja .................................... 41
23. Dane techniczne .............................................. 41
Page 20

-38-
-39-
6.1 Przełączanie czułości
Za pomocą przełącznika czułości (4) znajdującego się
po prawej stronie nadajnika można ustawić czułość
mikrofonu.
MIC LOW = nadajnik ustawiony jest na niską czułość
MIC HIGH = nadajnik ustawiony jest na wysoką czułość
Wskazówka! Pojęcie czułości oznacza poziom
zadziałania nadajnika. Powinien on być indywidualnie
dopasowany do warunków otoczenia.
7. Uruchomienie odbiornika
Odbiornik ustawić w pomieszczeniu, w którym będziecie
się znajdować lub przymocować go za pomocą
odpowiedniego materiału mocującego do ściany.
Odbiornik można tak samo jak nadajnik użytkować albo
za pomocą dołączonego zasilacza poprzez ładowarkę
lub za pomocą dołączonego zestawu akumulatorowego.
W przypadku zasilania akumulatorowego należy włożyć
zestaw akumulatorowy do skrytki na baterie zgodnie z
opisem znajdującym się w punkcie „Wkładanie zestawu
akumulatorowego do odbiornika“. W przypadku zasilania
sieciowego należy podłączyć zasilacz do gniazda (15)
ładowarki, a odbiornik włożyć do ładowarki.
Wskazówka! W przypadku zasilania sieciowego
niezbędne jest żeby zestaw akumulatorowy
znajdował się w urządzeniu. Bez włożonego zestawu
akumulatorowego odbiornik nie może być użytkowany
poprzez włożenie go do ładowarki.
Za pomocą przełącznika kanałów (13) można wybrać
kanał nadawania (1 lub 2). Zasadniczo nadajnik i
odbiornik, aby mogły spełniać swoją funkcję muszą być
ustawione na ten sam kanał (1 lub 2).
Poprzez przekręcanie regulatora głośności (12) do góry
urządzenie zostaje włączone. Po włączeniu zapala się
dioda LED (9) i informuje użytkownika o gotowości do
pracy. Poprzez dalsze przekręcanie regulatora głośności
(12) można dowolnie ustawić głośność.
Za pomocą dołączonej karty zamówień
można dokonać zakupu dodatkowych
oryginalnych zasilaczy lub też specjalnych zestawów
akumulatorowych.
7.1 Łańcuch z diod świecących
Odbiornik posiada optyczny wskaźnik odbioru (11)
(szereg diod). W momencie przekazywania dźwięku
nie jest on tylko słyszalny, lecz także sygnalizowany
optycznie poprzez szereg diod. Im silniejszy dźwięk tym
więcej diod zapala się.
8. Sprawdzanie działania
Jest to bardzo ważne, aby przed pierwszym użyciem
sprawdzić działanie niani elektronicznej. W tym celu
należy ustawić nadajnik w danym pomieszczeniu u
włączyć np. radio nastawiając umiarkowaną głośność.
Następnie należy ustawić przełącznik czułości (4)
nadajnika na żądany próg zadziałania. Na koniec należy
przejść z odbiornikiem przez pomieszczenia i ustawić
żądaną głośność.
9. Zasięg
Z uwagi na fizyczne warunki przesyłania fal
radiowych, należy określić zasięg nadajnika poprzez
przeprowadzenie prób w danym otoczeniu. W przypadku
optymalnych warunków można otrzymać zasięg do
200 m. Rzeczywisty zasięg zależy jednak głównie
od warunków miejscowych. Należy przy tym np.
uwzględnić lokalizację nadajnika, rodzaj zabudowy oraz
warunki atmosferyczne. Dodatkowo zasięg może być
ograniczony, gdy odbiornik trzymany jest w rękach i jest
on zamknięty.
9.1 Alarm zasięgu
W przypadku, gdy odbiornik znajduje się poza zasięgiem
nadajnika, zostaje to zasygnalizowane użytkownikowi
poprzez sygnał akustyczny przez odbiornik, który
powstaje ok. 55 sekund od chwili przerwania połączenia
z nadajnikiem. Alarm zasięgu powtarza się w rytmie ok.
35 sekund.
Akustyczny alarm zasięgu w odbiorniku zostaje
wyzwolony również wtedy, gdy:
• nadajnik jest wyłączony,
• nadajnik ustawiony jest na innym kanale niż odbiornik,
• nadajnik lub odbiornik pracują w trybie zasilania
bateryjnego lub akumulatorowego z wyczerpanymi
bateriami/akumulatorami.
10. Uchwyt
Nadajnik i odbiornik mogą być przyczepione poprzez
umieszczony z tyłu urządzenia uchwyt do paska spodni
lub do systemu zawieszenia (za pomocą odpowiedniego
materiału mocującego).
11. Wkładanie baterii do nadajnika
Nadajnik może być użytkowany przy użyciu zwykłych
dostępnych w handlu baterii!
1. W celu włożenia/dokonania wymiany akumulatorów/
baterii należy otworzyć skrytkę na baterie
nadajnika poprzez wciśnięcie do dołu zamknięcia i
jednoczesnego przesunięcia pokrywki schowka do
dołu.
2. Wyjąć zużyte akumulatory/baterie z urządzenia.
3. Włożyć naładowane akumulatory lub nowe
baterie przy uwzględnieniu biegunowości (+/-) do
przewidzianych dla nich zagłębień (patrz rycina na
obudowie).
4. Następnie zamknąć schowek na baterie poprzez
wsunięcie pokrywki na obudowę.
2. Cechy szczególne
• przełącznik czułości w nadajniku (High/Low)
• bezstopniowa regulacja głośności w odbiorniku
• optyczny wskaźnik odbioru
• ustawiane 2 różne kanały
• optyczna kontrola stanu baterii w nadajniku i w
odbiorniku
• funkcja dźwięku pilotującego do odbioru bez zakłóceń
• alarm zasięgu
• spełnia wysokie wymagania „Der Blaue Engel“
• zasilacz nadajnika posiada redukcję elektrosmogu
3. Ważne wskazówki
• Przed rozpoczęciem użytkowania niani elektronicznej
należy przeczytać instrukcję obsługi!
• Instrukcja obsługi jest częścią produktu. Zawiera
ona ważne wskazówki potrzebne do uruchomienia i
użytkowania urządzenia.
• Instrukcję obsługi należy starannie przechowywać w
celu ewtl. sprawdzenia wiadomości!
• W przypadku przekazania urządzenia osobom trzecim
musi być ona również przekazana.
4. Wskazówki bezpieczeństwa
W przypadku szkód, które powstają przez
nieprzestrzeganie instrukcji obsługi, wygasa prawo
gwarancyjne! Za powstałe w ich rezultacie następne
szkody nie przejmujemy odpowiedzialności! W
przypadku szkód rzeczowych i zdrowia osób, które
powstały w wyniku nieprawidłowego użytkowania lub
nieprzestrzegania wskazówek bezpieczeństwa, nie
przejmujemy odpowiedzialności. W takich wypadkach
wygasają wszelkie prawa do gwarancji.
5. Elementy obsługi
1
2
3
4 5
6
7
8
9
10
12
13
16
14
15
11
1. Antena nadajnika
2. Wskaźnik pracy
3. Wskaźnik nadawania
4. Przełącznik czułości
5. Wył./przełącznik kanałów
6. Mikrofon
7.
Gniazdo sieciowe
8. Antena odbiornika
9. Wskaźnik pracy
10.
Głośnik
11.
Optyczny wskaźnik odbioru
12.
Wył./wł./regulator głośności
13.
Przełącznik kanałów
14.
Ładowarka
15. Gniazdo sieciowe
16.
Wskaźnik kontroli ładowania
6. Uruchomienie nadajnika
W celu zapewnienia optymalnego nadawania,
nadajnik należy ustawić pionowo w nadzorowanym
pomieszczeniu lub przymocować go za pomocą
odpowiedniego materiału montażowego do ściany.
Nadajnik może być zasilany albo za pomocą
dołączonego zasilacza (TO TRANSMITTER) lub za
pomocą czterech ogniw typu mignon (brak w dostawie).
Przy zasilaniu bateryjnym należy włożyć cztery ogniwa
typu mignon AA do schowka na baterie tak jak jest to
opisane w punkcie „Wkładanie baterii do nadajnika“. Aby
użyć zasilania sieciowego należy podłączyć zasilacz z
napisem TO TRANSMITTER do gniazda (7) odbiornika.
Wskazówka! Zwrócić uwagę na to żeby zasilacz
znajdował się możliwie jak najdalej od dziecka
wykorzystując całkowitą długość podłączenia.
Za pomocą przełącznika przesuwnego (5) urządzenie
zostaje włączone jak też wybrany zostaje jeden z obu
kanałów. W położeniu 1 urządzenie nadaje na kanale 1 i
w pozycji 2 na kanale 2.
Gotowość do pracy wskazywana jest przez zapalającą
się diodę LED (2).
Z chwilą odebrania przez odbiornik szmeru zapala się
dioda LED (3) na czas trwania nadawania.
Wskazówka! Ze względów bezpieczeństwa oraz w
celu optymalnego przekazywania dźwięków zalecamy
ustawienie nadajnika w odległości, co najmniej
1,0 metra od łóżka dziecka. Przednia część urządzenia
powinna być skierowana w stronę nadzorowanej osoby
(np. niemowlęcia). Ponadto należy zwrócić uwagę, żeby
szmery lub dźwięki nie były tłumione przez przeszkody.
Poprzez dołączoną kartę zamówienia można
dokonać zakupu dodatkowych oryginalnych
zasilaczy.
Page 21

-40-
-41-
(połączenie możliwe jedynie w przypadku tego
samego ustawienia).
• Ponieważ urządzenie MBF 3333 działa za pomocą
fal radiowych, nie można wykluczyć, że słyszalne
będą rozmowy innych osób, które za pomocą swoich
urządzeń mogą nadawać rozmowy lub dźwięki, jak też
odbierać sygnały z niani elektronicznej. Urządzenie
MBF 3333 używa jednak takich częstotliwości
nadawania, które w dużym stopniu wykluczają
tego typu zakłócenia. W wyjątkowych przypadkach
stwierdzenia takich zakłóceń, należy przełączyć na
inny kanał (częstotliwość).
• W celu zapewnienia optymalnych możliwości
nadawania/odbioru należy stawiać prosto nadajnik i
odbiornik.
• W przypadku, gdy odbiornik znajduje się za blisko
nadajnika, a jego głośność jest za wysoko nastawiona,
może powstać gwizd (akustyczne sprzężenie zwrotne).
Aby tego uniknąć, należy zwiększyć dystans pomiędzy
nadajnikiem i odbiornikiem.
• Zbyt słabe baterie/akumulatory mogą prowadzić do
powstania szumów w odbiorniku.
• Należy pamiętać, że zakres częstotliwości 40-MHz nie
daje pełnego zabezpieczenia przed podsłuchem.
20. Ważne informacje
• Do zasilania urządzeń należy używać tylko
oryginalnych zasilaczy. W przypadku, gdy jeden z
zasilaczy ulegnie uszkodzeniu, należy skierować
się do specjalistycznego sprzedawcy. W przypadku
użycia innych zasilaczy może na skutek odwrócenia
biegunowości (+/-) lub zbyt wysokiego napięcia dojść
do znacznego uszkodzenia urządzeń.
• Uszkodzony zasilacz nie może zostać naprawiony.
Kabel zasilający nie może być wymieniony, w tym
wypadku zasilacz musi zostać natychmiast usunięty.
• W przypadku wyjmowania zasilaczy z gniazd
zasilających oraz niani elektronicznej nie należy
ciągnąć za kabel, lecz chwytać za wtyczki lub obudowę
w celu niedopuszczenia do uszkodzenia kabla przez
jego pękniecie lub zerwanie.
• Nie należy umieszczać nadajnika w łóżeczku dziecka
lub w kojcu.
• Urządzenia należy umieszczać poza zasięgiem małych
dzieci.
• W przypadku, gdy jedno lub oba urządzenia zasilane
są bateriami/akumulatorami, ich moc odbiorcza
i nadawcza jest nieco mniejsza niż w przypadku
zasilania poprzez zasilacze.
• Dołączone są dwa zasilacze, które umożliwiają
podłączenie nadajnika i odbiornika do każdego
gniazda zasilającego (230 Volt/50 Hz).
• W przypadku dłuższego przerwania pracy, zalecamy
wyjęcie baterii/akumulatorów, ponieważ zużyte
baterie/akumulatory krystalizują się i mogą
spowodować uszkodzenia.
21. Wskazówka dotycząca usuwania odpadów
Zużyte urządzenia, które oznaczone są podanym
na rysunku symbolem, nie mogą być usuwane
wraz z odpadami domowymi.
Zużyte baterie i akumulatory,
które oznaczone są
symbolem podanym na
rysunku nie mogą być usuwane z odpadami domowymi.
Powinny być one oddane w punkcie odbioru starych
urządzeń, baterii lub odpadów specjalnych (Prosimy o
poinformowanie się w urzędzie gminy) lub u sprzedawcy,
u którego zostały one nabyte. Zostaną one tam usunięte
w sposób przyjazny dla środowiska.
22. Pielęgnacja i gwarancja
Jeśli to konieczne przed czyszczeniem oddzielić
urządzenie od innych urządzeń. Prosimy nie stosować
agresywnych środków czyszczących.
Urządzenie zostało poddane dokładnej kontroli
końcowej. W razie zaistnienia podstaw do reklamacji,
prosimy o przesłanie do nas urządzenia wraz z dowodem
zakupu. Zapewniamy prawa gwarancyjne na okres 3 lat
od daty zakupu.
Za szkody powstałe wskutek nieprawidłowego użycia lub
zużycia nie ponosimy odpowiedzialności.
Zmiany techniczne zastrzeżone.
Brak gwarancji dla akumulatorów/zestawów
akumulatorowych lub baterii!
23. Dane techniczne
Częstotliwości
Częstotliwość nośna kanał 1: 40,670 MHz
Częstotliwość nośna kanał 2: 40,690 MHz
Promieniowanie wysokiej częstotliwości
maksymalna
moc
nadajnikag
(EIRP)
górna wartość
graniczna w mW
zmierzona wartość
rzeczywista w mW
1,25 0,0631
Promieniowanie niskiej częstotliwości
zakres
częstotliwości
indukcja magnetyczna*
górna wartość
graniczna w nT
zmierzona wartość
rzeczywista w nT
0,025-0,8 KHz 5/f 0,09
0,8-3 KHz 6,25 0,21
3-150 KHz
6,25 0,36
* w przypadku odstępu pomiarowego wynoszącego 30 cm
12.
Wkładanie zestawu akumulatorowego do odbiornika
W celu włożenia/dokonania wymiany akumulatorów/
baterii należy otworzyć skrytkę na baterie odbiornika
poprzez wciśnięcie do dołu zamknięcia i jednoczesnego
przesunięcia pokrywki schowka do dołu. Włożyć
naładowane akumulatory lub nowe baterie przy
uwzględnieniu biegunowości (+/-) do przewidzianych
dla nich zagłębień (patrz rycina na obudowie). Zamknąć
pokrywkę schowka na baterie w odwrotnej kolejności, aż
do słyszalnego zatrzaśnięcia się.
13. Kontrola baterii
W przypadku, gdy przy zasilaniu bateryjnym-/
akumulatorowym, napięcie baterii jest niewystarczające
informacja o tym pokazywana jest zarówno na nadajniku
jak też odbiorniku.
W przypadku zbyt niskiego napięcia roboczego, zmienia
się kolor wskaźnika pracy nadajnika (2) i w odbiorniku (9)
z zielonego na czerwony.
14.
Ładowanie zestawu akumulatorowego w odbiorniku
• W celu naładowania zestawu akumulatorowego w
odbiorniku należy odpowiedni zasilacz podłączyć do
gniazda (15) ładowarki.
• Z chwilą podłączenia zasilacza do ładowarki (14),
a odbiornik znajduje się w ładowarce, rozbłyskuje
ona 5 razy na zielono/czerwono. W tym czasie
sprawdzony zostaje zestaw akumulatorowy. Następnie
automatycznie rozpoczyna się ładowanie, co
wskazywane jest przez migającą na czerwono diodę
LED (16) znajdującą się w ładowarce.
• Czas ładowania w przypadku całkowicie
rozładowanego zestawu akumulatorowego i
wyłączonym urządzeniu wynosi ok. 12 godzin.
• W przypadku, gdy odbiornik w trakcie ładowania jest
włączony, czas ładowania podwaja się.
• Po zakończonym ładowaniu urządzenie może
pozostać w ładowarce (14). Przeładowanie zestawu
akumulatorowego jest technicznie wykluczone.
• Dioda LED (16) przy wyłączonym odbiorniku i
zakończonym ładowaniu przełącza się automatycznie
na zielono.
Wskazówki! Uszkodzone zestawy akumulatorowe należy
wymieniać na oryginalne zestawy akumulatorowe. W
tym urządzeniu nie można ładować/użyć normalnych
akumulatorów/baterii typu mikro AAA.
Szczególnie do czuwania nocnego zalecamy
użytkowanie obu urządzeń poprzez zasilanie sieciowe
za pomocą dołączonych zasilaczy, w celu zapewnienia
prawidłowego nadzoru. W normalnym trybie zasilania
akumulatorowego może w trakcie nocy w zależności
od stopnia naładowania rozlec się alarm zasięgu, który
niepotrzebnie obudzi osobę czuwającą.
15. Ładowanie akumulatorów nadajnika
W przypadku, gdy nadajnik użytkowany jest poprzez
zasilanie akumulatorowe oraz doszło do rozładowania
akumulatorów, należy jest usunąć z urządzenia i
naładować w osobnej ładowarce, ponieważ nadajnik nie
posiada funkcji ładowania.
16. Technika 40-MHz
Urządzenie pracuje w zakresie częstotliwości 40-MHz w
którym wykluczone są zakłócenia przez nadajniki CB.
17. Dźwięk pilotujący
Bezpieczeństwo nadawania oraz odporność na
zakłócenia niani elektronicznej zostaje dodatkowo
zwiększona poprzez zastosowanie niesłyszalnego dla
ucha ludzkiego dźwięku pilotującego, który sprawdził
się już praktycznie. Ten dźwięk pilotujący powoduje, że
odbiornik włącza się tylko wtedy, gdy otrzymuje sygnały
ze swojego nadajnika, np. od nadzorowanego dziecka.
W rzadkim przypadku, że w trakcie nadawania występują
zakłócenia z innego źródła nadawania z zakresu 40 MHz,
istnieje możliwość przełączenia kanału.
18.
Wskazówki dotyczące ekologicznego użytkowania
• W trakcie użytkowania akumulatorów/baterii można
całkowicie uniknąć powstania pól elektrycznych i
magnetycznych.
• W przypadku nieużywania niani elektronicznej
prosimy o wyłączenie zasilaczy z gniazd zasilania
w celu uniknięcia powstania pól elektrycznych,
magnetycznych i elektromagnetycznych. Ponadto
można zaoszczędzić sobie kosztów, ponieważ
zasilacze zużywają prąd również wtedy, gdy tylko są
podłączone do gniazda zasilania sieci.
Wskazówki dotyczące pól wysokiej i niskiej
częstotliwości:
Badania naukowe dotyczące możliwych zagrożeń dla
zdrowia przez pola elektromagnetyczne o wysokiej i
niskiej częstotliwości nie można było dotąd dowieść
jednoznacznej zależności pomiędzy przyczynami
i skutkami. Niektóre badania wykazują jednak na
możliwość powstawania ryzyka zdrowotnego. Z uwagi na
zapobieganie temu, należy używać wszelkich możliwości
technicznych, aby narażenie się na działanie pól
wysokiej i niskiej częstotliwości szczególnie u wrażliwych
na warunki otoczenia niemowląt i małych dzieci było jak
najmniejsze.
19. Wskazówki w przypadku usterek
• W przypadku, gdy nadajnik i odbiornik nie działają,
sprawdzić zasilanie.
• W przypadku braku połączenia pomiędzy nadajnikiem
i odbiornikiem, należy sprawdzić ustawienie kanałów
nadawczych-/ odbierających w obu urządzeniach
Page 22

-42-
-43-
Pobór mocy nadajnika
tryb
górna wartość
graniczna w
W
zmierzona wartość
rzeczywista w W
wyłączony
nadzór
2 0,53
pomieszczenia
1 0,38
Sprawdzenie zasięgu
Częstośc sygnału nadajnika: 1 x po 55 sekundach,
następnie, co 35 sekund
Czas trwania sygnału nadawania: < 20 mS
Napięcie robocze
Nadajnik: 6 V DC, za pomocą czterech baterii/
akumulatorów mignon (AA) lub za pomocą zasilacza
Napięcie robocze
Odbiornik: 3,6 V DC, za pomocą zestawu
akumulatorowego lub zasilacza (należy do dostawy)
maks. zasięg
200 metrów w zależności od warunków miejscowych
Zasilacz wtykowy
Nadajnik: 9 V DC, 200 mA pierwotnie; 100-240 V AC/ 5060 Hz wtórnie
Odbiornik: 6 V DC, 300 mA pierwotnie; 230 V AC/50 Hz
wtórnie
Aktualne informacje o produkcie znajdziecie Państwo na naszej
stronie internetowej http://www.hartig-helling.de
Vážený zákazníku,
Vámi zakoupený přístroj Babymonitor pro
monitorování dětí a nemocných H+H- Babyruf
MBF 3333 byl vyroben v souladu s licencí udělenou
pro ekologický výrobek označený „Der Blaue En-
gel“. Tímto MBF 3333 ve srovnání s dřívějšími
přístroji pro děti podléhá zvláštním směrnicím s
ohledem na ochranu životního prostředí, zdraví a
ochranu spotřebitele. Zvláště jsme při vývoji tohoto
výrobku brali ohled na extrémně nepatrné zatížení
zářením a na optimální spotřebu energie. Dále
se u materiálů použitých při výrobě dbá na na co
nejpřesnější dodržení všech zákonných požadavků.
MBF 3333 se hodí ideálně pro dohled nad malými
dětmi, kojenci, batolaty, nebo nad osobami
vyžadujícími péči. Aby mohlo být vaše dítě
ochráněno před elektrosmogem, splňuje tento
přístroj pro monitorování dětí náročné požadavky
„Der Blaue Engel“. Navíc je vysílač napájen
elektronickým zdrojem, takže oproti původním
napájecím zdrojům zde nebude vaše dítě vystaveno
zatížení z napájení z elektrické sítě.
MBF 3333 se skládá z vysílače, přijímače,
akumulátorové jednotky pro přijímač, nabíječky a
dvou napájecích jednotek (230 V stř. proud/50 Hz).
Váš monitorovací přístroj funguje na dvou různých
frekvencích (kanálech) v 40-MHz-frekvenčním
rozsahu a poskytuje takto pohodlí optimální kvality
přenosu. Můžete vysílač a přijímač provozovat
nezávisle na síti pomocí baterií/akumulátorů.
Vysílač je napájen čtyřmi tužkovými bateriemi/
akumulátory AA (nejsou zahrnuty v dodávce),
přijímač je napájen akumulátorovou jednotkou
(3,6 V stejn. proud, zahrnuta v dodávce). Pokud
se rozhodnete pro provoz s připojenými síťovými
zdroji, není nutné baterie/akumulátory odstraňovat
z přístrojů. Provoz na baterii, popř. akumulátor se
automaticky přeruší.
1. Rozsah dodávky
1 x vysílač
1 x přijímač
1 x speciální akumulátorová jednotka pro přijímač
1 x nabíječka pro přijímač
1 x elektronický napájecí zdroj pro vysílač
1 x napájecí zdroj pro přijímač
1 x návod k použití
2. Zvláštní vybavení
• přepínač citlivosti na vysílači (vysoká/nízká)
• stupňová regulace hlasitosti na přijímači
• optické zobrazení příjmu
• 2 různě nastavitelné kanály
• optická kontrola baterie na vysílači a přijímači
• funkce řídicího tónu pro bezporuchový příjem
Návod na obsluhu
Přehled
1. Rozsah dodávky .................................................43
2. Zvláštní vybavení .............................................43
3. Důležité pokyny ..............................................44
4. Bezpečnostní pokyny .......................................44
5. Obslužné prvky ................................................44
6. Uvedení vysílače do provozu .............................44
6.1 Přepnutí citlivosti .........................................44
7. Uvedení přijímače do provozu ...........................44
7.1 Řetěz světelných diod ..................................45
8. Kontrola funkce ...............................................45
9. Dosah ............................................................45
9.1 Alarm dosahu .............................................45
10. Spony .............................................................45
11. Vkládání bateriíí do vysílače ..............................45
12. Vkládání akumulátorové jednotky pro přijímač .....45
13. Kontrola baterií ................................................45
14. Nabíjení akumulátorové jednotky v přijímači ........45
15. Nabíjení akumulátorů vysílače ...........................46
16. Technika nosného kmitočtu 40 MHz ...................46
17. Pilotní tón .......................................................46
18. Doporučení pro ekologické použití .....................46
19. Tipy a nápady pro případ poruchy ......................46
20. Důležité informace ...........................................46
21. Pokyn pro likvidaci ...........................................47
22. Údržba a záruka ...............................................47
23. Technické údaje ..............................................47
Page 23

-44-
-45-
• poplach dosahu
• splňuje náročné požadavky „Der Blaue Engel“
• u napájecího zdroje vysílače je redukován elektrosmog
3. Důležité pokyny
• Před používáním dětské chůvy si pročtěte návod k
obsluze!
• Návod k obsluze je částí výrobku. Obsahuje důležité
pokyny k uvedení do provozu a manipulaci s
přístrojem.
• Uschovejte přiložený návod k obsluze tak, abyste si jej
kdykoliv mohli znovu přečíst!
• Při postoupení přístroje třetí osobě musí být s ním
předán i tento návod.
4. Bezpečnostní pokyny
Při škodách, způsobených nedodržením návodu, zaniká
nárok na poskytnutí záruky! Za následné škody z toho
plynoucí nepřebíráme žádnou záruku! Při škodách na
majetku nebo škodách na zdraví osob, způsobených
neodbornou manipulací nebo nedodržováním
bezpečnostních předpisů, nepřebíráme žádné ručení.
V takových případech zaniká jakýkoliv nárok na záruku.
5. Obslužné prvky
1
2
3
4 5
6
7
8
9
10
12
13
16 14
15
11
1. Anténa vysílače
2. Indikátor provozního stavu
3. Indikátor přenosu vysílání
4. Přepínač citlivosti
5. Výběrový přepínač/přepínač kanálů
6. Mikrofon
7.
Síťová zdířka
8. Anténa přijímače
9. Indikátor provozního stavu
10.
Reproduktor
11.
Optické zobrazení příjmu
12. Vypínač/Zapínač hlasitosti, regulátor hlasitosti
13.
Přepínač zvolených kanálů
14.
Nabíječka
15.
Síťová zdířka
16.
Kontrolní zobrazení stavu nabíjení
6. Uvedení vysílače do provozu
Pro zaručení optimální kvality přenosu umístěte vysílač
kolmo v kontrolovaném prostoru, nebo ho upevněte
potřebným montážním materiálem na stěnu.
Můžete vysílač provozovat buď pomocí přiloženého
napájecího zdroje (TO TRANSMITTER), nebo pomocí
čtyř tužkových baterií (nejsou součástí dodávky). Pro
provoz na baterie vložte, prosím, čtyři tužkové baterie
AA do prostoru pro baterie tak, jak je popsáno ve
„Vkládání baterií do vysílače“. Pro provoz na síť napojte
napájecí zdroj s popisem TO TRANSMITTER do zdířky
(7) vysílače.
Doporučení! Dávejte pozor na to, aby zvláště napájecí
zdroj byl co možná nejdále od vašeho dítěte a využijte
kompletní délku napojení.
Pomocí posuvného vypínače (5) se zapne přístroj a
zároveň navolí také jeden z obou přenosových kanálů.
V poloze 1 přístroj přenáší na kanál 1 a v poloze 2 na
kanál 2.
Připravenost k provozu se zobrazí pomocí rozsvícené
LED diody (2).
Jakmile uslyší zařízení zvuk/šum z vysílače, rozsvítí se
LED dioda (3)po dobu přenosu.
Doporučení! Z bezpečnostních důvodů a z důvodu
optimálního přenosu zvuku vám doporučujeme, abyste
minimální vzdálenost 1,0 metru mezi vysílačem a postelí
vašeho dítěte nezkracovali. Přední strana přístroje
by měla být obrácena co možná nejvíce ve směru k
osobě, která je monitorována (např. vaše dítě). Proto
je nutné dávat pozor na to, aby zvuky, popř hluk nebyly
přerušovány překážkami.
Pomocí přiloženého objednacího lístku můžete
objednat další originální napájecí zdroje.
6.1 Přepnutí citlivosti
Pomocí přepínače citlivosti (4) na pravé straně vysílače
se nastaví citlivost mikrofonu.
MIC LOW = vysílač je nastaven na nízkou citlivost
MIC HIGH = vysílač je nastaven na vysokou citlivost
Doporučení! Pojem citlivost označuje práh rozlišitelnosti
vysílače. Měla by být individuálně přizpůsobena místním
podmínkách.
7. Uvedení přijímače do provozu
Umístěte přijímač v místnosti, ve které se budete
nacházet, nebo ho upevněte pomocí odpovídajícího
montážního materiálu na stěnu.
Přijímač můžete stejně jako vysílač provozovat pomocí
přiloženého napájecího zdroje přes nabíječku, nebo
pomocí přiložené akumulátorové jednotky.
Pro provoz na baterie vložte, prosím, akumulátorovou
jednotku do prostoru na baterie tak, jak bylo uvedeno
u „Vkládání akumulátorové jednotky pro přijímač". Pro
síťový provoz napojte napájecí zdroj do zdířky (15)
nabíječky a nasaďte přijímač na nabíječku.
Doporučení! Pro síťový zdroj je nezbytně nutné, aby
akumulátorová jednotka zůstala v přístroji, bez vložené
akumulátorové jednotky nelze mít přijímač v provozu
přes nabíječku.
Pomocí přepínače kanálů (13) navolíte přenosový kanál
(1 nebo 2). V zásadě musí být provoz vysílače a přijímače
nastaven na stejný kanál (1 nebo 2).
Otáčením regulátoru hlasitosti (12) směrem nahoru se
přístroj zapne. Po zapnutí se rozsvítí LED dioda (9) a
zobrazí vám připravenost k provozu. Dalším otočením
regulátoru hlasitosti (12) pak můžete sílu hlasitosti
libovolně nastavit.
Prostřednictvím přiloženého objednávkového
lístku můžete obdržet dodatečné originální
napájecí zdroje a také akumulátorové jednotky.
7.1 Řetěz světelných diod
Přijímač je opatřený světelnou indikací příjmu (11)
(řetězec svíticích diod LED). Jakmile dojde k přenosu
ruchu, budete jej vnímat nejen akusticky, ale i opticky
pomocí řetězce svíticích diod LED. Čím silnější je
přijímaný ruch, tím více diod se rozsvítí.
8. Kontrola funkce
Je velmi důležité, abyste před prvním použitím dětské
chůvy zkontrolovali její funkčnost. Postavte k tomu účelu
svůj vysílač do požadované místnosti a nastavte např.
rádiový přijímač na pokojovou hlasitost.
Poté nastavte přepínačem citlivosti (4) vysílač na
požadovanou prahovou citlivost. Nakonec projděte se
svým přijímačem příslušnými místnostmi a nastavte
požadovanou hlasitost.
9. Dosah
Na základě fyzikálních podmínek šíření rádiových vln
musíte dosah své dětské chůvy ve svém okolí zjistit
odzkoušením. Při optimálních podmínkách je dosah až
200 m. Skutečný dosah závisí ale především na místních
podmínkách a poměrech. Tak je třeba brát do úvahy
např. místo, kde se nachází vysílač, druh zastavění
nebo atmosférické podmínky. Navíc může dojít k
omezení dosahu, pokud držíte přijímač v rukou a tím jej
překrýváte.
9.1 Alarm dosahu
Pokud se přijímač nachází mimo dosah vysílače,
obdržíte akustický signál dosahu, a sice asi 55 vteřin po
přerušení spojení k vysílači. Poplachový signál dosahu
se bude stále opakovat v rozmezí asi 35 vteřin.
Akustický signál dosahu přijímače se pak také spustí,
pokud:
• je vysílač vypnut,
• bude vysílač přepnutý na jiný kanál, než je nastavený
přijímač,
• vysílač, nebo přijímač bude v provozu na akumulátory/
baterie s prázdnými akumulátory/bateriemi.
10. Spony
Vysílač a přijímač lze pomocí spon na zadní straně
upevnit na opasek nebo na závěsné zařízení (vhodně
připevnit na zeď).
11. Vkládání bateriíí do vysílače
Vysílač lze provozovat také s původními bateriemi!
1. Za účelem vložení, popř. výměny akumulátorů/
baterií otevřete prostor pro baterie vysílače tak,
že zablokování stlačíte směrem dolů a současně
vysunete směrem nahoru kryt prostoru pro baterie.
2. Odeberte vybité akumulátory/baterie z přístroje.
3. Vložte pouze nabité akumulátory, nebo nové baterie
při dodržení požadované polarity (+/-) do pro ně
určených žlábků (viz označení na plášti).
4. Poté uzavřete prostor pro baterie tak, že kryt
prostoru pro baterie opět posunete na pouzdro.
12. Vkládání akumulátorové jednotky pro přijímač
Pro vložení, popř. výměnu akumulátorové jednotky
otevřete prostor pro baterie přijímače tak, že stlačíte
zablokování směrem dolů a současně kryt prostoru
pro baterie posunete směrem dolů. Vložte nyní
akumulátorovou jednotku s dodržením polarity (+/-) do
k tomu určených žlábků (viz označení na plášti).Uzavřete
kryt prostoru pro baterie v opačněm pořadí provedených
kroků až dokud slyšitelně nezapadne.
13. Kontrola baterií
Pokud při bateriovém/akumulátorovém režimu již napětí
baterií není dostačující, indikuje se Vám tento stav jak u
vysílače tak i u přijímače.
Při příliš nízkém provozním napětí se změní barva
indikátoru provozního stavu u vysílače (2) a u přijímače
(9) ze zelené na červenou.
14. Nabíjení akumulátorové jednotky v přijímači
• Pro nabíjení akumulátorové jednotky v přijímači
napojte, prosím, odpovídající napájecí zdroj na zdířku
(15) v nabíječce.
• Jakmile je napájecí zdroj spojen s nabíječkou(14) a
přijímač se nachází v nabíjecí stanici, zabliká nabíječka
Page 24

-46-
-47-
• Vadný síťový adaptér nelze opravit. Přívodní kabel
nelze vyměnit a tak je třeba síťový adaptér neprodleně
zlikvidovat.
• Při vytahování síťových adaptérů ze zásuvek a z dětské
chůvy netahejte za kabel, ale síťové adaptéry uchopte
za zástrčky nebo pouzdra a vytáhněte je, abyste
zabránili zlomení nebo vytržení kabelu.
• Neumisťujte vysílač v dětské postýlce nebo v místě,
kde se dítě batolí.
• Umisťujte přístroje vždy mimo dosah malých dětí.
• Pokud je jeden nebo oba přístroje napájeny z baterií/
akubaterií, pak je výkon přijímače a vysílače oproti
napájení přes síťové adaptéry poněkud menší.
• Jsou přiloženy dva síťové adaptéry, abyste vysílač a
přijímač mohli připojit do každé zásuvky (230 Volt/
50 Hz).
• V případě, že přístroje budou delší dobu mimo provoz,
doporučujeme, abyste baterie/akubaterie vyndali,
protože vybité baterie/akubaterie krystalizují a mohou
způsobit škody.
21. Pokyn pro likvidaci
Staré přístroje, označené vyobrazeným
symbolem, se nesmějí likvidovat s domovním
odpadem.
Vybité baterie a akumulátory
(aku), označené jedním z
vyobrazených symbolů, se
nesmějí likvidovat s domovním odpadem.
Musíte je odevzdat do sběrného dvora pro staré
přístroje, vybité baterie resp. nebezpečný odpad
(informujte se prosím ve Vaší obci) nebo u Vašeho
obchodníka, u něhož jste je koupil. Ti mají na starosti
jejich ekologickou likvidaci.
22. Údržba a záruka
Žárovku před čištěním odpojte od jiných komponentů a
na čištění nepoužívejte agresivní čistidla.
Žárovka byla podrobena přísné výstupní kontrole.
Vznikne-li přesto důvod pro reklamaci, zašlete nám
žárovku spolu s dokladem o zaplacení. Na výrobek
poskytujeme 3 roční záruku od datumu prodeje.
Neručíme za škody způsobené nesprávnou manipulací,
používáním anebo opotřebením.
Technické změny vyhrazeny.
Žádná záruka na akumulátory/akumulátorové jednotky
a baterie!
23. Technické údaje
Frekvence
Nosná frekvence kanál 1: 40,670 MHz
Nosná frekvence kanál 2: 40,690 MHz
Vysocefrekvenční záření
maximální
vysílaný výkon
(EIRP)
maximální mezní
hodnota v mW
naměřená
skutečná hodnota
v mW
1,25 0,0631
Nízkofrekvenční záření
frekvenční
rozsah
magnetická indukce*
maximální mezní
hodnota v nT
naměřená
skutečná hodno-
ta v nT
0,025-0,8 KHz 5/f 0,09
0,8-3 KHz 6,25 0,21
3-150 KHz
6,25 0,36
* při vzdálenosti měření 30 cm
Příkon vysílače
režim
maximální mezní
hodnota v W
naměřená
skutečná hodno-
ta v W
kontrola
místnosti
2 0,53
vypnuto
1 0,38
Kontrola dosahu
Četnost vysílaného signálu: 1 x po 55 vteřinách, poté
každých 35 vteřin
Délka vysílaného signálu: < 20 mS
Provozní napětí
Vysílač: 6 V stejn. proud, se čtyřmi tužkovými bateriemi/
akumulátory (AA), nebo s napájecím zdrojem
Přijímač: 3,6 V stejn. proud, s akumulátorovou
jednotkou, nebo s napájecím zdrojem (obsaženo v rámci
dodávky)
max. dosah
200 metrů podle místních poměrů
Napájecí zdroj se zástrčkou
Vysílač: 9 V DC, 200 mA sekundární; 100-240 V stejn.
proud/ 50-60 Hz primární
Přijímač: 6 V DC, 300 mA sekundární 230 V stejn. proud /
50 Hz primární
Jakékoliv informace o produktech najdete na naší internetové
stránce http://www.hartig-helling.de
5-krát zeleně/červeně. V této době se akumulátorová
jednotka prověřuje. Poté začne automatické nabíjení
a zobrazí se vám to na nabíječce pomocí červeně
blikajícího LED signálu(16).
• Doba nabíjení činí u zcela vybité akumulátorové
jednotky a vypnutého přístroje asi 12 hodin.
• Pokud je přijímač během této doby nabíjení zapnutý,
zdvojnásobí se uvedená doba nabíjení.
• Po dokončeném nabíjení můžete přístroj ponechat v
nabíjecí stanici (14). Přebití akumulátorové jednotky je
technicky vyloučeno.
• Signálka LED (16) se u vypnutého přijímače po
dokončeném nabití automaticky přepne na zelené
signální světlo.
Doporučení! Vadné akumulátorové jednotky vyměňte za
originální akumulátorové jednotky. U tohoto přístoroje
pro monitorování dětí nelze nabíjet, eventuálně použít
běžné mikročlánky/baterie AAA.
Zvláště pro noční monitorování doporučujeme
provozovat oba přístroje pomocí s přístrojem dodaných
napájecích zdrojů, aby se zajistil bezporuchový provoz
monitorování. V běžném provozu na akumulátory může
dojít v noci v závislosti na stavu nabití k poplachu dosahu
a tím k vašemu nežádoucímu probuzení.
15. Nabíjení akumulátorů vysílače
Pokud vysílač provozujete na akumulátory a dojde k
jejich vyprázdnění, musíte je odejmout z přístroje a znovu
nabít v oddělené nabíječce, potože vysílač nedisponuje
možností nabíjení.
16. Technika nosného kmitočtu 40 MHz
Zařízení pracuje ve frekvenční oblasti 40 MHz, v níž je
rušení ze strany radioamatérů, využívajících pásmo CB,
vyloučeno.
17. Pilotní tón
Bezpečnost rádiového přenosu a nerušení provozu
této dětské chůvy se dodatečně zlepší pilotním tónem,
který neslyšíte a jenž se v praxi osvědčil. Tento pilotní
tón způsobuje, že přijímač se zapíná pouze poté, pokud
dojde k vysílání (přenosu) ruchů vlastním vysílačem,
např. od hlídaného dítěte.
V případě, který nastává jen zřídka, kdy jste během
vysílání rušeni jinými zdroji signálů z frekvenčního pásma
40 MHz, máte možnost přepnout na jiný kanál.
18. Doporučení pro ekologické použití
• Při používání akumulátorů/baterií můžete zcela
zamezit vzniku elektrického a magnetického pole.
• Pokud nebudete přístroj pro monitorování dětí
používat, tak vytáhněte zdroj napájení ze zásuvky,
aby se zamezilo vzniku elektrického, magnetického a
elektromagnetického pole. Kromě toho můžete takto
ušetřit náklady, protože napájení ze sítě spotřebovává
rovněž energii, i když je přístroj jen zastrčen do zásuvky
sítě.
Doporučení pro vysokofrekvenční a nízkofrekvenční
pole:
Ve vědeckých studiích týkajících se možného ohrožení
zdraví nebylo doposud možné dokázat jednoznačnou
souvislost mezi účinkem vysokofrekvenčních a
nízkofrekvenčních elektromagnetických polí. Avšak z
několika studií vyplynuly odkazy na možná zdravotní
rizika. Z preventivních důvodů by se měly využít
všechny technické znalosti pro snížení možnosti
vystavení organismu vůči vysokofrekvenčnímu a
nízkofrekvenčnímu poli – a to právě u tak zvláště
citlivých jedinců jako jsou kojenci, batolata a malé děti
– a proto je nutné udržovat vystavení tomuto působení
na co možná nejnikratší dobu.
19. Tipy a nápady pro případ poruchy
• Pokud vysílač nebo přijímač nefungují, zkontrolujte
prosím napájení.
• Pokud mezi vysílačem a přijímačem nedochází k
přenosu signálu, zkontrolujte prosím vysílací a přijímací
kanály u obou přístrojů (pouze při shodě je možné
navázat spojení).
• Protože MBF 3333 pracuje na bázi rádiových vln, nelze
vyloučit, že můžete slyšet hovory jiných účastníků
radiotelefonní sítě a že jiní účastníci radiotelefonní
sítě rovněž mohou přijímat hovory nebo ruchy, které
vysílá Váš vysílač. MBF 3333 však používá kmitočtová
přenosová pásma, jež takové rušení dalekosáhle
vylučují. Pokud však přesto ve výjimečných případech
takové rušení zjistíte, přepněte na jiný kanál
(frekvenci).
• Pro zaručení optimálních možností vysílání a příjmu je
třeba vysílač a přijímač postavit do svislé polohy.
• Pokud se přijímač nachází příliš blízko u vysílače a
jeho hlasitost je vysoká, může vzniknout hvízdavý tón
(feedback, akustická zpětná vazba). Abyste se tomu
vyhnuli, měli byste zvětšit vzdálenost mezi vysílačem a
přijímačem.
• Příliš slabé baterie/akubaterie mohou vést u přijímače
ke vzniku šumu.
• Uvědomte si prosím, že ve frekvenční oblasti 40 MHz
neexistuje žádná obecná ochrana vůči odposlechu.
20. Důležité informace
• Pro provoz přístrojů používejte prosím pouze
originální síťové adaptéry. Pokud by byl jeden ze
síťových adaptérů vadný, obraťte se prosím na svého
specializovaného prodejce. Při používání jiných
síťových adaptérů může při nedodržování polarity
(+/-) a hodnoty napětí dojít ke značnému poškození
přístrojů.
 Loading...