

Hart & Cooley TLC User Manual

Model TLC
Installation Instructions
Sheet
Covering - Deluxe Rain Cap, Flashing,
S-3
Read Sheet GS for important clearance and safety precautions before installing
any of the parts described in this sheet. Sheet GS is packaged with supports.
Some Model TLC deluxe rain caps have a nominal inch
diameter expanding utility attachment adaptable to Model
TLC Chimney and other products of like internal diameter.
To attach securely:
1. Loosen screw on top of collar and squeeze bottom to
allow collar to enter pipe.
2. Press down evenly on lower skirt until it contacts upper
end of pipe.
3. Tighten screw on collar to expand lower end, and clamp
to inside of pipe. Keep tightening screw until collar is
expanded and fully tight.
Storm Collar, Spark Arrester
IMPORTANT: 10” to 14” are non-HT.
WARNING
Failure to follow these Installation Instructions could cause FIRE,
CARBON MONOXIDE POISONING, OR DEATH. If you are unsure
of installation requirements, call the phone number listed on the
back of these instructions.
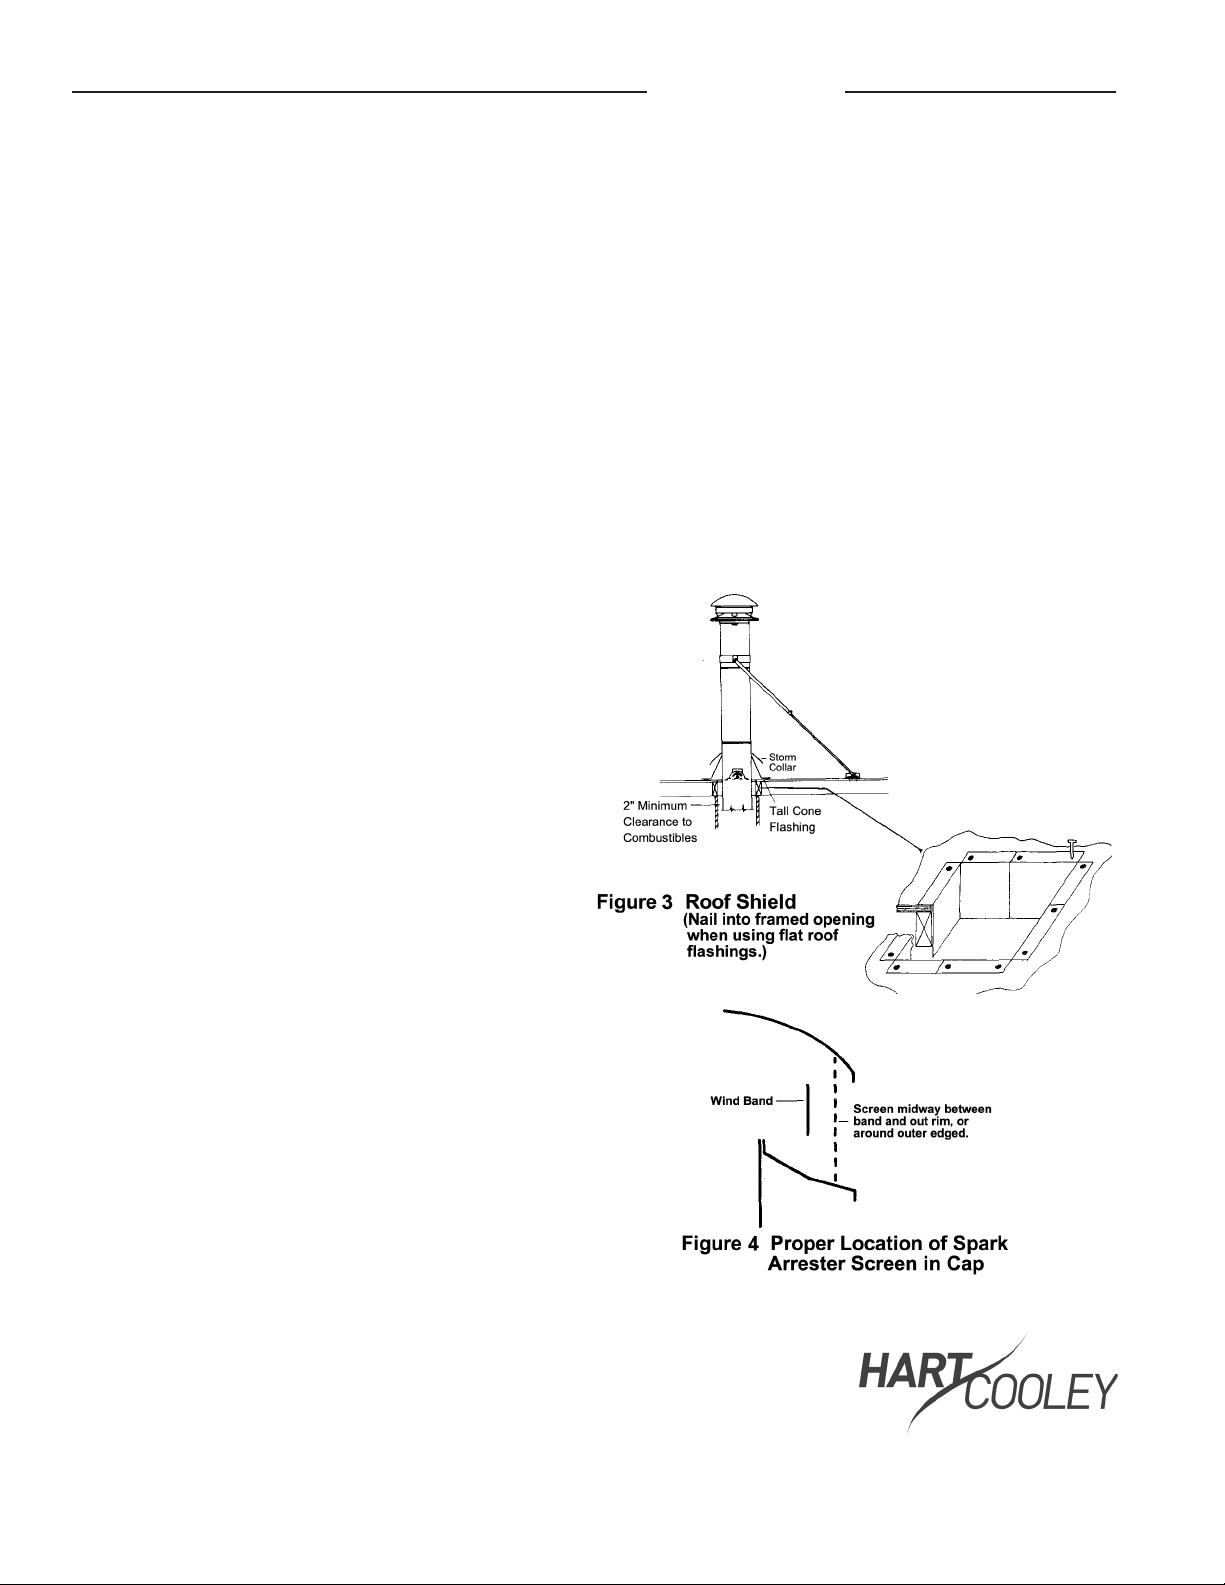
STORM COLLAR
Model TLC Chimney flashings are provided with screened
ventilation openings or slots at the top of the cone. In
service, these openings are protected from rain by the storm
collar. DO NOT SEAL THESE OPENINGS. Make sure the
openings are not obstructed when installing the storm
collar.
In unoccupied attics, the flashing termination will provide a
small amount of ventilation. If this ventilation is not desired,
the underside of the roof or ceiling may be trimmed and
closed with a pitched ceiling plate or a fitted metal plate. All
Model TLC Chimney flashings have adequate interior space
for a roof support. See Sheet S-4 for roof support details.
If you are installing a chimney with flashing and storm collar,
follow these steps:
1 Finish the chimney to its desired height. Maintain a
2-inch clearance to combustibles where the chimney
passes through the roof.
2. Place the flashing suitable for the roof pitch over the
chimney pipe, and nail securely to the roof through side
and top flanges. (DO NOT nail through lower flange.)
Use nails with a neoprene washer, or cover the nail
heads with a waterproof mastic.
Hart & Cooley, Inc.
3. Finish roofing around chimney, covering the side and
upper areas of the flange with roofing material. However,
be sure the lower unnailed portion of the flange covers
the roofing material. See Figure 2.
4. Place the storm collar down over the chimney until it
touches the flashing. Tighten the adjusting screws or
tabs until the storm collar fits snugly against the pipe.
Work in a waterproof mastic between the pipe and the
storm collar. (Roof shield included with tall cone flashing.
See Figure 3.)
BRACING REQUIREMENTS WHEN USING ROUND
CHIMNEY ASSEMBLY
These requirements apply to roof-supported chimneys, using
the roof support, and to chimneys supported below the roof.
1. Up to four feet of chimney above the roof.
a. NO bracing required above roof;
1
Model TLC Covering - Covering - Deluxe Rain Cap Installation Instructions
b. BUT a roof-supported chimney must be stabilized
below the roof by a pitched ceiling plate.
c. Normally a chimney will be stabilized by its support
or firestop below.
REGARDLESS of height, if the chimney cannot be
stabilized below the roof, use the universal roof brace kit,
or construct a suitable bracing system.
2. Over 5 feet above the roof.
a. As a general rule, clamp the support band to the
chimney at a point about 2/3 of height above the roof.
The angle of the support braces to the chimney should
be approximately 45 degrees. (See Figure 2.)
b. Depending on roof slope and chimney height, it may be
necessary to locate the support band at a height lower
than the desired 2/3. This is acceptable as long as the
installation complies with the following.
1) Never locate the support band lower than ½ of
the height of the chimney above the roof.
2) The height of the chimney above the support
band does not exceed 5 feet. (See Figure 2.)
3) Do not extend braces (which adjust from 4 feet
to 7 feet) farther than 7 feet. Some installations
may require the use of more than one set of braces.
3. Up to 10 feet above the roof, use one brace.
4. Over ten feet above the roof, use one brace 4 feet up and
one every 5 feet thereafter.
The preferred location for the support band is next to a joint,
immediately above or below a locking band. The purpose of the
bracing is to hold the chimney against wind loads.
In areas of heavy snow or ice accumulation, the braces and
chimney may require additional protection, such as a splitter,
to prevent damage to the chimney system. Check with local
chimney professionals to assess need/options for such product.
Steps:
1. Install flashing and storm collar in usual manner.
See Figure 2.
2. Build chimney to desired height, and locate external guy
band at ½H above the roof.
3. Bolt brace tubes to band, and attach angle brackets to
roof with lag screws into structure, bending brace and tabs
as necessary. Braces should be at a 45-degree angle to
the chimney or at any convenient angle when at minimum
length (4 to 6 feet total). Included angle between the
braces in plan should be 90 degrees.
4. Tighten end clamps on larger bracing tube.
5. The underside of the opening through an exposed
ceiling may be trimmed with a flat metal plate (or pair of
half-plates) cut to a round or elliptical opening to fit the
chimney pipe, or use a pitched ceiling plate.
1. PLACE the mesh between dome and skirt of top. It should
be midway between the inner wind band and the outer
edges. See Figure 4. Do not place the screen directly
against the wind band.
2. LAP ends of mesh and twist cut ends into any available
opening.
If the chimney is used for venting a gas appliance, use a
spark arrester to keep birds out.
If the spark arrester becomes clogged with creosote, it should
be cleaned or replaced.
IMPORTANT
Burning wood and coal produces creosote, soot, and fly ash,
which tend to collect in chimney flue and on termination parts,
causing reduced flow of gases through the chimney. Check
rain cap weekly for excessive accumulation of these normal
combustion products, and clean as necessary.
Use a spark arrester if you have a shingle roof or live in a
forested area.
Model TLC Chimneys require a roof
shield to protect combustible framing
and decking where the chimney passes
through a flat or low-pitch roof. This
four-part shield is shipped with the flat
roof flashing. Frame the appropriate size
square opening (ID+6), and nail the four
parts to the roof shield into the opening
from the top, as shown in Figure 3.
The roof shield is NOT required when
using adjustable flashings on roof slopes
greater than 2/12, and is NOT required
when the roof structure is noncombustible
(steel or concrete).
SPARK ARRESTER
The Model TLC spark arrester is made of flexible expanded
metal mesh of 18-8 stainless steel, with diamond-shaped
openings roughly ½ x 1 inch. Each size is cut to fit the same
size deluxe chimney cap.
hartandcooley.com
2
(800) 433-6341
©2013 Hart & Cooley, Inc. All rights reserved Form No. 851359 06/24/2013 Printed in U.S.A.
 Loading...