

Hartan 4001-07-825 operation manual

Bedienungsanleitung
Instructions
Kombitasche
Softtasche
WARNUNG!
geeignet, das sich noch nicht selbst aufsetzen bzw. auf
die Seite rollen oder sich auf Händen und Knien stützen
kann. Höchstgewicht des Kindes: 9 kg.
Bodenlänge: 76 cm, Bodenbreite: 30 cm
Diese Tragetaschen nie auf einem Ständer benutzen.
passend für die Modelle: Racer, Skater, Topline, Sky, VIP, Xperia
Diese Tragetaschen sind nur für ein Kind
nach DIN EN 1466:2008-09
D
GB
F
NL
DK
N
S
FIN
I
E
damit sich Ihr Baby sicher und geborgen fühlt!
1
D
Deutschland
9
18
27
36
45
54
63
72
81
GB
NL
DK
FIN
United Kingdom (UK)
F
La France
Nederlands
Danmark
Norge
N
Sverige
S
Suomi
Italia
I
España
E
Product of Germany
Sicherheit – Qualität und neueste Technik
DIN EN 1888:2012-06
DIN EN 1466:2008-09
Sicherheit
und
Vertrauen
durch schadstoffgeprüfte Textilien
Hartan Kinderwagenwerk e. K.
Mühlenweg 1
D-96242 Sonnefeld-Gestungshausen
www.hartan.de

Herzlichen Glückwunsch
Damit sich Ihr Baby sicher und geborgen fühlt, haben Sie sich für ein hochwertiges Produkt aus dem Hause entschieden und damit eine
sehr gute Wahl getroffen. Hochwertige Verarbeitung und laufende, strenge
Qualitäts kontrollen geben Ihnen die Sicherheit, dass Sie lange sehr viel
Freude an Ihrem -Produkt haben. Die Verarbeitung schadstoffgeprüfter Textilien garantiert Ihnen die Unbedenklichkeit für Ihr Baby.
Wichtig! Lesen Sie alle Anleitungen vor Gebrauch sorg
durch und heben Sie diese für spätere Zwecke
auf.
Wenn Sie diese Hin weise nicht beachten, kann das die
Sicherheit Ihres Kindes beeinträchtigen.
und Rückfragen
fältig
Zur Sicherheit Ihres Kindes
WARNUNG! Lassen Sie Ihr Kind nie unbeaufsichtigt in der
Tragetasche.
WARNUNG! Diese Tragetasche ist nur für ein Kind geeignet,
das sich noch nicht selbst aufsetzen bzw. auf die Seite rollen
oder sich auf Händen und Knien stützen kann. Höchstgewicht
des Kindes: 9 kg.
WARNUNG! Diese Tragetasche nie auf einem Ständer benut-
zen. Stellen Sie die Tasche nur auf einen festen, waagerechten
Untergrund ab.
WARNUNG! Lassen Sie andere Kinder nicht unbeaufsichtigt
in der Nähe der Tasche spielen.
WARNUNG! Verwenden Sie die Tragetasche nicht, wenn
Teile fehlen, eingerissen oder gebrochen sind. Kontrollieren Sie
regelmäßig die Griffe und den Boden auf Beschädigungen oder
Abnutzungserscheinungen.
WARNUNG! Beachten Sie die Risiken, die von offenem
Feuer oder anderen Hitzequellen, wie elektrischen Heizgeräten,
Gasflammen usw. ausgehen, wenn sich diese in unmittelbarer
Nähe der Tragetasche befinden.
WARNUNG! Vom Hersteller nicht zugelassene Zubehör- und
Ersatzteile dürfen nicht verwendet werden.
WARNUNG! Beachten Sie, dass sich die Tragegriffe der
Soft- oder Kombitasche während der Nutzung des
Kinderwagens nicht im Kinderwagenaufsatz befinden dürfen.
1
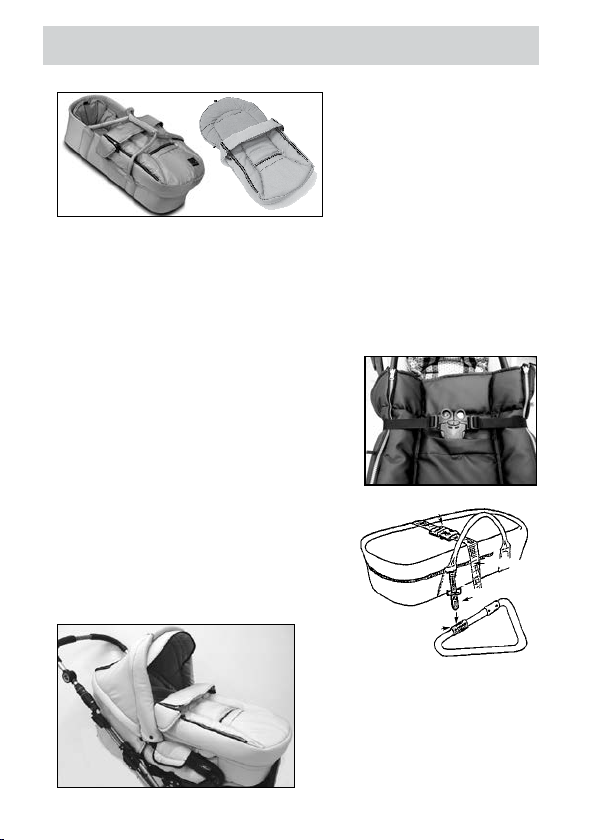
Bedienungsanleitung für Kombitasche
„Kombitragetasche”
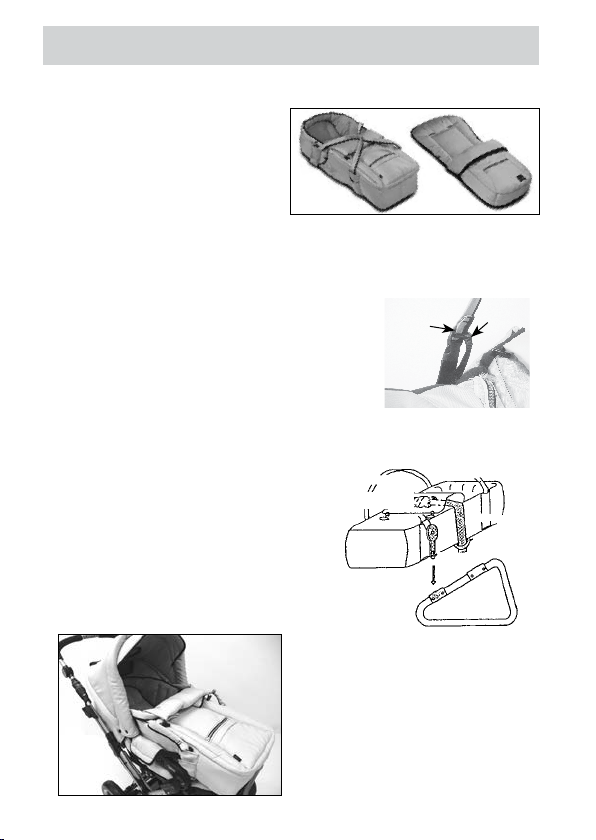
Die Kombitragetasche ist
Tragetasche und Fußsack zu-
gleich. Das Rückenteil des
Fußsackes ist gleichzeitig
Liegeauflage für den Trage-
„Kombitasche”
Die Kombitasche ist Trage tasche und Fußsack zu gleich.
Das Rückenteil des Fußsackes ist gleichzeitig Liege auflage für den Trage taschenboden.
Zur Nest chenbildung im Kopf bereich ziehen Sie die Kordel etwas an.
Das Oberteil des Fußsackes dient gleichzeitig als Windschutzdecke auf
der Tragetasche. Dazu befestigen Sie diese mittels Reißverschluss an
der Tragetasche.
Verwendung der Tragetasche
im Sportwagenaufsatz
WARNUNG! Befestigen Sie die
Trage tasche immer mit dem Becken gurt,
indem Sie die beiden Steckerteile des
Gurtsystems mit dem dafür vorgesehenen
Schnallengehäuseteil, das an der TaschenOberseite angebracht ist, zusammenstecken.
Ziehen Sie den Beckengurt immer straff an!
Stecken Sie zusätzlich die beiden seit lichen
Steckverbinder in die Öffnungen für den
Schutz bügel in der Armlehne! Stellen Sie
die Fußstütze des Sportwagens immer waagerecht damit die Tragetasche zusätzlich
gegen Herausrutschen gesichert ist.
(auch für
Schutzbügel)
Gurtschnalle
Aufnahme
Beckengurt
Steckverbinder
Armlehne
Das Verdeck des
Sportwageneinsatzes muss auf
dem Wagen montiert
Die Druckknöpfe müssen am
Sportwagenrücken fixiert werden.
sein.
2
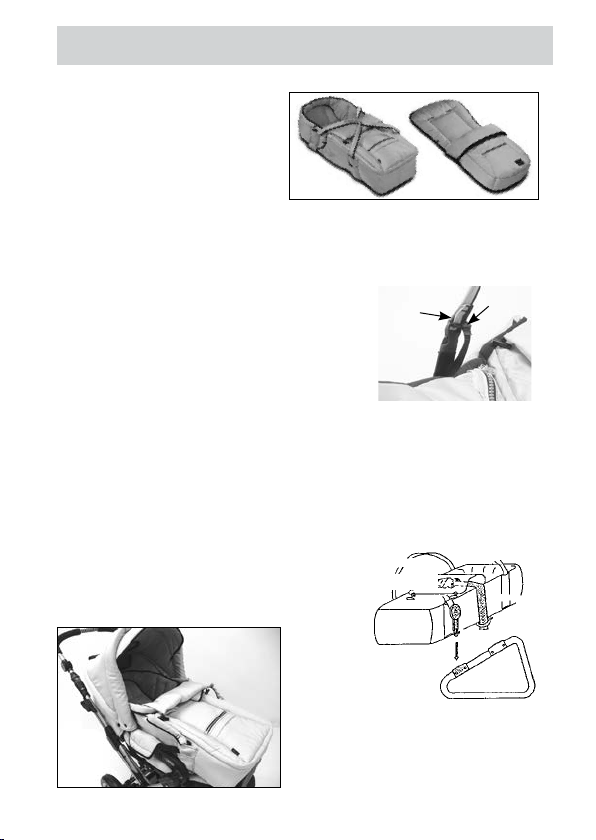
Bedienungsanleitung für
Softtasche
„Softtasche”
Die Softtasche ist Trage tasche
und Fußsack zu gleich.
WARNUNG! Prüfen Sie
vor dem Tragen der Softtasche
ob die Ver schlüsse der Trage gur te,
die Steckverbinder, dieWinkelelemente am Boden, die Zusatzsicherheitsgurte richtig eingerastet und alle Reiß ver schlüsse geschlossen sind.
WARNUNG! Tragen Sie Ihr Baby nur mit geschlossener Decke.
Achten Sie beim Tragen darauf, dass die Tragegurte möglichst senkrecht nach oben und
niemals seitlich nach außen gezogen werden.
Achten Sie darauf, dass der Zusatz sicherheits gurt immer beidseitig in den Schlaufen
der Tragegurte eingehängt ist.
Verwendung der Tragetasche im
Sportwagenaufsatz
Schlaufe des
Tragegurtes
Tasche
Schließe mit
Sicherheitsgurt
WARNUNG! Befestigen Sie die Trage tasche immer mit dem Becken-
gurt, indem Sie die beiden Steckerteile des Gurtsystems mit dem dafür
vorgesehenen Schnallengehäuseteil, das an der Taschen-Oberseite angebracht ist, zusammenstecken.
Stecken Sie zusätzlich die beiden seit lichen Steckverbinder in die
Öffnungen für den Schutzbügel in der Arm lehne! Stellen Sie die Fußstütze
des Sport wagens immer waagerecht, damit die Tragetasche zusätzlich
gegen Her aus rutschen gesichert ist. Das
Ver deck des Sportwageneinsatzes muss
auf dem Wagen montiert
Die Druckknöpfe müssen am
Sportwagenrücken fixiert werden
Ziehen Sie den Becken gurt immer straff an!
sein.
.
Tragegurt
Gurtschnalle
Aufnahme
(auch für
Schutzbügel)
Steckverbinder
Armlehne
Beckengurt
Schlaufe
WARNUNG! Verwenden Sie
keine Matratze!
3
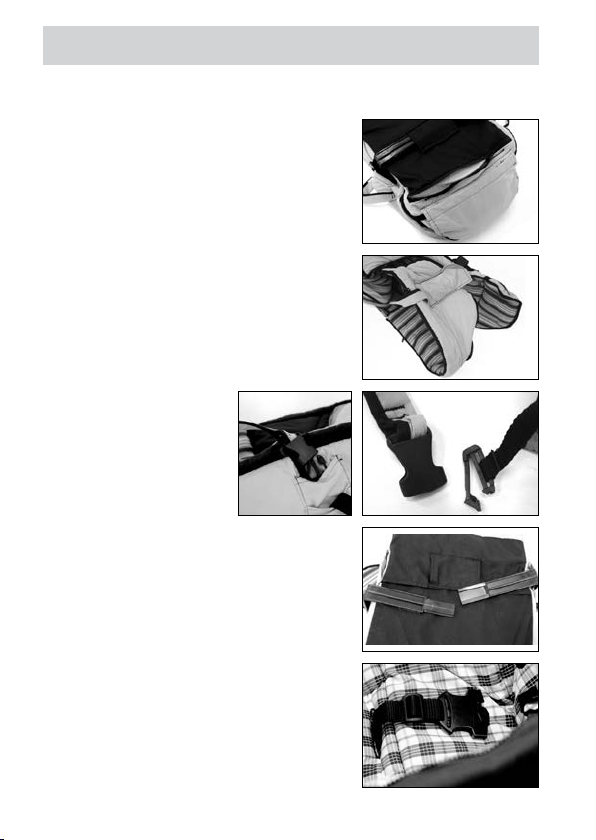
Bedienungsanleitung für
Anleitung für den Umbau der „Softtasche“
zum Thermofußsack:
1. Reißverschluss an der Unterseite
der Softtasche öffnen und die
Bodenplatte entfernen.
2. Kopfteil mit Reißverschluss von der
Softtasche abtrennen.
3. Tragegurte und
Sicherheitsgurte von
den Winkelelementen
entfernen.
4. Winkelelemente aus den
Stoffschlaufen herausziehen.
Softtasche
5. Beingurt des Wagens durch das
Knopfloch in der Mitte des Fußsackes
ziehen, dadurch sicherer Sitz und
erhöhte Sicherheit.
4

Bedienungsanleitung für
6. Schultergurte des Wagens durch
die Knopflöcher der Softtasche
ziehen.
Beckengurte seitlich zuführen und
mit Schnallenteil des Beingurtes
verbinden.
7. Rückenlasche der Softtasche über
das Rückenteil des Wagens ziehen
und das Klettverschlußband an der
Sicherungsöse befestigen.
Anleitung für den Einbau einer Winterfelleinlage (als Zubehör
erhältlich) in die Softtasche:
1. Das Winterfell wird mit dem
Reißverschluß am Kopfteil
der Softtasche befestigt.
Softtasche
2. Durch den Winterfellüberschlag
die zwei Knöpfe der Decke der
Softtasche ziehen.
5

Kontrolle und Pflegeanleitung
Alle von uns verwendeten Materialien lassen sich leicht pflegen.
Pflege der Stoffteile
Reinigen Sie verschmutzte Stoffe mit einer Kleiderbürste trocken oder
mit klarem Wasser (mit Fön trocknen), vermeiden Sie ein starkes Reiben.
Hartnäckige Flecken können mit einem milden Waschmittel entfernt wer
den. Alle abnehmbaren Stoffteile können Sie mit einem Feinwaschmittel in
der Waschmaschine bei 30° (Schon waschgang) waschen. Sollten Sie ein
mal von einem Regenguss überrascht werden, trocknen Sie anschließend
die Tragetasche in einem trockenen, luftigen Raum. Neben vielen posi
tiven Eigen schaften unserer Stoffe reagieren diese auf intensive Sonneneinstrahlung sehr empfindlich. Wir empfehlen deshalb das Abstellen der
Tasche im Schatten.
2-JAHRE Gewährleistung
Sie haben auf dieses Produkt einen Gewährleistungsanspruch gegenüber
Ihrem Vertragspartner von 2 Jahren. Die Gewährleistungsfrist beginnt
mit der Übergabe des Produktes von Ihrem Händler. Zum Nachweis
bewahren Sie bitte diese ausgefüllte Karte, den von Ihnen unterzeichneten
Übergabe-Check sowie den Kauf beleg für die Dauer der Gewähr leistungsf rist auf, ohne Vorlage dieser Dokumente kann eine Reklamation nicht
be arbeitet werden.
GEWÄHRLEISTUNG IM REKLAMATIONSFALL
Die Gewährleistung bezieht sich auf sämtliche Material- und Herstellungsfehler, die zum Zeitpunkt der Übergabe vorliegen.
KEINE GEWÄHRLEISTUNG WIRD ÜBERNOMMEN...
Es wird keine Gewähr übernommen für Mängel oder Schäden an der
veräußerten Ware, die von uns nicht zu vertreten sind. Dies gilt insbeson dere für
n natürliche Abnutzungserscheinungen (Verschleiß) und Schäden durch
übermäßige Beanspruchung
n Folgefehler, die dadurch entstanden sind, dass Schäden/Fehler nicht
beachtet wurden und aufgrund dessen zu einer erschwerten Reparatur
führen
n Schäden durch ungeeignete oder unsachgemäße Verwendung
(s. Gebrauchsanweisung)
n Schäden durch fehlerhafte Montage oder Inbetriebsetzung.
n Schäden durch nachlässige Behandlung oder mangelnde Wartung des
Kaufgegenstandes
n Schäden durch unsachgemäße Änderungen des Kaufgegenstandes.
6
-
-
-

Beschaffenheitsvereinbarung
GEWÄHRLEISTUNGSFALL ODER NICHT?
Schimmelbildung: Wenn Textilteile feucht geworden sind, müssen sie
richtig getrocknet werden, um Schimmelbildung zu vermeiden (siehe
Gebrauchs anweisung). Für Schimmelbildung kann keine Gewähr leistung
übernommen werden. Bleichung der Stoffe: Wir bestätigen, dass die
Stoffe den gültigen Normen entsprechen. Durch Sonneneinstrahlung,
Schweißeinfluss, Reinigungs mittel, Abrieb (insbesondere an den im Griffbereich liegenden Stellen) oder zu häufiges Waschen ist ein Aus bleichen
nicht auszuschließen und somit kein Reklamationsgrund. Geringe Farbunter schiede zwischen einzelnen Fertigungspartien lassen sich leider
nicht immer vermeiden. Hierfür kann keine Gewährleistung übernommen
werden. Noppenbildung der Stoffe: Gegen Noppenbildung wird keine
Gewährleistung übernommen. Dieses fällt unter allgemeine Kleiderpflege
und kann wie bei Wollpullovern einfach mit einer Kleiderbürste oder
Noppen maschine beseitigt werden. Einreißen der Nähte/Druck knöpfe/
des Stoffes: Bitte prüfen Sie beim Kauf genau, dass alle Stoffteile, Nähte
und Druckknöpfe ordnungsgemäß genäht und be festigt sind. Eventuelle
Bean standungen von Nähten/defekten Druck knöpfen müssen unverzüg lich nach Feststellen des Fehlers bei Ihrem Fachhändler reklamiert
werden.
7

Beschaffenheitsvereinbarung
WAS SIE BEIM KAUF BEACHTEN SOLLTEN
Prüfen Sie, dass die Tasche vollständig ausgeliefert worden ist und dass
keine Teile fehlen. Prüfen Sie, dass alle Funktionen der Tasche vollständig
funktionieren und bestätigen Sie dieses auf dem Übergabe-Check.
VORGEHENSWEISE BEI REKLAMATIONEN
Melden Sie den Fehler unverzüglich bei dem Fachhändler, bei dem Sie
die Tasche gekauft haben telefonisch an, um die weitere Vorgehensweise
zu besprechen. Für sicherheitsrelevante Mängel, die nicht innerhalb von
30 Tagen nach Auftreten beim Fachhändler angemeldet werden, kann
keine Gewährleistung übernommen werden. Bei der Bearbeitung von
Rekla mations ansprüchen kommen produktspezifische Abschreibungssätze zur An wendung. Hier verweisen wir auf die ausliegenden
All gemeinen Ge schäfts bedingungen.
Achten Sie darauf, daß der Wagen in einem sauberen Zustand eingeschickt wird. Stark verdreckte Wagen können nicht repariert werden.
VERWENDUNG, PFLEGE UND WARTUNG
Die Tasche ist ein Transportmittel für Ihr Kind und muss entsprechend
der Gebrauchsanweisung gepflegt und gewartet werden, damit seine
Ur sprungs qualität erhalten bleibt.
Händler
8
GB
United Kingdom (UK)

Congratulations on your purchase
You want your baby to feel safe and secure, that‘s why you have purcha
ed a high-quality product. You have made an excellent choice.
products are manufactured with the greatest possible care and
monitored constantly by rigorous quality control assuring that your carry
cot will provide life-long satisfaction. The textiles used for our products
have been tested for harmful substances (chemical residues) according to
the industry‘s own ‚Öko-Tex-Standard 100‘ to guarantee that all the fabric
parts of your carry cot are safe for your baby.
Important! Do not use this carry cot before read ing the
instructions carefully, and keep these instructions for queries
or future reference.
Your child‘s safety may be affected if you do not follow these
instructions.
s-
For the safety of your child
WARNING: Never leave your child unattended in the carry cot.
WARNING: This carry cot is suitable for holding only one baby,
that cannot yet sit up on its own, or roll on its side or support
itself on hands and knees. Maximum baby weight: 9 kg.
WARNING: Never place this carry cot on a stand. Always place
the carry cot on a solid, horizontal base.
WARNING: Never allow other children to play unsupervised
near the cot.
WARNING: Do not use the carry cot if any part is torn or
broken. Check the handles and the base regularly for signs of
wear or damage.
WARNING: Be aware of the risks posed by open fires or other
sources of heat, such as electric heaters, gas flames etc.,
are in the immediate vicinity of the carry cot.
WARNING: Accessories and spare or replacement parts not
approved by the manufacturer must not be used.
WARNING: Please note that the carrying handles of the
soft or hard carrycot must not remain inside the carrycot while
the pram is being used.
if these
10

Instructions for using the hard carrycot
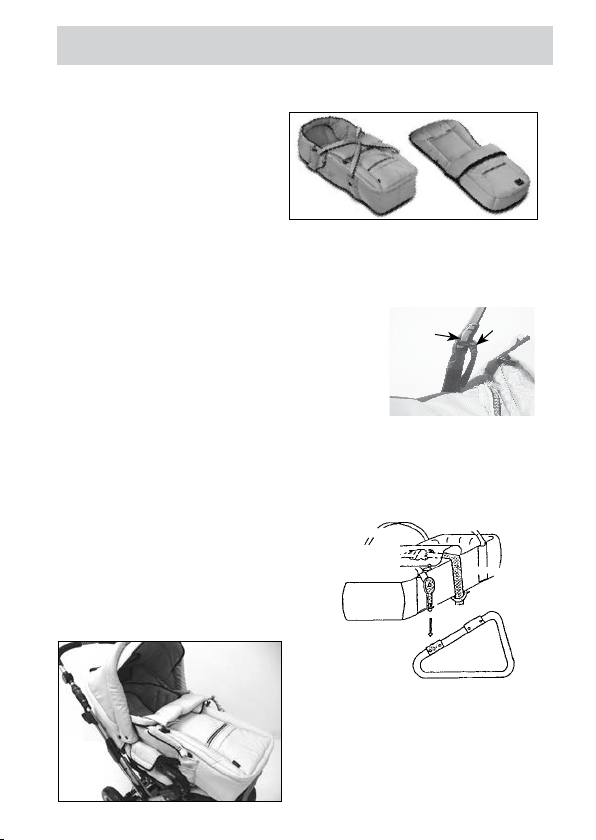
„Hard carrycot“
The hard carrycot is a carrycot
and foot-muff combined.
The back of the foot muff also
functions as the mattress for
the bottom of the carry cot.
It is possible to create a little
“nest” round the head by pulling the cord slightly. The upper part of the
foot muff also serves as a wind protector on the carry cot. It can be fixed
on the carry cot with the zip fastener.
Using the carry cot on a pushchair
frame
WARNING:
with the lap-strap by snapping together the two
parts of the belt system into the buckle housing,
which is located on the top of the carry-cot.
addition to it, insert the two lateral push-in
fastener into the respective safety-bar
arm-rest openings. The foot rest on the
pushchair should always be in the hori
zontal position, so that the carry cot is
further prevented from slipping out.
Always secure the carry-cot
In
-
The hood of the carrycot must be
fitted to the frame.
The pushbuttons must be fixed to
the back of the buggy.
Belt buckle
Catch
(also for
arm bar)
Lap belt
Push-in fastener
Arm rest
11
Instructions for using the soft carrycot
„Soft carrycot“
The soft carrycot is a carrycot
and foot-muff combined.
WARNING:
carrying the soft carrycot that the
clips of the carrying straps, the
buckles, the corner elements on the base, the additional safety straps
are securely in place and that all zips are properly closed.
Check before
WARNING:
closed when the baby is being carried. Take
care during carrying that the carrying straps
are as vertical as possible and are never
pulled out sideways. Make sure that the additional safety strap is always slotted through
the loops of the carrying straps on both sides.
Using the carry cot on pushchair frame
WARNING:
cot, always use the lap belt.
Always pull the lap belt tight. In addition to it, insert the two lateral push-in
fastener into the respective safety-bar
arm-rest openings. The foot rest on
the pushchair should always be in the
horizontal position, so that the carry cot
is further prevented from slipping out.
The cover must always be
To attach the carry
The hood of the carrycot must be
fitted to the frame.The pushbut
tons must be fixed to the back of
the buggy.
WARNING:
mattresses.
12
Cot
Carrying strap
Belt buckle
Catch
(also for
arm bar)
Carrying
strap
Push-in fastener
Arm rest
Do not use
Fastener
Safety
belt
Lap belt
Carrying strap
-

Instructions for using the soft carrycot
Instructions for converting the „Soft carrycot“
to a thermal foot-muff:
1. Undo the zip fastener on the
underside of the soft carrycot
and remove the base panel.
2. Separate the head piece from the
soft carrycot using the zip.
3. Remove carrying
straps and safety
belts from the corner
elements.
4. Pull the corner elements off
the material loops.
5. Draw the leg-strap through the
buttonhole in the middle of the
footmuff to ensure a stable seat
and improved safety.
13

Instructions for using the soft carrycot
6. Draw the shoulder-straps through
the buttonholes in the soft carrycot.
Draw the lap-straps to the sides and
click into place with the buckle of the
leg-strap.
7. Pull the rear strap of the soft carrycot
over the end of the pushchair and
fasten the Velcro strap to the fixing
eye.
Instructions for fitting a winter fur insert (available as an accessory)
in the soft carrycot:
1. The winter fur is attached with
the zip to the head piece of the
soft carrycot.
2. Draw the two buttons on the soft
carrycot cover through the flap of
the winter fur insert.
14

Instructions for checking and care
All the materials we use can easily be cared for.
Care of the fabric parts
Clean soiled fabrics when dry using a clothes-brush or lukewarm water
(then use hair dryer). Do not rub fabrics extensively. Remove tenacious
stains using a soft detergent. All removable fabric parts may be machine
washed in lukewarm water at a gentle setting and reduced agitation, at
30 °C. Let‘s say you have encountered a heavy rain shower. Dry your
carry cot in a dry and airy room.
Our fabrics have quite a number of distinctive features. However, they
are very sensitive to excessive sunlight. That‘s why you should place
your carry cot in the shade whenever possible.
2 YEARS warranty
This product is guaranteed for a period of 2 years by your contract partner.
For possible submission of proof, please keep your receipt, the completed
warranty card as well as the hand-over check bearing your signature for
the length of the warranty period. These documents must be submitted to
qualify for service under the warranty.
In case of warranty claim
This product is warranted against defects in materials and workmanship
that existed at the time it was handed over.
THIS WARRANTY DOES NOT COVER ……
We disclaim liability for defects in the object of purchase that are beyond
our control. This especially applies to:
n natural wear and tear (wear-related defects) and defects due to
excessive stress
n consequential defects, originally caused by neglect of defects/damages
but developing into conditions necessitating a more difficult repair
n defects due to improper or inappropriate use (see Instructions)
n defects due to incorrect assembly or operation
n defects due to negligent handling or lack of maintenance of the product
n defects due to improper alteration of the product.
15

Quality agreement
WARRANTY CLAIM — YES OR NO?
Mould formation: Fabric parts, having become wet, should be dried
properly to prevent mould formation (see Instructions). Mould formation
will not be covered by the warranty.
Bleaching of the fabrics: We confirm that the fabrics comply with the
established standards. It cannot be ruled out that colours of the fabrics
may fade while the parts are exposed to direct sunlight, washed too
frequently, come into contact with sweat and detergents, or suffer
abrasive wear (especially on those parts where the carry cot is handled).
Consequently, colour fading is excluded from the warranty. It is
unavoidable that colours sometimes differ slightly from one individual
batch to the next, which is why this case will not be covered under
the warranty.
Knob formation on fabrics: We recommend that you apply general
clothes care. As with woollen sweaters, the knobs can easily be removed
by using a clothes-brush or burling machine.
Tearing of seams, fabrics, press studs: At the time of purchase,
please check carefully that all the fabric parts, seams and snap fasteners
have properly been sewn and fastened. In case of a possible complaint
concerning seams/defective snap fasteners, a claim must immediately
be reported to your dealer after the defect has been discovered.
16

Quality agreement
WHAT TO REMEMBER WHEN BUYING YOUR CARRY COT
Check that your carry cot is complete when it is handed over and no
parts are missing. Check the function of all parts and confirm this by
signing the hand-over check.
WHAT TO DO IN CASE OF A COMPLAINT
ICall your dealer, from whom you bought the carry cot, to file the complaint
and to discuss how to handle the matter. In case of defects concerning
safety regulations, your complaint must be filed at your dealer within
a 30 days period from the date the defects have occurred, otherwise
these defects will not be warranted for. When handling your warranty
claims, we will apply productspecific depreciation rates. We refer you
to our general terms and conditions displayed at our premises.
Make sure that the pram is in a clean condition before being sent in
for repair. Repairs will not be carried out on prams which are in a dirty
condition.
USE, CARE AND MAINTENANCE
To maintain the original quality of your carry cot as a means of trans
portation for your child, it requires care and maintenance according to the
instructions.
-
Dealer
17
F
La France

Toutes nos félicitations
Vous souhaitez que votre bébé se sente à l‘aise et en sécurité et votre
choix s‘est porté sur un produit fabriqué par . Ce choix est parfaitement judicieux. La finition soignée et des contrôles permanents très
stricts de la qualité constituent des gages que votre nacelle porte-bébé
de la marque vous donnera longtemps toute satisfaction. Les
textiles utilisés ont été testés conformément à la norme öko-tex 100 sur
les substances nocives, attestant que votre bébé ne court aucun risque.
Important ! Avant d‘utiliser cette nacelle porte-bébé, veuillez
lire attentivement ces instructions en totalité et les conserver
pour un usage ultérieur ou toute demande de renseignement
complémentaire. La sécurité de votre enfant peut dépendre du
respect de ces informations.
Pour la sécurité de votre enfant
AVERTISSEMENT
lance dans sa nacelle porte-bébé.
AVERTISSEMENT
enfant qui ne peut pas encore se relever, se tourner sur le
côté ni prendre appui sur les mains et les genoux seul.
Poids maximum de l‘enfant : 9 kg.
AVERTISSEMENT
un châssis.
AVERTISSEMENT
proximité de la nacelle sans surveillance.
AVERTISSEMENT
éléments sont déchirés ou cassés. Contrôlez régulièrement si
les poignées et le fond sont endommagés ou présentent des
marques d‘usure.
AVERTISSEMENT
flammes nues ou de toute autre source de chaleur, telles que
les radradiateurs électriques, les veilleuses de gaz, si cellesci
se trouvent à proximité immédiate de la nacelle porte-bébé.
AVERTISSEMENT
rechange non homologuées par le fabricant.
AVERTISSEMENT
couffin souple ou combiné ne se trouvent pas sur la nacelle
pendant l‘utilisation de la poussette.
Ne laissez jamais votre enfant sans surveil-
Cette nacelle porte-bébé convient à un
Ne jamais utiliser cette nacelle porte-bébé sur
Posez la nacelle sur un support horizontal stable.
Ne laissez jamais d‘autres enfants jouer à
N‘utilisez pas la nacelle porte-bébé si des
Tenez compte des risques provenant de
Ne pas utiliser les accessoires et pièces de
Faire attention à ce que les poignées du
19

Notice d‘utilisation pour le couffin combiné
”Couffin combiné”
Le couffin combiné sert à la
fois de couffin amovible et
de chancelière. L‘arrière de
la chancelière sert en même
temps de couchette pour le
fond de la nacelle porte-bébé.
Tirez légèrement sur la cor
à la tête. La partie supérieure de la chancelière sert également sur la
nacelle porte-bébé de pare-vent, que vous fixerez à la nacelle au moyen
de la fermeture à glissière.
Utilisation de la nacelle porte-bébé en
élément de poussette
AVERTISSEMENT
nacelle avec la sangle sous-abdominale en
insérant les deux fixations du système de
sangle dans l’attache-ceinture prévu placé
sur la partie supérieure de la nacelle. Veillez
à ce que la sangle abdominale soit bien ser
rée. En plus, la fixez aux deux embouts en
Boucle-fermoir
de protection dans l‘accoudoir.Toujours
placer le cale-pieds à l’horizontale pour
assurer une protection anti-chutes sup
plémentaire lorsque le couffin est en place.
dans les passages de l‘arceau
Toujours fixer la
delette pour former la coquille
-
Boucle de ceinture de
sécurité
-
Logement
(aussi pour
arceau de
protection)
Sangle abdominale
Boucle-fermoir
Accoudoir
-
La capote de la nacelle doit être
montée sur la poussette. Les
boutons pression doivent être
fixés sur le dosseret de la pous
sette.
20
-
Notice d‘utilisation pour le couffin souple
”Couffin souple”
Le couffin souple sert à la fois
de couffin amovible et de
chancelière.
AVERTISSEMENT
Vérifier avant de porter le couffin
souple que les fermetures des
sangles, les raccords enfichables, les éléments d‘angle sur le fond et les
sangles de sécurité supplémentaires sont correctement enclenchés et
que toutes les fermetures éclair sont fermées.
AVERTISSEMENT
uniquement lorsque le tablier est fermé.
Veillez en le portant que les sangles de
portage soient tendues autant que possible
à la verticale vers le haut mais jamais latéralement vers l‘extérieur. Veillez à ce que la ceinture de sécurité supplémentaire soit toujours
accrochée de part et d‘autre aux boucles des
sangles de portage.
Utilisation de la nacelle porte-bébé en élément de poussette
AVERTISSEMENT
sangle abdominale. Veillez à ce que la sangle abdominale soit bien
serrée. En plus, la fixez aux deux embouts en Boucle-fermoir dans les pas
sages de l‘arceau de protection dans
l‘accoudoir. Toujours placer le calepieds à l’horizontale pour assurer une
protection anti-chutes supplémentaire
lorsque le couffin est en place. La capo
te de la nacelle doit être montée sur la
Portez votre bébé
Fixez toujours la nacelle porte-bébé à la
-
-
poussette. Les boutons pression
doivent être fixés sur le dosseret
de la poussette.
Sangle de
portage
Boucle de
ceinture de
sécurité
Logement
(aussi pour
arceau de
protection)
Sangle de
portage
Nacelle
Boucle-fermoir
Sangle abdominale
Passe-ceinture
Accoudoir
Fermoir
Ceinture de
sécurité
AVERTISSEMENT
Ne pas poser
de matelas.
21

Notice d‘utilisation pour le couffin souple
Instruction pour la transformation du couffin souple
en chancelière thermo :
1. Fermeture éclair sur la partie
inférieure Ouvrir le couffin souple
et retirer la plaque de fond.
2. Séparer la partie de la tête avec la
fermeture éclair du couffin souple.
3. Retirer les sangles
et les ceintures de
sécurité sur les
équerres.
4. Retirer les équerres des sangles
en tissu.
5. Faire passer la sangle d‘entrejambe
de la poussette dans la « boutonnière »
au milieu de la chancelière, ce qui
protège l‘assise et accroît la sécurité.
22

Notice d‘utilisation pour le couffin souple
6. Faire passer les sangles de la
poussette par les boutonnières de
la nacelle souple puis les sangles
abdominales sur le côté et les relier
avec la boucle de la sangle
d‘entrejambe.
7. Tirer la languette du dosseret de la
nacelle souple par l‘arrière de la
poussette et fixer la bande
autoagrippante sur l‘œillet de sécurité.
Instruction pour l‘insertion d‘un insert en peau d‘hiver
(disponible comme accessoires)
dans le couffin souple :
1. L‘insert en peau est fixé à la
fermeture éclair sur la partie de
tête du couffin souple.
2. Tirer les deux boutons de la
couverture du couffin souple par
le rabat de l‘insert en peau.
23

Vérification et conseils d‘entretien
Tous les matériaux que nous utilisons sont faciles d‘entretien.
Entretien des tissus
Nettoyer les tissus salis secs à la brosse à habits ou à l‘eau claire (puis
utiliser un sèche-cheveux). Eviter de frotter. Enlever les taches rebelles
avec un détergent doux. Il est possible de laver en machine toutes les
pièces amovibles en tissu à 30 °C (lavage délicat). S‘il vous arrive d‘être
surpris par une averse, essuyez votre nacelle porte-bébé dans une pièce
sèche et aérée. Nos tissus possèdent de nombreuses caractéristiques
favorables mais ils sont toutefois très sensibles au rayonnement intense
du soleil. Il est donc préférable dans la mesure du possible de laisser
la nacelle porte-bébé à l‘ombre.
Garantie deux ans
Ce produit bénéficie d’une garantie de 2 ans par votre contractant. La
période de garantie commence à la remise du produit par votre revendeur.
A titre de pièces justificatives, veuillez conserver pendant toute la durée de
la garantie cette carte dûment remplie, la liste de vérification au moment
de la remise du produit ainsi que votre reçu ; aucune réclamation ne
pourra être traitée sans présentation de ces documents.
EN CAS DE GARANTIE
La garantie se rapporte à la totalité des défauts de matériau et de fabri
cation qui se présentent au moment de la remise du produit.
AUCUNE PRISE EN CHARGE DE LA GARANTIE …
Aucune garantie ne s’appliquera pour tout défaut ou dommage sur la
chose vendue qui ne soit pas de notre responsabilité. Cela s’applique en
particulier à
n l’apparition de dégradations naturelles (usure) et dommages dus à une
utilisation excessive
n des défaillances consécutives au fait que les dommages/défaillances
n’ont pas été pris en considération et par suite aggravent la difficulté de
la réparation
n des dommages dus à une utilisation inappropriée ou non conforme
(voir mode d’emploi)
n des dommages dus à une erreur de montage ou de mise en service
n des dommages dus à une négligence de maniement ou l’entretien
insuffisant de l’objet acquis
n des dommages dus à des transformations non conformes de l’objet
acquis.
24
-

Convention sur la qualité
Cas de garantie ou non ?
Formation de moisissures : lorsque des textiles ont pris l‘humidité, il
faut les sécher correctement afin d‘éviter la formation de moisissures (voir
mode d‘emploi). Aucune garantie ne peut s‘appliquer pour la formation
de moisissures.
Décoloration des tissus : nous confirmons que les tissus sont conformes
aux normes en vigueur. Une décoloration ne peut pas être exclue en
raison du rayonnement solaire, de l‘effet de la sueur, des produits de
nettoyage, du frottement (en particulier les parties se trouvant dans la
zone des poignées) ou des lavages trop fréquents. La décoloration
n‘est donc pas une cause de réclamation. Il n‘est malheureusement pas
toujours possible d‘éviter de légères différences de couleur entre les
éléments de fabrication, en raison de quoi aucune garantie ne peut
s‘appliquer dans ces cas-là.
Boulochage des tissus : aucune garantie ne s‘applique contre le
boulochage qui est du ressort de l‘entretien des vêtements en général
et qu‘il n‘est pas possible d‘éliminer comme sur les tricots en laine par
une simple brosse à habits ou un appareil anti-boulochage.
Coutures déchirées/boutons arrachés/tissu déchiré : à votre achat,
veuillez vérifier précisément que toutes les parties en tissu, les coutures
et les boutons-pression sont cousus et fixés correctement. Toute
contestation éventuelle relative aux coutures/boutons-pression défec
tueux est à réclamer immédiatement auprès de votre revendeur dès
constatation du défaut.
25

Convention sur la qualité
PRÉCAUTIONS À L‘ACHAT DE VOTRE PART
Vérifiez que la nacelle porte-bébé vous a été fournie complète et
qu‘aucun élément ne manque. Vérifiez que toutes les fonctions de la
nacelle porte-bébé sont parfaites et confirmez-le sur le certificat de
livraison.
CONDUITE À TENIR LORS DE RÉCLAMATIONS
Signalez immédiatement par téléphone le défaut au revendeur auquel
vous avez acheté la nacelle porte-bébé pour discuter de la conduite à
tenir. Aucune garantie ne peut s‘appliquer pour tout vice relevant de
la sécurité qui n‘est pas signalé au revendeur moins de trente jours
après son apparition. Les droits à la garantie traités sont soumis à des
barèmes d‘amortissement spécifiques au produit. Se reporter à nos
Conditions Générales de vente affichées.
Veillez à ce que la poussette soit envoyée dans un état de propreté impec
cable. Une poussette fortement salie ne sera pas réparée.
UTILISATION, SOIN ET ENTRETIEN
Cette nacelle porte-bébé constitue un moyen de transport pour votre
enfant et elle requiert un certain soin et un entretien conformément
au mode d‘emploi pour conserver sa qualité d‘origine.
Le revendeur
26
-
NL
Nederlands
 Loading...