

Page 1
TS350 ®
Free Datasheet http://www.Datasheet4U.com
Basic Rate
Euro ISDN
Test Set
User's Guide V2
Page 2

TS350® Basic Rate Euro ISDN Test Set
Free Datasheet http://www.Datasheet4U.com
Harris Corporation has a policy of continuous product improvement,
and therefore the specification of this product may be subject to
change. Whilst every effort has been made to ensure the accuracy of
this User's Guide at the time of printing, Harris Corporation will not
be liable for any errors.
If you find any errors in this User's Guide or would like to make
suggestions for improvement please send your comments to Harris
Corporation at the address below.
The content of this User's Guide is proprietary and neither the whole
nor any part thereof may be used, copied or reproduced in any form
without the prior permission of Harris Corporation.
The Harris logo is a registered trademark of Harris Corporation
TS® is a registered trademark of Harris Corporation
Windows is a registered trademark of Microsoft Corporation
Copyright 2001 Vactel Communications Ltd. All rights reserved.
Harris Corporation | Network Support Division
809 Calle Plano | Camarillo, California 93012-8519 USA
1-805-987-9511
www.testsets.harris.com
2
Page 3

TS350® Basic Rate Euro ISDN Test Set
Free Datasheet http://www.Datasheet4U.com
Contents
TS350 Package........................................................................... 6
TS350 Introduction....................................................................... 6
Quick Start .................................................................................. 7
Battery Charging ...................................................................... 7
Making a BER test.................................................................... 8
Making a Speech Call..............................................................11
Receiving a Voice Call.............................................................13
TS350 Operation ........................................................................14
Display ...................................................................................14
LED Indicators.........................................................................15
Key Functions .........................................................................16
Connectors .............................................................................18
Network and dc battery charger.............................................18
RS232 Serial Port.................................................................18
Powering.................................................................................19
Low Battery Warning ...............................................................20
Charging the NiMH Batteries ....................................................20
Using Alkaline Batteries ...........................................................20
TS350 Configuration Modes ........................................................21
ISDN S - TE ............................................................................21
ISDN S - Monitor .....................................................................22
ISDN U - TE............................................................................22
PSTN......................................................................................22
ISDN BRI Testing........................................................................23
BER Test ................................................................................23
BER Test Options....................................................................26
Bearer .................................................................................26
Loopbox ..............................................................................27
Pattern ................................................................................29
Test Time ............................................................................29
G.821 Results......................................................................30
Test Thresholds ...................................................................31
Speech Call ............................................................................31
Dialling Mode .......................................................................33
3.1kHz Audio Call ....................................................................34
3
Page 4

TS350® Basic Rate Euro ISDN Test Set
Free Datasheet http://www.Datasheet4U.com
Receiving a Voice Call.............................................................36
Teleservice Tests ....................................................................37
Supplementary Service Tests...................................................41
Automatic ............................................................................43
Manual DDI/MSN/SUB/CLIP/CLIR.........................................45
Manual TP ...........................................................................46
Voltages .................................................................................48
Recorded Data ........................................................................49
Trace L1/L2/L3.....................................................................50
Number Log.........................................................................52
Setup......................................................................................52
TEI ......................................................................................54
Language ............................................................................54
Term...................................................................................55
Set Date & Time ...................................................................55
Coding Law..........................................................................56
Sub Address ........................................................................57
Terminal No .........................................................................57
Set Default...........................................................................58
Contrast...............................................................................59
Trace...................................................................................59
User Messages .......................................................................60
Layer 1 messages ................................................................60
Layer 2 messages ................................................................60
Layer 3 Messages ................................................................61
B Channel Status .................................................................62
Clear Cause.........................................................................62
Passive Monitor ..........................................................................63
PSTN Testing.............................................................................66
TS350 Firmware Upgrade ...........................................................68
TS350 Specifications ..................................................................70
Protocol ..................................................................................70
BRI Interface...........................................................................70
Power .....................................................................................70
Display ...................................................................................70
RS232 Port .............................................................................70
4
Page 5

TS350® Basic Rate Euro ISDN Test Set
Free Datasheet http://www.Datasheet4U.com
Weight....................................................................................71
Environmental .........................................................................71
Dimensions .............................................................................71
Safety .....................................................................................71
CE..........................................................................................71
APPENDIX.................................................................................72
User messages .......................................................................72
Layer 1 INFO States ................................................................72
Layer 1 Error message .........................................................72
Layer 2 Frame types.............................................................72
Layer 2 Error Messages........................................................73
Layer 3 Message Types.......................................................73
Clear Cause Number and Description....................................74
B Channel Status Messages .................................................76
Abbreviations ..........................................................................76
5
Page 6

TS350® Basic Rate Euro ISDN Test Set
Free Datasheet http://www.Datasheet4U.com
TS350 Package
Your TS350 Basic Rate Euro ISDN test set package contains the
following items:
• The TS350 test set
• Carry bag
• 12volt dc mains plug top battery charger
• 2 AA size NiMH 1.2volt batteries
• RJ45 to RJ45 BRI interface lead
• RJ11 (7mm-pins 2 and 3) to twin croc clip U interface lead
• RJ11 (7mm-pins 1 and 4) to twin croc clip analogue PSTN
lead
• 9 way D female to 9 way D male PC RS232 serial lead
• This User's Guide
TS350 Introduction
The TS350 is a versatile, light, robust and feature rich ISDN basic
rate test set for use by telephone company technicians and
engineers when installing, commissioning and maintaining ISDN
basic rate lines.
The TS350 can make an ISDN speech, data, or BERT call. It can
monitor the protocol on the ISDN line and when used with the
Genius
powerful maintenance tool. The TS350 has an internal store of
messaging protocol at Layer 1, 2 and 3 which can be inspected on
screen.
The TS350 has comprehensive test suites for making outgoing and
incoming Bit Error Rate Tests (BERT) to assure line quality;
automatic or manual Teleservice support tests; and automatic or
manual Supplementary service provisioning tests.
TM
ISDN Protocol Analyser software it makes an extremely
6
Page 7
TS350® Basic Rate Euro ISDN Test Set
RJ45
RJ11 (7mm)
DC battery
Free Datasheet http://www.Datasheet4U.com
For ease and convenience of testing combined analogue and ISDN
NTs (Network Termination), the TS350 has a PSTN analogue
telephone mode which supports Pulse and DTMF dialling, line
voltage measurement, and last number redial.
The TS350 has 2 rechargeable AA size NiMH batteries, which will
give approximately 12 hours battery life before you need to recharge
with the charger provided in your package.
The 100 x 64 pixel LCD graphics display has a backlight with
contrast adjustment to provide clear and detailed information on call
status, ISDN signalling in real time and stored test results.
Quick Start
Battery Charging
The AA size NiMH batteries are shipped uncharged so first you must
charge your TS350 NiMH batteries. Insert the dc plug of the mains
plug top dc battery charger into the dc socket at the bottom end of
the unit.
The TS350 will turn on automatically displaying the start up screen
sequence. Leave the unit to charge for approximately 16 hours.
ISDN S/T
Pins 3,6 Tx
Pins 4,5 Rx
Pins 7,8 PS2
ISDN U pins 2 & 3
PSTN pins 1, 4
charger socket
2.5mm
12VDC
7
Page 8

TS350® Basic Rate Euro ISDN Test Set
↵↵
14:20
Mode
↵↵
Free Datasheet http://www.Datasheet4U.com
If you are unable to recharge the NiMH batteries you can use
alkaline AA batteries if you wish. Alkaline batteries will not be
charged when using the dc battery charger.
Making a BER test
The TS350 has default values set as follows for the BERT test:
Bearer: Data (64k unrestricted digital information)
Loops: Bearer (for incoming BERT calls)
Pattern: 211-1 (Pseudo random test pattern)
Test time: 1 min
Test Thresholds; Errors: 1
You can use these values to make your first BERT test.
Note: For more detail on these options and their use see the appropriate
section in this User's Guide.
To make your first BERT call:
Step 1
Connect your TS350 with the RJ45 to RJ45 lead to the NT interface
S/T bus socket.
Step 2
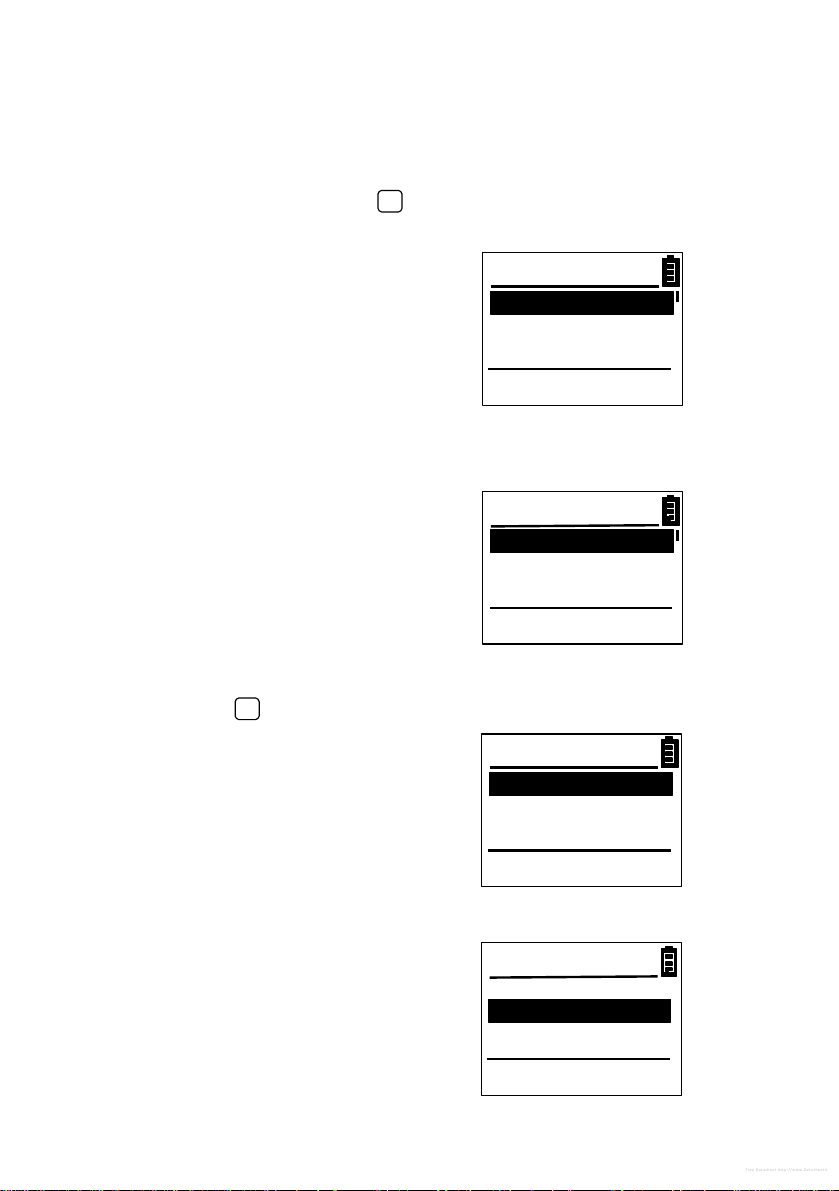
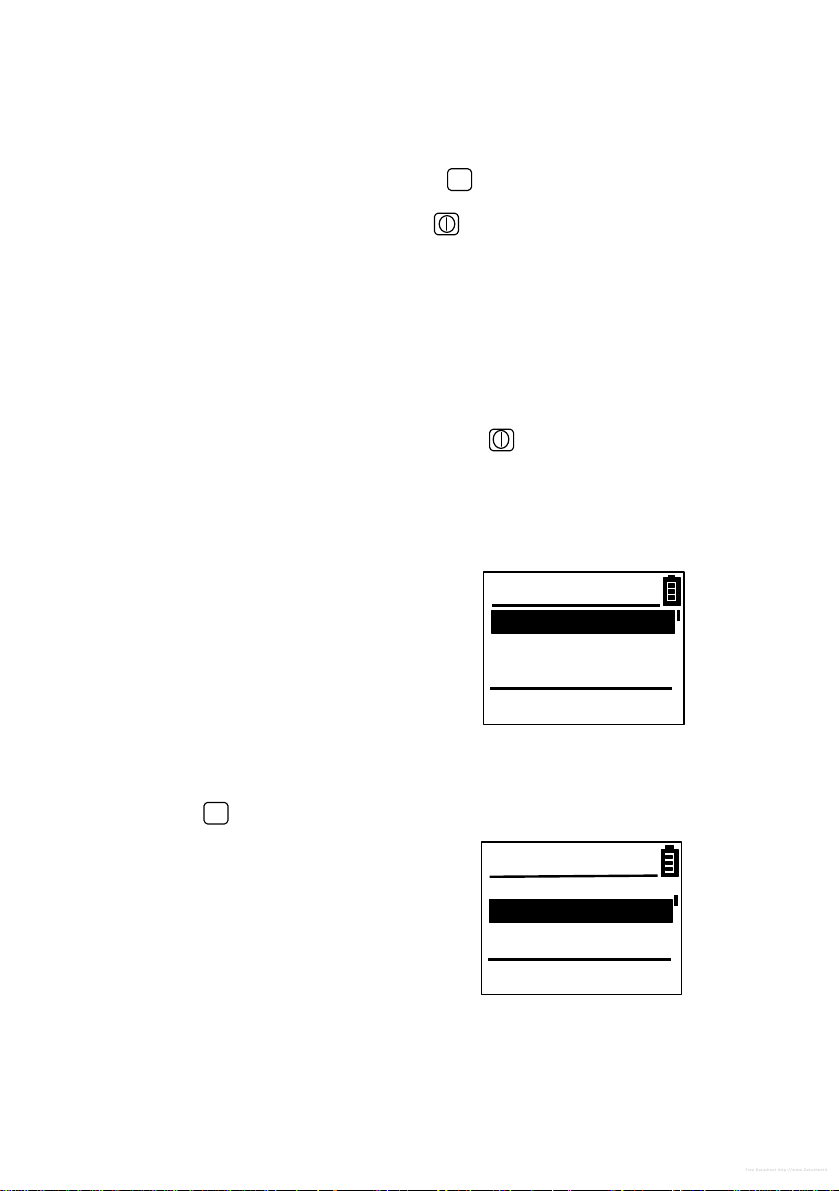
Switch on the TS350 by holding down the key for 2 seconds. The
TS350 turns on, beeps and displays its start up screen sequence.
You will be presented with the Mode selection screen. Select ISDN
S - TE by pressing the (select) key. (Note all menu items that are
reverse contrast are selected using the key).
ISDN S-TE 1
ISDN S-Monitor 2
ISDN U-TE 3
PSTN 4
8
Page 9
↵↵
14:20
BER Test
14:20
BER Test
14:20
BER Test
14:20
Test Menu
↵↵
Free Datasheet http://www.Datasheet4U.com
TS350® Basic Rate Euro ISDN Test Set
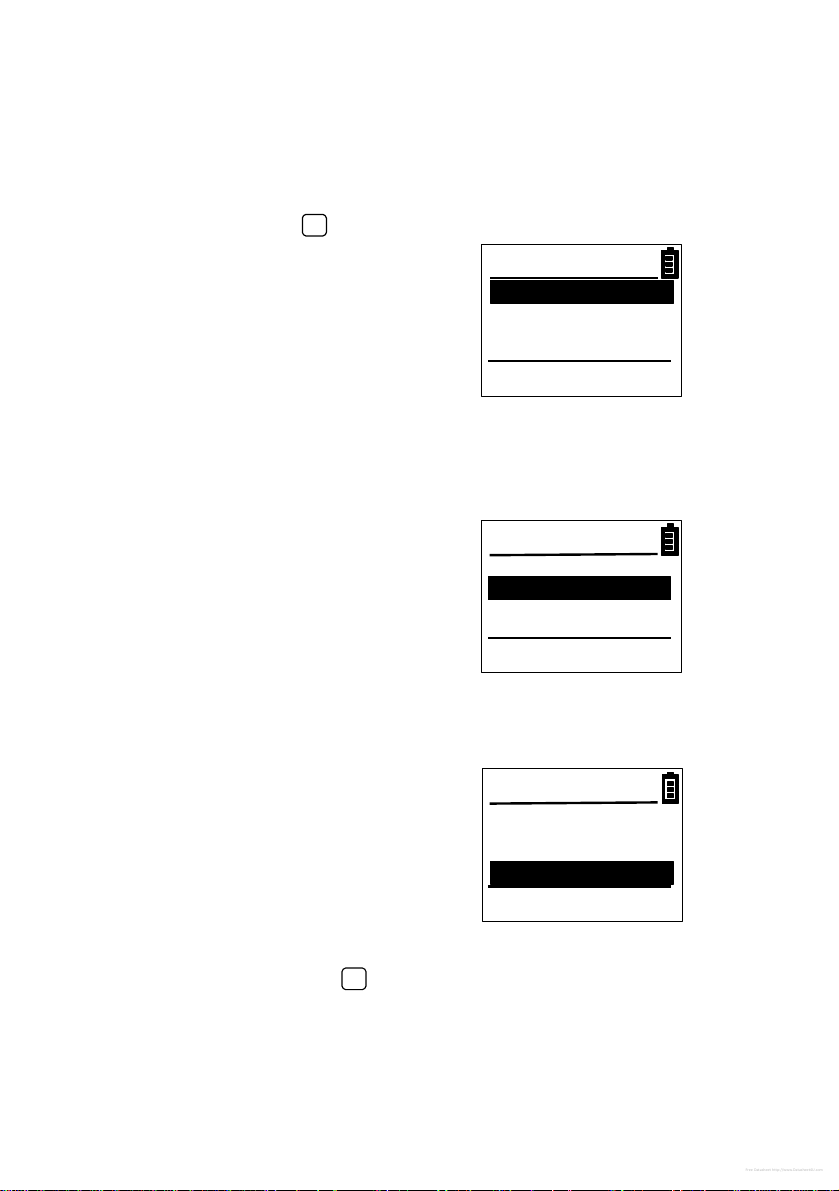
Step 3
Select BER Test by pressing
BER Test 1
Speech 2
3.1kHz Audio 3
Teleservices 4
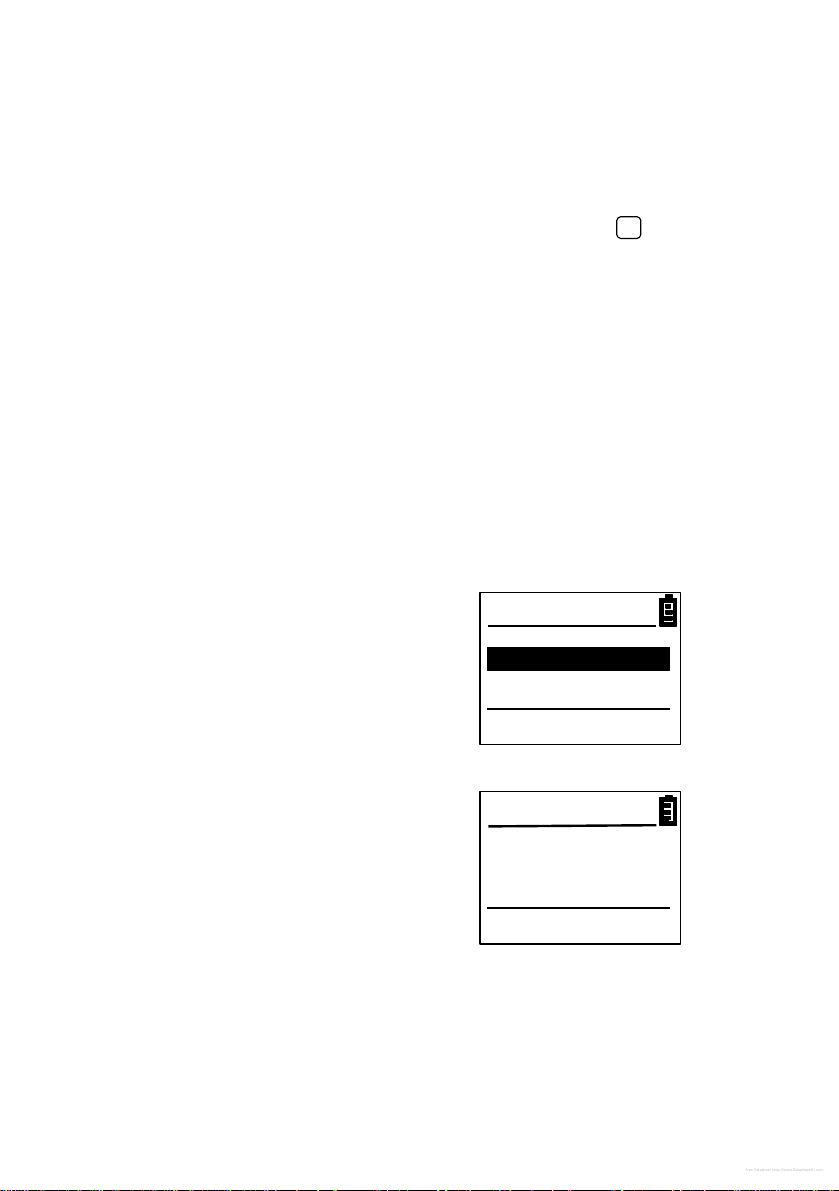
Step 4
Select BERT from the BER test menu
BERT 1
Bearer:Data 2
Loopbox:Bearer 3
Pattern: 211-1 4
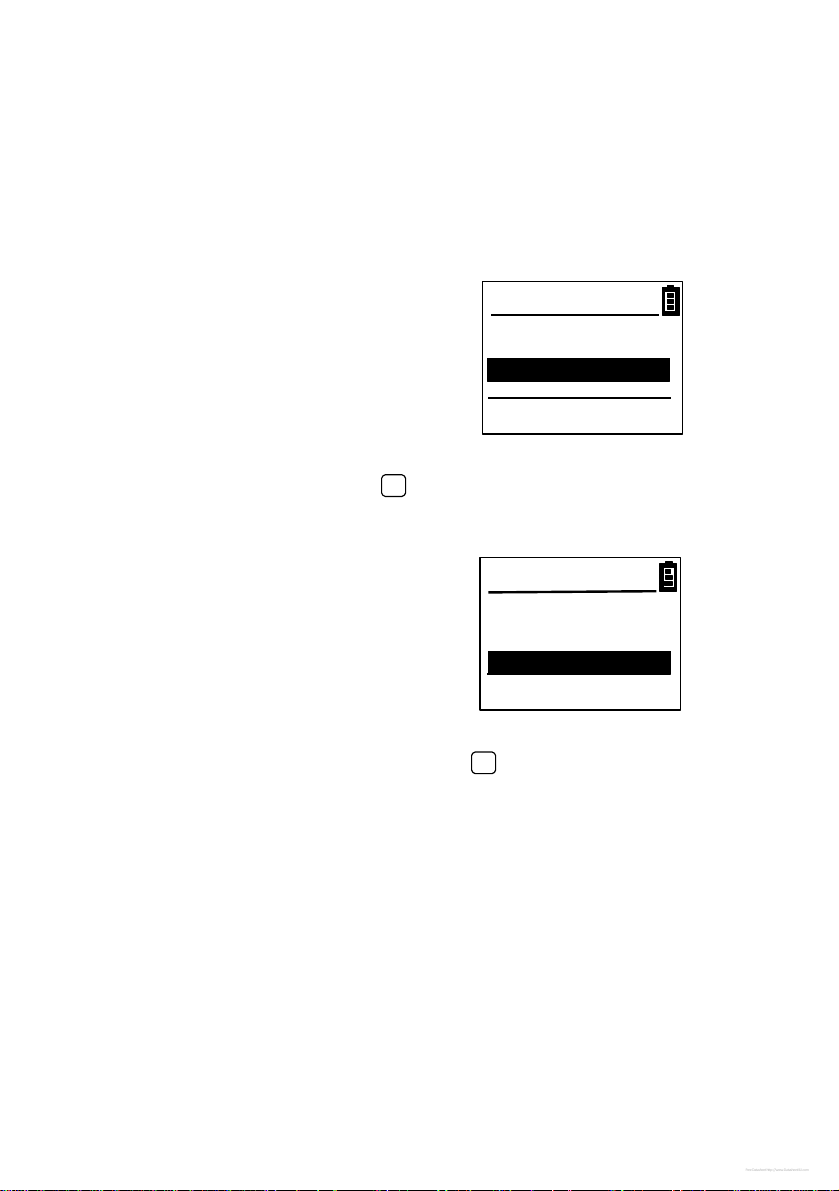
Step 5
Enter the B channel number (default is 1) to make an outgoing call
on and press .
Enter B ch#: 1
Bx
Step 6
You are prompted to Enter number:
Enter Number:
01633123456
B2 2
9
Page 10
TS350® Basic Rate Euro ISDN Test Set
↵↵
14:20
C=Stop *=Reset #=Err
BER Test
L2 USR RR_C TEI=0
B2 DATA IN PRBS
14:20
BER Test
ALL CHANNELS IDLE
Free Datasheet http://www.Datasheet4U.com
Enter the ISDN number of the line under test and press to make
the call.
The call is switched back onto the other B channel selected by the
network. You will see the Layer 2 and Layer 3 messages displayed
on the lower part of the screen.
The TS350 auto answers the incoming call and loops back the BERT
pattern (211-1), which is received on the outgoing channel.
Note: For a self call the incoming B channel always auto answers and loops
the data regardless of the Loopbox menu settings which are intended for
incoming BERT calls from another tester.
The TS350 displays the BERT test results menu and the test will be
automatically ended after the test time, in this case 1 minute.
Return to menu
E:0 ES:0 SES:0
Time left 00:00:59
2
The results screen is displayed.
**Test Passed**
E:0 ES:0 SES:0
Time time 00:01:00
2
Step 7
10
Page 11
TS350® Basic Rate Euro ISDN Test Set
↵↵
14:20
Test Menu
14:20
Mode
Free Datasheet http://www.Datasheet4U.com
To return to the Test menu press the key.
C
To turn off the TS350 press the key until the screen blanks
(approximately 2 seconds).
Making a Speech Call
Step 1
Connect your TS350 with the RJ45 to RJ45 lead to the NT S/T
interface socket.
Step 2
Switch on the TS350 by holding down the key for 2 seconds. The
TS350 turns on, beeps and displays its start up screen sequence.
Step 3
From the Mode menu select ISDN S-TE.
ISDN S-TE 1
ISDN S-Monitor 2
ISDN U-TE 3
PSTN 4
Step 4
Scroll the reverse contrast cursor down to highlight Speech by
pressing the t (scroll down) key once. Select Speech call by
pressing
BER Test 1
Speech 2
3.1kHz Audio 3
Channel Test 4
11
Page 12
TS350® Basic Rate Euro ISDN Test Set
↵↵
14:20
Speech Call
14:20
Speech Call
L2 USR RR_C TEI=0
L3 USR INFO
14:20
Speech Call
L2 USR RR_C TEI=0
B1 SPEECH OUT
Free Datasheet http://www.Datasheet4U.com
Step 5
Enter the B channel number (default is 1) on which to make an
outgoing and press
Enter B ch#: 1
Bx
Dial: Overlap
Step 6
You are prompted to Enter number:
Enter the number you wish to dial.
Note: The default dial mode is Overlap and in this mode the digits are
signalled as they are entered.
Enter Number:
01633123123
B2 2
You will then see the call in progress screen.
Called Number:
01633123123
C=Clear, s=KEYPAD
Return to Menu
Step 6
To end the call, press the key.
C
12
Page 13
TS350® Basic Rate Euro ISDN Test Set
14:20
Test Menu
L2 USR RR_C TEI=0
B1 3.1KHZ IN
↵↵
14:20
Test Menu
L2 USR RR_C TEI=0
B1 3.1KHZ IN
Free Datasheet http://www.Datasheet4U.com
Receiving a Voice Call
When your TS350 receives a compatible incoming Setup message
(incoming call) it will ring the sounder and prompt you with the
screen:
Incoming call...
01273860000
Answer Call
C to reject
To answer the call press the key and you will be able to talk to
the calling party. You will then be presented with the call in progress
screen:
Caller Number:
01273860000
C=Clear,s=KEYPAD
Return to Menu
If you wish to end the call, press the key or just wait for the
C
calling party to clear the call. After call clearing you will be returned
to the TS350 Test Menu.
13
Page 14
TS350® Basic Rate Euro ISDN Test Set
14:20
Test Menu
L2 USR RR_C TEI=0
L3 NET SETUP
Menu title
Scroll bar
Layer 2 frame and TEI
↵↵
Free Datasheet http://www.Datasheet4U.com
TS350 Operation
Display
The display is a backlit graphics LCD display with a resolution of 100
x 64 pixels. When operated only on the batteries, the backlight will
turn on after each key press and turn off after one minute. If the
TS350 is powered from the dc supply, then the backlight will remain
on all the time.
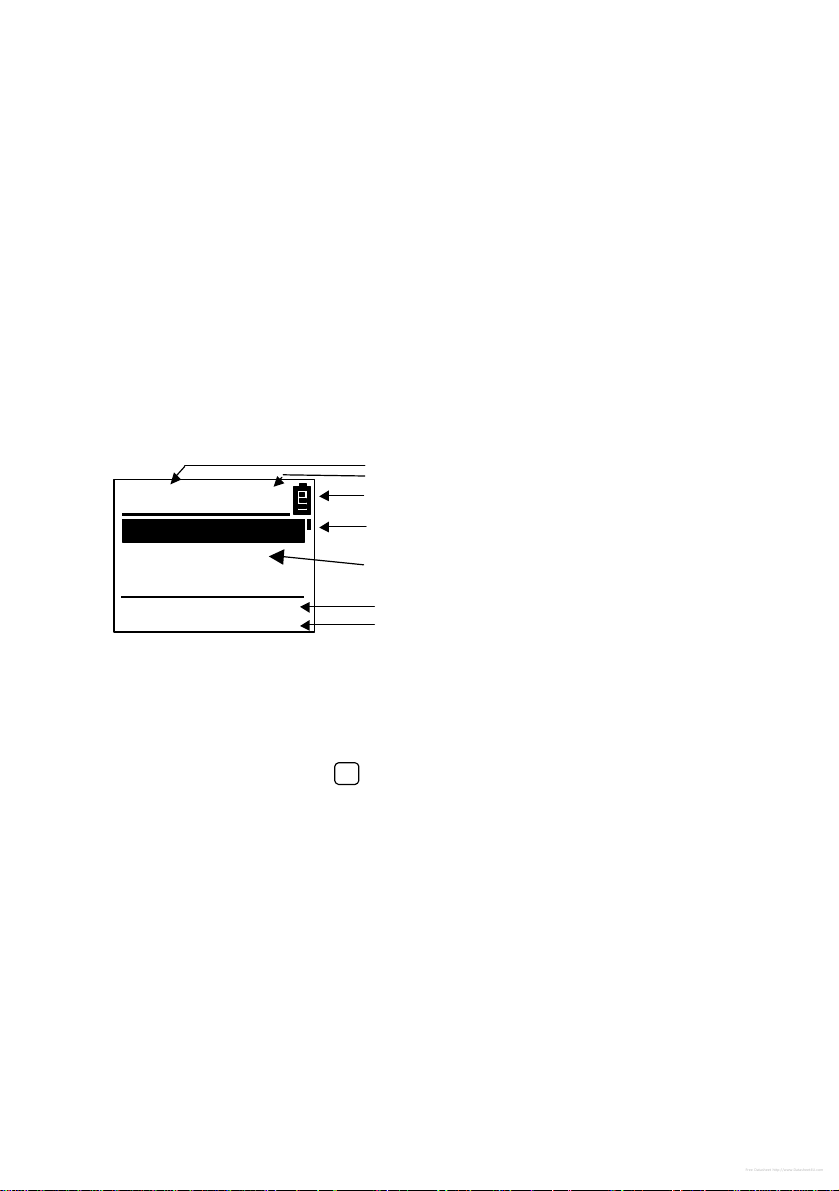
The screen is split into three sections as shown below.
BER Test 1
Speech 2
3.1kHz Audio 3
Teleservices 4
The top section displays the menu title, battery status, and time.
The mid section displays user selectable menu items, call status,
and test results. The menu item shown in reverse contrast may be
selected by pressing the key.
The bottom section displays Layer 2 frame types, TEI (Terminal
Endpoint Identifier) value, Layer 2 error messages, Layer 3 message
type, and Layer 3 error messages. These messages persist for 1S
and show the messaging activity as it occurs. The last 200 lines of
protocol are stored in the TS350 protocol trace store for inspection
after a test sequence has been performed.
Time
Battery status
Menu items
Layer 3 message
14
Page 15

TS350® Basic Rate Euro ISDN Test Set
B1
B2
S
U
14:20
Test Menu
L2 USR RR_C TEI=74
L3 NET SETUP
Free Datasheet http://www.Datasheet4U.com
LED Indicators
BER Test 1
Speech 2
3.1kHz Audio 3
Teleservices 4
B1 Flashes green when the B1 channel is active. The LED is Off
when the B1 channel is not in use.
B2 Flashes green when the B2 channel is active. The LED is Off
when the B2 channel is not in use.
S S interface status indicator.
Flashes green if Layer 1 is activated and both INFO 3 and
INFO 4 states have been received.
Flashes red if a signal is detected but INFO 3 and INFO 4
states have not been received. This indicates a Layer 1
activation failure.
If no signal or voltage is present, then this LED is off.
U U interface status indicator.
Flashes green if synchronisation and Layer 1 activation has
occurred.
Flashes red whilst synchronisation and activation is in
progress or has failed. Note: The U interface can take up to 20
seconds or so to synchronise and activate.
15
Page 16

TS350® Basic Rate Euro ISDN Test Set
s t
Free Datasheet http://www.Datasheet4U.com
Key Functions
Number keys:
ABC
• Enter dialled digits.
2
• Select menu items irrespective of cursor position.
• KEYPAD IE: during an ISDN call numbers are sent as
keypad information elements if KEYPAD is selected.
• DTMF tones: during a call numbers are sent as DTMF tones
if DTMF is selected.
• During en bloc CPN entry denotes the characters following
the * are a sub address.
• KEYPAD IE: during an ISDN call * can be sent as a keypad
information element if KEYPAD is selected.
• DTMF: during a call * is sent as a DTMF tone tones if DTMF
is selected.
• During a BERT: restarts the test and clears error counters.
• Resets the Trace or CLI Log when selected.
LD/MF
• KEYPAD IE: during an ISDN call # is sent as a keypad
#
information element if KEYPAD is selected.
• DTMF tones: during an ISDN call # is sent as a DTMF tone if
DTMF is selected.
• During a BERT: inserts a single bit error.
• In PSTN mode during a call: toggles between loop
disconnect (pulse) and DTMF dialling.
• Scroll up through menu items.
• In Test Results, Trace listing and CLI Log: short press scrolls
up 1 line; long press (>1 sec) scrolls up six lines at a time;
press and hold pages up 6 lines every second.
• Scroll down through menu items.
• In Test Results, Trace listing and CLI Log: short press scrolls
down 1 line; long press (>1 sec) scrolls down six lines at a
time; press and hold pages up 6 lines every second.
16
Page 17

TS350® Basic Rate Euro ISDN Test Set
↵↵
Free Datasheet http://www.Datasheet4U.com
• In menu listings: go back up one menu level.
C
• During a BERT: stops the test.
• During a call: clears the call.
• In the results screen: clears the results screen.
• During dialling: short press deletes the last digit; long press
(>1) aborts dialling and returns you to the Test Menu.
• Select a reverse contrast menu item.
• Select a reverse contrast function.
• Dial a reverse contrast number.
• Press and hold > 2 second to switch on the TS350.
• Press and hold > 2 seconds to turn off the TS350.
17
Page 18
TS350® Basic Rate Euro ISDN Test Set
RJ45 ISDN
RJ11 (7mm) pin 1 left
DC battery
Free Datasheet http://www.Datasheet4U.com
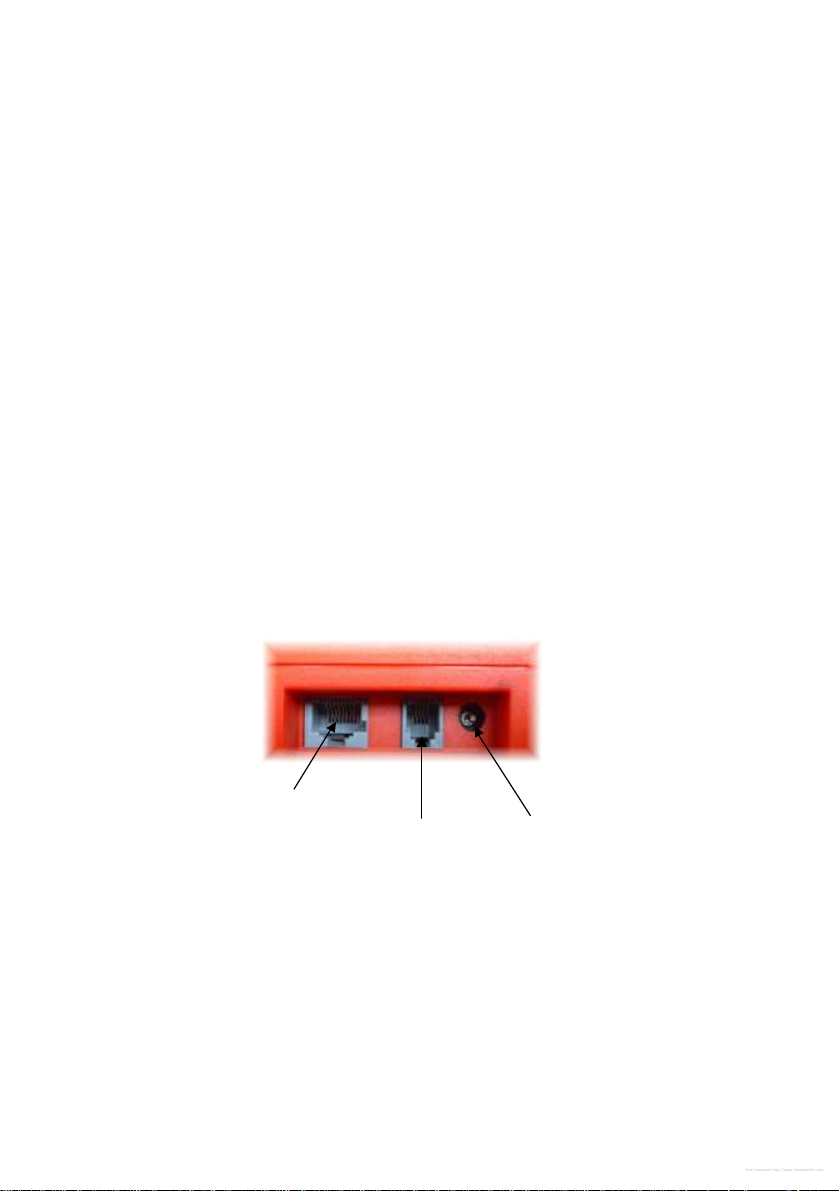
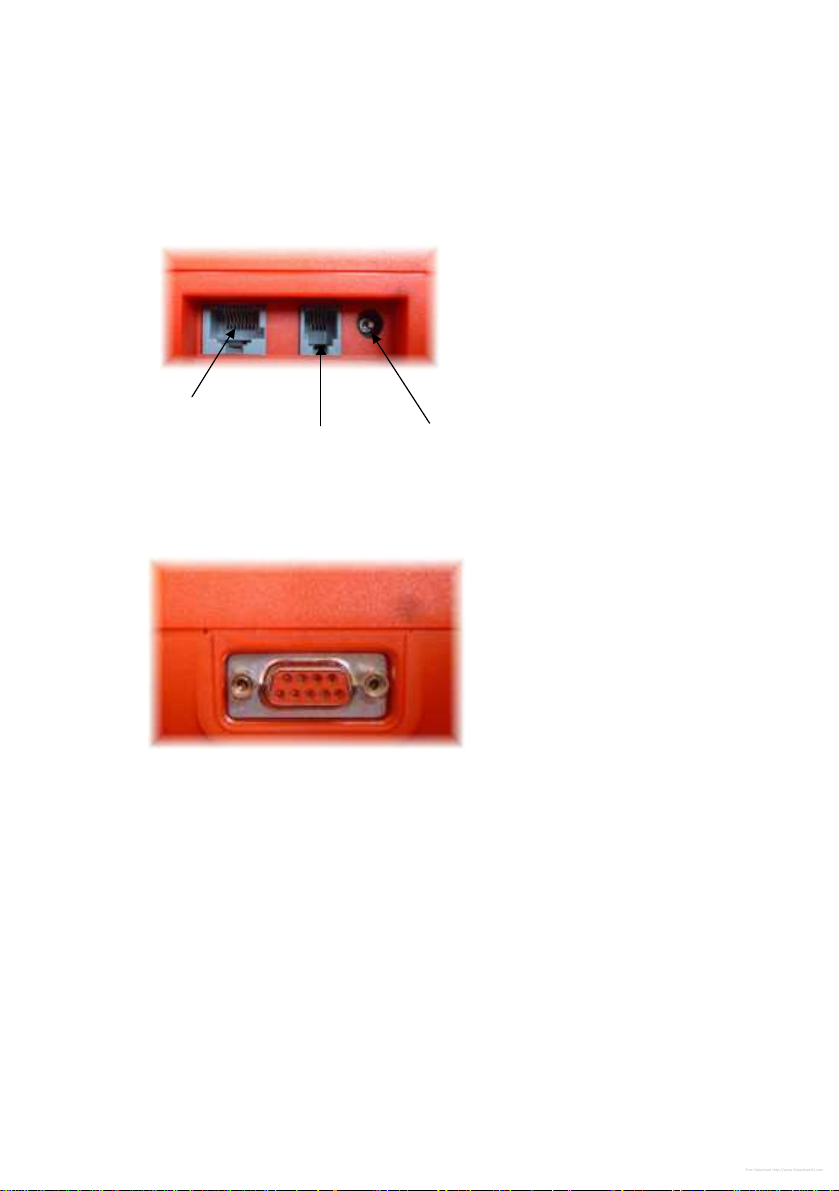
Connectors
Network and dc battery charger
S/T pin 1 left
Pins 3,6 Tx
Pins 4,5 Rx
Pins 7,8 PS2
ISDN U pins 2 & 3
PSTN pins 1, 4;
charger socket
2.5mm
12VDC
RS232 Serial Port
9 way D female
Baud rate 115200
Data bits: 8
Parity: none
Stop bits: 1
Flow control: Xon/Xoff
Pin out:
1 connected to 4 and 6
2 TS350 transmit data
3 TS350 receive data
4 connected 1 and 6
18
Page 19

TS350® Basic Rate Euro ISDN Test Set
Free Datasheet http://www.Datasheet4U.com
5 signal ground
6 connected to 1 and 4
7 connected to pin 8
8 connected to pin 7
9 not connected
The RS232 port has two functions.
Genius mode:
The normal mode of operation sends a Genius software compatible
binary output of the D channel protocol. In ISDN S-TE and ISDN UTE mode this protocol is the TS350 to Network protocol; in ISDN SMonitor passive monitor mode this is D channel protocol generated
by the TE and the Network.
Download mode:
When the Upgrade Windows PC application is run the serial port
receives the downloaded firmware upgrade to the TS350. To activate
this mode hold down the C key and turn on the unit until you hear the
beep. The screen will be blank until downloading starts.
Powering
The TS350 intelligently draws its power from available external
sources, drawing power from the batteries only when no other power
source is available.
The TS350 will draw power from:
• Normal power S bus PS1
• Restricted power S bus PS1
• S bus P S 2
• A powered U interface
• The 12VDC Power supply input
or if none of the above are available:
19
Page 20

TS350® Basic Rate Euro ISDN Test Set
Free Datasheet http://www.Datasheet4U.com
• The 2 AA NiMH rechargeable batteries.
The TS350 will operate from any of the external power sources
without its batteries fitted, or when the batteries are flat.
When operating from an external power source the LCD backlight
will be on all the time the unit is operating, and the unit will stay on
regardless of the activity on the network interfaces.
When operating from the batteries, the backlight will turn on when
any key is pressed and timeout 1 minute after the last key press to
conserve battery power. If there is no network activity on the Network
interface connections, then the unit will switch off after 5 minutes.
This is to conserve battery power and to avoid battery discharge if
the unit is accidentally turned on.
Low Battery Warning
When the TS350 batteries become discharged, a battery low
warning of 3 sounder beeps will occur every minute until the unit
switches itself off. You will have approximately 5 minutes of testing
time left when the battery warning starts.
Charging the NiMH Batteries
To charge the NiMH batteries, insert the plugtop supply into a
convenient mains socket and insert the dc jack into the TS350 dc
socket. If the TS350 is not already on, it will turn on immediately.
Leave the TS350 to charge for approximately 16 hours. Whilst the dc
plugtop supply is on you will see a plug icon in the top right hand
corner of the LCD.
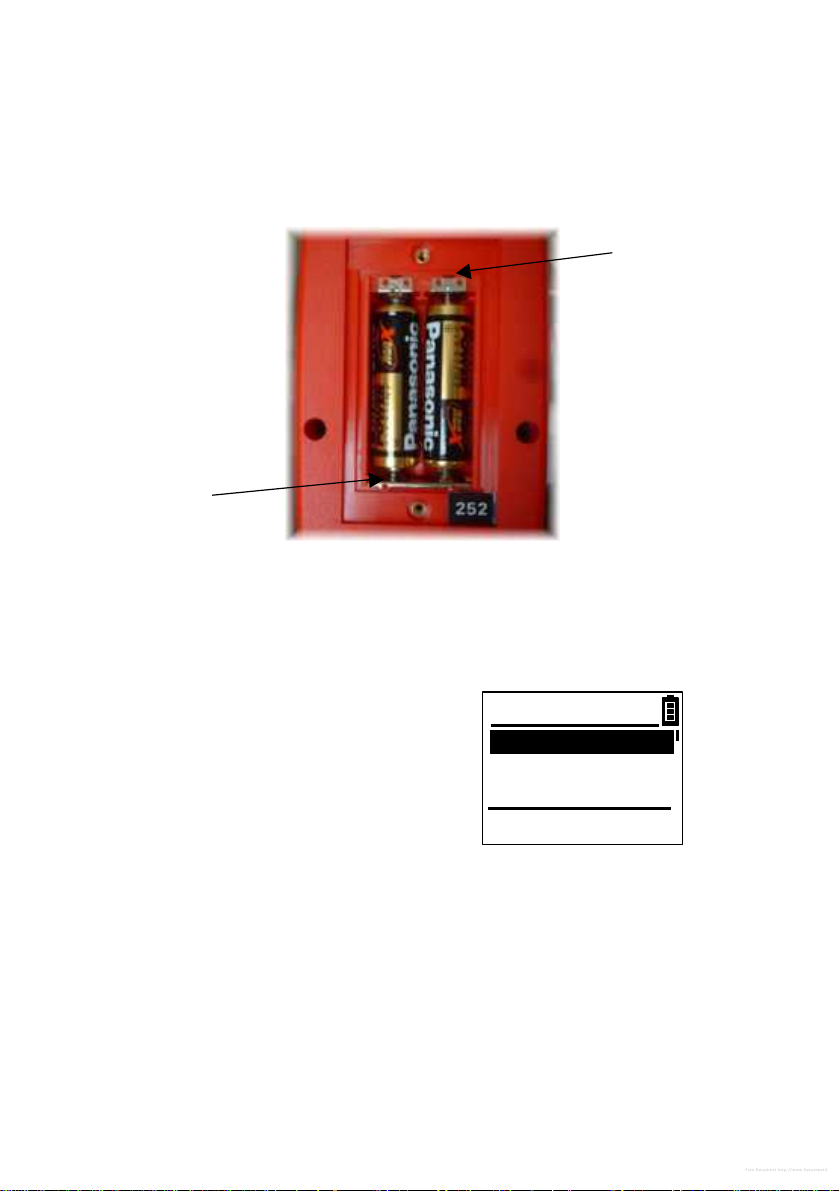
Using Alkaline Batteries
If you are unable to gain access to a mains supply to recharge the
batteries, alkaline AA batteries may be used. To change the batteries
remove the two battery cover retaining screws on the rear of the unit,
20
Page 21
TS350® Basic Rate Euro ISDN Test Set
14:20
Mode
Free Datasheet http://www.Datasheet4U.com
take off the battery cover and replace the batteries. The TS350
battery charging circuit will not charge alkaline batteries.
Positive
polarity
Positive
polarity
~~ Caution!!
Disconnect all
telecommunications
network connections
before opening the
battery compartment
TS350 Configuration Modes
The TS350 can be used in four network interface operating modes
which are selected from the Mode menu.
ISDN S - TE
Connect the TS350 to the NT1 S interface socket using the RJ45
lead provided. In this mode the TS350 will act as an ISDN terminal
connected to the four wire S/T bus. The TS350 can carry out a BERT
test on any bearer, make a voice call, carry out manual or automatic
tests for Teleservice network support and common Supplementary
ISDN S - TE 1
ISDN S - Monitor 2
ISDN U - TE 3
PSTN 4
21
Page 22

TS350® Basic Rate Euro ISDN Test Set
Free Datasheet http://www.Datasheet4U.com
service support. The mode is automatically selected if the S interface
is active or carries phantom power. If the S bus has no phantom
power and is deactivated the mode may be selected from the initial
Mode menu.
ISDN S - Monitor
In this mode the TS350 is "bridged" onto the S bus link between the
TE and the NT. The TS350 passively monitors D channel messaging
in bothTE to NT and NT to TE directions. The binary decode is
output on the RS232 port in real time for decode with the Genius
ISDN Protocol Analyser software. A simplified protocol trace is
shown on the screen scrolling in real time. The parameters to be
displayed are selected in the Setup menu in the sub menu Trace.
ISDN U - TE
Connect the TS350 to the two wire U interface with the crocodile
clips on the U interface lead provided. In this mode the TS350 will
act as an ISDN terminal connected to the two wire U interface and
replaces the NT1. The TS350 can carry out a BERT test on any
bearer, make a voice call, carry out manual or automatic tests for
Teleservice network support and common Supplementary service
support. The mode is automatically selected if the U interface is DC
powered or may be selected manually from the Mode menu.
PSTN
Connect the TS350 to the analogue interface with the crocodile clips
either connected directly to the pair or to a PSTN socket adapter. In
this mode the TS350 acts as an analogue test telephone and
supports DTMF or Pulse (loop disconnect) dialling, and line voltage
measurement. The mode is particularly useful when testing
combined analogue and ISDN network termination units (NTs). The
interface is automatically selected if a PSTN line voltage is detected
and no other interfaces are active or may be selected manually from
the Mode menu.
22
Page 23

TS350® Basic Rate Euro ISDN Test Set
↵↵ ↵↵
14:20
Test Menu
L2 USR INFO TEI=0
L3 USR SETUP
↵↵
Free Datasheet http://www.Datasheet4U.com
ISDN BRI Testing
The ISDN Test Menu is available in the ISDN S - TE mode and the
ISDN U - TE modes.
BER Test
The BER (bit error rate) test is selected from the Test Menu which is
presented after you have selected ISDN BRI - TE from the Mode
menu.
When the interface has activated the S or U interface LED will flash
green. Whilst activation is in progress or if it has failed, the LED will
flash red.
To make a BER test (BERT), select the outgoing channel by entering
the channel number1 (either 1 or 2) for making the call and then
pressing the (select) key to select the channel. Either enter a
remote test number or for a self call test, your own number, and then
press the key again to setup the call.
To allow the network to assign the outgoing channel number, select
Bx.
The screen sequence is as follows:
BER Test 1
Speech 2
3.1kHz Audio 3
Teleservices 4
23
Page 24

TS350® Basic Rate Euro ISDN Test Set
14:20
BER Test
↵↵
14:20
BER Test
↵↵
14:20
BER Test
L2 USR INFO TEI=0
L3 USR SETUP
14:20
C=Stop *=Reset #=Err
BER Test
L2 USR RR_C TEI=0
B1 DATA OUT PRBS
Free Datasheet http://www.Datasheet4U.com
BERT 1
Bearer:Data 2
Loopbox:Bearer 3
Pattern: 211-1 4
Enter B ch#: 1
Bx
Enter Number:
01633123456
B2 2
Upon connection of the call you will be presented with the test results
screen:
Return to menu
E:0 ES:0 SES:0
Time left 00:00:59
2
24
Page 25

TS350® Basic Rate Euro ISDN Test Set
↵↵
14:20
BER Test
ALL CHANNELS IDLE
Free Datasheet http://www.Datasheet4U.com
The test results are shown in real time:
• E is the bit error count
• ES is the errored second count
• SES is the severely errored second count
• Time left is shown counting down from the preset test time, (or if
Cont is set in the BERT setup options then the Test time counts
up).
If you wish to restart the test, press the key to reset the Time left
and error counters.
To insert a single bit error in the PRBS test pattern, press the
key.
#
If you wish to make a voice call whilst your BERT is running, then
press the during the test to return to the Test Menu and select
Speech or 3.1kHz Audio. Then proceed to make the call as
described later in this guide. During or after your speech call, to go
back to the test results menu select BER Test from the main menu.
The test will automatically stop when the test time is complete. The
test can be stopped at any time by pressing the key, which clears
C
the outgoing call.
When the test is complete you are presented with the test results
screen:
**Test Passed**
E:0 ES:0 SES:0
Time time 00:01:00
2
25
Page 26

TS350® Basic Rate Euro ISDN Test Set
14:20
BER Test
14:20
BER Test
t t s
↵↵
Free Datasheet http://www.Datasheet4U.com
To clear the results screen and return to the BER test menu press
C
the key.
BER Test Options
The BER test sub menu options are listed in the BER test menu.
Using the scroll down arrow key you can see all the options.
Note: When there are more menu items than are shown in the menu
window, you will see a scroll bar.
BERT 1
Bearer:Data 2
Loopbox:Bearer 3
Pattern: 211-1 4
Pattern: 211-1 4
Test Time: 1 min 5
G.821 Results 6
Test Thresholds 7
Use the or keys to highlight the menu option required and
then press the key to select a menu option. The selected item in
any option menu is shown with a * following the option name.
Bearer
Selects the bearer type menu that the outgoing or incoming BERT
uses to carry the PRBS test pattern.
26
Page 27

TS350® Basic Rate Euro ISDN Test Set
14:20
BER Test
14:20
BER Test
Free Datasheet http://www.Datasheet4U.com
Data * 1
Speech 2
3.1kHz Audio 3
Loopbox
Selects the menu for how the tester responds to an incoming BERT
test on any channel originated from a remote tester, which may be
another TS350, or any other compatible commercial tester.
Bearer * 1
All 2
None 3
ManPRBS 4
AutoPRBS 5
Bearer: Selects the bearer selected in the Bearer menu (above) that
will be automatically looped upon receipt of a compatible call. The
incoming receive pattern is looped back onto the transmit side of the
bearer channel. This function will operate whatever the test menu
state when an incoming call is received, even if a test call is in
progress on another channel.
In this mode the TS350 cannot clear the incoming call, which must
be cleared by the remote tester. This is to avoid tampering when the
TS350 is left unattended.
All: Any incoming call on any bearer is looped.
In this mode the TS350 cannot clear the incoming call, which must
be cleared by the remote tester. This is to avoid tampering when the
TS350 is left unattended.
27
Page 28

TS350® Basic Rate Euro ISDN Test Set
↵↵
14:20
C=Stop *=Reset #=Err
BER Test
L2 USR RR_C TEI=74
B2 DATA IN PRBS
Free Datasheet http://www.Datasheet4U.com
None: No incoming calls are looped. In this mode all calls are
manually answered. Voice calls operate normally.
ManPRBS: If an incoming call compatible with the selected bearer in
the Bearer menu is received the TS350 will ring. When you answer
the call with the key, the TS350 sends its own PRBS pattern as
selected in the Pattern menu. This mode allows the transmit and
receive directions to be independently tested for errors end to end.
After answering the call you are presented with the test results
screen.
In this mode you can wait for the remote tester to finish the test or
clear the call from your TS350.
Return to menu
E:0 ES:0 SES:0
Time left 00:00:59
2
AutoPRBS: If an incoming call compatible with the selected bearer
in the Bearer menu is received the TS350 automatically answers the
call and sends its own internally generated PRBS pattern as selected
in the Pattern menu. This mode allows the transmit and receive
directions to be independently tested for errors end to end. In this
mode the TS350 may be left unattended.
After The TS350 auto answers the call you are presented with the
test results screen, which shows the errors, received in the incoming
test pattern from the remote tester.
28
Page 29

TS350® Basic Rate Euro ISDN Test Set
t
14:20
BER Test
14:20
BER Test
Free Datasheet http://www.Datasheet4U.com
The TS350 cannot clear the incoming call, which must be cleared by
the remote tester. This is to avoid tampering when the TS350 is left
unattended.
Note: Scroll down the menu pressing the key to highlight Auto PRBS for
selection.
Pattern
Selects the PRBS test pattern to be used for both an outgoing BERT
and an incoming BERT.
29-1 1
211-1 * 2
215-1 inv 3
211-1 is the default pattern for basic rate individual B channel ISDN
circuits. The 29-1 and 215-1 inverted patterns provide flexibility when
interworking with the other test equipment. For example when doing
end to end BERTs with other test equipment.
Test Time
Selects the test time duration for an outgoing BERT.
1 Min * 1
15 Min 2
User 3
Cont 4
1 Min: 1 minute is the default test time for a line commissioning test.
15 Min: 15 minute test time option.
29
Page 30

TS350® Basic Rate Euro ISDN Test Set
14:20
C=Abort
BER Test
14:20
Test Results
14:20
Test Results
t
Free Datasheet http://www.Datasheet4U.com
User: Allows you to set your own standard test time by entering your
selected time in the sub menu:
Accept Value
Time- hh mm
01:30
To enter the test time enter the full time including leading zeros with
the hours first e.g. press 0; then 1; then 3; then 0; to give the test
time of 1 hour and 30 minutes
G.821 Results
Presents the full G.821 test results of the last BERT test as shown in
the example below:
Errors: 3
Test time: 60
BER: 7.8 E-07
UAT: 0=00.000%
UAT: 0=00.000%
ES: 3=05.000%
SES: 0=00.000%
DM: 0=00.000%
30
Page 31

TS350® Basic Rate Euro ISDN Test Set
14:20
1*
BER Test
14:20
Test Menu
↵↵
Free Datasheet http://www.Datasheet4U.com
Test Thresholds
Sets the error level that will be treated as a BERT failure. You can
either set the error level as a number of bit errors, or to be G.821
values. If you select G.821 values, the occurrence of any one of the
three values during the test will result in a test failure.
Errors:
G.821 ES: 02.4%
SES:0.0010%
DM:03.0%
To set a threshold value, highlight the menu item you require to set
and then enter the digits with the most significant digit first. To enter
Errors, enter the number of errors. E.g. for an error failure threshold
of 1, enter 1; for an error failure threshold of 20 enter 2 then 0. To
enter G.821 criteria e.g. to set ES to 02.4% enter 0; then 2, then 4.
Speech Call
To make a speech call, select Speech from the Test Menu.
BER Test 1
Speech 2
3.1kHz Audio 3
Teleservices 4
Enter the B channel number you want to call on. The options are:
B1 or B2: exclusive in the Setup message
Bx: any channel in the Setup message
31
Page 32

TS350® Basic Rate Euro ISDN Test Set
14:20
Speech Call
↵↵
14:20
Speech Call
L2 USR RR_C TEI=0
L3 USR INFO
14:20
Speech Call
L2 USR RR_C TEI=0
B1 SPEECH OUT
↵↵
Free Datasheet http://www.Datasheet4U.com
Note: Some iSPBXs will only allow a Setup message with any channel
specified.
Enter B ch#: 1
Bx
Dial: Overlap
Key in the digits of the number you wish to call. When Dial : Overlap
is set, the digits are signalled individually in Information messages.
Enter Number:
01633123123
B2 2
When the called number connects, you will be presented with the call
in progress screen:
Called Number:
01633123123
C=Clear, s=KEYPAD
Return to Menu
Pressing the key takes you back into the Test Menu. This
feature is useful to talk a colleague at a remote site whilst making an
end to end or self call BERT.
32
Page 33

TS350® Basic Rate Euro ISDN Test Set
s
14:20
Speech Call
t
↵↵
14:20
Speech Call
↵↵
Free Datasheet http://www.Datasheet4U.com
During a call DTMF tones can be sent end to end when the number
keys, and are pressed. This is useful when using remote test
#
equipment.
If the key is pressed then KEYPAD information messages are
sent when number keys number keys, and are pressed. This
#
is useful when invoking or suspending supplementary services.
Dialling Mode
Speech (and 3.1kHz) bearer calls can be made using either overlap
or en bloc number signalling. Overlap dialling send number
Information messages for each digit dialled, whilst with en bloc
dialling the entire number is sent in the Called Party Number
information element in the outgoing Setup message.
To select En Bloc dialling, from the Speech Call menu, scroll down
and select Dial: Overlap by pressing the key to toggle the dialling
mode to En Bloc.
Enter B ch#: 1
Bx
Dial: Overlap
Enter B ch#: 1
Bx
Dial: En-Bloc
33
Page 34

TS350® Basic Rate Euro ISDN Test Set
14:20
Test Menu
↵↵ ↵↵ ↵↵
14:20
3.1kHz Call
↵↵
Free Datasheet http://www.Datasheet4U.com
3.1kHz Audio Call
To make a 3.1kHz bearer voice call, select 3.1kHz from the Test
Menu.
BER Test 1
Speech 2
3.1kHz Audio 3
Teleservices 4
Enter the B channel number you want to call on and press the
key. The options are:
B1 or B2: exclusive in the Setup message
Bx: any channel in the Setup message
Note: Some iSPBXs will only allow a Setup message with any channel
specified.
Enter B ch#: 1
Bx
Dial: Overlap
Note: The dialling mode may be selected to be either En-Bloc or Overlap by
scrolling down to highlight Dial: En-Bloc and selecting your choice of dialling
mode in the same way as for a Speech call. Note that the default dialling
mode for 3.1kHz Audio is En-Bloc.
Key in the digits of the number you wish to call and press . When
Dial : En-Bloc is set, the digits are signalled in the Setup message.
34
Page 35

TS350® Basic Rate Euro ISDN Test Set
14:20
3.1kHz Audio
L2 USR RR_C TEI=0
B1 SPEECH OUT
↵↵
s
14:20
3.1kHz Call
L2 USR RR_C TEI=0
L3 USR SETUP
↵↵
Free Datasheet http://www.Datasheet4U.com
Enter Number:
01633123123
B2 2
When the called number connects, you will be presented wi th the call
in progress screen:
Called Number:
01633123123
C=Clear, s=KEYPAD
Return to Menu
Pressing the key takes you back into the Test Menu. This
feature is useful to talk a colleague at a remote site whilst making a
BERT.
During a call DTMF tones can be sent end to end when the number
keys, and are pressed. This is useful when using remote test
#
equipment.
If the key is pressed then KEYPAD information messages are
sent when number keys number keys, and are pressed. This
#
is useful when invoking or suspending supplementary services.
35
Page 36

TS350® Basic Rate Euro ISDN Test Set
↵↵
C↵↵
14:20
Test Menu
L2 USR RR_C TEI=0
B1 3.1KHZ IN
↵↵
14:20
Test Menu
L2 USR RR_C TEI=74
B1 3.1KHZ IN
Free Datasheet http://www.Datasheet4U.com
Receiving a Voice Call
When your TS350 receives a compatible incoming Setup message
(incoming call) the piezo sounder will ring and you will be prompted
with the screen:
Incoming call...
01273860000
Answer Call
C to reject
To answer the call press the key and you will be able to talk to
the calling party. You will then be presented with the call in progress
screen:
Caller Number:
01273860000
C=Clear,s=KEYPAD
Return to Menu
If you wish to end the call, press the key or just wait for the
calling party to clear the call. After call clearing you will be returned
to the TS350 Test Menu.
To make a second call, for example to conduct a BERT, press the
key to return to the Test Menu and select the BER Test option.
This feature is useful if you want to make an end to end BERT
whilst discussing results with a colleague.
C
36
Page 37

TS350® Basic Rate Euro ISDN Test Set
↵↵
14:20
Teleservices
t
14:20
Teleservices
t
14:20
Test Menu
L2 USR INFO TEI=74
L3 USR SETUP
t
↵↵
Free Datasheet http://www.Datasheet4U.com
Teleservice Tests
The TS350 can automatically check for Teleservice HLC (Higher
Layer Compatibility) support on the line by making a series of self
calls to the number of the line under test and inspecting the incoming
network Setup message for the appropriate HLC information
element. This test is performed without connecting the calls and so
no customer call charges are incurred.
BER Test 1
Speech 2
3.1kHz Audio 3
Teleservices 4
To select the Teleservices test suite, scroll down to highlight
Teleservices in the Test Menu and press .
The Teleservices test menu is then presented as shown below:
Automatic 1
Telephony 2
7kHz 3
Fax G2/3 4
To view all the test options scroll down through the menu:
Fax G4 C1: 5
Fax G4 C2/3: 6
Mixed Mode: 7
Teletex F220: 8
37
Page 38

TS350® Basic Rate Euro ISDN Test Set
14:20
Teleservices
14:20
Teleservices
t
↵↵ ↵↵ ↵↵
14:20
Teleservices
Free Datasheet http://www.Datasheet4U.com
Teletex F200: 9
Videotex: 01
Telex F60: 02
MHS X400: 03
MHS X400: 03
OSI X200: 04
Mainteneance: 05
Management: 06
Teleservices can be tested individually by highlighting the
Teleservice to be tested and pressing , or all services can be
tested automatically.
To conduct an automatic Teleservices test highlight and select
Automatic by pressing .
You will next be prompted to enter the B channel number on which to
make the outgoing call. The default is B1, or enter the channel
number of your choice. The press .
Enter B ch#: 1
Bx
38
Page 39

TS350® Basic Rate Euro ISDN Test Set
↵↵
14:20
Teleservices
↵↵
14:20
Teleservices
14:20
Teleservices
t
14:20
Teleservices
t
Free Datasheet http://www.Datasheet4U.com
When prompted to enter Own number:, enter the number of the
ISDN line under test and press to start the automatic test
sequence.
Own Number:
01633123456
During the test you are presented with test progress messages:
Testing...
Telephony
On completion of the test you will see a Normal call clearing
message and be presented with the test results, which you can scroll
down through. If a Teleservice has been tested as supported then
the item is shown with a 3. If it is not supported then it is shown with
a 6.
Automatic 1
Telephony: 3 2
7kHz: 6 3
Fax G2/3: 3 4
Fax G4 C1: 3 5
Fax G4 C2/3: 3 6
Mixed Mode: 3 7
Teletex F220: 3 8
39
Page 40

TS350® Basic Rate Euro ISDN Test Set
14:20
Teleservices
14:20
Teleservices
t
14:20
Teleservices
↵↵
14:20
Teleservices
ALL CHANNELS IDLE
↵↵ ↵↵
t
Free Datasheet http://www.Datasheet4U.com
Teletex F200: 3 9
Videotex: 3 01
Telex F60: 3 02
MHS X400: 3 03
MHS X400: 3 03
OSI X200: 3 04
Mainteneance: 3 05
Management: 3 06
To conduct a single Teleservice test highlight and select the
Teleservice to be tested
Fax G4 C1: 5
Fax G4 C2/3: 6
Mixed Mode: 7
Teletex F220: 8
Enter Own Number and press .
Own Number:
01633123456
40
Page 41

TS350® Basic Rate Euro ISDN Test Set
14:20
Teleservices
14:20
Teleservices
14:20
Test Menu
t
↵↵
Free Datasheet http://www.Datasheet4U.com
You are presented with the test progress message and the result
upon completion.
Testing...
Teletex F220
Fax G4 C1: 5
Fax G4 C2/3: 6
Mixed Mode: 7
Teletex F220: 3 8
Supplementary Service Tests
The TS350 can automatically check for Supplementary Service
support on the line by making a series of self calls to the number of
the line under test and inspecting the incoming network Setup
message for the appropriate information elements. This test is
performed without connecting the calls, and so customer call
charges are minimised.
Speech 2
3.1kHz Audio 3
Teleservices 4
Supplementary 5
41
Page 42

TS350® Basic Rate Euro ISDN Test Set
↵↵
14:20
Suppl. Serv.
t
14:20
Suppl. Serv.
Free Datasheet http://www.Datasheet4U.com
To select the supplementary services test suite, scroll down to
highlight Supplementary in the Test Menu and press the key.
The Supplementary services test menu is then presented as shown
below:
Automatic 1
DDI/MSN:
2
SUB: 3
CLIP: 4
To view all the test options scroll down through the menu:
SUB: 3
CLIP: 4
CLIR: 5
TP: 6
DDI/MSN: the TS350 makes an outgoing self call and inspects the
incoming network Setup message for a Called Party Number
information element. If this is present then the line supports DDI
(Direct Dialling IN).
SUB: the TS350 makes an outgoing self call containing a sub
address information element in the outgoing Setup message with
Sub address 'Harris', and inspects the incoming network Setup
message for the sub address information element. If its is present in
the network Setup message, then the line supports sub addressing.
The Sub address test uses the sub address type set in the Setup
menu: either NSAP or User.
42
Page 43

TS350® Basic Rate Euro ISDN Test Set
↵↵ ↵↵ ↵↵
14:20
Suppl. Serv.
↵↵
Free Datasheet http://www.Datasheet4U.com
CLIP: the TS350 makes an outgoing self call and inspects the
incoming network Setup message for a Calling Party Number
information element. If this is present with valid number contents,
then the line supports CLIP (Calling Line Identity Presentation).
CLIR: the TS350 makes an outgoing self call with the Calling Party
Number information element set to restricted and inspects the
incoming network Setup message. If the Calling Party Number
information element is set to restricted, then the line supports CLIR
(Calling Party Number Identity Restricted).
TP: the TS350 makes an outgoing self call and automatically
suspends and resumes the call when the Automatic test sequence
is selected. If the sequence occurs with the correct network
responses then TP (Terminal Portability) is supported on the line.
The Supplementary services listed in the menu can be tested
individually by highlighting the Supplementary service to be tested
and pressing the key , or you can test all the supplementary
services listed in the menu automatically.
Automatic
To conduct an automatic Supplementary services test highlight and
select Automatic by pressing the key.
You will next be prompted to enter the B channel number on which
you will make the outgoing call. The default is 1, or enter the channel
number of your choice. Then press .
Enter B ch#: 1
Bx
43
Page 44

TS350® Basic Rate Euro ISDN Test Set
↵↵
14:20
Suppl. Serv.
↵↵
14:20
Suppl. Serv.
14:20
Suppl. Serv.
t
Free Datasheet http://www.Datasheet4U.com
When prompted to enter Own number:, enter the number of the
ISDN line under test and press to start the automatic test
sequence.
Own Number:
01633123456
During the test you are presented with test progress messages:
Testing...
DDI
On completion of the test you will see a Normal call clearing
message and be presented with the test results, which you can scroll
down through. If a Teleservice has been tested as supported then
the item is shown with a 3. If it is not supported then it is shown with
a 6.
Automatic 1
DDI: 3 2
SUB: 6 3
CLIP: 3 4
44
Page 45

TS350® Basic Rate Euro ISDN Test Set
14:20
Suppl. Serv.
14:20
Suppl. Serv.
↵↵
14:20
Suppl. Serv.
↵↵ ↵↵ ↵↵
14:20
Suppl. Serv.
↵↵
Free Datasheet http://www.Datasheet4U.com
SUB: 6 3
CLIP: 3 4
CLIR: 3 5
TP: 3 6
Manual DDI/MSN/SUB/CLIP/CLIR
To conduct a manual Supplementary service test highlight and select
the service to be tested
Automatic 1
DDI: 2
SUB: 3
CLIP: 4
Enter the B channel number on which you will make the outgoing
call. Then press .
Enter B ch#: 1
Bx
Enter Own Number and press .
Own Number:
01633123456
45
Page 46

TS350® Basic Rate Euro ISDN Test Set
14:20
Suppl. Serv.
14:20
Suppl. Serv.
14:20
Suppl. Serv.
↵↵
14:20
Suppl. Serv.
B1 IDLE
↵↵
Free Datasheet http://www.Datasheet4U.com
You are presented with the test progress message and the result
upon completion.
Testing...
CLIP
Automatic 1
DDI/MSN: 2
SUB: 3
CLIP: 3 4
Manual TP
To test TP manually, select TP from the menu:
SUB: 3
CLIP: 4
CLIR: 5
TP: 6
Enter the number of another voice terminal e.g. the speaking clock.
Own Number:
123
46
Page 47

TS350® Basic Rate Euro ISDN Test Set
14:20
Suppl. Serv.
B1 SPEECH OUT
↵↵
14:20
Suppl. Serv.
B1 SPEECH OUT
↵↵
14:20
Suppl. Serv.
B1 SPEECH OUT
Free Datasheet http://www.Datasheet4U.com
When the call is answered select the Suspend ID (or enter your own
ID) to suspend the call:
Suspend ID:
12
Note: After you have successfully suspended the call, you can physically
disconnect the TS350 from the S bus and then reconnect within 3 minutes.
To resume the call, select the Resume ID:
Resume ID:
12
To end the test, clear the call:
C = Clear Call
If the correct network responses are received then the test will be
shown as passed. If the network rejects the Suspend message, then
the TP test will be shown as failed.
C
47
Page 48

TS350® Basic Rate Euro ISDN Test Set
14:20
Voltages
14:20
Voltages
t
↵↵
14:20
Test Menu
↵↵
Free Datasheet http://www.Datasheet4U.com
Voltages
To select the Voltages menu, scroll down to highlight Voltages in the
Test Menu and select by pressing the key.
3.1kHz Audio 3
Teleservices 4
Supplementary 5
Voltages 6
The TS350 measures the battery, DC supply and the ISDN interface
voltages. This feature is useful to ensure that the network voltages
are within specification. If not within the limits, then you may have a
network or NT1 fault.
Note: To see the PS2 scroll down.
Battery: 2.60v
DC: 0.0v
PS1: 40v(R)
PS2: 0.0v
DC: 0.0V
PS1: 40V(R)
PS2: 0.0V
U: 0.0V
48
Page 49

TS350® Basic Rate Euro ISDN Test Set
↵↵
14:20
Test Menu
↵↵
14:20
Recorded Data
Free Datasheet http://www.Datasheet4U.com
Battery: The NiMH batteries typically operate in the range 2.2 to
2.7volts. You will have up to 7 hours continuous use when
the battery has been charged to 2.7 volts (off charge).
DC: The voltage of the mains plug top DC power supply when
connected. Typically 12 to 14 volts.
PS1: Power Source 1. The phantom power feed voltage across
the transmit and receive pair of the S interface. N designates
Normal power in the range 24 to 42 volts with power of 1
watt. R designates restricted or emergency power (indicated
by reverse polarity) in the range 32 to 42 volts with power of
420mW.
PS2: Power Source 2 (optional on an NT1) on pins 7 and 8 of the
S interface RJ45 connector. Normal (N) power is a minimum
7 watts in the range 32 to 42 volts. Restricted (R) power is a
minimum of 2 watts in the range 32 to 42 volts.
U: The voltage at the U two wire interface. Typically 90 volts for
a powered line feed.
Recorded Data
To select the Recorded Data menu scroll down the Test Menu and
select with the key.
Teleservices 4
Supplementary 5
Voltages 6
Recorded Data 7
Trace L1/L2/L3 1
Number Log 2
49
Page 50

TS350® Basic Rate Euro ISDN Test Set
t s
↵↵
14:20
Recorded Data
Free Datasheet http://www.Datasheet4U.com
After selecting one of the Recorded Data menu items you can use
the keys below to move through the listings
Short press to scroll down one line. Long press (>1 sec) to
page down 6 lines. Press and hold continuously pages down
6 lines every second.
Short press to scroll up one line. Long press (>1 sec) to
page up 6 lines. Press and hold continuously pages up 6
lines every second.
Press to go to the first item in the log.
1
Number log: press to go to the last item in the log
0
Trace: press to go to last item and AUTO scroll.
Press to clear the log.
C
Press to exit the Test Results and return to the Test Menu.
Trace L1/L2/L3
To display Trace L1/L2/L3 select the item from the Recorded Data
menu.
Trace L1/L2/L3 1
Number Log 2
This screen shows a simple decode of the D channel protocol
captured during test calls. The frame types and message types can
50
Page 51

TS350® Basic Rate Euro ISDN Test Set
14:20
001 U 00 000 SABME C
Trace
Scroll Up/Down
1=TOP 0=AUTO *=CLEAR
Free Datasheet http://www.Datasheet4U.com
be filtered to display the options selected in the Setup menu item
Trace as shown below:
• Layer 1 INFO states
• Layer 2 frame types
• Layer 2 RR frames
• Layer 3 messages
• 'Display' Information Elements
The trace buffer will store up to 200 lines of decode. An example of a
captured trace is shown below.
002 N 00 000 UA R
003 U 00 000 RR C
004 N 00 000 RR R
005 U 00 000 I C
006 U 001 B2 SETUP
s t
The trace format is shown below:
Layer 1 INFO states:
Buffer
Line# STATE
001 U INFO3
U=User/terminal side
N=Network side
Layer 2 frames:
Buffer
Line# SAPI TEI Frame type
001 U 00 000 SABME
51
Page 52

TS350® Basic Rate Euro ISDN Test Set
14:20
Recorded Data
↵↵ ↵↵
14:20
Test Menu
↵↵
14:20
01 B2 O/G CALLING NO
Number Log
Scroll Up/Down
1=TOP 0=END *=CLEAR
Free Datasheet http://www.Datasheet4U.com
Layer 3 messages:
Buffer Call
Line# Ref Channel Message type
006 U 001 B1 SETUP
For a listing of all Layer 1 Alarm states, Layer 2 frame types and
Layer 3 message types see Appendix .
Number Log
To display Number Log select the item from the Recorded Data
menu.
This screen shows a log of all outgoing and incoming Calling Party
Numbers (CLI) and Called Party Numbers (CPN). An example of a
Number log is shown below.
Setup
To select the Setup menu, scroll down to highlight Setup in the Test
Menu and select by pressing the key.
52
Trace L1/L2/L3 1
Number Log 2
012911234567
B15 O/G CALLED NO
012916667777
02 B1 I/C CALLING NO
016337654321
s t
Supplementary 5
Voltages 6
Recorded Data 7
Setup 8
Page 53

TS350® Basic Rate Euro ISDN Test Set
14:20
Setup
t
14:20
Setup
t
14:20
01
Setup
↵↵
Free Datasheet http://www.Datasheet4U.com
The Setup menu is shown below:
TEI: Auto 1
Language:English 2
Term: 100ohm 3
Set Date & Time 4
Set Date & Time 4
Codec: A Law 5
Sub Address:NSAP 6
Terminal No 7
Terminal No 7
Set Default: 8
Contrast 9
Trace
To select a menu item, scroll down to highlight the item and select by
pressing the key to display the sub menu.
53
Page 54

TS350® Basic Rate Euro ISDN Test Set
↵↵
C↵↵
14:20
TEI
↵↵ ↵↵
Free Datasheet http://www.Datasheet4U.com
The current selection is shown with a * next to the item in the sub
menu. To exit a sub menu without making a new setting, press the
key.
TEI
This menu allows you to set an automatic TEI assignment procedure
as used on a Point to Multipoint (PMP) S bus, or to select a Fixed
TEI as used for example by iSPBXs.
Select the TEI sub menu by highlighting TEI in the Setup menu and
pressing the key.
Auto: * 1
Fixed: 0 2
To select automatic TEI assignment (PMP) highlight Auto and select
by pressing the key. You will be returned to the Setup menu and
see TEI: Auto displayed.
To enter a Fixed TEI value, scroll down to highlight Fixed, enter the
TEI value required in the range 0 to 63, and save by pressing the
key. You will be returned to the Setup menu and see TEI: Fixed 0
displayed with the value you entered (in this example 0).
Language
The menu structure can be displayed in 4 languages. To select the
language of your choice, select the Language sub menu, scroll to
highlight the language of your choice and press the key. You will
then be returned to the Setup menu with your choice of language
shown.
54
Page 55

TS350® Basic Rate Euro ISDN Test Set
14:20
Language
14:20
S Termination
↵↵
Free Datasheet http://www.Datasheet4U.com
English* 1
Francais 2
Deutsch 3
Espanol 4
Term
The S interface transmit and receive pairs can be terminated with a
100ohm resistor across each pair, or left high impedance - Hi Z. If
the TS350 is the only item on the S bus then use the 100 ohm
termination setting. If the S bus is already terminated by another
terminal, then use the Hi Z setting.
To change the termination setting, select S Term from the Setup
menu.
100 ohm *
Hi Z
Scroll down to highlight your choice and press the key. You will
then be returned to the Setup menu with your selection shown.
Set Date & Time
The TS350 has a real time clock, which is used to date and
timestamp the Genius compatible binary trace output on the RS232
port, and to display the time in all menus.
55
Page 56

TS350® Basic Rate Euro ISDN Test Set
↵↵
14:20
Set Date
14:20
Set Time
Free Datasheet http://www.Datasheet4U.com
Scroll down to Set Time and Date in the Setup menu, and select by
pressing the key.
* = Time
Date- dd
16/ 02/ 01
Save Date & Time
To set the date, enter the current date in the format shown on the
screen. e.g. to set the date shown enter 1, then 6, then 0, then 2,
then 0 then 1: i.e. 16th February 2001.
To set the time press the key to display the screen shown below:
* = Date
Time- hh
11: 20: 00
Save Date & Time
To set the time, enter the current time in the format shown on the
screen in hours, minutes and seconds. e.g. to set the time shown
enter 1, then 1, then 2, then 0, then 0, then 0.
i.e.
hh mm ss
11 20 00
Coding Law
The TS350 will support either the A law coding algorithm as used in
Europe or the µ (mu) law coding algorithm as used in the USA and
Japan.
56
Page 57

TS350® Basic Rate Euro ISDN Test Set
↵↵
14:20
Codec Law
↵↵ ↵↵
14:20
Sub Address
↵↵
Free Datasheet http://www.Datasheet4U.com
To set the Codec law, scroll down to select Codec in the Setup
menu and press the key.
A Law * 1
u Law 2
Scroll to highlight the codec law required and select by pressing the
key. You will be returned to the Setup menu with the Codec Law
selected shown.
Sub Address
The TS350 can send and recognise two types of sub address as
defined in the ETSI standards: User and NSAP.
Scroll down to highlight Sub Address in the Setup menu and select
by pressing the key.
User 1
NSAP * 2
Scroll to highlight the Sub Address type required and press the
key. You will be returned to the Setup menu with the Sub
Address type selected shown.
Terminal No
If you enter a Terminal No, the TS350 will send this number in Setup
messages as the Calling Party Number information element and
57
Page 58

TS350® Basic Rate Euro ISDN Test Set
↵↵
14:20
Terminal No
L2 USR RR_C TEI=0
↵↵ ↵↵
14:20
Setup
Free Datasheet http://www.Datasheet4U.com
respond only to calls that have a least significant digits match of the
terminal number in a Called Party Number information element in a
Network Setup message. If there is no Called Party Number IE in the
Network Setup message, or no entry in Terminal No, then the TS350
will respond to all Network Setup messages.
Scroll down to highlight Terminal No in the Setup menu and press
the key.
You are prompted to enter the number of the Terminal.
Terminal Number:
01291654321
Enter the number you wish to assign to the TS350 and press the
key to save the number. The number is saved and you are
returned to the Setup menu. This number is cleared when the unit is
switched off.
Set Default
This menu item will reset all the TS350 defaults setup parameters.
Scroll down to highlight Set Default and select by pressing the
key. When the default values have been selected this is denoted
with a * character:
Codec: A Law 5
Sub Address:NSAP 6
Terminal No 7
Set Default * 8
58
Page 59

TS350® Basic Rate Euro ISDN Test Set
s t
14:20
Set Contrast
L2 USR RR_C TEI=0
↵↵
14:20
Trace
↵↵
Free Datasheet http://www.Datasheet4U.com
When you set a parameter to a non-default value, the * will be
removed. All setup parameters (except Terminal No) are stored in
non volatile memory and will be maintained even if the batteries are
flat or removed.
Contrast
The LCD display contrast can be set after selecting the Contrast
Setup menu item.
Pressing the key repeatedly will increase the contrast, and
pressing the key repeatedly will decrease the contrast.
Display Contrast
tDown Ups
||||||||||||||||||||||
Trace
The internal trace buffer for Layer 1, 2 and 3 messages can be
filtered.
Scroll down to highlight Trace in the Setup menu and select by
pressing the key.
Each item can be selected as shown with a 4 or deselected as
shown with a X by scrolling to highlight the item and pressing the
key to toggle the item. When you have finished setting the filters
as you require, then press the key to exit the menu.
C
Layer 1: X
Layer 2: 4
L2-RR: X
Layer 3: 4
59
Page 60

TS350® Basic Rate Euro ISDN Test Set
14:20
Test Menu
Layer 1 activation
failure
14:20
Test Menu
USR INFO 3
Free Datasheet http://www.Datasheet4U.com
User Messages
A full listing of user messages is described in the Appendix
Layer 1 messages
The TS350 displays the INFO states as they are received in the top
line of the lower section of the screen.
BER Test 1
Speech 2
3.1kHz Audio 3
Teleservices 4
When Layer 1 activation is complete the TS350 indicates this by
either the S or U LED flashing green depending upon the interface
that is connected.
If the TS350 is unable to activate layer 1 at either the S or U
interface, then the message:
Layer 1 activation failure
will be displayed and the S or U LED will flash red.
BER Test 1
Speech 2
3.1kHz Audio 3
Teleservices 4
Layer 2 messages
When Layer 1 is activated, the TS350 will display all Layer 2 frames
sent or received together with the TEI value in the top line of the
lower section of the screen.
60
Page 61

TS350® Basic Rate Euro ISDN Test Set
14:20
Test Menu
L2 USR INFO TEI=0
L3 USR SETUP
14:20
3.1kHz Audio
L2 I_C TEI=0
L3 USR SETUP
14:20
Test Menu
L2SABME RETRANSMISSION
Free Datasheet http://www.Datasheet4U.com
BER Test 1
Speech 2
3.1kHz Audio 3
Teleservices 4
If a Layer 2 error has occurred an error message will be displayed in
the top line of the lower section of the screen. e.g.
BER Test 1
Speech 2
3.1kHz Audio 3
Teleservices 4
indicates that the TS350 has failed to get a network response to 4
transmissions of the SABME frame.
Layer 3 Messages
The TS350 will display all Layer 3 messages sent or received in the
bottom line of the lower section of the screen wherever you are in the
menu structure with the exception of the Trace screen.
Enter Number:
01633123123
B2 2
61
Page 62

TS350® Basic Rate Euro ISDN Test Set
14:20
Suppl. Serv.
B1 DATA OUT PRBS
14:20
3.1kHz Audio
L3 unknown message
14:20
BER Test
Free Datasheet http://www.Datasheet4U.com
If the TS350 does not recognise a Layer 3 message an error
message will be displayed on the bottom line of the lower section of
the screen. e.g.
Enter Number:
01633123123
B2 2
B Channel Status
The TS350 shows the B channel status by displaying the call type on
the bottom line of the lower section of the screen with scrolling
messages.
Own Number:
123
The display of Layer 3 messages takes priority over B channel status
messages.
Clear Cause
When a call is cleared the TS350 displays the clear cause number
and text description in the main section of the screen. e.g.
Cause = 16
Normal call
clearing2
62
Page 63

TS350® Basic Rate Euro ISDN Test Set
RJ45 lead
RJ45 dual
TS350
↵↵
14:20
Mode
Free Datasheet http://www.Datasheet4U.com
Passive Monitor
The TS350 Passive Monitor mode allows you to monitor Layer 1 and
the D channel protocol at Layer 2 and Layer 3 in the TE to NT (User)
and NT to TE (Net) directions on the S/T bus. In this mode the
TS350 must be bridged onto the link between the NT and the TE
which may be an ISPBX or multiplexer. You can do this by using
appropriate adapters e.g. a dual outlet RJ45 adapter.
To activate the passive monitor mode, select ISDN S-Monitor from
the Mode menu.
The Monitor screen shows a simple decode of the D channel
protocol captured. The frame types and message types can be
filtered to display the options selected in the Test Menu sub menu:
Setup, Trace as shown below:
• Layer 1 INFO states
• Layer 2 frame types
• Layer 2 RR frames
TE
NT1
outlet adapter
ISDN S-TE 1
ISDN S-Monitor 2
ISDN U-TE 3
PSTN 4
63
Page 64

TS350® Basic Rate Euro ISDN Test Set
14:20
001 U 00 000 SABME C
Monitor
Scroll Up/Down
1=TOP 0=AUTO *=CLEAR
t s
0
Free Datasheet http://www.Datasheet4U.com
• Layer 3 messages
• 'Display' Information Elements
The trace buffer will store up to 200 lines of decode. An example of a
captured trace is shown below.
002 N 00 000 UA R
003 U 00 000 RR C
004 N 00 000 RR R
005 U 00 000 I C
006 U 001 B2 SETUP
s t
You can use the keys below to move through the monitor trace.
Short press to scroll down one line. Long press (>1 sec) to
page down 6 lines. Press and hold continuously pages down
6 lines every second.
Short press to scroll up one line. Long press (>1 sec) to
page up 6 lines. Press and hold continuously pages up 6
lines every second.
Press to go to the first item in the decode.
1
Press to go to the last item in the decode and AUTO scroll
so that each new line of decode appears on the bottom of
the display and earlier lines move up.
Press to clear the log.
C
Press to exit and return to the Mode Menu.
The trace format is:
64
Page 65

TS350® Basic Rate Euro ISDN Test Set
Free Datasheet http://www.Datasheet4U.com
Layer 1 Alarm states:
Buffer
Line# INFO State
001 U INFO3
U=User/terminal side
N=Network side
Layer 2 frames:
Buffer
Line# SAPI TEI Frame type
001 U 00 000 SABME
Layer 3 messages:
Buffer Call
Line# Ref Channel Message type
006 U 001 B2 SETUP
For a listing of all Layer 1 alarm states, Layer 2 frame types and
Layer 3 message types see the Appendix.
In addition Genius ISDN protocol analysis software can be used with
the TS350 connected to a PC serial port using the RS232 lead.
65
Page 66

TS350® Basic Rate Euro ISDN Test Set
t
↵↵
14:20
PSTN
Line = 48.0V
14:20
Mode
Free Datasheet http://www.Datasheet4U.com
PSTN Testing
The TS350 can test analogue PSTN lines and ports. This mode is
very useful when testing combined ISDN S and analogue V5.1
combined NTs. The TS350 can also be used on regular analogue
PSTN lines.
The TS350 has the following PSTN modes:
• Line monitor - "on hook"
• Talk mode - "off hook"
• DTMF or pulse/loop disconnect dialling
• Line voltage measurement showing polarity reversal
When in the Mode menu, inserting the PSTN line cord provided will
auto select the PSTN menu if a line voltage is detected. If a voltage
is not detected, or you also have the S interface connected, then you
must manually select PSTN from the Mode menu.
ISDN S-TE 1
ISDN S-Monitor 2
ISDN U-TE 3
PSTN 4
Monitor Mode
DTMF
Talk/Off hook
66
Page 67

TS350® Basic Rate Euro ISDN Test Set
↵↵
C
14:20
PSTN
Line = 6.0V
Free Datasheet http://www.Datasheet4U.com
You can switch between DTMF and Loop Disconnect (Pulse) dialling
by pressing the key.
LD/MF
#
In the on hook Monitor Mode you can listen in to the analogue line in
high impedance monitor. The TS350 will not affect the use of other
telephones on the line
To make a call, press the key to select the Talk Mode screen
and then key in the called party number as you would with any test
set. To clear or abort the call, press the key to return to the
Monitor Mode screen.
Talk Mode
DTMF
0127386000T
C to clear call
The bottom section of the screen always displays the line voltage
and will show Reverse if the line polarity has been reversed. Normally
pin1 on the RJ11 will be approximately ground potential and pin 4
will be connected to the exchange battery negative. The TS350 will
operate normally if line polarity is reversed.
67
Page 68

TS350® Basic Rate Euro ISDN Test Set
Free Datasheet http://www.Datasheet4U.com
TS350 Firmware Upgrade
The TS350 firmware is stored in FLASH memory, which allows you
to upgrade the firmware release from your PC. The latest firmware
releases are available on the Harris web site or you may purchase
feature upgrades on CD.
To upgrade your TS350 carry out the following steps.
Step 1
Download the upgrade file from the Harris web site and store it onto
your hard drive in a directory of your choice. Or copy the upgrade
executable file from the Upgrade CD. For example the path:
C:\Harris TS350\TS350Upgrade.exe
Note: Dependant upon the type of upgrade, you may
need to get a security access code from your Harris
representative to enable you to access the TS350
download area of the Harris web site.
Step 2
Use the serial cable provided to connect your TS350 RS232 port to
the COM1 port on your PC.
Note: If COM1 is not available use another COM
port.
Set the COM1 port baud rate to:
Baud rate 115200
Data bits: 8
Parity: none
Stop bits: 1
Flow control: Xon/Xoff
68
Page 69

TS350® Basic Rate Euro ISDN Test Set
Free Datasheet http://www.Datasheet4U.com
Step 3
Put your TS350 into upgrade mode by holding down the key and
C
then simultaneously pressing the key to turn the TS350 on. You
will hear the turn on beep but initially the screen will be blank.
Note: Whilst upgrading there should be no network
connections to the TS350. Do not use the dc charger
during the upgrade process and make sure your
batteries are charged before starting.
Step 4
On your PC, in the Windows Start menu Run command dialogue
box, enter the path and filename of the Upgrade executable file e.g.
C:\Harris TS350\TS350Upgrade.exe
and follow the on screen instructions. If you are using a TS350
Upgrade CD you may run the TS350Upgrade.exe executable file
from your CDROM drive if you wish without copying the file to your
hard drive.
Step 5
When the upgrade download is complete, switch off your TS350 and
then turn it on again to load the new firmware. During the power on
screen sequence you will see the new firmware release number
displayed.
69
Page 70

TS350® Basic Rate Euro ISDN Test Set
Free Datasheet http://www.Datasheet4U.com
TS350 Specifications
Protocol
Layer 1 ETS300 012-1
Layer 2 ETS300 125
Layer 3 ETS300 102-1/2
BRI Interface
S 4 wire RJ45 socket. Pins 4,5 Receive, Pins 3, 6 Transmit (to NT)
U 2 wire RJ11 socket pins 2, 3
PSTN
RJ11 socket pins 1, 4.
Power
Typical operating power 230mW backlight off, 340mW backlight on
2 x 1.2volt NiMH batteries capacity 1200mAh
Typical battery operating time: 12 hours
12Vdc mains power supply 120mA max
dc plug 2.5mm inner, 5mm outer
Battery recharge time: 16 hours
Display
100 x 64 pixel LCD
Backlight power 110mW typical
RS232 Port
9 way D female
Baud rate 115200
Data bits: 8
Parity: none
Stop bits: 1
Flow control: Xon/Xoff
Pin out:
70
Page 71

TS350® Basic Rate Euro ISDN Test Set
Free Datasheet http://www.Datasheet4U.com
1 connected to 4 and 6
2 TS350 transmit data
3 TS350 receive data
4 connected 1 and 6
5 signal ground
6 connected to 1 and 4
7 connected to pin 8
8 connected to pin 7
9 not connected
Weight
350gms
Environmental
Operating temperature: -10oC to + 40oC
Storage temperature: -25 oC to +70 oC
Dimensions
Length: 205mm; width 78mm; depth 43mm
Safety
Complies with:
EN61010-1
EN41003
EN60950
CE
Complies with the EU Directives:
89/336/EC EMC
93/68/EC amendment
73/23/EC Low Voltage
92/31/EC Marking
71
Page 72

TS350® Basic Rate Euro ISDN Test Set
Free Datasheet http://www.Datasheet4U.com
APPENDIX
User messages
Layer 1 INFO States
INFO 0 No signal
INFO 1 Terminal activation request
INFO 2 Network activation request
INFO 3 Terminal activation indication
INFO 4 Network activation indication
Layer 1 Error message
Layer 1 activation failure
Layer 2 Frame types
I_R
I_C
DISC_R
DISC_C
DM_R
DM_C
FRMR_R
FRMR_C
REJ_R
REJ_C
RNR_C
RNR_R
RR_R
RR_C
SABM_R
SABM_C
SABME_R
SABME_C
UA_R
UA_C
UI_R
72
Page 73

TS350® Basic Rate Euro ISDN Test Set
Free Datasheet http://www.Datasheet4U.com
UI_C
SUPV_R
SUPV_C
XID_R
XID_C
ID_ASSIGN
ID_DENIED
ID_CHK_REQ
ID_CHK_RESP
ID_REMOVE
ID_VERIFY
Layer 2 Error Messages
UNSOLICITED RESP. (A)
UNSOLICITED RESP. (B)
UNSOLICITED RESP. (C)
UNSOLICITED RESP. (D)
UNSOLICITED RESP. (E)
SABME RE-ESTABLISH.
SABME RE-TRANSMISSION
STATUS ENQ RE-TRANS
N(R) ERROR
FRMR RESPONSE
UNDEFINED CTRL. FIELD
I FIELD NOT PERMITTED
WRONG FRAME SIZE
N201 ERROR
Layer 3 Message Types
ALERTING
CALL_PROC
PROGRESS
CONNECT
CONN. ACK
SETUP
SETUP ACK
73
Page 74

TS350® Basic Rate Euro ISDN Test Set
Free Datasheet http://www.Datasheet4U.com
DISCONNECT
RELEASE
REL. COMP
STATUS INQ
INFO
STATUS
REST ACK
RESUME
RESUME ACK
RESUME REJ
SUSPEND
SUSP. ACK
SUSP. REJ
RETRIEVE
HOLD
HOLD ACK
REGISTER
NOTIFY
FACILITY
UNKNOWN
Clear Cause Number and Description
1 Unallocated Number
2 No Route to spec Transit Ntwk.
3 No Route to Destination
6 Channel Unacceptable
7 Call Awarded & Being Delivd
16 Normal Call Clearing
17 User Busy
18 No User Respond
19 No Answer from User (Alerted)
21 Call Rejected
22 Number Changed
26 Non-Selected User Clearing
27 Destination Out of Order
28 Invalid Number Format
74
Page 75

TS350® Basic Rate Euro ISDN Test Set
Free Datasheet http://www.Datasheet4U.com
29 Facility Rejected
30 Response to STATUS ENQUIRY
31 Normal, Unspecified
34 No Circuit/Chan Available
38 Network Out of Order
41 Temporary Failure
42 Switching Equip. Congestion
43 Access Info. Discarded
44 Requested Cct or Chan. Unavail.
47 Resources Unavailable
49 Quality of Serv. Unavailable
50 Requested Facil. Not Subscribed
57 Bearer Capab. Not Authorized
58 Bearer Capab. Not Available
63 Service/Option Not Available
65 Bearer Capab. Not Implemented
66 Channel Type Not Implemented
69 Requested Facil. Not Implemented
70 Only Restricted Dig Info Bearer
79 Service/Option Not Implemented
81 Invalid Call Ref Value
82 Identified Chan Does Not Exist
83 Susp Call Exists But Wrong ID
84 Call Identity In Use
85 No Call Suspended
86 Requested Call ID Been Cleared
88 Incompatible Destination
91 Invalid Transit Ntwk Selection
95 Invalid Message
96 Mandatory IE Missing
97 Message Type Non-Existent
98 Message Incompat With Call State
99 IE Non-existent /Not Implement
100 Invalid IE Contents
101 Message Incompat With Call State
102 Recovery On Timer Expiry
75
Page 76

TS350® Basic Rate Euro ISDN Test Set
Free Datasheet http://www.Datasheet4U.com
111 Protocol Error Unspecified
127 Interworking Unspecified
B Channel Status Messages
n = B channel number i.e. B1 or B2
Bn IDLE
Bn SPEECH OUT
Bn SPEECH IN
Bn 3.1KHZ OUT
Bn 3.1KHZ IN
Bn DATA OUT PRBS
Bn DATA IN PRBS
Bn DATA IN LOOPED
Bn DATA T&A OUT PRBS
Bn DATA T&A IN PRBS
Bn DATA T&A IN LOOPED
Abbreviations
BER Bit Error Rate
BERT Bit Error Rate Test
BRI Basic Rate Interface
dc direct current
IE Information Element
ISDN Integrated Service Digital Network
ISPBX ISDN Private Branch Exchange
NT Network Termination
PC Personal Computer
PRBS Pseudo-Random Binary Sequence
TE Terminal Equipment
76
 Loading...