

Harris P5570, P5550, P5470, P5450 Quick Manual
Quick Guide
14221-1400-1000
Oct/11
EDACS®/Conventional/P25
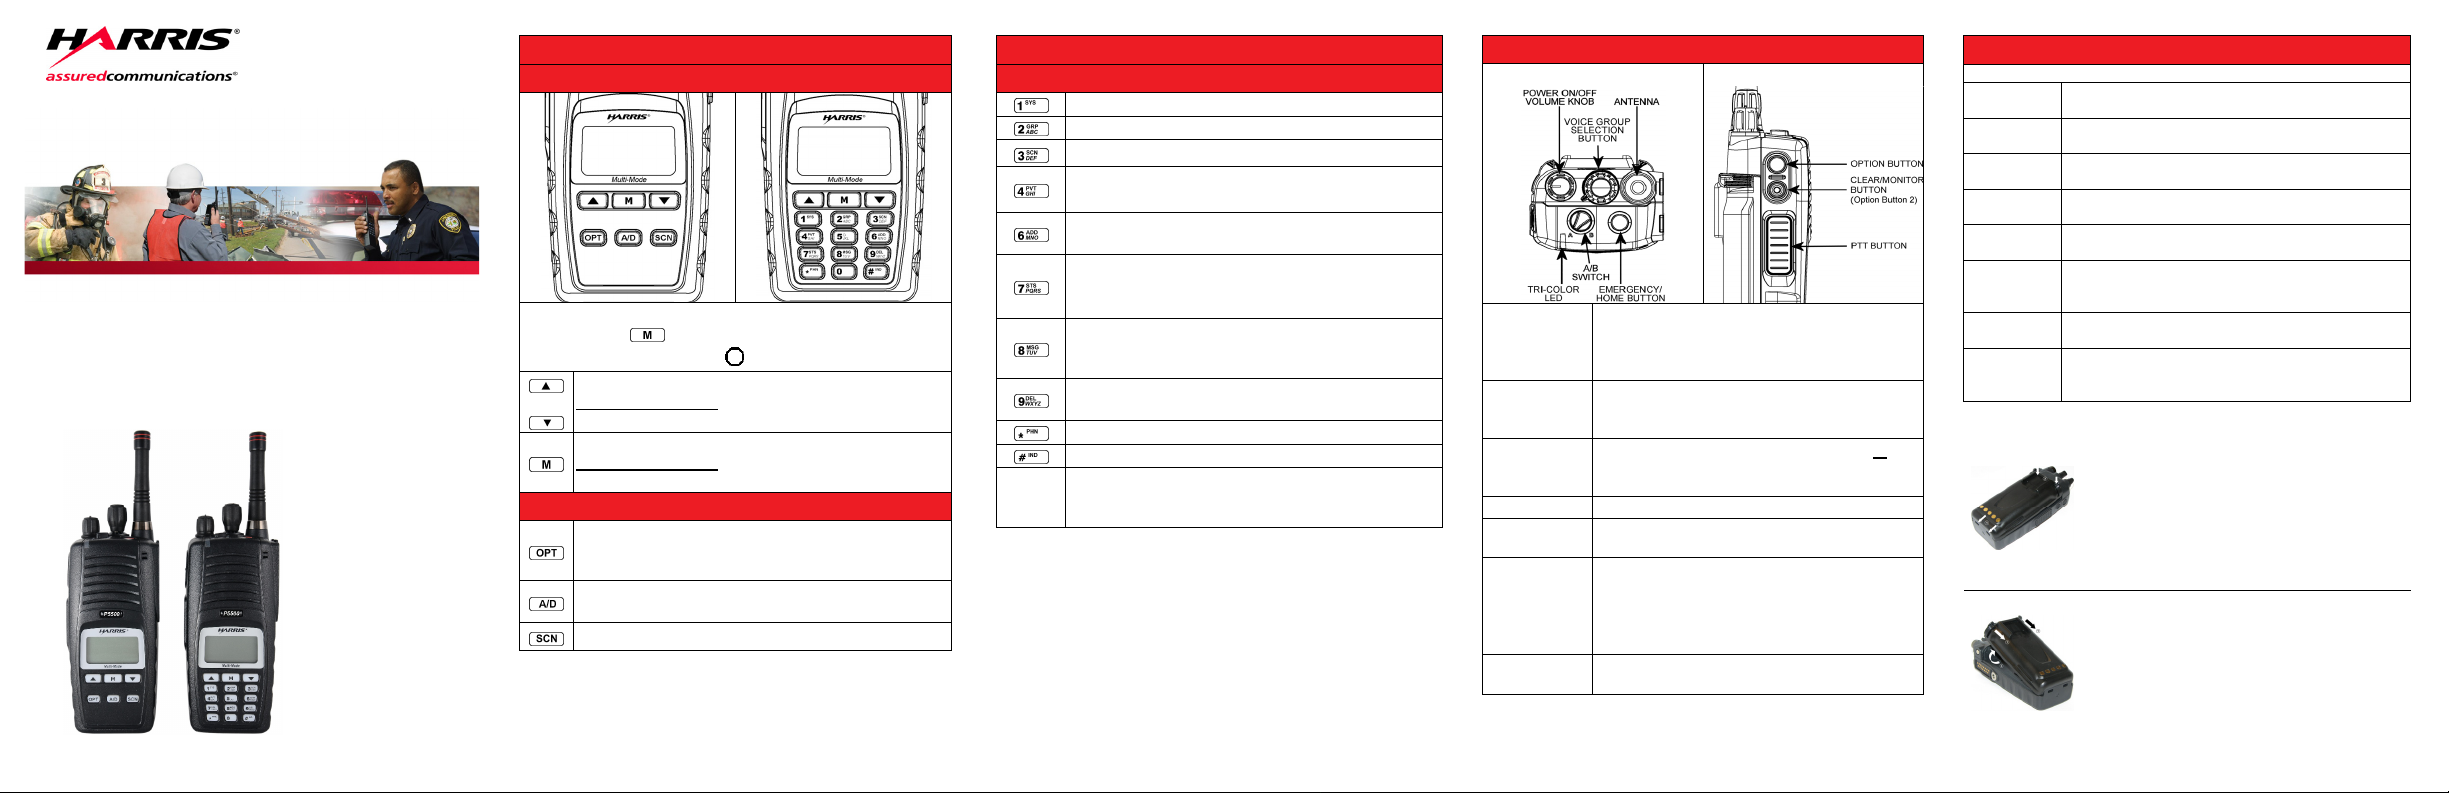
P5500 Portable Radios
P5500 Radio Keypad Functions
(P5550 and P5570 Models)
Locking/Unlocking Keypad
1. Press the
2. Within 1 second, press
Selects systems, groups, or channels.
Secondary Function
item within a list.
Accesses the pre-stored menu.
Secondary Function
within a list (similar to an “Enter” key).
Activates one of any programmable software options
selected during the PC programming, including:
high/low TX power and talkaround.
Adds/Deletes selected groups or channels from the
SCAN list of the currently selected system.
Toggles SCAN operation on and off.
Copyright© 2011 Harris Corporation. All rights reserved.
button.
on the side of the radio.
: Changes the selection for an
: Activates a selected item
P5550 Model Only
P5500 Radio Keypad Functions (cont’d)
P5570 Model Only
Selects a specific system.
Selects a specific group.
Toggles SCAN operation on and off.
Enables or disables Private Mode for the
system/group/channel displayed.
Adds groups or channels from the currently selected
system to the scan list.
Accesses the status list (0-9). The Status key
permits the transmission of a pre-programmed
status message to an EDACS or P25T site.
Accesses the message list (0-9). The Message key
permits the transmission of a pre-programmed
message to an EDACS or P25T site.
Deletes a selected group or channel from the SCAN
list of the currently selected system.
Initiates telephone interconnect calls.
Initiates individual (unit-to-unit) calls.
Keys used to place telephone interconnect and
1 – 9
individual (unit-to-unit) calls. Functions as a
* 0 #
telephone keypad.
The material contained herein is subject to U.S. export approval. No export or
re-export is permitted without written approval from the U.S. Government.
Rated: EAR99; in accordance with U.S. Dept. of Commerce regulations
15CFR774, Export Administration Regulations.
NOTICE!
P5500 Radio Controls
Top View Side View
Power OnOff/Volume
Knob
Voice Group
Selection
Knob
Emergency/
Home Button
PTT Button The PTT button is pressed to transmit.
Option Button
Clear/Monitor
Button
A/B Switch
Rotate clockwise to apply power to the radio
and increase the volume.
Rotate counter-clockwise to decrease volume
and power off radio.
A 16 position rotary knob for selecting
systems or groups/channels (set during
programming).
Programmed to declare an emergency or
select a pre-set Home group/system. One or
the other can be assigned to this button.
Pre-programmed to activate one software
option.
Trunked mode: Used to exit the current
operation and terminate special calls.
Conventional mode: Used to monitor
channels and temporarily remove Channel
Guard decoding from a channel.
EDACS only: Programmable to choose
between 2 software options.
P5500 Alert Tones
(T) = trunked only (B) = both trunked and conv modes
Ready-toTalk (B)
Call
Queued (T)
Autokey (T)
System
Busy (T)
Call
Denied (T)
Carrier
Control Timer
(B)
Low
Battery (B)
TX Low
Battery
Alert (B)
Attach Battery Pack
Remove Battery Pack
One short mid-pitched tone. OK to talk after
pressing PTT button.
One high-pitched tone. Ca ll queued for processing.
One mid-pitched tone. Queued call received
channel assignment.
Three low-pitched tones. System busy or unable to
complete the call.
One low-pitched tone. Radio not authorized on the
system or group.
Five high-pitched tones and one long low-pitched
tone. PTT pressed for too long.
One low-pitched and one short mid-pitched tone.
Low battery. Replace battery immediately.
Transmit Lockout: One low-pitched tone after PTT.
Battery too low to transmit.
1.
Align the tabs at each side on the bottom of
the battery pack with the slots at the bottom
of the battery cavity.
2. Push the top of the battery pack down until
the latches click to attach the battery to the
radio.
3. Tug gently to verify that the latches are
secure and the battery pack is properly
attached to the radio.
1. Pull both latches on either side of the battery
pack toward the bottom of the radio
simultaneously.
2. Pull the battery away from the radio.
3. Remove the battery pack from the radio.
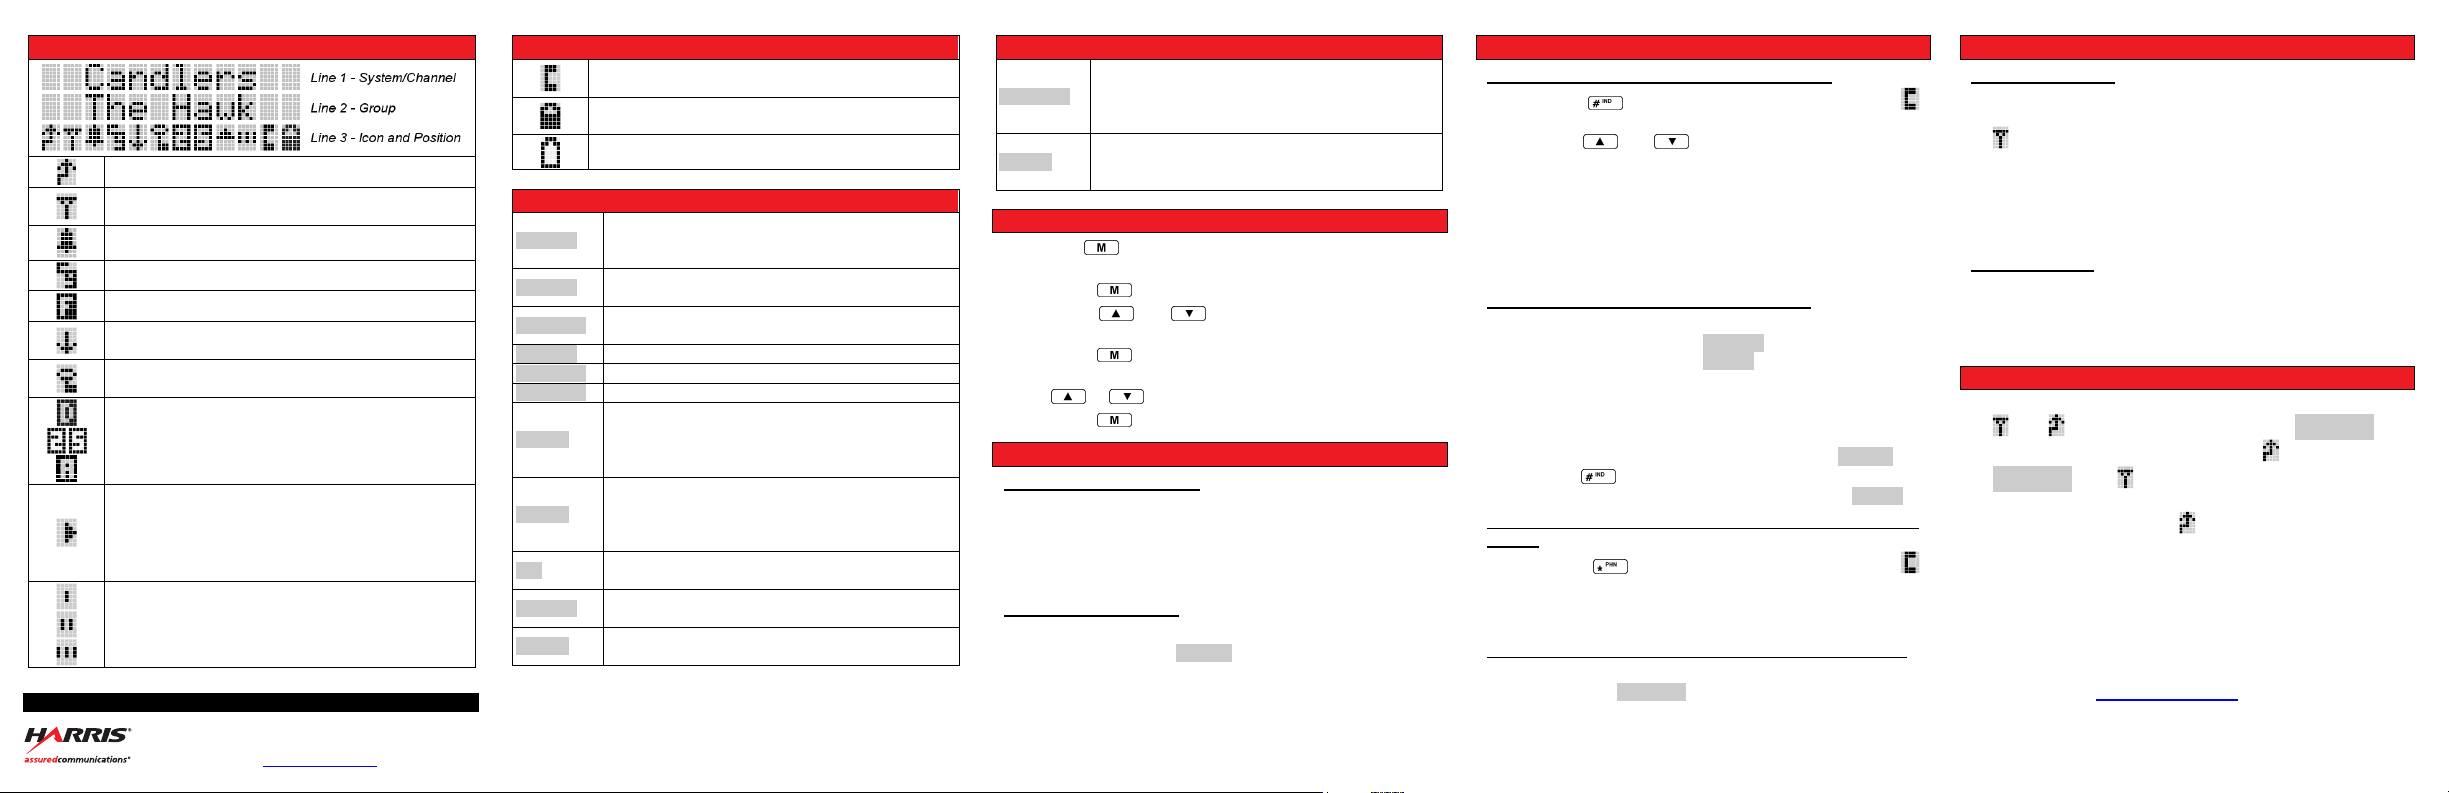
P5500 Display and Status Icons
Radio is transmitting.
Radio is transmitting/receiving a call.
Flashing – call has been queued.
T99 Mode enabled.
Channel Guard (CG) enabled.
EDACS trunked system is in Failsoft™ mode.
Selected group/channel is set at low power TX.
If icon is not visible, TX is at high power.
Radio is transmitting an encrypted message.
Flashing indicates an incoming encrypted call.
Selected talk group/channel is operating in Digital,
Project 25, or Analog mode.
On (animated) – Scan mode enabled.
On (steady) – Scan temporarily disabled (Priority
Scan status icon is present).
Off – Scan temporarily disabled (Priority Scan
status icon is not present).
Selected talk group/channel is a Priority 1, 2, or “in
the scan list.” The talk group or channel is not in
the scan list if a priority icon is not associated with
it.
221 Jefferson Ridge Parkway | Lynchburg, VA USA 24501
Public Safety and Professional Communications
www.pspc.harris.com | 1-800-528-7711
P5500 Display and Status Icons (cont’d)
Special call select/entry mode (Individual or
Telephone Interconnect).
Gauges approximate battery voltage level. Flashing
“empty” indicates low battery.
Flashing – Low battery.
P5500 Radio Status Messages
Control Channel Scan mode – Trunked mode
CC SCAN
only. Control channel lost, searching for a control
channel.
WA SCAN
TALKARND
SYSC ON
Wide Area Scan mode - Trunked mode only.
Radio searching for a new system.
Talkaround mode - Conventional mode only.
Radio operating unit-to-unit.
System Scan Features On – Trunked mode only.
SYSC OFF System Scan Features Off – Trunked mode only.
LOW BATT
Low Battery – Battery charge too low to transmit.
Receive Emergency – Trunked and P25 modes
RXEMER
only. Indicates an emergency call is being
received. This message will be flashing on line
two.
Transmit Emergency – Trunked and P25 modes
TXEMER
only. Indicates an emergency call has been
transmitted on this radio. This message will be
flashing on line two.
WHC
UNKNOWN
QUEUED
Who Has Called – Trunked and P25 modes only.
Missed Individual call.
Unknown ID – Trunked and P25 modes only. Ind.
call being received from an unknown ID.
Call Queued – Trunked mode only. Indicates the
system has placed the call in a request queue.
P5500 Radio Status Messages (cont’d)
System Busy – Trunked mode only. System is
SYS BUSY
busy, no channels available, queue is full, or
individual call being made to radio already
receiving a call.
Call Denied – Trunked mode only. Radio or
DENIED
group not authorized on selected system or
group.
Menu
The menu key allows access to features that are not
available from the keypad.
1. Press the
2. Use the
key to enter menu mode.
or button to scroll through the
available menu items.
3. Press the
key again to select the item.
4. Depending upon the item selected, further scrolling using
the
5. Press the
or button may be required.
key again to return to the active display.
Trunked Mode
Transmitting a Group Call
1. Select the group.
2. Press the PTT button and speak into the microphone.
maximum clarity, hold the radio approximately 2 inches
from your mouth.
3. Release the PTT button when finished and wait for reply.
Receiving a Group Call
1. Listen to the call.
2. The Group name or “GRxxxx” will appear in the display to
indicate a call is being received.
3. Press PTT button and speak into the microphone.
For
Trunked Mode (cont’d)
Transmitting an Individual Call (P5570 Model)
1. Press the
button to access individual call list.
appears.
2. Use the
or button to scroll through the
individual call list or enter the Logical ID (LID) number
from keypad.
3. Press the PTT button and speak into the microphone.
maximum clarity, hold the radio approximately 2-inches
from your mouth.
4. Release the PTT button when finished and wait for a
reply.
Receiving an Individual Call (P5570 Model)
1. Receive audio sounds when a call is received and the
display reads: ID xxxxx
*INDV*
2. Press and hold the PTT button to respond. Radio will
continue to ring until PTT is pressed or originating radio
disconnects.
3. If call is cleared with no response, the radio will store the
ID in Who Has Called (WHC) list and display: *WHC*.
4. Press the
key to display ID. Press the PTT button to
return call or press Monitor/Clear button to clear *WHC*.
Transmitting a Telephone Interconnect Call (P5570
Model)
1. Press the
button to access phone call list.
appears.
2. Follow steps 2 through 4 in “Transmitting an Individual
Call” above.
Receiving a Telephone Interconnect Call (P5570 Model)
1. Receive audio sounds when call is received and the
display reads: *PHONE*.
2. Follow Steps 2 through 4 for “Receiving an Individual
Call.”
For
Conventional Mode
Transmitting a Call
1. Select the conventional system and channel.
2. Press the Monitor/Clear button briefly. If audio is heard or
is lit, then the channel is busy.
3. When the channel becomes available, press the PTT
button and speak into the microphone.
For maximum
clarity, hold the radio approximately 2 inches from your
mouth.
4. Release the PTT button when finished and wait for reply.
Receiving a Call
1. Select a conventional system and channel or turn Scan
on and make sure desired channel is in Scan list.
2. When the radio receives a call, the radio unmutes and the
channel name or number appears in the display.
Declaring an Emergency
1. Press and hold the red Emergency/Home button.
2. and will appear in the display and *TXEMER* will
flash in the display. After 2-3 seconds
will turn off.
3. *TXEMER* and will remain until the emergency is
cleared.
4. Press the PTT button and
reappears. Speak normally.
5. Release the PTT button when transmission is complete.
Press and hold the Clear/Monitor button; then
simultaneously press the emergency button to clear an
emergency (if enabled through programming).
For more detailed operating information and a list of options and
accessories, refer to the Operator’s Manual, 14221-1400-2000,
available online at www.pspc.harris.com.
 Loading...