

Page 1
Quick Guide
14221-1510-1010
Rev. A, June 2016
OpenSky® XG-25M
Mobile Radios
Radio Controls – User Interface
Change Operating Mode
1.
Scroll through the menu until “App Mode” appears in the
bottom line of the display.
2.
Use the Menu Navigation Control to choose an available
mode. Press MENU and confirm (Y/N) with the Menu
Navigation Control and press MENU again.
or
Preset button C can be programmed to reboot the radio into a
particular application mode.
Radio Controls
Power On/Off
Volume
Control
Twist clockwise to power on radio and
increase volume.
Twist counter-
clockwise to decrease
volume and power off radio.
Microphone
Connector
Connect hand-held, hands-free
speaker-mic, or headset.
Emergency
Button
Pre-
programmed to declare an
emergency.
Group
Selection
or
Menu
Navigation
Knob
While in the dwell display, scrolls
through available talk groups.
Scrolls through selections within the
active menu (available talk groups,
pre-programmed speed dial numbers,
canned alert messages, etc.).
+
-
Scrolls through top-level menu.
OPT
CLR
Scrolls through selections within the
active menu (available talk groups,
pre-programmed speed dial numbers,
canned alert messages, etc.).
MENU Button
Activate current selection.
CLR
Used with the Emergency button to
clear an emergency.
SCAN
Toggles the Scan Mode ON/OFF.
Pre-Set
Buttons
A/B/C
These buttons are used to store and
recall user-selectable parameters.
Preset button C can be configured via
programming to reboot the radio into a
particular application mode.
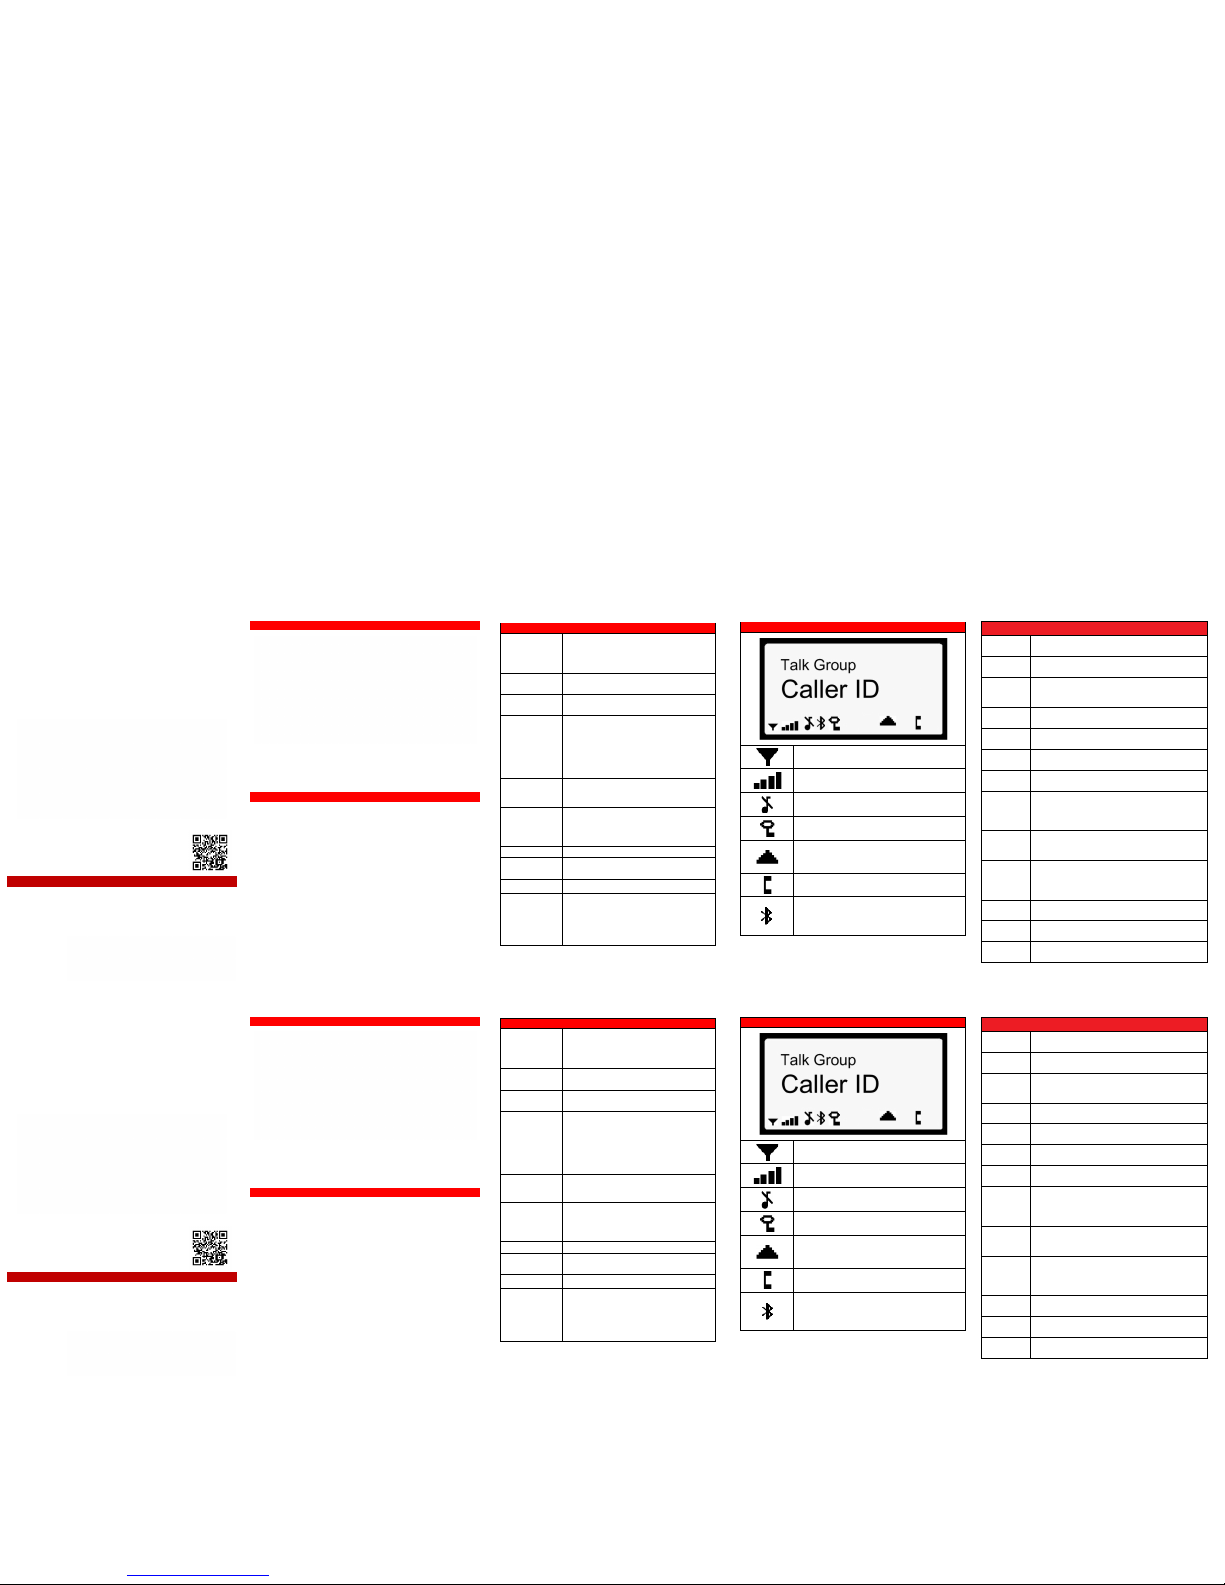
Radio Display and Status Icons
Steady – Radio is data registered.
Steady – Received Signal Strength Indicator
(RSSI).
Steady – Stealth mode is enabled (all tones and
display backlight disabled; voice is still heard).
Steady - Radio is transmitting or receiving a
manual or OTAR (Network) encrypted call.
Steady - Indicates Voice Scan mode is Normal or
Fixed; not displayed when Voice Scan mode is No
Scan.
Steady - Indicates Selective Call mode.
Flashing – Bluetooth® enabled, but no accessory
connected.
Steady – Radio is connected to a Bluetooth
accessory.
Alert Tones
Call Queued
1 low tone/2
high tones. Call queued for
processing.
Call Denied
3 short tones. Radio is out of coverage area or
requested voice group is active.
Grant (or
Go-Ahead)
Single short beep.
Resources have become
available for a call request placed in the queue
(if enabled) upon channel access.
Call
Removed
Single long low-
pitched tone. Notifies the user
that access to the channel has been lost.
Selective
Alert
4 short tones. Played once t
o indicate a selective
alert has been received.
Emergency
Alert
3 long beeps. Sounds when an emergency alert
is declared.
Emergency
Cleared
Single long low-pitched tone. Sounds when an
emergency is cleared.
Selective
Call
Ringing tone. Repeated every 4 seconds until
the call is accepted or rejected by the radio
being called, or until the network drops the call if
unanswered after one minute.
Out-ofRange
Configurable. Typical: 3 brief tones that repeat
every 15 seconds w
hen the radio does not have
consistent sync.
Roam
2 short tones: 1 high–pitched and 1 low-
pitched.
Sounds when the radio transitions from one
radio base station site to another while
transmitting voice.
Priority
Bump
Single medium tone. Current received call
preempted by higher priority call.
Site Found
3 short high pitched tones. Sounds when
selected Site is found or using Site Lock menu.
Site Not
Found
3 short high pitched tones. Sounds when
selected Site is not found using Site Lock menu.
Quick Guide
14221-1510-1010
Rev. A, June 2016
OpenSky® XG-25M
Mobile Radios
Radio Controls – User Interface
Change Operating Mode
1.
Scroll through the menu until “App Mode” appears in the
bottom line of the display.
2.
Use the Menu Navigation Control to choose an available
mode. Press MENU and confirm (Y/N) with the Menu
Navigation Control and press MENU again.
or
Preset button C can be programmed to reboot the radio into a
particular application mode.
Radio Controls
Power On/Off
Volume
Control
Twist clockwise to power on radio and
increase volume.
Twist counter-
clockwise to decrease
volume and power off radio.
Microphone
Connector
Connect hand-held, hands-free
speaker-mic, or headset.
Emergency
Button
Pre-programmed to declare an
emergency.
Group
Selection
or
Menu
Navigation
Knob
While in the dwell display, scrolls
through available talk groups.
Scrolls through selections within the
active menu (available talk groups,
pre-programmed speed dial numbers,
canned alert messages, etc.).
+
-
Scrolls through top-level menu.
OPT
CLR
Scrolls through selections within the
active menu (available talk groups,
pre-programmed speed dial numbers,
canned alert messages, etc.).
MENU Button
Activate current selection.
CLR
Used with the Emergency button to
clear an emergency.
SCAN
Toggles the Scan Mode ON/OFF.
Pre-Set
Buttons
A/B/C
These buttons are used to store and
recall user-selectable parameters.
Preset button C can be configured via
programming to reboot the radio into a
particular application mode.
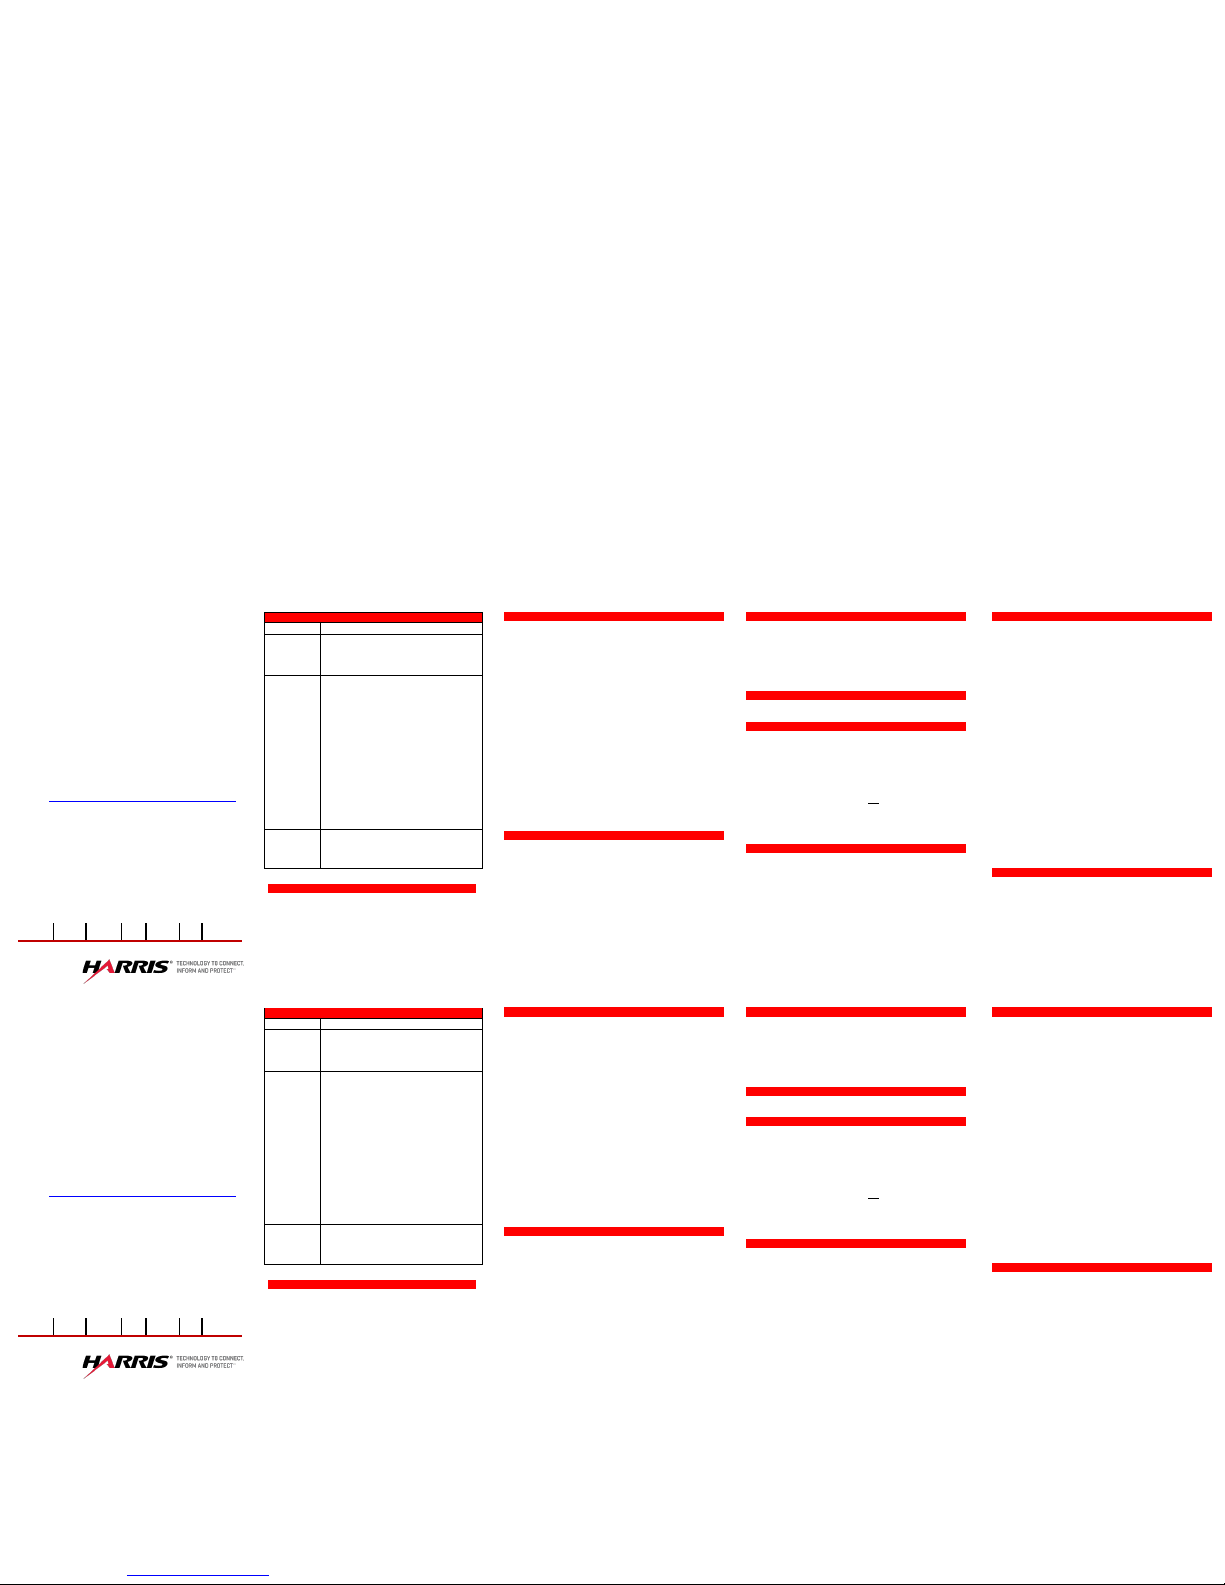
Radio Display and Status Icons
Steady – Radio is data registered.
Steady – Received Signal Strength Indicator
(RSSI).
Steady – Stealth mode is enabled (all tones and
display backlight disabled; voice is still heard).
Steady - Radio is transmitting or receiving a
manual or OTAR (Network) encrypted call.
Steady - Indicates Voice Scan mode is Normal or
Fixed; not displayed when Voice Scan mode is No
Scan.
Steady - Indicates Selective Call mode.
Flashing – Bluetooth® enabled, but no accessory
connected.
Steady – Radio is connected to a Bluetooth
accessory.
Alert Tones
Call Queued
1 low tone/2 high tones. Call queued for
processing.
Call Denied
3 short tones. Radio is out of coverage area or
requested voice group is active.
Grant (or
Go-Ahead)
Single short beep.
Resources have become
available for a call request placed in the queue
(if enabled) upon channel access.
Call
Removed
Single long low-pitched tone. Notifies the user
that access to the channel has been lost.
Selective
Alert
4 short tones. Played once to indicate a selective
alert has been received.
Emergency
Alert
3 long beeps. Sounds when an emergency alert
is declared.
Emergency
Cleared
Single long low-
pitched tone. Sounds when an
emergency is cleared.
Selective
Call
Ringing tone. Repeated every 4 seconds until
the call is accepted or rejected by the radio
being called, or until the network drops the call if
unanswered after one minute.
Out-ofRange
Configurable. Typical: 3 brief tones that repeat
every 15 second
s when the radio does not have
consistent sync.
Roam
2 short tones: 1 high–pitched and 1 low-pitched.
Sounds when the radio transitions from one
radio base station site to another while
transmitting voice.
Priority
Bump
Single medium tone. Current received call
preempted by higher priority call.
Site Found
3 short high pitched tones. Sounds when
selected Site is found or using Site Lock menu.
Site Not
Found
3 short high pitched tones. Sounds when
selected Site is not found using Site Lock menu.
Copyright © 2015, 2016 Harris Corporation.
Copyright © 2015, 2016 Harris Corporation.
Page 2
Refer to the Operator’s Manual (14221
-1510-2000), available
online at
http://pspc.harris.com/Products/Mobile/XG-25M.aspx,
for more detailed operating
instructions.
NOTICE!
The material contained herein is subject to U.S. export
approval. No export or re-export is permitted without written
approval from the U.S. Government. Rated: EAR99; in
accordance with U.S. Dept. of Commerce regulations
15CFR774, E
xport Administration Regulations.
FLORIDA
NEW
YORK
VIRGINIA BRAZIL
UNITED
KINGDOM
UAE SINGAPORE
Radio Scan Modes
Scan Mode
Explanation
No Scan
Eliminates distractions.
Full communications (transmit and
receive) on selected talk group.
No calls received from other talk groups.
Normal
(Default)
Scan all talk groups in the active profile
that are not locked out as long as there is
demand on the site.
Priority (P1, P2, and P3) groups are user
selectable.
Receive calls from more than one talk
group, if available from the current site.
Allows dragging of the selected talk group,
P1, P2, P3, and default emergency talk
groups to the site on which the radio is
registered. (If other calls are available at
the site, they also can be heard but they
are not be actively dragged.)
The default emergency talk group, as well
as any emergency-enabled talk groups, is
only dragged if it is in emergency mode.
Fixed
Functions the same as Normal Scan
Mode, except the priority groups are fixed
to the selected profile’s pre-defined P1
and P2 groups (configured via the UAS).
Stealth Mode
1. Scroll through the menu until “StealthMenu” appears.
2. Use the Menu Navigation knob to turn Stealth Mode
on.
3. To turn Stealth Mode off, press the MENU button on
the radio’s front panel.
Check or Change the Active Profile
The radio can store up to sixteen (16) standard profiles
within its personality, one of which is always set as the
currently active profile. Each profile can contain up to sixteen
(16) talk groups.
If the dwell display is set to “profile,” the currently active
profile’s name appears in the bottom line of the display.
Otherwise, to determine which profile is currently active, use
the menu buttons to access the Profile Menu. The active
profile’s name will appear in the top line of the display. To
switch to/activate a different profile:
1. Using
+ or -, s croll until “Profile Menu” appears in the
bottom line of the display. The name of the currently
active profile appears in the top line.
2. Use the Menu Navigation knob to choose the desired
profile stored in the radio as established by the OpenSky
®
network administrator.
3. The profile becomes active when selected for longer than
2 seconds, when MENU is pressed, or when the menu is
changed.
Check or Change the Selected Talk Group
One talk group within the currently active profile is set as the
“selected talk group.” For the radio user, the selected tal k
group is typically the focus of most voice transmissi ons and
receptions. There are two ways to change the select ed talk
group:
First Method:
From the dwell display, use the Talk Group Selection knob
to
scroll through the available list of talk groups in the active
profile.
Check or Change the Selected Talk Group (Con’t)
Second Method:
1. Using + or -, scroll through the menu until “TalkGrpMenu” is
displayed.
2. Use the Menu Navigation knob
to scroll through the
available list of talk groups in the active profile.
Receive a Voice Call
No action is required to receive a voice call.
Transmit a Voice Call
1. If not already on, power-up the radio.
2. Select the desired talk group on which to transmit.
3. Depress and hold the Push-To-Talk button on the handheld
microphone, pause for a moment, and then speak normally.
For maximum clarity, hold the microphone approximately 2
inches from the mouth and do not
shout or whisper into it.
If the call is queued by the network, wait for the grant tone
to sound before speaking.
4. Release the PTT button when finished speaking.
Adjust Side Tone Audio Level
1. Use + or - to cycle through the menu until the “Side Menu”
appears in the bottom line of the display.
2. Use the Menu Navigation knob to change to the desired
level (Off, Low, Medium, High). To turn side tones
completely off, use the “Off” setting.
Declare an Emergency
1. Press the red emergency button on the radio to enter
emergency mode. The emergency is raised after the
emergency raise delay [default is one (1) second].
• If the active profile of the unit initiating the emergency
is configured for Emergency Alert, the emergency alert
signal is sent to registered alert servers, such as the
dispatcher console.
• If the active profile of the unit initiating the emergency
is configured for Emergency Call, the talkgroup is
placed into emergency status notifying other radios
and
the emergency alert signal is sent to the
dispatcher console.
•
If the emergency behavior of the active profile is
Current, the active, selected voice group becomes the
default emergency voice group.
•
If the emergency behavior of the active profile is
Defa
ult, the radio moves to the default emergency
voice group of the profile and this talk group becomes
the select talk group.
2. The display will alternate between the emergency voice
group name and “EMERGENCY” and declaring User ID to
indicate that the emergency has been initiated.
Clear an Emergency
Check with the system administrator to ensure that the radio
is programmed to allow an emergency to be cleared.
1. Press and hold the CLR button and simultaneously
press the emergency button.
2. Release both buttons after the emergency cleared
tone sounds.
Refer to the Operator’s Manual (14221
-1510-2000), available
online at
http://pspc.harris.com/Products/Mobile/XG-25M.aspx,
for
more detailed operating instructions.
NOTICE!
The material contained herein is subject to U.S. export
approval. No export or re-export is permitted without written
approval from the U.S. Government. Rated: EAR99; in
accordance with U.S. Dept. of Commerce regulations
15CFR774, Export Administration Regulations.
FLORIDA
NEW
YORK
VIRGINIA BRAZIL
UNITED
KINGDOM
UAE SINGAPORE
Radio Scan Modes
Scan Mode
Explanation
No Scan
Eliminates distractions.
Full communications (transmit and
receive) on selected talk group.
No calls received from other talk groups.
Normal
(Default)
Scan all talk groups in the active profile
that are not locked out as long as there is
demand on the site.
Priority (P1, P2, and P3) groups are user
selectable.
Receive calls from more than one talk
group, if available from the current site.
Allows dragging of the selected talk group,
P1, P2, P3, and default emergency talk
groups to the site on which the radio is
registered. (If other calls are available at
the site, they also can be heard but they
are not be actively dragged.)
The default emergency talk group, as well
as any emergency-enabled talk groups, is
only dragged if it is in emergency mode.
Fixed
Functions the same as Normal Scan
Mode, except the priority groups are fixed
to the selected profile’s pre-defined P1
and P2 groups (configured via the UAS).
Stealth Mode
1. Scroll through the menu until “StealthMenu” appears.
2. Use the Menu Navigation knob to turn Stealth Mode
on.
3. To turn Stealth Mode off, press the MENU button on
the radio’s front panel.
Check or Change the Active Profile
The radio can store up to sixteen (16) standard profiles
within its personality, one of which is always set as the
currently active profile. Each profile can contain up to sixteen
(16) talk groups.
If the dwell display is set to “profile,” the currently active
profile’s name appears in the bottom line of the display.
Otherwise, to determine which profile is currently active, use
the menu buttons to access the Profile Menu. The active
profile’s name will appear in the top line of the display. To
switch to/activate a different profile:
1. Using
+ or -, s croll until “Profile Menu” appears in the
bottom line of the display. The name of the currently
active profile appears in the top line.
2. Use the Menu Navigation knob to choose the desired
profile stored in the radio as established by the OpenSky
®
network administrator.
3. The profile becomes active when selected for longer than
2 seconds, when MENU is pressed, or when the menu is
changed.
Check or Change the Selected Talk Group
One talk group within the currently active profile is set as the
“selected talk group.” For the radio user, the selected tal k
group is typically the focus of most voice transmissi ons and
receptions. There are two ways to change the select ed talk
group:
First Method:
From the dwell display, use the Talk Group Selection knob
to
scroll through the available list of talk groups in the active
profile.
Check or Change the Selected Talk Group (Con’t)
Second Method:
1. Using + or -, scroll through the menu until “TalkGrpMenu” is
displayed.
2. Use the Menu Navigation knob
to scroll through the
available list of talk groups in the active profile.
Receive a Voice Call
No action is required to receive a voice call.
Transmit a Voice Call
1. If not already on, power-up the radio.
2. Select the desired talk group on which to transmit.
3. Depress and hold the Push-To-Talk button on the handheld
microphone, pause for a moment, and then speak normally.
For maximum clarity, hold the microphone approximately 2
inches from the mouth and do not
shout or whisper into it.
If the call is queued by the network, wait for the grant tone
to sound before speaking.
4. Release the PTT button when finished speaking.
Adjust Side Tone Audio Level
1. Use + or - to cycle through the menu until the “Side Menu”
appears in the bottom line of the display.
2. Use the Menu Navigation knob to change to the desired
level (Off, Low, Medium, High). To turn side tones
completely off, use the “Off” setting.
Declare an Emergency
1. Press the red emergency button on the radio to enter
emergency mode. The emergency is raised after the
emergency raise delay [default is one (1) second].
• If the active profile of the unit initiating the emergency
is configured for Emergency Alert, the emergency alert
signal is sent to registered alert servers, such as the
dispatcher console.
• If the active profile of the unit initiating the emergency
is configured for Emergency Call, the talkgroup is
placed into emergency status notifying other radios
and
the emergency alert signal is sent to the
dispatcher console.
•
If the emergency behavior of the active profile is
Current, the active, selected voice group becomes the
default emergency voice group.
•
If the emergency behavior of the active profile is
Defa
ult, the radio moves to the default emergency
voice group of the profile and this talk group becomes
the select talk group.
2. The display will alternate between the emergency voice
group name and “EMERGENCY” and declaring User ID to
indicate that the emergency has been initiated.
Clear an Emergency
Check with the system administrator to ensure that the radio
is programmed to allow an emergency to be cleared.
1. Press and hold the CLR button and simultaneously
press the emergency button.
2. Release both buttons after the emergency cleared
tone sounds.
 Loading...