

Harris OpenSky M5300 Quick Manual
Quick Guide
MM-012997-001
Rev. E, Jul/11
OpenSky
Mobile Radio
®
M5300
*The Scan Model Control Head (not shown) does not have a
DTMF keypad.
1. Press the MENU button.
2. While the MENU button is pressed, within one second press
the OPTION button.
3. A brief message will be displayed on the 2
display (Kypd Lck, Kypd Unlck).
Copyright ©
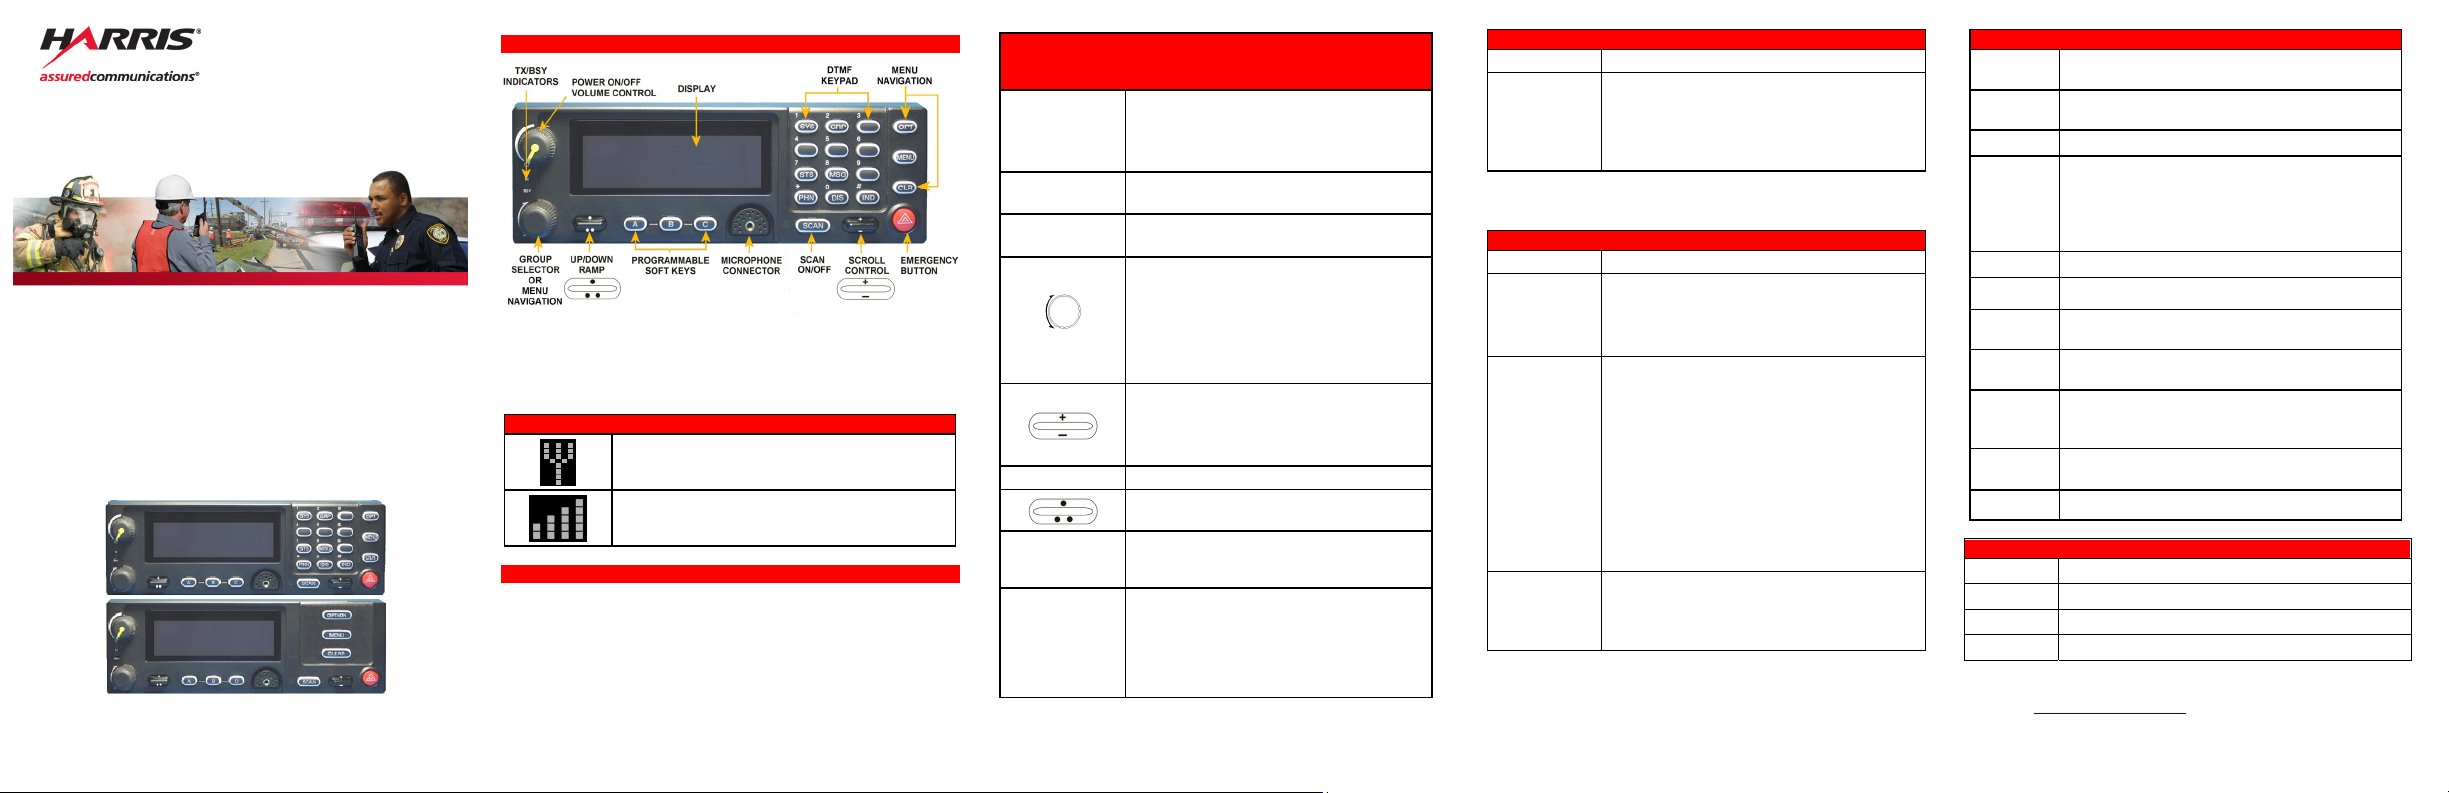
Radio Controls – User Interface
Figure 1: System Model Control Head*
M5300 Icons
Indicates data registration.
Volume bars – indicates relative volume level.
Keypad Lock/Unlock
2008-2011 Harris Corporation. All rights reserved.
nd
line of the
Note that button function may vary depending upon radio
Power
On/OffVolume
Control
Microphone
Connection
Emergency
Button
MENU Button Activate current selection.
OPTION
CLEAR
0 – 9
M5300 Radio Controls
Twist clockwise to power on radio and
increase volume.
Twist counter-clockwise to decrease
volume and power off radio.
Connect hand-held, hands-free
speaker-mic, or headset.
Pre-programmed to declare an
emergency.
While in the dwell display, scrolls
through available talk groups.
Scrolls through selections within the
active menu (available talk groups,
pre-programmed speed dial numbers,
canned alert messages, etc.).
If enabled via programming, functions
same as above.
or
Increases/decreases display brightness.
Depending on programming, scrolls
through available menu items.
Scrolls through available menu items.
Used to place telephone interconnect and
individual (unit-to-unit) calls. Functions as
a telephone keypad. Also used to enter
passwords for logging into the OpenSky
network (if not pre-configured for
automatic registration at power-up).
programming.
M5300 Radio Controls (Con’t)
SCAN Toggles the Scan Mode ON/OFF.
These buttons are used to store and recall
Pre-Set
Buttons
user-selectable parameters.
Preset button C can be configured via
programming to reboot the radio into a
particular application mode.
M5300 Radio Scan Modes
Scan Mode Explanation
Eliminates distractions.
No Scan
Normal
(Default)
Fixed
Full communications (transmit and
receive) on selected talk group.
No calls received from other talk groups.
Full communications (transmit and
receive) on the selected talk group.
Scans all talk groups in the active profile
that are not locked out.
Receives calls from more than one talk
group, if available from the current site.
Allows dragging of the selected and
default emergency talk groups to the site
on which the radio is registered.
An emergency-enabled talk group is only
dragged if it is in emergency mode.
Functions the same as Normal Scan
Mode, except the priority groups are fixed
to the selected profile’s pre-defined P1
and P2 groups (configured via the UAS).
DTMF Keypad Functions
*0
*1
*2 Status Message: *2 <0...9> #.
*4
*5 RTT Message: *5 <0...9> #.
*6 Go to default profile.
*7
*8
*9
*32
*33
1# Transition to ECP Mode.
2# Stealth Mode On/Off.
3# Scan Mode On/Off.
4# Lights/Tones On/Off.
Refer to the Operator’s Manual (MM-012125-001), available
online at www.pspc.harris.com
instructions.
Log-off command: *0## (Logs the user off
the system.)
Log-in command: *1<User ID> #
<Password> ## (Required for encryption.)
Enter Scene of Incident (SOI) Mode:
*4#<ccc>#<bb># where ccc is the SOI
channel number and bb is the number
assigned to each frequency band.
Press *40# to exit SOI Mode.
Initiate Selective Alert command:
*7<Target ID>#[Choose Message]#.
Radio-to-Radio Call command: Selective
call number # (PTT to dial.)
Public Switched Telephone Network
(PSTN) Call command. (See Operator’s
Manual.)
Begin Manual Encryption command:
*32<Pre-determined Encryption Key># .
End Manual Encryption command: *33#
Quick Buttons
, for more detailed operating

M5300 Tones
Name Description
Deny Tone
Queued
Tone
Grant/GoAhead
Tone
Removed
Tone
Emergency
Cleared
Tone
Priority
Bump
Volume
The material contained herein is subject to U.S. export approval. No
export or re-export is permitted without written approval from the U.S.
Government. Rated: EAR99; in accordance with U.S. Dept. of Commerce
regulations 15CFR774, Export Administration Regulations.
3 short tones - Release the Push-to-Talk
button and re-key the PTT to make another
call request.
1 low tone/2 high tones - Indicates the call
has been placed in a queue. Release PTT at
this point.
1 short beep - Sounds when resources
become available for a call request placed in
the queue.
A single long low-pitched tone - Notifies the
user that access to the channel has been
lost.
When an emergency call has been initiated,
the initiator of the call can clear the call by
pressing and holding the emergency button
until the emergency cleared tone (one long
low-pitched) sounds.
1 short tone - Stopped current incoming call
in favor of higher-priority incoming call.
1 short tone that reflects current volume
level.
221 Jefferson Ridge Parkway | Lynchburg, VA USA 24501
NOTICE!
Public Safety and Professional Communications
www.pspc.harris.com
| 1-800-528-7711
M5300 Tones (Con’t)
Name Description
Emergency
Tone
Selective
Call Ring
Tone
Selective
Alert
Received
Tone
Roam Tone
PSTN Ring
Out of
Range
1. Scroll through the menu until “StealthMenu” appears.
2. To immediately turn Stealth Mode on, press up or down
with
3. To turn Stealth Mode off, press the MENU button on the
radio’s front panel.
OR
On System Model control heads, the 2# command can be
used to enable and disable Stealth Mode.
3 long tones sound when an emergency is
declared.
Ringing tone similar to that of a telephone
repeated every four seconds.
Four tones (low, high, low, low) played
once to indicate a selective alert has been
received.
Two quick tones (high-low) sound when
the radio transitions from one radio base
station site to another.
This single medium-pitch reiterative tone
is generated by the radio when there is an
incoming or an outgoing telephone call.
3 brief tones. If enabled via programming,
sounds when the radio is not within
operational range with base station.
Stealth Mode
.
Check or Change the Active Profile
The radio can store up to sixteen (16) standard profiles
within its personality, one of which is always set as the
currently active profile. Each profile can contain up to sixteen
(16) talk groups.
If the dwell display is set to “profile,” the currently active
profile’s name appears in the bottom line of the display.
Otherwise, to determine which profile is currently active, use
the menu buttons to access the Profile Menu. The active
profile’s name will appear in the top line of the display. To
switch to/activate a different profile:
1. Scroll until “Profile Menu” appears in the bottom line of the
display. The name of the currently active profile appears
in the top line.
2. Use
radio as established by the OpenSky
administrator.
3. Profile becomes active when selected for longer than 2
seconds, when the MENU is pressed, or when the menu
is changed using
One talk group within the currentl y active profile is set as the
“selected talk group.” For the radio user, the selected talk
group is typically the focus of most voice transmissions and
receptions. There are two ways to change the selected talk
group:
First Method:
1. Scroll through the menu until “TalkGrpMenu” is displayed.
2. Use
groups in the active profile.
to choose the desired profile stored in the
.
Check or Change the Selected Talk Group
to scroll through the available list of talk
®
network
Check or Change the Selected Talk Group (Con’t)
Second Method:
From the dwell display, use
available list of talk groups in the active profile.
Receive a Voice Call
No action is required to receive a voice call.
Transmit a Voice Call
1. If not already on, power-up the radio.
2. If required, log-in to the network using a user ID and
password.
3. Select the desired talk group on which to transmit.
4. Depress and hold the Push-To-Talk button on the handheld
microphone, pause for a moment, and then speak normally.
For maximum clarity, hold the microphone approximately
1½ inches from the mouth and do not
it. If the call is queued by the network, wait for the grant
tone to sound before speakin g.
5. Release the PTT button when finished speaking.
Adjust Side Tone Audio Level
1. Scroll through the menu until the “Side Menu” appears in
the bottom line of the display.
2. Use
Medium, High). To turn side tones completely off, use the
“Off” setting.
Change operating mode via the App Mode menu
OR
Preset button C can be programmed to reboot the radio into
a particular application mode.
OR
1# will transition the radio to ECP mode. If ECP mode is not
loaded in the radio, the radio displays “No App.”
to change to the desired level (Off, Low,
Change Operating Mode
to scroll through the
shout or whisper into
Declare an Emergency
1. Press the red emergency button on the radio to enter
emergency mode. The emergency is raised after the
emergency raise delay [default is one (1) second].
If the active profile of the unit initiating the emergency
is configured for Emergency Alert, the emergency alert
signal is sent to registered alert servers, such as the
dispatcher console.
If the active profile of the unit initiating the emergency
is configured for Emergency Call, the talkgroup is
placed into emergency status notifying other radios
and the emergency alert signal is sent to the
dispatcher console.
If the emergency behavior of the active profile is
Current, the active, selected voice group becomes the
default emergency voice group.
If the emergency behavior of the active profile is
Default, the radio moves to the default emergency
voice group of the profile and this talk group becomes
the select talk group.
2. The display will alternate between the emergency voice
group name and “EMERGENCY” and declaring User ID to
indicate that the emergency has been initiated.
Clear an Emergency
Check with the system administrator to ensure that the radio
is programmed to allow an emergency to be cleared.
1. Press and hold the CLR/CLEAR button and
simultaneously press the emergency button.
2. Release both buttons after the emergency cleared
tone sounds.
 Loading...