

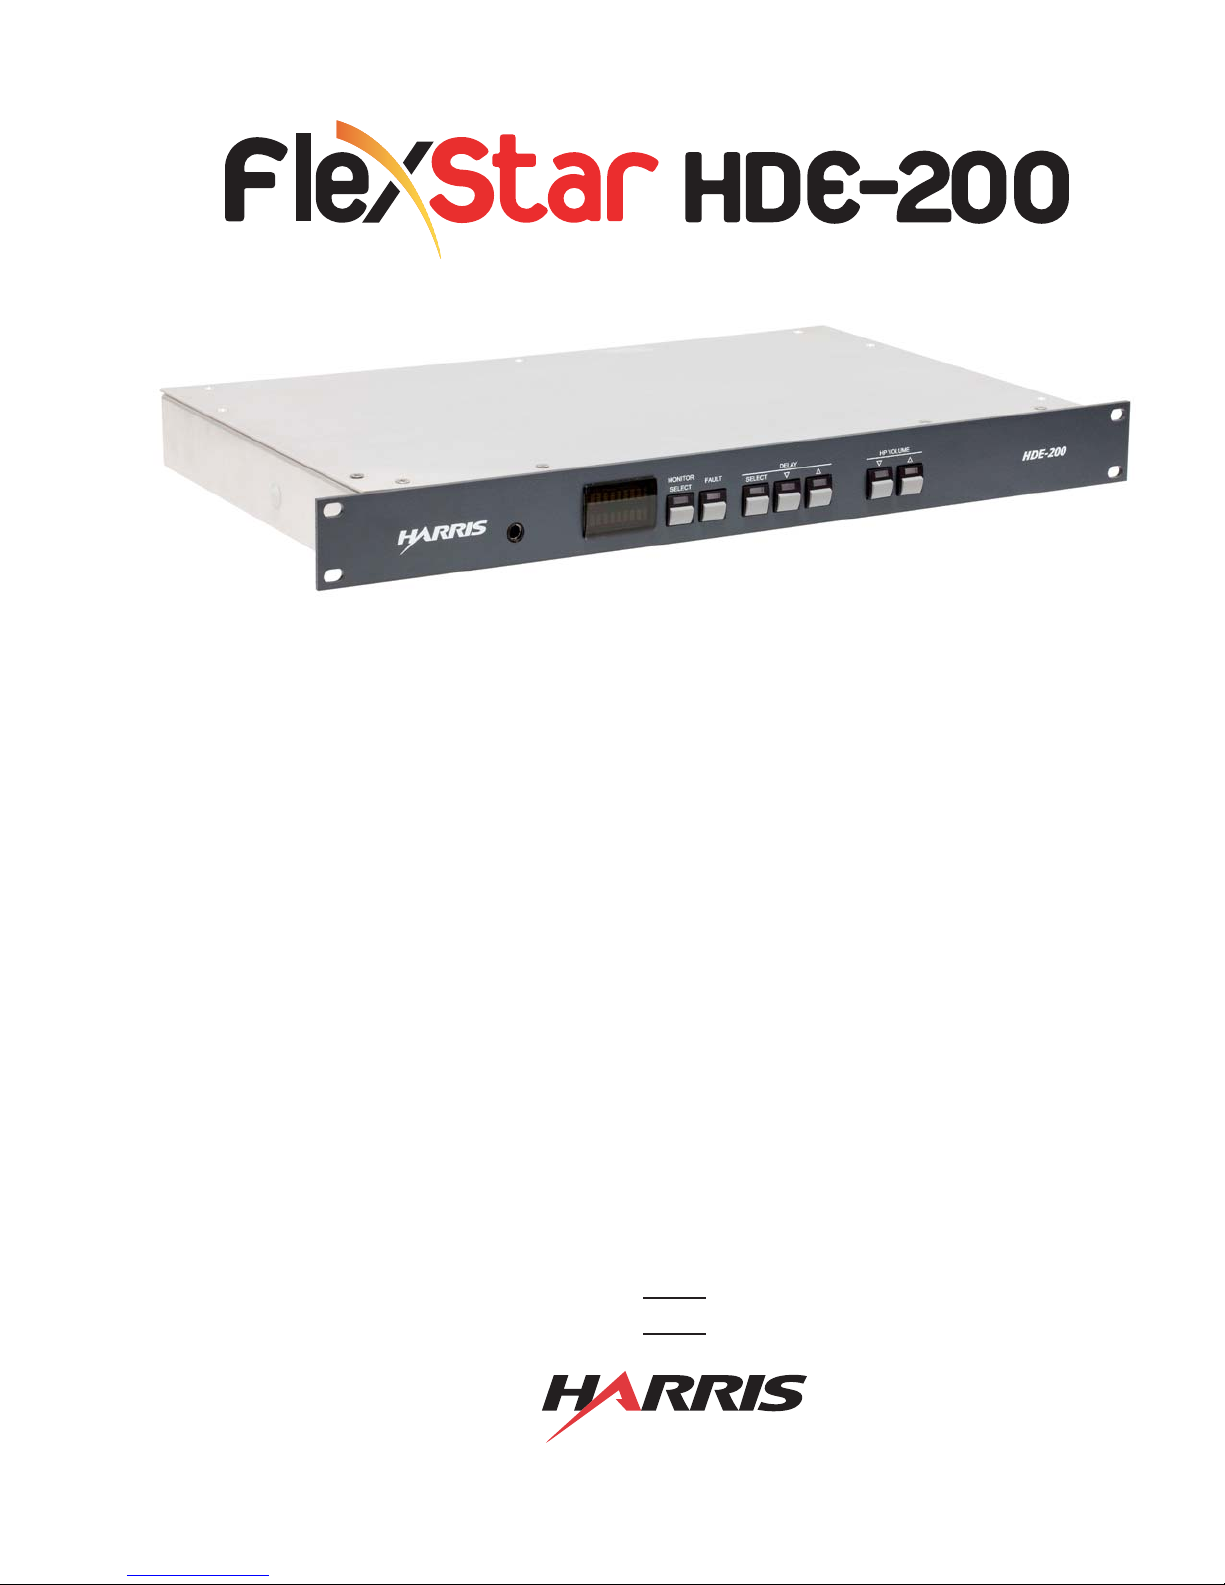
Harris FlexStar HDE-200, HARHDE200, HARHDE200-PROFAN, HARHDE200-PPM, HARHDE200-PROF/PPM Installation Manual & Users Manual
Page 1
Installation Manual
&
User Guide
HARHDE200 FlexStar HDE-200 Embedded Exporter
HARHDE200-PROFAN Profanity Delay Upgrade
HARHDE200-PPM Arbitron PPM Interface Upgrade
HARHDE200-PROF/PPM Combined Upgrade
75-56
Revision F • 3/12
BROADCAST COMMUNICATIONS DIVISION
Support phone: 217.222.8200 • e-mail: tsupport@harris.com
Internet: http://ecustomer.broadcast.harris.com
Page 2

HARRIS CORPORATION
ii
Revision F • 3/12
Page 3

Contents
CE Declaration of Conformity ....................... iv
Hazard/Warning Label Identification ............ v
Manual Revision History .............................. vi
Safety Instructions ......................................... v
Trademark Information................................. vi
1 PRODUCT OVERVIEW
1.1 Product Overview ................................. 1-1
1.1.1 HDE-200 Features........................... 1-1
1.1.2 HDE-200 Upgrades ......................... 1-2
1.2 Specifications ........................................ 1-3
1.3 Warranty ............................................... 1-4
2 HARDWARE
2.1 Installation Overview ............................ 2-1
2.1.1 Audio Connections ........................... 2-1
2.1.2 Connection Summary ...................... 2-2
2.2 Optional Upgrade Kits .......................... 2-3
2.2.1 Upgrade Kit Installation .................. 2-3
2.3 HDE-200 Connections .......................... 2-4
2.3.1 Grounding & Shielding .................... 2-4
2.3.2 GPS Antenna Connection ................ 2-4
2.3.3 Audio Connections ........................... 2-5
2.3.4 HDE-200 Sample & Bit Rate ........... 2-6
2.3.5 S/PDIF Connections ........................ 2-6
2.3.6 Using a Studio Remote Panel........... 2-7
2.3.7 HD Radio Exciter Connections ........ 2-9
2.3.8 FM Exciter Connection .................... 2-9
2.3.9 Network Connections ..................... 2-10
3 SOFTWARE
3.1 ECC App Overview................................ 3-1
3.2 Installing the ECC App.......................... 3-3
3.2.1 User Group Setup ............................ 3-3
3.3 Starting the ECC App ............................ 3-5
3.4 Editing HDE-200 Network Settings ...... 3-6
3 SOFTWARE (CONTINUED)
3.5 HDE-200 Configuration ........................ 3-9
3.5.1 File Menu ........................................ 3-9
3.5.2 Device Menu .................................... 3-9
3.5.3 Delay Control Menu....................... 3-10
3.5.4 Profanity Menu ............................. 3-12
3.5.5 System Menu ................................. 3-14
3.5.6 Help Menu .................................... 3-22
3.6 Supplemental Software ....................... 3-22
4 USING THE HDE-200
4.1 HDE-200 Controls ................................ 4-1
4.1.1 Selecting the Monitor Source ........... 4-1
4.1.2 Headphone Volume Adjustment ....... 4-2
4.1.3 Delay Status & Control .................... 4-2
4.1.4 Fault ................................................ 4-2
4.2 Using the ECC App ............................... 4-3
4.2.1 Audio Metering ................................ 4-4
4.2.2 Diversity Delay Control .................... 4-5
4.2.3 Profanity Delay Control ................... 4-6
4.2.4 Status Indicators.............................. 4-6
5 SERVICE
5.1 Parts and Repair Services ..................... 5-1
5.1.1 Parts Ordering & Repair Information 5-1
5.1.2 HDE-200 Replacement Parts List ... 5-2
5.1.3 Upgrade Kit Parts ............................ 5-3
5.2 Technical Overview ............................... 5-3
5.3 HDE-200 Troubleshooting .................... 5-6
5.4 Software & Firmware Updates ............... 5-8
5.5 Replacing Assemblies.......................... 5-10
APPENDIX
App Note AN10-02 ECC App & Win 7 ....... A-1
iii
HARRIS CORPORATION
Revision F • 3/12
Page 4

CE Declaration of Conformity
Declaration of Conformity
Application of Council Directive: 2004/108/EC
Standards To Which
Conformity Is Declared:
Manufacturer's Name:
Manufacturer's Address:
Equipment Description:
Equipment Class:
Model Numbers:
EN55103-1:1997 (Professional Audio)
EN55022 Class A
Radiated Emissions
Conducted Emissions
EN55103-1 Magnetic Emissions
EN61000-3-2 Harmonics
EN61000-3-3 Voltage Flicker
EN55103-2:1997 (Professional Audio)
EN55103-2 Magnetic Immunity
EN61000-4-2
EN61000-4-3
EN61000-4-4
EN61000-4-5
EN61000-4-6
EN61000-4-11
Harris Corporation
1493 Poinsettia Avenue, Suite 143
Vista, CA 92081
(760) 936 4010
Embedded Exporter
Professional Audio Equipment Residential
99 1440
I the undersigned, hereby declare that the equipment specified
above, conforms to the above Directive(s) and Standard(s).
HARRIS CORPORATION
Place:
Harris Corporation - Mason, Ohio USA
Signature:
Full Name:
Ted Staros
Position:
Director - Studio Products Development
iv
Revision F • 3/12
Page 5
Hazard/Warning Label Identification
CAUTION
REFER SERVICING TO QUALIFIED
SERVICE PERSONNEL ONLY.
The Exclamation Point symbol,
within an equilateral triangle, alerts
the user to the presence of important
operating and mainte-nance
(servicing) instructions in product
WARNING: TO REDUCE THE RISK OF FIRE OR ELECTRIC
literature and instruction manuals.
SHOCK, DO NOT EXPOSE THIS PRODUCT TO RAIN, HIGH
HUMIDITY OR MOISTURE.
WARNING: THIS PRODUCT USES A UL-LISTED 5 VDC
POWER SUPPLY. IF REPLACEMENT IS REQUIRED, USE
ONLY A HARRIS PRE50-26 POWER SUPPLY.
NOTE:
This equipment has been tested and found to comply with the limits for a Class A digital device, pursuant to part 15 of
the FCC Rules. These limits are designed to provide reasonable protection against harmful interference when the equipment is
operated in a commercial environment. This equipment generates, uses, and can radiate radio frequency energy and, if not
installed and used in accordance with the instruction manual, may cause harmful interference to radio communications.
Operation of this equipment in a residential area is likely to cause harmful interference in which case the user will be required
to correct the interference at his own expense.
Safety Instructions
1. Read All Instructions. Read all safety and operating
instructions before operating the product.
2. Retain All Instructions. Retain all safety and operating
instructions for future reference.
3. Heed All Warnings. You must adhere to all warnings
on the product and those listed in the operating
instructions.
4. Follow All Instructions. Follow all operating and
product usage instructions.
5. Heat. This product must be situated away from any heat
sources such as radiators, heat registers, stoves, or other
products (including power amplifiers) that produce heat.
6. Ventilation. Slots and openings in the product are
provided for ventilation. They ensure reliable operation
of the product and keep it from overheating. Do not block
or cover these openings during operation. Do not place
this product into a rack unless proper ventilation is
provided and the manufacturer’s recommended
installation procedures are followed.
7. Water and Moisture. Do not use this product near
water such as a bathtub, wash bowl, kitchen sink, or
laundry tub, in a wet basement, or near a swimming
pool or the like.
8. Attachments. Do not use any attachments not
recommended by the product manufacturer as they may
cause hazards.
9. Power Sources. You must operate this product using
the type of power source indicated on the marking label
and in the installation instructions. If you are not sure of
the type of power supplied to your facility, consult your
local power company.
10. Grounding and Polarization. This product is equipped
with a polarized AC plug with integral safety ground pin.
Do not defeat the safety ground in any manner.
11. Power Cord Protection. Power supply cords must be
routed so that they are not likely to be walked on nor
pinched by items placed upon or against them. Pay
particular attention to the cords at AC wall plugs and
convenience receptacles, and at the point where the cord
plugs into the product.
12. Lightning. For added protection for this product, unplug
it from the AC wall outlet during a lightning storm or
when it is left unattended and unused for long periods of
time. This will prevent damage to the product due to
lightning and power line surges.
13. Overloading. Do not overload AC wall outlets, extension
cords, or integral convenience outlets as this can result
in a fire or electric shock hazard.
14. Object and Liquid Entry. Never push objects of any
kind into this product through openings as they may touch
dangerous voltage points or short out parts, which could
result in a fire or electric shock. Never spill liquid of any
kind on the product.
15. Accessories. Do not place this product on an unstable
cart, stand, tripod, bracket, or table. The product may
fall, causing serious injury to a child or adult and serious
damage to the product. Any mounting of the product
must follow manufacturer’s installation instructions.
16. Product and Cart Combination. Move this product
with care. Quick stops, excessive force, and uneven
surfaces may cause the product and the cart combination
to overturn.
17. Servicing. Refer all servicing to qualified servicing
personnel.
18. Damage Requiring Service. Unplug this product from
the wall AC outlet and refer servicing to qualified service
personnel under the following conditions:
a. When the AC cord or plug is damaged.
b. If liquid has been spilled or objects have fallen into the
product.
c. If the product has been exposed to rain or water.
d. If the product does not operate normally (following
operating instructions).
e. If the product has been dropped or damaged in any way.
f. When the product exhibits a distinct change in
performance. This indicates a need for service.
19. Replacement Parts. When replacement parts are
required, be sure the service technician has used
replacement parts specified by the manufacturer or that
have the same characteristics as the original parts.
Unauthorized substitutions may result in fire, electric
shock, or other hazards.
20. Safety Check. Upon completion of any repairs to this
product, ask the service technician to perform safety
checks to determine that the product is in proper
operating condition.
21. Cleaning. Do not use liquid or aerosol cleaners. Use
only a damp cloth for cleaning.
v
HARRIS CORPORATION
Revision F • 3/12
Page 6

Manual Revision History
Revision A - Preliminary release
Revision B - First official release, numerous technical and format changes
Revision B.1 - Supplemental software release information added, updated on-screen captures
Revision C - Section numbers added; updated user groups section; added manual rev history
Revision D - Updated specifications and SIS Summary illustration
Revision E - Updated specifications for Clock Outputs, IP addresses, added networking notes
Revision F - New Front Panel design changes, IP addressing changes, operational changes reflected for
ECC app version 1.2.16 and HDE-200 firmware version 4.3.2.6
Trademark Information
FlexStarTM and HDE-200TM are proprietary trademarks of Harris Corporation.
HD Radio
Corporation. HD Radio
of iBiquity Digital Corp.
TM
Technology manufactured under license from iBiquity Digital
HARRIS CORPORATION
TM
and the HD Radio logo are proprietary trademarks
vi
Revision F • 3/12
Page 7

Product Overview
of Exporters. Its Ethernet output can be set to use
UDP, TCP/IP, or Starlink MAC, making it fully
Thanks for joining the broadcasters employ-
ing Harris Corporation products. Our mission:
provide the highest quality products, systems, docu-
mentation, and after-sale support. We invite com-
ments and suggestions for improvements to this
documentation or to any of our services.
To obtain the maximum benefit from the
TM
FlexStar
this chapter, and the
chapters, prior to product installation.
1.1 Product Overview
The HDE-200 is a Program Exporter for HD
Radio
the necessary information to broadcast one or
more HD Radio
existing analog FM broadcast spectrum. The HDE-
200 adds the signal encoding required by an HD
Radio Exciter. In addition, it encodes Program Ser-
vice Data (PSD), Advanced Application Services
(AAS) data, and secondary channel audio supplied
from an HD Radio Importer, like the Harris HDI-
100 or HDI-200 Program Importer.
The HDE-200 outputs an Ethernet data stream,
termed the E2X transport stream, to feed an HD
Radio Exciter like the Harris HDX-100 Exciter.
The HDE-200 can be located in a studio or in a
terminal room—as opposed to having to be co-
located at the transmitter, as in earlier generations
HDE-200’s capabilities, read through
Hardware
TM
broadcasts. It allows a broadcaster to add
digital audio channels within their
and the
Software
HARRIS CORPORATION
1-1
compatible with Digital STLs, DHCP-controlled
local area networks, and even the public Internet.
The HDE-200 is an
means that the iBiquity
data encoding algorithms, and the required diver-
sity delay, are all processed within the unit. No
external PC is required for daily operation, as in
previous generations of Program Exporters.
This third-generation HD Radio Program Ex-
porter provides a powerful hardware/software
platform that offers improved reliability and ease-
of-use—at a significantly lower cost, over first and
second generation products. This is accomplished
by “embedding” a microcontroller within the Ex-
porter—eliminating the cost of an external Linux
x86 PC and its custom hardware features.
Incorporating the control architecture within the
HDE-200 allows the diversity delay to remain
intact—even if a microcontroller reboot is
required, something no previous design could do.
embedded exporter
TM
HD Radio codec and
1.1.1 HDE-200 FEATURES
The HDE-200, once configured for your appli-
cation, has just a few local controls (the front panel
has seven control buttons plus indicator LEDs,
two 10-Character displays, and a headphone jack
for confidence monitoring). Setup and other moni-
toring and control functions are done by using
the supplied HDE-200 Exporter Control Center
software (ECC app).
The hardware controls on the front panel do
allow the incoming or output audio to be moni-
tored via a level meter and front panel headphone
jack. Three buttons (Delay Select, Ramp Up, Ramp
1
, which
Revision F • 3/12
Page 8

1 Product Overview
Down) select which delay (Diversity Delay or the
optional Profanity Delay) is being monitored and
allow basic Ramp Up/Down control. The 10-Char-
acter displays show the status of the delay. The
Ramp Up/Down LEDs indicate whether the de-
lays are at zero, are ramping, or are complete.
More extensive control over the delays is done
through the ECC app. A hardware studio remote
panel can also be used to control such Profanity
Delay features as Dump, Rebuild, and Ramp to
Zero, and Diversity Delay control of Ballpark
mode, which ramps the Diversity Delay out so that
the analog broadcast of a live event (like a sport-
ing event) can be done with minimal delay.
The front panel Monitor Select button allows
any audio input or output to be monitored on the
front panel level display, the front panel headphone
jack, and the rear panel
Ref Mon Out
connection,
which can feed a pair of digital monitor speakers.
A Fault LED on the front panel blinks if a GPS
lock or audio fault occurs. Pressing the Fault but-
ton brings up a Fault display overriding the nor-
mal monitor level display.
There are two AES digital audio inputs on the
HDE-200 (
Main Delay In
The
Main Delay In
and
MPS Audio In
put is typically used for the
audio going to the analog carrier, although it can
also be the set as the source for the HD Radio
main channel when both signals use common air
chain processing. When the HD Radio main chan-
nel and analog broadcast use different signal pro-
cessing, then the HD Radio main channel audio
is connected to the Main Program Signal input
(
MPS Audio In
Main Delay Out
).
, which feeds the analog trans-
mission chain, goes through an adjustable Diver-
sity Delay to compensate for the HD Radio signal
processing time. This is so an HD Radio receiver
will smoothly blend between the analog carrier
and digital main channel without any time-shift-
ing artifacts. The ECC app is used to select which
input signal feeds this output and to set the length
of the Diversity Delay to keep the analog and digi-
tal broadcast audio outputs aligned in time.
A digital monitor output (
Ref Mon Out
) can feed
a local digital audio monitor. Its source is set by
the front panel Monitor Select button, between
MPS in, MPS out, Main Delay In, and Main De-
lay out.
The 320 kbps E2X transport stream is output
on the three Ethernet connections built into the
HDE-200. These allow an HD Radio Exciter or
Digital STL, plus an HD Radio
Importer and an
admin computer, to directly connect to the HDE-
200 so a separate LAN switch is not required,
although the HDE-200 can interconnect though
any standard LAN switch, if required.
1.1.2 HDE-200 UPGRADES
Three upgrade kits are available: Profanity De-
lay (HARHDE200-PROFAN); Arbitron PPM En-
coder Interface (HARHDE200-PPM); and a com-
bined Profanity/PPM Encoder Interface
(HARHDE200-PROF/PPM).
The Profanity Delay kits add a second delay
).
function to the HDE-200—with remote studio
logic control via a parallel logic I/O port or via
on-screen commands, so that a separate profanity
delay controller is not required. It has variable
ramp times and allows delays of up to 35 seconds
to be set using the HDE-200 ECC app.
The Arbitron PPM Encoder Interface allows two
PPM Encoders to be used to separately add in
the Personal People Meter encoding to the main
HD Radio and analog carrier audio streams. These
are both sent post Diversity Delay so that ramp-
ing in/out does not affect the PPM Encoding. The
PPM Encoders connect to the HDE-200 using a
standard XLR interface cable (supplied with the
upgrade kit) that plugs into the Post Delay Loop
I-O connector.
HARRIS CORPORATION
1-2
Revision F • 3/12
Page 9

1 Product Overview
1.2 Specifications
Compliance
RoHS:
Fully compliant
FCC:
Meets FCC Part 15, under CE mark
UL:
N/A. Commodity supply is UL approved
GPS Antenna Input
Connection:
Impedance:
GPS Antenna:
USB Interface
USB 2.0 Host (200 mA max current draw)
Ethernet Interface
3 Ethernet Ports:
compliant transceivers, auto negotiating
Default IP addressing:
Host :
DSP:
Multicast: 239.255.255.1 **
E2X Exgine Exciter Transmit:
* These addresses may need to be changed, as
needed, during product installation.
** This address is normally not changed.
Clocks (GPS referenced, with satellite lock)
10 MHz: +2 dBm, nominal @ 50 ohms (BNC)
±1 ppt, 24-hour avg
44.1 Word Clock: 2.5 V nominal @ 75 ohms (BNC)
±1 ppt, 24-hour avg
1 PPS: 2.5 V nominal @ 50 ohms (BNC)
±100 nsec, relative to UTC
Digital Audio I/O
Internal Sample Rate: 44.1 kHz
AES Input Compliance:
inputs are truncated to 16-bits)
Input Signal Format (Main Delay In, MPS Audio In):
110 ohm AES (S/PDIF accepted, 0.3 Vpp min)
Type-F (+5 VDC on center pin)
50 ohms
Trimble Bullet III (supplied)
10/100 T/TX IEEE802.3u
10.10.10.10 *
Importer Receive: Port 10000
PSD Receive: Port 11000
Diversity Correction: Port 53491
10.10.10.22 *
Community Announcements Port: 50010
Meter Data Port: 50020
Log Data Port: 8003
10.10.10.11 *
E2X Data Port: 10000 (TCP/IP)
E2X Data Port: 11000 (UDP)
16-bit or 24-bit (24-bit
Input Sample Rate (Main Delay In, MPS Audio In):
32 kHz to 96 kHz
Output Signal Format (Ref Mon Out and Main Delay Out):
110 ohm AES
Output Sample Rate (Ref Mon Out and Main Delay Out):
44.1 kHz
AES Output Compliance (Ref Mon Out and Main Delay
16-bit
Out):
Encoded HD output:
As specified by iBiquity IRSS
(iBiquity Reference System Software) ver 4.x.
Audio Frequency Response
Main Delay Input to Main Delay Output: ±0.01 dB,
20 Hz to 20 kHz
AA
udio Dudio D
A
udio D
AA
udio Dudio D
ynamic Rynamic R
ynamic R
ynamic Rynamic R
angeange
ange
angeange
Main Delay Input to Main Delay Output: 96 dB
(16-bit limited)
AA
udio udio
TT
otal Hotal H
arar
A
udio
AA
udio udio
T
otal H
TT
otal Hotal H
monic Dmonic D
ar
monic D
arar
monic Dmonic D
istist
ist
istist
oror
tion + Ntion + N
or
tion + N
oror
tion + Ntion + N
oiseoise
oise
oiseoise
Main Delay Input to Main Delay Output: <0.005%,
20 Hz to 20 kHz, -6 dbFS input, -6 dbFS output, 22 kHz filter bandwidth
RR
emotemot
e I/O Le I/O L
oo
R
emot
RR
emotemot
e I/O L
e I/O Le I/O L
gicgic
o
gic
oo
gicgic
Logic Inputs: Opto-isolated
Logic Outputs:
Opto-isolated
+5 VDC/GND: Used with control panels and other
fully isolated devices only
EE
nn
virvir
onmenonmen
onmen
onmenonmen
tt
t
tt
E
n
vir
EE
nn
virvir
Ambient Temperature: 0°C - 50°C
Cooling: Convection cooled, no fans
PP
oo
ww
er Rer R
equirequir
emenemen
P
o
w
er R
PP
equir
oo
ww
er Rer R
equirequir
emen
emenemen
tsts
ts
tsts
<30 watts at 120 VAC / 60 Hz
Power Supply
Supply: Commodity type, plug in, single output
(+5 VDC)
AC input: Polarized power cord, for 3-pin North
American outlets (IEC60320-C13 to 5-15P)
DimensionsDimensions
Dimensions
DimensionsDimensions
1RU: 1.75" x 19" x 12" (H, W, D)
WW
eigheigh
tt
W
eigh
t
WW
eigheigh
tt
4 lbs
Harris Corporation reserves the right to change
specifications without notice or obligation.
1-3
HARRIS CORPORATION
Revision F • 3/12
Page 10

1 Product Overview
1.3 Warranty
Equipment Warranty Claims and
Procedures
The Standard Equipment Warranty Period is
1.
15 months from date of equipment shipment from
a Harris facility . The Customer’s sole and exclusive
remedy for any breach of the Standard Equipment
Warranty will be, at Harris’ sole discretion and
option, repair or replacement of the defective
Product. Components that Customer claims to be
defective must be made available to Harris for
inspection and evaluation. Unless otherwise
agreed in writing by Harris, Customs clearance
for all replacement parts under the warranty or
otherwise will be Customer’s sole responsibility.
To be entitled to rights under the Standard
Equipment Warranty, the Customer must notify
Harris in writing within thirty (30) days after
discovering a suspected defect in any Product or
Services, but in any event prior to the expiration
of the applicable Standard Warranty P eriod. Notice
to a Harris dealer, system integrator, sales
representative or other third party is not notice
to Harris. Following its receipt of any such
Customer notice, Harris will determine whether
the reported problem is covered by this Standard
Equipment Warranty. If Harris determines that
the problem is covered, Harris will authorize repair
or replacement of the defective Product, as
deemed appropriate by Harris in its sole
discretion. For clarification purposes, any technical
support provided by Harris will be for the sole
purpose of fulfilling Harris’ warranty obligations.
If Harris determines that Customer is using
technical support as a substitute for training of
Customer’s personnel, then such technical
support will be subject to additional charges at
Harris’ prevailing unit rate for such services.
2. Before shipping any Product to Harris, the
Customer must obtain a written Return
Authorization from Harris, and provide any proof
of warranty eligibility requested by Harris. Any
Product received by Harris without a Return
Authorization may, at Harris’ option, be returned
to the Customer collect. Once a Return
Authorization is obtained, the Customer is
responsible for packing and shipping the Product,
to which its warranty claim relates, to a service
facility designated by Harris, with all shipping
charges prepaid by the Customer, within thirty
(30) days after receipt of the Return
Authorization. Harris will pay for return of the
repaired or replacement Product to the Customer
if the repaired or replacement Product is shipped
to a designated Harris service facility. Harris will
use commercially reasonable efforts to supply
Equipment (or part thereof) from the geographical
region of Customer’s site, so as to minimize
freight and duty. Harris bears the risk of loss or
damage while the Equipment (or part thereof) is
in transit to Customer from the Harris Service
Center, and Customer bears the risk of loss or
damage while the Equipment (or part thereof) is
in transit back to the Harris Service Center.
3. Upon receipt of replacement Equipment (or
a part thereof), Customer has thirty (30) days to
tender the defective Equipment (or part thereof)
to the return carrier for shipment to the service
center designated by Harris. If Customer does
not timely return the defective Equipment (or a
part thereof), Harris shall invoice Customer for
the list price of such Equipment (or part thereof),
plus applicable shipping. Such failure to return
the Equipment (or part thereof) may, in Harris’
discretion, be grounds for termination of the
Warranty and/or suspension of any future
advance exchange privileges until such
outstanding defective Equipment has been
returned. Under the Standard Equipment
Warrant y Harris will provide Customer with new,
rebuilt, refurbished or alternate Equipment (or a
part thereof) of equal or improved quality, as the
exchange Equipment (or part thereof) to replace
eligible defective Equipment (or part thereof). Any
alternate Equipment (or part thereof) will meet
or exceed the specifications of the replaced
Equipment (or part thereof). Rebuilt or
refurbished Equipment may bear cosmetic
blemishes that do not affect performance. Unless
otherwise specified by Harris in writing, repaired
or replaced Equipment (or parts thereof) are
covered only for the remainder of the term of
the applicable Standard Equipment Warranty. All
defective Equipment (or parts thereof) replaced
by Harris become the property of Harris. Harris
has no obligation to (i) service, exchange or
otherwise replace any Equipment (or part thereof)
that has been damaged, modified, abused,
misused or overused as determined by Harris or
has been used with non-Harris supplies or
products that have caused damage or
malfunction; (ii) paint, refinish, refurbish, restore
or exchange any Equipment (or part thereof) with
cosmetic blemishes; (iii) service, exchange or
otherwise replace any Equipment (or part thereof)
if the same would interfere with, impede or be
redundant with normal or scheduled maintenance
of such Equipment (or part thereof); (iv) service,
exchange or otherwise replace any Equipment
(or part thereof) that is within sixty (60) days of
the end of its production life; or (v) provide any
application software support or service involving
application hardware or replace any accessories.
If Harris elects to perform any such services at
Customer’s request, then such services will be
deemed a service call and all labor, parts and
materials used for the service call will be charged
at Harris’ then-prevailing rates.
Equipment Warranty Exclusions
Harris does not warrant nor guarantee, and is
not responsible for:
1. Defects, failures, damages or performance
limitations caused in whole or in part by (A) power
failures, surges, fires, floods, snow, ice, lightning,
excessive heat or cold, highly corrosive
environments, accidents, actions of third parties,
or other events outside of Harris’ control, or (B)
HARRIS CORPORATION
1-4
Revision F • 3/12
Page 11

1 Product Overview
Customer’s abuse, mishandling, misuse,
negligence, improper storage, servicing or
operation, or unauthorized attempts to repair or
alter the Equipment in any way. Customer must
provide qualified technical personnel to maintain
and repair the Equipment.
2. Equipment built to Customer’s specifications
that are later found not to meet Customer’s needs
or expectations.
3. The performance of the Equipment when
used in combination with equipment not
purchased, specified, or approved by Harris.
4. Signal coverage delivered by antenna
equipment whether or not supplied by Harris.
5. Batteries and other consumable goods.
Additional Warranty Notes
. OEM or Third Party equipment that is
1
incorporated into Harris Equipment is covered
under the applicable Harris Standard Equipment
Warranty unless the OEM or Third P arty equipment
carries its own limited warranty, in which event
the OEM or Third Party warranty will apply to such
equipment incorporated into Harris Equipment.
For example and not limitation, CRT s, LCDs, FSMs
and Optical Test products are OEM products that
have a limited 1 year manufacturer’s warranty.
2. Items Sold As Resale. Items sold as resale
are such items that are not manufactured by
Harris but may be utilized in conjunction with or
independently of Harris manufactured Equipment
(such as tubes, printers and antenna transmission
lines) and shall be covered only by the specific
warranty terms of the supplier or original
equipment manufacturer of those items. IF AN
ORDER COVERS EQUIPMENT NOT OWNED BY
HARRIS, IT IS SOLD SUBJECT TO HARRIS’
ACQUISITION OF POSSESSION.
3. B-Stock Equipment. B-Stock Equipment for
non-transmitter related Equipment is defined as
any non-out-of-production product that is less
than three (3) years old. B-Stock Equipment
related to transmitters is defined as equipment
repurchased by Harris that is reconditioned or
refurbished for sale to a second generation owner
by Harris or its reseller.
4. Used Equipment. IF THE EQUIPMENT
SPECIFIED IN AN ORDER IS DESCRIBED AS
USED, UNLESS OTHERWISE AGREED IN WRITING
BY THE PARTIES, IT IS SOLD “AS IS” AND WITH
NO WARRANTY.
Services Warranty
Harris warrants that the Services will be
performed in a professional manner (the “Services
Warranty”). Notice of a breach of the Services
Warranty must (i) specify in reasonable detail,
the nature of the claim, and (ii) be received within
ninety (90) days from the last day of performance
of the Services. Upon notice of a breach of the
Services Warranty and Harris’ determination of
the validity of such breach of the Services
Warranty, Harris will re-perform the applicable
Services at Harris’ expense. If after reasonable
opportunity Harris is unable to re-perform such
Services to the reasonable satisfaction of
Customer , Customer ma y, as its ex clusive remedy ,
obtain a refund of the fees paid to Harris under
the applicable Order for such Services.
Software Warranty
1. Physical Media. Harris warrants all physical
media (“software media”) for the Licensed
Programs, including without limit custom software
and traffic translators, to be free of defects in
material or workmanship for a period of ninety
(90) days from the date of completed installation,
or if Customer should assume responsibility for
installation of the Software, for a period of ninety
(90) days from the date of shipment of the
Licensed Programs by Harris (the “Software
Warrant y Period”). This limited warr anty extends
only to Customer as the original licensee.
Customer’s sole and exclusive remedy under this
limited warranty will be, at Harris’ option, repair
or replacement of the software media.
2. Licensed Programs. Harris warrants that
during the Software Warranty Period (or such
other time period as agreed in writing by the
parties) the Licensed Programs shall operate
substantially in compliance with Harris’
specifications for the Licensed Programs (the
“Software W arranty”). The entire liability of Harris
under this limited warranty is to provide, free of
charge, a corrected copy of any portion of the
Licensed Programs which is found by Harris
inspection not to be in substantial compliance with
its specifications. If Harris is unable to provide a
corrected copy of the Licensed Programs within
a reasonable time, as Customer’s sole and
exclusive remedy, Harris will replace the same
with a functionally similar program or refund to
Customer the amounts Customer paid Harris to
purchase or license such Licensed Programs.
Harris does not warrant that such Programs are
error free or that Customer will be able to operate
such Programs without problems or interruptions.
Corrections to the Licensed Programs beyond the
Software Warranty Period will only be made by
Harris pursuant to a separate software
maintenance agreement.
3. Cost of Corrections. During the Software
Warr anty Period, Harris will bear the material cost
and shipment of corrected or replacement
Software at no charge to Customer. Software
corrections will be sent via e-mail. In the rare
event Customer requires a Harris customer
support engineer to visit the site, related
reasonable pre-approved on-site time and travel
expenses will be billed at the prevailing daily rates,
unless otherwise agreed to in writing prior to the
visit. A ONE-DAY MINIMUM CHARGE APPLIES
TO ALL ON-SITE VISITS.
4. Software W arranty Exclusions. The Softwa re
Warranty does not apply to any software media
1-5
HARRIS CORPORATION
Revision F • 3/12
Page 12

1 Product Overview
or Licensed Program that (A) has been altered or
modified, except by Harris; (B) has not been
installed, operated, repaired, or maintained in
accordance with instructions supplied by Harris;
(C) has been subjected to abnormal physical or
electrical stress, misuse, negligence, or accident;
or (D) is used in ultrahazardous activities.
Disclaimer of Warranties
EXCEPT AS EXPRESSLY PROVIDED IN THIS
STANDARD WARRANTY POLICY STATEMENT,
HARRIS HEREBY EXPRESSLY DISCLAIMS ALL
REPRESENTATIONS, CONDITIONS AND
WARRANTIES, WHETHER EXPRESS OR
IMPLIED, INCLUDING BY WAY OF EXAMPLE
AND NOT LIMITATION, THE IMPLIED
WARRANTIES OF TITLE,
MERCHANTABILITY, NON-INFRINGEMENT
AND FITNESS FOR A PARTICULAR PURPOSE.
Limitation on Liability
NOTWITHSTANDING ANYTHING HEREIN TO
THE CONTRARY, IN NO EVENT WILL HARRIS
BE LIABLE FOR ANY SPECIAL, INCIDENTAL,
PUNITIVE OR CONSEQUENTIAL DAMAGES
WHATSOEVER, INCLUDING LOSS OF
PROFITS, WHETHER ARISING IN CONTRACT,
TORT, WARRANTY OR OTHERWISE, EVEN IF
IT HAS BEEN ADVISED OF THE POSSIBILITY
OF SUCH DAMAGES. THE LIMITATIONS SET
FORTH HERE WILL APPLY EVEN IF THE
REMEDIES OF ERROR CORRECTION, REPAIR
OR REPLACEMENT, REPERFORMANCE OF
SERVICES AND REFUND OF PAYMENTS
COMPLETELY FAIL OF THEIR ESSENTIAL
PURPOSE. NOTWITHSTANDING ANYTHING
HEREIN TO THE CONTRARY, THE LIMIT OF
HARRIS’ LIABILITY (WHETHER IN
CONTRACT, TORT, NEGLIGENCE, STRICT
LIABILITY, BY STATUTE OR OTHERWISE) TO
CUSTOMER OR TO ANY THIRD PARTY
CONCERNING THE HARRIS EQUIPMENT OR
SOFTWARE LICENSES SOLD TO CUSTOMER
AND WARRANTED HEREUNDER, HARRIS’
PERFORMANCE OR NONPERFORMANCE, OR
IN ANY MANNER RELATED TO THIS
STANDARD WARRANTY POLICY STATEMENT,
FOR ANY AND ALL CLAIMS WILL NOT IN THE
AGGREGATE EXCEED THE ACTUAL AMOUNTS
RECEIVED BY HARRIS FOR THE SPECIFIC
PRODUCT WITH RESPECT TO WHICH SUCH
CLAIM IS MADE.
Governing Law and Jurisdiction
Applicable Law, Venue and Jurisdiction. This
Standard Warranty Policy Statement, and any
disputes related hereto, shall be governed by and
interpreted in accordance with the laws of the
State of Florida, USA, regardless of any law
principles requiring the application of any other
law. The parties agree that the exclusive venue
for any action related to the dispute or
interpretation of this Agreement shall be in the
courts with the appropriate jurisdiction located
in Orlando, Florida, and each party irrevocably
submits to the jurisdiction of each such court in
any such action and waives any objection it may
now or hereafter have to venue or personal
jurisdiction in each such court. The prevailing
party in any action related to the dispute or
interpretation of this Agreement shall be entitled
to recover its reasonable attorneys fees incurred
in pursuing the action, including those fees
incurred throughout all bankruptcy and appellate
proceedings.
Jury Waiver. THE PARTIES FURTHER AGREE, TO
THE EXTENT PERMITTED BY LAW, TO WAIVE ALL
RIGHTS TO A TRIAL BY JURY OF ANY ACTION
RELATING TO THE DISPUTE OR INTERPRET ATION
OF THIS AGREEMENT, WHETHER SOUNDING IN
CONTRACT , TOR T , OR O THERWISE. THE PARTIES
SPECIFICALLY ACKNOWLEDGE THAT THIS
WAIVER IS MADE KNOWINGLY AND VOLUNT ARIL Y
AFTER AN ADEQUATE OPPORTUNITY TO
NEGOTIATE ITS TERMS.
HARRIS CORPORATION
1-6
Revision F • 3/12
Page 13
Hardware
2
The HDE-200 can be mounted in a studio,
terminal room, or transmitter facility. It requires one
rack unit (1RU) of space. No special venting require-
ments are required and low power equipment can
be mounted directly above and below the unit.
2.1 Installation Overview
All HDE-200 signal and power connections are
made on the rear panel. There are no internal
adjustments on the HDE-200, but there are op-
tional upgrade kits that require removing the top
cover for installation. We recommend installing any
upgrade kit (Profanity Delay and/or Arbitron
PPM Encoder Interface) before the HDE-200 is
rack mounted. Upgrade kit installation instruc-
tions are presented on page 2-3.
2.1.1 AUDIO CONNECTIONS
There are four AES-3 balanced digital audio
connections using XLR-type connectors. All con-
form to standard AES-3 (AES/EBU) digital wir-
ing practices (3 volt signals, 110 ohm, balanced
lines) and levels (-20 dBFS corresponds to 0 VU
on the on-screen metering). For best results use
110 ohm balanced wiring suitable for digital au-
dio signals on these four connections.
Note that unbalanced 75 ohm S/PDIF digital
audio signals can be connected to the AES inputs.
See page 2-6 for connection details.
The HDE-200 has two audio inputs: the Main
Program Service input (
the audio for the HD Radio main channel; and
Main Delay In
the
the analog broadcast carrier. If the HD Radio main
channel and analog carrier will use the same sig-
nal, then connect to the
Which inputs are active is set using the Exporter
Control Center program (ECC app).
MPS Audio In
, which is the audio input for
Main Delay In
), which is
connector.
The HDE-200 draws about 30 watts from a
100-240 VAC, 50/60 Hz outlet. An IEC power
cord, terminating in a Type B plug (for the USA,
Canada and Japan) is included with the HDE-200.
The HDE-200 is designed to be rack mounted
using four rack screws.
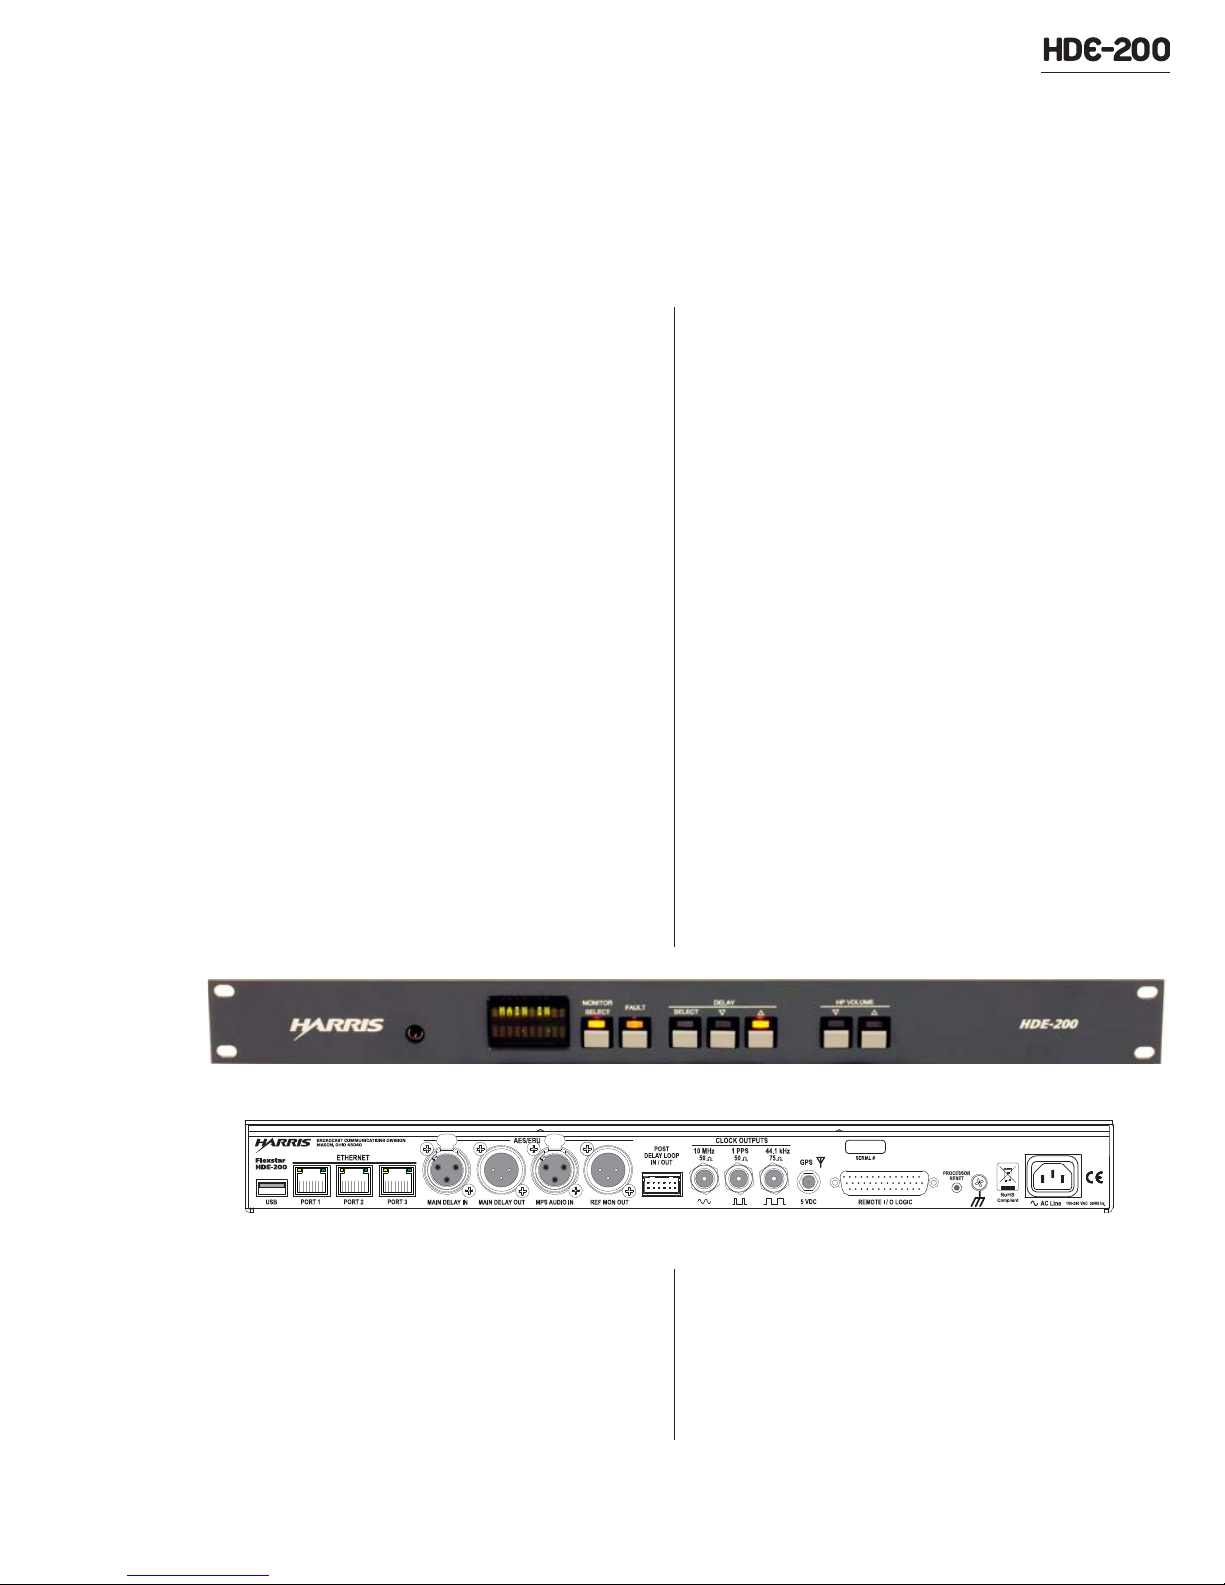
HDE-200 Front Panel
HDE-200 Rear Panel
Main Delay Output
The
mission chain. It is time delayed, by the Diversity
Delay setting, so that HD Radio tuners will
seamlessly switch between the analog carrier and
the HD Radio main channel. The Diversity Delay
will be roughly eight seconds when compared to
2-1
HARRIS CORPORATION
Revision F • 3/12
feeds the analog trans-
Page 14
2 Hardware Installation
an undelayed analog broadcast signal. The Diver-
sity Delay is set using the ECC app.
The fourth digital audio connection is a Refer-
ence Monitor output (
Ref Mon Out
) that can feed
a pair of local digital monitor speakers. Its source
(
MPS Audio In
Main Delay Out
, MPS Output,
Main Delay In
, or
) is set by the front panel Monitor
Select button. The front panel headphone jack is
fed with the same monitor audio, but it’s level con-
trolled using the front panel HP Volume down and
up (
) buttons.
2.1.2 CONNECTION SUMMARY
A summary of the HDE-200’s audio, network-
ing, and logic connections is shown below. In ad-
dition to the four AES audio connectors there are:
a loop-thru connector for interfacing two Arbitron
PPM Encoders; three RJ45 Ethernet ports; a USB
2.0 host port; a Remote Logic I-O connector; a
GPS antenna input; and clock outputs used when
an HD Radio Importer and HD Radio Exciter are
co-located with the HDE-200.
There is no dedicated output connector for the
HD Radio main channel signal since it consists of
a 320 kbps data stream (for FM broadcast) which
is routed to the HD Radio Exciter, either directly
or through a digital STL, using UDP or TCP/IP,
though one of the Ethernet ports on the HDE-
200. Three ports are supplied so an HD Radio
Importer, an HD Radio Exciter (or digital STL),
and an admin computer can directly connect to
the HDE-200.
The HDE-200 can, alternately, connect through
a standard LAN switch in order to feed the data
stream to the STL or HD Radio Exciter.
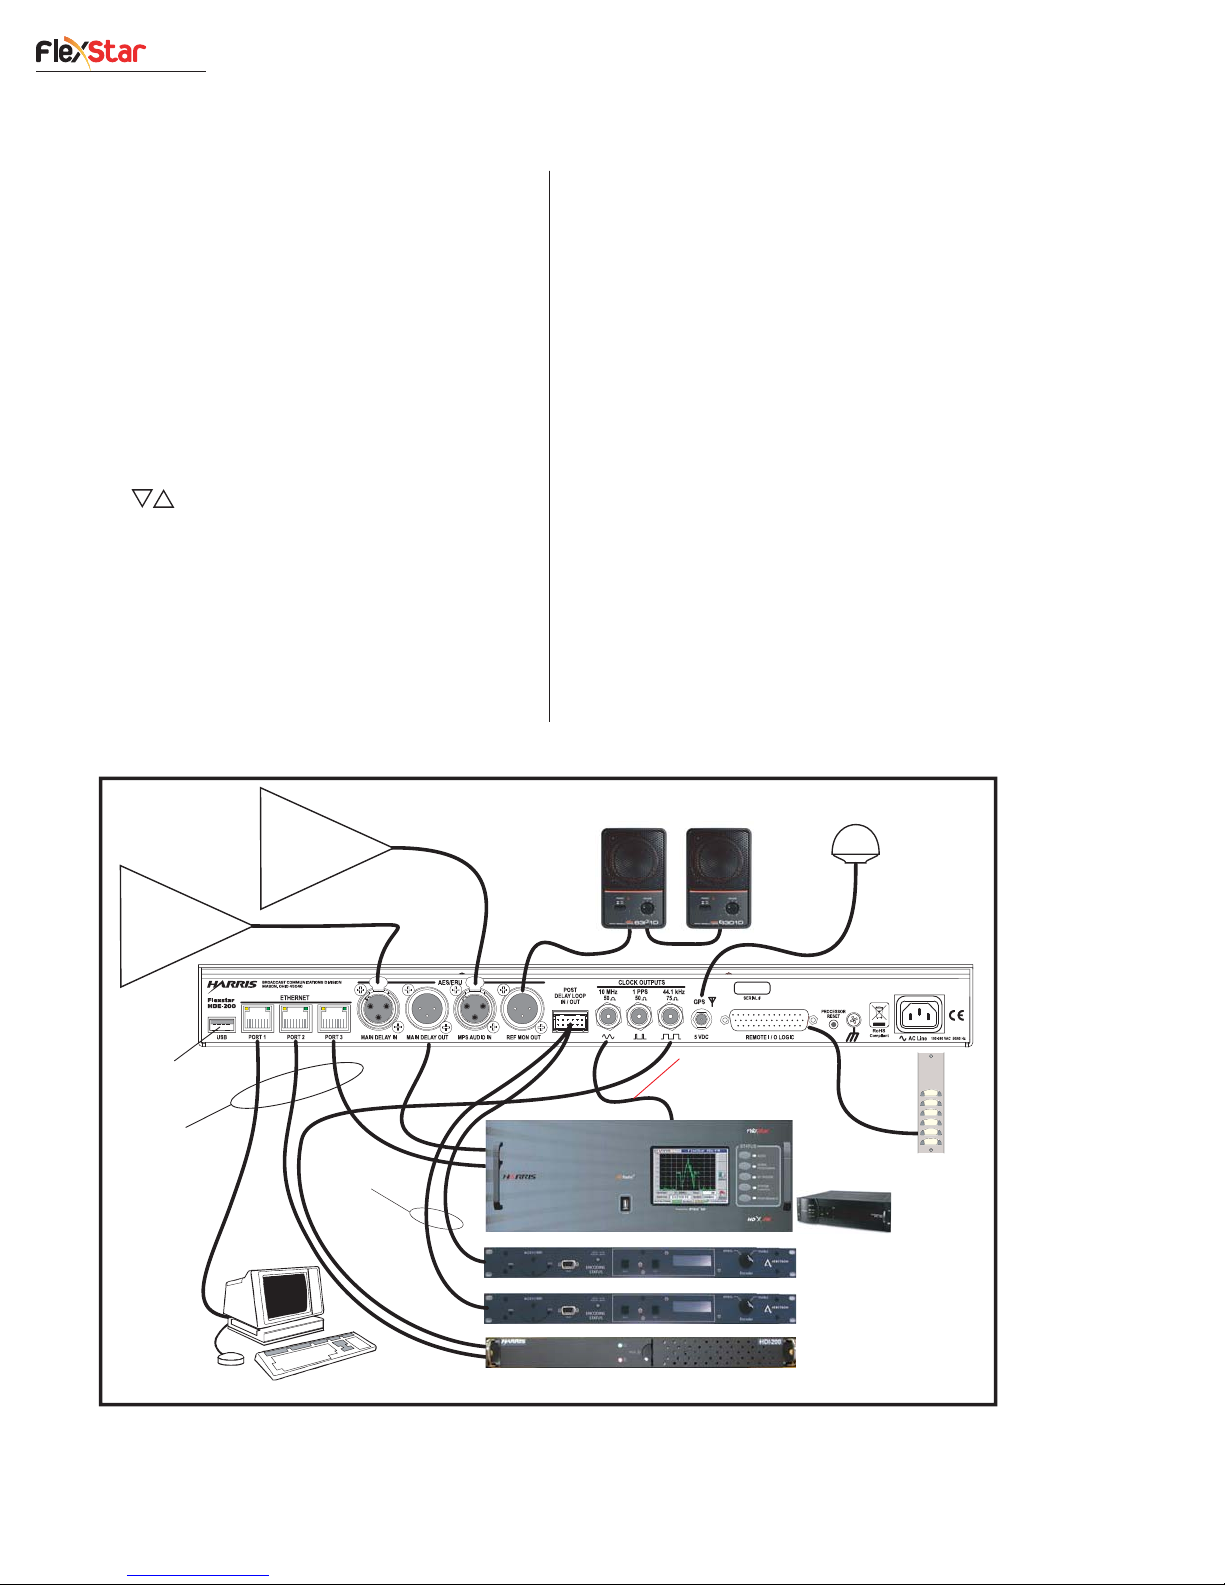
Analog
Broadcast
Air Chain
Processing
(AES out)
USB port for code
updates and config
data backup to a
USB flash drive
Standard CAT-5
cables
Admin Computer
MPS (HD1)
Air Chain
Processing
(AES out)
Cables included in
HARHDE200-PPM or
HARHDE200-PROF/PPM
upgrade kits
Local AES/EBU Input Monitor Speakers
Use of Ext 10 MHz for the Exciter
PLL Sync is recommended for all
installations. Systems with STL
need to use an additional GPS
receiver at the transmitter.
GPS Antenna
DUMP
REBUILD
RAMP
HDx-FM
FlexStar Exciter
(or STL)
Arbitron People Meter Encoder
(for the HD Radio Main Channel)
Arbitron People Meter Encoder
(for the analog carrier)
HDI-200 Importer
(for audio and PSD
to HD2 and above)
TO ZERO
PRE99-1212
Six Button Studio
Remote Panel
(Dump, Build,
Ramp to Zero, etc.)
HARRIS CORPORATION
HDE-200 Connection Summary
2-2
Revision F • 3/12
Page 15
2 Hardware Installation
NOTE: The HDE-200 uses two IP
addresses, one for the CPU (default:
10.10.10.10), the other for the iBiq-
uity HD Radio DSP board (default:
10.10.10.22). Do not connect any
CAT-5 cables to the HDE-200’s three
Ethernet ports until after the IP ad-
dresses and other network settings are
configured. This can be done is two
ways: by following the procedure in
the Software chapter (page 3-6), or by
running the ECC app on a host com-
puter with its IP address set to the
10.10.10.x subnet in order to connect
to the Exporter.
If the subnet of the Exporter is
changed from the default, then the
Host Subnet must also be changed.
For most installations it will probably
be easier to use the HDE-200 configu-
ration method presented in the Soft-
ware chapter.
2.2 Optional Upgrade Kits
Three upgrade kits are available to expand the
HDE-200 functionality: a Profanity Delay Up-
grade (HARHDE200-PROFAN) adds the profan-
ity delay option so that a separate profanity delay
and controller are not required; an Arbitron PPM
Encoder Interface (HARHDE200-PPM) activates
the rear panel Loop Thru connection to interface
two Arbitron PPM Encoders (one for the analog
channel, the other for the HD Radio main chan-
nel); and a combined upgrade (HARHDE200-
PROF/PPM) which adds the Profanity Delay and
activates the Arbitron PPM Encoder interface.
The Profanity Delay adds a second delay func-
tion to the HDE-200—with remote studio logic
control via the Remote I-O Logic connector or via
on-screen commands, so that a separate profanity
delay controller is not required. It has variable
HARRIS CORPORATION
ramp times and allows profanity delays of up to
35 seconds to be set through the ECC app. This
delay is completely separate from—and does not
affect, the Diversity Delay built into the HDE-200.
The Arbitron PPM Encoder Interface connects
two PPM Encoders to add the People Meter sig-
nals to the main HD and analog carrier audio
streams. These are post processing and Diversity
Delay so that ramping the Diversity Delay in or
out does not affect the PPM Encoding.
The PPM Encoders connect to the HDE-200
using XLR interface cables, included in the up-
grade kit, which plug into the
connector. The six foot long cables plug
In/Out
into the PPM Encoder’s
Post Delay Loop
In
and
Out
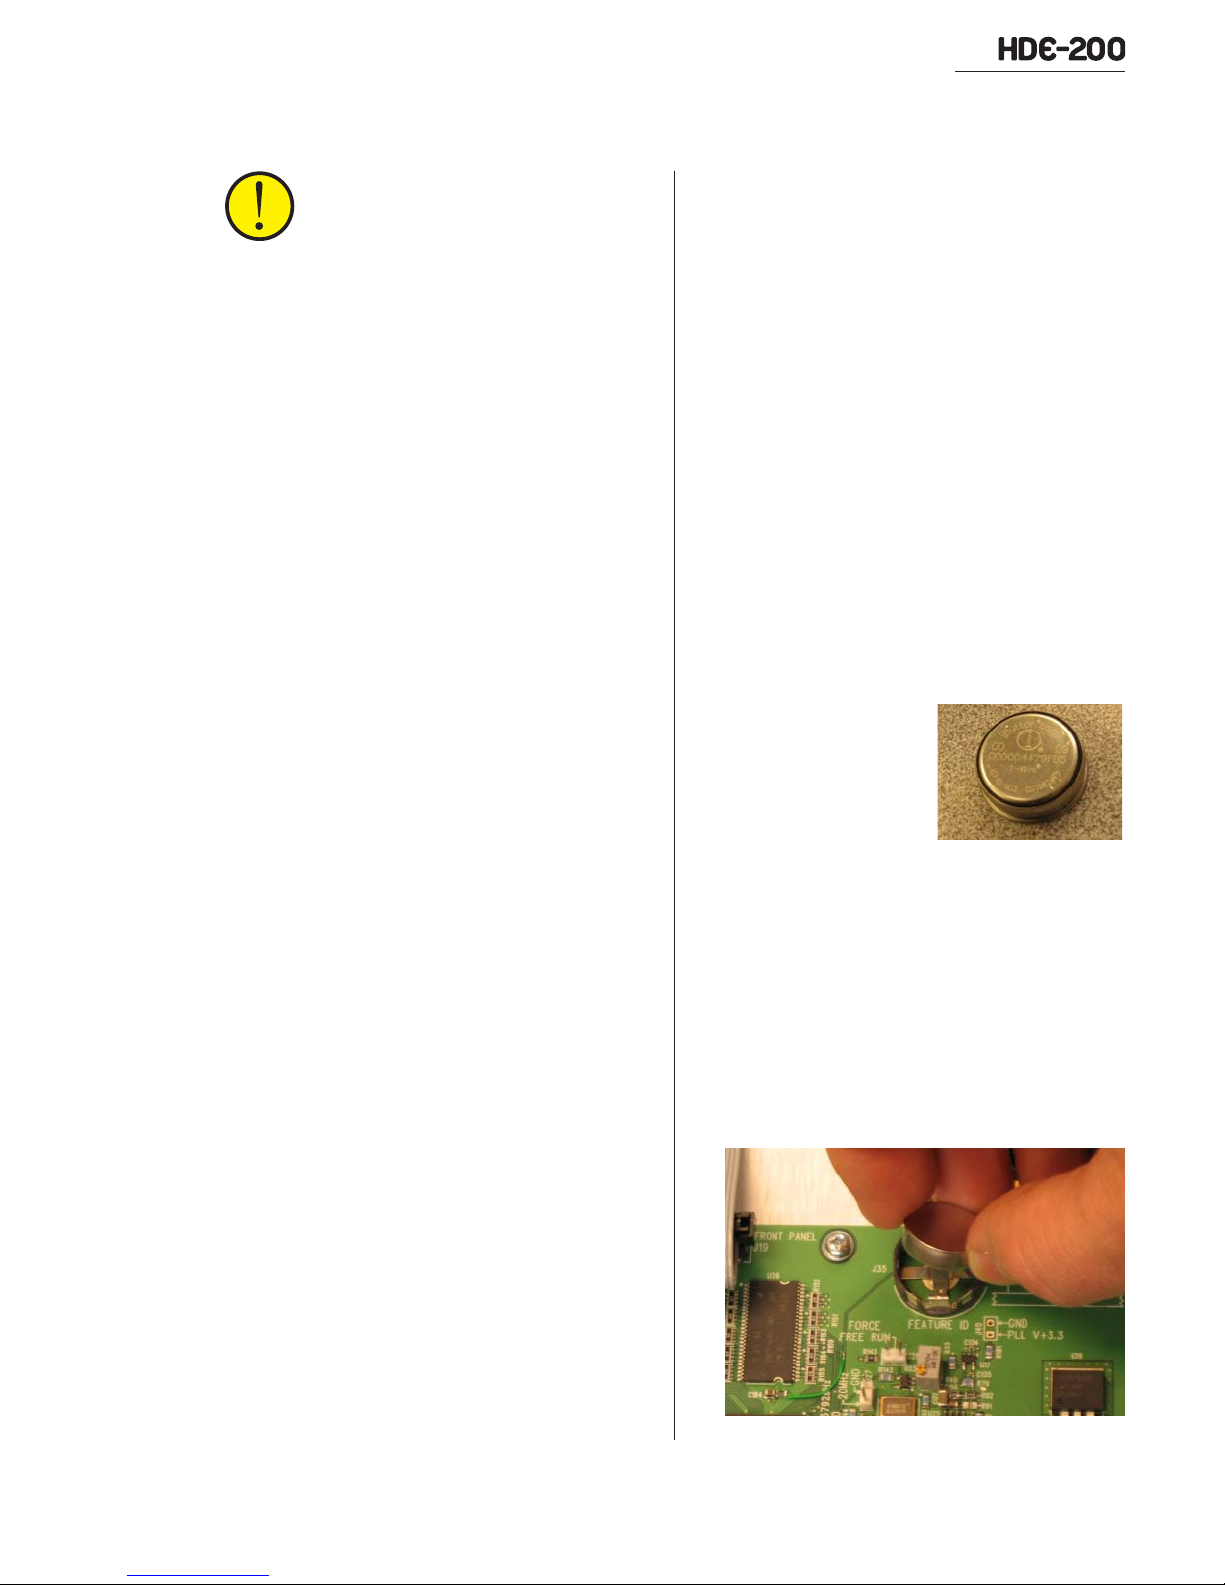
2.2.1 UPGRADE KIT INSTALLATION
Installing an upgrade
kit requires that the
HDE-200 top panel be
removed to install an
iButton
the purchased option.
head Phillips screws along the edges of the cover,
and lift the cover off.
iButton
any components inside the HDE-200, except for
the
board next to the ribbon cable going to the front
Snapping the iButton into its Main Board Socket
2-3
which activates
Power down the HDE-200, then remove 11 flat-
Dissipate any static charges before removing the
from its antistatic packaging. Do not touch
iButton
socket, which is on the main interface
connectors.
iButton
Revision F • 3/12
Page 16
2 Hardware Installation
132
132
132
132
panel display board, as shown on the previous
page. Replace the top cover, then rack mount the
HDE-200 using four rack screws.
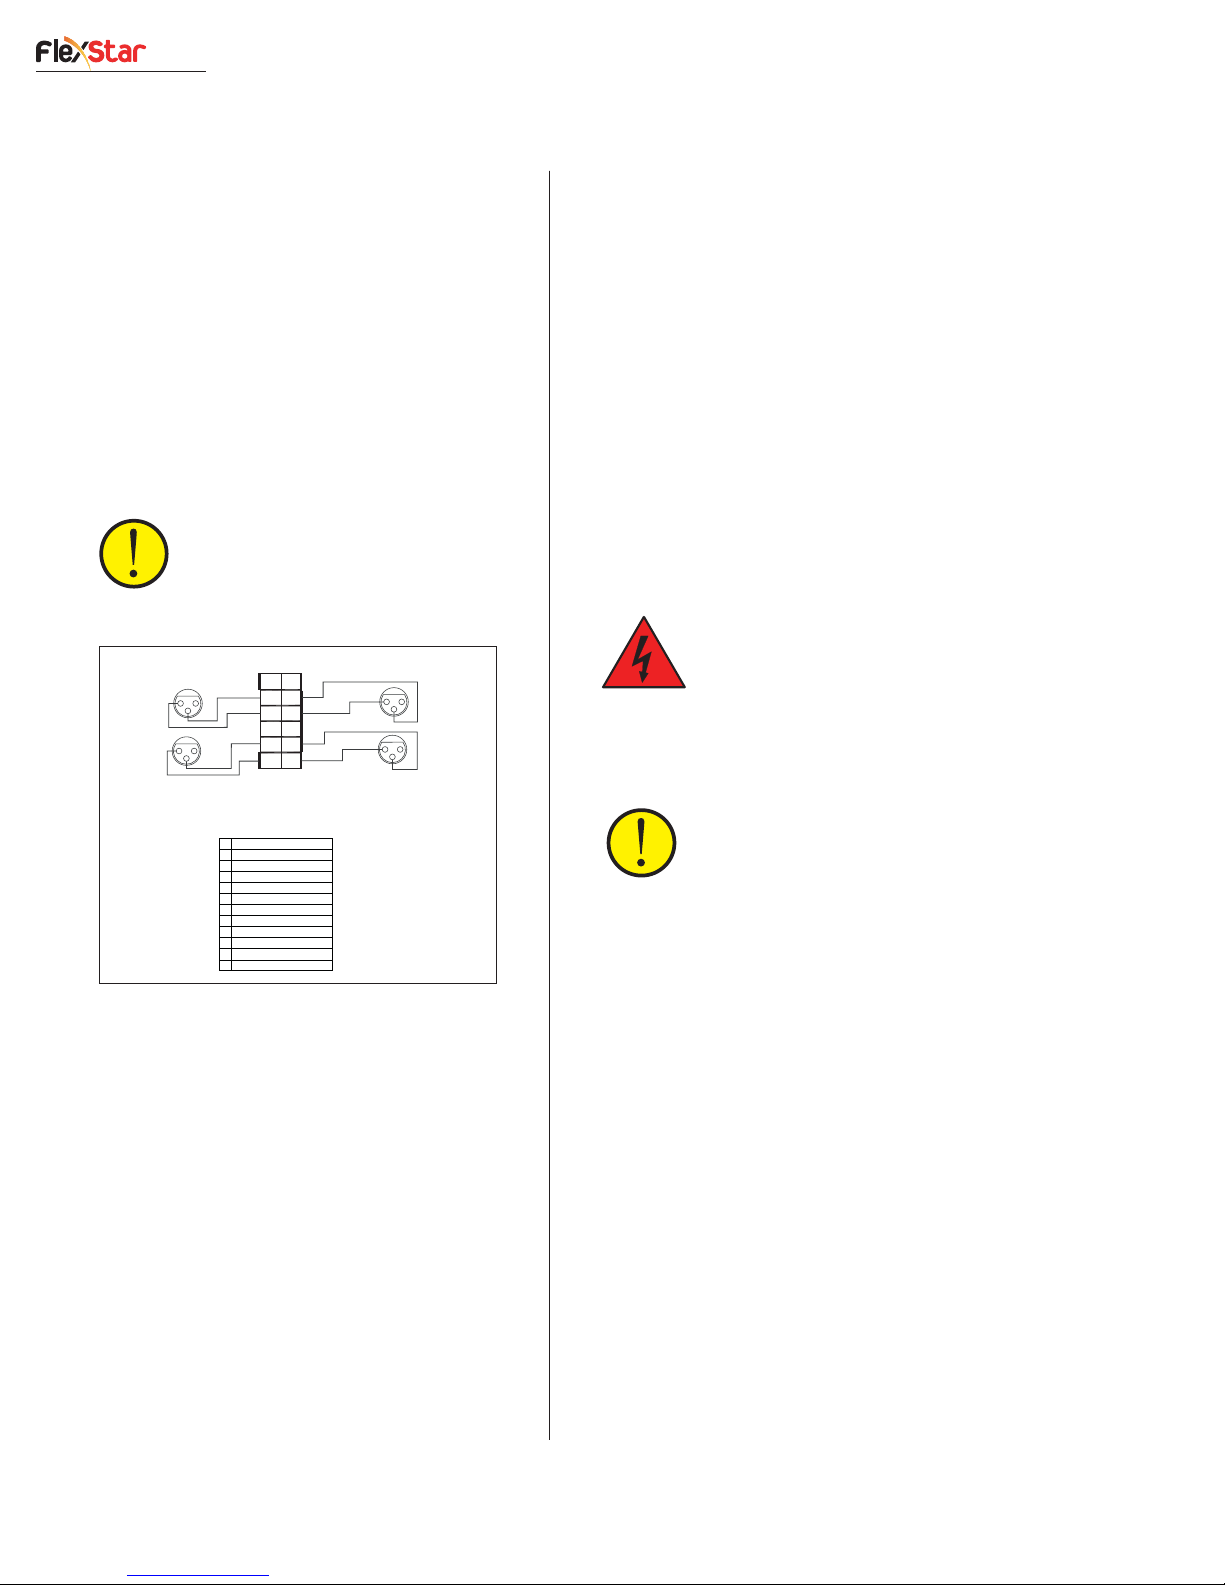
The PPM Encoder kits include an interface
cable (schematic shown below) which plugs into
the keyed
Post Delay Loop In/Out
connector on
the rear panel. Connectors P2 and P4 go to the
PPM Encoder for the HD Radio main channel.
Connectors P3 and P5 go to the PPM Encoder
for the analog broadcast channel.
NOTE: Use only these AES Digital
PPM Encoders (Arbitron 1000-1134-
xx, 1000-1149-xx, 1000-1150-xx or
1000-1161-xx) with the HDE-200.
P3
ARBITRON
PPM (FOR
HD SIGNAL)
PPM OUT
PPM IN
P2
(XLR-F)
+
+
P4
(XLR-M)
-
-
6
12
5
11
4
10
3
9
2
8
1
7
P1
(12-PIN MOD IV)
WIRE INSERTION
END VIEW
P1 SIGNAL LIST
1 MPS LOOP OUT +
2 MPS LOOP OUT 3 GROUND
4 MPS LOOP IN +
5 MPS LOOP IN 6 GROUND
7 MAIN DELAY LOOP OUT +
8 MAIN DELAY LOOP OUT 9 GROUND
10 MAIN DELAY LOOP IN +
11 MAIN DELAY LOOP IN 12 GROUND
+
+
(XLR-F)
P5
(XLR-M)
-
-
ARBITRON
PPM (FOR
MAIN SIGNAL)
PPM OUT
PPM IN
People Meter Encoder Interface Cable
For signal shielding, connect the digital audio
cable shields at both the HDE-200 and the inter-
connecting equipment ends when all system com-
ponents share a common ground potential and use
isolated ground AC outlets tied to the main tech-
nical ground.
When isolated ground AC outlets are not avail-
able, connect cable shields at the HDE-200 end
only. Do not connect the shields at the peripheral
equipment end. Ensure that all peripheral equip-
ment has a clean ground, either through their
power cords or through separate ground wires tied
to the facility’s technical ground.
GROUNDING NOTE: The power
supply’s AC mains safety or “U”
ground ties to the chassis. A rear
panel screw can be used for a sepa-
rate ground wire to technical ground.
AUDIO GROUND NOISES: Buzz
pickup is generally electrostatic—
capacitive coupling between audio
lines and AC power lines or logic and
display cabling. To avoid audio
ground noises, separate audio wires,
as much as possible, from AC power
lines and logic/display cabling.
2.3 HDE-200 Connections
How the HDE-200 is physically connected with
peripheral devices depends upon where the HDE-
200 is installed (a studio, the TOC, or transmitter
room) and what peripherals are connected, so all
connections may not be used.
2.3.1 GROUNDING & SHIELDING
With the HDE-200 rack mounted, the broad-
cast facility’s technical ground wire can connect
to the chassis ground screw provided on the rear
panel near the power supply.
HARRIS CORPORATION
2.3.2 GPS ANTENNA CONNECTION
The HDE-200 uses the GPS System to ensure
the time-accuracy of its internal 44.1 kHz sample
clock and HD Radio data stream. The included
(or equivalent) GPS antenna must be connected
and must have sufficient sky exposure to lock onto
the GPS satellites in order to meet operational
specifications. In addition, the HD Radio Exciter
must also be locked to the GPS System.
When the HDE-200 is co-located with the HD
Radio Exciter its 10 MHz clock output can be
used to sync the two products together. When the
2-4
Revision F • 3/12
Page 17

2 Hardware Installation
HD Radio Exciter is remotely located, a 10 MHz
GPS reference at the Exciter is
mended
.
strongly recom-
Under some conditions a GPS reference at the
Exciter may not be essential. Exporter Reference
mode is used for this implementation. Ethernet
performance can have great variability, conse-
quently this method may not be sufficiently reli-
able. The packet jitter performance, or perfor-
mance of your particular Ethernet connection to
the Exciter, will determine the reliability of Ex-
porter Reference operations. Please consult your
Exciter’s documentation for more information.
A Trimble Bullet III GPS antenna, with type-F
connector, is supplied with the HDE-200. Up to
75 feet of customer-supplied RG-58 (50 ohm coax)
or RG-59 (75-ohm coax) cable can connect it to
the
GPS Antenna
input. The GPS input uses a
type-F connector for easy installation.
An existing GPS antenna, like the Panasonic
VIC-100 supplied with other Harris products, can
alternately be used. An existing VIC-100 cable
would have to use a TNC-to-F adapter or a type-F
connector would have to be crimped onto the cable
in order to connect it to the HDE-200.
Other GPS antennas may work with the HDE-
200, but they must use +5 VDC for power (many
GPS antennas use +3.3 VDC). Their gain specifi-
cations must at least equal the Bullet III antenna.
When a GPS antenna is powered by another
device, an in-line DC-block or a DC-blocking power
divider should be used to connect the antenna
cable to the HDE-200’s GPS input. Note that the
+5 volt supply for the GPS antenna is only cur-
rent protected against momentary shorts.
NOTE: If the HDE-200 is not locked
onto the GPS satellites a GPS Unlock,
an ECC app alarm, and a remote logic
status tally (
Critical Fault
) are acti-
vated until GPS lock is obtained.
2.3.3 AUDIO CONNECTIONS
All audio wiring to/from the HDE-200 is AES/
EBU digital (AES-3). Each audio connector
(3-pin, XLR-type) uses this pinout:
AES/EBU Digital Inputs & Outputs
Pin Signal Description
1 Shield (connects directly to the chassis)
2 High (+), typically a red or blue wire
3 Low (-), typically a black or white wire
The digital inputs (
Audio In
) accept AES-3 compatible signals using
Main Delay In
sample rates from 32 to 96 kHz. Each 110 ohm
input is transformer coupled, which feeds a sample
rate converter that converts the signal to the HDE-
200’s internal sample rate of 44.1 kHz.
For most applications, connect the processed
audio source for the analog broadcast to the
Delay In
connector. Connect the processed audio
source for the HD Radio main channel to the
Audio In
connector.
If there is only one processed audio signal to
feed both the analog and digital Exciters, connect
that signal to
Main Delay In
. You must then use
the ECC app to change the HDE-200 to use only
Main Delay In
the
be an
Audio Fault
connector (otherwise there will
indication). The input option is
set in the System > Other Controls pop-up win-
dow by clicking the
The two digital outputs (
Ref Mon Out
) are transformer-coupled AES-3 com-
Main Only
Main Delay Out
patible signals using a 44.1 kHz sample rate.
Main Delay Out
is the analog broadcast signal
with Diversity Delay (and PPM Encoder signals
when the optional PPM interface kit is installed).
This signal connects directly to the analog broad-
cast Exciter or to a digital STL to feed the analog
transmission chain.
Ref Mon Out
can connect to a local rackmount
digital monitor speaker, like the Fostex RM-2 or
to a pair of powered digital input speakers like
option.
and
MPS
Main
MPS
and
2-5
HARRIS CORPORATION
Revision F • 3/12
Page 18
2 Hardware Installation
132
the Fostex 6301D. It can alternately be used as a
source for a balanced AES-3, 44.1 kHz master
sample clock signal.
Pins 2 and 3 of each digital input and output
are fully protected against static (ESD), overvolt-
age spikes (EFT), and lightning surges. Pin 1 and
the XLR shell are tied directly to chassis ground.
If the HDE-200 power is lost, the
signal is relay switched to directly connect to
In
the
Main Delay Out
connector for uninterrupted
Main Delay
operation.
When power is applied, it takes about one
minute for the HDE-200 to begin transmitting the
HD Radio data stream again. The
Main Delay Out
signal will automatically start to rebuild its Diver-
sity Delay about 30 seconds after power is ap-
plied. The method used to rebuild the Diversity
Delay is set using the ECC app’s System > Other
Controls pop-up window.
All digital outputs (
, the HD Radio data stream and the two
Out
Delay Loop
outputs) use a 44.1 kHz sample rate
Main Delay Out, Ref Mon
Post
that is time-synchronized using the GPS System
clock signals. The HDE-200 outputs a 24-bit word,
which is using the 16 most significant bits.
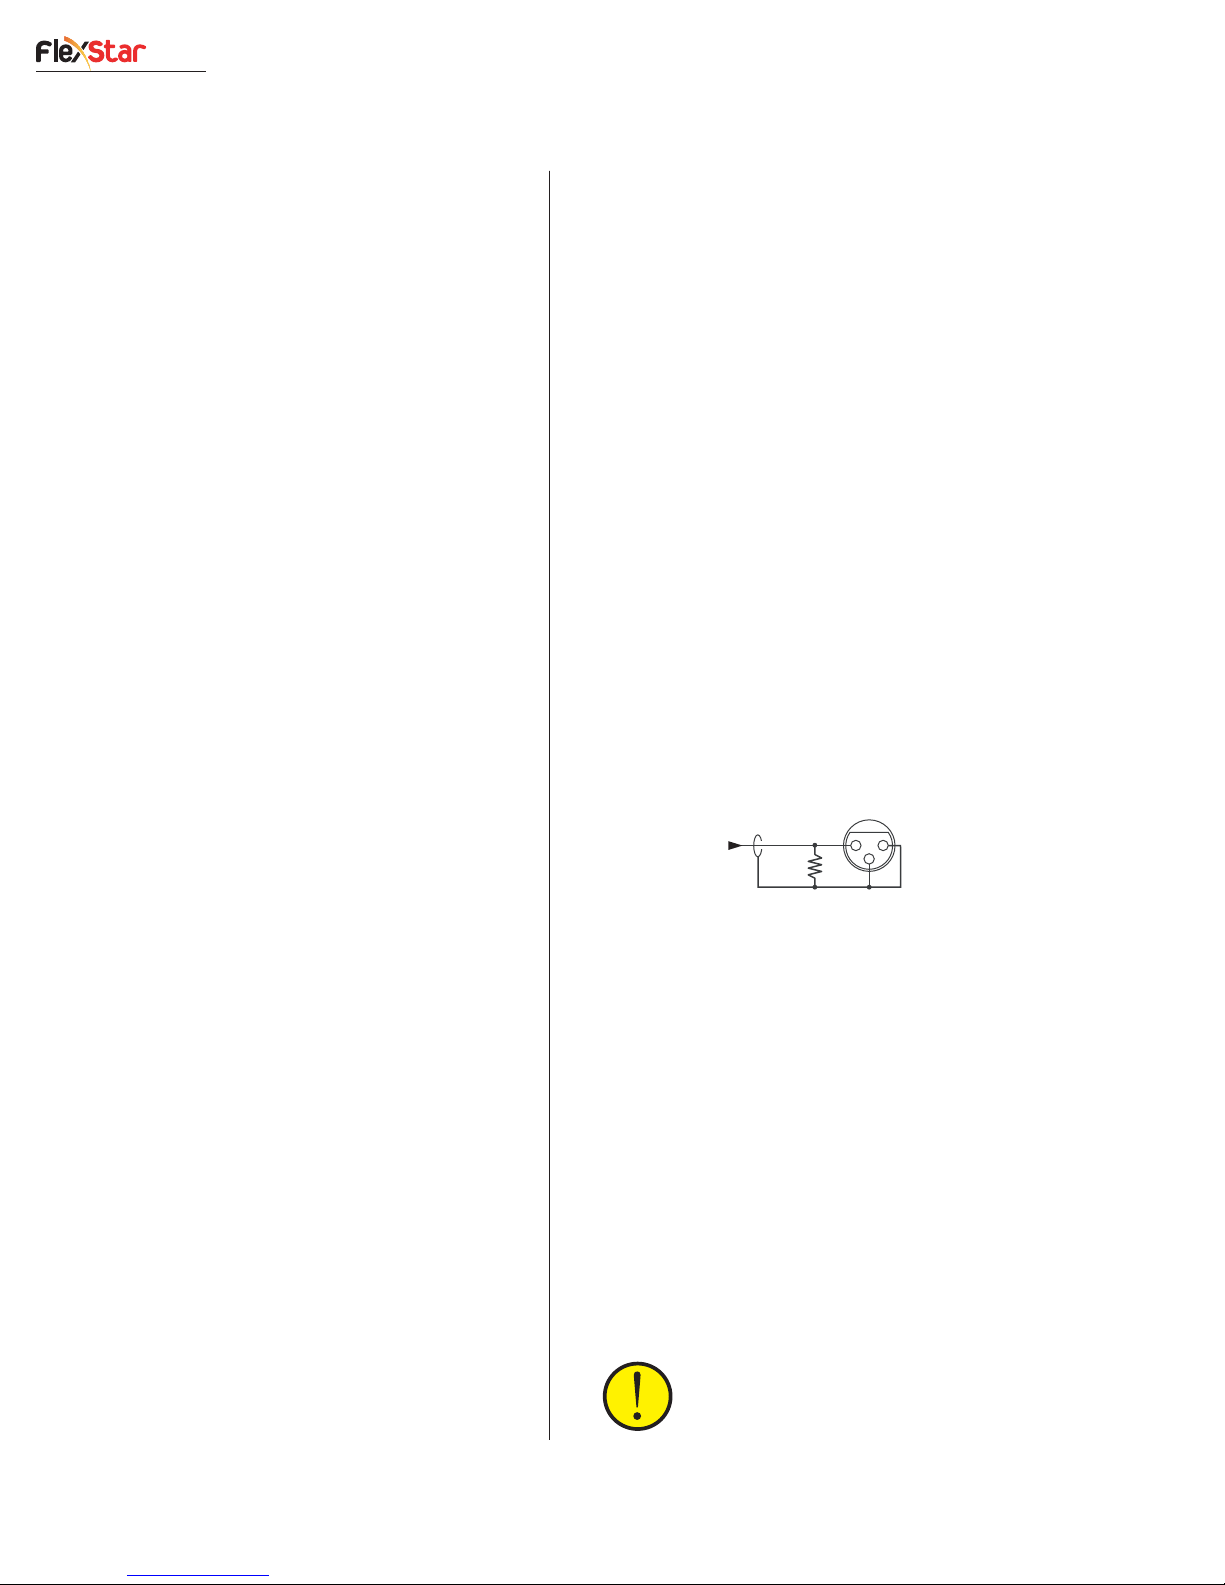
2.3.5 S/PDIF CONNECTIONS
Digital devices with S/PDIF unbalanced out-
puts can connect to an HDE-200 input by tying
pins 1 and 3 together to unbalanced the input.
When a longer cable (beyond about fifteen feet)
is used, a 249 ohm terminating resistor may be
required to impedance match the S/PDIF cable
(which is typically 75-ohm coax cable) to the 110
ohm input. For shorter cables (under about fif-
teen feet), the terminating resistor is typically not
required. Solder the resistor onto the male XLR
terminals, per the following illustration.
2.3.4 HDE-200 SAMPLE & BIT RATE
The HDE-200 uses a 44.1 kHz sample rate for
internal signal processing. The sample clock is
synchronized with a time-based signal obtained
from an internal GPS receiver. This ensures
sample-accurate synchronization with the HD
Radio Exciter.
44.1 kHz
The
typically tied to the HD Radio Importer in order
to synchronize it with the HDE-200 Exporter.
The
Ref Mon Out
nector) can also be used as a 44.1 kHz master
sample clock output source.
All digital inputs (
and the two
In
in sample rate conversion. Signals with sample
rates between 32 and 96 kHz and with bit depths
of 16- or 24-bits can be received. Bit depth is trun-
cated to 16-bits internally in the HDE-200.
Note that sample rate and bit depth conver-
sion cannot be bypassed in the HDE-200.
clock output (75 ohm BNC) is
output (a female XLR con-
Main Delay In, MPS Audio
Post Delay Loop
inputs) use built-
HARRIS CORPORATION
2-6
*
HDE-200
XLR Input
+
-
Coax from the
S/PDIF Device
Signal
Shield
* 249 ohm termination resistor
required if signal drops outs are
encountered (typically only used
with long cable runs)
Connecting an S/PDIF Device to an
HDE-200 AES/EBU Input
An unbalanced-to-balanced line transformer can
alternately be used to interface a S/PDIF signal
to an AES-3 input.
To connect an HDE-200 output to an S/PDIF
input requires a voltage divider be used to lower
the AES-3 signal level to a level the S/PDIF input
can handle (shown in the diagram on the next
page).
Note: Some S/PDIF devices may not
interface correctly with the HDE-
200—even after adding resistors or
Revision F • 3/12
Page 19
2 Hardware Installation
132
using transformers, because of inher-
ent protocol differences between the
AES-3 and S/PDIF formats. Rane
Corp. has a well-written application
note (www.rane.com/note149.html)
which addresses AES/EBU and
S/PDIF signal interfacing.
HDE-200 Coax to the
XLR Output S/PDIF Device
+
56 ohm
-
56 ohm
110 ohm 200 ohm
Connecting an HDE-200 AES/EBU
Output to an S/PDIF Device
2.3.6 USING A STUDIO REMOTE PANEL
A 44-pin D-Sub connector (
allows remote control and delay status indication
for the HDE-200. It’s typically wired to a
studio-mounted remote panel like the six-button
Harris Control Panel (Harris p/n PRE99-1212).
Remote I-O Logic
The
shown on page 2-8, is divided into three main sec-
tions: Diversity Delay; Profanity Delay; and Other
controls and tallies/status indicators. Each
section’s inputs and outputs are separately enabled
by jumpering pins on the panel to +5 VDC or Logic
Ground, for most applications.
All logic connections (see the signal summary
on this page) are opto-isolated through using opto-
couplers on the inputs and solid-state “dry-con-
tact relays” on the outputs.
To maintain complete isolation, do not use the
+5 VDC Logic Supply or the Logic Ground pins
when connecting the
to active peripheral devices. Power and ground
should be sourced from the peripheral device.
The +5 VDC Logic Supply and Logic Ground
connections are intended for use with a studio
remote control panel only.
Remote I-O Logic
Signal
Shield
Remote I-O Logic
interface block diagram,
connector
HARRIS CORPORATION
)
2-7
Revision F • 3/12
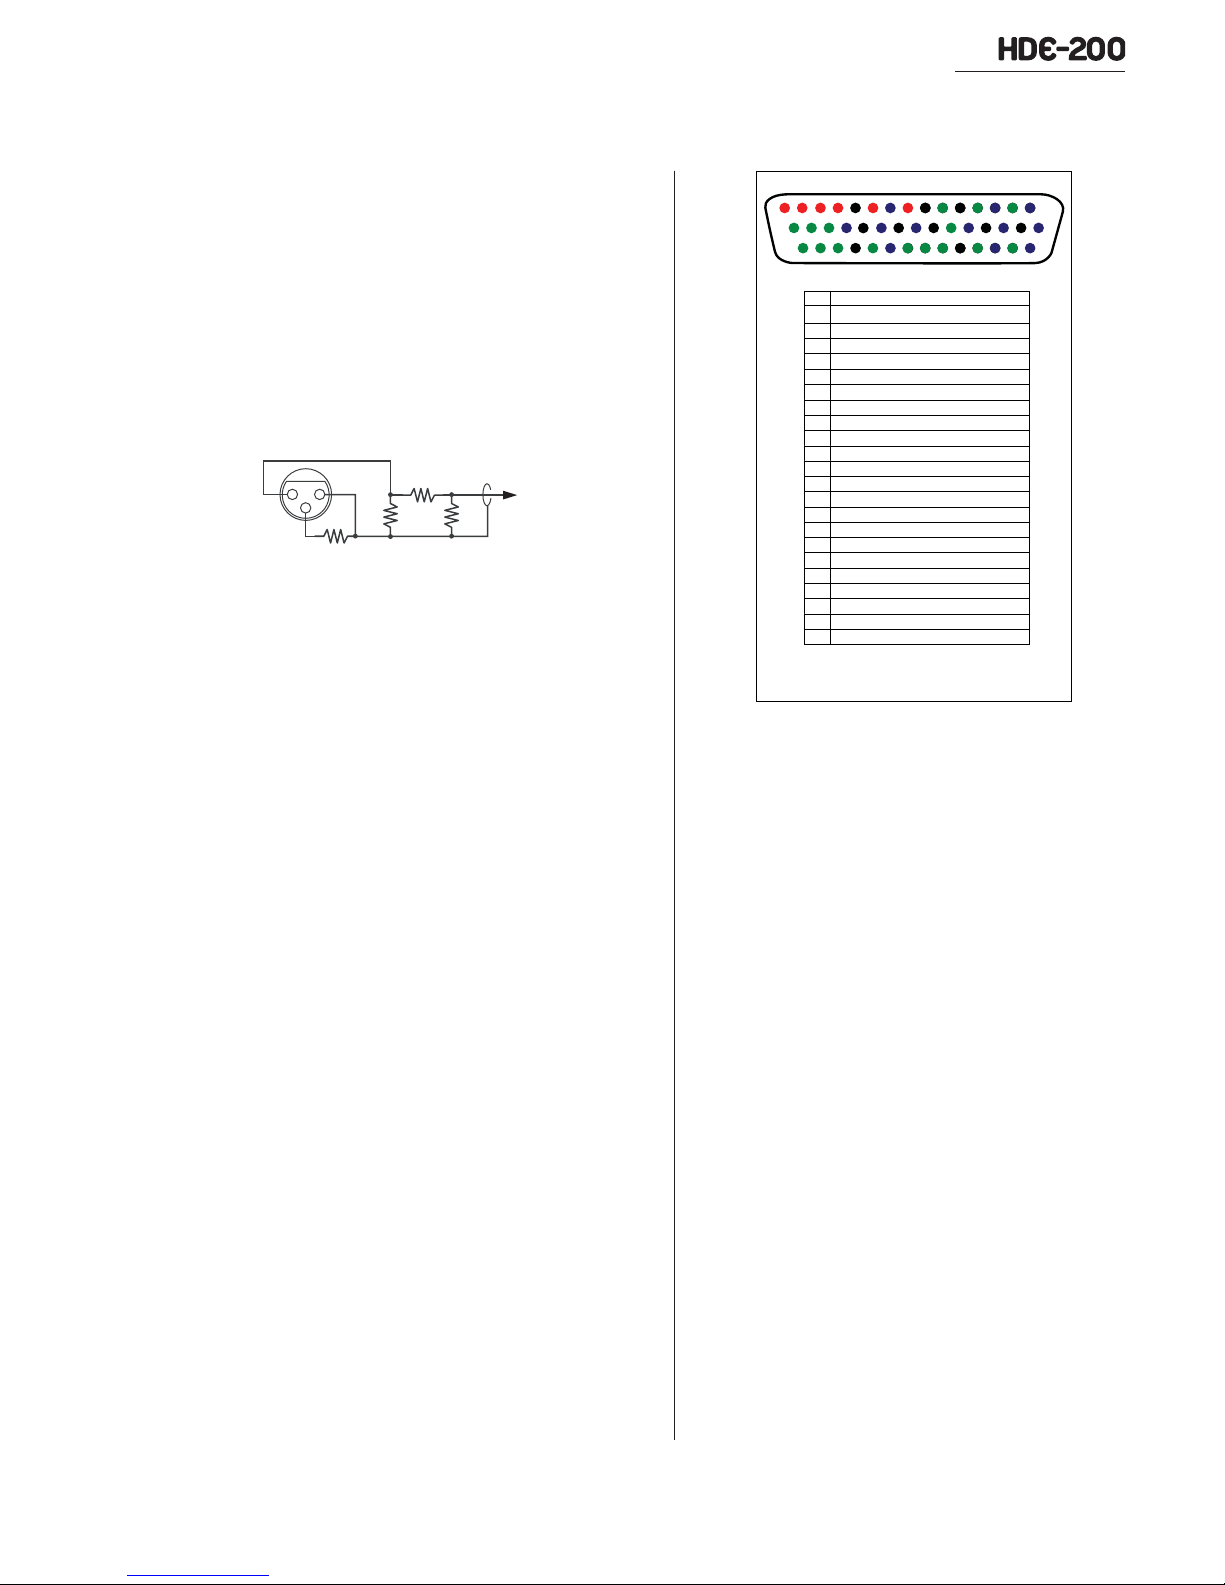
REMOTE I/O LOGIC CONNECTOR
15
30
44
Pin numbers on the chassis connector
PIN SIGNAL
1 Diversity Delay Tally Common
3 Profanity Delay Tally Common
5 Other Tally Common
7 Diversity Input Enable
9 Profanity Input Enable
11 Other Input Enable
16 Diversity Delay, Ramp Up Tally
17 Diversity Delay, Ramp Down Tally
18 Profanity Delay, Ramp Up Tally
19 Profanity Delay, Ramp Down Tally
20 Critical Fault Tally (other tally)
22 Diversity Delay, Ramp Up Switch
23 Diversity Delay, Ramp Down Switch
24 Profanity Delay, Ramp Up Switch
25 Profanity Delay, Ramp Down Switch
26 Warm Boot HDE-200 (other switch)
27 Spare input (other switch)
31 Diversity Delay, Ramp Complete Tally
33 Profanity Delay, Safe Tally
35 Ballpark Delay Tally (other tally)
39 Profanity Delay, Dump Switch
41 Ballpark Delay Switch (other switch)
Pins 8, 10, 12, 13, 14, 15: +5VDC Logic Supply
Pins 2, 4, 6, 21, 28, 29, 30, 32, 34, 36, 37,
38, 40, 42, 43, 44: Logic Ground
1
16
31
Remote I-O Logic Signal Summary
Logic Inputs
Each input section must be enabled by
jumpering its Enable pin to a + voltage source
like +5 VDC (logic signals from +5 to +40 volts
can be used). Logic inputs are activated by pull-
ing the input pin low.
When a studio remote panel is connected, the
enable pins are jumpered to +5 VDC Logic Sup-
ply pins. Likewise, the remote panel switches are
typically commoned on the panel, which is tied to
a Logic Ground pin in order to generate the low
logic. This is shown in the Using a Studio Remote
Panel with the HDE-200 illustration on page 2-9.
Logic Outputs
Each logic output section has its own Tally Com-
mon connection that can connect to either a + volt-
age or to ground, depending upon the application.
The logic outputs (tallies) typical drive LEDs
in a studio remote panel. One end of all of the
status LEDs on the studio panel are typically
commoned together to connect to the +5 VDC
Page 20

2 Hardware Installation
Diversity Delay Enable (+)
Diversity Delay Ramp Up (-)
Diversity Delay Ramp Down (-)
Profanity Delay Enable (+)
Profanity Delay Ramp Up (-)
Profanity Delay Ramp Down (-)
Profanity Delay Dump (-)
Other Enable (+)
Warm Boot HDE-200 (-)
Spare
Other Controls Profanity Delay Controls Diversity Delay Controls
Ballpark Mode (-)
Notes:
Optional Profanity Delay activation kit required to use Profanity Delay Logic.
+5 VDC and Logic Ground should only be connected on isolated devices,
like remote control panels.
Each Enable pin must connect to +5 to +40 VDC to enable the logic inputs.
Logic inputs are triggered by active lows.
Output logic can switch up to 60 volts AC/DC (350 mA maximum current).
+5 VDC Logic Supply pins can supply up to 250 mA total current.
7
22
23
9
24
25
39
11
26
27
41
Remote I-O Logic Interface Block Diagram
HDE-200 Internal Logic
20 Critical Fault Tally
Ballpark Delay Tally
35
5
Other Tally Common
Ramp Up Tally, Diversity
16
17 Ramp Down Tally, Diversity
Ramp Complete Tally, Diversity
31
1
Diversity Delay Tally Common
Ramp Up Tally, Profanity
18
Ramp Down Tally, Profanity
19
Ramp Complete Tally, Profanity
33
Profanity Delay Tally Common
3
+5 VDC Logic Supply
+
+ Pins 8, 10, 12, 13, 14, 15
Logic Ground
#
# Pins 2, 4, 6, 21, 28, 29, 30, 32, 34,
36, 37, 38, 40, 42, 43, 44
Profanity Delay Tallies Diversity Delay Tallies Other Tallies
Logic Supply. To drive this design, the Tally Com-
mon pins are jumpered to Logic Ground so that
an active low output turns on the status LEDs.
In some designs the status LEDs are commoned
together to ground. In this case, the Tally Com-
mon pins are jumpered to the +5 VDC Logic Sup-
ply pins so that an active high output turns on the
status LEDs.
Regardless of how the solid-state relays are con-
nected, they can switch up to 60 volts, AC or DC,
and carry up to 350 mA of current. Again, if the
tally outputs are driving an active peripheral de-
vice, the Tally Common and Tally output pins
should only connect to that device. There should
be no connection made to any +5 VDC Logic Sup-
ply or Logic Ground pin.
HARRIS CORPORATION
2-8
Revision F • 3/12
Using the Remote I/O Logic Connection
The
Remote I-O Logic
interface is enabled or
disabled in the ECC app (for usage details see the
Software and User chapters). When disabled, all
inputs and outputs are disconnected. The default
setting is enabled.
In most cases, a studio remote panel is used in
conjunction with the Profanity Delay upgrade
option to give the board operator control over the
Profanity Delay.
NOTE: To use the Profanity Delay
controls/tallies, a Profanity Delay
Upgrade Option must be installed.
Page 21

Using a Studio Remote Panel with the HDE-200
The Diversity Delay controls are typically not
available in the studio, but the Diversity Delay
Ramp Complete tally can be used for a studio in-
dication that the Diversity Delay is active.
A Ballpark mode switch and tally can also be
used in the studio to give local control over tem-
porarily ramping the Diversity Delay to zero so
that live events that are being simulcast (like a
football game) can be delivered in real time to the
analog broadcast chain. This control also typically
sets the HD Radio blend feature to off.
As shown above, the Harris PRE99-1212 Six
Button Remote panel can be configured for status
and control of the Ballpark Mode and the optional
Profanity Delay, as well as show the status of a
critical failure alarm and the Diversity Delay.
2.3.7 HD RADIO EXCITER CONNECTIONS
When the HDE-200 is co-located with the HD
Radio Exciter, a separate GPS antenna connec-
tion on the Exciter is not required. To synchro-
nize the Exciter to the HDE-200 Exporter con-
nect the
10 MHz
to the Exciter’s 10 MHz Reference Input.
clock output from the HDE-200
2 Hardware Installation
10 MHz
REFERENCE IN
1PSS
IN
HDX-FM Exciter Connections, Detailing
the 10 MHz Connection
The HD Radio main channel audio, part of the
HD Radio data stream sent out of the Exporter’s
Ethernet ports, must be sent to and received by
the HD Radio Exciter. The
Exporter Link
specifically designed to receive the E2X data
stream from the Exporter when using TCP or UDP.
EXPORTER INTERFACE
EXPORTER LINK
ETHERNET 3
Exporter Link Connection on an HDX-FM Exciter
In order to properly route the data stream, the
correct network settings must be defined on both
the Exporter and the Exciter. Complete software
configuration of the Exporter is detailed in the
Software chapter.
2.3.8 FM EXCITER CONNECTION
When the HDE-200 is co-located with the FM
Exciter—regardless of whether or not the FM
Exciter is part of the HD Radio Exciter, the FM
Exciter’s input is connected to the
On the Harris HDX-FM Exciter, connect the
Exporter to the
Main AES
Exciter used does not have an AES input, an AES/
EBU-to-analog signal converter is required.
Main Delay Out
connection. If the FM
port is
.
2-9
HARRIS CORPORATION
Revision F • 3/12
Page 22

2 Hardware Installation
MAIN
AES
ANALOG L/
MONO
ANALOG R/
AUDIO INPUTS
AUX AES
SCA AUDIO
GND pin 1
#1 pins 2,3
#2 pins 4, 5
FM Analog Broadcast Input on an HDX-FM
Exciter
2.3.9 NETWORK CONNECTIONS
The HDE-200 does not require that a computer
be networked with it at all times, but one is re-
quired to set up the HDE-200’s network settings,
the Diversity Delay and Profanity delay settings
and the other HDE-200 operational settings.
The admin computer can be any laptop or desk-
top computer with an Ethernet port, running
TM
Windows
dows 7 Pro, and the HDE-200 Exporter Control
Center (ECC app). It can directly connect to any
of the three Ethernet ports on the HDE-200 for
complete security. The other two ports can be used
to connect the HD Radio Exciter and an HD
Radio Importer.
Any of the HDE-200 Ethernet ports can alter-
nately be connected into a facility LAN in order
to use an engineering department computer as the
admin computer.
XP (SP2 or later), Vista Pro, or Win-
HDE-200 Network and USB Connections
Once the HDE-200’s network settings have been
changed from the default settings, the admin com-
puter can be networked with the HDE-200 and
the ECC app used to set the various HDE-200
configurations directly over the network. These set-
tings are then maintained in the HDE-200 using
flash memory.
Note: The HDE-200’s network set-
tings must be set before it is connected
into the facility’s network. This is done
either directly from the ECC app or
by using a USB flash drive (the flash
drive supplied with the HDE-200 can
be used for this purpose). The flash
drive plugs into the rear USB port on
the HDE-200 to first capture the cur-
rent settings and to then upload new
configuration settings by resetting the
HDE-200. Refer to the
Software
ter for network configuration details.
HARRIS CORPORATION
chap-
2-10
Revision F • 3/12
Page 23

Software
3
The HDE-200 does not need to be networked
with an admin computer during normal operation,
but a WinXP (SP2 or later), Vista (Business or Ulti-
mate), or Windows 7 (Ultimate or Pro) computer is
needed to configure and monitor the HDE-200
using the
app). The ECC app is supplied with each HDE-200
on a USB flash drive. The ECC app can also be down-
loaded from the Harris Broadcast Customer Portal
(see page 5-1 for website access details).
Exporter Control Center
program (the ECC
If security is enabled in the ECC app, there are
five security levels that allow varying levels of ac-
cess and control over the ECC app and any net-
worked HDE-200 Exporters.
Four User Groups are added to the Windows
operating system when the ECC app is installed.
The various user group members are assigned us-
ing the standard Windows Manage Local Users
and Groups function.
The four User Groups, summarized in the table
below, allow specific program access and control
to be assigned to each ECC user using your
facility’s computer login names and passwords.
User Group Description
No Credentials Can select & view any
HDE-200
Censor Can select & view any
HDE-200 and issue
Profanity dumpcommands
3.1 ECC App Overview
The ECC app has two main functions: to con-
figure HDE-200 Exporter operational parameters;
and to allow multiple users to remotely monitor
and/or control one or more HDE-200 Exporters.
The ECC app can be run concurrently on any num-
ber of computers on your network, if desired.
NOTE: ECC app security is NOT
turned on during installation (for easy
ECC app and HDE-200 Exporter
setup). If security will be used, assign
Users to the four User Groups before
clicking Enable Security, in the
>
Preferences
tem
activate User Group security.
pop-up window, to
Sys-
HARRIS CORPORATION
User Can select & view any
HDE-200 and control
normaloperational
features on the HDE-200
Engineer Has control over most
HDE-200 configurations,
but cannot make network
changes
Commissioner Has full control over the
HDE-200 configuration,
including network
configuration changes
If someone logs into a computer and starts the
ECC app, but is not a member of any of the groups,
then that person is a No Credentials user with lim-
ited control over the ECC app and no control over
any HDE-200. Here is a summary of the control
functionality for the four HDE-200 User Groups
and a non-credentialed user:
3-1
Revision F • 3/12
Page 24

3 Control Center Software
A No Credentials user is anyone who logs into
a computer with the ECC app but is not a mem-
ber of any ECC User Group. If they open the ECC
app the standard HDE-200 monitor screen can
be viewed. They can also change which HDE-200
is being monitoring and select between pre- and
post-delay metering, but most other menu items
are grayed out.
A Censor is one step above a No Credentials
user: they have the same basic signal level moni-
toring and selection abilities and most menu items
are grayed out. The difference: a Censor, typically
assigned to show producers when the optional Pro-
fanity Delay feature is active, have control of the
Profanity Delay dump button.
A User has the same privileges as a Censor but
also has basic control over the Diversity Delay (the
Ramp Up/Down buttons are active). If the Pro-
fanity Delay is installed, a User also has control
over Dump, Ramp to Zero, and Rebuild. This user
group is for nontechnical station personnel like
board operators.
An Engineer has almost full ECC app access,
and hence, can change most HDE-200 operating
parameters. Anything but network settings can be
adjusted, saved, and then uploaded to the HDE-
200. This user (along with a Commissioner) can
also upgrade the operating system on the HDE-
200 or the ECC app itself. This access level should
be limited to the engineering staff with direct re-
sponsibilities for the HDE-200 Exporters.
A Commissioner is the super user (like a com-
puter administrator). They have full access to all
ECC app features including the ability to change
the HDE-200 network settings. This setting is for
the chief engineer and for IT techs or system in-
stallers that need to change network settings (IP
address, subnet, etc.) on the HDE-200 Exporters.
The table illustrates the specific control permis-
sions for the four HDE-200 User Groups and the
No Credentials user. Note that you do not have to
set up and use these User Groups when the ECC
app is being run under the control of the engi-
neering staff on a secure administration PC.
Again, these User Groups are not activated in
the ECC app until the Enable Security button, in
the
System
>
Preferences
pop-up window, is
clicked. At that time the User Groups are acti-
vated to allow different people, with different lev-
els of permission, to alternately use the same ECC
app on any networked computer.
HDE-200 User Access Summary
When a user logs into Windows and launches
the ECC app, his User Group credentials (or lack
thereof) define which functions can be performed
in the ECC app, as outlined above.
NOTE: If multiple users access a com-
puter running the ECC app, always
close the ECC app (and the Logger
utility if it is running) before logging
off the computer. If this is not done, a
port error will be shown when another
user opens the ECC app, and security
settings, if active will be compromised.
HARRIS CORPORATION
3-2
Revision F • 3/12
Page 25

3 Control Center Software
3.2 Installing the ECC App
The ECC app is supplied on a USB 2.0 flash
drive (Harris p/n 7320514000-1), along with
other administration apps and PDF files.
The illustrations used in the following instruc-
tion show WinXP screens. When the ECC app is
installed on a Windows 7 computer, see the Har-
ris App Note AN10-02 ECC & Windows 7 (in-
cluded as Appendix A) for installation tips per-
taining specifically to Windows 7.
1. Locate the HDE-200 installation file on the
USB flash drive (F:\Software_Install_Pkg\
Harris\Exporter Control Center\72-
1441rN_ECC_ Installer_ V1.2.16.msi)
2. Launch the installation file by double click-
ing the .msi file.
one using the app on that computer. Use
when multiple users will log into the
eryone
computer and need to access ECC.
4. Continue the installation by clicking
on the
Select Installation Folder
on the following screen. Once the installa-
tion completes, click
staller window.
Close
screen and
to close the in-
Ev-
Next
Next
3. Click
Folder
fault file location. Before continuing, set the
program access. Use
currently logged-in administrator is the only
to open the
screen. For best results, use the de-
Select Installation
Just Me
(default) if the
3.2.1 USER GROUP SETUP
The ECC app automatically creates four Win-
dows User Groups to allow different users to have
varying access to the ECC app’s features. If the
ECC app is only used on an access-controlled com-
puter, and only accessed by station engineers, then
these four User Groups do not need to be assigned.
But, in this case, DO NOT CLICK on Enable Se-
curity, in the
dow to run the ECC app without security.
The HDE-200 User Groups are maintained even
if the ECC app is removed from the computer so a
new app version can be installed maintaining the
same User Groups. These instructions pertain to
WinXP computers, see Appendix A for steps spe-
cific to Windows 7 and Vista computers.
System
NOTE: Only a computer
tor
HDE-200 user groups.
>
Preferences
pop-up win-
Administra-
can add or remove users in the
3-3
HARRIS CORPORATION
Revision F • 3/11
Page 26

3 Control Center Software
1. To add or remove users from an HDE-200
user group, right click on the
Computer
2. Expand the
icon and select
Local Users and Groups
the left pane, then select
Manage
Groups
My
.
tab in
to show
the various user groups defined on the com-
puter. The right-hand pane lists the four
HDE-200 user groups.
3. To add or remove users, double click the
HDE-200 Group name to open its proper-
ties window. A list of the current users in
that group is displayed.
Groups
dows login names in the
names to select
window. Type in the new users’ Win-
Enter the object
dialog box. To enter mul-
tiple names, separate each name with a semi-
colon (;). For example, if you want to add
both John Doe, who logs in as jdoe, and Phil
Smith, who logs in as psmith02, then type
in: jdoe;psmith02.
If users must log into Windows using a
network domain (an optional feature), the
network domain name must be included. If
John Doe logs into the computer using the
ACME domain, then ACME\jdoe would be
the user name.
If no network domain is specified, use the
local computer name in place of the network
domain name. For example, to add a new
jcommissioner
user,
, who is already an ex-
isting Windows user, to the HDE-200 Com-
missioners group on a local computer named
Local_Computer, perform the following
steps:
a) In the
Properties
b) In the
window, click
HDE-200 Commissioners
window, click
Add…
Select Users, Computers, or Groups
Locations...
User Group Properties
Window
4. To add a new user to the group, click
which opens a
Select Users, Computers, or
HARRIS CORPORATION
Add…
,
3-4
Revision F • 3/12
c) Select the name of the local computer (e.g.,
OK
Local_Computer), then click
.
d) Type in the username (i.e., jcommissioner)
in the
Enter the object names to select
dialog box.
e) Click on the Check Names button and
verify that the username is valid. If the user-
Page 27

3 Control Center Software
name is valid, the displayed name will auto-
matically update to append the local com-
puter name to the username
(LOCAL_COMPUTER\ jcommissioner).
OK
f) Click
To remove a user, open up the properties win-
dow for that group. Click on a name to highlight
it, then click
to close the
Remove.
Properties
window.
Alternately, use the Windows
to start the ECC app:
Corp >
FlexStar
Main Window, with no HDE-200 Selected
The first time the ECC app is run
shown in the title bar. This indicates that an HDE-
200 has yet to be selected as the monitor source.
If any HDE-200s are already configured and
connected to the network (see page 2-10 for con-
nection information), select an HDE-200 to moni-
tor by clicking
Exporter Device Browser window.
Start
>
HDE-200 Control Center
Device
>
Select Device
>
Programs
Programs
>
(No Device)
to open the
menu
Harris
.
is
As an
administrator
once the user group privileges have been set, so
that the next person logging in has the proper ac-
cess to the ECC app.
, always log off the computer,
3.3 Starting the ECC App
An ECC app shortcut icon was
added to the computer’s desktop
during installation. Double-click
the icon to launch the ECC app.
HARRIS CORPORATION
3-5
NOTE: If the admin computer has
multiple NICs, verify the correct NIC
is assigned as the Flexstar Network
Interface in the
pop-up window (see page 3-21).
Exporter Browser Window
System > Preferences
Revision F • 3/11
Page 28

3 Control Center Software
The Exporter Browser Window shows all of the
Harris HDE-200s it has detected on the local net-
work. To select a device double-click on its name
(or click to highlight its entry, then click
press
Enter
on the keyboard) to select that HDE-
200 and close the window.
The selected HDE-200’s current status and con-
figuration information is transferred to the ECC
app. If audio is going through that HDE-200, the
audio meters will show the audio levels for the
Analog and Digital Main Programs.
If a new HDE-200 is being added to the net-
work, then the HDE-200 must typically first be
configured for the facility’s network, off-line, be-
fore being physically connected to the network and
subsequently appear in this list.
Network configuration can be done in two ways:
by using a USB flash drive to copy and move the
HDE-200 configuration information to the ECC
app for editing (the “sneaker net” method); or by
setting the NIC on a computer running the ECC
app to be 10.10.10.2 so it can be directly net-
worked with the new HDE-200 (“direct” method).
Here are the default network settings assigned
to the HDE-200 at the factory:
HDE-200 Default Network Settings
OK
, or
3.4 Editing the HDE-200
Network Settings
To edit the network settings for a new HDE-
200 using the “direct” method, install the ECC app
onto a laptop or desk computer with the IP ad-
dress of 10.10.10.2. Directly connect the computer
to port 1 on the new HDE-200. Then select the
new HDE-200 in the
browser window (shown on page 3-5). Select the
System
>
Address Configuration Utility
the Configuration Window and follow the instruc-
tions from step 5 onwards to edit the network set-
tings.
When the ECC app is running on a networked
computer that is already connected to other
Flexstar devices, use the “sneaker net” method by
using a USB flash drive to move the settings from
the new HDE-200 to the computer by following
the instructions from step 1 onwards.
NOTE: With either method the ECC
app must be set for no security, or you
must be logged in as a Commissioner,
in order to edit the network settings
on the new HDE-200.
Device > Select Device
to open
Device IP Address
HDE-200 CPU 10.10.10.10
HDE-200 DSP 10.10.10.22
HDE-200 Gateway 10.10.10.1
HD Radio Exciter 10.10.10.11
HD Radio Importer 10.10.10.9
HDE-200 Net Mask: 255.255.255.0
NOTE: These settings will most likely
NOT match those needed by the
HDE-200 to function in an existing
network. DO NOT CONNECT the
new HDE-200 to your network until
its network settings are changed us-
ing the following procedure.
HARRIS CORPORATION
3-6
Revision F • 3/12
1. Insert a blank USB flash drive, 32 MB or
larger, into the new HDE-200’s USB port
(rear panel, near the Ethernet jacks). Wait a
minute for the HDE-200 to detect the flash
drive and to write its current configuration
.xml
settings to the drive. Various
saved in a folder, labeled by that HDE-200’s
MAC address, inside a new
Flash Drive Folder with the HDE-200 Files
files are
HDE200
folder.
Page 29

2. Move the USB flash drive from the HDE-
200 to a USB port on the computer running
the ECC app. Wait a moment for the USB
flash drive to be recognized by Windows.
3 Control Center Software
Step 5
3. Click
4. Click
System
>
Address Configuration Util-
to open the Configuration Window.
ity
Load Config from USB...
to open a File
Selection window. Navigate to the folder with
the new HDE-200’s config file (e.g.,
E:\HDE200\00-50-C2-0E-0D-30). Click
OK
to load the settings. The settings will be
changed to reflect the new HDE-200’s de-
fault settings.
5. The
Address Configuration Utility
shows the current settings for the new HDE-
200 (as selected in the
vice
browser window when the computer is
Device > Select De-
directly connected to the new HDE-200, or
by clicking the
Load Config From USB
ton in step 4).
The new HDE-200’s default settings should
be like those shown in the illustration on
this page. These settings are typically
changed to fit into the facility’s network.
• Set the CPU and DSP IP Addresses, Sub-
net Mask and Default Gateway Address, as
required, for your network. The CPU is the
9260 Linux board which is the signal pro-
cessor for the analog and profanity delays.
The DSP is the iBiquity HD Radio proces-
sor or Exgine board in the Exciter.
Step 3
Step 4
• If required, change the Logging Address
IP and Port, although these are normally
left set to their default settings.
window
• Set the Exciter IP address. Three trans-
mission methods may connect the HDE-200
to one or more Exciters, detailed in the Link
Configuration Details sidebar, shown on the
next page. The Port and Protocol are typi-
but-
cally set to: 11000 and UDP, respectively.
• Enter a unique name for this HDE-200
and its site location. Typically the Device
Name includes call letters or other signal
identifier, while the Site Location could iden-
tify the city, if the HDE-200 is remotely ac-
cessed on the same subnet, or give its spe-
cific location (TOC, air studio, transmitter
shack, etc.).
6. Once all changes are made, click
Config…
to move the configuration files to the ECC
app, a file selection window opens so the
USB flash drive can be select. Click
3-7
HARRIS CORPORATION
Step 6
HDE-200 Configuration Window
Save New
When a USB flash drive was used
OK
to
Revision F • 3/11
Page 30

3 Control Center Software
Exciter Link Configuration Details
Use one of three HDE-200 transmission modes:
1. Unicast
local network or a bidirectional TCP/IP-capable STL, e.g.
an Intraplex STL HD or Moseley Starlink 9003T1)
- Enter the Flexstar Exciter’s Exporter Link IP address
(e.g., 10.10.10.11) as the Exciter Address.
- Select port 11000 and UDP protocol. Contact Harris
field service if there is a compelling reason to use TCP.
- Verify
2. Unidirectional Unicast
Exciter, using its MAC address, over a unidirectional
STL path, e.g. Harris HD Link or Moseley StarLink
9003Q)
- Enter the Flexstar Exciter’s Exporter Link IP address
(e.g., 10.10.10.11) as the Exciter Address.
- Select port 11000 and UDP protocol.
- Check mark
- Enter the MAC address of the FlexStar’s Exporter Link
as shown in the FlexStar GUI, Serial Setup, screen 4/4.
3. Unidirectional Subnet Broadcast
multiple Exciters to be fed from this HDE-200 over any
type of non-routed path)
-Enter the Exciter Address, but use .255 in the last octet
(e.g., 10.10.10.255). All devices with addresses from
10.10.10.1 to 10.10.254 will then receive the HDE-200
packets. NOTE: All network switches between the HDE200 and the FlexStar Exciter or STL must be set to allow
broadcast packets to pass through to the desired destination ports. Also, consult with your IT group before
implementing this feature.
- Verify
- Select port 11000 and UDP protocol.
Additional Note
traffic into the Exciter’s Ethernet 3 port. Also, do not
allow duplicate IP addresses to be set on any Exciter
Ethernet port, leave all unused ports set for DHCP.
(to connect to one Flexstar Exciter using a
Use StarLink MAC is unchecked.
Use StarLink MAC.
Use StarLink MAC is unchecked.
write a
NewIPAddressInfo.xml
MAC address folder on the flash drive.
(to connect to a Flexstar
(allows
: Do not allow the Exporter’s E2X
file to the
7. When using “sneaker net” to transfer the new
settings to the HDE-200 remove the USB
flash drive from the computer and insert it
back into the HDE-200’s USB port.
CAUTION: Right click on the
Remove Hardware
icon in the Win-
Safely
dows system tray to select the USB
device (e.g.,
Storage Device
Safely remove USB Mass
) before unplugging it.
8. With the USB flash drive inserted into the
USB port on the HDE-200, press the
RESET PROCESSOR
button on the rear
panel to restart the HDE-200. This causes
the updated files to be read, and stored, in
the HDE-200 flash memory.
9. As the HDE-200 restarts and reads the up-
dated network configuration information,
START-UPSTART-UP
START-UP is displayed on the front
START-UPSTART-UP
panel. When this display goes away, the
HDE-200 has updated its file settings, au-
tomatically overwriting the original configu-
.xml
ration
files with the new settings. The
new HDE-200 can now be connected to the
facility LAN.
If the HDE-200 is directly connected to the
computer, then a warning pop-up box ap-
pears to confirm that you want to upload
the changes to the HDE-200. Click
write the files and cause the HDE-200 to
reboot. See step 9 for the results. Click
to not upload the new configuration to
cel
the HDE-200.
HARRIS CORPORATION
OK
to
Can-
Revision F • 3/12
3-8
To view the new HDE-200 on any ECC app,
Device
>
click
Select Device
and double-click on
the desired HDE-200 name in the Exporter De-
vice Browser window.
If audio is going through that HDE-200 it will
immediately appear in the meters. The device name
will appear at the top of the ECC window.
Page 31

Backing up the New Configuration Files
When the direct connection method is used to
update the HDE-200 files, follow steps 1 and 2 in
order to write a MAC address-named folder from
the updated HDE-200 to the USB flash drive. Use
Windows Explorer to then backup that folder to
the admin computer.
When the USB flash drive method was used to
set the new configuration, move the USB drive
back to the admin computer to backup the MAC
address-named folder using Windows Explorer.
3.5 HDE-200 Configuration
With the newly updated HDE-200 shown in the
ECC app, the various operational settings (Diver-
sity Delay time, Profanity Delay time, activating
the Profanity Delay remote control, assigning GPS
options, assigning Blend options, etc.) can now be
edited as desired. This section also presents an
overview of each ECC menu item and their pop-
up window settings.
3 Control Center Software
User Log On Dialog Box
If an Engineer User needs to make an urgent ad-
justment of the HDE-200 settings, they simply log
File
>
Logon
in using the
app is now running with their level of credentials.
When finished, the Engineer logs off the app, and
the original user logs back on, returning the per-
mission level back to Censor.
pop-up window, the ECC
3.5.2 DEVICE MENU
3.5.1 FILE MENU
File Menu Items
The File menu provide a means for an alternate
user (like an Engineer or Commissioner) to gain
immediate access to the ECC app, with elevated
privileges, by logging into the app to make changes
and then logging off. The current user then logs
back into the ECC app with their level of access.
As an example of how User Groups are used,
assume the current user is a Censor. This user
group can control Profanity Dump operations and
select which HDE-200 to view but not much else.
HARRIS CORPORATION
3-9
Device Menu Items
The
Device Menu
HDE-200 is currently communicating with that
ECC app. The currently connected HDE-200 is
shown in the title bar of the ECC window:
Current HDE-200 Shown in ECC Window Title Bar
To change the current device, click
Device
>
Select Device...
vice Browser
shows each HDE-200 Exporter connected to the
network. Double-click an HDE-200 Exporter
name to select it for monitoring (or editing with
an Engineer or Commissioner User).
window (shown on page 3-5), which
is used to change which
to open the
Exporter De-
Revision F • 3/11
Page 32

3 Control Center Software
NOTE: Always confirm which HDE-
200 the ECC app is connected to—
especially when there are multiple
HDE-200 Exporters in the network,
before editing any settings.
3.5.3 DELAY CONTROL MENU
Delay Control Menu Items
This Menu is where the Diversity Delay settings
are defined and where the HD Radio mode:
Enable Blend or Enable Ballpark Mode is set.
Because of the significant time difference be-
tween the HD Radio signal (due to its encoding,
transmission, and decoding processes) and the
analog signal transmitted via standard FM, for the
HD Radio tuner to seamlessly blend from the
analog signal to the HD Radio signal, the analog
broadcast signal must be time delayed by mul-
tiple seconds to stay time-aligned with the HD
Radio signal.
3.5.3.1 Setting the Diversity Delay
Up to twelve and half seconds of
lay
can be set in the HDE-200. But before one
adjusts the Diversity Delay setting, Enable Blend
must be checked and the Diversity Delay must be
fully ramped up (the main ECC display shows the
Diversity Delay at 100%).
Click
Diversity Settings...
Settings pop-up window. Fine tuning of the Diver-
sity Delay time can be done using this window,
but to accurately do this requires that either a pro-
fessional HD Radio receiver be used so that direct
correlation measurements can be used or so that
Diversity De-
to open the Diversity
HARRIS CORPORATION
3-10
Diversity Settings Window
the receiver can be set to “Split Mode” where the
decoded HD Radio signal audio feeds one chan-
nel (typically, the left channel) while the received
analog broadcast audio feeds the other channel
(typically, the right channel).
Connect a dual-channel oscilloscope to the HD
Radio receiver audio outputs (while it is in
) to accurately align the two signals visually
Mode
Split
while “tweaking” the delay setting in the Diversity
Settings pop-up window.
Here are some tips to get you started:
1. Start with an initial setting of roughly seven
seconds. This setting is often associated with
a particular Exciter, so also refer to the HD
Radio Exciter’s manual about their recom-
mended Diversity Delay.
2. Use program material with plenty of peaks
and silence (like spoken word) instead of
music so that the delay or time difference
between the two signals is most easily seen.
3. Progressively “zoom in” the scope as the two
signals are more closely aligned.
Delay Trim
The current Diversity Delay time (Absolute Di-
versity Delay) is shown in the Delay Trim section
of the window in seconds (the default setting each
time the window is opened) or in the number of
audio samples the signal is being delayed (each
Revision F • 3/12
Page 33

3 Control Center Software
audio sample is 1/44,100 of a second or 22.7 mi-
croseconds).
Adjusting the delay time can be done by double-
clicking the Absolute Diversity Delay time (which
then turns blue) and entering a new delay time.
The Diversity Delay Adjustment entry can be used
to add or subtract time to the existing Diversity
delay. In either case, click Apply to change the
delay time. Note that the delay time will then ramp
to the new setting using the Ramp Mode.
To view the delay by Samples, click the Samples
radio button. The same entry methods (double-
clicking the Absolute Diversity Delay entry or en-
tering an adjustment into the Diversity Delay Ad-
justment entry box) as used with Seconds can be
used with Samples.
A rough determination of the HD Radio signal
to analog delay difference can be determined by
simply listening to the two signals in Split Mode.
An audio source with speech, rather than music,
will best facilitate this process. A time difference
of greater than 0.2 seconds is clearly discernible.
If the analog signal arrives before the HD signal,
then more delay is needed and vice-versa.
To more precisely adjust the Diversity Delay,
view the two signals on a dual trace oscilloscope
or use a dedicated HD monitor like the Audemat
Golden Eagle HD.
Ramp Control
The Ramp Control Section simply shows how
much time, in minutes:seconds.hundreds of sec-
onds, that it takes to ramp up from no delay to
the Absolute Diversity Delay set in the Delay Trim
section.
The actual amount of the ramp time is affected
by both the Diversity Delay time itself and by
which Ramp Mode is selected in the
Other Controls...
S
oft Ramp is active, the ramp time shown is accu-
setup window. When Linear or
Systems
rate. When Smart Ramp is active the time shown
is the maximum ramp time. The actual ramp time
may be much shorter, especially with spoken word
programming.
Diversity Correction
Checking External Correction Enable will al-
low an external “Audio Time Correlation Measure-
ment Device” to post delay correction values, via
Ethernet, to the HDE-200. These correction val-
ues are only utilized when the Diversity Delay is
not being altered (e.g., not being manually adjusted
and not ramping up or down).
The Port used by the particular Time Correla-
tion device is also set in this part of the window
using the Up/Down arrows.
Note that at this time there are no HD receivers
that incorporate this feature, thus it is not nor-
mally enabled.
Saving the Diversity Delay Settings
Once the delay is set (the HD Radio audio and
analog FM audio are in phase with no time differ-
Accept
ence), click
to store the Absolute Diversity
Delay Value and other settings in this window to
the nonvolatile memory of the HDE-200 and to
close the window.
The delay value will now be the target during
all subsequent Ramp Up commands. If the delay
was ramped up at the time of an accidental power
outage, the Exporter will automatically ramp back
to that delay target at power restoration.
To discard all changes made to the Absolute
Diversity Delay value, and to the other sections of
Cancel
this window, click
to close the window. The
HDE-200 will then ramp to the previous Abso-
lute Diversity Delay value.
>
3.5.3.2 Enable Blend
The Exporter adds a control signal to the HD
Radio stream that tells an HD Radio receiver what
to do when the HD Radio signal is interrupted or
3-11
HARRIS CORPORATION
Revision F • 3/11
Page 34

3 Control Center Software
too weak to be received properly. When Enable
Blend is checked, the receiver blends from the HD
Radio signal back to the analog broadcast signal.
The Enable Blend setting affects how the HD
Radio receivers operate, which means that it also
affects how much Diversity Delay is required to
align the analog broadcast with the HD Radio sig-
nal. Since Enable Blend is normally checked, you
should ensure that it is checked prior to setting
the Diversity Delay.
To set the Enable Blend option, click on the
lay Control
menu item, then click Enable Blend
De-
to check the option.
3.5.3.3 Enable Ballpark Mode
Clicking on
mark this option (unchecking
will immediately begin ramping down the Diver-
sity Delay to zero.
This function can be used for live broadcasts of
sporting events so that the FM broadcast listeners
at the ballpark will hear a low latency signal (al-
though most likely there will still be Profanity de-
lay of several seconds). The
tion will be temporarily overridden and the blend
bit turned off in the HD Radio stream.
Ballpark mode is canceled by either sending a
cancel Ballpark mode command from a Studio re-
mote panel or by clicking
Enable Ballpark Mode
Enable Blend
Enable Blend
Enable Blend
will check
) and
func-
.
3.5.4 PROFANITY MENU
Profanity Menu Items
The HDE-200 Exporter has an optional feature
that can provide up to thirty-five seconds of pro-
fanity delay protection. Profanity delay controls
and the profanity delay settings are accessed
through the
is grayed out if the optional Profanity Delay fea-
ture is not active.
Enable Profanity (Ramp On) and Disable Pro-
fanity (Ramp Off) are mutually exclusive settings.
Checking Enable Profanity ramps up the Profan-
ity Delay to the current stored value of Total Pro-
fanity Duration. Checking Disable Profanity
(Ramp Off) causes the Profanity Delay to begin
ramping to zero delay.
3.5.4.1 Profanity Delay Settings
Clicking
fanity Delay Settings pop-up window where the
total profanity delay is set along with how much
time is dumped per Dump Event. It also shows
the recovery time required to build the delay back
up after a Dump Event occurs.
Profanity
Profanity
menu item. This menu item
>
Settings...
opens the Pro-
HARRIS CORPORATION
Profanity Delay Settings Window
3-12
Revision F • 3/12
Page 35

Delay Management Section
The Total Profanity Duration and the Dump Du-
ration are displayed in seconds.milliseconds. There
is some interaction between the two controls since
adjusting the Total Profanity Duration can affect
the Dump Duration since the maximum Dump
Duration is equal to the setting of the Total Pro-
fanity Duration.
The settings can be changed using one of these
methods:
1. Click on a number to highlight it in blue.
Press the backspace key to erase the cur-
rent value, then type in a new value on the
keyboard. The value can have a resolution
to 0.01 seconds, if desired.
2. Click on a value (it highlights in blue), then
use the mouse scroll wheel to increment the
value by one second for each forward click
or decrement it by one second for each rear-
ward click.
3. Click the up or down arrow button to incre-
ment or decrement the value by one second.
Click/holding an arrow button gives four
continuous increments or decrements per
second.
4. Click the large down arrows to pop up a
Slider Bar. When the slider is fully left, the
Total Profanity Duration, or the Dump Du-
ration, is set to zero seconds. Moving the
slider to the right increases the delay or
dump duration. The maximum Total Pro-
fanity Delay is 35 seconds. The maximum
Dump Duration is limited to the setting of
the Total Profanity Duration. Clicking on the
bar to the left or right of the slider adds or
subtracts one second from the Duration.
Click/holding the slider bar continuously in-
crements or decrements by one second about
two times per second. To close the slider pop-
3 Control Center Software
Profanity Duration Slider Bar
up window, click on any other part of the
computer screen.
The Scroll wheel method (#2) is probably the
easiest and fastest method to set the delay times
giving a more than adequate resolution finer than
one second.
OK
Click
to save the selected values to the
Exporter’s nonvolatile memory and close the Pro-
Cancel
fanity Delay Settings window. Click
to close
the window and ignore any changes. The previ-
ously stored values will then be recalled and used.
Recovery Section
The Dump Recovery Time is displayed in
minutes:seconds.milliseconds. The Dump Recov-
ery Time is calculated by the time set in the Dump
Duration and by the selected Ramp Mode.
The Ramp Mode is set in the
window. For
Linear
and
Soft Ramp Mode
the time shown is accurate. For the
Mode
setting, the time shown is the maximum
Other Controls
settings,
Smart Ramp
ramp time. The actual ramp time will vary by pro-
gramming, being much shorter when used with
spoken word content.
The time displayed in the window is for the re-
covery time for a single dump event. Since mul-
tiple dumps are allowed, the total recovery time
will be lengthened proportional to the number of
executed dumps.
3-13
HARRIS CORPORATION
Revision F • 3/11
Page 36

3 Control Center Software
3.5.5 SYSTEM MENU
System Menu Items
The System menu items are used for setting ad-
ditional HDE-200 configurations and to display
or control information specific to the FlexStar de-
vice community.
3.5.5.1 Mode Control Menu
Click
System > Mode Control...
tem Mode Settings window where some of the most
basic HD Radio receiver display settings are made.
System Mode Settings Window
Operational Mode Control
The top section of the window is where the
modulation Band is set. At this time this setting is
FM
fixed on
(AM HD Radio will be supported
when Flexstar products are released). The Modu-
lation mode should be set to
to open the Sys-
Hybrid MP1-11
.
Station ID
The lower section of this window is where the
entries used by the Station Information Service
Transport Data (SIS Data) are entered. Note that
the current HDE-200 firmware release is in com-
pliance with NRSC document SY_IDD_1020s,
Rev F.
The Country Code is entered into the Country
Code entry box. At this writing, there is little util-
ity in selecting anything other than
US
in this box.
The FCC Facility ID is your assigned FCC ID
number.
The Call Letters is limited to four characters. To
add “-FM” to your Call Letters, check the FM check
box. If you do not want “-FM” added to your call
letters, uncheck the FM check box. In the SIS Data
this field is called the
Call Sign Standard.
The Slogan entry box allows up to 56 alphanu-
meric characters to be entered. These scroll across
the HD Radio display after the Station Name. In
the SIS Data this field is called the
Slogan Stan-
dard. Be sure to edit the default text in this box or
else “This is the Slogan” could be scrolling across
HD Radio receivers when tuned to your station!
The Message (also known as the
Station Mes-
sage in the SIS Data) is a text message of up to
124 alphanumeric characters that scroll across the
HD Radio after the Slogan. Be sure to edit the
default text in this box or else “This is the Mes-
sage” could be scrolling across HD Radio receiv-
ers when tuned to your station!
Check mark
Priority Alert if you want the HD
Radio receiver to emphasize the Station Message.
How this is done varies by the HD Radio receiver
manufacturer, so the message might be in bold-
face, underlined, in a larger typeface than the Sta-
tion Name and Slogan, or be surrounded by
*ALERT*.
Encoding allows for support of future Unicode
character sets, but at this time it should be set to
the E.1 encoding method.
HARRIS CORPORATION
3-14
Revision F • 3/12
Page 37

3 Control Center Software
NAME
PAYLOADS
REQUIRED
DESCRIPTION
Staon ID 1
Consists of FCC ID &
Country Code
Staon Locaon 1
Consists of Latude,
Longitude, and Altude of
staon's locaon
Staon Message 2 - 64
Up to 124 character text
message (for broadcasters
to use at their discreon)
Staon Message 1
Bief descripon of each
Service (MPS, SPS, Data)
that is available
Call Sign Standard 1 4-character call sign
Slogan Standard 2 - 1 6
Staon slogan (56character text string)
Call Sign Universal * 2
Call sign (6 - 12 characters),
supports extended
characters
Slogan Universal * 2 - 32
Extended Slogan (95 - 124
character text string),
supports extended
characters
ALFN 1
Details of local me: Leap
Second offset, me zone,
daylight savings me, etc.
Parameter Message 1
Local Time data
parameters, leap second,
me offset
* Not supported in the current release
3.5.5.2 Station Information Service
Click
System > Station Information Service...
to open the SIS data schedule window. Ten SIS
messages are available for scheduling, as shown
in the following illustration.
Station Information Service Settings Window
in the first payload of a block leaving the second
payload of that block empty.
There are a few arcane restrictions regarding
the placement of payloads beyond the above de-
scription. Fortunately, the ECC software disciplines
these restrictions for you. You simply click and drag
the desired SIS message block from the top of the
window to one of the available payload slots. Per-
mitted placement choices are clearly indicated, and
the application will not permit you to place a mes-
sage in a restricted payload location.
Note that if a message requires more than two
payloads to deliver its respective message, only a
portion of the message gets broadcast each time
the message is scheduled since each frame (16
blocks) are sent at a rate of one frame per 1.5
seconds.
Choices that are not supported in the current
iBiquity software release are grayed out (Call Sign
Universal and Slogan Universal).
The Station Message box will be grayed out if
the Message entry box does not have any text en-
tered in the
System Mode Settings
SIS data is structured into 32 payloads, which
constitute one frame. These 32 payloads are di-
vided into 16 blocks of two payloads each and are
numbered along the left side of the SIS window.
SIS messages vary by payload requirements.
Some messages require a single payload, some
require two payloads, or more, to fully deliver their
message content. It all depends upon the length of
the respective message.
SIS Messages are deployed in the schedule as
either single or double message payloads. You are
free to schedule your SIS messages however you
choose, but there are some restrictions. Single pay-
load messages can generally be placed anywhere,
while multiple payload messages must be placed
window.
Station Information Settings Summary
3-15
HARRIS CORPORATION
Revision F • 3/11
Page 38

3 Control Center Software
Messages needing more than two payloads to
complete will be repeated slower than the 1.5 sec-
ond frame rate, unless they are scheduled to ap-
pear more than once per frame. For example if the
Slogan Standard uses all 56 characters, it will need
16 payloads to complete. If it’s scheduled four
times per frame, it takes about six seconds for a
full display on the HD Radio receiver’s display:
16 / 4 (payloads/times per frame)
X 1.5 (seconds/frame) = 6 seconds
A similar situation applies to the latency of the
Service Messages. Each service requires its own
message. Only a single service’s message is broad-
cast when a Service Message is scheduled. There-
fore if a station wants to promote multiple HD
services in a timely fashion, then Service Messages
need to be scheduled more often.
As an example, assume a station has five Ser-
vices total: three audio services (HD1, HD2 and
HD3) plus two additional data services. If the sta-
tion wants information about these services to be
promoted with the least latency then the Service
Information message must be scheduled five times
in the 32 payload frame. If you’ve got five ser-
vices, then five payloads will get it done in the 1.5
second frame period.
To summarize, here are some SIS guidelines:
• Message latency is managed though
repetition
• Keep your messages as short as practical
• Allow shorter, more important messages, to
be interspersed within the schedule of
longer messages
The iBiquity default SIS schedule is included
on the HDE-200 Flash Drive in the Documenta-
tion folder (Harris\APN-146-WCF HDE-200 SIS
SETTINGS.pdf).
For further reading see the
The IBOC Handbook
by David Maxson (keep in mind that IBOC stan-
dards are a moving target, and that this handbook
was out of date on the day it was published).
3.5.5.3 Other Controls
Other Controls Settings Window
Click
System > Other Controls ...
to open the
Other Controls pop-up window which is divided
into Other Controls, Audio Options, and Licensed
Features.
Other Controls Section
Enable Studio Interface
Check mark
Enable Studio Interface
to activate
the Remote I/O Logic connector on the rear panel
of the HDE-200 (page 2-7 has details on using
this connection). Uncheck
Enable Studio Interface
to disable this connection.
Active Input Sources
The default selection is
Failover
. This setting is used when both the Main
Main & MPS, Auto-
and MPS inputs have signals connected, as would
be the case when the audio for the analog FM sig-
nal is separately processed from the MPS or HD
Radio signal. In this mode, if either of the two
AES input signals are lost, the other signal will be
used to maintain signal continuity. This causes the
Fault LED to light on the HDE-200 front panel.
HARRIS CORPORATION
3-16
Revision F • 3/12
Page 39

Select
Main Only
when the Main AES input
provides the signal for both the analog and the
HD Radio modulation paths. The AES Fault indi-
cation is suppressed since the MPS input will not
have a valid AES signal.
Select
Main & MPS, No failover
when the pro-
gram processing is so different between the ana-
log signal and the HD Radio signal that it is not
desirable to use one signal in the other applica-
tion. Thus, if either signal were to fail, there would
only be an AES Fault indication without any in-
ternal signal switching to cover for the missing
audio input.
Note that the HDE-200 does not perform
silence detection, it simply monitors the two in-
puts looking for valid AES clock, outputting an
AES Fault if no AES clock is detected.
Audio Options Section
Invert Digital Polarity
Check this selection to invert the signal polarity
of the analog signal path within the HDE-200 in
the unlikely event there is an unresolvable polar-
ity inversion between the HD Radio signal pro-
cessing and the analog signal processing paths
through your system. Normally this is unchecked.
Receiver Trim Level
This control affects the HD Radio receiver’s
output level for the HD Radio signal. It’s used to
compensate for any apparent loudness disparity
between the analog and HD Radio signals due to
how the analog and digital signal chains are pro-
cessed and transmitted.
The HD Radio signal’s audio output can be ad-
justed by up to +/- 7 dB, as compared to the ana-
log broadcast output level (which has a fixed level
in the receiver). Adjust the output level in 1 dB
increments by clicking the up or down arrows.
Click the large arrow button to pop up a volume
slider.
3 Control Center Software
Ramp Mode
This setting affects how the HDE-200 Diver-
sity and optional Profanity Delay ramping algo-
rithms operate. There are three ramp modes on
the HDE-200:
· Linear Ramp (not recommended)
· Soft Ramp (recommended for any format)
· Smart Ramp (recommended for sports and
talk formats only)
Selecting Linear alters the Diversity and Pro-
fanity delays by a fixed rate. The default ramp rate
is fairly slow, approximately 3% deviation from
normal pitch and tempo. The downside of linear
ramping is that most people can easily discern the
beginning and end of the ramp change by the
abrupt alteration of pitch and tempo.
If the ramp rate is too fast the effect is rather
jarring to the audience. If the ramp rate is too slow,
it will seem to take forever for the ramp process to
complete. This method is the way all other
manufacturer’s exporter devices behave during
Diversity delay alterations.
Soft Ramp (an HDE-200 exclusive mode) be-
gins and ends the alterations of the Diversity and
Profanity delays in a very gradual manner. The
Soft ramp rate achieves an ultimate rate much
faster than a linear rate without being noticeable
to the listening audience. Soft ramp’s default limit
rate is a 6% deviation from normal pitch and
tempo, which is roughly a musical semitone.
The advantage of soft ramp is that no one will
discern the beginning and end change of pitch and
tempo, while the ramp rate can be accelerated to
a more rapid terminal ramp rate without listeners
being able to discern the process. The Soft ramp
selection can be applied to all program formats
with no concern as to the audience impact.
Smart Ramp (an HDE-200 exclusive mode) al-
ters the Diversity and Profanity delays in two ways:
an extraordinarily slow, 0.8% ramp rate is used
3-17
HARRIS CORPORATION
Revision F • 3/11
Page 40

3 Control Center Software
while there is program material level above a cer-
tain threshold; a remarkably fast 20% ramp rate
is then used when the program material level falls
below this threshold. This has the effect of devi-
ously shortening or lengthening gaps between spo-
ken words. The advantage of Smart Ramp is that
listeners cannot discern a change of pitch. At the
same time, the duration that the ramp remains in
process is dramatically reduced.
Of the three modes, Smart Ramp is the fastest,
but since its ramp time is dependent upon the pro-
gram material, the ramp duration is non-determin-
istic. One downside of Smart Ramp is that during
extended musical passages, the ramping process
is not particularly effective. Consequently, it’s best
to limit the Smart Ramp selection to spoken word
format program material.
Licensed Features
This section lists which licensed optional up-
grade features have been enabled. Enabling the
features is done by installing one of the iButton
upgrades to the HDE-200. See Chapter 2
ware Installation
for details on the Optional Up-
grade Kits that are available.
3.5.5.4 Address Configuration Utility
Click
System > Address Configuration Utility...
to open the Address Configuration window. It has
two sections: HDE-200 Configuration and Harris
Signal Chain Community ID. Changing the settings
in this window, for a new HDE-200, were covered
on pages 3-6 to 3-8.
This window allows the active HDE-200’s con-
figurations to be edited and then uploaded directly
to the HDE-200 by clicking
which opens a pop-up warning (see page 3-8) that
OK
clicking
Click
You can alternately use a USB flash drive to
“sneaker net” the settings to the HDE-200. In this
will update and reboot the HDE-200.
Cancel
to stop the update procedure.
Hard-
Save New Config...
Address Configuration Window
case click
Load Config From USB
to show the
HDE-200 settings copied to the USB flash drive.
A complete procedure for editing the HDE-200
Network settings in the ECC app, and for updat-
ing the HDE-200 using a USB flash drive was de-
scribed earlier in this chapter.
NOTE: ECC will refuse to accept an
IP address when the Gateway and IP
addresses are not within the same sub-
net mask range. It also will not allow
duplicate or all zero addresses.
The logging address is typically set within the
range of 239.255.255.1 - .254 so the address falls
within the normal address range for local network
multicasting. The default setting is 239.255.255.1,
using port 50010. It would be unusual to change
these settings.
Harris Signal Chain Community ID
The dialog boxes in this section allow the user
to enter a device name for the HDE-200 settings
that are being shown in the top of the window, its
location (e.g., TOC, rack 9), and its Multicast Com-
HARRIS CORPORATION
3-18
Revision F • 3/12
Page 41

3 Control Center Software
munity Announce IP address and port. Normally
the Multicast address and port are left set to their
default settings, but these may be edited for spe-
cial purposes.
The HDE-200 sends status, meter data, and
community announce messages to the network
using Multicast Community Announcements so
that the data can be displayed on any ECC app
running on any computer in the network. Mul-
tiple Exporters will normally share the same Mul-
ticast address since the ECC app is designed to
administer multiple HDE-200 devices.
3.5.5.5 Show Signal Chain
Click
System > Show Signal Chain...
the Signal Chain pop-up window, which is divided
into three columns to show the various Importers,
Exporters, and Exciters in the system.
to open
If you hover your mouse over the different ele-
ments of the available devices on the dialog box, a
pop-up dialog box appears describing the item.
This Signal Chain dialog box is expected to be-
come more evolved as other HD Radio
synchrocasting implementations become available.
Multiple Importers, Exporters and Exciters may
be visible in this dialog box, depending upon the
extent of your community.
3.5.5.6 GPS Configuration
Click
System > GPS Configuration...
the GPS Settings pop-up window to show the
HDE-200’s GPS receiver performance.
to open
Signal Chain Window
The Exgine in the FlexStar Exciter emits Multi-
cast Community Announce messages like the
HDE-200. Its information appears in the Exciter
section.
The FlexStar Community Announce messages
are provided as a convenience since they are not
required for normal operation. In the future, they
may play a larger and more critical integrative role.
HARRIS CORPORATION
GPS Settings Window
The Current Coordinates section lists the lati-
tude, longitude, and altitude of the HDE-200 along
with the number of satellites that the GPS receiver
has detected. Clicking the Map button will dis-
play—provided the PC running ECC has Internet
access, the location of the HDE-200 receiver.
Check Override Coordinates to enter your
transmitter’s coordinates in lieu of using the coor-
dinates for the HDE-200’s location.
The Daylight Savings Time section allows you
to select the proper DST schedule for your loca-
tion. A local time Zone Offset, set in minutes, is
also available for locations that require this op-
tion. The settings for the standard North Ameri-
can time zones are shown on the next page:
3-19
Revision F • 3/11
Page 42

3 Control Center Software
North American Time Zone Settings
Newfoundland (-210) Central (-360)
Atlantic (-240) Mountain (-420)
Eastern (-300) Pacific (-480)
Enable Regional DST
is checked for Regions
or Nations that observe DST. This would always
be checked in the United States.
Enable Local DST
Check
serves DST. This should
if your locality ob-
almost
always be checked
as well. There are a few grey areas here: Arizona
broadcasters typically leave this box unchecked
since Arizona does not observe DST, whereas
Indiana has worked out most of its DST mess:
http://en.wikipedia.org/wiki/Time_in_Indiana.
You need not expend too much time on the time
features, as the current iBiquity code release does
not fully support all of this time data and there
are no commercially available HD Radio receiv-
ers which make use of this time data anyway.
3.5.5.7 Upgrade Device
Click
System > Upgrade Device Firmware...
open a pop-up window to show the currently con-
nected HDE-200’s MAC address, the current firm-
ware code Version, and the HDE-200 description.
to
HDE-200 firmware can be downloaded from
the Harris Broadcast Customer Portal. See page
5-8 for access information.
Note that various firmware files will be found
on the site under:
Download Software Updates >
Radio Transmission > HD FM > HDE-200 Ex-
Before downloading an update, talk with a
porter.
Harris Field Service Engineer to determine the
correct package for your application. There are
also helpful App Notes about upgrading the firm-
ware on this site as well.
The update process is comprehensive, updat-
ing the CPU, the DSP board, and the HDE-200
firmware in one procedure to avoid the complica-
tion of providing individual updates for the vari-
ous software and firmware elements.
HDE-200 Firmware Upgrade Procedure
1. Download new firmware from the Harris
Broadcast Customer Portal and save the
zipped folder to the My Documents folder
on the computer running the ECC app.
2. Insert a blank USB flash drive (32MB or
larger) into the USB port located on the rear
panel of the HDE-200.
Wait one minute to
allow the HDE-200 to save its current con-
figuration files to the USB flash drive.
Upgrade Device Firmware Window
Use this information to ensure the correct HDE-
200 is selected before proceeding with a firmware
update.
HARRIS CORPORATION
3-20
Revision F • 3/12
3. Select that HDE-200 so it is shown in the
ECC app.
System
>
4. In the ECC app, select
Device
to open the Upgrade Device Firm-
Upgrade
ware window.
5. In the Upgrade Source section of the win-
dow, click the ... button to browse to the
zipped folder containing the firmware up-
date.
6. Remove the USB flash drive from the HDE-
200 and insert it into a USB port on the PC
running the ECC app. Wait a moment to al-
Page 43

3 Control Center Software
low the USB flash drive to be recognized by
Windows.
Install
7. Click
. In the pop-up window, select
the USB flash drive as the destination. The
ECC app will now unzip and copy the firm-
ware code update files to the USB flash drive.
8. Once the updated files are copied from the
PC to the USB flash drive, right click on
“Safely Remove Hardware” in the Windows
system tray and select the USB device (for
example: “Safely remove USB Mass Storage
Device”). Remove the USB flash drive from
the PC’s USB port.
9. Insert the USB flash drive back into the USB
port on the rear panel of the HDE-200.
The HD Radio signal encoding will be in-
10.
terrupted when you perform the next step
so you must ramp out of the Diversity
Delay and the optional Profanity Delay. You
can do this using ECC or from the front panel
buttons on the HDE-200.
11. Once the Diversity and Profanity Delays are
both at 0.0 seconds (0% ramp), reset the
HDE-200 by pressing the rear panel re-
cessed button: RESET PROCESSOR. The
HD Radio signal will be interrupted but the
non-delayed analog audio continues through
the HDE-200 during this process.
It takes about four minutes for the HDE-
200 to update the code (ATTN: KEEP
POWER ON is displayed during the update
process) and restart (a normal STARTUP
message is displayed during this time).
12. When the normal display returns, Ramp Up
the Diversity Delay and, if applicable, the
Profanity Delay.
13. Remove the USB flash drive.
3.5.5.8 Preferences
Click
System > Preferences...
200 Control Center Preferences
to open the
HDE-
pop-up window
which shows which IP address the computer is
using to communicate with the FlexStar LAN, the
Multicast IP address, and Multicast port used to
receive community Multicast messages.
Preferences Window
,
If there is only one network connection on the
computer, then its IP address will be shown in the
FlexStar Network Interface entry box. If there are
two or more NICs in the computer, click on the
down arrow to select the IP address for the NIC
connected to the FlexStar network.
If this setting is not set to the NIC connected to
the FlexStar devices then the ECC app will not
see the HDE-200. Thus, this window is the first
place to look if you cannot establish a connection
to the HDE-200.
NOTE: To ensure proper Multicast
monitoring by ECC, the FlexStar Mul-
ticast settings should be set to their
defaults: 239.255.255.1, port 50010.
When the ECC app is first installed, the Win-
dows Users and Groups security settings are NOT
applied to the app, allowing for easy configura-
tion of the ECC app and the HDE-200 Exporters.
But, once the ECC app and the HDE-200s are
configured, click Enable Security to activate the
3-21
HARRIS CORPORATION
Revision F • 3/11
Page 44

3 Control Center Software
Windows Users and Groups to control access to
the ECC app features. You must log into the ECC
app, using your User Credentials as an Engineer
or Commissioner, to then make any new changes
on the HDE-200 configuration.
3.5.6 HELP
Help Menu
There are two options under help: About and
Check for Updates. Selecting About lists the ver-
sion of the ECC app.
to the Internet, to check for updates, use a com-
puter connected to the Internet and navigate to:
http://support.broadcast.harris.com/
Using the Harris Customer Portal requires reg-
istration. If you already are registered, enter your
username and password. A new user must select
New User in the
plete the registration process.
Once you have access to the Harris Customer
Portal, under
ware Updates >
HDE-200 Exporter
to the HDE-200 and ECC app.
Customer Login
Self Service
Radio Transmission > HD FM >
to locate the files pertaining
window and com-
click
Download Soft-
3.6 Supplemental Software
Several software utilities, app notes, and other
files are provided on the HDE-200 USB flash drive.
Copy these to the admin computer for reference.
These files can also be downloaded from the Har-
ris Customer Portal website as well:
About ECC Pop-Up Window
Selecting Check for Updates opens Internet
Explorer on the Harris corporate web site
(www.harris.com), which is only useful if the ECC
app is on a PC connected to the Internet. Since, in
most cases, the admin computer is not connected
Software supplied by Harris
· HDE-200 Logger Utility
Software supplied by iBiquity Digital
· PSDGen 4.7 package (executable binaries)
3.6.1 HDE-200 LOGGER UTILITY
This utility receives log messages from the ECC
app and from the HDE-200 devices. The logger
collects these messages, filters them, and then for-
wards important ones to the Windows Event da-
tabase. The utility should be run on the FlexStar
network admin computer at startup. It typically
resides as an icon in the system tray.
3.6.1.1 Installation
Locate and open the
HDE-200 Flash Drive. Select Install for Everyone
during the installation.
LogInstall.msi
file on the
Check for Updates Opens the Harris Webpage
HARRIS CORPORATION
3-22
Revision F • 3/12
Page 45

Using the HDE-200
4
The HDE-200 has limited front panel con-
trols, which are for engineering use only. Board op-
erators and other users interface with the HDE-200
through using the Exporter Control Center (ECC
app), a software application running on Windows
XP, Vista, or Windows 7 Pro computers networked
with one or more HDE-200 Exporters, or through
a hardware button control panel.
4.1 HDE-200 Controls
The front panel controls on the HDE-200,
shown below, allow engineers to monitor various
audio inputs and outputs both visually, through a
front panel level display, and aurally, through a
front panel headphone jack or the rear panel AES
monitor output. Only three buttons—Monitor Se-
lect, Headphone Volume up and Headphone Vol-
ume Down, are needed to quickly select, view, and
listen to any input or output.
A dual row dot matrix display shows the name
of the Monitor Source Signal in its top row while
the stereo signal level is shown in the lower row.
This display can alternately show alarm condi-
tions; delay status for the Diversity and optional
TM
Profanity Delay; and the headphone output level.
4.1.1 SELECTING THE MONITOR SOURCE
Press the
step through the four monitor sources: Main In is
the analog transmission’s input signal; MPS In is
the digital transmission’s input signal; Main Out
is the analog transmission’s output signal from
the HDE-200; and MPS Out is the internal-only
audio signal feeding the iBiquity DSP board. Note
that MPS In will not be available if the HDE-200
is set to use a common input (Main In) as the
source for both the analog and digital transmis-
sion chain signals. In addition, the output of the
iBiquity DSP board cannot be monitored by the
HDE-200 since it is the E2X serial data stream
Monitor Select
button to sequentially
Signal Monitor Name & Signal level * Fault Selector & Indicator Delay Controls & Indicators
Headphone Jack Monitor Source Selector Headphone Level Controls
* Alternately shows Alarm Conditions, Diversity or Profanity Delay Ramp Status, Headphone Volume level
HDE-200 Front Panel
Front Panel Controls and Displays
4-1
HARRIS CORPORATION
Revision F • 3/12
Page 46

4 Using the HDE-200
going to the three Ethernet ports, thus monitor-
ing of this signal can only be done at the HD
Radio Exciter.
4.1.2 HEADPHONE VOLUME ADJUST
Pressing the
buttons, lights both LEDs and changes the dis-
play to show Volume in the top row and the cur-
rent headphone level in the bottom row.
Tap the
2 dB steps. The length of the bargraph is also de-
creased. Conversely, tap the
headphone volume in 2 dB steps, which also in-
creases the bargraph length.
The maximum volume (0 dB) is indicated by a
full bargraph. The minimum volume (-50 dB) is
indicated by no bargraph. Note that dots in the
bargraph indicate 0%, 50%, and 100% of the vol-
ume range.
HP Volume Down
Down
button to decrease the volume in
or Up ( )
Up
button to raise the
lay is ramping: an up arrow indicates the delay is
building or getting longer and a down arrow indi-
cates the delay is ramping out or getting shorter.
Pressing the
Down
or Up ( ) button that
has a lit LED has no action, whereas pressing the
button with the unlit LED reverses the ramp
direction.
When the display shows monitor signal levels,
a fault condition, or the headphone volume, the
Ramp Down and Up button LEDs indicate the
current status for both the Diversity and the Pro-
fanity delay. In normal use, both delays are typi-
cally full, thus the Ramp Up LED is normally lit.
But, both LEDs might be lit, or one or both LEDs
might be blinking, because the two delays are in
different states. Press
Delay Select
to view the sta-
tus for the Diversity Delay. If the optional Profan-
ity Delay is active, pressing
Delay Select
again will
show the Profanity Delay.
4.1.3 DELAY STATUS & CONTROL
Press
Delay Select
Diversity Delay or Profanity Delay. If the optional
Profanity Delay iButton is not installed, only the
Diversity Delay status is shown.
The display’s upper row identifies which delay
is shown: DVRSTY DLY (for the Diversity Delay)
or PRFNTY DLY (for the Profanity Delay). The
bottom row bargraph indicates the delay status—
from fully ramped down (empty bargraph) to fully
ramped up (full bargraph).
The
Down
and Up ( ) LEDs above the de-
lay Down and Up buttons indicate the displayed
delay’s status. When the
displayed delay is at maximum. When the
LED is lit solid, the displayed delay is at mini-
mum (0.00 seconds).
An Up or Down LED blinks to indicate ramp
up or ramp down. The display also shows an up
arrow (^) or a down arrow ( ) at the right end of
the delay bargraph to indicate which way the de-
to show the status of the
Up
LED is lit solid the
Down
^
4.1.4 FAULT
The
Fault
LED is unlit if there are no fault con-
Fault
ditions in the HDE-200. Pressing the
ton in this state shows Alarm in the top row and
System OK in the bottom row.
The
Fault
LED blinks to indicates a fault con-
dition in the HDE-200. Press the
Fault
change the display to show the fault. Alarm ap-
pears in the top row while the bottom row lists
the alarm condition. If there are multiple faults,
Fault
press the
button again to show the next
alarm.
A logic output is triggered when a fault is de-
tected. This can be used to alert engineering. See
page 2-7 for more information on the Studio Re-
mote panel connections and Critical Fault Tally
output.
Once the fault is cleared, the
Fault
off, the Alarm display returns to show System OK,
and the Critical Fault Tally is turned off.
but-
button to
LED turns
HARRIS CORPORATION
4-2
Revision F • 3/12
Page 47

4 Using the HDE-200
4.2 Using the ECC App
Any user can monitor any HDE-200 through
the Exporter Control Center software (ECC app)
running on a studio computer. Any HDE-200 Ex-
porter in the network can be monitored, or moni-
tored and controlled, depending upon the creden-
tials of the logged in user. User credentials are set
using the facility’s normal system login names.
When the user is assigned to an HDE-200 User
Group, as defined by a computer administrator
when the ECC app was installed, then they will
have their assigned level of access. If the user
logged into the computer is not set as an HDE-
200 User, and they start the ECC app they will
have No Credentials access.
NOTE: When the ECC app is in-
stalled, security is NOT ACTIVE
and any user is a Commissioner.
Once the ECC app, the HDE-200s,
and the User Groups have been con-
figured, it is important to click the
Enable Security button on the
HDE-200
Preferences
activate User accounts. Until this is
done any ECC app user has full ac-
cess to change any setting on any
HDE-200!
window to
To start the ECC app, double-click
its icon on the desktop. A program
shortcut is also added to the Windows
Programs
Corp >
menu. Click
FlexStar
ECC App Location in the Start Menu
Start
>
Programs > Harris
>
HDE-200 Control Center
.
The main program window, shown on the next
page, opens up showing the name of the active
HDE-200 at the top of the window, above the menu
items. When first opened (No Device) will be
shown until an HDE-200 is selected.
To select an
HDE-200, click
>
vice
Device
to open the
De-
Select
Exporter Device
Browser window. It lists all of the Harris HDE-
200s detected on the local network. Double-click
on a device name to select that HDE-200, or click
to highlight the name, then click OK, or press
, to select that HDE-200 and close the window.
ter
En-
ECC App Preferences Pop-Up Window
with the Enable Security Button
ECC App, Device Browser Window
The selected HDE-200’s current status and con-
figuration information is sent to that ECC app. If
audio is going through the HDE-200, the audio
meters will immediately show the audio levels for
the Analog and Digital Main Programs.
If no HDE-200s are shown, then the ECC app
Preferences may not be set up properly. See page
3-21 about the
4-3
HARRIS CORPORATION
Revision F • 3/12
System > Preferences...
menu item.
Page 48

4 Using the HDE-200
Name of the active HDE-200
Menu Items
Analog Broadcast
Audio Signal Level
Meter Source Selectors
(Pre or Post Delay)
HDE-200 Status
Indicators
ECC App, Main Window
4.2.1 AUDIO METERING
One of the main ECC app uses is to allow the
audio levels for both the analog carrier and the
HD Radio signal to be shown in the HDE-200.
The top meter (Analog Main Delay Service)
shows the audio levels for the Main Delay Input
(Pre Delay) or the Diversity delayed signal (Post
Delay). This audio signal’s ultimate destination is
the analog exciter/transmitter.
The bottom meter (Digital Main Program Ser-
vice) displays the audio levels for the MPS Audio
Input (Pre Delay) or the audio going to the iBiq-
uity DSP board (Post Delay). There is no meter
display of the iBiquity DSP output since it’s an
Ethernet data stream feeding the HD Radio ex-
citer/transmitter.
4.2.1.1 Meter Source Selection
The source for each meter is in-
dependently selected by the two but-
tons to the left of the meters. The
blue highlighted button is the active
source. Pre Delay selects the audio input and Post
Delay selects the output audio for each meter. Click
the gray button to change the meter source.
Diversity Delay Status
& Ramp Controls
HD Radio Audio
Signal level
The top, or Analog Signal meter, can show the
Pre Delay audio level (the audio as it enters the
HDE-200 on the
Main Delay In
put jack) or the
Post Delay audio (the audio level as it exits the
HDE-200 on the
Main Delay Out
jack). The Post
Delay signal may have no delay, a Diversity delay,
a Profanity delay or both Diversity and Profanity
delays, depending upon the current settings of the
HDE-200.
The bottom, or Digital Signal meter, when set
for Pre Delay, shows the AES digital audio signal
as it enters the HDE-200 on the
MPS Audio In
put. If the HDE-200’s Active Input Source is set
for Main Input only, then this meter shows the
same signal as the upper meter. Post Delay shows
the audio level feeding the iBiquity HD Radio DSP
processor. This signal will only be delayed if the
optional Profanity delay is active, otherwise the
Pre and Post Delay metering is identical in time.
4.2.1.2 Audio Levels
Each meter displays both the average signal level
(shown as a bar) and a peak level indication
(shown as a moving single segment typically six -
ten dB above the top of the average level, depend-
-
HARRIS CORPORATION
4-4
Revision F • 3/12
Page 49

4 Using the HDE-200
Meter Source Selection Peak Levels
Average Levels Peak Signal Alarms
ECC App Meter Features
ing upon the amount of signal processing). Peak
levels are held for one second before decaying.
Ideally, the right end of the average level bar
will fall between -20 and -12 dBFS marks for typi-
cal processed air signals. The levels from -57 dBFS
up to -20 dBFS are displayed using green seg-
ments. Signal levels from -19 dBFS up to -3 dBFS
are shown using amber segments. This is the area
where the average and peak indications should
normally be seen. The amber color indicates you
are getting close to using up the signal headroom.
The last three segments: -2, -1 and 0 dBFS, use
red segments to indicate these levels are danger-
ously close to digital clipping. An occasional peak
in this area is OK, but regular peaks in this area
indicate the level is too hot and digital clipping
may occur.
To the right side of each meter are two Signal
Peak indicators. These blue indicators turn on any
time a signal level of -3 dBFS or higher is detected.
If the blue Peak indicators regularly turn on, the
signal level feeding the HDE-200 is too hot.
4.2.2 DIVERSITY DELAY CONTROL
Status indication and control of the Diversity
Analog
Delay are located just below the
There are two controls in this section (Ramp
Up and Ramp Down) to allow a User to control
the Diversity Delay, which is a delay that delays
the analog broadcast so it is aligned with the HD
Radio broadcast.
The Diversity Delay Status Bar shows both a
visual and the numerical state of the diversity de-
lay. When the delay is out (or ramped down), then
meter.
Diversity Delay Status Bar
Ramp Down Button Ramp Up Button
Diversity Status and Ramp Controls
the diversity delay is 0% with 0.00 seconds delay.
When the delay is fully ramped up, then 100%
and the diversity delay setting, in seconds, is shown.
The Progress Bar waxes green from left to right
in a linear fashion as the delay is built from zero
seconds to the target value. The relative length of
the bar corresponds to the percentage completion
of the delay.
If there is currently no Diversity Delay, the Ramp
Up button is enabled. Holding the pointer over
the Ramp Up button (mouse over) turns it Yellow
signifying that clicking will cause the action to oc-
cur.
Once the Ramp Up button is clicked, the Ex-
porter commences inaudibly increasing delay, typi-
cally utilizing the Soft Ramp feature, to the
log
audio stream. It continues this process until
Ana-
the Diversity Delay target is reached or the Ramp
Down button is clicked.
The green Progress Bar appears immediately
progressing from left to right as the delay increases.
Also, the amount of delay in seconds and the per-
centage completion begin to increment. While the
Diversity Delay is ramping up, the Ramp Up But-
ton function is “grayed out” and not available for
activation.
Ramp Down may be initiated at any time the
delay is ramping up or when the delay has reached
the “Target Value.” During ramp down, the progress
bar proceeds from right to left. Also, the amount
of delay in seconds and the percentage comple-
tion decrement. While “ramping down” the Ramp
Down button is “grayed out” and not available for
activation.
4-5
HARRIS CORPORATION
Revision F • 3/12
Page 50

4 Using the HDE-200
4.2.3 PROFANITY DELAY CONTROL
When the optional Profanity Delay is active on
the HDE-200 being displayed there is a second
delay status box for the Profanity Delay below
the Digital Program meter levels. It does not have
Ramp Up and Down buttons, but one Dump but-
ton (with a Red Flag) at the end of the status bar.
The Profanity Delay Status Bar shows the state
of delay by a visual, numerical, and percent of the
delay. When the delay is out (or ramped down),
then the profanity delay is 0% with 0.00 seconds
delay. When the delay is fully ramped up, then the
bar is green, the profanity delay setting in seconds
and 100% is shown.
Profanity Delay Status Bar
Dump Button
Profanity Status and Dump Button
The Profanity Progress Bar waxes red from left
to right as the delay builds from zero seconds to
the Total Profanity Duration. The relative length
of the bar corresponds to the percentage comple-
tion of the delay. The bar color turns from red to
green as the delay builds past the Dump Duration
setting (set in the
Profanity Delay Settings
dow), which means that a dump event could oc-
cur at that point.
Triggering a dump event can be done using the
on-screen or a hardware remote panel Dump but-
ton to allow a producer or call screener to dump
the Profanity Delay. The Profanity delay almost
instantly ramps down the delay by the Dump
Duration. Most often the Dump Duration is set to
only dump part of the delay so that a second dump
event could be triggered as the dump builds back
up. For example, if one Dump dumps 50% of the
delay, then a second Dump would dump the rest
of the delay.
win-
When the Profanity Delay is dumped, the delay
instantly starts to rebuild the delay using the as-
signed ramp method so it is almost inaudible to
the listeners. The Progress Bar will be red if the
dump is below the Dump Duration time, turning
green once a delay event can be triggered again.
4.2.4 STATUS INDICATORS
The bottom portion of the ECC app’s main win-
dow shows the status for the signals required for
proper operation of the HDE-200.
ECC App, Status Indicators
The Signal Status names and indicators use
various colors to indicate their current status. A
name in white indicates an option or signal that is
not active. A name or indicator in green means
that the signal is present or good. A name or indi-
cator in red or orange indicates a fault condition.
In some cases these faults will also be indicated
on the front panel of the HDE-200, blinking the
Fault LED.
Here’s a summary of what the various Signal
Status names and indicators mean:
AES Main = Main Delay Input status: green (has
AES clock); red (no AES clock detected)
AES MPS = MPS Audio Input status: green (has
AES clock); red (no AES clock detected)
ARB Loop = Arbitron PPM Encoder option sta-
tus: white (PPM option not active); green (iBut-
ton installed with PPM option)
ARB Main = Arbitron PPM Encoder audio for
the analog broadcast signal: white (PPM option
not active); green (has AES clock); red (no AES
clock detected)
HARRIS CORPORATION
4-6
Revision F • 3/12
Page 51

4 Using the HDE-200
GPS Lock Status Indications
ARB MPS = Arbitron PPM Encoder audio for
the HD Radio signal: white (PPM option not ac-
tive); green (has AES clock); red (no AES clock
detected)
UP LOS = status of service to HD Exciter
DN LOS = status of service from HD Importer
UP QOS = Quality of Service to HD Exciter
DN QOS = Quality of Service from HD Importer
GPS = status of the GPS receiver (hovering over
this indicator will pop up various messages, as
shown in the illustration above, to indicate the GPS
status in more detail)
PLL = 1 PPS clock status
Active Data Service = type of active service
Encoding Format = the active encoding format
(e.g., FM Hybrid MP1-11 for HD Radio using FM
transmission)
4-7
HARRIS CORPORATION
Revision F • 3/12
Page 52

Service
5
The HDE-200 is designed to yield many years
of trouble-free 24/7 operation. But, if it does re-
quire service, read through this chapter as it pro-
vides technical information on the HDE-200 along
with a list of parts and repair services available
through the Harris service department in Quincy,
Illinois, USA.
5.1 Parts and Repair
Services
The field-replaceable parts available for the
HDE-200 are listed on page 5-2. Most parts are
field-replaceable rather than being readily field-
serviceable. Printed Wiring Assemblies (PWAs)
should be returned to Harris for repair as indi-
vidual circuit board components are not available
from the Harris service department.
There may be additional HDE-200 technical
information, beyond what is included here,
available from the Harris Broadcast Customer
Portal website: (http://www.broadcast.
harris.com.servicesandsupport/).
Most documents, including schematics and wir-
ing diagrams, are published in PDF format, which
requires Acrobat Reader 6.0 or later to view. The
current Acrobat Reader software can be down-
loaded, at no charge, from the Adobe website
(http://www.adobe.com).
5.1.1 PARTS ORDERING AND REPAIR
INFORMATION
Replacement PWAs and other parts can be ob-
tained through the Harris parts department in
Quincy, Illinois, USA. To ensure the correct part is
ordered, be sure to use the Harris product num-
ber when ordering. A list of HDE-200 part and
product numbers is on page 5-2. Some parts may
not have a product number assigned yet, see the
note in the parts list for details. Also, some parts
may have long lead times, so order accordingly.
Products returned to Harris for service, ex-
change, or credit must have a Return Authoriza-
tion (RA) tracking number assigned by the Field
Service Department prior to their return. Items
received without an RA number clearly written
on the shipping label side of the packaging may
be delayed and subject to additional handling fees.
To request an RA number, the Harris Field Ser-
vice Department can be contacted via telephone,
fax, e-mail, the web, or regular mail:
Harris Corp
BCD Field Service Department
PO Box 4290
Quincy, IL 62305-4290 USA
Service Phone: 217.222.8200
Service Fax: 217.221.7096
Service E-mail: tsupport@harris.com
Web: www.broadcast.harris.com
Return shipping charges are added to all non-
warranty repairs. Serviced parts are normally
shipped, within the USA, using FedEx or UPS
economy service. Overnight and next morning
delivery are also available for most items.
International customers must specify their pre-
ferred return shipping method when requesting
an RA number.
5-1
HARRIS CORPORATION
Revision F • 3/12
Page 53

5 Service
5.1.2 HDE-200 REPLACEMENT PARTS
Harris # Description
50-31 5 VDC Power Supply
76-1440 HDE-200 Connector Kit
15-999 Hood, D-Sub
15-967 44-pin D-Sub Connector
90-1445 Cable, Interface Controller to HD Radio DSP
90-1446 Cable, Interface Controller to Front Panel
90-1872-6 Assy, H/P Jack and cable
PRE17-22 TRS jack
90-2131-2 Cable, CAT-5, flat
95-1440 Interface Controller PWA
99-1815 Linux CPU
99-1820 HD Radio DSP PCA
99-1811 GPS Antenna, Trimble Bullet III
HDE-200 Chassis Parts
90-1446
Ribbon Cable
99-2131-2
CAT-5 Cable
901 012 1293
Front Panel PWA
Harris # Description
901 012 1293 Front Panel PWA
PRE12-93 10-Character Display
80-1752 Lens, Dual Display
603 006 9000 Switch, Momentary
943 5600 166 Front Panel (silkscreened metal only)
943 5600 161 Top Cover
NOTE: Not all parts have been assigned a
“product number” as of the date of this manual
revision. These parts will require a product number
(assigned by the Harris parts department) before
they can be sold as a replacement part.
99-1820
HD Radio DSP PCA
90-1872-6
H/P Jack Assy
90-1445
Power Cable
99-1815
Linux CPU
PRE17-22
H/P Jack
80-1752
Lens
iButton upgrade
socket
HDE-200 Front Panel Parts
PRE12-93 (x2)
10-Character Display
Switches, Momentary
HDE-200 Replaceable Parts
95-1440
Interface PWA
603 006 9000 (x7)
50-31
Power Supply
943 5600 161
Top Cover
(not shown)
943 5600 166
Front Panel metal
HARRIS CORPORATION
5-2
Revision F • 3/12
Page 54

5 Service
5.1.3 UPGRADE KIT PARTS
Profanity Delay (HARHDE200-PROFAN)
Harris # Description or Use Qty.
21-801-1 iButton for Profanity Delay 1
71-1441 Installation documentation 1
Arbitron PPM Interface (HARHDE200-PPM)
Harris # Description or Use Qty.
21-801-2 iButton for Arbitron PPM 1
71-1441 Installation documentation 1
90-2200 Interface Cable Assy 1
Arbitron PPM & Profanity Delay
(HARHDE200-PROF/PPM)
Harris # Description or Use Qty.
21-801-3 iButton (PPM & Profanity Delay) 1
71-1441 Installation documentation 1
90-2200 Interface Cable Assy 1
5.2 Technical Overview
The HDE-200 consists of four PCAs:
· Interface Controller
· Linux CPU
· Front Panel Display
· HD Radio DSP
The HDE-200 block diagram is shown below.
The part identifiers in this section are silkscreened
onto the circuit boards.
The power supply—a commodity +5 VDC “line
lump” type held captive within the chassis, plugs
into J23 on the Interface Controller. The 5 volt
output is filtered, regulated and/or current lim-
ited by U14, U15, U17, U32, U38, U39, U40, and
U41 to derive the four supply voltages (+1.2, +1.8,
+3.3 and +5 volts) used in the HDE-200.
5.2.1 Interface Controller
A Field Programmable Gate Array (FPGA),
U33, controls signal routing, remote I-O logic, the
9260
Processor
with SRAM
and DRAM
Linux CPU
(plugs into
SODIMM socket)
I/O
Ethernet
MPS
Audio
In
Ref
Mon
Out
A
Copernicus
GPS Receiver
F
GPS
DELAY MEMORY
SERIAL-PORT
B
B
Post Delay
Loop I/O
12-pin
MOD IV
Xilinx Spartan 3 FPGA
1PPS
44-pin D-Sub
PHASE
PHASE
PHASE LOCKED
LOOPS
10.00MHZ
BNC
Main
Main
Delay
Delay
Out
In
XLR-F XLR-M XLR-MXLR-F
MAIN DELAY
BYPASS RELAYS
~RST_9260
~IRQ0
~IRQ1
SSC Audio
SPI 0 Status/Command
~SPI0_GA_PROG
SERIAL-PORT A
~SPI0_FPGA_CNFG
USB Host
USB 10 MHz 1 PPS 44.1 kHz
HDE-200 Block Diagram
5-3
HARRIS CORPORATION
Remote I/O
Logic
20.00MHZ
1PPS
BNC BNC TRS
22.58MHZ
44.1KHZ
Port1Port2Port
RJ-45
RJ-45 RJ-45
Broadcom Multi-Port
Ethernet Switch
~RST_9260
HEAD
PHONE
AMP
LEFT
RIGHT
3-PIN
3
Processor Reset
iButton
socket
INTERNAL
POWER
H/P Monitor
FILTER
DC
POWER
RJ-45
~RST_9260
Power
90-1446
Ribbon Cable
90-2131-2
CAT-5 Cable
RJ-45
99-1820
HD Radio
DSP PCA
50-31
+5VDC
Supply
AC Input
(110-240 VAC
50/60Hz)
901 012 1293
Front Panel
Display Assembly
Revision F • 3/12
Page 55

5 Service
front panel displays, and for the delay processing.
It’s programmed by the data stored in a 2 MB
Flash Memory chip (U16). The board’s firmware
code can be updated, as required, by plugging a
USB thumb drive with updated data files into the
USB port (J6) on the rear panel.
The update procedure is detailed
in a Code Update section, later in
this chapter.
A 128 MB SDRAM chip (U26) is used for the
Diversity Delay and for the optional Profanity
Delay. About 47 seconds of total delay time is
available.
A GPS antenna signal (input on J20) feeds a
Copernicus GPS receiver (U1). The center conduc-
tor of the type-F connector carries a current
limited +5 volts to power the GPS antenna. The
GPS receiver has 1 PPS (pulse
per second) clock and GPS lock
outputs. If the GPS receiver is not
locked onto the GPS satellites, the
FPGA then generates a GPS Un-
lock alarm.
Two VCXOs (made up of Y2, Y3, and U25) gen-
erate a 20 MHz and a 22.5792 MHz clock which
are phase locked to the GPS 1 PPS signal. The 20
MHz clock is divided in half to generate the 10
MHz clock output, which is further divided by
3,125 to generate a 3,200 Hz clock, which is com-
pared with the 1 PPS signal in a phase detector
circuit. Another 3,200 Hz clock is generated by
dividing down the 22.5792 MHz clock. This clock
is phase locked to the 3,200 Hz clock generated
by the 20 MHz VCXO.
The 10 MHz clock
output (on J11) is used
to synchronize an HD
Radio Exciter, when
it’s co-located with the
HDE-200, along with
the 1 PPS clock out-
put, which is sent through a tri-state octal buffer
(U10) to J9. These signals are typically only used
when the HD Radio Exciter is co-located with the
HDE-200.
The 22.5792 MHz clock is divided by two to
generate a 11.2896 MHz master clock for the
FPGA, the delay memory, and the AES transmit-
ters. This clock is called the 256fs clock since it is
256 times the 44.1 kHz AES audio sample rate,
which is called the fs clock. The 11.2896 MHz
clock is also divided by 4 to
create a 64fs clock, which is used
by the AES receiver chips. It is
divided by 256 to generate the
44.1 kHz master clock which is
sent through a line driver (U10)
to rear panel jack, J10.
An Ethernet switch chip (U24) connects the
Linux CPU (plugged into SODIMM socket J8) to
the HD Radio DSP board (via the internal CAT-5
cable) and to the three rear panel RJ45 jacks (Port
1, Port 2, Port 3). These ports can be used to di-
rectly connect to an HD Radio Importer, admin
computer, STL, HD Radio Exciter, or to a facility
network switch.
The iButton socket (J35) connects to the FPGA.
An iButton is a 1-wire® device programmed with
a specific code to unlock
optional features on the
HDE-200. The iButton
uses +3.3 volts and must
be installed for the op-
tional features to func-
tion.
HARRIS CORPORATION
5-4
Revision F • 3/12
Page 56

5 Service
All audio inputs and outputs conform to AES/
EBU standards for digital signals. Each input and
output goes through a 110 ohm balanced AES
signal transformer (T2 - T9). The Main Delay In
(J2) signal goes through a relay (U28) which
couples the signal, through relay U29, to the Main
Delay Out (J4) whenever the HDE-200 is
unpowered.
Each digital input, after being unbalanced by
the AES transformer, goes to an AES receiver chip
(U35 - U37) which time aligns and sample rate
converts the incoming AES or S/PDIF signal to
the internal 44.1 kHz sample rate that the HDE-
200 uses. The serial data output of each AES re-
ceiver goes to the FPGA for internal routing. An
AES Loss alarm is generated if an AES signal is
not present.
The four digital outputs (Main Delay Out, Ref
Mon Out, and the two loop outputs) go through
AES transmitter chips (U18 - U21) that connect
through AES transformers (T4, T5, T8, T9) to J4
(Main Delay Out), J5 (Ref Mon Out), and J1 (the
Post Delay Loop outputs).
The front panel headphone jack is driven from
U22, a combined DAC
(digital to analog con-
verter) and headphone
amp in one chip. The
Front Panel HP Vol-
ume buttons adjust the output level in twenty-five
2 dB steps. The maximum output level is 50 mW
per channel into 16 Ohm headphones.
Refer to the
Hardware
chapter for a detailed
description of the 44-pin Remote I-O Logic con-
nection.
5.2.2 FRONT PANEL DISPLAY
The Front Panel Display board connects to the
Interface Controller using a 30-conductor ribbon
cable that carries +5 volts and various control sig-
nals to and from the display. The Interface
Controller’s FPGA drives the Front Panel com-
ponents through two Octal Line Driver/Buffer ICs
(U11 and U12).
The Front Panel Display board has few active
components. Its two 10-Character Intelligent Dis-
plays (DS1 and DS2),
mounted in IC sockets,
indicate Alarm status or
show a selected input or
output signal level. The
displays are self-supporting with built-in signal
decoding and multiplexing circuits and LED driv-
ers. Each display character is a 5x5 dot matrix
with individually addressable LED segments. Two
reference dots (visible between the audio signal
level bargraphs) indicate 0 dBFS (full scale digi-
tal) and -20 dBFS (20 dB below full scale digital).
The seven Front Panel switches connect in an
X-Y matrix to the FPGA chip on the Interface
Controller. The amber LEDs (D1 - D7) indicate
5-5
HARRIS CORPORATION
Revision F • 3/12
Page 57

5 Service
operational status or an error condition. These
are driven by U1, a 16-bit shift register/ latch
with constant current LED driver outputs.
5.2.3 LINUX CPU
The Linux CPU is the small PCA latched into
a SODIMM memory card socket (J8), a 144-pin
edge connector on the Interface Controller.
The CPU is an Atmel ARM9 microprocessor
running a Linux kernel (a subset of a full Linux
install) so it takes about 30 seconds for it to boot
up from pressing
the Linux operating system and the HD Radio
codec code. It has an Ethernet interface (hence
the Linux CPU MAC address and IP address) that
goes through T1 on the Interface Controller to
connect to the Broadcom Ethernet switch.
The CPU also has a USB controller (Host 2.0
compatible). USB power is supplied by U41 on
the Interface Controller.
Processor Reset
or from when
power is first ap-
plied to the
HDE-200.
The CPU in-
cludes on-board
SDRAM to hold
5.2.4 HD RADIO DSP
The Main Program Service (MPS) audio, plus
the various HD Radio data and settings assigned
using the Exporter Control Center (ECC app), pro-
gram service data (PSD) from a digital playback
system, and any incoming data received from an
HD Radio Importer, is encoded by the HD Radio
DSP board using an Ethernet connection on the
Interface Controller. Thus, the HD Radio DSP
board also has its
own separate
MAC and IP ad-
dresses. In addi-
tion, each board
HARRIS CORPORATION
is serialized, to identify the exact codec that gen-
erated the HD Radio signal. This serial number
must be properly identified during HDE-200 con-
figuration.
The HD Radio DSP board is based on a Texas
Instruments TMS320C6713 floating point DSP.
This DSP chip is used to compress and trans-
form the incoming MPS audio into the HD Ra-
dio format using proprietary code (HDC codec)
supplied by iBiquity. The ECC app selections and
the HD Radio Importer data and secondary au-
dio channels are combined with the processed
MPS audio to then create the HD Radio E2X
data stream, which is output on the Ethernet ports
to feed the HD Radio Exciter.
5.3 HDE-200 Troubleshooting
As with other software-based products, if the
HDE-200 should stop responding to the front
panel controls or to the ECC app, then it most
likely indicates the unit has to be reset. If there is
no HD Radio audio output, then it would indi-
cate the Linux CPU, which controls audio routing
through the HDE-200, or the HD Radio DSP
board have hung up and will need to be reset.
The analog broadcast audio will continue since
there are fail-over relays that couple the Main
Delay In audio to the Main Delay Out audio in
the event of a CPU failure. If there is an issue with
the Interface Controller FPGA, then the Diversity
Delay will be affected.
If any of these conditions are encountered (no
HD Radio signal but the Main Delay Out is still
working) then the first step would be to press the
Processor Reset button on the rear panel. This
reboots the Linux CPU, reloads the FPGA con-
figuration from the Flash Memory, and restarts the
HD Radio DSP.
It takes about 30 seconds for the Linux CPU to
complete rebooting (a boot message is shown on
the front panel display during this time). At the
5-6
Revision F • 3/12
Page 58

5 Service
end of this boot time the Linux CPU reestablishes
communications with the HD Radio DSP and with
the HD Radio Exciter. The HD Radio DSP board
can then begin processing the incoming audio,
which will take roughly seven to fifteen seconds
to make it through the processor and out the Eth-
ernet connection to the HD Radio Exciter.
During this time the analog broadcast audio
continues, but in a non-delayed state. The Blend
control bit is turned off until the Diversity Delay
completes rebuilding to its set length. Once the
Diversity Delay is ramped back to full, the Blend
function is turned back on since the analog broad-
cast is now time locked to the HD Radio audio.
5.3.1 HDE-200 DEVICES DO NOT
SHOW UP IN THE ECC APP
When no HDE-200 devices appear in the HDE-
200 Exporter Control Center list of devices to con-
nect to—even though one or more HDE-200 de-
vices are responding to pings from the computer,
then there are typically three possible causes:
• The FlexStar Network Interface (
Preferences
) address has a typo, the wrong
NIC was assigned, or the FlexStar network
cable is plugged into the wrong NIC.
• The FlexStar Multicast settings differ from
the default setting of 239.255.255.1, port
50010 in the ECC app or on the HDE-200
device. For most installations the default
settings should be used.
• The Windows Firewall is enabled and is not
configured to allow HDE-200 messages or
ECC app communications through the
firewall.
Any one (or more) of these configuration errors
will cause the multicast messages, transmitted by
the HDE-200 devices, to not be received by the
ECC app. Subsequently, this means that the HDE-
200 devices will not appear in the select device
list.
System
Check that the NIC address for the computer’s
interface to the FlexStar network is set correctly
and verify the FlexStar Multicast settings are cor-
rect. If both were set correctly then the issue is
most likely associated with the Windows Firewall
settings.
Windows Firewall is automatically disabled in-
side the Harris domain network. However, when
a user logs into Windows but does not use the
Harris domain, the default setting for the Win-
dows Firewall (for WinXP SP2 and later) is auto-
matically enabled. This enabled setting will block
multicast messages sent by the HDE-200 from
being received by the ECC app.
5.3.2 CONFIGURING THE FIREWALL
TO UNBLOCK THE ECC APP
A security alert pop-up window, shown below,
appears if the ECC app is started and Windows
Firewall is blocking the HDE-200 multicast mes-
sages. Click
Unblock
low these communications to reach the ECC app.
The HDE-200 should now appear on the select
device list.
If the Windows Firewall was incorrectly config-
ured (e.g., someone previously clicked
ing
) or the pop-up window does not appear, then
the Windows Firewall configuration will have to
be manually changed. Open Windows Firewall
Start/Settings/Control Panel/Windows Firewall
(
and select the Exceptions tab.
Windows Security Alert Pop-up
so Windows Firewall will al-
Keep Block-
)
5-7
HARRIS CORPORATION
Revision F • 3/12
Page 59

5 Service
Windows Firewall Exceptions List
The program name
will be listed. In order for multicast messages to
get through the firewall, the program name must
be checked, as shown in the illustration. Once
checked, click
Windows Firewall. The HDE-200 should not ap-
pear in the ECC app Device list.
Harris.Exporter.HDEConfig
OK
to save the changes and close
HDE-200 code is distributed in a compressed
(.zip) folder. The code and version is listed in the
folder name (e.g., HDE-200_code_1.90.5.zip).
The code is downloaded from the Harris site to a
computer running the ECC app.
You must be logged into this computer as a
System
Commissioner in order to access the
items in the ECC app. A USB Flash Drive (32MB
or larger) is required to transfer new code to the
HDE-200.
menu
NOTE: Changing the HDE-200 code
will interrupt your HD Radio signal.
To prevent interruption of your ana-
log broadcast signal, ramp out of Di-
versity Delay before changing code.
Once the code update is complete,
ramp the Diversity Delay back in to
return to normal operation.
5.4 Embedded Software &
Firmware Updates
The proprietary iBiquity HD Radio codec em-
bedded software, the TINI card’s Linux operat-
ing system and the Interface Controller card’s
FPGA firmware may be updated over the life of
the HDE-200. When updated code is available, it
can be downloaded from the Harris Broadcast
Customer Portal website:
http://www.broadcast.harris.com.
servicesandsupport/
To access this site, you must be a registered
user. The Radio and TV/Software Downloads sec-
tion of the Harris support site is where the HDE-
200 code can be found.
To determine whether newer code is available,
the current code running on each HDE-200 in
your network can be shown using the ECC app.
Device
Select the
Device
. Each HDE-200 Exporter connected to the
network will be listed. The Version column shows
the code version running on each HDE-200.
menu item, then choose
Select
HARRIS CORPORATION
The analog audio continues through the HDE-
200 during the code upgrade, however, there may
be momentary dropouts as the HDE-200 restarts
using the new code. During the code updating
procedure—which requires a Processor Reset and
will take roughly three minutes, the HD Radio
digital signal will be off-air. This forces HD Ra-
dio receivers to switch back to the analog signal.
5.4.1 HDE-200 CODE UPDATING
1. Insert a writable flash drive (32 MB or
larger) into the USB port on the back of the
HDE-200. Wait for one minute, or until the
drive activity LED stops blinking, to allow
the HDE-200 to detect the drive and to up-
load its current configuration settings to the
drive in a folder labeled with that HDE-
200’s MAC address. The flash drive can then
be unplugged.
5-8
Revision F • 3/12
Page 60

5 Service
2. Insert the flash drive into the computer with
the .zip folder holding the updated code.
Device
3. Start the ECC app. In the
choose
Select Device
and select the HDE-
menu
200 that you want to upgrade. This connects
the computer to that HDE-200.
4. In the
System
to open the
menu, select
Upgrade Device
Upgrade Device Firmware
win-
dow. This window shows the MAC address,
the current code version and the descrip-
tion of the selected HDE-200. Verify this is
the correct HDE-200.
5. In the Upgrade Source section of the win-
dow, click the browse button (...) then lo-
cate the .zip folder with the new code.
Open
Double-click the folder, or click
, to set
that folder as the Package File Upgrade
Source.
6. With the .zip folder shown in the
File
field, click
window. Select the USB flash drive,
Drive
then click
Install
. This opens the
OK
. The ECC app automatically
Package
Select
extracts and copies the code files to the flash
drive, saving the files to an Update folder in
the HDE-200’s MAC address folder (e.g.,
HDE200\00-00-00-00-00-00\Update).
the HDE-200 rear panel. This will automati-
cally upload the new code. The HDE-200
front panel shows ATTN: KEEP POWER
ON while the code is uploaded into the vari-
ous HDE-200 components. Once this is
done, the HDE-200 will restart and the front
panel will display STARTUP until the HDE-
200 startup process has completed. During
this time the HD Radio data stream will be
silent and the analog signal will be bypassed.
11. Once the HDE-200 has finished restarting
and STARTUP is no longer shown on the
front panel, and the HD Radio signal data
stream is active once again, then ramp the
analog signal Diversity Delay back in.
5.4.2 UPDATING THE ECC PROGRAM
The HDE-200 Exporter Control Center software
(ECC app) can only be removed or updated by an
administrator on the computer running the ECC
app. Also, if user groups have been set up, then
the current ECC user must be a member of the
HDE-200 Commissioner
1. If running, close the ECC app.
2. Open up
(Windows Start/Settings/Control Panel).
group.
Add or Remove Programs
.
7. Close the
Upgrade Device Firmware
If needed, click on
in the Windows system tray and select the
USB device (e.g., Safely Remove USB Mass
Storage Device), then unplug the drive.
8. Insert the flash drive into the USB port on
the HDE-200 rear panel.
9. Ramp down the Diversity Delay by clicking
Ramp Down
in ECC or by pressing the front
panel button on the HDE-200.
10. Once the Diversity Delay ramps to 0.0 sec-
onds, restart the HDE-200 by pressing the
recessed
PROCESSOR RESET
window.
Safely Remove Hardware
button on
HARRIS CORPORATION
5-9
Revision F • 3/12
3. Highlight
trol Center
programs, then click
Harris FlexStar HDE-200 Con-
from the list of currently installed
Remove
and
Ye s
to
remove the program.
4. Once the ECC app is removed, close the
or Remove Programs
window.
Add
5. Locate the installer file for the updated ver-
sion of HDE-200 Control Center. The cur-
rent version can be downloaded from the
Harris Customer portal. See page 5-8 for site
access details.
6. Launch the installation file by double click-
ing the .msi file.
Page 61

5 Service
7. Click
Next
to open the
window. For best results, use the de-
Folder
Select Installation
fault file location. Before continuing, set the
program access. Select
Everyone
so that mul-
tiple users can log into the computer and
use ECC. Continue the installation by click-
ing
Next
on this and the following screen.
Once the installation completes, click
Close
to close the installer window.
8. The ECC program automatically leaves the
four Windows user groups as they were from
the previous version of the program. If new
users need to be added or others removed,
follow the instructions on page 3-3 to set
user access to the ECC program’s features.
NOTE: The ECC program requires
Microsoft .NET Framework Version
2.0 Service pack 1. It can be down-
loaded from Microsoft’s website
(http://www. microsoft.com).
5.5 Replacing Assemblies
Should the DSP assembly (PRE99-1820) or
CPU assembly (PRE99-1815) require replace-
ment, they must be “paired-up” before use.
NOTE: Unplug the HDE-200 from the
Ethernet network, before applying
power, if either the CPU or DSP as-
semblies have been replaced.
When power is first applied to the HDE-200,
the CPU performs a scan of the local IP network
subnet looking for the presence of the DSP as-
sembly. Once the DSP assembly is found, the IP
address for that DSP board is automatically up-
dated to the DSP IP address that had been previ-
ously recorded by the CPU. Two scenarios can
HARRIS CORPORATION
5-10
occur, depending upon which assembly was re-
placed.
Scenario 1Scenario 1
Scenario 1: The CPU is replaced.
Scenario 1Scenario 1
The existing DSP IP address is returned to
the factory default (10.10.10.22).
Scenario 2Scenario 2
Scenario 2: The DSP assembly is replaced.
Scenario 2Scenario 2
The new DSP assembly will be changed
to the IP address that was assigned to the
replaced DSP assembly.
Note that the pairing process will take a bit
longer than the typical startup duration (could last
up to 5 minutes). This is normal for this pairing
process. The HDE-200 will automatically restart
again after the DSP assembly has been found and
paired with the CPU.
If the HDE-200 continually restarts, this is an
indication that the CPU is not able to pair up with
the DSP. This could be due to the CPU detecting
another HDE-200 on its local network. If this
occurs, the CPU will purposely refuse to perform
the pairing process. In this case, disconnect all
network cables from the HDE-200.
If a USB Flash Drive is connected—before start-
ing the Boot process, a boot log file will be written
to the Flash Drive. This will give a progress indi-
cation for the pairing process. Contact Harris Tech-
nical Support if continuous restarting occurs even
with the network cables disconnected.
Once the pairing is complete, review the IP ad-
dress assignments using HDE-200 Control Cen-
ter. Make any IP address adjustments that may
be necessary. Once all the network settings match
their previous settings, the connection to the Eth-
ernet network can be restored.
Revision F • 3/12
Page 62

Application Note AN10-02
Exporter Control Center
and Windows 7
OVERVIEW
The Exporter Control Center (ECC app) is supplied
by Harris to configure and monitor HDE-200 Exporters.
It can be run on computers using WinXP (SP2), Vista
Pro, or Win7 Pro. Because Windows 7 offers much tighter
control over security and firewalls, and in public vs.
private network settings, many users have experienced
difficulty in installing and using the ECC app on a
Windows 7 computer.
USING ECC ON A WINDOWS 7 COMPUTER
Here are some tips on installing and configuring the
ECC app to run on a Windows 7 computer.
1. If security messages (this is not a Windows certified
program, etc.) are displayed when running the
HDEConfigInstaller.msi
install. Right-click on the file name and select
Troubleshoot Compatibility to open the Program
Compatibility window, which analyzes the program for
compatibility with Windows 7. Once it finishes, click Start
The Program to install the ECC app. It should now install
without any pop-up warning boxes, although you will
still get permission
pop-ups, depending
upon the Windows 7
security settings.
2. Once the program
is installed, make sure
that the computer’s
network adapter,
which connects to the
HDE-200 network, is
program, then close out of the
configured as a private network. Often you can’t change
an unidentified network to private because that function
is prevented by a default security setting. Thus, you have
to change the security setting first so that the network is
not made public in the first place. This can be done in
the Microsoft Management Console (MMC) window.
Microsoft Management Console window
To open this window, click the START button and
then type MMC into the search dialog box. The MMC
program will open (again, you may get a permission pop-
up, if so, click OK).
Click on File and
select Add/Remove Snap-
in to open up the Add or
Remove Snap- in window
(shown on the next page).
Click on the Group
Policy Object Editor to
highlight it, then press the
Add button to pop up the
Group Policy Wizard.
Local Computer
click Finish to accept Local Computer and close the
should be displayed by default. If so,
Appendix A A-1
Page 63

Application Note AN10-02
Add or Remove Snap-
Ins and Group Policy
Wizard windows
window. Then click OK to close the Add or Remove
window.
In the MMC window’s left hand pane, there is a new
Local Computer Policy
entry:
to the name to expand the display to show
Configuration
Click the arrow next to Computer Configuration to
Windows Settings
show
Click the arrow next to Windows Settings to show
Security Settings
Under Security Settings, click
Policies
pane, the networks used by that computer.
.
.
, to highlight it. This then shows, in the right hand
. Click the small arrow next
Computer
.
Network List Manager
3. Verify the Windows Firewall, if on, allows the ECC app
to communicate with networked HDE-200 Exporters.
You can view the Windows Firewall Permissions
through the Windows Control Panel: click Start, then
Control Panel, then click System and Security.
In the window that opens, click Allow a program
through Windows Firewall. This opens a window listing
installed programs and their permissions.
Selecting Network List Manager Policies
in the MMC window
Double-click on
Unidentified Networks
up the Unidentified Network
Properties window. Set the
Unidentified Networks as
Private then click OK to close
the window.
to open
Appendix A A-2
Verify that Harris.Exporter.HDEconfig is check
marked for both Public and Private network access. If
each is checked, then click Cancel and close the various
Control Panel windows.
If either box is unchecked, then click Change Settings,
to activate the window, then click each box so ECC can
access both Public and Private networks. Click OK to
save the
settings and
then close
each open
Control panel
window.
 Loading...