

Page 1

Effective: October 25, 2005
OWNER'S (OPERATOR'S) MANUAL
FOR
HARRINGTON
STATIC & DYNAMIC
LOAD TESTER
Model SHLT/DHLT
BEFORE USING THIS PRODUCT:
ALWAYS READ OWNER'S MANUAL
ALWAYS SAVE THIS BOOK FOR FUTURE REFERENCE
Page 2

TABLE OF CONTENTS
1. ASSEMBLY INSTRUCTIONS FOR LOAD TESTER FRAME ........................... 3
1.1 Frame Assembly ........................................................................................ 3
1.2 Assembly of Static Option.......................................................................... 9
1.3 Assembly of Dynamic Option ................................................................... 10
2. SEQUENCE OF OPERATIONS FOR STATIC HOIST LOAD TESTER.......... 11
2.1 Load Testing a Manually Operated Hoist................................................. 11
3. SEQUENCE OF OPERATIONS FOR DYNAMIC HOIST LOAD TESTER...... 13
3.1 Load Testing an Electric Operated Hoist ................................................. 13
3.2 Load Testing a Manually Operated Hoist................................................. 15
3.3 Trouble Shooting Tips.............................................................................. 16
4. PARTS LIST ................................................................................................... 19
4.1 Step Assembly (50767) ........................................................................... 19
4.2 Winch Assembly ...................................................................................... 20
4.3 Trolley Beam Assembly (50973) .............................................................. 21
4.4 Link Support (50614) ............................................................................... 22
4.5 Electro-Hydraulic Base Assy. for Dynamic Option................................... 23
4.6 English/Metric Tester Frame Assembly ................................................... 24
4.7 English/Metric Tester Assembly - Static Option ....................................... 27
4.8 English/Metric Tester Assembly - Dynamic Option .................................. 28
4.9 Electrical Components and Wiring Subassembly - Dynamic Option ....... 31
2
Page 3

1. ASSEMBLY INSTRUCTIONS FOR LOAD TESTER FRAME
Note: Please refer to drawing 50979 on page 26 entitled English/Metric Tester Frame
Assembly. This portion of the assembly instructions is identical for either static or
dynamic options.
Recommended Equipment:
Forklift or hoist with a minimum capacity of one ton, various hand tools and two quali
fied assembly personnel.
Note: Please review this entire portion of the assembly instructions prior to beginning the
assembly of the hoist tester frame. Follow the steps listed below for assembly of your
hoist tester frame.
1.1 Frame Assembly
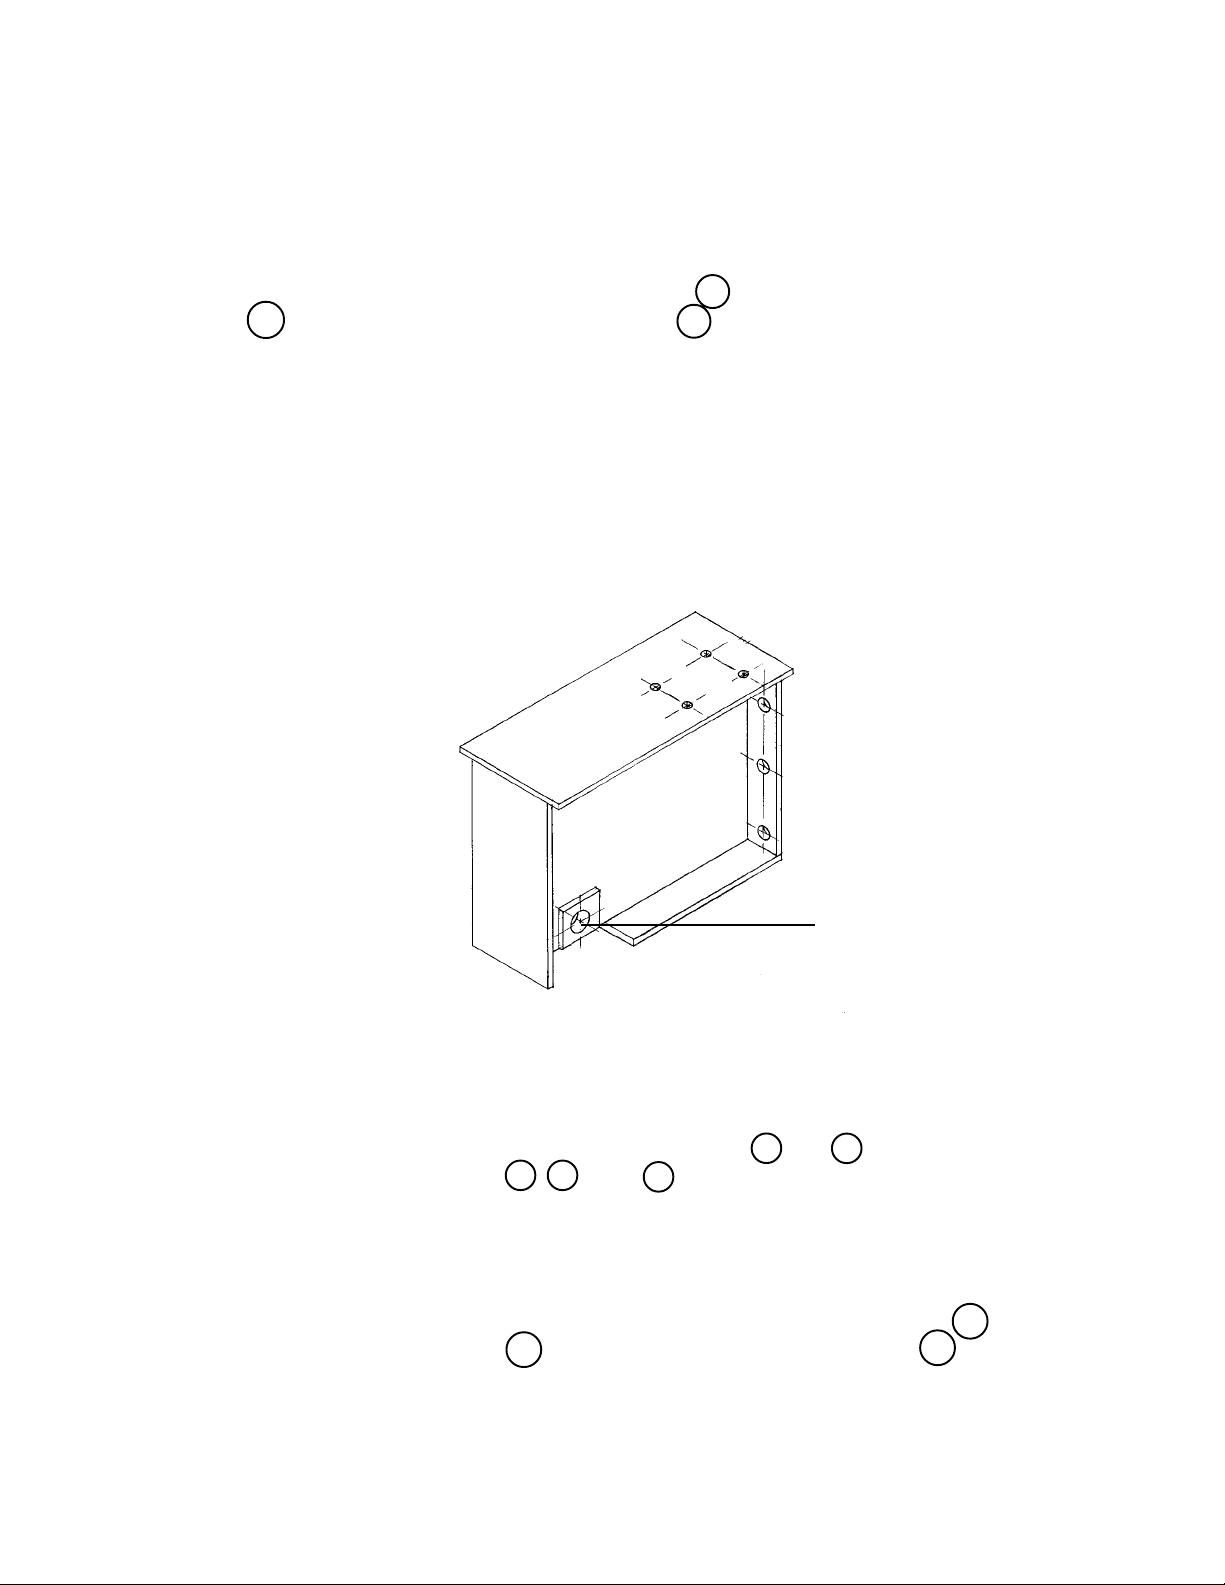
Step 1: Assembly of the hoist tester base item 5 on drawing 50979, page 26.
a.) Locate all component parts for the base assembly and orient them according to
Figure #1.
Note: Be sure that the support beam 4 with the front support holes is oriented
on support angle B 1 as shown in Figure #1.
b.) Secure the entire assembly by using eight (8) M16x65mm long bolts, item 16 ,
eight (8) M16 lock washer, item 18 , and eight (8) M16x20 nuts, item 19 , as
shown on drawing 50979.
c.) Make certain that these fasteners are tight by applying 187 foot-lb of force using
a torque wrench.
d.) Install two plain caster, item 30 , and two (2) swivel casters, item 31 , to the
frame using sixteen (16) 1/2x13x1 1/4" long bolts, item 26 , sixteen (16) 1/2"
diameter flat washer, item 28 , sixteen (16) 1/2" diameter lock washers, item
27 , and sixteen (16) 1/2-13 nuts, item 29 , as shown on drawing 50979.
Note: The swivel casters are located on the front or narrow portions of the base.
After tightening all fasteners lock the brakes on the swivel casters to prepare for
the remainder of the assembly.
3
Page 4
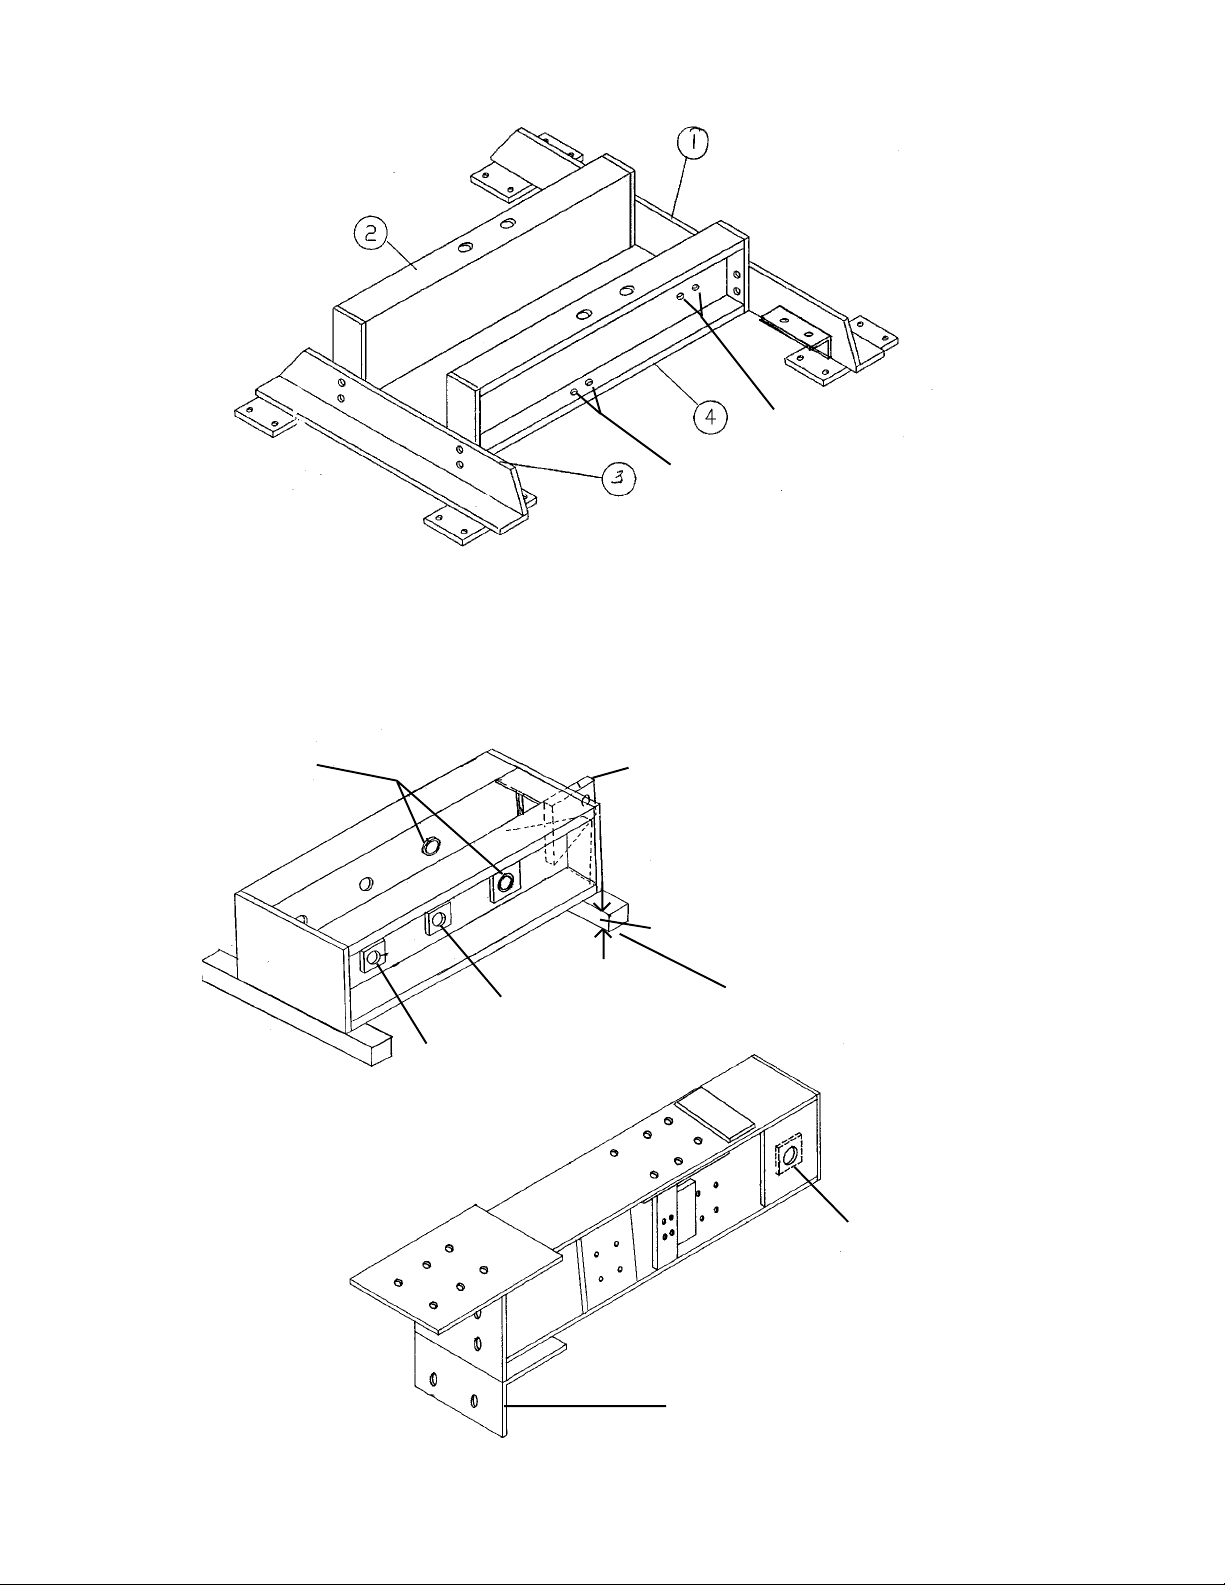
Figure 1
Limit Switch Holes
Front Support Holes
Step 2: Assembly of the lower beam, Figure #2, and the vertical column, Figure #3. Examine
drawing #50979 for correct orientation of the lower beam, Figure #2, the vertical
column, Figure #3 and the base assembly Figure #1.
Attachment Holes for
Vertical Column
Cylinder
Mount
Figure 3
Front
5 Ton
10 Ton
Figure 2
4"
Concrete
Floor
Attachment
Pin Hole
Attachment
Angle
4
Page 5
a.) Remove the lower beam assembly, Figure #2, from the shipping crate using a
forklift or bridge crane.
b.) Locate the lower beam assembly securely on heavy blocks to allow approxi
mately 4" of clearance between the bottom of the lower beam and a smooth flat
surface preferably a concrete floor, as shown in Figure #2.
c.) Select three long pins, item 7 , and one orange colored size 1 1/4" master link,
item 10 , and one yellow colored size 1" master link, item 9 . Also select six (6)
M8x60mm long bolts, item 32 , and six (6) M8 lock nuts, item 33, all shown on
drawing 50979. Insert two (2) of the long pins in the pin holes labeled 5 ton and
10 ton, sliding them partially through the lower beam. Place the orange 1 1/4"
master link on the pin at the 10 ton location and the yellow 1" master link on the
pin at the 5 ton location. Now slide the pins the remainder of the way through
the lower beam and secure them by placing the M8x60mm long bolt with lock nut
at each end of the two pins, as shown in section A-A on drawing 50979.
d.) Remove the vertical column, Figure #3 from the shipping crate using a forklift,
trolley/hoist, or bridgecrane.
e.) Orient the vertical column in a vertical position with the attachment pin hole at
the bottom and the attachment angle in a position pointing toward the front of the
lower beam. See Figures 2 and 3.
f.) Lift the vertical column high enough to clear the lower beam and center the
attachment pin hole in the vertical column directly above the attachment hole for
the vertical column in the lower beam.
g.) Lower the vertical column down between the two horizontally oriented channels
of the lower beam and align attachment holes between the beam and the
column.
h.) Slide the third long pin, item 7 , drawing 50979 through the attachment holes
coupling the beam and column together. Install M8x60mm long bolts, item 32 ,
and 8 lock nuts, item 33 , as shown in section A-A on drawing 50979.
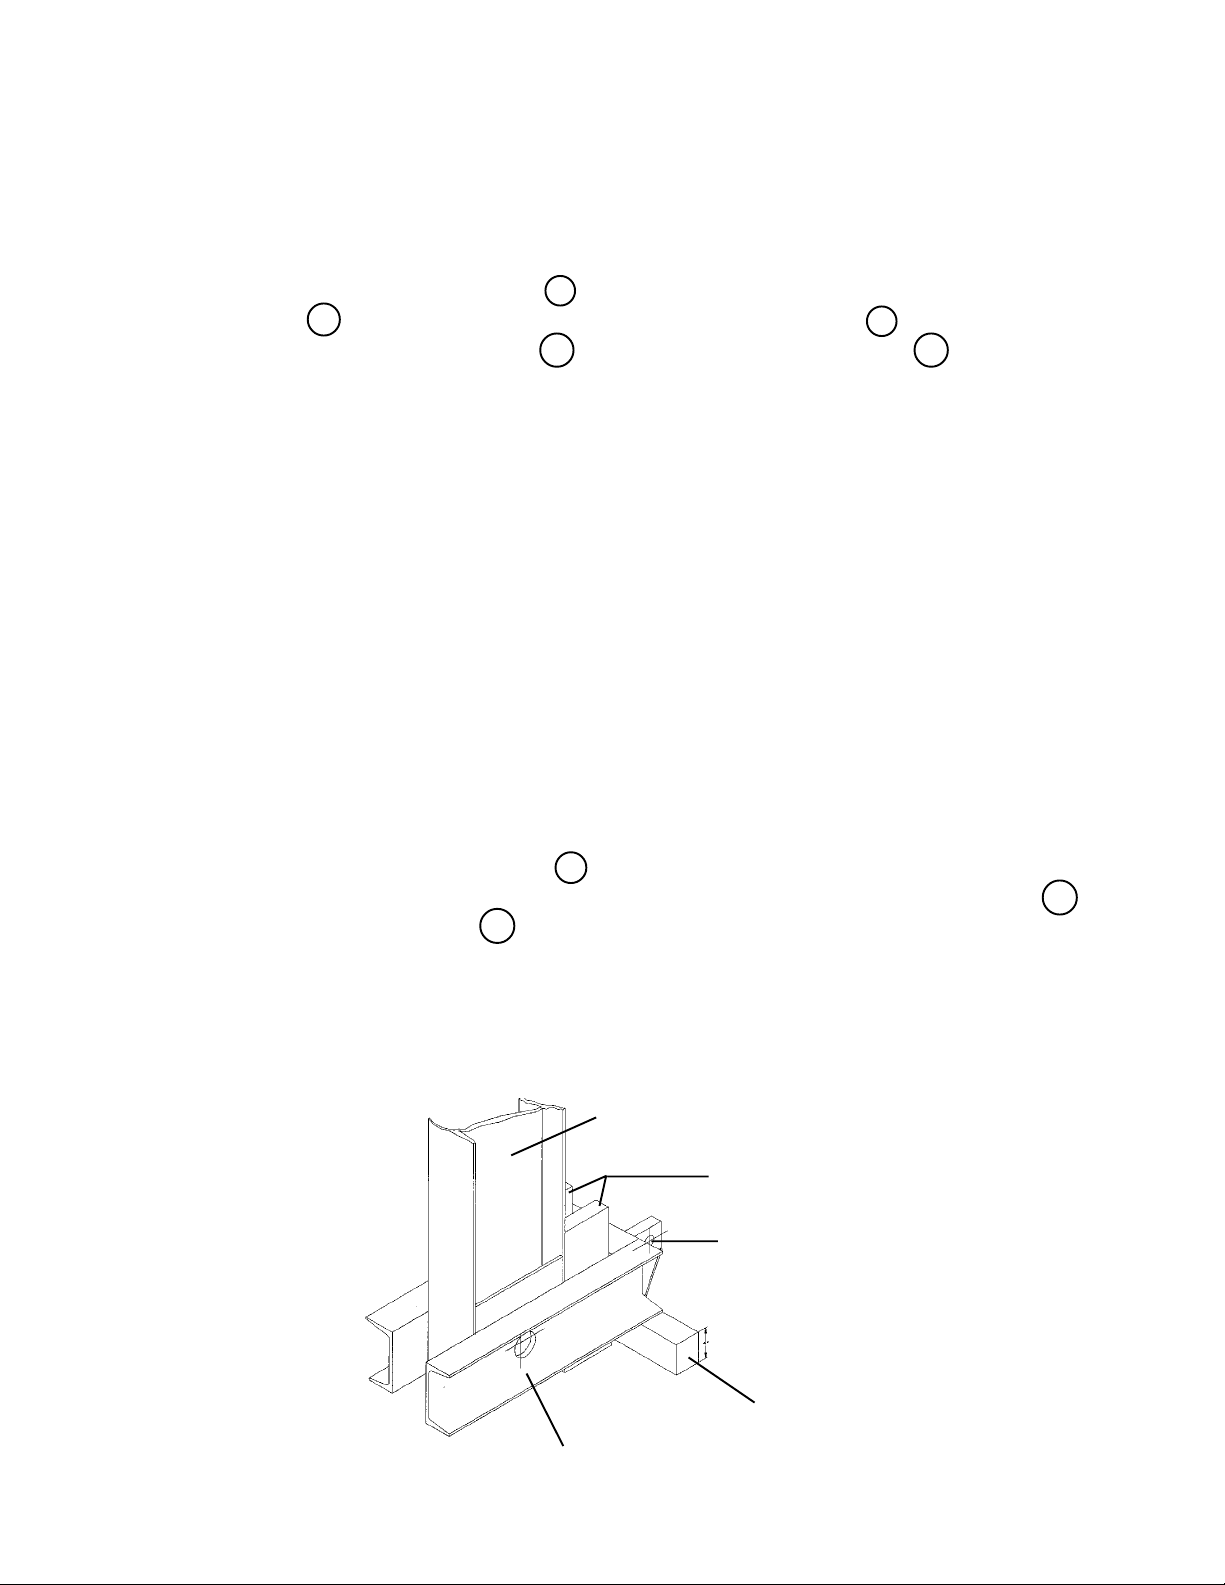
i.) Slide two pieces of 2"x6"x18" long wood through the opening between the rear of
the vertical column and the rear of the lower beam allowing them to bottom on
the floor and extend vertically upward along the column. See Figure #4 below.
These blocks of wood will prevent the lower beam from rotating about the attachment pin.
Figure 4
Vertical Column
2"x6"x18" long wood
Lower Cylinder Pin Hole
4"x4"x25" long wood
Lower Beam Assembly
5
Page 6
Step 3: Assembly of vertical column, Figure #3, and lower beam, Figure #2, to base assem-
bly, Figure #1.
a.) Lift the coupled vertical column and lower beam assembly by attaching to verti
cal column. Lift high enough to clear the base assembly and move directly over
the base assembly.
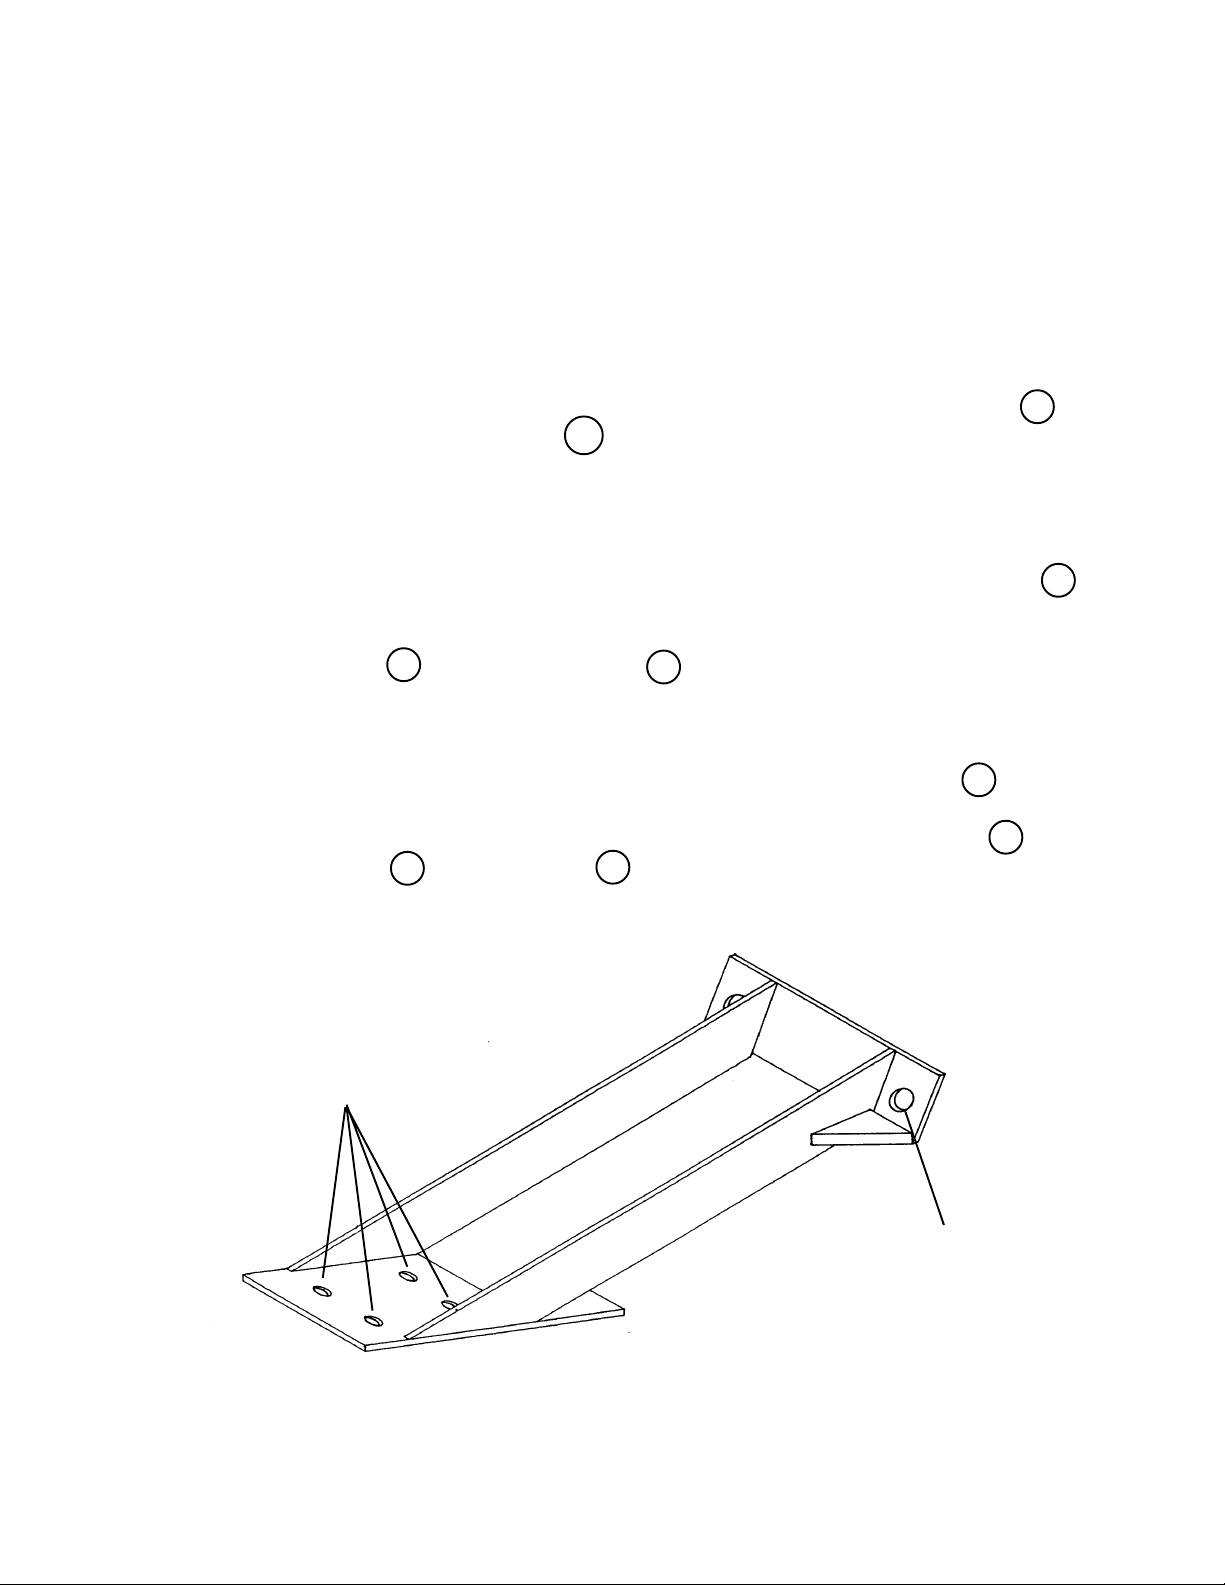
b.) Lower the vertical column and lower beam until the outriggers, Figure #5, can be
attached to the base and vertical column.
c.) Before installing the outriggers place the six (6) M20x46x100 bolts, item 13 , with
six (6) 3/4" flat washers, item 54 , through the holes on the rear flange of the
vertical column. These bolts will be used to attach the cylinder mount during a
later step in the assembly instruction. These bolts must be placed with the
threads pointing toward the rear of the load tester and must be inserted prior to
the installation of the outriggers to avoid interference.
d.) Fix both outriggers into position using four (4) M16x65mm long bolts, item 16 ,
pushing through the lower attachment holes of the outriggers and through the
attachment holes on the base. Secure the outriggers by placing M16 "U"
washer, item 34 , and M16 nuts, item 19 , as shown on drawing 50979. Do not
tighten these nuts until the remainder of the attachment bolts have been placed
in the upper holes of the outriggers.
e.) Align the upper holes of the outriggers and the vertical column attachment holes
by using a drift punch until the four (4) M16x65mm long bolts, item 16 , have
been placed through the alignment holes at the top of the outrigger shown in
drawing 50979. Secure the four (4) bolts with M16 flat washers, item 17 , lock
washer, item 18 , and nuts, item 19 .
f.) Make certain that all M16 fasteners are tight by applying 187 foot-lb of force
using a torque wrench.
Top Attachment
Holes
Bottom Attachment
Holes
Figure 5
6
Page 7
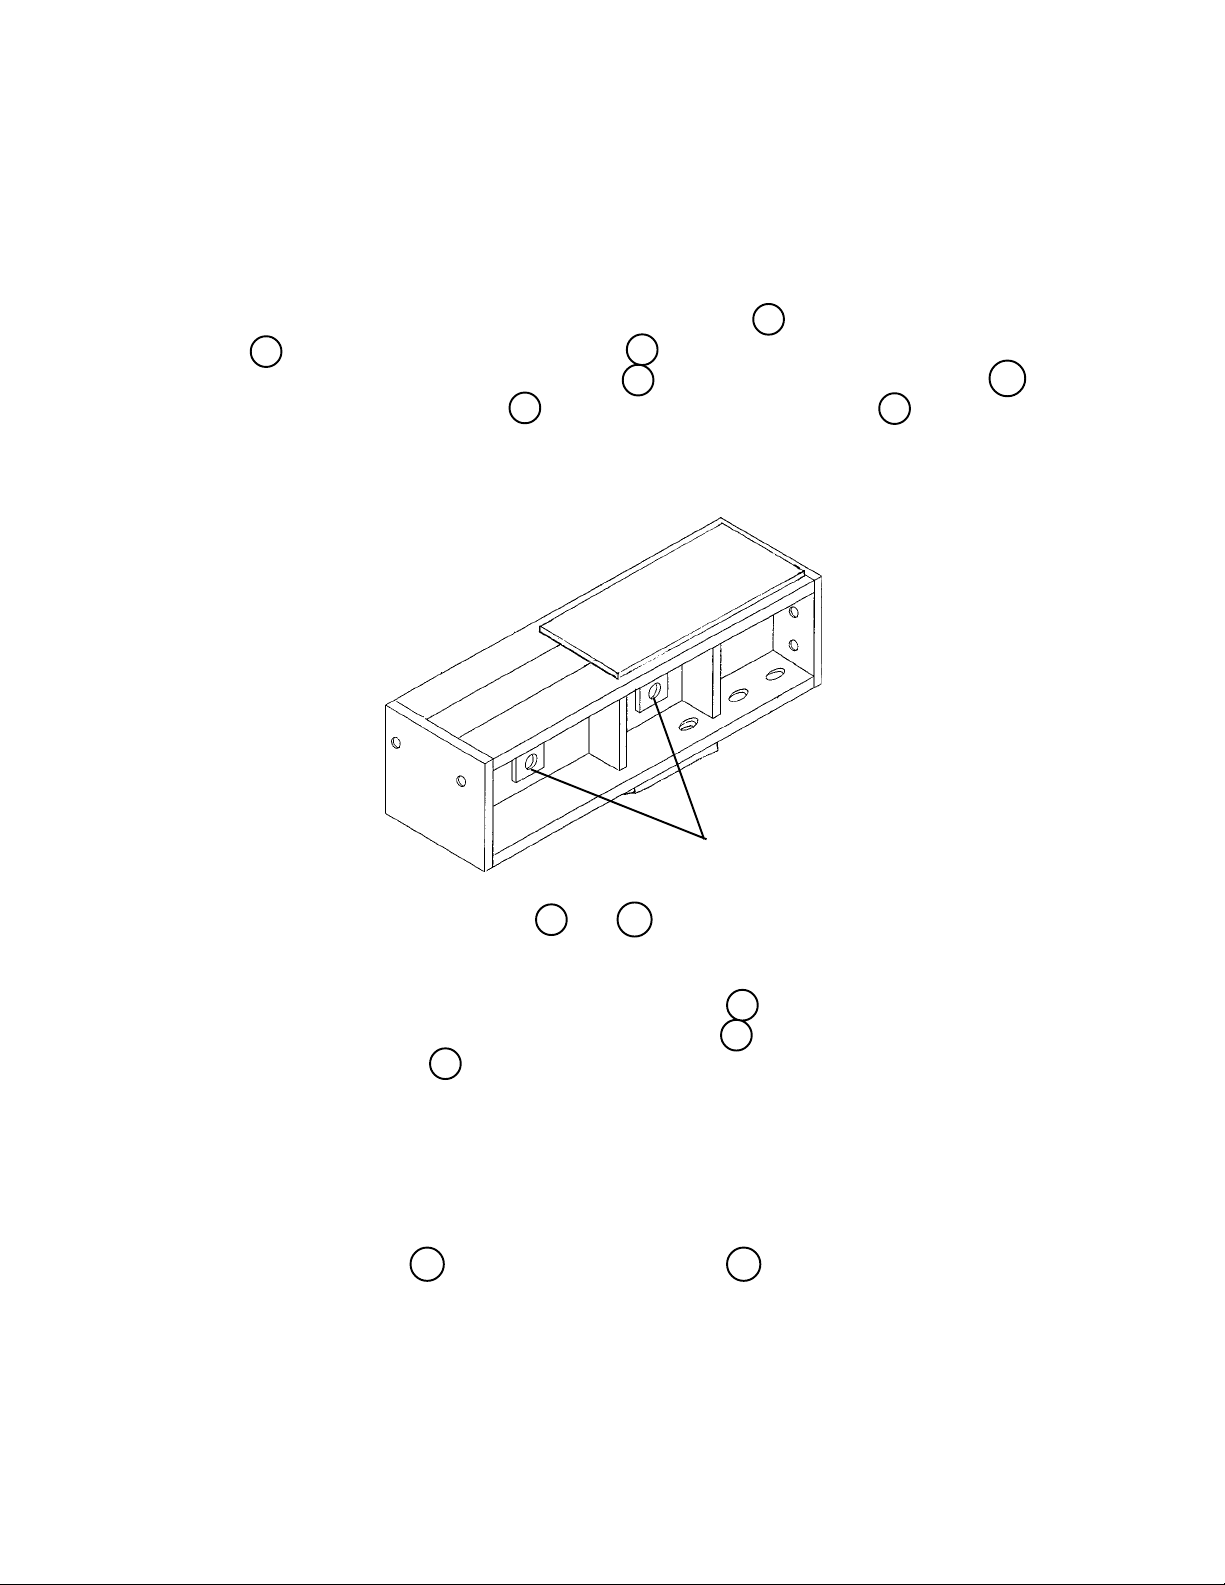
Step 4: Assembly of top beam, Figure #6, to vertical column, Figure #3.
a.) Remove the upper beam, Figure #6, from the shipping crate using a forklift or
bridgecrane.
b.) Lift the upper beam, Figure #6, to the top of the vertical column and couple them
by inserting six (6) M20x75mm long bolts, item 13 , six (6) M20 lock washer, item
14 , and six (6) M20x2.5 nuts, item 15 , as shown on drawing 50979. Also insert
six (6) M16x65mm long bolts, item 16 , six (6) M16 "U" washers, item 34 , six (6)
M16 lock washers, item 18 , and six (6) M16x2.0 nuts, item 19 , shown on draw
ing 50979.
c.) Make certain that all fasteners are tight by applying 187 foot-lb to the M16 fas-
teners and 367 foot-lb to the M20 fasteners, using a torque wrench.
Figure 6
Pin Holes
Step 5: Assembly of master links, item 9 and 10 , to the upper beam as shown on drawing
50979.
a.) Select the two (2) remaining short pins, item 7 , and the one (1) remaining
orange colored size 1 1/4" master link, item 10 , and the yellow colored size 1"
master link, item 9 .
b.) Insert the two (2) short pins into the pin holes and slide them partially through
the top beam.
c.) Place one (1) orange size 1 1/4" master link on the pin closest to the vertical
column and labeled 10 ton and place the yellow size 1" master link farthest away
from the vertical column and labeled 5 ton. Now slide the pins the remainder of
the way through the top beam and secure them by placing one (1) M8x60mm
long bolt, item 32 , and an M8 lock nut, item 33 , at each end of both pins as
shown in section A-A drawing 50979.
7
Page 8
Step 6: Assembly of cylinder mount, Figure #7, to vertical column, Figure #3 as shown on
drawing 50979.
a.) Remove the cylinder mount from the shipping crate using a forklift or
bridgecrane.
b.) Select six (6) M20 "I" taper washers, item 12 , six (6) 3/4" flat washers, item
54 , and twelve (12) M20x2.5 nuts, item 15 .
c.) Lower the cylinder mount and carefully align and slide over the six (6) M20 bolts
protruding through the vertical column. The cylinder mount must be oriented so
that the cylinder pin hole is located at the bottom rear corner of the cylinder
mount.
d.) Now place the six (6) M20 "I" taper washers, the six (6) 3/4" flat washers, and
the six (6) M20 nuts respectively on the bolts. Make certain the nuts are tight by
applying 367 foot-lb of force using a torque wrench. Now place one (1) each
M20 nut in addition to the existing nuts and torque to ensure that the fasteners
will remain secure during operation of the test stand. See drawing 50979 for
details and orientation.
Figure 7
Upper Cylinder
Pin Hole
Step 7: Assembly of winch to tester frame. See assembly on page 20 and drawing 50979
page 26.
a.) Select the components as shown on the winch assembly drawing page 20.
b.) Assemble the RH and LH pulley mounts, items 1 and 4 page 20, and pulleys
with components, items 6 , 7 , and 9 , prior to attaching them to the tester
frame. Be sure the mounting holes are oriented correctly as shown in the assembly drawing page 20. The ends of the frame with two (2) mounting holes
are located to the front of the tester and the ends with the single mounting holes
to the rear. Place all three (3) pulleys, pulley spacers, and pulley bushings in
position and attach by using three (3) M12x70mm long bolts, item 50 , three (3)
M12 lock washers, item 47 , and three (3) M12x1.75 nuts, item 46 , as shown on
assembly drawing 50979. Do not tighten nuts until after attaching to the tester
frame.
8
Page 9

c.) Attach front and rear mounting brackets, items 2 and 3 on winch assembly
page 20, to the tester frame in their respective positions. See also drawing
50979 page 26, items 20 and 21 for correct placement.
d.) Assemble pulley mounts and pulleys to frame by using two (2) M10x40mm long
bolts, item 42 , two (2) M10 lock washers, item 43 , and two (2) M10x1.5 nuts,
item 44 . Tighten all fasteners located on this pulley mount.
e.) Attach the winch, item 5 , on page 20, to the tester by placing it on top of the
cylinder mount as shown on drawing 50979 page 26. Use four (4) M10x40mm
long bolts, item 42 , four (4) M10 lock washers, item 43 , and four (4) M10x1.5
nuts, item 44 , to secure winch to load tester frame.
This completes the assembly of the frame for your hoist load tester. Please refer to section
1.2 if you have the static option or section 1.3 if you have the dynamic option.
1.2 Assembly of static hydraulic cylinder assembly to the tester frame assembly
a.) Remove the static hydraulic cylinder assembly, item 12 on drawing 50979-1,
from the shipping crate with a forklift or crane.
b.) Select two (2) "U" bolt assemblies, item 22 , from the hardware packet.
c.) Lower the winch cable and attach it to the 1" master link in the lower beam
assembly. Raise the winch which will lift the lower beam until the 2"x6"x18" long
wood can be removed from between the rear of the lower beam and the vertical
column.
d.) Remove the lower pin from the cylinder (end opposite the rod end) and tilt the
upper yoke away from the rear of the vertical column and gently slide the lower
yoke over the lower beam cylinder mount, (see Figure #2 page 4 and 27). Lower
the cylinder assembly until the holes in the yoke of the cylinder and the lower
beam cylinder mount align. Insert the lower pin and replace the fixing clip to
secure the lower yoke to the hoist tester frame. Now tilt the rod end of the cylin
der forward adjusting the lower beam by raising or lowering the winch until the
rod end holes align with the upper cylinder pin hole of the cylinder mount. Insert
the upper pin and replace the fixing clip to secure the upper yoke to the cylinder
mount.
e.) Attach the pressure gauge to the appropriate location using the "U" bolt assem-
blies, item 22 , as shown on drawing 50979-1.
9
Page 10

1.3 Assembly of dynamic hydraulic system to hoist load tester frame, drawing 50924
a.) Remove dynamic hydraulic system from the shipping crate using a forklift or
crane.
b.) Select the dynamic option hardware packet, the front support, item 4 , and the
DHLT stand cover, item 6 page 23.
c.) Attach the front support, item 4 , as shown on drawing 50924 to the base as
sembly of the load tester frame using two (2) M12x40mm long bolts, item 18 ,
two (2) M12 "U" taper washers, item 19 , two (2) M12 lock washers, item 20 ,
and two (2) M12x1.75 nuts, item 21 , as shown on drawing 50924. Tighten
securely before proceeding to the next step.
d.) Lower the dynamic hydraulic system assembly orienting the accumulator end
according to drawing 50924. Fasten the system by inserting two (2) M12x40mm
long bolts, item 18 , through the rear mounting holes in the pump base and
through the holes in the mounting angle, item 6 , at the rear of the tester base ,
see Figure #1 and drawing 50924. Secure by placing two (2) M12 lock washers,
item 20 , and two (2) M12x1.75 nuts, item 21 , onto the M12 bolts, item 18 , and
tighten.
e.) Refer to parts "c" and "d" of section 1.2 for installation of cylinder assembly.
f.) Attach the pressure gauge/adjusting valve to the appropriate location using two
(2) M10x75 long bolts, item 25 , two (2) M10 lock washers, item 12 , and two (2)
M10x1.5 nuts, item 13 , as shown on drawing 50924 page 23.
g.) Attach the lower arm limit switch assembly, item 39 , to the base of the test stand
using two (2) M8x20 socket head cap screws, item 40 , and two (2) M8 lock
washer, item 16 , as shown on drawing 50924 page 30. Set the cam roller of
the limit switch so it will activate the limit switch as the lower beam assembly is
lifted and before the cylinder is fully extended. The measurement of the length
of the rod that is extended when the limit switch is activated is approximately
4 1/2".
h.) Attach the electrical enclosure, item 5 , to the mounting bracket on the vertical
column using four (4) 1/4-20x1 1/4" long bolts, item 6 , four (4) 1/4" flat washers,
item 7 , and four (4) 1/4-20 nuts, item 8 , as shown on drawing 50924.
i.) Remove plug with red tag from pump oil tank and replace with vented cap.
This completes the assembly of the dynamic option of your hoist load tester. Please
refer to the operation instructions for initial set up and operation of your tester.
10
Page 11
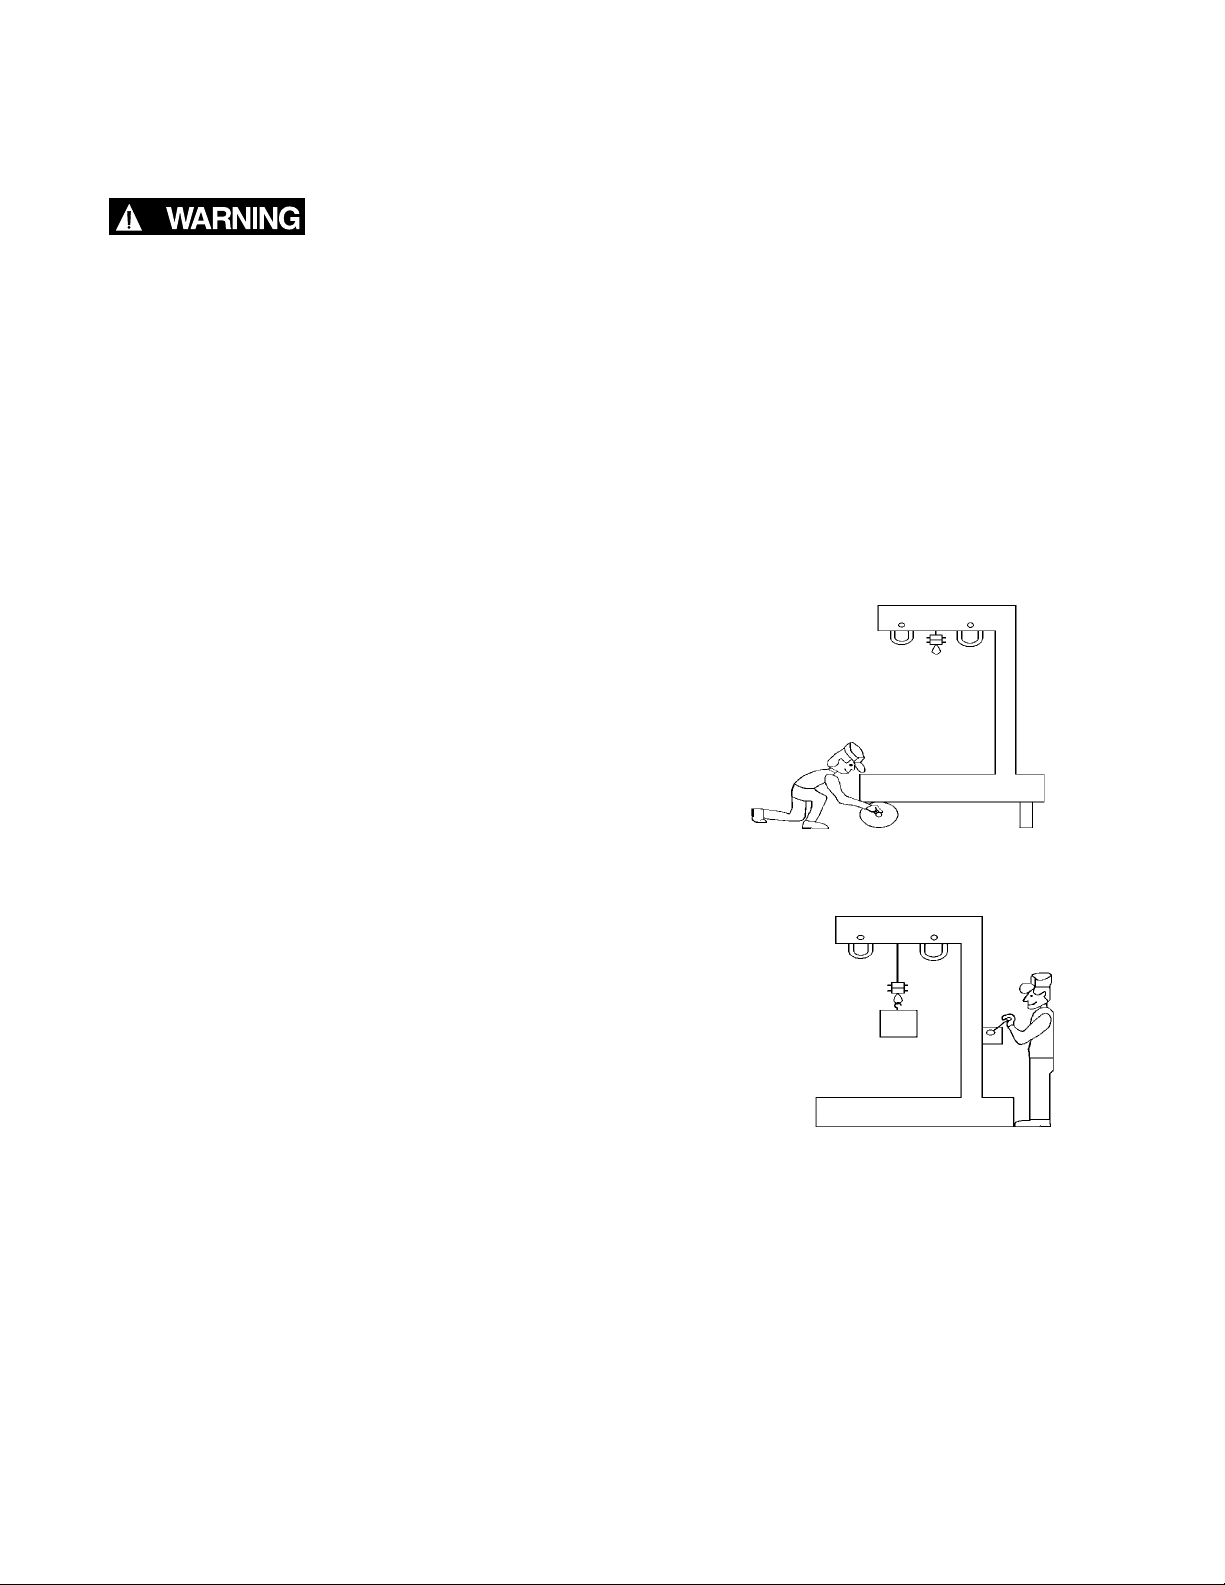
2. SEQUENCE OF OPERATIONS FOR STATIC HOIST LOAD TESTER
IMPROPER test stand use could result in death or serious injury.
To avoid these hazards:
NEVER overload unit.
ALWAYS operate, inspect and maintain this test stand with
operator safety as a goal.
ALWAYS read owner's manual and safety instructions prior to
use.
2.1 The following is a suggested procedure for load testing a manually operated
hoist.
Step 1: If the hoist tester is mounted on casters,
insure that the caster pivot and rolling locks
are engaged.
Step 2: Always use the winch to lift heavy units into place.
Step 3: Using the hoist tester winch and hoist tester step, suspend a 1/4 to 5 ton hoist
from front top link (yellow, size 1) or 6 to 10 ton hoist from the rear top link
(orange, size 1 1/4).
Step 4: Engage the bottom hook through the corresponding master link on the lower
beam assembly and remove the slack from the load chain.
Step 5: Review the calibration chart and locate the pressure setting that corresponds
to the rated capacity of the hoist being tested.
11
Page 12

Step 6: Operate the hoist in accordance with proper load lifting procedures. Monitor the
pressure gauge until the desired pressure is reached.
Step 7: Leave the hoist suspended for 30 to 60 seconds and observe the gauge to be sure
the pressure doesn't fluctuate. This will ensure that the hoist load brake is
functioning properly.
Step 8: Lower and remove the hoist from the tester. The test is now complete.
Maximum cylinder stroke is 8". Do not try to exceed this value. Hoist and
test stand overload will occur.
Do not overload the hoist tester. Overloading will shorten the life of the unit
or cause a possible accident and will void the warranty.
If gauge pressure reading exceeds 1800 psi, STOP OPERATION...
the hoist tester has reached its limit.
Do not switch links from 5 ton capacity to 10 ton capacity.
Do not overload the hoist beyond 125% of its rated capacity.
Anytime the cylinder lines are disconnected, the hoist tester MUST
BE RECALIBRATED.
Calibration of the hoist load tester is recommended on an annual
basis.
12
Page 13

3. SEQUENCE OF OPERATIONS FOR DYNAMIC HOIST LOAD TESTER
IMPROPER test stand use could result in death or serious in
jury.
To avoid these hazards:
NEVER overload unit.
ALWAYS operate, inspect and maintain this test stand with
operator safety as a goal.
ALWAYS read owner's manual and safety instructions prior to
use.
3.1 The following is a suggested procedure for load testing an electric operated
hoist.
Step 1: If the hoist tester is mounted on casters,
insure that the caster pivot and rolling locks
are engaged.
Step 2: Always use the winch to lift heavy units into place.
Step 3: Using the hoist tester winch and hoist tester step, suspend a 1/4 to 5 ton hoist
from front top link (yellow, size 1) or 6 to 10 ton hoist from the rear top link
(orange, size 1 1/4).
Step 4: If the hoist is a Harrington ES series hoist, select the cord assembly with 5P
plugs on both ends. Next plug the one 5P plug into receptacle on the electrical enclosure on the hoist test stand and the other 5P plug into the area
where the pendant plug is normally inserted at the lower portion of the electrical enclosure of the hoist.
13
Page 14

Step 4: Continued - If the hoist is a competitors model select the cord assembly that
has one 5P plug on one end and wire pig tails on the other end. Place the 5P
plug into the receptacle on the enclosure on the hoist test stand. Remove the
cover from the electrical enclosure of the competitors hoist and attach the
wire matching the labels on the wires to the corresponding function of the
hoist.
Never use the pendant that was provided with the hoist to perform
the load test. Using the pendant provided with the hoist will bypass
the limit switch on the hoist load tester. This could cause overload
and possible damage to the hoist and the tester which could cause a
serious accident.
Step 5: Connect power source to hoist that is to be tested.
Step 6: Connect the hoist load tester to the power supply. Depress the black button
on the electrical enclosure and allow the accumulator to charge until the
maximum pressure is reached and the pump motor shuts off.
Step 7: Adjust the reducing valve knob, item 10 on drawing 50924 page 30, to the
hoist lift pressure setting for the appropriate model and capacity of the hoist
(see calibration chart). Whenever adjusting the pressure setting, make sure
that the pressure value is reached by adjusting from a lower value to a higher
value.
Step 8: Slide the chain particle restraint, item 40 on drawing 50979-1, over the bot-
tom hook and load chain and attach the chain particle restraint hook to the
hoist.
Step 9: Attach the bottom hook to the corresponding bottom master link. Ease any
slack from the load chain by gently depressing the up button of the hoist load
tester pendant. Avoid sudden loading of the hoist and test stand. After all
slack is removed form the load chain depress the up button and hold until the
rod of the hydraulic cylinder has extended approximately 3 3/4" inches.
Adjust the reducing valve knob, item 10 drawing 50924, to the hoist lower
pressure setting, and leave the hoist suspended for 30 to 60 seconds, This
ensures that the hoist brake holds 125% of its rated capacity.
Lower the hoist approximately 3" and leave the hoist suspended for 30 to 60
seconds. The test procedure is now complete and the hoist has been tested
both statically and dynamically.
14
Page 15

3.2 The following is a suggested procedure for load testing a manually operated
hoist.
Step 1: Follow Steps 1, 2, and 3 of the suggested procedure for an electrically operated
hoist.
Step 2: Choose the corresponding master link on the lower beam and engage the bottom
hook through the master link. Remove all slack from load chain.
Step 3: Connect the hoist load tester to the correct power supply and depress the black
button on the electrical enclosure energizing the test stand.
Step 4: After the pump has charged the accumulator, adjust the reducing valve knob,
item 10 drawing 50924, to the pressure setting on the calibration chart that
corresponds to the capacity of the hoist being tested.
Step 5: Raise the hoist until the cylinder rod has extended approximately 1" and leave
the hoist suspended for 30 to 60 seconds. The hoist has now been tested.
Step 6: Lower the hoist and disconnect it from the tester. This cycle will be repeated for
every load test on manually operated hoists.
Maximum cylinder stroke is 5". Do not try to exceed this value. Hoist and
test stand overload will occur.
Do not overload the hoist tester. Overloading will shorten the life of the unit
or cause a possible accident and will void the warranty.
If gauge pressure reading exceeds 1800 psi, STOP OPERATION...
the hoist tester has reached its limit.
Do not switch links from 5 ton capacity to 10 ton capacity.
Do not overload the hoist beyond 125% of its rated capacity.
Anytime the cylinder lines are disconnected, the hoist tester MUST
BE RECALIBRATED.
Calibration of the hoist load tester is recommended on an annual
basis.
Remove tagged plug on pump tank and replace with vented cap before
operating system.
15
Page 16

3.3 Trouble Shooting Tips
FINDING AND SOLVING PROBLEMS:
Most hydraulic system failures follow the same pattern, a gradual or sudden loss of
pressure or flow with a resulting loss of cylinder or motor power. Any one of the
system’s components may be at fault. By following step-by-step procedures, the trouble
can be located in a short time.
1. SYSTEM INOPERATIVE
• No oil in system, insufficient oil in Fill system. Check for leaks.
system
• Wrong oil in system Refer to specifications. Change oil.
• Filter is dirty or clogged Drain oil and replace filter or filter
element.
• Oil line restriction Oil lines are dirty or collapsed. Clean
or replace.
• Air leaks in pump suction line Repair or replace as necessary.
• Worn or dirty pump Clean, repair or replace. Check
alignment. Check for contaminated oil.
Drain and flush system.
• Badly worn components (valves, Examine and test for internal or external
cylinders, etc.) leakage. Replace faulty components.
Check for cause of wear.
• Leakage Check all components, particularly the
relief valve for proper settings. Refer to
technical manuals.
• Excessive load Check unit specifications for load limits.
• Slipping or broken pump drive Repair or replace belts, couplings, etc.
Check for proper alignment or tension.
2. SYSTEM OPERATES ERRATICALLY
• Air in system Check suction side of system for leaks.
Repair.
• Cold oil Allow ample warm-up period.
• Dirty or damaged components Clean or repair as necessary.
• Restriction in filters or lines Clean and/or replace elements or lines.
16
Page 17

3. SYSTEM OPERATES SLOWLY
• Oil viscosity too high, cold oil Allow oil to warm up before operating
machine.
• Low oil level Check reservoir and add oil as necessary.
• Air in system Check suction side for leaks. Repair.
• Badly worn pump, valves, cylinders, etc. Repair or replace as needed.
• Restriction in filters or lines Clean and/or replace elements or lines.
• Improper adjustments Check orifices, relief valves, etc. Adjust
per manual.
• Oil leaks Tighten fittings. Replace seals or damaged
lines.
4. SYSTEM OPERATES TOO FAST
• Wrong size or incorrectly adjusted Replace or adjust as necessary.
restrictor
5. OVERHEATING OF OIL IN SYSTEM
• Oil passing through relief valve for Return control valve to neutral when not
excessive time in use.
• Incorrect oil, low oil, or dirty oil Use recommended oil. Fill reservoir, clean
oil, replace filter element.
• Excessive component internal leakage Repair or replace component as necessary.
• Restriction in filters or lines Clean and/or replace elements or lines.
• Insufficient heat radiation Clean dirt and mud from reservoir and
components.
• Malfunctioning component Repair or replace.
6. FOAMING OF OIL
• Incorrect, low or dirty oil Replace, clean or add oil as needed.
• Air leaks Check suction line and component seals for
suction leaks. Replace.
7. NOISY PUMP
• Low oil level, incorrect oil, foamy oil Replace, clean or add oil as needed.
• Suction line plugged, inlet screen Clean or replace.
plugged
• Worn or damaged pump Repair or replace
17
Page 18

8. LEAKY PUMP OR MOTOR
• Damaged or worn shaft seal Check for misalignment.
• Loose or broken parts Tighten or replace.
9. CONTROL VALVE STICKY (BINDING)
• Valve linkage misaligned Repair.
• Tie-bolts too tight (stack valves) Loosen as necessary.
• Valve damaged Replace.
10. CONTROL VALVE LEAKS
• Tie-bolts too loose (stack valves) Tighten as necessary.
• Seals damaged or worn Replace.
11. CYLINDER LEAKS
• Seals worn or damaged Replace.
• Rod damaged Replace.
18
Page 19

4. PARTS LIST
4.1 Step Assembly
Fig. No. Name Dwg. No. Qty. per Assy.
1 Step Assembly 5076702 1
2 Flat Washer 9012514 4
3 Lock Washer 9012712 2
4 Nut 9093427 2
5 Tube Spacer 50779 2
6 Flat Spacer 50780 2
7 Bolt 9093365 2
19
Page 20

4.2 Winch Assembly
Fig. No. Name Dwg. No. Qty. per Assy.
0 Winch Assembly 1
1 Pulley Mount LH 5099901 1
2 Rear Mounting Bracket 5099902 2
3 Front Mounting Bracket 5099903 1
4 Pulley Mount RH 5099904 1
5 Winch Base Modification 5065305 1
6 Pulley Bushing 5099906 3
7 Pulley Spacer 5099907 6
8 Wire Rope Clip 9003702 2
9 Pulley 9010601 3
10 Cable 9004002 20'
20
Winch Assembly
Page 21

4.3 Trolley Beam Assembly
Fig. No. Name Dwg. No. Qty. per Assy.
0 Trolley Beam Assembly 50973
1 Trolley Beam Sub Assy. 50972 1
5 End Stop 52306-02 4
6 Spring Washer 9012713 8
7 Nut 9093433 4
8 Bolt 9093147 4
9 Eye Bolt 9010002 1
10 Threaded Connector 9010101 1
11 Nut 9003903 1
21
Trolley Beam Assembly
Page 22

4.4 Link Support
Fig. No. Name Dwg. No. Qty. per Assy.
1 Link Support 50614 1
22
Page 23

4.5 Electro-Hydraulic Base Assembly for Dynamic Option
Fig. No. Name Dwg. No. Qty. per Assy.
0
Electro-Hydaulic Base Assembly for Dynamic
Option
4 Front Support 509204 1
6 DHLT Stand Cover Hyd. 50923 1
50921 1
23
Page 24

4.6 English/Metric Tester Frame Assembly
Fig.
No.
0 Tester Frame Assembly 50979 1
1 Top Beam Assembly 50980 1
2 Column Assembly 50955 1
3 Cylinder Mount 50950 1
4 Lower Beam Assembly 50954 1
5 Base Assembly 50554 1
6 Outrigger Assembly 50558 2
7 Pin 5055302 3
8 Pin 5055301 2
9 Master Link 9010201 2
10 Master Link 9010202 2
11 Trolley Test Beam Assy. 50973 1
12 "I" Taper Washer 9043522 6 M20
13 Bolt 90931135 6 M20 x 46 x 80
14 Lock Washer 9012717 6 M20
Name Dwg. No.
Qty. per
Assy.
Notes
15 Nut 9093445 18 M20 x 2.5
16 Bolt 9093192 22 M16 x 65
17 Flat Washer 9012517 4 M16
18 Lock Washer 9012715 18 M16
19 Nut 9093439 22 M16 x 2.0
20 Rear Mounting Bracket 5099902 2
21 Front Mounting Bracket 5099903 1
22 Bolt 90931135 6 M20 x 46 x 75
23 Capacity Plate 80037 4
24 Label 80048 1
25 Calibration Chart 1
26 Bolt 9004785 16 1/2 - 13 x 1 1/4
27 Lock Washer 9005313 16 1/2
28 Flat WAsher 9012515 16 M12
29 Nut 9003905 16 1/2 - 13
30 Plain Caster 9007203 2
31 Swivel Caster 9007202 2
32 Bolt 9093106 10 M8 x 60
33 Lock Nut 9098506 10 M8 x 1.25
34 U Taper Washer 9043418 10 M16
24
Page 25

Fig.
No.
0 Tester Frame Assy. cont. 50979 1
35 Link Support 50614 2
36 Hose Clamp 9009901 2
37 Winch 9010701 1
38 Serial Number Plate 80049 1
39 Shackles 9010301 2
40 Chain Particle Restraint Assy. 50788 1
41 Bolt 9093349 2 M10 x 25
42 Bolt 9093124 12 M10 x 40
43 Lock Washer 9012712 12 M10
44 Nut 9093427 12 M10 x 1.5
45 Hook for Chain Particle Rest. 50790 1
46 Nut 9093433 3 M12 x 1.75
47 Lock Washer 9012713 3 M12
48 Pulley Spacer 5099907 6
Name Dwg. No.
Qty. per
Assy.
Notes
49 Pulley Bushing 5099906 3
50 Bolt 9093151 3 M12 x 70
51 Pulley Mount R. H. 5099904 1
52 Pulley Mount L. H. 5099901 1
53 Step Assembly 50767 1
54 Washer 9005212 12 3/4
55 Shackle 9010303 1
25
Page 26

English/Metric Tester Frame Assembly
(50979)
26
Page 27

4.7 Hydraulic Cylinder Assembly Static Option
Fig. No. Name Dwg. No. Qty. per Assy.
12 Hydraulic Cylinder Assembly Static Option 9410201 1
22 U Bolt Assembly 9010401 2
English/Metric Tester - Static Option
(50979-1)
27
Page 28

4.8 English/Metric Tester Dynamic Option
Fig.
No.
English/Metric Tester
0
Dynamic Option
1 Electro-Hydraulic Assy. Cover 50923 1
3 Front Support Assembly 5092102 1
4 Electro-Hyd. Base Assy. 5092101 1
5 Elect. Enclosure Sub Assembly 51624-6 1
6 Bolt 9004706 10 1/4 - 20 - 1 1/4" long
7 Flat Washer 9005205 10 1/4"
8 Lock Nut 9004505 10 1/4 - 20
11 Bolt 9093369 2 M10 x 25
12 Lock Washer 9012712 4 M10
13 Nut 9093427 4 M10 x 1.5
14 Limit Switch Bracket 509207 1
Name Dwg. No.
50924 1
Qty. per
Assy.
Material
15 Bolt 9093328 10 M8 x 25
16 Lock Washer 9012711 18 M8
17 Socket Hd. Cap Screw 1 10 - 24 x 1" long
18 Bolt 9093145 4 M12 x 40
19 "U" Taper Washer 9043414 2 M12
20 Lock Washer 9012713 4 M12
21 Nut 9093433 4 M12 x 1.75
22 Nut 9093424 8 M8 x 1.25
23 Socket Hd. Cap Screw 1 10 - 24 x 2" long
25 Bolt 9093131 2 M10 x 75 x 26
27 Socket Hd. Cap Screw 9091276 8 M8 x 40
34 Nut 9003903 4 3/8 - 16
35 Eye Bolt 9010002 2 3/8 - 16 x 1 1/4 long
39 Limit Switch Assembly ------ 1
28
Page 29

Fig.
No.
Dynamic Option Electric Hydraulic
0
Subassembly
9 4" Pressure Gauge ------ 1
10 Pressure Setting Valve ------ 1
24 Pressure Switch ------ 1
28 Pump ------ 1
29 Cylinder with Cushion ------ 1
30 Accumulator ------ 1
31 2" Pressure Gauge ------ 1
32 Ball Valve ------ 1
33 Filter ------ 1
36 Accumulator Mtg. Brackets ------ 2
37 Hoses ------ ----
Name Dwg. No.
9010502 1
Qty. per
Assy.
Material
38 Fittings ------ ----
40 Socket Head Cap Screw 9091272 2 M8 x 20
41 Lock Washer 9012711 2 M8
29
Page 30

English/Metric Tester - Dynamic Option
(50924)
30
Page 31

4.9 Electrical Components & Wiring Subassembly Dynamic Option
Name Qty. Harrington No.
Electrical Components & Wiring Subassembly Dynamic Option 1 51624-6
Junction Box 1 9006709
Panel 1 9006808
Push Button Operator 1 9009615
Early Close Contact Block 2 9009617
Alternate Action 1 9009621
Pilot Light Green 1 9009634
Legend Plate On/Off 1 9009635
Terminal Strip 1 MS518010
2 Push Button Cord Complete Set (new Kito cable) 1 ES1605D00310
1/2" Liquid Tight Connector 9 9008101
Socket 5P with 5 Leads 1 ES1614D015
Flat Head Machine Screw 4 E6FL558010
Flexible Conduit 20' 9008302
Cable 5C Complete Set 2 M7S1610010
1/2" Plastic Bushing 2 9008403
Contactor 110V 1 9006904
Limit Switch 1 9012201
Limit Lever 1 9012202
15 Amp Fuse 1 90062-25
Fuse Holder 1 90071-05
Philips Head Machine Screw (M5x12) 10 9798534
Nut (M5x0.8) 10 9093417
Spring Washer (M5) 10 9012708
S.O. Cord 30' 2 @7.5' & 1 @15'
4 Prong Plug Assembly 1 L1420P
S.O. Cord 7'
1/2" "T" Outlet 2 9008701
1/2" "T" Outlet Cover 2 9008702
90º Liquid Tight Connector 2 9008901
Plug 5P 1 ES613003
Cable Holder 42 Assembly 1 E6F613003
Appleton Malleable Cover 1 9012101
5/10 AMP Fuse 1 90062-18
31
Page 32

32
Page 33

33
Page 34

www.harringtonhoists.com
Harrington Hoists, Inc.
401 West End Avenue
Manheim, PA 17545
Phone: 717-665-2000
Toll Free: 800-233-3010
Fax: 717-665-2861
Western Factory Warehouse
2341 Pomona Rincon Road #103
Corona, CA 92880
Phone: 909-279-7100
Toll Free: 800-317-7111
Fax: 909-279-7500
LTOM
 Loading...