

Harrie Leenders HL2, HL4 Manual And Installation Instructions

Handleiding + Installatie-instructie
Manual + Installation instruction
Manuel + Instruction d’installation
Anleitung + Montageanleitung
Manuale + Istruzione di montaggio
NL
HL2 + HL4
GB
F
D
I
www.leenders.nl
1
HL2 + HL4
Inhoud
Handleiding Installatie-instructie
Manual Installation instruction
Manuel Instruction d’installation
Anleitung Montageanleitung
Manuale Istruzione di montaggio
2
12
17
22
7
28
32
34
36
30
1 Beluchtingsschuif Aeration slide Verrou de l'arrivée d'air primaire Belüftungsschieber Presa d’aria comburente
2 Afvoerklep Throttle Flap Clapet d’étranglement Drosselklappe Valvola di strozzamento
2
1
1
2

De drie basisregels voor goed stoken zijn:
1. Stook droog en schoon hout.
De haard is geschikt voor het stoken van zogenaamde ‘stapelbare brandstoffen’: hout en briketten. We gaan er van uit dat u alleen droge
brandstoffen gebruikt. Dat geldt dus ook voor het aanmaakpapier en karton. Natte brandstof kost extra energie, geeft aanslag op het glas en
vervuilt het rookkanaal.
2. Stook niet te getemperd.
Geef de haard de tijd om op temperatuur te komen (blijf erbij in dit stadium) en temper het vuur niet te snel.
Onthoud deze regel: u kunt een haard pas temperen als deze op temperatuur is.
3. Zorg altijd voor voldoende verse lucht.
De huidige woningen zijn vaak kierdicht gemaakt. Een roostertje of klapraampje openen zorgt voor voldoende verse lucht.
Of u gebruikt de verse luchtvoorziening van uw haard, mits deze is aangesloten.
• Bij het aanmaken is het hoofdzaak dat het rookkanaal en de haard op temperatuur komen.
• Telkens als u tijdens het stoken de haard wilt openen, moet de beluchtingsschuif wat open staan voor goede beluchting.
Open de deur voorzichtig zodat er geen rook in de kamer komt.
Wat u moet weten over de HL2 en HL4.
• De HL 2 is een enkelwandige stralingshaard met een convectie-achterwand en HL 4 is een dubbelwandige haard. Dat wil zeggen, dat deze
haard bij goed stoken een convectiestroom (warme luchtstroom) op gang brengt die zorgt voor een fijne warmteverdeling in de ruimte.
• De mantel is vervaardigd uit plaatstaal. De brandkamer is van binnen bekleed met hoogwaardige keramische vuursteen elementen.
De stenen van de bodem en de achterwand worden het meest belast (stoten met houtblokken bij het vullen) en zijn daarom extra versterkt.
U heeft een houthaard gekocht. Hout als brandstof is in veel opzichten een ideale keus.
Maar wat is hout eigenlijk? Onder invloed van zonlicht bouwt een boom houtcellen op uit CO
2
(kooldioxide), water en energie. In zijn groeiproces onttrekt de boom CO2 aan de lucht en
staat in ruil daarvoor zuurstof af. Daarom is een wandeling door het bos zo gezond. Ook wat
het milieu betreft is hout als brandstof ideaal. Als we het ongemoeid laten rotten, komt er
evenveel CO
2
vrij als wanneer we het verbranden. In mileutermen zeggen we dan dat hout
‘CO
2
-neutraal’ is.
Alleen droog hout is haardhout.
Niet alle hout is haardhout. U stookt goed met hout dat minstens anderhalf jaar ‘winddroog’
heeft gelegen. Dat wil zeggen: liefst gekloofd hout, onder een afdakje, dat beschermd tegen de
regen zijn vocht langzaam kan laten verdampen. Droog hout sist niet in het vuur en laat geen roet achter op het glas.
Erik Bendien creëerde een houtopslag waar de wind van alle kanten bij kan. Immers, hout droogt in de wind.
Vandaar het basisrooster (vrij van de grond tegen optrekkend vocht), de geperforeerde zijpanelen en de extra
ruimte bovenin. De staanders en het rooster zijn van roestwerend verzinkt staal. Het corten-staal van de
zijpanelen gaat na enige tijd oxyderen. Dat hoort zo, want het dunne roestlaagje is niet alleen decoratief,
het beschermt de panelen ook tegen verdere aantasting. De basismodule kan naar wens verbreed worden met
steeds dezelfde ruimte. U bouwt The Woodstocker in een mum van tijd op. Het resultaat staat als een huis
en is leeg te verplaatsen. Even gemakkelijk is The Woodstocker weer te demonteren als u gaat
verhuizen.
De goede warmte van hout
The Woodstocker. Zo wordt uw haardhout mooi droog.
HL2 en HL4
3
Algemene instructies en voorschriften
Conformiteitsverklaring
De ondergetekende, de volgende onderneming vertegenwoordigend:
Harrie leenders Haardkachels
Industrieweg 25, 5688 DP Oirschot, Nederland
verklaart hiermede dat de HL2 en HL4 in overeenstemming zijn met de bepalingen van de hierna genoemde EU-richtlijnen wanneer
geïnstalleerd volgens de installatie-instructies zoals vervat in de productdocumentatie:
EN 13240:2001/A2:2004 “Lokale verwarmingstoestellen gestookt met vaste brandstoffen”
Product: Lokale verwarmingstoestellen gestookt met vaste brandstoffen vallend onder het gebruik zoals bedoeld in
deze norm: ruimteverwarming in voor bewoning bestemde gebouwen.
Kenmerken Rapport
Brandveiligheid 50970/01
Uitstoot van verbrandingsproducten 50970/01
Vrijkomen van gevaarlijke stof 50970/01
Oppervlaktetemperatuur 50970/01
Mechanische weerstand (om een schoorsteen / rookkanaal te dragen) 50970/01
Nuttig thermisch effect / energierendement 50970/01
Beschrijving van het ruimteverwarmingstoestel HL2 en HL4:
Uit metaalplaat vervaardigde houthaard. De haardkachel is ontworpen om op de vloer te worden geplaatst. Hij is uitgevoerd met een raam en
regelbare raamwassing. De verbrandingskamer is met keramische vuurstenen geïsoleerd. De rookgasaansluiting bevindt zich boven of aan de
achterzijde van het toestel.
Notified body: TNO Industrie en Techniek
Laan van Westenenk 501, Postbus 342, 7300 AH, Apeldoorn
Rapportnummer: 50970/01
Fabrikant: Harrie Leenders Haardkachels
Naam: Hans van de Weideven
Functie: Algemeen Directeur
Datum: 15-07-2005
Gebruik
• Alle locale voorschriften, inclusief diegene refererend aan nationale en europese standaarden moeten in acht worden genomen bij gebruik
van het toestel.
• Zorg ervoor dat er geen brandbare materialen in de nabije omgeving van de haard aanwezig zijn.
• Houdt de haard gesloten, behalve bij het ontsteken en bijvullen van het toestel en bij het verwijderen van restmateriaal.
• Onderdelen van het toestel en met name de oppervlakte zijn heet bij aanraking wanneer het toestel in gebruik is.
Gelieve gepaste maatregelen te treffen.
• Gebruik stookhout van ±25 cm lang en ±7 cm dik. Leg het plat op de bodem. Plaats niet meer dan 3 blokken
tegelijk in de haard. Vul de haard bij, wanneer het vuur gaat doven, na ongeveer 1 uur stoken.
• Gebruik het toestel niet als allesbrander. Maak geen gebruik van ongeschikte en niet aanbevolen brandstoffen en gebruik vooral geen
vloeibare brandstoffen.
Onderhoud
• Laat regelmatig onderhoud plegen aan het toestel door een bekwaam technicus.
• Zorg ervoor dat de rookgasaansluiting en de schoorsteen regelmatig worden gereinigd.
• Controleer of de schoorsteen nog open is alvorens opnieuw te ontsteken, wanneer het toestel voor langere periode niet gebruikt is geweest.
• Ontstaat er ondanks de getroffen voorzorgsmaatregelen toch een schoorsteenbrand (dat merkt u meestal aan een loeiend lawaai in de
schoorsteen), doe dan het volgende:
- Sluit direct de luchttoevoer en de deur van de haard
- Waarschuw de brandweer (112)
- Doof snel het vuur in de haard met zand of soda om rook in uw huis te voorkomen
- Ventileer de woning
- Gebruik nooit water om het vuur te doven
- Zorg dat de schoorsteen na een brand eerst wordt geveegd en geïnspecteerd op beschadiging en lekkage.
Service
• Het is niet toegestaan modificaties te verrichten aan het toestel zonder autorisatie van de fabrikant.
• Maak slechts gebruik van vervangende onderdelen die door de fabrikant worden geadviseerd.
4
2
Wij feliciteren u met de aanschaf van uw haard. Met deze handleiding willen wij u informeren over een juist gebruik en de kunst van
goed stoken. Leest u, voordat u gaat stoken, eerst de tekst over het instoken goed door. Deze stookinstructie is van toepassing op
type HL2 en HL4 en is bedoeld als richtlijn. Uw haard zal zich namelijk op elke andere plek anders gedragen, simpelweg omdat
de omstandigheden anders zijn. Het rookkanaal, het weer, de kwaliteit van het hout en de luchthuishouding in huis bepalen het
stookgedrag van uw haard. Op den duur ontwikkelt u uw eigen gebruiksaanwijzing, met deze stookinstructie als basis.
4. Met de beluchtingsschuif in combinatie
met de afvoerklep regelt u de
verbranding.
2. De haard aanmaken met papier, karton
of aanmaakblokjes en klein hout.
Stapel luchtig.
Stook de haard enige tijd goed door. Dit
zorgt voor een goede trek, u houdt het
rookkanaal schoner en krijgt zo een
goed ondervuur voor massieve blokken.
5. Een rustig brandend vuur krijgt u
vervolgens door:
- beluchtingsschuif dichter te zetten
(naar links schuiven),
- de afvoerklep dichter te zetten.
Hierdoor regelt u als het ware de trek in
de haard.
Bij een gloeiende houtskoolmassa kunt
u de afvoerklep nog verder sluiten.
Hierdoor profiteert u langer van de
warmte.
3. Vul bij met massief hout. De hoeveelheid is afhankelijk van de warmtebehoefte. Stapel luchtig. Per keer niet
meer dan 1/3 van de branderkamer
vullen. Geef na elke bijvulling extra
zuurstof. Doe dit steeds totdat de
brandstof goed brandt.
1. Zet de beluchtingsschuif helemaal open
(rechts).
Zet de afvoerklep in geopende stand
(de stand van het handvat komt overeen
met de stand van de afvoerklep).
Zet voor extra trek het raam aan de
bovenkant op een kier.
Zo stookt u de HL2 en HL4
Enkele Tips
• Stook altijd op een bed van as. Dit is een isolatie-laag voor het vuur en een goed bed voor de brandstof.
• Als u de haard te vol heeft geladen en de zuurstoftoevoer is maximaal (beluchtingsschuif en afvoerklep helemaal open), kan het vuur
‘op hol slaan’. Sluit in dat geval de beluchtingsschuif. Laat de haard in zo’n geval nooit onbeheerd. U zou de deur of het raam volledig
kunnen openen, waardoor het vuur wordt gekoeld.
•U regelt de temperatuur ook door de hoeveelheid en de soort brandstof die u per vulling stookt.
•Verwijder het teveel aan as met een schep of de Ash-cleaner. As nooit met een stofzuiger verwijderen omdat vuur nog dagenlang kan
nagloeien. Zorg dat er een laagje as (± 3 cm) achterblijft om op door te stoken.
• Bij mistig weer bij voorkeur niet stoken wegens te lage trek in het rookkanaal.
• De haard wordt goed gestookt indien de keramische vuurstenen grijs tot licht beroet zijn en het raam zuiver blijft.
De kracht van vuur
Eigenlijk is er maar weinig bestand tegen een echt heet vuur. Ook uw haard kan door oververhitting beschadigen. Om dat te voorkomen
mag in uw haard niet meer dan 3 kg droog hout tegelijk worden verbrand. 3 kg is ongeveer gelijk aan 3 massieve houtblokken, eiken met
15% vocht. De constructie en gebruikte materialen zijn zo gekozen om een verantwoord vuur te kunnen beheersen en weerstaan.
Stook dus met beleid. (Bij de HL4 betreft het 4 kg droog hout. Dat is ongeveer 4 massieve houtblokken.)
5
1. aanmaakhout
2. dikker hout
3. massief houtblok
Bij voorkeur deze volgorde van houtdikte gebruiken als u gaat stoken.
Instoken, een goed begin
U heeft een gloednieuwe haard gekocht; 'nul op de teller', nog geen vlammetje gezien. Het betekent dat u zelf gaat zorgen voor die eerste
'kilometers'. Dat instoken vereist wat extra tijd en aandacht en een aanpak die we hieronder in stappen voor u hebben weergegeven.
Het instoken zal 3 à 4 uur in beslag nemen. Voordat u begint is het volgende punt van belang.
• De keramische vuurstenen zullen vocht verdampen en uw haard gaat zich zetten.
Stook daarom de eerste keren niet te heet omdat de stenen dan kunnen scheuren. Het ontstaan van krimpscheurtjes kan geen kwaad.
Instoken in stappen
1. Eerst controleren of het hitteschild
(het schuin geplaatste stalen schild dat
boven de stookruimte zit) goed in de
bevestiging hangt.
2. Zet de beluchtingsschuif helemaal open
door deze naar rechts te schuiven.
Zet de afvoerklep in geopende stand
(de stand van het handvat komt overeen
met de stand van de afvoerklep).
3. Steek een flinke prop droog papier aan
tegen de achterwand van de stookruimte
en laat dit vuurtje weer uit gaan.
5. Laat het vuur uit gaan en de haard een
uur lang afkoelen zodat het vocht in de
vuursteen kan verdampen.
6. Nu gaat u de hele haard goed op
temperatuur brengen met eerst wat dun
aanmaakhout en daarna dikkere blokjes
van + 5 x 5 cm dik en 30 cm lang.
Zet daarbij het raam op een kier. Als de
blokjes vlam vatten het raam sluiten.
De haard zal nu warm worden.
Nogmaals: ventileer goed, zorg voor trek
naar buiten, schuif gordijnen helemaal
opzij en zet deuren en ramen open.
4. Vul de haard met een handvol droog en
dun aanmaakhout. Steek het hout aan
en laat het raam op een kier staan.
4

1. De haard afstoffen met een niet vezelige doek. Zonodig reinigen met een schraal sopje van groene zeep.
Goed afnemen en de haard even verwarmen zodat het vocht in de kieren kan verdampen.
2. Beschadigingen kunnen worden bijgewerkt met een schuurdoekje en speciale Harrie Leenders-kachellak.
Vraag advies aan uw leverancier.
Onderhoud gelakte onderdelen
Onderhoud keramische vuursteen
Scheuren in de keramische vuursteen elementen kunnen geen kwaad zolang de vlam geen direct contact heeft met het achterliggende
metaal. Mocht dit wel het geval zijn, dan is het nodig de steen te vervangen; neem contact op met uw leverancier.
Onderhoud
Onderhoud van het glas
Onderhoud van bewegende onderdelen
Rookkanaal vegen
Zo reinigt u het glas: met keukenpapier en vervolgens met een vochtige doek de lichte aanslag verwijderen.
Dikkere aanslag kunt u met speciale haard-ruitenreiniger behandelen. (Dat kan ook met een stukje nat keukenpapier en witte as). Even laten inwerken. Zorg er altijd voor dat deze middelen niet in contact komen met de lak
of uw vloer, om beschadiging te voorkomen.
Bewegende en piepende delen kunnen worden gesmeerd met grafietvet of kopervet. Vraag advies aan uw leverancier.
Het glas beslaat als er vochtige brandstof wordt gestookt of te weinig zuurstof wordt toegevoerd. Bovendien kan het glas beslaan als het
aanmaken niet fel genoeg gebeurt. Bijvoorbeeld als u start met massieve blokken in plaats van dun aanmaakhout. Er blijft dan te lang
vocht in de haard dat neerslaat op het koudste deel: het glas.
6
Laat door een erkend schoorsteenveegbedrijf uw rookkanaal jaarlijks inspecteren.
Voordat het rookkanaal wordt geveegd, dient het hitteschild opgeklapt te worden. Let er nadien op dat het hitteschild op de juiste wijze
wordt teruggeplaatst. De bovenzijde van het hitteschild moet in de nokjes hangen van de haard.
Het hitteschild kan krom trekken als het niet goed ligt.
Tot Slot
Zorg voor een goed schoon rookkanaal, de juiste droge brandstof en een verstandig stookgedrag.
Dan heeft u het meeste plezier van uw haard. Wij wensen u veel warmte en stookplezier.
General instructions and regulations
Declaration
The undersigned, representing the following:
Harrie leenders Haardkachels, Industrieweg 25, 5688 DP, Oirschot, Nederland
herewith declare that the product HL2 and HL4 are in conformity with the provisions of the following EC Directives when installed in
accordance with the installation instructions contained in the product documentation:
EN 13240:2001/A2:2004 (E) “Roomheaters fired by solid fuel”
Product: Roomheaters fired by solid fuels as covered under the scope of this standard intended use: Space heating in residential buildings.
Characteristics Report
Fire safety 50970/01
Emission of combustion products 50970/01
Release of dangerous substance 50970/01
Surface temperature 50970/01
Mechanical resistance (to carry a chimney / flue) 50970/01
Thermal output / energy efficiency 50970/01
Description of the room heater HL2 and HL4:
Woodstove made of sheet metal.The stove is designed for placement on the floor. It is equipped with a window and controllable air wash supply.
The combustion chamber is insulated with ceramic fire bricks. The flue gas connection is located at the top or at the back of the appliance.
Notified body:
TNO Industrie en Techniek
Laan van Westenenk 501
Postbus 342, 7300 AH, Apeldoorn
Reportnumber: 50970/01
Manufacturer: Harrie Leenders Haardkachels
Name: Hans van de Weideven
Position: General Manager
Date: 15-07-2005
Gebruik
• All local regulations including those referring to national and European standards must be observed when using the appliance.
• Ensure that there are no combustible materials in the direct vicinity of the stove.
• Keep the stove closed except when lighting and adding fuel to the appliance, and when removing residual material.
• Parts of the appliance, notably the surface, are hot when touched when the appliance is being used. Take appropriate measures.
• Use firewood that is ±25 cm long and ±7 cm thick. Put it flat on the bottom of the stove. Do not place more than 3 logs in the stove at the
same time. When the fire starts to go down after about 1 hour, add wood.
• Do not use the appliance as a multi-burner. Do not use fuels that are unsuitable or not recommended, and in particular do not use any
liquid fuels.
Maintenance
• Have the appliance serviced regularly by a qualified technician.
• Ensure that the flue-gas connection and the chimney are cleaned regularly.
• Check to ensure that the chimney is still open before lighting the stove again if it has not been used for an extended period of time.
• If, in spite of the precautions taken, there should occur a chimney fire (usually accompanied by a roaring noise in the chimney), proceed as
follows:
- Shut off the air supply and close the door of the stove immediately
- Call the fire brigade
- Quickly extinguish the fire in the stove with sand or soda to prevent smoke from getting into your house
- Ventilate the house
- Never use water to extinguish the fire
• Ensure that after a fire the chimney is first swept and inspected for any damage and leaks.
Service
• It is not allowed to make any modifications to the appliance without prior authorization of the manufacturer.
• Only use replacement parts recommended by the manufacturer.
7

The three basic rules for proper burning are:
1. Use dry and clean wood.
The stove is suitable for burning so-called 'stackable fuels': wood and briquettes. We assume you will be using dry fuels only. So, this also holds
for the kindling paper and cardboard. Wet fuel costs more energy, leaves moisture on the glass and soils the flue.
2. Do not temper the burning process excessively.
Allow the stove sufficient time to warm up (stay with it at this stage) and do not temper the fire too quickly. Bear this rule in mind: you must
not temper a stove until it has warmed up properly.
3. Always make sure there is enough fresh air.
In houses today, cracks and chinks have often been sealed. Opening a small grate or cantilever window will ensure
sufficient fresh air, provided no fresh-air-supply system is used.
• The main thing when making the fire is that both the flue and the stove reach the proper temperature.
• Each time you want to open the stove when burning, the air-control slide must be open (completely pulled out) to ensure proper air supply.
What you should know about the HL2 and HL4
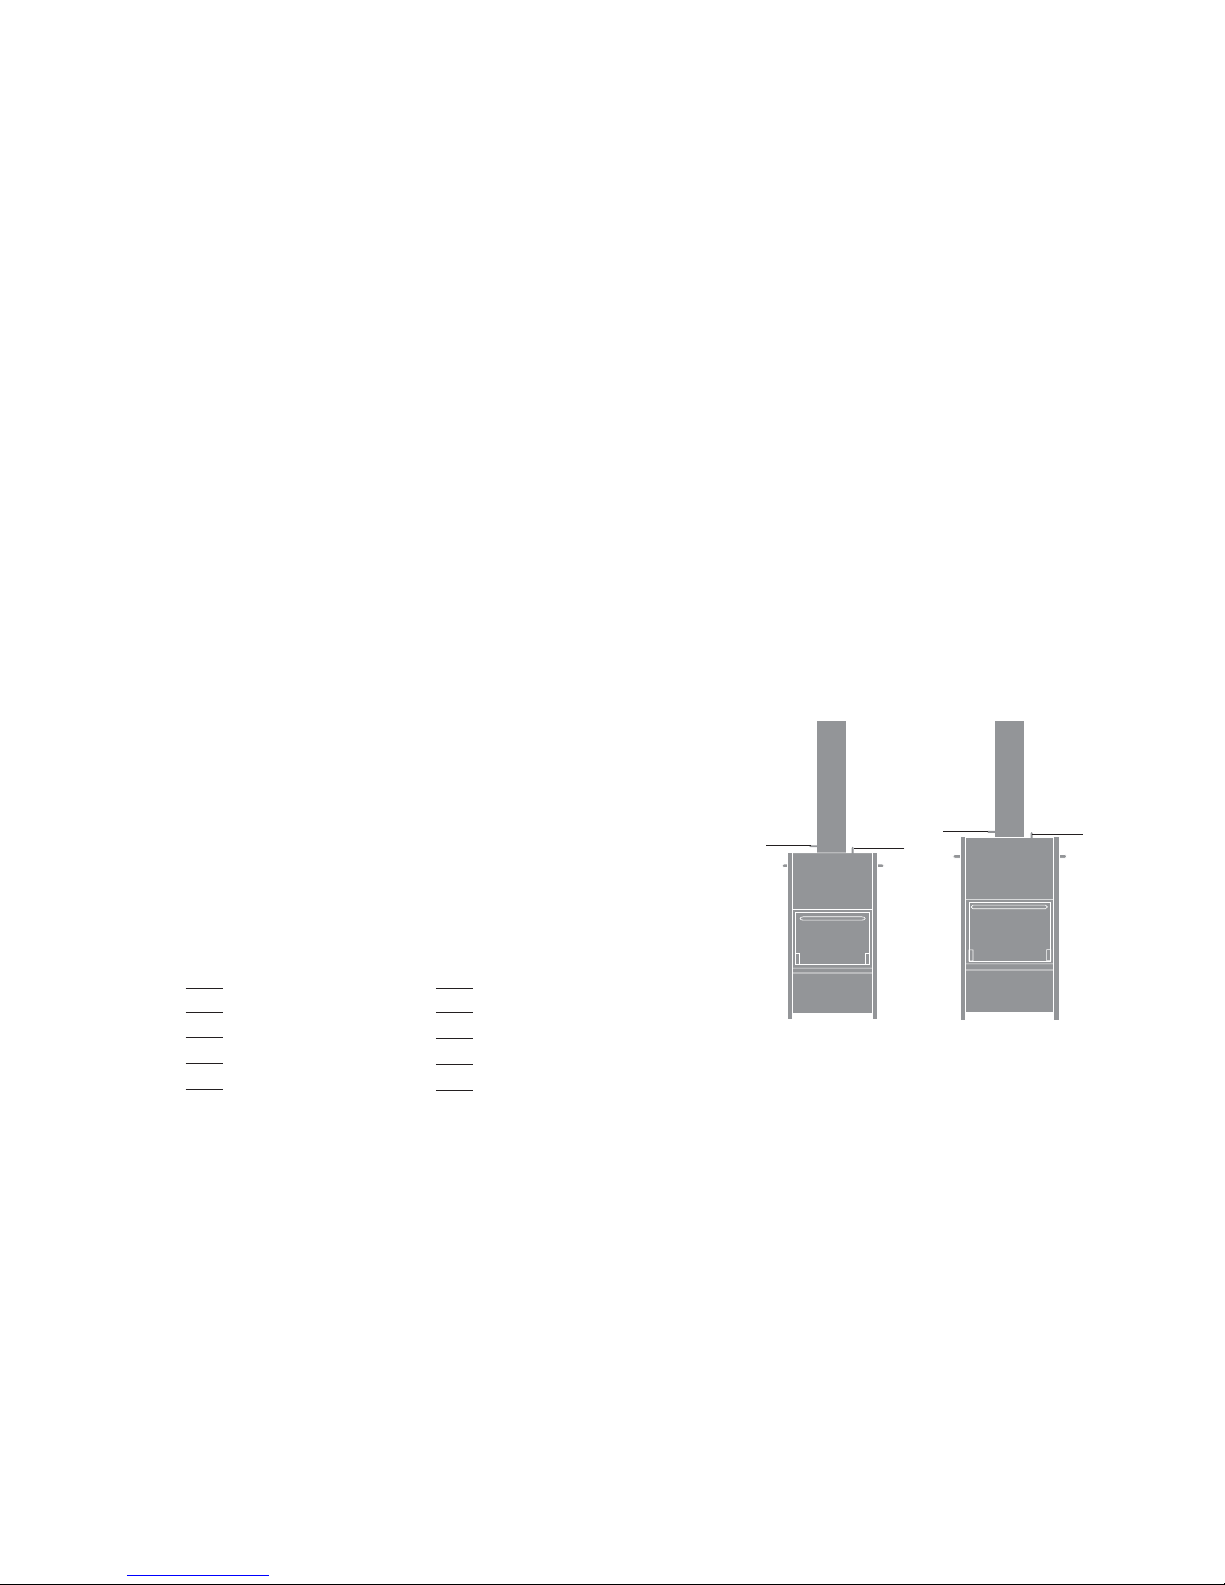
• The HL2 is a single-walled radiant stove with a convection back wall, and the HL4 is a double-walled stove.
This means that when used properly this stove starts a convection current (hot air stream) which ensures a fine heat distribution in the room.
• The casing is made of sheet steel. The combustion chamber is lined on the inside with high-grade refractory ceramic elements. The elements
of the bottom and the back are affected most (due to the impact of logs when filling) and have therefore been additionally strengthened.
You have purchased a wood stove. In many respects, wood used as fuel is an ideal choice.
But what exactly is wood? Under the influence of sunlight, a tree builds up wood cells from
CO
2
(carbon dioxide), water and minerals. So, in fact, wood is stored solar energy. In its
growth process, the tree takes CO
2
from the air and gives off oxygen in return. Also in terms
of the environment, wood is an ideal fuel. When it is left to rot, the same amount of CO
2
is
released as when it is burned. In environmental terms, we then say that wood is 'CO
2
-neutral'.
Only dry wood is stove wood
Not all wood qualifies as stove wood. Good burning is obtained by using wood that has been
seasoned for at least eighteen months. That is to say: preferably chopped wood that, stored
under a shelter and protected from the rain, can slowly let its moisture evaporate. Dry wood
does not sizzle in the fire and does not soot the glass.
Erik Bendien created the wood store that allows wind access from every side. This is logical - wind dries
wood. Hence the basic grid, which is free of the ground to avoid damp, the perforated side-panels and the
extra space above. The uprights and the grid are in stainless - galvanized - steel. After a while the corten-steel
side panels start to oxidise. It's designed that way because the thin layer of rust is both highly decorative,
and protects the panels against further corrosion. The basic module, with a single compartment, can handle
1.3 cubic meters of wood. This can be widened by the same dimensions. It looks good as a garden partition
or alongside the drive. With the user-friendly instruction you can put together The WoodStocker in no time at
all. The highly robust finished item can be manoeuvred when empty. And disassembling The WoodStocker is
just as easy, when you move house.
The fine heat from wood
The Woodstocker. Getting firewood good and dry.
HL2 and HL4
We congratulate you on the purchase of your stove. This manual will inform you about the best way of using the stove and the art of
keeping a perfect fire. Before using the stove, carefully read the text about breaking in the stove.
These heating instructions apply to the HL2 and HL4 type. They are merely intended as a guideline as your stove will behave differently
according to the place where it is installed, simply because the conditions are different. The flue, the weather, the quality of the wood
used and the climate conditions in the house determine your stove’s burning behaviour. In time you will develop your own directions for
use, based on these heating instructions.
Initial fire-up, a good start
You have purchased a brand-new stove; ‘zero on the meter’, has not seen a flame yet. This means that you are going to take care of the first
few ‘miles’. This initial operation requires some additional time and attention as well as the steps we have outlined for you below.
This procedure will take 3 to 4 hours. Before you start, bear in mind the following point.
O The refractory ceramic elements will evaporate moisture and your stove will start setting. Therefore, the first few times, do not build
your fire too hot because otherwise the elements could crack. However, you need not worry about any shrinkage cracks being formed.
Initial fire-up in steps
1. First check to ensure that the heat
shield (the inclined steel shield above
the combustion chamber) hangs
properly at its fastening point.
2. Fully open the air-control slide by
pushing it all the way to the right. Put
the throttle flap in its opened position
(the position of the handle corresponds
to the position of the throttle flap).
3. Light a large ball of dry paper against
the back wall of the combustion
chamber and let this fire go out again.
5. Allow the fire to go out and the stove to
cool off so that the moisture in the
refractory ceramic elements can
evaporate.
6. Then you will start bringing the whole
stove at the proper temperature using
first some thin kindling wood and then
small, thicker logs + 5 x 5 cm thick and
30 cm long. Leave the window ajar.
Shut the window once the small logs
catch fire. The stove will now heat up.
Again: ventilate properly, ensure a good
draught to the outside, drawing back
the curtains all the way and opening
doors and windows of the room.
4. Fill the stove with a handful of dry and
thin kindling wood. Light the wood and
leave the window ajar.
8 9

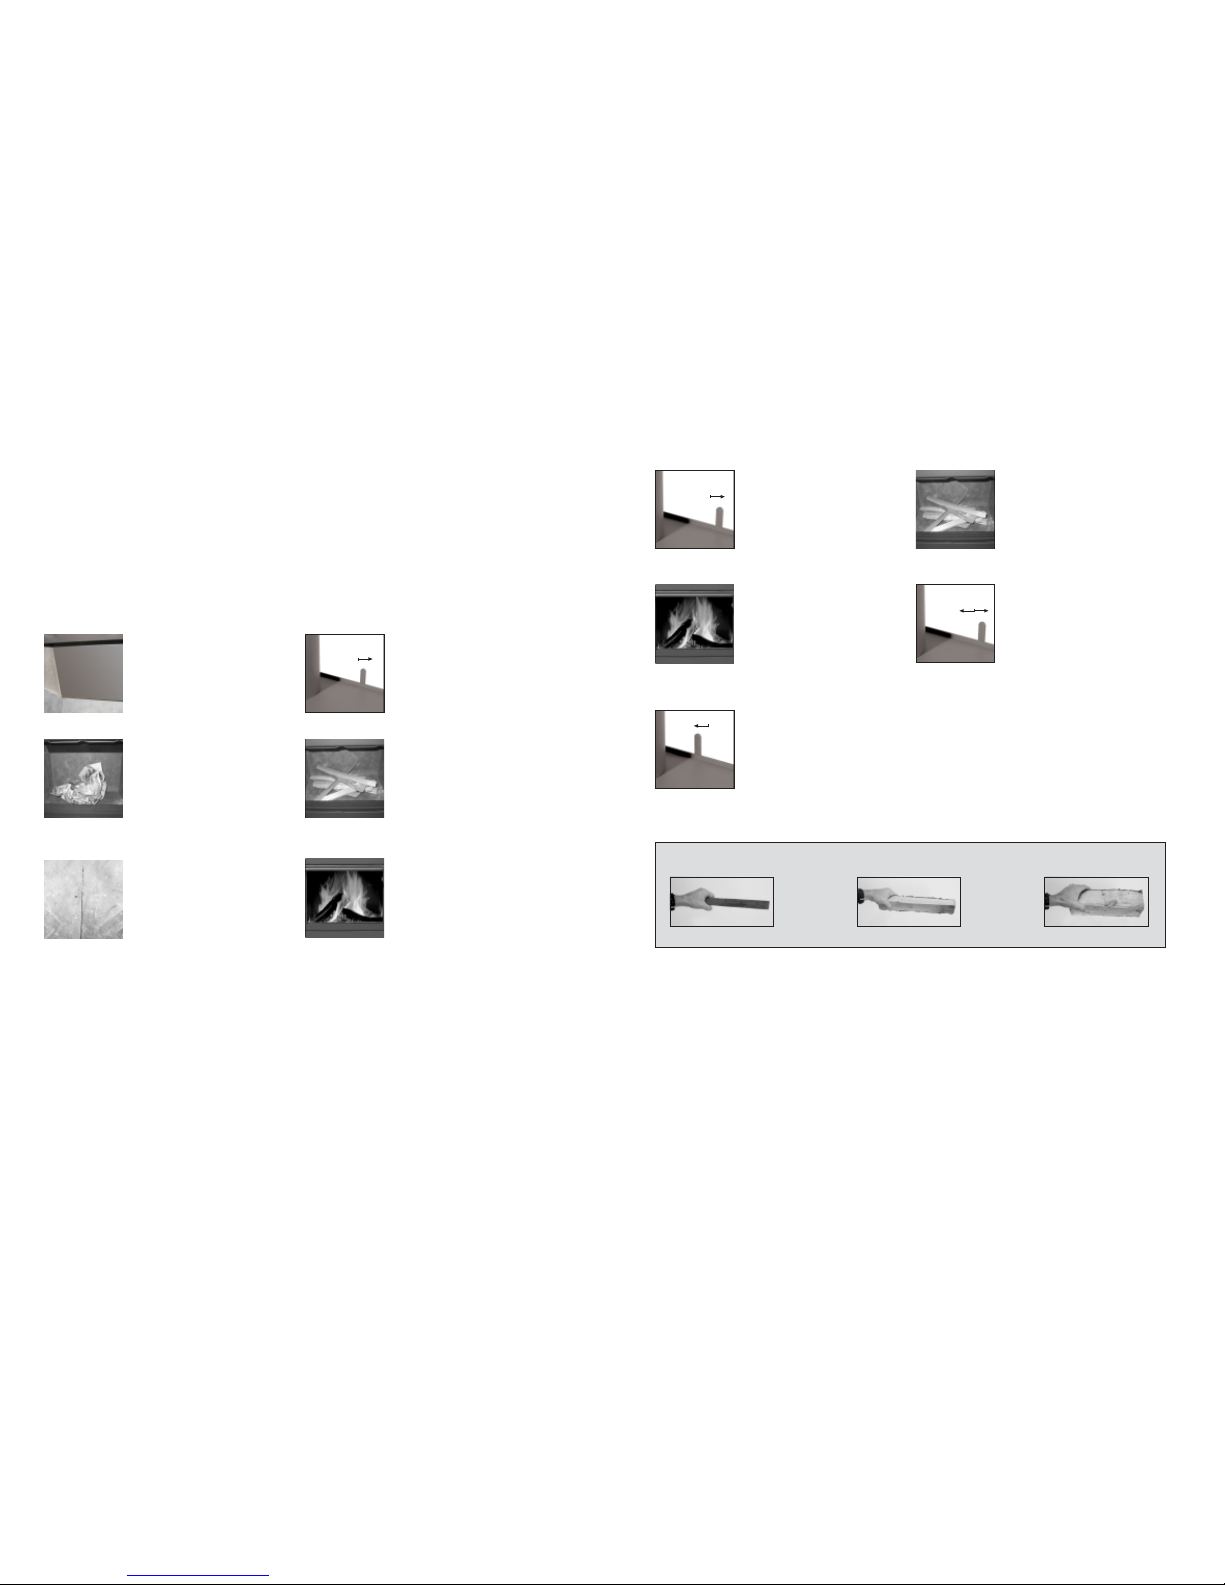
4. Using the air-control slide in conjunction
with the throttle flap, you can regulate
the residual burning.
2. Light the stove with paper, cardboard
or firelighters and small wood. Stack
lightly. Maintain a good fire for a while.
This will ensure a good draught, will
keep the flue cleaner, and will give you
a nice fire for the solid logs.
5. A quietly burning fire is obtained by:
- closing the air-control slide further
(pushing it to the left),
- closing the throttle flap further.
That way you are actually controlling the
draught in the stove.
For a glowing mass of charcoal, you may
close the air-control slide even further.
This way will enjoy the heat longer.
3. Add solid logs. The amount depends on
the heat needed. Stack lightly. Each
time you add fuel, do not load more
than up to 1/3 of the combustion chamber. Each time you have added a load,
give the fire some extra oxygen. Keep
doing this until the fuel is burning properly.
1. Open the air-control slide completely
(pushed to the right). Put the throttle
flap in the opened position (the position
of the handle corresponds to the position of the throttle flap). For additional
draught, set the window at the top ajar.
How to use the HL2 and HL4
A few tips
• Always keep a fire on a bed of ashes. This is an insulating layer for the fire and also an excellent bed for the fuel.
• If you have overloaded the stove and the oxygen supply is at its maximum (air-control slide and throttle flap opened completely), the fire
may ‘run wild’. In this case never leave the stove unattended. You could open the window completely, thus cooling the fire.
•You also control the temperature by the amount and the kind of fuel you add each time.
• Remove the surplus of ashes with a scoop or an Ash cleaner. Never use a vacuum cleaner because a fire may still glow after extinction
for days. Ensure that a layer of ashes (+ 3 cm) is left for your next fire.
• When the weather is foggy, preferably, do not use the stove for the draught in the flue will be too low.
• The stove is burning well when the refractory ceramic elements are grey or lightly sooted, and the window stays clean.
The power of fire
As a matter of fact just a few things withstand a real hot fire. Your stove can also be damaged by overheating. Just to prevent this take
account of not burning more than 3 kilograms of wood at the same time. 3 Kilograms is approximately equal to 3 massif logs; oak with
15% moisture. The construction and the used materials from the stove are suchlike chosen to control and resist a fire in a considered way.
So heat with consideration. (For the HL4, this is 4 kg of dry wood.)
1. kindling wood
2. thicker wood
3. solid log
Preferred order of wood thicknesses to be used when you start burning the stove.
1. Dust the stove using a non-fibrous cloth. Clean with lean soapsuds if necessary.
2. Damaged spots can be touched up using an abrasive cloth and the special Harrie Leenders stove paint.
Ask you supplier for advice.
Maintenance enamelled parts
Maintenance ceramic firebricks
You need not worry about any cracks in the ceramic firebrick elements as long as the flame does not come into direct contact with the
metal behind them. Should this be the case, however, then it will be necessary to replace the brick; contact your supplier.
Maintenance
Maintenance glass
Maintenance moving parts
Use paper towel and then remove the light moisture using a damp cloth.
Thicker deposits can be treated with special stove-glass cleaner (this can also be done with a piece of moist paper
towel and white ash). Always ensure that these agents do not come into contact with the paint or your floor to avoid
damaging it.
Moving and squeaking parts can be lubricated with graphite grease or copper grease. Contact your dealer for advice.
The glass is steamed up when burning wet fuel or too little oxygen is supplied. Also, the glass may steam up if the fire does not start fiercely enough. This happens, for instance, when you start with small logs instead of thin kindling wood. Moisture will then remain in the
stove for too long, and will settle on the coldest part: the glass.
Sweeping the chimney
Have your flue inspected once a year by a recognized chimney sweeping firm. Before the flue is swept, the heat shield must be tipped up.
Afterwards ensure that the heat shield is replaced correctly. If not, the heat shield may get warped.
10 11
In conclusion
Ensure that the flue is kept clean, the correct dry fuel is used, and operate the stove sensibly for proper burning behaviour.
That way you will derive most pleasure from your stove. We wish you much warmth and heating pleasure.
 Loading...