

User Guide
Mountbatten Writer
Revision 2
© Harpo Sp. z o. o.
ul. 27 Grudnia 7, 61-737 Poznań, Poland
www.mountbattenbrailler.com

Thank you for purchasing a Mountbatten Writer. Since 1990, the Mountbatten
range of Braille Writers has been offering expanded Braille writing
opportunities to people all around the world. Mountbatten Braille Writers are
in use in countries all over the world, bringing and supporting Braille literacy
in many languages.
To get the most from your new MB Writer, please read the first section,
Welcome, and follow it with the second section, Exploring the MB Writer. After
that, you can skip to the sections you want to read first, because you will have
the most important basic information.
News, resources, regular updates to this User Guide and a range of support
material can be obtained from the Mountbatten website:
www.mountbattenbrailler.com
This device complies with Part 15 of the FCC Rules. Operation is subject to the following
two conditions: (1) this device may not cause harmful interference, and (2) this device
must accept any interference received, including interference that may cause undesired
operation.

Contents
Welcome................................................................................................................................................................ 1
Reading your User Guide.................................................................................................................................. 1
Very Important!.................................................................................................................................................. 1
What can your Mountbatten Writer do?............................................................................................................. 1
Exploring the MB Writer......................................................................................................................................... 2
What’s inside the box?....................................................................................................................................... 2
Removing the Shipping Lock............................................................................................................................. 2
The Keyboard.................................................................................................................................................... 3
The Embossing Area......................................................................................................................................... 4
The Left Hand Side............................................................................................................................................ 6
The Right Hand Side......................................................................................................................................... 7
Loading Paper................................................................................................................................................... 7
Removing Paper................................................................................................................................................ 8
Writing Braille......................................................................................................................................................... 9
Erasing and Correction.................................................................................................................................... 10
How to Move Around the Page........................................................................................................................ 10
Formatting Your Braille..................................................................................................................................... 11
Braille Writing Commands............................................................................................................................... 14
Embossing Speed........................................................................................................................................... 15
More on Commands............................................................................................................................................ 16
Turning the Command Key On and Off............................................................................................................16
Entering Commands........................................................................................................................................ 16
Chorded commands........................................................................................................................................ 17
Help Command and Options........................................................................................................................... 17
Miscellaneous Commands............................................................................................................................... 18
Essential Extras................................................................................................................................................... 19
Writing Braille Files in Memory........................................................................................................................ 19
Writing Braille on Heavy Card, Plastic film or Labels....................................................................................... 20
Writing Braille on Small Paper......................................................................................................................... 20
Using different weights of paper...................................................................................................................... 20
Embossing Speed........................................................................................................................................... 21
Speech................................................................................................................................................................. 22
Adjusting Speech............................................................................................................................................. 22
No Speech....................................................................................................................................................... 22
Speak Commands as You Type Them............................................................................................................. 22
Adding the Mimic................................................................................................................................................. 23
The Mimic Display........................................................................................................................................... 23
Connecting your MB Writer.................................................................................................................................. 25
Installing MB-Comm........................................................................................................................................ 25
Using MB-Comm............................................................................................................................................. 26
Starting MB-Comm and Connecting the MB Writer......................................................................................... 26
Embossing a file using MB-Comm................................................................................................................... 27
The MB Writer as a Personal Embosser.............................................................................................................. 29
Using the MB Writer with Braille Translation Software.....................................................................................29
Making Braille Graphics....................................................................................................................................... 33
Graphics Mode................................................................................................................................................ 33
Graphics from the Keyboard............................................................................................................................ 33
Braille Codes....................................................................................................................................................... 34
Using Dropped or Lower Numbers.................................................................................................................. 34
Using ASCII or Computer Braille..................................................................................................................... 34
Modifying and Adapting the MB Writer Keyboard................................................................................................. 36
One-Handed Braille Writing............................................................................................................................. 36
Changing the Dot Key Layout.......................................................................................................................... 36
Special Keyboards........................................................................................................................................... 38
Saving and Restoring Settings............................................................................................................................. 39
Care and Troubleshooting Guide......................................................................................................................... 41
Power.............................................................................................................................................................. 41
How to Check the Battery................................................................................................................................ 41
Status and Operation Error Messages............................................................................................................. 41
i

Procedure to Reset the MB Writer................................................................................................................... 43
If you have to return your MB Writer for service:..............................................................................................43
Battery Care.................................................................................................................................................... 44
Resources for Users, Parents and Teachers........................................................................................................46
Posture and Seating........................................................................................................................................ 46
Other Resources............................................................................................................................................. 46
Updates to this User Guide.............................................................................................................................. 46
User Guide Index................................................................................................................................................. 47
User Guide Illustrations
The Mountbatten Writer......................................................................................................................................... 1
The MB Writer Shipping Lock................................................................................................................................ 2
The MB Writer with paper bail installed.................................................................................................................. 3
The MB Writer keyboard with labels...................................................................................................................... 3
The top of the MB Writer, cover off, with the Embossing Area labelled..................................................................5
The left side of the MB Writer, showing the sockets and speaker grille.................................................................6
The right side of the MB Writer, showing the ports................................................................................................. 7
The three steps for loading paper into the MB Writer............................................................................................. 7
Loading paper from the back of the MB Writer....................................................................................................... 8
The command activation keystroke........................................................................................................................ 9
The three steps to enter a regular command....................................................................................................... 10
The command activation keystroke...................................................................................................................... 16
The three steps to entering a command.............................................................................................................. 16
Comparison of normal spacing and Graphics Mode spacing...............................................................................33
The battery-check keystroke................................................................................................................................ 41
ii
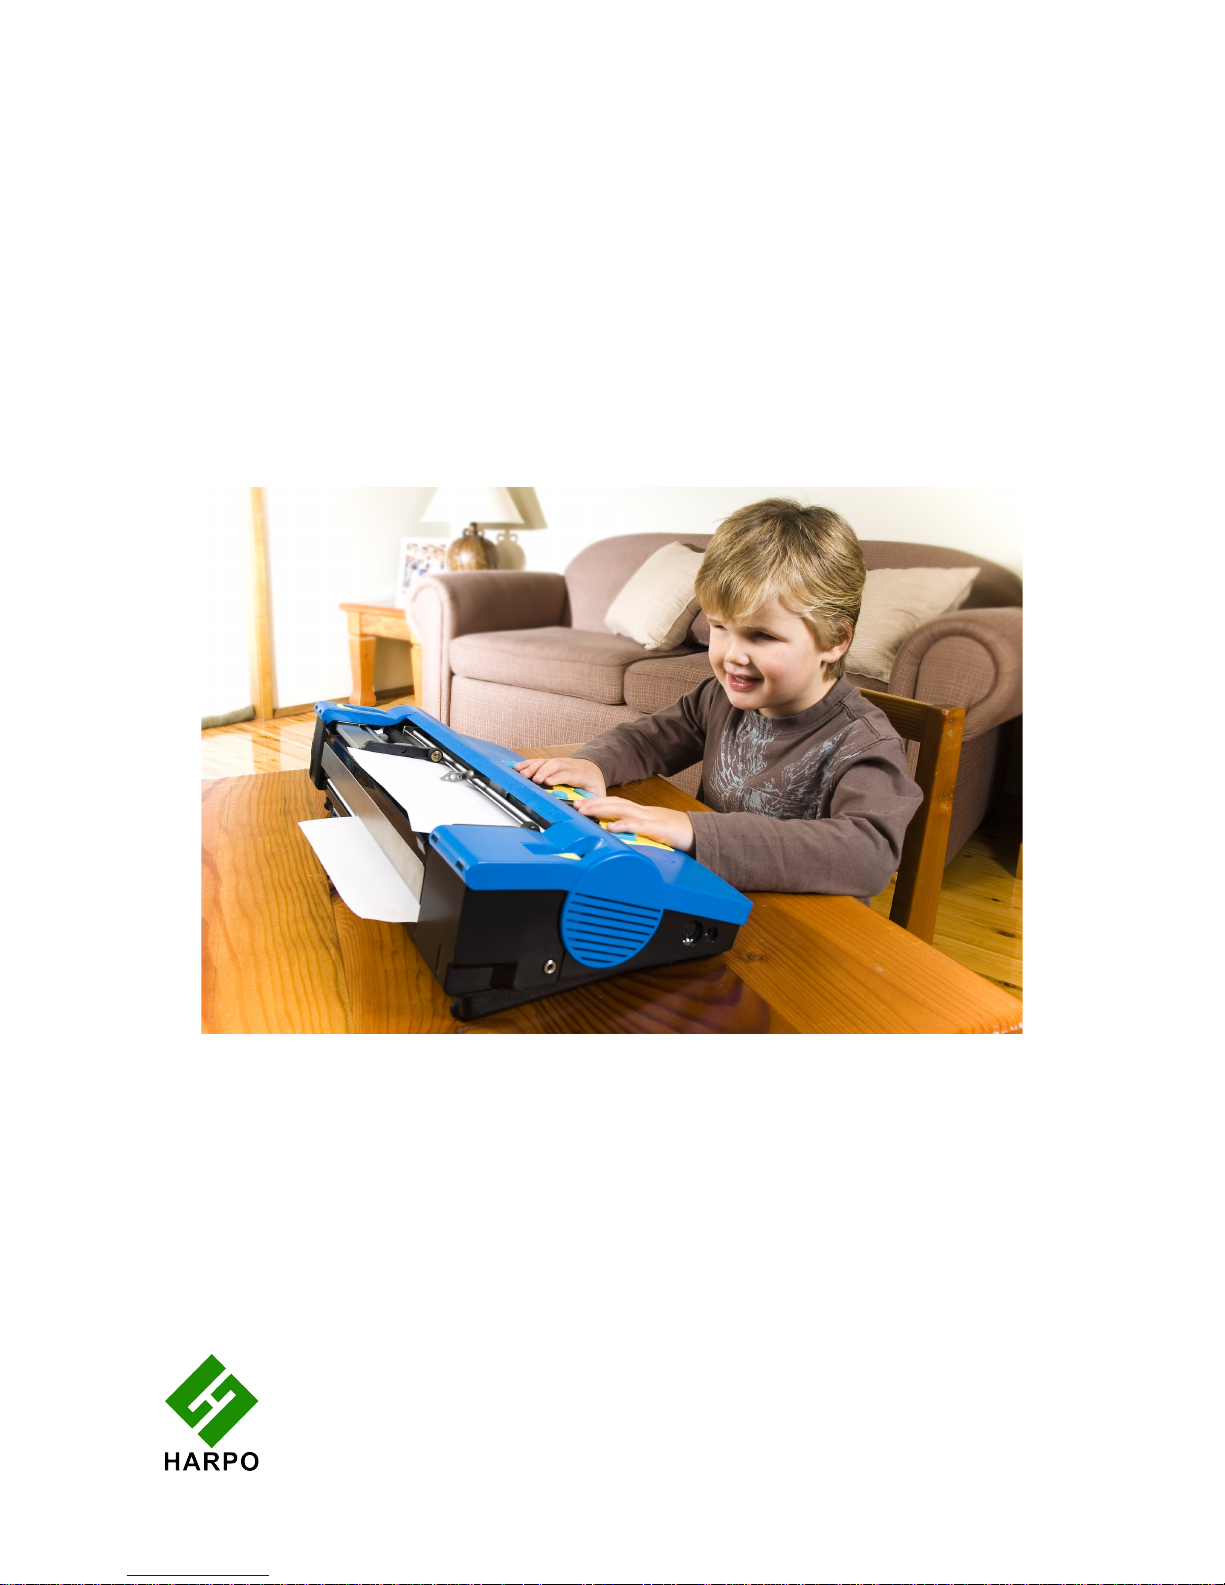
Welcome
We'd like to welcome you to the global society of Mountbatten users, and to introduce you to
your Mountbatten Writer (MB Writer).
We have designed the MB Writer to be used by children learning Braille. We hope that you
will find it a fun and inclusive introduction to Braille literacy, providing a solid foundation for a
lifetime of learning, and that you will enjoy using the MB Writer for the very first stages of
Braille instruction, and then through to secondary school and beyond.
Reading your User Guide
Read this section to find about the MB Writer, the things it does,
and where to find information in this User Guide. When you are
more familiar with the features, the Contents or Index gives you
an easy way to find the information you want; and we have
added a Reference Section at the end for quick lookups.
The first section, Exploring the MB Writer, is to read while you
open the box and look through the contents, and while you explore the MB Writer.
Very Important!
You MUST remove the shipping lock before switching your MB Writer on. If you don't, the MB
Writer could be damaged. The next section, Exploring the MB Writer, gives instructions on
how to do that.
What can your Mountbatten Writer do?
• MB Writer is an electronic Braille Writer with speech, and some extras like erase and
correct, and page formatting. To find out more, check the section Writing Braille.
• The MB Writer speech output helps a learner to remember each new character, and it will
also let a new Braille user make discoveries about new characters. Try it!
• To find out what you can do to control speech to get the output you want, see the
section Speech.
• You can use the MB Writer to make patterns and pictures, and play Braille-learning
games that also help with computer skills.
• For the MB Writer Graphics Mode, and to get started with pictures and
patterns, see the section Making Braille Graphics.
• Contact us for more graphics, both for drawing and for embossing, by visiting
the MB Writer website, www.mountbattenbrailler.com.
• You can use the MB Writer as a Braille printer with Duxbury or other Braille Translation
software.
• See the section The MB Writer as a Personal Embosser for more information.
• For quick lookups, there's a Reference Section, and both the User Guide and Reference
Section have an Index.
We Welcome Your Feedback!
Your feedback is very important to us! Please contact your distributor with any comments or
questions, and you can be sure they'll pass them on to us.
User Guide 1
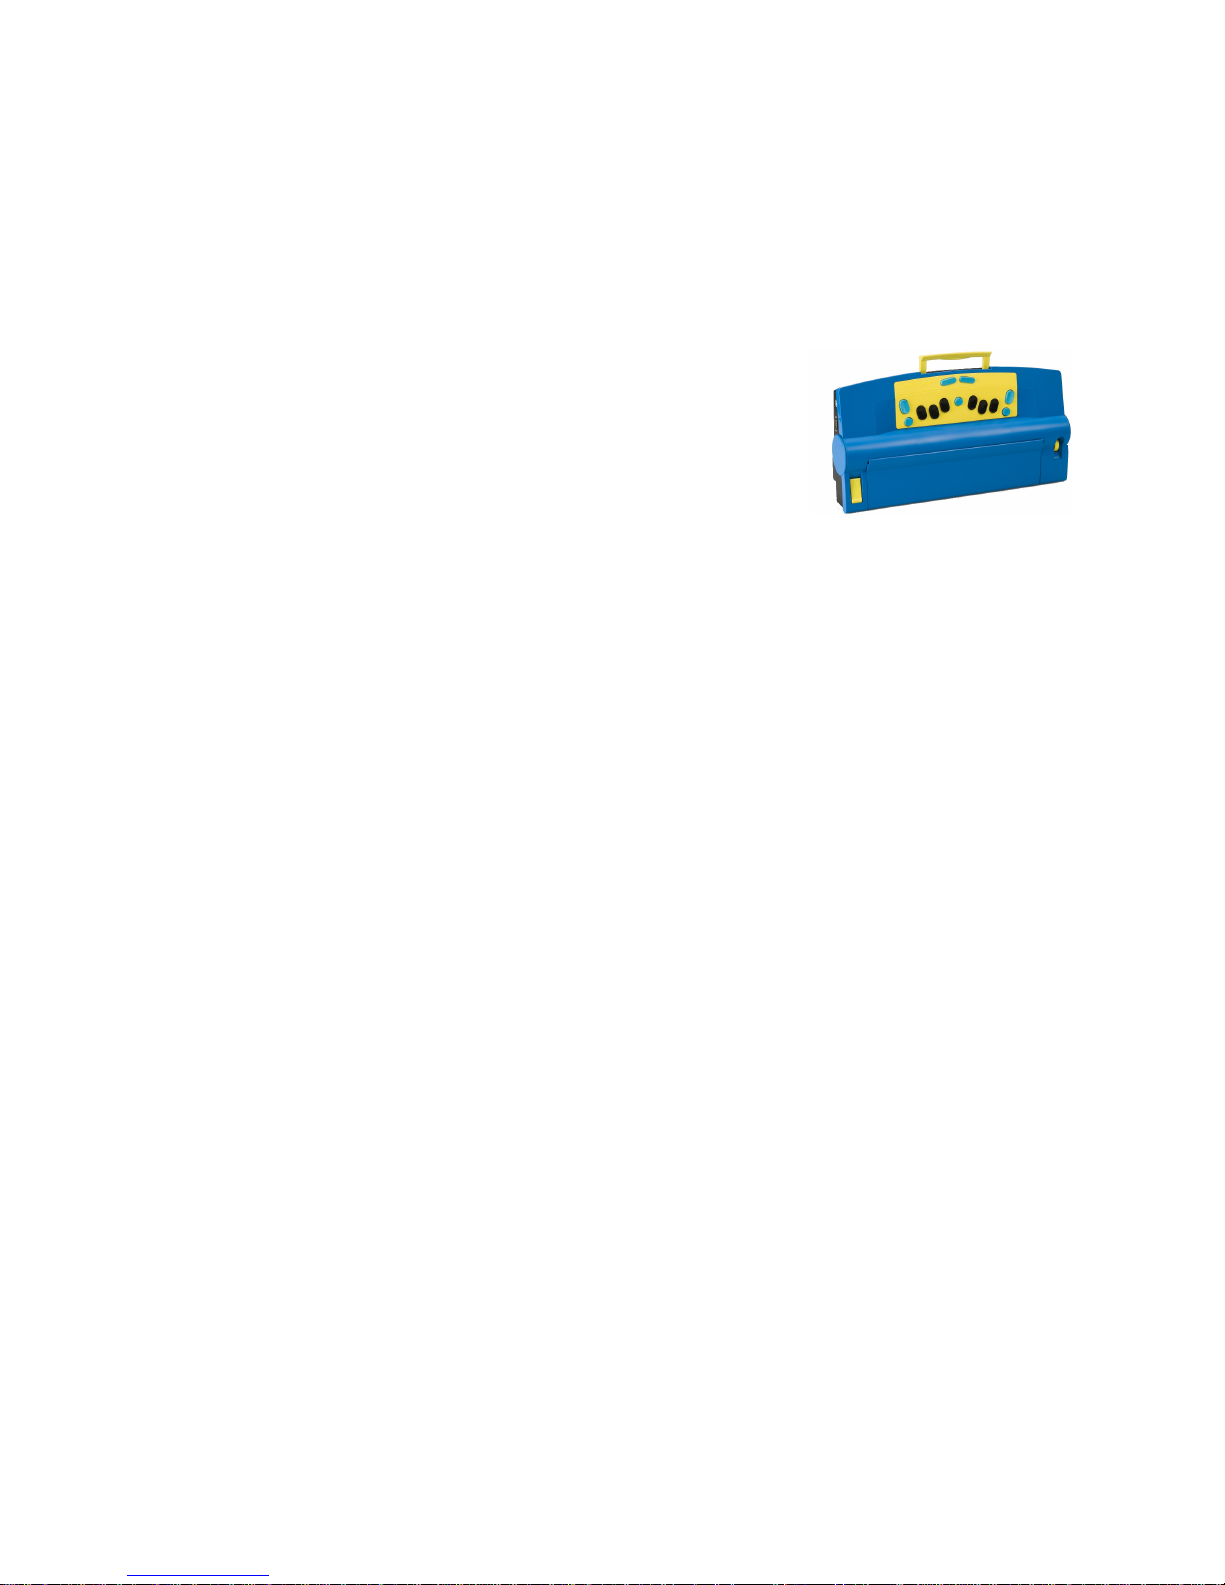
Illustration 1: The Mountbatten Writer

Exploring the MB Writer
In this section we provide an overview of the physical aspects of the MB Writer, where
everything is located and what it does. We also provide an overview of the basic things you
will need to start using your new MB Writer.
What’s inside the box?
Inside the outer carton, you will find the MB Writer has been packed in a smaller carton, with
foam cutouts to support it inside the outer carton. Around the foam cutouts we have packed
all the other things you need to use the MB Writer. The MB Writer is wrapped in bubble-wrap
inside its small inner carton.
Please keep ALL the packaging - both cartons, the bubble-wrap and the foam cutouts. If you
have to return the MB Writer to us for service, or if you have to ship it somewhere, it MUST
be packed in this original packaging, so it doesn't suffer damage in transit.
When you receive your MB Writer and unpack it, please check that you have received the
following:
• The Mountbatten Writer
• 1 X USB Peripheral cable
• MB-Comm software and USB drivers on CD
• This User Guide, inside which you will find:
o a warranty sheet
o A set of keyboard stickers
• A starter pack of 80-gsm paper for Brailling
• an AC mains power supply
• A power lead to connect the power supply to the wall socket.
If anything is missing, please contact us or your distributor immediately, so we can supply
you with the missing item.
Fill out the Warranty sheet and store it safely - this sheet only needs to be returned with the
MB Writer if you need service during the warranty period.
Removing the Shipping Lock
Don't switch the MB Writer on yet! First you MUST remove
the shipping lock, or you could damage your new MB
Writer.
When you have the MB Writer out of its box, sit it on the
table in front of you, with the keys towards you.
Remove the top cover by reaching over to the rear of the
MB Writer, and lifting the tab that is in the middle of the cover. Lift the cover over the MB
Writer, towards you. Place the cover to one side. The cover should come off very easily - it
doesn't need any force.
You will now be able to examine the cardboard shipping lock. The two legs of the shipping
lock sit on either side of the Braille embossing head, and prevent it from moving while the
MB Writer is in transit. There is a short piece of the shipping lock which slides between the
two parts of the embossing head. The lock is held in place by the paper bail.
Before you can remove the shipping lock, you need to remove the paper bail.
User Guide 2
Illustration 2: The MB Writer Shipping
Lock
Removing the Paper Bail
The Paper Bail is only needed when the MB Writer is operating as a Braille embosser.
When using the MB Writer as a Braille writer, we recommend that you remove it, because
with the Paper Bail in place, it is difficult to read the Braille just written.
To remove the Paper Bail, first lift the Paper Grip Lever, which is on the right. Then slide the
right hand margin adjuster as far right as it will go. The adjuster will not move unless the
Paper Lever has been lifted.
On the left hand end of the Paper Bail is a small spring-loaded sleeve. Take this sleeve
between your fingers and push it to the right, releasing the left side of the Paper Bail from its
slot. You can then pull the Paper Bail towards the left to release it from the slot on the right.
Lift the paper bail out and put it to one side.
Now you can remove the shipping lock, by sliding it towards the read of your MB Writer.
We suggest that you store the Paper Bail and the shipping lock in the carton, so you can find
them easily when you need them.
Instructions for re-packing your MB Writer, in case you need to transport it, can be found in
the section Care and Troubleshooting.
Now let's begin finding out more about the MB Writer by taking a tour.
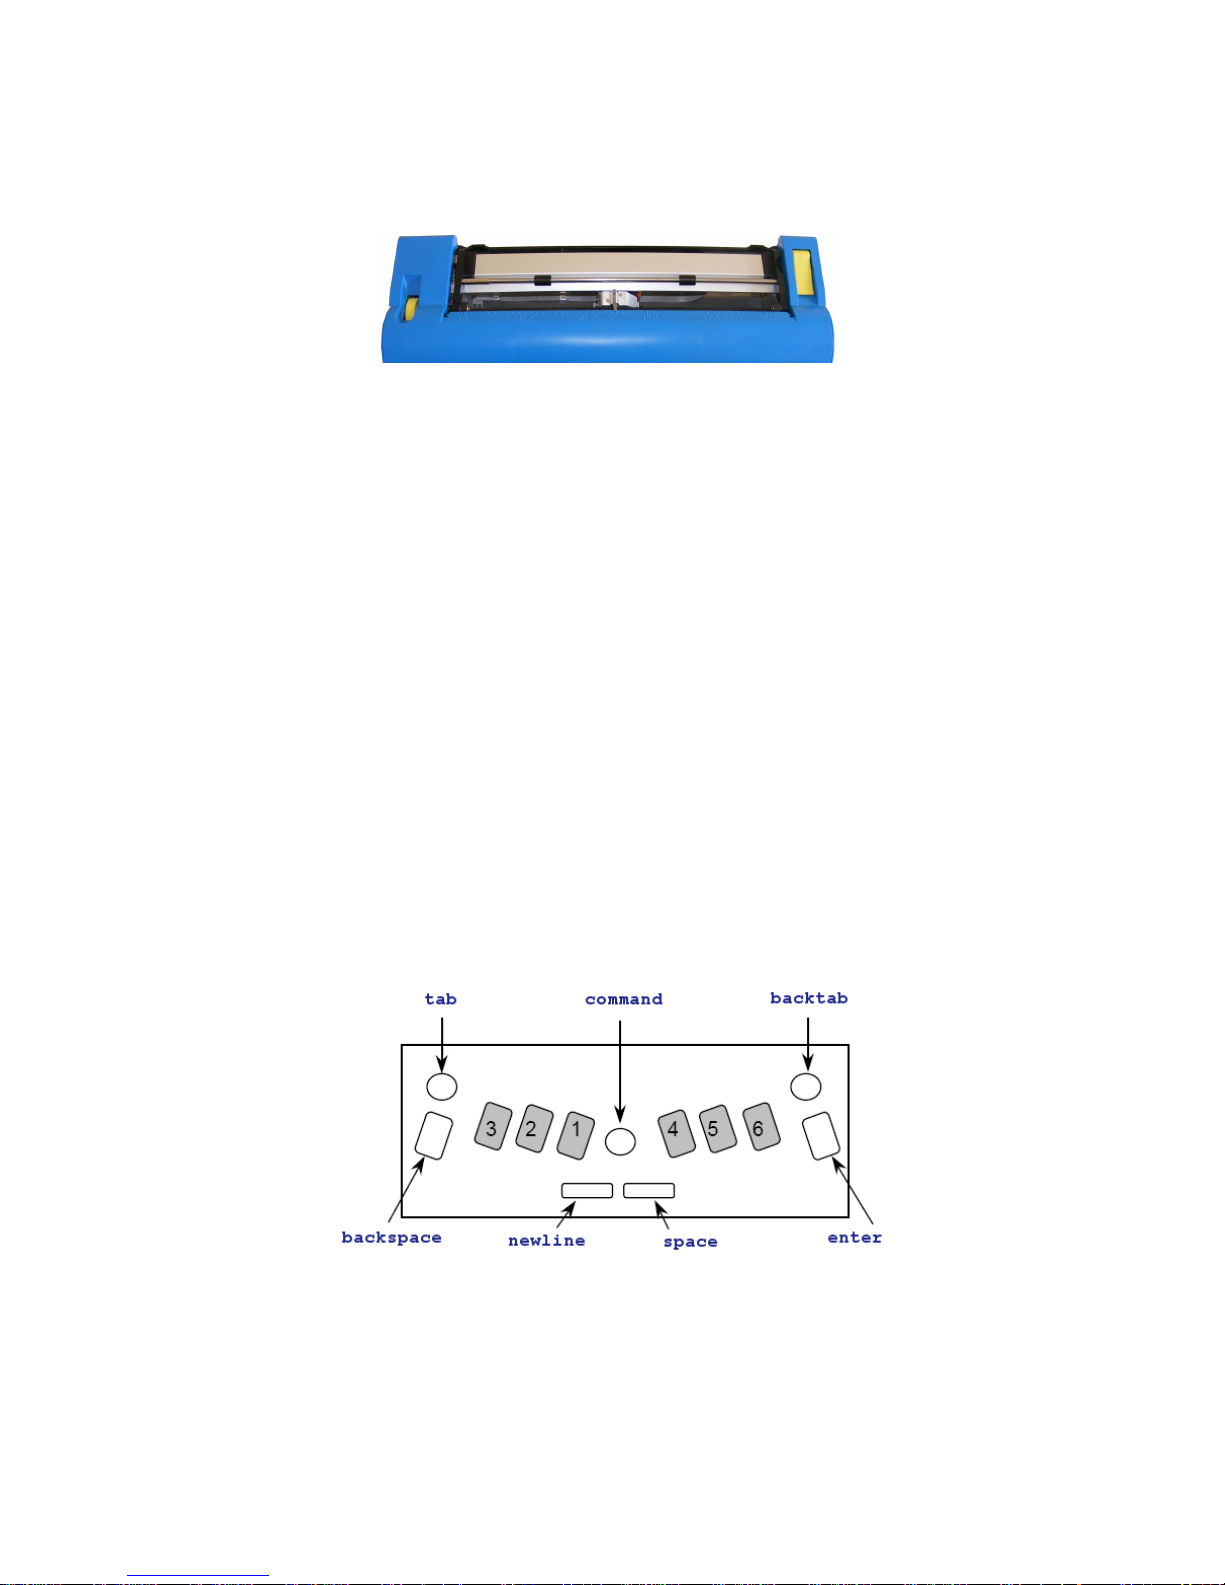
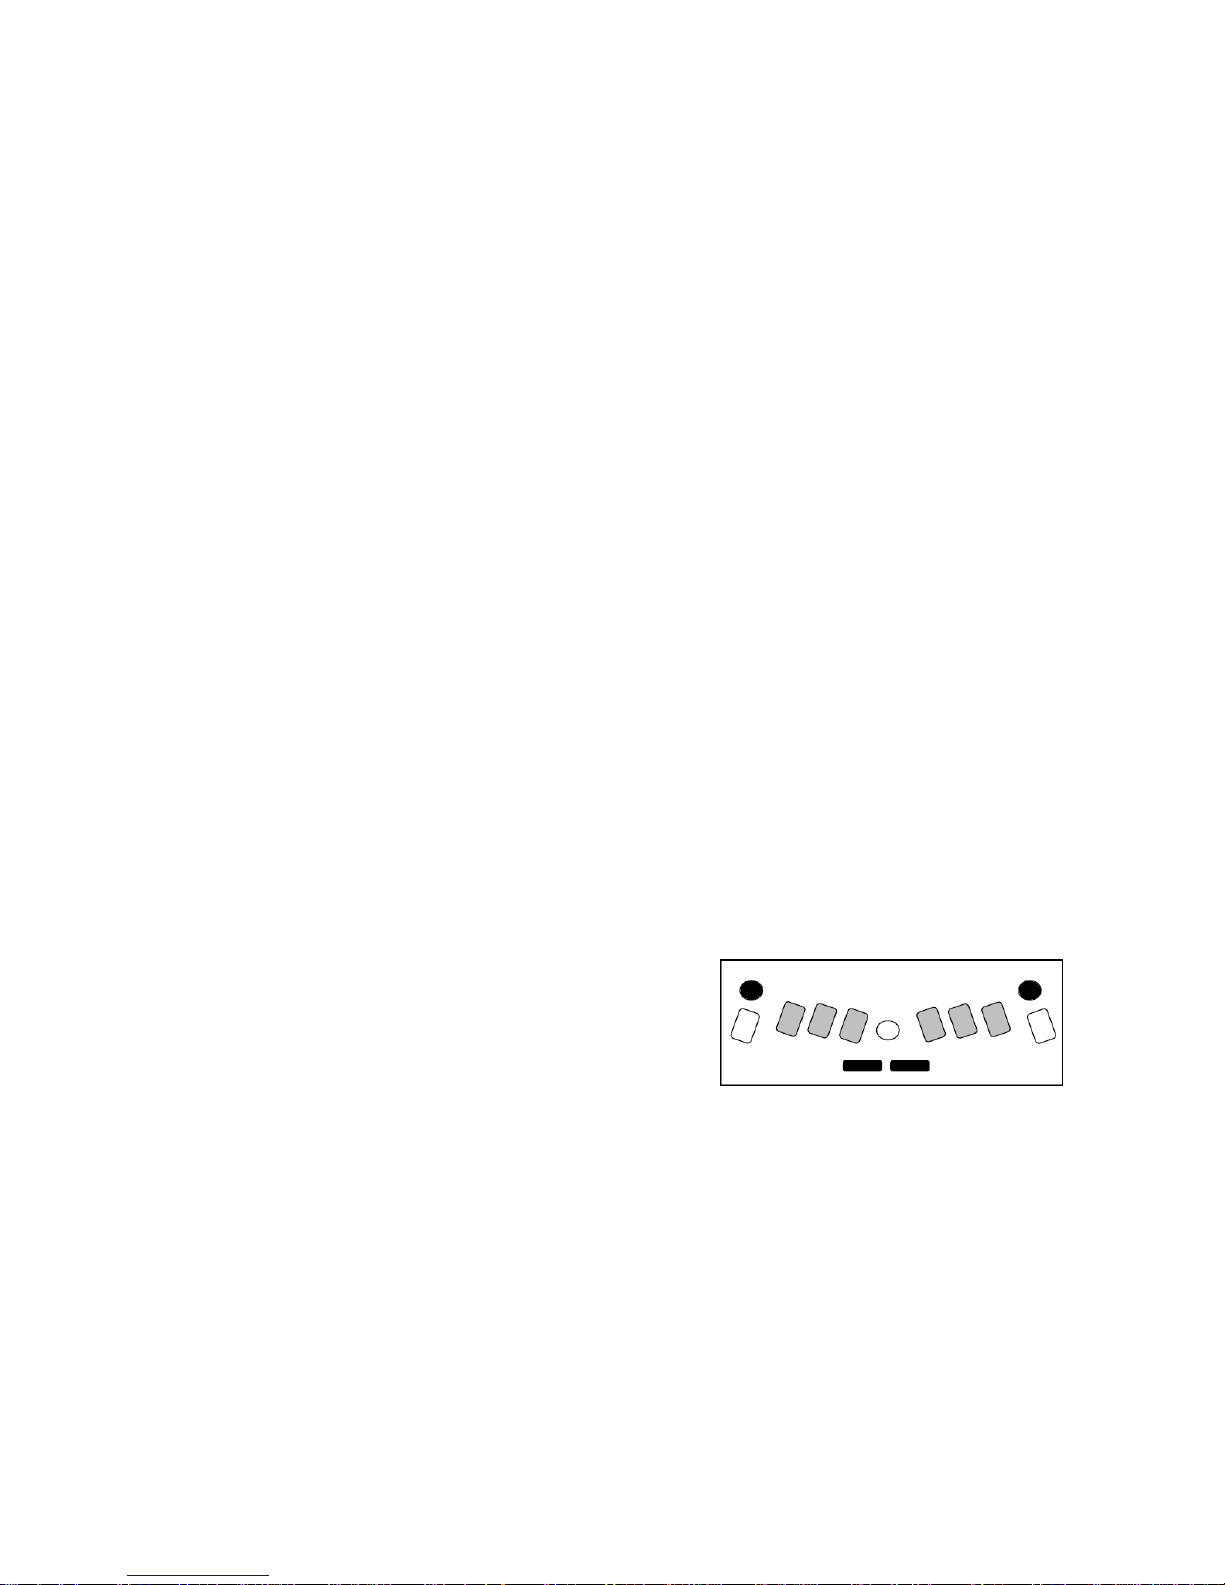
The Keyboard
The keyboard is located in the centre front of the MB Writer. For added contrast, it has a
bright yellow background.
In the descriptions below, key positions are described in terms of where your fingers rest,
when both hands are in the standard position resting on the 6 Braille dot keys.
Braille Keys
The standard keys for 6-dot Braille are the black keys situated on either side of the centre of
the keyboard, arranged in a slight curve so that your fingertips rest comfortably on them.
They are oval in shape, smooth in the centre, and the edges have a ridge.
The keys are known by their dot numbers. From the centre, the left-side Braille keys are dot
User Guide 3
Illustration 3: The MB Writer with paper bail installed.
Illustration 4: The MB Writer keyboard with labels.

1, dot 2 and dot 3, and the right-side Braille keys are dot 4, dot 5 and dot 6.
The backspace Key and the enter Key
At the far right and far left of the 6 dot keys, under your little fingers, are two additional blue
keys, shaped the same as the standard keys, but with a ridged top. When you are using the
MB Writer for 6 dot Braille, the left key is the backspace and the right key is enter. These
keys can also operate as the additional keys for 8 dot Braille.
You can press the enter key when at either the left or right margin if you want to move
temporarily beyond the margin setting; for example, to continue Brailling on the same line
after reaching the right margin.
Because of this function, enter is also known as margin release.
The enter key is also used to terminate commands.
command Key
At the centre of the keyboard, between the right and left hand keys is a round, blue button
with a smooth, recessed top. This is called command, and is used for giving the MB Writer
special commands.
newline Key
Under your left thumb is the newline key. This key advances the page one line and moves
the embossing head to the beginning of the new line.
newline and space both have flat tops, and are nearly rectangular in shape, with rounded
right and left ends.
space Key
Under your right thumb is space.
tab and backtab Keys
Above your little fingers, at the top left and top right of the keyboard, are programmable
function keys. Both keys are round and blue with smooth recessed tops.
When your MB Writer arrives these keys are programmed to be tab on the left and
backtab on the right.
They can also be programmed so that they activate other functions - see the Section
Modifying and Adapting the MB Writer Keyboard for more information.
The Embossing Area
Behind the keyboard you will find the part of the MB Writer where the paper is loaded and
where all the embossing is done.
Ruler
Just before the embossing area, between the keyboard and the Embossing Head, there is a
ruler line embossed into the case of the MB Writer. You can use this to follow where your
Braille is relative to the width of the paper.
Embossing Head
The Embossing Head moves across the paper just behind the ruler. After printing a
character, it stops at the next character position to the right.
User Guide 4
Paper Lever
At the far right you will find the Paper Lever. This is a flat yellow lever; lift it from the front to
release the paper, or to allow you to load paper.
Slip your thumb into the recess from the front to lift the Paper Lever, so you can insert or
remove paper. To make this easier, you can raise the front end of the lever slightly by
pressing a finger back and down on the raised rear edge of the lever. Lowering the Lever will
make the MB Writer grip the new sheet of paper.
Each time you lower the Paper Lever, the MB Writer moves the Embossing Head over to the
Right Margin Adjuster to find out the paper width before moving back to the left. The MB
Writer also resets the line count to zero, and assumes that you are at the top of the page.
Reading Table
The Reading Table is the flat strip of metal behind the Embossing Head. It provides support
for the paper when you want to read it. A groove runs along the front of the reading table. If
you align the top of your paper with this groove when inserting a new sheet, it will be in the
right place for your Braille.
Paper Bail
The Paper Bail is the round bar that goes from left to right above the reading table. Two
rollers fixed to the Paper Bail press down the paper and guide it. These rollers can slide
along the bail to adjust for different paper widths.
The Paper Bail is not needed for daily use with single sheets of paper; it is provided to help
control continuous paper when you are using the MB Writer as an embosser. So you can put
the Paper Bail aside in a safe place until you need it.
Margin Adjusters
There are two Margin Adjusters fixed to the Reading Table, so you can adjust for different
sizes of paper.
The left Adjuster is fixed in place. When you insert paper into the MB Writer, you align the left
edge of the paper with the left Margin Adjuster, making sure the paper is under the Grip
Wheel, and then slide the right Margin Adjuster across so that it holds the right edge of the
paper.
User Guide 5
Illustration 5: The top of the MB Writer, cover off, with the Embossing Area labelled
Raise the Paper Lever to lift the Reading Table and Margin Adjusters when you are inserting
or removing paper.
Paper Grip Wheels
The Paper Grip Wheels are small rollers, at the front of the Margin Adjusters. They grip the
paper while you are Brailling, so that the MB Writer can move the paper the right amount for
each new line. Your paper must pass underneath these Grip Wheels when you are loading it.
Paper Advance Knob
This is a yellow knob set in a recess on the left of the embossing area, on the opposite side
to the Paper Lever. You can use this knob to adjust the top paper edge when you have
inserted paper. You should avoid using this knob when the paper is already inserted and you
have moved down the page, as the paper position will change, and the MB Writer will not
know where the margins and line position are.
The Left Hand Side
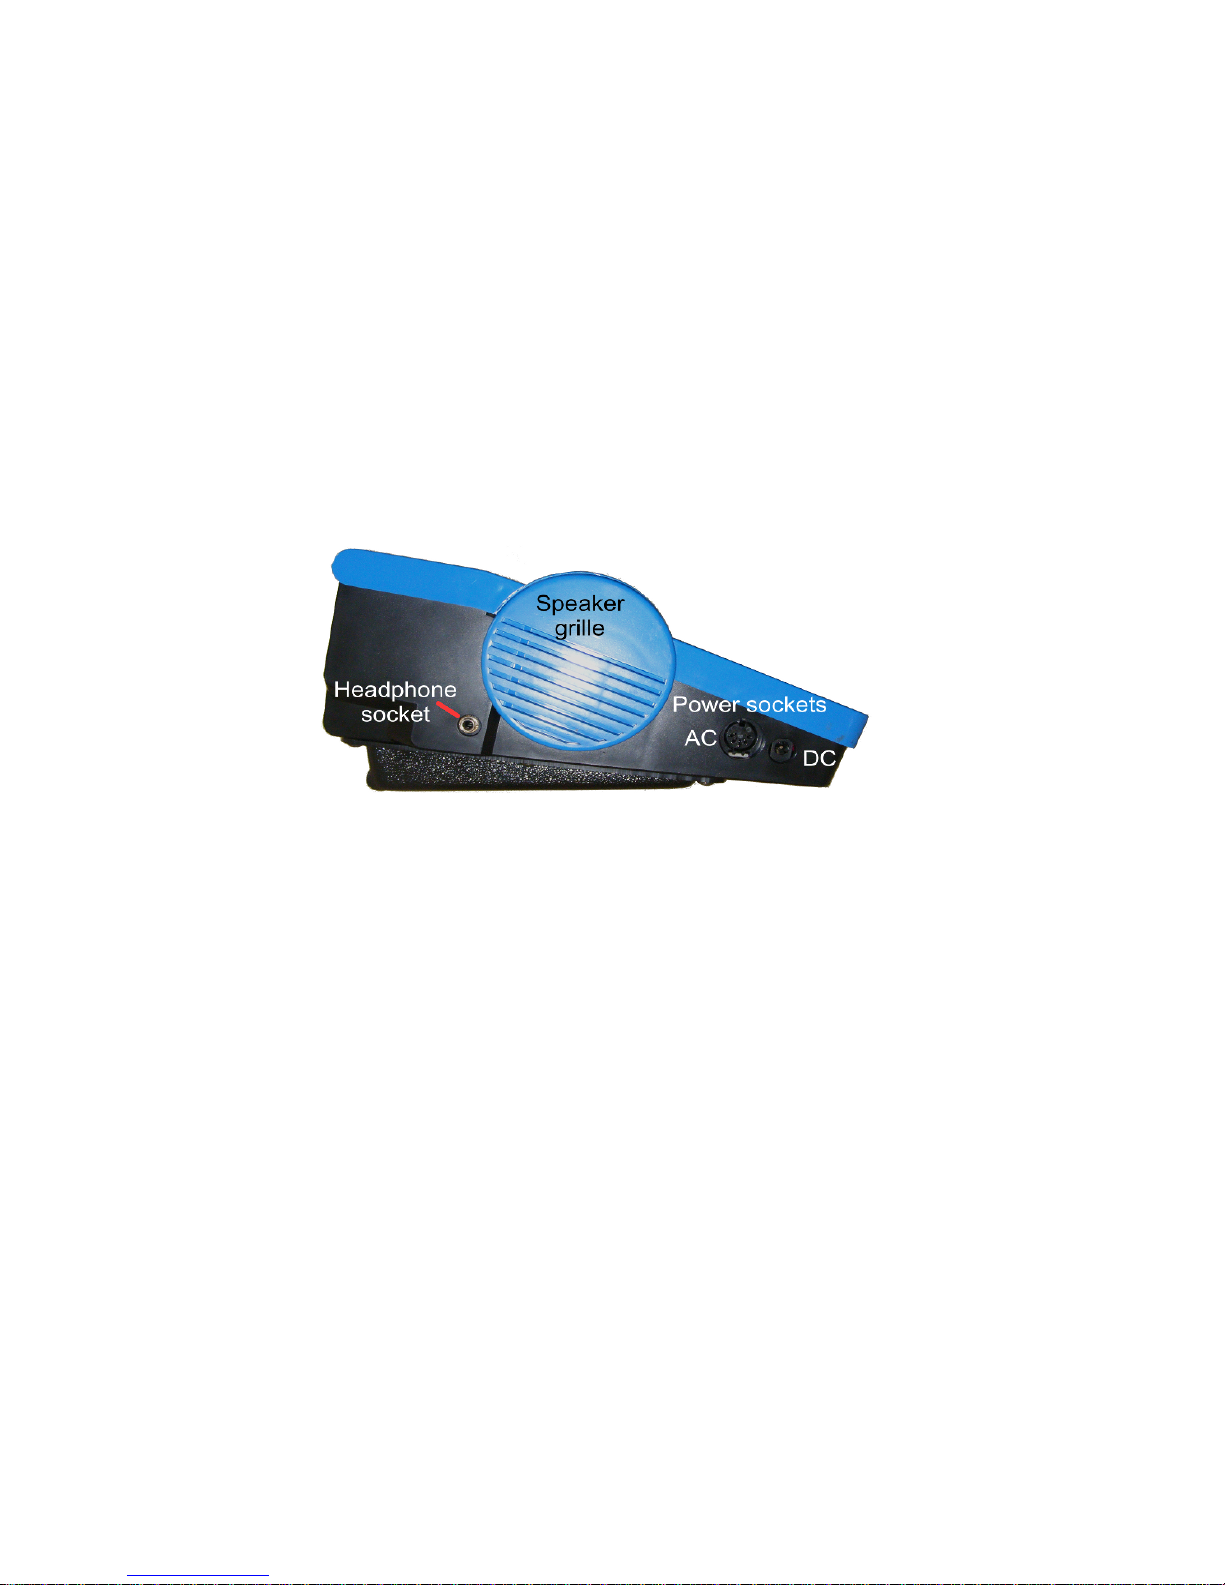
Headphone Socket
This is a standard 3.5mm headphone socket; when headphones are plugged in, the speech
output is directed to the headphones instead of the speaker, so that only the person wearing
the headphones can hear what the MB Writer is saying.
Speaker Grille
The speaker is located directly behind this grill. This is where speech output is normally
directed.
AC Power Socket
This is where you connect the mains power adaptor supplied with your MB Writer. You
should only use the power unit supplied.
The connector is a round DIN-type plug, which has a locator slot that has to be at the top of
the plug when you insert it. Do not use force when inserting the connector - if it is the right
way up it will go in easily.
DC Power Socket:
The MB Writer is not supplied with a DC power adaptor. If you would like to use a DC
adaptor, for instance to charge the MB Writer while in the car, please contact us or your
User Guide 6
Illustration 6: The left side of the MB Writer, showing the sockets and speaker
grille
distributor for information about the proper adaptor.
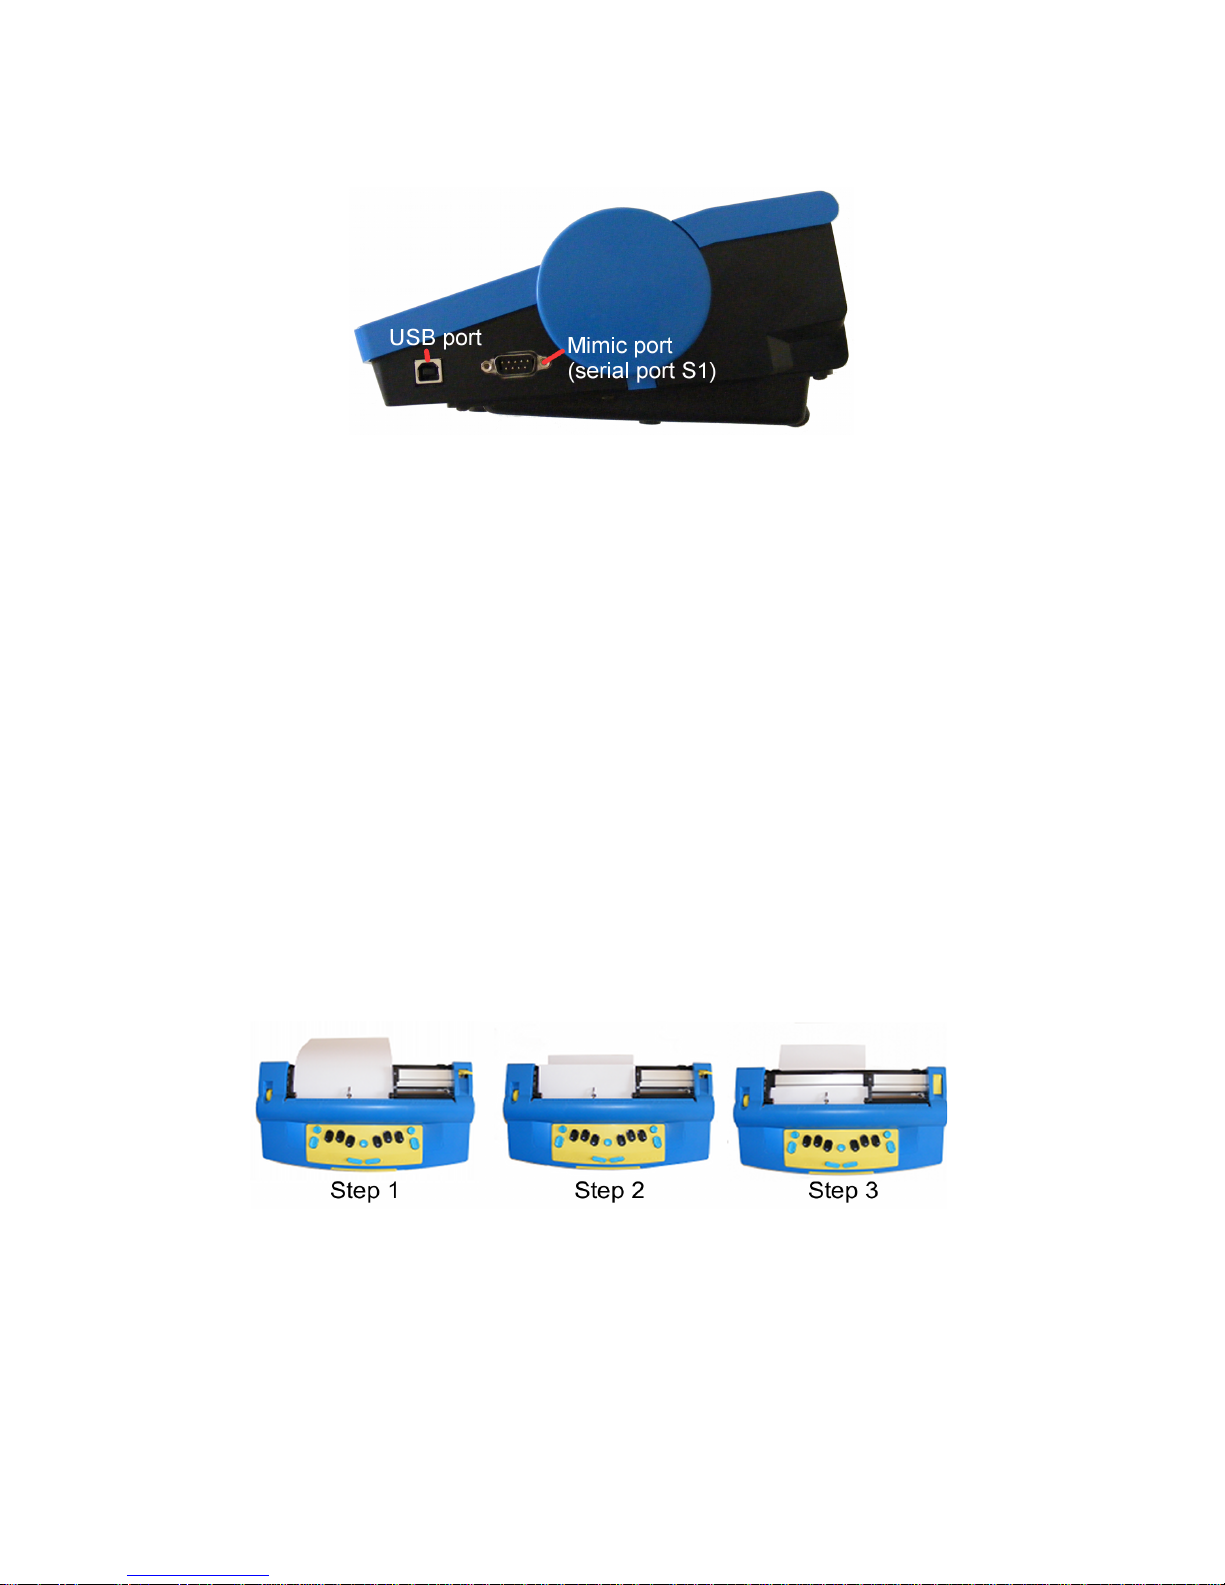
The Right Hand Side
USB Port
This is used for connecting to a computer and for transferring information between the PC
and the MB Writer. Use this port with our software MB-Comm. The use of MB-Comm is
described in the section Connecting your MB Writer.
Mimic Port (S1 port)
The Mimic LCD display is connected here. For information on using the Mimic, see the
section Adding the Mimic and a Keyboard.
Note:
You can only use one port on the right hand side at any time. If the Mimic Port is being used,
you cannot use the USB at the same time (and vice versa).
Loading Paper
There are two methods for loading paper. Try each method to find the one that suits you
best.
Loading Paper: Method 1
The first method is very similar to loading paper into a typewriter.
Step 1 Lift the yellow Paper Lever, and slide the right hand margin to the position
that suits the paper size being used. Lay the paper flat on the Reading Table.
Make sure that the paper is positioned so that it goes underneath the small
rollers on the left and right margins and under the embossing head.
User Guide 7
Illustration 7: The right side of the MB Writer, showing the ports
Illustration 8: The three steps for loading paper into the MB Writer
Step 2 Slide the paper into the unit. Some people grasp either side of the paper and
push it in. Others prefer to slide it in by pressing on the Reading Table and
sliding forward.
Step 3 When the paper is fully inserted, align the top of the page on the Reading
Table. Check that the paper is placed straight against the left hand margin.
Slide the right margin to the left until it rests against the right edge of the
paper. Flip the Paper Lever to the down position. The embossing head will
now move across to the right margin adjuster and back again, to check the
paper size.
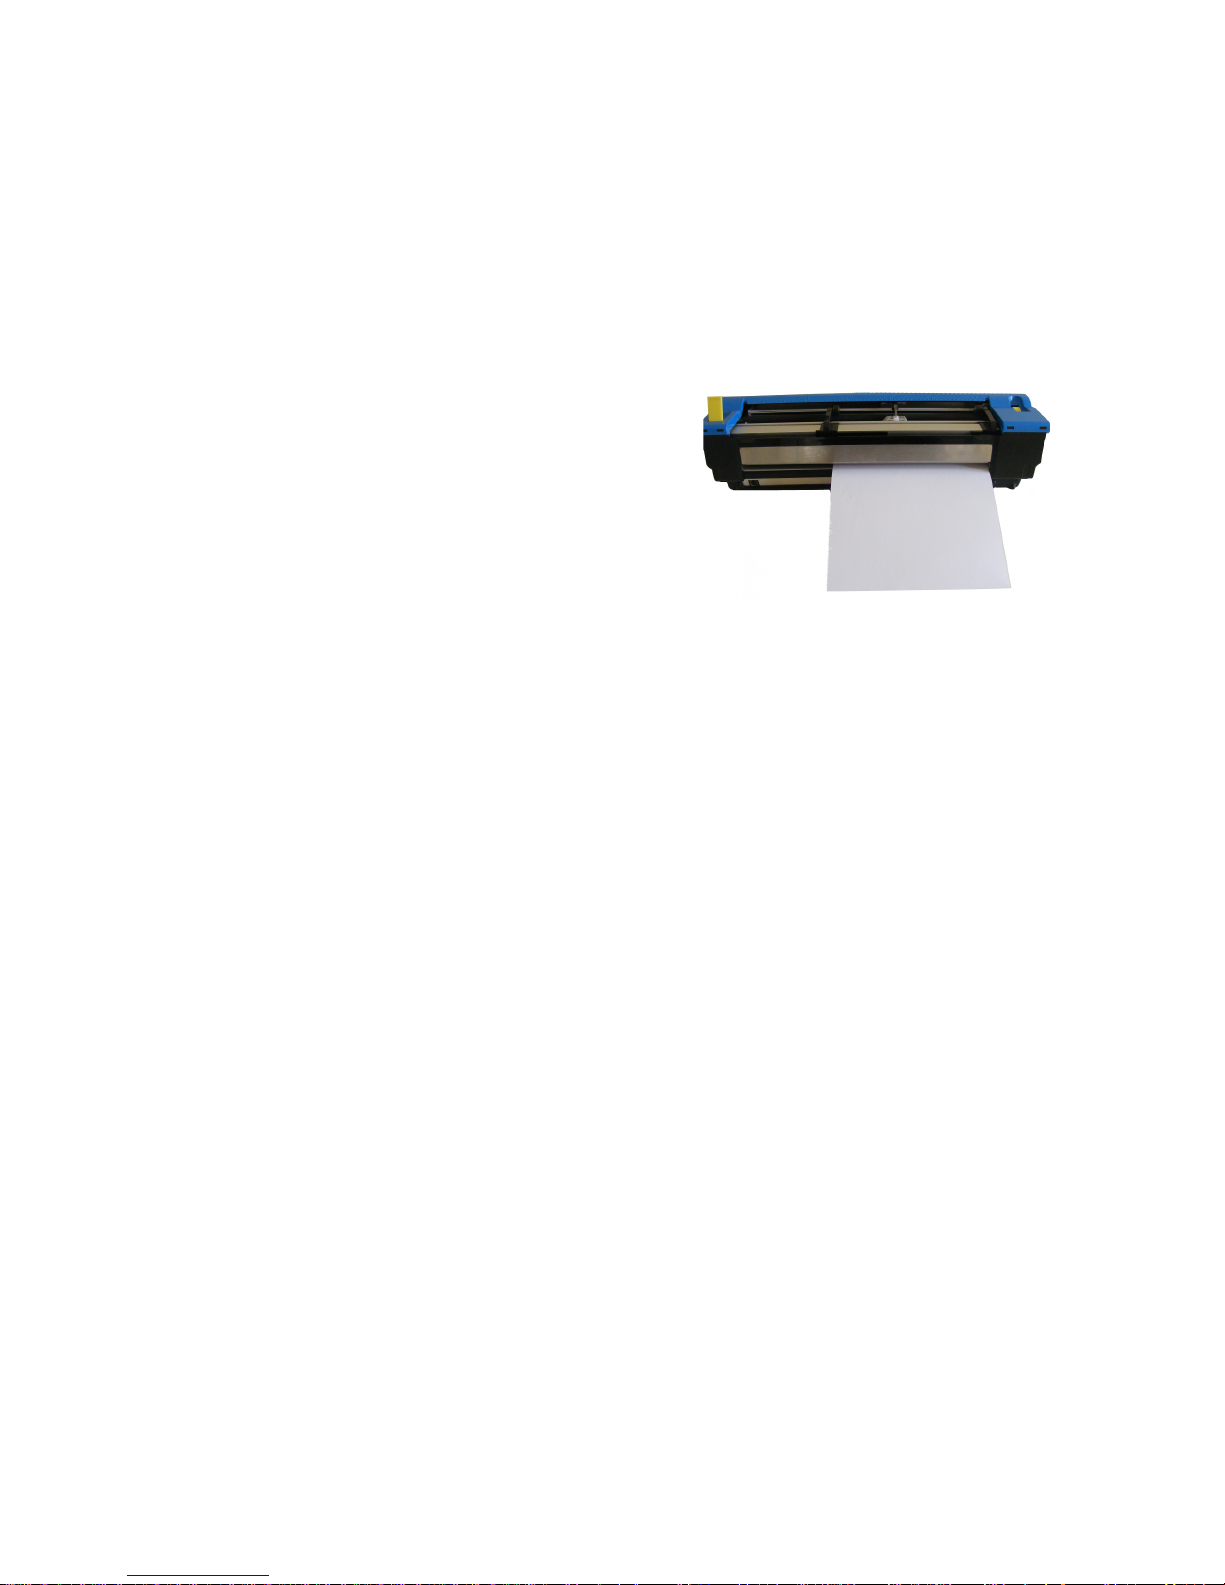
Loading Paper: Method 2
The second method involves inserting the paper from
the rear of the MB Writer.
First lift the Paper Lever. Then locate the Paper Input
Slot at the rear of the MB Writer and insert the top of
the page into it. Simply push the paper in until it
appears on top of the Reading Table. Align the paper,
adjust the Right Margin Adjuster as needed, and
move the Paper Lever to the down position.
Removing Paper
To remove paper, simply lift the Paper Lever and pull the paper back and out of the MB
Writer.
For users who cannot reach to pull the paper out of the back of the MB Writer, it is possible
to eject the page from the keyboard. There are three ways to do this:
newline + enter Page eject. Press newline and enter together.
p-chord Page eject. Press p and space together, dots 1, 2,
3, 4 and space.
np Force a new page. This is a command, and can be used
by itself or in a file to be translated.
Your MB Writer will say "Page Eject" and the paper will be rolled out of the machine, ready to
be collected.
User Guide 8
Illustration 9: Loading paper from the back of
the MB Writer
Writing Braille
First, load a sheet of paper using the instructions in the previous section.
Then turn the MB Writer on using the switch, and use the six black Braille keys and space,
in exactly the same way as you would type on a mechanical Braille writer. Whatever you type
will be embossed on the paper.
The MB Writer keyboard works a little differently from a mechanical Braille writer. On a
mechanical Brailler, the keystroke makes dots when you get to the bottom; on the MB Writer
the keystroke makes dots when the keys come back up as you let go. This means that a
learner can add dots together to make up a Braille character.
End of line and Word Wrap
When you get close to the end of the line, you will hear a beep. This is the margin bell, and it
lets you know that you will soon be at the end of this line - the factory setting has the beep
sounding 5 characters before the end of the line. You can turn this bell off if you wish.
The important thing to remember is this: your MB Writer doesn't need you to do a carriage
return at the end of the line. Unless you wish to begin a new line, just keep Brailling; the MB
Writer, when it gets to the end of the line, will automatically go to the next line. This is called
Word Wrap.
In the default setting of Word Wrap, your MB Writer will take your Braille as close to the right
side of the page as it can. If the word you are Brailling isn't finished, the MB Writer will place
a hyphen, move to the next line and keep Brailling.
If you don't want hyphens, you need to use a command.
Enabling commands
When you first receive your MB Writer, it is in Learn Mode, and the command key is inactive.
command is the small round blue key in the very centre of the keyboard, between the Braille
keys. When it is active, it's easy for a beginner to activate all sorts of features and find
themselves lost. However, it's very easy to activate the command key and to deactivate it
again. These are the keys you use; they switch the
command key from inactive to active, and from active
to inactive:
tab+backtab+newline+space
When you press these keys together, your MB Writer
will say "command on" or "command off". You will know
immediately which state the command key is in.
Now that you have the command key active, you can change the Word Wrap behaviour if
you wish. The command to do this is ww.
ww Turn Word Wrap on and off.
When Word Wrap is on, the word is not embossed until space is pressed. If the word cannot
fit on the line, it is moved to the beginning of the next line. The default for ww is off. This
command is a toggle; use the same command to turn it on and off.
Entering the command
All regular commands begin with the command key, and finish with the enter key.
User Guide 9
Illustration 10: The command activation
keystroke
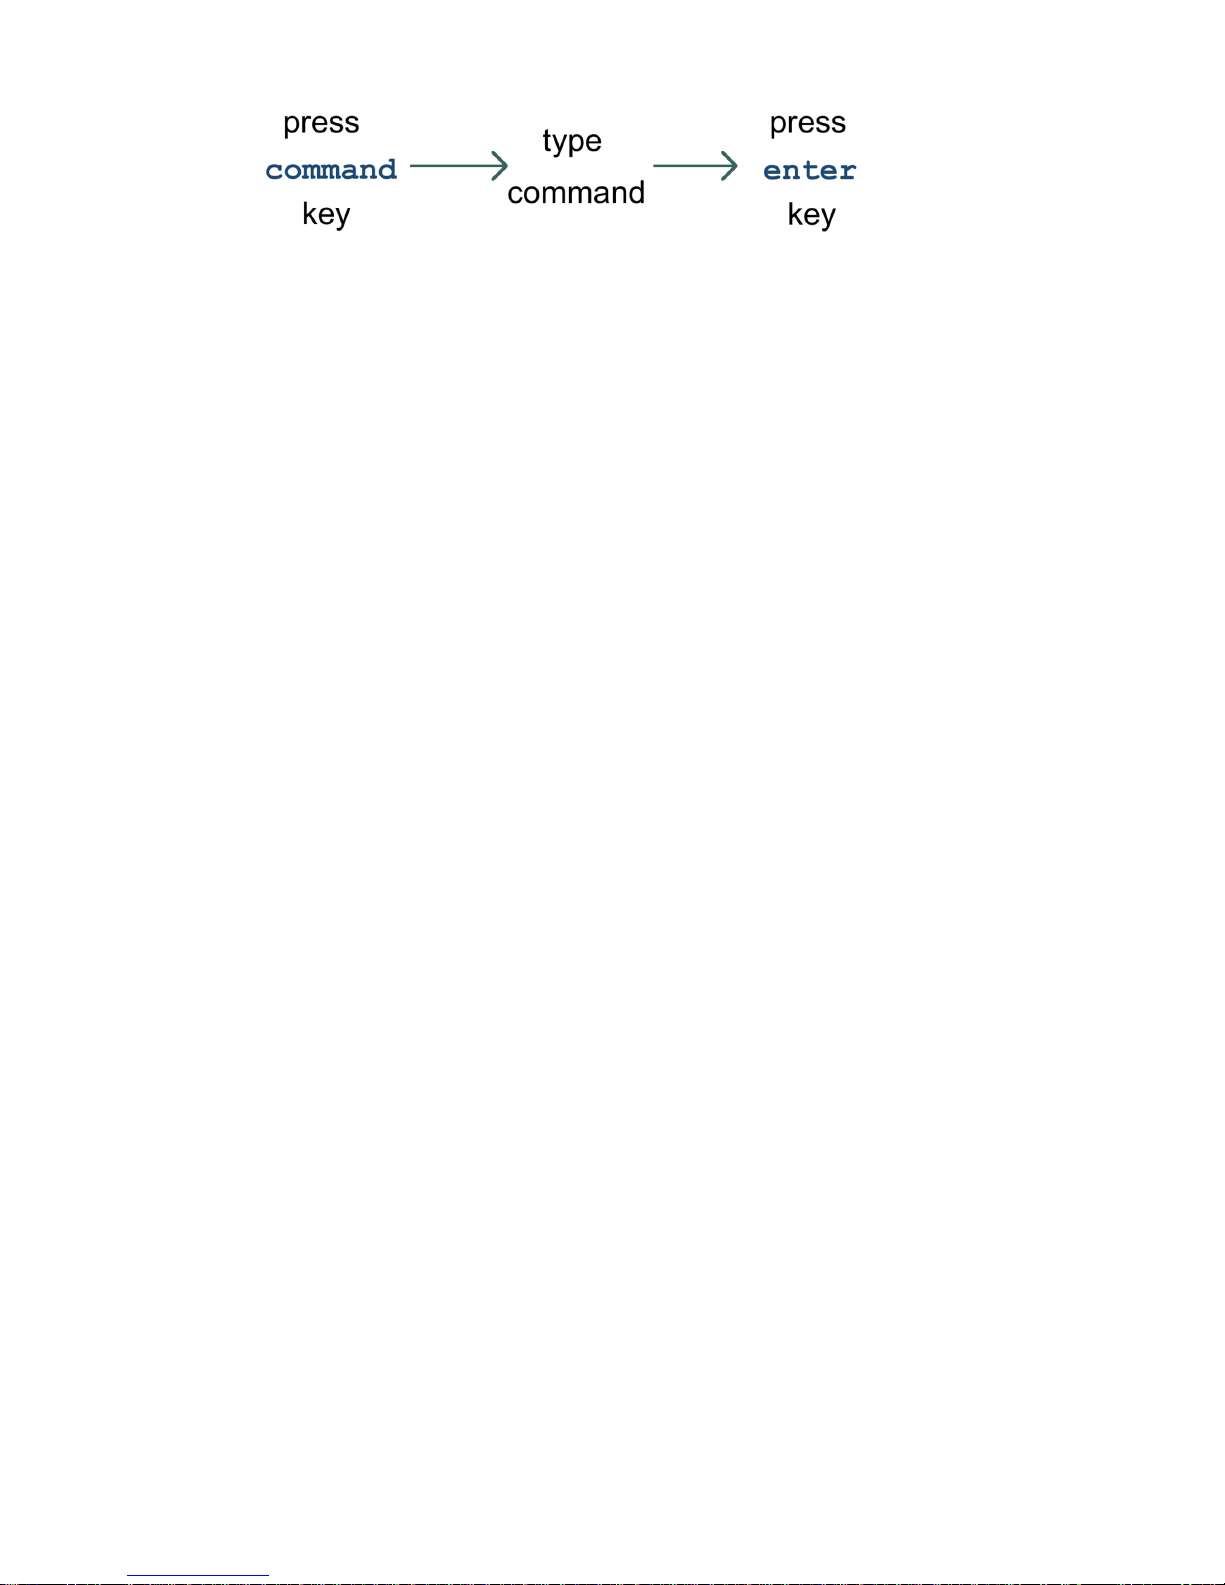
For example to turn the Word Wrap command on, you first press command, then type ww and
then press enter. Your MB Writer will say “on” or “off” depending on the original setting.
Toggle Commands
Some commands, like Word Wrap, are "toggle" commands, meaning that they toggle
between an on and off state, each time they are invoked. Throughout this User Guide and
the Reference Section, each toggle command will have a note as part of its description,
telling you it is a toggle command.
Commands Needing Extra Information
If your command needs you to enter a number or another parameter as well as the
command, press the command key, type the letters of the command, press space and then
type the number or other parameter. Numbers can be entered using literary or Grade Zero
numbering; use the numeral sign, dots 3,4,5,6 with the letters a to j, or use the Grade
Zero lower numbers. See the section Braille Codes for more information on using dropped
or lower numbers.
You will find more information about commands throughout this User Guide, and in the
Reference Section.
Erasing and Correction
Your MB Writer can erase or correct mistakes.
Make sure the Braille head is one space to the right of the cell you wish to change. When
you press the keys, the head will move back, make the change or erase the error, and then
return to its original position
backspace+space replaces a character with a space.
backspace+correct dots replaces a character with your desired character.
If you have typed a letter where you wanted a space, make sure you are one position to the
right of the letter you want to erase, and press backspace+space.
However, if you typed p when you wanted w, you could change the p to w. Make sure you
are one position to the right of the p, and press backspace+w (backspace+dots 2456).
How to Move Around the Page
newline+space Move down the page in same column
newline+backspace Move up the page in the same column
newline+enter Page Eject
tab Move right 5 spaces
backtab Move left 5 spaces
space Move one position right
User Guide 10
Illustration 11: The three steps to enter a regular command

backspace Move one position left
Playing Shark Attack - practise moving and correcting
"Shark Attack" is a game devised by SET-BC in Canada, to use the erase and correct
feature and all the page movement commands.
Braille the letter g, dots 1,2,4,5, about 12 times in various areas of the Braille page, in
front of the student or person who will play. Explain that these are fish swimming in the
ocean.
Bring the embossing head to the centre of the page before starting, so that there are some
fish above the embossing head as well as some below, and some to either side.
Explain that the student or player is a very hungry great white shark and that they want fresh
fish for supper. Explain that once they know how to move around and swim they can start
eating the fish.
The player then navigates to the cell immediately to the right of each fish and uses
backspace + space to gobble up the fish.
There are other variations of Shark Attack:
The Star Catcher Game - players have to catch as many stars as possible; instead of g,
Braille the letter s, dots 2,3,5 for each star.
The Hungry Wolf Game - the hungry wolf wants to eat some tasty sheep. In this variation,
the fat woolly sheep are represented by a full cell, dots 1,2,3,4,5,6.
You can vary the number of fish, stars or sheep to increase or decrease the difficulty; you
can add characters that aren't to be "eaten", and subtract points for characters eaten in error.
If you have more than one player, you can set an audible timer for 2 minutes and then count
the consumed stars, fish or sheep; the highest score wins.
Formatting Your Braille
For simple Brailling, your MB Writer will wrap the ends of lines and doesn't require you to do
any formatting. When you reach the bottom of the sheet of paper, the MB Writer will say "out
of paper", or you can remove or eject the page when finished.
If you would like to format your Braille pages, there are some commands you can use. They
fall into four different areas.
Positioning Braille on the page
With no positioning commands active, the MB Writer begins embossing from the left margin,
and doesn't align the right-hand end of each line. There are two other choices:
ce Centres your Braille on the line.
Press newline before entering this command, so that the Braille to be centred begins on a
new line, and begin typing the Braille after the command is entered.
As you type the MB Writer stores your Braille in a memory area called a buffer. It will begin
embossing the first line, centred on the page, when the buffer fills, after you press a space. If
you continue typing, the MB Writer will treat each line this way, centring it and embossing
when the buffer fills. Use this facility for centring a paragraph or a single line, or even a
whole document.
If you are Brailling a heading or a line of only a few words, press newline when you have
finished typing, and the MB Writer will centre and emboss the line.
User Guide 11

To turn Centring off, enter the ce command again; this command is a toggle. The default
state is off.
ra Aligns your Braille to the right-hand margin.
Like ce, the Right Align command stores your Braille in a buffer, and begins to emboss the
first line when the buffer has filled, after you press a space. Continuing to type will give you a
right-aligned paragraph. To right-align short lines, press newline at the end of each line,
when the line will emboss and be right-aligned.
Right Align will not work if Centring is active, even if you have it turned on first.
To turn Right Align off, enter the ra command again; this command is a toggle. The default
state is off.
Margins
When you load a new sheet of paper, the default margins are active. The MB assumes a
page length of 26 lines, with a top and bottom margin of zero; the left and right margins
depend on the width of the paper which the MB Writer discovers during the margin seek
when the paper lever is lowered, or when the MB Writer is switched on.
The left margin is hard left at a position equivalent to a little more than two characters (about
1.5 centimetres, or 9/16ths of an inch) in from the edge of the paper. The right margin is as
far right as it can be, the same distance from the right-hand edge of the paper. These are the
positions for a Left Margin of 0 (zero) and a Right Margin of 0 (zero).
To change the left and right margins, the following commands are available:
lmh Set the left margin to the embossing head position.
Use tab, space, backtab or backspace to get to the position you want before entering
this command.
lm number Set the left margin to the position given by "number", counting from the
leftmost position on the page. For instance, if you want the left margin to
be set 10 spaces more to the right than its usual place, enter the
command as lm 10.
lm Use this command to reset the left margin to zero, which is the same as
returning it to its default state.
rmh Set the right margin to the embossing head position.
Use tab, space, backtab or backspace to get to the position you want before entering
this command.
rm number Set the right margin to position given by "number", counting from the
leftmost position on the page. For instance, if you want the right margin to
be set 10 spaces more to the right than its usual place, enter the
command as lm 10.
rm Use to reset the right margin to zero, which is the same as returning it to
its default state.
When you load a new sheet, the top margin is decided by the position of the top of the sheet
of paper when you lower the paper grip lever. When you begin to Braille, the MB Writer
begins embossing immediately without inserting any lines. This is equivalent to a Top Margin
of 0 (zero). To change this top margin so that the MB Writer moves the paper up a certain
number of lines before beginning to emboss, use the tm command below:
tm number Set Top Margin of Braille page in number of lines. This will set the number
of lines to feed before beginning embossing.
User Guide 12

When you are Brailling all the way down the page, the MB Writer will continue to feed a new
line up at the end of each line, or when you press newline, until the bottom of the sheet is
reached. If you would like the Braille to finish on each page before the bottom of the sheet
arrives, you can use the bm command below to change this.
bm number Set the Bottom Margin of the Braille page in number of lines. This will tell
the MB how far down the page to go before ejecting the page and asking
for a new page. The number you enter as part of the bm command is the
number of lines up from the bottom of the sheet. So if you have kept the
default page length, a Bottom Margin of 10 will give 16 lines for Braille,
less any Top Margin.
Releasing a Margin
If you are almost at the end of the line, and your word has only one character more than you
have space for, you can use enter to release the margin so you can fit the word on the
current line.
Margin Release only works if you have Manual New Line on, and the Right Margin is greater
than zero. The command for setting Manual New Line, man, is explained further on in this
section.
Tab Settings
Each time you press tab, the Braille head moves to the right 5 cells; backtab moves the
head to the left 5 cells.
If you would like tab stops in different places, first you must remove the default tab settings:
tc Clear all the currently-set tab stops.
The embossing head will now not move when either tab or backtab is pressed, and the
MB Writer will say "No tab set".
Now that the default tabs are removed, you can set your own tabs by spacing to the place
you want to set a tab stop, and then using the tsh command:
tsh Set a tab stop at the position of the embossing head.
You can set up to 10 tab stops using tsh; if you try to set more, the MB Writer will say
"error".
To restore all your default tabs, use the std command or, if you have saved your default
settings, use restore. See the section Saving and Restoring Settings for more
information on how and when to do this.
Line Spacing
The default spacing for lines of Braille on the MB Writer is single line spacing. This means
that each time there is a wrap at the end of a line, or each time you press linefeed, the
paper will advance by one line. You can change this using the ls command:
ls x.y Use this command to set the line spacing.
In the command, x.y represents a decimal number; if you want a whole number of lines, it's
not necessary to enter the point or a following zero. For example, if you want a line spacing
of 1.5 lines, the command would be ls 1.5. If you would like line spacing of 2 lines (double
line spacing), use ls 2.
When you are typing numbers into a command, it is often easiest to use the dropped or
lower numbers. For ls 1.5, you would type this sequence:
User Guide 13

command l s space dot 2 dots 4,6 dots 2,6 enter
Where numbers are used in a command, they can be entered as either the number sign plus
a letter from a to j, or as a "dropped" or "lower" character. Some commands include ‘x’ and
‘y’ to indicate numbers, where ‘x’ indicates a number and .‘y’ indicates a number after a
decimal point.
Decimal points can be entered as dot 2, (as in literary Braille); or as dots 4,6, as in
ASCII Braille, also known as the North American Braille Computer Code (NABCC). See the
section Braille Codes for more information on using dropped or lower numbers and for a
listing of ASCII Braille.
Braille Writing Commands
There are several other commands which affect Braille writing:
cor This command turns Correction Mode on and off.
When Correction Mode is off, the MB Writer will no longer erase and correct. It is a toggle
command. Correction Mode is on by default; the first time you use cor it will turn Correction
Mode off, and the next time it will turn it on, and so on.
em This command turns embossing off and on.
Embossing is on by default; when it is off, and speech is on, it's possible to Braille into a file
in memory silently.
man Choose between Manual New Line & Auto New Line.
A Manual new line means you have to press the New Line key at the end of each line. Auto
New Line means the embossing head will automatically move to the beginning of a new line
as defined by the ww command. The default is off, meaning that the default setting is Auto
new line. This is another "toggle" command.
np Use this command to Force a new Braille page. The current page will be
ejected.
There are also two keystrokes you can use to eject the paper from the MB Writer; p-chord
and newline+enter. See the paragraphs headed Removing Paper, in the section
Introduction.
pn [number] Use this command to insert a page number in the top right hand corner of
the page.
Page numbering begins starting at the number you enter in the command. Each time a new
page is inserted, the page number will be embossed sequentially. This setting stays active
until the MB Writer is turned off.
pbell [number] Set the page bottom warning bell to sound a certain number
of lines before the end of the page.
The default number of lines is 2 lines.
rmbell Turn the right margin bell on or off.
When you are Brailling, the MB Writer will beep when you reach a position 5 characters
before the right margin. The bell rings 5 positions from the right hand margin. The default is
for the bell to be on; this is a "toggle" command.
show Each command is embossed as it is entered on the keyboard.
It can be helpful for working out why a command isn't successful. The default setting is off;
this is a "toggle" command.
User Guide 14

ww Word Wrap.
When Word Wrap is on, each word is not embossed till the Space Key is pressed. If the word
cannot fit on the line, it is moved to the beginning of the next line. The default setting is off;
this is a "toggle" command.
Embossing Speed
The MB Writer has two embossing speeds, Writing Speed and Embossing Speed. Your MB
Writer is set by default to Writing Speed, which is the slower of the two.
When you reach the chapter Essential Extras, you will find information about setting the
different speeds.
It's quite safe to use the MB Writer for Braille writing at Embossing Speed, although you
might find it a bit louder than Writing Speed.
User Guide 15

More on Commands
Turning the Command Key On and Off
The command key is used for entering all the commands that make the MB Writer such a
powerful tool for learning. You can turn it on or off as needed. Whatever is chosen remains
the default after you turn the unit off.
newline + space + tab + backtab
Turns command on or off.
Press all four keys together to turn on; press all
four keys together again to turn off.
Entering Commands
There are 2 types of command used in your MB
Writer, Regular Commands and Chorded Commands.
All regular commands begin with the command key, and finish with the enter key.
For example to turn the Word Wrap command on, you first press command, type ww and then
press enter. Your MB Writer will say “on” or “off” depending on the original setting. Some
commands, like Word Wrap, are "toggle" commands, meaning that they toggle between an
on and off state, each time they are invoked.
If your command needs you to enter a number or another parameter as well as the
command, press the command key, type the letters of the command, press space and then
type the number or other parameter. Numbers can be entered using literary or nemeth
numbering; use the numeral sign, dots 3,4,5,6 with the letters a to j, or use the lower
numbers.
Throughout this User Guide, regular commands are laid out like this:
command Description of command
Using the command for Word Wrap as an example:
ww Word Wrap.
When Word Wrap is on, the word is not embossed until space is pressed. If the word cannot
fit on the line, it is moved to the beginning of the next line. The default for WW is off. This
command is a toggle; use the same command to turn it on and off.
Conventions for Regular Commands Used In This Manual
If there is a space indicated in the command, you have to press the space key when you are
entering the command. For example to set a left hand margin 6 characters in from the left
hand side of the page, use the command:
User Guide 16
Illustration 12: The command activation keystroke
Illustration 13: The three steps to entering a command

lm 6 Set left margin to position 6
Where numbers are used in a command like the example above they can be entered as
either the number sign plus a letter from a to j, or as a "dropped" or "lower" character. Some
commands include ‘x’ and ‘y’ to indicate numbers, where ‘x’ indicates a number and .‘y’
indicates a number after a decimal point.
Decimal points can be entered as dot 2, (as in literary Braille); or as dots 46, as in ASCII
Braille, also known as the North American Braille Computer Code (NABCC). See the section
Braille Codes for more information on using dropped or lower numbers and for a listing of
the ASCII Braille code.
Chorded commands
A chorded command is one that you enter by pressing space with the designated letter.
There are only a limited number of chorded commands and they can be used at any time.
b-chord backtab
c-chord linefeed
f-chord Paper feed. - feed the paper down one line without returning the head to
the initial position.
h-chord Help.
i-chord Indent. Move to the next tab stop. This command is the same as pressing
tab or using t-chord.
p-chord Page eject.
r-chord Reverse line. This command feeds the paper up one line without returning
the head to the initial position.
t-chord tab. Each press moves the head one tab stop to the right.
z-chord Stops the speech while speaking.
Help Command and Options
There is a help function available in the MB Writer that you can access at any time. The help
function provides further information about any commands and can be accessed by using:
hp This will provide a summary of the help topics available.
If you are using recorded speech, the MB Writer will Braille this summary. In synthesised
speech, it will speak this summary.
hp [group] Enter the command hp followed by the code for the group on which you
would like help. Choose one of the groups from the list below. Press Enter
to finish.
In recorded speech, the MB Writer will emboss the information it has
about the command you enter. In synthesised speech, it will speak this
description.
Help doesn't have an entry for every single Mountbatten command: the information is stored
in groups. The available groups are as follows:
General groups:
hp bc gives a summary of the Braille code commands
hp em gives a summary of embossing output commands
hp kc gives a summary of the Mountbatten keyboard setting commands
User Guide 17

hp ku gives a summary of the Unimanual (one-handed) mode commands
hp lm gives a summary of the Left Margin commands
hp report gives a summary of command parameters for the report command
hp restore gives a summary of command parameters for the restore command
hp rm gives a summary of the Right Margin commands
hp s1 gives a summary of the first serial port output commands
hp spk gives a summary of the speech status commands
hp std gives a summary of the command parameters for the std command
hp tc gives a summary of the command for clearing tabs
hp tm gives a summary of the Top Margin commands
hp tsh gives a summary of the tab setting commands
hp usb gives a summary of the USB port commands
Miscellaneous Commands
ver Embosses the software version in your MB Writer.
alt [number] Enables your MB to accept ASCII characters above 128.
‘number’ can be any valid ASCII value.
save Saves all current settings. Use this to save your preferred settings, which
will then become the default until you use std.
std Restore your MB Writer back to factory default settings. This will remove
all of your settings; before using std, you should ensure that you have
saved any settings you would like to use again.
reportc Embosses the current settings, whether saved or not.
reports Embosses the saved settings.
reportd Embosses the default, or factory, settings.
See the section Saving and Restoring Settings for more information about save, std and
the report commands.
User Guide 18

Essential Extras
Writing Braille Files in Memory
The MB Writer has a memory in which you can save up to fifty files. This is intended for quick
saves of your Braille, for instance when you don't have time to edit as you take notes.
When you type Braille into the memory of the MB Writer, it is stored as Braille; no translation
is made. When you emboss the file you have saved, it will be exactly as you have Brailled it
into the memory.
Naming files in the MB Writer
An MB Writer file must have a name.
Each name needs to be different, so that you don't write over the top of a file you already
have; each name can be up to 22 characters long.
You should restrict the characters in your filename to letters and numbers, and you should
use uncontracted Braille, lower case letters and lower numbers. Shorter filenames are easier
to remember, and numerals which tell you the date or time of saving can be helpful.
It is advisable to use easily remembered, descriptive names for your files, and ones that will
sound different when you listen to the directory of stored files.
Start a File
begin [filename] Open a new file called filename.
Once you have entered this command, the MB Writer is recording your keystrokes, whether
you are typing on the Braille keyboard or an external PC keyboard. Everything you type will
be stored in memory until you close the file.
Close a File
end Close the open file.
If you turn the MB Writer off, the open file will be automatically saved.
Getting a list of the Files Stored in Memory
dir This command will read out a list of the files by name, and their sizes.
You can also examine the contents of the MB Writer memory from the PC. See the section
Connecting your MB Writer for all the information about how to do this.
free This command will tell you how much free space you have available.
The MB Writer has 400KB of memory, which will let you save around 600 Braille pages.
Change a File
append [filename] Add more information to the end of filename.
The append command can be used to add information to any existing file. The new data will
begin at the end of the existing data and continue from there.
rename [filename1] [filename2] Rename filename1 to filename2.
Delete Files
del [filename] Delete the file named "filename".
User Guide 19

undel Restore the last deleted file.
undel only works if you use it before you switch the MB Writer off, in the same session as
you deleted the file.
del all Delete all saved files.
Once you have used the del all command, you will not be able to retrieve any files.
Emboss files stored in Memory
emb [filename] Emboss the file named filename.
memb [number] [filename] Emboss multiple copies of the file named filename,
where [number] is the number of copies.
Writing Braille on Heavy Card, Plastic film or Labels
In addition to using the impact adjustment described on the next page you can also select
the number of times each dot is hit by the embosser. If you are using a heavy card, or a
plastic label with adhesive backing, you might need to use the multi-strike setting to make
good Braille. You can choose from single strikes (default) up to 4 strikes on each dot.
ms [number] Turn on the Multi-strike feature.
This command sets the number of times the embossing head strikes each dot. This can help
to make readable Braille on heavy materials such as plastic label sheets. The default
number of strikes is 1; you can change this to any whole number up to 4.
Writing Braille on Small Paper
When you use a small piece of paper (like a birthday card) the MB might respond as if there
is no paper in the machine and refuse to emboss. To overcome this, press space and
newline together. This invokes “no paper operation” and means you can write Braille on a
very small page.
Using different weights of paper
Writing Braille onto paper makes noise. There is no way to avoid this completely with a
Braille writer, however there are strategies and procedures to help minimise noise.
The first strategy is to use lighter paper, because it requires less force to make the dots and
is therefore quieter. Braille properly produced on lighter paper lasts well and is very readable
with good-quality dots.
The MB Writer has been designed to work best and most quietly with regular office paper.
This paper is 80 gsm or 20lb paper as sold for use in photocopiers and printers. The strike
weight set up in the factory is correct for this weight of paper, and we have included a starter
pack with your MB Writer.
It is possible to use heavier papers in the MB Writer, but you will find that the dots are not
very strong; in this case, you will need to adjust the impact force to make better dots, and
then if you change back to lighter paper, you will need to adjust the impact force back down
to suit.
The impact force should be adjusted to the minimum level necessary, to ensure that the
minimum noise is produced on whatever paper you are using.
User Guide 20

Adjusting the Dot Impact for Different Types of Paper
This function is used to match the impact force of the dots to the paper used. For heavy
Braille paper, the impact force can be increased. For
lighter paper, the impact force can be decreased.
command + backtab Increase Impact
When you press command and backtab together, the
impact force will increase by one step, and the MB
Writer will say “up”.
command + tab Decrease Impact
When you press tab with command, the impact
force decreases by one step, and the MB Writer
says "down".
You do not need to turn command on to use this
keystroke.
Embossing Speed
The MB Writer has two modes of embossing: Writing Mode and Embossing Mode. The
default is Writing Mode, which is half the speed of Embossing Mode, and therefore quieter.
If you wish to emboss several pages, you will find that the file embosses much faster if you
set the MB Writer to Embossing Mode.
The command to change between embossing speeds is:
m Change from Writing Speed to Embossing Speed and back.
The default setting is Writing Mode, or half speed. This command is a toggle, so use m again
to change back from Embossing Speed to Writing Speed.
In Writing Mode, your MB Writer embosses at around 3 characters per second, depending
on the complexity of the Braille; in Embossing Mode your MB Writer embosses at around 6
characters per second.
User Guide 21

Speech
The MB Writer has recorded speech built in. Recorded speech sounds clear and easily
understood, because it is a human voice; however, it is not as powerful or flexible as
synthesised speech.
Adjusting Speech
By default all keys, functions and commands will be spoken. This is particularly useful for
anyone who is learning Braille, or for family and friends who want to familiarise themselves
with a Braille writer.
The commands for controlling the speech options are:
spk r Select recorded speech.
This command is only available in Advanced Mode to deselect synthesised speech.
spk a Speak all MB Writer keyboard keys, functions and commands.
This setting is the default setting in Learn Mode. With every key stroke being spoken, the
user receives immediate feedback every step of the way. As less speech is required, one of
the following options can be selected:
spk c Speak errors and prompts only.
No Braille dot keys are spoken.
spk d Speak only Braille dot keys and the command key.
No function keys are spoken, and space, newline, backspace are silent.
Braille was initially created with six dots combinations providing 64 potential combinations.
For recorded speech the entire alphabet has been recorded, as well as some contractions.
However when a dot combination has two (or more) different meanings, the MB Writer will
speak the dot numbers only.
Settings will be lost when the MB Writer is switched off; Speech will return to its default
speech settings unless the speech settings are saved.
No Speech
spk n No speech. This command puts your MB Writer into tones-only mode. For
information about the tones and what they mean, see the Reference
Section.
Speak Commands as You Type Them
c This command toggles between speaking and not speaking commands as
they are typed.
The default setting is for commands to be spoken as you are typing them: pressing
command causes the MB Writer to say "command", and each character typed is spoken.
After you use this keystroke to toggle to "speak commands no", the MB Writer beeps when
you press command; the command keystrokes themselves will be silent. The MB Writer will
beep again when you press enter; a high-pitched short beep for a successful command,
and a longer, lower tone for a command error.
User Guide 22

Adding the Mimic
You can add an external display your MB Writer, so that people who don't know Braille can
see what you're writing, displayed as text.
The Mimic Display
The Mimic is a small external display for the MB Writer. It
displays in text what has been typed on the MB Writer in
Braille.
The Mimic takes 4 AA batteries. When nothing has
happened for 15 minutes, the Mimic will go to sleep; this
conserves battery life. The batteries should last for several months.
The Mimic comes with its own cable to connect it to the 9-pin serial port on the right side of
the MB Writer, the Mimic or S1 port. To refresh your memory about which port this is,
compare your MB Writer to this diagram:
The Mimic port is the second port from the front, on the right-hand side of the MB Writer, and
it is the larger of the two ports. You can feel the pins. You can connect either end of the cable
to the MB Writer; it is reversible. The connector will only go in one way.
After you have connected the Mimic, turn it on and then turn the MB Writer on.
Communication with the Mimic is on by default.
As you type information on the MB Writer, it is translated and sent to the Mimic every time
you press space.
If you want to turn communication to the Mimic off, use the command mimic. This is a toggle
command, so you can use it to turn communication with the Mimic back on.
The Mimic has a memory of 20 kilobytes, which is equivalent to around 10 pages of Braille. It
records and stores all the information sent from the MB Writer, so long as it stays on and the
batteries have charge; while it is asleep it doesn't record any information, but information
already recorded is not lost.
Because Mimic stores information, you can scroll back through work that has done
previously. However, the Mimic works just like a printer in the sense that once a character is
displayed, it cannot be edited,
Tip: If a word is corrected before you press the space bar, the Mimic will display the
corrected word.
As you type Braille on the MB Writer, the Mimic displays the text for the current line of Braille,
scrolling the previous text up as new text is received. However, if you then press one of the
Mimic buttons to scroll back through the text, new words Brailled on the MB Writer will no
longer appear automatically on the display. You will have press the “scroll down” button to
User Guide 23

find the most recent characters.
The Mimic can be connected to a computer and, using the MB-Comm software supplied with
your MB Writer, all the information in the Mimic can be sent to the computer for storage or
further analysis.
User Guide 24

Connecting your MB Writer
Your MB Writer has two ports for connecting it to other devices:
USB Port
The MB Writer has a USB-B port on the right-hand side, towards the front. This port is the
same kind of USB port as you will find on a printer; it is a square port. Use this port when
connecting to a PC. If your computer doesn't have a USB port free, but there is a free COM
port, see the Serial Port, below.
The settings for the MB Writer USB port are:
Data speed: 115200
Data bits: 8
Stop bits: 1
Handshake: Hardware (RTS/CTS)
Parity: None
The USB cable supplied with your MB Writer can be used to connect with a PC, so you can
use MB-Comm to transfer files or use the MB as an embosser.
Mimic Port
The Mimic Port is a 9-pin serial port, on the right side of the MB Writer. This port should
always be used when you are connecting the Mimic. If you need to connect to a PC using a
serial or COM port, use the serial port on the back of the MB Writer.
Serial Port
The second Serial Port is a 9-pin serial port on the back of the MB Writer. This port is
available to connect a serial printer, or to connect to the serial port on a PC if you don't have
USB available.
The settings for the MB Writer Serial Port are:
Data speed: 9600
Data bits: 8
Stop bits: 1
Handshake: Hardware (RTS/CTS)
Parity: None
If you are using a serial-to USB adapter, or connecting to a PC using a serial cable, you
need to make sure the COM port on the PC is set to the same settings as the MB Writer
Serial Port. If you need a cable to connect to your PC from the Serial Port, contact your
distributor.
Installing MB-Comm
MB-Comm is a Windows PC application, for Microsoft Windows XP, Vista and Windows 7. It
enables the transfer of files between a PC and a MB Writer or MIMIC LCD display.
For New MB-Comm Users:
• Close any programs that may be running on your PC before installing.
• Double-click the MBCommSetup file and the installation will begin.
User Guide 25

• The installation checks your computer for Windows NET components and loads them
if required. This may take several minutes.
For Existing MB-Comm Users
You must first uninstall the old MB-Comm. To uninstall the old version, follow these
instructions:
• Go to the Control panel.
• In XP, open Add/Remove Programs, or in Vista/Win7, open Programs and Features.
• Scroll down the list until you find MB-Comm.
• Highlight MB-Comm and then click the Add/Remove button.
• If queried about Shared files, do not remove, leave them in place.
• Make sure that the MB-Comm folder under Program Files has been removed.
• Once the old version is removed then proceed as for New Users.
Installing the MB-USB Drivers
The MB-USB drivers are required for MB-Comm to connect to the MB Writer using the USB
port.
Important: Please DO NOT connect the USB to the MB Writer until after the
drivers have been installed.
• Close any programs that may be running on your PC before running the install.
• Insert the CD and follow the prompts. If the CD does not Autoplay, navigate to your
CD drive and run the Setup file on the CD by double-clicking. Follow the prompts.
• The new driver will auto detect any older version and prompt to replace the files.
Accept the new one when asked.
• During install you may be twice prompted to “Continue anyway”. Please accept this
and continue.
• Under XP, when the installation finishes you will be prompted to re-boot your PC. The
driver install will not be complete until the PC is re-booted. Under Windows Vista and
Windows 7 this is not required.
• Now connect your MB Writer to the PC. Under XP there may be extra driver
installation which will take place automatically; answer "yes" when prompted.
Using MB-Comm
MB-Comm can connect your MB Writer to the PC using either the USB port or either of the
Serial ports. A USB cable has been provided with your MB Writer; if you need a suitable
serial cable to connect to an older PC, please contact your distributor.
Make sure that the MB Writer has paper loaded and is switched on and connected to the PC.
Run MB-Comm.
Starting MB-Comm and Connecting the MB Writer
There are two methods;
• Open the MB-Comm icon from the desktop, or
• Open the Start menu, go to Programs, and click MB-Comm.
From the start-up screen menu, select Device and then Connect (either Mountbatten or
Mimic). MB-Comm will then ask you to confirm the PC COM port.
User Guide 26

If you are using USB, click on the arrow beside the list, and you should see Mountbatten
USB Port (COMn), where n is the number the PC has given the port. Choose this port from
the list.
If you are connecting with a serial cable, you should know which port on the PC you have
connected to; choose this port from the list.
Once you have chosen the port, click OK. There will be a brief wait, and then you should
hear your MB Writer making a series of connection beeps; two short high beeps and one
short mid-tone beep, repeated several times as communication is established.
If you don't hear any tones, make sure the MB Writer is on, connected and has paper
loaded; if all this is in place, and no connection is made, contact your distributor for
assistance.
Once the beeps have completed, the red buttons on the MB-Comm screen will turn from red
to green, and the status bar will say MB Connected and Embosser Connected.
You can then use any feature of MB-Comm by selecting the Menu item of choice.
Instructions are available in the MB-Comm Help menu.
Embossing a file using MB-Comm
When you have the MB Writer connected and the red buttons on the MB-Comm status bar
are green, you have several choices from the File menu:
Receive and Save file from the Mountbatten
This feature lets you examine the contents of the MB Writer memory, and transfer any file
from the MB Writer to the PC. If you have already turned Back Translation on, the file will be
translated into text as it is transferred; otherwise, the untranslated Braille file will be
transferred. See the section Back Translation: Converting Braille to Print for more
information on how to set translation up for this feature.
Display file from Mountbatten
This feature also lets you examine the contents of the MB Writer memory, but instead of
transferring the file, you have the opportunity to display the contents of the file on the MBComm screen. The file will be displayed in ASCII Braille; see the Reference Section for
more information on ASCII Braille.
Send Text File to Mountbatten
If you would like to simply transfer a file to the MB Writer, so that you can emboss it later, use
this feature; if you have embedded Forward Translation commands in the file, they will be
activated when the file is embossed.
Emboss File on Mountbatten
This will send the file to the MB Writer to be embossed
Chat Mode
Chat mode allows you to use the MB Writer and the PC as a communication device, since
everything typed on the PC will be Brailled on the MB Writer and everything Brailled on the
MB Writer will be translated to text on the MB-Comm screen.
You can also use Chat Mode to display what a student is doing in the classroom, and save
the contents of the screen to a file for printing. This can be very helpful when a student is
working in more than one language, since the accented characters will be displayed on the
User Guide 27

MB-Comm screen.
See the section Braille Chat for more information on how to use this feature.
Upgrade Mountbatten Software
This feature lets you update your MB Writer via the USB port, when a new software release
is issued. Your distributor will be able to advise you.
Save Display to File
This feature lets you save the MB-Comm display screen contents to a file on the PC.
User Guide 28

The MB Writer as a Personal Embosser
Using the MB Writer with Braille Translation Software
If you use Duxbury or another translation program, you will need to add the MB Writer as a
printer on your Windows system, so that the program can send the translated output to the
MB for embossing.
One way is to set up your MB Writer as a Generic/Text Only printer.
To do this, follow these steps:
1. Connect your MB Writer. You should already have installed the MB-USB drivers if
you are using the USB port.
2. Open the Add Printer dialog. In XP, this is Start, Settings, Printers and Faxes, Add
New Printer.
3. Click on Next.
4. Select "Local Printer attached to this computer" and make sure "Automatically
detect my Plug and Play printer" is NOT checked.
5. Click Next.
6. Select the correct port from the drop-down list.
a) If you are using USB on both the MB Writer and the PC, select the Mountbatten
USB port from the list. If you don't see this port, make sure the MB Writer is
connected and switched on.
b) If you are using the serial port on the back of the MB Writer, connected to the
PC with a USB-to-Serial adapter from a USB port on your PC, select the
correct COM port for the adapter.
c) If you are using the serial port on the back of the MB Writer, select a free COM
port from the list.
7. Click Next.
8. From the left side of the new dialog, select Generic.
9. Now from the right side of the dialog, select Generic / Text Only.
10. Click Next.
11. Windows might now ask if you want to keep the existing driver or replace it; it's fine
to keep the existing driver. Click Next.
12. Give the printer a name; we suggest MB Writer Embosser, so you can easily
recognise it.
13. Click on "No" to the question "Do you want to use this printer as the default
printer".
14.Click Next.
15. On the next dialog, you have the opportunity to share the printer over a network, so
it can be reached by other computers.
a) If your computer is on a network, and you will always leave it switched on, and
the MB Writer connected, loaded with paper and switched on, you can click on
Share Name and give the printer a Share Name; we suggest you use "MB
Writer Embosser" again, so that it's easily
User Guide 29

b) If none of the above things is true, click "no".
16. To the final question, "Do you want to print a Test Page", click "No".
17.Click Next.
18. Click Finish.
You now have a Windows Printer called MB Writer Embosser, which you can use with
Duxbury or any other Braille translation software.
Testing the Setup
To test your new printer setup, make sure the MB Writer is connected, and has paper
loaded.
Now open Notepad and type a few words.
Click on File, Print, and select the MB Writer Embosser from the list of installed printers.
Click OK.
Your MB Writer should immediately begin producing Braille.
This Braille will not be correct, since it hasn't been translated; at this point you are only
testing that the connection works, and the printer setup you have just done sends the output
to the right place.
You now need to go to your Braille software and complete any setup needed there, to make
sure your software sends its output to the MB Writer Embosser printer, and so to the MB
Writer.
Troubleshooting
If you follow all the steps carefully, and you aren't getting any Braille on the MB, but your PC
doesn't come up with an error message:
You could have the wrong communication speed.
Make sure the MB Writer is connected and switched on.
1. Go to Start, Settings, Control Panel, System.
2. Open the Hardware tab.
3. Click the Device Manager button.
4. You will now see a list of the different devices on your system.
5. Click on the + sign beside Ports (COM & LPT).
6. Find the port you have assigned to the printer you have just set up. If the port isn't on
the list, go to the next section.
7. Once you have found the port, click on it once to select it.
8. Now you need to look at the properties of the port. You can do this in one of two
ways:
a) right-click on the port and choose Properties;
b) From the Action menu, choose Properties.
9. Click the Port Settings tab. These are the settings you should see:
a) For a connection to the Mountbatten USB port:
• Bits per second 115200
User Guide 30

• Data bits 8
• Parity none
• Stop bits 1
• Flow control Hardware
b) For a connection to the Serial Port:
• Bits per second 9600
• Data bits 8
• Parity none
• Stop bits 1
• Flow control Hardware
Make sure you use the settings that suit the port you are using on the MB Writer. The USB
port will not work at 9600 bits per second, and the serial port on the back of the MB Writer
will not work at 115200 bits per second.
If you are sure that these settings are correct for the MB Writer port, and you still have no
Braille, the chances are that your USB cable, serial cable or adapter is faulty. Contact your
distributor for assistance.
If the port you selected isn't on the list:
If you try to print to a port that isn't there, the PC doesn't give an error message, but
nothing is printed. If the port you selected for the printer isn't in the device list, cancel out of
the Device Manager. Now look at the following steps, and pick the set which suits your
setup.
For a COM (serial) port, where you are not using any USB:
Make sure that you know which serial (COM) ports you have available on your PC, and
whether they are already being used. You might need some technical help for this; contact
your distributor if you do. You need to pick a COM port which is completely free; if Windows
has it set aside for some purpose, it will not work as a printer port.
Once you have that information:
1. Make sure the MB is connected and switched on.
2. Go to Start, Settings, Printers and Faxes, and select the MB Writer Embosser you just
set up.
3. When the printer dialog appears, from the Printer menu, select Properties.
4. When the Printer Properties dialog appears, select the Ports tab. Check the correct
COM port.
5. Click OK.
6. From the Printer menu, select Properties again, and click on the Ports tab. You should
now see the printer name showing beside the port you have just chosen,
7. Click on Properties to check that the port speeds and settings are correct as per the
previous section.
For the MB Writer USB port:
Make sure the MB-USB drivers have been installed and activated correctly. See the MB-
User Guide 31

Comm installation information for how to make sure of this.
Make sure the MB Writer is connected, switched on and loaded with paper before trying to
print from Notepad.
For the USB-serial adapter:
Make sure that the driver for the USB-Serial adapter has been installed according to the
instructions; if they say install first without the adapter plugged in, you might need to unplug
the adapter, uninstall the driver (using Add/Remove Programs or Programs and Devices
from the Control Panel) and do a fresh install.
If none of these tips helps, please contact your distributor for assistance.
User Guide 32

Making Braille Graphics
There are two ways to make graphics - tactile images - on your MB Writer: directly from the
keyboard, or by sending an image file from a computer to be embossed.
Graphics Mode
gf enter or leave Graphics Mode. This is a toggle.
In normal Braille, or non-graphics mode, your MB Writer allows the correct amount of space
between Braille characters and between lines of Braille for reading. In Graphics Mode, these
spaces are reduced, so that it is possible to make unbroken lines of dots.
The effect of reducing the spacing between characters and lines can be seen in this
graphical example. In the first picture of a flag, the line-spacing means that the picture has
gaps which will make it more difficult to identify. The second picture has had the gaps
reduced, and the line of the flagpole is now continuous, while the edges of the flag have
smaller gaps.
Graphics from the Keyboard
As soon as your MB Writer is in Graphics Mode, typing at the keyboard can produce an
image. The simplest example is a rectangle:
pcccccc?
l _
v------#
This rectangle can be made by typing the following three lines:
p c c c c c c th
l space space space space space space dots 4 5 6
v - - - - - - number sign
To make this graphic from the PC keyboard, you will have to type the corresponding ASCII or
Grade Zero characters. For more information on ASCII Braille, see the section Braille Grades
in the Reference Section.
For the rectangle, the PC keyboard keystrokes are:
p c c c c c c ?
l space space space space space space _
v - - - - - - #
User Guide 33
_5959595
_ _
_ _
_595959w
_
_
Illustration 14: Comparison of normal spacing and Graphics
Mode spacing
_5959595
_ _
_ _
_595959w
_
_
_

Braille Codes
Using Dropped or Lower Numbers
All through this User Guide, you will see mention of using "dropped" or "lower" numbers
when entering commands and calculations.
The standard literary Braille method of entering numbers is to use a number sign, dots
3,4,5,6 followed by any combination of letters from a through j:
Number 1 2 3 4 5 6 7 8 9 0
Sign
#a #b #c #d #e #f #g #h #i #j
Dropped or lower numbers use no number sign prefix, and are written in the lower half of the
Braille cell. Thus, 1 is represented by dot 2, also known as "lower a" or "dropped a":
Number 1 2 3 4 5 6 7 8 9 0
Sign
1 2 3 4 5 6 7 8 9 0
Using ASCII or Computer Braille
This table shows the correspondence between ASCII characters and Braille characters.
ASCII Braille, or Computer Braille, is also known as Grade Zero or the NABCC code.
If you open a Braille file after translation by Duxbury or another translation software package,
you will see that the Braille in the file is displayed as ASCII characters; this table can help
you make sense of those files.
ASCII
Braille
Dots Braille ASCII
Braille
Dots Braille ASCII
Braille
Dots Braille
A 1
⠁
W 2456
⠺
/ 34
⠌
B 12
⠃
X 1346
⠭
> 345
⠜
C 14
⠉
Y 13456
⠽
# 3456
⠼
D 145
⠙
Z 1356
⠵
+ 346
⠬
E 15
⠑
$ 1246
⠫
- 36
⠤
F 124
⠋
' 3
⠄
^ 45
⠘
G 1245
⠛
@ 4
⠈
_ 456
⠸
H 125
⠓
" 5
⠐
. 46
⠨
I 24
⠊
, 6
⠠
; 56
⠰
J 245
⠚
= 123456
⠿
0 356
⠴
K 13
⠅
& 12346
⠯
1 2
⠂
User Guide 34

ASCII
Braille
Dots Braille ASCII
Braille
Dots Braille ASCII
Braille
Dots Braille
L 123
⠇
( 12356
⠷
2 23
⠆
M 134
⠍
] 12456
⠻
3 25
⠒
N 1345
⠝
\ 1256
⠳
4 256
⠲
O 135
⠕
< 126
⠣
5 26
⠢
P 1234
⠏
? 1456
⠹
6 235
⠖
Q 12345
⠟
% 146
⠩
7 2356
⠶
R 1235
⠗
: 156
⠱
8 236
⠦
S 234
⠎
* 16
⠡
9 35
⠔
T 2345
⠞
) 23456
⠾
(space)
⠀
U 136
⠥
! 2346
⠮
V 1236
⠧
[ 246
⠪
User Guide 35

Modifying and Adapting the MB Writer
Keyboard
One-Handed Braille Writing
ku Turns on One-Handed operation.
The ku command is a toggle. Once it is active, to use ku again, you must press command k
space u space enter, in that order.
When ku is on, press space after the you have entered the dots for each character. For
example:
To type the letter u, you do not have to press dots 1, 3, 6, together. You can press
the dot keys separately in any order. For example, using one finger press dot 3, then dot
1 then dot 6. Then press space to emboss the character.
When the MB Writer is in unimanual mode there are alternatives to chorded commands
available The following commands are available in one-handed mode only.
bt backtab
cr newline
in Indent
lf Linefeed
np New Page
rl Reverse Linefeed
tb tab
To exit unimanual Mode, to return to standard keyboard use, remember to press command k
space u space enter.
Changing the Dot Key Layout
The six dot keys are normally configured in the following dot pattern:
The left-hand group of dot keys is configured from the centre outwards as dot 1, dot 2
and dot 3; the right-hand group is configured from the centre outwards as dot 4, dot 5
and dot 6.
It is possible to change the layout of these six keys at any time, using the following
command:
kbd [key 1] [key 2] [key 3] [key 4] [key 5] [key 6]
This is done by pressing command, typing kbd, space, and then pressing and releasing the
dot keys in the new order, one at a time. [key 1] will be the new dot 1, [key 2] will be
the new dot 2 and so on.
After pressing the six keys for the new order, press enter to make the new layout available.
To return to the standard dot layout, use the same method, or, if the setting has not been
saved, switch the MB Writer off and the standard dot layout will be restored when you switch
on again.
If you find that the keyboard has been rendered unusable by the kbd command, and the
setting has been saved, you can reset the MB Writer to return to the proper keyboard layout.
User Guide 36

See the section Care and Troubleshooting for information on how to do this.
Changing the Control Key Layout
The Control key layout can also be changed.
As before, Control Key layout settings can be saved as part of the Keyboard group, along
with Dot Key layout settings, using the command SAVE KB.
The standard layout of Control keys from left to right is as follows:
Control Key 1 backspace b
Control key 2 newline n
Control Key 3 space s
Control Key 4 enter or margin release m
To change the layout of the control keys, enter this command:
kbc
and press space. Now Braille the four letters, b, n, m and s, representing each control
function, in the order of your new layout.
For instance, if you want the new layout from left to right to be newline, space,
backspace and enter, your command would be:
kbc nsbm
Complete the command by pressing enter, remembering that you must use the existing
enter, not the new one, since the new enter will not be changed until after the command
has been entered.
Left Function Key
The command to change the left function key (which is usually tab) looks like this:
kblf [command]
[command] is the function you wish to assign to the function key, and can be any command
you would normally type at the keyboard.
For instance, you might like to have the left function key turn Forward Translation on in
Advanced Mode. To do this, enter the command:
kblf fe
You will now find that if, when you are in Advanced Mode, you press the left function key,
nothing will seem to happen. If you type on the external keyboard, however, you will find that
you have to press Return twice to have your input embossed, and that it has now been
translated properly.
If you don't want to use Forward Translation very often, there might be another command
which you enter a lot. You can assign it to this function key to save a lot of time. It might be a
page formatting command - for instance, you might want to change the left margin back and
forth. To put your secondary Left Margin setting into the Left Function key, enter
kblf lm 15
for a secondary left margin of 15 spaces.
Right Function Key
The right function key (which is usually backtab) can be redefined in exactly the same way,
except that the command now looks like this:
User Guide 37

kbrf [command]
For example, to complete the pair, you might like to enter the command
kbrf fe or kbrf lm 10
Combined Function Keys
It is also possible to have a third command available, for when you press both function keys
together. The command looks like this:
kblrf [command]
For instance, you might like to use the combined function keys to turn the Multi-Strike feature
on for those times when you want to use heavy paper. To do this, enter
kblrf ms 2
So that, when you press both Function keys together, the Braille embossed after that will be
double-strike.
Multiple Commands on a Function Key
The Function keys can be assigned to perform multiple commands, one after the other, in a
group.
The same procedure and codes for redefining the Function buttons still applies; however, for
multiple commands, each command required within the definition is separated by a
newline.
For example: to assign a multiple command to the Left Function Key, such as turning off
Back Translation and turning on Forward translation with the one keypress, use the following
sequence:
kblf fb newline fe
where newline is the usual key for that purpose. Note that there are NO spaces between
the commands and the newline key.
Warning: When assigning commands to the Function keys, do not use the following
commands unless they are the LAST command in the definition. These commands are
usually involved in automatically printing or embossing from memory. See the User Guide for
an explanation of Print control mode and the keys involved.
Commands to be avoided are:
pr append dir rename report
help copy ver
Special Keyboards
For some users, even the light touch and ergonomic design of the MB Writer keyboard are
unsuitable. Your distributor will be happy to help with advice about and design of external
keyboards, as well as helping with the connection information needed.
The extra port on the front of the MB Writer is designed to be used for connecting speciallyadapted keyboards.
Please ask your distributor if you would like more information.
User Guide 38

Saving and Restoring Settings
Every command used by the MB Writer has a default, or factory, setting. However, toggle
commands can be turned on and off, and other commands can be set to suit your
requirements, including keyboard layout, communication parameters and page format.
Settings that are not saved are temporary and will be lost at switch-off. If your changes are
meant to be temporary, then all is well. However, if you want permanent changes, to avoid
having to re-enter settings every time you turn the MB Writer off and on, the settings can be
saved so that they will be available at the next switch-on.
Note: The commands em and the commands to turn USB or Serial ports on cannot be
saved. When the MB is switched off and back on again, embossing will be on, and the Serial
and USB ports will be turned off. This is to prevent confusion at turn on.
Groups
Settings are saved in groups, where the name of the group indicates the type of setting. A
group has a two-letter identification code which is used to save, report and restore the
settings. You might have already used the save pf command as mentioned in the User
Guide; this is but one group of many available. The different Groups are given below.
The Save Command
The SAVE command stores and saves current settings. This is normally done by group. If no
group names are given, all current settings will be saved. The general command is:
save [group] where [group] is optional. If [group] is not given, you will save
every current setting from every group, so we advise you to use this
command with care.
As well as an individual group, combinations of groups can also be saved. There should be a
space between the save command and the first group name, and a space between each
two-letter group name.
For example: to save Forward Translation settings and Page Format settings at the same
time, use the command: save ft pf.
Defaults
Although you might have settings saved for every available group, the default (factory)
settings are still available. At any time, you can restore the original defaults without changing
the settings you have saved, by using the std command. You can specify the group name of
the settings you wish to return to their default. For instance, to return Forward Translation
and Page Format settings to their defaults, enter:
std pf ft
Using the command std without specifying any groups will return all the settings on your MB
Writer back to their default values. However, your saved settings are still saved and
accessible to you until you use save again to save a new value to a setting.
Restoring
Having saved settings and then returned to the defaults for a particular group, you can use
the restore command to restore the saved settings. Following on from the previous
example, you would use the command:
restore pf ft
It is not necessary to keep the group names in any particular order.
User Guide 39

If the MB Writer has been switched off, the default settings will be replaced by your saved
settings after the next switch-on. restore is only necessary if you wish to restore saved
settings during the same session.
Reporting
If you need a list of the saved settings, or if you have forgotten what you are currently using,
then you can have the MB Writer emboss or speak a report on the settings.
If you have synthesised speech active, then you will hear the report spoken; if you have
recorded speech active, the report will be embossed.
The categories for reporting are for Current, Saved and Default settings as follows;
reportc [group] reports current settings
reports [group] reports saved settings
reportd [group] reports default settings
For [group], use the two-letter code for the group or groups required. If no group is given,
then all settings are embossed or spoken.
Group Names
A group can have a single setting, or it can cover several related settings.
Advanced Commands and Formatting Groups
kb stores the keyboard layout which includes:
Braille keyboard settings - if no changes have been made, this will report "standard".
External keyboard setting
Eight Dot Braille setting
pf stores all Braille page format settings:
Left margin Right Margin Line Length Top Margin
Form Length Page Length Tabs Word Wrap status
Line Spacing Right Margin Bell status Page Bell status
Data Transfer Groups
bc This group stores the Computer Braille Code setting. The default is
NABCC.
s1 first serial port (Mimic port) settings, which relate to data transfer through
the serial port on the side of the MB Writer where the Mimic is connected.
Settings include:
Bit rate Data Bits Stop Bits Parity Handshaking
Newline mapping
Other Settings
Some other settings which are not stored or retrieved as part of groups are reported on when
you use any of the report commands:
• the Multi-strike setting;
• the status of the spk setting; and
• the status of unimanual mode.
User Guide 40

Care and Troubleshooting Guide
If you experience problems with the operation of your MB Writer, assistance is available to
help you or your support person diagnose the problem.
Power
The MB Writer has an internal battery which is re-chargeable. A universal power supply is
provided which, when plugged into the mains, will re-charge the battery at the same time it
provides power to the whole unit. It connects to the MB Writer through the round connector
on the left-hand side of the MB Writer.
Try and ensure the battery is kept charged. You cannot over-charge the battery, and leaving
the unit permanently charging will not damage it in any way. For regular classroom use, you
will typically get a full days use out of the battery. When you do this please ensure to recharge the MB Writer overnight so it is ready for the next days work.
How to Check the Battery
space+newline+b
Use this command to check the MB Writer battery
status. Press all 4 keys together.
The MB Writer will respond with either "Battery
OK" or "Battery Flat". The MB Writer will also tell
you if power is connected or not by saying
"Charging" or "Not Charging". If the battery is flat, embossing will stop.
The causes of a flat battery are:
• The battery hasn’t been charged. Connect the MB Writer to the power for 24 to 48
hours.
• The wrong power supply is being used. Your MB Writer is supplied with a universal
power supply, and this is what you should be using.
• The power cable could be faulty.
• There could be no power coming through the wall outlet.
• The battery is faulty and needs to be replaced. The expected life of your main
battery is 5 years.
If you suspect the wall outlet, the power cord or the charger is faulty, the simple way to check
is to unplug and re-plug the power supply; if there is power coming to your MB Writer, it will
say "not charging" when the power supply is unplugged, and "charging" when the power
supply is plugged back in, even when the MB Writer is switched off . If you don't hear either
of these messages, try using a different wall outlet, or a different power cord. If this doesn't
help, contact your distributor.
Status and Operation Error Messages
The following messages will be spoken using Recorded Speech no matter whether
Recorded or Synthesised speech is in use. A continuous status or error message can only
be cancelled by turning your MB Writer off.
Status messages tell you what condition your MB Writer is in. Most of these do not represent
problems that require your MB Writer to be returned for service. Error messages advise you
about problems that could be more serious and require some expert assistance to resolve.
User Guide 41
Illustration 15: The battery-check keystroke

Status Message Description
Charging Your MB Writer battery is charging
Not Charging
Your MB Writer is not connected to an external power
source
Battery OK The battery is 2/3 charged or more.
Battery Low
The battery is low. You need to recharge the battery.
Connect to power as soon as possible.
Battery Flat. Recharge
The battery is flat. Recharge for 24 hours. If this does not
work, first check that you are using the right power
adaptor, and then make sure that the power adaptor is
working and that you have power coming from the wall
outlet.
Error Form length
The actual form length of paper being used does not
match the form length selected
Input Buffer Full
Either typing speed on PC keyboard is too fast, or the MB
Writer is waiting to clear the input buffer. Please wait until
the buffer is cleared.
Keyboard Buffer Full
Either typing speed on the Braille keyboard is too fast, or
the MB Writer is waiting to clear the input buffer. Please
wait until the buffer is cleared.
Serial Buffer Full
The MB Writer cannot receive any further information
through the serial port (usually from a PC or Braille notetaker). Please restart your MB Writer.
Memory full
You must delete some files from memory to free up some
space.
Duplicate file. Error File name exists. Use a different filename.
Printer not ready or
Printer not found
Printer not connected or switched on or on-line.
Backup Battery Low
The internal backup battery is low. Report this message to
your distributor and send the MB Writer in for service.
The normal life of the internal backup battery is 3-5 years.
Error Message Description
Braille Head Jammed
The MB Writer cannot find the margin. Possible paper jam
or other obstruction. Switch off and then on again.
Braille Head moved. Error
Head has jammed momentarily or user has interfered with
its movement. Switch off and then on again. If the
message still occurs after this, you need to call your
distributor.
Serial Interface Error
Incorrect bit rate, parity or number of bits. Check the
settings on your PC.
System Error
Operating system fault or failure in Main board circuits. Try
turning off and then on after a short wait.
User Guide 42

Battery Temperature Error
Temperature fault. Battery temperature has exceeded <00
or >600C. Switch off for ten minutes. If the problem
persists, please contact your distributor.
Procedure to Reset the MB Writer
Sometimes you will need to reset the MB Writer to the factory defaults - your distributor will
tell you if this is needed.
There are two reset methods.
If you have files saved in memory:
• Turn the MB off. Please disconnect all cables (You can leave the power supply on if
you want to)
• Press New Line+ Command + dot 2 + Backspace
• Turn the MB on
• Release the keys once the head starts moving.
This will reset all the commands to the Factory default.
If you have no files saved in memory (or if the first method does not work):
• Turn the MB off
• Press Space + Command + dot 5 + Enter key
• Turn the MB on
• Release the keys once the head is moving.
This will reset all the commands and the memory to the Factory default.
What happens now?
• The MB Writer should say: “Good day. Not charging. Learn Mode, Mimic not found”
• The embossing head should also move.
• When you do a hard reset, the command key is deactivated. You need to reactivate
it.
If you have to return your MB Writer for service:
Make sure you have already spoken with your distributor before sending the MB. Do not
send an MB Writer for service unless it is expected at the receiving end, as it could be lost in
transit.
Pack your MB Writer correctly according to the following instructions.
Packing the MB Writer for Shipping
You MUST pack the MB Writer in its original packaging to ship it anywhere. Your warranty
does not cover damage caused in transit by insufficient packaging, and there will be an extra
charge for supplying the correct packaging to return your MB Writer after repair.
What you need:
• The MB Writer;
• The paper bail and shipping lock;
• The bubble wrap and inner carton;
• The cut foam and the outer carton.
If you are sending the MB Writer for service, ask your distributor whether you need to include
the following items:
User Guide 43

• The AC Mains Power adaptor;
• The Power cord;
• The USB or Serial Cable;
• The Mimic.
Insert the shipping lock and paper bail
To prepare the MB Writer for travel, you must insert the shipping lock.
Turn the MB off, and disconnect any cables and the power supply. Lift the Paper Lever up
and move the right margin all the way to the right. With your fingers, gently move the block
under the Braille head to a position about one-third of the way across from the left.
Now take the sheet that says REMOVE THIS INSERT. Fit the legs of the card back of this
insert across the block you have just moved. Let the sheet of paper at the front fall naturally
across the keyboard.
Now replace the paper bail; fit the end without the spring into the hole in the right margin,
then push the spring back and fit the spring end into the hole in the left margin.
Replace the top cover by fitting the two front corners into the slots at either side of the front
embossed ruler. Now press the cover down gently until it clicks.
Packing the MB Writer:
Wrap the MB Writer in Bubble-wrap; put the MB Writer in the inner carton. Close and tape
the inner carton.
Putting the cut foam in place
The hollow square goes around the inner carton. The end-piece with the extra cut-out can be
used to house the Mimic if it is travelling also; the other end-piece goes on the other end. If
the Mimic is not travelling, use another piece of foam or bubble-wrap in the space, tightly
packed and taped in place, to make sure that the foam-packed inner carton fits snugly into
the outer box.
If you are packing extra items, place them in the box at the end with the foam cut-out that
has no extra space. Cables can be stowed down the sides, between the inner and outer
cartons. When everything is snugly packed, close and tape the outer carton.
If you are sending your MB for service
Please make sure you include:
• Your name and address and a contact phone number;
• A note telling the service people about the fault, and
• Your RMA number if you have been given one.
Battery Care
The MB Writer needs power! It uses a lot of power when embossing and has a specially
designed battery.
The battery will operate the MB Writer for up to 8-hours, or a day in class. After this it must
be recharged!
If possible connect the power adapter provided, at all times. Otherwise, use the power
adapter overnight to recharge the batteries.
It is important to remember the following battery care tips:
Each time you switch the MB Writer on, it will tell you the battery status. It will tell you to
User Guide 44

charge the battery if it is low.
• It is a good idea to charge the battery overnight.
• If the battery is not re-charged when completely run down, permanent damage can
result. Replacing a battery is expensive and often inconvenient.
• It is a good idea to leave the MB Writer plugged in wherever possible to ensure the
battery is kept charged.
• You need to charge your battery for at least 24 hours prior to storing it over period of
up to 6 weeks.
• To maintain battery charge when the MB Writer is disconnected for longer periods,
call your supplier and have them disconnect the battery or tell you how to do this.
• You can check the battery status by pressing: newline+space+b. The MB Writer
will tell you either "Battery OK" or "Battery Low". If the battery is low, you must plug
it into the power as soon as possible.
IMPORTANT: The battery is not covered by the warranty. Please take good care of it!
User Guide 45

Resources for Users, Parents and Teachers
Graham Cook of SET-BC in Vancouver has written some wonderful support documents and
curriculum materials for the MB Writer. These are available online at
http://www.setbc.org/setbc/vision/mbpro/default.html.
Posture and Seating
Brailling posture and body alignment are very important.
• The student's feet should be touching the ground or resting on a custom made foot
stool.
• Their back needs to be supported by the chair.
• The table surface needs to be at a comfortable height for brailling. It is helpful if the
young student has a specially designed Braille desk with adjustable legs so that it can
grow with the student.
• Where possible have an occupational therapist assess the learning environment.
They will often point out things that we might overlook.
Other Resources
Online at www.mountbattenbrailler.com you will find many resources for teachers and
parents including tutorials, resources for using the MB Writer in Braille lessons and much
more.
Updates to this User Guide
The most current version of this User Guide can be found online at
www.mountbattenbrailler.com/userguides
From time to time we will use the online guide to issue a new print revision; there will be a
notification on the website of the most recent print version available. If you would like to
obtain a print copy of the latest version, please contact your distributor.
User Guide 46

User Guide Index
A
Adjusting for different types of paper.......................21
Adjusting the Dot Impact.........................................21
ASCII or Computer Braille.......................................34
B
Braille Chat.............................................................. 27
Braille Graphics.......................................................33
Graphics from the Keyboard..............................33
Braille on Heavy Card.............................................20
Braille on Small Paper............................................. 20
Braille Writing..............................................................
Choose Manual or Auto New Line......................14
Emboss commands as entered..........................14
Force a new Braille page....................................14
Insert a page number.........................................14
Set page warning bell.........................................14
Turn Correction Mode on and off........................14
Turn embossing off and on.................................14
Turn right margin bell on or off...........................14
Word Wrap.........................................................15
C
Changing a File.......................................................19
Changing the Control Key Layout...........................37
Changing the Dot Key Layout.................................36
Chorded commands................................................17
Close a File............................................................. 19
Combined Function Keys........................................38
Commands with parameters...................................10
D
Decrease dot impact...............................................21
Deleting a file..........................................................19
Deleting all files.......................................................20
Different weights of paper.......................................20
Dropped or Lower Numbers....................................34
E
Embossing a file .....................................................20
Embossing Area..........................................................
Embossing head..................................................4
Margin adjuster....................................................5
Paper advance knob............................................6
Paper bail............................................................. 5
Paper Grip Wheels...............................................6
Paper Lever..........................................................5
Reading table....................................................... 5
Ruler.................................................................... 4
Embossing multiple copies......................................20
Embossing Speed.............................................15, 21
Embossing Speed.......................................................
Embossing Speed..............................................15
Writing Speed.....................................................15
Enabling Commands.................................................9
Enter ASCII characters............................................18
Entering Commands................................................16
Erasing and Correcting............................................10
F
File transfers...............................................................
Display file on PC...............................................27
Emboss File.......................................................27
Embossing a file.................................................27
Installing MB-Comm...........................................25
Installing the MB-USB Drivers............................26
MB-Comm..........................................................25
Save Display to File...........................................28
Save file to PC...................................................27
Send file to MB W+............................................27
Upgrade Mountbatten Software.........................28
Using MB W+ as an Embosser..........................29
Using MB-Comm................................................26
Find out the software version..................................18
Formatting your Braille................................................
Centre your Braille on the line............................11
Clear all tab stops.............................................13
Line spacing....................................................... 13
Positioning Braille on the Page...........................11
Releasing a margin............................................13
Reset left margin to zero....................................12
Reset right margin to zero..................................12
Restore default tab stops...................................13
Right aligns your Braille......................................12
Set left margin to head position..........................12
Set right margin to a position..............................12
Set right margin to head position........................12
Set tab stop at the head position........................13
Set the bottom margin........................................13
Set the left margin to a position..........................12
Set the top margin .............................................12
Setting Margins..................................................12
Tab settings........................................................13
Top margin position............................................12
H
Help Command.......................................................17
I
Increase dot impact.................................................21
Inserting Paper..........................................................6
K
Keyboard.....................................................................
Backspace............................................................4
Backtab or Right Function Key.............................4
Braille Keys..........................................................3
Command.............................................................4
Enter....................................................................4
Margin release.....................................................4
Newline................................................................4
Space................................................................... 4
Tab or Left Function key.......................................4
The MB W+ Keyboard..........................................3
L
Left-hand side.............................................................
AC Power Socket.................................................6
DC Power Socket.................................................6
Headphone Socket...............................................6
Speaker Grille......................................................6
Listing files..............................................................19
Loading Paper...........................................................7
M
Mimic.......................................................................23
Modifying the Left Function Key..............................37
Modifying the Right Function Key............................37
47

Moving around the page..............................................
Games for moving and correcting......................11
Move down the page..........................................10
Move left 5 spaces.............................................10
Move one position left.........................................11
Move one position right......................................10
Move right 5 spaces...........................................10
Move up the page..............................................10
Page Eject..........................................................10
Multiple Commands on a Function Key...................38
N
NABCC Code..........................................................34
Naming files............................................................19
O
One-Handed Mode..................................................36
Open a file...............................................................19
P
Ports and Connections................................................
Mimic Port..........................................................25
Serial Port..........................................................25
USB Port............................................................25
Posture and Seating................................................ 46
R
Regular commands.................................................16
Removing Paper.......................................................8
Page eject commands..........................................8
Removing the Paper Bail...........................................3
Removing the Shipping Lock.....................................2
Renaming a file.......................................................19
Reporting available memory....................................19
Right Hand Side..........................................................
Mimic Port (S1 port).............................................7
USB Port..............................................................7
S
Save and restore settings............................................
Defaults..............................................................39
Emboss current settings.....................................18
Emboss default settings.....................................18
Emboss saved settings......................................18
Formatting Groups.............................................40
Groups...............................................................39
Reporting............................................................40
Restore to factory default settings......................18
Restoring............................................................39
Save all current settings.....................................18
The Save Command..........................................39
Saving files..............................................................19
Special Keyboards..................................................38
Speech........................................................................
No speech..........................................................22
Speak all keys.................................................... 22
Speak errors and prompts only..........................22
Speak only dot and command keys...................22
Tones-only mode................................................22
Start a File...............................................................19
Synthesised Speech...................................................
Speak Commands as You Type ........................22
T
Toggle Commands..................................................10
Troubleshooting...........................................................
Battery Care.......................................................44
Battery check.....................................................41
Error Messages..................................................41
Packing the MB W+ for shipping........................43
Power................................................................. 41
Resetting the MB W+.........................................43
Returning the MB W+ for service......................43
Turning the Command Key On and Off...................16
U
Unimanual Mode....................................................36
Updates to this User Guide.....................................46
Using Commands....................................................16
W
Word Wrap................................................................9
48

MB Writer Reference Section
Reference Section Contents
MB Writer Commands......................................................................................................................................... R1
Changing between Learn Mode and Advanced Mode.........................................................................................R2
Speech Control.................................................................................................................................................... R2
Handy Things to Know........................................................................................................................................ R2
Braille Writing...................................................................................................................................................... R3
Braille Files in Memory........................................................................................................................................ R4
Extra Commands................................................................................................................................................. R4
Getting Help........................................................................................................................................................ R4
Braille Graphics................................................................................................................................................... R5
Braille Embossing................................................................................................................................................ R5
Changing the Keyboard Layout........................................................................................................................... R6
Assigning Commands to the Function Keys........................................................................................................ R6
Braille Graphics................................................................................................................................................... R6
Check Battery Status........................................................................................................................................... R7
Audio Tones......................................................................................................................................................... R7
Reference Illustrations
The MB Writer keyboard, labelled....................................................................................................................... R1
Command activation keystroke........................................................................................................................... R1

MB Writer Commands
Keyboard layout
From the top left of the keyboard, clockwise,
edges first:
tab - top left, small round smooth key.
backtab -top right, small round smooth key.
enter - right, oval ridged key below backtab.
space - bottom centre, right side, long key.
newline - bottom centre, left side, long key.
backspace - left, oval ridged key below tab
command - small round key in the centre
between dot 1 and dot 4 of the braille keys.
The 6 braille dot keys have the Perkins layout: dot 3 2 1, 4 5 6 from the left. Braille
keys are on either side of command, and are oval with smooth centres and ridged edges.
Turn Commands On and Off
newline + space + tab + backtab - used to
activate and deactivate the command key.
Press all 4 keys together to turn command on.
Press all 4 keys together again to turn command off.
Regular commands
All regular commands begin with the Command key and finish with the Enter key. Follow this
sequence to use any regular command.
1. Press command key.
2. Type the command.
3. Press enter.
If there is a space indicated in the command, press space when entering the command. If
there is a + in the command, it means that the keys must be pressed and released together.
Where numbers are needed in a command, they can be entered either as the number sign
plus character or as a ‘dropped’ or ‘lower’ character. See the section Braille Grades for more
information on using dropped or lower numbers.
If there is a part of the command enclosed in square brackets, [ ], replace the square
brackets and their content by the proper parameter.
Chorded commands
Chorded commands use space pressed with the designated letter. For users with small
hands, they can be easier than some of the main keyboard combinations, particularly Page
Eject.
There are only a few chorded commands. They can be used at any time after the command
key has been activated.
b-chord Backtab
c-chord Carriage return
e-chord End
f-chord Line feed
h-chord Help
i-chord Indent
MB Writer Reference Section 1
Illustration 16: The MB Writer keyboard, labelled
Illustration 17: Command activation
keystroke

o-chord enter Options Menu
(Advanced Mode only)
p-chord Page eject
r-chord Reverse Line
t-chord Tab
z-chord Stops the speech (while
speaking).
Changing between Learn Mode and Advanced Mode
The factory default setting is Learn Mode. Enter the command adv to change between Learn
and Advanced Mode. The MB Writer will respond by speaking the name of the Mode you
have just activated.
Speech Control
spk a Speaks all keyboard keys, functions and commands.
spk c Speaks errors and prompts only (no braille dot keys).
spk d Speaks only braille dot keys (no function keys).
No Speech
spk n No speech - tones only.
Handy Things to Know
Adjusting Dot Height for Different Types of Paper
This function is used to match the impact force on the dots to the type of paper used. For
heavy braille paper, the impact force can be increased. For lighter paper, the impact force
can be decreased. The factory default setting is for regular photocopy paper: 80gsm weight.
command + backtab Increase impact (speech prompt ‘Up’).
command + tab Decrease impact (speech prompt ‘Down’).
Writing Braille on Cards or Small Paper
No Paper Operation
For use with small paper sizes (like a birthday card). Press space and newline together
during a margin search.
Using Heavy Card or Labels
You can choose from single strikes (default) up to 4 strikes on each dot.
ms [n] Multi - strike feature (sets strikes per dot to n). n is a whole number from 1
to 4 (default is 1). Useful for brailling on heavy materials such as plastic
labels.
One-Handed Mode
ku Toggles Unimanual Mode on and off (default off). When one-handed mode is on,
press Space after each character.
Note: To turn one-handed mode off, remember to press k space u space.
Alternatives to Chorded Commands for One-handed Mode
These alternatives are regular commands using command to begin and enter to finish.
MB Writer Reference Section 2

bt Backtab
cr New line
end Close an open file
in Indent
lf Linefeed
np New page
rl Reverse linefeed
tb Tab
Braille Writing
Braille Formatting Commands
The following formatting commands apply in both Learning and Advanced modes.
Position of Braille on the Paper
ce Centre text. Embossing starts after the New Line key is pressed. Default = off
(toggle).
ra Right adjust braille. The braille will be printed from the right hand margin. Default =
off (toggle).
Margins
lm Set left hand margin to 0, the left - most position.
lmh Set left margin to embossing head position.
lm [n] Set left margin to column ‘n’.
rm Set right margin to 0, the right - most position.
rmh Set right margin to embossing head position.
rm [n] Set right margin to column ‘n’.
tm [n] Set braille page top margin (n = number of lines).
bm [n] Set bottom margin of braille page (n = number of lines for bottom margin).
Tab Settings
tsh Set tab at the position of the embossing head.
tc Clear all tab settings.
Line Spacing
ls [n.m] Line spacing. Default = 1. If you want line spacing of 1.5 lines, the
command would be ls 1.5. Only use the decimal point if necessary.
Braille Writing Commands
The following formatting commands apply in both Learn and Advanced Mode.
cor Correction Mode. Default = on (toggle).
em Turn embossing off and on. Default = on (toggle).
man Choose between Manual new line and Auto new line. Default = Auto (toggle).
np Force a new (braille) page. Page eject.
pn [n] Begin page numbering starting at value of n.
MB Writer Reference Section 3

pbell [n] set page bottom warning bell to ring n lines before the end of the
page.
rmbell Right margin bell. The bell rings 5 positions from the right margin. Default is
on (toggle).
show Emboss commands as they are entered (can be helpful for tracking
mistakes). Default = off (toggle).
ww Word Wrap. When Word Wrap is on, the word is not embossed until the
Space Key is pressed. Default = off (toggle).
Braille Files in Memory
The following formatting commands apply in both Learn and Advanced mode. In the
following commands, 'filename' means any name up to 16 characters long.
Start a File
begin [filename] Opens a new file, called ‘filename’.
Close a File
end Close an open file. Alternatively, simply turn the MB off and the open file
will be saved.
Find Out Which Files You have Stored in Memory
dir Embosses all file names and their sizes.
free Embosses the remaining free memory space.
Change the File
append [filename] Append more information to ‘filename’.
rename [filename1 filename2] Rename ‘filename1’ to ‘filename2'.
Delete Files
del [filename] Delete the file named ‘filename’.
del all Delete all files.
undel Retrieve deleted file - only works if used before turning MB Writer off.
Emboss files that are stored in Memory
emb [filename] Print the file named ‘filename’ (uses current settings).
memb [n] [filename] Print n number of copies of the file named ‘filename’.
Extra Commands
ver Embosses braille software version.
hp Help. Prints command summary.
save Saves all current settings. Use to save your preferred settings (will then
become the default).
std Restore back to factory default settings.
alt [n] Enables your MB to accept ASCII characters above 128 (n can be any
proper ASCII value).
Getting Help
hp emboss or speak a complete summary of the Help groups outlined below.
MB Writer Reference Section 4

hp [group] emboss or speak the help for any of the groups outlined below.
General Help groups
hp bc gives a summary of the Braille code commands
hp dfln gives a summary of default language selection commands
hp em gives a summary of embossing output commands
hp emb gives a summary of commands for embossing from the memory
hp kc gives a summary of the Mountbatten keyboard setting commands
hp ku gives a summary of the Unimanual (one-handed) mode commands
hp lm gives a summary of the Left Margin commands
hp report gives a summary of command parameters for the report command
hp restore gives a summary of command parameters for the restore command
hp rm gives a summary of the Right Margin commands
hp s1 gives a summary of the first serial port output commands
hp save gives a summary of the command parameters for the save command
hp spk gives a summary of the speech status commands
hp std gives a summary of the command parameters for the std command
hp tc gives a summary of the command for clearing tabs
hp tm gives a summary of the Top Margin commands
hp tsh gives a summary of the tab setting commands
hp usb gives a summary of the USB output commands
Braille Graphics
gf Graphics mode. The space between the dots and lines is reduced. Default
= off (toggle).
Braille Embossing
Using Your MB Writer as an Embosser
The MB Writer can be used as a regular Braille embosser for note-takers and PCs.
It can use single sheet or continuous sheet paper. Continuous embossing is most reliable if
you use a lightweight 80 gram continuous paper - regular printer paper.
Using Continuous Paper
cp Continuous paper feed. Default = off (toggle).
cpa [+n]
or
cpa [-n] Add or subtract increment n to form length when using continuous paper.
Paper Size
fl [n.m] Form Length. Sets physical length of page in inches or centimetres. If the
length is a whole number do not add the decimal point.
Page Numbering
pn [n] Begin page numbering, starting at value of n.
MB Writer Reference Section 5

Control of Braille Output
el n Allow only ‘n’ blank lines while embossing. Any lines greater than ‘n’ will
be discarded (avoids having large blank areas on the braille page).
cap Caps lock. Default = off (toggle).
The MB Writer has only one port which has been designed to use with the Mimic. If you want
to use it as a port to connect to a PC or a note-taker, you must first turn the Mimic function
off, using the mimic command (see the Mimic section in the User Guide).
Changing the Keyboard Layout
The following formatting commands apply in both Learn and Advanced Mode.
kbc bnse Re-defines control key functions. b, n, s, e is the
order required of the 4 control keys (backspace,
newline, space, enter). For example if you wanted
to reverse the positions of the backspace and enter
keys, the command would be kbc ensb
kbd key1 key2 key3 key4 key5 key6
Re-define dot key layout. The default dot key layout is the
same as the Perkins layout.
After entering the command kbd, press the dot keys in the sequence you want them.
For example, to set the keyboard up to emulate the Stainsby Brailler layout, you would press
the Braille key on the far left for key1, making it dot 1; then you would press the middle
Braille key on the left, to make it dot 2; then you would press the key immediately to the left
of command, making it dot 3; then the key to the far right for dot 4, the middle right key for
dot 5 and the inner right key for dot 6.
Assigning Commands to the Function Keys
If you have a particular command or set of commands that you use frequently you can create
a macro or ‘hot key’ to store them on. This is done by changing the function of the tab and
backtab keys.
The following three commands enable the two function keys to be used as macro keys by
substituting the command of your choice.
kblf Re-defines the left function key. Follow kblf with the new command. If
you want to assign multiple commands to this key, press newline
between each command.
kbrf Re-defines the right function key. Follow kbrf with the new command. If
you want to assign multiple commands to this key, press newline
between each command.
kblrf Re-defines a third function for when the left and right keys are pressed
together. If you want to assign multiple commands to the double keypress,
press newline between each command.
Braille Graphics
Turn graphics mode on by using the command
gf Graphics mode.
In Graphics Mode the space between the dots is reduced, giving the appearance and feel of
lines instead of dots. There is much scope for creativity and learning about Braille graphics
MB Writer Reference Section 6

really reinforces the Braille code for the Braille learner. Default = off. Toggle
To try these drawings, check the Braille Grades table in this section for the keys you need to
press. We have shown you how the Heart will look to get you started.
Heart
1. s, e, i, wh
2. gh, space twice, ar
3. space once, e, i
sei:
< >
ei
Teddy Bear
1. space once, ow, o, two colons, ow, o
2. space once, s, ow, o, ow, o, wh,
3. space once, gh, space once, e, I, space once, ar
4. ow, s, space 4 times, wh, o
5. in, gh, space 4 times, ar, en
6. e, I, e, 2 colons, I, e, i
Sailboat
1. space once, 4-5-6, ch
2. space once, 4-5-6, space once, ch
3. space once, 4-5-6, space twice, ch
4. er, full cell, full cell, full cell, full cell, n
For anyone interested in making tactile graphics on their Braille writer, Marie Porter's
wonderful resource book called - So What About Drawing? Instructions for Drawing Using a
Braille Writer is available. Contact your distributor for details.
Check Battery Status
newline + dots 1,2 - Press all 4 keys together to hear battery status.
Check the Care and Troubleshooting Guide section for more information.
Audio Tones
When your MB Writer is in Tones-Only Mode, following the command spk n, it replaces
speech while you type with tones. There are three tones:
Acknowledge a short high frequency beep
Bell a longer mid-frequency beep
Error a long, low frequency tone.
When the Tones will happen
You will hear two Acknowledge beeps when you press command, just like when a command
is sent through by MB-Comm. You will hear a single Bell tone when your command has been
correctly entered and is being activated, and a single Error tone if you have entered the
command wrongly or entered an invalid command.
MB Writer Reference Section 7

You will hear an Error tone if you try to move left when you are at the Left Margin, either with
backspace or backtab.
You will hear a single Acknowledge beep when Page Eject is complete.
A single Bell beep indicates:
• A command has been accepted correctly.
• You have reached the margin zone when Brailling; you have 5 cells remaining.
• The Paper Lever has been lowered, and the margin search begins in 2 seconds.
You will hear two Bell beeps when you lift the Paper Lever, and when you reach the last line
on the page.
You will hear a single Error tone when you would normally hear the word "Error" spoken, or
when you would normally hear another error message, such as:
• when there is no paper in the MB Writer and you try to type;
• if you press keys while the paper grip lever is up;
• if you press enter if there is no command to complete, or no margin to release.
• if you press an invalid combination of keys;
• there is a command error.
You won't hear any tones during switch-on; these messages are still given with speech.
MB Writer Reference Section 8
 Loading...