

Harpo BraillePen12 User Manual
BraillePen12
Bluetooth Braille keyboard
User Guide
© Harpo Sp. zo. o.
Poznań, August 2009

Contents
What’s in the box?............................................................................................................................................ 1
Regulatory information..................................................................................................................................................... 1
Trademark information..................................................................................................................................................... 1
Your BraillePen12 at a glance...........................................................................................................................2
Exploring the BraillePen12............................................................................................................................................... 2
Switching BraillePen12 on and off.................................................................................................................................... 2
BraillePen12 sound signals.............................................................................................................................................. 2
Connecting the BraillePen12............................................................................................................................................3
Bluetooth Adapter Types.............................................................................................................................................3
Under Windows XP..................................................................................................................................................... 3
Under Windows Vista or Windows 7............................................................................................................................4
BraillePen12 with the Dolphin Pen.................................................................................................................... 5
To set up the BraillePen12 as a keyboard and display for Supernova:............................................................................5
BraillePen12 keystrokes for use with Supernova............................................................................................................. 5
Using BraillePen12 with MobileSpeak..............................................................................................................7
Pairing the BraillePen12 with your MobileSpeak phone...................................................................................................7
BraillePen12 keystrokes for MobileSpeak........................................................................................................................7
Joystick Commands:................................................................................................................................................... 7
Other Commands:....................................................................................................................................................... 7
Using BraillePen12 with Talks...........................................................................................................................8
Setting Talks up to connect..............................................................................................................................................8
BraillePen Write................................................................................................................................................ 9
Installing BraillePen Write.................................................................................................................................................9
Running BraillePen Write................................................................................................................................................11
The Main Window......................................................................................................................................................11
Keyboard Emulation.................................................................................................................................................. 12
Special behaviour for Alt............................................................................................................................................ 12
Configuring A New Keyboard Map................................................................................................................................. 12
The Main BPConfig Window...................................................................................................................................... 12
BraillePen12 and 6-key entry into Braille files................................................................................................. 15
The US-ASCII Keymap.................................................................................................................................................. 15
Duxbury Braille Translator..............................................................................................................................................15
Appendix A: Care and Resources................................................................................................................... 17
Making the Bluetooth Connection..................................................................................................................................17
Pairing your BraillePen12 with the Toshiba Bluetooth Adapter......................................................................................17
Pairing with the Broadcom WIDCOMM® Bluetooth Adaptor.........................................................................................20
Special note for potential problems with the Broadcom WIDCOMM drivers:............................................................22
Pairing with the BlueSoleil drivers.................................................................................................................................. 24
BraillePen12 Settings and Test Menu............................................................................................................................25
To reset the BraillePen12 do the following:....................................................................................................................26
Updating BraillePen Write.............................................................................................................................................. 26
Braille ASCII or computer Braille....................................................................................................................................26
Appendix B: Windows Keymaps..................................................................................................................... 29
Polish keymap (pl.kmf)................................................................................................................................................... 29
US-ASCII keymap (us-ascii.kmf)....................................................................................................................................29
UK Keymap (uk.kmf)...................................................................................................................................................... 30
Table of Illustrations
The BraillePen12, with all features labelled.......................................................................................................................... 2
The first dialog in the BraillePen Write install process.......................................................................................................... 9
Step 2 in the BraillePen Write install process.......................................................................................................................9
Step 3 in the BraillePen Write install process.....................................................................................................................10
Final step in the BraillePen Write install process................................................................................................................ 10
The main BraillePen Write window...................................................................................................................................... 11
No Bluetooth error dialog.................................................................................................................................................... 11
MAC address showing, ready to connect............................................................................................................................ 11
BraillePen12 connected, showing Disconnect button.........................................................................................................11
BPConfig main window....................................................................................................................................................... 12
BPConfig Interactive Mode Error - no keymap loaded........................................................................................................13
BPConfig Bluetooth search screen..................................................................................................................................... 13
BPConfig ready to connect................................................................................................................................................. 14
Duxbury Braille Translator's opening dialog........................................................................................................................ 15
Duxbury Braille Translator showing Braille typed from the BraillePen12............................................................................16
Bluetooth icons and the right-click menu............................................................................................................................17
Toshiba Bluetooth Add New Device window....................................................................................................................... 18

Toshiba Bluetooth Wizard, Step 1....................................................................................................................................... 18
Toshiba Bluetooth Device Search.......................................................................................................................................18
BraillePen12 showing in Device List................................................................................................................................... 19
Connecting to BraillePen12................................................................................................................................................. 19
Setup Complete, and COM port notification........................................................................................................................ 19
Bluetooth Settings Window showing BraillePen12..............................................................................................................20
The details shown when the Details button is clicked......................................................................................................... 20
Windows XP Menu showing Bluetooth Configuration......................................................................................................... 20
The first screen of the WIDCOMM setup............................................................................................................................ 21
WIDCOMM Setup searching for devices............................................................................................................................21
BraillePen12 showing in the WIDCOMM Devices window..................................................................................................21
Widcomm window asking for Passcode..............................................................................................................................22
Turning off WIDCOMM security stage 1.............................................................................................................................22
Turning off WIDCOMM Security - stage 2........................................................................................................................... 23
WIDCOMM Service Discovery............................................................................................................................................23
Final screen of WIDCOMM setup.......................................................................................................................................23
My Bluetooth Places window showing BraillePen12, ready to connect..............................................................................24
Graphical connection screen of BlueSoleil software........................................................................................................... 24

What’s in the box?
Your new BraillePen12 comes in its own carton, and it is packaged carefully for transport in
foam packaging. Please keep the carton and foam packaging safe; if you ever need to ship
your BraillePen12 anywhere, this packaging will help to keep it from damage in transit.
• The BraillePen12
• BraillePen12 Pouch
• BraillePen12 lanyard
• The AC adapter, with appropriate mains lead for your country
• This User Guide in Print and Electronic formats
• BraillePen Write software on CD
• Optional: 1 USB Bluetooth adapter
Please check the contents of the box carefully as soon as you receive it. If anything is
missing or appears damaged, please contact your distributor immediately.
Regulatory information
This equipment has been developed and tested in order to comply with the EMC and safety requirements of the
following directives:
EN 300 328
EN 301 489-1
EN 301 489-1
EN 55022
EN 61000-4-2
EN 61000-4-3
EN 60950-1
EN 60601-1
This device complies with Part 15 of the FCC Rules. Operation is subject to the following two conditions: (1) this
device may not cause harmful interference, and (2) this device must accept any interference received, including
interference that may cause undesired operation.
This device bears the CE and FCC approval mark.
Trademark information
BluetoothTM is a trade mark of the Bluetooth Special Interest Group,
www.bluetooth.com.
Microsoft® and Windows® are registered trademarks of Microsoft Corporation.
WIDCOMM® is a trademark of Broadcom Corporation.
BlueSoleil® is a trademark of IVT Inc.
1
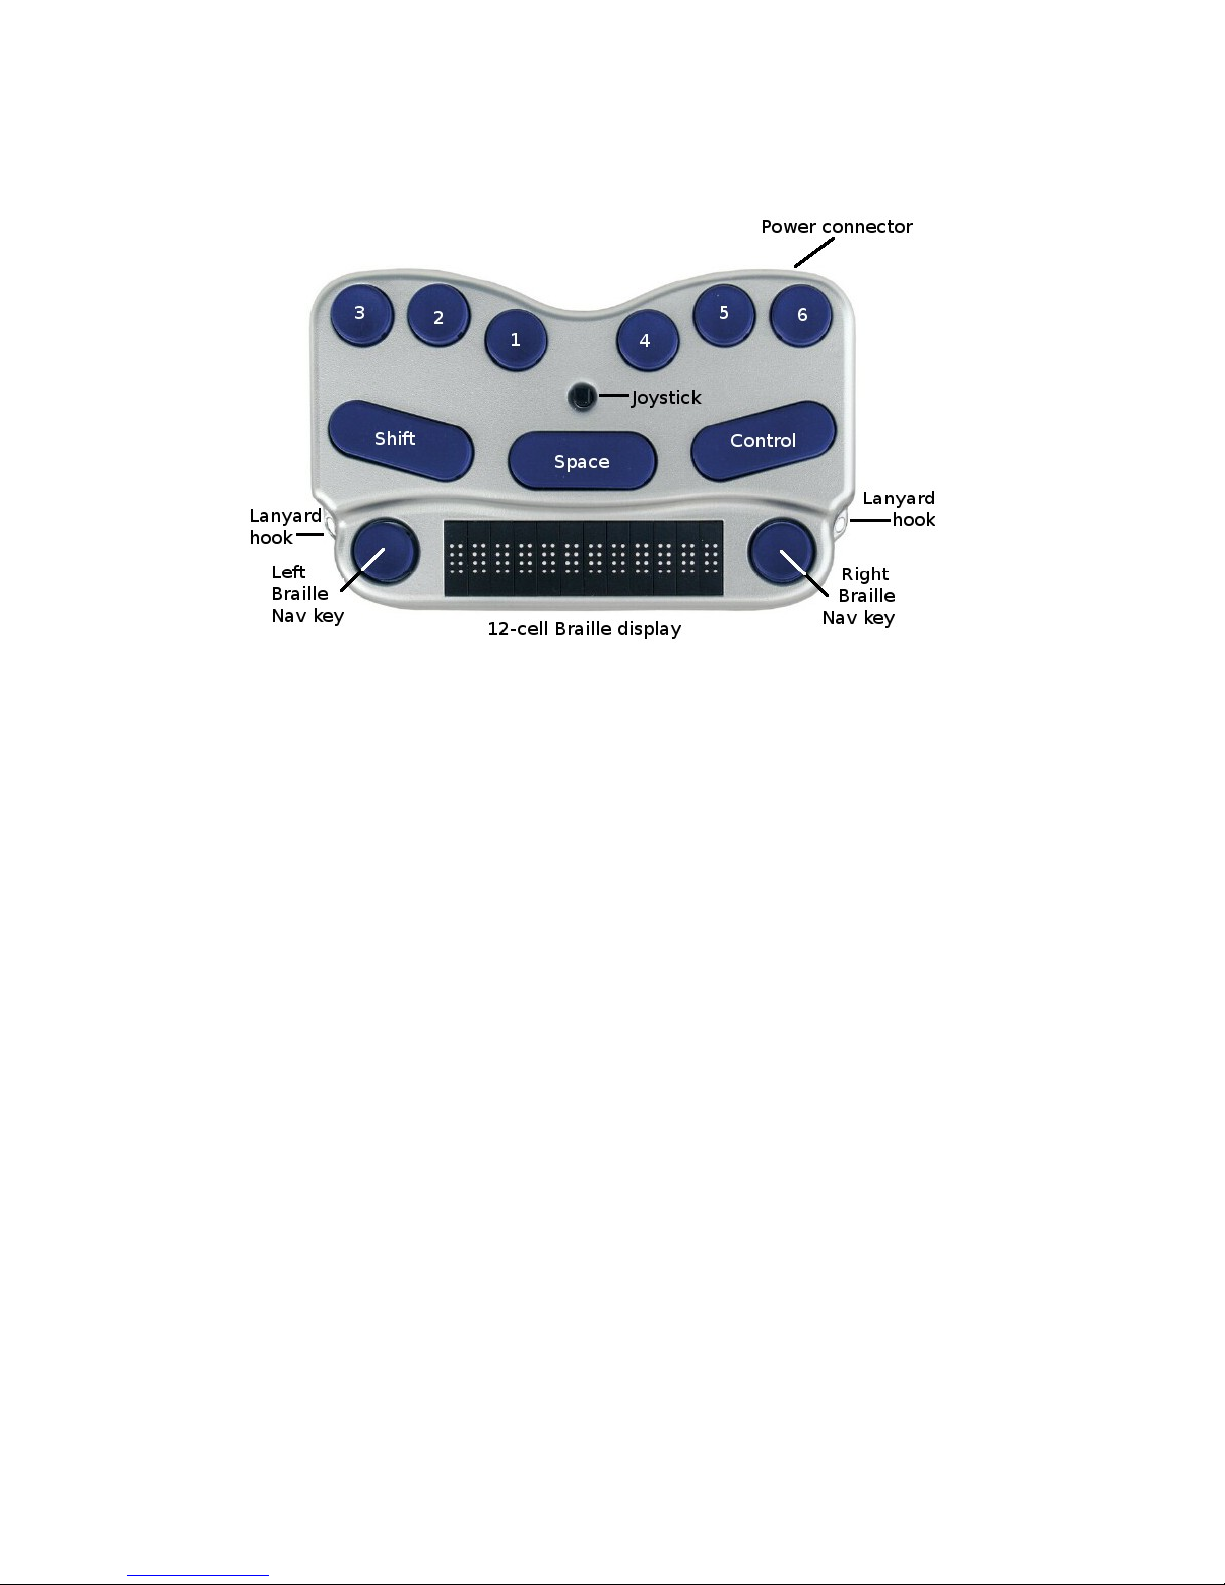
Your BraillePen12 at a glance
Exploring the BraillePen12
Your BraillePen12 has a 6-dot Braille keyboard, with the keys from left to right: dot 3, dot
2, dot 1, dot 4, dot 5, dot 6. Below the Braille keys there are three function keys, from
left to right: shift, space and control. In the centre of the keyboard area, between the
Braille keys and the function keys there is a joystick with 5 directions of movement: left, right,
up, down (towards you) and enter, which is activated by pressing the joystick towards the
keyboard until it clicks.
Below the keyboard area is the Braille area. In the centre of the Braille area you will find the
12-cell refreshable Braille display, with one round Braille navigation key either side of the
display. These keys are known as left pan and right pan, or left nav and right
nav.
On the rear edge, the connector for the battery charger is situated at the right-hand side; on
each side towards the front are two loops for attaching the lanyard.
To use the BraillePen12 pouch, open the pouch and locate the velcro patches inside. This is
the base of the pouch; place your BraillePen12 on these, keys uppermost, so that the velcro
dots on the base of the BraillePen12 attach to the velcro patches on the pouch. Close the
pouch snugly with the velcro strip.
Switching BraillePen12 on and off
Switch your BraillePen12 on by pressing the following keys simultaneously: space, dot 1
and dot 3.
When the BraillePen12 is on, the display will show braillepen12
Use the same key combination to switch the unit off. You will hear beeps to tell you whether
you have switched off or on.
2
Illustration 1: The BraillePen12, with all features labelled.

BraillePen12 sound signals
BraillePen12 communicates its status using high-pitched beeps. When you first turn your
BraillePen12 on, it give several beeps.
First you hear a single short beep to let you know that the BraillePen12 is on.
Then you hear a set of beeps to tell you the battery status.
The third set of beeps tells you that the BraillePen12's Bluetooth interface is active and can
make a connection with another device.
The sound for "BraillePen12 on" and the sound for "Bluetooth active" don't change; the
battery sounds will change depending on how much charge there is. Here is the full list of
battery status beeps:
One long beep, pause, three short beeps means that the unit is not connected to the power
and the battery is fully charged.
One long beep, pause, two short beeps means that the unit is not connected to the power,
and the battery is charged to half its capacity.
One long beep, pause, one long beep means that the unit is not connected to the power, and
that the battery is drained and needs to be recharged immediately.
Two mid-length beeps means that the unit is connected to power and the battery is charging,
but doesn't report on the state of the battery.
Two mid-length beeps, pause, three short beeps means that the unit is on charge, and the
battery is already fully charged.
Connecting the BraillePen12
Before switching your BraillePen12 on, make sure you first turn on the device you want to
connect to. When your device is on, then turn the BraillePen12 on by pressing Space and
dots 1 and 3 together.
Sometimes the connection can take up to 20 seconds to complete, after both devices have
been switched on. Listen for the triple-beep that tells you BraillePen12's Bluetooth interface is
active, and allow up to 20 seconds from there.
If you are connecting to a PC or netbook for the first time, you will need to discover the
BraillePen12 as a Bluetooth device. Once discovered, the connection will be made
automatically every time after that.
If your BraillePen12's battery is getting a little low, you might notice that it's more difficult to
connect to other devices, or to stay connected. Recharge the battery, and then consult the
Care and Resources section of this manual to find out how to reset your BraillePen12.
Bluetooth Adapter Types
BraillePen12 is compatible with four adaptor types: WIDCOMM, Toshiba, Microsoft and
BlueSoleil. The instructions here apply to those Bluetooth adapters using the Microsoft
Bluetooth drivers. If your Bluetooth doesn't work as described, check in the Care and
Resources section for connection information for other Bluetooth discovery methods.
Under Windows XP
First turn on your BraillePen12, and wait for the triple-beep. Next go to the Control Panel and
choose Bluetooth. Select Add a Device and wait while Windows discovers the device.
3

The MAC address of the BraillePen12, a series of letters and numbers beginning with BP, will
appear in the window; there could also be other devices such as other computers or phones.
You should select the BraillePen12's identifier as your device and click Next.
You will be asked whether you want to enter a pairing code or allow the device to pair without
a code. We suggest pairing without a code if you are pairing for the first time; you can
remove the BraillePen12 from the list of devices and pair again with a code later if you wish.
Once you have chosen and clicked Next, the BraillePen12 and your computer will be paired.
Under Windows Vista or Windows 7
First, turn on your BraillePen12 and wait for the triple-beep.
Go to Control Panel and select Devices and Printers. Choose Add a Device.
So long as you have Bluetooth on the computer and your BraillePen12's Bluetooth is active,
the MAC address of your BraillePen12 will appear in the window. Select this and click Next.
You will then have three choices; enter a code you already know, have Windows assign a
code, or pair without a code.
Navigating using BraillePen12
Using your BraillePen12 to navigate is made easier with the use of the Joystick.
We have used these conventions for naming the keystrokes:
joystick left Push the joystick horizontally, so it bends towards the left
joystick right Push the joystick horizontally, so it bends towards the right
joystick up Push the joystick horizontally, so it bends away from you
joystick down Push the joystick horizontally, so it bends towards you
joystick enter Push the joystick, with your finger on the top, straight down towards
the BraillePen12.
These keystrokes perform the following actions:
joystick left Move the cursor left one character or one tab or menu item
joystick right Move the cursor right one character or one tab or menu item
joystick up Move the cursor up one line or one menu item
joystick down Move the cursor down one line or one menu item
joystick enter Enter: confirm or activate a selection.
In some software you will use, joystick enter can't be used to end a paragraph in text;
for that keystroke you might need to use the keyboard-based Enter, which is usually space
+ control. Check the keystrokes for your software to make sure.
Moving the Cursor in your Applications
Because BraillePen12 is so compact, we haven't provided Cursor Routing buttons. The
requirements for cursor movement vary between the applications you will use, on your
phone, PDA or PC, but we have included some cursor movement and text selection
keystrokes to get you started.
To move the cursor in text, you will usually find that these keystrokes will work:
control + dot 1 Left
control + dot 4 Right
4

control + dot 5 Up
control + dot 2 Down
These keystrokes have the same effect in BraillePen Write, for instance, as if you used the
Joystick to move the cursor.
To move word by word, press control while you move the Joystick: control + joystick
left will move the cursor one word to the left, while control + joystick right will
move the cursor one word to the right.
To select text, press shift + control + joystick right to select from the cursor to
the end of the word.
Always check the keystrokes for your application to make sure.
5

BraillePen12 with the Dolphin Pen
To set up the BraillePen12 as a keyboard and display for Supernova:
• In Supernova, Select Control Panel, Popup Menu, Configuration, SAM Setup.
• Select BraillePen12 from the list box
• Press the Configure button
• Select Manual Configuration radio button
• Turn on your BraillePen12 using Space and dots 1 and 3.
• Press the Bluetooth Find button in the SAM dialog and wait for a minute.
• When detected press the OK button.
• In the SAM dialog, press the Detect All Devices Now button.
• Click OK to accept the hardware change dialogs.
• Your SAM dialog should now show BraillePen12 Braille Display 1
• Tab using Space and dots 5 and 6, or use the BraillePen12 joystick to move to the
close button and press Joystick Enter to select.
For questions about the Dolphin Pen, please contact support@dolphinuk.co.uk
For questions about BraillePen12 please contact your distributor.
BraillePen12 keystrokes for use with Supernova
Action BraillePen12 Braille key
Open Control Panel Space and dots 1 3 5 (o)
Popup Menu Space and dots 1 2 3 4 (p)
Mute Speech Control
List System Tray Shift, Space and dots 2 3 4 5 (t)
Application Hotkey Information Space and dots 125 (h)
Toggle Key Describe Mode on/off Space and dots 1456
Speak Keys
Speak PDA Battery Status Space and Dots 2 3 4 (s)
Speak current time/date Space and Dots 1 4 5 (d)
Speak Status Bar Shift, Space and Dots 2 3 (2)
Speak Selection Shift, Space and Dot 2 (1)
Speak Focus Shift, Space and Dots 3 5 6 (0)
Speak Headings Shift, Space and Dots 2 5 (3)
Speak Control Shift, Space and Dots 4 6
Speak Window Shift, Space and Dots 3 5 (9)
Where am I? (Application, file &
focus)
Space and Dots 2 4 (i)
Describe Focus position Shift, Space and Dots 2 3 6 (8)
Navigation
Press Ok/Close Icon Shift, Space and Control
Enter Space and Dots 4 6 or Joystick
Enter
Space Space
Page Up Space and Dots 1 2 6
Page Down Space and Dots 3 4 5
6

Tab Space and Dots 5 6
Shift Tab Space and Dots 2 3
Escape Space and Dots 1 5 (e)
BackSpace Space and Dots 1 2 (b)
Delete Space and Dots 1 3 4 6 (x)
Start Menu (Windows Key) Space and Dots 2 4 5 6 (w)
Cursor Up Space and Dot 1 or Joystick Up
Cursor Down Space and Dot 4 or Joystick Down
Cursor Left Space and Dot 3 or Joystick Left
Cursor Right Space and Dot 6 or Joystick Right
Home Shift, Space and Dots 1 2 3
End Shift, Space and Dots 4 5 6
Control Home Space and Dots 1 2 3
Control End Space and Dots 4 5 6
Alt Control and Space
Alt tab Shift and Space
Virtual Focus (VF)
Choose Virtual Focus (VF) Control and dots 3 6
VF Activate Press Space
VF Interact with control Space and dots 4 6
VF Interact with control Space and Control
VF Next Line Space and dot 4
VF Previous Line Space and dot 1
VF Right Space and dot 6
VF Left Space and dot 3
VF Right Word Space and dot 5
VF Left Word Space and dot 2
VF Choose Live Focus Control and dots 3 6
VF Next Object Space and dots 5 6
VF Previous Object Space, Shift and dots 5 6
7

Using BraillePen12 with MobileSpeak
Pairing the BraillePen12 with your MobileSpeak phone
Connecting your BraillePen12 to MobileSpeak requires you to first pair with your phone, and
then to go into MobileSpeak's Configuration Menu and choose the Braille device and connect
to it. MobileSpeak has drivers built in for the BraillePen12; choose the EasyLink12 drivers
from the list.
BraillePen12 keystrokes for MobileSpeak
Some of these keystrokes only apply when you are using a smartphone with Windows
Mobile; others apply to both Windows Mobile and SymbianOS phones.
Joystick Commands:
Previous line Joystick Up
Next line Joystick Down
Previous character Joystick Left
Next character Joystick Right
Enter Joystick Enter
Other Commands:
Previous line Space and dot 1
Next line Space and dot 4
Previous character Space and dot 3
Next char Space and dot 6
Page up Space and dots 1 2 6
Page down Space and dots 3 4 5
Home Space and dots 1 2 3
End Space and dots 4 5 6
Backspace Space and dots 1 2
Delete Space and dots 4 5
Escape Space and Shift
Tab Space and Control
Shift Shift
Stop Speech Control
Enter Space, Shift and Control
Menu Space and dots 2 4 5 6
Menu bar Space and dots 1 3 4
Context menu Space, Shift and dots 1 3 4
Close window Space and dots 1 3 4 6
Edit Mode / Read Mode toggle Space and dots 2 4
Read screen Space and dots 1 2 4
Status information Space and dots 2 3 4
Open MSP control panel Space and dots 1 4
Display date and time Space and dots 1 4 5
Mute Speech toggle Space and dots 1 3 6
Move focus to Taskbar Space and dots 2 3 4 5
Stylus Mode on/off Space and dots 1 2 4 5
8
 Loading...