


Auto-Lektor
Independent Reader
User Guide
© Harpo Sp. z o. o.
Poznań, November 2009

Contents
What's in the box............................................................................................................................................ 4
Setting up your Auto-Lektor ......................................................................................................................... 4
Connecting to the power............................................................................................................................... 4
Connecting to the Internet............................................................................................................................ 4
Introduction..................................................................................................................................................... 5
Exploring the external features of your Auto-Lektor...................................................................................... 5
The Auto-Lektor Keyboard............................................................................................................................ 8
Getting Started.............................................................................................................................................. 13
Scanning and Reading............................................................................................................................... 13
Getting Help................................................................................................................................................ 13
Essential Keys............................................................................................................................................ 13
Some things to remember.......................................................................................................................... 14
Using More of your Auto-Lektor.................................................................................................................. 15
Scanning documents and loading text from a CD....................................................................................... 15
Reading and Pausing................................................................................................................................. 16
Titles........................................................................................................................................................... 16
Scanning in colour or black and white........................................................................................................ 16
Selecting the Language.............................................................................................................................. 16
Changing Voice Parameters....................................................................................................................... 16
Saving text.................................................................................................................................................. 16
Loading text from a file............................................................................................................................... 17
Reading web pages.................................................................................................................................... 17
Reading RSS feeds (Internet Newsfeeds)..................................................................................................18
Reading and creating e-mail....................................................................................................................... 19
Checking recognition status........................................................................................................................ 19
Connecting Auto-Lektor............................................................................................................................... 20
Using an External Keyboard....................................................................................................................... 20
Primary keys on the External Keyboard..................................................................................................... 20
External Keyboard keystrokes.................................................................................................................... 20
Additional Keystrokes................................................................................................................................. 21
Setting up your internet connection for Web browsing and RSS Feeds.....................................................22
Using Auto-Lektor to send and receive email............................................................................................. 23
BraillePen Bluetooth Braille Keyboard....................................................................................................... 27
BraillePen Key Layout................................................................................................................................ 27
BraillePen: Switching On, Switching Off and Resetting..............................................................................27
Charging the BraillePen.............................................................................................................................. 28
Using the BraillePen with Auto-Lektor........................................................................................................ 28
BraillePen Keystrokes................................................................................................................................ 28
Tutorials......................................................................................................................................................... 30
Navigating through your text....................................................................................................................... 30
Black And White Scanning......................................................................................................................... 30
Colour Scanning......................................................................................................................................... 31
Reading text from a CD.............................................................................................................................. 31
Reading websites....................................................................................................................................... 32
Reading Email with the Integrated Keyboard.............................................................................................. 33
Using Auto-Lektor as an Audio Player........................................................................................................34
Writing text to a CD or DVD........................................................................................................................ 35
Caring for your Auto-Lektor......................................................................................................................... 36
Cleaning the Scanner Glass....................................................................................................................... 36
Updating the Auto-Lektor Software............................................................................................................. 36
Appendix A - Auto-Lektor Primary Keystrokes..........................................................................................37
Appendix B -The User Menu........................................................................................................................ 38
One Menu for Each Text Source................................................................................................................. 38
Scanning as text source............................................................................................................................. 38
C drive as text source................................................................................................................................. 39
Working folder as text source..................................................................................................................... 40
CD Drive as text source ............................................................................................................................. 41
Pen Drive as text source............................................................................................................................ 41
Internet as text source................................................................................................................................ 42
RSS Feeds as text source.......................................................................................................................... 44
1

E-mail as text source.................................................................................................................................. 45
Table of Illustrations
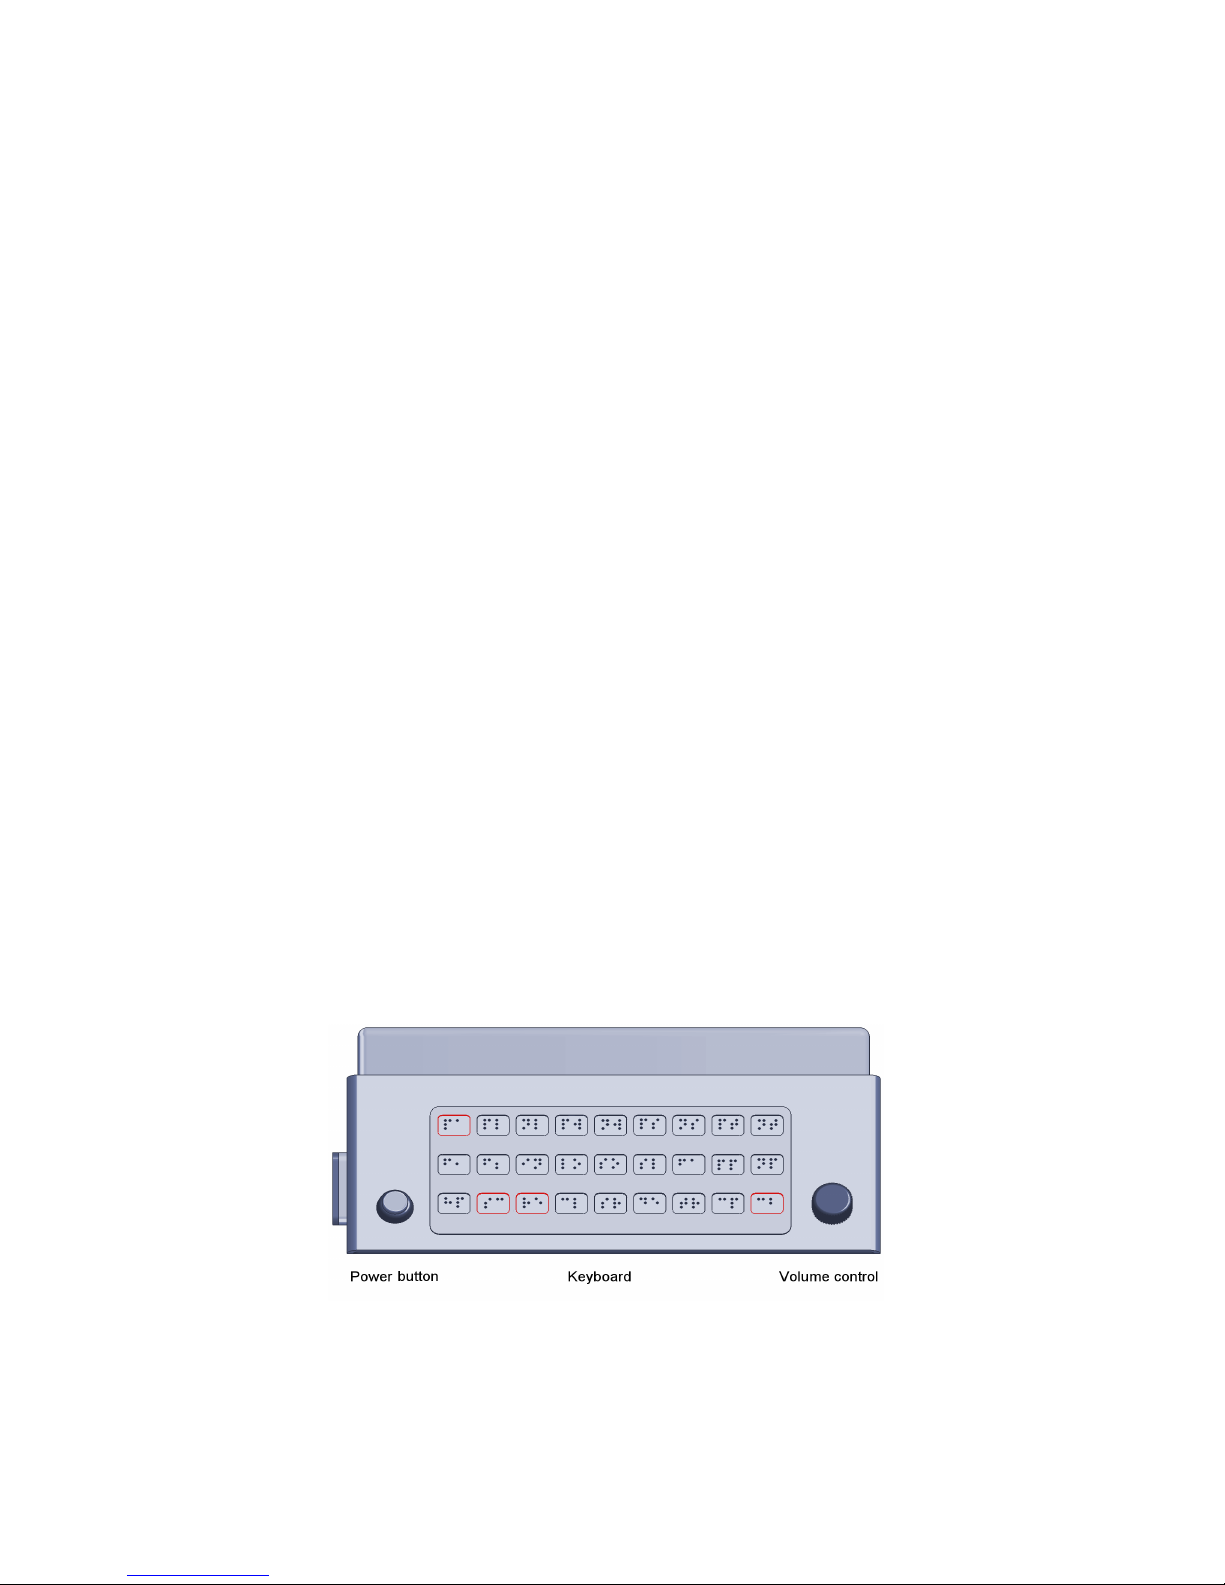
Auto-Lektor front panel. Primary keys are marked in red..................................................................................5
Auto-Lektor left side, showing CD drive and shelf mounting.............................................................................6
Auto-Lektor right side, showing ports and headphone socket...........................................................................6
Auto-Lektor rear, showing power connector...................................................................................................... 7
Auto-Lektor integrated keyboard showing two-letter key names.......................................................................8
2

What's in the box
• The Auto-Lektor
• A power cable suitable for your location
• This User Guide in print and on CD
• The BraillePen Bluetooth keyboard
• The BraillePen AC Power adapter and power cable
• The BraillePen User Guide in print and on CD
Please check that everything has been included. If any items are missing or appear
damaged, please notify your distributor immediately.
Setting up your Auto-Lektor
Auto-Lektor should be placed on a firm, level surface out of direct sunlight, and close to a
power source. If you will be using Auto-Lektor's internet connection capability, make sure
you place it close enough to your router so that an Ethernet cable can reach from one unit
to the other, and be placed safely where it won't create a hazard.
Connecting to the power
Connect the socket end of the power cord to the power connector on the back end of your
Auto-Lektor, and the plug end to a suitable wall socket.
Beside the power connector on the Auto-Lektor, you will find a switch. When the top of this
switch is pressed in to the Auto-Lektor, it is in the Off position; when the bottom of the
switch is pressed in, it is in the On position.
Turning this switch on doesn't actually start Auto-Lektor up; it simply provides power.
Turning Auto-Lektor on is done on the front panel.
Connecting to the Internet
It is not necessary to connect to the internet to use Auto-Lektor as a self-contained reading
machine; this connection is only used for emailing, reading web pages, reading RSS feeds
and listening to internet radio.
To connect physically to the internet, first the Ethernet cable must be plugged in to the side
panel on the right side of the Auto-Lektor. The other end of the cable should be plugged in
to a free port in your router. If you are not sure how to do this, or if you need assistance in
obtaining a suitable Ethernet cable, please contact your distributor for assistance.
Setting up Auto-Lektor with the parameters for your internet connection and email is
discussed in the section Connecting Auto-Lektor.
3
Introduction
Auto-Lektor is a stand-alone reading device, self-contained in a single unit. It has an
integrated keyboard on the front panel, through which you have access to all the functions.
Auto-Lektor incorporates a scanner, keyboard, hard disk, CD drive and then gives you
access to multiple devices and sources of text: USB, serial and network or the internet. It
can scan large or heavy books; it can save or email the text it has recognised. The
integrated keyboard on the front panel has high-contrast colours, and each button has a
Braille label as well as a text label.
Exploring the external features of your Auto-Lektor
Your Auto-Lektor has features on all four sides and on the top. This tour will help you to
become familiar with these features.
With the Auto-Lektor on the table in front of you, with the front panel towards you, use the
following explanations to identify the features as you explore.
The Front Panel
This panel contains the power button, the volume knob and the integrated keyboard.
The power button is located at the bottom left corner of the front face. On the bottom right
corner you will find the volume control. Between them is the keyboard.
The keyboard has three rows of nine keys each. Each key has a two-character Braille
identifier, to help you to find the key you want. There is a full explanation of the keyboard in
the next section.
To get you started, the four keys you need to begin reading are Scan, Read, Pause and
Clear. These keys are labelled SC, RE, PA and CB. You will find them as follows:
Scan, SC, is on the bottom row, second key in from the left.
Read, RE, is next to Scan, on the right.
Pause, PA, is the leftmost key on the top row.
Clear, CB, is the rightmost key on the bottom row.
Next, we go through the features on each side of your Auto-Lektor.
4
Illustration 1: Auto-Lektor front panel. Primary keys are marked in red.

The Left Side
If you run your hand along the left side, down towards the base, first you will find some
small slots in the case; these are air vents for cooling. Next you will find the CD drive,
where you can load CDs for reading; then, beginning at about the centre of the left side
and going all the way to the back corner, is the support for the reading shelf.
Your Auto-Lektor is supplied with a removable shelf, so that if you have larger books,
magazines or newspapers to scan, they can sit flat; this prevents them from sliding off the
scanner, and helps to give the scanner the best picture. The shelf has a flat top around the
same width as the scanner, and a shorter section at a right-angle, which can be slotted
into the support.
The Right Side
On the right-hand side of your Auto-Lektor, going from front to back, you will first find the
headphone socket; this socket takes a standard 3.5mm headphone plug. Then you will
find another set of small ventilation slots, just like those on the left side.
Further down towards the back you will find a panel with many connectors. The first two,
one below the other, are for a PS/2 external keyboard and mouse. The next two, one
below the other, are the Serial port, COM1,for connecting a serial device, and a VGA port
so that a monitor can be connected.
Next you will find two USB ports, for connecting external USB drive or a USB pen-drive.
Then there is a column of 3 ports. The top one is an RJ45 Ethernet port, for connecting to
a network or to the Internet. Below this there are two more USB ports.
The next two ports, one below the other, are RCA and S-Video, followed by three audio
sockets; Audio in, Audio out and Microphone.
5
Illustration 2: Auto-Lektor left side, showing CD drive and shelf mounting
Illustration 3: Auto-Lektor right side, showing ports and headphone socket

These ports allow you great freedom of access to texts of all kinds; as you read through
this User Guide you will discover how Auto-Lektor makes use of them.
Now let's take a look at the back of the Auto-Lektor.
The Rear Panel
Although you will generally use the power button on the front panel, there is another power
switch on the rear panel. This will turn off all power to the Auto-Lektor, so that you will
know it is using no power. As well as saving electricity when the Auto-Lektor is not in use,
this is a safety feature; if you will be out for the day or away for several days, you should
switch the Auto-Lektor off at this switch.
On the rear panel you will also find more ventilation slots and a fan.
And finally, the all-important top: the scanner.
The Top of the Auto-Lektor
The Auto-Lektor's top is the scanner. The lid opens from the left side, with its hinge on the
right. Lift the lid from the left, and you will find that the hinge feels quite loose; this is
because the hinge can open quite widely, to accommodate larger books. When you set the
lid down again, the hinge returns to its proper position.
The next step in getting to know your Auto-Lektor is finding out about all the
available functions. The place to begin is the integrated keyboard.
6
Illustration 4: Auto-Lektor rear, showing power connector

The Auto-Lektor Keyboard
The Auto-Lektor keyboard located on the front panel has three rows of nine buttons. Each
button is labelled with two Braille characters to remind you of what it does. In this Guide,
we will use the two-letter names for the keys throughout, after this explanation of the keys.
All the keys are grouped according to their function, and all the keys in a group have the
same colour.
The groups and their colours and positions are:
Reading, green; these keys are along the bottom row, with one key on the centre row, third
in from the left.
Clear Buffer, red. This group has only one key, which is on the bottom row, far right.
Voice Parameters, blue; these keys are in the middle row, from positions fourth from the
left to second from the right.
Navigation, yellow; these keys take up all of the top row and the two right-most positions of
the middle row.
Function keys, purple; these keys are the two left-most keys on the middle row.
The Reading Group:
Most of the reading group buttons are on the bottom row. The following explanations take
the keys in order from left to right.
Help (HP)
This key puts you in Help mode; once that is on, you can press any other key and AutoLektor will tell you what it does. When you press HP, Auto-Lektor says "Entering context
help mode. Press a key to hear its function." To leave Help Mode, press HP again.
Scan (SC)
Pressing this key starts the scan of the document on the glass, or, if the source text is set
to an external source such as a CD, the hard drive or a USB device, to load the text from
the external source into the Buffer.
If you are reading text from a CD, first you need to choose from the list of the files on the
CD. Choose a title using PT and NT, and then press SC again to load the file. For web
pages and RSS feeds, you work in a similar way. The User Menu section has detailed
information about how each of these text sources works.
7
Illustration 5: Auto-Lektor integrated keyboard showing two-letter key names

Read (RE)
Pressing RE causes Auto-Lektor to begin reading from beginning of the first page in the
Buffer. If there is no text in the Buffer, because you haven't scanned a document yet, AutoLektor will say "Buffer is empty."
Once you begin reading, if you have more than one page of text in the Buffer, Auto-Lektor
will read it all in sequence. Any time you press RE after pausing, reading will begin again
at the top of the first page in the Buffer.
Change language (CL)
CL changes the language Auto-Lektor uses to read and recognise. Use this button
between scans or in Pause Mode, to change the recognition and reading language for the
next scan or for the rest of the current text.
Auto-Lektor can have multiple languages installed. This means that Auto-Lektor will
recognise and read the text in any of the languages that are installed on the device, and
the CL key allows you to choose from the list of installed languages.
Source (SR)
SR determines where the text is to come from, to be read. You have the choice of:
• Black and white scanning;
• Colour scanning;
• C drive (the Auto-Lektor's hard drive);
• Work folder (an area set aside on the C drive);
• CD, for text files on the CD;
• Pen drive, for text files on an external USB device;
• Internet;
• RSS channel;
• Email
Once you have chosen a Source, the text will come from that source; for anything except a
scan, you will need to use PT and NT to choose a file or bookmark from a list. The Source
setting also determines which User Menu is available to you when you press F1.
Destination (DE)
DE determines where the text will be sent after pressing TR, the next button along this
row. Your choices are.
• CD drive;
• Pen drive;
• C drive;
• Working folder on the Auto-Lektor hard disk.
Transfer (TR)
sends the recognised text from the Buffer to the destination you have selected in DE. AutoLektor will tell you if there is no text to be sent, and prompt you as needed.
8

Configure Punctuation (CP)
specifies how Auto-Lektor is to read punctuation. If you select None, the punctuation will
not be spoken, but Auto-Lektor will change intonation and pause, where there is
punctuation. If you select All, every punctuation sign will be named. If you select Some,
you will only hear the following punctuation and special characters spoken; all other
punctuation will instead cause intonation changes and pauses, just as with None.
The characters spoken in Some punctuation mode are:
& ampersand ` apostrophe ) right parenthesis ; semi-colon
/ slash ^ caret { left brace " double-quote
> greater than _ underscore } right brace ' single quote
< less than | vertical bar [ left square bracket ? question mark
@ at \ backslash ] right square bracket ! exclamation mark
# hash ( left parenthesis : colon
~ tilde * asterisk + plus
Information (IN)
IN is one of the most important keys, because it tells you what is happening. If you are not
sure where you are in a process, or if you just want to find out what Auto-Lektor is doing,
press IN.
IN is on the middle row, the third key in from the left. Pressing it tells you how many pages
are already in the Buffer, and how many remain to be recognised; it tells you the current
language setting; and your Source Text and Destination settings.
The IN key can only be used in Pause mode; if Auto-Lektor is reading, press PA to go into
Pause Mode, and then you can press IN.
The Clear Buffer Key
Clear Buffer (CB)
Clear Buffer can be found on the bottom row, the right-most key. If you press it once, AutoLektor asks you for confirmation that you would like to clear any text from the Buffer; if you
want to clear the Buffer, press CB again. If you press any other key, the first keypress is
cancelled.
The Speech Parameters Group
These keys are available for use at any time, except when you are in Help Mode, where
you will hear what each key does. They alter the speed and volume of the speech output.
They are on the middle row, beginning at the fourth key from the left. From left to right, the
keys are:
• Louder (LO)
• Softer (SO)
• Slower (SL)
• Faster (FA)
You can also use the Volume control on the front panel to control the volume of speech.
However, to control the volume of audio playback, use LO and SO.
9

F1 and F2: the User Menu keys
These keys are responsible for handling the user menu. These menus are explained in
detail in their own section.
The Text Navigation Group.
Pause (PA)
This key pauses reading, and stops the cursor at the beginning of the most recently
spoken word.
When reading has been paused using PA, we say Auto-Lektor is in Pause Mode. While
Auto-Lektor is in Pause Mode, it is possible to navigate around in text, and change voice
parameters and language settings.
Use PA again to leave Pause Mode, and begin reading from the current cursor position.
Previous letter (PL)
PL moves the cursor in the Buffer to the previous character and speaks it.
Next letter (NL)
NL moves the cursor in the Buffer to the next character and speaks it.
Previous word (PW)
PW moves the cursor in the Buffer to the first character in the previous word and speaks
the word.
Next word (NW)
NW moves the cursor in the Buffer to the first character in the next word and speaks the
word.
Previous sentence (PS)
PS moves the cursor in the Buffer to the first character of the first word in the previous
sentence and speaks the sentence.
Next sentence (NS)
NS moves the cursor in the Buffer to the first character of the first word in the next
sentence and speaks the sentence.
Previous title (PT)
PT can be used for navigating in text; in Pause Mode, PT moves the cursor in the Buffer to
the previous title and speaks the title.
PT is also used to step backwards through lists of files, internet radio stations or audio
tracks in any of the Source settings other than Scanning,
Next Title (NT)
NT can be used for navigating in text; in Pause Mode, NT moves the cursor in the Buffer to
the next title and speaks the title.
NT is also used to step forwards through lists of files, internet radio stations or audio tracks
in any of the Source settings other than Scanning,
10

Previous page (PP)
PP moves the cursor in the Buffer to the first character of the first word on the previous
page and speaks the word.
Also, in multi-level lists like internet radio stations, use PP to move to the previous
category; use PP also to move to the previous folder on a pen drive, an MP3 CD or DVD,
or the C: drive.
Next Page (NP)
NP moves the cursor in the Buffer to the first character of the first word on the next page
and speaks the word.
Also, in multi-level lists like internet radio stations, use NP to move to the next category;
use PP also to move to the next folder on a pen drive, an MP3 CD or DVD, or the C: drive.
In the next section we cover the primary use of Auto-Lektor as a scanner and
reader.
11

Getting Started
Scanning and Reading
Turn Auto-Lektor on with the power button. You will find this button to the left of the
keyboard on the front, towards the bottom left-hand corner of the front panel.
In addition to the power button on the front panel, there is also a switch on the rear panel,
to shut off all power to Auto-Lektor. Make sure this switch is in the "on" position before
pressing the power button.
Auto-Lektor will take a few moments to be completely ready to scan; when it is ready, you
will hear it say "Hello. Auto-Lektor system version 1 5. Press Help button at any time to
enter Context Help."
Lift the lid, and put a document or book face down on the glass. Close the lid. If you have
chosen to scan a book, you will notice that the hinge opens up widely, so that the lid can
still close over the book. When there is only a single sheet on the glass, this hinge folds
back down into the scanner.
Press the Scan button. This is on the bottom row, second button from the left.
You will hear the scanner head move along the glass, as Auto-Lektor scans the page; then
you will hear the scanner head return. If you rest your hand on the lid, you can feel the
changes as the scanner head moves forward and back.
Once the first page has been scanned, Auto-Lektor will say "Starting recognition". You can
continue scanning while recognition is taking place, if you have more than one page to be
read.
As soon as the first page has been recognised, the text is loaded into the Buffer, and AutoLektor says "New text in Buffer".
Now press the Read button, and Auto-Lektor will read the text aloud.
Getting Help
When you turn Auto-Lektor on, the first message you hear is "Press Help button at any
time to enter context help".
The Help button is at the bottom left-hand side of the Auto-Lektor keyboard, the left-most
button on the bottom of the three rows of buttons.
Pressing the Help button gives you a way to hear what each individual button does,
without activating it. If you press the Help button once,you enter Context Help Mode; AutoLektor says "Entering Context Help Mode. Press a key to hear its function". Now if you
press any other button, Auto-Lektor will give you a spoken explanation of its function. For
instance, if you press Help and then press Scan, Auto-Lektor will say "Scan and
Recognise, or fetch text from other source". This describes what the Scan button does in
normal use.
To leave Context Help Mode, press the Help button again. Auto-Lektor then returns to
normal keyboard mode.
Essential Keys
There are some important buttons on the keyboard to give you access to the primary
functions of Auto-Lektor. These buttons are:
12

Scan
This button is in the bottom row of keys, one key in from the left - just to the right of the
Help button. Use this button to scan a document on the glass, or to load text from a CD or
the hard disk, or to fetch a document from the internet.
Read
Once a document has been recognised or fetched, and is safely in the Buffer, Auto-Lektor
will say "New text in Buffer". Now the Read button can be used to read the document.
Auto-Lektor will read from the beginning to the end.
Pause
The Pause button is at the top left of the Auto-Lektor keyboard; on the top row, the leftmost button. Pressing Pause will stop Auto-Lektor reading. To re-start reading from the
place where you paused, press Pause again. To return and start reading from the
beginning, press Read.
Clear Buffer
This key is at the bottom right of the Auto-Lektor keyboard. If you press it in Context Help
Mode, Auto-Lektor will say "Clear Buffer". In use, it will say "Erase Buffer. Press again to
confirm". Using the Clear Buffer button will clear any previous text from the Buffer so that
you can start afresh with a new document.
Some things to remember
Scanning and reading operate independently of each other. Once the first document has
been scanned and you have heard the scanning head return, you can start scanning the
second and subsequent pages, even before the announcement that there is new text in
the Buffer. You can start reading as soon as Auto-Lektor tells you there is new text, and
continue with recognition of subsequent pages during the scan.
Now that you have the primary functions working, we invite you to read on and
discover more of your Auto-Lektor's features.
13

Using More of your Auto-Lektor
Scanning documents and loading text from a CD
Auto-Lektor does three tasks: it scans, it recognises the scanned image and it reads the
recognised text.
The Buffer
Once the text has been recognised, it is placed into a memory area called the "Buffer". as
more pages are recognised, they are added at the end of text which is already in the
Buffer.
When you read or navigate around in the recognised text, you are working in the Buffer.
If you want to read text you have saved, or read text you have loaded from a CD, AutoLektor will load the text directly into the Buffer. If there was already some text in the Buffer,
the new text will be added to the end of the existing text. If you want the new text not to be
added to the previous text, you must clear the Buffer using CB before scanning or loading
the new text.
Pages
When you load text from a CD or from the Auto-Lektor hard disk, Auto-Lektor will check for
page breaks. If there are no page breaks in the file, Auto-Lektor will divide the text into
pages for you.
To start reading you do not need to wait for the recognition to finish, but only for the first
page of text to be loaded into the Buffer. Auto-Lektor will tell you that there is new text in
the Buffer.
Auto-Lektor scans a document by passing the scanner head along under the scanner
glass, to take a picture of the page lying on the glass. The scanner head passes twice
along the glass; once to scan the page, and once to return to the start position ready for
the next page. You can hear and feel when the scanning mechanism begins to return to
the start position; as soon as it begins to return, you can put a new page on the glass
ready to be scanned.
The Cursor
The cursor is the term for your place in the document in the Buffer. As you read through a
document, the cursor moves from word to word; as you navigate around the document, the
cursor moves up, down, left or right. When you leave the Buffer or shut Auto-Lektor down,
the position of the cursor is saved, so you can begin reading again at the same place. The
cursor position is only saved for text in the Buffer; Auto-Lektor doesn't save the cursor
position for a file on the hard disk or on CD.
The contents of the Buffer are saved automatically when you shut Auto-Lektor down.
The cursor can be moved around in your text using the navigation keys on the front panel
or on an external keyboard. When you navigate, you move by character (a letter or Space
or punctuation mark), by word, by sentence, by paragraph or by page.
14

Reading and Pausing
To navigate around in the text in the Buffer, first press PA to stop reading. Your cursor in
the Buffer will be at the last word spoken; you can check this by pressing PW and then
NW.
While you are in Pause Mode, you can move the cursor to any place in the document; you
might want to re-read a particular sentence, for instance. Navigate to that place in the
Buffer, and use PA again to re-start reading from the cursor.
If you press RE (Read) to re-start reading, the cursor will return to the beginning of the
Buffer and reading will begin again from the start.
Titles
Auto-Lektor uses Titles to navigate through text, filenames, audio tracks and radio stations.
For lists such as filenames, radio stations and audio tracks, the Previous Title and Next
Title keys take you to the previous or next item in the list.
In text, Title can refer to short paragraphs such as headlines, or where there are no
headlines, the NT or PT key will jump to the beginning of the next or previous paragraph.
The kind of text Auto-Lektor will recognise as a title will depend on the text you have
scanned.
Scanning in colour or black and white
Auto-Lektor has the ability to scan in two modes: black and white and colour. Black and
white is faster and allows you to work with books, newspapers and other printed media, so
long as the contrast between the background and the text is good. If the text is written on a
dark background, is printed in the negative, or is in colour, you will generally get better
results scanning in colour. Black-and-white scanning can be more effective for poor quality
print.
Selecting the Language
The language used when Auto-Lektor begins reading will be whatever language was
chosen previously, or the default language if your Auto-Lektor is new, or the installed
language if you only have one language installed.
To change the language, first press PA to pause reading. Then press CL as many times as
you need to, until Auto-Lektor announces the correct language. Then you can resume
reading, using the new language, by pressing PA to come out of Pause Mode.
Changing Voice Parameters
Voice parameters can be adjusted at any time and in any mode of Auto-Lektor, with the
exception of Help mode; in that mode, when you press each key you will receive an
explanation of its function. The Voice Parameter keys are Louder, Softer, Slower and
Faster; the parameters you choose will apply to all the languages you have installed.
Saving text
Any text in the Buffer, whether you have scanned and recognised it, or loaded it from an
external source, can be saved as a file.
You can save to several places: a standard file on Drive C called al.txt; the working folder
on Drive C; a CD; or a USB device such as a memory stick or USB hard drive.
Before you save a file, remember to press the DE key to set the destination you want.
15

To save a file, press the TR or Transfer key.
Text saved to the C: drive is written to a file with a standard name, al.txt, in plain text
format. If you save to the C: drive at a later time, this file will be overwritten with the new
text.
By contrast, when you save to CD, into the working folder, or to your USB device, the
filename can be created in one of two ways: with the first twenty characters from the
Buffer, or using the filename you have entered from the external keyboard. So, you can
save multiple files at a given location. Use the User Menu to change the way the filename
is created.
The working folder is a folder set aside on the hard disk for saving files.
Loading text from a file
Auto-Lektor can read text into the Buffer from a file. The source of the file can be the CD,
al.txt on the C: drive, a file in the working folder or a file on a pen drive. The only thing to
remember is: it must be plain text with a txt extension to the filename.
At the time of loading the text, Auto-Lektor will check for page breaks. If the text is not
divided into pages, Auto-Lektor will set page breaks into the text as it is read into the
Buffer.
If you set the Source to the CD, the working folder or external memory, the PT and NT
keys enable you to select a file to load.
Reading web pages
Auto-Lektor can read web pages, and if you connect an external keyboard or the
BraillePen, you can also edit form fields on a web page. This allows you to go to a search
site, enter the text to search for and browse the search results.
if you have selected the internet as your text source with SO, the list of available
bookmarks is immediately accessible; use PT and NT to step through the list and use SC
to confirm your bookmark selection and load the page.
You will hear the sound of a ticking clock while the page loads, and then Auto-Lektor will
begin reading.
When you are reading a web page, the following keys have special functions:
Scan (SC) Go to a web page from the bookmarks list, follow a
link on a web page, or enter an editable field on the
current website; change the status of a radio button
or checkbox on a web page.
Previous title (PT) Move to the previous link, button or field when on a
page, or to the previous bookmark.
Next Title (NT) Move to the next link, button or field on a web page,
or to the next bookmark.
Previous page (PP) Return to the previous level; if you are in the first web
page, PP takes you back to the bookmarks list.
If you have followed a link, press PP to go up one
level to the page you just came from, before you are
returned to the bookmark list.
Numeric Keypad Enter the number of the element on the page, that
16

you want to jump to. Elements include links, buttons,
text fields, check boxes and radio buttons, and they
are numbered in order from the top of the page.
Enter Move to the item number chosen with the number on
the Numeric keypad.
If there is a large number of links on the page, and you would like to speed up reading, you
can use the "ignore the link" setting located in the user menu. When this setting is active,
Auto-Lektor will read only the text on the web page, and disregard any links.
Note: In this mode, pressing Scan (SC) also clears the Buffer; web pages are not added to
previous text in the Buffer.
Reading RSS feeds (Internet Newsfeeds)
When you choose RSS feeds as your Source, you have immediate access to the list of
saved addresses of the most popular sites with RSS feeds.
Use PT and NT to step through the list of available RSS services, and press SC to go to
the service; you will hear the ticking clock again while Auto-Lektor reads that service's
channels list.
When the list is loaded, use PT and NT to step through the list of available channels, and
press SC to choose the channel. Each channel has several RSS newsfeeds, which you
can step through using PT and NT.
When you find a newsfeed that interests you, press SC to go to the page with the
extended information.
As with reading web pages, RSS reading mode changes the meaning of some keys:
Scan (SC) Load the services or channels list, or to go to the web
page of the selected RSS feed.
Previous title (PT) Move to the previous newsfeed, channel or service.
Next Title (NT) Move to the next service, channel or newsfeed.
Previous page (PP) Return to the previous RSS category, or transfer to
your bookmarks.
Next page (NP) Move to the next RSS category.
Reading information from RSS feeds is divided into four stages:
• Choosing the RSS site from the list.
• Choosing the category of information you're interested in from the list of categories
on the RSS site, and going to that category.
• Stepping through the list of RSS link from the list of links for that category, listening
to the brief information, and then choosing a link and following that link.
• Reading the web page with the full information.
In each of these stages, use PT and NT to move between items and SC to select. To go
back one step, use PP. The fourth stage, reading a page, switches Auto-Lektor into the
mode for reading web pages; use PP to return to selecting from RSS feeds and reading
the short information.
Note: In this mode, as with web pages, pressing Scan also clears the Buffer.
17

Reading and creating e-mail
Auto-Lektor can read and send e-mail.
First, you must configure your mail account parameters in the User Menu. There is
detailed information on how to do this in the section Connecting Auto-Lektor.
Once you have successfully set up your email account, you can check whether there are
any messages waiting, through the User Menu. After downloading all the messages, you
can move between them using PT and NT.
As with reading web pages, e-mail reading mode changes the meaning of some keys:
Scan (SC) Read the selected message
Previous title (PT) Move to the previous message
Next Title (NT) Move to the next message
Note: In this mode, pressing Scan also clears the Buffer.
Checking recognition status
If you are scanning multiple pages, you can begin reading as soon as the first page has
been recognised. However, because you are reading, you won't hear a message to tell
you whether or not recognition has been finished.
When you press IN, among the other information you will hear is whether there are any
pages remaining to be recognised.
Now that you know about the way each feature works, the next section
introduces you to what Auto-Lektor can do when you connect to external
devices and to the Internet.
18

Connecting Auto-Lektor
Your Auto-Lektor is an independent reader; it doesn't require connection to any other
device to scan, read or save. However, you can connect to your Auto-Lektor in many ways,
to bring text in from external sources or to save to external sources.
Using an External Keyboard
Auto-Lektor is able to take your commands from an external PC keyboard.
Make sure that you plug the keyboard into the PS/2 keyboard port or one of the 4 USB
ports on the right side of Auto-Lektor before switching on. If Auto-Lektor is already on, and
you wish to change to an external keyboard, switch off first and connect the keyboard, and
then switch on again.
All the functions of the built-in keyboard are available with an external keyboard, plus other
features not available through the built-in keyboard.
Primary keys on the External Keyboard
The four primary keys are Scan, Read, Pause and Clear Buffer. These keys on the
external keyboard are: Ins, C, Esc or Space, and O.
For Context Help, press F1.
External Keyboard keystrokes
The following table shows the keys on the Auto-Lektor built-in keyboard and their
counterparts on the external keyboard:
Auto-Lektor External Keyboard
Help (HP) F1
Scan (SC) Ins
Read (RE) C
Change Language (CL) L
Source of text to read (SR) S
Destination of saved text (DE) D
Transfer (TR) T
Configure Punctuation (CP) K
Information (IN) I
Clear the Buffer (CB) O
User Menu (F1) F11
User menu (F2) F12
Louder (LO) G
Softer (SO) H
Faster (FA) W
Slower (SL) E
Pause (PA) Esc or Spacebar
19

Auto-Lektor External Keyboard
Previous Letter (PL) , (comma)
Next Letter (NL) . (period)
Previous Word (PW) Left arrow
Next Word (NW) Right arrow
Previous Sentence (PS) Up arrow
Next Sentence (NS) Down arrow
Previous Title (PT) Numpad -
Next Title Numpad +
Previous Page Page Up
Next Page Page Down
Additional Keystrokes
Because there are so many extra keys, it's possible to do things from the external
keyboard that can't be done from the front panel. This table shows the additional
keystrokes available to you:
Del
Deletes the current page in the Buffer. This can be
useful if you wish to repeat the scan or recognition of
this page. As with Clear Buffer, you will be prompted
to press this key again to confirm the deletion.
Numpad /
This keystroke deletes the word from the Buffer that
is currently at the cursor position. You will be
prompted to press again to confirm.
F2
Edits the sentence at the cursor position. Once you
have pressed F2, you will have access to the normal
editing keys to move back and forward in the
sentence, backspace or delete to remove characters,
and the letter and punctuation keys and space to add
corrected text. Press Enter to confirm that you have
completed editing.
]
Switches the scanner to scan mode with reduced
resolution. This feature improves the OCR scanning
in some cases with larger font sizes.
Number keys
Jump to a certain page number; enter the number of
the page, press Enter after the number and the
cursor will move to the top of that page in the Buffer.
Note: This command doesn't correspond to the page
numbering in a book you have scanned, but to the
pages in the Buffer, although they may be the same
in some cases.
Home Jump to the first sentence in the Buffer.
End Jump to the last sentence in the Buffer.
20

Entering data from the PC Keyboard
An external keyboard gives you the ability to enter data, for instance a file name when you
are saving text. If you want to be able to type in filenames, you need first to set this in the
User Menu. See the User Menu section for information on how this is done.
Once you have entered data entry mode, the keyboard is no longer sending commands to
control Auto-Lektor; it is waiting for you to enter the data. Once you have entered the data,
press Enter to confirm the entry, and normal keyboard mode will resume.
To pause or cancel the data entry, press the Escape key on the external keyboard.
To verify what you have entered, before pressing Enter, press F1.
When you are in data entry mode, not all the keys on your keyboard are active. Which
keys are active depends on what data is being entered.
For instance, if you are entering an IP address, you only have access to the row of number
keys above the keyboard, plus the period or full stop, the arrow keys, F1, Backspace,
Delete and Enter. If you are entering an email address, the full range of alphanumeric keys
plus the @ sign and some punctuation keys are available as well as period or full stop, the
arrow keys, F1, Backspace, Delete and Enter.
Setting up your internet connection for Web browsing and RSS Feeds
If your computer gets its internet connection address automatically from your router, you
do not need to set up your connection; you simply need to connect the two with an
Ethernet cable.
Auto-Lektor is set up by default to obtain its IP address automatically, using DHCP. Most
personal Internet provider services use this method of connection. However, just in case
your provider or network administrator uses a different method, Auto-Lektor is able to be
set up another way.
If you need your Auto-Lektor to have a static IP address, you will need to use this facility to
enter the connection parameters into Auto-Lektor.
You will need your external keyboard to set up the internet connection.
Setting up a static IP address
These instructions are aimed primarily at IT administrators; if you are connecting AutoLektor to a network in an organisation, you should pass these instructions to the IT
administrator of your network.
To set up your internet connection for a static, you must first select the internet as text
source. Use S on the external keyboard, or SR on the front panel. Step through the text
sources until you reach Internet as text source.
Now press F1 on the front panel or F11 on the external keyboard. Auto-Lektor will say
"Internet menu active". Step through the menu until you hear "change internet connection
parameters".
Press F12 on your external keyboard to enter this menu. If at any time you want to cancel,
press Escape.
The first prompt you will hear is "Enter I P number." The numeric keypad is not active, so
you must enter the IP address for Auto-Lektor using the numeric row of keys above the
main part of the keyboard, separating each set of numbers using the period key on the
keyboard. Use the Backspace key if you make a mistake. Auto-Lektor will speak the
21

keystrokes as you make them, including echoing any characters you delete using the
Backspace key. Press Enter to confirm.
If you have entered an invalid IP address, you will be returned to the buffer, and you will
need to re-enter the menu to try again.
After pressing Enter to confirm your IP address, you will be asked for your IP mask. This is
usually in the form 255.255.255.0 or 255.255.255.255. Enter this IP address in the same
way as for your IP number and press Enter to confirm.
The next number to enter is the default gateway, which is the address of your router. Enter
this in the same way as before, and press Enter to confirm. Then you will be asked for a
DNS address; this could be the address of the router or a DNS address supplied by your
provider. Enter it in the same way and press Enter to confirm.
Once all the addresses are in, you will hear a ticking-clock sound while Auto-Lektor tests
the connection, and then the message "internet connection parameters set".
If you have entered valid IP data which is incorrect, you will hear an error message when
Auto-Lektor tries to connect to a web page.
Changing From a Static IP to Automatic Connection
If your internet connection changes and you want to return to DHCP connection, which
obtains an IP address automatically, use F1 or F11 to enter the Internet Menu. Step
through the menu using F1 or F11 until you hear Set DHCP as Default Connection Type.
Press F2 to confirm. You will hear the ticking clock for a few seconds, and then Auto-Lektor
will say "IP dynamic parameters set". The change has now been made.
Using Auto-Lektor to send and receive email
When you use Auto-Lektor to read email, you are using the same methods as you do to
scan a page of text. First you set the source of your text, and then you scan the text. Then
you read the text, and you can pause, navigate, re-start reading from the beginning, and
so on. The keystrokes you use to do all these things are just the same as they are for
reading a book.
Before you can actually go ahead and read email, Auto-Lektor needs to know where to
fetch the email from, and where to send email to.
This facility requires the use of the external keyboard; make sure it is plugged in before
you turn Auto-Lektor on.
Before you begin
Before you begin using Auto-Lektor's email facility, you must enter all the details of your
email account, so you will need to prepare the following information:
• Your incoming email or POP3 server name;
• The POP3 port to be used;
• Your outgoing email or SMTP server name;
• The SMTP port to be used;
• Your full email address;
• Your login name;
• Your login password.
22

You should have received these from your Internet Service Provider. If you don't have
them, check with your provider or network administrator before setting up these
parameters.
At the time of writing Auto-Lektor is not able to download or send mail via GMail or Yahoo
accounts, since these providers require SSL connections. You should instead use the
email account set up with your Internet service account by your Internet Service Provider.
Setting up the email account details
First select Email as Text Source using SO or S. Then press F1 on the integrated
keyboard, or F11 on the external keyboard to enter the Email menu. Use F11 to step
through the choices until you hear "Enter email configuration from external keyboard", and
press F2 or F12.
The first prompt is "Enter POP3 server address, which refers to the server for your
incoming email. Type the address using the external keyboard and press the Enter key to
confirm. The next prompt asks for the POP3 port number; type this in using the number
keys above the alphabetic keys, and press Enter to confirm.
Next you are asked for the SMTP server address, which is entered in the same way as the
POP3 server address; then the SMTP port, entered in the same way as the POP3 port.
The next prompt asks you to "Enter your valid email address as sender". This is your full
email address in the form user@domain.com. Make sure you enter both parts, either side
of the @ sign. Press Enter to confirm.
Then Auto-Lektor will ask for your username. This is the username you use to log in to
your email service; it could be the same as the first part of your email, but it might be
something different, which is why you are asked to enter it here. Type it in and press Enter
to confirm.
Then you are asked for your password. This is the password you use to log in to your
email service. Although Auto-Lektor will spell it out as you enter it, so that you can edit it if
you make a mistake, the password is encrypted for storage on Auto-Lektor, so it is secure.
Type it in and press Enter to confirm.
Auto-Lektor will now say "Email account parameters changed". No checking is done at this
stage, so you will need to send a test message to make sure you have all the settings
correct.
Sending a message
Press F1 to activate the Email Menu. Then press F1 again and step through to Write New
Message and press F2 to confirm.
Auto-Lektor will now give you the list of keystrokes you need to compose and send an
email.
The first keystroke is F5, to enter the recipient's email address. Once you press F5, you
can type in the address, and use the arrow keys and Backspace and Delete to edit as you
go.
When entering the recipient's email address, you can also use + and - on the Numpad
(Previous Title and Next Title) to step through your address book.
For this test message, you will be sending it to yourself, so type your own email address in
and press Enter to confirm. Auto-Lektor will read it back to you, so you can use F5 and
type it in again if it isn't correct.
23

As you complete each part of an email, Auto-Lektor will tell you about the keystrokes you
need to complete the other parts.
The second keystroke is F6, to enter the message subject. Enter a short subject line for
the email, and confirm with the Enter key. For this test email, we suggest using "test" as a
subject.
Next press F7 to enter the body of the message. Type a short text into the body of the
email. Remember that the Enter key will confirm and return to the previous level - you
aren't able to have paragraphs separated by the enter key in Auto-Lektor messages.
When you have all three parts of the message - recipient, subject and body - entered,
press F9 to send the message. Auto-Lektor will say "sending email", and when the
message has been safely sent, Auto-Lektor will say "message sent".
You can press Escape at any time before sending to cancel the message.
The next test is to download email, and find out if your test message came through.
Downloading email
Press F1 to enter the Email menu, and then F1 once more to go to "check for new
messages". Press F2 to confirm. Auto-Lektor will tell you in percentages how the
downloading is going, and say "downloading finished" when all messages have been
received. If there are no messages on the server, Auto-Lektor will tell you that.
Caution! Emails that are downloaded are deleted from your email server, so make sure
you save any that you want to keep; read further in this section to find out how to do this.
Reading through emails
To read the downloaded messages, press Ins or SC, and Auto-Lektor will begin reading
from the top of the first message.
To step from one message to the next for a quick check of the message subjects and the
number of messages, press PA to enter Pause Mode, and then use PT and NT, or
Numpad - and Numpad +. You will step from message to message, and at each message
Auto-Lektor will first announce whether you have read the message or not by saying
"Status: read" or "Status: unread"; then you will hear the subject line and the sender's
email address. When you reach the test message you just sent, you can press PA to
resume reading from that message. Use Home and End to move to the beginning and
end of the Buffer, where the first and last messages can be found.
Email messages are sorted in order of arrival, with the oldest messages at the end of the
buffer and the newest messages at the start. Sent messages are also kept in the buffer, in
date order among the received messages; you will recognise them because Auto-Lektor
will say, after the Status: read message, "sent by Auto-Lektor".
Replying to a message
If you want to reply to a message you have received, press F1 to return to the Email Menu,
and F1 to step through until you hear "reply to selected message".
You will hear the same set of prompts as for writing a new message. However, if you press
F5 and then press Enter without typing anything, the recipient address will be filled with the
address of the original sender. If you press F6 for subject and just press Enter without
typing anything, the original subject will be preserved. When you press F7 to enter the
email body, the original text is not included.
24

Press Escape at any time before sending to cancel the message.
Saving email
If you want to keep any of your downloaded emails, you must save them using TR or T.
This is because, if you leave Email as Text Source and use CB to clear the Buffer, all your
emails will disappear.
When you elect to save emails, only the currently-selected email is saved as a single text
file. So if you wish to save all the emails, you will need to start at one end of the list of
emails, and save each one. Make sure you are in Pause Mode, and step through the list
with PT or NT, or Numpad + or Numpad -, just as for reading. When you hear Auto-Lektor
speak the brief details of an email, that is the currently-selected email.
If you have not selected to type in the filename from the external keyboard, the filename
given to the file will be the first 20 characters from the Buffer. In the case of email, this can
produce strange results; we suggest that you go to the Email Menu using F1 before you
begin your transfer, and press F1 until you hear "enter filename from external keyboard",
and press F2 to confirm.
Next use DE or D to set the destination of the saved text, and then use TR or T to save the
selected email to your chosen source. If you then wish to save another email, use PT or
NT to step to that email, and press TR or T to save. Continue in this way until you have
saved all the emails you want.
Deleting unwanted emails
First you must select the message you want to delete. In Pause Mode, Use Numpad + or
NT, and Numpad - or PT, to step through the messages. The status, sender and subject of
each message will be spoken. When you reach the message you want to delete, press F1
or F12 to enter the Email Menu, then F1 or F12 again to step through until you hear
"delete selected message". Press F2 or F12 to confirm. Auto-Lektor will say "selected
email message has been deleted".
Continue deleting messages until the buffer is empty, or until only the messages you wish
to save are remaining.
Now that you have read about connecting, read on to find out about using the
BraillePen Bluetooth Braille keyboard with your Auto-Lektor.
25

BraillePen Bluetooth Braille Keyboard
Auto-Lektor comes with a Bluetooth Braille keyboard called BraillePen, so that you can
operate your Auto-Lektor with Braille, in the same way as using a standard external PC
keyboard.
BraillePen Key Layout
The BraillePen keyboard has six round Braille keys; from the left these correspond to Dots
3, 2, 1, 4, 5, 6 in the standard Braille keyboard layout.
Below the Braille keys are three horizontal oval keys. From the left these keys are Shift,
Space and control.
BraillePen: Switching On, Switching Off and Resetting
To turn on your BraillePen, hold down the Space key and Dots 1 and 3 together. If you
press a different combination, BraillePen will not turn on; this is to prevent it from being
turned on accidentally. When you have pressed the right combination, you will hear a
series of tones, to tell you first that you have turned on the BraillePen, and then to tell you
about the remaining battery charge. Read further in this section to find out the different
battery charge tones.
The same combination, Space with Dots 1 and 3, is used to switch off; you will hear a
single short tone.
Once the BraillePen is on, there will be a short wait until the Bluetooth is active; then you
will hear a series of three short beeps to let you know that it is available to connect to the
Auto-Lektor. After that, there will be a short wait while the connection is being established,
and you will hear a single short beep.
If you turn your Auto-Lektor on and BraillePen is not yet switched on, Auto-Lektor will
search for the BraillePen approximately every 30 seconds. Then it might take a further 45
seconds to complete the Bluetooth connection. So, if you are going to use the BraillePen
with your Auto-Lektor, we recommend that you switch your BraillePen on at the same time
as turning on your Auto-Lektor, so that the connection will be established between the two
while the Auto-Lektor is warming up.
If you take your BraillePen too far away from Auto-Lektor, or if you turn the Auto-Lektor off
first, you will hear a single short beep from the BraillePen to tell you that the connection
has been lost.
If you have problems connecting, you should first check whether the BraillePen's battery is
charged. You can check this by turning BraillePen off and then on again.
When you switch the BraillePen on, you hear the following beeps:
One short beep, to let you know that the BraillePen is on.
Then you hear the battery charge indicator beeps. There are three different indicators:
Three short beeps: fully charged.
Two short beeps: not fully charged, but still with plenty of charge.
One long beep: battery needs recharging. You should plug the BraillePen into the mains.
If the BraillePen's battery has been completely discharged, you might find that it has
locked up and will no longer communicate, even after the battery is charged. In this case,
you will need to reset the BraillePen by pressing the Reset switch. This switch is inside a
26

small hole in the back of the BraillePen. To press the Reset switch, first make sure your
BraillePen is off, and then gently insert a narrow object, such as the tip of a ballpoint pen
or a paper-clip into hole and press gently. Now switch your BraillePen on again, and it
should connect normally.
Charging the BraillePen
BraillePen keyboard is battery-operated, and it works best when it has plenty of charge.
To conserve battery power, if you don't press a key for a set period, BraillePen will turn off
automatically, making a single beep as it does so. You receive a quiet warning beep a
minute and a half before automatic switch-off.
Here is the full list of BraillePen battery sounds:
One long beep, pause, three short beeps means that the unit is not connected to the
power and the battery is fully charged.
One long beep, pause, two short beeps means that the unit is not connected to the power,
and the battery is charged to half its capacity.
One long beep, pause, one long beep means that the unit is not connected to the power,
and that the battery is drained and needs to be recharged immediately.
Two mid-length beeps means that the unit is connected to power and the battery is
charging, but doesn't report on the state of the battery.
Two mid-length beeps, pause, three short beeps means that the unit is on charge, and the
battery is already fully charged.
Using the BraillePen with Auto-Lektor
You can use the BraillePen with your Auto-Lektor in exactly the same way as you can use
a standard PC keyboard, for naming files, navigation and accessing the Auto-Lektor's
features.
Switch your BraillePen on first, and then your Auto-Lektor. Auto-Lektor will search for your
BraillePen as soon as it switches on, and connect automatically as soon as it finds it.
If your Auto-Lektor is already on, switch on your BraillePen; Auto-Lektor will find it within 20
seconds, since it starts a new Bluetooth search process every 20 seconds. You will hear
the single connection beep on the BraillePen once connection is established.
BraillePen Keystrokes
This table shows the combinations of BraillePen keys that correspond to each of the keys
on a standard PC keyboard, and is the table used for the USA and Poland.
Other tables may be used for other countries or languages. If your location requires a
different table it will be included elsewhere in this User Guide.
Where the BraillePen keys include Shift, Space or Control, remember that these are the
horizontal oval keys on the BraillePen, and they are named from left to right Shift, Space
and Control
BraillePen Keyboard BraillePen Keyboard BraillePen Keyboard BraillePen Keyboard
1 a Shift Space ESC 4 6 Caps Lock 2 5 :
1 2 b Shift Space 1 F1 Control 1 4 6 ~ 2 3 ;
1 4 c Shift Space 1 2 F2 4 ' 5 “
1 4 5 d Shift Space 1 4 F3 1 2 4 5 6 ! 1 2 5 6 `
27

BraillePen Keyboard BraillePen Keyboard BraillePen Keyboard BraillePen Keyboard
1 5 e Shift Space 1 4 5 F4 1 1 5 6 <
1 2 4 f Shift Space 1 6 F5 3 4 5 @ 2 ,
1 2 4 5 g Shift Space 1 2 4 F6 1 2 2 4 5 >
1 2 5 h Shift Space 1 2 4 5 F7 Control 1 4 # 3 .
2 4 i Shift Space 1 2 5 F8 1 4 3 2 6 ?
2 4 5 j Shift Space 2 4 F9 Control 1 4 5 $ 2 5 6 /
1 3 k Shift Space 2 4 5 F10 1 4 5 4 Space Control 2 4 5 Numpad 0
1 2 3 l Shift Space 1 3 F11 1 2 3 4 5 6 % Space Control 1 Numpad 1
1 3 4 m Shift Space 1 2 3 F12 1 5 5 Space Control 1 2 Numpad 2
1 3 4 5 n Shift Space 1 3 4 Print Screen 1 2 4 6 Space Control 1 4 Numpad 3
1 3 5 o Shift Space 1 3 5 Scroll Lock 1 2 4 6 & Space Control 1 4 5 Numpad 4
1 2 3 4 p Shift Space 1 2 3 4 Pause 1 2 4 5 7 Space Control 1 5 Numpad 5
1 2 3 4 5 q Shift Space 1 2 3 4 5 Break 3 5 * Space Control 1 2 4 Numpad 6
1 2 3 5 r Control 2 4 Ins 1 2 5 8 Space Control 1 2 4 5 Numpad 7
2 3 4 s Shift Control 3 Home 2 3 6 ( Space Control 1 2 5 Numpad 8
2 3 4 5 t Space 1 2 3 Home 2 4 9 Space Control 2 4 Numpad 9
1 3 6 u Control 6 Page Up 3 5 6 ) Space Ctrl 2 3 5 Numpad +
1 2 3 6 v Control 3 6 Del 2 4 5 0 Space Ctrl 2 Numpad .
2 4 5 6 w Space 3 6 Del 6 _ Space Ctrl 3 5 Numpad *
1 3 4 6 x Shift Control 4 6 End 3 6 - Space Ctrl 2 5 6 Numpad /
1 3 4 5 6 y Space 4 5 6 End 2 3 5 + Space Ctrl 3 6 Numpad -
1 3 5 6 z Control 3 Page Down 2 3 5 6 = Space Ctrl 1 3 4 5 Numpad Enter
1 6 Control 4 6 Page Up 4 5 6 |
1 4 6 Control 5 Up 3 4 \
1 5 6 Control 2 Down Space 1 2 Backspace
2 4 6 Control 1 Left Space 5 6 Tab
1 2 6 Control 4 Right Space 2 3 Shift-Tab
1 4 5 6 Shift Space 1 4 Alt Shift 1 2 3 5 6 {
3 4 6 Control 2 4 5 6 Windows 1 2 3 5 6 [
2 3 4 6 Space Control Enter Shift 2 3 4 5 6
1 2 3 4 6 3 4 5 6 Num Lock 2 3 4 5 6
The next section of this User Guide is a set of Tutorials, with all the steps
required for the most common tasks on the Auto-Lektor.
28

Tutorials
Navigating through your text
No matter what the source of your text, once Auto-Lektor says "Text in Buffer", the text has
been loaded into the Buffer and ready to be read. Press RE to begin reading from the
beginning.
Reading can be interrupted at any time by pressing PA. This key acts like a switch; the
next time you press it, Auto-Lektor will resume reading. In Pause Mode, if you have more
than once page in the Buffer, you can move forward and backward by pressing NP and
PP. If you have only one page, pressing NP will take you to the end of the Buffer; if you do
that and then press PP, Auto-Lektor will take you to the beginning of the page, and say
Page number 1, and read the first few words. Each time you move to a new page, AutoLektor will announce the page number and speak the first few words.
You can also move forwards and backwards by paragraph, by pressing NT and PT Previous Title. When you move to a new paragraph, Auto-Lektor will read the first
sentence of the paragraph you have moved to.
You can also move forwards and backwards sentences using PS and NS. Auto-Lektor will
read the whole of the sentence you have moved to; if you press PS or NS while AutoLektor is reading, this will interrupt the reading, move to the previous or next sentence and
begin reading the new sentence.
You can also move by word using PW and NW. Auto-Lektor will speak the word you have
moved to.
To check the spelling a word, use PL and NL to move character by character. Auto-Lektor
speaks each character as you move to it.
In all these cases, the reading cursor moves, so that if you begin reading again using PA to
leave Pause Mode, reading will begin from the cursor position.
You can also begin reading again from the beginning using RE.
When you switch Auto-Lektor off, all the text in the Buffer is saved, and the cursor position
is saved also. Next time you switch on, you can use PA to begin reading exactly where you
left off.
Black And White Scanning
First, as with any new document, press the Clear Buffer key (CB) twice to clear the Buffer.
You should hear the spoken message "Buffer cleared".
Press SR (Source) repeatedly, until you hear "scan in black and white" set as the source
text.
Raise the scanner lid and place your text on the glass. Check that the document is lying
flat on the glass - press it down if necessary - and that its edges are parallel to the edge of
the scanner.
Press the Scan key (SC). You will hear the message "scanning in black and white" The
scanner head will move, and the next message will be "new text in the Buffer".
If you are scanning a smaller book, that will fit completely on the glass,both pages are
scanned at once. In this case, it is very important to press the centre of the book carefully
on the glass, so that the centre of the book where the pages join is as flat as possible.
29

Press the Read button (RE); Auto-Lektor will begin reading the scanned and recognised
text.
While the text is being spoken, you can scan the next page by repeating the previous
steps. However, you won't hear spoken feedback while Auto-Lektor is reading, so that the
reading isn't interrupted.
If there are errors in your text, there are some steps you can take:
• Clean the scanner glass gently with a cloth dampened with window-cleaner. Never
apply the liquid directly to the glass; apply it sparingly to a soft, dry, lint-free cloth
and clean the glass with the damp cloth. Finish with a clean, dry cloth.
• If the scanner glass is clean and the recognition is still not satisfactory, retry the
scan, ensuring that the text is flat on the glass and the edges of the text are parallel
to the edge of the scanner. You can also try reversing the text 180 degrees.
• If you try both the steps above and you are still getting errors, try scanning in colour
as described below. This method is slower but can be more accurate for difficult
texts.
It is possible to have a text which is very difficult for a scanner. These include texts printed
on very thin paper, where the text from the other side is visible; texts with very low contrast
between the background and foreground; and texts on very old paper which has dark
marks. If you try all the suggestions above and you still do not have readable text, please
contact your Auto-Lektor dealer for assistance.
Colour Scanning
First, as with any new document, press the Clear Buffer key (CB) twice to clear the Buffer.
You should hear the spoken message "Buffer cleared".
Press SR repeatedly, until you hear "scan in colour" set as the source text.
Raise the scanner lid and place your text on the glass. Check that the document is lying
flat on the glass - press it down if necessary - and that its edges are parallel to the edge of
the scanner.
Press the Scan key (SC). You will hear the message "scanning in colour" The scanner
head will move, and the next message will be "new text in the Buffer".
If you are scanning a smaller book, that will fit completely on the glass,both pages are
scanned at once. In this case, it is very important to press the centre of the book carefully
on the glass, so that the centre of the book where the pages join is as flat as possible.
Press the Read button (RE); Auto-Lektor will begin reading the scanned and recognised
text.
While the text is being spoken, you can scan the next page by repeating the previous
steps. However, you won't hear spoken feedback while Auto-Lektor is reading, so that the
reading isn't interrupted.
If there are errors in your text, you should use the first two troubleshooting steps as for
Black and White scanning; if these don't help, try changing to black and white scanning.
Otherwise, you may have a text which will not respond well to scanning; contact your
dealer for assistance.
Reading text from a CD
First, as with any new document, press CB twice to clear the Buffer. You should hear the
spoken message "Buffer cleared".
30

Press SR until you hear the CD set as a source of text. Then Put the CD into the drive,
and select the title you want to read by pressing the PT and NT keys to step through the
list of files on the CD. When you hear the name of the file you want to read, press SC to
load the text.
If you receive an error message, there are two possibilities:
• the files on the CD are not in a format that Auto-Lektor can read. Auto-Lektor can
read plain text files with the extension TXT. If you receive files in any other format,
please ask your correspondents to re-save them as plain text files and re-send
them.
• the CD may be unreadable because it is damaged. You could test the CD in a
computer or CD player.
Your Auto-Lektor distributor will be happy to help if you are not sure.
Press NT (next title) or PT (previous title) to step through the files on the CD. When you
have heard the filename you want, press SC (Scan) and you will hear the message
"Loading text from the CD". Once the file has loaded into the Buffer, press RE (Read) to
read the text aloud.
When your source is set to CD, the PT and NT keys are reserved for selecting files, rather
than being navigation keys.
Reading websites
First, as with any new document, press CB twice to clear the Buffer. You should hear the
spoken message "Buffer cleared".
Press SR until you hear "Internet is set as text source". You have two options; you can
load a page from the bookmarks list, or you can type in a web address from the external
keyboard.
To select a bookmark, use PT and NT to step through the list of bookmarks. At each
bookmark, you will hear the web address followed by "chosen". When you reach the
correct bookmark, press SC to confirm the page you want to load.
Auto-Lektor will say "reading web page", and you will hear the ticking clock. When the
page is loaded, you will hear the first few words from the page. Use RE to read the whole
page from the beginning.
If there are many links on the page that disrupt reading, press PA to pause, and then use
F1 to enter the menu. Press F1 again to hear "enable or disable links". Press F2 to
confirm, and press PA to return to reading. You can restore the links to the page by
repeating this process.
Once you have loaded a page, you can move between links using PT and NT. If you have
disabled links, these keys will have no effect. If links are enabled, using PT or NT will move
the cursor to the previous or next link and speak its number and any text associated with it;
to follow the link, press SC.
To go back to the previous page, press PA if you are reading, and then use PP.
Entering text into a search field
To search using Google, first you need to navigate to the Google page by entering it from
the external keyboard. Use F1 to open the Internet Menu, and F1 again to step through the
choices until you hear "Enter web page from external keyboard". Type in www.google.com
and press SC or Ins to load the page.
31

Google's page has a lot of links, and you might want to jump over the links to the text field
to enter your search term. For the first visit, it can be helpful to step through all the links
using NT or Numpad +, so you can find the number of the text box; at the time of writing it
is Link 23, but this could change.
When you have reached the text field, enter the search string into the text field and press
Enter to complete. Now use NT or Numpad + to move to the Search button and press SC
to activate the search button and perform the search.
When the next page loads, it is the Google search results; all the beginning links are as
they were for the previous Google page, so to find the beginning of the search results you
will need to move to at least link 25, possibly link 30, and begin using Numpad + or NT to
find the first result. Each result can have as many as five links associated with it, so you
will need to read the full result text including links before deciding which one you wish to
follow. As you become more accustomed to different search engines and their results
pages, you will generally be able to jump immediately to the results using the Number
Keypad.
Reading Email with the Integrated Keyboard
Once your email settings have been entered with the external keyboard, you can read,
navigate, delete and save emails with the integrated front panel keyboard.
Downloading email
Press F1 to enter the Email menu, and then F1 once more to go to "check for new
messages". Press F2 to confirm. Auto-Lektor will tell you in percentages how the
downloading is going, and say "downloading finished" when all messages have been
received. If there are no messages on the server, Auto-Lektor will tell you that.
Caution! Emails that are downloaded are deleted from your email server, so make sure
you save any that you want to keep; read further in this section to find out how to do this.
Reading through emails
To read the downloaded messages, press SC, and Auto-Lektor will begin reading from the
top of the first message.
To step from one message to the next for a quick check of the message subjects and the
number of messages, press PA to enter Pause Mode, and then use PT and NT. You will
step from message to message, and at each message Auto-Lektor will first announce
whether you have read the message or not by saying "Status: read" or "Status: unread";
then you will hear the subject line and the sender's email address. When you reach the
message you want to read, you can press PA to resume reading from that message.
Email messages are sorted in order of arrival, with the oldest messages at the end of the
buffer and the newest messages at the start. Sent messages are also kept in the buffer, in
date order among the received messages; you will recognise them because Auto-Lektor
will say, after the Status: read message, "sent by Auto-Lektor".
Deleting unwanted emails
First you must select the message you want to delete. In Pause Mode, Use NT and PT to
step through the messages. The status, sender and subject of each message will be
spoken. When you reach the message you want to delete, press F1 to enter the Email
Menu, then F1 again to step through until you hear "delete selected message". Press F2 to
confirm. Auto-Lektor will say "selected email message has been deleted".
32

Continue deleting messages until the buffer is empty, or until only the messages you wish
to save are remaining.
Saving email
If you want to keep any of your downloaded emails, you must save them using TR.
This is because, if you leave Email as Text Source and use CB to clear the Buffer, all your
emails will disappear.
When you elect to save emails, only the currently-selected email is saved as a single text
file. So if you wish to save all the emails, you will need to start at one end of the list of
emails, and save each one in turn. Make sure you are in Pause Mode, and step through
the list with PT or NT, just as for reading. When you hear Auto-Lektor speak the brief
details of an email, that is the currently-selected email.
If you have not elected to type in the filename from the external keyboard, the filename
given to the file will be the first 20 characters from the Buffer. In the case of email, this can
produce strange results; we suggest that you go to the Email Menu using F1 before you
begin your transfer, and press F1 until you hear "enter filename from external keyboard",
and press F2 to confirm. You can use either a PC keyboard or the BraillePen to enter the
file name.
Next use DE to set the destination of the saved text, and then use TR to save the selected
email to your chosen source. If you then wish to save another email, use PT or NT to step
to that email, and press TR to save. Continue in this way until you have saved all the
emails you want.
Using Auto-Lektor as an Audio Player
Auto-Lektor can play audio CDs or MP3 files. The internal Audio Player uses three data
sources: CDs, USB devices and Internet radio.
If you insert an audio CD, Auto-Lektor will look at the CD and recognise that the files on
the CD are audio files; if you insert a data CD with MP3 files, Auto-Lektor can also play
those.
Starting the Audio Player
To start the player, select the user from the menu option: "sub-audio player, approve it by
pressing F2 and then using F1 to select the source and confirm them (F2).
Starting and stopping playback
The player starts by default in pause mode. To start or stop playback, use the Pause
button (PA).
Moving between tracks
To move forward a track, use NT; to move back a track, use PT.
Moving between internet radio stations
In Internet Radio Mode you can switch between the stations using NP to move forward in
the list and PP to move back.
33

Update list of radio stations
With this feature, users have the ability to update the list of available stations from the
internet. To do this, you will need to have your internet connection configured and the
Ethernet cable connected; the update is automatic.
Exit Audio Playback
To exit the player and return to normal reading, press F1.
Scanning while listening to audio
The built-in Audio Player allows you to continue to scan documents while listening to
audio; simply use SC to scan.
If you find that the spoken feedback from scanning interrupts your audio playback, you can
turn down the speech volume using SO; if the spoken feedback is hard to hear because of
the audio playback, use LO. These two keys only affect the speech volume. The Audio
Player volume is controlled separately by the volume control on the front panel.
Writing text to a CD or DVD
Auto-Lektor can read from and write to CD-R and CD-RW, as well as DVD-R, DVD+R and
DVD-RW.
Auto-Lektor writes a multi-session file when you first save a text file to a CD or DVD; this
means that you will be able to write further files to the same disk.
Saving to a CD or DVD is exactly the same as saving to any other medium; you simply
choose CD as text destination using DE or D.
Before you save, make sure that there is a blank CD or DVD, or an Auto-Lektor multisession CD or DVD in the drive, and the drive is closed. Then select the email to save and
press TR or T, or simply press TR or T to save the contents of the Buffer. When the save is
completed, Auto-Lektor will eject the disk.
Multi-session CDs can be read in most personal computers, and can of course be read at
any time in your Auto-Lektor.
Read on to find out about caring for your Auto-Lektor and updating the AutoLektor software.
34

Caring for your Auto-Lektor
Cleaning the Scanner Glass
From time to time you might notice that your Auto-Lektor isn't reading as accurately as it
usually does. This can be caused by marks on the scanner glass; in normal operation
fingerprints and dust build up over time.
To keep your Auto-Lektor accurate, we recommend that you use a good-quality windowcleaning fluid. The frequency of cleaning will depend how often you use your Auto-Lektor.
Before you clean the glass, turn the Auto-Lektor off and disconnect the power. Open the lid
of the scanner. Apply a little window-cleaning fluid to a clean, soft, lint-free cloth - use a
very small amount, and never apply it directly to the glass.
Wipe the scanner glass with the damp area of the cloth, making sure you clean the entire
surface. Then reverse the cloth and go over the glass again with the dry part of the cloth.
You can now use the dry part of the cloth to wipe down the rest of the Auto-Lektor.
Your Auto-Lektor should now be as accurate as before.
Updating the Auto-Lektor Software
We have done our best to make updating your Auto-Lektor an uncomplicated process.
When there is a software update, your distributor will supply you with a CD.
Place the CD in the Auto-Lektor's CD drive, but not until after Auto-Lektor has spoken the
welcome message.
Auto-Lektor will tell you it has found the update; it says "Updating program started,
updating to version" and the new version number, and tells you that you can hear the new
features in the new version by pressing the IN key. Auto-Lektor then asks you to press the
Clear Buffer key to confirm the update should go ahead.
If you press IN, the update will not take place yet; only the information about the new
update will be read out. From the information, you can go to the update, and a message
at the end of the information will tell you how to do this.
If you press CB instead of IN, the update will go ahead.
If you press any other key, the update will be aborted without the information messages
being read.
To update Auto-Lektor, you must use the integrated keyboard on the front panel; external
keyboards will not work.
Clear Buffer (CB) is the button on the far right-hand end of the bottom row of keys.
If you have pressed CB to go ahead with the upgrade, Auto-Lektor will say "Updating
started, copying files." When the update is complete, Auto-Lektor will say "Update
complete, re-starting Auto-Lektor", and your Auto-Lektor will re-start with the new software.
If there are any major changes to the way Auto-Lektor operates, there will be an updated
version of this User Guide on the CD with the update.
As a safety measure, the update process checks to see whether the current software
installed in Auto-Lektor is newer than or the same version as the software on the CD; in
either case, the update will not proceed. Auto-Lektor will tell you either that the software is
too old, or it is the same version as the installed version.
35

Appendix A - Auto-Lektor Primary Keystrokes
The keystrokes in this table are those keystrokes which can be made on the integrated
Auto-Lektor keyboard; there are several extra keystrokes available from both the PC
keyboard and the BraillePen. See each keyboard's section to find out about those
keystrokes.
Auto-Lektor PC Keyboard BraillePen
Help (HP) F1
Scan (SC) Ins Control and Dots 2 4
Read (RE) C Dots 1 4
Change Language (CL) L Dots 1 2 3
Source of text to read (SR) S Dots 2 3 4
Destination of saved text (DE) D Dots 1 4 5
Transfer (TR) T Dots 2 3 4 5
Configure Punctuation (CP) K Dots 1 3
Information (IN) I Dots 2 4
Clear the Buffer (CB) O Dots 1 3 5
User Menu (F1) F11 Shift, Space and Dots 1 3
User menu (F2) F12 Shift, Space and Dots 1 2 3
Louder (LO) G Dots 1 2 4 5
Softer (SO) H Dots
Faster (FA) W Dots 2 4 5 6
Slower (SL) E Dots 1 5
Pause (PA) Esc or Spacebar Shift and Space or Space
Previous Letter (PL) , (comma) Dot 2
Next Letter (NL) . (period) Dot 3
Previous Word (PW) Left arrow Control and Dot 1
Next Word (NW) Right arrow Control and Dot 4
Previous Sentence (PS) Up arrow Control and Dot 5
Next Sentence (NS) Down arrow Control and Dot 2
Previous Title (PT) Numpad - Space, Control and Dots 3 6
Next Title Numpad + Space, Control and Dots 2 3 5
Previous Page Page Up Control and Dot 3
Next Page Page Down Control and Dot 6
36

Appendix B -The User Menu
The User Menu gives you access to all the internal parameters of your Auto-Lektor.
F1 is used to call the menu. and to navigate through the available settings in a menu; F2 is
used to confirm a selection or to move into a sub-menu.
When you press F1, Auto-Lektor tells you which Menu is active. If you have entered the
menu in error, press F2; you will hear "Exit Auto-Lektor Menu". Press F2 again to return to
normal operation.
One Menu for Each Text Source
When you enter the User Menu, the active menu is set by the currently selected text
source. So, if you have either black and white or colour scanning selected, the Scanning
menu will be the one that comes up. There are two buttons on the keyboard to access the
Menu structure: F1 and F2. These are the purple keys, located on the middle row, first and
second keys on the left-hand end of the row.
This section describes each menu in detail. Many items will be the same for all menus, but
they are included for completeness.
Scanning as text source
This menu is active when either Black and white or Colour Scanning is in use. Auto-Lektor
will say "Scanner, Black and White Mode, Menu Active" or "Scanner, Colour Mode, Menu
Active". Use F1 to step through the available choices, and F2 to select a particular choice
or activate a function.
Create file name from the first 20 letters of the Buffer.
This option allows you to change the way a saved file is named. When this option is
confirmed using F2, the file name will be created from the first twenty characters of the
Buffer.
Enter file name from external keyboard
Confirming this option with F2 allows you to enter a file name using the external keyboard.
Enable or disable internet text sources
This feature makes it possible to change the list of available sources of text, allowing you
to exclude Internet sources; press F2 to confirm that you wish to do this. If there is no
internet connection available, selecting this option will shorten the list of text sources.
Select this function again to restore the excluded sources.
Audio Player Sub-menu
This is a group menu containing the parameters available for audio playback. Press F2 to
enter this sub-menu, and F1 to step through the available choices:
Set CD as audio source
Allows you to play a CD. The plate may include music in audio format, or MP3.
Set pen drive as audio source
You can play mp3 files from the portable storage such as pen drive.
37

Set internet radio as audio source
Gives the ability to play music from Internet radio.
Update internet radio stations list
Allows you to update a list of radio stations. Press F2 and the update will take place
automatically; Auto-Lektor will say "file updated" when it is complete.
Exit the Menu System
Exit from the user menu.
C drive as text source
This menu is active when C drive is selected as the source of text. Auto-Lektor will say "C
Drive, Menu Active". Use F1 to step through the available choices, and F2 to select a
particular choice or activate a function.
Remove a file from Drive C
Allows you to delete a file from Auto-Lektor's internal hard drive.
Create file name from the first 20 letters of the Buffer.
This option allows you to change the way a saved file is named. When this option is
selected, the file name will be created from the first twenty characters of the Buffer.
Enter file name from external keyboard
Selecting this option allows you to enter a file name using the external keyboard.
Enable or disable internet text sources
This feature makes it possible to change the list of available sources of text, allowing you
to exclude Internet sources. If there is no internet connection available, selecting this
option will shorten the list of text sources. Select this function again to restore the excluded
sources.
Audio Player Sub-menu
This is a group menu containing the parameters available for audio playback. Press F2 to
enter this sub-menu, and F1 to step through the available choices:
Set CD as audio source
Allows you to play a CD. The plate may include music in audio format, or MP3.
Set pen drive as audio source
You can play mp3 files from the portable storage such as pen drive.
Set internet radio as audio source
Gives the ability to play music from Internet radio.
Update internet radio stations list
Allows you to update a list of radio stations. Press F2 and the update will take place
automatically; Auto-Lektor will say "file updated" when it is complete.
38

Exit the Menu System
Exit from the user menu.
Working folder as text source
This menu is active when the working folder is selected as the text source. Auto-Lektor will
say "Working folder, Menu Active". Use F1 to step through the available choices, and F2 to
select a particular choice or activate a function.
Remove a file from the working folder
Allows you to delete the file from the working folder; use PT and NT to step through the list
and select the file to be deleted.
Create file name from the first 20 letters of the Buffer.
This option allows you to change the way a saved file is named. When this option is
selected, the file name will be created from the first twenty characters of the Buffer.
Enter file name from external keyboard
Selecting this option allows you to enter a file name using the external keyboard.
Enable or disable internet text sources
This feature makes it possible to change the list of available sources of text, allowing you
to exclude Internet sources. If there is no internet connection available, selecting this
option will shorten the list of text sources. Select this function again to restore the excluded
sources.
Audio Player Sub-menu
This is a group menu containing the parameters available for audio playback. Press F2 to
enter this sub-menu, and F1 to step through the available choices:
Set CD as audio source
Allows you to play a CD. The plate may include music in audio format, or MP3.
Set pen drive as audio source
You can play mp3 files from the portable storage such as pen drive.
Set internet radio as audio source
Gives the ability to play music from Internet radio.
Update internet radio stations list
Allows you to update a list of radio stations. Press F2 and the update will take place
automatically; Auto-Lektor will say "file updated" when it is complete.
Exit the Menu System
Exit from the user menu.
39

CD Drive as text source
This menu is active when the CD drive has been chosen as the text source. Auto-Lektor
will say "CD Drive, Menu Active". Use F1 to step through the available choices, and F2 to
select a particular choice or activate a function.
Create file name from the first 20 letters of the Buffer.
This option allows you to change the way a saved file is named. When this option is
selected, the file name will be created from the first twenty characters of the Buffer.
Enter file name from external keyboard
Selecting this option allows you to enter a file name using the external keyboard.
Enable or disable internet text sources
This feature makes it possible to change the list of available sources of text, allowing you
to exclude Internet sources. If there is no internet connection available, selecting this
option will shorten the list of text sources. Select this function again to restore the excluded
sources.
Audio Player Sub-menu
This is a group menu containing the parameters available for audio playback. Press F2 to
enter this sub-menu, and F1 to step through the available choices:
Set CD as audio source
Allows you to play a CD. The plate may include music in audio format, or MP3.
Set pen drive as audio source
You can play mp3 files from the portable storage such as pen drive.
Set internet radio as audio source
Gives the ability to play music from Internet radio.
Update internet radio stations list
Allows you to update a list of radio stations. Press F2 and the update will take place
automatically; Auto-Lektor will say "file updated" when it is complete.
Exit the Menu System
Exit from the user menu.
Pen Drive as text source
This menu is active when Pen Drive has been chosen as the text source. Auto-Lektor will
say "Pen Drive, Menu Active". Use F1 to step through the available choices, and F2 to
select a particular choice or activate a function.
Delete selected file from Pen Drive
Allows you to delete the file from the Pen Drive; use PT and NT to step through the list and
select the file to be deleted.
40

Create file name from the first 20 letters of the Buffer.
This option allows you to change the way a saved file is named. When this option is
selected, the file name will be created from the first twenty characters of the Buffer.
Enter file name from external keyboard
Selecting this option allows you to enter a file name using the external keyboard.
Enable or disable internet text sources
This feature makes it possible to change the list of available sources of text, allowing you
to exclude Internet sources. If there is no internet connection available, selecting this
option will shorten the list of text sources. Select this function again to restore the excluded
sources.
Audio Player Sub-menu
This is a group menu containing the parameters available for audio playback. Press F2 to
enter this sub-menu, and F1 to step through the available choices:
Set CD as audio source
Allows you to play a CD. The plate may include music in audio format, or MP3.
Set pen drive as audio source
You can play mp3 files from the portable storage such as pen drive.
Set internet radio as audio source
Gives the ability to play music from Internet radio.
Update internet radio stations list
Allows you to update a list of radio stations. Press F2 and the update will take place
automatically; Auto-Lektor will say "file updated" when it is complete.
Exit the Menu System
Exit from the user menu.
Internet as text source
This menu is active when Internet has been chosen as the text source. Auto-Lektor will say
"Internet, Menu Active". Use F1 to step through the available choices, and F2 to select a
particular choice or activate a function.
Enable or disable links
This option lets you simplify web page content for reading by not speaking any links on the
page. If you wish to enable links again, use this option again; it switches between on and
off.
Go to bookmarks
This item lets you jump straight to the list of bookmarks and leave the menu.
41

Add current page to bookmarks
Use this item to add the web address of the page you are currently reading to your
bookmark list.
Delete selected bookmark
This deletes the currently-selected bookmark from your list. Move to the bookmark you
wish to delete, before entering the Menu, and then use this option.
Enter web address from the external keyboard
You'll be able to introduce their own web address with an external keyboard.
Change Internet connection parameters
If you wish to enter static IP address settings for your internet connection, this menu option
is the place to do this. A detailed explanation is given in the Connecting Auto-Lektor
section of this Guide.
Set DHCP as default connection type
This option sets Auto-Lektor to obtain the internet connection settings automatically from
your router. A detailed explanation is given in the Connecting Auto-Lektor section of this
Guide.
Create file name from the first 20 letters of the Buffer.
This option allows you to change the way a saved file is named. When this option is
selected, the file name will be created from the first twenty characters of the Buffer.
Enter file name from external keyboard
Selecting this option allows you to enter a file name using the external keyboard.
Enable or disable internet text sources
This feature makes it possible to change the list of available sources of text, allowing you
to exclude Internet sources. If there is no internet connection available, selecting this
option will shorten the list of text sources. Select this function again to restore the excluded
sources.
Audio Player Sub-menu
This is a group menu containing the parameters available for audio playback. Press F2 to
enter this sub-menu, and F1 to step through the available choices:
Set CD as audio source
Allows you to play a CD. The plate may include music in audio format, or MP3.
Set pen drive as audio source
You can play mp3 files from the portable storage such as pen drive.
Set internet radio as audio source
Gives the ability to play music from Internet radio.
42

Update internet radio stations list
Allows you to update a list of radio stations. Press F2 and the update will take place
automatically; Auto-Lektor will say "file updated" when it is complete.
Exit the Menu System
Exit from the user menu.
RSS Feeds as text source
This menu is active when RSS Feeds has been chosen as the text source. Auto-Lektor will
say "RSS Feeds, Menu Active". Use F1 to step through the available choices, and F2 to
select a particular choice or activate a function.
Enable or disable links
This option lets you simplify web page content for reading by not speaking any links on the
page. If you wish to enable links again, use this option again; it switches between on and
off.
Create file name from the first 20 letters of the Buffer.
This option allows you to change the way a saved file is named. When this option is
selected, the file name will be created from the first twenty characters of the Buffer.
Enter file name from external keyboard
Selecting this option allows you to enter a file name using the external keyboard.
Enable or disable internet text sources
This feature makes it possible to change the list of available sources of text, allowing you
to exclude Internet sources. If there is no internet connection available, selecting this
option will shorten the list of text sources. Select this function again to restore the excluded
sources.
Audio Player Sub-menu
This is a group menu containing the parameters available for audio playback. Press F2 to
enter this sub-menu, and F1 to step through the available choices:
Set CD as audio source
Allows you to play a CD. The plate may include music in audio format, or MP3.
Set pen drive as audio source
You can play mp3 files from the portable storage such as pen drive.
Set internet radio as audio source
Gives the ability to play music from Internet radio.
Update internet radio stations list
Allows you to update a list of radio stations. Press F2 and the update will take place
automatically; Auto-Lektor will say "file updated" when it is complete.
43

Exit the Menu System
Exit from the user menu.
E-mail as text source
This menu gives you complete access to the email subsystem; as well as setting email as
your source text, it gives you access to download email and send messages. Auto-Lektor
will say "Email, Menu Active". Use F1 to step through the available choices, and F2 to
select a particular choice or activate a function.
Check for new messages
Run this command to check for new messages in your mailbox. If there are new
messages, they are downloaded to Auto-Lektor. Auto-Lektor will tell you when
downloading starts and finishes. You can interrupt message retrieval at any time with PA.
Delete selected message
Before using this menu item, you should have the message selected. Pressing F2 to
confirm this item will delete the selected message.
Answer selected message
Allows you to reply to the selected mail message.
Write new message
Allows you to create and send a new mail message.
Edit address book
Allows you to add, delete and edit your saved email addresses.
Enter e-mail configuration from external keyboard
This menu item lets you set up or re-configure your email account. It will ask you for your
POP3 mail server address, SMTP server address, email address, login and password. The
password is stored in Auto-Lektor in encrypted form, keeping it secure. For more detail on
how to set up email and an explanation of these terms, see the next section, Connecting
Auto-Lektor.
Create file name from the first 20 letters of the Buffer.
This option allows you to change the way a saved file is named. When this option is
selected, the file name will be created from the first twenty characters of the Buffer.
Enter file name from external keyboard
Selecting this option allows you to enter a file name using the external keyboard.
Enable or disable internet text sources
This feature makes it possible to change the list of available sources of text, allowing you
to exclude Internet sources. If there is no internet connection available, selecting this
option will shorten the list of text sources. Select this function again to restore the excluded
sources.
44

Audio Player Sub-menu
This is a group menu containing the parameters available for audio playback. Press F2 to
enter this sub-menu, and F1 to step through the available choices:
Set CD as audio source
Allows you to play a CD. The plate may include music in audio format, or MP3.
Set pen drive as audio source
You can play mp3 files from the portable storage such as pen drive.
Set internet radio as audio source
Gives the ability to play music from Internet radio.
Update internet radio stations list
Allows you to update a list of radio stations. Press F2 and the update will take place
automatically; Auto-Lektor will say "file updated" when it is complete.
Exit the Menu System
Exit from the user menu.
45
 Loading...