

Page 1

VC-60
R
Vertical Mower
Operator’s
VC-60 Plus
Manual
VERTI-CUTTER
R
8/11 Part No. 970066
R
Page 2

R
VERTI-CUTTER
Page 3

Thank you for purchasing a Harper Industries, Inc. Verti-Cutter.
TO THE OWNER OR OPERATOR:
As with all Harper products, the Harper Verti-Cutter has been developed through tough design
and testing procedures to provide a quality machine. This manual gives assembly, operating, and
service information for the VC-60 and VC-60 Plus.
Please read and understand all instructional material included with the Verti-Cutter or its
components before assembling and operating the equipment.
A vertical mower such as the Verti-Cutter can present hazards to an operator who follows unsafe
procedures in either the operation or maintenance of the unit. Therefore, SAFETY WARNINGS
are presented at certain locations in the text.
THIS SYMBOL: SAFETY WARNING!
MEANING: Failure to understand and obey this warning may result in injury to you or others.
Whenever this symbol is used, please pay very close attention to the information presented, and
make sure you fully understand. If you do not, contact your Goossen dealer or Harper Industries
for clarication.
SAFETY WARNING!
ALL SHIELDS AND GUARDS MUST BE IN PLACE FOR PROPER AND SAFE OPERATION
OF THIS EQUIPMENT. WHERE THEY ARE SHOWN REMOVED IN THIS MANUAL, IT IS FOR
PURPOSES OF ILLUSTRATION AND INSTRUCTION ONLY. DO NOT OPERATE THIS
EQUIPMENT UNLESS ALL SHIELDS AND GUARDS ARE IN PLACE.
The Harper name ais registered trademarks of Harper Industries, Inc.
All other brand and product names are trademarks or registered trademarks of their respective companies.
VERTI-CUTTER
© 2011 Harper Industries, Inc.
R
Page 4

LIMITED WARRANTY
The Harper Verti-Cutter is warranted against defects in workmanship and materials
for a period of TWELVE MONTHS from the date of retail purchase to the original
purchaser.
Harper Industries will repair or replace, at our option, any part that our examina-
tion shows to be defective. Warranty is limited to parts, labor and ground freight
delivery of replacement parts. The user will pay freight charges for parts submitted
under this warranty.
No product or part may be returned for warranty consideration without prior ap-
proval from Harper Industries. This warranty does not apply to parts subjected to
misuse, abuse, alteration, improper or inadequate maintenance, or normal wear
(including belts, chains and knives).
Harper Industries, its agents or representatives, make or imply no other warranties.
Contact Harper Industries with any questions regarding this warranty.
RECORDS
Date of Purchase / /
Dealer’s Name
Dealer’s Phone
Serial Number Machine
Serial Number Engine
R
VERTI-CUTTER
Page 5

Table of Contents
Operator’s Section
To the Owner or Operator
Warranty Statement
Table of Contents
Specications
Control Identication
VC-60
PTO Shaft.........................................................
Skid Plates........................................................
Hitch..................................................................
Blade Depth Adjustment...................................
Hydraulic Cylinder.............................................
Hydraulic Hoses................................................
Ram Stop..........................................................
Gas Shock........................................................
Gearbox............................................................
Blades...............................................................
Chain Tension Adjustment................................
VC-60 Plus
Front Unit..........................................................
Blade Rotation..................................................
Rear Unit...........................................................
Hydraulic Hose Splitter.....................................
Safety Guidelines
Gards & Shields................................................
Safety Decals...................................................
Equipment & Controls.......................................
Before Operation..............................................
Safety Guidelines..............................................
Operation..........................................................
Transport..........................................................
Hook Up & Operation
Hook Up............................................................
Starting Operation.............................................
Tips for Successful Operation...........................
Adjustments
Blade Depth......................................................
Level Hook Up..................................................
Chain Tension...................................................
Service & Maintenance...................................................
Troubleshooting..............................................................
Hydraulic Assy. Rear Unit.................................
Shield Assy. Front Unit.....................................
Shirld Assy. Rear Unit.......................................
PTO Shaft Front/Rear Units.............................
Blades Front/Rear Units...................................
Decal Location Front/Rear Units......................
1
2
3
4
4
4
4
4
4
4
4
4
4
4
5
5
5
5
6
6
6
6
6
6
6
7
7
7
8
8
8
9
9
2.6
2.7
2.8
2.9
2.10
2.11
Parts Section
VC-60
Frame Assy.......................................................
Wheel & Hub Assy............................................
Shaft Assy.........................................................
Blades...............................................................
Hydraulic Assy..................................................
Shield Assy.......................................................
PTO Shaft.........................................................
Decal Kit, Complete..........................................
VC-60 PLUS
Frame Assy. Front/Rear Unit............................
Wheel & Hub Assy Front/Rear Units................
Shaft Assy Front Unit........................................
Shaft Assy Rear Unit........................................
Hydraulic Assy. Front Unit.................................
VERTI-CUTTER
1.1
1.2
1.3
1.4
1.5
1.6
1.7
1.8
2.1
2.2
2.3
2.4
2.5
R
1
Page 6

Specications
Model VC-60 & VC-60 Plus
Swath 60”
Blades 40 - 12 gauge / 10 point / 12” diameter blades
Blade Spacing 1.5” standard, 2” or 2.5” spacing is optional
Blade Shaft Rotation VC-60 – forward rotation
VC-60 Plus – front unit: forward rotation
rear unit: backward rotation
Blade Depth 0” to 1”
Blade Depth Large jacking bolts on no maintenance skids
Adjustment
Draw Bar Two position adjustable tow bar
Hitch Adjustable quick pin tag along
Drive 540 RPM PTO to gear box, sprockets with #60
chain to blade shaft with shear bolt
Required Horsepower 25 to 45 hp
Transport System Single hydraulic lift cylinder with E-Z ram lock, quick
disconnect from tractor auxiliary valve
Tires 2 – foam-lled 16 x 6.50 x 8
Frame All-welded steel construction
Weight 800 lbs
Dimensions Length - 62” Height - 38” Width - 89”
Harper Industries, Inc. is continually striving to improve the design and performance of its products. We
reserve the right to make changes in specications and design without thereby incurring any obligation relative to
previously manufactured products.
R
2 3
VERTI-CUTTER
Page 7

Control Identication
VC - 60
PTO SHAFT – transfers power from the
tractor to the Verti-Cutter.
SKID PLATES – control depth of blades and
prevents the blades from gauging.
HITCH – connects to tractor draw bar with
standard 3/4” hitch pin.
BLADE DEPTH ADJUSTMENT – adjusts the
height of the skids which controls the
depth of the blades.
HYDRAULIC CYLINDER – lifts the blades for
transport.
HYDRAULIC HOSES – provide power to
raise and lower the blades. They are
connected to the tractor hydraulic
remotes.
RAM STOP – secures cylinder ram in
extended position for transport.
ALWAYS USE RAM STOP WHEN
TOWING VERTICUTTER.
GAS SHOCK – puts pressure on the axle
which reduces the drag of the skids.
GEARBOX – transfers power from PTO shaft
to chain drive with a 90° turn.
BLADES – rotate forward to de-thatch and
aerate turf.
CHAIN TENSION ADJUSTMENT – adjusts
the tension on the chain.
VERTI-CUTTER
R
3
Page 8

VC - 60
FRONT UNIT – PTO driven from the tractor.
The blades are forward rotating. A tow
hitch is attached to its frame in order to
pull the rear unit. The gearbox has an
output shaft to power the rear unit.
BLADE ROTATION – The forward blade
rotation of the front unit and the back ward blade rotation of the rear unit
work together to more thoroughly de thatch and aerate the turf.
R
REAR UNIT – PTO driven from the front unit.
The rear unit is the same as the VC-60
expect that it has a shorter PTO shaft
and a reverse rotation gearbox which
reverses the blade rotation.
HYDRAULIC HOSE SPLITTER – provides
outlets for hydraulic hoses on rear unit.
VERTI-CUTTER
4 5
Page 9

Safety Guidelines
SAFETY WARNING!
Use genuine factory parts or parts with
equivalent characteristics, including type,
strength and material. Failure to do so
may result in product malfunction and
possible injury to the operator and/or
others.
• Replace locknuts and locking screws if
you can tighten them without feeling
considerable resistance for several
turns before they are completely tight.
Replace them with factory authorized
parts or their equivalent.
• If hardware is not secure, or if some
of the hardware is over-tightened,
equipment failure may result, posing
possible safety hazards.
• New decals may be obtained from
your local Harper/Goossen Dealer.
Equipment & Controls
• Altering this equipment in any manner
which adversely affects its operation,
performance, durability, or use will void
the warranty and may cause hazard ous conditions.
• Know the location and function of all
controls and how to stop this equip ment quickly in an emergency. Read
and understand the owner’s manual
before you operate the equipment.
• Keep all nuts, bolts and screws tight to
help ensure safe operation of this
equipment.
Before Operation
• Before operating this equipment, read
and understand the Owner’s Manual.
• To prevent possible eye injury, always
wear SAFETY GLASSES while oper ating and servicing the equipment.
Guards & Shields
• Keep the equipment and attachments
in good operating condition, and keep
all safety devices in place. Replace all
worn, damaged, unusable, missing or
lost safety shields and guards before
operating the equipment.
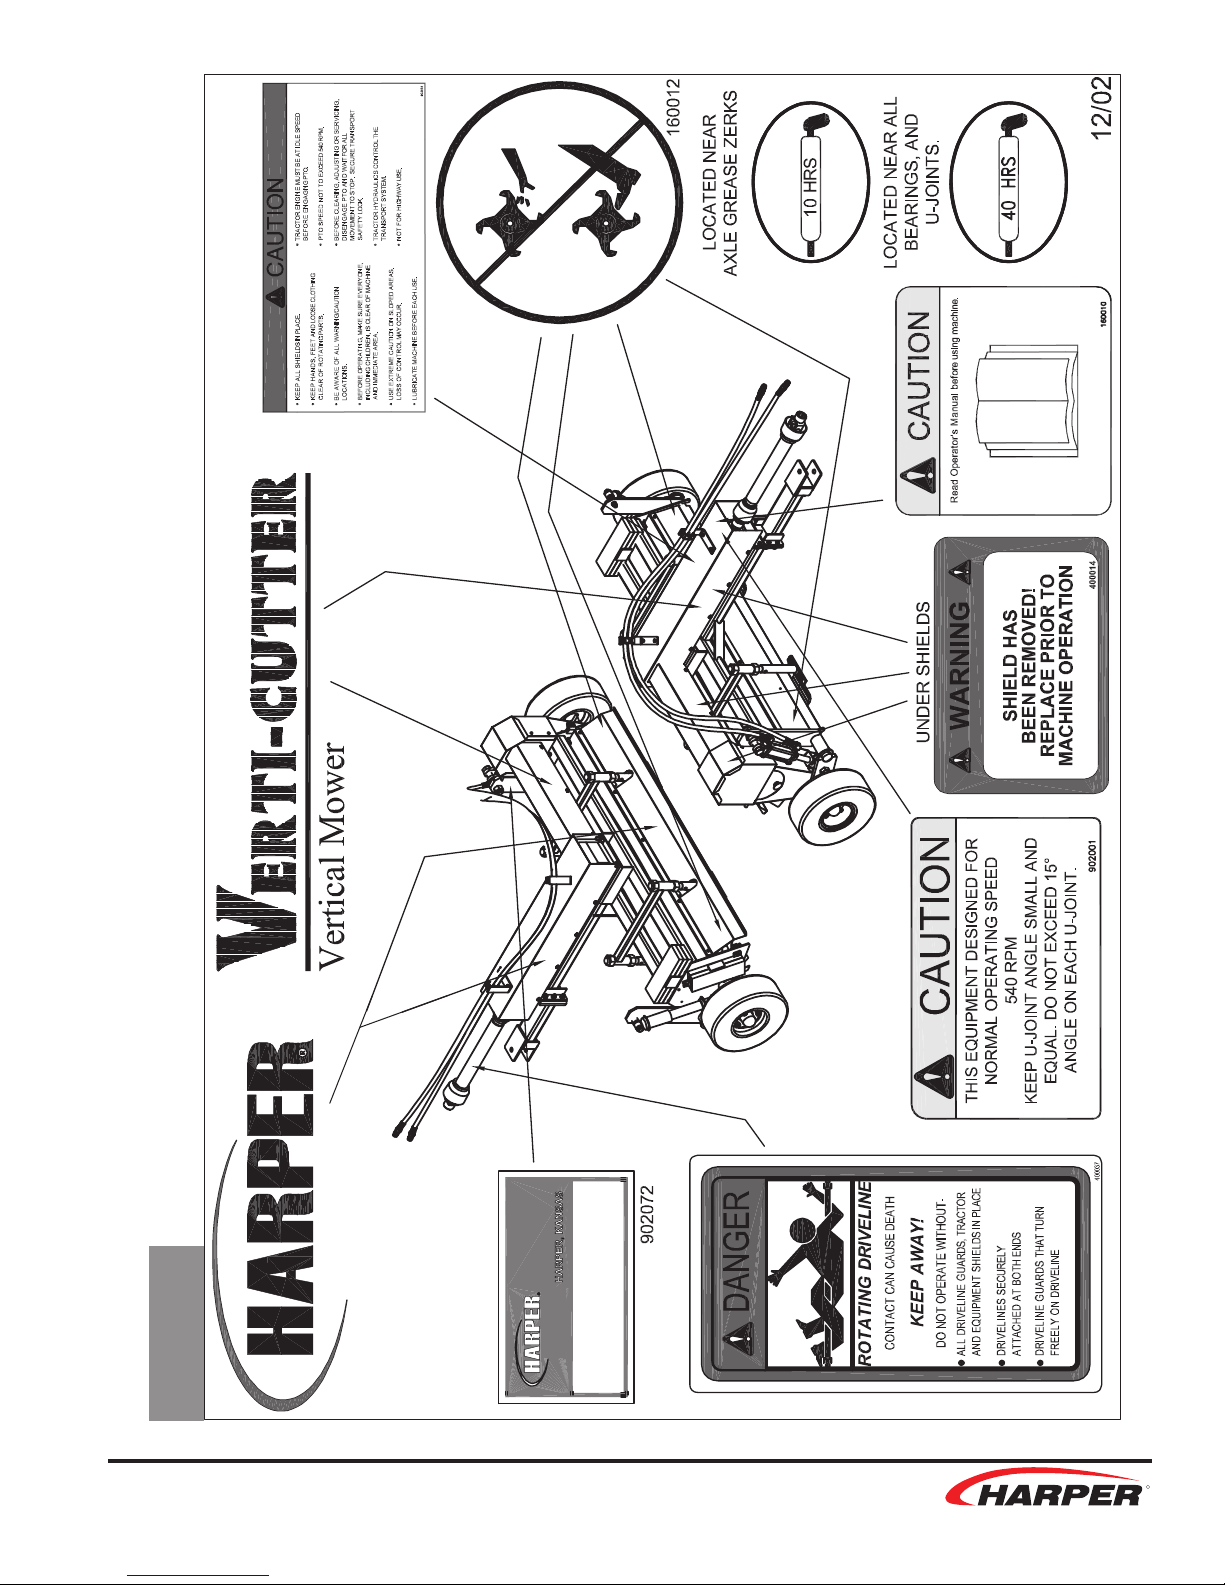
Safety Decals
• If safety related or instructional decals
become illegible or are removed, re
place them immediately.
• If you replace parts that have such
decals attached to them, make sure
the decals are replaced with current
versions, and that the decals are on
the replacement parts before the
machine is operated again.
• Do not allow children to operate this
machine.
• Never operate this machine in the
vicinity of bystanders.
• Before servicing or inspecting the
machine, make certain that the power
source is shut down, make certain all
moving parts have stopped and
disconnect the spark plug or PTO
shaft.
• Never allow hands, clothing or any
part of the body near the blades or
moving parts.
• Avoid wearing loose-tting clothing.
Safety Guidelines
• Wear approved eye and ear protection
while operating the machine.
VERTI-CUTTER
R
5
Page 10

• The machine should be operated on
levelsurfaces only.
• Before starting the machine, visually
inspect all nuts, bolts and other fasten ers to see that they are properly
secured. Nuts, bolts and other fasten ers should be checked every 8 to 10
hours of operation for proper align ment and tightness.
stop. Disconnect the spark plug wire
from the spark plug or PTO shaft be fore clearing debris.
• Do not allow hands, clothing or any
part of the body to enter near any
moving parts.
• Replace damaged or missing safety
decals.
Operation
• Make certain the blades are clear of
debris before starting the machine.
• If a foreign object should strike the
blades of the machine and cause
an unusual noise or vibration, shut
the engine or PTO off immediately
and allow it to come to a complete
stop. Disconnect the spark plug wire
from the spark plug, or PTO from the
power unit, and then do the following:
1. Inspect for damage.
2. Repair or replace any damaged
parts.
3. Check for and tighten any loose
bolts, nuts, fasteners or parts.
• Keep debris or foreign material from
building up in the mower, as this may
inhibit proper operation or cause poor
performance.
• Keep all safety shields and guards in
place and in good working condition.
• Keep your face and all body parts
awayfrom moving parts.
• Keep hands, feet and clothing away
from PTO driven parts.
• Keep all guards and shields in place
during operation. Disengage PTO and
shut off the engine before removing
guards or shields.
• Never attempt to adjust, clean or lubri-
cate the machine while PTO is con nected to tractor.
• Operator should never wear loose
clothing when working around PTO.
• Before starting tractor, make sure that
the transmission and PTO are disen gaged.
• Make sure the tractor’s engine is at
idle speed before engaging the PTO.
Transport
• Always use the ram stop when towing
the Verti-Cutter.
• SPEEDS SHOULD NOT EXCEED 10
MPH FOR MORE THAN 2 MINUTES
WHEN TOWING VERTI-CUTTER.
• Stay away from the discharge area
when machine is in operation.
• If the vertical mower should become
clogged, shut off the engine or PTO
and allow it to come to a complete
R
• The Verti-Cutter should be transported
on a trailer when moving distances
greater than 2 miles.
VERTI-CUTTER
6 7
Page 11

Hook Up & Operation
Starting Operation
1. Engage PTO lever on the tractor AT IDLE
SPEED of the tractor.
SAFETY WARNING!
• Wear approved eye and ear protec-
tion while operating the Verti-Cutter.
• Keep all guards in place during
operation. Never operate the verti cal mower with safety shields re moved.
• Before operating the machine,
check to ensure that the chain is
tight to prevent the chain from
slipping off the sprockets.
• Keep clothing and all body parts
away from rotating parts.
• Never operate the vertical mower
beyond the suggested 540 PTO
speed.
IMPORTANT: To avoid damage to the
machine, lawn or pavement, always raise
blades into transport position when
moving from one location to another.
Hook Up
1. Mount Verti-Cutter to hitch of tractor
and connect PTO shaft to tractor out
put shaft.
2. Connect hydraulic hoses to auxiliary
connections on tractor.
3. With the tractor and unit on level
ground, adjust so that the skid plates
are parallel to the ground. This allows
the Verti-Cutter to glide smoothly over
turf. The hitch can also be adjusted to
adjust for different tractor hitch heights.
2. Lower machine with lever on tractor that
controls auxiliary hydraulics and place in
“oat” position.
3. Increase tractor engine speed to rated
operating RPM and begin operation of the
vertical mower.
Stopping Operation
1. Move throttle on tractor to the slow
position and disengage the PTO lever on
the tractor.
2. Shut off the tractor engine and allow the
machine to come to a complete stop.
3. If it is necessary to inspect or service the
Verti-Cutter, always disengage the PTO
and shut off the tractor before doing so.
NOTE: On initial operation of the machine,
the chain may stretch and need re-
adjused after the rst hour of use. When
re-adjusting chain tension, use a straightedge across the faces of the sprockets to
make sure they are properly aligned and
the chain will run true.
Tips for Successful Operation
• Rake across slopes, never up and
down.
• Use caution when changing direction
on slopes.
• Avoid raking very steep slopes or ar-
eas where safety might be in doubt.
• Do not rake water-soaked lawns. This
will pull turf off the surface.
VERTI-CUTTER
• Mow tall grass before raking.
R
7
Page 12

Adjustments
Blade Depth
The skid plate height determines the cutting
depth of the blades.
• Tighten or loosen the nuts on the skid
plate height adjustment to raise or
lower the blades.
• The hitch bar is adjusted up or down
depending on which holes it is bolted
into.
• The hitch can be mounted in the top
two holes to raise the hitch position or
the bottom two holes to lower the hitch
position.
• The position of the hitch depends upon
the height of the tractor hitch.
Chain Tension
CHAIN TENSION
ADJUSTMENT
• Make sure both skid plates are adjust-
ed equally and parallel to the ground
to get an even cut and ensure the unit
glides smoothly.
Level Hook Up
Level hook up between the Verti-Cutter and
the tractor will prevent the skid plates from
digging into the ground.
(DOUBLE)(SINGLE)
Check the condition of drive chain before
each use or after every 25 hours of operation.
• Adjust chain by moving tensioner
adjustment nut to achieve proper ten sion.
NOTE: Do not over-tighten chain.
Excessive tension can cause premature
bearing and chain failure.
NOTE: Use a straightedge to check
alignment across the faces of sprockets
after adjusting chain tension to ensure
that the chain will run true.
R
8 9
VERTI-CUTTER
Page 13

Service & Maintenance
Standard Torque Chart
SAFETY WARNING!
• Before servicing or inspecting the
Verti-Cutter, make sure the power
source is shut off and all parts have
stopped moving.
• Disconnect the PTO shaft from the
tractor.
• Always wear safety glasses and
protective gloves when servicing
the vertical mower.
Break-in Service
After the rst hour of use:
• Check chain. Tighten if needed.
• Tighten set screws on bearings.
Size
No. 10-24
1/4 in.
5/16 in.
3/8 in.
1/2 in.
In.-lb.
25-35
60-80
120-140
340-360
Ft.-lb.
5-7
18-20
28-30
64-74
126-150
N-m
2.8-4.0
7-9
14-16
24-27
90-100
NOTE: When tightening two or more
screws or bolts on the same part, DO NOT
tighten screws completely right away, or
one at a time. To avoid distortion, rst
tighten all screws in sequence to onethird
of torque value, then tighten to twothirds
of torque value, then tighten to full
value.
Troubleshooting
• Check nuts, bolts and fasteners to
see that they are secure.
Lubrication
Grease every 10 hours:
• 2 bearings on axle
Grease every 40 hours:
• 2 bearings on blade shaft
• 2 U-joints on PTO shaft
NOTE: Follow the recommended greasing
requirements to ensure long life for
bearings and joints.
Probelem What to Check
Chain comes off • Tension adjustment.
• Load may be
excessive
• Bearings may have
seized
Chains wears • Sprockets may not be
rapidly, jump, be properly aligned
catches or twists. • Check sprockets w/
straightedge across
faces of sprockets.
Skid plates dig into • Verti-Cutter may not
the ground be hooked up level
w/ tractor
• Skid plates may not
VERTI-CUTTER
be adjusted level w/
ground.
R
9
Page 14

R
VERTI-CUTTER
Page 15

VC-60
R
Vertical Mower
Parts
VC-60 Plus
Section
VERTI-CUTTER
R
8/11 Part No. 970066
R
Page 16

R
VERTI-CUTTER
Page 17

VC -60
PARTS
VERTI-CUTTER
R
Page 18

R
VERTI-CUTTER
Page 19

Table of Contents
Parts Section
VC-60
Frame Assy.......................................................
Wheel & Hub Assy............................................
Shaft Assy.........................................................
Blades...............................................................
Hydraulic Assy..................................................
Shield Assy.......................................................
PTO Shaft.........................................................
Decal Kit, Complete..........................................
VC-60 PLUS
Frame Assy. Front/Rear Unit............................
Wheel & Hub Assy Front/Rear Units................
Shaft Assy Front Unit........................................
Shaft Assy Rear Unit........................................
Hydraulic Assy. Front Unit.................................
Hydraulic Assy. Rear Unit.................................
Shield Assy. Front Unit.....................................
Shirld Assy. Rear Unit.......................................
PTO Shaft Front/Rear Units.............................
Blades Front/Rear Units...................................
Decal Location Front/Rear Units......................
1.1
1.2
1.3
1.4
1.5
1.6
1.7
1.8
2.1
2.2
2.3
2.4
2.5
2.6
2.7
2.8
2.9
2.10
2.11
VERTI-CUTTER
R
Page 20

970491
08/11
VC-60
970491
R
VERTI-CUTTER
1.1 1.2
Page 21

15
8/11
VC-60
VERTI-CUTTER
R
1.2
Page 22

8-11
NAME
PART # QTY
*
4
(WEASLER)
*
*
024
943036
2
*
*
(SINGLE)
(SINGLE)
*
4
E
10 GA
(CURT. & WEAS.)
W/ CONN. LINK
CUTTING BLADE, CORTEN STEEL
940026
970401
VC-60 GEARBOX
*
SERIAL NO. BREAKS:
* Verify gearbox manufacturer
before ordering part number.
03A01 - above use 943024
02A01 - 02A03 use 943018
02A04 - 02A20 use 943014
CHAIN 60 ROLLER (DOUBLE)
CONN. LINK (DOUBLE)
140021
112031
IDLER SPROCKER SPACER (DB)
UPPER SPROCKET (DOUBLE)
LOWER SPROCKET (DOUBLE)
942013
942214
110650 3
VC-60
110650
942214
940026
140021
112031
943024
970401
942013
943036
R
1.3 1.4
VERTI-CUTTER
Page 23

, 10 GA
8-11
970805 2.0”
1
970803 INSIDE BLADE SPACER398
8
VC-60
VERTI-CUTTER
R
1.4
Page 24

20
RAM STOP
PIN, LOCK 1/4 X 1-3/4
1
970415
102018 1
VC-60
R
102018
970415
VERTI-CUTTER
1.5 1.6
Page 25

WASHER, 5/16 FLAT
NUT, 5/16-18. U TYPE
BOLT, 5/16-18 X .75
22
65
19
(SINGLE)
(SINGLE)
8/11
LOWER CHAIN GUARD (DOUBLE)
LOWER CHAIN GUARD (DOUBLE)
UPPER CHAIN GUARD WELDMENT (DOUBLE)
1
1
970810 1
970811
975800
65
975800
22
19
970810
970811
22
65
19
VC-60
VERTI-CUTTER
R
1.6
Page 26

942215
942207
942206
942207
942207
942207
942207
942205 FUNCTION CLUTCH (NOT SHOWN)
942207
942207
942206
942207
942205
PTO SHAFT - Part No. 943036
VC-60, VC-60 PLUS (FRONT UNIT)
VC-60
R
942207
942207
942215
VERTI-CUTTER
1.7 1.8
Page 27
902080
VC-60
DECAL KIT, COMPLETE - 905041
902108
VERTI-CUTTER
R
1.8
Page 28

R
VERTI-CUTTER
Page 29

VC -60 PLUS
PARTS
VERTI-CUTTER
R
Page 30

R
VERTI-CUTTER
Page 31

970491
8/11
(Rear unit frame is same as front unit frame except for
absence of rear hitch assembly.)
970491
FRONT UNIT
VC-60 PLUS
VERTI-CUTTER
R
2.1
Page 32

27
FRONT & REAR UNIT
VC-60 PLUS
VC-60 PLUS
R
2.2
VERTI-CUTTER
Page 33

W/ CONN. LINK
8/11
10
13
*
CHAIN 60 ROLLER (DOUBLE)
CONN. LINK (DOUBLE)
UPPER SPROCKET (DOUBLE)
LOWER SPROCKET (DOUBLE)
IDLER SPROCKET SPACER (DB)
975421
112031
942013
942214
110650 3
110650
OR
1 2
2
940026
*
Verify manufacturer of gearbox before ordering part number.
*
*
*
FRONT UNIT
VC-60 PLUS
VERTI-CUTTER
942214
975421
940026
112031
942013
R
2.3
Page 34

OR
1 2
W/ CONN. LINK
8/11
Verify manufacturer of gearbox
before ordering part number.
*
*
CHAIN 60 ROLLER (DOUBLE)
CONN. LINK (DOUBLE)
975421
112031
*
UPPER SPROCKET (DOUBLE)
LOWER SPROCKET (DOUBLE)
942013
942214
940026
*
*
REAR UNIT
SHAFT ASSY.
VC-60 PLUS
R
942214
940026
975421
112031
942013
VERTI-CUTTER
2.4
Page 35

30
RAM STOP
PIN, LOCK 1/4 X 1-3/4
1
7
7
FRONT UNIT
970415
102018 1
VC-60 PLUS
VERTI-CUTTER
102018
970415
R
2.5
Page 36

31
REAR UNIT
VC-60 PLUS
R
102018
970415
VERTI-CUTTER
2.6
Page 37

BOLT, 5/16-18 X .75
WASHER, 5/16 FLAT
NUT, 5/16-18. U TYPE
22
65
19
8/11
LOWER CHAIN GUARD (DOUBLE)
LOWER CHAIN GUARD (DOUBLE)
UPPER CHAIN GUARD WELDMENT (DOUBLE)
1
1
970810 1
970811
975800
FRONT UNIT
65
975800
22
19
970810
970811
22
65
19
VC-60 PLUS
VERTI-CUTTER
R
2.7
Page 38

8/11
LOWER CHAIN GUARD (DOUBLE)
LOWER CHAIN GUARD (DOUBLE)
UPPER CHAIN GUARD WELDMENT (DOUBLE)
1
1
970810 1
970811
975800
REAR UNIT
975800
VC-60 PLUS
R
970810
970811
2.8
VERTI-CUTTER
Page 39

8/11
FRONT & REAR UNIT
943036
VC-60 PLUS (REAR UNIT)
PTO SHAFT - Part No. 943020
VC-60 PLUS
VERTI-CUTTER
R
2.9
Page 40

2.0”
8-11
970803 INSIDE BLADE SPACER398
FRONT & REAR UNIT
VC-60 PLUS
8
BLADES ARE FLIPPED OVER ON REAR UNIT FOR REVERSE ROTATION.
NOTE:
R
VERTI-CUTTER
2.10 2.11
Page 41
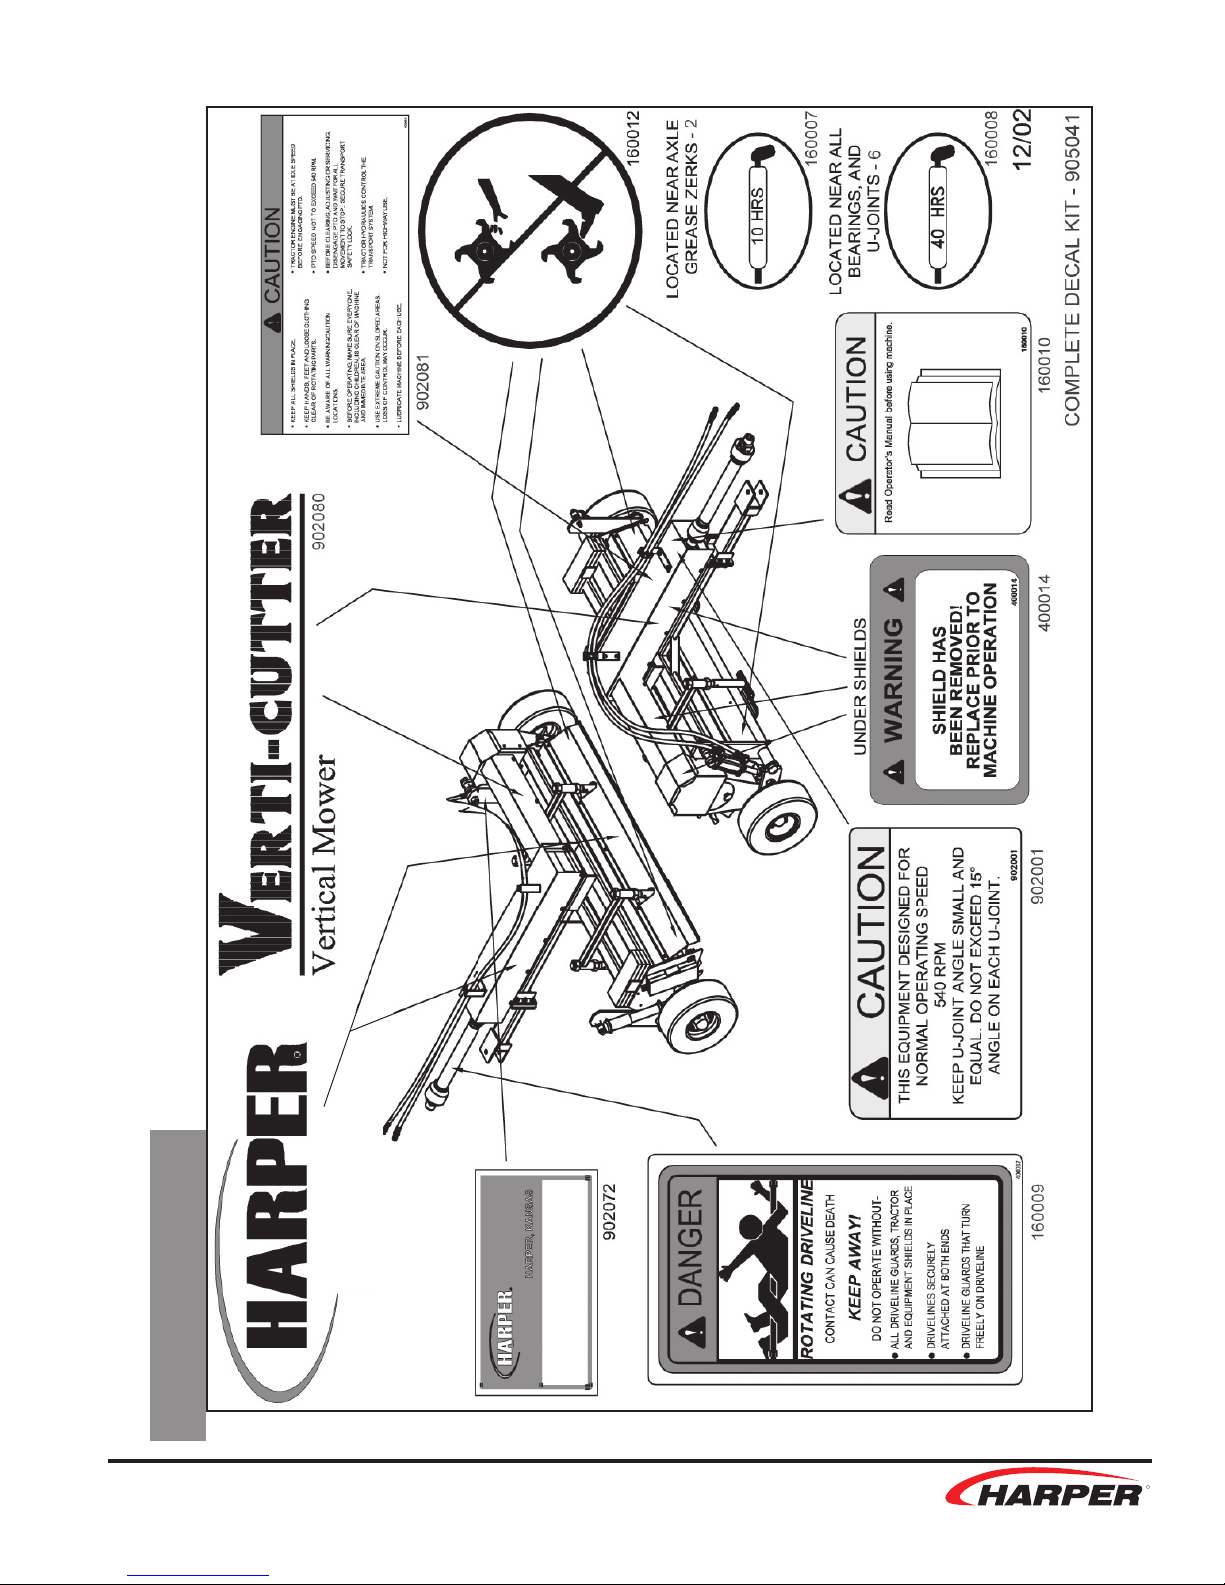
(ONE PER UNIT)
VC-60 PLUS
FRONT & REAR UNIT DECAL LOCATIONS
902108
VERTI-CUTTER
R
2.11
Page 42

NOTES
R
VERTI-CUTTER
Page 43

Harper Industries, Inc.
151 E. Highway 160
Harper, KS 67058
Telephone: 620-896-7381
Toll-Free: 800-835-1042
Fax: 620-896-7129
Website: www.harperindustries.com
VERTI-CUTTER
E-mail: info@harperindustries.com
R
Page 44

© 2011 Harper Industries, Inc.
All rights reserved. Printed in U.S.A.
R
VERTI-CUTTER
 Loading...