

Page 1
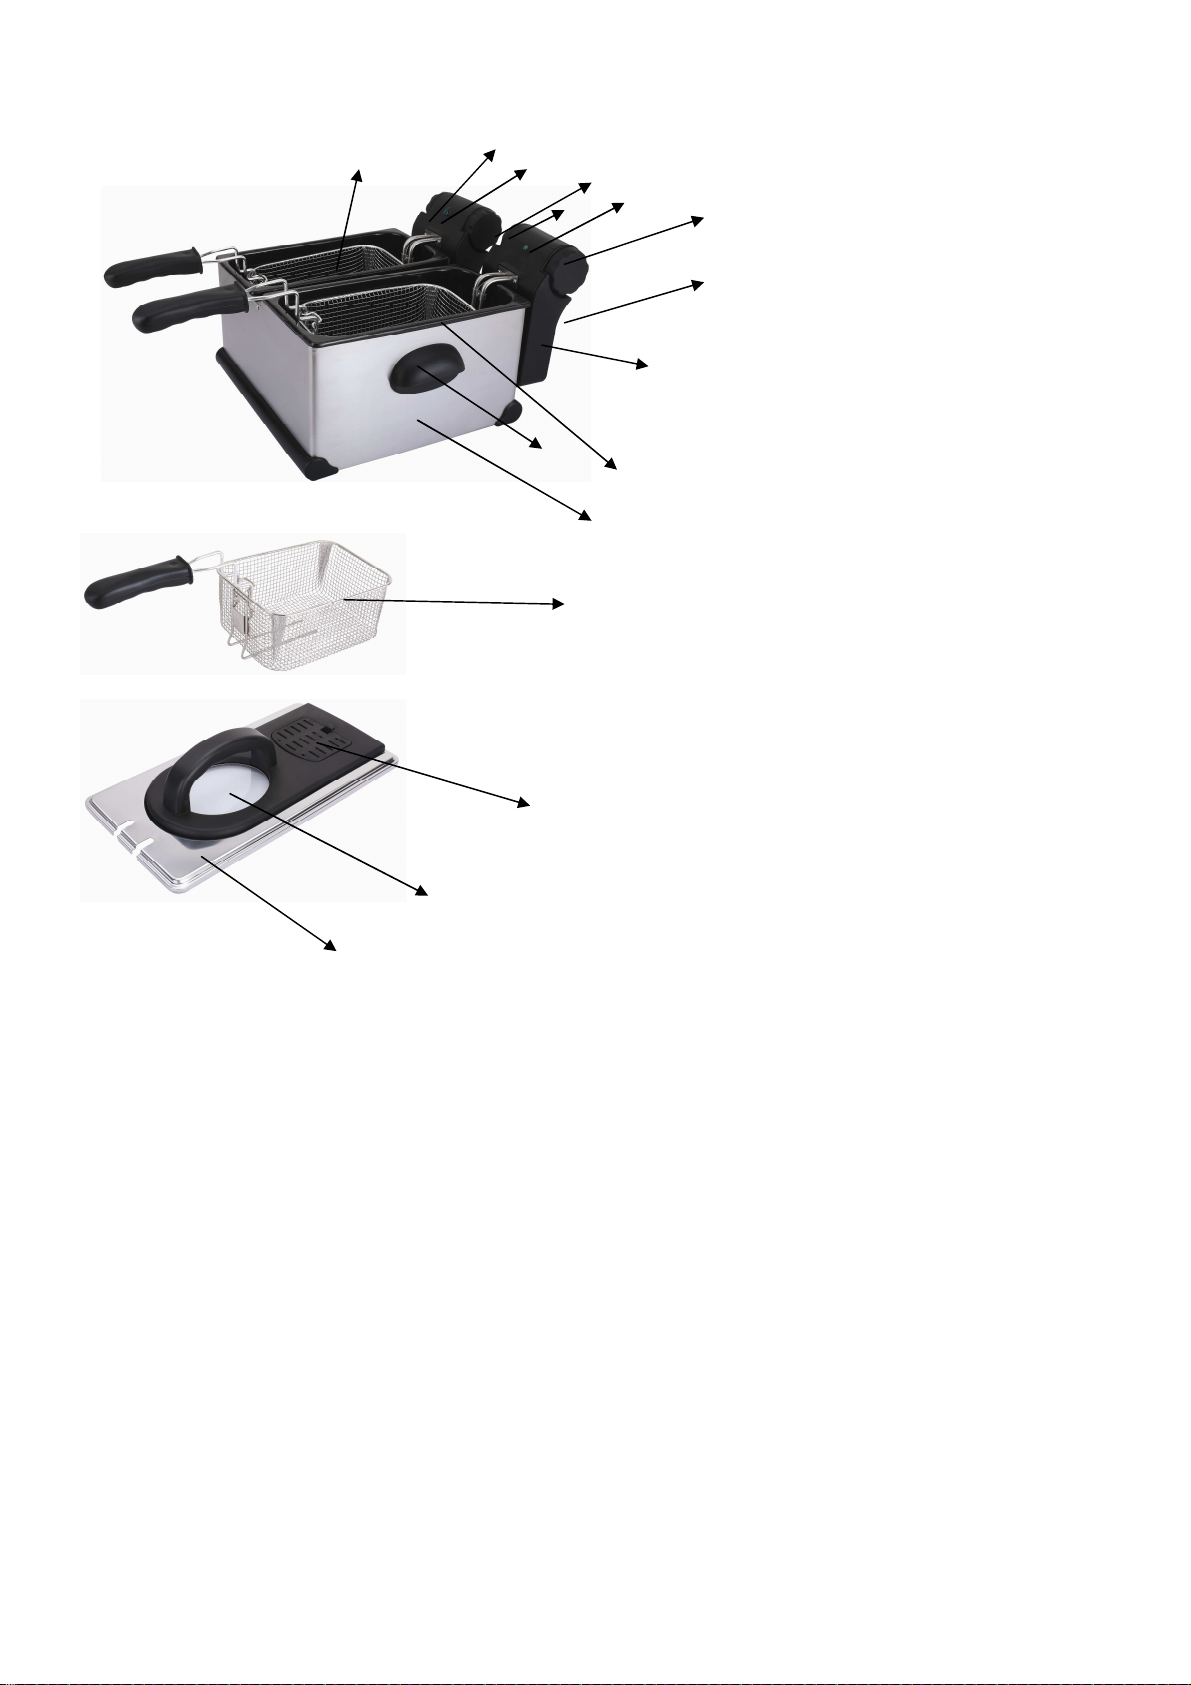
1, Housing 11, lid
2, Handle 12, view window
3, Oil container 13, Filter
4, Control device (removable)
5, Thermostat
6, Control lamp
7, 30 min timer
8, Frying basket
Rear:
9,cable take-up
10, restart button
DESCRIPTION
This double semi-pro deep fryer is practically designed with two 3.5-litre oil container with separate
temperature & time regulation: can be used together or separately. One can be used for the normal amounts,
Page 2

both for larger portions. Or the second can be used for other food. For example: Chips in one deep fryer and
snacks in the other. This way, the cooking grease stays cleaner longer & the unwanted mixing of the tastes
can be avoided.
CONNECTION:
The fryer must be connected to a properly installed 230V~, 50Hz, socket with earthing protection.
SAFETY RECOMMENDATIONS
-Please read the instructions for use carefully before using your fryer for the first time.
- Never leave the fryer (whether or not it is in use) within reach of children without supervision. Never allow
children to use the fryer on their own. The use of this appliance by disabled persons must be made under
supervision.
-Check that the voltage rating of your fryer corresponds to that of your electrical system, and that your
electricity supply can support at least 10 amps.
Any connection error will render the guarantee null and void.
-It is essential that your fryer is connected by means of an earthed plug.
Non compliance with this
obligation can cause an electric shock and may lead to serious injury. It is vital for your own safety
that the earth plug corresponds to the electrical installation standards in force in your country. If
your wiring system does not include an earthed socket, it is vital that you call in a qualified
electrician before plugging in the appliance, in order to bring your electrical system up to standard.
- Never use your fryer if it is not working properly, or if it has been damaged.
-Any intervention other than cleaning intended exclusively for domestic use and within the
home.
-Unplug your fryer once you have stopped using it and when you are cleaning it.
- Never put the fryer, the power cable or the plug into water or any other liquid.
-Never allow the power cable to hang down within reach of children. Always keep the fryer
well away from children.
-The power cable must never be close to or touching the hot parts of the appliance, near a source
of heat or rest on a sharp edge.
- If the power cable or the plug are damaged, do not use the fryer. To avoid any risk, these must be
replaced by an approved service centre
-Install your fryer on a worktop well away from any source of heat and from any risk of water
splashes.
- A safety cut-out switch prevents the fryer from working if the removable tank, the external
casing or the control panel are not in place.
-Never operate your fryer without putting in the removable tank filled with oil.
Page 3

- Check that the oil level is above the “min” indicated in the tank.
-Oil and fat are flammable products. If the oil or fat catches fire, unplug the fryer, cover it with its
own lid or a plate to stifle the flame, but
-The fryer is protected by a thermostat and an overheating safety appliance which automatically cuts
off the electrical power in the event of accidental over-heating. However, if the appliance is used
incorrectly (no oil, or insufficient oil, or failure to comply with the instructions for melting fat), it is
possible to reset the safety switch. If the safety switch cuts off the power for other reasons, it is
vital that you consult your retailer or an approved service centre.
-Always observe the mini/maxi levels indicated inside the removable tank.
-Never move your fryer while it is in use or while the oil is still hot. Hot oil can cause very serious
burns.
-It is essential that you wait until the oil has cooled down before removing the tank.
THERMAL SAFETY SWITCH
-A thermal safety switch automatically cuts off the electrical power to the appliance in case of
accidental overheating as the result of incorrect use of the appliance (no oil, or insufficient oil or
never use water
.
failure to comply with the instructions for melting fat), or as the result of some kind of functional
failure of the appliance (for example: defective thermostat).
- If the appliance is used incorrectly, and after allowing the appliance to cool down, using a toothpick
or similar object, all you need to do is press gently on the reset button behind the control panel.
BEFORE FIRST USE
- Unpack your fryer and read the instructions for use carefully.
-Open the lid
- Fold down the handle until it locks.
-Remove the basket
-Remove the control panel
- Wash the oil container and the basket with hot water and washing up liquid, rinse and dry
carefully.
-Replace the oil container
by lifting the handle
and the removable bowl by lifting them vertically.
USING THE FRYER
1. Adding oil or fat
-Open the lid
-Remove the basket
container up to the «Maxi» level never exceed the «Maxi» level indicated in the removable bowl, as
you run the risk of the oil overflowing during frying.
If you are using blocks of fat,
by raising the handle
cut them into pieces, melt them in a container and pour the melted fat
.
If you are using oil,
pour the oil into the removable oil
Page 4

into the container .Never melt the blocks of fat in the basket or on the element.
litre
Model
2 x3.5
Oil capacity
2x3.5 litre 2x 6,0 blocks of 2x 600 g
Blocks of fat
- Now you can start cooking.
Note:
When the level of fat in its solid state falls below the “mini” level,
add 250 g.
2. Frying food
-Set the thermostat to the required setting, then set the timer to the required sttting,The control light
comes on. When the oil has reached the required temperature, the control light goes out.
-Open the lid by lifting it with the handle.
-Place the food in the basket.
-Slowly lower the basket into the oil from the draining position.
-Close the lid
-When the cooking is finished, open the lid, raise the basket and place it in the draining position.
- Do not forget to turn off your fryer.
Notes:
-If you need to fry several batches of food in succession, wait each time until the indicator light has
gone out before putting food into the oil.
The fryer is fitted with a 30 min timer:
- Turn the timer button to the position “I”, the fryer is switched on.
- You can set the time from 1 min to 30 min by turning the timer button
- When the cooking time is up, a tone will sound, the fryer turns off.
PRACTICAL TIPS
1. Oil or fat
-Never operate your fryer without oil.
-Always use an oil which can withstand high temperatures.
-Do not mix oils of different qualities.
-Change the oil when it becomes brown after cooking (after 10 to
20 uses, depending on the type of cooking done).
Important:
Before each use, make holes in the solid fat with a non metallic spatula to the bottom
Page 5

of the tank, in order to allow any water trapped under the fat to escape in the form of steam.
temperature selector
- In order to preserve your oil or fat for longer, the small particles of food will fall into a cool zone
which is located at the bottom of the tank beneath the heating element.
2. Preparing foods for frying
-No matter what the recipe, food must be perfectly dry to prevent overflowing and to extend the life
of the oil.
-When dishes include raw potatoes (chips, crisps and potato straws), wash them in cold water
to get rid of the starch after chopping them. Dry them carefully, and this will prevent them from
sticking together.
-When preparing frozen foods, remove any ice crystals before cooking by shaking the basket
over the sink.
3. Cooking
-Do not overfill the basket, or you will cause the temperature in the fryer to drop, and this will make
the food too greasy. The safety capacity of your fryer (provided that you slowly lower the basket
into the oil to prevent any risk of overflowing)and the optimum cooking capacity are limited to:
For fresh or frozen chips
Model
2x3.5
litre
Maximum safety capacity
2x 1,0 kg 2x 900 g
Optimum capacity
-Do not leave your fryer heating unnecessarily: your oil will last longer.
- Set the temperature selector to the “low” setting while waiting between two batches of frying.
-Do not leave your fried preparations in the basket in the draining position for too long, as the steam
may soften them and take away their crispness.
COOKING CHARTS
Cooking times are given by way of indication.
You can adjust them according to your own tastes and
the quantities.
Setting of
150 Onions 3-4
170 Mushrooms 6-8
Foods
Time (min)
Page 6

180 Vegetable fritters 6-8
180 Cod fillets 6-8
170 Fried smelt 6-8
160 Prawns 6-8
170 Fish balls 6-8
170 Breaded pork chops 8-10
170 Veal cutlets 8-10
160 Fish fillets 6-8
170 Sardines 8-12
170 Apple fritters 4-6
170 Chips - 1st immersion 6-9
190 Chips - 2nd immersion 2-4
190 Chips - one immersion 13-15
180 Chicken portions 5-6
Please note
When cooking chips, lower the basket slowly to prevent overflowing. This risk is
:
increased if you are using new potatoes, pre-cooked chips available from the chill cabinet or
defrosted chips (see preparation of food for frying). For frozen foods, set the thermostat & the
timer.
Time
(min)
Weight and cooking times frozen products
FOOD
Chips (pre-cooked) 900 11 - 15
Optimum Weight (g)
For each container
Mini potato
croquettes
Potato pancakes 300 6 - 8
Cod in breadcrumbs 400 4 - 6
Hake in
bredadcumbs
Fried smelt 400 4 - 6
Fish fillets in batter 400 4 - 6
Scampi 500 4 - 6
800 8 - 12
400 4 - 6
Page 7

Squid rings 500 4 - 6
Apple fritters 300 5 - 7
Breaded chicken
escalopes
Breaded pork chops 400 8 - 10
Breaded veal chops 400 8 - 10
400 8 -10
CLEANING
-Unplug your fryer and allow it to cool down.
-Clean the exterior of the fryer with a damp cloth. Do not use an abrasive pad or alcohol.
-Never immerse the fryer in water and never wash it under running water.
- To clean the inside of the lid, use a damp sponge with washing up liquid, rinse and dry. Do
not use abrasive pads as you will risk damaging it.
- To clean the basket, remove it. Wash the basket in hot water with washing up liquid, rinse
and dry.
- The basket must not be put into the dishwasher.
-When you change the oil, take the opportunity to clean the removable bowl in the dishwasher or
in hot water with washing up liquid. Rinse and dry.
IMPORTE PAR
Tradecom France
93 300 Aubervilliers
www.tradecom.fr
Page 8

1, Parois 11, Couvercle
2, Poignee 12, Hublot
3, Reservoir d’huile en email 13, Filtre permanent
4, Element de commande (amovible)
5, Thermostat
6, lampe
7, 30 min minuteur
8, Panier a friture
Dos de L’appareil
9, Rangement du cable
10,Bouton restart
Page 9

DESCRIPTION
This double semi-pro deep fryer is practically designed with two 3.5-litre oil container with separate
temperature & time regulation: can be used together or separately. One can be used for the normal amounts,
both for larger portions. Or the second can be used for other food. For example: Chips in one deep fryer and
snacks in the other. This way, the cooking grease stays cleaner longer & the unwanted mixing of the tastes
can be avoided.
( Pls translate it into French)
RACCORDEMENT
Ne brancher cet appareil que dans une prise de courant sécurisé en bon état de fonctionnement de
230V~/50Hz
CONSEILS DE SÉCURITÉ
-Lisez attentivement le mode d’emploi avant la première utilisation de votre appareil.
-Ne laissez pas l’appareil à la portée des enfants sans surveillance (en fonctionnement ou à l’arr
êt).
Ne laissez pas les enfants utiliser seuls la friteuse. L
handicapées doit être faite sous surveillance.
’
utilisation de cet appareil par des personnes
- Vérifiez que la tension d’alimentation de votre appareil correspond à celle de votre installation, et
que votre compteur électrique supporte au moins 10 ampères.
Toute erreur de branchement annule la garantie.
-Branchez impérativement votre appareil sur une prise de courant reliée à la terre.
Le non respect
de cette obligation peut provoquer un choc électrique et entraîner éventuellement des lésions
graves. Il est indispensable pour votre sécurité que la prise de terre corresponde aux normes
d’installation électrique en vigueur dans votre pays.
-Si votre installation ne comporte pas de prise de courant reliée à la terre, il est impératif que vous
fassiez intervenir, avant tout branchement,
un organisme agréé
qui mettra en conformité votre
installation électrique.
- Votre appareil est destiné uniquement à un usage domestique et à l’intérieur de votre
habitation.
-Débranchez votre appareil si vous cessez de l’utiliser et lorsque vous le nettoyez.
-N’utilisez pas votre appareil s’il ne fonctionne pas correctement ou s’il a été endommagé.
-Ne mettez pas l’appareil, le bloc de commande, le cordon d’alimentation ou la fiche dans l’eau ou
tout autre liquide.
-Ne laissez pas pendre le cordon d’alimentation à portée de mains des enfants. Tenez toujours les
enfants éloignés.
Page 10

- Le cordon d’alimentation ne doit jamais être à proximité ou en contact avec les parties
chaudes de votre appareil, près d’une source de chaleur ou sur un angle vif.
-Si le cordon d’alimentation ou la fiche sont endommagés, n’utilisez pas votre appareil. Afin d’é
viter tout danger,
-Installez votre friteuse sur un plan de travail éloigné d’une source de chaleur et de tout risque de
projections d’eau.
-Un système de sécurité empêche le fonctionnement de votre friteuse en cas d’absence de la
cuve amovible, de l’enveloppe extérieure ou du bloc de commande.
-Ne faites jamais fonctionner votre friteuse sans avoir remis la cuve amovible remplie de corps gras.
-Vérifiez que le niveau soit au dessus du “mini” indiqué dans la cuve.
- L’huile et la graisse sont des produits inflammables. Si toutefois le corps gras prenait feu, dé
branchez la prise, couvrez l’appareil avec son couvercle ou un plat pour étouffer la flamme,
n’utilisez jamais d’eau.
- La friteuse est protégée par un thermostat et un dispositif de sécurité thermique qui, en cas
de surchauffe accidentelle, coupe automatiquement l’alimentation électrique. Toutefois en cas de
mauvaise utilisation (absence ou insuffisance de graisse ou non respect des consignes pour faire
faites-les obligatoirement remplacer par un centre service agréé
mais
fondre la graisse), il est possible de réarmer le dispositif de sécurité .
-Respectez les niveaux mini/maxi indiqués à l’intérieur de la cuve amovible
-Ne déplacez jamais votre friteuse en fonctionnement ou lorsque le corps gras est encore chaud.
L’huile chaude peut vous brûler très grièvement.
-Attendez impérativement que le corps gras soit refroidi pour enlever la cuve amovible. - N’obstruez
jamais la zone de filtration des graisses située sur le couvercle avec votre main ou un objet
quelconque (torchon, plat, assiette...), vous risqueriez de vous brûler.
DISPOSITIF DE SÉCURITÉ THERMIQUE
-Un dispositif de sécurité thermique coupe automatiquement l’alimentation électrique de l’appareil
en cas de surchauffe accidentelle soit à la suite d’une mauvaise utilisation de l’appareil (absence
ou insuffisance de graisse ou non respect des consignes pour faire fondre la graisse), soit à la
suite d’une anomalie de fonctionnement de l’appareil (exemple: thermostat défectueux).
-Dans le cas d’une mauvaise utilisation, et après refroidissement de l’appareil, à l’aide d’un
cure-dents ou objet similaire, il suffit d’appuyer délicatement sur le bouton de réarmement par
l’orifice
-Dans le cas d’une anomalie de fonctionnement inexpliquée consultez votre détaillant.
situé en-dessom du bloc de commande .
Page 11

AVANT LA PREMIÈRE UTILISATION
-Déballez votre appareil et lisez attentivement la notice d’utilisation.
-Retirez le couvercle
-Dépliez la poignée jusqu’à son verrouillage.
-Retirez le panier en soulevant la poignée
-Retirez le bloc de commande et la cuve amovible en les soulevant verticalement.
- Lavez la cuve amovible, le panier avec de l’eau chaude et un produit à vaisselle, rincez et
essuyez soigneusement.
-Remettez en place la cuve amovible.
UTILISATION
1. Mise en place de l’huile ou de la graisse
-Retirez le couvercle
-Dépliez la poignée jusqu’à son verrouillage.
-Enlevez le panier en soulevant la poignée
-
Si vous utilisez de l’huile,
versez l’huile dans la cuve amovible
jusqu’au niveau «Maxi». Ne dépassez pas le niveau “Maxi”
indiqué dans la cuve amovible, vous risqueriez de provoquer
un débordement de l’huile hors de la friteuse.
-
Si vous utilisez des pains de graisse,
coupez-les en morceaux, faites-les fondre dans un
autre récipient et versez la graisse fondue dans la cuve de l’appareil. Ne faites jamais fondre les
pains de graisse dans le panier ou sur la résistance.
Modèle Volume d’huile Maxi
2x3.5 L 2x3.5 L 6 pains de 600 g
Poids de graisse Maxi
- Posez le couvercle ,
-Mettez l’interrupteur sur la position “1”.
- Vous pouvez commencer une cuisson.
Remarque :
Lorsque le niveau de graisse figée est en dessous du niveau “mini”, ajoutez 250 g.
Page 12

2. Réalisation d’une friture
-Réglez le sélecteur de température sur la position choisie (voir tableaux de cuisson).
Le voyant de régulation s’allume. Lorsque le corps gras a atteint la température requise, le voyantde
régulation s’éteint.
-Retirez le couvercle en le soulevant par la poignée.
- Placez les aliments dans le panier.
-Abaissez lentement le panier dans le corps gras en le retirant de la position égouttage.
- Posez le couvercle filtrant .
-En fin de cuisson, retirez le couvercle, remontez le panier et positionnez-le en position é
gouttage.
-N’oubliez pas d’éteindre votre friteuse.
Remarques :
-Si vous devez faire plusieurs fritures de suite, attendez à chaque fois que le voyant de régulation
soit éteint avant de mettre les aliments dans le corps gras.
- Pour éviter tout risque de brûlure, ne mettez pas les mains au-dessus de la zone de
filtration des graisses
The fryer is fitted with a 30 min timer:
- Turn the timer button to the position “I”, the fryer is switched on.
- You can set the time from 1 min to 30 min by turning the timer button
- When the cooking time is up, a tone will sound, the fryer turns off.
(pls translate it into French!)
CONSEILS PRATIQUES
1. Le corps gras
-Ne faites jamais fonctionner votre friteuse sans corps gras.
-Employez toujours un corps gras supportant des températures élevées.
-Evitez de mélanger des corps gras de qualités différentes.
- Changez le corps gras lorsqu’il devient brun après la cuisson, (toutes les 10 à 20 fritures suivant
les cuissons faites).
Important:
non métallique jusqu’au fond de la cuve afin de permettre le passage, sous forme de vapeur, de
l’eau emprisonnée sous la graisse.
-Afin de conserver votre corps gras plus longtemps, les petites particules des aliments tomberont
dans une zone froide qui est située au fond de la cuve sous l’élément chauffant.
Avant chaque utilisation, percez des trous dans le corps gras solide avec une spatule
Page 13

2. Préparation des aliments à frire
-Quelle que soit la recette, les aliments doivent être parfaitement secs, vous éviterez les dé
bordements et prolongerez la durée d’utilisation du corps gras.
-Dans le cas de préparation à base de pomme de terre crues (frites, pommes pailles),
lavez-les à l’eau froide pour éliminer l’amidon après les avoir coupées. Essuyez-les
soigneusement, elles ne colleront plus entre elles.
-Dans le cas de préparation à base d’aliments surgelés, avant la cuisson, éliminez les
cristaux de glace qui les recouvrent en secouant le panier au dessus de l’évier.
3. La cuisson
- Evitez de trop remplir le panier, vous provoqueriez une baisse de température du bain de friture qui
rendrait la préparation trop grasse. La capacité limite de sécurité (à condition de descendre le
panier très lentement dans le bain de graisse pour éviter tout débordement) et la capacité
optimum de cuisson sont :
Pour frites fraîches et surgelées
Modèle Capacité limite de sécurité Capacité optimum
2x3 L 2x1 kg 2x900 g
- Evitez de laisser votre bain de friture en chauffe inutilement: votre huile durera plus longtemps.
- Placez le sélecteur de température en position “mini ” en cas d’attente entre deux fritures.
- Ne laissez pas vos préparations cuites dans le panier en position égouttage trop longtemps, les
vapeurs pourraient les ramollir et éliminer leur aspect croustillant.
Page 14

TABLEAUX DE CUISSON
Les temps de cuisson sont donnés à titre indicatif. Vous les ajusterez en fonction de vos
go
û
ts et des quantités.
Position du sé
lecteur de tempé
rature
150 Oignons 3-4
170 Champignons 6-8
180 Beignets de légume 6-8
180 Cabillaud en tranche 6-8
170 Friture d’éperlans 6-8
160 Crevettes 6-8
170 Beignets de poisson 6-8
170 Côtes de porc panées 8-10
170 Escalopes de veau 8-10
160 Filets de poisson 6-8
170 Sardines 8-12
170 Beignets de pomme 4-6
170 Frites - 1ère plongée 6-9
Préparations
Temps (min)
190 Frites - 2ème plongée 2-4
190 Frites -1 plongée 13-15
180 Morceaux de poulet 5-6
Attention:
Lors de la cuisson des pommes frites, descendez
lentement le panier pour éviter des débordements. Ce risque
augmente si vous utilisez des pommes de terre nouvelles, des
frites précuites achetables au rayon frais ou des pommes frites
décongelées (voir préparation des aliments à frire).
Pour les surgelés, réglez le sélecteur de température en
position
190ºC
.
Page 15

ignets aux crevettes
Beignets aux calamars
Poids et temps de cuisson Produits surgelés
Poids optimum (g)
Préparations
Each oil container
Modèle
3.5L
Frites (précuites) 900 11 à
Pommes noisettes 800 8 à 12
Croustines de
pommes de terre
Cabillaud pané 400 4 à 6
Merlu pané 400 4 à 6
Friture d’éperlan 400 4 à 6
Filets de poisson en
beignet
300 6 à 8
400 4 à 6
Temps
(min)
15
Be
Beignets de pomme 300 500 5 à 7
Escalopes de poulet
panées
Côtes de porc panées 400 8 à 10
Côtes de veau panées 400 8 à 10
500 4 à 6
500 4 à 6
400 8 à 10
NETTOYAGE
- Débranchez votre friteuse et laissez-la refroidir.
-Nettoyez l’extérieur de la friteuse avec un chiffon humide. N’utilisez ni tampon abrasif ni
alcool.
-Ne trempez jamais la friteuse dans l’eau et ne la lavez jamais à l’eau courante.
- Pour nettoyer l’intérieur du couvercle, utilisez une éponge humide additionnée d’un produit à
vaisselle, rincez et essuyez. N’utilisez pas de tampons abrasif, vous risqueriez de le détériorer.
- Pour nettoyer le panier, retirez-le. Lavez le panier à l’eau chaude additionnée d’un produit à
vaisselle, rincez et essuyez.
- Le panier ne doit pas être mis au lave-vaisselle.
- Profitez du changement de matière grasse pour nettoyer votre cuve amovible au lave vaisselle ou
à l’eau chaude additionnée d’un produit à vaisselle. Rincez puis essuyez.
Page 16

IMPORTE PAR
Tradecom France
93 300 Aubervilliers
www.tradecom.fr
 Loading...