

harmoni LUGOHS440, LUGOHS0660, LUGOHS1320, LUGOHS1540, LUGOHS0880 Instruction And Installation Manual
...
Digital electric radiator
INSTRUCTION & INSTALLATION GUIDE
2
Introduction
harmoni digital electric radiators are programmable with an exclusive electronic temperature program-
mer and manufactured with quality components designed for you. harmoni digital electric radiators
have passed the most demanding quality controls to meet with the most rigorous safety and eciency
requirements. The digital electric radiators are designed for xed installation only and below are the main
features:
• Backlight display
• Easy to follow settings and programming
• Highly accurate electronic thermostat
Please read this Instruction & Installation Guide carefully to ensure correct operation. It is important that this
guide is left with the product after installation.
Contents
1. harmoni Technical Specications ........................................................................................................................................3
2. Installation & Safety precautions ........................................................................................................................................4
2.1. Installation precautions ..................................................................................................................................................4
2.2. Safety precautions ..............................................................................................................................................................4
3. harmoni system Installation........ ........................................................................................................................................4
3.1. Mounting ...............................................................................................................................................................................4
3.2. Fixing the supports .............................................................................................................................................................5
4. harmoni system Information & Instructions.............................................................................................................................5
4.1. Keypad ...............................................................................................................................................................................5
4.2. Screen ................................................................................................................................................................................6
4.3. Switch on & o (stand-by) ............................................................................................................................................6
4.4. Adjust the day & time ..........................................................................................................................................................7
4.5. Lock the keypad.....................................................................................................................................................................7
4.6. Select either MANUAL or AUTOMATIC mode..........................................................................................................7
4.7. harmoni system Advanced Functions........................................................................................................................10
5. Maintenance & Cleaning............... .......................................................................................................................................11
6. Guarantee......................................... .......................................................................................................................................11
3
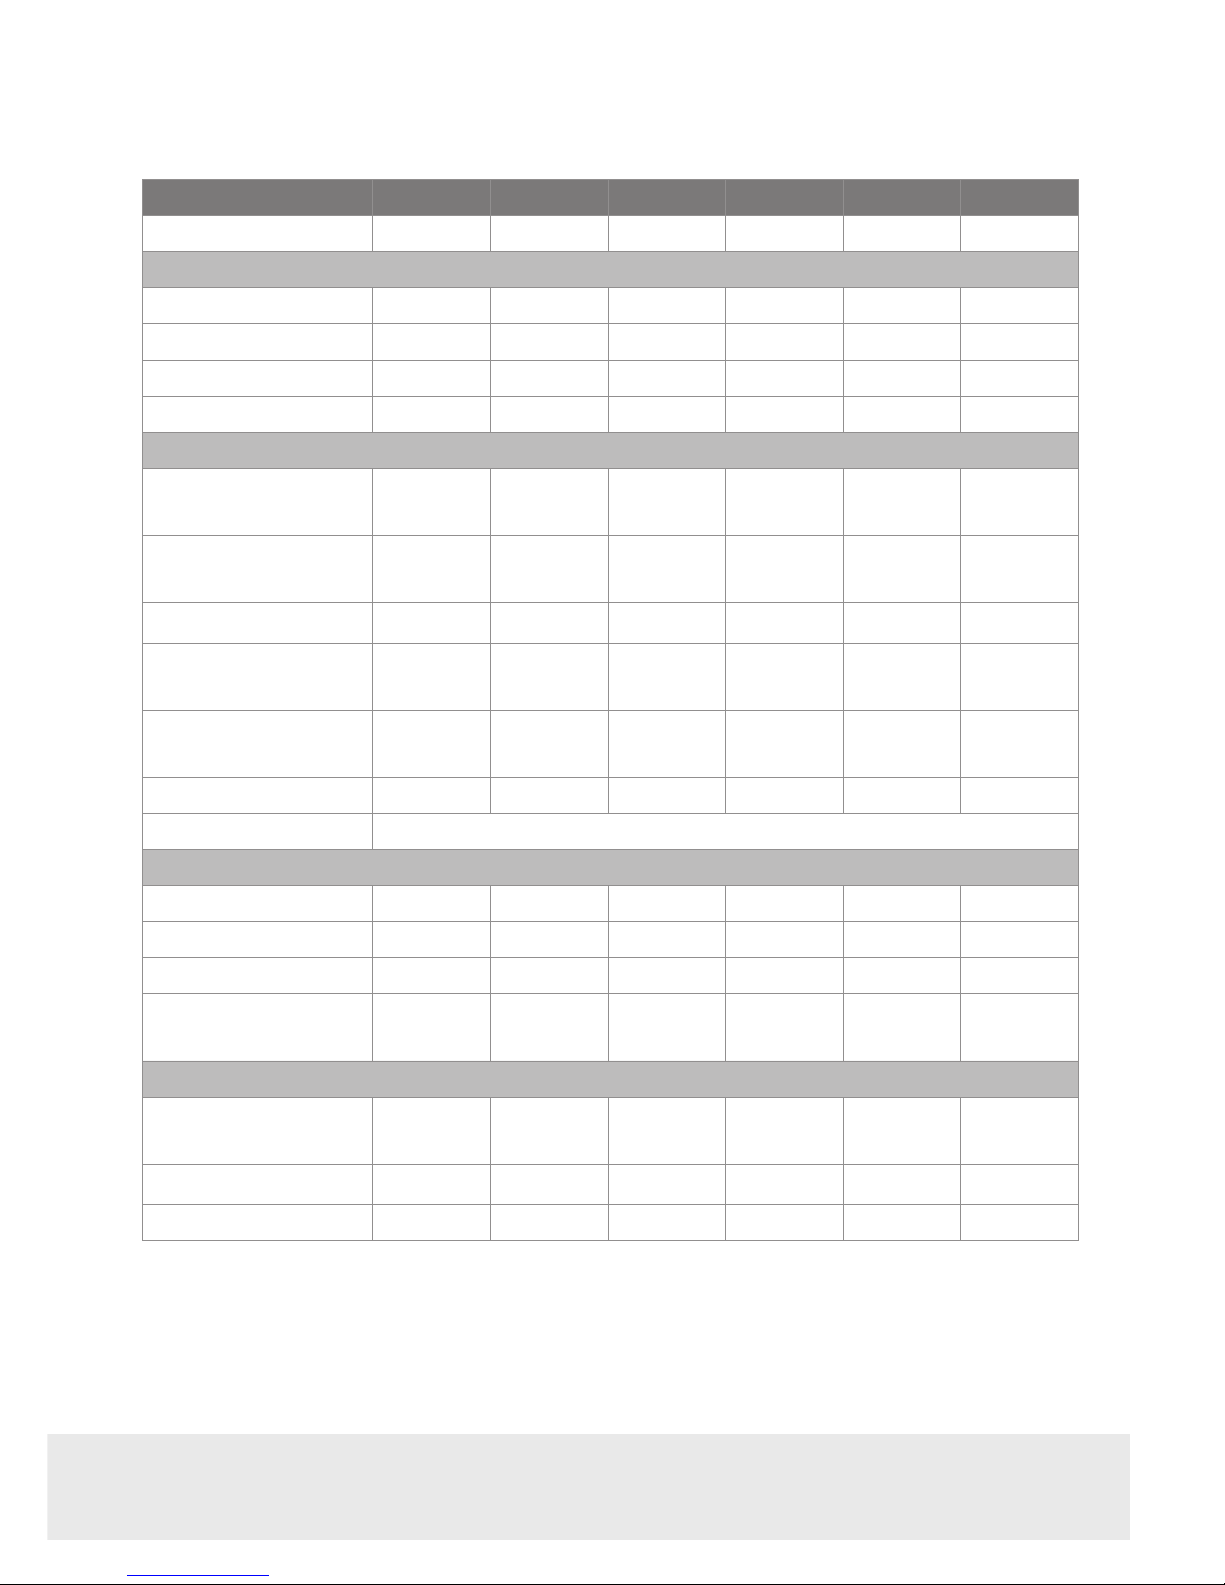
1. harmoni Technical Specications
MODEL
LUGOHS440 LUGOHS0660 LUGOHS0880 LUGOHS1100 LUGOHS1320 LUGOHS1540
No. Elements 4 6 8 10 12 14
DIMENSIONS
Width (mm) 425 585 747 907 1,069 1,230
Height (mm) 575 575 575 575 575 575
Depth (mm) 98 98 98 98 98 98
Installed Depth (mm) 120 120 120 120 120 120
MECHANICAL CHARACTERISTICS
Armoured steel
heating element
High purity
aluminium
Thermal oil
PC/ABS panel with
keypad
Left side cover
PC/ABS
Weight (kg) 8 12 16 20 24 28
Finish White RAL 9010
ELECTRICAL CHARACTERISTICS
Nominal Power (W) 440 660 880 1,100 1,320 1,540
Voltage (V) 230 V ~ 230 V ~ 230 V ~ 230 V ~ 230 V ~ 230 V ~
Current (A) 1.9 2.9 3.8 4.8 5.6 6.7
Power per Element
(W/Element)
110 110 110 110 110 110
INSTALLATION & PROTECTION
Template &
Installation Kit
Safety thermostat
Protection Grade IP 24 IP 24 IP 24 IP 24 IP 24 IP 24
4
2. Installation & Safety precautions (EN 60335 Standards)
Before switching on the product, please read the “Installation & Safety Precautions” in detail rst to ensure
the correct operation of the product.
2.1. Installation precautions
The product is designed for household or residential use. You are advised to have the product installed by
an authorized professional installer. Make sure the product is properly connected to 230V and is earthed.
2.2. Safety precautions
This appliance can be used by children aged from 8 years and above and persons
with reduced physical sensory or mental capabilities or lack of experience and
knowledge if they are supervised or have been given instruction concerning use
of the appliance in a safe way and understand the hazards involved. Children
should not play with the appliance. Cleaning and user maintenance should not
be carried out by children without supervision. Children must be supervised at
all times to ensure that they do not interfere with the product.
This product is lled with a precise amount of special oil that does not need
any maintenance. Any repairs requiring the opening of the oil tank must only
be done by an ocial harmoni installer or its after-sales service personnel, who
should also be notied should an oil leak be noticed. The regulations on discarding oil when the heater is being disposed of must be observed. If the power cable
is damaged, it must be replaced by the manufacturer, its after-sales service or
authorized personnel in order to avoid any damage.
3. harmoni system Installation
3.1. Mounting
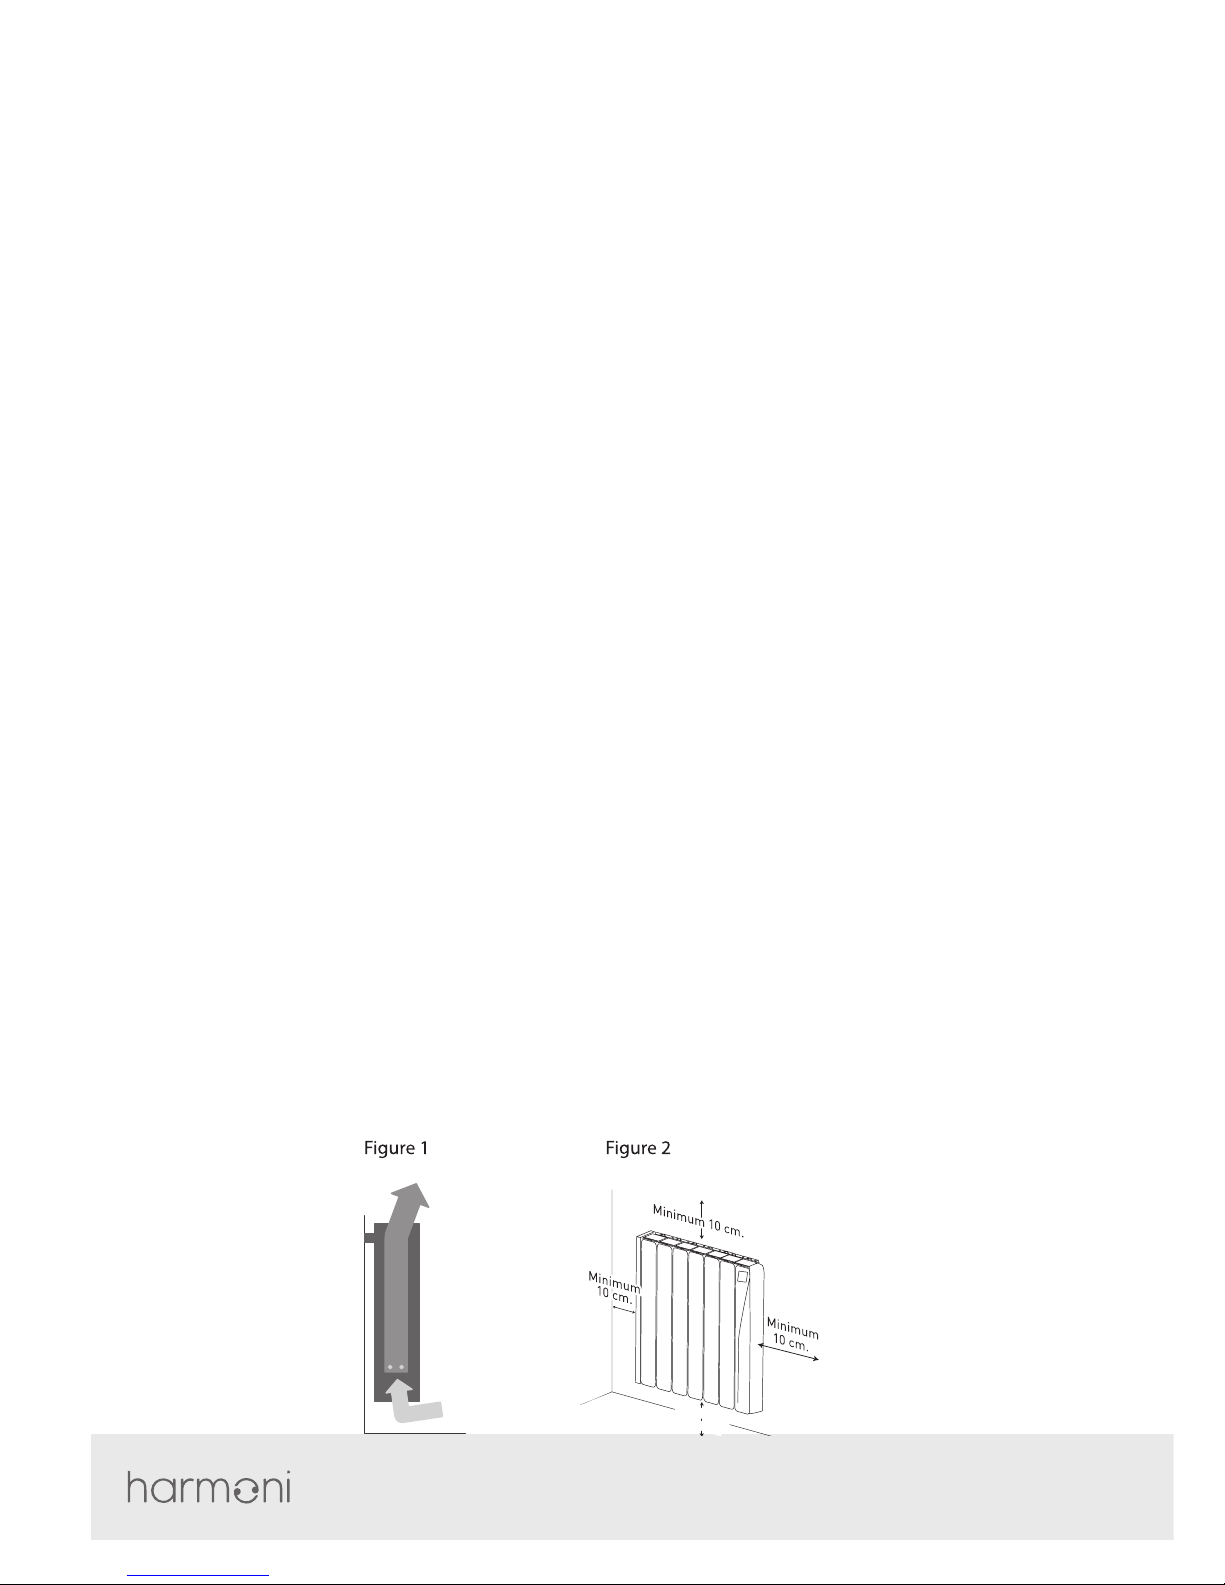
The product works by means of natural air convection (Figure 1). In order to achieve optimal functioning
and an even distribution of heat, the lower part of the product, once mounted on the wall, must be at least
10-12cm from the oor, and 30cm at the most. As for the sides and above, a minimum distance of between
10-12cm must be left from any wall or brickwork in order for it to function correctly (Figure 2).
Minimu
m
10 cm
.
5
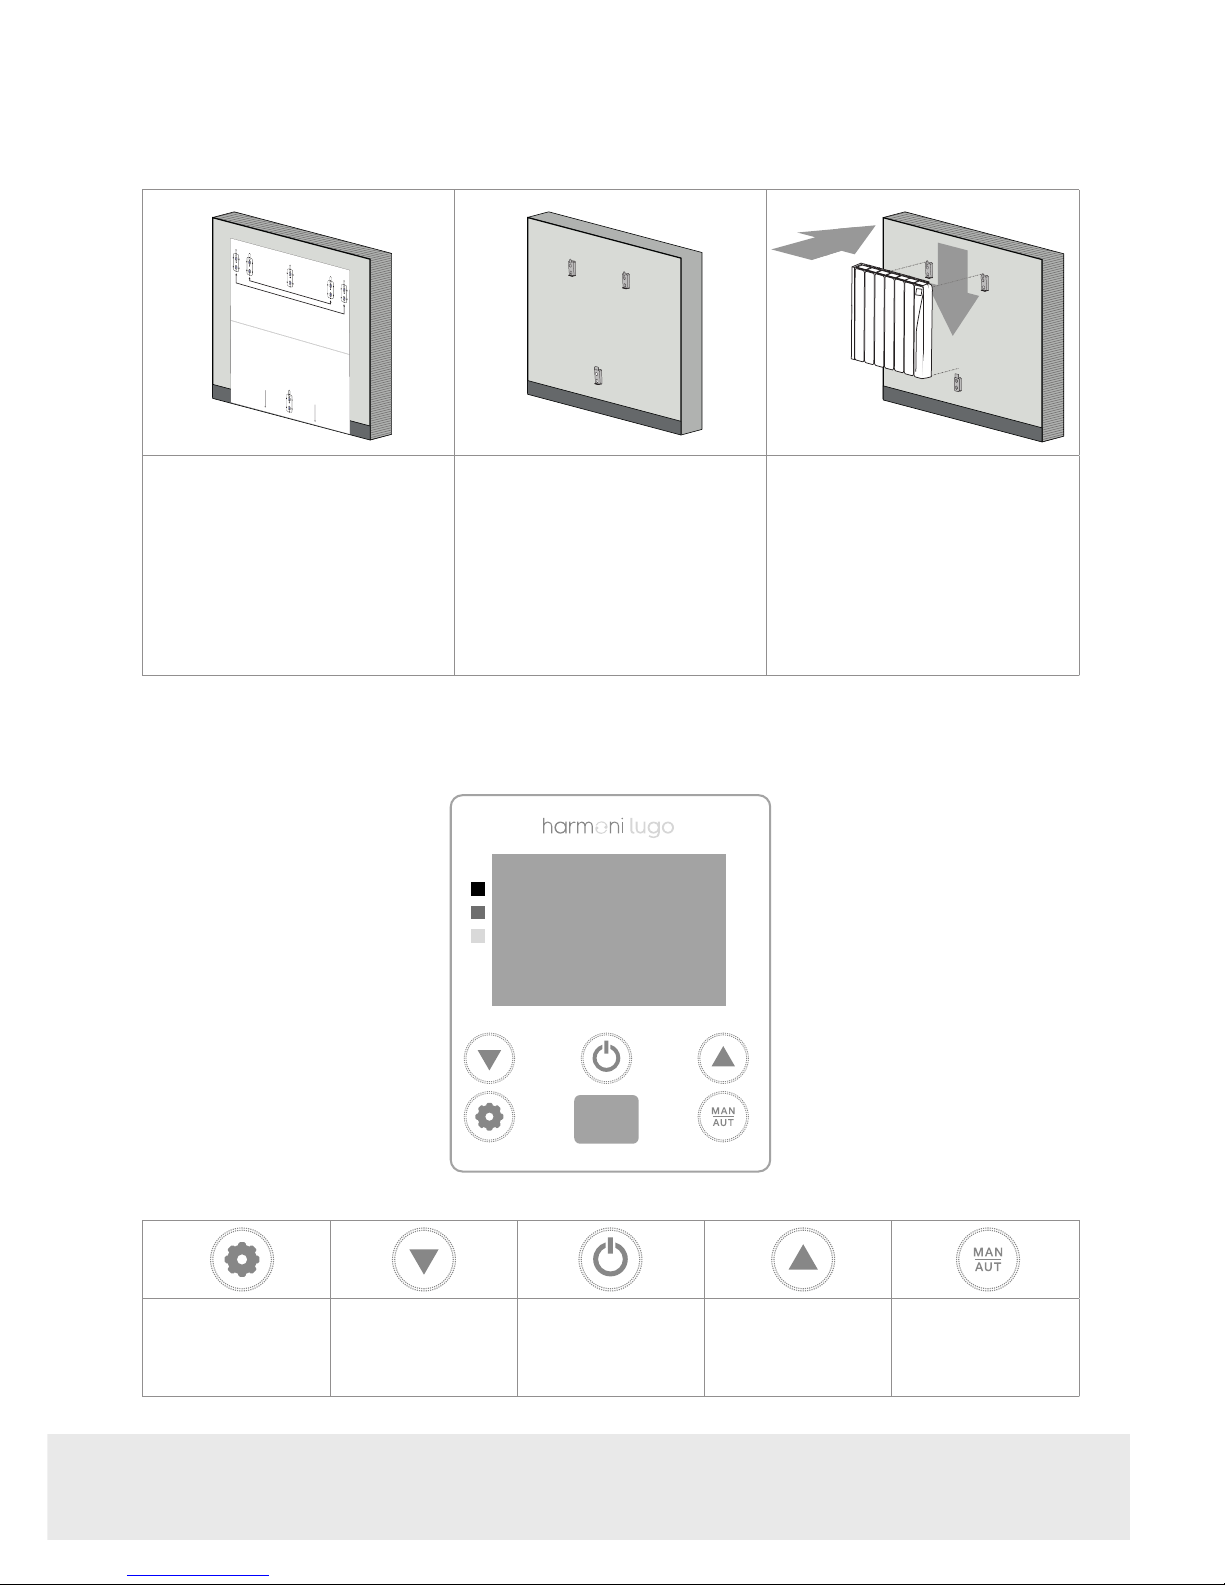
3.2. Fixing the supports
Inside the packaging you will nd a xing kit. Please nd the instructions below:
1. Choose the right part of the
wall.
2. Place the mounting stencil on
the wall, marking the places for
the holes.
3. Remove the stencil and make
the holes in the wall.
4. Fix the supports using the
plugs and screws provided, or
others suitable for the wall type.
5. Check the correct positioning
of the lower support.
6. Align the product with the top
supports.
7. Place the product in the
supports.
4. harmoni system Information & Instructions
4.1. Keypad
Settings
/ Back
Decrease
Temperature
/ Move down
On/O (stand-by)
/ Conrm
Increase
Temperature
/ Move up
MANUAL / AUTO
function

6
4.2. Screen
4.3. Switch on & o (stand-by)
To switch the product on, please press the button once. To switch the product o, please press the
button again.
When you switch the product on for the rst time you will be prompted to set the day and time. Use the
buttons to select the correct hour and press the button to conrm. Next use the buttons to
select the correct minute and press the button to conrm. Then use the buttons to select the
correct day and press the button to conrm.
1 Programming - Hours of the Day available
2 Programming - Hours of the Day selected
3 Days of the Week
4 Energy Consumption indicator
5 SET TIME setting indicator
6 Current time/temperature
7 Keypad Locked indicator
8 Heating element on indicator
9 COMFORT / ECO / ANTI-FROST mode indicator
10 OPEN WINDOWS /
PRESENCE DETECT function indicator (*Only
available upon demand*)
11 Pre-installed programmes indicator
12 MANUAL /
PILOT function indicator (*Only available upon
demand*)
13 Programming - COMFORT / ECO function
indicator
Keypad locked
Heating element on
ANTI-FROST mode on
ECO mode on
COMFORT mode on
OPEN WINDOWS function on
PRESENCE DETECT function on
(*Only available upon demand*)
Pre-installed programme active
MANUAL function active
PILOT function active (*Only
available upon demand*)

7
4.4. Adjust the day & time
To adjust the day or time of the product, please press the button to access the Settings Menu. Then you
will need to use the buttons to scroll to the menu on the screen and press the button
to conrm.
Use the buttons to select the correct hour and press the button to conrm. Next use the
buttons to select the correct minute and press the button to conrm. Then use the buttons to
select the correct day and press the button to conrm.
4.5. Lock the keypad
To lock the keypad, please press and hold the buttons at the same time for 3 seconds. A icon will
appear at the top of the screen.
To unlock the keypad, press and hold the buttons again at the same time for 3 seconds. The icon
will disappear from the top of the screen.
4.6. Select either the MANUAL, AUTOMATIC or PILOT mode (*Only upon demand.*)
To select either the MANUAL, PILOT and AUTO, AUTO 1, AUTO 2, AUTO 3 and AUTO 4 modes you need to press
the button and keep pressing until the mode you want is highlighted.
On the display panel, the icon will appear when you are in one of the AUTO modes (1-4), the icon will
appear when you are in MANUAL mode and the icon will appear when in PILOT mode.
00 01 02 03 04 05 06 07 08 09 10 11
AM
4.6.1. MANUAL mode
When MANUAL mode is selected the set temperature, MANUAL mode icon, COMFORT/ECO/ANTI-FROST icon
and the time/day of the week will be displayed on the screen. The set temperature and the hour will alternate
every 5 seconds on the screen.

8
In MANUAL mode you can choose a set temperature and the corresponding COMFORT/ECO/ANTI-FROST icon
will appear on the screen according to the ranges below:
COMFORT
21 - 30 oC
ECO
7.5 – 20.5 oC
ANTI-FROST
7 oC
To adjust the set temperature:
Use the buttons to either increase or decrease the temperature respectively. When you choose a
temperature in the table above, the corresponding icon will appear on the screen.
When the room temperature is lower than the set temperature on the display panel, the product will display
the symbol in the top right of the screen.
4.6.2 AUTOMATIC mode
When the AUTOMATIC mode is selected, this activates the programming already established in the product.
You can choose from one of the 4 pre-installed programmes within the harmoni product:
Auto 1 Auto 2 Auto 3 Auto 4
You can also modify these pre-installed programmes to suit your needs. Please see page 9 for a step by step
guide on how to activate or modify one of the pre-installed programmes.
AUTO Pre-Installed Programme Scheduling:
COMFORT
ECO
00 01 02 03 04 05 06 07 08 09 10 11 12 13 14 15 16 17 18 19 20 21 22 23
Mon - Fri
COMFORT
ECO
Sat - Sun
A1
COMFORT
ECO
Mon - Fri
COMFORT
ECO
Sat - Sun
A2
COMFORT
ECO
Mon - Sun
A3
COMFORT
ECO
Mon - Fri
COMFORT
ECO
Sat - Sun
A4
Time

9
To activate one of the pre-installed programmes:
Press the button on the keypad until either AUTO, AUTO 1, AUTO 2, AUTO 3 or AUTO 4 is highlighted. The
pre-installed programme will now be active and the corresponding icon will appear on the screen.
1
A
00 01 02 03 04 05 06 07 08 09 10 11
AM
To modify one of the pre-installed programmes:
STEP 1 - You will need to establish the set temperature of the COMFORT/ECO/ANTI-FROST modes rst. Please
press the button to access the Settings Menu. Then you will need to use the buttons to scroll
between the menus to select the menu on the screen and press the button to conrm. The
COMFORT temperature is adjusted rst.
Press the buttons to either increase or decrease the temperature respectively within the pre-set
COMFORT temperature range (see table above). Press the button to conrm and you will then move
to the ECO temperature settings. Use the buttons to either increase or decrease the temperature
respectively within the pre-set ECO temperature range. Press the button to conrm and you will then
move to the ANTI-FROST temperature settings. Use the buttons to either increase or decrease
the temperature respectively and press the button to conrm.
STEP 2 - Press the button on the keypad until the programme that you wish to modify (AUTO, AUTO 1,
AUTO 2, AUTO 3 or AUTO 4) is highlighted. The pre-installed programme will now be active and the corre-
sponding icon will appear on the screen.
STEP 3 - Press AND hold the button on the keypad for 2 seconds to modify the hours and days. The days
can be modied rst. Use the buttons to select the chosen days and press the button to select
the days you want to modify.
1
A
STEP 4 - Then you will move onto setting the mode for each hour, of the day which will begin at 0h (midnight).
You will need to go through each hour and select a mode for each hour.
Select the mode by pressing the button - press once for COMFORT, press twice for ECO and press three
times for ANTI-FROST. To move onto the next hour, use the buttons.

10
Once all 24 hours of the day have been assigned a mode, press the button to save your settings and
return to the main screen.
4.7. harmoni system Advanced Functions
The harmoni system includes three advanced functions - see below.
To activate or deactivate one of the below functions, please press the button to access the Settings Menu.
Then you will need to use the buttons to scroll between the menus to select the OPEN WINDOWS/
PRESENCE DETECT function. Once selected, press the button and use the buttons to activate or
deactivate the OPEN WINDOWS function. If you wish to activate the PRESENSE DETECT function, please press
the button again and use the buttons to activate or deactivate the PRESENCE DETECT function.
Press the button to save your settings and return to the main screen.
4.7.1. OPEN WINDOWS function
The harmoni system has the OPEN WINDOWS function set to ON to begin with. This function is activated
when the temperature sensor detects a drop of 4ºC from the set temperature within a 30 minute time period.
The OPEN WINDOWS function will be active for 2 hours. When the OPEN WINDOWS function is activated, the
product will move into ANTI-FROST mode at 7ºC.
4.7.2. PRESENCE DETECT function (*Only upon demand.*)
The harmoni system has a PRESENCE DETECT function installed within the product. This function detects
movement (or presence) around the product.
If no presence is detected within 60 minutes then the product will automatically decrease the set temper-
ature by 1oC. If no movement is detected for 120 minutes then the product will automatically decrease the
temperature by a further 1oC. If there is no movement within 180 minutes then the product will automatically
decrease the temperature by a further 1.5oC.
If a presence is detected by the product at any moment, then the product will automatically increase the
temperature back to the previously established user set temperature.
4.7.3. Energy Consumption Indicator
The harmoni system has a unique energy consumption indicator so you can monitor your energy expendi-
ture. The icon will appear down the left side of the screen when switched on to indicate the expenditure
level.

11
M
24.5 - 30ºC 19 - 24ºC < 19ºC
Within this temperature range,
you are using a high amount of
energy.
Within this temperature range,
you are using an average/medium
amount of energy.
Within this temperature range,
you are using a low amount of
energy.
5. Maintenance & Cleaning
The product does not require any type of maintenance. We recommend that all parts of the product are kept
clean (behind, underneath, upper ns, etc.). Do not use any abrasive product on the aluminium. Clean it with
a damp cloth and a pH neutral soap, and the control panel with a dry cloth.
European Directive 2012/19/UE
Under the European Directive 2012/19/UE on waste electrical and electronic equipment (WEEE), the prod-
uct cannot be disposed in the usual council bins and containers. They must be separated to optimize the
recovery and recycling of all of the components and materials and reducing the impact to human health and
the environment. The symbol of the container crossed out over a horizontal line is marked on all of harmoni
products to remind the consumer of the obligation to separate them on disposal.
The consumer should contact the local authority or original point of sale to learn more about the correct
disposal of this product.
6. Guarantee
In this section, we hereby describe the guarantee conditions which the buyer acquires on buying a new
harmoni product. These conditions comply with all the rights construed in the national legislation in force, as
well as any additional rights and guarantees which are oered by harmoni.
6.1. Any incident that you might detect in your harmoni product can be sorted by the product seller or quickly
by the manufacturer. Please contact harmoni by telephoning 01473 559088 for technical support.
You will need to state the product reference (located on the label indicating product features), serial number,
proof of purchase and the type of incident at hand when contacting us so that we can check the guarantee.

12
In addition, please attach a copy of the product invoice.
6.2. harmoni guarantees that there are no material defects of design or manufacture at the time of original
acquisition and guarantees the aluminium for a period of 120 months and 24 months for any electronic and
electrical components.
6.3. If during the guarantee period, the product does not work correctly under normal use, and any design,
material or manufacturing defect is found, harmoni will repair or substitute the product as it may see t, in
accordance with the terms and conditions as follows:
6.3.1. The guarantee is only applicable if the original guarantee is issued by the seller and when the said
guarantee is lled in correctly including product reference, series number (marked on the product’s label
indicating technical features), purchase date and the seller’s stamp.
harmoni reserves the right to reject the guarantee service when this information has been removed or mod-
ied after the original product purchase.
6.3.2. The guarantee only applies to those cases that concern material, design and manufacturing defects,
and under no circumstances covers damage to the product for the following reasons:
6.3.2.1 Incorrect use of the product, i.e. used for other purposes that are not construed as its normal use
or for not respecting the instructions of use and maintenance given by harmoni as well as incorrect installa-
tion or use of the product that may not comply with the current technical standards of safety.
Corrosion caused by direct exposure to salt water is excluded from the guarantee. When the product is in-
stalled no more than 200m from the coast the guarantee for damages caused by corrosion the period will be
reduced by 50%.
6.3.2.2 Any unauthorized repairs carried out by unauthorized technicians or opening of the product
by unauthorized people.
6.3.2.3 Any accidents that are deemed outside the control of harmoni, such as lightning, res, oods,
public disorders, etc.
6.3.3. Any repairs or substitutions that are included in this guarantee do not allow any additions or new
periods of guarantee.
6.3.4. Any repairs or substitutions covered under this guarantee must be parts that are functionally equiv-
alent. The defective parts or parts removed or replaced shall become the property of harmoni.
6.4. The technical service of harmoni will advise you if you need to buy any parts not covered under the
guarantee or out of guarantee.
6.5. This guarantee does not aect the buyer’s legal rights stipulated in the current national legislation, nor
aects those rights against the distributor or installer that could come forth in compliance with the purchase
contract.
6.6. In the absence of a national legal legislation applicable, this guarantee shall prevail and may be construed
as the buyer’s only protection. harmoni, its oces, distributors and installers may not be held responsible for
any accidental damage that emerges due to infringement of any rules implicitly related to this product.

13
GUARANTEE CERTIFICATE
Please ll in the product details below:
PRODUCT
REFERENCE NO.
PRODUCT
SERIAL NO.
PRODUCT NAME PURCHASE DATE*
Please ll in your details below:
FIRST NAME SURNAME
ADDRESS
COUNTY
POSTCODE TELEPHONE NO.
EMAIL
In order to obtain the harmoni guarantee, an authorised installer/electrician must ll in the details below:
INSTALLER /
ELECTRICIAN
NAME
INSTALLATION
DATE*
PRODUCT NAME
STAMP* SIGNATURE
PLEASE NOTE:
This Guarantee Certicate must be completed in full in order to obtain guarantee rights. The purchase date,
installation date and the stamp are compulsory. Please keep the completed guarantee safe.
* Compulsory elds to be completed.
Please cut along the dotted line.

14

15
NOTES:

harmoni
Edison House
Edison Close
Ransomes Europark
Ipswich
Suolk IP3 9GU
T: 01473 559088
IMHRUK17V2
harmoni cannot accept any responsibility for any errors in catalgoues, brochures and other printed materials. harmoni reserves the right to alter its products without notice. This also applies to products already on order provided that such alterations can be made without subsequent
changes to specications already agreed. All trademarks in this material are the property of harmoni. harmoni and the harmoni logotypes are
trademarks of Edison House Ltd. All rights reserved.
 Loading...