

Page 1

Sound System Audi symphony
Operating Instructions
Englisch Nordamerika 07.07
281.566.458.21
Sound System Audi symphony
Operating Instructions
Page 2

© 2007 AUDI AG
It has always been Audi’s policy to continuously improve its prod-
ucts. Audi, therefore, reserves the right to make changes in design
and specifications, and to make additions or improvements in its
products, without incurring any obligation to install them on products previously manufactured.
Text, illustrations and specifications in this book are based on the most up-to-date information available at the time of printing.
All rights reserved. May not be reproduced or translated in whole or in part without the written consent of AUDI AG. Specifications are subject to change without notice.
“Audi” and the four rings emblem are registered trademarks of AUDI
AG.
“BOSE” is a registered trademark of Bose Corporation.
Editorial deadline: 05/23/2007
Tips
This owner's manual is only valid in conjunction with the owner's manual for your vehicle.
For the sake of the environment
Printed on environmentally friendly paper (bleached without chlorine, recyclable).
Page 3

Introduction
You have decided on the Audi Sound System - thank you very much for your confidence in us.
With this equipment, you are acquiring a highly developed technical system which offers various choices for entertainment and communication. All the settings can be made centrally, using an easy-to-follow menu guide.
We recommend that you carefully read the operating instructions so that you quickly become completely familiar with all of the functions and possibilities of the system and are able to make full use of them while driving.
Please note that these operating instructions are a supplement to your vehicle's owner's manual and should only be used in conjunction with the current owner's manual.
Should you have any further questions about the Audi Sound System in your vehicle, please direct them to your authorized Audi dealer.
We hope you enjoy driving your car!
AUDI AG
Page 4

Table of contents2
Table of contents
About this User's Manual
. . . . . . . . . . . . . . . . . . . . . .
Overview . . . . . . . . . . . . . . . . . . .
Control unit . . . . . . . . . . . . . . . . . . . . .
Notes on traffic safety . . . . . . . . . .
Notes on care . . . . . . . . . . . . . . . . . .
General operation . . . . . . . .
Switching on and off . . . . . . . . . . .
Principle of operation . . . . . . . . . .
Display . . . . . . . . . . . . . . . . . . . . . . . . .
Adjusting the volume . . . . . . . . . . .
Adjusting the sound . . . . . . . . . . . .
Setting time of day . . . . . . . . . . . . .
Restarting the radio . . . . . . . . . . . .
Additional settings . . . . . . . . . . . . .
Listening to the radio . . .
Introduction . . . . . . . . . . . . . . . . . . . .
Technical requirements . . . . . . . . .
System information . . . . . . . . . . . .
Starting radio operation . . . . . . . .
Activating your satellite radio
service . . . . . . . . . . . . . . . . . . . . . . . . . .
Selecting frequency band . . . . . .
Selecting a station from the
station list . . . . . . . . . . . . . . . . . . . . .
4
Satellite station list . . . . . . . . . . . .
Selecting a station . . . . . . . . . . . . .
6
Scanning stations . . . . . . . . . . . . .
6
Storing stations . . . . . . . . . . . . . . . .
6
Selecting a stored station . . . . .
6
Entering a channel number . . . .
Moving a stored station . . . . . . .
8
Additional settings . . . . . . . . . . . . .
8
Playing media . . . . . . . . . . . .
8
9
Introduction . . . . . . . . . . . . . . . . . . .
12
General instructions for CD
operation . . . . . . . . . . . . . . . . . . . . . .
14
General information on memory
15
cards . . . . . . . . . . . . . . . . . . . . . . . . . .
16
CD changer . . . . . . . . . . . . . . . . . . . .
16
Memory card reader . . . . . . . . . . .
Selecting drive . . . . . . . . . . . . . . . . .
18
Selecting a folder . . . . . . . . . . . . . .
18
Selecting a track . . . . . . . . . . . . . . .
18
Forward/reverse and
19
previous/next track . . . . . . . . . . . .
19
Shuffle . . . . . . . . . . . . . . . . . . . . . . . . .
Scanning a track (SCAN) . . . . . . .
19
Stopping/resuming a drive . . . .
20
Additional settings . . . . . . . . . . . . .
Calling . . . . . . . . . . . . . . . . . . . . . . .
20
Introduction . . . . . . . . . . . . . . . . . . . .
21
Starting operations . . . . . . . . . . . .
21
Starting telephone mode . . . . . .
22
Entering a PIN/PUK . . . . . . . . . . . . .
23
Dialing a telephone number . . .
24
Answering/rejecting a call . . . . .
24
Ending a call . . . . . . . . . . . . . . . . . . .
25
Dialing stored telephone
25
numbers . . . . . . . . . . . . . . . . . . . . . . .
Additional settings . . . . . . . . . . . . .
28
28
Multifunction steering wheel
28
Introduction . . . . . . . . . . . . . . . . . . . .
Adjusting the volume . . . . . . . . . .
29
Listening to the radio . . . . . . . . . .
29
Playing media . . . . . . . . . . . . . . . . . .
31
Calling . . . . . . . . . . . . . . . . . . . . . . . . .
33
Name tag . . . . . . . . . . . . . . . . . . . . . .
34
34
. . . . . . . . . . . . . . . . . . . . . . . .
Telep hone vo ic e
35
operation
35
Introduction . . . . . . . . . . . . . . . . . . . .
36
General operation . . . . . . . . . . . . . .
36
Name tags . . . . . . . . . . . . . . . . . . . . .
36
. . . . . . . . . . . . . . . . . . .
38
38
39
43
43
44
46
47
47
48
50
50
50
51
52
53
56
57
57
58
60
Page 5

Alphabetical index . . . . . . 63
Table of contents 3
Page 6

About this User's Manual4
About this User's Manual
This user's manual contains important information, tips, suggestions, and warnings for the use of your vehicle.
Make sure that this user's manual is always located in the vehicle. This is especially important if you allow other people to drive the vehicle, or if you sell it.
This user's manual describes the equipment range specified for this model at the editorial deadline date. Some of the equipment described here will only be available at a later date, or only in specific markets.
Some sections in this user's manual do not apply to all vehicles. In that case, the range of applicability is given at the beginning of the section, e. g. “Applies to vehicles: with telephone”. In addition, optional equipment is indicated by an asterisk “*”.
The details in the illustrations may be different from those in your vehicle, and are intended to be viewed as a basic guide.
You will find a table of contents at the beginning of this book, which displays all topics described in this manual in order of appearance. You will find an alphabetical index at the end of this book.
All directions, such as “left”, “right”, “front”, “back”, are relative to the direction of travel.
* optional equipment
! This section continues on the next page. " Indicates the end of a section.
® Registered trademarks are identified with a ®. If this symbol is
missing, it is no guarantee that the terms can be used freely.
⇒ Cross-reference to a “WARNING!” within a section. For indication with a page number, the corresponding “WARNING!” can be
found outside of the section.
WARNING
Text with this symbol contains important information on safety and how to reduce the risk of personal injury or death.
Note
Text with this symbol draws your attention to potential sources of damage to your vehicle.
For the sake of the environment
Text with this symbol contains information about the environment and how you can help protect it.
Tips
Text with this symbol contains special tips and other information about getting the most out of your vehicle and its features.
Page 7
Overview 5
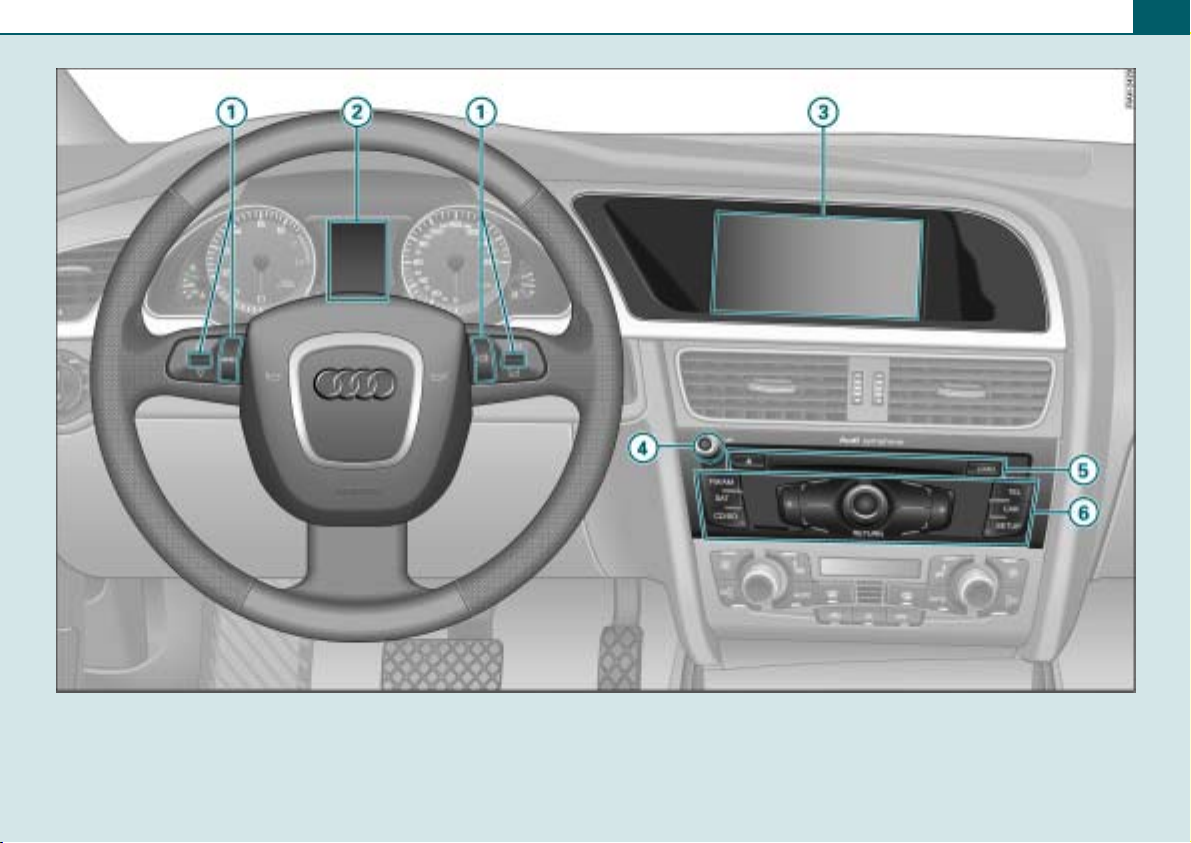
Fig. 1 Audi symphony radio system
Page 8
Overview6
A
A
A
A
A
A
Overview
Control unit
This overview is to assist you in familiarizing yourself with the controls and their functions.
1
Multifunction steering wheel* . . . . . . . . . . . . . . . . . . .
2
Driver information system . . . . . . . . . . . . . . . . . . . . . . .
3
Display . . . . . . . . . . . . . . . . . . . . . . . . . . . . . . . . . . . . . . .
4
On/Off knob
− Switching on and off . . . . . . . . . . . . . . . . . . . . . . . . .
− Adjusting the volume . . . . . . . . . . . . . . . . . . . . . . . . .
− Muting (Mute) . . . . . . . . . . . . . . . . . . . . . . . . . . . . . . .
5
CD changer . . . . . . . . . . . . . . . . . . . . . . . . . . . . . . . . . . .
6
Radio system controls . . . . . . . . . . . . . . . . . . . . . . . . . .
50
50
12
12
29
Tips
• Please note that only the Audi radio system and its components
are described in this manual. You will find additional information on
operating your vehicle in your Owner's Manual.
• You can carry out many of your radio system's functions from the
multifunction steering wheel* ⇒ page 50.
Notes on traffic safety
When operating the radio system while driving, be constantly aware
of the current traffic situation and stop the operation when necessary due to traffic. When driving, you should use the controls on the
multifunction steering wheel* ⇒ page 50 whenever possible.
WARNING
• Pay attention first and foremost to your driving! As the driver
of the vehicle, you have total responsibility for operating the
vehicle safely. Therefore, when using the Sound System functions,
make certain that you always have complete control of your
vehicle!
9
• Traffic today requires your full and continuous concentration.
As the driver, you bear complete responsibility for safety in traffic.
8
Therefore, to ensure driving safety, settings in the Sound System
must be performed only when the vehicle is parked.
• The volume controls on the Sound System should be selected
to ensure that outside signals, such as police and fire truck sirens,
can always be heard - danger of accident!
8
• Be sure to follow applicable laws regarding speaking on the
telephone* while driving a vehicle.
Notes on care
Cleaning the display
– Clean the display with a soft clean cloth and an LCD
cleaner.
Cleaning the controls
– First clean the controls with a small brush to remove
dust.
– Then wipe the controls with a clean, soft and slightly
damp cloth.
Page 9
Note
• Treat the display with care. Pushing on it with your finger or
touching it with sharp objects can cause dents or scratches.
• Cleaning CDs can damage the drives.
− Do not use cleaning CDs to clean the drives.
Overview 7
Page 10
General operation8
General operation
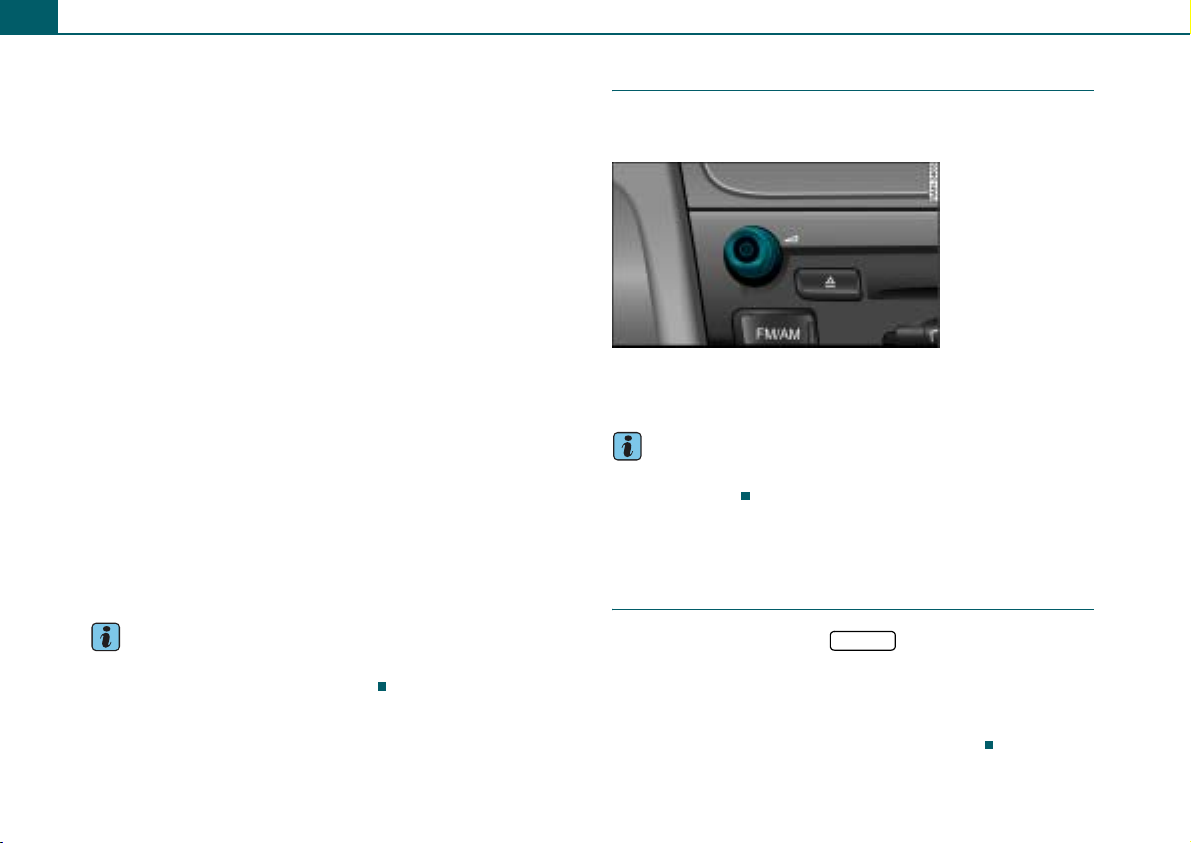
Switching on and off
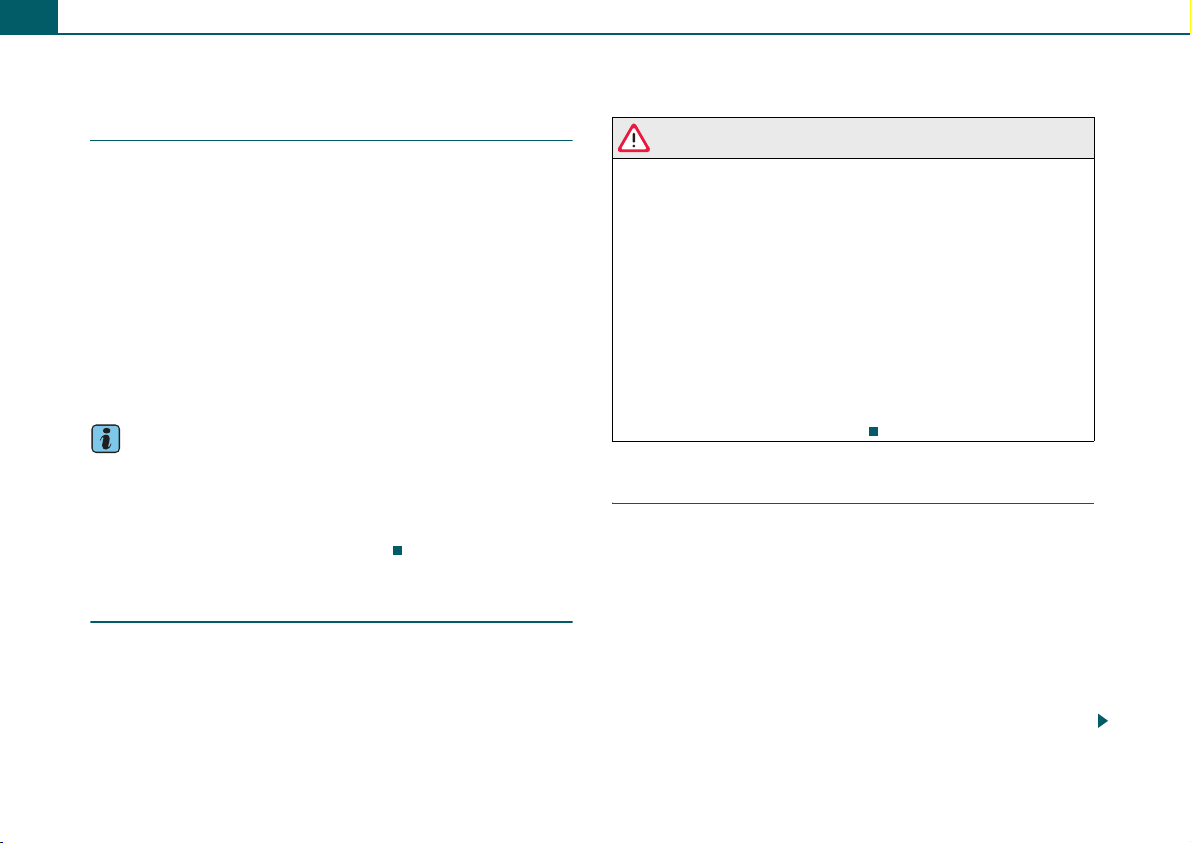
Fig. 2 On/Off knob
Automatic operation
– To turn the radio on, insert the ignition key in the ignition
lock. The menu for the last selected main function is
displayed, and the last selected audio source is switched
on.
– To turn the radio off, remove the ignition key. Your
settings are saved.
Manual operation
– Press the On/Off knob briefly to turn the radio on.
– To turn the radio off, press the On/Off knob until the radio
switches off.
A radio that has been turned off manually, is not automatically turned on again the next time the ignition is switched on.
With the ignition off, the radio can still be used for about 10
minutes. If you do not press any function button, control button or
the control knob on the radio, the radio turns itself off again automatically.
Tips
With the engine not running and a low battery charge, the radio is switched off automatically.
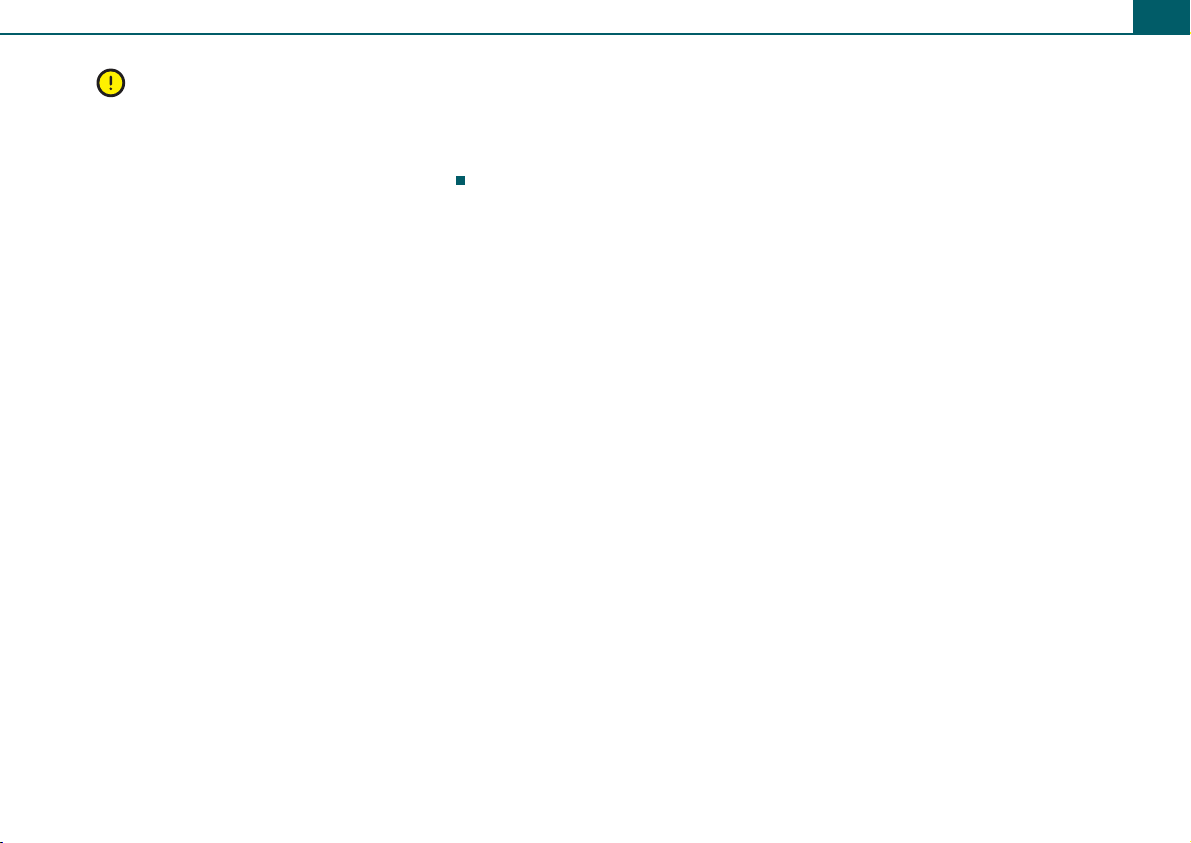
Principle of operation
The radio functions are performed by pressing the buttons and rotating and/or pressing the knobs on the radio.
Fig. 3 Buttons on the
radio
Page 11
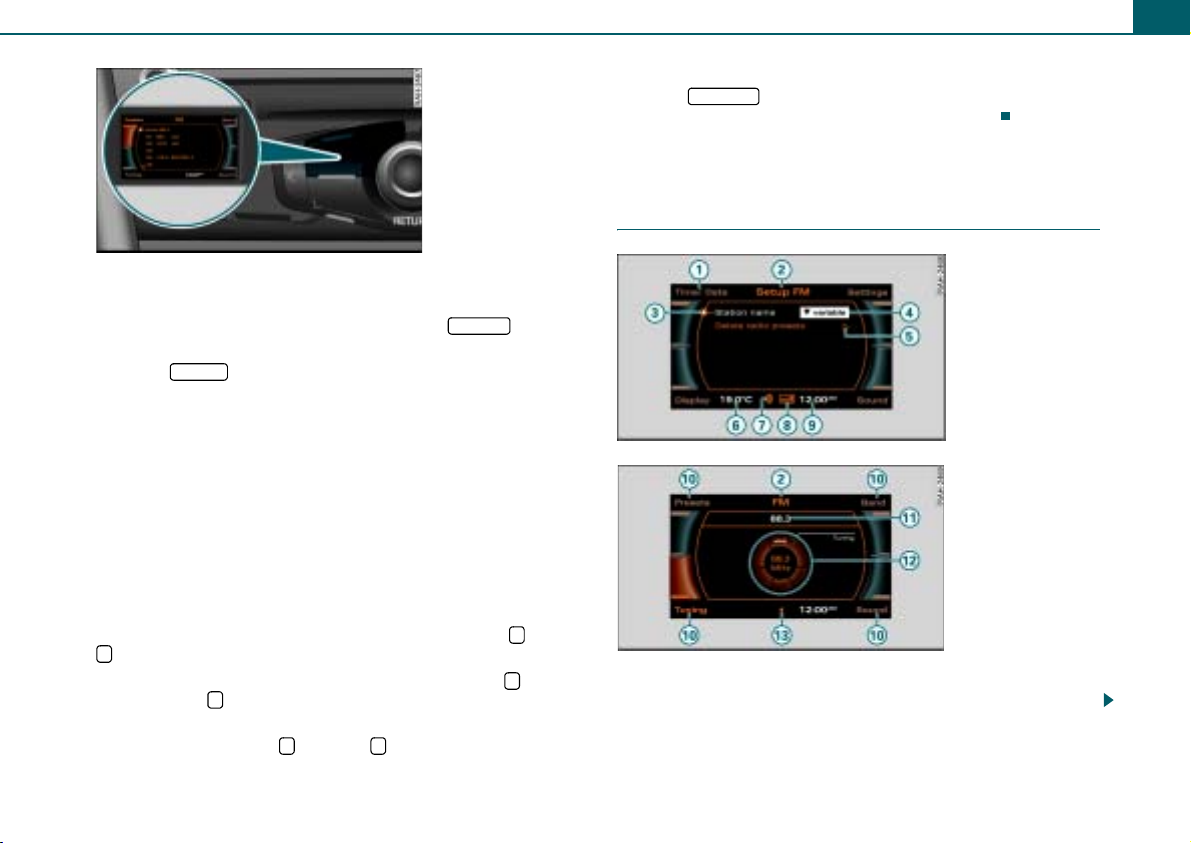
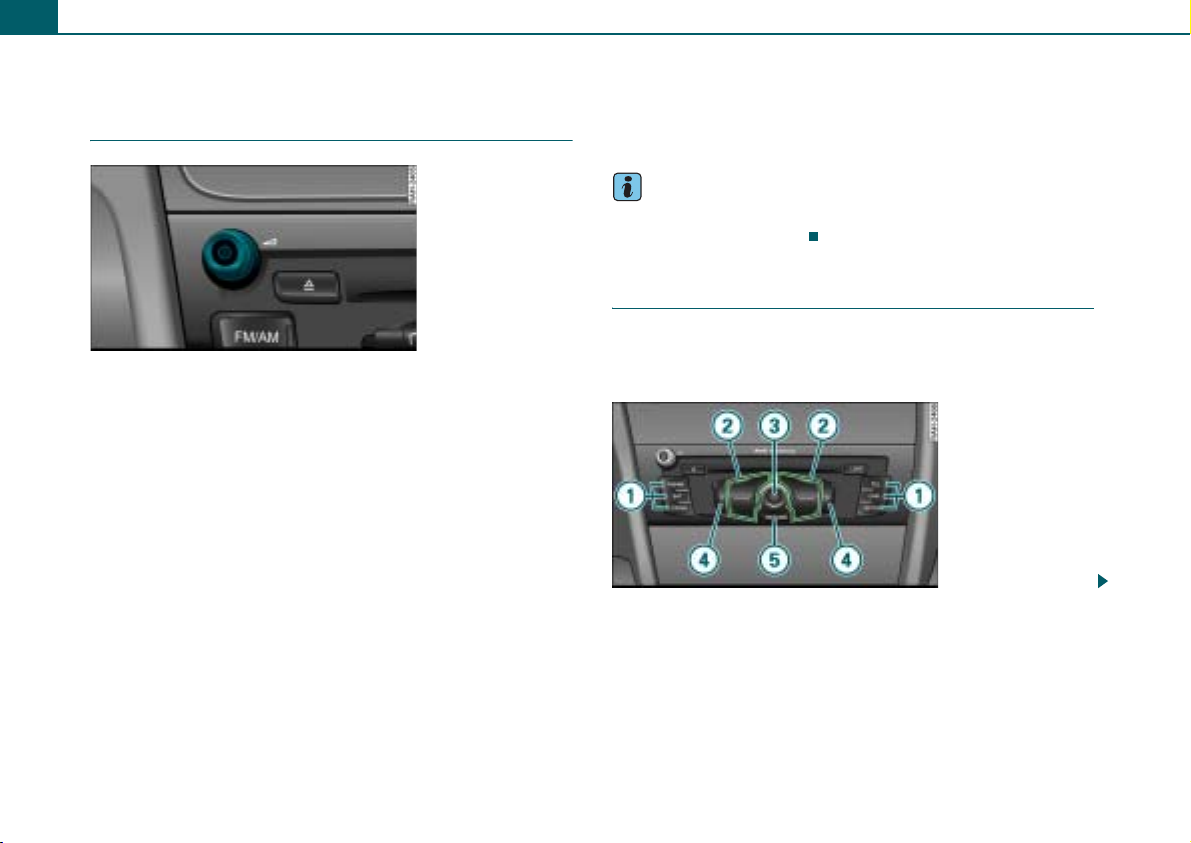
Fig. 4 Assigning the
A
A2A3A
A
control button to the
button symbol in the
display
1
Function buttons
Press a function button to start an operating mode. For example, start the FM/AM operating mode by pressing the function
FM/AM
button.
Using the function button, you can open additional
SETUP
settings for the active operating mode.
Control buttons
To access the function shown in one of the four corners of the
display, press the control button corresponding to this display
corner. For example, the control button in the upper left corresponds to the upper left display corner ⇒ fig. 4.
Control knob
To select a menu item highlighted in the display, rotate the control knob to the left or right and press the control knob.
4
Arrow buttons
To select the previous or the next radio station, press the or the
>
button.
To select the next track on a CD or memory card, press the button.
If you press the button within 10 seconds after a track has started
<
<
>
to play, playback jumps to the beginning of the previous track.
If you press and hold the button or in CD or SD mode, fast
< >
rewind or fast forward is activated.
General operation 9
5
Return button
Press the button to cancel a selection you have not yet
RETURN
confirmed or to return to the next higher menu level.
Display
“Standard” menus
Fig. 5 Setup Radio
Fig. 6 Radio submenu
After you press a function button ⇒ page 9, a menu appears in the display.
Page 12
General operation10
A1A
A
A4A
A
A
A
A9A
A
A
A
Legend
2
3
5
6
7
8
10
Symbol/
Description
Selected text
Title line
Cursor Shows a line selected in a menu.
Options box Options for the menu item selected.
Arrow
Temperature
display*
Bluetooth
symbol
Signal
strength bar*
Time of day
Display cor-
ners
Explanation
A menu item you have selected has a white background.
Operating mode selected (e.g. FM/AM
⇒ page 9, fig. 6).
Setup display: Setup menu for the
operating mode selected (e.g. Setup
FM ⇒ page 9, fig. 5).
On vehicles with a telephone*, the cell
phone operator and, where applicable,
the roaming symbol # will be displayed.
Points to additional options or possible settings.
Cell phone is connected via Bluetooth to the cell phone package.
Cell phone connection quality, or
PIN: Enter PIN ⇒ page 43
PUK: Enter PUK ⇒ page 43
SIM: Insert SIM card
Show selectable functions. You perform the functions using the control buttons. The top right corner of the display corresponds to the top right control button.
11
12
13
Symbol/
Description
Subtitle
Control wheel
Cancelled
loudspeaker
symbol
Explanation
Tells you about a selected option (e.g. radio station preference).
Is operated by rotating and pressing the control knob.
Active audio source is muted.
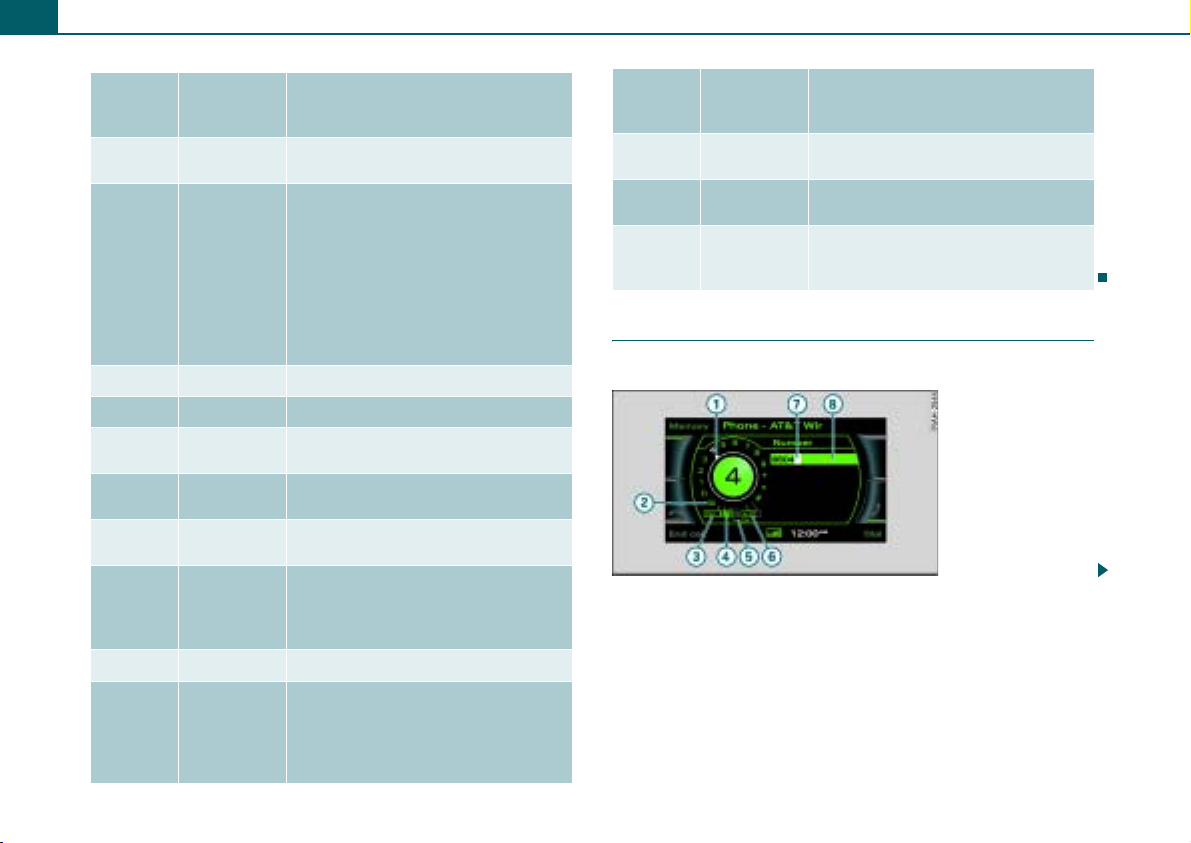
Legend
Speller
You enter telephone numbers using the speller.
Fig. 7 Number speller:
Telephone n u m b e r
entry
Page 13
General operation 11
A12A6A1A2A
A4A
A
A
A8A
A10A
A12A
A14A
A1A
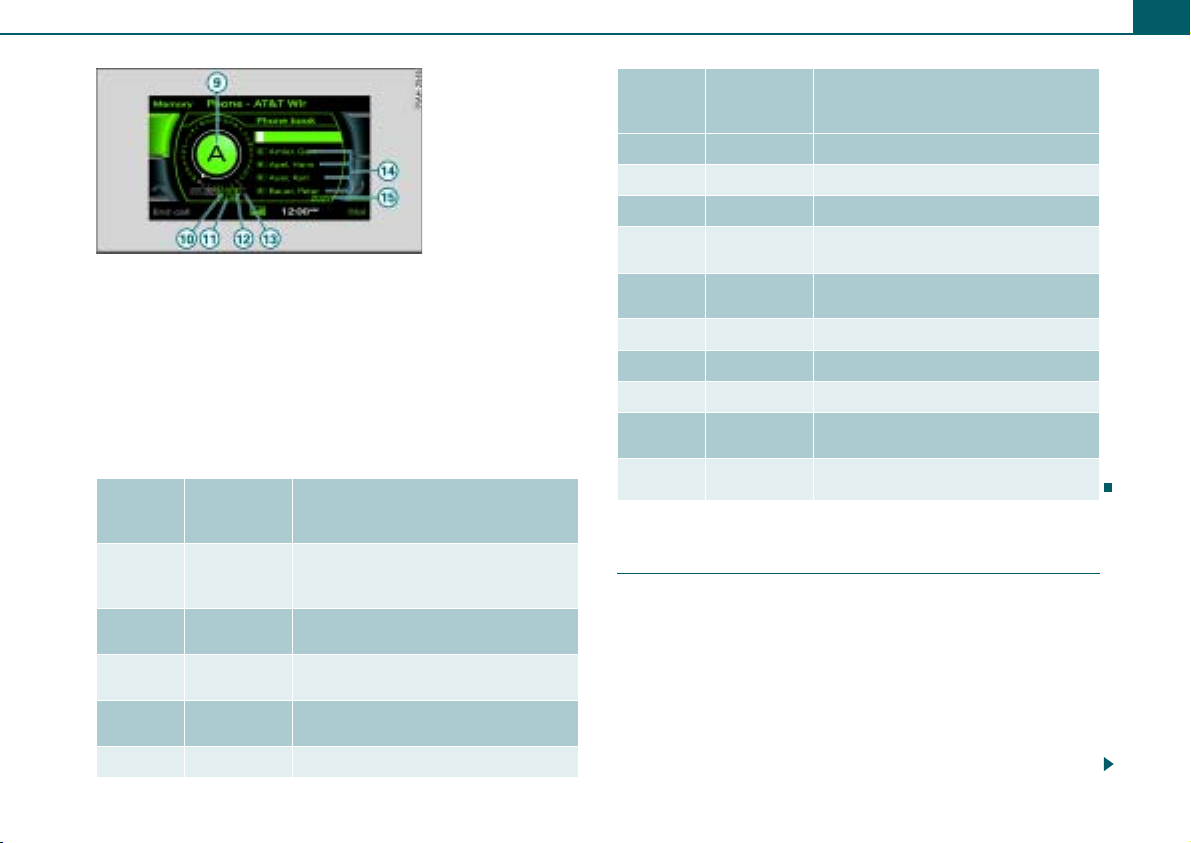
A
Fig. 8 Letter speller:
Telephone n u m b e r
entry
In telephone* mode, you are required to enter letters or numbers.
For you to do this, the number speller ⇒ page 10, fig. 7 or the letter
speller ⇒ fig. 8 appears in the display.
While you are making your entry, you can switch as needed from numbers to letters or from letters to numbers by rotating the control knob 0..9 ⇒ fig. 8 or A..Z ⇒ page 10, fig. 7 and pressing the knob.
The symbols for entering letters and numbers are explained in the table below:
3
5
Symbol/
Description
Selection
arrow
Mailbox sym-
bol
DEL
$%
OK Confirms the entry.
Explanation
Puts a white background behind the selected element and shows it enlarged in the entry ring.
Call mailbox.
Deletes the character to the left of the white highlighted cursor.
Moves the cursor forward/backward in the entry field.
Legend
6
7
9
11
13
15
Symbol/
Description
A..Z Switches from number to letter entry.
Cursor
Entry field
Entry ring
!
LIST Shows a list containing suggestions.
0..9 Switches from letter to number entry.
Space Inserts a space in the entry field.
List with sug-
gestions
&
Explanation
Shows the character selected with the selection arrow enlarged.
Switches from lower case to upper case.
Lists suggestions in alphabetical order.
Refers to additional list entries.
Legend
Entering letters, numbers and symbols using the speller
You can find an overview of the speller on ⇒ page 10.
Entering numbers, letters, and symbols
– Rotate the control knob with the selection arrow to
the letters, the number or the symbol. Your selection is
shown enlarged in the entry ring .
9
– To accept the letter, the number or the symbol, press the
control knob. Your entry appears in the entry field .
8
Page 14
General operation12
A5A
– When you have entered all the digits, rotate the control
knob to OK and press the knob.
Deleting numbers, letters, and symbols
– Rotate the control knob with the selection arrow to DEL
3
.
– To delete the last digit in the entry field, press the control
knob.
– To delete all the digits in the entry field, hold the control
knob down until no digits show in the entry field.
In some cases the selection of letters is limited by logical exclusion. This means that you can select only the letters which are possible at this place in a word.
Enter special characters (e.g. hyphen or period) using the number speller.
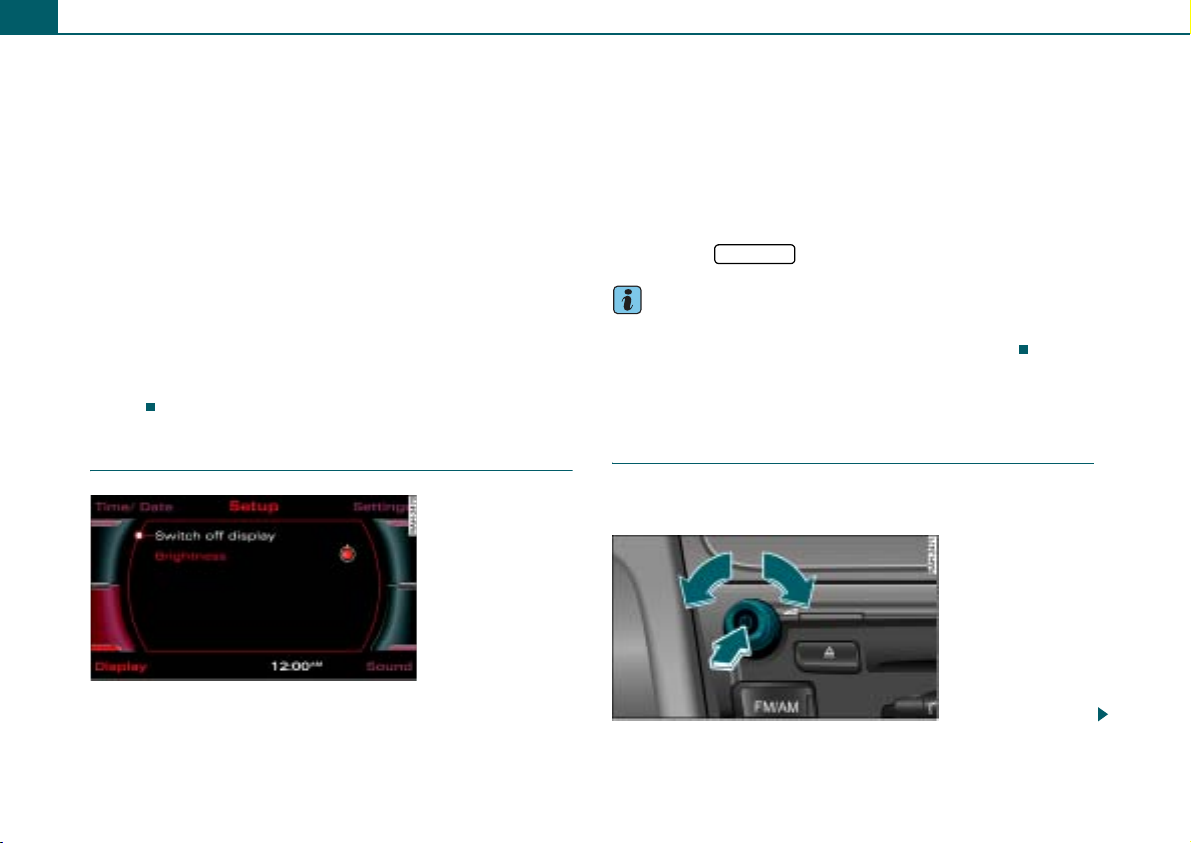
Switching display on/off
– Rotate the control knob to Switch off display ⇒ fig. 9 and
press the control knob. The display is switched off.
Switching display on
– Press or rotate the control knob, or
– Press a function button, or
– Press a control button, or
– Press the button.
RETURN
Tips
After the display is switched off, you can still change radio stations or find a selected audio source using the arrow buttons.
Adjusting the volume
Active audio source
You can adjust the volume or mute the audio sources using the On/Off control knob.
Fig. 9 Switching
display off
Switching display off
– Press the control button Display in a setup menu.
Fig. 10 Adj usting radi o
volume
Page 15
General operation 13
Adjusting the volume
– Rotate the On/Off knob to the left or the right. The volume
will be adjusted.
Muting (Mute)
– Press the On/Off knob briefly. A cancelled loudspeaker
symbol appears in the display.
Canceling mute
– Press the On/Off knob briefly.
Volumes that are too high or too low are automatically set to a predetermined level when the radio is switched on.
If you have activated the mute function by pressing the On/Off knob briefly, the mute function will still be active after you turn the radio on again. While adjusting an additional audio source (volume setting, entertainment suppression) ⇒ page 13, you cannot activate the mute function.
In CD/SD mode, playback is stopped for as long as the source is muted.
Tips
You can also adjust the volume using the right thumb wheel on the
multifunction steering wheel* without taking your hands from the
wheel ⇒ page 50.
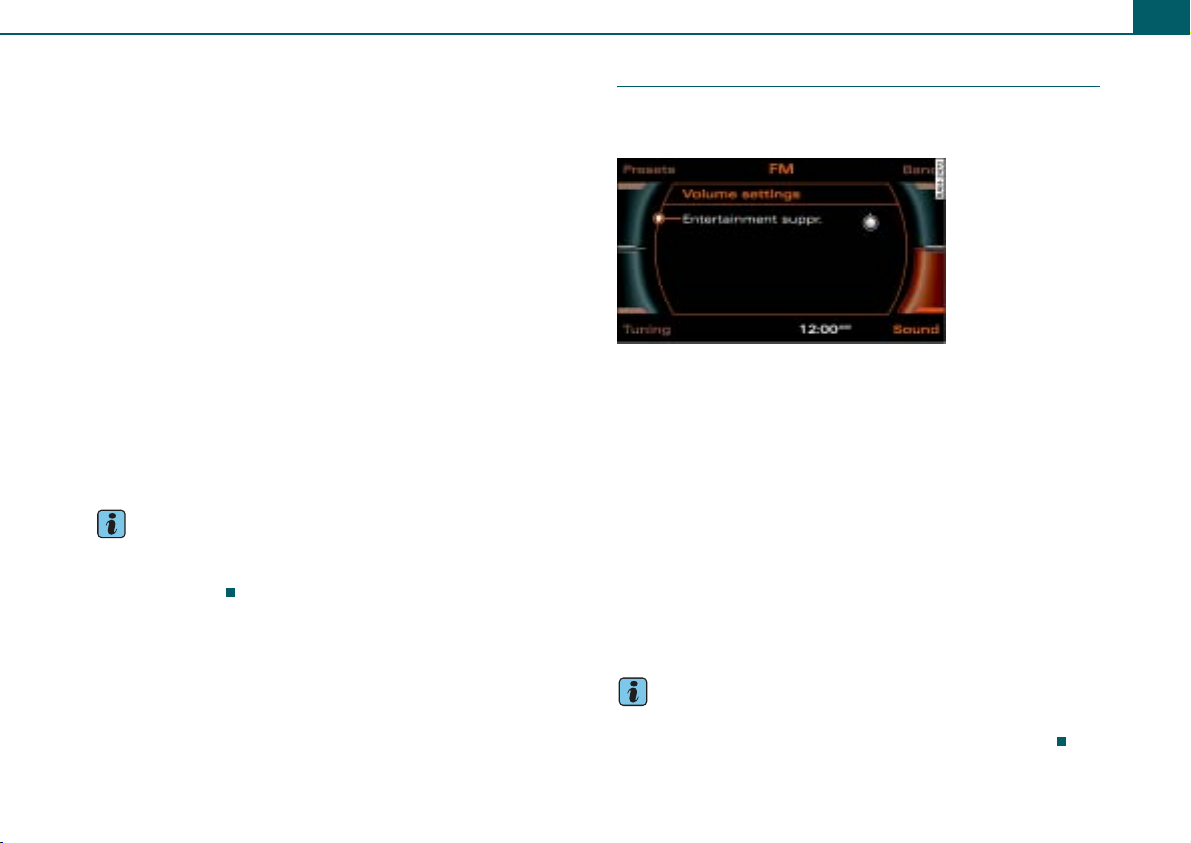
Additional audio sources
You can adjust the volume for entertainment suppression individually.
Fig. 11 Volume
settings
– In an audio or setup menu, press the control button
Sound. – Rotate the control knob to Volume settings. – Press the control knob. The Volume settings ⇒ fig. 11
menu appears in the display.
– Rotate the control knob to the menu item Entertainment
suppr..
– Press the control knob. Now you can adjust the volume
for the selected menu item.
– Rotate the control knob to the desired volume.
– To save your setting, press the control knob.
Tips
Using Entertainment suppr.*, you can adjust the volume for the active audio source while the Audi parking system* is active.
Page 16

General operation14
Adjusting the sound
Basic settings
Fig. 12 Selecting
treble
Fig. 13 Adjusting
treble
– In an audio or setup menu, press the control button
Sound ⇒ page 6.
– Rotate the control knob to a menu item (e.g. Treble
⇒ fig. 12).
– Press the control knob. The selected menu item is shown
enlarged in the display ⇒ fig. 13.
– To adjust the sound characteristics, rotate the control
knob to the right or the left.
– To save your setting, press the control knob.
The following sound adjustments are possible:
• Tre ble
• Midrange
• Bass
• Balance: Adjusts speaker control left/right
• Fader: Adjusts speaker control front/rear
• GALA (speed dependent volume adjustment)
• DSP PREMIUM* ⇒ page 14
• Volume settings for additional audio-sources ⇒ page 13
Treble, midrange, and bass settings are valid for the mode you are currently in. The balance and fade settings are independent of the mode.
Applies to vehicles: with DSP Premium
DSP PREMIUM
Fig. 14 DSP PREMIUM
Displaying DSP PREMIUM menu
– In an audio or setup menu, press the control button
Sound ⇒ page 6.
Page 17

General operation 15
– Rotate the control knob to DSP PREMIUM and press the
knob. The DSP PREMIUM ⇒ page 14, fig. 14 menu appears in the display.
Surround
– Rotate the control knob to Surround and press the knob.
– To switch Surround on, rotate the control knob to on.
– To save your setting, press the control knob. Surround
Sound is only active for a selected CD or SD source.
GALA
– Rotate the control knob to GALA and press the knob. – To adjust the level of volume equalization, rotate the
control knob to one of the seven steps and press the
knob.
– To switch the function off, rotate the control knob to off
and press the knob.
– For the system to automatically adjust the volume to
compensate for the ambient noise, rotate the control knob to auto and press the knob.
Setting time of day
Fig. 15 Setting time
Opening the time setting menu
– Press the function button. – Press the control button Time/Date. The time setting
menu ⇒ fig. 15 appears in the display.
Setting time of day
– Rotate the control knob to Time and press the knob. The
hour display is shown in the display highlighted in white.
– To set the hour, rotate the control knob to the left or right
and then press the control knob. The minute display is
shown in the display highlighted in white.
– To set the minutes, rotate the control knob to the left or
right.
– Save the time of day entry by pressing the control knob.
SETUP
Setting the date
– Rotate the control knob to Date and press the knob. The
day display is shown in the display highlighted in white.
Page 18
General operation16
– To set the day, rotate the control knob to the left or right
and then press the knob. The month display is shown in
the display highlighted in white.
– To set the month, rotate the control knob to the left or
right and then press the knob. The year display is shown
in the display highlighted in white.
– To set the year, rotate the control knob to the left or right.
– Save the date entry by pressing the control knob.
Setting the time format
– Rotate the control knob to Time format and press the
control knob.
– Rotate the control knob to 24h or AM/PM.
– To save your setting, press the control knob.
Setting the date format
– Rotate the control knob to Date format and press the
control knob.
– To adjust the date format “Day.Month”, rotate the control
knob to DD.MM and press the knob. – To adjust the date format “Month/Day”, rotate the control
knob to MM/DD and press the knob.
Tips
If you enter a new time zone with your vehicle, you have to adjust the time display manually to local time.
Restarting the radio
The functionality of the radio is restored through the On/Off knob.
Fig. 16 On/Off knob
– Press and hold down the On/Off knob ⇒ page 12, fig. 10
until the radio restarts.
Tips
If problems arise during system reset, please consult your authorized Audi dealer.
Additional settings
Menu language
– Select: Function button > control button
Settings > Menu language.
You can change the information in the display and in the driver information system.
English, French, Spanish and German are available.
SETUP
Page 19
Measurement units
General operation 17
– Select: Function button > control button
SETUP
Settings > Measurement units.
The measurement units in the radio display, in the driver information system and in the climate control system display can be
changed.
You can change the units for distance (km or miles), speed (km/h or
mph), temperature (°C or °F), and pressure (bar or psi).
Factory settings
– Select: Function button > control button
SETUP
Settings > Default settings.
This option resets adjustable functions to the factory settings.
Version information
– Select: Function button > control button
SETUP
Settings > Version information.
This function shows the hardware and software version for the radio.
Display brightness
– Select: Function button > control button Display
SETUP
> Brightness.
By rotating the control wheel to the right or left, you can adjust the brightness of the display.
Page 20
Listening to the radio18
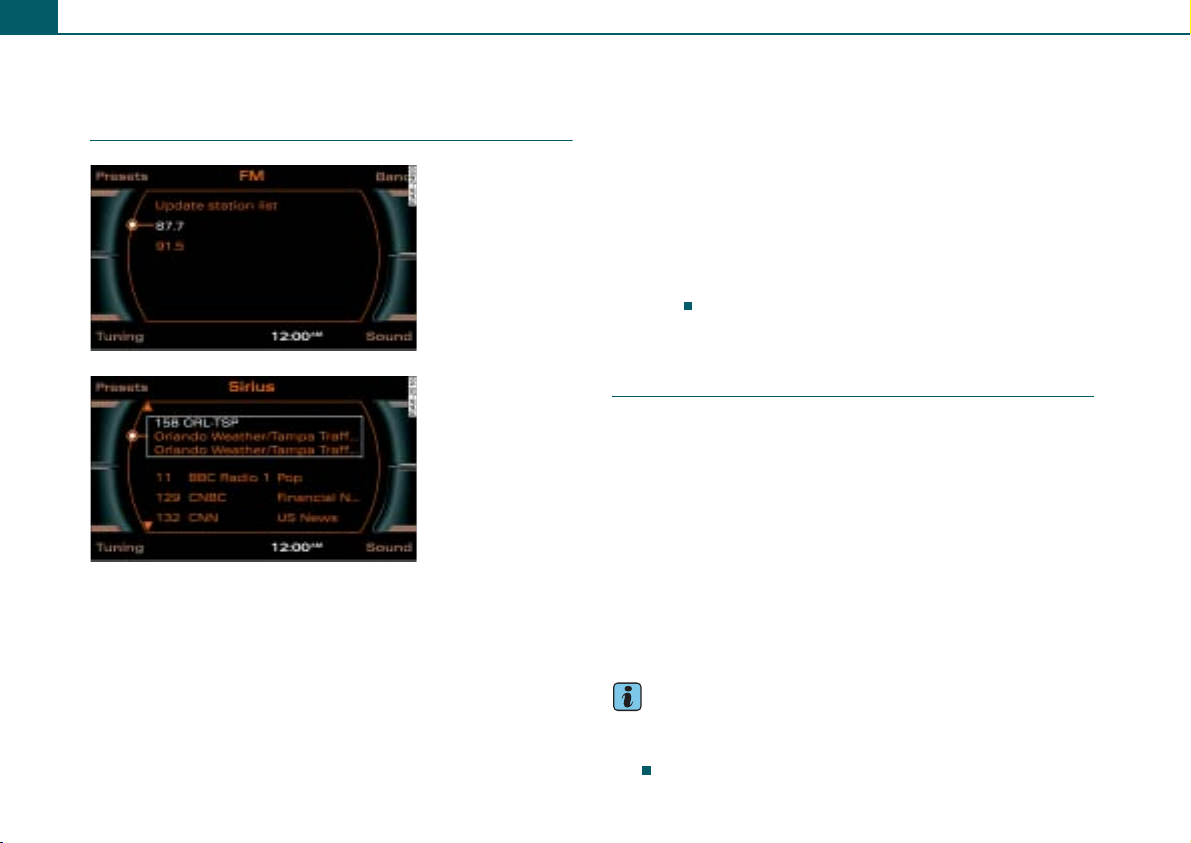
Listening to the radio
Introduction
Fig. 17 FM station list
Fig. 18 Sirius station
list
The radio has three frequency bands: AM, FM, and satellite radio*.
The receivable stations are shown on a radio station list and can be
selected directly. You can select the next receivable station by
pressing a button or playing all stations for a few seconds (SCAN).
You can also save your favorite stations on a preset list in any order.
Frequency modulation (FM)
The FM station list is updated automatically ⇒ fig. 17. You can also update the station list manually.
Amplitude modulation (AM)
You have to update the AM station list manually ⇒ page 19, fig. 19. When you leave the reception area, the stations on the list continue
to be displayed but reception is no longer guaranteed.
Satellite Radio (Sirius)*
The station list in the Sirius satellite radio* main menu is updated
dynamically. Non selectable channels are automatically passed over
when searching channels and are not shown in the display
⇒ fig. 18.
Applies to vehicles: with Satellite Digital Audio Radio Service
Technical requirements
In addition to the radio in your vehicle, a tuner module has to be
installed in order to receive satellite programs. For the system to
function, existing satellite technology must be available and operating properly. The antenna in your vehicle must not be covered by
objects. Objects such as buildings, tunnels, bridges, terrain, other
vehicles or objects on or above the roof of the vehicle can result in
decreased performance. Satellite radio reception is not available in
Alaska and Hawaii.
You can select Radio Satellite mode (Radio Sirius) by pressing the control button SAT ⇒ page 20.
The control button Presets functions the same for all bands (FM, AM or Sirius) ⇒ page 23.
Tips
• Only one tuner module can be installed in a vehicle at a time.
• Sirius and related marks are trademarks of Sirius satellite radio
Inc.
Page 21
Listening to the radio 19
Applies to vehicles: with Satellite Digital Audio Radio Service
System information
The following system messages can be displayed:
System messages
ANTENNA No antenna is connected to the tuner, or
LINKING The tuner is presently not receiving any
Meaning
there are loose plug contacts on the
antenna cable.
satellite signal.
Starting radio operation
Fig. 19 Frequency
bands
Requirement: The radio is on ⇒ page 8. – Press the function button. The list of stations or
the most recent active radio menu appears in the display.
FM/AM
Applies to vehicles: with Satellite Digital Audio Radio Service
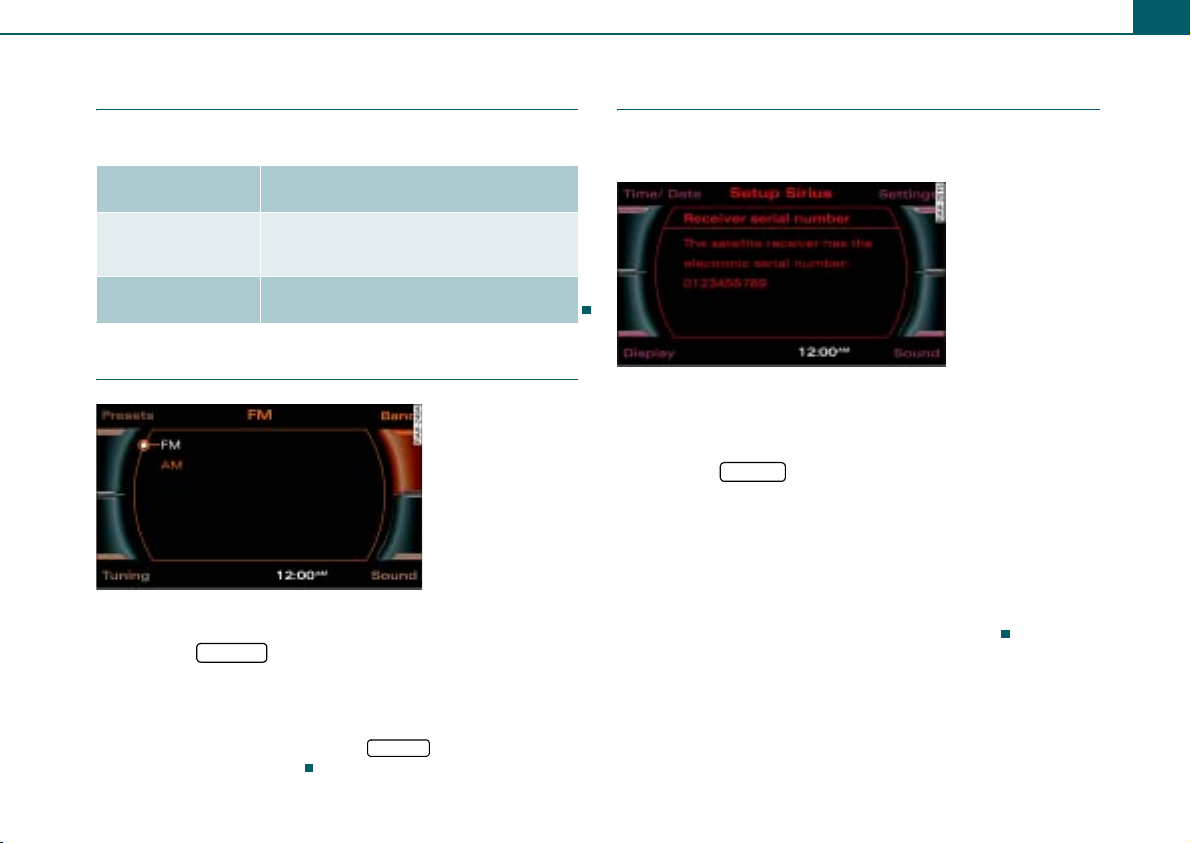
Activating your satellite radio service
In order to be able to receive satellite programs, this service must be enabled.
Fig. 20 Setup Sirius:
Receiver serial number
In order to have the service enabled at your provider, you need the ID number of the tuner. To show the ID number in the display:
– Press the function button in the satellite radio
menu.
– Select Receiver serial number by rotating the control
knob.
– Press the control knob. The ID number will appear on the
Display ⇒ fig. 20.
This number is a 12 character alphanumeric number.
SETUP
The menu that was open the last time you listened to the radio is
shown in the display. You can switch between the AM, FM and satellite radio station lists by pressing the function button
while you are in radio mode.
FM/AM
Page 22

Listening to the radio20
Selecting frequency band
The radio has the three frequency bands: Frequency
Modulation (FM), Amplitude Modulation (AM), and satellite radio (Sirius)*.
Fig. 21 AM/FM
frequency bands
Fig. 22 Sirius
frequency band
Requirement: The radio is on ⇒ page 19. – In AM/FM mode, press the ⇒ fig. 21 control button Band. – Rotate the control knob to the desired frequency band. – To select the frequency band, press the control knob. The
current frequency band is shown in the title line in the
display, or
– Press the * function button to activate satellite
SAT
radio* ⇒ fig. 22.
Tips
• Each time you press the function button, you change
the AM/FM frequency band.
FM/AM
• To use the satellite program, you must have an additional tuner
in the vehicle and a contract with a service provider (Sirius*). Activating the satellite radio service is described starting ⇒ page 19.
• You can select the frequency band and the radio stations in the
instrument cluster display using the multifunction steering wheel*
⇒ page 51.
Selecting a station from the station list
The receivable stations for the selected frequency band are displayed in the station lists.
Fig. 23 FM station list
Requirement: The desired frequency band is selected ⇒ page 20 and receivable radio stations are shown in the display ⇒ page 19.
Page 23

Listening to the radio 21
– To update the station list, rotate the control knob to
Update station list ⇒ page 19, fig. 19 and press the knob. – Rotate the control knob to the desired radio station. – To select the station, press the control knob.
Tips
Did you know that you can also perform this function using the
multifunction steering wheel* ⇒ page 51?
Applies to vehicles: with Satellite Digital Audio Radio Service
Satellite station list
The available stations are listed in the satellite main menu.
Fig. 24 Radio: Sirius
satellite radio station
list
– Press the function button.
– Select the desired radio station in the main Sirius radio
menu with the control knob.
SAT
Operating the control button Presets displays the preset list. You may store stations from the FM, AM and satellite radio (Sirius) bands ⇒ page 23.
The explanations for the sound settings start with section ⇒ page 14.
Tips
• The stations that are displayed in the station list can be filtered
according to your personal desires as to type of program ⇒ page 27.
• If you operate the button in a sub menu, the satellite
radio main menu will be displayed.
RETURN
Selecting a station
Fig. 25 Manual station
search (FM band)
If you are not in the main satellite radio menu (Radio Sirius) after pressing the function button, you can change the frequency band by repeatedly pressing the function button.
SAT
Page 24

Listening to the radio22
– Press the control knob.
Briefly pressing the control knob selects the next available station. If you hold the control knob down, the available stations will advance or back up more quickly.
Tips
Fig. 26 Satellite radio:
Seek up
Non selectable channels are automatically passed over when searching channels and are not shown in the display.
Requirement: A frequency band is selected ⇒ page 20.
Next receivable station
– Press the control button Tuning.
– Rotate the control knob to >| (Seek up) or |< (Seek down).
– Press the control knob. The next receivable station is
selected.
Frequency on the FM or AM band
– Press the control button Tuning. – Rotate the control knob to MAN. (Tuning) ⇒ page 21,
fig. 25 and press the control knob.
– To select the station, rotate the control knob to the left or
right.
– To save the selected station, press the control knob.
Frequency with satellite radio
– Press the control button Tuning in the satellite radio
menu.
– Select >| (Seek up) ⇒ fig. 26 or |< (Seek down) in the
Display by rotating the control knob.
Scanning stations
Using the SCAN function, the receivable stations are played for a few seconds.
Fig. 27 FM radio SCAN
function
Page 25

Fig. 28 Satellite radio:
SCAN function
Requirement: The desired frequency band is selected ⇒ page 20.
– Press the control button Tuning.
– Rotate the control knob to SCAN.
– To start the SCAN function, press the control knob. The
station list appears in the display.
– To stop the SCAN function, press the control knob again.
The currently scanned station is selected.
Listening to the radio 23
Storing stations
The preset list can contain up to 30 stations from all frequency bands.
Fig. 29 Storing
stations
Fig. 30 Storing
stations
Requirement: A station is selected ⇒ page 21.
From the control knob
– Press and hold the control knob until the station is
displayed in an open position in the preset list.
– To change the position on the preset list, rotate the
control knob to the left or the right.
Page 26

Listening to the radio24
– To store the station to the selected position on the preset
list, press the control knob.
From the control button Tuning
– Press the control button Tuning.
– Rotate the control knob to STORE (Store station)
⇒ page 23, fig. 29.
– Press the control knob. The selected station is stored in
an open position on the preset list.
– To change the position on the preset list, rotate the
control knob to the left or the right.
– To store the station to the selected position on the preset
list, press the control knob.
From the control button Presets
– Press the control button Presets. – Rotate the control knob to Store Station name ⇒ page 23,
fig. 30.
– Press the control knob. The selected station is stored in
an open position on the preset list.
– To change the position on the preset list, rotate the
control knob to the left or the right.
– To store the station to the selected position on the preset
list, press the control knob.
Selecting a stored station
Requirement: A station is stored on the preset list ⇒ page 23.
– Press the control button Presets. The preset list is
displayed.
– To select a station from the preset list, rotate the control
knob to the station.
– Press the control knob. The station is selected.
Tips
Also try selecting a stored station using the multifunction steering
wheel* ⇒ page 52.
Applies to vehicles: with Satellite Digital Audio Radio Service
Entering a channel number
The desired station can also be selected by entering the channel number.
Tips
You can delete an individual station or all stations from the preset list ⇒ page 25.
Fig. 31 Satellite radio:
Channel number
– Press the control button Tuning in the satellite radio
menu.
Page 27

Listening to the radio 25
– By rotating the control knob, select CH-Nr. (Channel)
⇒ page 24, fig. 31.
– Press the control knob.
– To select the station, rotate the control knob to the left or
right.
– To save the selected station, press the control knob.
Once you have confirmed the entry of an available channel with OK, the associated station is selected.
Moving a stored station
Requirement: A station is stored on the preset list ⇒ page 23.
– Press the control button Presets. The preset list is
displayed. – Rotate the control knob to Move Station name and press
the control knob.
– To change the position on the preset list, rotate the
control knob to the left or the right.
– To store the station to the selected position on the preset
list, press the control knob.
Additional settings
Displaying radio text
Requirement: The FM frequency band is selected ⇒ page 20.
– Select: Function button > control button Tuning
> TEXT (radio text).
Radio texts are additional information transmitted by some stations (e.g. station name, artist or track).
FM/AM
Deleting memory entries
Requirement: A station is stored on the preset list ⇒ page 23.
– Select: Function button > function button
SETUP
stations.
Single station
By rotating and pressing the control knob, select Single station and then the station to be deleted.
All stations
Select All stations by rotating and pressing the control knob.
> Delete radio presets > Single station or All
FM/AM
Opening and closing Setup
– In a Radio menu, press the button to open the
main Setup menu for the radio function.
– Press the button again to close the main Setup
menu.
The following settings are possible in Setup Sirius:
SETUP
SETUP
• Station info ⇒ page 26
• Station sort ⇒ page 26
• Category filter ⇒ page 27
• Receiver serial number ⇒ page 19
Page 28

Listening to the radio26
• Delete radio presets ⇒ page 27
The time/date, sound and settings functions and the brightness of the display can be adjusted using the control buttons ⇒ page 8.
Tips
We recommend that you enter these settings when the vehicle is stationary. Please note ⇒ page 6.
Applies to vehicles: with Satellite Digital Audio Radio Service
Station info
The two-part informational text in the display can be switched on and off.
Fig. 32 Setup Sirius:
Station info
– Press the function button in the satellite radio
menu. – Select Station info. – Select on or off ⇒ fig. 32.
If you have switched on Station info, two-part information is displayed in the satellite radio main menu. For example, the names of the artist and song are displayed for a short time in a window that opens separately ⇒ page 21, fig. 24.
SETUP
Applies to vehicles: with Satellite Digital Audio Radio Service
Sorting stations
Stations can be sorted by Channel No., Channel name, Category and Channel No. or Category and chan. name.
Fig. 33 Setup Sirius:
Station sort
– Press the function button in the satellite radio
SETUP
menu. – Select Station sort. – Select Channel No., Channel name, Category and channel
No. or Category and chan. name ⇒ fig. 33.
If you select “Station sort” Channel no., the stations are listed by channel number in ascending order.
If you select “Station sort” Channel name, the station categories are listed in the main menu in alphabetical order.
If you select “Station sort” Category and channel No., the stations are listed by category and than by channel no.
If you select “Station sort” Category and chan. name, the stations are listed by category and than by channel name.
Page 29

Listening to the radio 27
Tips
The stations that are displayed in the station list can be filtered according to your personal desires as to type of program ⇒ page 27.
Applies to vehicles: with Satellite Digital Audio Radio Service
Category filter
You can preselect program categories.
Fig. 34 Setup Sirius:
Category filter
Turning on filter option
– Press the function button in the satellite radio
SETUP
menu. – Select Category filter. –Under Category filter select the desired filter option and
press the control knob. A check
' will appear after the
filter option.
Turning off individual filter options
– Press the function button in the satellite radio
SETUP
menu. – Select Category filter.
–Under Category filter select individual filter options that
are not to be active any longer and press the control
knob. The check
' after the filter option disappears.
Turning off all filters
– Press the function button in the satellite radio
SETUP
menu.
– Select Switch off all filters and press the control knob so
that a check
checks
The stations that are displayed in the station list can be filtered
according to your personal desires as to type of program. The selection of program categories depends on what your provider offers.
If you select the option Switch off all filters, all filter options are deactivated and all available channels are displayed in the satellite station list.
' appears after Switch off all filters. The
' will disappear after each filter option.
Delete radio presets
The individual preset entries or all preset entries on the preset list can be deleted.
– Press the function button in the satellite radio
SETUP
menu. – Select Delete radio presets ⇒ page 26, fig. 32. – Select Single station and select the station to be deleted
in the preset list, or – Select All stations. All stations on the preset list are
deleted.
Page 30

Playing media28
AAABACADA
Playing media
Introduction
Your radio system also has a CD function that operates exactly like a normal CD changer. An audio CD or MP3/WMA CD is inserted in the CD changer ⇒ page 29. You can also play a SD/MMC memory card with MP3/WMA files. You can choose individual tracks of a CD or memory card, play the tracks in any order, or just listen to each track for a few seconds.
General instructions for CD operation
Fig. 35 CDs that must
not be used
Requirements for good sound quality
To ensure good, high-quality sound reproduction and to prevent damage to the drives, please observe the following:
• Do not used damaged or scratched CDs .
• Do not use single CDs (8 cm / 3 inch diameter) .
• Do not use CDs of different shapes .
• Do not attach labels .
• Do not use protective rings .
E
• Do not use dirty CDs.
• Do not use a protective CD film or stabilizer.
• Always keep CDs in a protective sleeve and do not expose them
to direct sunlight.
Cleaning drives and CDs
Never use a cleaning CD to clean the drives.
Clean CDs with a soft, lint-free cloth. Wipe the CD in a straight line
from the center outward. Heavy soiling can be removed with a
commercial CD cleaner or isopropyl alcohol. Never use gasoline,
paint thinner, or record cleaner since they can damage the CDs.
Using laser equipment
Laser equipment is divided into safety classes 1 to 4 in accordance
with DIN IEC 76 (CO) 6/VDE 0837. The various types of audio equipment installed meet safety class 1. The laser uses so little power or
is shielded so that there is no danger when used properly.
Read error display
A read error message in the display may be caused by the following:
Problem Solution
CD is dirty. Clean the CD. CD is scratched. Exchange the CD for a CD with-
CD was inserted upside down. Insert the CD label side up. Condensation has formed on
the CD.
The mechanism for the drive is
malfunctioning.
out scratches.
Wait until the CD is dry.
Restart the radio system (reset
⇒ page 16), or contact an autho-
rized Audi dealership or authorized facility.
Page 31

Playing media 29
A
A2A
Tips
• Copyrighted CDs or CD-ROMs that do not conform to audio CD
standards cannot be played by your CD drive. Use only CDs having
the following logo on the CD itself “Compact Disc Digital Audio”.
• If outside temperatures are extremely high or low, playback of
the navigation DVD may be temporarily unavailable. A thermal
switch has been installed to protect the navigation DVD and the
laser scanner.
• Do not remove the cover. The device contains no parts that can
be repaired by the consumer.
General information on memory cards
Both SD and MMC cards can be used as memory cards.
The memory card reader has been tested with many of the products available on the market. However, in isolated cases it is possible that individual memory cards may not be recognized.
Always keep the memory card in a suitable case to protect it from dirt, dust particles, scratches, and other damage.
We recommend not saving the music files directly in the main directory of the memory card, but instead, create folders (e.g. put all the
tracks of a particular music style/an artist in one folder).
DRM music formats are not supported!
Note
• Use only single-piece SD/MMC memory cards. If you use
SD/MMC adapter cards (multi-piece memory cards), the memory
card can become detached from the adapter as the result of vibration while driving. There is a possibility that individual pieces may
become stuck in the drive.
• Never store important information on the memory card. Audi
bears no liability for damaged or lost data or files.
Tips
Individual types of memory cards may have limited functions.
CD changer
Introduction
Fig. 36 Loading a CD
1
Eject button
CD tray
3 LOAD
Button
The radio system has a CD changer. Audio CDs or MP3/WMA CDs can be loaded into the CD changer.
A CD inserted in the drive is played using the CD function ⇒ page 28.
MP3/WMA files must have the following properties:
Page 32

Playing media30
A
A
A3A
A
MP3 Files WMA files
Format MPEG-1 layers 2 and 3
Standard ISO 9660 level 1 and 2
Bit rates 32 to 320 kbit/s and variable bit rate Number of
files or
folders
Play lists Max. 128 per medium;
ID3 tags/ WMA tags
Supported media
In the case of MP3 files with a variable bit rate, there may be a discrepancy between the play time displayed and real time.
Please note that music files are subject to copyright law.
MPEG-2 layers 2 and 3
Joliet (single session and multi-session)
Maximum of 255 files per directory,
maximum 255 directories,
in total, no more than 512 files and directories per
m3u format, file extension “m3u”
Version 1.1 and 2.3 Version 7, 8 and 9
CD-ROM, CD-R, CD-RW with a capacity of 650 MB,
700 MB and 800 MB
Version 7, 8 and 9
medium
Tips
• Please follow the information for handling CDs ⇒ page 28.
• The CD changer will not support playlists.
• The CD changer will not support DRM-protected files.
• Because of the diversity of CD-R/CD-RW blanks and their various
storage capacities, function may be limited for individual storage
media.
• Be sure to store the CDs that are not being played in the CD cases
designed for that purpose.
• If outside temperatures are extremely high or low, CD playback
may be temporarily unavailable. A thermal switch has been installed
to protect the CD and the laser scanner.
Loading a CD
Up to 6 CDs can be loaded into the CD changer.
A CD should never be forced into the drive. The CD is pulled in automatically.
Loading a CD
– Press the button ⇒ page 29, fig. 36. As soon as
LOAD
the CD changer is ready to load, Please insert CD appears in the display.
– Insert the CD straight into the CD tray with the label
side up. The CD is automatically loaded in the next empty
position in the CD changer.
Loading all CDs
– Press and hold the button for more than two
seconds. As soon as the CD changer is ready to load, Please insert CD appears in the display.
– Insert a CD straight into the CD tray with the label side
up. As soon as the CD changer is ready to load the next CD, Please insert CD appears in the display.
– Insert each additional CD after Please insert CD appears
in the display.
Loading the CD in a specific empty position
– Press the button ⇒ page 29, fig. 36. The CD list
LOAD
appears in the display.
3
2
LOAD
2
3
Page 33

Playing media 31
A
A
A
A
A
A
A
– Rotate the control knob to an empty CD location shown
in the display and press the control knob. As soon as the CD changer is ready to load, Please insert CD appears in the display.
– Insert the CD straight into the CD tray with the label
2
side up.
Loading a CD into a specific occupied position
– Press the button ⇒ page 29, fig. 36. The CD list
LOAD
3
appears in the display.
– Rotate the control knob to an occupied CD location
shown in the display and press the control knob. The respective CD will be ejected. Please remove CD appears in the display.
– Remove the CD from the CD tray . As soon as the CD
2
changer is ready to load, Please insert CD appears in the display.
– Insert the CD straight into the CD tray with the label
2
side up.
If you press the button a second time while all CDs are being loaded, the loading procedure is stopped.
The CD is pulled back into the CD changer automatically if it is not removed from the CD tray within about 30 seconds after it has been ejected.
LOAD
Ejecting a CD
Ejecting a CD
– Press the Eject button ⇒ page 29, fig. 36.
1
– Rotate and press the control knob to select the CD to be
ejected in the display of the radio system.
Ejecting all CDs
– Press and hold the Eject button ⇒ page 29, fig. 36 for
1
more than two seconds. All the CDs will be ejected in
turn.
The CD is pulled back into the CD changer automatically if it is not removed from the CD tray within about 30 seconds after it has been ejected.
Note
• Always keep your CDs in their original cases to protect them
from dirt, dust, scratches or other damage.
• Never expose CDs to direct sunlight.
Tips
• To cancel ejecting, press the Eject button again .
1
• Please follow the information for handling CDs ⇒ page 28.
Tips
Please follow the information for handling CDs ⇒ page 28.
Memory card reader
Introduction
The radio system has a memory card reader. SD or MMC cards can be loaded in the memory card reader.
Page 34

Playing media32
The CD/SD function ⇒ page 28 is used to operate an SD/MMC card inserted in the memory card reader.
MP3/WMA files must have the following properties:
MP3 Files WMA files
Format MPEG-1 layers 2 and 3
File system FAT or FAT32 method Bit rates 32 to 320 kbit/s and variable bit rate Number of
files or
folders
Play lists Max. 128 per medium;
ID3 tags/ WMA tags
Supported media
For compressing MP3 files we recommend a bit rate of at least 160 kbit/s.
In the case of MP3 files with a variable bit rate, there may be a discrepancy between the play time displayed and real time.
Please note that music files are subject to copyright law.
MPEG-2 layers 2 and 3
Maximum of 512 files per directory,
maximum 255 directories,
in total, no more than 2048 files and directories
per medium
m3u format, file extension “m3u”
Version 1.1 and 2.3 Version 7, 8 and 9
SD or MMC memory cards with a capacity up to 2 GB
Version 7, 8 and 9
Tips
• Please follow the instructions for handling memory cards
⇒ page 29.
• The more play lists or ID3/WMA tags on a medium, the longer
loading a track takes.
• The CD player will not support DRM-protected files.
• The memory card reader has been tested with many of the prod-
ucts available on the market. However, in isolated cases it is
possible that individual memory cards may not be recognized.
Inserting a memory card
Fig. 37 Insert memory
card
– Slide the memory card in the card reader slot with the
label side up (contact surface down) ⇒ fig. 37. The
angled corner of the memory card must point toward the
front right.
– Then push the memory card into the slot until you feel it
click into place. The memory card is flush with the area
around it. When the CD/SD function is activated, the
system automatically changes to the memory card
reader and begins playing.
If a memory card has been inserted and not played, the data from the ID3/WMA tags are read in the background. If you start playback of the memory card immediately, the ID3/WMA tag data are displayed for the track currently being played.
Page 35

Playing media 33
Tips
• The storage capacity displayed is equal to the formatted storage
capacity on the SD card being used and may differ from the capacity
printed on the label.
• Please follow the instructions for handling memory cards
⇒ page 29.
Removing a memory card
Fig. 38 Removing a
memory card
– Gently push the memory card ⇒ fig. 38. The card is
released from the slot.
– Remove the memory card.
Note
As long as the message Loading appears in the display, the memory card should not be removed from the drive.
Selecting drive
The CDs in the CD changer and the memory card in the card reader slot can be selected using the radio system.
Fig. 39 List of available drives
Requirement: A CD is in the CD changer ⇒ page 29 or a memory card is inserted in the slot of the card reader ⇒ page 32.
– Press the function button.
– Press the control button Drive.
– Rotate the control knob to SD or a CD ⇒ fig. 39.
– Press the control knob. The selected memory card or CD
is played.
CD/SD
Tips
Please follow the instructions for handling memory cards ⇒ page 29.
Page 36

Playing media34
Selecting a folder
The folders of an MP3/WMA CD or a memory card are shown in the display.
Fi g. 40 L is t o f tr ac ks o f
a folder
Requirement: An MP3/WMA CD ⇒ page 30 or memory card ⇒ page 32 is being played.
– Press the function button. The folder structure
of an MP3/WMA CD or a memory card is displayed
⇒ fig. 40.
– Rotate the control knob to a folder and press the knob.
– Rotate the control knob to a track ⇒ fig. 40.
– To select the track, press the control knob. The selected
track will play.
Tips
Please follow the instructions for handling memory cards ⇒ page 29.
CD/SD
Selecting a track
The track with the play time is shown in the display.
Fig. 41 List with CD
tracks
Requirement: A CD ⇒ page 33 or a folder ⇒ page 34 was selected.
– Rotate the control knob to a track ⇒ fig. 41.
– To select the track, press the control knob. The track will
play.
Tips
Did you know that you can also operate this function with the multifunction steering wheel* ⇒ page 52?
Page 37

Playing media 35
Forward/reverse and previous/next track
You can move forward or backward within a track and jump from one track to the previous or next track on a CD or a in a folder.
Fig. 42 Forward
Requirement: A track is playing ⇒ page 34.
Forward/reverse
– Press the control button Control.
– Rotate the control knob to >> (Forward) ⇒ fig. 42 or <<
(Reverse) and keep the control knob pressed.
Previous/next track
– Press the control button Control.
– Rotate the control knob to >| (Next track) ⇒ fig. 42 or |<
(Previous track).
– To jump to the previous/next track, press the control
knob. The track will play.
To jump from one to the next track one after the other, press and hold the control knob.
If you select “Previous” within 10 seconds after a track has started
to play, the previous track will start playing. If it is pressed after
playing for 10 seconds, it jumps to the start of the current track.
Tips
You can fast forward and reverse within a track by pressing and holding the arrow buttons on the radio system ⇒ page 6. Pressing the arrow buttons briefly will jump to the previous/next track ⇒ page 6.
Shuffle
You can play the tracks in random order.
Fig. 43 Shuffle
Requirement: A track is played ⇒ page 34. – Press the control button Control. – Rotate the control knob to MIX (Shuffle) ⇒ fig. 43. – To start shuffle play, press the control knob.
Tips
Shuffle depends on which repeat settings you have selected ⇒ page 36.
Page 38

Playing media36
Applies to the model:
Scanning a track (SCAN)
The SCAN function plays each track on the CD or memory card for a few seconds.
Fig. 44 Scanning a
track
Requirement: A track is played ⇒ page 34. – Press the control button Control. – Rotate the control knob to SCAN ⇒ fig. 44. – To start the SCAN function, press the control knob. The
track list appears in the display.
– To stop the SCAN function, press the control knob again.
The track currently playing will be selected.
Stopping/resuming a drive
Requirement: A track is played.
Stopping a drive
– Press the On/Off knob briefly.
Resuming a drive
– Press the On/Off knob briefly.
Tips
You can also operate this function without removing your hands from the steering wheel ⇒ page 53.
Additional settings
Track information (INFO)
Requirement: An MP3/WMA CD or memory card ⇒ page 32 is being played.
– Select: Function button > control button Control
> INFO (Info).
Information stored in the ID3/WMA tag for the current track (e.g. artist) is displayed.
Repeat
Requirement: An audio CD or MP3/WMA CD inserted into the CD changer is playing ⇒ page 29.
– Select: Function button > function button
SETUP
Repeat off
The Repeat function is switched off. When shuffle is turned on, the tracks of the current CD are played in random order first, and then the tracks of the CDs in the CD changer or an inserted memory card will be played.
> Repeat.
CD/SD
CD/SD
Page 39

Playing media 37
Repeat CD/SD
The tracks of the CD or memory card being played are repeated. When shuffle is turned on, the tracks of the current CD or memory card are played in random order.
Repeat Tra ck
The track currently being played will be repeated. Shuffle play is not possible.
Repeat Folder
Requirement: An inserted MP3/WMA CD ⇒ page 29 or a memory card ⇒ page 31 is being played.
The tracks of the currently played folder list are repeated. When shuffle is turned on, the tracks of the current track list are played in random order.
When the tracks of an MP3/WMA CD or memory card are played, you can also select the With subdirectories function for the selection Folder. This will also repeat the tracks in the sub-folders.
Repeat All play lists
Requirement: The play lists of an inserted MP3/WMA CD ⇒ page 29 or memory card ⇒ page 31 are being played.
The tracks of all play lists are repeated. When shuffle is turned on, the tracks of the current play list are played in random order, and then the tracks of other play lists.
Repeat Curr. play list
Requirement: A play list of an inserted MP3/WMA CD ⇒ page 29 or memory card ⇒ page 31 is being played.
The current play list tracks are repeated. When shuffle is turned on, the tracks of the current play list are played in random order.
Track information
Requirement: An MP3/WMA CD or memory card ⇒ page 31 is being played.
– Select: Function button > function button
SETUP
Track name
Information about the currently played track is shown by using the function INFO (track information) ⇒ page 36 (e.g. artist, album). The information must be stored in the ID3/WMA tag.
File name
The name of the file will be displayed without any file extension.
> Track di s pl a y .
CD/SD
Tips
Shuffle play also depends on these settings ⇒ page 36.
Page 40

Calling38
Calling
Applies to vehicles: with cell phone package
Introduction
A cell phone is connected to the cell phone package and
operated using the radio system, the multifunction
steering wheel*, or the telephone voice operation.
The cell phone package is located in the center arm rest. You connect your cell phone using the special cell phone cradle. You can purchase cell phone cradles from your authorized Audi dealer.
You operate your cell phone using the radio system, the multifunction steering wheel* ⇒ page 50, or the telephone voice operation
⇒ page 58.
The active audio source is muted during an incoming/outgoing call and the drive is stopped. Muting is indicated by the crossed-out speaker symbol. After the call is ended, the audio source is restored to the previous volume level.
A cell phone in the cell phone cradle transmits and receives through the external vehicle antenna. This ensures good transmission quality and prevents cell phone electromagnetic fields in the vehicle interior.
To use the telephone function of your radio system, a cell phone must be connected to the cell phone package ⇒ page 39.
After switching off the ignition, the system will remain operable
with the cell phone in the cradle for about 30 minutes (switch-off
delay1)).
WARNING
• Make sure that all persons maintain a minimum distance of 6
in (15 cm) from the antenna, in accordance with the certification
guideline for mobile HF transmitters.
• Pay attention first and foremost to your driving! As the driver,
you have total responsibility for operating the vehicle safely.
Therefore, when using the functions, make certain that you have
complete control of your vehicle in all traffic situations!
• The telephone voice operation* should not be used in emergen-
cies, since the voice can change in stressful situations. The result
can be that the desired telephone connection does not go through
under certain circumstances or does not go through quickly
enough. Dial the emergency number manually.
Note
• Observe all applicable laws for making telephone calls in vehi-
cles.
• Switch off your cell phone in areas in which the use of cell
phones is prohibited.
• Switch off your cell phone in locations where there is a danger of
explosion. These locations are not always clearly identified. They
include, for example, filling stations, storage or transportation facilities for fuel or chemicals; locations where there is fuel vapor in the
air (e.g. escaping propane or fuel vapors in vehicles or buildings) or
locations where there are chemicals or large quantities of dust
particles (e.g. from flour or wood) in the air. This also applies to all
other locations where you normally switch off your car's engine.
1)
The switch-off delay can be altered by an authorized Audi dealer.
Page 41

Calling 39
A2A1A
Tips
• The phone functions depend on whether your mobile phone is
compatible with the cell phone package and whether your cell
phone provider supports these functions.
• Reception may be impaired in screened areas, for example, in a
tunnel or an underground parking garage.
• There may be regions without network coverage from cell phone
operators. Your telephone cannot be used in these areas.
• You can find current information about the cell phone package
online at www.audiusa.com/bluetooth or at an authorized Audi
dealer.
Starting operations
Applies to vehicles: with cell phone package
Installing/removing cradle
The cradle is placed on the adapter plate in the vehicle.
Installing the cradle
– Fold the center armrest up.
– Push the cradle ⇒ fig. 45 with the catch into the guide
tab on adapter plate .
– Engage cell phone cradle by gently pushing down on
2
the rear section.
Removing the cradle
– Fold the center armrest up.
– Remove the cell phone from the cradle ⇒ page 40.
– Carefully pull the cradle up out of the catch by the rear
section.
Note
Remove the cell phone cradle only when necessary to prevent damage to it.
Tips
• The cradle used depends on the type of cell phone and may differ
from the one shown in the illustration.
• To prevent system malfunctions, make sure that the cell phone
cradle is properly installed.
Fig. 45 Installation of
the cradle
Page 42

Calling40
A
Applies to vehicles: with cell phone package
Inserting/removing cell phone
Fig. 46 Inserting cell
phone in the cradle
Fig. 47 Removing cell
phone from the cradle
Requirement: The cell phone cradle has been installed
⇒ page 39
Inserting
– Place the cell phone in the cradle ⇒ fig. 46.
– Press the cell phone into the cradle until it engages.
Removing
– Press the release knob ⇒ fig. 47.
A
– Remove the cell phone by pulling it up.
If you place the cell phone in the cradle or remove it during a phone call, it may interrupt the voice transmission or cause the call to be disconnected.
WARNING
Check to be sure the cell phone is properly secured in the cradle. In an accident, an improperly engaged cell phone can be thrown from the cradle and injure vehicle occupants.
Note
An improperly secured cell phone can fall out during vehicle operation and be damaged.
Tips
• Placing the cell phone in the cradle will establish the connection
via the interface in the cradle set and disconnect the Bluetooth
connection2).
• Electromagnetic fields can result from using radio devices inside
the vehicle.
− Always operate a radio device using an exterior antenna. This
also applies to radio devices with Bluetooth operation. The exterior antenna directs the electromagnetic fields outside and the
strength of the fields inside the vehicle decreases in comparison
to operation without an exterior antenna.
2)
With some commercially available cradle sets the Bluetooth connection will not be disconnected.
Page 43

Calling 41
A
− Make sure that a retrofit exterior antenna is installed correctly.
Applies to vehicles: with cell phone package
Bluetooth™
Bluetooth technology sets up a cordless connection from the cell phone to the cell phone package.
Fig. 48 Bluetooth
symbol
The cell phone3) must be bonded one time to the cell phone
package in the vehicle. Depending on the cell phone being
used, various steps are required for this procedure. After
switching on the ignition, with the vehicle stationary, you
have five minutes to connect your phone to the cell phone
package.
– Make sure that no other cell phone is connected to the
cell phone package through a Bluetooth connection.
– Switch on the ignition and the radio system.
3)
Please make sure that the cell phone to be bonded supports the hands-free profile.
– On the cell phone, select the appropriate menu option
that searches for Bluetooth-enabled devices (cell phone
package).
– Connect the cell phone to the cell phone package. Your
cell phone package calls the cell phone using the name
“Audi UHV”.
– Enter “1234” as the Bluetooth PIN for the cell phone
package within 30 seconds.
– Wait until your cell phone displays the message indi-
cating successful bonding. The Bluetooth symbol
1
⇒ fig. 48 appears in the display.
To protect yourself from outside access to your cell phone, you should change the Bluetooth PIN ⇒ page 48.
A maximum of four cell phones
You can connect up to four cell phones to the cell phone package.
However, only one cell phone at a time is actively connected to the
cell phone package. If a fifth cell phone is bonded to the cell phone
package, the device which has not been used in conjunction with
the cell phone package for the longest time is disconnected.
Making and breaking a connection
An operational cell phone which has been bonded to the cell phone package is automatically connected after the ignition is switched on. For some cell phones you have to confirm the connection.
The Bluetooth connection is disconnected after the ignition key is removed unless there is a call in progress.
Range
The Bluetooth connection from cell phone to cell phone package is
limited to the interior of the vehicle. It depends on local conditions,
such as obstacles between the devices, and on interference from
other devices. If your cell phone is in a pocket for example, it can
affect the quality of data transmission.
Page 44

Calling42
WARNING
During air transportation, the Bluetooth function for the cell phone package must be switched off by an authorized Audi dealer or other qualified workshop.
Tips
• Electromagnetic fields can result from using radio devices inside
the vehicle.
− Always operate a radio device using an exterior antenna. This
also applies to radio devices with Bluetooth operation. The exte-
rior antenna directs the electromagnetic fields outside and the
strength of the fields inside the vehicle decreases in comparison
to operation without an exterior antenna.
− Make sure that a retrofit exterior antenna is installed correctly.
• You can find instructions on how to operate your cell phone in
the appropriate owner's manual.
Applies to vehicles: with cell phone package
Phone book entries
The phone book entries for the SIM card and the cell phone address book are stored automatically in the cell phone package.
Fig. 49 Searching
entry in the telephone
book
Loading the phone book entries
As long as the cell phone supports this function, the phone book
entries are automatically loaded into the cell phone package
memory after the ignition is switched on. This loading process can
last several minutes and depends on the number of entries in the
phone book.
The last four phone books loaded into the cell phone package are
saved. After a fifth cell phone has been inserted in the cell phone
package, the phone book from the cell phone which has not been
used the longest is deleted. Up to 500 total phone book entries can
be saved each time.
Reconnecting the cell phone
With an identical SIM card the telephone book entries are already saved in the cell phone package. You can use the phone book after a brief waiting period.
The system checks the phone book entries for changes and loads them into the memory automatically.
Page 45

Calling 43
Phone book entry display
The phone book entries are shown in alphabetical order and are labeled by category, e.g. SIM cards, home, work, cell phone and phone symbols ⇒ page 42, fig. 49.
Tips
• If you use a GSM cell phone, the entries available on the SIM card
and in the cell phone address book are saved in the cell phone
package.
• If you use a CDMA cell phone, the available cell phone address
book entries are saved in the cell phone package.
Applies to vehicles: with cell phone package
Starting telephone mode
Fig. 50 Speller for
entering a phone
number
Requirement: The radio is on ⇒ page 8. – Press the function button. The speller for PIN
⇒ fig. 51 or phone number input ⇒ fig. 50 or the last
active telephone menu appears in the display.
TEL
Tips
• The active audio source is muted during a telephone call. The
status bar displays the mute symbol.
• There may be technical interference with cell phones, which can
impair the performance of the device. Please read the User's Guide
for your cell phone for more information in this regard.
• Reception may be impaired in covered areas, such as, for
example, in a tunnel or an underground garage.
• There may be areas without network coverage from cell phone
providers. Unfortunately, the telephone cannot be used there.
• In order to use the telephone, you must have a contract with a
cell phone provider.
• You can select different telephone functions in the instrument
cluster display cluster via the multifunction steering wheel*
⇒ page 53.
• The telephone functions described depend on the compatibility
of the cell phone with the cell phone package, and whether or not
your cell phone service provider supports these functions.
Applies to vehicles: with cell phone package, cell phone cradle, GSM cell phone and
multifunction steering wheel
Entering a PIN/PUK
The menu that was opened during the most recent call is shown in the display. You open the speller by pressing the function button in telephone mode.
TEL
Fig. 51 Telephone:
Entering PIN
Page 46

Calling44
– Press the function button.
TEL
– Enter the PIN using the speller ⇒ page 43, fig. 51.
– Confirm the entry in the speller with OK.
PIN (Personal Identification Number)
The personal identification number (PIN) consists of four to eight characters and protects your SIM card from misuse.
You will receive the PIN along with the SIM card from your cell
phone service provider. If you enter a PIN incorrectly three times4)
in a row, the SIM card is blocked and a message appears in the
display.
PUK (Personal Unblocking Key)
A blocked SIM card is unblocked with an eight-character personal unblocking key (PUK).
You will receive the PUK along with the SIM card from your cell
phone service provider. If you incorrectly enter the PUK ten times4)
in a row, please contact your cell phone service provider.
Tips
• When entering a PIN, only asterisks (*) are shown in the display
in the place of numerals.
• PIN is not shown in the display in every instance, it depends on
the cell phone being used and the cell phone provider. If the cell
phone used is not compatible with the cell phone package, then it
is possible that this note will not be displayed.
• Depending on the cell phone being used, it may be necessary to
enter the PIN on the cell phone. In this case, you are not shown a
request to enter the PIN in the Display.
• For additional information, please see the User's Guide for your
cell phone.
• When the ignition has been switched on, a warning message will
appear when the speller is used for the first time while driving.
Please read the warning message carefully and follow the
instructions.
Dialing a telephone number
Applies to vehicles: with cell phone package
Dialing directly using the speller
The speller can be used to enter a phone number directly as a series of numbers or letters.
Fig. 52 Entering telephone numbers using
the number speller
Fig. 53 Entering telephone numbers using
the letter speller
4)
The number of attempts depends on the SIM card.
Page 47

Calling 45
A
Requirement: Telephone mode is active ⇒ page 43 and the speller is shown in the display ⇒ page 44, fig. 52.
Entering telephone numbers using a number sequence
– Enter the phone number using the speller.
– Confirm your entry by rotating the speller to OK and then
pressing it, or
– Press the control button Dial. After the connection has
been made, the audio source is muted.
Entering telephone numbers using a letter sequence
– Enter an area code e.g. 1 800 using the speller ⇒ page 44,
fig. 52.
– To change to the letter speller, rotate the speller to A-Z
1
⇒ page 44, fig. 52 and press the control knob. The letter
speller appears in the display ⇒ page 44, fig. 53.
– Use the speller to enter a series of letters, e.g. AUDISER-
VICE ⇒ page 44, fig. 53.
– Confirm your entry by rotating the speller to OK and then
pressing it, or
– Press the control button Dial. The entered telephone
number is dialed.
If a telephone number has been entered incorrectly, you can press
RETURN
on the button to completely delete the telephone number
you entered in the speller.
Tips
• DTMF tones are entered directly through the speller or loaded
from the stored telephone numbers ⇒ page 45.
• The active audio source is muted during a telephone call. The
status bar displays the mute symbol ⇒ page 9, fig. 5.
• You can initiate a phone call directly from your cell phone. Read
the Owner's Manual of your cell phone to find out how to do this.
• If you make calls on your cell phone, it is possible that the tele-
phone number will not appear on the MMI Display.
• You can also make phone calls using the multifunction steering
wheel*.
Applies to vehicles: with cell phone package
Dialing from a list
Fig. 54 Dialing a phone
number from a list
Requirement: Telephone mode is active ⇒ page 43.
Searching and calling telephone numbers in a list
– Press the control button Memory. –Rotate the control knob to Dialed numbers, Call mailbox,
Phone book, Missed calls, or Received calls.
Page 48

Calling46
– Press the control knob. The telephone numbers of the
selected list appear in the display.
– Rotate the control knob to the desired telephone
number.
– Press the control knob. The selected telephone number is
copied to the speller.
– To initiate the call, rotate the speller to OK and press the
control knob, or
– Press the control button Dial.
Quick display of the Dialed numbers list and calling a number
– Press the function button. The speller is displayed
TEL
in the display. There is no telephone number in the entry
field of the speller. – Press the control button Dial. The Dialed numbers list
appears in the display.
– Rotate the control knob to the desired telephone
number.
– Press the control knob. The selected telephone number is
copied to the speller.
– To initiate the call, rotate the speller to OK and press the
control knob, or
– Press the control button Dial.
Tips
• The telephone functions depend on the cell phone service
provider and the cell phone you are using. You can obtain more
information from your cell phone service provider.
• Depending on the cell phone being used, it may happen that no
phone book entries and no entries for the “Dialed numbers”,
“Received calls” and “Missed calls” functions are shown in the MMI
Display.
Applies to vehicles: with cell phone package
Answering/rejecting a call
Fig. 55 Answering an
incoming call
Requirement: An incoming call.
Answering a call
– Rotate the control knob to Answer and press the control
knob, or
– Press the control button Answer.
Rejecting a call
– Rotate the control knob to Reject and press the control
knob, or
– Press the control button Reject.
Depending on whether the caller has been stored in the phone book and whether the number is available for viewing, the Name, the
Phone number or Unknown appears in the display.
Page 49

Tips
• The audio source is muted during an incoming/outgoing call.
The status bar displays the mute symbol ⇒ page 9, fig. 6.
• A call can also be answered/rejected using the multifunction
steering wheel ⇒ page 55.
Applies to vehicles: with cell phone package
Ending a call
Requirement: There is an active call.
– To end a phone call or to cancel dialing, press the control
button End call.
Calling 47
Applies to vehicles: with cell phone package
Dialing stored telephone numbers
Simply dial a telephone number from call lists or the phone book.
Fig. 56 Searching
stored telephone
numbers
Tips
A call can also be ended using the multifunction steering wheel ⇒ page 55.
Requirement: The telephone is switched on ⇒ page 43 and contains at least one stored telephone number.
– Press the control button Memory. – Rotate the control knob to Phone book ⇒ fig. 56. – Press the control knob. Search for entry appears in the
display and a listing of stored entries appears at the
same time.
– Rotate the control knob to Search for entry ⇒ fig. 56 and
press the control knob. The speller appears in the display
where you can enter names, or
– Rotate the control knob to a name from the list and press
the control knob.
– Confirm your entry by rotating the speller to OK and then
pressing it, or
– Press the control button Dial.
Page 50

Calling48
Additional settings
Applies to vehicles: with cell phone package
Options during a call
Requirement: Ongoing telephone call ⇒ page 44. – Select: Control button Options > Switch off microphone.
Switching the microphone off and on
When the microphone is switched off your telephone partner cannot hear anything from your phone. However, you can hear your telephone partner. Muted is shown in the display.
Replacing a call
When there is an incoming call during an ongoing telephone call, the Replace and Reject functions appear in the display.
Replace is used to replace the active telephone call by an incoming call. Reject will reject the incoming call.
The display may still remain visible for several seconds, depending on the cell phone used. If you use the Replace or Reject functions while its display is still visible, the current telephone call will be ended.
Tips
To be alerted to an incoming call during an active call, the function Call waiting must be activated in your cell phone. The call options depend on the cell phone and service provider.
Applies to vehicles: with cell phone package
Telephone settings
– Select: Function button > function button >
Phone settings.
TEL SETUP
Bluetooth PIN
The Bluetooth PIN is factory set to 1234. This function is used to change the Bluetooth PIN.
Factory settings
The cell phone package is reset to default settings. The stored phone books ⇒ page 42, bonded Bluetooth devices ⇒ page 41 and mailbox numbers are deleted.
Applies to vehicles: with cell phone package
Call options
– Select: Function button > function button >
TEL SETUP
Call options > Auto answer.
on - An incoming call is answered automatically. As long as the call
has not yet been answered automatically, this can be rejected using
Reject.
off - An incoming call is not answered automatically.
Applies to vehicles: with cell phone package
Mailbox number
– Select: Function button > function button >
TEL SETUP
Mailbox number.
The mailbox number is entered using the speller and stored with OK in the speller.
Using DEL in the speller, the mailbox number is deleted and confirmed with OK.
After these are saved, the mailbox can be called up using the control button Memory.
Page 51

Calling 49
Tips
You must set up and activate this service in the cell phone network in advance. You can obtain more information from your cell phone provider.
Applies to vehicles: with cell phone package
Calling mailbox
– Select: Function button > control button Memory >
TEL
Call mailbox.
The mailbox number must be highlighted ⇒ page 48. This service must be set up and activated in advance in the cell phone network. You can obtain more information from your cell phone service provider.
Tips
The mailbox number can also be called up using the speller ⇒ page 10.
Applies to vehicles: with cell phone package
Memory settings
– Select: Function button > function button >
TEL SETUP
Memory settings.
Resorting call lists
The telephone numbers in the call lists are sorted according to the time they called. Switching on this function will sort them in the opposite order.
Memory used
• SIM - SIM card entries are loaded in the cell phone package and
shown in the display.
• Te l. - Directory entries of the cell phone are loaded in the cell
phone package and shown in the display.
• All - SIM card entries and directory entries of the cell phone are
loaded in the cell phone package and shown in the display.
Tips
Depending on the cell phone, either the SIM card entries or the cell
phone address book entries might not be available. Further information about the cell phone package is available online at
www.audiusa.com or at an authorized Audi dealership.
Page 52

Multifunction steering wheel50
A1A
A
A1A
A
A
A
A
Multifunction steering wheel
Applies to vehicles: with a multifunction steering wheel
Introduction
Using the multifunction steering wheel, you can operate
selected radio, CD, SD and telephone* functions quickly
and easily.
Fi g. 57 Co nt ro ls on th e
multifunction steering
wheel
The multifunction steering wheel ⇒ fig. 57 allows you to operate selected functions for the radio, CD, SD, and telephone* without taking your hands off the steering wheel.
The functions are shown in the driver information system ⇒ page 51, fig. 58. Additionally, you can turn the telephone voice operation* on and off as well as change the volume using the multifunction steering wheel.
It is operated by pressing and rolling the buttons to ⇒ fig. 57.
• Pressing the button multiple times changes between
the Telephone* and the active audio source. The function is also
displayed in the driver information system ⇒ page 51, fig. 59. When
a submenu is displayed in the driver information system, the
submenu can be exited again by pressing the button.
MODE
2
MODE
4
• Rolling the left thumbwheel selects a function that varies
depending on whether radio, CD, SD, and telephone* is selected.
• The telephone voice operation* is activated by pressing the talk
3
button . Pressing and holding the talk button cancels voice operation.
• Rolling the right thumbwheel up/down increases/decreases
the volume.
• Pressing the right thumbwheel will mute the radio system or
cancel mute.
4
4
Tips
• The trip computer is also displayed in the driver information
system. Comprehensive information on this topic can be found in
the Owner's Manual of your vehicle.
• If systems are not available in the vehicle, the button on the
steering wheel assigned to that system has no function.
Applies to vehicles: with a multifunction steering wheel
Adjusting the volume
The volume of the active audio source (radio, CD, SD) and
the telephone voice operation* is adjusted using the
multifunction steering wheel.
Requirement: The radio is switched on ⇒ page 8.
Increasing and decreasing the volume
– Roll the right thumbwheel ⇒ fig. 57 up/down.
Muting (Mute)
– Press the right thumbwheel ⇒ fig. 57 to mute the
radio system or to cancel mute, or
4
4
Page 53

Multifunction steering wheel 51
A
A
A
– Roll the right thumbwheel downward to mute; a
4
crossed-out speaker symbol will appear in the status bar
of the display. If the drive is active, it will be stopped.
– Roll the right thumbwheel up to cancel mute. The drive
that was stopped will start playing again.
Listening to the radio
Applies to vehicles: with a multifunction steering wheel
Selecting the radio
Fig. 58 Frequency
band list
Requirement: Radio mode is active ⇒ page 19. – Press the ⇒ page 50, fig. 57 button until the
radio menu appears in the driver information system
⇒ fig. 59.
MODE
Applies to vehicles: with a multifunction steering wheel
Selecting the frequency band
The three frequency bands: FM, AM, and Sirius* are
displayed in the upper part of the driver information
system.
Requirement: The radio menu is displayed ⇒ fig. 59. – Roll the left thumbwheel ⇒ page 50, fig. 57 down to a
1
frequency band.
– To select the frequency band, press the left
thumbwheel.
Applies to vehicles: with a multifunction steering wheel
Selecting a station from station list
Fig. 59 Radio menu
Requirement: The radio menu is displayed ⇒ fig. 59. – Roll the left thumbwheel ⇒ page 50, fig. 57 down/up
1
to a radio station.
– To select the station, press the left thumbwheel.
Page 54

Multifunction steering wheel52
A
Applies to vehicles: with a multifunction steering wheel
Selecting a stored station
Requirement: The radio menu is displayed ⇒ page 51, fig. 59 and a station is stored in the preset list ⇒ page 23.
– Roll the left thumbwheel ⇒ page 50, fig. 57 down/up
1
to Presets. – Press the left thumbwheel. The radio preset list is
displayed.
– Roll the left thumbwheel to a radio station and press the
left thumbwheel. The radio station is selected.
Playing media
Applies to vehicles: with a multifunction steering wheel
Selecting a drive
Fig. 60 List with CD
tracks
Would you like to learn more about operating the CD/SD in your vehicle? You will find a detailed description in ⇒ page 28.
Tips
Characters and symbols that are not part of the ISO-8859-1 or UTF8 standard are not displayed in the driver information system.
Applies to vehicles: with a multifunction steering wheel
Selecting a folder
Fi g. 61 L is t o f tr ac ks o f
a folder
Requirement: The folders of an MP3/WMA CD or a memory card are shown in the driver information system ⇒ fig. 61.
– Roll the left thumbwheel ⇒ page 50, fig. 57 to a folder
and press the left thumbwheel.
– Roll the left thumbwheel to the desired track.
– To select the track, press the left thumbwheel.
Requirement: CD mode or SD mode is active ⇒ page 33. – Press the ⇒ page 50, fig. 57 button until a list
MODE
with tracks ⇒ fig. 60/⇒ fig. 61 appears in the driver information system.
Tips
A drive is selected using the radio system ⇒ page 33.
Page 55

Multifunction steering wheel 53
Applies to vehicles: with a multifunction steering wheel
Selecting a track
Requirement: A list with tracks ⇒ page 52, fig. 60/⇒ page 52, fig. 61.
– Roll the left thumbwheel ⇒ page 50, fig. 57 to a track.
– To select the track, press the left thumbwheel.
Tips
A drive is selected using the radio system ⇒ page 33.
Applies to vehicles: with a multifunction steering wheel
Stopping/resuming a drive
Requirement: A track is playing ⇒ page 28. – To pause the track, rotate the right thumbwheel all the
way to the bottom.
– To continue track playback, rotate the right thumbwheel
upwards.
Calling
Applies to vehicles: with multifunction steering wheel and cell phone package
Introduction
Calling in the vehicle has become an everyday activity. You can operate all of the relevant telephone functions safely and easily using the multifunction steering wheel.
The following messages could appear in the driver information system:
Please wait... The connection from cell phone to vehicle is
Please insert SIM card.
Please enter the PIN.
Tel. c all An external call is being received. If the
Busy The selected number is busy. Phone is
switched
off.
Connecting... The connection is being established. No entries
available.
Phone not connected or plugged in.
Would you like to learn more about operating the telephone in your vehicle? You will find a detailed description in ⇒ page 38.
being established.
The SIM card is not in the cell phone.
The PIN has not been entered yet ⇒ page 43.
name/telephone number of the caller is sent, it
will also be displayed.
The telephone is switched off.
The phone book does not contain any entries or
the phone book entries have not yet been read
into the cell phone package* ⇒ page 42.
The telephone is not connected with the vehicle. Place the cell phone in the cell phone
adapter or establish a Bluetooth connection.
Tips
• The basic telephone functions are available on the multifunction
steering wheel if your telephone equipment was installed at the
factory.
• The telephone functions displayed in the instrument cluster
depend on whether your cell phone is compatible with the cell
Page 56

Multifunction steering wheel54
phone package*, and whether your cell phone provider supports
these functions.
Applies to vehicles: with multifunction steering wheel and cell phone package
Selecting telephone
Fig. 62 Telephone
menu
Requirement: The cell phone package ⇒ page 39 has been activated.
– Press the ⇒ page 50, fig. 57 button until the tele-
MODE
phone menu appears in the driver information system
⇒ fig. 62.
Telephone menu:
• Dialed numbers: contains the telephone numbers dialed most
recently.
• Phone book: contains the entries of the SIM card and/or the
directory entries of the cell phone ⇒ page 49.
• Missed calls: contains the most recent calls not received.
• Received calls: contains the most recently received calls.
You can dial the desired telephone number directly from each of these lists.
Displaying phone book entries
The phone book entries are shown in alphabetical order and are labeled by category, e.g. SIM cards, home, work, cell phone and phone symbols ⇒ fig. 63.
Applies to vehicles: with multifunction steering wheel and cell phone package
Dialing a telephone number and ending a call
Telephone numbers stored in the phone book and in the call lists can be dialed.
Fig. 63 Dialing a telephone number from
the phone book
Requirement: The telephone menu is displayed ⇒ fig. 62.
Calling
– Roll the left thumbwheel ⇒ page 50, fig. 57 to Dialed
numbers, Phone book, Missed calls, or Received calls.
– Press the left thumbwheel. A list with entries appears in
the driver information system ⇒ fig. 63.
– Roll the left thumbwheel to an entry.
– Press the left thumbwheel. The telephone number is
dialed.
Page 57

Multifunction steering wheel 55
Ending a call
– Roll the left thumbwheel to End call and press the left
thumbwheel.
The radio system ⇒ page 44 is used to enter a telephone number that has not yet been stored.
Tips
The multifunction steering wheel can only be used to dial stored telephone numbers. Dial a new telephone number on the radio system ⇒ page 44.
Applies to vehicles: with multifunction steering wheel and cell phone package
Answering/rejecting a call
Fig. 64 Incoming call
Requirement: A call is coming in.
Depending on whether the caller has been stored in the phone book, and whether his number is available for viewing, the Name, the Phone number or Unknown appears in the driver information system.
Tips
With an incoming/outgoing call, audio source muting is activated automatically.
Applies to vehicles: with multifunction steering wheel and cell phone package
Options during a call
When there is an incoming call during an ongoing telephone call, the functions Replace and Reject appear in the driver information system.
Replace is used to replace the active telephone call by an incoming call. Reject will reject the incoming call. A call on hold remains in queue.
Tips
In order to be alerted to an incoming call during an ongoing telephone call, you have to activate the “Call waiting” function in your
cell phone. Read the Owner's Manual of your cell phone for
information.
Answering a call
– Press the left thumbwheel ⇒ page 50, fig. 57.
Rejecting a call
– Roll the left thumbwheel to Reject and press the left
thumbwheel.
Page 58

Multifunction steering wheel56
A1A
Name tag
Applies to vehicles: with multifunction steering wheel and telephone voice operation
Switching the telephone voice operation on and off
Fig. 65 Multifunction
steering wheel: Talk
button
Activating
– Press button ⇒ fig. 65.
Deactivating
– Press button again and hold it until you hear the
announcement <Cancel>.
A chime will confirm when the system is ready for dialog. Then the desired functions can be selected using voice commands.
1
Tips
You can find a detailed description in chapter ⇒ page 57. This button does not operate on vehicles without telephone voice operation.
Page 59

Telephone voice operation
Telephone voice operation 57
Applies to vehicles: with Telephone voice operation
Introduction
Telephone functions can be operated by voice operation.
Functions
In conjunction with hands-free operation it is not necessary to pick up the cell phone. The telephone voice operation recognizes commands and number sequences regardless of the person speaking.
The voice operation offers you the following functions:
• Creating name tags ⇒ page 60
• Entering and dialing a phone number ⇒ page 59
The dialog is ended immediately when an incoming call is received.
Unrecognized voice commands
The systems reacts to your input with audible feedback. If a voice command is not recognized, the system asks <Pardon?> and asks you to repeat the command. After the third failed attempt, the response <Cancel> is given and the dialog is terminated.
For the system to understand you
• Speak clearly and distinctly at a normal volume. Speak louder
when driving faster.
• Stress your statements evenly and do not leave long pauses.
• Do not speak when the voice operation is responding.
• To reduce ambient noise, close the doors, the windows and the
sunroof*. Make sure that passengers are not speaking when you are
giving a voice command.
• Do not direct the air vents toward the hands-free microphone
that is close to the front interior lights.
• Only use the system from the driver's position since the hands-
free microphone is oriented toward that position.
<The Function is not possible>
If the system responds with <Function not possible>, check the operating status of the telephone voice operation
• Is the key in the ignition?
• Is the cell phone connected to the cell phone package through
Bluetooth?
• Is the cell phone in the cell phone cradle*?
• Is the phone switched on and the PIN entered?
• Are the phone book entries from the cell phone being loaded
into the cell phone package ⇒ page 42?
WARNING
• Please devote your full attention to driving! As the driver, you
hold complete responsibility for safety in traffic. Only use the functions in such a way that you always maintain complete control
over you vehicle in all traffic situations.
• Because the voice can change in stressful situations and it may
not be possible to recognize numbers being said, the voice operation system should not be used in emergencies. The desired telephone connection* may not occur quickly enough or at all under
certain circumstances. Dial the emergency call number manually
in emergencies.
Tips
You can adjust the volume of the telephone voice operation via the right thumbwheel on the multifunction steering wheel ⇒ page 50.
Page 60

Telephone voice operation58
A
A
A
General operation
Applies to vehicles: with Telephone voice operation
Switching on/off
Voice operation is activated using the talk button on the
multifunction steering wheel*.
Fig. 66 Multifunction
steering wheel: Talk
button and right thumbwheel
Requirement: The ignition is on and you are not making a phone call.
Activating
– Press the talk button on the multifunction steering
wheel ⇒ fig. 66.
1
– Say the desired command.
Deactivating
– Say the command CANCEL, or – Press the talk button on the multifunction steering
wheel ⇒ fig. 66 and hold it until you hear the
1
announcement <Cancel>.
$
$
Applies to vehicles: with telephone voice operation
Adjusting the volume
Requirement: The telephone voice operation is switched on ⇒ page 58 and an announcement is made by the system.
– Roll the right thumbwheel of the multifunction steering
wheel ⇒ fig. 66 upward
2
"/downward #, or
– Rotate the On/Off knob on the radio system ⇒ page 12 to
increase/decrease the volume.
Applies to vehicles: with telephone voice operation
Help function
The telephone voice operation offers you two help functions: help commands and system-guided help.
Fig. 67 Possible
commands
Help commands
When the telephone voice operation is on ⇒ page 58, you can say the command HELP. Possible commands are shown in the display ⇒ fig. 67 and are read by the system.
Page 61

Telephone voice operation 59
System-guided help
When the telephone voice operation is on ⇒ page 58 and you do not say a command, the system asks <Pardon?>. If a command is not given, the system offers possible commands.
Example of system-guided help (Dialing a number from the telephone voice operation phone book)
Operation/ Commands
Press talk button briefly Chime: <Beep> DIAL NUMBER <The number, please?> e.g. ZERO, ONE, TWO,
THREE
No command given <Pardon?>
No command given
Applies to vehicles: with telephone voice operation
Announcement telephone voice operation
<Zero, one, two, three>
<Important commands are:>
<Dial>
<Repeat>
<Back>
Entering a PIN
Requirement: The telephone voice operation is on ⇒ page 58.
– Say the command ENTER PIN or ENTER PIN CODE. – Say the individual numbers of your PIN code. – Say the command STORE.
When a PIN code longer than 8 numbers is entered, the system announces <The PIN is too long>. The system announces the entry of an incorrect PIN code with <The PIN code is incorrect>. If the
wrong PIN is entered three times in a row, the SIM card is locked.
The SIM card can be unlocked by using your personal unlock code,
PUK. The unlock code can only be entered from the cell phone key
pad, not through voice operation.
Applies to vehicles: with telephone voice operation
Dialing a telephone number
Requirement: the telephone voice operation is on ⇒ page 58.
Dial number
– Say the command DIAL NUMBER. The telephone voice
operation prompts you to enter the phone number.
– Say the individual numbers of the desired phone number
one after the other (e.g. two, three) or in groups of
numbers. After each sequence of numbers, the numbers
are repeated.
– After entering the last number, say the command DIAL.
The phone number is dialed.
Select name
– Say the command SELECT NAME. – After being prompted say a previously stored name tag
⇒ page 61.
– Say the command DIAL. The phone number is dialed.
Play phone book
– Say the command PLAY PHONE BOOK. The name tags are
played.
Page 62

Telephone voice operation60
– Press the talk button while a name tag is being said to
dial the phone number for the spoken name tag.
Tips
• Voice tags are user-dependent and are best recognized with the
user who assigned the voice tag.
• The commands REPEAT, BACK and DELETE can be used during
the dialog.
Applies to vehicles: with telephone voice operation
Redial
Requirement: The telephone voice operation is on ⇒ page 58.
– Say the command REDIAL. The number last dialed will be
dialed again.
Tips
• On some cell phones, the number dialed last in the call list is put
in last place. The redial function of the telephone voice operation
cannot be used in this case.
• The commands REPEAT, BACK and DELETE can be used during
the dialog.
Name tags
Applies to vehicles: with telephone voice operation
Introduction
Name tags are stored in the telephone voice operation phone book.
General information
The telephone voice operation phone book contains 50 memory locations. You can use it independently of the cell phone. The entries are stored in the telephone voice operation phone book.
In the telephone voice operation phone book, you can store spoken
names for entries in the cell phone package phone book. You can
also store spoken names with their corresponding spoken phone
numbers, regardless of the phone book entries in the cell phone
package ⇒ page 61.
If you have stored name tags in the telephone voice operation phone book, they can be dialed by voice operation.
Entry
You should choose the spoken names so that they can be clearly recognized by the telephone voice operation.
When entering phone numbers, the numbers ZERO to NINE are recognized. Enter the telephone numbers as a continuous string of numbers (complete telephone number), as a sequence of numbers (separated by short pauses) or by numbers spoken individually. After each sequence of numbers (separated by a short pause in speech), the numbers recognized are repeated by the system. The system does not recognize combinations of numbers, for example, twenty three, only numbers spoken individually (TWO, THREE). When TWO is spoken, it is easier for the system to recognize the number.
If more than 20 numbers are entered, the system responds with <The number is too long>. A Plus (+) can also be placed in front of the 20 digits.
Page 63

Telephone voice operation 61
A
A
Applies to vehicles: with telephone voice operation
Storing a name tag for phone book entry
Store a name tag for a phone book entry displayed in the driver information system.
Fig. 68 Phone book
entry with name tag
Requirement: Entries are stored in the phone book.
– Press the button on the multifunction steering
MODE
wheel ⇒ page 50 until the Telephone menu ⇒ page 54,
fig. 62 is displayed in the driver information system.
– Roll the left thumbwheel on the multifunction steering
wheel to Phone book ⇒ page 54, fig. 62 and press the left thumbwheel. The phone book entries are displayed.
– Roll the left thumbwheel to the desired phone book
entry.
– Press the talk button on the multifunction steering
wheel ⇒ page 58, fig. 66. The chime <Beep> sounds.
1
$
– Say the command STORE.
– After being prompted, say the name under which this
phone book entry should be stored.
– Repeat the name after being prompted. The name tag for
the selected phone book entry is stored in the telephone
voice operation phone book.
If a name tag was stored for a phone book entry, this phone book entry is displayed in the driver information system with a ⇒ fig. 68 symbol.
Applies to vehicles: with telephone voice operation
1
Storing a name tag with telephone number
Name tags consisting of names and associated telephone numbers can be stored.
Requirement: The telephone voice operation is on ⇒ page 58.
– Say the command STORE NAME. – After being prompted, say the name under which this
phone book entry should be stored.
– Repeat the name after being prompted.
– Say the individual numbers of the desired phone number
one after the other (e.g. two, three) or in groups of
numbers. After each sequence of numbers, the recog-
nized numbers are repeated.
– After entering the last number, say the command STORE.
The name tag is stored in the telephone voice operation
phone book.
The voice tags that are stored in the telephone voice operation phone book using the STORE NAME command, are not shown in the driver information system.
Page 64

Telephone voice operation62
Tips
For similar sounding names, additional designations (e.g. first names) should also be stored.
Applies to vehicles: with telephone voice operation
Deleting a name tag with telephone number
Requirement: The telephone voice operation is on ⇒ page 58.
– Say the command DELETE NAME. – After being prompted say a previously stored name tag
⇒ page 61.
– After being prompted, say YES to delete a name tag
previously stored in the voice operation phone book. The
name tag deletion is confirmed.
If the user answers NO, the system responds with <Cancel> and the dialog is ended.
Applies to vehicles: with telephone voice operation
Deleting a phone book
Requirement: The telephone voice operation is on ⇒ page 58.
Deleting the entire phone book
– Say the command DELETE PHONE BOOK. – After being prompted, say YES. –Say YES after being prompted to delete the entire phone
book.
Deleting a name tag
– Say the command DELETE PHONE BOOK. – After being prompted, say NO. The name tags are played. – Press the talk button while the name tag to be deleted is
being read out.
– After being prompted, say YES. The read name tag is
deleted.
As long as the telephone voice operation phone book is being played, additional entries can be deleted by pressing the talk button.
Page 65

Alphabetical index
Alphabetical index 63
A
Activate your satellite radio service . . . . . 19
Adjusting the volume
Radio system . . . . . . . . . . . . . . . . . . . . . 12
Telephone voice operation . . . . . . . . . . 58
Adjusting volume . . . . . . . . . . . . . . . . . . . . 13
AM
See Selecting the frequency band . . . . 18
Answering/rejecting a call
Multifunction steering wheel . . . . . . . . 55
Radio system . . . . . . . . . . . . . . . . . . . . . 46
B
Balance . . . . . . . . . . . . . . . . . . . . . . . . . . . . . 14
Band . . . . . . . . . . . . . . . . . . . . . . . . . . . . . . . 20
Bass . . . . . . . . . . . . . . . . . . . . . . . . . . . . . . . 14
Bluetooth . . . . . . . . . . . . . . . . . . . . . . . . . . . 41
Bluetooth PIN
Settings . . . . . . . . . . . . . . . . . . . . . . . . . 48
Brightness of the display . . . . . . . . . . . . . . 17
Buttons . . . . . . . . . . . . . . . . . . . . . . . . . . . . . . 8
C
Call answer . . . . . . . . . . . . . . . . . . . . . . . . . 48
Call lists
Multifunction steering wheel . . . . . . . . 54
Radio system . . . . . . . . . . . . . . . . . . . . . 45
Call options . . . . . . . . . . . . . . . . . . . . . . . . . 48
Calling
Multifunction steering wheel . . . . . 53, 54
Radio system . . . . . . . . . . . . . . . 38, 44, 45
Telephone voice operation . . . . . . . 57, 59
Calling mailbox . . . . . . . . . . . . . . . . . . . . . . 49
Care instructions
CD . . . . . . . . . . . . . . . . . . . . . . . . . . . . . . 28
Category filter (satellite radio) . . . . . . . . . . 27
CD
Eject . . . . . . . . . . . . . . . . . . . . . . . . . . . . . 31
Instructions for handling . . . . . . . . . . . 28
Loading a CD . . . . . . . . . . . . . . . . . . . . . 30
Repeat . . . . . . . . . . . . . . . . . . . . . . . . . . . 36
CD changer . . . . . . . . . . . . . . . . . . . . . . . . . 29
Cell phone
Inserting/removing . . . . . . . . . . . . . . . . 40
Programming . . . . . . . . . . . . . . . . . . . . . 41
Cell phone cradle
Inserting cell phone . . . . . . . . . . . . . . . . 40
Installation/removal . . . . . . . . . . . . . . . . 39
Removing cell phone . . . . . . . . . . . . . . . 40
Cell phone package
Calling (multifunction steering wheel) 53
Calling (radio system) . . . . . . . . . . . . . . 38
Entering a PIN . . . . . . . . . . . . . . . . . . . . 43
Channel number (satellite radio) . . . . . . . . 24
Cleaning (CD) . . . . . . . . . . . . . . . . . . . . . . . . 28
Control button . . . . . . . . . . . . . . . . . . . . . . . . 8
Control knob . . . . . . . . . . . . . . . . . . . . . . . . . 8
Controls . . . . . . . . . . . . . . . . . . . . . . . . . . . . . 8
Cradle for cell phone package . . . . . . . . . . 39
D
Delete radio presets (satellite radio) . . . . . 27
Dial telephone number
Multifunction steering wheel . . . . . . . . 54
Dialed numbers
Multifunction steering wheel . . . . . . . . 54
Radio system . . . . . . . . . . . . . . . . . . . . . 45
Dialing a telephone number
Radio system . . . . . . . . . . . . . . . . . . 44, 45
Telephone voice operation . . . . . . . . . . 59
Dialing stored telephone numbers . . . . . . 47
Dialing telephone numbers
Radio system . . . . . . . . . . . . . . . . . . . . . 47
Display
Brightness . . . . . . . . . . . . . . . . . . . . . . . . 17
Notes on care . . . . . . . . . . . . . . . . . . . . . . 6
Speller . . . . . . . . . . . . . . . . . . . . . . . . . . . 10
Standard menus . . . . . . . . . . . . . . . . . . . . 9
Switching on/off . . . . . . . . . . . . . . . . . . . 12
Drives
CD changer . . . . . . . . . . . . . . . . . . . . . . . 29
Memory card reader . . . . . . . . . . . . . . . 31
Notes on care . . . . . . . . . . . . . . . . . . . . . . 6
DSP PREMIUM . . . . . . . . . . . . . . . . . . . . . . . 14
DTMF tones . . . . . . . . . . . . . . . . . . . . . . . . . 44
Page 66

Alphabetical index64
E
Ending a call
Multifunction steering wheel . . . . . . . 54
Radio system . . . . . . . . . . . . . . . . . . . . . 47
Entering a PIN . . . . . . . . . . . . . . . . . . . . . . . 43
Entertainment suppression . . . . . . . . . . . . 13
F
Factory settings . . . . . . . . . . . . . . . . . . 17, 48
Fader . . . . . . . . . . . . . . . . . . . . . . . . . . . . . . 14
FM
See Selecting the frequency band . . . 18
Folder structure
Multifunction steering wheel . . . . . . . 52
Radio system . . . . . . . . . . . . . . . . . . . . . 34
Forward within a track (drive) . . . . . . . . . . 35
Frequency . . . . . . . . . . . . . . . . . . . . . . . . . . 21
Function button . . . . . . . . . . . . . . . . . . . . . . 8
G
GALA . . . . . . . . . . . . . . . . . . . . . . . . . . . . . . 14
DSP PREMIUM . . . . . . . . . . . . . . . . . . . . 14
H
Help function of the telephone voice
operation . . . . . . . . . . . . . . . . . . . . . . . 58
I
INFO . . . . . . . . . . . . . . . . . . . . . . . . . . . . . . . 29
INFO (MP3 CD) . . . . . . . . . . . . . . . . . . . . . . . 36
Instructions for handling CDs . . . . . . . . . . 28
Instructions for handling memory cards . 29
L
Laser equipment . . . . . . . . . . . . . . . . . . . . . 28
Last calls
Multifunction steering wheel . . . . . . . . 54
Radio system . . . . . . . . . . . . . . . . . . . . . 45
Listening to the radio
Multifunction steering wheel . . . . . . . . 51
Radio system . . . . . . . . . . . . . . . . . . . . . 18
M
Mailbox number . . . . . . . . . . . . . . . . . . . . . 48
Memory (radio)
Delete stations . . . . . . . . . . . . . . . . . . . . 25
Moving station . . . . . . . . . . . . . . . . . . . 25
Select station . . . . . . . . . . . . . . . . . . . . . 51
Selecting station . . . . . . . . . . . . . . . 23, 24
Storing stations . . . . . . . . . . . . . . . . . . . 23
Memory card reader . . . . . . . . . . . . . . . . . . 31
Inserting a memory card . . . . . . . . . . . 32
Removing a memory card . . . . . . . . . . 33
Memory settings . . . . . . . . . . . . . . . . . . . . . 49
Memory used (radio system) . . . . . . . . . . . 49
Menu language . . . . . . . . . . . . . . . . . . . . . . 16
Midrange . . . . . . . . . . . . . . . . . . . . . . . . . . . 14
Missed calls
Multifunction steering wheel . . . . . . . . 54
Radio system . . . . . . . . . . . . . . . . . . . . . 45
Moving stored station . . . . . . . . . . . . . . . . 25
MP3 . . . . . . . . . . . . . . . . . . . . . . . . . . . . . 29, 31
Muting
Multifunction steering wheel . . . . . . . . 50
Radio system . . . . . . . . . . . . . . . . . . . . . 12
N
Name tags . . . . . . . . . . . . . . . . . . . . . . . . . . 60
Deleting . . . . . . . . . . . . . . . . . . . . . . . . . 62
Dialing a number . . . . . . . . . . . . . . . . . . 59
Listening to the phone book . . . . . . . . 59
Storing . . . . . . . . . . . . . . . . . . . . . . . . . . 61
Next radio station . . . . . . . . . . . . . . . . . . . . 21
Notes on care
Radio system . . . . . . . . . . . . . . . . . . . . . . 6
Notes on traffic safety . . . . . . . . . . . . . . . . . 6
O
Options (cell phone package) . . . . . . . 48, 55
P
Phone book
Multifunction steering wheel . . . . . . . . 54
Radio system . . . . . . . . . . . . . . . . . . . . . 45
Telephone voice operation . . . . . . . . . . 60
Phone book entries . . . . . . . . . . . . . . . . . . . 42
PIN
For Bluetooth . . . . . . . . . . . . . . . . . . . . . 48
Telephone voice operation . . . . . . . . . . 59
Page 67

Alphabetical index 65
Playing media
Multifunction steering wheel . . . . . . . . 52
Radio system . . . . . . . . . . . . . . . . . . . . . 28
Programming using Bluetooth . . . . . . . . . 41
R
Radio
Category filter (satellite radio) . . . . . . . 27
Channel number (satellite radio) . . . . . 24
Delete radio presets (satellite radio) . . 27
Entering a channel number (satellite
radio) . . . . . . . . . . . . . . . . . . . . . . . . . . 24
Satellite station list . . . . . . . . . . . . . . . . 21
Sorting stations (satellite radio) . . . . . 26
Station info (satellite radio) . . . . . . . . . 26
System information (Satellite Radio) . 19
Radio station
Moving . . . . . . . . . . . . . . . . . . . . . . . . . . 25
Radio station list (radio) . . . . . . . . . . . . . . . 18
Radio station on the multifunction steering
wheel
Selecting from memory . . . . . . . . . . . . 52
Selecting from station list . . . . . . . . . . 51
Radio stations
Frequency . . . . . . . . . . . . . . . . . . . . . . . . 21
Next station . . . . . . . . . . . . . . . . . . . . . . 21
Scanning . . . . . . . . . . . . . . . . . . . . . . . . . 22
Seek . . . . . . . . . . . . . . . . . . . . . . . . . . . . . 21
Selecting from memory . . . . . . . . . . . . 24
Selecting from the station list . . . . . . . 20
Storing . . . . . . . . . . . . . . . . . . . . . . . . . . 23
Radio system
Notes on care . . . . . . . . . . . . . . . . . . . . . . 6
Overview . . . . . . . . . . . . . . . . . . . . . . . . . . 6
Restarting . . . . . . . . . . . . . . . . . . . . . . . . 16
Switching on and off . . . . . . . . . . . . . . . . 8
Radio text . . . . . . . . . . . . . . . . . . . . . . . . . . . 25
Read error display (CD) . . . . . . . . . . . . . . . . 28
Received calls
Multifunction steering wheel . . . . . . . . 54
Radio system . . . . . . . . . . . . . . . . . . . . . 45
Receiver serial number . . . . . . . . . . . . . . . . 19
Redial . . . . . . . . . . . . . . . . . . . . . . . . . . . . . . 48
Telephone voice operation . . . . . . . . . . 60
Repeat . . . . . . . . . . . . . . . . . . . . . . . . . . . . . 36
Replacing a call . . . . . . . . . . . . . . . . . . . . . . 48
Multifunction steering wheel . . . . . . . . 55
Reset . . . . . . . . . . . . . . . . . . . . . . . . . . . . . . . 16
Resort call lists . . . . . . . . . . . . . . . . . . . . . . 49
Restart (Radio system) . . . . . . . . . . . . . . . . 16
Reverse within a track (drive) . . . . . . . . . . . 35
S
Safety notes . . . . . . . . . . . . . . . . . . . . . . . . . . 6
Safety when calling . . . . . . . . . . . . . . . . . . . 38
SAT
See Selecting the frequency band . . . . 18
Satellite Digital Audio Radio Service
Activate your satellite radio service . . . 19
Category filter . . . . . . . . . . . . . . . . . . . . 27
Delete radio presets . . . . . . . . . . . . . . . 27
Entering a channel number . . . . . . . . . 24
Sorting stations (satellite radio) . . . . . . 26
Station info . . . . . . . . . . . . . . . . . . . . . . . 26
Station list . . . . . . . . . . . . . . . . . . . . . . . . 21
Technical requirements . . . . . . . . . . . . 18
SCAN
Radio stations . . . . . . . . . . . . . . . . . . . . . 22
Track (drive) . . . . . . . . . . . . . . . . . . . . . . 36
Seek (radio) . . . . . . . . . . . . . . . . . . . . . . . . . 21
Selecting drive . . . . . . . . . . . . . . . . . . . . . . . 33
Selecting the frequency band
Multifunction steering wheel . . . . . . . . 51
Radio system . . . . . . . . . . . . . . . . . . . . . 20
Setting date . . . . . . . . . . . . . . . . . . . . . . . . . 15
Setting language . . . . . . . . . . . . . . . . . . . . . 16
Setting the volume
Multifunction steering wheel . . . . . . . . 50
Setting time of day . . . . . . . . . . . . . . . . . . . 15
Setup radio
Activate your satellite radio service . . . 19
Category filter (satellite radio) . . . . . . . 27
Delete radio presets (satellite radio) . . 27
Sorting stations (satellite radio) . . . . . . 26
Station info (satellite radio) . . . . . . . . . 26
Setup radio (satellite radio)
Close . . . . . . . . . . . . . . . . . . . . . . . . . . . . 25
Open . . . . . . . . . . . . . . . . . . . . . . . . . . . . 25
Setup Sirius
Receiver serial number . . . . . . . . . . . . . 19
Shuffle . . . . . . . . . . . . . . . . . . . . . . . . . . . . . 35
Software version . . . . . . . . . . . . . . . . . . . . . 17
Sorting stations (satellite radio) . . . . . . . . 26
Sound
Basic settings . . . . . . . . . . . . . . . . . . . . . 14
DSP PREMIUM . . . . . . . . . . . . . . . . . . . . 14
Page 68

Alphabetical index66
GALA . . . . . . . . . . . . . . . . . . . . . . . . . . . . 14
Volume settings . . . . . . . . . . . . . . . . . . 13
Speller . . . . . . . . . . . . . . . . . . . . . . . . . . . . . 10
Starting radio operation . . . . . . . . . . . . . . 19
Starting telephone mode (radio system) . 43
Station info (satellite radio) . . . . . . . . . . . . 26
Station list (radio)
Select station . . . . . . . . . . . . . . . . . . . . . 51
Selecting station . . . . . . . . . . . . . . . . . . 20
Updating . . . . . . . . . . . . . . . . . . . . . . . . 20
Stopping/resuming a drive
Multifunction steering wheel . . . . . . . 53
Radio system . . . . . . . . . . . . . . . . . . . . . 36
STORE (Radio stations) . . . . . . . . . . . . . . . 23
Surround Level . . . . . . . . . . . . . . . . . . . . . . 14
Switching on/off
Radio system . . . . . . . . . . . . . . . . . . . . . . 8
Telephone voice operation . . . . . . . . . 58
Switching the microphone off/on (cell phone
package) . . . . . . . . . . . . . . . . . . . . . . . 48
System information (Satellite Radio) . . . . 19
T
Talk button on the multifunction steering
wheel . . . . . . . . . . . . . . . . . . . . . . . 56, 58
Technical requirements - Satellite Radio . 18
Telephone settings . . . . . . . . . . . . . . . . . . . 48
Telephone voice operation . . . . . . . . . . . . 57
Help . . . . . . . . . . . . . . . . . . . . . . . . . . . . 58
Switching on/off . . . . . . . . . . . . . . . 56, 58
TEXT (Radio) . . . . . . . . . . . . . . . . . . . . . . . . 25
Time . . . . . . . . . . . . . . . . . . . . . . . . . . . . . . . 15
Track (drive)
Next/previous . . . . . . . . . . . . . . . . . . . . 35
Scan . . . . . . . . . . . . . . . . . . . . . . . . . . . . 36
Select . . . . . . . . . . . . . . . . . . . . . . . . 34, 53
Track information (MP3 CD) . . . . . . . . 36, 37
Traffic radio . . . . . . . . . . . . . . . . . . . . . . . . . 13
Traffic safety . . . . . . . . . . . . . . . . . . . . . . . . . 6
Treble . . . . . . . . . . . . . . . . . . . . . . . . . . . . . . 14
U
Units of measurement . . . . . . . . . . . . . . . . 17
V
Version information . . . . . . . . . . . . . . . . . . 17
Voice control . . . . . . . . . . . . . . . . . . . . . . . . 57
W
WMA files . . . . . . . . . . . . . . . . . . . . . . . 29, 31
 Loading...