

Page 1

We wish you much enjoyment with your
Driver Information System.
Please familiarize yourself with the Driver
Information System and read the operating
guide before using the system. You will
thus be able to make better use of your
system and avoid endangering yourself
and others.
Please understand that actual road status
my be different from the map screens in this
manual due to future updates and changes
of the map content.
The colors on screen elements
represented in this manual my be different
from actual color on the display due to the
illumination from the printing ink.
Hyundai is constantly updating the system
to the latest technological standards and
therefore retains the right to implement
changes in design, equipment and
technology.
Page 2

Page 3

Table of contents
Introduction. . . . . . . . . . . . . . . . . . . . . 9
Chapters in this guide . . . . . . . . . . . . . . 9
Symbols. . . . . . . . . . . . . . . . . . . . . . . . 11
General symbols . . . . . . . . . . . . . . 11
Safety instructions . . . . . . . . . . . . . 11
Operational safety . . . . . . . . . . . . . . . . 12
Safety instructions . . . . . . . . . . . . . 12
Information about the laser used . . 14
Information about the operating
temperature range . . . . . . . . . . . . . 14
Intended purpose. . . . . . . . . . . . . . 14
Servicing . . . . . . . . . . . . . . . . . . . . 15
Function restrictions when
driving the vehicle . . . . . . . . . . . . . 15
FCC compliance statement . . . . . . 15
IC compliance statement . . . . . . . . 15
Bluetooth
®
information . . . . . . . . . . 16
Maintenance. . . . . . . . . . . . . . . . . . 16
Warranty. . . . . . . . . . . . . . . . . . . . . 16
Functional introduction . . . . . . . . . 17
System features. . . . . . . . . . . . . . . . . . 18
System components . . . . . . . . . . . . . . 19
Headunit. . . . . . . . . . . . . . . . . . . . . 19
Display . . . . . . . . . . . . . . . . . . . . . . 19
Central control panel . . . . . . . . . . . 20
Function buttons on the
steering wheel . . . . . . . . . . . . . . . . 22
Menu system. . . . . . . . . . . . . . . . . . . . . 24
Composition of the main menu . . . . 24
Calling up main functions . . . . . . . . 25
BACK function. . . . . . . . . . . . . . . . . 26
Operating example for the
FM main menu . . . . . . . . . . . . . . . . . . . 27
Opening the FM main menu . . . . . . 27
Top status line. . . . . . . . . . . . . . . . . 27
Bottom status line . . . . . . . . . . . . . . 27
Main menu, content area and
Options menu . . . . . . . . . . . . . . . . . 28
Lists. . . . . . . . . . . . . . . . . . . . . . . . . 29
Basic functions . . . . . . . . . . . . . . . . . . . 31
Switching the system on . . . . . . . . . 31
Switching the system off . . . . . . . . . 32
Switching audio/video
playback on/off . . . . . . . . . . . . . . . . 32
Setting the volume. . . . . . . . . . . . . . 33
Switching to FM or AM mode and
switching radio band . . . . . . . . . . . . 34
Audio settings . . . . . . . . . . . . . . . . . 34
Video settings . . . . . . . . . . . . . . . . . 38
FM and AM mode. . . . . . . . . . . . . . . . 39
HD Radio (TM) information. . . . . . . . . . 40
Licensing information. . . . . . . . . . . . 40
Availibilty information. . . . . . . . . . . . 40
What is HD Radio
TM
technology? . . 40
Multicasting. . . . . . . . . . . . . . . . . . . 40
HD Radio
TM
signal delay. . . . . . . . . 40
Automatic switching between digital
and analog broadcasting. . . . . . . . . 41
Text based information . . . . . . . . . . 41
General operation. . . . . . . . . . . . . . . . . 42
Opening the FM or AM main menu. 42
Tuning to stations. . . . . . . . . . . . . . . . . 44
Overview. . . . . . . . . . . . . . . . . . . . . 44
Tuning to a station via
the station list . . . . . . . . . . . . . . . . . 44
Tuning to a station via
manual tuning or a search . . . . . . . 45
Tuning to a station via the presets . 46
Tuning to a station via
the Scan function . . . . . . . . . . . . . . 47
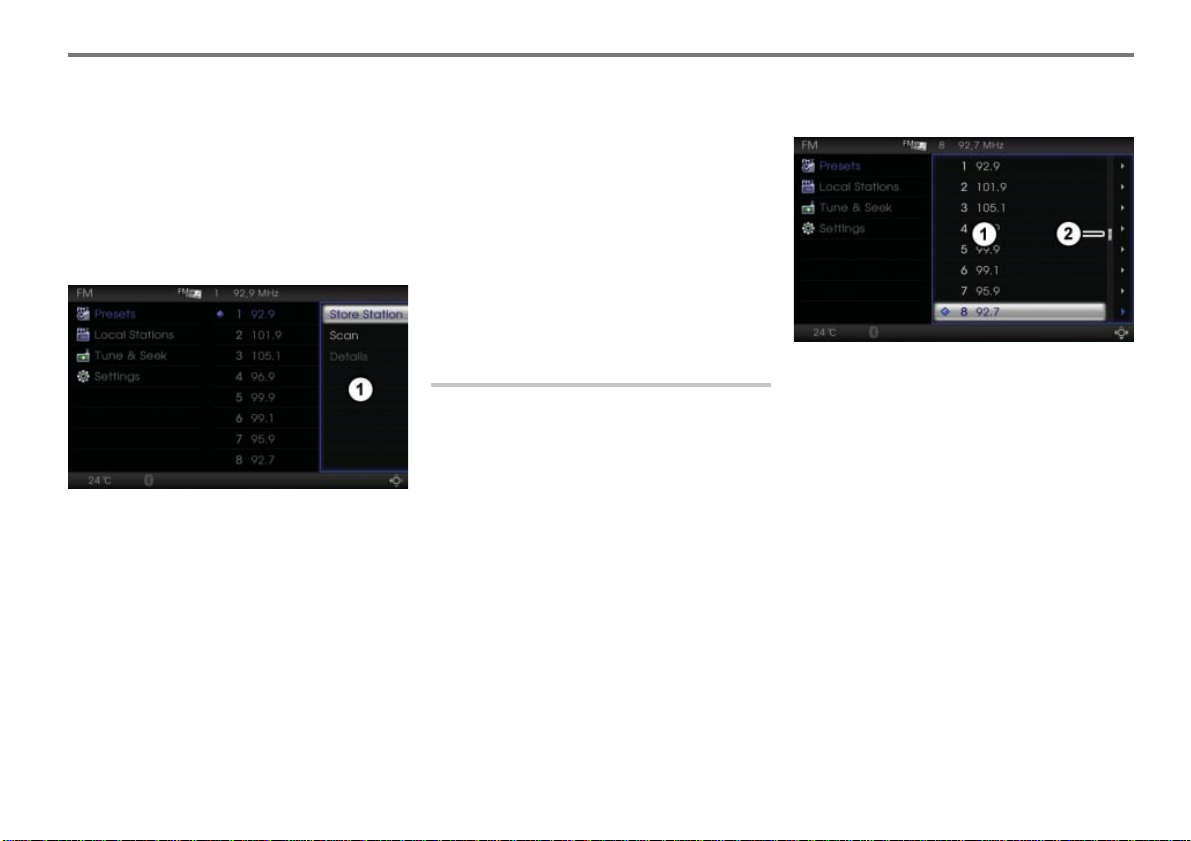
Storing stations. . . . . . . . . . . . . . . . . . . 49
Calling up the station presets . . . . . 49
Showing station details. . . . . . . . . . . . . 50
Showing details of the currently
tuned HD Radio
TM
station. . . . . . . . 50
Settings. . . . . . . . . . . . . . . . . . . . . . . . . 52
Overview. . . . . . . . . . . . . . . . . . . . . 52
Opening and closing the
Settings menu. . . . . . . . . . . . . . . . . 52
HD off . . . . . . . . . . . . . . . . . . . . . . . 52
RDS off . . . . . . . . . . . . . . . . . . . . . . 53
3
Page 4

Table of contents
XM Satellite Radio mode. . . . . . . . . 55
XM Satellite Radio information/
General operation . . . . . . . . . . . . . . . . 56
®
Satellite Radio information. . . 56
XM
General operation. . . . . . . . . . . . . . 57
Tuning to channels. . . . . . . . . . . . . . . . 58
Overview . . . . . . . . . . . . . . . . . . . . 58
Tuning to a channel via
the channel presets . . . . . . . . . . . . 58
Tuning to a channel via
the Scan function . . . . . . . . . . . . . . 59
Tuning to a channel via
the channel list . . . . . . . . . . . . . . . . 60
Tuning to a channel via
the category list . . . . . . . . . . . . . . . 61
Tuning to a channel via
channel number input. . . . . . . . . . . 63
Storing channels . . . . . . . . . . . . . . . . . 64
Storing a channel . . . . . . . . . . . . . . 64
Settings . . . . . . . . . . . . . . . . . . . . . . . . 65
Overview . . . . . . . . . . . . . . . . . . . . 65
Opening the XM
settings menu. . . . . . . . . . . . . . . . . 65
Closing the XM
®
Radio
®
Radio
settings menu. . . . . . . . . . . . . . . . . 65
Set the display in the
upper status line. . . . . . . . . . . . . . . 66
Set the category filter for
the channel list. . . . . . . . . . . . . . . . . 66
Show the Radio ID number . . . . . . . 67
Status screens and messages . . . . . . . 68
Status screen
"Channel Unauthorized". . . . . . . . . . 68
Status screen "No signal" . . . . . . . . 68
Status screen "Loading XM" . . . . . . 69
Status screen
"Selected XM channel is
no longer available" . . . . . . . . . . . . . 69
Status screen "Check Antenna" . . . . 69
Status message "OFF AIR". . . . . . . 70
Disc mode . . . . . . . . . . . . . . . . . . . . . . 71
General information. . . . . . . . . . . . . . . . 72
Safety instructions . . . . . . . . . . . . . . 72
License notice . . . . . . . . . . . . . . . . . 72
Automatic video lock-out . . . . . . . . . 72
Supported discs. . . . . . . . . . . . . . . . 73
Permissible file systems . . . . . . . . . 73
Multisession CDs. . . . . . . . . . . . . . . 73
Mixed Mode CD/CD-Extra. . . . . . . . 73
MP3 or wma discs . . . . . . . . . . . . . . 74
Note on copyright. . . . . . . . . . . . . . . 75
Notes on discs. . . . . . . . . . . . . . . . . 75
Notes on the care of discs. . . . . . . . 76
Notes on playback. . . . . . . . . . . . . . 76
Loading the disc changer magazine . . . 77
Safety instruction. . . . . . . . . . . . . . . 77
General information. . . . . . . . . . . . . 77
Loading the first available
empty magazine compartment . . . . 77
Loading a specific empty
magazine compartment. . . . . . . . . . 78
Loading all empty magazine
compartments . . . . . . . . . . . . . . . . . 79
Ejecting the disc changer magazine. . . 81
Ejecting the magazine
compartment containing
the last disc played . . . . . . . . . . . . . 81
Ejecting a specific magazine
compartment . . . . . . . . . . . . . . . . . . 81
Ejecting all magazine
compartments . . . . . . . . . . . . . . . . . 82
Audio disc playback . . . . . . . . . . . . . . . 84
Switching to disc mode and
starting audio disc playback . . . . . . 84
Disc main menu . . . . . . . . . . . . . . . 84
Selecting and playing discs. . . . . . . 87
Pausing or resuming playback . . . . 87
Selecting tracks. . . . . . . . . . . . . . . . 87
Selecting folders and MP3 or
wma tracks . . . . . . . . . . . . . . . . . . . 88
Selecting a group . . . . . . . . . . . . . . 88
Fast forwarding/reversing . . . . . . . . 89
4
Page 5

Table of contents
Repeating tracks or folders . . . . . . 89
Random play . . . . . . . . . . . . . . . . . 90
Scan function . . . . . . . . . . . . . . . . . 92
Video DVD playback . . . . . . . . . . . . . . 93
Video DVD playback conditions. . . 93
Functional restrictions . . . . . . . . . . 94
Switching to disc mode and
starting video DVD playback . . . . . 94
Disc main menu . . . . . . . . . . . . . . . 95
Selecting chapters . . . . . . . . . . . . . 96
Skipping chapters forward/back. . . 97
Selecting titles . . . . . . . . . . . . . . . . 97
Switching subtitles on/off . . . . . . . . 97
Switching audio track. . . . . . . . . . . 97
Switching viewing angle. . . . . . . . . 97
Audio settings. . . . . . . . . . . . . . . . . 97
Video settings. . . . . . . . . . . . . . . . . 97
Language settings . . . . . . . . . . . . 100
Native DVD menu . . . . . . . . . . . . 100
On-screen menu . . . . . . . . . . . . . 105
Video CD playback . . . . . . . . . . . . . . 109
Functional restrictions . . . . . . . . . 109
Notes on PBC (PlayBack Control) 109
Switching to disc mode and
starting video CD playback . . . . . 109
Disc main menu . . . . . . . . . . . . . . 110
Selecting and playing discs . . . . . 111
Selecting tracks. . . . . . . . . . . . . . . 112
Video settings . . . . . . . . . . . . . . . . 112
Audio settings . . . . . . . . . . . . . . . . 112
Native video CD menu. . . . . . . . . . 112
On-screen menu . . . . . . . . . . . . . . 116
AUX mode. . . . . . . . . . . . . . . . . . . . . 121
General information. . . . . . . . . . . . . . . 122
Trademarks . . . . . . . . . . . . . . . . . . 122
Note on copyright . . . . . . . . . . . . . 122
Signal sources. . . . . . . . . . . . . . . . . . . 123
Supported signal sources . . . . . . . 123
Connecting signal sources . . . . . . 125
General operation . . . . . . . . . . . . . . . . 129
Switching to AUX mode and
opening the AUX main menu. . . . . 129
iPod playback . . . . . . . . . . . . . . . . . . . 131
Starting playback. . . . . . . . . . . . . . 131
AUX main menu during iPod
playback . . . . . . . . . . . . . . . . . . . . 131
iPod® menu . . . . . . . . . . . . . . . . . . 132
Pausing or resuming playback . . . 134
Selecting a track . . . . . . . . . . . . . . 135
Fast forwarding/reversing . . . . . . . 136
Repeating tracks . . . . . . . . . . . . . . 136
Audio settings . . . . . . . . . . . . . . . . 137
®
USB playback. . . . . . . . . . . . . . . . . . . 138
Starting playback . . . . . . . . . . . . . 138
AUX main menu during
USB playback . . . . . . . . . . . . . . . . 138
Selecting folders and tracks . . . . . 139
Skipping tracks forward/back . . . . 140
Fast forwarding/reversing . . . . . . . 140
Repeating tracks or folders. . . . . . 140
Random play. . . . . . . . . . . . . . . . . 141
Scan function . . . . . . . . . . . . . . . . 143
Audio settings . . . . . . . . . . . . . . . . 143
AUX playback. . . . . . . . . . . . . . . . . . . 144
Automatic picture switch-off . . . . . 144
Starting playback . . . . . . . . . . . . . 144
Opening/closing the
AUX main menu during playback . 145
Audio settings . . . . . . . . . . . . . . . . 145
Video settings . . . . . . . . . . . . . . . . 145
Phone . . . . . . . . . . . . . . . . . . . . . . . . 149
General information . . . . . . . . . . . . . . 150
Safety instructions. . . . . . . . . . . . . 150
General information . . . . . . . . . . . 150
Phone main menu . . . . . . . . . . . . . . . 152
Opening the Phone main menu . . 152
5
Page 6

Table of contents
Pairing/connecting/disconnecting a
mobile phone . . . . . . . . . . . . . . . . . . . 153
General. . . . . . . . . . . . . . . . . . . . . 153
Activating Bluetooth
mobile phone . . . . . . . . . . . . . . . . 153
Pairing a mobile phone. . . . . . . . . 153
Connecting a mobile phone . . . . . 156
Terminating a connection. . . . . . . 158
Dropped connection. . . . . . . . . . . 159
Options. . . . . . . . . . . . . . . . . . . . . . . . 160
Calling up the device list. . . . . . . . 16 0
Renaming a phone. . . . . . . . . . . . 160
Deleting a pairing . . . . . . . . . . . . . 161
Deleting all pairings . . . . . . . . . . . 162
Initiating a call/accepting or
rejecting a call . . . . . . . . . . . . . . . . . . 164
Initiating an outgoing call . . . . . . . 164
Accepting/rejecting an
incoming call. . . . . . . . . . . . . . . . . 168
Functions during a call. . . . . . . . . . . . 169
Overview . . . . . . . . . . . . . . . . . . . 169
Call display. . . . . . . . . . . . . . . . . . 169
Mute the microphone . . . . . . . . . . 169
Holding and reactivating a call . . . 170
Sending DTMF tones . . . . . . . . . . 171
Ending a call. . . . . . . . . . . . . . . . . 171
Special functions for two calls . . . 172
®
on the
Phonebook . . . . . . . . . . . . . . . . . . . . . 175
General information . . . . . . . . . . . . 175
Calling up the phonebook . . . . . . . 175
Creating a new entry . . . . . . . . . . . 175
Editing an entry . . . . . . . . . . . . . . . 177
Searching for an entry . . . . . . . . . . 178
Displaying details on an entry . . . . 180
Initiating a call to an entry . . . . . . . 180
Deleting an entry . . . . . . . . . . . . . . 181
Navigation. . . . . . . . . . . . . . . . . . . . . 183
General information. . . . . . . . . . . . . . . 184
Safety instructions . . . . . . . . . . . . . 184
Digital map. . . . . . . . . . . . . . . . . . . 184
GPS reception . . . . . . . . . . . . . . . . 184
Route guidance after
vehicle transport . . . . . . . . . . . . . . 185
Function restrictions when
driving the vehicle . . . . . . . . . . . . . 185
Basic functions . . . . . . . . . . . . . . . . . . 187
Calling up the map display and
switching to navigation mode. . . . . 187
Position/scroll mode within the
map display . . . . . . . . . . . . . . . . . . 187
Information on the current
vehicle position . . . . . . . . . . . . . . . 189
Moving the map/setting the
map scale . . . . . . . . . . . . . . . . . . . 190
Audible driving recommendatio ns . 190
Navigation main menu . . . . . . . . . . . . 192
Opening the
Navigation main menu . . . . . . . . . 192
Entering destinations . . . . . . . . . . . . . 193
Entering a destination via
the address . . . . . . . . . . . . . . . . . . 193
Entering a destination via
the Previous Destinations . . . . . . . 198
Entering a destination via
Intersection input. . . . . . . . . . . . . . 198
Entering a POI destination via
POI name . . . . . . . . . . . . . . . . . . . 199
Entering a POI destination via
POI category. . . . . . . . . . . . . . . . . 203
Entering a POI destination via
POI phone number . . . . . . . . . . . . 206
Entering a POI destination via
a vicinity search. . . . . . . . . . . . . . . 208
Entering a destination via
the Address Book . . . . . . . . . . . . . 210
Entering an emergency
destination. . . . . . . . . . . . . . . . . . . 211
Entering a destination via the map 212
Functions after entering the
destination. . . . . . . . . . . . . . . . . . . . . . 214
Options after entering
the destination. . . . . . . . . . . . . . . . 214
Conforming the destination. . . . . . 215
6
Page 7

Table of contents
Adding the destination to an
existing route as a waypoint. . . . . 215
Add the destination to the
Address Book. . . . . . . . . . . . . . . . 215
Initiating a call to a POI . . . . . . . . 216
Adjusting the destination position. 216
Route calculation . . . . . . . . . . . . . 216
Route guidance . . . . . . . . . . . . . . . . . 220
Safety instructions . . . . . . . . . . . . 220
General information . . . . . . . . . . . 220
Audible driving recommendations 220
Route guidance displays . . . . . . . 220
Functions during route guidance . . . . 222
Suspending route guidance . . . . . 222
Resuming route guidance . . . . . . 222
Displaying the calculated route
again . . . . . . . . . . . . . . . . . . . . . . 222
Changing the route. . . . . . . . . . . . 223
Switching the distance/direction
display . . . . . . . . . . . . . . . . . . . . . 223
Waypoints . . . . . . . . . . . . . . . . . . 224
Functions independent of
route guidance. . . . . . . . . . . . . . . . . . 228
Freeway information. . . . . . . . . . . 228
Turn List. . . . . . . . . . . . . . . . . . . . 228
POI information . . . . . . . . . . . . . . 229
Traffic information . . . . . . . . . . . . 230
Saving/deleting destinations in the
Address Book . . . . . . . . . . . . . . . . . . . 232
Address Book categories. . . . . . . . 232
Entering a destination via the map
and saving it . . . . . . . . . . . . . . . . . 232
Entering the destination by
conventional means and saving it . 233
Deleting destinations. . . . . . . . . . . 236
Editing Address Book entries . . . . . . . 239
Selecting an Address Book entry . 239
Editing an entry . . . . . . . . . . . . . . . 239
Settings. . . . . . . . . . . . . . . . . . . . . . . . 243
Opening the Settings menu. . . . . . 243
Map display settings . . . . . . . . . . . 243
Switching the map orientation . . . . 244
Switching the map mode. . . . . . . . 245
Estimated time of arrival settings. . 245
Avoid Area settings . . . . . . . . . . . . 246
Displaying navigation information . 2 49
Reset function . . . . . . . . . . . . . . . . 250
Voice control . . . . . . . . . . . . . . . . . . 251
General information. . . . . . . . . . . . . . . 252
Safety instruction. . . . . . . . . . . . . . 252
Symbols. . . . . . . . . . . . . . . . . . . . . 252
Operating language. . . . . . . . . . . . 253
General notes on operation. . . . . . 253
Voice input . . . . . . . . . . . . . . . . . . 253
General operation. . . . . . . . . . . . . 254
Commands . . . . . . . . . . . . . . . . . . 255
Skipping sections of a dialog . . . . 255
Configuring voice control . . . . . . . 256
Help function (teleprompter) . . . . . 256
Operating picklists. . . . . . . . . . . . . 257
Tuner mode
(FM, AM and XM Satellite Radio). . . . 258
Calling up tuner mode. . . . . . . . . . 258
Tuner mode help . . . . . . . . . . . . . . 258
Setting the waveband . . . . . . . . . . 258
Setting the frequency
(FM or AM tuner mode only). . . . . 258
Next/previous station
(FM and AM tuner mode only) . . . 259
Next/previous channel
®
tuner mode only) . . . . . . . . . 259
(XM
Station search
(FM and AM tuner mode only) . . . 259
Selecting channels
®
tuner mode only) . . . . . . . . . 259
(XM
Operating examples . . . . . . . . . . . 259
Disc mode. . . . . . . . . . . . . . . . . . . . . . 261
Calling up disc mode. . . . . . . . . . . 261
Disc mode help. . . . . . . . . . . . . . . 261
Next/previous disc. . . . . . . . . . . . . 261
7
Page 8

Table of contents
Selecting a disc directly . . . . . . . . 261
Next/previous folder . . . . . . . . . . . 261
Skipping tracks
forwards/backwards . . . . . . . . . . . 262
Selecting a track directly . . . . . . . 262
Operating examples. . . . . . . . . . . 262
Phone mode. . . . . . . . . . . . . . . . . . . . 263
Calling up phone mode . . . . . . . . 263
Phone help. . . . . . . . . . . . . . . . . . 263
Dialing a number . . . . . . . . . . . . . 263
Redialing . . . . . . . . . . . . . . . . . . . 263
Storing numbers in the
phonebook . . . . . . . . . . . . . . . . . . 263
Calling a phonebook entry . . . . . . 264
Operating examples. . . . . . . . . . . 264
Navigation mode . . . . . . . . . . . . . . . . 268
Calling up navigation mode . . . . . 268
Navigation mode help. . . . . . . . . . 268
Entering a destination. . . . . . . . . . 268
Saving current position. . . . . . . . . 269
Entering a destination stored in the
Adress Book. . . . . . . . . . . . . . . . . 269
Starting route guidance . . . . . . . . 269
Stopping route guidance . . . . . . . 270
Redefining a navigation route . . . . 270
Setting a detour . . . . . . . . . . . . . . 270
Map display . . . . . . . . . . . . . . . . . 270
Switching traffic information on/off 271
Operating examples. . . . . . . . . . . 271
Command overview. . . . . . . . . . . . . . . 277
Group commands . . . . . . . . . . . . . 277
Tuner commands. . . . . . . . . . . . . . 277
Disc commands. . . . . . . . . . . . . . . 277
Phone commands . . . . . . . . . . . . . 278
Navigation commands . . . . . . . . . . 278
Info . . . . . . . . . . . . . . . . . . . . . . . . . . . 281
Opening the Info main menu . . . . . . . . 282
Info main menu . . . . . . . . . . . . . . . 282
Info functions. . . . . . . . . . . . . . . . . . . . 283
Climate. . . . . . . . . . . . . . . . . . . . . . 283
Trip Info . . . . . . . . . . . . . . . . . . . . . 283
Car Settings. . . . . . . . . . . . . . . . . . 283
System Settings. . . . . . . . . . . . . . . 287
Rear camera* . . . . . . . . . . . . . . . . . . 293
General information and operation . . . 294
General information . . . . . . . . . . . . 294
Operation. . . . . . . . . . . . . . . . . . . . 294
Appendix. . . . . . . . . . . . . . . . . . . . . . 297
Technical data. . . . . . . . . . . . . . . . . . . 298
Head unit . . . . . . . . . . . . . . . . . . . . 298
Antenna type . . . . . . . . . . . . . . . . . 298
Radio . . . . . . . . . . . . . . . . . . . . . . . 298
Display. . . . . . . . . . . . . . . . . . . . . . 298
Common . . . . . . . . . . . . . . . . . . . . 298
8
Page 9

This operating guide has been designed to
assist in using the Driver Information
System. The guide includes the following
chapters:
Functional Introduction
This chapter includes the following:
Functional Description
Menu System
System Components and Controls
FM Main Menu Example
FM and AM mode
Here you will find all information regarding
FM, AM and HD Radio
2
®
XM
Satellite Radio mode
This chapter describes the XM
1
TM
operation.
®
Satellite
Radio mode.
1. HD RadioTM Technology Manufactured Under
License From iBiquity Digital Corporation. U.S. and
Foreign Patents. HD Radio
logo are proprietary trademarks of iBiquity Digital
Corporation.
®
2. XM
and the XM® logos are registered trademarks
of XM Satellite Radio Inc.
TM
and the HD Radio
Disc mode
In this chapter you will find the descriptions
of how to play the following discs:
Audio CD
MP3 CD
Audio DVD
Video DVD
Video CD
AUX mode
This chapter describes how to connect and
play back audio/video from the following
external signal sources:
3
®
iPod
(audio playback only)
USB stick (audio playback only)
AUX signal source (audio and/or video
playback)
3. iPod® is a trademark of Apple Inc.
Introduction
Introduction
Chapters in this guide
®
Phone (Bluetooth
This chapter describes the phone functions
that can be accessed if there is a mobile
phone connected with the system.
Navigation
Here you will find, among other things,
detailed information regarding the following
topics:
Destination input
Functions following destination input
Route guidance
Voice control
Here you will find the description of how to
operate the system with voice control.
Info
This chapter describes the following topics:
Displaying various vehicles details
Vehicle settings
System settings
Hands-Free)
9
Page 10

Introduction
Chapters in this guide
Rear camera*1
Here you will find the description of the
Rear camera*.
Appendix
In this chapter you will find the technical
data of the system and a troubleshooting
section.
Table of contents
The table of contents is intended to help
you find information quickly.
1. The asterisk * identifies optional equipment
10
Page 11
General symbols
Icon or text Explanation
*
! The 'info' icon identifies tips
The filled triangle prompts
Two filled triangles
Page 23 This is how a reference to
etc.
The asterisk * identifies
optional equipment.
and additional information.
you to perform an action.
represent the continuation
symbol.
another page is shown.
These bullet points are
used to identify lists.
Icon or text Explanation
!
"
#
etc.
Display On-screen displays are
Command Commands for the voice
Legends for illustrations
are consecutively
numbered.
shown in this font.
control system and voice
output of the voice control
system are shown in italics.
Safety instructions
In this operating guide you will find various
safety instructions intended to ensure your
personal safety. You should carefully read
and follow all safety instructions.
WARNING
This warning identifies where the possible
cause of serious damage to the product may
be, and possible causes of traffic accident
due to user’s carelessness.
Introduction
Symbols
CAUTION
This warning identifies a situation where
operation may be misunderstood as an error
or when care needs to be taken when
handling or using the product..
11
Page 12
Introduction
Operational safety
Safety instructions
WARNING
Operating the Driver-Information-Systems
while driving could cause accidents due to
lack of attention to the road.
Operate the system with the vehicle
parked. Some functions of the system
are disabled when vehicle is in motion.
The system is fully functional only when
the vehicle is parked.
Minimize the time looking at the display.
Parking the vehicle in areas where stopping
or parking is prohibited to operate the
Driver-Information-Systems may be a cause
of an accident.
To operate the system, do not park in areas
where stopping or parking is prohibited.
WARNING
If you use the phone functions when driving,
you may be distracted from the traffic
situation, thus increasing the accident
hazard.
Only use the phone functions when the
vehicle is stationary.
If you use the navigation system, you may
be distracted from the traffic situation and
fail to observe traffic signs, traffic
regulations and road safety facilities, thus
increasing the accident hazard.
Only enter a navigation destination
when the vehicle is stationary.
Always observe traffic signs, traffic
regulations and road safety facilities.
These always have priority over driving
recommendations made by the system.
WARNING
It is impossible to provide an assurance that
the speed values stored in the digital map
will always match those of the current traffic
regulations in every situation.
Always observe the applicable legal
speed limits and traffic regulations.
The current legal road traffic speed limit
always takes priority over the values
stored in the digital map.
The vehicle speedometer must always
be given priority for display of the
vehicle speed.
12
Page 13
Introduction
Operational safety
WARNING
Disassembling or altering the Driver
Information System my be a cause for an
accident, fire or electrical shock.
Do not disassemble or alter the system.
Water or other foreign objects entering the
Driver Information System may be a cause
for an accident, fire or electrical shocks.
Be careful of water or other foreign objects
entering the system.
Using the Driver Information System in its
damaged state, such as display or audio not
working, may cause an accident, fire or
electrical shock.
Do not use the system in its damaged state.
WARNING
It can not be guaranteed that all available
emergency services in your vicinity are
stored in the digital map of the navigation
system.
Do not rely excusively on the navigation
system when attempting to locate an
emergency service (hospital, fire
service, etc.).
Use your own discreption and abilities to
secure help in such situations.
Touching the antenna during a
thunderstorm could cause an electrical
shock due to lightning striking the antenna.
Do not touch the antenne during a
thunderstorm.
WARNING
The Driver Information System is a class 1
laser product. Opening the housing or a
defective or damaged housing represents
an injury hazard due to invisible laser
radiation.
Do not open the housing.
For safety reasons, have any
maintenance work performed by
qualified service experts only.
CAUTION
Do not place beverages close to the Driver
Information System. The system may be
damaged if you spill them.
Do not strike or allow anything to impact the
Driver Information System. Damage to the
system could occur.
(continued)
13
Page 14
Introduction
Operational safety
CAUTION
(continued)
Do not use the Driver Information System in
its damaged state. It may cause a critical
damage to the system.
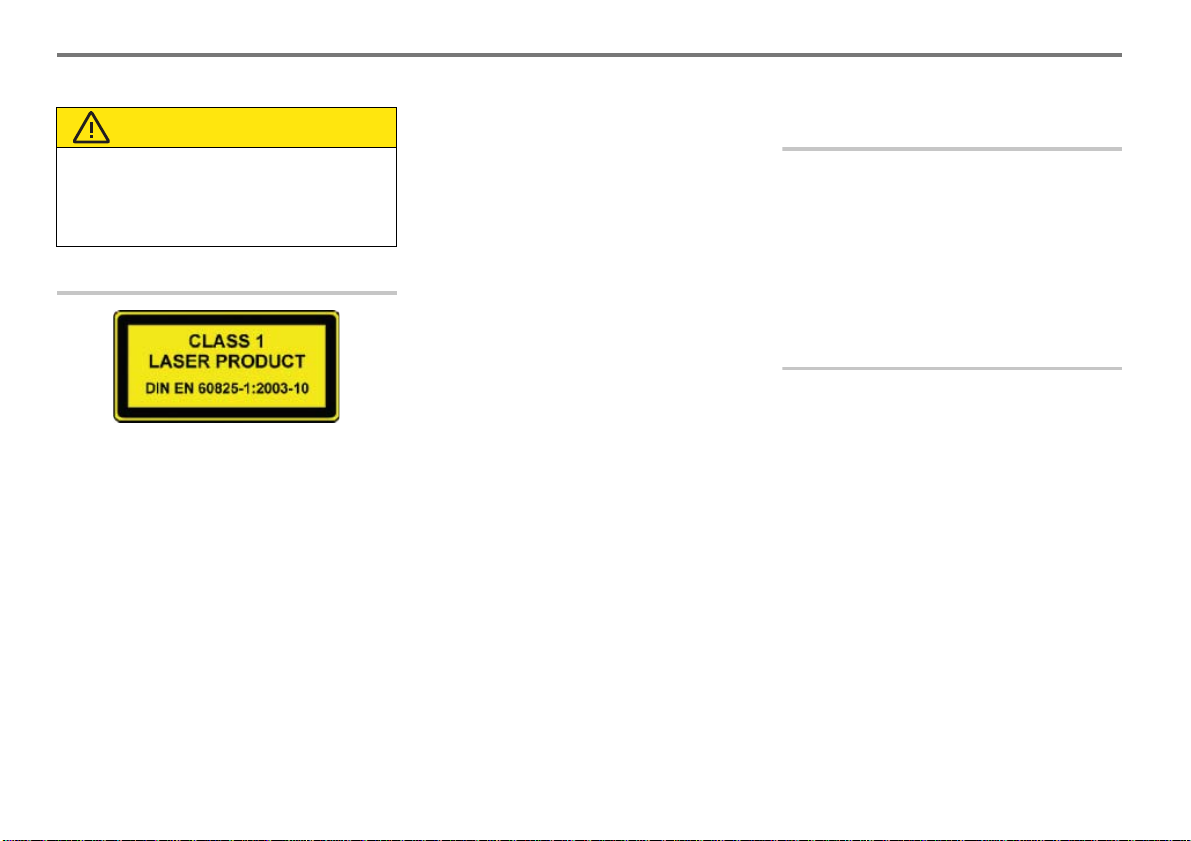
Information about the laser used
This laser product is classified as a class 1
laser product in accordance with the
national/international standards DIN
EN 60825-1 : 2003-10 and DHHS Rules
21 CFR Subchapter J to the date of
manufacture.
The laser beam in this class 1 laser product
is so weak that it poses no threat in any
situation, or this product is designed that
the laser beam is limited to the inside of the
device. A laser encased in this device can,
however, still be powerful enough to qualify
as a higher class of laser. For this reason
the protective case should not be opened at
any time (loss of warranty).
Technical data for the laser equipment
inside the device:
Output power from laser beam: 0.68 mW
(DVD) / 0.85 mW (CD)
Wave length of laser beam: 665 nm (DVD)
/ 795 nm (CD)
The laser diode is not pulsed during
operation.
Information about the operating
temperature range
!"The guaranteed operating temperature
range is -40° C - +80° C (-40° F - +176° F).
If the temperature is too low or to high, the
Driver Information System may not work.
This is not an indication of damage in the
product, so don’t be alarmed. Please use
the system after waiting for awhile.
Intended purpose
Please keep the following information in
mind when using the Driver Information
System:
The safety instructions in this guide
The road traffic regulations
14
Page 15

Servicing
Tampering with electronic components or
systems and their software may result in
malfunctions. Even systems which have
not been modified may be affected due to
the connectivity of the electronics.
Malfunctioning of the electronics can
seriously endanger the operational safety
of your vehicle.
Always have all work or modifications to
electronic components carried out by an
approved service center with the necessary
expertise and tools for any work required.
Especially for safety-related operations and
operations on safety-related systems,
servicing by an approved service center is
essential.
Function restrictions when driving
the vehicle
Certain functions, such as Navigation
menu selection or Car Settings may be
restricted or unavailable while driving.
As soon as the vehicle falls below a certain
speed, the functions are unrestricted or
available again.
The restriction can be recognized, for
example, from the fact that certain menu
items have no function or that a
corresponding message appears.
Videos such as video DVD or video CD are
viewable only when the gear stick position
is at „P“.
You will find further information in the
corresponding chapters in this manual.
FCC compliance statement
This device complies with Part 15 of the
FCC Rules. Operation is subject to the
following two conditions:
(1) this device may not cause harmful
interference, and
(2) this device must accept any interference
received, including interference that may
cause undesired operation.
Caution
Any changes or modifications not expressly
approved by the manufacturer, responsible
for compliance, could void the user’s
authority to operate the equipment.
Introduction
Operational safety
Radiofrequency radiation exposure
information
The radiated output power of the device is
far below the FCC radio frequency
exposure limits. Nevertheless, the device
shall be used in such a manner that the
potential for human contact during normal
operation is minimized.
IC compliance statement
This device complies with RSS-210 of
Industry Canada. Operation is subject to
the following two conditions:
(1) this device may not cause harmful
interference, and
(2) this device must accept any i nterference
received, including interference that may
cause undesired operation of the device.
Bluetooth® information
Bluetooth® Qualified Design ID
Number B013386
15
Page 16
Introduction
Operational safety
Maintenance
CAUTION
The Driver Information System contains
high-quality electronic components which
require special care with regard to
maintenance.
The following should be observed:
The display scratches easily. Clean the
display using a dry, clean and soft cloth
with the system off.
Do not exert excessive pressure on the
displays or other surfaces when
cleaning it.
Rough rub, chemical wipe or solvent
(e.g. alcohol, benzene, thinner) may
scratch or distort the display surface.
(continued)
CAUTION
(continued)
The device must not be sprayed with
cleaning agents or liquids. Ingress of
liquids can result in the destruction of
the equipment.
If the system has any problem, please
contact your Hyundai dealer or an
approved service center to resolve the
problem.
Warranty
CAUTION
Do not open the housing of any system
component.
If you open the housing, the warranty is lost
and after service will not be possible.
16
Page 17

Functional introduction
System features . . . . . . . . . . . . . . . . . . . . . . . . . . . . . 18
System components. . . . . . . . . . . . . . . . . . . . . . . . . . 19
Menu system . . . . . . . . . . . . . . . . . . . . . . . . . . . . . . . . 24
Operating example for the FM main menu . . . . . . . . 27
Basic functions . . . . . . . . . . . . . . . . . . . . . . . . . . . . . . 31
17
Page 18

Functional introduction
System features
Congratulation to your Driver
Information System!
The Driver Information System is a highend multimedia system supporting the
following:
1
TM
FM, AM and HD Radio
2
®
XM
Satellite Radio reception
reception
DVD changer supporting up to six discs
of the type audio CD, DVD audio, DVD
video, VCD, MP3 files on CD or DVD,
and WMA files on CD or DVD
External connection supporting USB
with MP3 or WMA files, iPod, and audio
or video AUX connection via a mini
jack.
Especially, the 8-inch display provides high
quality images with great audio output from
Lexicon sound system.
1. HD RadioTM Technology Manufactured Under
License From iBiquity Digital Corporation. U.S. and
Foreign Patents. HD Radio
logo are proprietary trademarks of iBiquity Digital
Corporation.
®
2. XM
and the XM® logos are registered trademarks
of XM Satellite Radio Inc.
TM
and the HD Radio
Advantages of the Driver Information
System
Display
8-inch LCD provides three aspect ratio for
all video sources for your taste.
Radio
An additional FM tuner allows all available
stations to be available instantly without
having to search through the entire
frequency band.
TM
The integrated HD Radio
capable FM/
AM tuner offers digital radio reception.
®
The integrated XM
Radio tuner offers
digital satellite radio reception.
Antenna
®
Roof antenna (GPS and XM
Radio
reception) and an integrated glass antenna
(FM/AM reception) offers superb reception
quality.
DVD Changer 6
6 discs in the changer at a time provides a
convenient way of changing switching
between discs without the hassle of
searching, removing, and inserting a
desired disc.
Inserted disc type is identified, and auto
play of its content depending on its type
makes it convenient for the user.
With the PBC (supported by MPEG1
version 2.0 VCD) provides a convenient
way of navigating through the contents
provided by the VCD.
Others
A center control panel that offers commonly
used functions at the tip of your finger gives
great control over the Driver Information
System. The rotate-push-press controller
at the center allows great ease of
navigating through the Driver Information
System menus.
18
Page 19
Functional introduction
System components
The Driver Information System consists of
the following main components:
Headunit, see page 19
Display, see page 19
Central control panel, see page 20
Function buttons on the steering wheel,
see page 22
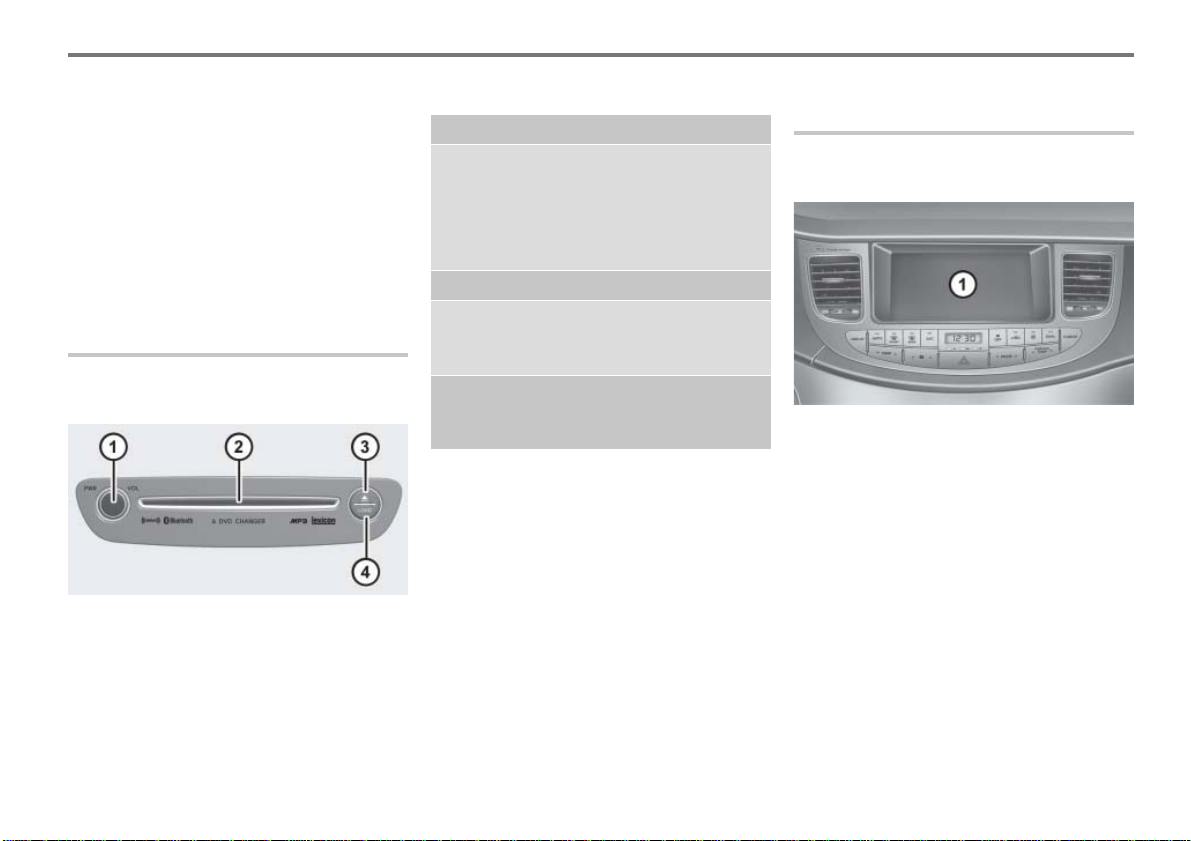
Headunit
The headunit is located in the vehicle
dashboard.
Control Page
! Press !:
Switching audio/video
playback on/off
!:
Turn
Setting the volume
" Disc slot
# "
Ejecting the disc changer
magazine
$ #
Loading the disc changer
magazine 77
Display
The display is located in the vehicle
dashboard.
32
33
81
! F ront display
19
Page 20
Functional introduction
System components
Central control panel
The central control panel is located in the
front in the vehicle center console. It
comprises the controller and the main
function buttons.
Pushing the controller
Push forwards or backwards
to the left or right
)*:
%& , push diagonally
'(, push
Moving the map, see chapter
"Navigation", section "Moving the map/
setting the map scale" on page 190.
Turning the controller
! Main function buttons
" Controller
Controller
You can push, turn and press the
controller $, see illustrations below.
20
Push to the left or right
%&:
Switching between the areas in a main
menu, see page 29 in this chapter.
Push forwards or backwards
'( :
Scrolling through a list page by
page, see page 29 in this chapter.
Selecting a menu item, see page 28
in this chapter.
Turn to the left or right +,:
Selecting a menu item, see page 28 in this
chapter.
Page 21
Pressing the controller
Press:
Confirming the selection, see page 28 in
this chapter.
Main function buttons
Main function button Page
! -
Switching to FM or AM
mode and switching radio
band
" .
Short press:
Going back one menu level
34
26
Functional introduction
System components
Main function button Page
" .
Long press:
Opening the main menu for
the active main function
# /
Calling up the map
display and switching to
navigation mode
Calling up a current
audible driving
recommendation
$ 0
Opening the Navigation
main menu
% 1
Opening the Info main
menu
Opening the Phone
main menu
26
187
191
192
282
152
21
Page 22
Functional introduction
System components
Main function button Page
& 2
Switching to disc mode
Closing the Disc main
menu and returning to
video full-screen display
(Video DVD or video CD
playback only)
Switching to AUX mode
and opening the AUX
main menu
Closing the AUX main
menu and opening the
AUX full-screen display
' 3
Opening the XM® Satellite
Radio main menu
84
94
109
95
110
129
145
57
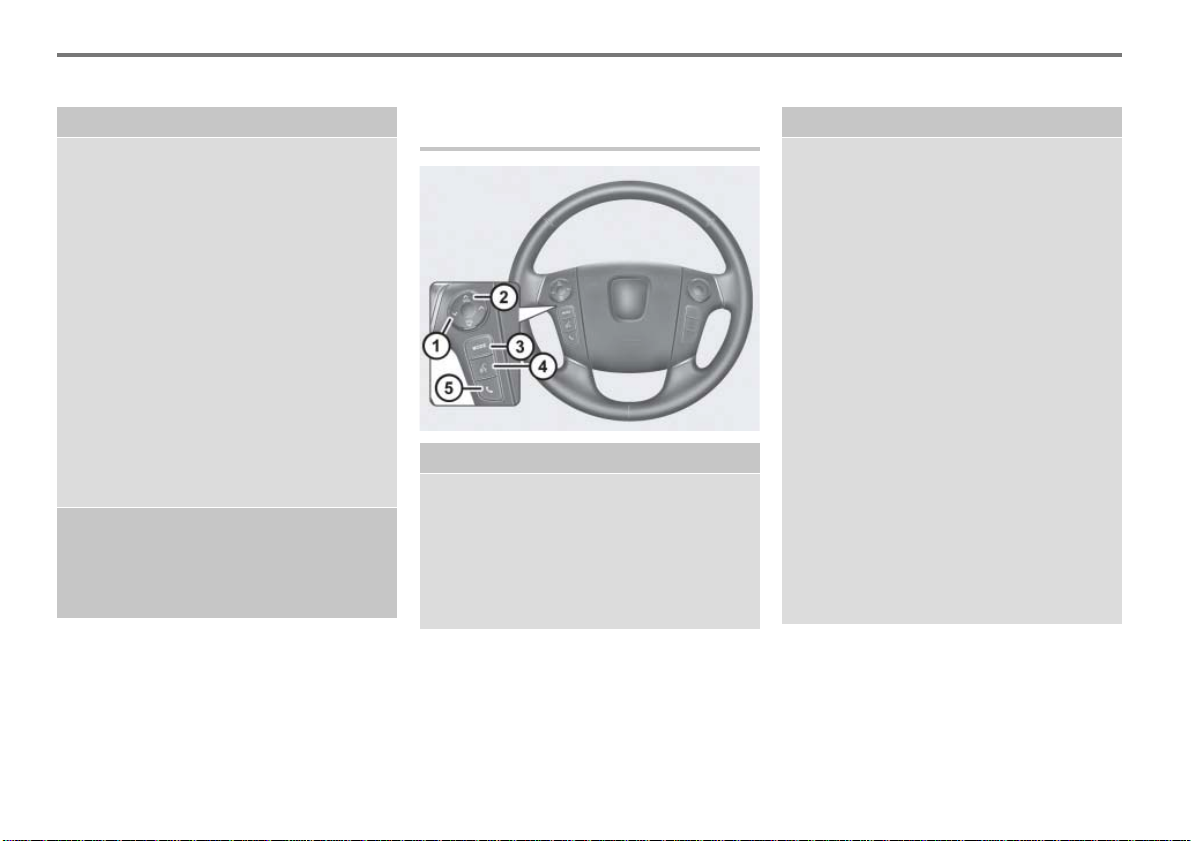
Function buttons on the steering
wheel
Function button Page
! 4 and 5
Tuning to a station via
the presets (FM or AM)
Tuning to a station via a
search (FM or AM)
! 4 and 5
46
45
Function button Page
Tuning to a channel via
the channel list (XM
®
Satellite Radio)
Selecting discs
111
Fast forwarding/
reversing:
USB memory stick
1
®
iPod
140
136
Skipping chapters
forward/back (video
DVD)
Skipping tracks forward/
back:
Audio disc
Video CD
2
®
iPod
USB
112
135
140
60
87
96
97
87
22
1iPod® is a trademark of Apple Inc.
®
2iPod
is a trademark of Apple Inc.
Page 23

Function button Page
" 6 and 7
Setting the volume
# 8
Switching mode
Switching private mode
on/off (phone)
Switching audio/video
playback on/off
$ 9
Activating/deactivating the
voice control system
% :
Opening the Phone
main menu
Using redial
Accepting/rejecting an
incoming call
Ending a call
Swapping between two
calls
Functional introduction
System components
33
170
32
254
152
168
168
171
173
23
Page 24
Functional introduction
Menu system
WARNING
Operating the Driver-Information-Systems
while driving could cause accidents due to
lack of attention to the road.
Operate the system with the vehicle
parked. Some functions of the system
are disabled when vehicle is in motion.
The system is fully functional only when
the vehicle is parked.
Minimize the time looking at the display.
The Driver Information System is easy to
use thanks to its menu system.
There is a main menu for each of the
following main functions:
FM (FM band)
AM (AM band)
®
XM
(Satellite Radio)
Disc (audio CD, MP3 CD, audio/video
DVD and video CD)
AUX (iPod, USB memory stick and AUX
signal source)
®
Phone (Bluetooth
handsfree)
Info (vehicle and system settings as
well as various vehicle status displays)
Navigation
Composition of the main menu
The main menu for a main function
comprises at most the following three usercontrol areas:
Main menu
Content area
Options menu
It also contains the following two non-usercontrol areas:
Top status line
Bottom status line
The illustration below shows the main
menu for the FM main function.
! Main menu
" Top status line
# Content area
$ Options menu
% Highlighted menu item in the Options
menu
& Botto m status line
24
Page 25

Top and bottom status lines
The top and bottom status lines
" and &
contain no user controls. The status lines
are provided for information purposes only
and can show you, for example, the
following:
information on the currently active main
function, see section "Top status line"
on page 27,
information on the currently active
entertainment source (e.g. FM), see
section "Top status line" on page 27,
Bluetooth connection status of the
phone, see chapter "Phone", section
"Connecting a mobile phone" on
page 156.
Main menu
The main menu
! shows the subfunctions
available for the active main function as
individual menu items.
!"See page 28 for a description of how to
select a menu item and confirm the
selection.
Content area
The content area
# shows either the
content of the menu item selected in the
main menu
! or a further submenu where
you can again select a menu item.
!"See page 28 for a description of how to
select a menu item and confirm the
selection.
Options menu
For certain displays in the content area
#
you can open the Options menu $. It
contains additional information or setting
options.
Calling up main functions
Option 1
!"Pressing one of the following main function
buttons activates the corresponding mode,
provided it was not previously active. If it
was already active, then it remains active.
Functional introduction
Menu system
FM mode: Press the main function
button -, see page 42.
AM mode: Press the main function
button -, see page 42.
®
XM
Disc mode: Press the main function
AUX mode: Press the main function
Phone mode: Press the main function
Info mode: Press the main function
Navigation mode: Press the main
or
Press the main function button 0,
Satellite Radio mode: Press the
main function button 3, see page
page 57.
button 2, see page 84, 94 or 109.
button 2, see page 129.
button 1, see page 152.
button 1, see page 282.
function button /, see page 187.
see page 192.
25
Page 26

Functional introduction
Menu system
Option 2
Press the 8 button on the steering
wheel repeatedly until the desired main
function is displayed.
!"You cannot switch to the main functions
Phone, Info and Navigation on the steering
wheel.
!"If Navigation, Info or Phone is the active
main function, switching to FM/AM, XM
Satellite Radio, Disc or AUX main function
on the steering wheel does not switch the
display, only the audio source will be
switched accordingly.
If you want to switch the display also, you
must use the corresponding main function
button on the control panel.
®
BACK function
To go back one menu level: Briefly
press the . button.
To open the main menu for the active
main function: Press and hold
the . button.
!"There are certain menus or displays that you
can only exit or close by briefly pressing
. button.
the
26
Page 27
Opening the FM main menu
Top status line
Functional introduction
Operating example for the FM main menu
Bottom status line
Press the - button.
Either the FM or the AM main menu
appears when you press the button.
If the AM main menu appears:
Press the - button again.
The FM main menu appears.
or
Press the 8 button on the steering
wheel repeatedly until the FM main
menu appears.
!"If Navigation, Info or Phone is the active
mode, switching to FM mode on the steering
wheel does not switch the display, only the
audio source will be switched accordingly.
If you want to switch the display also, you
must use the
panel.
- button on the control
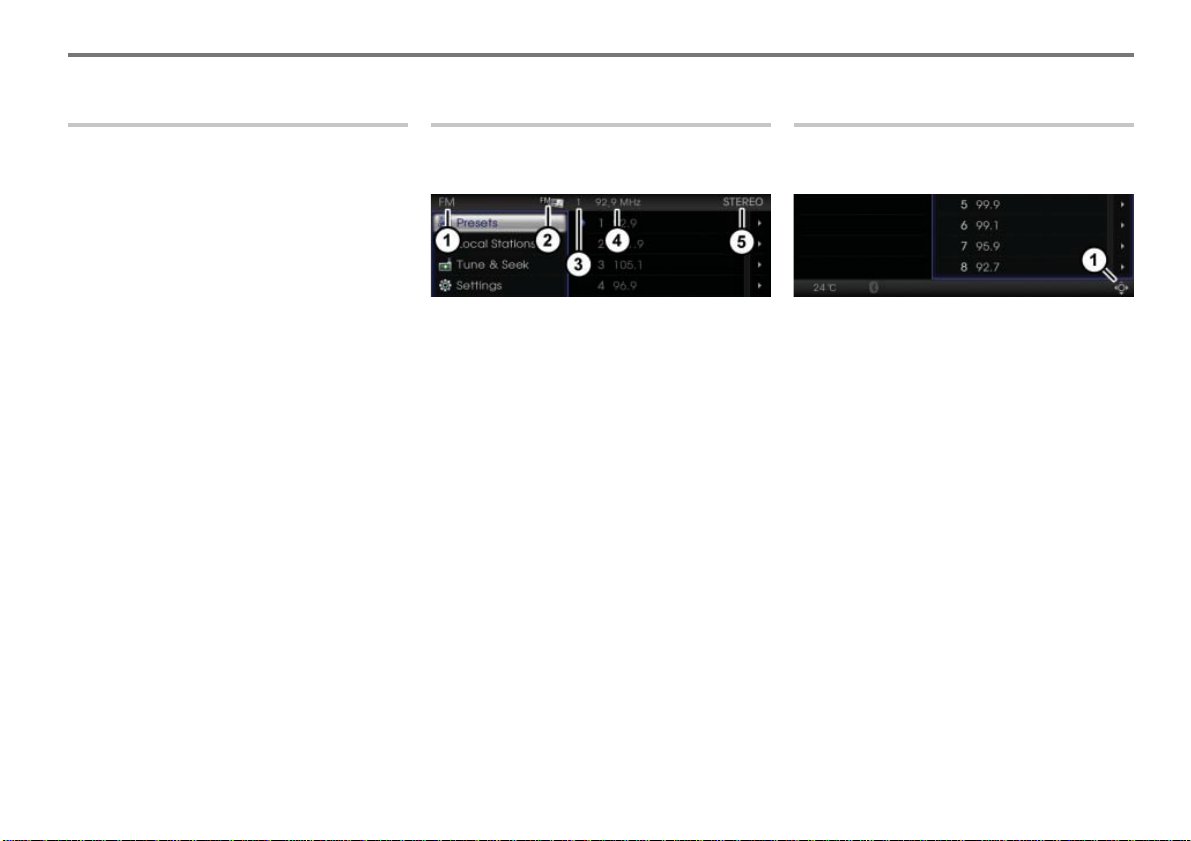
The top status line shows various
information.
! Currently active main function
" Currently active entertain ment source
# Preset of the currently selected station
in the presets
$ Frequency of the currently selected
station
% Indicator for stereo reception
The bottom status line shows the controller
icons amon other things.
! Controller icons
The icons , , and represent the
directions of movement of the
controller
The icon
$.
! represents turning the
controller $.
Each individual icon can be shown in white
or grey.
White icon:
Pushing or turning as appropriate initiates
an operation.
Grey icon:
Pushing or turning as appropriate does not
initiate an operation.
27
Page 28
Functional introduction
Operating example for the FM main menu
Main menu, content area and
Options menu
Push
!"If you select a menu item in the main menu
'( the controller $ until the
desired menu item is highlighted.
!, then the display in the content area #
can automatically show further information
or menus for the selected menu item. In the
previous illustration, the menu item
is selected and the content area
shows the presets in the form of a list.
Presets
# then
! Main menu with the various menu items
(blue frame around the menu= menu is
active)
" Selected menu item
# Content area (no blue frame around the
content area= content area is inactive)
Selecting a menu item
Turn
+, the controller $ until the
desired menu item is highlighted.
or
28
Confirming the selection
Press the controller
$.
The content area is now active and
supplied with a blue frame.
!"In the following descriptions, selection of a
menu item and confirmation of the selection
is combined into one prompt for action and
referred to as "selecting".
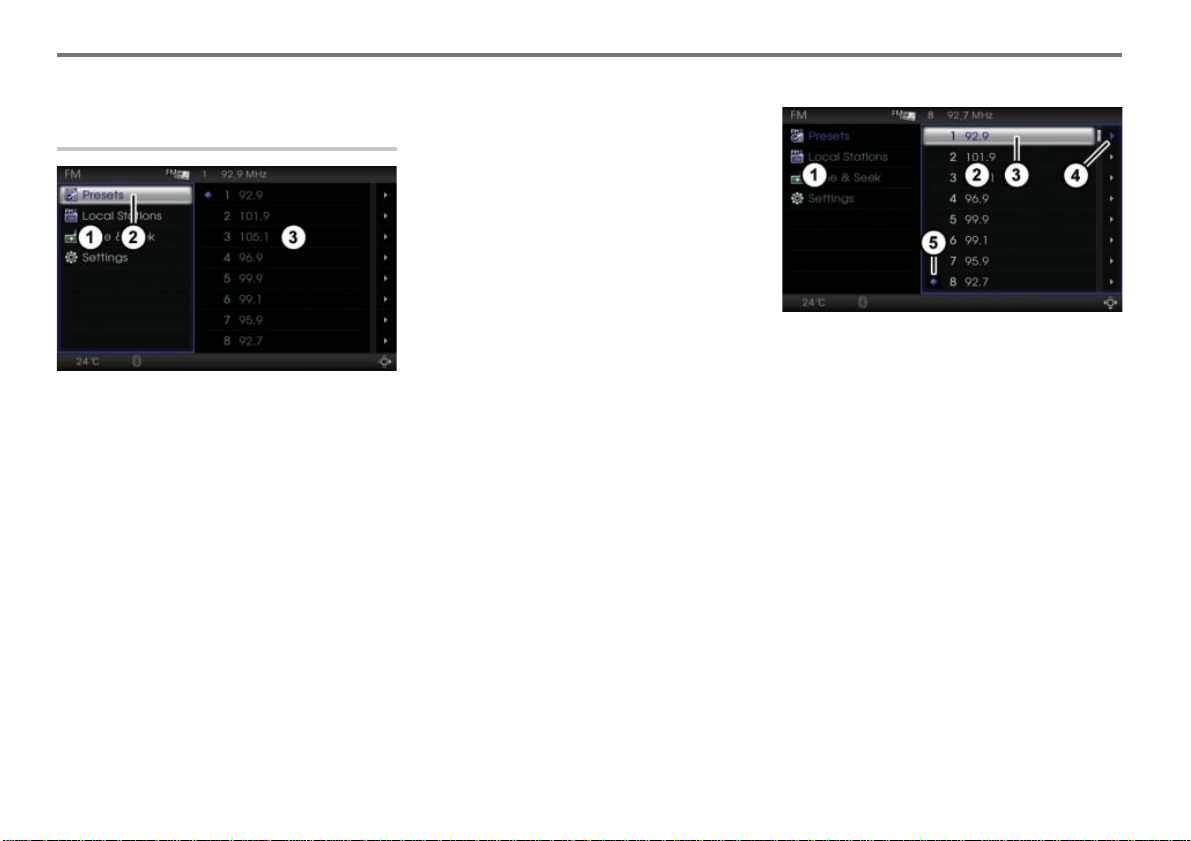
The illustration below shows, in the content
area ", the presets in the form of a list.
You can select and confirm a menu item in
the list as previously described, which, in
this example, will result in the system
tuning to the appropriation station.
! Main menu
" Content area
# Selected menu item in the content area
$ Icon indicating the Options menu is
available
% Icon for the currently selected station
!"The Options menu is only available if the
appears to the right of a menu item.
icon
In the illustration above, the Options menu
is available for all menu items.
Page 29
Opening the Options menu
With the content area active, push
the controller
$ once.
The Options menu for the selected
menu item appears. In the Options
menu you can select and confirm
further menu items.
! Options menu
Closing the Options menu
Push % the controller $ once.
or
Operating example for the FM main menu
Briefly press the . button.
&
The Options menu is now closed and
the content area becomes active again.
Switching between the areas in a main
menu
Push
%& the controller $ repeatedly
until the desired area is active.
!"You can tell an active area by the blue frame
around the area.
Lists
The menus in all three us er-control areas in
a main menu (main menu, content area and
Options menu) can be displayed in the form
of lists.
In addition to selecting and confirming as
previously described, when using lists the
following options are also available:
Scrolling through a list page by page,
see page 29
Displaying an abbreviated list entry in
full, see page 30
Functional introduction
Scrolling through a list page by page
! List
" Scrolling behavior cursor
If a list contains more than one page, the
scrolling behavior cursor
displayed.
To scroll down: Push
controller $ repeatedly until the
desired page is displayed.
To scroll up: Push
repeatedly until the desired page is
displayed.
" will be
( the
' the controller $
29
Page 30
Functional introduction
Operating example for the FM main menu
!"When you scroll through the list page by
page or select an entry, the scrolling
behavior cursor
doing so it indicates your current position in
the list.
" moves accordingly. By
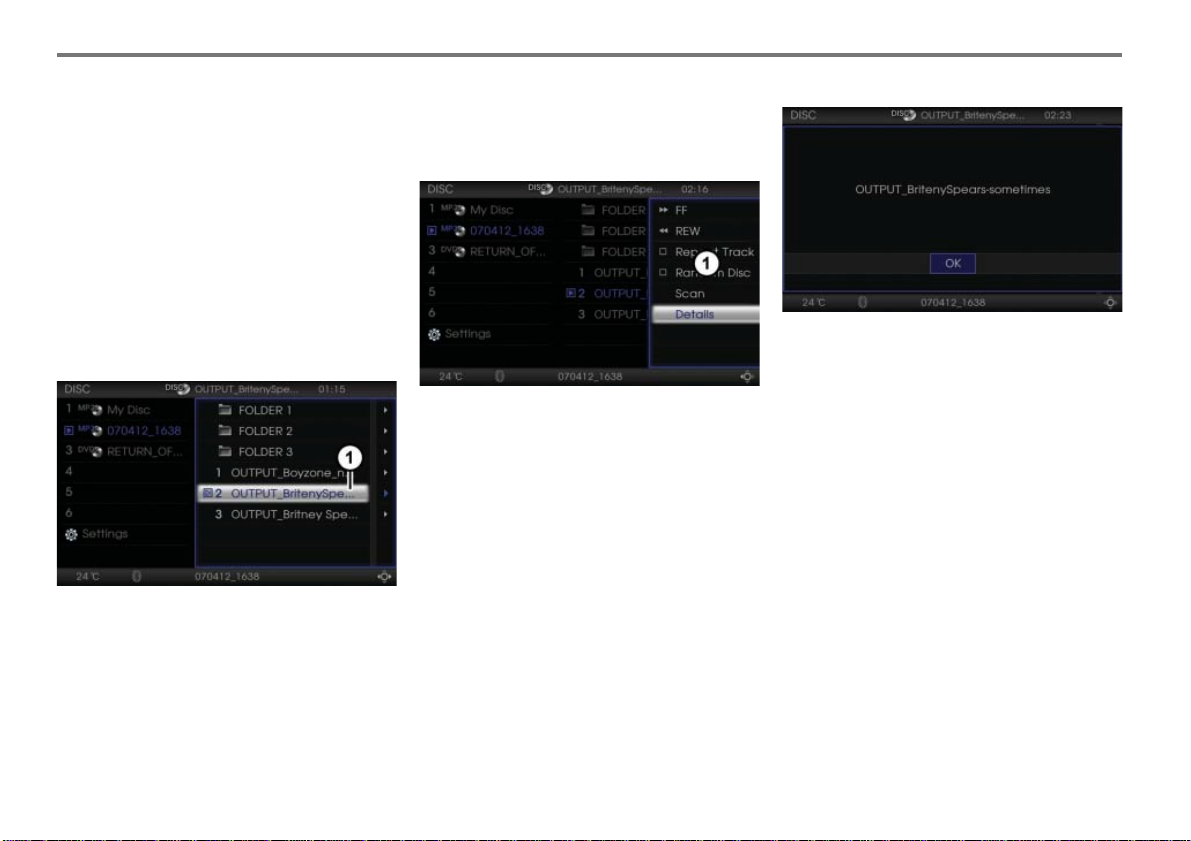
Displaying an abbreviated list entry in
full
List entries must be abbreviated for display
in the content area. Abbreviated entries are
indicated by the three dots at the end of the
entry.
! Abbreviated entry
To call up the complete text: Push
the controller
Options menu is displayed.
! Options menu
Turn
+, the controller $ until the
menu item Details is highlighted.
or
Push
' ( the controller $ until the
menu item Details is highlighted.
Press the controller
The complete text is displayed.
$ repeatedly until the
$.
&
! Complete text
To close the complete text: Press the
controller
$ again.
30
Page 31

Switching the system on
WARNING
Hearing damage due to high volume
!
level
When switching the Driver Information
System on, a sudden burst of high volume
may be a cause of hearing damage.
When the system switches on, be careful of
the volume level. Set the volume to an
acceptable level before switching the
system off.
!"After switching the system on, the boot
process starts. During the boot process you
can not operate the system. It takes some
time until all system functions are ready,
especially for the voice control system.
Vehicles with ignition
Insert the ignition key into the ignition
and turn to the ACC or IGN position.
The system will switch on and a safety
instruction will be displayed after a short
time.
To confirm the safety instruction:
Press the controller
$.
Vehicles without ignition
Press the vehicle’s Start button once.
If you have not applied the brakes, ACC
and the system is switched on.
If you have applied the brakes, IGN and
the system is switched on and the
vehicle engine starts.
In both cases, the safety instruction
mentioned above will be displayed.
To confirm the safety instruction:
Press the controller
$.
Functional introduction
Basic functions
Battery warning message
Please use the system with the vehicle’s
engine running. When using the system
with the engine not running, after 10
minutes of operation you will be warned
with the following message to turn the
ignition on to start the engine.
The message disappears automatically
after a short time and will be redisplayed for
5 seconds every 1 minute continuously.
Prolonged usage of the system with the
engine not running may cause complete
discharge of the battery.
31
Page 32

Functional introduction
Basic functions
Switching the system off
Vehicles with ignition
To switch the system off: Turn the
ignition key to the OFF position.
The system will switch off.
Vehicles without ignition
Press the vehicle’s Start button once.
The system will switch off.
Switching off during a phone call
If you switch the system off during a phone
call using the hands-free unit of the system,
the call will be transfered automatically
back to the mobile phone (private mode).
Switching audio/video playback on/
off
!"When the system is switched on, you can
switch audio/video playback off and on
independently. Whether audio/video
playback is switched on or off, you can
switch the system on and off without
affecting it.
The following functions are still available
when audio/video playback is switched off:
Phone (Bluetooth
Navigation
Info
Switching off
On the headunit: Press the rotary
!.
knob
or
®
handsfree)
On the steering wheel: Press and hold
the 8 button.
In both cases, audio/video playback
switches off and the message AV OFF
is shown in the top status line.
Additionally, the system switches to the
navigation map display, if one of the
following modes was selected and
shown in the display before playback
was switched off:
FM mode
AM mode
®
XM
Satellite Radio mode
Disc mode
AUX mode
For all other modes, the display
remains unchanged.
32
Page 33

Switching on
Option 1
On the headunit: Press the rotary
knob !.
or
On the steering wheel: Briefly press
the 8 button.
In all of the above cases, the audio/
video that was playing before playback
was switched off is resumed.
Option 2
Press one of the main function buttons
-, 2or 3.
The system will switch to the mode
corresponding to the button pressed.
or
Disc mode: Loading a magazine
compartment, see page 77, page 78
and page 79.
or
AUX mode: Connecting an iPod or
USB memory stick, see page 125.
In both cases, the system will switch to
the corresponding mode.
Setting the volume
WARNING
Driving with the volume set to such a level
that the outside sound is not audible, may
be a cause of an accident.
Set the volume to such a level, that the
outside sound is audible.
There is one common volume setting for
the FM, AM, Disc, AUX and XM® Satellite
Radio signal sources.
Functional introduction
Basic functions
Separate volume settings are possible
for the phone, for audible driving
recommendations and for voice control.
The respective volume can be set during
a phone call, during an audible driving
recommendation and during voice output.
!"The volume for audible driving
recommendations can also be set in the
navigation settings, see the chapter
"Navigation", section "Audible driving
recommendations" on page 190.
The system automatically saves the
respective setting upon setting.
On the headunit
Turn the rotary knob !.
On the steering wheel
Briefly press the 7 or 6 button one
or more times.
The volume will change in small
increments.
or
33
Page 34

Functional introduction
Basic functions
Press and hold the 7 or 6 button.
The volume will change in large
increments.
Switching to FM or AM mode and
switching radio band
Press the - button.
If FM or AM mode was active before,
the system will switch band.
If another mode was active before, the
system will switch to FM or AM mode
and tune to the FM or AM band.
or
Press the 8 button on the steering
wheel repeatedly until the FM or AM
main menu appears.
!"If Navigation, Info or Phone is the active
mode, switching to FM or AM mode on the
steering wheel does not switch the display,
only the audio source will be switched
accordingly.
If you want to switch the display also, you
must use the
panel.
- button on the control
Audio settings
The audio settings include the following
functions:
Setting the balance/fader, see page 35
Setting the treble/mid/bass, see
page 36
Setting the equalizer, see page 36
Switching surround on/off, see page 37
Performing an audio reset, see page 38
Opening the Audio Settings menu
!"The Audio Settings menu is opened in
different ways, depending on the currently
active signal source.
Active signal source is FM, AM, XM®
Satellite Radio, audio CD/DVD, MP3 CD
or AUX (audio)
The illustration shows the FM main menu
with the main menu activated
! Main menu
" Audio Settings menu
# Content area
$ Settings menu item
34
Page 35

In the main menu !, select the menu
item Settings
The Audio Settings menu
$.
" is
displayed in the content area #.
Active signal source is Video CD, video
DVD or AUX (video)
Press and hold the . button until the
appropriate main menu is displayed.
The illustration shows the video DVD main
menu with the main menu activated
! Main menu
" Selection menu
# Content area
$ Settings menu item
In the main menu
item Settings
!, select the menu
$.
The audio/video selection menu is
displayed in the content area
#.
In the audio/video selection menu,
select the menu item
Audio.
The Audio Settings menu is displayed
in the content area
#.
Closing the Audio Settings menu
Briefly press the . button.
Setting the balance/fader
!"The balance/fader setting applies to all
signal sources.
To open the Balance/Fader menu: In
the Audio Settings menu, select the
menu item Balance/Fader.
The Balance/Fader menu is display ed
in the content area.
Functional introduction
Basic functions
! Scale for the fader setting
" Fader indicator
# Balance indicator
$ Scale for the balance setting
The position of the two indicators
# on the scale show the current settings.
The color of the two indicators shows
whether the balance function or the fader
function is active. In the illustration above,
the fader function is active.
Activating the balance or fader
function: If necessary, press the
controller
$.
The previously inactive function is now
active.
" and
35
Page 36

Functional introduction
Basic functions
To set balance or fader: Turn +, the
controller
reached.
The system saves the setting
automatically.
To close the Balance/Fader menu:
Push
or
Briefly press the . button.
Setting the treble/mid/bass
!"The system automatically saves the treble/
mid/bass settings separately for all audio
and video signal sources.
To open the Treble/Mid/Bass menu:
In the Audio Settings menu, select the
menu item Treble/Mid/Bass.
The Treble/Mid/Bass menu is displayed
in the content area.
$ until the desired setting is
% the controller $ once.
! Scale for the treble setting
" Scale for the mid setting
# Scale for the bass setting
$ Treble indicator
% Mid indicator
& Bass indicator
The position of the three indicators
$, %
and & on the scales !, " and # show
the respective current settings.
The color of the indicators shows which of
the scales is active. In the illustration
above, the scale for the treble setting is
active.
!"You can tell an active scale by the white
frame around the scale.
Activating a scale: Push '( the
controller
$ repeatedly until the
desired scale is active.
or
Press the controller
$ until the desired
scale is active.
To set a value: Turn
controller
$ until the desired setting is
+, the
reached.
The indicator moves accordingly on the
scale, showing you the setting.
To close the Treble/Mid/Bass menu:
% the controller $ once.
Push
or
Briefly press the . button.
Setting the equalizer
!"The equalizer provides you with five
predefined presets for calling up. You
can activate different presets for all audio
and video signal sources; the system
automatically saves the setting.
36
Page 37

To open the Equalizer menu: In the
Audio Settings menu, select the menu
item EQ Presets.
The Equalizer menu is displayed in the
content area.
! Highlighted menu item
" Currently active preset (icon ")
# Currently inactive presets (icon !)
To activate a preset: Select the
desired preset in the content area.
The Equalizer menu is automatically
closed after a short time.
!"If you adjust the sound settings, see the
section "Setting the treble/mid/bass" on
page 36, then the system will automatically
activate the Custom preset and store the
changes made in this preset.
Switching surround on/off
There is a common surround setting for the
following signal sources:
FM
AM
®
XM
Satellite Radio
iPod, USB memory stick and AUX
signal source
Audio CD without DTS sound
Video CD
There is also a common surround setting
for the following signal sources:
Audio DVD
Video DVD
Audio CD with DTS sound
Functional introduction
Basic functions
!"The two settings are independent of each
other. The system saves the settings
automatically.
To switch the surround function on/
off: In the Audio Settings menu, select
the menu item
! Status display
" Menu item Surround
Surround.
37
Page 38

Functional introduction
Basic functions
Depending on the previous status, the
function will be switched on or off. The
status display will change accordingly.
Display
Display
Performing an audio reset
You can use the audio reset function to
reset the following features to the factory
settings:
Balance/Fader
Treble/Mid/Bass
EQ Presets
Surround
In the Audio Settings menu, select the
menu item Reset Audio Settings.
You will be prompted to confirm that
you wish to reset the audio settings.
# = function switched off
$ = function switched on
Select Yes or No.
The system will or will not reset the
audio settings, depending on the
answer you select.
Video settings
Please see chapter "Disc mode", section
"Video DVD playback", subsection "Video
settings" on page 97 for a description of the
video settings.
38
Page 39

FM and AM mode
HD Radio (TM) information. . . . . . . . . . . . . . . . . . . . . 40
General operation . . . . . . . . . . . . . . . . . . . . . . . . . . . . 42
Tuning to stations. . . . . . . . . . . . . . . . . . . . . . . . . . . . 44
Storing stations. . . . . . . . . . . . . . . . . . . . . . . . . . . . . . 49
Showing station details . . . . . . . . . . . . . . . . . . . . . . . 50
Settings . . . . . . . . . . . . . . . . . . . . . . . . . . . . . . . . . . . . 52
39
Page 40

FM and AM mode
HD Radio (TM) information
Licensing information
HD RadioTM Technology Manufactured
Under License From iBiquity Digital
Corporation. U.S. and Foreign Patents. HD
TM
Radio
proprietary trademarks of iBiquity Digital
Corporation.
Availibilty information
HD RadioTM reception is available in the
United States, including Alaska and
Hawaii.
What is HD RadioTM technology?
The Driver Information System is able to
receive standard analog FM/AM radio
broadcasting as well as digital HD Radio
FM/AM broadcasting.
and the HD Radio logo are
TM
HD RadioTM technology provides digital
and analog reception using existing FM
and AM broadcasting frequencies.
Currently, radio stations broadcasting an
HD Radio
TM
signal are operating in a hybrid
mode of both, analog and digital, in order to
reach both receivers. In both modes,
analog and digital, the broadcasted
program content is the same (except of
multicasting, see below).
Eventually, as analog receivers are
replaced by digital ones, radio stations may
be able to turn off their analog broadcasting
and use only the digital one.
Multicasting
HD RadioTM FM stations are able to
broadcast multiple digital program streams
(channels) over a single FM frequency. For
example, a HD Radio
a main channel of music and a sub channel
of news (or even two different music
channels) at one frequency.
But only the program content of the main
channel is also broadcasted analog.
TM
FM station can run
HD RadioTM signal delay
To overcome the delay that digital systems
inherently produce, HD RadioTM
technology first uses the audio signal of the
analog broadcasting when you tune to an
AM station or to the main channel of a FM
station. After that, the system will blend
from analog to digital signal.
Normally, this blending is very smooth. If
you experience a skip in program content of
several seconds, the radio station has not
implemented HD Radio
correctly. This is not a problem with your
Driver Information System.
Due to the fact that sub channels are only
broadcasted digital, blending from analog
to digital signal is not possible if you tune to
a sub channel. In this case playback of the
sub channel starts after several seconds,
this is a normal function.
TM
broadcasting
40
Page 41

Automatic switching between
digital and analog broadcasting
If the reception of the digital signal is lost,
the system switches automatically to the
analog signal. As soon as the digital signal
is available again it will switch back.
Due to the fact that sub channels are only
broadcasted digital, first the system mutes
playback if you have tuned to a sub channel
and the digital signal is lost.
Second, after 25 seconds with the digital
signal lost, the system will automatically
tune to the analog signal of the main
channel.
Text based information
HD RadioTM stations are able to broadcast
text based informations, e.g. station name,
song title and artist name. The Driver
Information System is able to display these
informations.
FM and AM mode
HD Radio (TM) information
41
Page 42

FM and AM mode
General operation
!"For information on general system
operation, please refer to the chapter
"Functional introduction" from page 17.
Opening the FM or AM main menu
Opening the FM or AM main menu
Press the - button.
or
Press the 8 button on the steering
wheel repeatedly until the FM or AM
main menu appears.
!"If Navigation, Info or Phone is the active
mode, switching to FM or AM mode on the
steering wheel does not switch the display,
only the audio source will be switched
accordingly.
If you want to switch the display also, you
must use the
panel.
- button on the control
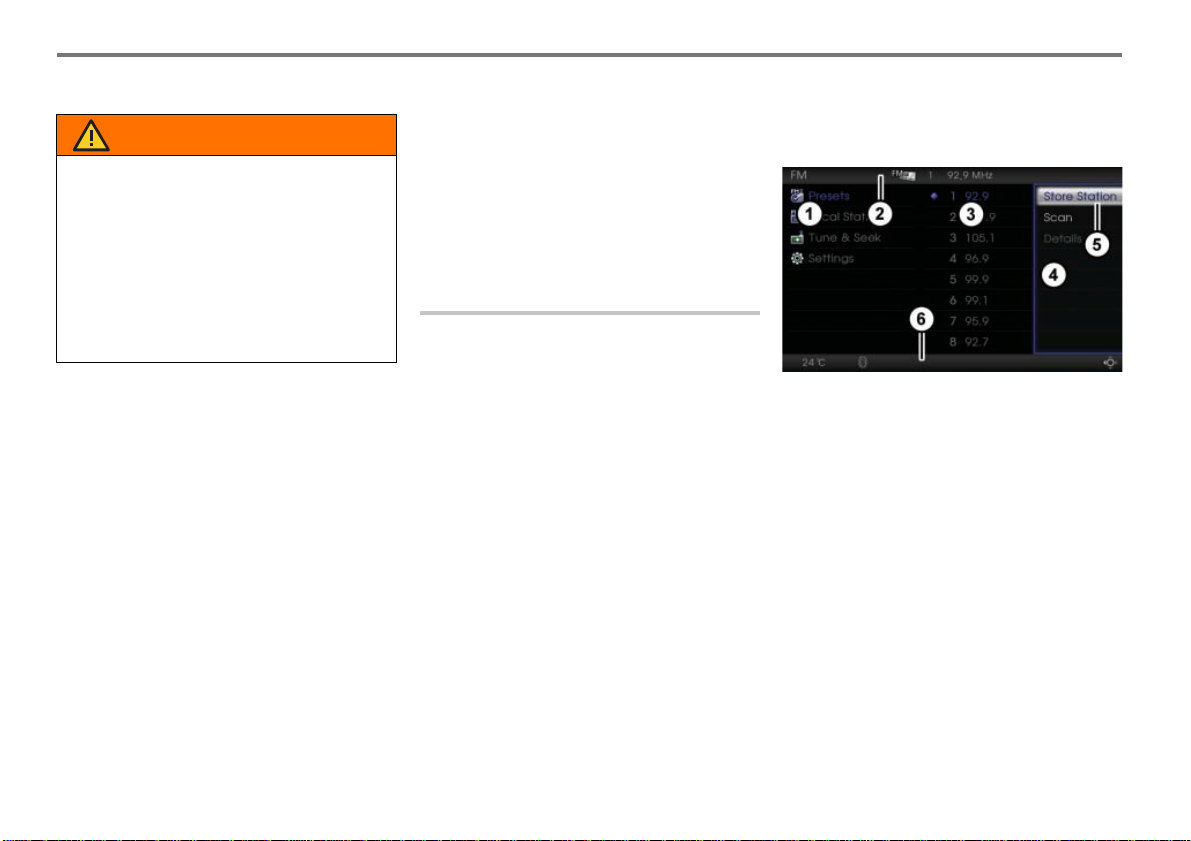
FM main menu and upper status line
while receiving an FM signal
! Currently active main function
" Highlighted menu item in the main
menu
# Currently active entertainment source
$ Preset of the currently tuned statio n in
the presets
% F r equency or name of the currently
tuned station (depends on the setting,
see section "RDS off" on page 53)
& Indicator for stereo reception
' Main menu
FM main menu and upper/lower status
line while receiving a digital FM HD
TM
Radio
! Currently active main function
" Highlighted menu item in the main
signal
menu
# Currently active entertainment source
$ Preset of the currently tunded station in
the presets
% If transmitted name of the currently
tuned station, else frequency
& Indicator for HD Radio
' I f transmitted song title currently
TM
reception
playing, else no display
( Main menu
42
Page 43

AM main menu and upper status line
while receiving an analog AM signal
! Currently active main function
" Highlighted menu item in the main
menu
# Currently active entertainment source
$ Preset of the currently tuned station in
the presets
% Frequency of the currently tuned station
& Main menu
AM main menu and upper/lower status
line while receiving a digital AM HD
TM
Radio
! Currently active main function
" Highlighted menu item in the main
signal
menu
# Currently active entertain ment source
$ Preset of the currently tuned station in
the presets
% If transmitted name of the currently
tuned station, else frequency
& Indicator for HD Radio
' If transmitted song title currently
TM
reception
playing, else no display
( Main menu
FM and AM mode
General operation
Switching bands
Press the - button.
The system will switch band.
43
Page 44

FM and AM mode
Tuning to stations
!"For information on general system
operation, please refer to the chapter
"Functional introduction" from page 17.
Overview
The following options are available:
Tuning to a station via the station list,
see page 44
Tuning to a station via manual tuning or
a search, see page 45
Tuning to a station via the presets, see
page 46
Tuning to a station via the Scan
function, see page 47
Tuning to a station via the station
list
!"This function is only available in the FM
band. The station list contains all the
currently receivable FM stations. It is sorted
by frequency number and is automatically
refreshed and updated by the system.
To request the station list: Open the
FM or AM main menu, see section
"Opening the FM or AM main menu" on
page 42.
In the FM or AM main menu, select the
menu item
Local Stations.
The station list appears.
! Icon for the currently tuned station
To tune to a station: Select the
desired station in the station list.
The system tunes to the corresponding
station.
If the selected station is a multicasting
HD Radio
TM
FM station, the system tunes to the
main channel of the corresponding
station. The station list will show the
main and the sub channel.
! Main channel
" Sub channel
To tune to a sub or a main channel:
Select the corresponding channel in the
station list.
The system tunes to the corresponding
channel.
44
Page 45

Tuning to a station via manual
tuning or a search
Using the steering wheel
Press and hold the 4 or 5 button.
The search proceeds downwards or
upwards and stops at the next
receivable station.
Using the central control panel
To open the Tune & Seek menu:
Open the FM or AM main menu, see
section "Opening the FM or AM main
menu" on page 42.
In the FM or AM main menu, select the
menu item
The Tune & Seek menu appears.
Tune & Seek.
! Frequency indicator (shows the
currently tuned frequency)
" Indicator.
The indicator
HD 1 or HD 2 (in case the tuned station
" shows one the following:
is a multicasting HD RadioTM station,
see section "Tuning to a sub channel"
below)
HD (in case the tuned station is a non-
multicasting HD RadioTM station)
MHz or kHz (in case the tuned station is
an analog radio station)
FM and AM mode
Tuning to stations
!"If HD off is set in the settings (see section
"Settings" on page 52), you have only
access to analog radio stations. In this case,
the indicator
Manual tuning: Turn +, the
controller
The frequency increases or decreases,
depending on the direction of rotation.
Search: Push
The seek proceeds upwards or
downwards and stops at the next
receivable station.
Tuning to a sub channel
Tuning to a HD Radio
possible if the tuned station is a
multicasting HD Radio
You can tell this by indicator ", see picture
above.
To tune to another channel: Press the
controller
The indicator
" shows always MHz or kHz.
$.
'( the controller $.
TM
sub channel is only
TM
station.
$.
" is highlighted.
45
Page 46

FM and AM mode
Tuning to stations
! Frequency indicator (not highlighted)
" Indicator (highlighted)
Turn
To highlight the frequency indicator
+, the controller $.
The system tunes to the next or the
previous channel.
again: Press the controller
$.
! Frequency indicator (highlighted)
" Indicator (not highlighted)
Now you can operate the manual tuning
or the search again.
Branching from the Tune & Seek menu
directly to the presets
!"This function is useful if you have tuned to a
station in the Tune & Seek menu and wish
to store it as a preset.
Press and hold the controller $ until
the presets appear.
Tuning to a station via the presets
!"If you tune via the presets to a non-
receivable sub channel of a FM HD Radio
station, the system mutes playback. In this
case, tune to another receivable station.
Using the central control panel
To call up a preset: Open the FM or
AM main menu, see section "Opening
the FM or AM main menu" on page 42.
In the FM or AM main menu, select the
menu item
Presets.
The presets appear in the form of a list.
TM
46
Page 47

! Preset number of the currently tuned
station
" Icon for the currently tuned station
To tune to a station: Select the
desired station in the list.
Using the steering wheel
Briefly press the 4 or 5 button.
The system will tune to the previous or
next station stored in the presets.
Tuning to a station via the Scan
function
!"The Scan function searches through the
selected band, stops at a receivable station,
plays the station for five seconds and goes
to the next receivable station. It will not
search for FM HD Radio
To request the presets: Open the FM
or AM main menu, see section
"Opening the FM or AM main menu" on
page 42.
In the FM or AM main menu, select the
menu item
Presets.
The preset appear.
TM
sub channels.
FM and AM mode
Tuning to stations
To open the Options menu: In the
presets push the controller
The Options menu appears.
! Options menu
" Menu item Scan
To start the Scan function: In the
Options menu select the menu item
Scan.
The Scan function starts, a
corresponding Scan message is
displayed.
$ once &.
! Presets
47
Page 48

FM and AM mode
Tuning to stations
!"The Scan function will not search for FM HD
To stop the Scan function manually :
or
TM
Radio
will stop automatically, if the frequency from
where it has been started is reached again.
You can also stop the Scan function
manually.
sub channels. The Scan function
Press the controller $.
The system will stop the Scan function.
Briefly press the 4 or 5 button on
the steering wheel.
The system will stop the Scan function.
Button 4 was pressed: The system
will tune to the station stored in the
preset 16.
Button 5 was pressed: The system
will tune to the station stored in the
preset 1.
or
Press and hold the 4 or 5 button on
the steering wheel until the Scan
message disappears.
The system will stop the Scan function
and activate the search function.
Button 4 was pressed: The seek
proceeds downwards and stops at the
next receivable station.
Button 5 was pressed: The seek
proceeds upwards and stops at the next
receivable station.
48
Page 49

FM and AM mode
Storing stations
!"For information on general system
operation, please refer to the chapter
"Functional introduction" from page 17.
!"There are 16 presets available for each
band.
Calling up the station presets
Open the FM or AM main menu, see
section "Opening the FM or AM main
menu" on page 42.
In the FM or AM main menu, select the
menu item
The presets appear in the form of a list.
The currently tuned station is displayed
in the top status line.
Presets.
! Frequency or name of the currently
tuned station (depends on the setting,
see section "RDS off" on page 53)
" Preset number 6
Selecting a preset (e.g. preset number 6)
Turn
+, the controller $ until the
preset number 6 is highlighted.
Storing the currently tuned station in the
preset number 6
Option 1: Press and hold the
controller
$ until the station is stored.
Option 2: Push
& the controller $
once.
The Options menu appears.
! Options menu
In the Options menu, select the menu
Store Station.
item
The station is stored.
49
Page 50

FM and AM mode
Showing station details
Showing details of the currently
tuned HD RadioTM station
!"The system is able to show the following
details of the currently tuned HD Radio
station:
Name and the frequency of the currently
tuned HD Radio
TM
station,
the title name and the artist name of the
title currently playing.
Opening the Options menu
In case of a multicasting FM HD Radio
station
In the station list or in the presets,
highlight the currently tuned channel.
TM
! Highlighted channel
& the controller $.
The Options menu appears, see
TM
Push
section "Options menu" below.
In case of a non-multicasting FM HD
RadioTM station or an AM HD RadioTM
station
In the station list or in the presets,
highlight the currently tuned channel.
Push
& the controller $.
The Options menu appears, see
section "Options menu" below.
Options menu
! Menu item Details
" Options menu
To open the details screen: In the
Options menu, select the menu item
Details.
You will see the details screen.
!"The menu item Details has no function if the
highlighted station is not the currently tuned
station or if it is not a HD Radio
TM
station.
50
Page 51

To close the details screen: Press the
controller $.
FM and AM mode
Showing station details
51
Page 52

FM and AM mode
Settings
Overview
The settings include the following
functions:
HD off, see page 52
RDS off, see page 53
Opening and closing the Settings
menu
Opening the Settings menu
Open the FM or AM main menu, see
section "Opening the FM or AM main
menu" on page 42.
In the FM or AM main menu, select the
menu item
The Settings menu appears.
Settings.
! Menu item Settings
" Settings menu
Closing the Settings menu
Briefly press the . button.
HD off
!"With this function switched on, you have
access to analog FM/AM stations only.
Open the Settings menu, see section
"Opening and closing the Settings
menu" on page 52.
! Settings menu
" Menu item HD off
# Status display
Select the menu item
HD off.
Depending on the previous status, the
function will be switched on or off.
The status display
# changes
accordingly.
Display
Display
# = function switched off
$ = function switched on
52
Page 53

RDS off
!"With this function switched on, the upper
status line always shows the frequency of
the currently tuned analog FM radio station.
With this function switched off, the upper
status line shows the station name if
transmitted by the analog FM radio station,
else the frequency will be displayed.
! Station name or frequency
Open the Settings menu, see section
"Opening and closing the Settings
menu" on page 52.
! Settings menu
" Menu item RDS off
# Status display
Select the menu item
RDS off.
Depending on the previous status, the
function will be switched on or off.
The status display
# changes
accordingly.
Display
Display
# = function switched off
$ = function switched on
FM and AM mode
Settings
53
Page 54

FM and AM mode
Settings
54
Page 55

XM Satellite Radio mode
XM Satellite Radio information/General operation . 56
Tuning to channels . . . . . . . . . . . . . . . . . . . . . . . . . . 58
Storing channels . . . . . . . . . . . . . . . . . . . . . . . . . . . . 64
Settings . . . . . . . . . . . . . . . . . . . . . . . . . . . . . . . . . . . . 65
Status screens and messages . . . . . . . . . . . . . . . . . 68
55
Page 56

XM Satellite Radio mode
XM Satellite Radio information/General operation
!"For information on general system
operation, please refer to the chapter
"Functional introduction" from page 17.
XM® Satellite Radio information
Licensing information
XM® and the XM® logos are registered
trademarks of XM Satellite Radio Inc.
Availibility information
XM® Satellite Radio is available in the
United States (except Alaska and Hawaii)
and Canada.
What is XM® Satellite Radio?
®
Satellite radio offers the reception of a
XM
multitude of stations - all in digital quality.
A wide range of programs is available, e.g.
music, sports, news, and entertainment, all
largely without the interruption of
advertisements.
®
Using of XM
Before using the XM
service, you must sign up with the provider
®
Satellite Radio. The provider needs
XM
Satellite Radio
®
Satellite Radio
the Radio ID number which can be
displayed in the Settings menu, see section
"Settings" on page 65.
!"If you have tuned to channel 0, the Radio ID
number will also be displayed in the lower
statusline, see section "Opening the XM®
Satellite Radio main menu" on page 57.
Without sign up, only the free-to-air
channels of XM® Satellite Radio are
available. Channel 1 (preview/promotional
channel) is one example. But there may be
other free-to-air channels.
®
The XM
available for a modest monthly fee.
XM
Satellite Radio program is
®
Satellite Radio may request payment
of an additional fee to enable certain
channels.
®
For further information about XM
Satellite
Radio please visit the following website:
www.xmradio.com
56
Page 57

General operation
Opening the XM® Satellite Radio main
menu
Press the 3 button.
or
Press the 8 button on the steering
wheel repeatedly until the XM
menu appears.
!"If Navigation, Info or Phone is the active
mode, switching to XM
mode on the steering wheel does not switch
the display, only the audio source will be
switched accordingly.
If you want to switch the display also, you
must use the
panel.
3 button on the control
®
Satellite Radio
The following illustration shows the XM®
Satellite Radio main menu with the main
menu activated.
®
main
XM Satellite Radio information/General operation
! Currently active main function
" Highlighted menu item in the main
menu
# Currently active entertain ment source
$ Preset of the currently tuned channel in
the presets
% Channel name or number of the
currently tuned channel (depends on
the setting, see section "Settings" on
page 65)
& Indicator for XM
' If transmitted song title currently
playing, else no display
!"If you have tuned to channel 0, the display
' shows the Radio ID number.
( Main menu
®
Satellite Radio mode
XM Satellite Radio mode
57
Page 58

XM Satellite Radio mode
Tuning to channels
!"For information on general system
operation, please refer to the chapter
"Functional introduction" from page 17.
Overview
The following options are available:
Tuning to a channel via the channel
presets, see page 58
Tuning to a channel via the Scan
function, see page 59
Tuning to a channel via the channel list,
see page 60
Tuning to a channel via the category
list, see page 61
Tuning to a channel via channel
number input, see page 63
Tuning to a channel via the channel
presets
Using the central control panel
To request the presets: Open the XM
Satellite Radio main menu, see section
"Opening the XM® Satellite Radio main
menu" on page 57.
®
In the XM
select the menu item Presets.
The presets appear.
! Preset number of the currently tuned
channel
" Icon for the currently tuned channel
Satellite Radio main menu,
To tune to a channel: Select the
desired channel in the presets.
!"A status screen appears if the selected
®
channel is no longer available, see section
"Status screen "Selected XM channel is no
longer available"" on page 69.
To show details of the currently
tuned channel: Highlight the currently
tuned channel in the presets.
Push
& the controller $.
The Options menu appears.
! Options menu
" Menu item Details
58
Page 59

In the Options menu, select the menu
Details.
item
You will see the details screen.
To close the details screen: Press the
controller
$.
Using the steering wheel
Briefly press the 4 or 5 button.
The system will tune to the previous or
next channel stored in the presets.
Tuning to a channel via the Scan
function
!"The Scan function searches through the
subscribed channels, stops at a receivable
channel, plays the channel for five seconds
and goes to the next channel.
The Channel 0 is not covered by the Scan
function.
In the settings, see section "Settings" on
page 65, you can set a category filter for the
Scan function.
To request the presets: Open the XM®
Satellite Radio main menu, see section
"Opening the XM® Satellite Radio main
menu" on page 57.
®
In the XM
select the menu item Presets.
The presets appear.
Satellite Radio main menu,
XM Satellite Radio mode
Tuning to channels
! Presets
To open the Options menu: In the
presets push the controller
The Options menu appears.
$ once &.
! Options menu
" Menu item Scan
59
Page 60

XM Satellite Radio mode
Tuning to channels
To start the Scan function: In the
Options menu, select the menu item
Scan.
The Scan function starts, a
corresponding message is displayed.
!"The Scan function will stop automatically, if
the channel from where it has been started
is reached again. You can also stop the
Scan function manually.
To stop the Scan function manually :
Press the controller $.
The system will stop the Scan function.
or
Briefly press the 4 or 5 button on
the steering wheel.
The system will stop the Scan function.
Button 4 was pressed: The system
will tune to the channel stored in the
preset 16.
Button 5 was pressed: The system
will tune to the channel stored in the
preset 1.
or
Press and hold the 4 or 5 button on
the steering wheel until the Scan
message disappears.
The system will stop the Scan function.
Button 4 was pressed: The system
will tune to the previous channel in the
channel list.
Button 5 was pressed: The system
will tune to the next channel in the
channel list.
Tuning to a channel via the channel
list
!"The channel list contains only channels you
have subscribed. In the settings, see
section "Settings" on page 65, you can set a
category filter for the list.
Using the steering wheel
Press and hold the 4 or 5 button.
The system tunes to the previous or
next channel in the channel list.
Using the central control panel
To request the channel list: Open the
®
Satellite Radio main menu, see
XM
section "Opening the XM® Satellite
Radio main menu" on page 57.
®
In the XM
select the menu item Channel List.
The channel list appears.
Satellite Radio main menu,
60
Page 61

! Icon for the currently tuned channel
" Channel number
# Channel name
To tune to a channel: Select the
desired channel in the channel list.
To show details of the currently
tuned channel: Highlight the currently
tuned channel in the channel list.
Push
& the controller $.
The Options menu appears.
! Options menu
In the Options menu, press the
controller
$.
You will see the details screen.
XM Satellite Radio mode
Tuning to channels
To close the details screen: Press the
controller
Tuning to a channel via the category
list
To request the category list: Open
the XM® Satellite Radio main menu,
see section "Opening the XM® Satellite
Radio main menu" on page 57.
In the XM
select the menu item Category List.
The category list appears.
$.
®
Satellite Radio main menu,
! Category list
61
Page 62

XM Satellite Radio mode
Tuning to channels
Select the desired category.
The channel list according to the
selected category appears.
Select the desired channel.
To go back to the category list:
Select the item
! in the channel list or
press the . button.
To show details of the currently
tuned channel: Highlight the currently
tuned channel in the channel list.
Push
& the controller $.
The Options menu appears.
In the Options menu, press the
controller $.
You will see the details screen.
! Item for going ba ck to the category list
" Currently tuned channel
# Channel name
$ Channel number
!"If no channel is available for the selected
category, the list will be empty except for the
!.
item
62
! Options menu
To close the details screen: Press the
controller
$.
Page 63

Tuning to a channel via channel
number input
!"The channel number input is restricted to
channels you have subscribed
To request the channel number input
menu: Open the XM® Satellite Radio
main menu, see section "Opening the
XM® Satellite Radio main menu" on
page 57.
®
In the XM
select the menu item
The channel number input menu
appears. The number of the currently
tuned channel is displayed and the first
digit of the channel number is
highlighted.
Satellite Radio main menu,
Direct Tune.
! First digit of the channel number
(highlighted)
" Second digit of the channel number
# Third digit of the channel number
$ Channel related information
!"You can enter the channel number digit by
digit. The input of a digit will be not available
if the digit combination will result in a chanel
number which is not subscribed or out of
range.
To enter the first digit: Turn +, the
controller $ until the desired first digit
is displayed.
XM Satellite Radio mode
Tuning to channels
After that, press the controller $.
The second digit is highlighted.
To enter the second digit: Turn
the controller
$ until the desired
second digit is displayed.
After that, press the controller
The third digit is highlighted.
To enter the third digit: Turn
controller $ until the desired third digit
is displayed.
After that, press the controller
The channel number input is finished
and the system tunes to the
corresponding channel.
Branching from the channel number
input menu directly to the presets
!"This function is useful if you have tuned to a
channel in the channel number input menu
and wish to store it as a preset.
Press and hold the controller $ until
the presets appear.
+,
$.
+, the
$.
63
Page 64

XM Satellite Radio mode
Storing channels
!"For information on general system
operation, please refer to the chapter
"Functional introduction" from page 17.
!"You can store the currently tuned channel in
the channel presets. There are 16 presets
available in the channel preset.
Storing a channel
Tune to the desired channel, see
section "Tuning to channels" on
page 58.
To request the presets: Open the XM
Satellite Radio main menu, see section
"Opening the XM® Satellite Radio main
menu" on page 57.
®
In the XM
select the menu item
The presets appear.
Satellite Radio main menu,
Presets.
! Currently tuned channel
" Icon for the currently tuned channel
®
To select a preset (e.g. preset
number 6): Turn
+, the controller $
until the preset number 6 is highlighted.
Storing the currently tuned station in
the preset number 6: Press and hold
the controller
$ until the channel is
stored.
or
Push
& the controller $.
The Options menu appears.
! Options menu
In the Options menu, select the menu
Store Channel.
item
The channel is stored.
64
Page 65

Overview
The XM® Radio settings include the
following functions:
Set the display in the upper status line,
see page 66
Set the category filter for the channel
list, see page 66
Show the Radio ID number, see
page 67
Opening the XM® Radio settings
menu
Open the XM® Satellite Radio main
menu, see section "Opening the XM®
Satellite Radio main menu" on pag e 57.
®
In the XM
select the menu item
The Settings menu appears.
Satellite Radio main menu,
Settings.
! Settings menu
In the Settings menu, select the menu
XM Radio.
item
®
The XM
Radio settings menu appears.
XM Satellite Radio mode
Settings
®
! XM
Closing the XM® Radio settings
menu
Briefly press the . button.
Radio settings menu
65
Page 66

XM Satellite Radio mode
Settings
Set the display in the upper status
line
!"With this function, you can set whether the
channel number or the channel name is
displayed in the upper status line.
Open the XM® Radio settings menu,
see section "Opening the XM® Radio
settings menu" on page 65.
! Status display
" T opmost menu item
®
# XM
Radio settings menu
The labelling of the topmost menu item
shows the current setting. It will change
with every selection, the status display
changes accordingly.
Possible labellings:
Display by CH Number (Upper status
line shows channel number instead of
channel name)
Display by CH Name (Upper status
line shows channel name instead of
channel number)
®
To change the setting: In the XM
Radio settings menu #, select the
topmost menu item ".
Set the category filter for the
channel list
!"With this function, you can set one or more
category filters. After that, only channels
matching to the filter setting are shown in
the channel list. Additionally, the Scan
function plays only channels matching to the
filter setting.
Open the XM® Radio settings menu,
see section "Opening the XM® Radio
settings menu" on page 65.
! Menu item Category Filter
To request the category list: In the
®
Radio settings menu, select the
XM
menu item Category Filter.
You will see the category list.
66
Page 67

! Status display
" Category filter
# Category filter list
To set a category filter: Select the
desired filter .
The status display
# changes
accordingly.
Display
Display
!"You can activate several filters at the same
time. If you activate the filter "All", all other
filters are automatically deactivated.
As soon as you activate one of the other
filters, the filter "All" is automatically
deactivated.
# = Filter is deactivated
$ = Filter is activated
To close the category list and go
back to the XM
®
Radio settings
menu: Briefly press the . button.
Show the Radio ID number
!"Before using the XM® Satellite Radio
service, you must sign up with the provider
XM Satellite Radio. The provider needs the
Radio ID number.
Open the XM® Radio settings menu,
see section "Opening the XM® Radio
settings menu" on page 65.
! Menu item Radio ID
XM Satellite Radio mode
Settings
To show the Radio ID number: Select
the menu item
You will see the Radio ID number.
!"If you have tuned to channel 0, the Radio ID
number will also be displayed in the lower
statusline, see section "Opening the XM®
Satellite Radio main menu" on page 57.
To go back to the XM® Radio settings
menu: Briefly press the . button.
Radio ID.
67
Page 68

XM Satellite Radio mode
Status screens and messages
Status screen
"Channel Unauthorized"
If you try to tune to a non-subscribed
channel, the status screen " shown below
appears.
Additionally, the upper status line shows
the status message
UNAUTHORIZED
! Status message
" Status scre en
! (CHANNEL
).
To close the status screen: Press the
controller $.
The status screen and status message
disappears and the system tunes to the
channel heard before.
If the currently tuned channel becomes
unauthorized, the same status screen
and the same status message as
described above appears.
To close the status screen: Press the
controller
$.
The status screen and status message
disappears and the system tunes to the
channel 1.
Status screen "No signal"
If the received signal is not strong enough,
the status screen " shown below appears.
Additionally, the upper status line shows
the status message
! (NO SIGNAL).
! Status message
" Status screen
To close the status screen: Press the
controller
The status screen
$.
" disappears, but
the status message ! will be displayed
as long as the received signal is not
strong enough.
In this case, operation of the system is
possible, but the status screen
"
appears again, as soon as you try to
tune to another channel.
68
Page 69

If the received signal is strong enough
again, the status message
" disappears
and the system tunes automatically to your
last tuned channel.
Status screen "Loading XM"
If the tuner acquires audio or information/
decoding data, the status screen " shown
below appears. Additionally, the upper
status line shows the status message
(LOADING).
! Status message
" Status screen
!
To close the status screen: Press the
controller
The status screen
$.
" disappears, but
the status message ! will be displayed
unitl the process has been finished.
In this state, operation of the system is
possible, but the status screen
"
appears again, as soon as you try to
tune to another channel.
If the process has been finished, the
status message
" disappears and the
system tunes automatically to your last
tuned channel.
Status screen "Selected XM channel
is no longer available"
If you tune to channel which is no longer
available, the status screen " shown
below appears. Additionally, the upper
status line shows the status message
(CHANNEL UNAVAILABLE)
!
XM Satellite Radio mode
Status screens and messages
! Status message
" Status scre en
To close the status screen: Press the
controller
The system tunes to the channel heard
before.
Status screen "Check Antenna"
If the antenna is not connected properly,
the status screen
Additionally, the upper status line shows
the status message !)(CHECK
ANTENNA
$.
" shown below appears.
).
69
Page 70

XM Satellite Radio mode
Status screens and messages
! Status message
" Status scre en
To close the status screen: Press the
controller
The status screen
the status message ! will be displayed
until the antenna is connected properly.
$.
" disappears, but
Status message "OFF AIR"
If you have tuned to a channel and the
channel goes off air, the upper status line
shows a corresponding status message
!. The channel list shows also the
message, instead of the channel name.
! Status message
70
Page 71

Disc mode
General information . . . . . . . . . . . . . . . . . . . . . . . . . . 72
Loading the disc changer magazine . . . . . . . . . . . . . 77
Ejecting the disc changer magazine . . . . . . . . . . . . . 81
Audio disc playback . . . . . . . . . . . . . . . . . . . . . . . . . . 84
Video DVD playback . . . . . . . . . . . . . . . . . . . . . . . . . . 93
Video CD playback . . . . . . . . . . . . . . . . . . . . . . . . . . 109
71
Page 72

Disc mode
General information
Safety instructions License notice
WARNING
The Driver Information System is a class 1
laser product.
Invisible laser radiation poses a risk of injury
to the eyes if the cover is opened or
damaged.
Do not open the housing.
The Driver Information System does not
contain any user-serviceable parts.
For safety reasons, any maintenance
work must be performed exclusively by
qualified service experts.
Manufactured under license under U.S.
Patent #’s: 5,451,942;5,956,674;
5,974,380; 5,978,762; 6,487,535 & other
U.S. and worldwide patents issued &
pending. DTS and DTS Digital Surround
are registered trademarks and the DTS
logos and Symbol are trademarks of DTS,
Inc. © 1996-2007 DTS, Inc. All Rights
Reserved.
Manufactured under license from Dolby
Laboratories. Dolby and the double-D
symbol are trademarks of Dolby
Laboratories.
Automatic video lock-out
!"Switching the gear is described in detail in
the vehicle’s operation manual. Please pay
attention to the corresponding descriptions
and safety instructions in the vehicle’s
operation manual.
In the interest of safety, video CD/DVD
playback is only possible if the gear stick is
in position P.
Else you will see a corresponding message
in the display.
The system switches the picture back on as
soon as the gear stick is in position P.
The video CD/DVD playback sound is not
affected by the lock-out.
72
Page 73

Supported discs
Permissible file systems
Disc mode
General information
Mixed Mode CD/CD-Extra
The Driver Information System supports
the following CDs and DVDs:
CD-DA (audio CD)
CD-ROM
CD-R/RW
VCD ( video CD)
DVD-Video (single- and dual-layer)
DVD-Audio
DVD-ROM (single- and dual-layer)
DVD-R/RW
!"Audio CDs with copy protection do not
comply with the standard and may not be
able to be played.
It may be possible to play DVD-R and
DVD-RW discs, however this cannot be
guaranteed.
ISO9660/Joliet for CDs
UDF for DVDs
Multisession CDs
On multisession CDs, the content of the
first session determines how the Driver
Information System handles the CD.
If the first session contains data in the audio
CD format, for example, and the second
session contains MP3 or wma tracks, the
system will handle the CD as a
conventional audio CD. This means that
the MP3 or wma tracks cannot be
accessed.
If the first session contains MP3 or wma
tracks, for example, and the second
session contains data in the audio CD
format, the system will not handle the CD
as an audio CD. In this case, only the MP3
or wma tracks can be accessed.
Mixed Mode CDs are CDs that contain data
in the audio CD format as well as other
data, such as pictures. The Driver
Information System can play back neither
the audio data nor the other data from this
type of CD.
CDs with the designation "CD-Extra" can
have the same content as Mixed Mode
CDs. With CD-Extra CDs, however, the
data is stored in a different manner. The
Driver Information System can play back
the audio data from these CDs.
!"These CDs can also bear the designation
"CD Plus" or "Enhanced CD".
73
Page 74

Disc mode
General information
MP3 or wma discs
File structure
When creating MP3 or wma discs, you can
organize the tracks into folders. Folders
can also contain further folders
(subfolders). A disc may have a maximum
of 255 folders in total. A maximum of 255
tracks and 255 subfolders are permissible
per folder, with a maximum nesting depth of
8 folder levels.
The system cannot access more deeply
nested folders. The same applies to the
tracks stored in these folders.
A maximum of 4000 tracks in total are
permissible per disc.
Below you will find an example of a file
structure.
Track and folder names
When creating MP3 or wma discs, you can
assign names to the tracks and to the
folders. The Driver Information System
uses these names for the corresponding
display when playing the disc. Empty
folders or folders containing data other than
MP3 or wma tracks are not displayed by the
system.
!"The Driver Information System does not
support ID3 tags.
Please note the following when assigning
track names:
Track names must contain at least one
character and should not contain more
than one hundred characters. The
system cannot display names with
more than one hundred characters.
Track names must have the extension
"mp3" (MP3 tracks) or „wma“ (wma
tracks).
A period must appear between the track
name and the extension.
Example of a correct MP3 track name:
Track 1.mp3
The system will not recognize an MP3 or
wma track if:
there is no period between the track
name and the extension
the extension is missing
74
Page 75

Supported format
The Driver Information System supports
the wma format (without digital rights
management DRM) and the MPEG1 audio
layer 3 format.
!"In everyday speech, the MPEG1 audio layer
3 format has been replaced by the
designation "MP3".
Supported bit and sampling rates
Fixed and variable bit rates up to 320
kbps
Sampling rates from 24 kHz to 48 kHz
!"Only use MP3 or wma tracks with a bit rate
of 128 kbps or higher and with a sampling
rate of 44.1 kHz or higher. Lower rates may
result in audibly impaired quality. This is
particularly true if the surround function is
activated.
Note on copyright
The music tracks that you can create for
MP3 or wma playback or can play back in
MP3 or wma mode are generally copyrightprotected under applicable international
and national laws.
In many countries, the reproduction of
copyrighted material is not permitted, even
if only for personal use, without the express
prior consent of the copyright holder.
Please check the current copyright laws for
your country and comply with them.
These restrictions do not apply,
for example, to your own compositions and
recordings, or to recordings for which
authorization has been obtained from the
copyright holder.
Disc mode
General information
Notes on discs
CAUTION
Do not attach stickers or labels of any kind
to discs. They may come loose and damage
the Driver Information System.
The Driver Information System has been
designed for playback of discs conforming
to the standard IEC 60908. Therefore, only
discs with a maximum thickness of 1.3 mm
(0.0472") can be used. If a thicker disc is
used, the system may be damaged.
Do not use 8 cm (3.15") diameter discs, not
even with an adapter. Only use round, 12
cm (4.72") diameter discs.
Do not insert any other objects than the
discs described above into the disc slot.
Damage to the disc changer may occur.
Do not load warped or poor quality discs into
the magazine as damage to the disc
changer may occur.
(continued)
75
Page 76

Disc mode
General information
CAUTION
(continued)
Do not attempt to insert more than one disc
into the disc slot at the same time. This will
destroy the disc changer.
Do not attempt to grab or pull a disc out
while it is pulled into the disc changer by the
self-loading mechanism. Damage to the
disc changer and the disc could occur.
Off-road or rough surface driving may cause
the disc to skip. Do not use the disc changer
when driving in such conditions as damage
to the system or to the disc surface could
occur.
Audio CDs with copy protection do not
comply with the standard and may not
be able to be played.
When playing copied discs, problems
may occur with the playback.
A wide variety of discs, burning
software and burners are available.
Due to this wide variety, we cannot
guarantee that the system will be able
to play every user-burned disc.
There may be problems playing back
user-burned CDs with a storage
capacity of more than 700 MB.
These CDs do not meet current valid
standards.
Notes on the care of discs
Only touch the discs at the edges.
Handle discs with care in order to avoid
malfunctions during playback.
Avoid scratching, leaving fingerprints
and dust on the discs.
Clean the discs occasionally with a
commercially available cleaning cloth.
Always wipe in a straight line from the
inside outwards, never in a circular
motion.
The discs must only be labeld using
pens specially designed for this
purpose.
After use, put the discs back into the
box.
Protect the discs from heat and direct
sunlight.
Notes on playback
If it is raining, at high humidity or after
heating was working, the humidity may
condense at the optical lens of the disc
changer.
In this case, the disc changer can not work
well. Remove the disc from the disc
changer and wait until the optical lens is
dried.
76
Page 77

Disc mode
Loading the disc changer magazine
!"For information on general system
operation, please refer to the chapter
"Functional introduction" from page 17.
Safety instruction
WARNING
If you load the magazine when driving, you
may be distracted from the traffic situation,
thus increasing the accident hazard.
Only load the magazine when the vehicle is
stationary.
General information
The Driver Information System features a
built-in disc changer magazine with six
compartments.
If the disc is printed on one side, this side
must face upwards when loading the
magazine. If neither side is printed, the side
to be played must face downwards.
Loading the magazine automatically
terminates playback of another disc.
Loading the first availa b le em pt y
magazine compartment
!"The following description only applies to
scenarios where a mode other than disc
mode is active, for example in telephone
mode.
If you wish to load a magazine compartment
when disc mode is active, please proceed
as described in the section "Loading a
specific empty magazine compartment",
see page 78.
! Disc slot
" # button
CAUTION
Only insert a disc into the disc slot ! when
the display shows the message
insert Disc. The Driver Information System
may be damaged if you insert a disc before
this message is displayed.
Please
Briefly press the # button.
After a short time, the system will
prompt you to insert a disc with the
message Please insert Disc.
77
Page 78

Disc mode
Loading the disc changer magazine
Insert a disc into the slot !.
The system will load the disc into the
appropriate magazine compartment
and then play it.
!"If you wait too long before inserting the disc,
the system will abort the loading procedure.
Loading a specific empty magazine
compartment
Opening the Disc main menu
!"You cannot open the Disc main menu
if the magazine is completely ejected.
The message
available will appear instead. If this
happens, proceed as described in the
previous section "Loading the first available
empty magazine compartment". The
system will automatically load magazine
compartment 1 in this case.
No playable disc
Press the 2 button.
Either the Disc or the AUX main menu
appears.
If the AUX main menu appears:
Press the 2 button again.
or
Press the 8 button on the steering
wheel repeatedly until the Disc main
menu appears.
!"If Navigation, Info or Phone is the active
mode, switching to disc mode on the
steering wheel does not switch the display,
only the audio source will be switched
accordingly.
If you want to switch the display also, you
must use the
panel.
The Disc main menu appears.
! Occupied magazine compartments
" Disc main menu
# Empty magazine compartments
2 button on the control
78
Page 79

Selecting the magazine compartment to
load
Highlight an empty magazine
compartment in the Disc main menu
!"If you highlight a magazine compartment
that is already occupied, then the system
will automatically load the disc into the first
available empty compartment.
".
Loading the selected magazine
compartment
! Disc slot
" # button
CAUTION
Only insert a disc into the disc slot ! when
the display shows the message
insert Disc. The Driver Information System
may be damaged if you insert a disc before
this message is displayed.
Please
Briefly press the # button.
After a short time, the system will
prompt you to insert a disc with the
message
Please insert Disc.
Disc mode
Loading the disc changer magazine
Insert a disc into the slot
The system will load the disc into the
appropriate magazine compartment
and then play it.
!"If you wait too long before inserting the disc,
the system will abort the loading procedure.
Loading all empty magazine
compartments
!"You can also load all empty magazine
compartments in modes other than disc
mode, for example it also works in
telephone mode.
! Disc slot
" # button
!.
79
Page 80

Disc mode
Loading the disc changer magazine
CAUTION
Only insert a disc into the disc slot ! when
the display shows the message
insert Disc. The Driver Information System
may be damaged if you insert a disc before
this message is displayed.
Please
Press and hold the # button until
you hear a beep sound.
The system prompts you to insert a disc
with the message
Please insert Disc.
Insert a disc into the slot
The system will load the disc and once
more prompt you to insert the next disc
with the message
!"If you wait too long before inserting the disc
or do not load a further disc, the system will
stop the loading procedure and play the last
inserted disc.
Repeat the last step after each prompt
until all of the magazine compartments
have been loaded.
After the last magazine compartment
has been loaded, the system will
automatically play the appropriate disc.
!.
Please insert Disc.
80
Page 81

Disc mode
Ejecting the disc changer magazine
!"For information on general system
operation, please refer to the chapter
"Functional introduction" from page 17.
WARNING
If you eject the magazine when driving, you
may be distracted from the traffic situation,
thus increasing the accident hazard.
Only eject the magazine when the vehicle is
stationary.
If the disc slot is obstructed and you eject
the magazine, this may cause fire or
electrical shock and may damage the
system.
Only eject the magazine if the disc slot is not
obstructed.
Ejecting the magazine compartment
containing the last disc played
!"You can also eject this magazine
compartment if a mode other than disc
mode is active, for example in telephone
mode. If the last disc played is no longer
available, the system will eject the first
available occupied magazine compartment.
If you wish to eject a specific magazine
compartment when disc mode is active,
please proceed as described in the section
"Ejecting a specific magazine
compartment", see page 81.
! Disc slot
" " button
Briefly press the " button.
The system will eject the respective
disc.
Remove the disc from the slot
!"If you wait too long before removing the disc,
the system will automatically pull it back in
after a certain time.
!.
Ejecting a specific magazine
compartment
Press the 2 button.
Either the Disc or the AUX main menu
appears.
If the AUX main menu appears:
Press the 2 button again.
The Disc main menu appears.
or
81
Page 82

Disc mode
Ejecting the disc changer magazine
Press the 8 button on the steering
wheel repeatedly until the Disc main
menu appears.
!"If Navigation, Info or Phone is the active
mode, switching to disc mode on the
steering wheel does not switch the display,
only the audio source will be switched
accordingly.
If you want to switch the display also, you
must use the
panel.
! Occupied magazine compartments
" Disc main menu
# Empty magazine compartments
2 button on the control
Selecting the magazine compartment to
eject
Highlight an occupied magazine
compartment in the Disc main menu.
!"If you highlight a magazine compartment
that is already empty, then the system will
eject the disc currently playing.
Ejecting the selected magazine
compartment
! Disc slot
" " button
Briefly press the " button.
The system will eject the disc.
Remove the disc from the slot
!"If you wait too long before removing the disc,
the system will automatically pull it back in
after a certain time.
!.
Ejecting all magazine
compartments
!"You can also eject all magazine
compartments in modes other than disc
mode, for example it also works in
telephone mode.
! Disc slot
" " button
82
Page 83

Press and hold the " button until the
first disc will be ejected.
Remove the disc from the slot
The system will eject the next disc.
!"If you wait too long before removing the disc,
the system will automatically pull it back in
after a certain time and abort ejecting of the
magazine compartments.
Repeat the last step until the magazine
is empty.
!.
Disc mode
Ejecting the disc changer magazine
83
Page 84

Disc mode
Audio disc playback
!"For information on general system
operation, please refer to the chapter
"Functional introduction" from page 17.
Switching to disc mode and starting
audio disc playback
Option 1
Load the magazine with an appropriate
disc, see the section "Loading the disc
changer magazine" from page 77.
Option 2
Press the 2 button.
The system will switch to either disc or
AUX mode.
If the system switches to AUX mode:
Press the 2 button again.
or
Press the 8 button on the steering
wheel repeatedly until disc mode
appears in the display.
!"If Navigation, Info or Phone is the active
mode, switching to disc mode on the
steering wheel does not switch the display,
only the audio source will be switched
accordingly.
If you want to switch the display also, you
must use the
panel.
2 button on the control
The system will resume playing the last
disc played if available, otherwise it will play
the next available disc.
If it is a video disc, please select an audio
CD in the Disc main menu, see the section
"Selecting and playing discs" on page 96.
If the magazine is empty, the message
playable disc available
appears. If this
No
happens, load the magazine with an
appropriate disc, see the section "Loading
the disc changer magazine" from page 77.
Disc main menu
During playback of an audio CD
! Mode display
" Disc main menu with list of discs
# Disc icon
$ Track currently playing
% Track list of the disc currently playing
& Name of the disc currently playing
' Play icon % for the track currently
playing
( Disc currently playing
* Icon for an audio CD
+ Play icon % for the disc currently
playing
84
Page 85

During playback of an MP3 or wma CD
! Mode display
" Disc main menu with list of discs
# Disc icon
$ Track currently playing
% Track or folder list of the disc currently
playing
& Name of the disc currently playing
' Play icon % for the track currently
playing or the current folder
( Disc currently playing
* Icon for an MP3 CD
+ Play icon % for the disc currently
playing
!"The display & shows also the folder
currently playing if the track currently
playing is stored in a folder.
During playback of an audio DVD
! Mode display
" Disc main menu with list of discs
# Disc icon
$ Track currently pla ying
% Track list of the disc currently pla y ing
& Name of the disc currently playing
' Play icon % for the track currently
playing
( Disc currently playing
* Icon for an audio DVD
+ Play icon % for the disc currently
playing
Disc mode
Audio disc playback
Displaying the disc, track and folder
names
The list of discs in the Disc main menu
shows the discs available in the magazine
by their names, provided the names are
stored on the discs. If there are no names
stored, the respective disc type is
displayed.
The track or folder list
% shows the tracks
or folders on the disc currently playing.
In the case of audio CDs and audio DVDs,
the tracks are displayed with their names if
the names are stored on the disc. If there
are no names stored, "
Track" followed by
the appropriate track number is displayed.
In the case of MP3 or wma CDs, the system
uses the names assigned during creation
of the CD to display the CD, track and
folder names. Any ID3 tags in the files are
ignored.
"
85
Page 86

Disc mode
Audio disc playback
If a track or folder name is too long, the
system will display it in abbreviated form.
This is indicated by the three dots "…" at
the end of the name. If this happens, you
can call up a complete name display.
! Ab reviated track name
Calling up a complete name display
To open the Options menu: Highlight
the desired track or folder and push &
the controller
$.
! Options menu
To call up a track name display: In the
Options menu, select the menu item
Details.
After selecting the menu item
Details,
the complete track name display
appears.
To close the display: Press the
controller $.
Unknown discs
Discs that have not yet been played after
the magazine has been loaded are not
known to the system. They are displayed
as follows.
! Icon for an unknown disc
" Display for the unknown content of the
unknown disc
As soon as an unknown disc is played,
display takes place as previously described
in the section "Displaying the disc, track
and folder names", see page 85.
86
Page 87

The system does not store the data,
therefore after a disc is removed from the
magazine and reinserted at a later date, it
may be unknown to the system once more.
Selecting and playing discs
Selecting using the central control
panel
Select an audio disc in the list of discs
in the Disc main menu.
Selecting using the steering wheel
Press and hold the 4 or 5 button.
The system will play the previous or
next disc, depending on the button
pressed.
!"The previous or next disc may also be a
video disc, depending on how the magazine
compartments are loaded.
Disc mode
Audio disc playback
To pause: Highlight the track currently
playing and press the controller $.
The play icon
pause icon &.
To resume: Highlight the track
currently playing once more and press
the controller
The pause icon
play icon %.
Selecting tracks
% will change to the
$.
& will change to the
! Icon for a video CD
" Icon for a video DVD
# Icon for an audio DVD
$ Icon for an audio CD
% Icon for an MP3 CD
& Disc main menu with list of discs
' Play icon % for the disc currently
playing
Pausing or resuming playback
! Play icon %
" Track currently playing (highlighted)
Skipping tracks forward/back
Briefly press the 5 or 4 button on
the steering wheel.
The system will execute the track skip
corresponding to the button pressed.
!"'Skip track forward' skips to the next track.
'Skip track back' skips to the beginning
of the current track, if the track has been
playing for more than 10 seconds. If the
track has been playing for less than
10 seconds, it will skip to the beginning of
the previous track.
87
Page 88

Disc mode
Audio disc playback
Track list
!"You can select a specific track for playback
directly in the track list.
Select the desired track in the track list.
Selecting folders and MP3 or wma
tracks
!"This function is only available for MP3 or
wma CDs. Folders can only be selected if
the MP3 or wma tracks were organized into
folders when the CD was created.
! Menu item for the folder change
function
" Folder
# Play icon % for track currently playing
$ Track
% Highlighted track
To switch to the next folder level up:
Select the menu item !.
The display will change accordingly.
To open a folder: Select the desired
folder.
You will see the tracks stored in this
folder.
To play a track: Select the desired
track.
Selecting a group
!"This function is only available for audio
DVDs. The music tracks on an audio DVD
can be organized into up to nine groups.
To open the Options menu: Highlight
any track and push & the controller $.
The Options menu appears.
! Options menu
To open the Group menu: In the
Options menu, select the menu item
Change Group.
The Group menu appears. The group
currently being played is marked with
the play icon
! Play icon %
" Group menu
%.
88
Page 89

Select the desired group.
The system will play the first track in the
chosen group.
Fast forwarding/reversing
To terminate forwarding/reversing:
Release the controller
!"During fast forwarding/reversing the track
time changes are displayed in the upper
status line.
$.
Disc mode
Audio disc playback
To open the Options menu: Push
the controller
$.
&
To open the Options menu: Highlight
any track and push & the controller $.
! Options menu
To start forwarding: In the Options
menu, select the menu item
press and hold the controller
FF and
$.
or
To start reversing: In the Options
menu, select the menu item
REW and
press and hold the controller $.
Repeating tracks or folders
!"This function will keep repeating a track or
folder until it is cancelled. In the case of MP3
or wma CDs, repetition of folders is only
possible if the CD contains folders. Tracks
in subfolders within the folder to be repeated
will be ignored.
Highlight the desired track or folder.
! Folder
" Highlighted track
# Track
! Status display
" Options menu
To switch the function on/off: In the
Options menu, select the menu item
Repeat Track or Repeat Folder.
Depending on the previous status, the
function will be switched on or off. The
status display
Display
Display
! changes accordingly.
# = function switched off
$ = function switched on
89
Page 90

Disc mode
Audio disc playback
When the function is switched on, the icon
(repeat track) or (repeat folder)
additionally appears on the right in the top
status line.
!"The repeat track function switches off
automatically when you select another
track.
The repeat folder function switches off
automatically when you select a track in
another folder.
Both functions are switching off
automatically when you:
eject a magazine compartment,
select another disc,
switch to a different audio or video
signal source, for example to FM,
switch the system off and back on
again.
Random play
Switching random play of all tracks
on/off
!"Random play of all tracks plays all tracks on
a current audio or MP3 or wma CD in
random order.
In the case of audio DVDs, random play is
restricted to the tracks in the currently active
group.
Highlight the track currently playing.
! Highlighted track currently playing.
!"You can tell the track currently playing by the
play icon
%.
To open the Options menu: Push &
the controller
! Status display
" Options menu
$.
In the Options menu, select the menu
Random Disc.
item
Depending on the previous status, the
function will be switched on or off.
The status display
! changes
accordingly.
Display
Display
# = function switched off
$ = function switched on
90
Page 91

When the function is switched on, the
icon additionally appears on the
right in the top status line.
!"The function switches off automatically
when you:
select any track,
eject a magazine compartment,
select another disc,
switch to a different audio or video
signal source, for example to FM,
switch the system off and back on
again.
Switching random play within a specific
folder on/off
!"Random play within a specific folder only
applies to MP3 or wma CDs. It plays all
tracks in a specific folder in random order.
Tracks in subfolders within the specific
folder will be ignored.
Highlight the desired folder.
! Highlighted folder
To open the Options menu: Push
the controller $.
! Status display
" Options menu
Disc mode
Audio disc playback
In the Options menu, select the menu
Random Folder.
item
Depending on the previous status, the
function will be switched on or off.
The status display
accordingly.
Display
Display
When the function is switched on, the
&
icon additionally appears on the
right in the top status line.
!"The function switches off automatically
when you:
select any track,
eject a magazine compartment,
select another disc,
switch to a different audio or video
signal source, for example to FM,
switch the system off and back on
again.
! changes
# = function switched off
$ = function switched on
91
Page 92

Disc mode
Audio disc playback
Scan function
!"This function plays about 10 seconds of
each track on the disc currently playing and
then skips to the next track.
Highlight the track from which you want
the function to start.
! Highlighted track
To open the Options menu: Push
the controller $.
&
! Options menu
To switch the function on/off: In the
Options menu, select the menu item
Scan.
Depending on the previous status, the
function will be switched on or off.
When the function is switched on, the
icon appears on the right in the
top status line.
!"The function switches off automatically
when you:
select any track,
eject a magazine compartment,
select another disc,
switch to a different audio or video
signal source, for example to FM,
switch the system off and back on
again.
It also switches off automatically when it
reaches the track where it started.
92
Page 93

Disc mode
Video DVD playback
!"For information on general system
operation, please refer to the chapter
"Functional introduction" from page 17.
Video DVD playback conditions
!"Retailers supply video DVDs that do not
meet the standards.
These video DVDs may cause picture,
sound or other playback problems.
DVD region code
Most of the video DVDs are encoded with a
region code intended to restrict the area of
the world in which they can be played.
Information about which region code a
DVD has can usually be found either on the
video DVD itself or on the sleeve.
In order to play a video DVD, the video
DVD and the video DVD player must have
the same region code.
Below you will find the possible region
codes and the countries assigned.
Region
code
0 No region code (DVD can be
1 Bermuda, Canada, Cayman
2 Egypt, Europe, Greenland,
3 Hongkong, Macau, Parts of
4 Australia, Central America,
Country
played with all DVD players
independently of the player’s
region code)
Islands, U.S.A. and U.S.A.
territories
Japan, Lesotho, Middle East,
South Africa, Swaziland
South East Asia,
South Korea, Taiwan,
The Philippines
Latin America (including
Mexico), New Guinea,
New Zealand, Oceania,
Papua, The Caribbean
Region
code
5 African countries not
6 China (except Macau and
7 Reserved
8 Cruise ships, Airlines etc.
For example, DVD players sold in the
U.S.A. have the region code 2, and video
DVDs sold in the U.S.A. can have the
region code 0 or 2.
So, if you insert a DVD with a region code
except 0 or 2 into an U.S.A. DVD player
(e.g. the disc changer of the Driver
Information System), the DVD will not be
played.
Country
explicitly included in other
regions, Indian subcontinent,
Mongolia, North Korea,
Seychelles, countries
included in the former
Soviet Union
Hongkong)
93
Page 94

Disc mode
Video DVD playback
TV Standard
The Driver Information System can play
video DVDs that meet PAL or NTSC TV
standard.
Information on this can usually be found
either on the DVD itself or on the DVD
sleeve.
Functional restrictions
It may be the case that some functions or
actions may not be possible at certain
times, or may not be possible in general,
depending on the video DVD.
When such functions or actions are
activated, they are indicated by the icon
in the top left corner of the display.
! Icon
Switching to disc mode and starting
video DVD playback
Option 1
Load the magazine with an appropriate
disc, see the section "Loading the disc
changer magazine" from page 77.
Option 2
Press the 2 button.
The system will switch to either disc or
AUX mode.
If the system switches to AUX mode:
Press the 2 button again.
Option 3
Press the 8 button on the steering
wheel repeatedly until disc mode
appears in the display.
!"If Navigation, Info or Phone is the active
mode, switching to disc mode on the
steering wheel does not switch the display,
only the audio source will be switched
accordingly.
If you want to switch the display also, you
must use the
panel.
The system will resume playing the last
disc played if available, otherwise it will play
the next available disc.
If it is an audio disc, please select a
video DVD in the Disc main menu, see
the section "Selecting and playing
discs" on page 87.
If it is a video CD, please select a video
DVD in the Disc main menu, see the
section "Selecting and playing discs" on
page 96.
2 button on the control
94
Page 95

If the magazine is empty, the message No
playable disc available
appears. If this
happens, load the magazine with an
appropriate disc, see the section "Loading
the disc changer magazine" from page 77.
Playback will not start if the DVD has the
wrong region code. Instead you will see an
appropriate message.
After video playback starts, the system will
show the video content as a full-screen
display.
You can open the following menus during
playback:
Disc main menu, see page 95
Native DVD menu, see page 100
On-screen menu, see page 105
Disc main menu
Opening the Disc main menu
During video playback, press and hold
the . button until the Disc main
menu appears.
!"Video playback continues in the background
when the Disc main menu is open.
! Mode display
" Disc main menu with list of discs
# Disc icon
$ Chapter currently playing
% Content area with native DVD menu
& Name of the disc currently playing
' Open the Settings menu
( Disc currently playing
* Icon for a video DVD
+ Play icon % for the disc currently
playing
Disc mode
Video DVD playback
Closing the Disc main menu and
returning to video full-screen display
In the content area
DVD menu select the menu item
Return to Screen.
or
Press the 2 button.
Displaying the disc name
The list of discs in the Disc main menu
shows the discs available in the magazine
by their names, provided the names are
stored on the discs. If there are no names
stored, the respective disc type will be
displayed.
If a video DVD is highlighted in the list of
discs in the Disc main menu
content area % will display the native DVD
menu if the DVD has the correct region
code.
If it does not have the correct region code,
the content area
appropriate message.
% with the native
"
", then the
% will display an
95
Page 96

Disc mode
Video DVD playback
Unknown discs
Discs that have not yet been played after
the magazine has been loaded are not
known to the system. They are displayed
as follows.
! Icon for an unknown disc
" Display for the unknown content of
the unknown disc
As soon as an unknown disc is played,
display takes place as previously described
in the section "Displaying the disc name",
see page 95.
The system does not store the data,
therefore after a disc is removed from the
magazine and reinserted at a later date, it
may be unknown to the system once more.
Selecting and playing discs
Selecting using the central control
panel
To open the Disc main menu: During
video playback, press and hold
the . button until the Disc main
menu appears.
! Icon for a video CD
" Icon for a video DVD
# Icon for an audio DVD
$ Icon for an audio CD
% Icon for an MP3 CD
& Disc main menu with list of discs
' Play icon % for the disc currently
playing
To play a disc: Select a video DVD in
the Disc main menu
&.
Selecting using the steering wheel
Press and hold the 4 or 5 button.
The system will play the previous or
next disc, depending on the button
pressed.
!"The previous or next disc may also be an
audio disc or a video CD, depending on how
the magazine compartments are loaded.
Selecting chapters
!"If a film contains chapters, you can use the
chapter list or the chapter skip function to
select a chapter for playback.
Chapter list
This function is described in the section
"Native DVD menu", see page 100.
96
Page 97

Skipping chapters forward/back
!"These two functions are also available in the
on-screen menu, see the section "Skipping
chapters forward/back" on page 107.
Briefly press the 5 or 4 button on
the steering wheel.
The system will execute the chapter
skip corresponding to the button
pressed.
Selecting titles
This function is described in the section
"Native DVD menu", see page 100.
Switching subtitles on/off
This function is described in the section
"Native DVD menu", see page 100.
Switching audio track
This function is described in the section
"Native DVD menu", see page 100.
Switching viewing angle
This function is described in the section
"Native DVD menu", see page 100.
Audio settings
Please see the section "Audio settings" on
page 34 for a description of the audio
settings.
Video settings
Open the Video Settings menu
During video playback, press and hold
the . button until the Disc main
menu appears.
Disc mode
Video DVD playback
In the Disc main menu, select the menu
Settings.
item
A selection menu appears.
! Selection menu
In the selection menu, select the menu
Video.
item
The Video Settings menu appears.
! Video settings menu
97
Page 98

Disc mode
Video DVD playback
The Video Settings menu includes the
following functions:
Aspect ratio, see page 98
Brightness, color and contrast, see
page 98
Video reset, see page 99
Close the Video Settings menu
Briefly press the . button.
Aspect ratio
Open the Video settings menu, see
section "Open the Video Settings
menu" on page 97.
To open the Aspect Ratio menu: In
the Video Settings menu, select the
menu item
The Aspect Ratio menu appears.
! Icon " for currently active setting
To set the aspect ratio: Select the
desired setting.
Brightness, color and contrast
Open the Video settings menu, see
section "Open the Video Settings
menu" on page 97.
Aspect Ratio.
! Video settings menu
To open the desired menu: In the
Video Settings menu, select either the
menu item
Contrast.
The corresponding menu appears.
Brightness, Color or
! Video settings menu
98
Page 99

The illustration shows the brightness setting
! Scale for the brightness setting
" Indicator
The position of the indicator
! shows the current setting.
Turn
+, the controller $ until the
" on the scale
desired setting is reached.
The system saves this setting
automatically.
To close the menu: Press the
controller
$.
or
Briefly press the . or 2 button.
Video reset
You can use the video reset function to
reset the following settings to their factory
settings:
Aspect ratio
Brightness
Color
Contrast
Open the Video settings menu, see
section "Open the Video Settings
menu" on page 97.
! Video settings menu
Disc mode
Video DVD playback
To open the Video Reset menu: In the
Video Settings menu, select the menu
item Reset Video Settings.
You will be prompted to confirm that
you wish to reset the video settings.
Select
Yes or No.
The system will or will not reset the
video settings, depending on the
answer you select.
99
Page 100

Disc mode
Video DVD playback
Language settings
!"After starting DVD playback, some DVDs
will show a language menu. In this language
menu a specific language is marked by
default, it depends on the DVD content.
With the language settings you can set a
different language which should be marked
in the language menu as default in future.
If the DVD does not contain that different
language, the DVD depending language is
marked by default.
This setting is applied only when a DVD is
inserted, changing this setting during
playback does not have an effect.
To open the Language Settings
menu: During video playback, press
and hold the . button until the Disc
main menu appears.
Select the menu item
A selection menu appears.
Settings.
! Selection menu
In the selection menu, select the menu
Menu Language.
item
The Language menu appears.
! Icon " for currently active setting
To change the language: Select the
desired language.
Native DVD menu
! Native DVD menu
The native DVD menu includes the
following functions:
Closing the native DVD menu and
returning to video full-screen display,
see page 101
DVD top menu/DVD menu, see
page 101
Chapter list, see page 102
Selecting titles, see page 103
100
 Loading...