

Page 1

Dear Customer,
In this operating manual you will learn about the
various functions of the PCM (Porsche Communication Management) system and its operating options. To prevent danger to yourself and to others,
please start by familiarising yourself with your
PCM.
On-board literature
Keep the on-board literature in the vehicle at all
times and if you ever come to sell your vehicle,
please hand it over to the new owner.
Suggestions
Do you have any questions, suggestions or ideas
about your vehicle or the on-board literature?
Please write to us:
Dr. Ing. h.c. F. Porsche AG
Vertrieb Customer Relations
Porschestraße 15-19
71634 Ludwigsburg Germany
Orientation aids in the operating manual
This operating manual contains four orientation
aids to help you quickly locate the information you
want. They are each shown against a yellow background.
The master table of contents offers you an
overview of the structure of the entire manual.
In the section table of contents you will find detailed listings of the individual topics.
The index enables you to find the various topics
with the help of keywords.
Equipment
There may be some differences in equipment and
technology with respect to the illustrations and descriptions due to the ongoing development of the
systems and the varying laws in individual countries.
The equipment versions shown are not always included as standard. Some of the functions described in this operating manual are optional
equipment and may not be available in your PCM.
If this is the case, the relevant menu items will not
be available to you.
Page 2

WKD 952 220 10 03/09
Porsche, the Porsche Crest, Panamera, Carrera,
Targa, Boxst er, Cayen ne, Tipt ronic and
Tequipment are registered trademarks
of Dr. Ing. h.c. F. Porsche AG.
Printed in Germany.
Reprinting (including excerpts) as well as all other
forms of reproduction are prohibited without the
written permission of Dr. Ing. h.c. F. Porsche AG.
© Dr. Ing. h.c. F. Porsche AG
Porscheplatz 1
70435 Stuttgart Germany
2
Page 3

Contents
Using the PCM..................................... 6
Important information on operation and
road safety..................................................... 6
Introduction to operation ................................. 7
Menu types and options for operation............. 12
Sound settings ............................................. 15
Sound settings with BOSE
Sound System .............................................. 16
Sound settings with Burmester
End Surround Sound System ......................... 17
Configuring the PCM display .......................... 18
®
Surround
®
High-
TUNER............................................... 22
Radio ..........................................................22
Making settings for radio mode...................... 25
TV ............................................................... 27
Making settings for TV mode ......................... 31
DISC ................................................. 34
iPod* .......................................................... 40
USB.............................................................43
External Bluetooth
Bluetooth
®
®
audio source .................. 48
settings ......................................49
PHONE .............................................. 54
Bluetooth®..................................................54
Operating the Bluetooth
(Bluetooth
Telephone settings
(Bluetooth
Bluetooth
phone preparation) ........................................67
Phonebook settings
(Bluetooth
Transferring the phonebook ...........................71
Operating the PCM telephone.........................72
Text messages (SMS)
(with PCM telephone only) ..............................83
Telephone settings
(PCM telephone)............................................91
Call settings
(PCM telephone)............................................93
Bluetooth
(PCM telephone)............................................95
Phonebook settings ......................................98
Settings for messages and data
(PCM telephone)..........................................100
Cordless handset ........................................101
®
mobile phone preparation)..........56
®
mobile phone preparation) ...........66
®
settings (Bluetooth® mobile
®
mobile phone preparation) ...........70
®
settings
®
hands-free unit
INFO ............................................... 109
Displaying traffic messages (TMC) ............... 109
Displaying sections of the route................... 111
Displaying information about the location ..... 111
Displaying detailed information about the
active audio source .................................... 111
CAR ................................................ 113
Trip data display ........................................ 113
ParkAssist ................................................. 114
Rear view camera ...................................... 116
Logbook.................................................... 119
The Sport display ....................................... 127
Extended memory ...................................... 135
NAVI ............................................... 140
General operation....................................... 140
Entering an address ................................... 141
Starting/stopping route guidance ................ 143
List of previous destinations........................ 144
Personal destination memory ...................... 146
Points of interest........................................ 151
Changing options for route guidance ........... 153
Stopovers (tour) ......................................... 155
Destination input using
geographical coordinates ........................... 158
Destination input using the map ................... 158
Storing ...................................................... 158
Off-road navigation ..................................... 159
Reloading data........................................... 164
Contents 3
Page 4

MAP ................................................166
Map display................................................ 166
Voice control ...................................172
How voice control works ............................. 172
Symbols in sample dialogues....................... 173
Commands................................................. 173
Basic voice control functions ....................... 175
Using the help function ................................ 177
Operating examples ....................................179
Index...............................................194
Technical data .................................202
Radio frequency ranges............................... 202
Tuning steps used during automatic
station search ............................................ 202
Regional codes for video DVDs ....................202
Affiliated countries for TV tuner
country settings..........................................202
4 Contents
Page 5

Using the PCM
Important information on operation and
road safety..................................................... 6
Introduction to operation .................................7
Switching the PCM on/off..............................7
Setting the volume........................................8
Muting ......................................................... 8
Selecting the audio source ............................8
Controls and their functions........................... 9
Menu types and options for operation .............12
What are the menu types? ...........................12
Calling up and operating menu types............12
Exiting menus............................................. 13
Operating lists............................................13
Operating input menus ................................ 14
Sound settings.............................................. 15
Setting the bass .........................................15
Setting the treble........................................15
Setting the balance.....................................15
Setting the fader ........................................15
Setting the loudness ...................................16
Setting SDV (speed-dependent volume) ........16
Sound settings with BOSE
Sound System ..............................................16
Setting surround.........................................16
Setting linear..............................................16
Setting AudioPilot
Sound settings with Burmester
High-End Surround Sound System ..................17
Setting the listening position........................17
Setting smooth...........................................17
Setting surround.........................................17
®
Surround
®
.....................................16
®
Setting live ................................................ 17
Setting sound conditioner ........................... 17
Configuring the PCM display.......................... 18
Configuring display settings ........................ 18
Setting the language .................................. 19
Setting the units ........................................ 19
Resetting personal settings ........................ 20
Using the PCM 5
Page 6

Using the PCM
Important information on
operation and road safety
The PCM (Porsche Communication Management) system is the central control unit for the ra-
dio, TV tuner, disc mode (CD/DVD, USB, iPod and
an external audio source), sound settings, onboard computer, navigation system and telephone.
To avoid danger or injury to yourself and others
while using your PCM, you must take the following
into consideration:
WARNING!
Accident hazard. Distraction could result in
you losing control of the vehicle.
û Operate your PCM only when you are safely
in control of your vehicle and traffic conditions permit. If in doubt, stop the vehicle
and operate the PCM while the vehicle is
parked.
CAUTION!
Injury hazard. Opening the housing or a dam-
aged housing represents a hazard due to invisible laser radiation.
û The PCM is a Class 1 laser product. Do not
open the housing.
The PCM does not contain any user-serviceable parts. Any maintenance work must be
performed exclusively by qualified service
experts.
WARNING!
Accident hazard. The navigation system is
only intended as an aid to the driver and makes
recommendations on the routes to take. This
does not release you from full responsibility for
observing road safety, traffic conditions, legal
road traffic regulations and any other relevant
regulations while driving your vehicle.
As the driver, you must assess the traffic situation. Yo u have sole responsibility for road
safety while driving your car.
û Continue to pay attention to the traffic situ-
ation.
WARNING!
Injury hazard. The telephone must not be
used near explosives or flammable materials
(e.g. at a petrol station) or near operations involving explosives.
Mobile phones must be switched off in certain
hazardous areas such as near petrol stations,
fuel depots, chemical plants and demolition
work in progress using explosives, for example. They can interfere with technical equipment.
û Please heed appropriate warnings.
û Observe statutory regulations and local re-
strictions when using the telephone.
6 Using the PCM
Page 7

Introduction to operation
Switching the PCM on/off
Switching on/off via the ignition
(permanently)
û Switch on the ignition.
The PCM is permanently active.
Switching on/off via the left rotary knob
If the PCM is not to be permanently active, you can
also switch it on/off using the left rotary knob.
û Press and hold the left rotary knob (volume
control) for at least one second.
Battery discharge protection
Switching on/off via the left rotary knob is also
possible when the ignition is off.
To protect your vehicle’s battery, the PCM will automatically switch itself off again after a few minutes.
NOTICE
Risk of damage. The PCM contains high-qual-
ity electronic components which require spe-
cial care with regard to maintenance.
The following should be observed:
– The display is sensitive to scratches.
– The device must not be sprayed with liq-
uids. Ingress of liquids can result in the destruction of the equipment.
û Carefully clean your PCM periodically using
a dry, clean and soft cloth (microfibre cloth)
or a cleaning brush.
û Do not exert excessive pressure on the sur-
face when cleaning.
>>>
û Under no circumstances may solvents
such as methylated spirits, thinners, petrol,
acetone or alcohol (ethanol, methanol or
isopropyl alcohol) or scouring agents of
any type be used.
û Remove fingerprints using a slightly damp
cloth or a mild cleaning agent.
û Never spray cleaning agents or other liq-
uids directly onto the display. Instead
dampen a cloth and carefully wipe the display clean.
û If faults occur, do not open the PCM equip-
ment yourself under any circumstances.
Always have defective devices repaired by
a qualified specialist workshop. We recommend tha t th is wor k be per formed by a Porsche partner, as Porsche partners have
trained workshop personnel as well as the
necessary parts and tools.
Using the PCM 7
Page 8

Setting the volume
û Turn the left rotary knob t.
Depending on the situation, this adjusts the volume for:
– the active audio source,
– a traffic announcement,
– a voice control system announcement,
– the ringtone during an incoming call,
– hands-free mode during a telephone call.
Cancelling muting
û To cancel muting, briefly press the left rotary
knob
u again.
Muting navigation or traffic announcements
û To interrupt a navigation or traffic announce-
ment, briefly press the left rotary knob
during the announcement.
u
Muting
Muting an audio source
û Briefly press the left rotary knob
This mutes the active audio source. The mute
symbol is shown in the bottom line.
However, navigation recommendations, telephone calls and traffic announcements continue to be audible.
u.
8 Using the PCM
Selecting the audio source
Pressing the a button opens a window
where you can set the current audio source.
The window closes again as soon as:
– you have set an audio source or
– several seconds pass and you have made no
entry.
1. Press the a button.
2. Select the audio source you want on the dis-
play.
Page 9
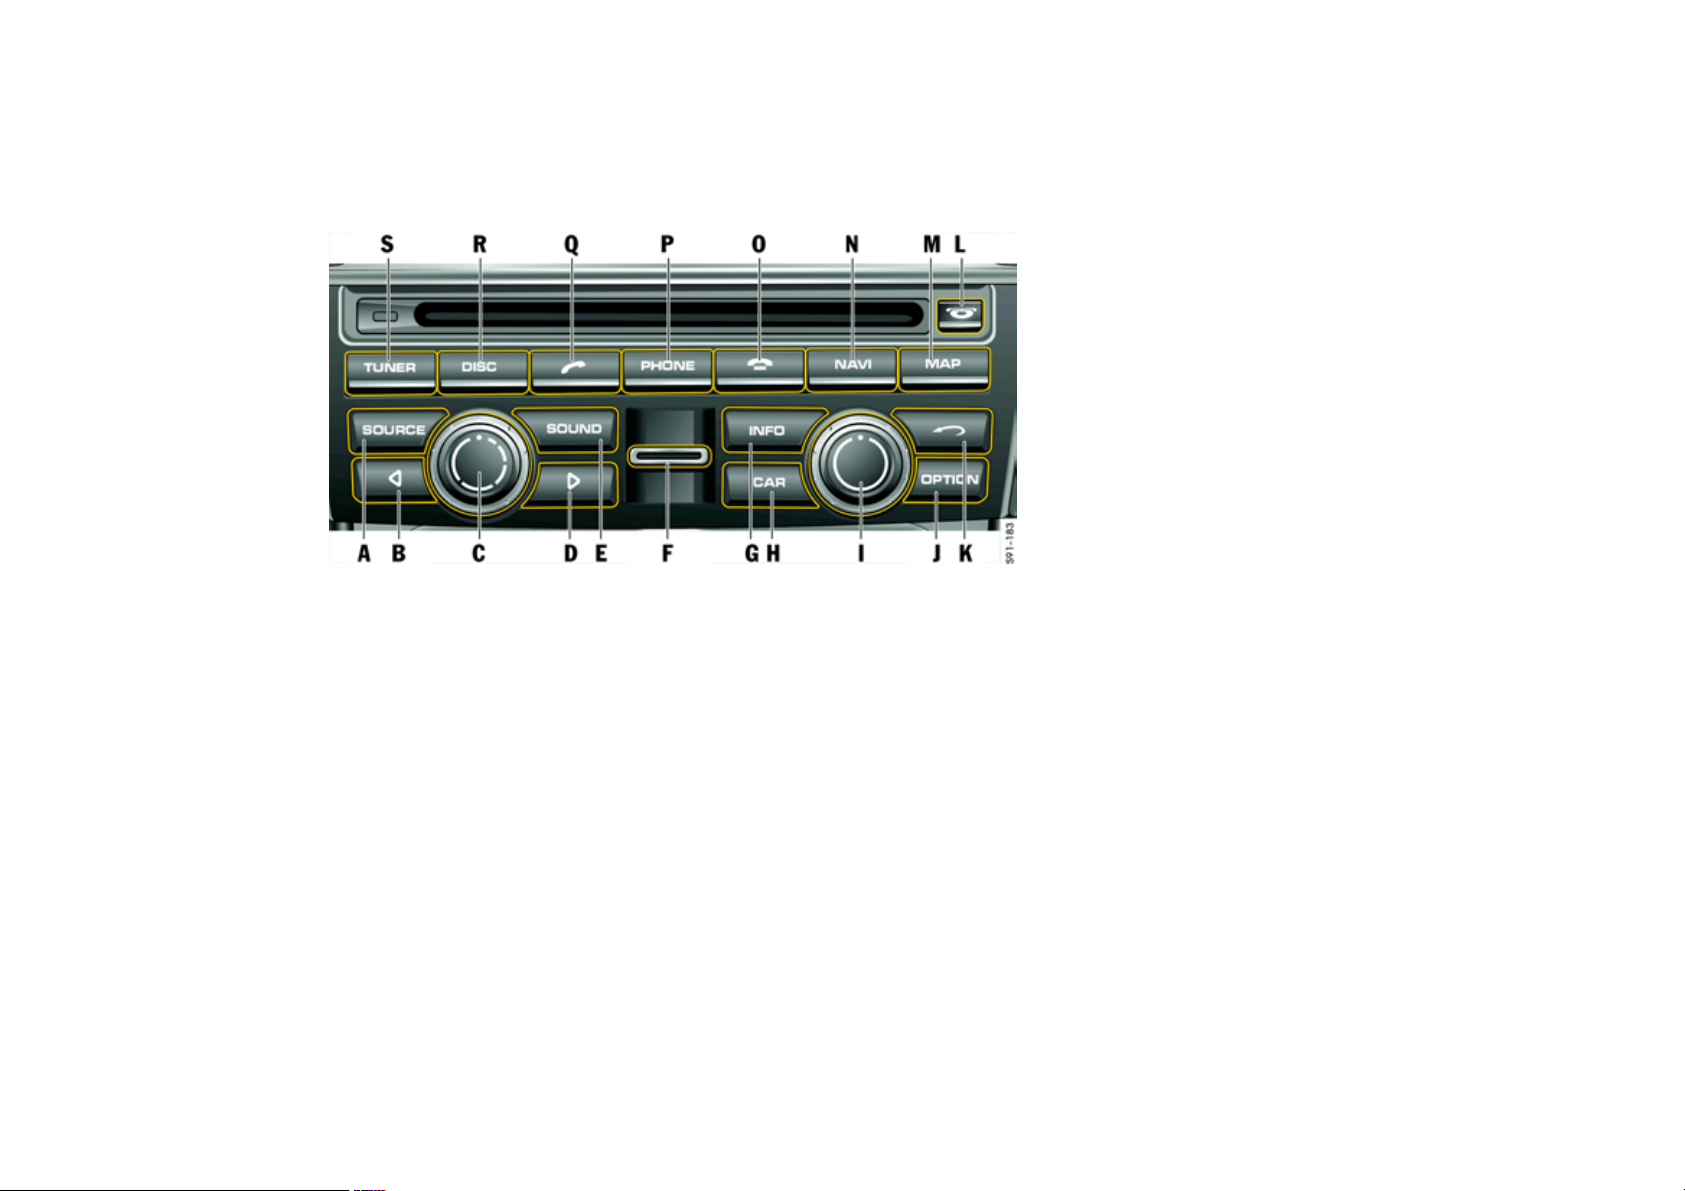
Controls and their functions
The controls for the PCM are arranged below the
display and around the CD/DVD slot.
A a button
B
p arrow button
CLeft rotary knob
v
t: Sets the volume
u (press briefly): Switches on or mutes the
device
u (press and hold): Switches the device on
and off
D
o arrow button
E b main menu button
FSlot for SIM card
G d main menu button
H w main menu button
I Right rotary knob
: Highlights a menu item
q
s
r: Selects the highlighted menu item
J i button
KBack button h
L Eject/retract button for CDs and DVDs
j
M g main menu button
N f main menu button
O End call button
P c main menu button
Q Lift handset button
R n main menu button
S m main menu button
k
l
Using the PCM 9
Page 10

A - a button
Pressing the a button opens a window
where you can set the current audio source.
The window closes again when:
– you have set an audio source,
– several seconds pass and you have made no
entry.
B - p arrow button
By briefly pressing the arrow button you can:
– start a search downwards in radio or TV mode,
– skip a track in CD/DVD, USB or iPod mode.
Pressing the arrow button for several seconds in
CD/DVD mode starts fast reverse.
C - Left rotary knob v
Pressing and holding the left rotary knob u
switches the device on or off.
Turning the left rotary knob
lowing settings:
– volume of the active audio source,
– volume of a traffic announcement,
– volume of a voice control system announce-
ment,
– volume when in hands-free mode during a tele-
phone call,
– ringtone volume of the telephone during an in-
coming call,
– cancelling muting (turning the rotary knob
clockwise).
Briefly pressing the left rotary knob
the following functions:
– cancels navigation and traffic announcements,
– rejects an incoming telephone call,
– mutes the device,
– switches on the system.
t changes the fol-
u executes
D - o arrow button
By briefly pressing the arrow button you can:
– start a search upwards in radio or TV mode,
– skip a track in CD/DVD, USB or iPod mode.
Pressing the arrow button for several seconds in
CD/DVD mode starts fast forward.
E - b main menu button
Pressing the b button opens a menu
where you can make the sound settings for the
PCM.
F - Slot for the telephone SIM card
To use the internal telephone, you must insert the
SIM card in the slot provided.
Alternatively, the SIM card of a mobile phone with
the Bluetooth
®
SIM Access Profile can be used.
10 Using the PCM
Page 11

G - d main menu button
Pressing the d button displays various general information such as the current audio source,
the date and time and the signal strength for your
telephone network.
H - w main menu button
Pressing the w button opens an overview of
various trip data.
I - Right rotary knob s
Along with the touchscreen, the right rotary knob
is the central control:
– Turn the rotary knob
menu item you want.
–Press
r to select a highlighted menu item.
q to highlight the
J - i button
Since not all of the operating options for a main
menu can be shown on one display, the i
menu summarises various operating options for
the main menus. You call up these operating options by pressing the i button.
Instead of pressing the button you can also
touch the tab of the same name on the display.
K- Back button h
By pressing the Back button h you can execute various functions.
Briefly press the button to:
– undo a selection in the menu,
– cancel a list selection.
Press and hold the button to:
– delete all characters already entered into an in-
put menu.
L - Eject button j
Pressing the j button executes the following functions depending on the equipment of your
PCM:
PCM without CD/DVD changer
– A CD or DVD inserted in the drive is ejected so
it can be removed.
PCM with CD/DVD changer
– The CD/DVD changer menu is opened. Press-
ing the button again ejects the highlighted CD
or DVD so it can be removed.
– If you press the button for several seconds and
there are still no CDs/DVDs in the changer
compartments, you will be prompted to fill the
individual compartments one after the other.
– If you press the button for several seconds and
the magazine compartments are at least partially full, all CDs or DVDs are ejected one after
the other.
M - g main menu button
Pressing the g button opens the map view of
the navigation function.
N - f main menu button
Pressing the f button opens the menu of the
navigation function.
O - End call button k
By pressing the End call button k you can:
– reject an incoming telephone call or
– end an active call.
P - c main menu button
Pressing the c button opens the menu of
the telephone function.
Using the PCM 11
Page 12

Q - Lift handset button l
By pressing the Lift handset button l you can:
– accept an incoming telephone call or
– call up the quick dial function.
R - n main menu button
Pressing the n button opens the menu for operating the CD, DVD, iPod, USB, AUX and AUX BT
audio sources.
S - m main menu button
Pressing the m button opens the menu for
radio mode.
Menu types and options for
operation
The PCM display is a colour touchscreen. All menu
functions, list entries and text input fields as well
as the arrow symbols and scrollbars can be operated by lightly touching the corresponding location on the display.
What are the menu types?
Main menus
The range of functions of the PCM is divided between the following main menus:
– m: radio main menu,
– n: disc main menu,
– c: telephone main menu,
– f: navigation main menu,
– g: map view,
– b: sound settings,
– d: information menu as well as
– w: vehicle and trip data main menu.
Each of these main menus contains various sub-
menus for a specific topic.
Option menus
Each of the eight main menus has an option menu
where you find settings and other functions for the
respective main menu.
Calling up and operating menu types
Calling up main menus
û To call up a main menu, press the appropriate
button below the display.
You can switch from one main menu to another at
any time.
When you return to a main menu, you return to the
function you were using before exiting the menu.
If you want to return to the top level of a main
menu, you must press the relevant main menu button twice in succession.
Calling up option menus
û To call up an option menu, press the
button.
- or -
û Touch the tab on the display with your finger.
i
12 Using the PCM
Page 13

Operating menus with the touchscreen
û Touch the individual menu items or symbols di-
rectly on the display.
If the menu functions cannot be operated by
touching the display, it is because the touchscreen is deactivated. For further information,
see “Switching the touchscreen on/off” on
page 19.
Operating menus with the right rotary knob
Instead of operation on the touchscreen, you can
also operate the menu items with the right rotary
knob.
û Turn the right rotary knob
menu item.
û Press
The process of highlighting
u the right rotary knob to activate the
highlighted menu item.
ing
r using the right rotary knob or touch-
ing the menu item on the display is referred to
below as “selecting”.
t to highlight a
q and activat-
Exiting menus
Returning to the next highest menu
û Press the Back button
eration and return to the next highest menu.
Returning to the main menu
û Press a main menu button to return to the cor-
responding main menu.
Returning to the top level of a main menu
û Briefly press the appropriate main menu button
twice in succession to return to the top level of
the main menu.
h to cancel an op-
Operating lists
The following operating options are available to
you for selecting a list entry:
û Touch the symbols and on the display.
- or -
û Touch the scrollbar between the two symbols
and .
- or -
û Turn the right rotary knob
Highlighted list entries are framed in orange.
Showing the first letter of list entries
To mak e it easi er t o find your way i n lo ng li sts , you
can show the first letter of list entries in the following lists:
– the phonebook,
– the list for the music search in the iPod or in
USB mode,
– the track list in USB and MP3 disc mode or
– the destination memory in the navigation
menu.
û Touch and hold one of the two symbols and
for several seconds.
- or -
û Quickly turn the right rotary knob
Only letters with corresponding entries in the
list will be displayed.
q.
q.
Using the PCM 13
Page 14
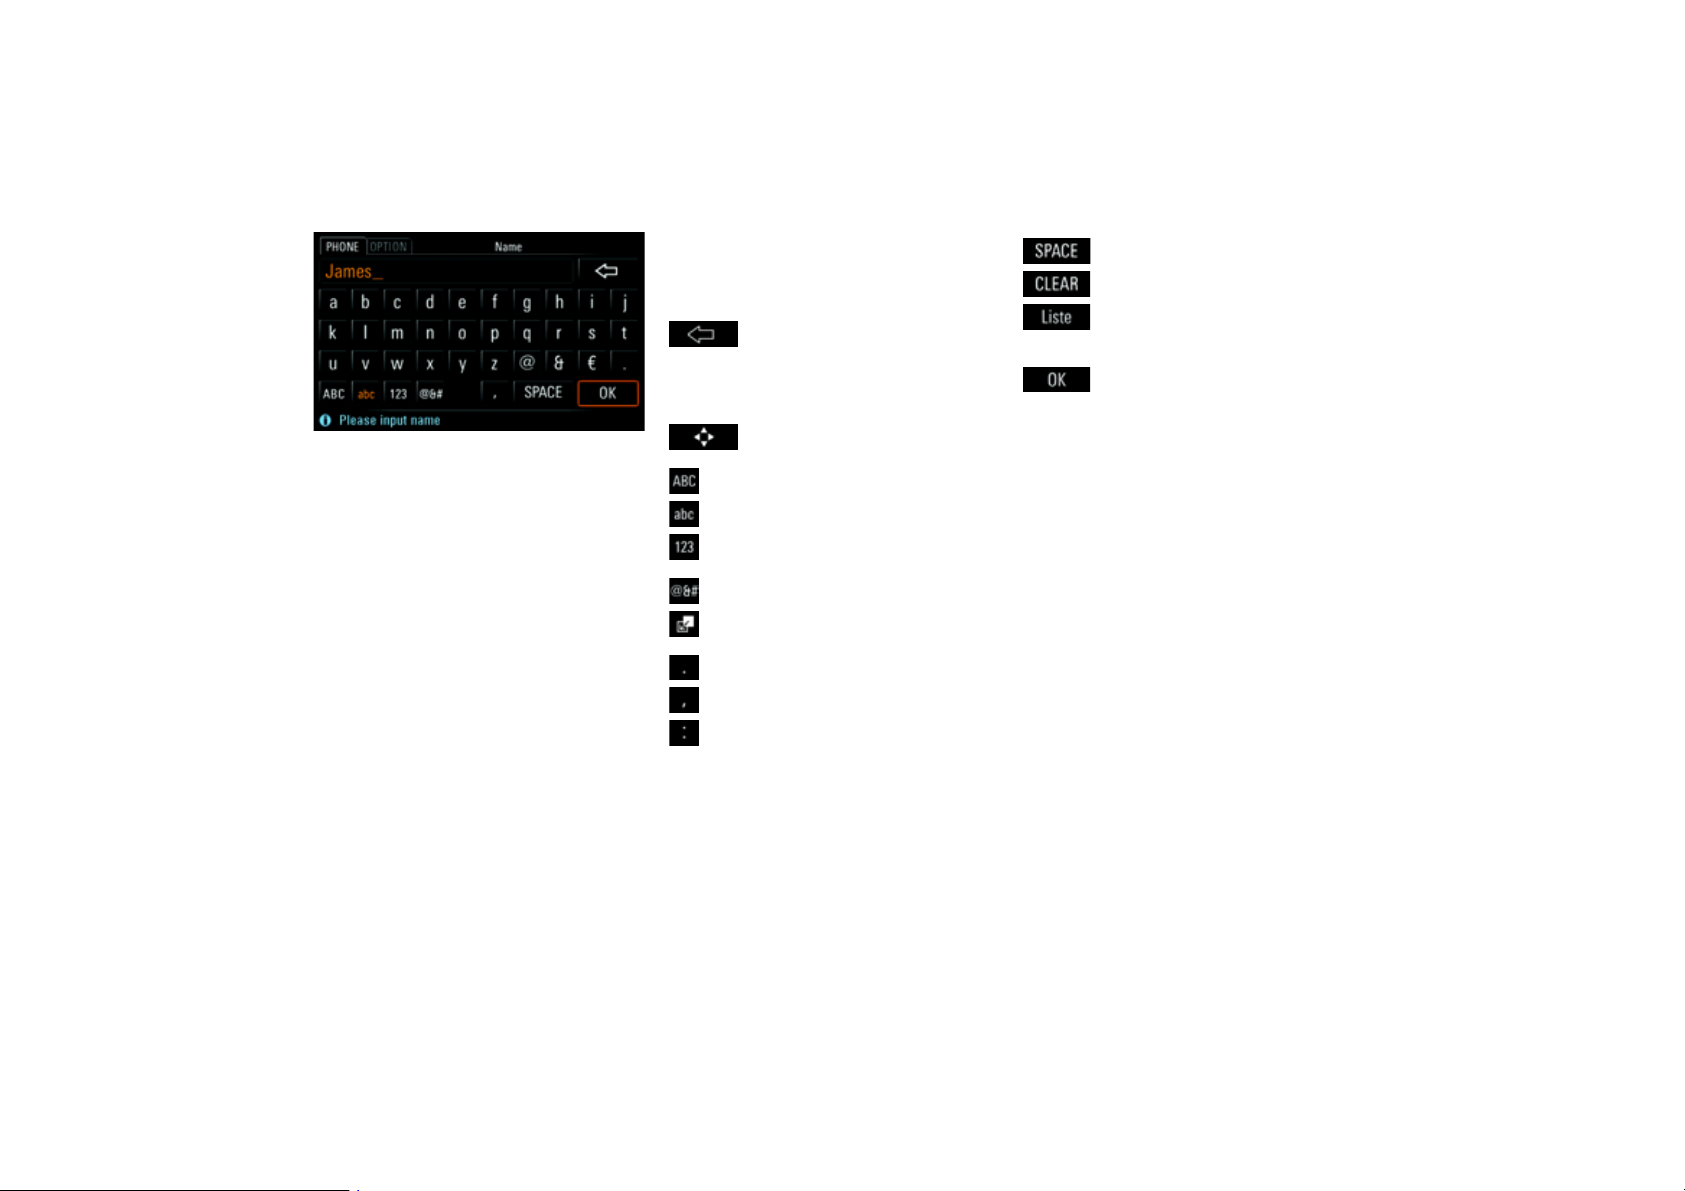
Operating input menus
In many cases you can enter data into the PCM.
This can be the case when entering an SMS message, a telephone number or a navigation destination, for example. The various input menus are
customised to their respective operating situations.
û To enter data into an input menu, lightly touch
the characters on the display.
- or -
û Highlight the characters by turning the right ro-
tary knob
the right rotary knob
û To confirm and accept the data you have en-
tered, select
q and insert them by pressing
r.
OK.
In addition to the letter fields, the input menus also
provide a number of function fields for changing
the character set displayed and for moving the
cursor:
deletes the last character entered
(if button is touched briefly)
- or deletes all characters entered
(if button is touched and held)
switches to positioning mode when
composing text messages (SMS)
switches to uppercase
switches to lowercase
switches to numbers and punctuation marks
switches to special characters
switches to insertion mode when
composing a text message
inserts a period
inserts a comma
inserts a colon
inserts a space
deletes all entries in the input field
calls up a stored list, for example
when entering an address in the navigation system
confirms the input and closes the
input menu
Greyed out characters cannot be selected.
In many cases the input menus are pre-sort-
ed. This means that after you have entered at
least three letters, only the letters for which
there is an entry in a list are offered for selection.
14 Using the PCM
Page 15

Setting the layout for the keyboard of the
input menu
The letter fields in the input menu can either be arranged alphabetically or like a computer keyboard.
1. Press the w button.
2. Press the i button or touch the tab of
the same name in the header.
3. Select “
4. Select one of the two options:
SET PCM system”
>“
Display PCM”
>“
Keyboard layout”.
–“
ABC”:
The letter fields are arranged alphabetically.
–“
QWERTY/QWERZ”:
The letter fields are arranged like a computer keyboard.
The chosen keyboard layout is set.
Sound settings
You can set the sound of your PCM for each audio
source separately using the sound settings in the
Sound menu. As soon as an audio source is selected, its sound settings are set automatically.
The range of displays and functions for the sound
settings depends on the vehicle type and the
equipment installed. In some cases, therefore, not
all of the functions described here may be available.
Setting the bass
1. Press the b button.
2. Select “
3. Make the setting you want by touching the two
Setting the treble
1. Press the b button.
2. Select “
3. Make the setting you want by touching the two
Bass”.
symbols and .
Treble”.
symbols and .
Setting the balance
The Balance setting allows you to set the volume
distribution between the left and right speakers.
1. Press the b button.
2. Select “
3. Make the setting you want by touching the
Balance”.
symbols , , and or by turning
q the right rotary knob.
Setting the fader
The Fader setting allows you to set the volume distribution between the front and rear speakers.
1. Press the b button.
2. Select “
3. Make the setting you want by touching the
Fader”.
symbols , , and or by turning
q the right rotary knob.
Using the PCM 15
Page 16

Setting the loudness
“Loudness” increases the sound volume by increasing the bass and treble frequencies.
This setting is particularly effective for low volumes and guarantees a pleasant sound.
1. Press the b button.
2. Select “
Loudness” to activate ( ) or
deactivate ( ) the function.
Setting SDV (speed-dependent volume)
The “SDV” function automatically adjusts the audio
playback volume as a function of the vehicle’s
speed.
You can set the degree to which the volume adjusts to the vehicle’s speed on a scale from 0 (no
increase in volume) to 5 (large increase in volume).
1. Press the b button.
2. Press the i button or touch the tab of
the same name in the header.
3. Select “
4. Make the setting you want by touching the
SDV”.
symbols and .
Sound settings with
BOSE®Surround Sound System
Setting surround
Activating “Surround” achieves a sound setting
with greater spatial depth.
This permits the creation of a virtual surround
sound with conventional stereo sources such as
CDs, radio or MP3 formats, for example.
The function can be set separately for the individual audio sources.
The “
Surround” function is generally activated with
multi-channel sources such as 5.1 DVDs, for example.
It cannot be activated for the sources “
“
TV”.
1. Press the b button.
2. Press the i button or touch the tab of
the same name in the header.
3. Select “
Surround” to activate ( ) or
deactivate ( ) the function.
AM” and
Setting linear
Selecting “Linear” switches the PCM from a bassheavy setting (linear off) to a more neutral sound
(linear on).
1. Press the b button.
2. Press the i button or touch the tab of
the same name in the header.
3. Select “
Setting AudioPilot
If the “
level inside the vehicle is monitored. Background
noise is analysed and the volume and dynamics of
the music playback across the entire frequency
spectrum is automatically adjusted.
An additional sound control feature is available for
vehicles with convertible tops. It adjusts the music
playback to the special requirements when driving
with an open top.
1. Press the b button.
2. Press the i button or touch the tab of
3. Select “
Linear” to activate ( ) or
deactivate ( ) the function.
®
AudioPilot” function is activated, the noise
the same name in the header.
AudioPilot” to activate ( ) or
deactivate ( ) the function.
16 Using the PCM
Page 17

Sound settings with Burmester®
High-End Surround Sound System
Setting the listening position
The “Listening position” setting allows you to optimise the sound settings for the front or rear seats.
If, on the other hand, you select the symmetrical
setting, you achieve the best possible sound setting taking all seats into account.
1. Press the b button.
2. Select “
3. Select one of the following settings:
Setting smooth
The “Smooth” function is used to precisely reduce
overemphasized frequencies in the midrange and
treble, which may be present in highly compressed music material. Typical examples include
playing MP3 files with a low data rate or listening
to an FM station with unfavourable reception conditions.
This function facilitates a relaxing, pleasant listening experience for these sources over a long period.
Listening position”.
–“
Front”,
–“
Symmetrical” or
–“
Rear”.
1. Press the b button.
2. Press the i button or touch the tab of
the same name in the header.
3. Select “
4. Select “
SET Burmester”.
Smooth” to activate ( ) or
deactivate ( ) the function.
Setting surround
Activating “Surround” achieves a sound setting
with greater spatial depth.
This permits the creation of a virtual surround
sound with conventional stereo sources such as
CDs, radio or MP3 formats, for example.
The function can be set separately for the individual audio sources. The listening position is then
set to “
Symmetrical”.
The “
Surround” function is generally activated with
multi-channel sources such as 5.1 DVDs, for example.
It cannot be activated for the sources “
“
TV”.
1. Press the b button.
2. Press the i button or touch the tab of
the same name in the header.
3. Select “
4. Select “
SET Burmester”.
Surround” to activate ( ) or
deactivate ( ) the function.
AM” and
Setting live
The “Live” function generates surround sound that
sounds just like a live concert from any stereo music signal. This is achieved through the precise addition of the type of reverberation and tonal components normally found in concert halls.
The listening position is set to “
this.
1. Press the b button.
2. Press the i button or touch the tab of
the same name in the header.
3. Select “
4. Select “
SET Burmester”.
Live” to activate ( ) or deactivate ( )
the function.
Symmetrical” for
Setting sound conditioner
If the “Sound conditioner” function is activated, the
noise level inside the vehicle is monitored. Background noise is analysed and the volume and dynamics of the music playback across the entire
frequency spectrum is automatically adjusted.
An additional sound control feature is available for
vehicles with convertible tops. It adjusts the music
playback to the special requirements when driving
with an open top.
Using the PCM 17
Page 18

1. Press the b button.
2. Press the i button or touch the tab of
the same name in the header.
3. Select “
4. Select “
SET Burmester”.
Sound conditioner” to activate ( ) or
deactivate ( ) the function.
Configuring the PCM display
You can set various units, the date and time, the
welcome display and the user language of the
PCM in the “
Configuring display settings
Switching the display off
You c an sw i tch o f f or dar ken the display using the
“
Switch off display” menu.
1. Press the w button.
2. Press the i button or touch the tab of
3. Select “
4. Select “
5. Confirm the prompt that appears.
Switching the display back on
You can switch a display that is off back on at any
time (if the touchscreen is active) by touching it.
û Touch anywhere on the screen with your finger.
SET PCM system” menu.
the same name in the header.
SET PCM system”
>“
Display PCM”
>“
Screen”.
Switch off display”.
- or -
û Press any button.
Choosing colours for the map view (day/
night design)
1. Press the w button.
2. Press the i button or touch the tab of
the same name in the header.
3. Select “
4. Select “
5. Set the option you want by selecting it.
SET PCM system”
>“
Display PCM”.
Day/night switchover”.
The following options are then available for you
to select:
–“
Automatic”
Your PCM automatically switches from day
design to night design as a function of the
vehicle lighting.
–“
Day”
Your PCM always remains set to the day design colours. This means the display colours
are optimised for legibility.
–“
Night”
Your PCM always remains set to the night design colours. The display colours are
dimmed to prevent glare.
18 Using the PCM
Page 19

Choosing the brightness of the display
Displaying the system version
Selecting the language yourself
1. Press the w button.
2. Press the i button or touch the tab of
the same name in the header.
3. Select “
4. You can set the brightness by selecting the two
Switching the touchscreen on/off
1. Press the w button.
2. Press the i button or touch the tab of
3. Select “
4. Select “
SET PCM system”
>“
Display PCM”
>“
Screen”
>“
Brightness”.
symbols and .
the same name in the header.
SET PCM system”
>“
Display PCM”.
>“
Screen”.
Touchscreen off” to activate ( ) or
deactivate ( ) the function.
You have the option of viewing the system version
of your PCM.
1. Press the w button.
2. Press the i button or touch the tab of
the same name in the header.
3. Select “
SET PCM system”
>“
Display PCM”
>“
System version”.
The system version is displayed.
Setting the language
Adapting the language to the instrument
cluster
1. Press the w button.
2. Press the i button or touch the tab of
the same name in the header.
3. Select “
4. Select “
If the language of the instrument cluster is not
SET PCM system”
>“
PCM language”.
Automatic”.
The language of the instrument cluster is set.
available as a language in the PCM, the lan-
English GB” is set.
guage “
1. Press the w button.
2. Press the i button or touch the tab of
the same name in the header.
3. Select “
4. Select the language you want.
SET PCM system”
>“
PCM language”.
Setting the units
Adapting the units to the instrument cluster
1. Press the w button.
2. Press the i button or touch the tab of
the same name in the header.
3. Select “
4. Select “
SET PCM system”
>“
PCM units”.
Automatic”.
The settings of the instrument cluster are set.
Using the PCM 19
Page 20

Setting the unit for consumption
1. Press the w button.
2. Press the i button or touch the tab of
the same name in the header.
3. Select “
4. Select one of the following units:
Setting the display unit for temperatures
1. Press the w button.
2. Press the i button or touch the tab of
3. Select “
4. Select either “
SET PCM system”
>“
PCM units”
>“
Consump.”.
–“
l/100km”,
–“
km/l”,
–“
mpg” or
–“
mpg (UK)”.
the same name in the header.
SET PCM system”
>“
PCM units”
>“
Temperature”.
°C (Celsius)” or “°F (Fahrenheit)”.
Resetting personal settings
This menu item allows you to reset settings you
have previously made.
1. Press the w button.
2. Press the i button or touch the tab of
the same name in the header.
3. Select “
4. Select one of the following options:
5. Confirm the relevant prompt by selecting
SET PCM system”
>“
Reset PCM”.
–“
Factory settings”
Resets all settings to predefined values. Any
data you entered (addresses, destinations
and telephone numbers) is, however, retained.
–“
Vehicle handover”
Resets all settings to predefined values and
deletes the data you entered (addresses,
destinations, telephone numbers, logbook
as well as the recordings in the Sport display).
“
Yes”.
20 Using the PCM
Page 21

TUNER
Radio ......................................................... 22
Calling up the main menu for radio mode..... 22
Tuning to stations ...................................... 22
Storing stations on station buttons in the
preset memories ....................................... 23
Traffic programme (TP) .............................. 24
Making settings for radio mode ..................... 25
Switching RDS on/off ................................. 25
Switching regionalisation on/off .................. 25
Switching RDS radio text on/off .................. 25
Choosing a PTY (programme type) filter ..... 26
Setting sorting criteria for the FM station list 26
TV............................................................... 27
Calling up the main menu for TV mode ........ 27
Tuning to TV stations ................................. 27
Storing TV stations .................................... 28
Showing the information window ................. 29
Video text ................................................ 29
Electronic Programme Guide ...................... 30
Making settings for TV mode......................... 31
Setting sorting of the station list ................. 31
Setting the reception country ..................... 31
Setting TV picture parameters ................... 31
TUNER 21
Page 22
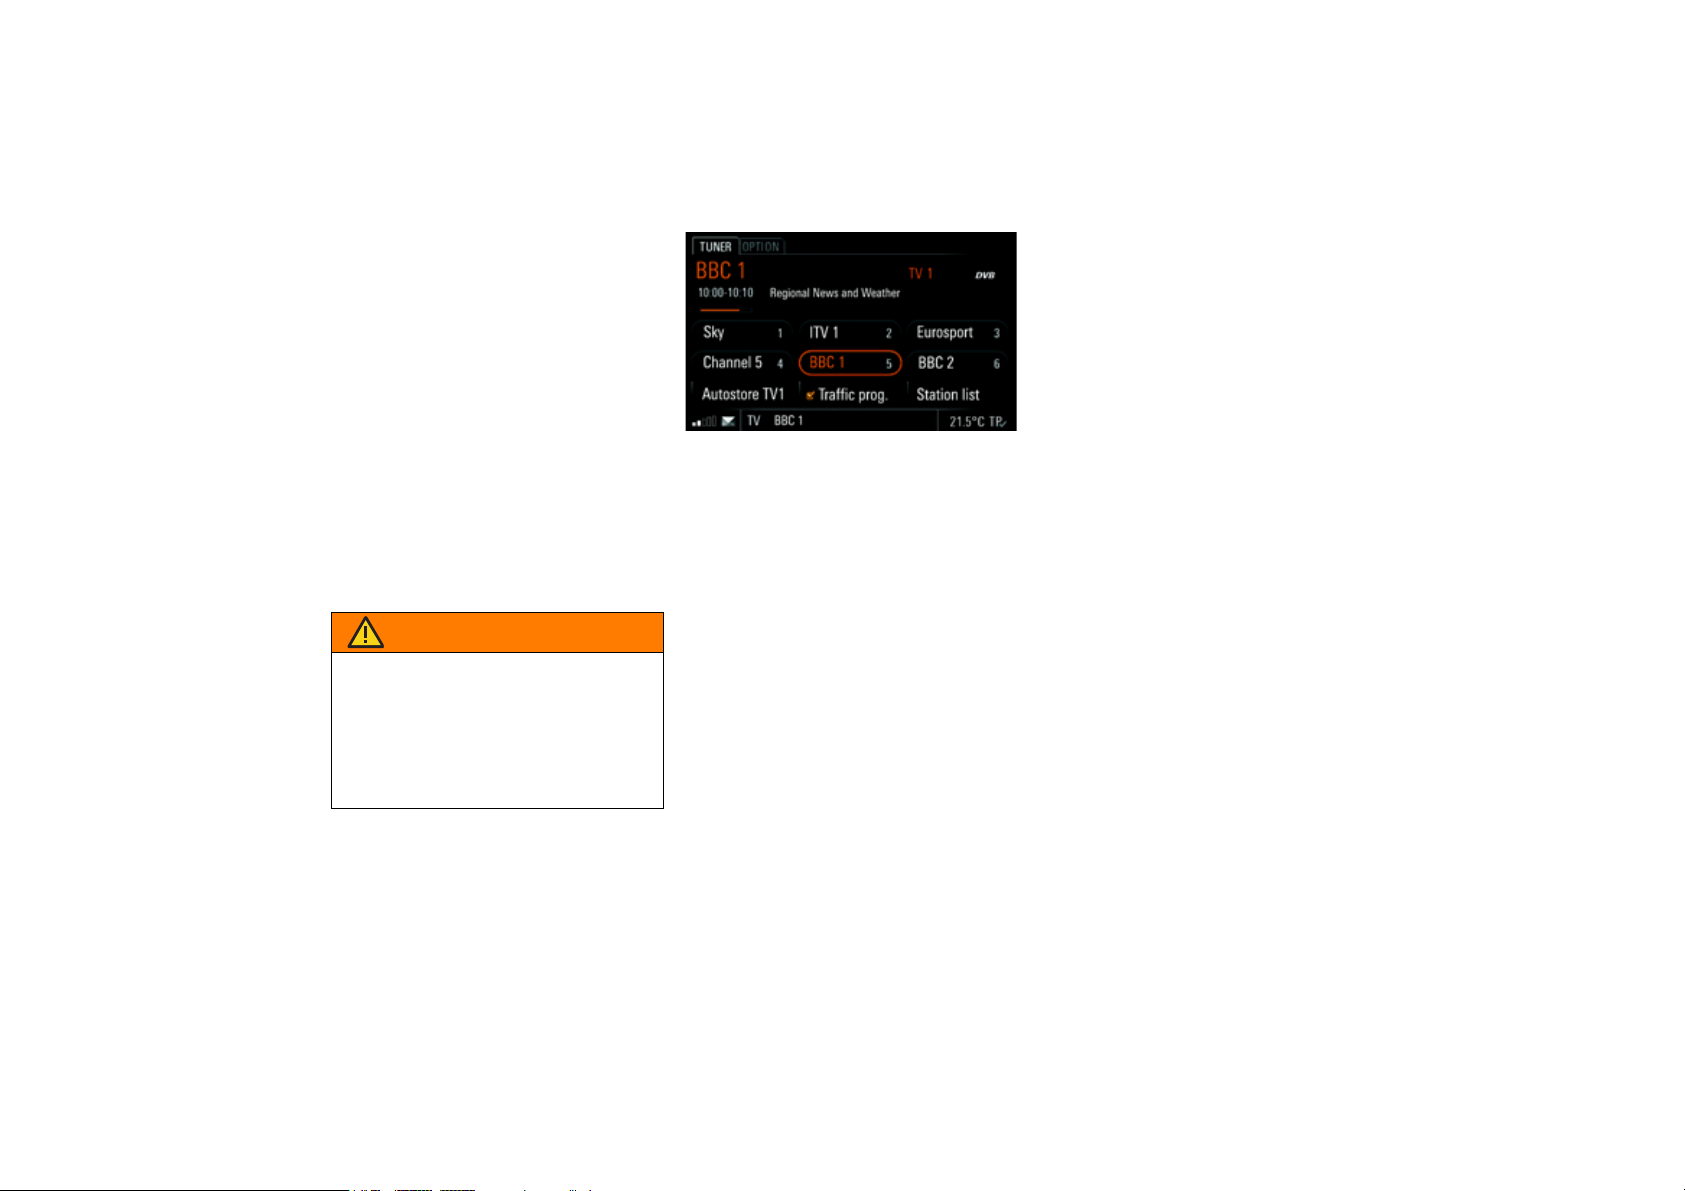
TUNER
Radio
Calling up the main menu for radio mode
û Press the m button repeatedly until
the mode you want (
ed in the bottom line.
You will see the main menu for the chosen mode
together with the station buttons. If there are already stations stored on the station buttons, the
names or frequencies of these stations are displayed.
If the station tuned to is broadcasting RDS signals
(RDS = Radio Data System) in FM mode, you will
see the information contained in these signals
(e.g. station name, programme type and radio
text) above the station buttons.
To find out more, please refer also to the sections
“Switching RDS on/off” on page 25 and “Switching RDS radio text on/off” on page 25.
AM - FM - TV) is highlight-
Tuning to stations
You have the following options for tuning to a station:
– using the station buttons,
– using the station list,
– via a station search or
– entering the frequency directly.
Tuning to stations using the station buttons
To be able to tune to a station using the station
buttons, there must already be a station stored on
a station button. To find out more, please refer to
the section “Storing stations on station buttons in
the preset memories” on page 23.
1. Press the m button repeatedly until
the mode you want is highlighted.
2. Briefly press the station button.
The station stored on the station button is
tuned to.
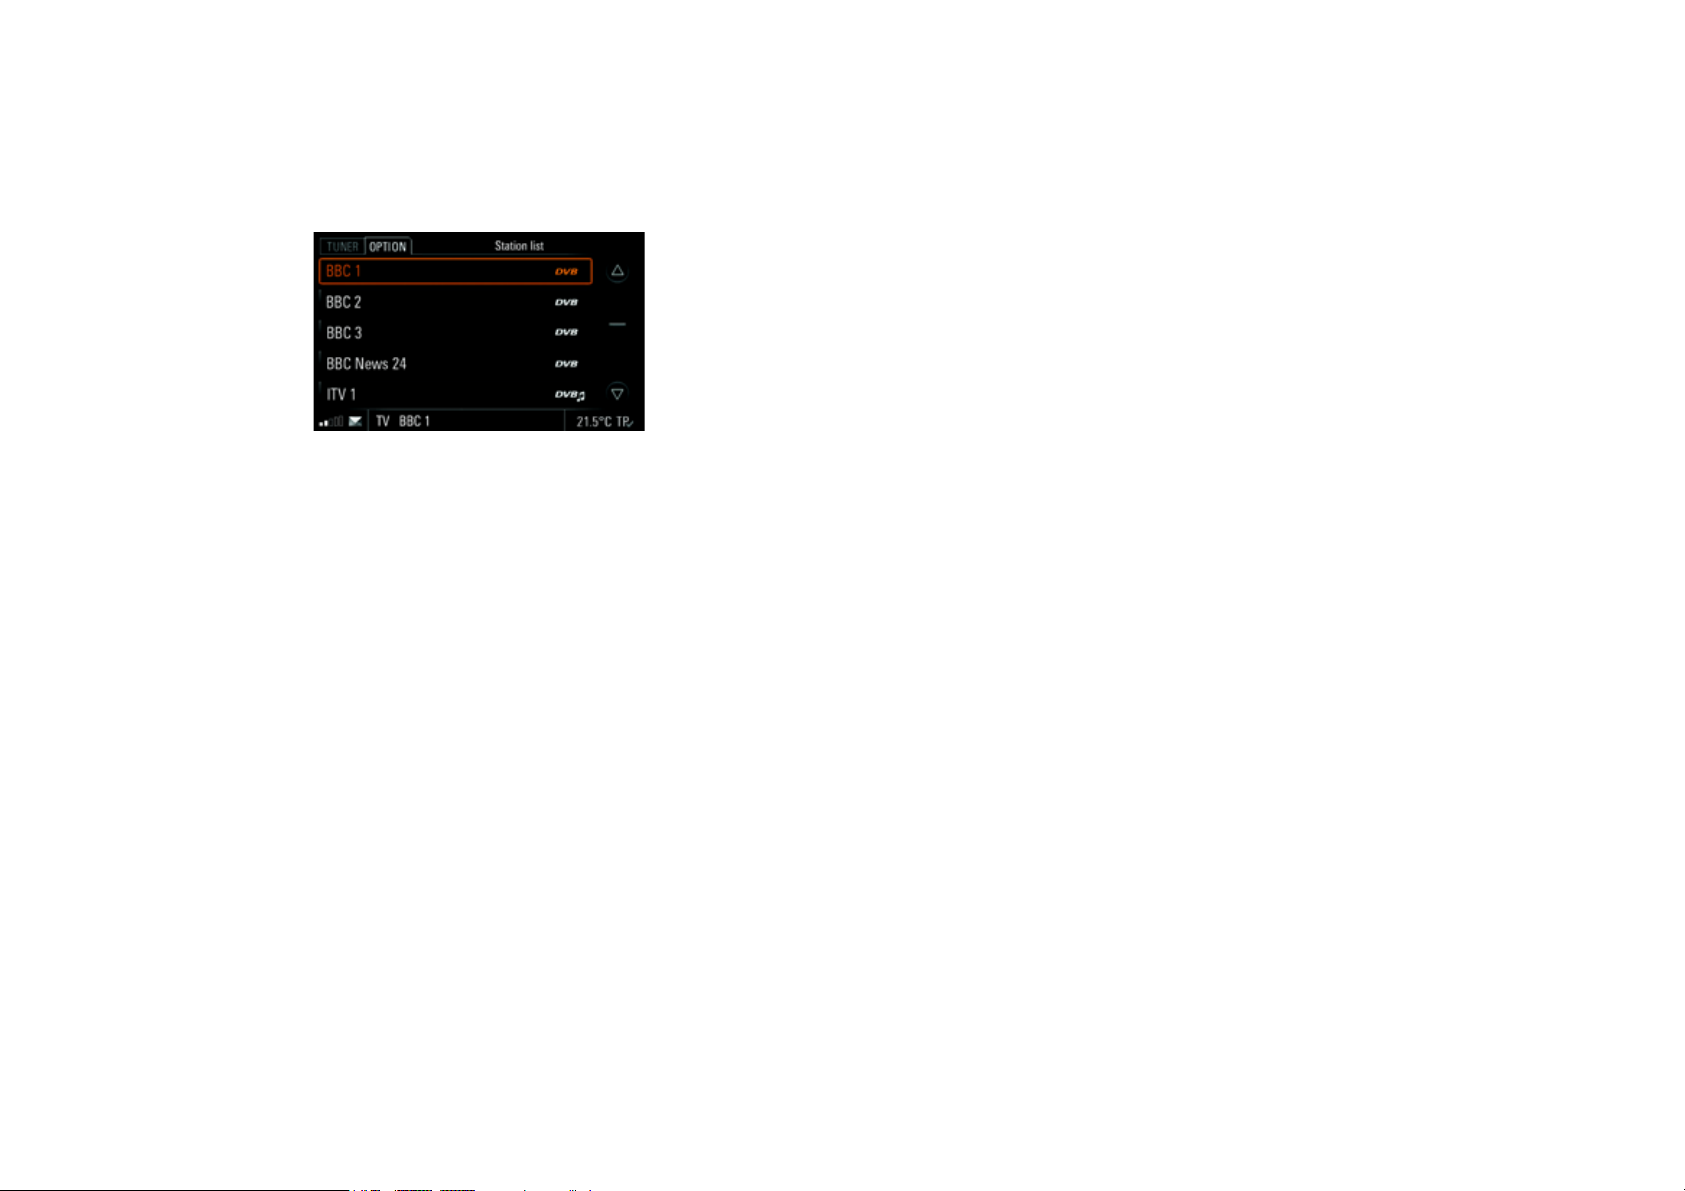
Tuning to stations using the station list
The station list contains all the stations that can
currently be received. It is only available in FM
mode.
1. Press the m button repeatedly until
FM” is displayed.
“
2. Select “
3. Select a station.
Tuning to stations via a station search
û Start a search by pressing the arrow buttons
Station list”.
The station list is opened. In addition to the station names, it also contains the respective programme types.
The station currently tuned to is highlighted in
colour.
and
o.
The search stops at the next station in the
waveband.
p
22 TUNER
Page 23
Tuning to stations by entering the frequency
directly
1. Press the m button repeatedly until
“
FM” is displayed.
2. Press the i button or touch the tab of
the same name in the header.
3. Select “
4. Tune to the frequency using one of the follow-
Manual tune”.
The input menu is opened. The frequency of
the current station is displayed.
ing options:
– Entering it directly by touching the number
buttons.
- or -
– Tuning to the next station from the station list
by touching the symbols and on the
display.
- or -
– Tuning to the next station from the station list
by touching the stations shown on the left
and right on the display.
- or -
– Turning the rotary knob
frequency upwards or downwards.
As so on as a valid fre qu ency is input, it is tuned
to.
Tuning to stations by scanning
If you activate this function, each station found
within the frequency range will be played for approx. 5 seconds.
1. Press the m button repeatedly until
the mode you want is highlighted.
2. Press the i button or touch the tab of
the same name in the header.
3. Select “
4. Select “
Start scan”.
Each station within the frequency range is
played for approx. 5 seconds.
Stop scan” to tune to the scanned sta-
tion.
q to change the
Storing stations on station buttons in the
preset memories
Setting the preset memory
There are six memory locations available in each
of the preset memories. The preset memories for
radio mode are:
– In FM mode:
FM 1, FM 2, FM 3, BEST FM and MIXED.
–In AM mode:
AM 1, AM 2, AM 3 and MIXED.
The PCM automatically fills the station buttons
for the Best FM preset memory at regular intervals with the stations with the strongest reception.
In contrast to all other preset memories, the
MIXED preset memory can store stations
from different modes. This means you can
store stations from FM mode and AM mode as
well as stations from TV mode here.
TUNER 23
Page 24

1. Press the m button repeatedly until
the mode you want (
ed.
2. Press the i button or touch the tab of
the same name in the header.
3. Select “
4. Select the preset memory you want.
5. Tou c h t he m tab in the header again.
If you briefly touch the preset memory dis-
Choosing a station in the station list and
storing it
1. Press the m button repeatedly until
2. Select “
3. Select the station entry you want by pressing
4. To store the station on a station button, select
Preset memory”.
The available preset memories are listed.
played in the main menu, you will likewise
switch to another preset memory.
FM” is displayed.
“
Station list”.
and holding it for several seconds.
The station buttons are displayed and the station previously chosen is shown in the information window.
the station button you want.
The station list is displayed again.
FM - AM - TV) is highlight-
Storing via an automatic station search
(autostore)
The automatic station search is only available for
the preset memories
FM 1, FM 2, FM 3 as well as
AM 1, AM 2 and AM 3.
1. Press the m button repeatedly until
the mode you want (
ed.
2. Set the preset memory if applicable
(> page 23).
3. Press and hold the “
The search is activated. It stores the six stations with the strongest reception and tunes to
the strongest station.
Storing stations manually
1. Press the m button repeatedly until
the mode you want (
ed.
2. Tune to the station (> page 22).
3. Set the preset memory if applicable
(> page 23).
4. Press and hold the station button for a few seconds.
As soon as the station is stored on the station
button, the station name or the station frequency is displayed on the button and you hear a
signal tone.
FM - AM - TV) is highlight-
Autostore” menu item.
FM - AM - TV) is highlight-
Traffic programme (TP)
Various FM radio stations broadcast traffic messages in addition to their radio programmes.
The broadcasting stations are responsible for the
quality of these traffic messages. For that reason,
no liability can be accepted for the completeness
and correctness of the information.
Traffic messages are part of the RDS signals and
are not available everywhere. To find out more,
please refer also to the sections “Switching RDS
on/off” on page 25 and “Displaying traffic messages (TMC)” on page 109.
Switching the traffic programme on
1. Press the m button repeatedly until
FM” is highlighted.
“
2. Select “
Traffic prog.” to activate ( ) or
deactivate ( ) the function.
When the traffic programme is switched on,
the abbreviation TP (Traffic Programme) is dis-
played in the bottom line and you hear the traffic messages regardless of the audio source
that is currently active.
24 TUNER
Page 25

Setting the Traffic prog. volume
The traffic programme volume refers to the volume at which the traffic programme announcements are output.
It specifies the minimum volume as a function of
the volume of the audio source currently selected.
1. Press the b button.
2. Press the i button or touch the tab of
the same name in the header.
3. Select “
4. Make the setting you want on the scale by
Traffic prog.”.
touching the two symbols and .
Making settings for radio mode
Switching RDS on/off
The PCM is capable of receiving RDS signals (RDS
= Radio Data System) in FM mode. It supports the
following functions:
– station name,
– programme type (PTY),
– traffic programme,
– radio text as well as
– detection of alternative frequencies.
(Radio stations transmit programmes with the
same programme content on different frequencies in different regions.)
You can switch tracking of these alternative frequencies on or off in the Set menu.
1. Press the m button repeatedly until
“
FM” is highlighted.
2. Press the i button or touch the tab of
the same name in the header.
3. Select “
4. Select “
SET FM”.
RDS” to activate ( ) or deactivate ( )
the function.
Switching regionalisation on/off
When RDS (tracking of the alternative frequencies)
is active, regionalisation can additionally be
switched on or off.
If stations have a station chain with varying regional programme contents, switching on regionalisation prevents switching between the different stations.
1. Press the m button repeatedly until
FM” is highlighted.
“
2. Press the i button or touch the tab of
the same name in the header.
3. Select “
4. Select “
SET FM”.
Regional” to activate ( ) or
deactivate ( ) the function.
Switching RDS radio text on/off
1. Press the m button repeatedly until
“
FM” is highlighted.
2. Press the i button or touch the tab of
the same name in the header.
3. Select “
4. Select “
SET FM”.
Radio text” to activate ( ) or
deactivate ( ) the function.
TUNER 25
Page 26

Choosing a PTY (programme type) filter
RDS stations can broadcast the station’s programme type (PTY).
The programme type allows stations to be classified based on their genre, for example “pop”,
“rock” or “news”.
If a programme type is selected, only stations that
correspond to the selected programme type are
displayed in the FM station list.
You can select as many different programme
types in a list as you wish.
1. Press the m button repeatedly until
“
FM” is highlighted.
2. Press the i button or touch the tab of
the same name in the header.
3. Select “
4. Select the programme types you want for sort-
SET FM”
>“
PTY filter”.
ing ( ) or deselect those you wish to omit ( ).
By selecting “
or deselect ( ) all the programme types in the
list.
Activate all” you can select ( )
Setting sorting criteria for the FM station
list
The FM station list can be sorted according to various criteria. You can set the sorting as follows:
1. Press the m button repeatedly until
FM” is highlighted.
“
2. Press the i button or touch the tab of
the same name in the header.
3. Select “
4. Select “
SET FM”.
Sorting criteria”.
Various radio buttons are then available for you
to select:
–
Alphabetical: The station list is sorted alpha-
betically.
–
Genre (PTY): The station list is sorted ac-
cording to programme type (PTY).
If a programme type is selected, only stations that correspond to the selected programme type are displayed in the FM station
list. Only after selecting “
PTY filter list are all stations that can be received listed.
Activate all” in the
Station strength: The station list is displayed
–
sorted according to station strength. Stations with good reception are shown at the
top of the list.
–
Last stations: The station list shows the sta-
tions listened to for at least two minutes. The
last station listened to is shown at the top of
the list.
–
Frequency: The station list is displayed sort-
ed according to the order of the stations in
the frequency band.
5. Set the sorting option you want by selecting it.
26 TUNER
Page 27
TV
Tuning to TV stations
The standard TV on the PCM can receive non-encrypted terrestrial analogue and digital (DVB-T)
programmes. Depending on the country and reception area, only analogue, digital or a mixture of
analogue and digital programmes may be available. If a programme is simultaneously received in
both analogue and digital forms, the TV tuner automatically selects the higher-quality of the two.
In some areas, DVB-T programmes are also broadcast without picture content. These are characterised by an additional note symbol.
The activation of the automatic hatchback as
well as some other vehicle functions may sporadic cause temporary restrictions of the TV
reception.
WARNING!
Accident hazard. For your own safety, no TV
picture or video text can be shown during driving for legal reasons.
û To receive a TV picture, the vehicle must be
stopped.
û In some countries, the parking brake must
also be engaged.
Calling up the main menu for TV mode
û Press the m button repeatedly until
the “
TV” mode is highlighted in the bottom line.
To use TV mode, you must first tune to a TV station. You can do this via a station search or using
the TV menu.
You can return from the TV picture of the cur-
rent station to the main menu for TV mode at
any time by touching the display or pressing
the Back button h.
Displaying the TV picture
1. Press the m button repeatedly until
the “
TV” mode is highlighted in the bottom line.
2. Touch the information area in the TV menu
(above the station buttons on the display).
The TV picture of the TV station currently tuned
to is shown.
Tuning to stations using the station buttons
Station buttons must already have TV stations
stored before they can be used to tune to a station. To find out more, please refer to the section
“Storing TV stations” on page 28.
1. Press the m button repeatedly until
TV” mode is highlighted in the bottom line.
the “
2. Briefly press the station button.
The station is tuned to and its TV picture displayed. An information window appears for
about 3 seconds.
TUNER 27
Page 28
Tuning to stations using the station list
The station list provides details of the stations that
can currently be received.
Depending on the setting, the station list is arranged alphabetically, based on reception quality
or based on the last stations. To find out more,
please refer to the section “Making settings for TV
mode” on page 31.
1. Press the m button repeatedly until
the “
TV” mode is highlighted in the bottom line.
2. Select “
3. Select the TV station or the DVB-T radio station
Station list”.
you want.
The station is tuned to and its TV picture displayed.
The digital programmes can also be selected
using the EPG list.
To find out more, please refer to the section
“Electronic Programme Guide” on page 30.
Storing TV stations
Each of the preset memories, TV 1, TV 2, TV 3 and
MIXED, has six memory locations available.
In contrast to all other preset memories, the
MIXED preset memory can store stations from dif-
ferent modes. Here, you can manually store stations from FM/AM mode as well as stations from
TV mode.
Storing stations manually
1. Press the m button repeatedly until
the “
TV” mode is highlighted in the bottom line.
2. Tune to a TV station (> page 27).
3. Press and hold the station button for a few sec-
onds.
As soon as the TV station is stored on the station button, the station name is shown on the
button.
Storing via an automatic station search
The automatic station search is only available for
the preset memories
TV” mode.
1. Set “
2. If necessary, set the preset memory as fol-
lows:
a.Press the i button or touch the tab of
the same name in the header.
b.Select “
c.Select the preset memory you want.
d.Touch the m tab in the header again.
You can likewise change the preset memory
3. The set preset memory now appears after the
Preset memory”.
The available preset memories are listed.
by touching “
Autostore” menu item.
“
Select the menu item.
The search starts. It stores the six programmes with the strongest reception and
switches to the strongest programme.
TV 1, TV 2 and TV 3.
TV 1”, etc. in the TV main menu.
28 TUNER
Page 29
Selecting a video text page
1. Touching the display opens a bar for entering
the numbers directly.
2. Touch the appropriate digits on the display.
After the third digit is entered, the video text
search begins and the video text page is
shown. The bar for entering numbers is hidden.
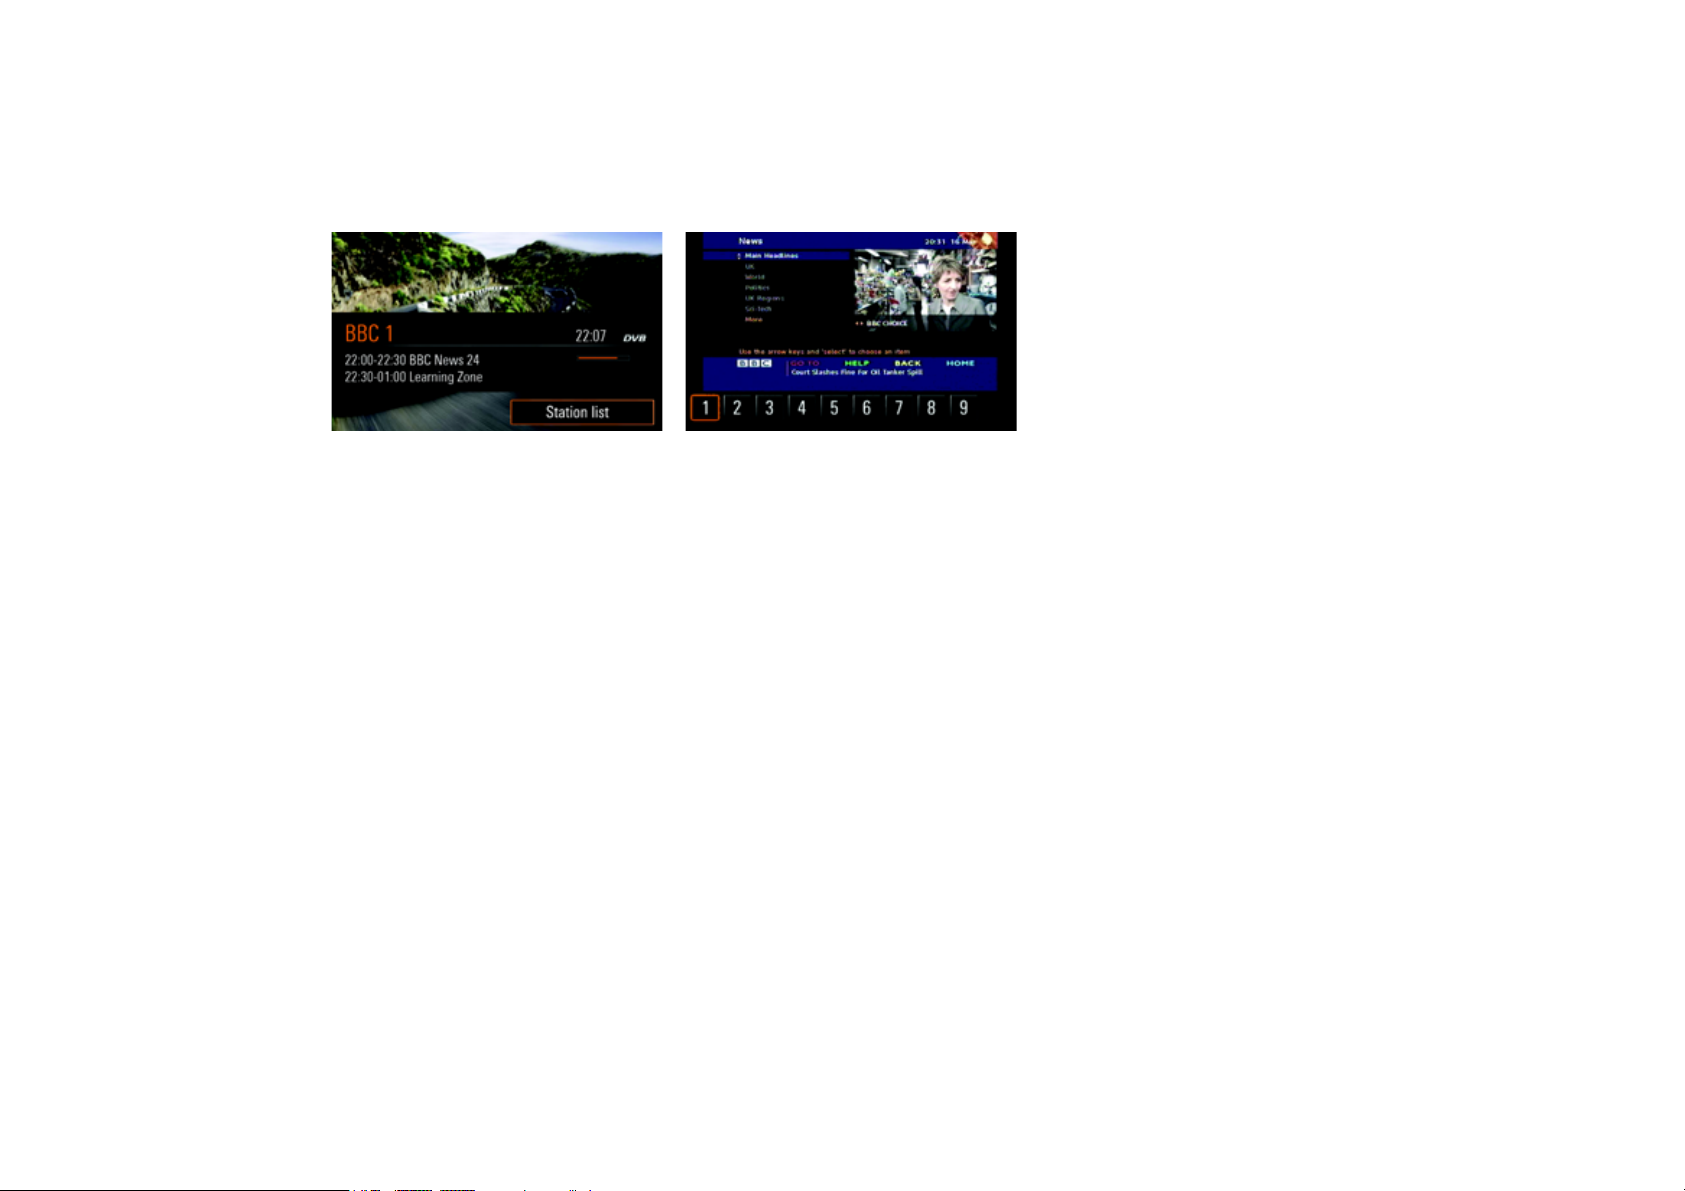
Showing the information window
û Press the right rotary knob r while in TV
mode.
The information window is called up together
with the “
While for digital programmes it shows details
about the programme currently active, for analogue programmes the information window only
contains the name of the station plus the current
time.
The various information can, however, only be
Station list” menu item.
displayed if the relevant signal is being broadcast by the station.
Video text
Calling up video text
1. Press the m button repeatedly until
the “
TV” mode is highlighted in the bottom line.
2. Press the i button or touch the tab of
the same name in the header.
3. Select “
Not all stations transmit a video text signal.
Video text”.
The video text display appears. When called up
for the first time, the programme page “100”
is shown.
If the “
Zooming into a video text page
û Call up an enlarged view of the upper half of the
û Turn once more to return to the normal page
Video text via TV” function is activated,
the video text picture is overlaid onto that of
the TV programme. To find out more, please
refer to the section “Placing video text over
the TV picture” on page 30.
display by turning the right rotary knob q.
Turn the knob again to switch to an enlarged
view of the lower half of the display.
view.
TUNER 29
Page 30
Placing video text over the TV picture
If you activate this function, the video text page is
overlaid transparently over the picture of the current TV programme.
1. Press the m button repeatedly until
TV” mode is highlighted in the bottom line.
the “
2. Press the i button or touch the tab of
the same name in the header.
3. Select “
4. Select “
SET TV”.
Video text via TV” to activate ( ) or
deactivate ( ) the function.
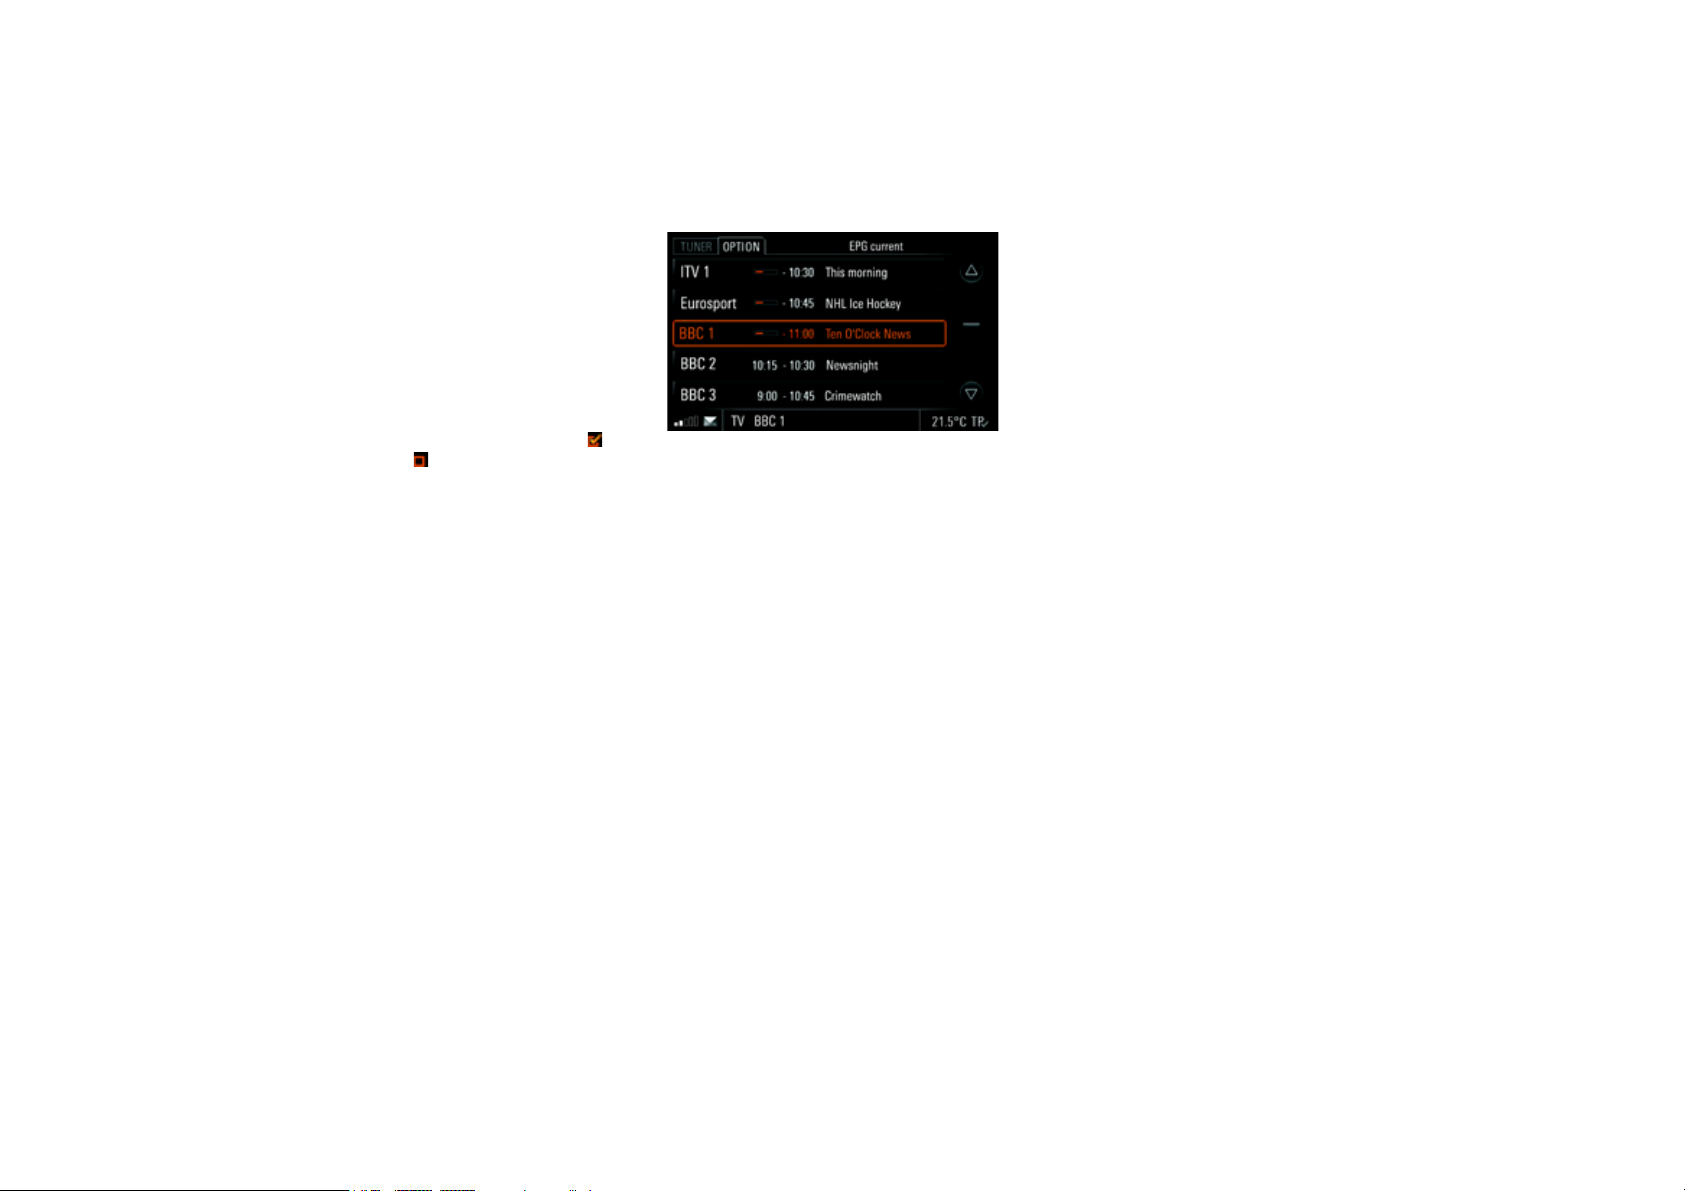
Electronic Programme Guide
The PCM features an Electronic Programme
Guide, which contains various information about
the digital programmes. The programmes are listed in chronological order.
Information (station, progress bar, end time and
name of current programme) about programmes
that are currently playing is shown at the top of the
list. This is followed by information (station, start/
end time, names of following episodes) for the
subsequent programmes.
Please note that only digital channels transmit
EPG data. This service is not available for analogue channels.
1. Press the m button repeatedly until
the “
TV” mode is highlighted in the bottom line.
2. Press the i button or touch the tab of
the same name in the header.
3. Select “
The menu item is greyed out if no EPG data is
EPG list”.
The Electronic Programme Guide appears.
Selecting an entry in the
corresponding programme and shows its TV
picture.
being received.
You can also view the EPG data available for
the current programme in the d menu by
selecting the “
out more, please refer to the section “Displaying detailed information about the active audio
source” on page 111.
Details TV” menu item. To f i n d
EPG list tunes to the
30 TUNER
Page 31

Making settings for TV mode
Setting sorting of the station list
The TV station list can be sorted according to various criteria. You can set the sorting as follows:
–
Alphabetical: When sorted alphabetically,
DVB-T TV stations are shown first, followed by
analogue TV stations. DVB-T radio stations are
at the bottom of the list.
–
Station strength: When sorted based on sta-
tion strength, the stations are listed in descending order of reception quality.
–
Last stations: The station list shows the sta-
tions tuned to for at least two minutes. Stations that cannot be received are not displayed.
1. Press the m button repeatedly until
TV” mode is highlighted in the bottom line.
the “
2. Press the i button or touch the tab of
the same name in the header.
3. Select “
4. Select the sorting you want.
SET TV”
>“
Sorting criteria”.
Setting the reception country
Information about the available channel range is
stored for the PCM in the country setting.
If you take your vehicle abroad and wish to use the
TV tuner, you should first set the correct entry in
the country list.
1. Press the m button repeatedly until
the “
TV” mode is highlighted in the bottom line.
2. Press the i button or touch the tab of
the same name in the header.
3. Select “
A complete list of the reception countries can
SET TV”
>“
Reception country”.
The country list is opened. It is sorted alphabetically. If the correct region is not available
in the list, you can choose a setting with a
symbol representing the correct TV standard.
be found in the section “Affiliated countries for
TV tuner country settings” on page 203.
Setting TV picture parameters
Setting the Brightness
1. Press the m button repeatedly until
the “
TV” mode is highlighted in the bottom line.
2. Press the i button or touch the tab of
the same name in the header.
3. Select “
4. Make the setting you want by touching the two
SET TV”
>“
Picture param. - TV”
>“
Brightness”.
symbols and .
TUNER 31
Page 32

Setting the Contrast
1. Press the m button repeatedly until
the “
TV” mode is highlighted in the bottom line.
2. Press the i button or touch the tab of
the same name in the header.
3. Select “
4. Make the setting you want by touching the two
Setting the Colour
1. Press the m button repeatedly until
2. Press the i button or touch the tab of
3. Select “
4. Make the setting you want by touching the two
SET TV”
>“
Picture param. - TV”
>“
Contrast”.
symbols and .
the “
TV” mode is highlighted in the bottom line.
the same name in the header.
SET TV”
>“
Picture param. - TV”
>“
Colour”.
symbols and .
Setting the Format
1. Press the m button repeatedly until
TV” mode is highlighted in the bottom line.
the “
2. Press the i button or touch the tab of
the same name in the header.
3. Select “
4. Select the setting you want.
SET TV”
>“
Picture param. - TV”
>“
Format”.
The following options are then available for you
to select:
–“
Automatic”
The picture format being received by the TV
tuner is evaluated and its on-screen display
is adjusted accordingly (automatic format
switching between 4:3 and 16:9).
–“4:3”
The picture is shown in such a way that no
image contents are lost.
–“16:9”
The picture is expanded to cover the entire
width of the display. The picture is cropped
at the upper and lower edges of the display.
This setting is particularly useful for programmes that are broadcast with a black
border at the upper and lower edges of the
display.
With the
Setting the tint (special feature of NTSC
stations)
The
when receiving signals from NTSC stations
(National Television System Committee: colour TV
standard in the USA and Japan, amongst other
countries). This allows colour distortions related
to transmission to be corrected.
1. Press the m button repeatedly until
the “
2. Press the i button or touch the tab of
the same name in the header.
3. Select “
>“
4. Make the setting you want by touching the two
symbols and .
Automatic setting, an ID broadcast
by the station in question is analysed.
Some stations do not broadcast this ID correctly, with the result that the PCM cannot implement format settings automatically.
Under certain circumstances, poor reception
can lead to the ID not being analysed properly.
In such cases, please set a fixed format (4:3
or 16:9).
Tint display option is additionally available
TV” mode is highlighted in the bottom line.
SET TV”
Picture param. - TV”
>“
Tint”.
32 TUNER
Page 33

DISC
Loading and ejecting CDs/DVDs ..................36
Calling up the main menu for
CD/DVD mode ...........................................37
Selecting a CD/DVD....................................37
Selecting a track ........................................37
Selecting a track (MP3 CD/DVD) ..................37
Selecting a chapter in video DVD mode ........38
Setting the audio format for video DVD ........ 38
Setting audio groups (DVD-Audio) ................38
Naming a CD..............................................38
Skipping to the previous/next track..............39
Fast forward/reverse ..................................39
Repeating a track .......................................39
Switching the shuffle function on/off ............39
Starting/stopping scanning .........................39
Searching for music in MP3 mode
(full text search)..........................................39
iPod* ..........................................................40
Calling up the main menu for iPod mode.......40
Searching for music.................................... 40
Playlists .....................................................41
Track list ...................................................42
Skipping to the previous/next track..............42
Fast forward/reverse ..................................42
Repeating a track .......................................42
Switching the shuffle function on/off ............42
Adapting the volume for iPod mode..............42
USB ............................................................ 43
Calling up the main menu for USB mode ...... 44
Searching for a track ................................. 44
Track list................................................... 46
Skipping to the previous/next track............. 46
Fast forward/reverse ................................. 46
Repeating a track ...................................... 46
Switching the shuffle function on/off............ 46
Starting/stopping scanning......................... 46
Calling up an external audio source ............. 47
Activating the interface............................... 47
Adapting the volume for an external
audio source ............................................. 47
External Bluetooth
Calling up an external Bluetooth
®
audio source.................. 48
®
audio
source/starting playback............................ 48
Activating the interface............................... 48
Skipping a track ........................................ 49
Fast forward/reverse ................................. 49
Repeating a track ...................................... 49
Switching the shuffle function on/off............ 49
Starting/stopping scanning......................... 49
Bluetooth
®
settings...................................... 49
Calling up Bluetooth
Switching Bluetooth
Adding a new Bluetooth
Establishing a connection from an
external Bluetooth
Setting visibility ........................................ 50
Authorised Bluetooth
®
settings .................... 49
®
on/off ....................... 49
®
device ................. 50
®
device ......................... 50
®
devices .................. 50
DISC 33
Page 34

DISC
CD audio/DVD-Audio/DVD-Video
CAUTION
û Always touch the CD/DVD at the edges on-
ly. Never touch the side without writing and
keep the CD/DVD clean.
û Never stick anything on the CD/DVD.
û Protect the CD/DVD against direct sunlight
and from heat sources such as heaters,
etc.
û Before playing the CD/DVD, it should be
cleaned with a special, commercially available cleaning cloth, wiping from the centre
outwards. Solvents such as petrol, thinners
or other commercially available cleaning
agents and anti-static sprays must not be
used.
û Do not bend the CD/DVD.
The system may not be able to play copyprotected CDs/DVDs or CDs with CD-ROM
sections that do not correspond to the audio
CD standard.
Notes on copyright
You are only permitted to create copies of CDs/
DVDs for your own private use. The copyright exceptions do not cover circulation of the duplicated
CDs/DVDs to third parties.
The music tracks that you can create for and play
in MP3 mode are generally copyright-protected
under the applicable international and national
laws. In many countries, the reproduction of copyrighted material is not permitted, even if only for
personal use, without the express prior consent of
the copyright holder. Please check the current
copyright laws for your country and comply with
them. These restrictions do not apply,
for example, to your own compositions and recordings or to recordings for which authorisation
has been obtained from the copyright holder.
The most current laws always apply!
Notes on the media supported
To avoid problems when playing your CDs/DVDs,
please note the following:
– Permissible media:
CD-R and CD-RW (650 MB and 700 MB)
DVD+R and DVD+RW
DVD-R and DVD-RW
– Permissible file systems:
CD-ROM (Yellow Book)/ISO 9660 Level 1/
Joliet for CD (filenames max. 64 characters)
– Permissible file structures:
The maximum number of tracks per disc is
4,000.
A disc may hold a maximum of 2,000 folders
in total.
Each folder in turn may contain a maximum of
1,000 tracks.
The maximum directory depth is 11 levels.
34 DISC
Page 35

No warranty is accepted for:
– poor quality user-burned CDs/DVDs,
– CDs of other formats,
–Mixed Mode CDs,
– CD-Extra CDs as well as
– multi-session CDs/DVDs.
CDs/DVDs that have not been finalised cannot be
played.
Insertion of a non-standard CD/DVD format such
as DVD-Plus (one side audio CD, the other side
DVD) may lead to irreparable damage of the
drive due to the greater thickness of the media.
Supported audio formats
The PCM supports the following audio formats:
MP3 *
(MPEG1 Audio Layer 3)
WMA *
(Windows Media Audio)
AAC-LC *(Low Complexity
Advanced Audio Coding)
WAVE file format *
DTS **
(Digital Theater Systems)
Dolby® Digital ***
Meridian Lossless Packing ****
*) No guarantee can be made that all MP3, WMA,
AAC and WAV formats can be played back, due to
the wide variety of different audio programmes
(encoders) available.
**) Manufactured under licence in accordance
with US patents No. 5.451.942, 5.956.674,
5.974.380, 5.978.762, 6.487.535 and other
patents issued and registered in the USA and internationally. DTS and DTS Digital Surround are registered trademarks and the DTS logos and the
DTS symbol are trademarks of DTS, Inc. © 19962008 DTS, Inc. All rights reserved.
***) The double D symbol is a legally protected
trademark of Dolby Laboratories.
****) MLP Lossless
TH
is a trademark of Dolby
Laboratories.
Notes on DVD mode
Video DVDs generally feature a regional code. Information on this can usually be found either on
the DVD itself or on the DVD sleeve.
The CD/DVD drive of the PCM detects the respective regional code of the video DVD inserted. As
per the “Regional Protection Code”, it allows you
to change the regional code up to five times.
Please contact your Porsche partner to find out
how to change the regional code.
You will find a list of regional codes in the section
“Regional codes for video DVDs” on page 203.
When playing video DVDs, only playback of the audio information is supported.
Some of the video DVDs you find in stores may not
conform to the standards. You may experience
sound or other playback problems with these
DVDs.
Discs, DVD authoring software, burning software
and burners are widely available. Due to this wide
variety, we cannot guarantee that the CD/DVD
drive of the PCM will be able to play every userburned video DVD.
DISC 35
Page 36

Loading and ejecting CDs/DVDs
Loading a disc in a PCM with CD/DVD drive
û Insert the disc into the CD/DVD slot with the
printed side facing upwards.
Incorrectly inserted CDs/DVDs will not be played.
Ejecting a disc in a PCM with
CD/DVD drive
û Briefly press the j button.
The CD/DVD is stopped and ejected.
The system automatically switches to the current
audio source in TUNER mode as soon as you have
removed the CD/DVD from the magazine compartment.
Calling up the CD/DVD changer menu
û Briefly press the j button.
The CD/DVD changer menu is displayed. A button is displayed for each compartment in the
changer magazine.
If there is a CD or DVD in the compartment, you
will see the title of the CD/DVD on the button (if
available).
If the title of the CD/DVD is not available, the format of the disc (CD or DVD) is indicated instead.
If a compartment is empty, “
side the compartment number on the display.
Loading a disc in a PCM with
CD/DVD changer
Incorrectly inserted CDs/DVDs will not be played.
To allow for the fastest possible changes, you
should load the magazine successively beginning
with compartment 1.
1. Briefly press the j button.
The CD/DVD changer menu is displayed.
2. Select an empty magazine compartment.
You are then prompted to insert a disc.
empty” is shown be-
3. Push the CD/DVD into the slot.
The printed side of the CD/DVD must face up-
wards.
Incorrectly inserted CDs/DVDs will not be
played.
DISC” flashes on the button. As soon as the CD/
“
DVD is detected, it is scanned and the current
track is shown on the display.
Loading all discs in a PCM with empty
CD/DVD changer
û Press and hold the j button or any mag-
azine compartment for several seconds.
All magazine compartments are moved into
position one after the other and at each stage
you are prompted to insert a CD/DVD.
Ejecting a disc in a PCM with
CD/DVD changer
1. Briefly press the j button.
The CD/DVD changer menu is displayed.
2. Select the magazine compartment you want.
The CD/DVD is stopped if necessary and ejected.
36 DISC
Page 37

3. Remove the CD/DVD.
If you do not insert another CD/DVD in this
magazine compartment, the CD/DVD in the
next occupied compartment is played.
If you do not remove the CD/DVD from the
slot, the PCM will automatically retract it after
a short while.
Ejecting all discs in a PCM with
CD/DVD changer
û Press and hold the j button or any mag-
azine compartment for several seconds.
All discs are ejected in sequence.
The system automatically switches to the current
audio source in TUNER mode as soon as you have
removed the last CD/DVD from the magazine
compartment.
Calling up the main menu for CD/DVD
mode
û Press the n button repeatedly until the
“
DISC” audio source is highlighted in the bot-
tom line.
Selecting a CD/DVD
1. Press the n button repeatedly until the
“
DISC” audio source is highlighted in the bot-
tom line.
2. Select “
3. Select the CD/DVD you want.
Disc selection”.
A list of the available CDs/DVDs is opened.
Playback is started at the beginning of the
disc.
Selecting a track
You can select a track directly using the track list.
The track list shows the track numbers and, if
available, the track names.
1. Press the n button repeatedly until the
DISC” audio source is highlighted in the bot-
“
tom line.
2. Select “
3. Select the track you want.
Track list”.
Selecting a track (MP3 CD/DVD)
If the disc currently playing is an MP3 CD/DVD, the
track list shows the names of the root directories
as well as the subdirectories.
The following symbols are used in the track list to
make it easier for you to navigate within the directory structure of the MP3 CD/DVD:
–Subdirectory
Selecting this list entry opens the corresponding subdirectory and displays the directories
and tracks it contains.
– Higher-level directory
Selecting this list entry or pressing
the h button displays the higher-level directory.
– Playlist
Selecting this list entry allows you to play lists
of tracks in m3u format you have created on
your computer and burned to the CD/DVD.
1. Press the n button repeatedly until the
“
DISC” audio source is highlighted in the bot-
tom line.
2. Select “
3. Select the directory or playlist you want.
4. Select the track you want.
Track list”.
DISC 37
Page 38

If the directory structure of the folders is very
deep or the number of files is very large, it
may not be possible to display all the folders
or tracks.
File formats that cannot be played will not be
displayed.
To find out more, please refer also to the section “Notes on the media supported” on
page 34.
Selecting a chapter in video DVD mode
When playing video DVDs, only playback of the audio information is supported.
1. Press the n button repeatedly until the
“
DISC” audio source is highlighted in the bot-
tom line.
2. Select “
3. Select the chapter you want.
- or if you want to choose a chapter in another film
title -
3 Select the first list entry with the “higher-level
4. Select the video title you want.
5. Select the chapter you want.
Track list”.
directory” symbol .
The list of video titles is opened.
Setting the audio format for video DVD
1. Press the n button repeatedly until the
“
DISC” audio source is highlighted in the bot-
tom line.
2. Press the i button or touch the tab of
the same name in the header.
3. Select “
4. Select the audio format you want.
After selecting a new audio format from the
DVD audio format”.
A list of the available audio formats is opened.
list, playback is resumed at the same point in
the current chapter if possible. If this is not
possible, the current chapter is played once
again from the beginning.
All following tracks are also played with the
newly set audio format. If this is not possible
with a track, playback reverts to the originally
set audio format. This format is then retained
for the subsequent tracks.
Setting audio groups (DVD-Audio)
1. Press the n button repeatedly until the
“
DISC” audio source is highlighted in the bot-
tom line.
2. Select “
3. Select the first list entry with the “higher-level
4. Select the audio group you want.
5. Select the track you want within the audio
Track list”.
directory” symbol .
The list of audio groups is opened.
group.
Naming a CD
This function is only available for audio CDs
and DTS-CDs without CD text.
A maximum of 100 CDs can be named.
1. Press the n button repeatedly until the
“
DISC” audio source is highlighted in the bot-
tom line.
2. Press the i button or touch the tab of
the same name in the header.
3. Select “
4. Enter the name you want for the CD.
Name CD”.
The input menu is opened.
38 DISC
Page 39

Skipping to the previous/next track
If the current track has been playing for longer
than 10 seconds, pressing the p button resumes
playback from the start of the current track.
If the current track has not yet been playing for
10 seconds, playback is resumed from the start
of the previous track.
û If you want to skip to the next track when a CD/
DVD is playing, briefly press the o button.
û If y ou wan t to s kip ba ck to t he sta rt of the track
when a CD/DVD is playing, briefly press the p
button.
Fast forward/reverse
û Press and hold the o button or p button for a
few seconds when a CD/DVD is playing until
the position you want is reached.
Repeating a track
Activating this function repeats the current track
or chapter (video DVD mode).
û Select “
- or to switch it off -
û Press the p or o button.
Repeat” while a CD/DVD is playing to
activate ( ) or deactivate ( ) the function.
Switching the shuffle function on/off
When you activate this function, the current track
is played to the end. The current CD/DVD is then
played in random order.
û Select “
Shuffle” while a CD/DVD is playing to
activate ( ) or deactivate ( ) the function.
Starting/stopping scanning
When this function is activated, each track on the
CD/DVD or each chapter on a video DVD is played
for approx. 10 seconds.
1. Press the n button repeatedly until the
“
DISC” audio source is highlighted in the bot-
tom line.
2. Select “
Start scan” to activate the function.
3. Select “
The function is automatically stopped as soon as
a track is selected directly in the track list.
Stop scan” to deactivate the function.
The CD/DVD track that has started playing will
continue to play.
Searching for music in MP3 mode
(full text search)
The music search in MP3 mode is based on a full
text search of the file names.
1. Press the n button repeatedly until the
“
DISC” audio source is highlighted in the bot-
tom line.
2. Press the i button or touch the tab of
the same name in the header.
3. Select “
The menu item is only available when the track
4. Enter at least three letters of the search term.
5. Call up the search results by selecting “
6. Select the track you want in the result list.
Full text search”.
The input menu is opened.
list is available.
List”.
The track is played.
DISC 39
Page 40

*) iPod is a trademark of Apple Computer, Inc. and
is registered in the USA and in other countries.
**) Compatibility of later iPod models with the
PCM cannot be guaranteed.
Calling up the main menu for iPod mode
û Press the n button repeatedly until the
“
iPod” audio source is highlighted in the bot-
tom line.
iPod jack
iPod*
You can connect one of the following iPod models
with your PCM via a jack in the centre console of
your vehicle using the connecting cable supplied:
–iPod 4th generation,
– iPod 5th generation (video),
– iPod nano,
– iPod nano 2nd generation as well as
–iPod mini,
– iPod photo,
– later iPod models**.
If you encounter any problems it may be nec-
essary to update your iPod’s firmware.
It is recommended not to leave an iPod in the
vehicle for long periods of time as extreme
ambient conditions (temperature, humidity)
can occur in vehicles.
The iPod charges during use.
For proper operation of an iPod or iPhone on
the PCM, including the charging function, both
connectors must be attached to the media interface.
The “
iPod” mode is only displayed if a corre-
sponding device is connected to the interface.
Searching for music
You can search for specific tracks on your iPod.
The following categories are available to you for
this:
–Artists
Displays a list of all available artists. If you select an artist from the list, the number of tracks
and albums available for the subsequent
search is updated and displayed after the
menu item.
40 DISC
Page 41

–Albums
Displays a list of the available albums. If you
have already selected an artist, only albums by
that artist will be available for the subsequent
search.
If you select an album from the list, the number
of tracks available for the subsequent search
is updated.
–Track
Displays a list of all tracks stored on the iPod.
If you have already selected a category
(e.g. “Artists”), the list of tracks will have been
automatically updated and only tracks by that
artist will be available.
– Music genres
The tracks stored on the iPod are generally assigned to a music genre (provided the “Genre”
ID3 tag has been assigned). These music genres can also be used as categories for a
search.
If you have selected a music genre, the artists,
albums and tracks available for the subsequent search are updated.
Once you select a category, higher-level categories are no longer available. After you select an
artist, for example, the “
can no longer be selected.
Selecting “
plays the tracks in accordance with your previous
selection.
Below is an example of how to perform a search
for the tracks of a specific artist and album.
1. Press the n button repeatedly until the
2. Select “
3. Select “
4. Select the artist you want in the list.
5. Select “
Start playback” ends the search and
“
iPod” audio source is highlighted in the bot-
tom line.
Find music” in iPod mode.
Artists”.
A list of all the artists whose tracks are stored
on the iPod is opened.
Albums”.
A list of all the albums by the selected artist
stored on the iPod is opened.
Music genres” category
6. Select the album you want in the list.
The number of tracks on this album is now
shown in brackets on the “
7. Select “
The tracks from a music search are displayed
Start playback”.
The tracks on the selected album are now
played one after the other.
in the track list. To find out more, please refer
also to the section “Track list” on page 42.
The iPod determines the sorting of the lists.
Track” button.
Playlists
Selecting this list entry allows you to play lists of
tracks you have stored on your iPod.
1. Press the n button repeatedly until the
“
iPod” audio source is highlighted in the bot-
tom line.
2. Select “
3. Select the playlist you want.
Playlists”.
The menu is opened.
The tracks in the list are played one after the
other. After the last track is played, the playlist
is automatically repeated.
DISC 41
Page 42

Track list
If you have performed a music search or selected
a playlist, the corresponding tracks are displayed
in the track list.
The iPod determines the sorting of the lists.
1. Press the n button repeatedly until the
“
iPod” audio source is highlighted in the bot-
tom line.
2. Select “
3. Select the track you want.
Track list”.
The menu is opened.
The track is played.
Fast forward/reverse
û Press the o button or p button when the iPod is
playing until the position you want is reached.
Repeating a track
Activating this function repeats the current track.
û Select “
- or to switch it off -
û Press the p or o button.
Repeat” when the iPod is playing to ac-
tivate ( ) or deactivate ( ) the function.
Adapting the volume for iPod mode
You will only be able to access the “SET DISC
/ AUX” menu if there is at least one audio
source from the DISC area available.
1. Press the n button.
2. Press the i button or touch the tab of
the same name in the header.
3. Select “
4. Make the setting you want by selecting the
SET DISC / AUX”
>“
Volume adaptation”
>“
Volume iPod”.
symbols and or by turning
right rotary knob.
q the
Skipping to the previous/next track
û If you want to skip to the next track when the
iPod is playing, briefly press the o button.
û If you want to skip back to the start of the track
when the iPod is playing, briefly press the p
button.
42 DISC
Switching the shuffle function on/off
When you activate this function, the current track
in the music selection is played to the end. All
tracks in the current music selection are then
played in random order.
û Select “
Shuffle” when the iPod is playing to ac-
tivate ( ) or deactivate ( ) the function.
Page 43

USB jac
k
USB
You can connect a USB memory stick or a USB
MP3 player containing audio files to the USB interface of the PCM in the centre console.
You can use it to:
– play audio data from your USB stick
(permitted formats: MP3, WAV, WMA and AACLC),
– download data from the Sport display as well
as
– download data from the PCM logbook.
You cannot connect USB devices that require
the installation of special drivers. The use of a
USB hub is not permitted.
Compatibility with all memory sticks and MP3
players cannot be guaranteed due to the rapid rate at which USB media are developing.
USB devices with increased power require-
ments (e.g. external hard drives) cannot be
operated on the USB interface in some circumstances.
It is recommended not to leave USB devices
in the vehicle for long periods of time as extreme ambient conditions (temperature, humidity) can occur in vehicles.
Notes on the media supported
To avoid problems when playing your USB devices, please note the following:
– Permissible media:
USB mass storage device,
USB MP3 player (to MTP standard)
– Permissible file systems:
USB devices with the file systems FAT 16 and
FAT 32 are supported.
– Permissible USB standards:
USB devices that meet the USB 2.0 specifications are supported.
– Permissible file structures:
Up to 10,000 tracks are supported on the USB
device.
DISC 43
Page 44

Calling up the main menu for USB mode
û Press the n button repeatedly until the
“
USB” audio source is highlighted in the bot-
tom line.
The “
The first time USB mode is activated, the au-
USB” mode is only displayed if a corre-
sponding device is connected to the interface.
dio files in the USB memory are loaded. The
menu cannot be used and the menu items are
greyed out during this process. Playback begins as soon as the first tracks are found on
the USB device.
Searching for a track
You can search for specific tracks on your USB device. The following options are available to you for
this:
– search for tracks using categories
(“
Find music”),
– search for similar tracks to the track currently
playing using categories
(“
Play more from”)
and
– search for tracks using a “
Full text search”.
The music search only works if metadata for
the tracks (ID3 tags) is available.
A database is created in the PCM for the music search. This can take a few minutes.
The tracks from a music search are compiled in a
playlist named “
the “
Track list” menu item.
Searching for tracks by category
You can compile the tracks you want using the following categories:
Tracks from music search” under
–Artist
Displays a list of all artists. If you select an artist from the list, the number of tracks available
for the subsequent search is updated.
If you select “
using the input menu.
All artists” you can also search
–Album
Displays a list of the available albums. If you
have already selected a category
(e.g. “Artists”), only albums by that artist will
be available for the subsequent search.
If you select an album from the list, the number
of tracks available for the subsequent search
is updated.
If you select “
using the input menu.
All albums” you can also search
–Track
Displays a list of all tracks stored on the USB
device. If you have already selected a category
(e.g. “Artists”), the list of tracks will have been
automatically updated and only tracks by that
artist will be available.
If you select “
using the input menu.
All tracks” you can also search
–Music genres
The tracks stored on the USB device are generally assigned to a music genre (provided the
“Genre” ID3 tag has been assigned). These
music genres can also be used as categories
for a search.
44 DISC
Page 45

These categories can be used either individually
or in succession for the search. The remaining
number of entries is updated.
In contrast to the music search in iPod mode, the
categories can be set in any order.
Selecting “
plays the tracks in accordance with your previous
selection.
Below is an example of how to perform a search
for tracks by a specific artist on a specific album.
1. Press the n button repeatedly until the
2. Select “
3. Select “
4. Select the artist you want in the list.
5. Select “
6. Select the album you want in the list.
7. Select “
Start playback” ends the search and
“
USB” audio source is highlighted in the bot-
tom line.
Find music” in USB mode.
Artists”.
A list of all available artists whose tracks are
stored on the USB device is opened. Highlight
the artist you want by selecting in the list.
Albums”.
A list of all albums by the selected artist stored
on the USB device is opened.
The number of tracks on this album is now
shown in brackets on the “
Track” button.
Start playback”.
The tracks on the selected album are now
played one after the other.
Searching for similar tracks by category
1. Press the n button repeatedly until the
USB” audio source is highlighted in the bot-
“
tom line.
2. Press the i button or touch the tab of
the same name in the header.
3. Select “
4. Select the category you want.
In some cases, no further tracks may be
Searching for tracks using a full text search
The full text search function gives you quick access to specific tracks. It is suitable for the following situations:
– there is no metadata (ID3 tags) on your USB
– there are a large number of tracks stored on
– you do not know the exact name of the track/
Play more from”.
You can now choose between the following categories:
–“
Artist”,
–“
Album” and
–“
Genre”.
The corresponding tracks are played one after
the other.
found for the selected category.
device,
your USB device and a search using filters
would produce very long result lists or
artist you want.
1. Press the n button repeatedly until the
“
USB” audio source is highlighted in the bot-
tom line.
2. Press the i button or touch the tab of
the same name in the header.
3. Select “
4. Enter at least three letters of the search term.
5. Call up the search results by selecting “
In the result list, symbols are used to distinguish
between an artist, track or album:
6. Select the artist/album/track you want in the
Full text search”.
The input menu is opened.
List”.
Artist
Album
Tra ck
result list.
The selection is played.
DISC 45
Page 46

Track list
The tracks and playlists stored on the USB device
are displayed in alphabetical order in the track list.
To find out more about using the track list, please
refer to the section “Selecting a track (MP3 CD/
DVD)” on page 37.
1. Press the n button repeatedly until the
USB” audio source is highlighted in the bot-
“
tom line.
2. Select “
3. Select the track you want.
If the directory structure of the folders is very
Track list”.
The menu is opened.
The track is played.
- or Select the playlist and then the track you want.
The track is played.
deep or the number of files is very large, it
may not be possible to display all of the folders or tracks.
File formats that cannot be played will not be
displayed.
Skipping to the previous/next track
If the current track has been playing for longer
than 10 seconds, pressing the p button resumes
playback from the start of the current track.
If the current track has not yet been playing for
10 seconds, playback is resumed from the start
of the previous track.
û If you want to skip to the next track in USB
mode, briefly press the o button.
û If you want to skip back to the start of the track
in USB mode, briefly press the p button.
Fast forward/reverse
û Press the o button or p button in U SB mode un-
til the position you want is reached.
Repeating a track
Activating this function repeats the current track.
û Select “
- or to switch it off -
û Press the p or o button.
Repeat” in USB mode to activate ( ) or
deactivate ( ) the function.
Switching the shuffle function on/off
When you activate this function, the current track
is playe d to the end. Al l trac ks in th e curre nt m usic
selection are then played in random order.
û Select “
The shuffle function is automatically deactivated
as soon as a new music search is started.
Shuffle” in USB mode to activate ( ) or
deactivate ( ) the function.
Starting/stopping scanning
When this function is activated, each track from
the USB device or the current music selection is
played for approx. 10 seconds.
1. Press the n button repeatedly until the
USB” audio source is highlighted in the bot-
“
tom line.
2. Select “
3. Select “
The function is automatically stopped as soon as
a track is selected directly in the track list or a music search is performed.
Start scan” to activate the function.
Stop scan” to deactivate the function.
The track on the USB device that has started
playing continues to be played.
46 DISC
Page 47

AUX jack
External audio source
You can use the AUX interface to connect an external audio source that is operated on the source itself rather than on the PCM. Please refer to the operating manual for the relevant device.
WARNING!
Accident hazard. Distraction could result in
you losing control of the vehicle.
û Operate the external audio source only
when you are safely in control of your vehicle and traffic conditions permit. If in doubt,
stop the vehicle and operate the external
audio source while the vehicle is parked.
Calling up an external audio source
û Press the n button repeatedly until the
“
AUX” audio source is highlighted in the bot-
tom line.
Activating the interface
To be able to select a connected external audio
source with the n button, the interface must
be activated in the SET menu.
1. Press the n button.
2. Press the i button or touch the tab of
the same name in the header.
3. Select “
SET DISC / AUX”.
You will only be able to access the “
SET DISC /
AUX” menu if there is at least one CD/DVD in-
serted or at least one audio source activated
( ) in the menu.
4. Select “
AUX” to activate ( ) or deactivate ( )
the function.
Adapting the volume for an external audio
source
Volume control should mainly be performed
on the external audio source to avoid large differences in volume (particularly increases)
when changing the audio source.
Recommendation:
û Set the maximum volume on the external
audio source.
û Then set the volume you want on the PCM.
You can also adapt the volume of the external
audio source to the volume of the PCM.
DISC 47
Page 48

You will only be able to access the “
SET DISC
/ AUX” menu if there is at least one audio
source from the DISC area available.
1. Press the n button.
2. Press the i button or touch the tab of
the same name in the header.
3. Select “
4. Make the setting you want by selecting the
SET DISC / AUX”
>“
Volume adaptation”
>“
Volume AUX”.
symbols and or by turning
right rotary knob.
q the
External Bluetooth® audio source
You can also connect an external audio source
that is partially operated on the source itself rather than on the PCM via a Bluetooth
For the connection and operation of the exter-
nal Bluetooth
supports the A2DP/AVRCP profile.
The extent to which the external Bluetooth
audio source can be operated on the PCM depends on the functions supported by the audio source. Operation of the external Bluetooth
restricted in some cases. In other cases, operation on the PCM is not possible. The audio
source is then operated on the connected device itself. Please refer to the operating manual for the relevant device.
®
audio source, the PCM also
®
audio source on the PCM is therefore
WARNING!
Accident hazard. Distraction could result in
you losing control of the vehicle.
û Operate the external audio source only
when you are safely in control of your vehicle and traffic conditions permit. If in doubt,
stop the vehicle and operate the external
audio source while the vehicle is parked.
®
connection.
®
Calling up an external Bluetooth® audio
source/starting playback
û Press the n button repeatedly until the
“
AUX BT” audio source is highlighted in the bot-
tom line.
Playback starts automatically if this is supported by the Bluetooth
sary to start playback manually on the Blue-
®
tooth
device.
The “
AUX BT” mode is only displayed if a cor-
responding device is connected to the interface.
®
device. It may be neces-
Activating the interface
To use an external Bluetooth® audio source, the
AUX Bluetooth function must be activated in the
“
SET DISC / AUX” menu.
1. Press the n button.
2. Press the i button or touch the tab of
the same name in the header.
3. Select “
4. Select “
SET DISC / AUX”.
You will only be able to access the “
AUX” menu if there is at least one CD/DVD in-
serted or at least one audio source activated
( ) in the menu.
AUX Bluetooth” to activate ( ) or
deactivate ( ) the function.
When you deactivate “
Bluetooth
necessary.
®
devices are deleted from the list if
AUX Bluetooth”, the
SET DISC /
48 DISC
Page 49

With some devices, it may be necessary to
set the volume on the device.
Recommendation:
û Set the required volume on the external
Bluetooth
û Then set the volume you want on the PCM.
The functions and displays depend on the ac-
tive Bluetooth
®
audio source.
®
device.
Skipping a track
û If you want to skip to the next track, briefly
press the o button.
û If you want to skip back to the start of the
track/to the previous track, briefly press the p
button.
Fast forward/reverse
û Press the o button or p button in AUX BT mode
until the position you want is reached.
Repeating a track
Activating this function repeats the current track.
û Select “
- or to switch it off -
û Press the p or o button.
Repeat” in Bluetooth
tivate ( ) or deactivate ( ) the function.
®
AUX m ode to ac-
Switching the shuffle function on/off
When you activate this function, the current track
is played to the end. All tracks are then played in
random order.
û Select “
Shuffle” in Bluetooth
tivate ( ) or deactivate ( ) the function.
®
AUX mode to ac-
Starting/stopping scanning
When this function is activated, each track from
the external audio source is played for approx.
10 seconds.
1. Press the n button repeatedly until the
“
AUX BT” audio source is highlighted in the bot-
tom line.
2. Select “
3. Select “
Start scan” to activate the function.
Stop scan” to deactivate the function.
The track from the external audio source that
has started playing will continue to play.
Bluetooth® settings
Calling up Bluetooth® settings
1. Press the n button.
2. Press the i button or touch the tab of
the same name in the header.
3. Select “
You will only be able to access the “
Switching Bluetooth® on/off
Switching Bluetooth® on
û Select “
Switching Bluetooth
û Select “
SET DISC / AUX”
>“
Bluetooth settings”.
SET DISC
/ AUX” menu if there is at least one audio
source from the DISC area available.
Switch on Bluetooth” in the Bluetooth
settings.
®
off
Switch off Bluetooth” in the Bluetooth
settings.
®
®
DISC 49
Page 50

Adding a new Bluetooth® device
For the PCM to find your Bluetooth® device,
please ensure that the Bluetooth
device has been activated and set to “visible”.
1. Select “
2. Choose the device you want by selecting it in
Establishing a connection from an
external Bluetooth
To find out more, please refer to the section “Establishing a connection from an external Bluetooth
New MP3 player” in the Bluetooth
settings.
A search is started and a list of the devices
found is displayed.
the list.
A Bluetooth
enter in the corresponding Bluetooth
Once you have entered the code, successful
authorisation of the device is shown on the display.
®
®
code is displayed that you must
®
device” on page 69.
device
®
function on the
®
device.
®
Setting visibility
To find out more, please refer to the section “Setting visibility” on page 69.
Authorised Bluetooth® devices
This function allows you to display a list of the
Bluetooth
nect with your PCM. The list contains all authorised MP3 players .
Displaying authorised Bluetooth
û Select “
Connecting an authorised Bluetooth
with the PCM
1. Select “
2. Select the device you want in the list.
3. Select “
Disconnecting an authorised and connected
Bluetooth
1. Select “
2. Select the device you want in the list.
3. Select “
®
devices currently authorised to con-
List of MP3 players” in the Bluetooth
settings.
List of data devices” in the Bluetooth
settings.
Connect”.
®
device from the PCM
List of data devices” in the Bluetooth
settings.
Disconnect”.
®
devices
®
device
Renaming an authorised Bluetooth
1. Select “
2. Select the device you want in the list.
3. Select “
4. Enter the name you want and confirm by se-
®
Deleting an authorised Bluetooth
from the list
®
1. Select “
2. Select the device you want in the list.
3. Select “
4. Confirm the prompt that appears by selecting
Deleting the list of authorised Bluetooth
®
devices
1. Select “
2. Select any device in the list.
3. Select “
4. Select “
5. Confirm the prompt that appears by selecting
List of data devices” in the Bluetooth
settings.
Rename”.
The input menu is opened.
lecting “
OK”.
The name of the device is now changed in the
PCM.
List of data devices” in the Bluetooth
settings.
Delete”.
“
Yes”.
List of data devices” in the Bluetooth
settings.
Delete”.
Delete list”.
“
Delete all”.
®
device
®
device
®
®
®
®
50 DISC
Page 51

Displaying details for the authorised
Bluetooth
1. Select “
®
device
List of data devices” in the Bluetooth
settings.
2. Select any device in the list.
3. Select “
Device details”.
The following information is displayed:
– the device name,
–the Bluetooth
®
address as well as
– the supported services.
®
DISC 51
Page 52

PHONE
Bluetooth®................................................. 54
Prerequisites for the mobile phone .............. 55
Hands-free quality....................................... 55
Interruptions to the connection while driving .55
Switching Bluetooth
Operating the Bluetooth
(Bluetooth
®
®
on/off........................ 56
®
hands-free unit
mobile phone preparation) .... 56
Authorising a mobile phone .........................56
Establishing a connection from an
external Bluetooth
®
device..........................57
Conducting calls.........................................58
Temporarily muting the
hands-free microphone ............................... 58
Accepting a call ......................................... 58
Ending a call .............................................. 59
Rejecting a call........................................... 59
Dialling a number ....................................... 60
Using the quick dial (redial) function ............. 60
Using the direct dial function ....................... 60
Holding a call ............................................. 60
Phonebook ................................................ 60
List of previous calls...................................61
List of received calls................................... 62
Touch tone dialling (DTMF tones) .................63
Establishing an additional call ......................63
Call waiting ................................................ 64
Call waiting (swapping) and conference ........65
Speed dialling ............................................65
Telephone settings
(Bluetooth
®
mobile phone preparation) ........... 66
Setting the ringtone type............................. 66
Setting the ringtone volume......................... 66
Setting the call volume................................ 66
Setting the microphone volume ................... 66
Switching 3-way calling on/off .....................66
Bluetooth
phone preparation)........................................ 67
®
settings (Bluetooth® mobile
Authorised Bluetooth
Adding a new Bluetooth
Establishing a connection from an
external Bluetooth
®
devices ...................67
®
device..................68
®
device..........................69
Setting visibility ..........................................69
Phonebook settings
(Bluetooth
®
mobile phone preparation) ........... 70
Setting the memory for the phonebook ........70
Setting sorting ...........................................70
Setting automatic transfer of
the phonebook ...........................................70
Transferring the phonebook ........................... 71
Transferring the phonebook
entries manually ......................................... 71
Deleting the phonebook .............................. 71
Operating the PCM telephone ...................72
Inserting the SIM card in the PCM ................72
Entering the PIN .........................................73
Conducting calls.........................................73
Temporarily muting the
hands-free microphone ...............................73
Accepting a call .........................................74
Ending a call .............................................. 74
Rejecting a call...........................................75
Dialling a number........................................75
Using the quick dial (redial) function .............75
Using the direct dial function ....................... 75
Holding a call .............................................76
PCM phonebook .........................................76
List of previous calls ...................................78
List of received calls...................................79
Touch tone dialling (DTMF tones) .................80
Establishing an additional call ......................81
Call waiting ................................................81
Call waiting (swapping) and conference ........82
Using supplementary services .....................83
Making an emergency call ...........................83
52 PHONE
Page 53

Text messages (SMS)
(with PCM telephone only)..............................83
Reading a text message ............................ 84
Replying to a text message ......................... 84
Creating and sending a new text message ...85
Forwarding a text message ......................... 87
Deleting a text message ............................87
Reading a vCard.........................................87
Accepting vCards .......................................88
Editing vCard details................................... 88
Discarding (deleting) vCards........................ 89
Numbers in text messages.......................... 89
Displaying the complete text ....................... 90
Creating a template ....................................90
Telephone settings
(PCM telephone) ...........................................91
Switching the PCM telephone on/off ............91
Setting ringtones........................................ 91
Selecting a network .................................... 91
Displaying the IMEI .....................................92
Switching 3-way calling on/off ..................... 92
SIM settings .............................................. 92
Call settings
(PCM telephone) ...........................................93
Activating call forwarding ............................93
Switching the “Call waiting” function on/off...94
Switching the “Redial” function on/off........... 95
Setting transfer of your own number ............ 95
Setting automatic call answering ................. 95
Bluetooth
(PCM telephone)............................................95
®
settings
Authorised Bluetooth
®
Adding a new Bluetooth
devices ...................95
®
device..................97
Setting visibility .........................................98
Finding the cordless handset .......................98
Phonebook settings ......................................98
Setting the memory for the phonebook ........98
Setting sorting ...........................................99
Setting automatic transfer of
the phonebook ...........................................99
Transferring the phonebook ......................100
Deleting the phonebook ............................ 100
Settings for messages and data
(PCM telephone)..........................................100
Changing the number of the
SMS service centre ..................................100
Switching the SMS signal tone on/off.........100
Cordless handset ........................................101
Switching the cordless handset on/off .......101
Charging the cordless handset ..................101
General operation .....................................101
Accepting a call........................................102
Ending a call ............................................102
Rejecting a call.........................................102
Dialling a number......................................102
Temporarily muting the
handset microphone .................................102
Establishing an additional call ....................102
Call waiting (swapping) and conference ......103
Phonebook............................................... 104
Text messages (SMS) ...............................105
Settings...................................................107
PHONE 53
Page 54

PHONE
The PCM can be equipped with an integrated car
phone (PCM telephone) as an optional accessory.
This car phone (PCM telephone) is a quadband
GSM radio telephone (GSM 850/900/1800/
1900) with hands-free unit and a cordless handset. It conforms to the GSM standard (Global Sys-
tem for Mobile communication) currently implemented in more than 100 countries.
For information on the current GSM coverage and
planned expansion of the coverage areas of GSM
networks, contact your network provider.
Your PCM also offers a facility for the connection,
operation and hands-free operation of an external
telephone (mobile phone) via a Bluetooth
®
con-
nection.
An alternative equipment version (Bluetooth
®
mobile phone preparation) does not include a PCM
telephone, but does still allow you to use the PCM
as a hands-free unit for Bluetooth
®
mobile
phones.
A list of selected compatible mobile telephones
is available on the Internet at
http://www.porsche.com.
WARNING!
Injury hazard. The telephone must not be
used near explosives or flammable materials
(e.g. at a petrol station) or near operations involving explosives.
Mobile phones must be switched off in certain
hazardous areas such as near petrol stations,
fuel depots, chemical plants and demolition
work in progress using explosives, for example. They can interfere with technical equipment.
û Please heed appropriate warnings.
û Observe statutory regulations and local re-
strictions when using the telephone.
Bluetooth
®
Bluetooth® is a system for establishing radio con-
nections between electronic devices within a maximum range of 10 metres (approx. 33 feet).
Bluetooth
®
allows you to use your mobile phone
via the PCM. You can accept, make and end calls.
You use your vehicle’s audio system for hands-free
operation and have access to the contents of your
phonebook.
Access to the phonebook depends on the
range of functions supported by the mobile
phone used.
The connection is established in different ways depending on the telephone version in your PCM:
–In the case of a PCM with Bluetooth
®
mobile
phone preparation, connection takes place using the Hands-Free Profile.
When connecting using the Hands-Free Profile,
the PCM simply serves as a Bluetooth
®
hands-free unit for the external telephone.
The SIM card of the external telephone cannot
be accessed (e.g. to write a text message) and
the range of functions is restricted accordingly
(depending on the mobile phone used).
54 PHONE
Page 55

– In the case of a PCM with PCM telephone,
connection takes place using the SIM Access
Profile if this profile is supported by the mobile phone used. When connecting using the
SIM Access Profile, the SIM card of the mobile
phone is used for operation of the PCM telephone. The data on the SIM card (phonebook
entries and text messages) is read out by the
PCM and is available for use on the PCM.
The range of functions for a connection using
the SIM Access Profile is largely the same as
the function of the PCM telephone with SIM
card inserted.
If the mobile phone does not support the SIM
Access Profile, connection takes place using
the Hands-Free Profile.
With mobile phones that support both profiles,
it is possible to switch between the connection
types.
The option of connection using the SIM
Access Profile is not available on all mobile
phones and must also be activated on the device for some mobile phones.
In some countries there may be limitations on
the use of devices with Bluetooth
®
. Please
contact the local authorities for further information.
Prerequisites for the mobile phone
Not all mobile phones are equally suitable for making and receiving calls via the Bluetooth
of the PCM.
– You need a mobile phone that supports Blue-
®
.
tooth
– The mobile phone must support the Hands-
Free Profile 1.0 or higher.
– The mobile phone must be switched on and
Bluetooth
®
must be activated.
– On some mobile phones, the device must also
be rendered “visible” to other devices with
Bluetooth
®
.
Further information on the settings on your mobile
phone can be found in the manufacturer’s operating instructions.
Some mobile phones have special character-
istics when it comes to Bluetooth
fully support Bluetooth
®
. Contact your mobile
phone retailer and, if applicable, download the
latest software onto your mobile phone.
®
interface
®
or do not
Hands-free quality
The hands-free quality can be impaired by
– having the fan on, windows open or the top
down,
– wind and rolling noise,
– mobile phone having a poor network connec-
tion,
– vehicle travelling at high speed.
Interruptions to the connection while
driving
Interruptions to the connection may occur if:
– there is inadequate GSM coverage in certain
regions,
– you are switching from one GSM transmitting/
receiving station (GSM cell) to another and
there is no voice channel available in this cell,
–you are using a SIM card that is not compatible
with the available network,
– you are using two SIM cards and the mobile
phone is simultaneously logged into the net-
work with the second SIM card.
PHONE 55
Page 56

Switching Bluetooth® on/off
Switching Bluetooth® on
1. Press the c button.
2. Press the i button or touch the tab of
the same name in the header.
3. Select “
4. Select “
Switching Bluetooth® off
1. Press the c button.
2. Press the i button or touch the tab of
3. Select “
4. Select “
SET PHONE”
>“
Bluetooth settings”.
Switch on Bluetooth”.
the same name in the header.
SET PHONE”.
>“
Bluetooth settings”.
Switch off Bluetooth”.
Operating the Bluetooth® handsfree unit
(Bluetooth® mobile phone
preparation)
The Bluetooth® hands-free unit allows you to use
the PCM as a hands-free unit for Bluetooth
bile phones.
Please note that your mobile phone must sup-
port the Bluetooth
with the Bluetooth
®
Hands-Free Profile for use
®
hands-free unit.
®
mo-
Authorising a mobile phone
Using the “Find telephone” function you can have
the PCM search for and authorise your mobile
phone. Follow the instructions on the PCM display
for this.
®
For the PCM to find your Bluetooth
please ensure that the Bluetooth
device has been activated and set to “visible”.
Further details can be found in the operating manual for your mobile phone.
device,
®
function on the
56 PHONE
Page 57

1. Press the c button.
2. Select “
Find telephone”.
A search is started and a list of the devices
found is displayed.
3. Select the device you want in the list.
A Bluetooth
must enter on your mobile phone.
4. Enter the displayed Bluetooth
®
code is displayed, which you
®
code on the
mobile phone.
Successful authorisation of the device is
shown on the display and the connection is established.
With some mobile phones, the connection re-
quest by the PCM must be explicitly confirmed
on the mobile phone. This may even have to
be done a number of times in some cases,
for example before transferring the phonebook. To avoid this request, you can authorise
the PCM in your mobile phone’s list of devices. The connection will then be established
automatically in the future, without the need
for further checks.
Further details can be found in the operating
manual for your mobile phone.
To find out more, please refer also to the sections
“Authorised Bluetooth
“Adding a new Bluetooth
Establishing a connection from an
external Bluetooth
®
devices” on page 95 and
®
device” on page 97.
®
device
If the PCM does not find your mobile phone or a
connection attempt by the PCM fails, you can also
start the authorisation from the mobile phone.
1. If another mobile phone is connected with the
PCM, switch off Bluetooth
®
on the connected
mobile phone to disconnect the connection
with the PCM.
2. Press the c button.
3. Press the i button or touch the tab of
the same name in the header.
The PCM is now visible for external devices.
®
Please ensure that the Bluetooth
visibility of
the PCM is activated. To find out more, please
refer to the section “Setting visibility” on
page 69.
4. Using the mobile phone, search for audio accessories or devices that support Bluetooth
®
Refer to the manufacturer’s operating instructions to find out how to do this.
5. Select the device “PCM” from the mobile
phone’s search results and establish a connection.
Refer to the manufacturer’s operating instructions to find out how to do this.
6. A request appears on the PCM display.
Select “
Bluetooth
with “
OK”.
Accept”.
®
code of your choice and confirm
7. A keypad appears where you enter a four-digit
.
PHONE 57
Page 58

8. Enter the same Bluetooth
bile phone.
Once you have entered the code, successful
authorisation of the device is shown on the display.
9. With many mobile phones, the connection with
the PCM must be explicitly established from
the mobile phone following authorisation. Further details can be found in the operating manual for your mobile phone.
With some mobile phones, the Bluetooth
code must be directly provided by the mobile
phone during the connection request. If this is
the case, enter a 4-digit code of your choice
on your mobile phone and confirm it with OK.
You will then be shown a keypad on the PCM
display where you must enter the same code
and confirm it.
®
code on your mo-
®
Conducting calls
There is a hands-free microphone in the roof control console of the vehicle. This means that you
can conduct all telephone calls without using a
handset.
You control the volume using the left rotary
knob
t.
If there is a mobile phone connected to the PCM
using the Hands-Free Profile, the call is normally
conducted using the hands-free unit. It can, however, be transferred to the mobile phone by select-
Private” function.
ing the “
û Select “
Private” during the call to activate ( )
or deactivate ( ) the “
Private” function.
Temporarily muting the hands-free
microphone
û Select “Mute microphone” during a call to acti-
vate ( ) or deactivate ( ) the function.
The microphone can also be muted by:
– briefly pressing
- or - (with multi-function steering wheel
with telephone function)
– pressing the left roller on the multi-function
steering wheel.
u the left rotary knob
Accepting a call
As soon as a call comes in, the current audio
source is muted and the selected ringtone is
played. In addition, an appropriate menu is temporarily displayed or an appropriate message is
shown in the bottom line.
If available, the telephone number and name of the
caller are displayed.
58 PHONE
Page 59
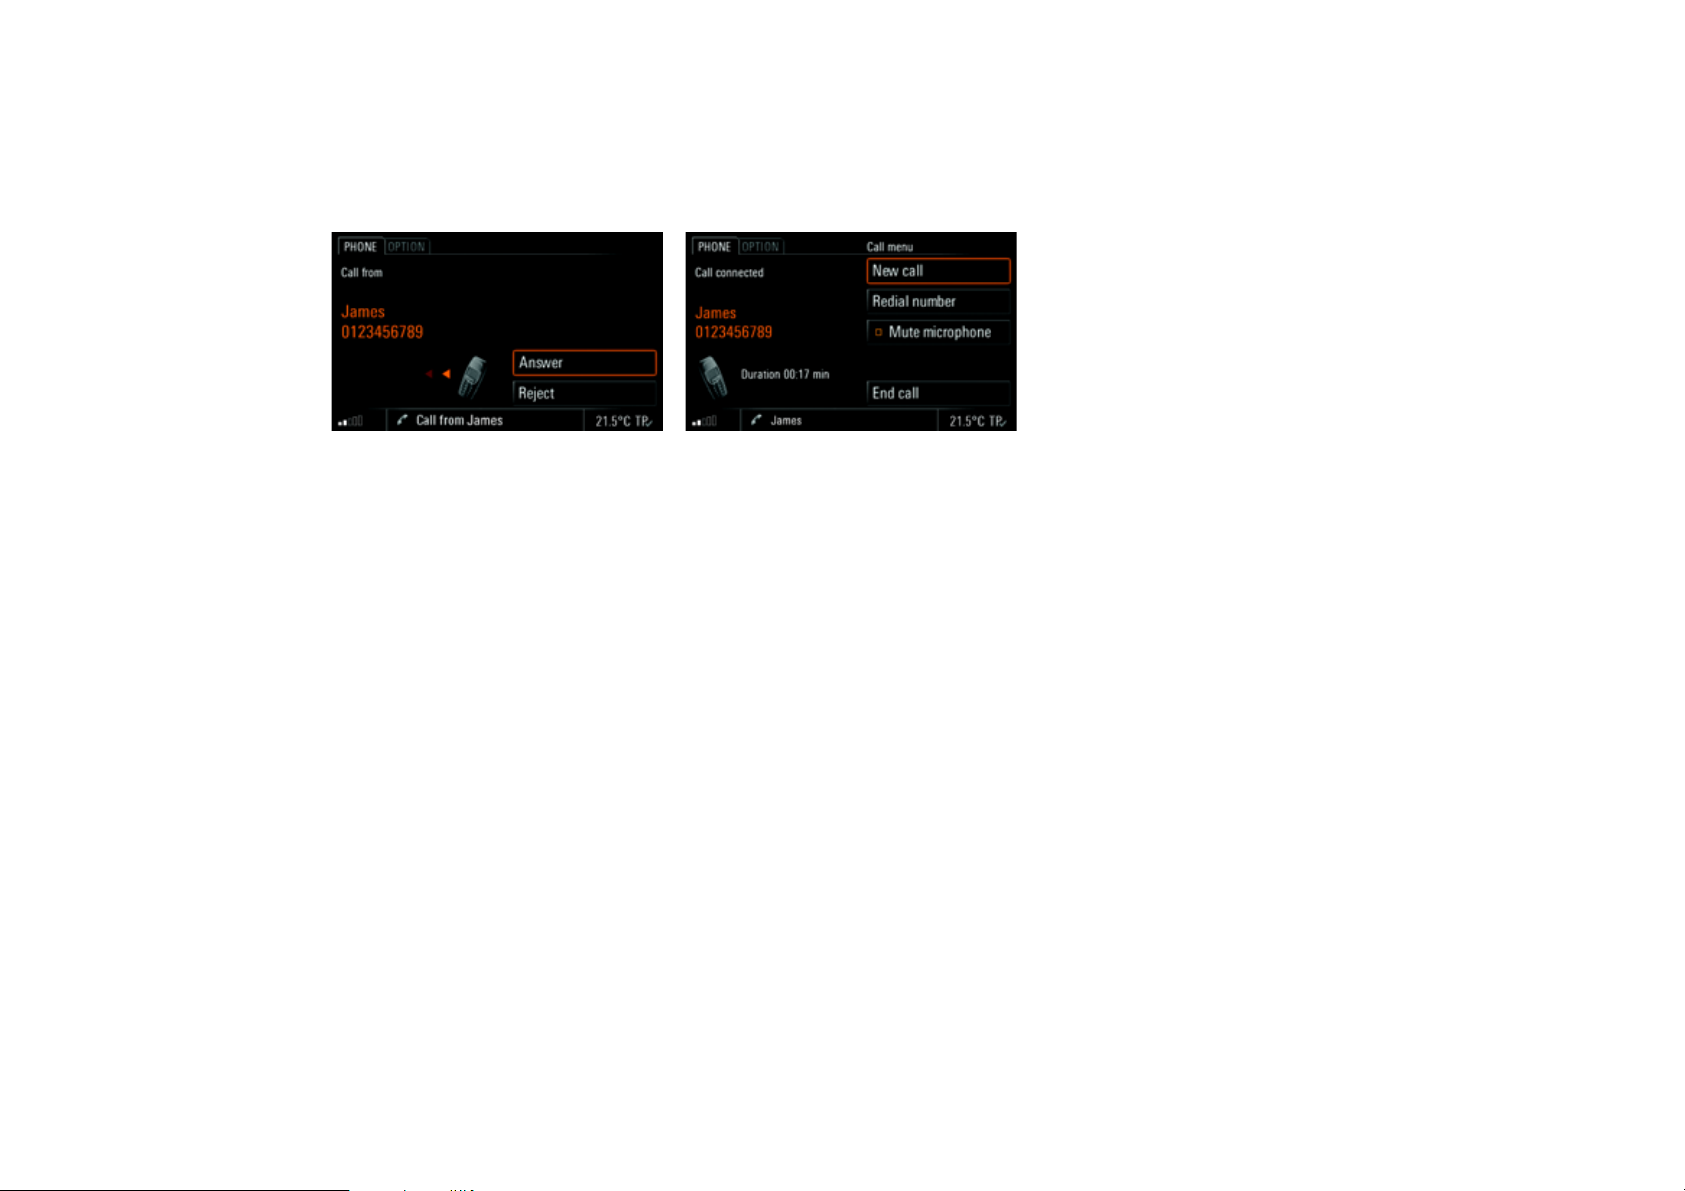
You can accept the incoming call in a number of
ways:
û Pressing the Lift handset button l on the
PCM.
- or -
û Selecting “
- or -
û Pressing the Lift handset button l on the ex-
ternal mobile phone.
- or -
û Selecting the menu item in the instrument clus-
ter using the lower right stalk on the steering
wheel.
- or - (with multi-function steering wheel with
telephone function)
û Pressing the Lift handset button l on the
multi-function steering wheel.
Answer” on the display.
Ending a call
You can end an active call by:
û Pressing the End call button k on the PCM.
- or -
û Selecting “
- or -
û Pressing the End call button k on the exter-
nal mobile phone.
- or -
û Selecting the menu item in the instrument clus-
ter using the lower right stalk on the steering
wheel.
- or - (with multi-function steering wheel with
telephone function)
û Pressing the End call button k on the multi-
function steering wheel.
End call” in the call menu.
Rejecting a call
You can reject an incoming call by:
û Pressing the End call button k on the PCM.
- or -
û Selecting “
- or -
û Briefly pressing the left rotary knob
- or -
û Pressing the End call button k on the exter-
nal mobile phone.
- or -
û Selecting the menu item in the instrument clus-
ter using the lower right stalk on the steering
wheel.
- or - (with multi-function steering wheel with
telephone function)
û Pressing the End call button k on the multi-
function steering wheel.
Reject” in the call menu.
u.
PHONE 59
Page 60

Dialling a number
1. Press the c button.
The PHONE main menu appears.
2. Select “
3. Select the individual digits in the telephone
4. Select “
Always enter the telephone number with the
Dial number”.
The input menu for telephone numbers is
opened. The input field for the telephone
number is blank.
number one after the other.
Call number”.
The telephone call is established and the call
menu is displayed.
dialling code.
Using the quick dial (redial) function
Pressing the Lift handset button l on the PCM
opens the quick dial menu. This menu contains a
list of previous calls.
1. Press the Lift handset button l on the PCM.
2. Select the person you want to talk to.
3. Select “
4. Enter the telephone number you want.
5. Select “
Call number” or press the Lift handset
button l on the PCM again.
- or Select the first list entry, “
The input menu for telephone numbers opens.
Dial number”.
Call number”.
Using the direct dial function
If a telephone number is displayed in a menu and
is highlighted, the number is dialled directly if you
û press the Lift handset button l on the PCM
- or -
û touch the displayed number for at least one
second.
Holding a call
û You can hold an active call by pressing the Lift
handset button l on the PCM.
The menu items “
“
End call” are then available for you to select.
û To continue the call, press the Lift handset but-
ton l on the PCM again.
New call”, “Take call” and
Phonebook
After a Bluetooth® connection has been established between the PCM and the mobile phone, the
PCM attempts to transfer the phonebook data
from the mobile phone. You can prevent this automatic phonebook transfer by deactivating the “
to update” function. To find out more, please refer
to the section “Setting automatic transfer of the
phonebook” on page 70.
Displaying the phonebook
1. Press the c button.
The PHONE main menu appears.
2. Select “
Phonebook”.
The phonebook is opened.
Au-
60 PHONE
Page 61

Calling a phonebook entry
1. Press the c button.
2. Select “
3. Select the phonebook entry you want.
4. If there is more than one number stored for this
5. Select “
Sending a vCard
You can send phonebook entries directly as
vCards. A vCard is an “electronic visiting card” that
a recipient can accept directly into his or her
phonebook.
1. Press the c button.
2. Select “
3. Select the phonebook entry you want.
4. Select “
Phonebook”.
entry, select the number you want.
Call number”.
The number you want is dialled.
Phonebook”.
Send vCard”.
The list of known devices that are suitable for
a transfer is displayed. If the device you want
is not there, you can search for further devices. To do this, press “
also the section “Adding a new Bluetooth
vice” on page 97).
As soon as the search is complete, a list containing the devices found is displayed. Once
you have selected a device in this list, a connection is established and the vCard is sent.
New data device” (see
®
de-
List of previous calls
When a mobile phone is connected to the PCM via
a Bluetooth
lists are transferred and displayed after the connection has been established. The last number dialled appears at the top of the list.
The transfer of the phonebook and call lists is
If one of the telephone numbers matches an entry
from your phonebook, the name of the person
called is displayed instead of the telephone
number.
Displaying the list
1. Press the c button.
2. Select “
®
connection, the mobile phone’s call
not supported by all mobile phones.
Previous calls”.
The list of previous calls is displayed with the
time and date of the calls, if this information is
available in the PCM.
Calling a number from the list of previous
calls
1. Press the c button.
2. Select “Previous calls”.
3. Select the number you want.
4. Select “
Deleting a number from the list of previous
calls
Entries transferred from the mobile phone
1. Press the c button.
2. Select “
3. Select the number you want.
4. Select “
5. Confirm the prompt that appears by selecting
Call number”.
cannot be deleted in the PCM.
Please delete the entries on your mobile
phone.
Previous calls”.
Delete”.
“
Yes”.
The number is deleted from the list.
PHONE 61
Page 62

Adding to a number from the list of previous
calls
1. Press the c button.
2. Select “
3. Select the number you want.
4. Select “
5. Make the change you want.
6. Select “
The telephone number stored in the list is not
changed.
Previous calls”.
Add to number”.
The input menu is opened and the number is
shown in the input field ready for editing.
Call number”.
List of received calls
When a mobile phone is connected to the PCM via
a Bluetooth
lists are transferred and displayed after the connection has been established. The last call received appears at the top of the list.
The transfer of the phonebook and call lists is
®
connection, the mobile phone’s call
not supported by all mobile phones.
If the date and time information for the individ-
ual calls is not transferred from the mobile
phone, the list begins with the unanswered
calls. These are then followed by the accepted calls.
If one of the telephone numbers matches an entry
from your phonebook, the name of the caller is
displayed instead of the telephone number.
Displaying the list
1. Press the c button.
2. Select “
Received calls”.
The list of received calls is displayed with the
time and date of the calls, if this information is
available in the PCM. It contains both accepted
and missed calls.
Calling a number from the list of received
calls
1. Press the c button.
2. Select “
3. Select the number or name you want.
4. If there is more than one telephone number
5. Select “
Deleting a number from the list of received
calls
Entries transferred from the mobile phone
1. Press the c button.
2. Select “
3. Select the number you want.
4. Select “
5. Confirm the prompt that appears by selecting
6. The number is deleted from the list.
Received calls”.
stored for a name, select the number you
want.
Call number”.
cannot be deleted in the PCM. Please delete
these entries on your mobile phone.
Received calls”.
Delete”.
“
Yes”.
62 PHONE
Page 63

Adding to a number from the list of received
calls
1. Press the c button.
2. Select “
3. Select the number you want.
4. Select “
5. Make the change you want.
6. Select “
The telephone number stored in the list is not
changed.
Received calls”.
Add to number”.
The input menu is opened and the number is
shown in the input field ready for editing.
Call number”.
Touch tone dialling (DTMF tones)
DTMF (Dual Tone Multi Frequency) tones can be
sent once a telephone connection has been established. You need this function to communicate with
touch tone-activated telephone systems (e.g. for
controlling your voice mailbox or when dialling in
remotely to your answering machine).
Touch tone dialling
1. Select “
2. Enter the digits you want.
Dial number” in the call menu.
The numerical input menu is opened.
Each digit is immediately transmitted as a
DTMF tone.
Combining DTMF tones with a telephone
number
You can use the + and w characters in the numerical input menu to combine DTMF tone dialling with
the entry of a telephone number.
The DTMF dialling digits are appended to
the digits of the telephone number without
any breaks.
+
û To enter the + character, touch and
hold the 0+ symbol in the telephone input menu.
The digits of the telephone number are dialled first. As soon as the connection to
the telephone number dialled has been established, the DTMF dialling digits must be
w
confirmed again.
û To enter the w character, touch and
hold the * symbol in the telephone input
menu.
The digits of the telephone number are dialled first. The PCM then waits until the
connection has been established before
p
dialling the DTMF dialling digits.
>>>
The p character cannot be entered in
the telephone input menu. It is, however, recognised by the PCM if it is
stored in a telephone number on the
SIM card, for example. In this case, the
behaviour of the PCM is the same as
the behaviour for “+” described above.
Establishing an additional call
You can establish an additional call while there is
another call active.
Some mobile phones do not support making
or accepting a second call. In this case, the
New call” menu item is greyed out during an
“
active call.
PHONE 63
Page 64

1. Select “
2. You then have the following options for enter-
The original call is held while the new connection
is established.
You can switch between the two calls or establish
a conference call. To find out more, please refer
to the section “Call waiting (swapping) and conference” on page 65.
New call” in the call menu.
ing the telephone number:
–“
Dial number”:
The input menu for telephone numbers is
opened. Please refer to the section “Dialling
a number” on page 60.
–“
Phonebook”:
You can insert a number stored in the phonebook. To find out more, please refer to the
section “Calling a phonebook entry” on
page 61.
–“
Previous calls”:
You can insert a telephone number from the
list of previous calls. To find out more,
please refer to the section “Calling a number
from the list of previous calls” on page 61.
–“
Received calls”:
You can insert a telephone number from the
list of received calls. To find out more,
please refer to the section “Calling a number
from the list of received calls” on page 62.
Call waiting
The “Call waiting” function is only available if supported by the network provider and by the mobile
phone.
The “
Call waiting” function must also be activated
in the call settings of the mobile phone. To find out
more, please refer also to the section “Call waiting
(swapping) and conference” on page 65.
Rejecting a waiting call
If you receive another call while there is already
one active, you will hear a call waiting tone.
The menu for the incoming call is displayed and a
message appears in the bottom line.
û Select “
Reject”.
The waiting call is rejected. The caller hears a
busy signal.
If the caller’s telephone number is transmitted,
the number or name appears in the “
Received
calls” list.
Accepting a waiting call
û Select “
The PCM will not accept a third incoming call.
The caller hears a busy signal or is redirected to
the mailbox.
Ending a connected call
û Select “
Answer”.
The waiting call is accepted and activated. The
previously active call is put on hold.
You then have the option to switch between the
two calls or to establish a conference with both
callers. To find out more, please refer to the
section “Call waiting (swapping) and conference”.
End connected call”.
The currently active call is ended and the first
call that is on hold is activated again.
64 PHONE
Page 65

Call waiting (swapping) and conference
The “Call waiting & conf.” function is only available
if supported by the network provider and by the
mobile phone.
When using the Bluetooth
function is only available for a limited selection of
devices.
A prerequisite for this function is that there are two
calls, one of which is active and one of which is on
hold (inactive). To find out more, please refer to
the sections “Establishing an additional call” on
page 63 and “Accepting a waiting call”.
û Select “
Call waiting & conf.”.
You now have a number of options:
®
hands-free unit, this
Swapping between the calls (call waiting)
1. Select “
2. Select “
3. To end one of the two calls, select “
Conferencing the two calls
1. Select “
2. To end one of the two calls, select “
Swap”.
The system swaps to the other call. The previously active call is put on hold.
Swap” again to return to the call on
hold.
End call 1”
or “
End call 2”.
- or Select “
End all” to end both calls.
Conference”.
Both calls are activated and connected so that
all parties can speak to each other.
End call 1”
or “
End call 2”.
- or Select “
End all” to end the conference.
Speed dialling
Speed dialling is a frequently used function in the
US market, which allows dialling without having to
enter the complete telephone number.
Instead, you can enter the number of a memory location on the SIM card followed by the “#” character to dial the corresponding telephone number.
The speed dialling function is only available if
supported by your mobile phone.
1. Press the c button.
The PHONE main menu appears.
2. Select “
3. Select the individual digits of the memory loca-
4. Select the “#” character.
5. Select “
Dial number”.
The input menu for telephone numbers is
opened.
tion on the SIM card one after the other.
Call number”.
The corresponding telephone number is inserted and dialled. The call menu is displayed.
PHONE 65
Page 66

Telephone settings
(Bluetooth® mobile phone
preparation)
Setting the ringtone type
1. Press the c button.
2. Press the i button or touch the tab of
the same name in the header.
3. Select “
4. Set the ringtone you want by selecting it.
5. Change the volume of the ringtone type if nec-
If the connected mobile phone supports the
Telephone settings”
>“
Ringtone type”.
A list of the available ringtones is displayed.
After a ringtone is selected, it is played back
again.
essary by turning the left rotary knob
The volume level set in this way is saved when
you exit the menu.
transfer of the ringtone via Bluetooth
ringing), the Ringtone settings item is greyed
out and the ringtone must be set on the mobile phone.
t.
®
(inband
Setting the ringtone volume
1. Press the c button.
2. Press the i button or touch the tab of
the same name in the header.
3. Select “
4. Make the setting you want by turning the right
The implementation of audio transmission via
Telephone settings”
>“
Ringtone volume”.
rotary knob
bols and .
Bluetooth
bile phone implementation. If the volume in
the vehicle or for the called party is insufficient, it can be readjusted in the PCM.
q or by selecting the two sym-
®
often depends on the specific mo-
Setting the call volume
1. Press the c button.
2. Press the i button or touch the tab of
the same name in the header.
3. Select “
4. Make the setting you want by turning the right
Telephone settings”
>“
Call volume”.
rotary knob
bols and .
q or by selecting the two sym-
Setting the microphone volume
1. Press the c button.
2. Press the i button or touch the tab of
the same name in the header.
3. Select “
4. Make the setting you want by turning the right
Telephone settings”
>“
Mic volume”.
rotary knob
bols and .
q or by selecting the two sym-
Switching 3-way calling on/off
Problems may occur with 3-way calling on the
PCM as these functions are not correctly supported by all mobile phones and telephone networks
(in particular CDMA networks).
It is recommended that 3-way calling be switched
off in such cases in order to ensure reliable telephone operation.
1. Press the c button.
2. Press the i button or touch the tab of
the same name in the header.
3. Select “
4. Select “
Telephone settings”.
3-way calling” to activate ( ) or
deactivate ( ) the function.
66 PHONE
Page 67

Bluetooth® settings (Bluetooth®
mobile phone preparation)
Authorised Bluetooth® devices
This function allows you to display a list of the
Bluetooth
nect with your PCM. The list contains:
– mobile phones ,
– MP3 players as well as
– data devices .
Displaying authorised Bluetooth
1. Press the c button.
2. Press the i button or touch the tab of
3. Select “
®
devices currently authorised to con-
®
devices
the same name in the header.
Bluetooth settings”
>“
Device list”.
The list is opened.
Devices that can be connected with the PCM
using different profiles appear only once in
the list. The symbol used always corresponds to the main application. Mobile
phones that can also be used as MP3 players or data devices appear in this list with
the telephone symbol.
Connecting an authorised Bluetooth
with the PCM
1. Open the list of authorised Bluetooth
es.
2. Select the device you want in the list.
3. Select “
Data devices cannot be connected from the
Disconnecting an authorised and connected
Bluetooth
1. Open the list of authorised Bluetooth
2. Select the device you want in the list.
3. Select “
Renaming an authorised Bluetooth
1. Open the list of authorised Bluetooth
2. Select the device you want in the list.
3. Select “
4. Enter the name you want and confirm by se-
Connect”.
list of devices; they can only be connected by
calling the appropriate application,
for example when transferring a vCard.
®
device from the PCM
es.
Disconnect”.
es.
Rename”.
The input menu is opened.
lecting “
OK”.
The name of the device is now changed in the
PCM.
®
device
®
devic-
®
devic-
®
device
®
devic-
Deleting an authorised Bluetooth
from the list
1. Open the list of authorised Bluetooth
es.
2. Select the device you want in the list.
3. Select “
4. Confirm the prompt that appears by selecting
Deleting the list of authorised Bluetooth
devices
1. Open the list of authorised Bluetooth
2. Select any device in the list.
3. Select “
4. Select “
5. Confirm the prompt that appears by selecting
“
Yes”.
es.
“
Delete all”.
Delete”.
Delete”.
Delete list”.
®
device
®
®
devic-
®
devic-
PHONE 67
Page 68

Displaying details for the authorised
Bluetooth
®
device
1. Open the list of authorised Bluetooth
es.
2. Select any device in the list.
3. Select “
Device details”.
The following information is displayed:
– the device name,
–the Bluetooth
®
address,
– the connection quality as well as
– the supported services.
®
devic-
Adding a new Bluetooth® device
For the PCM to find your Bluetooth® device,
please ensure that the Bluetooth
device has been activated and set to “visible”.
1. Press the c button.
2. Press the i button or touch the tab of
the same name in the header.
> Select “
Bluetooth settings”.
>“
New device”.
A search is started and a list of the devices found is displayed.
3. Choose the device you want by selecting it in
the list.
A Bluetooth
®
code is displayed that you must
enter in the corresponding Bluetooth
Once you have entered the code, successful
authorisation of the device is shown on the display.
4. The connection is automatically established by
the PCM.
®
function on the
®
device.
With some mobile phones, the connection re-
quest by the PCM must be explicitly confirmed
on the mobile phone. This may even have to
be done a number of times in some cases,
for example before transferring the phonebook. To avoid this request, you can authorise
the PCM in your mobile phone’s list of devices. The connection will then be established
automatically in the future, without the need
for further checks.
It can take a few seconds for the Bluetooth
device to be authorised.
If the list of authorised Bluetooth
®
devices is
full (max. 5 mobile phones), you must first delete a device from the list. An appropriate
message will be displayed. To find out more,
please refer to the section “Deleting an authorised Bluetooth
®
device from the list” on
page 67.
®
68 PHONE
Page 69

Establishing a connection from an
external Bluetooth
If the PCM does not find your mobile phone or a
connection attempt by the PCM fails, you can also
start the authorisation from the mobile phone.
1. If another mobile phone is connected with the
PCM, switch off Bluetooth
mobile phone to disconnect the connection
with the PCM.
2. Press the c button.
3. Press the i button or touch the tab of
the same name in the header.
The PCM is now visible for external devices.
Please ensure that the Bluetooth
the PCM is activated. To find out more, please
see the following section.
4. Using the mobile phone, search for audio accessories or devices that support Bluetooth
Refer to the manufacturer’s operating instructions to find out how to do this.
5. Select the device “PCM” from the mobile
phone’s search results and establish a connection.
Refer to the manufacturer’s operating instructions to find out how to do this.
®
device
®
on the connected
®
visibility of
®
6. A request appears on the PCM display.
Select “
7. A keypad appears where you enter a four-digit
8. Enter the same Bluetooth
9. With many mobile phones, the connection with
With some mobile phones, the Bluetooth
.
Accept”.
Bluetooth
with “
bile phone.
Once you have entered the code, successful
authorisation of the device is shown on the display.
the PCM must be explicitly established from
the mobile phone following authorisation. Further details can be found in the operating manual for your mobile phone.
®
code of your choice and confirm
OK”.
code must be directly provided by the mobile
phone during the connection request. If this is
the case, enter a 4-digit code of your choice
on your mobile phone and confirm it with OK.
You will then be shown a keypad on the PCM
display where you must enter the same code
and confirm it.
®
code on your mo-
Setting visibility
To ensure that your PCM can be found by other devices via the Bluetooth
ible” (=recognisable) for other devices during the
search.
To prevent further unwanted connection requests,
you can deactivate visibility of the PCM after the
connection operation.
1. Press the c button.
2. Press the i button or touch the tab of
the same name in the header.
Bluetooth settings”.
PCM visible” to activate ( ) or
deactivate ( ) visibility of the PCM.
®
3. Select “
4. Select “
®
interface, it must be “vis-
PHONE 69
Page 70

Phonebook settings
(Bluetooth® mobile phone
preparation)
Setting the memory for the phonebook
You can set which phonebook entries should be
shown in the PCM phonebook display:
– phonebook entries on the SIM card
and/or
– phonebook entries in the telephone’s memory.
This allows you to adapt the phonebook list of the
PCM to your list in the mobile phone.
1. Press the c button.
2. Press the i button or touch the tab of
the same name in the header.
3. Select “
4. Make the setting you want by selecting it.
Phonebook settings”
>“
Phonebook memory”.
Setting sorting
You can adapt the sorting of the phonebook and
call lists to the display on your mobile phone.
You have the following options for sorting the
phonebook:
–“
Standard”
The phonebook is sorted by surname.
–“
Alternative”
The phonebook is sorted by first name.
You have the following options for sorting the
call lists:
Standard”
–“
The call lists are sorted in the same order in
which the entries were transferred from the
mobile phone.
–“
Alternative”
The order of the entries transferred from the
mobile phone is reversed. This option supports
some mobile phones that transfer the oldest
entries first.
1. Press the c button.
2. Press the i button or touch the tab of
the same name in the header.
3. Select “
Setting sorting of the phonebook
4. Select “
5. Select the sorting you want.
Setting sorting of the call lists
4 Select “
5. Select the sorting you want.
Phonebook settings”
>“
Sorting”.
Phonebook”.
Call lists”.
Setting automatic transfer of the
phonebook
If the “Auto update” function is activated, the
phonebook of a mobile phone is transferred as
soon as the PCM is connected to this mobile
phone.
As soon as the transfer is complete, the phonebook stored in the PCM is replaced by the current
phonebook from the mobile phone.
If the “
Auto update” function is deactivated, the
data will no longer be updated.
70 PHONE
Page 71

6. Press the c button.
7. Press the i button or touch the tab of
the same name in the header.
8. Select “
9. Select “
Your phonebook data can then only be ac-
Phonebook settings”.
Auto update” to activate ( ) or
deactivate ( ) the function.
cessed when the corresponding mobile phone
is connected to the PCM.
Transferring the phonebook
This function transfers the phonebook of the connected mobile phone into the PCM again. The
phonebook stored in the PCM is replaced by the
current phonebook from the mobile phone once
transfer is complete.
1. Press the c button.
2. Press the i button or touch the tab of
the same name in the header.
3. Select “
Transfer phonebook”.
Transferring the phonebook entries
manually
Some mobile phones do not support automatic
phonebook transfer. In these cases, you can load
entries from your mobile phone’s phonebook into
the PCM phonebook manually.
1. Press the c button.
2. Press the i button or touch the tab of
the same name in the header.
3. Select “
4. You can now choose whether to add to the
5. Select the entries you want from your mobile
6. When transfer is complete, select “
Transfer phonebook”.
phonebook or completely replace it.
Select the function you want.
phone and transfer them to the PCM via Bluetooth.
The PCM counts the entries already transferred.
Ready”.
The transferred entries are now available to
you in the PCM phonebook.
Deleting the phonebook
The copy of the phonebook transferred to the
PCM can be deleted again.
Your mobile phone’s phonebook remains unchanged.
1. Press the c button.
2. Press the i button or touch the tab of
the same name in the header.
3. Select “
Delete phonebook”.
PHONE 71
Page 72

Operating the PCM telephone
A SIM card is required if you want to use the internal PCM telephone in telephone mode. You can
– insert the SIM card in the slot provided under
the display or
– connect a suitable mobile phone to the PCM
via Bluetooth
To find out more, please refer to the sections
“Connecting an authorised Bluetooth
the PCM” on page 96 and “Adding a new Blue-
®
tooth
device” on page 97.
Please note that your mobile phone must sup-
port the Bluetooth
Bluetooth
the PCM telephone.
®
.
®
device with
®
®
Hands-Free Profile or the
SIM Access Profile for use with
Inserting the SIM card in the PCM
û Push the SIM card (SIM = Subscriber Identifica-
tion Module) into the slot provided until it engages.
To remove the SIM card, press the card into
the slot again until it stops.
Insert the SIM card so that the metal contacts are
on the underside. The slanted corner of the SIM
card must be on the rear left.
The use of twin SIM cards, for example in the
mobile phone and the internal PCM telephone
(both cards active at the same time), may impair the telephone functions.
For more information on this, contact your
network provider.
If there is no SIM card inserted in the slot, the PCM
automatically attempts to establish a Bluetooth
connection with a mobile phone. However, this is
only possible if you have
–activated Bluetooth
mobile phone and
– authorised at least one mobile phone on the
PCM.
If you have not yet authorised a mobile phone on
the PCM, you can select “
the PCM search for and authorise your mobile
phone. Follow the instructions on the display.
You can find more information in the sections “Authorised Bluetooth
“Adding a new Bluetooth
®
on the PCM and on the
Find telephone” to have
®
devices” on page 95 and
®
device” on page 97.
®
72 PHONE
Page 73

Entering the PIN
As soon as you have switched on the telephone
and inserted the SIM card, you are prompted to
enter the PIN (PIN = Personal Identification
Number).
You will find the PIN in the documentation you received from your network provider.
1. Enter the PIN by selecting the keys on the keypad shown.
The numbers entered will be shown as asterisks in the input field.
2. Confirm your entry by selecting “
The SIM card will be blocked if you enter the
wrong PIN three times in a row. To unblock the
card, you must enter the PUK (Pin Unblocking
Key). Follow the instructions on the PCM display to do this.
The SIM card will be blocked if you enter the
wrong PUK ten times in a row. This block can
only be removed by the network provider.
You can deactivate the PIN prompt after the device is swit ched on. To find out more, please refer
to the sections “Switching the PIN prompt on or
off” on page 93 and “Using a stored PIN” on
page 93.
OK”.
Conducting calls
There is a hands-free microphone in the roof control console of the vehicle. This means that you
can conduct all telephone calls without using a
handset.
You control the volume using the left rotary
knob
t.
Conducting a call using a headset
1. Select “
2. Select “
The call can only be conducted using a head-
Hands-free” in the call menu to switch
to hands-free mode.
Headset” in the call menu to terminate
hands-free mode. The call is transferred back
to the headset.
set if it has previously been connected with
the PCM via Bluetooth
To find out more, please refer to the sections
“Authorised Bluetooth
and “Adding a new Bluetooth
page 97.
®
.
®
devices” on page 95
®
device” on
Conducting a call using the cordless handset
1. Select “
2. Press the Lift handset button on the handset to
Hands-free” in the call menu to switch
to hands-free mode.
terminate hands-free mode. The call is transferred back to the handset. To find out more,
please refer to the section “Cordless handset”
on page 101.
Temporarily muting the hands-free
microphone
û Select “Mute microphone” during the call to
activate ( ) or deactivate ( ) the function.
The microphone can also be muted by:
– briefly pressing
- or - (with multi-function steering wheel
with telephone function)
– pressing the left roller on the multi-function
steering wheel.
u the left rotary knob
PHONE 73
Page 74

Accepting a call
As soon as a call comes in, an appropriate menu
is temporarily displayed or an appropriate message shown in the bottom line.
If available, the telephone number and name of the
caller are displayed.
You can accept the incoming call in a number of
ways:
û Pressing the Lift handset button l on the
PCM.
- or -
û Selecting “
- or -
û Selecting the menu item in the instrument clus-
ter using the lower right stalk on the steering
wheel.
Answer” on the display.
- or - (with multi-function steering wheel with
telephone function)
û Pressing the Lift handset button l on the
multi-function steering wheel.
- or - (with handset if available)
û Pressing the Lift handset button on the
handset.
- or -
û Removing the handset from the charging cra-
dle.
Ending a call
You can end an active call by:
û Pressing the End call button k on the PCM.
- or -
û Selecting “
- or -
û Selecting the menu item in the instrument clus-
ter using the lower right stalk on the steering
wheel.
- or - (with multi-function steering wheel with
telephone function)
û Pressing the End call button k on the multi-
function steering wheel.
End call” in the call menu.
74 PHONE
Page 75
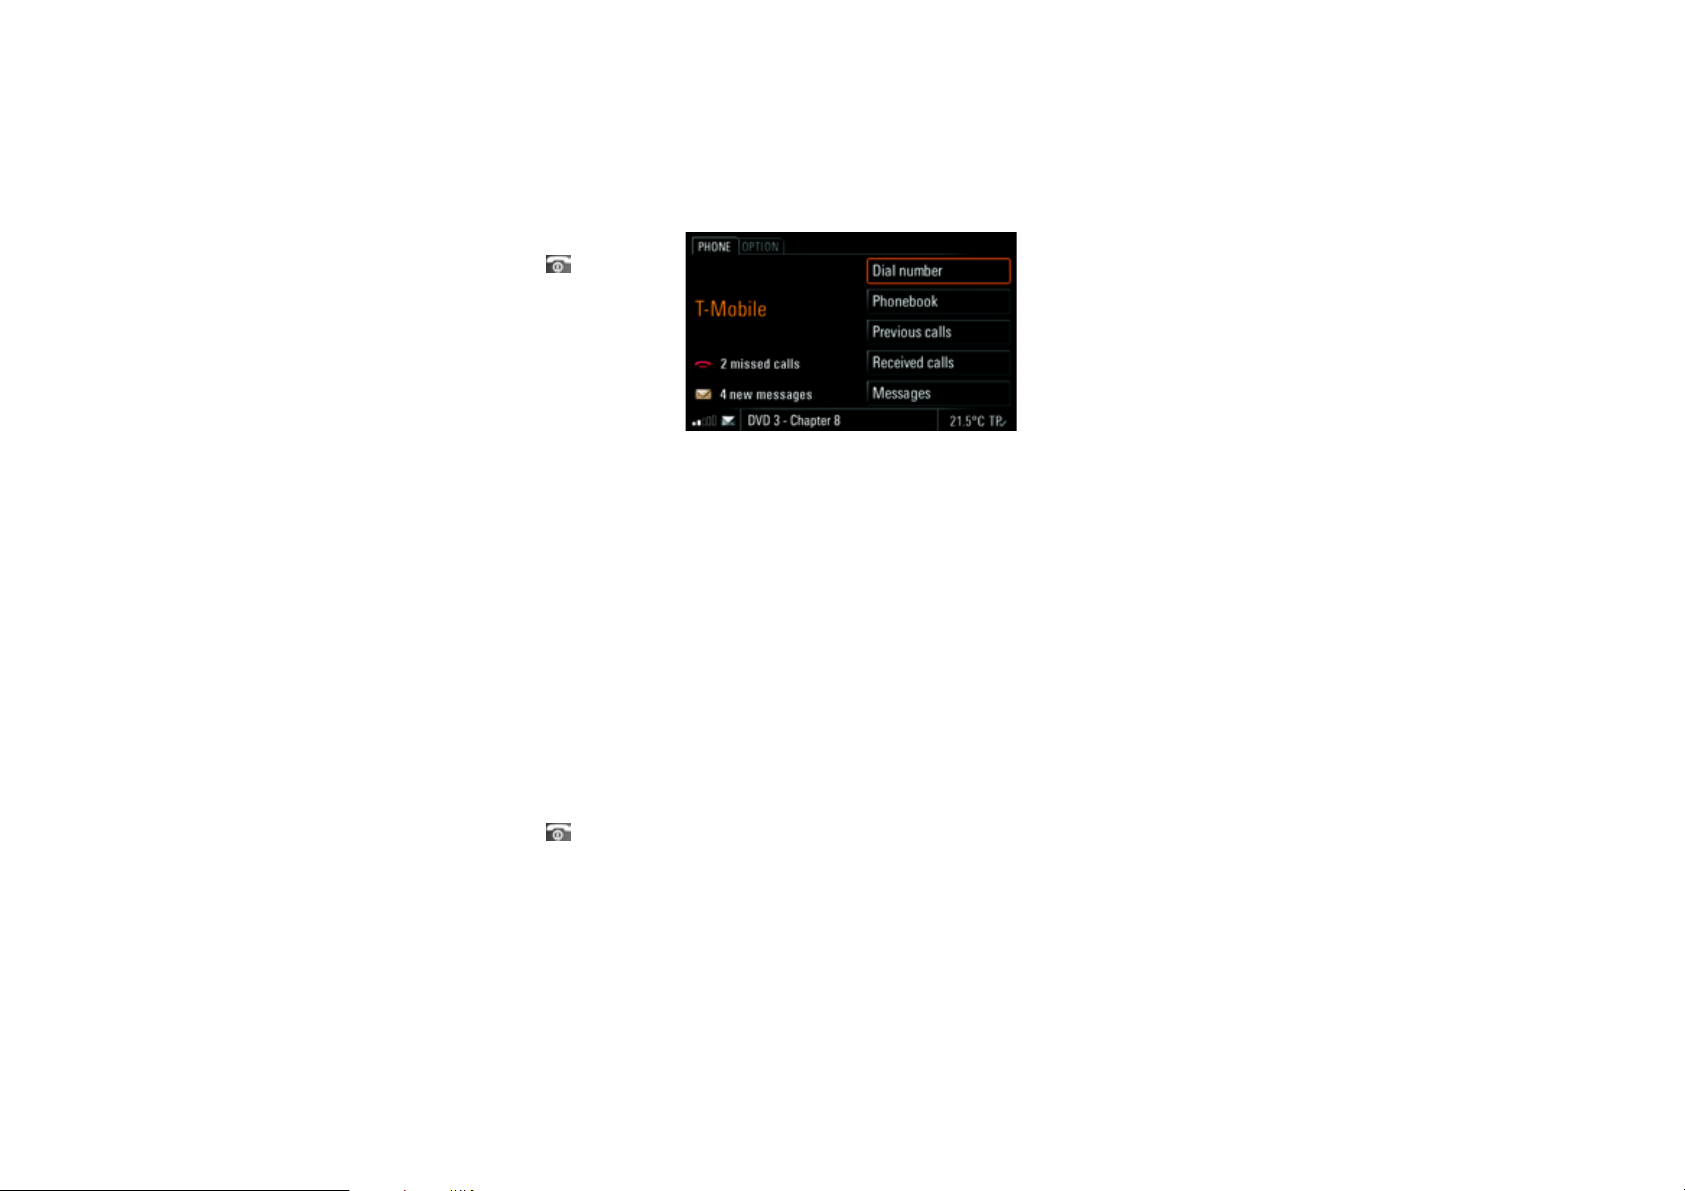
- or - (with handset if available)
û Pressing the End call button on the hand-
set.
- or -
û Placing the handset in the charging cradle (if
the call is on the handset).
Rejecting a call
You can reject an incoming call by:
û Pressing the End call button k on the PCM.
- or -
û Selecting “
- or -
û Briefly pressing the left rotary knob
- or -
û Selecting the menu item in the instrument clus-
ter using the lower right stalk on the steering
wheel.
- or - (with multi-function steering wheel with
telephone function)
û Pressing the End call button k on the multi-
function steering wheel.
- or - (with handset if available)
û Pressing the End call button on the hand-
set.
Reject” in the call menu.
u.
Dialling a number
1. Press the c button.
The PHONE main menu appears.
2. Select “
3. Select the individual digits in the telephone
4. Select “
Always enter the telephone number with the
Dial number”.
The input menu for telephone numbers is
opened. The input field for the telephone
number is blank.
number one after the other.
Call number”.
The telephone call is established and the call
menu is displayed.
dialling code.
Using the quick dial (redial) function
Pressing the Lift handset button l on the PCM
opens the quick dial menu. This menu contains a
list of previous calls.
1. Press the Lift handset button l on the PCM.
2. Select the person you want to talk to.
3. Select “
4. Enter the telephone number you want.
5. Select “
Call number” or press the Lift handset
button l on the PCM again.
- or Select the first list entry, “
The input menu for telephone numbers opens.
Dial number”.
Call number”.
Using the direct dial function
If a telephone number is displayed in a menu and
is highlighted, the number is dialled directly if you
û press the Lift handset button l on the PCM
- or -
û touch the displayed number for at least one
second.
PHONE 75
Page 76

Holding a call
û You can hold an active call by pressing the Lift
handset button l on the PCM.
The menu items “
“
End call” are then available for you to select.
û To continue the call, press the Lift handset but-
ton l on the PCM again.
New call”, “Take call” and
PCM phonebook
After you insert a SIM card, the phonebook entries
are transferred from the SIM card to the PCM.
®
After a Bluetooth
lished between the PCM and the mobile phone, the
PCM also attempts to transfer the phonebook
data from the mobile phone. You can prevent this
automatic phonebook transfer by deactivating the
“
Auto update” function. To find out more, please
refer to the section “Setting automatic transfer of
the phonebook” on page 70.
connection has been estab-
Displaying the phonebook
1. Press the c button.
The PHONE main menu appears.
2. Select “
Phonebook”.
The phonebook is opened.
If no entries have been stored in it yet, “
List
empty” is displayed.
If entries have already been stored, these are
shown in a list.
Calling a phonebook entry
1. Press the c button.
2. Select “
3. Select the phonebook entry you want.
4. If there is more than one number stored for this
5. Select “
Phonebook”.
entry, select the number you want.
Call number”.
The number you want is dialled.
Creating and storing a phonebook entry
(only with the SIM card inserted)
1. Press the c button.
2. Select “
3. Select “
4. Select “
5. Enter the name you want by selecting the indi-
6. Select “
7. Enter the number you want by selecting the in-
8. Select “
The telephone number must be entered with a
Phonebook”.
New entry” at the end of the list.
Name”.
The input menu is opened.
vidual letters in the input menu and confirm
your entry by pressing “
OK”.
Number”.
dividual digits in the input menu and confirm
your entry by pressing “
OK”.
Store entry”.
The entry is stored on the SIM card.
dialling code (there are a few exceptions to
this). For overseas telephone calls you must
also specify the international dialling code.
Example: For Germany, you must enter
+4917XXX instead of 017XXX if you will be dialling the number from outside the country.
76 PHONE
Page 77

Editing a phonebook entry
(only with the SIM card inserted)
1. Press the c button.
2. Select “
3. Select the phonebook entry you want.
4. Select “
5. Select the menu item to be edited and make
6. Confirm your entry by selecting “
7. Select “
Deleting a phonebook entry
(only with the SIM card inserted)
1. Press the c button.
2. Select “
3. Select the phonebook entry you want.
4. Select “
5. Confirm the prompt by selecting “
Phonebook”.
Edit”.
the change you want in the relevant input
menu.
OK”.
Store entry”.
The entry is stored on the SIM card.
Phonebook”.
Delete”.
A prompt is displayed asking whether the entry
selected should actually be deleted.
Yes”.
The phonebook entry is deleted.
Deleting the contents of the SIM card
(only with the SIM card inserted)
1. Press the c button.
2. Select “
3. Select any phonebook entry.
4. Select “
5. Select “
6. Confirm the prompt which then appears with
Sending a vCard
You can send phonebook entries directly as
vCards. A vCard is an “electronic visiting card” that
a recipient can accept directly into his or her
phonebook.
1. Press the c button.
2. Select “
3. Select the phonebook entry you want.
4. Select “
5. Select one of the two following transfer meth-
Phonebook”.
Delete”.
Delete SIM card”.
“
Delete all”.
Phonebook”.
Send vCard”.
ods:
–“
As SMS”
–“
To Bluetooth”
6. If you choose “
ephone number of the recipient in the input
menu that appears.
You can also select the number from the
phonebook or call lists by selecting the corresponding menu item. To find out more, please
refer to the section “Creating and sending a
new text message” on page 85.
If you choose “
devices that are suitable for a transfer is displayed. If the device you want is not there, you
can search for further devices. To do this,
press “
“Adding a new Bluetooth
page 97).
As soon as the search is complete, a list containing the devices found is displayed. Once
you have selected a device in this list, a connection is established and the vCard is sent.
You can also send a destination entry from the
personal destination memory of your navigation system as a vCard. To find out more
about this, please refer to the section “Sending a destination” on page 149.
As SMS”, you must enter the tel-
>>>
To Bluetooth”, the list of known
New data device” (see also the section
®
device” on
PHONE 77
Page 78

List of previous calls
When a mobile phone is connected to the PCM via
a Bluetooth
lists are transferred and displayed after the connection has been established. The last number dialled appears at the top of the list.
The transfer of the phonebook and call lists is
If one of the telephone numbers matches an entry
from your phonebook, the name of the person
called is displayed instead of the telephone
number.
Displaying the list
1. Press the c button.
2. Select “
®
connection, the mobile phone’s call
not supported by all mobile phones.
Previous calls”.
The list of previous calls is displayed with the
time and date of the calls, if this information is
available in the PCM.
Calling a number from the list of previous
calls
1. Press the c button.
2. Select “Previous calls”.
3. Select the number you want.
4. Select “
Storing a number from the list of previous
calls in the phonebook
This function is only available when there is a SIM
card inserted.
1. Press the c button.
2. Select “
3. Select the number you want.
4. Select “
5. Enter the name corresponding to the number
Deleting a number from the list of previous
calls
Entries transferred from the mobile phone
Call number”.
Previous calls”.
Store number”.
and store the entry.
To find out more, please refer to the section
“PCM phonebook” on page 76.
cannot be deleted in the PCM. Please delete
these entries on your mobile phone.
1. Press the c button.
2. Select “
3. Select the number you want.
4. Select “
5. Confirm the prompt that appears by selecting
Sending a message to a number from the list
of previous calls
Messages can only be sent when a SIM card
1. Press the c button.
2. Select “
3. Select the number you want.
4. Select “
5. Enter and send your message.
Previous calls”.
Delete”.
“
Yes”.
The number is deleted from the list.
is inserted or a mobile phone is connected to
the PCM using the SIM Access Profile.
Previous calls”.
Send message”.
The SMS input menu is opened. The number
previously chosen is already entered as the recipient.
To find out more, please refer to the section
“Replying to a text message” on page 84.
78 PHONE
Page 79

Adding to a number from the list of previous
calls
1. Press the c button.
2. Select “
3. Select the number you want.
4. Select “
5. Make the change you want.
6. Select “
The telephone number stored in the list is not
changed.
Previous calls”.
Add to number”.
The input menu is opened and the number is
shown in the input field ready for editing.
Call number”.
If one of the telephone numbers matches an entry
from your phonebook, the name of the caller is
displayed instead of the telephone number.
Displaying the list
1. Press the c button.
2. Select “
Received calls”.
The list of received calls is displayed with the
time and date of the calls, if this information is
available in the PCM. It contains both accepted
and missed calls.
Storing a number from the list of received
calls in the phonebook
This function is only available when there is a SIM
card inserted.
1. Press the c button.
2. Select “
3. Select the number you want.
4. Select “
5. Enter the details you want.
Received calls”.
Store number”.
Please refer to the section “PCM phonebook”
on page 76.
List of received calls
When a mobile phone is connected to the PCM via
a Bluetooth
lists are transferred and displayed after the connection has been established. The last call received appears at the top of the list.
The transfer of the phonebook and call lists is
If the date and time information for the individ-
®
connection, the mobile phone’s call
not supported by all mobile phones.
ual calls is not transferred from the mobile
phone, the list begins with the unanswered
calls. These are then followed by the accepted calls.
Calling a number from the list of received
calls
1. Press the c button.
2. Select “
3. Select the number or name you want.
4. If there is more than one telephone number
5. Select “
Received calls”.
stored for a name, select the number you
want.
Call number”.
Deleting a number from the list of received
calls
Entries transferred from the mobile phone cannot
be deleted in the PCM. Please delete these entries
on your mobile phone.
1. Press the c button.
2. Select “
3. Select the number you want.
4. Select “
5. Confirm the prompt that appears by selecting
6. The number is deleted from the list.
“
Yes”.
Received calls”.
Delete”.
PHONE 79
Page 80

Sending a message to a number from the list
of received calls
Messages can only be sent when a SIM card
is inserted or a mobile phone is connected to
the PCM using the SIM Access Profile.
1. Press the c button.
2. Select “
3. Select the number you want.
4. Select “
5. Enter and send your message.
Adding to a number from the list of received
calls
1. Press the c button.
2. Select “
3. Select the number you want.
4. Select “
5. Make the change you want.
6. Select “
The telephone number stored in the list is not
changed.
Received calls”.
Send message”.
The SMS input menu is opened. The number
previously chosen is already entered as the recipient.
To find out more, please refer to the section
“Replying to a text message” on page 84.
Received calls”.
Add to number”.
The input menu is opened and the number is
shown in the input field ready for editing.
Call number”.
Touch tone dialling (DTMF tones)
DTMF (Dual Tone Multi Frequency) tones can be
sent once a telephone connection has been established. You need this function to communicate with
touch tone-activated telephone systems (e.g. for
controlling your voice mailbox or when dialling in
remotely to your answering machine).
Touch tone dialling
1. Select “
2. Enter the digits you want.
Combining DTMF tones with a telephone
number
You can use the + and w characters in the numerical input menu to combine DTMF tone dialling with
the entry of a telephone number.
Dial number” in the call menu.
The numerical input menu is opened.
Each digit is immediately transmitted as a
DTMF tone.
The DTMF dialling digits are appended to
the digits of the telephone number without
any breaks.
+
û To enter the + character, touch and
hold the 0+ symbol in the telephone input menu.
The digits of the telephone number are dialled first. As soon as the connection to
the telephone number dialled has been established, the DTMF dialling digits must be
w
confirmed again.
û To enter the w character, touch and
hold the * symbol in the telephone input
menu.
The digits of the telephone number are dialled first. The PCM then waits until the
connection has been established before
p
dialling the DTMF dialling digits.
>>>
80 PHONE
Page 81

The p character cannot be entered in
the telephone input menu. It is, however, recognised by the PCM if it is
stored in a telephone number on the
SIM card, for example. In this case, the
behaviour of the PCM is the same as
the behaviour for “+” described above.
Establishing an additional call
You can establish an additional call while there is
another call active.
Some mobile phones do not support making
or accepting a second call. In this case, the
New call” menu item is greyed out during an
“
active call.
1. Select “
2. You then have the following options for enter-
New call” in the call menu.
ing the telephone number:
–“
Dial number”:
The input menu for telephone numbers is
opened. Please refer to the section “Dialling
a number” on page 75.
Phonebook”:
–“
You can insert a number stored in the phonebook. To find out more, please refer to the
section “Calling a phonebook entry” on
page 76.
–“
Previous calls”:
You can insert a telephone number from the
list of previous calls. To find out more,
please refer to the section “Calling a number
from the list of previous calls” on page 78.
–“
Received calls”:
You can insert a telephone number from the
list of received calls. To find out more,
please refer to the section “Storing a
number from the list of received calls in the
phonebook” on page 79.
The original call is held while the new connection
is established.
You can switch between the two calls or establish
a conference call. To find out more, please refer
to the section “Call waiting (swapping) and conference” on page 82.
Call waiting
The “Call waiting” function is only available if supported by the network provider.
The “
Call waiting” function must also be activated
in the call settings for the PCM or the mobile
phone. To find out more, please refer also to the
section “Call waiting (swapping) and conference”
on page 65.
Rejecting a waiting call
If you receive another call while there is already
one active, you will hear a call waiting tone.
The menu for the incoming call is displayed and a
message appears in the bottom line.
û Select “
Reject”.
The waiting call is rejected. The caller hears a
busy signal.
If the caller’s telephone number is transmitted,
the number or name appears in the “
Received
calls” list.
PHONE 81
Page 82

Accepting a waiting call
Swapping between the calls (call waiting)
û Select “
The PCM will not accept a third incoming call.
The caller hears a busy signal or is redirected to
the mailbox.
Ending a connected call
û Select “
Answer”.
The waiting call is accepted and activated. The
previously active call is put on hold.
You then have the option to switch between the
two calls or to establish a conference with both
callers. To find out more, please refer to the
section “Call waiting (swapping) and conference” on page 82.
End connected call”.
The currently active call is ended and the first
call that is on hold is activated again.
Call waiting (swapping) and conference
The “Call waiting & conf.” function is only available
if supported by the network provider.
When using the Bluetooth
function is only available for a limited selection of
devices.
A prerequisite for this function is that there are two
calls, one of which is active and one of which is on
hold (inactive). To find out more, please refer to
the sections “Establishing an additional call” on
page 63 and “Accepting a waiting call” on
page 64.
û Select “
Call waiting & conf.”.
You now have a number of options:
®
hands-free unit, this
1. Select “
2. Select “
3. To end one of the two calls, select “
Conferencing the two calls
1. Select “
2. To end one of the two calls, select “
Swap”.
The system swaps to the other call. The previously active call is put on hold.
Swap” again to return to the call on
hold.
End call 1”
or “
End call 2”.
- or Select “
End all” to end both calls.
Conference”.
Both calls are activated and connected so that
all parties can speak to each other.
End call 1”
or “
End call 2”.
- or Select “
End all” to end the conference.
82 PHONE
Page 83

Using supplementary services
Supplementary services are services that can be
called up using star and hash codes.
The supplementary services can either be entered
in the number selection menu or selected in the
phonebook (provided they have been stored here).
The last digit of a supplementary service is always
the # character.
1. Press the c button.
2. Select “
3. Select the individual digits and symbols of the
4. Select “
5. If necessary, display the entire text by select-
Dial number”.
The input menu for telephone numbers is
opened.
supplementary service one after the other.
Send”.
The respective service is called up.
If the reply text is too long, it is truncated at the
bottom right with “...”.
ing “
Details”.
Making an emergency call
1. Press the c button.
2. Select “i”.
3. Select “
4. Select one of the two menu items in the emer-
You can also make an emergency call:
Emergency call”.
gency call menu that appears
– Yes
If you select “Yes”, a connection is estab-
lished to the emergency service.
–
No
If you select “No”, no emergency call is
made. Instead the previous menu is opened
again.
– during an active call,
– without having to enter a PIN,
– while the SIM card is being checked as well
as
– without a valid SIM card (depending on the
country and network).
If your vehicle is equipped with a navigation
system, you can call up the current location information in the event of an emergency call.
To do this, select the “
:
Location info” function.
Text messages (SMS)
(with PCM telephone only)
You can create and receive text messages (SMS)
with the
Messages function.
1. Press the c button.
2. Select “
Messages”.
The list of received text messages is opened.
Small symbols indicate the status or type of
the text messages:
unread text message,
read text message,
unread vCard,
read vCard.
vCards can be sent by other devices to the
PCM via Bluetooth
®
or SMS.
PHONE 83
Page 84

Arrival of a text message
When a new text message arrives, a closed envelope symbol is displayed in the bottom line regardless of the menu selected.
If a flashing envelope symbol is displayed in the
bottom line, it means there is no more storage
space available on the SIM card for text messages. To be able to receive further messages, one or
more saved messages must first be deleted.
To find out more, please refer to the section “Deleting a text message” on page 87.
The arrival of a text message can also be indicated by an audible signal.
To find out more, please refer to the section
“Switching the SMS signal tone on/off” on
page 100.
Arrival of a vCard
The arrival of a vCard is indicated by a message in
the bottom line as well as by an audible signal. The
envelope symbol in the bottom line is not displayed.
Reading a text message
1. Press the c button.
2. Select “
3. Open the relevant text message by selecting it.
Messages”.
If you have received a text message with your
mobile phone and cannot read it on the PCM
display, this means that the text message was
stored in your mobile phone’s memory and
not on the SIM card. The PCM does not have
access to the mobile phone memory.
In this case, please check whether the storage location for the text messages can be
changed in your mobile phone’s settings.
Please consult the operating instructions for
your mobile phone for this purpose.
Replying to a text message
The following options are available to you:
–“
New text”: The input menu is opened and new
text can be entered.
–
“Attach reply”: The input menu is opened and
the original text of the message is shown in the
text field. You can edit or add to the text as you
want.
–“
Reply with YES”: The input menu is opened
and the original text of the message is shown
in the text field. The reply “YES” is appended to
the end of the text.
You can edit or add to the text as you want.
–“
Reply with NO”: The input menu is opened and
the original text of the message is shown in the
text field. The reply “NO” is appended to the
end of the text.
You can edit or add to the text as you want.
–“
Templates”: A list of the message templates is
opened and a template can be accepted or edited by selecting it.
Creating a reply with new text
1. Press the c button.
2. Select “
3. Select the text message you want to reply to.
4. Select “
5. Select “
6. Enter the text you want using the input menu.
7. Confirm your entry by selecting “
8. Select “
Messages”.
Reply”.
New text”.
The input menu is opened.
OK”.
The text input menu is closed and the input
menu for the telephone number is opened. The
number of the sender of the text message is already entered in the text field.
Send” to send the message.
84 PHONE
Page 85

Creating a text message with attached reply
1. Press the c button.
2. Select “
3. Select the text message you want to reply to.
4. Select “
5. Select “
6. Edit the text as you want using the input menu
7. Select “
Replying to a text message with Yes or No
1. Press the c button.
2. Select “
3. Select the text message you want to reply to.
4. Select “
5. Select “
Messages”.
Reply”.
Attach reply”.
The input menu is opened. The reply is appended to the text received.
and confirm by selecting “
The text input menu is closed and the input
menu for the telephone number is opened. The
number of the sender of the text message is already entered in the text field.
OK”.
Send” to send the message.
Messages”.
Reply”.
Reply with YES” or “Reply with NO”.
The input menu is opened.
6. Edit the text as you want using the input menu
and confirm by selecting “
The text input menu is closed and the input
menu for the telephone number is opened. The
number of the sender of the text message is already entered in the text field.
7. Select “
Replying to a text message using a text
template
1. Press the c button.
2. Select “
3. Select the text message you want to reply to.
4. Select “
5. Select “
6. Select the template you want in the list that is
7. Select “
Send” to send the message.
Messages”.
Reply”.
Templates”.
displayed.
Edit template” if applicable and make
the changes you want in the text.
Otherwise, select “
missing information.
OK”.
Use template” and add any
8. Confirm your entry by selecting “
The text input menu is closed and the input
menu for the telephone number is opened. The
number of the sender of the text message is already entered in the text field.
9. Select “
Send” to send the message.
OK”.
Creating and sending a new text message
The following options are available to you for creating a text message:
–“
New text”: The input menu is opened and new
text can be entered.
–“
Last text”: The input menu is opened and the
text of the last message is shown in the text
field. You can edit or add to this text as you
want.
–“
Templates”: A list of the message templates is
opened and a template can be accepted or edited by selecting it.
PHONE 85
Page 86

Creating a text message with new text
1. Press the c button.
2. Select “
3. Select the first list entry, “
4. Select “
5. Enter the text you want using the input menu.
6. Confirm your entry by selecting “
7. Enter the telephone number of the recipient.
8. Select “
Messages”.
New message”, in
the list that appears.
New text”. The input menu is opened.
OK”.
The text input menu is closed and the input
menu for the telephone number is opened.
The following options are available to you:
– Enter the digits in the input menu.
– Select “
– Select “
– Select “
Phonebook” to insert the number
from the phonebook.
Select the number you want to enter it in the
input menu.
Previous calls” to insert the number
from the list.
Select the number you want to enter it in the
input menu.
Received calls” to insert the number
from the list.
Select the number you want to enter it in the
input menu.
Send” to send the message.
Editing and sending the text of the last
message
1. Press the c button.
2. Select “
3. Select the first list entry, “
4. Select “
5. Edit the text displayed using the input menu
6. Confirm your entry by selecting “
7. Enter the telephone number of the recipient.
8. Select “
Messages”.
New message”, in
the list that appears.
Last text”.
and add to it if applicable.
OK”.
The text input menu is closed and the input
menu for the telephone number is opened.
The following options are available to you:
– Enter the digits in the input menu.
–Select “
–Select “
–Select “
Phonebook” to insert the number
from the phonebook.
Select the number you want to enter it in the
input menu.
Previous calls” to insert the number
from the list.
Select the number you want to enter it in the
input menu.
Received calls” to insert the number
from the list.
Select the number you want to enter it in the
input menu.
Send” to send the message.
Creating a text message using a text
template
1. Press the c button.
2. Select “
3. Select the first list entry, “
4. Select “
5. Select the template you want in the list that is
6. Select “
7. Confirm your entry by selecting “
Messages”.
New message”, in
the list that appears.
Templates”.
displayed.
Edit template” if applicable and make
the changes you want in the text.
Otherwise, select “
missing information.
Use template” and add any
OK”.
86 PHONE
Page 87

8. Enter the telephone number of the recipient.
The following options are available to you:
– Enter the digits in the input menu.
– Select “
– Select “
– Select “
9. Select “
Phonebook” to insert the number
from the phonebook.
Select the number you want to enter it in the
input menu.
Previous calls” to insert the number
from the list.
Select the number you want to enter it in the
input menu.
Received calls” to insert the number
from the list.
Select the number you want to enter it in the
input menu.
Send” to send the message.
Forwarding a text message
1. Press the c button.
2. Select “
3. Select the text message you want to forward.
4. Select “
5. Edit the text message as you want and confirm
Messages”.
Forward”.
The input menu is opened.
by selecting “
The text input menu is closed and the input
menu for the telephone number is opened.
OK”.
6. Enter the telephone number of the recipient.
The following options are available to you:
– Enter the digits in the input menu.
–Select “
–Select “
–Select “
7. Select “
Phonebook” to insert the number
from the phonebook.
Select the number you want to enter it in the
input menu.
Previous calls” to insert the number
from the list.
Select the number you want to enter it in the
input menu.
Received calls” to insert the number
from the list.
Select the number you want to enter it in the
input menu.
Send” to send the message.
Deleting a text message
1. Press the c button.
2. Select “
3. Select the text message you want to delete.
4. Select “
Messages”.
Delete”.
You can then choose whether to delete the selected text message only or the entire list.
Deleting the selected text message
5. Confirm the prompt that appears by selecting
“
Yes”.
The selected text message is deleted.
Deleting all text messages
5. Select “
6. Confirm the prompt that appears by selecting
Delete all”.
“
Delete all” again.
The text messages are deleted.
Reading a vCard
1. Press the c button.
2. Select “
3. Open the relevant vCard by selecting it.
4. Select “
Messages”.
All details” to view all of the details in
the vCard.
PHONE 87
Page 88

Accepting vCards
If you save the vCard, the following data is ac-
cepted:
– the telephone numbers contained in the
phonebook as well as
– the addresses in the personal destination
memory in the navigation menu.
To find out more, please refer also to the
section “Personal destination memory” on
page 146.
Accepting a single vCard
1. Press the c button.
2. Select “
3. Open the relevant vCard by selecting it.
4. Select “
5. Confirm the acceptance of the valid addresses
Accepting all vCards
1. Press the c button.
2. Select “
3. Open the relevant vCard by selecting it.
Messages”.
Accept”.
The details of the vCard are checked.
and telephone numbers by selecting “
Messages”.
OK”.
4. Select “
5. Select “
Accept all”.
Accept all” again to confirm the prompt
that appears.
The details of the vCards are checked and the
valid addresses and telephone numbers are
accepted.
Editing vCard details
The addresses and telephone numbers contained
on a vCard are listed in the vCard details. The following symbols are used:
Details are correct and are accepted when
the vCard is saved.
Details are correct, but are not accepted
when the vCard is saved. An appropriate
message will be displayed.
Details are not correct and can be
?
changed or entered again if necessary.
The procedure for editing details is described below using address data as an example.
1. Press the c button.
2. Select “
3. Open the relevant vCard by selecting it.
4. Select “
5. Select the address with the “?” symbol.
Inserting and editing a similar address
6. Select a similar address from the list.
7. Select “
8. Select “
After selecting “
Messages”.
Addresses”.
The addresses are checked.
The address is checked again. A search for
similar addresses is performed.
If similar addresses are found, these are listed
after the check is completed.
Edit” if applicable and make the chang-
es you want in the address input menu.
Accept”.
Accept”, the address can no
longer be edited.
88 PHONE
Page 89

Re-entering an address
6. Select “
If no similar addresses are found during
7. Enter the address you want.
8. Select “
After selecting “
Re-enter address”.
The address input menu is opened.
checking, the address input menu opens automatically.
Accept”.
Accept”, the address can no
longer be edited.
Discarding (deleting) vCards
Discarding a single vCard
1. Press the c button.
2. Select “
3. Open the relevant vCard by selecting it.
4. Select “
5. Confirm the prompt by selecting “
Messages”.
Discard”.
Yes”.
The vCard is closed and deleted from the list
of received messages.
Discarding all vCards
1. Press the c button.
2. Select “
3. Open the relevant vCard by selecting it.
4. Select “
5. Select “
Messages”.
Discard”
>“
Discard all”.
Discard all” again to confirm the
prompt that appears.
The vCards are closed and deleted from the
list of received messages.
Numbers in text messages
If a text message contains telephone numbers or
geographical coordinates, you can store these directly in the phonebook or list of personal destinations.
Calling telephone numbers from a text
message
1. Press the c button.
2. Select “
3. Open the relevant text message by selecting it.
Messages”.
4. Select “
5. Select the number you want in the list.
6. Select “
7. Select “
Storing telephone numbers from a text
message
(only with the SIM card inserted)
1. Press the c button.
2. Select “
3. Open the relevant text message by selecting it.
4. Select “
5. Select the number you want in the list.
6. Select “
7. Enter the details you want.
Extract number”.
A list of the numbers contained in the text message is displayed.
Add to number” if applicable and enter
the necessary digits.
Call number”.
The call is made.
Messages”.
Extract number”.
A list of the numbers contained in the text message is displayed.
Store number”.
To find out more, please refer to the section
“PCM phonebook” on page 76.
PHONE 89
Page 90

Using geographical coordinates for route
guidance
1. Press the c button.
2. Select “
3. Select “
4. Open the relevant geographical coordinate by
5. Select
Storing geographical coordinates
1. Press the c button.
2. Select “
3. Select “
4. Open the relevant geographical coordinate by
Messages”.
Extract number”.
selecting it.
The map view is displayed and the geographical coordinate is shown. To find out more,
please refer also to the section “Map display”
on page 166.
“Start route guidance”.
The route is calculated and route guidance
starts.
Messages”.
Extract number”.
selecting it.
The map view is displayed and the geographical coordinate is shown. To find out more,
please refer also to the section “Map display”
on page 166.
5. Select “
6. Enter the name of the geographical coordinate
Store position”.
The input menu is opened and the coordinate
is entered in the input field.
and confirm your entry by selecting “
The geographical coordinate is stored in the
list of personal destinations and the map view
is displayed again.
OK”.
Displaying the complete text
1. Press the c button.
2. Select “
3. Open the relevant text message by selecting it.
4. Select “
Messages”.
Complete text”.
The contents of the text message are shown
across the entire display.
Creating a template
Included in the list of templates are some blank entries that you can edit as you want.
1. Press the c button.
2. Select “
3. Select the first list entry, “
4. Select “
5. Select a blank template in the list that is dis-
6. Select “
7. Confirm your entry by selecting “
8. Select “
9. Enter the telephone number as described in
10.Select “
Messages”.
New message”, in
the list that appears.
Templates”.
played.
Edit template” and enter the text you
want.
OK”.
The template is saved with the entered contents and will be subsequently displayed in the
list.
Use template” and add any missing in-
formation.
the section “Creating a text message using a
text template” on page 86.
Send” to send the edited template.
90 PHONE
Page 91

Telephone settings
(PCM telephone)
Switching the PCM telephone on/off
Switching the telephone on
1. Press the c button.
2. Press the i button or touch the tab of
the same name in the header.
3. Select “
Switching the telephone off
1. Press the c button.
2. Press the i button or touch the tab of
3. Select “
SET PHONE”
>“
Telephone settings”
>“
Switch on telephone”.
The telephone is switched on.
the same name in the header.
SET PHONE”
>“
Telephone settings”
>“
Switch off telephone”.
The telephone is switched off. All functions not dependent on the telephone are
still available.
Setting ringtones
Setting the ringtone type
1. Press the c button.
2. Press the i button or touch the tab of
the same name in the header.
3. Select “
4. Set the ringtone you want by selecting it.
5. Change the volume of the ringtone type if nec-
If the connected mobile phone supports the
SET PHONE”
>“
Telephone settings”
>“
Sound PHONE”
>“
Ringtone type”.
A list of the available ringtones is displayed.
The ringtone type is played after it is selected.
essary by turning the left rotary knob
The volume level set in this way is saved when
you exit the menu.
transfer of the ringtone via Bluetooth
ringing), the Ringtone settings item is greyed
out and the ringtone must be set on the mobile phone.
t.
®
(inband
Setting the ringtone volume
1. Press the c button.
2. Press the i button or touch the tab of
the same name in the header.
3. Select “
4. Make the setting you want by turning the right
SET PHONE”
>“
Telephone settings”
>“
Sound PHONE”
>“
Ringtone volume”.
rotary knob
bols and .
q or by selecting the two sym-
Selecting a network
You can set your PCM so that the network will be
automatically or manually selected.
This function is only available with the SIM
card inserted or with a connection using the
SIM Access Profile.
1. Press the c button.
2. Press the i button or touch the tab of
the same name in the header.
3. Select “
SET PHONE”
>“
Telephone settings”
>“
Network selection”.
PHONE 91
Page 92

4. Select one of the two available menu items:
– Automatic
The PCM automatically selects the mobile
phone network of the SIM card that is logged
in.
If this network is not found (e.g. when
abroad), the network of a roaming partner is
automatically selected.
–
Manual
If you select
searches for the currently available networks, from which you can choose the mobile phone network you want to use.
If a manually selected network is lost for more
than 10 seconds, the system switches to automatic network selection.
Manual, the PCM telephone
Displaying the IMEI
The IMEI (International Mobile Equipment Identity)
is a serial number that permits unique identification of the hardware in mobile radio equipment.
This number allows different network providers to
block the telephone in the event of misuse.
1. Press the c button.
2. Press the i button or touch the tab of
the same name in the header.
3. Select “
SET PHONE”
>“
Telephone settings”
>“
IMEI”.
The device number is displayed.
Switching 3-way calling on/off
Problems may occur with 3-way calling on the
PCM as these functions are not correctly supported by all mobile phones and telephone networks
(in particular CDMA networks).
It is recommended that 3-way calling be switched
off in such cases in order to ensure reliable telephone operation.
This function is only available if your mobile
phone is connected to the PCM using the
Hands-Free Profile.
1. Press the c button.
2. Press the i button or touch the tab of
the same name in the header.
3. Select “
4. Select “
SET PHONE”
>“
Telephone settings”.
3-way calling” to activate ( ) or
deactivate ( ) the function.
SIM settings
This function is only available with the SIM
card inserted or with a connection using the
SIM Access Profile.
Changing the PIN
This function allows you to change the PIN of your
SIM card.
1. Press the c button.
2. Press the i button or touch the tab of
the same name in the header.
3. Select “
4. Enter the current PIN by selecting the buttons
SET PHONE”
>“
SIM settings”
>“
Change PIN”.
The input menu for PIN entry is displayed.
You must start by entering the current
PIN.
on the keypad shown and confirm your entry
by selecting “
You are then prompted to enter the new PIN.
OK”.
92 PHONE
Page 93

5. Enter the new PIN by selecting the buttons on
the keypad shown and confirm your entry by
selecting “
You are then prompted to enter the new PIN a
second time to confirm it.
6. Enter and confirm the new PIN again.
If the two new PINs match you will see the message “
If the two entries do not match, you will be
prompted to enter the new PIN again.
Switching the PIN prompt on or off
The “
PIN prompt on and off.
If the function is activated, you will be prompted
for the PIN after you insert the SIM card. If the
function is deactivated, the PIN prompt is deactivated.
1. Press the c button.
2. Press the i button or touch the tab of
the same name in the header.
3. Select “
>“
OK”.
PIN has been changed”.
PIN prompt” function allows you to switch the
SET PHONE”
SIM settings”.
4. Select “
5. Enter the PIN if necessary.
The PIN prompt cannot be switched off with
PIN prompt” to activate ( ) or
deactivate ( ) the function.
The PIN prompt is switched on or off if the PIN
is entered correctly.
some SIM cards.
The PIN cannot be changed using the “
Change
PIN” function while the PIN prompt is switched
off.
Using a stored PIN
Last PIN” function is activated, the PIN of
If the “
the SIM card currently inserted is stored. The next
time you insert the SIM card, the stored PIN is automatically used for the prompt.
1. Press the c button.
2. Press the i button or touch the tab of
the same name in the header.
3. Select “
4. Select “
If an incorrect PIN entry is registered after the
SET PHONE”
>“
SIM settings”.
Last PIN” to activate ( ) or
deactivate ( ) the function.
SIM card is inserted, the last PIN will not be
used any further. The input menu and the
number of attempts still possible are displayed instead.
Call settings
(PCM telephone)
This function is only available with the SIM
card inserted or with a connection using the
SIM Access Profile.
Activating call forwarding
Call forwarding allows you to forward (divert) calls
to another telephone number (e.g. to your answering machine).
When you first access the call forwarding system,
the status of all call diversions in the network is automatically queried. The individual call forwarding
functions cannot be selected during this time.
Activating and deactivating call forwarding is
not supported in all networks.
1. Press the c button.
2. Press the i button or touch the tab of
the same name in the header.
3. Select “
SET PHONE”
>“
Call settings”
>“
Call forwarding”.
PHONE 93
Page 94

4. Select one of the following settings for call forwarding:
–
Divert all
activates call forwarding for all incoming
calls.
–
Busy
activates call forwarding for calls that come
in while you are on another call.
To be ab le to acti vat e ca ll fo rw arding wi th t he
“
Busy” setting, the “Call waiting” function
must be switched off first.
–
No answer
activates call forwarding for calls that you
cannot or do not want to accept. The call is
forwarded to the entered number after a certain time.
–
Cannot be reached
activates call forwarding for calls that come
in while the telephone is switched off or is
not ready to receive calls.
–
Cancel all
deactivates all call diversions at once. The
telephone numbers entered for the individual
call diversions remain saved in the network
and are displayed again the next time call
forwarding is activated.
5. Select “
6. Enter the telephone number you want for the
7. If you set the “
Checking the status of the call diversion
1. Select the type of call forwarding you want.
2. Select “
Switch on”.
The input menu is opened.
call diversion and confirm your entry by selecting “
OK”.
- or Select “
Phonebook”.
After selecting
number from the phonebook. The call is then
diverted to this number.
Phonebook you can select a
No answer” call diversion type,
you also need to set the delay after which the
calls are to be diverted.
Select “
Delay”.
Set the delay you want by selecting it in the list
that appears.
The relevant call diversion is then activated
and the settings are shown on the display.
Check status”.
The current status is then queried in the network and shown on the display after a few seconds.
Deactivating call forwarding
1. Select the type of call forwarding you want.
2. Select “
Switch off”.
The corresponding call diversion is deactivated.
Switching the “Call waiting” function on/
off
If the “Call waiting” function is activated, an incoming call will be indicated during an active call.
The caller hears a ringing tone.
1. Press the c button.
2. Press the i button or touch the tab of
the same name in the header.
1. Select “
2. Select one of the following options:
SET PHONE”
>“
Call settings”
>“
Call waiting”.
–Select “
–Select “
–Select “
Switch on” to activate the function.
Switch off” to deactivate the func-
tion.
Check status” if the current status is
unknown and should be queried in the network.
The current status will be displayed in the information area as soon as the query is answered.
94 PHONE
Page 95

Switching the “Redial” function on/off
If the “Redial” function is activated, the telephone
automatically redials a number that could not be
reached because the line was busy.
1. Press the c button.
2. Press the i button or touch the tab of
the same name in the header.
3. Select “
4. Select “
SET PHONE”
>“
Call settings”.
Redial” to activate ( ) or
deactivate ( ) the function.
Setting transfer of your own number
If the “Send own number” function is activated,
your own telephone number will be sent to the other party.
1. Press the c button.
2. Press the i button or touch the tab of
the same name in the header.
3. Select “
SET PHONE”
>“
Call settings”
>“
Send own number”.
4. Select one of the following menu items:
Yes” if you want to send your own number.
–“
–“
No” if you want to suppress sending of your
own number.
–“
As network” if you want to adopt the net-
work operator or provider’s setting.
Depending on the network operator or provid-
er, it may not be possible to switch off sending of your own number.
If you need to dial numbers with special characters (+, #, or *), you must choose the “
As
network” setting.
Setting automatic call answering
If the “Auto. answer” function is activated, the
PCM automatically answers all incoming calls after
the first ring. The active audio source is muted and
the hands-free function automatically activated.
1. Press the c button.
2. Press the i button or touch the tab of
the same name in the header.
3. Select “
4. Select “
SET PHONE”
>“
Call settings”.
Auto. answer” to activate ( ) or
deactivate ( ) the function.
Bluetooth® settings
(PCM telephone)
Authorised Bluetooth® devices
This function allows you to display a list of the
Bluetooth
nect with your PCM. The list contains:
– mobile phones ,
–MP3 players ,
– headsets as well as
– data devices .
Displaying authorised Bluetooth
1. Press the c button.
2. Press the i button or touch the tab of
3. Select “
Devices that can be connected with the PCM
®
devices currently authorised to con-
®
devices
the same name in the header.
SET PHONE”
>“
Bluetooth settings”
>“
Device list”.
using different profiles appear only once in the
list. The symbol used always corresponds to
the main application. Mobile phones that can
also be used as MP3 players or data devices
appear in this list with the telephone symbol.
PHONE 95
Page 96

Connecting an authorised Bluetooth
®
device
with the PCM
1. Open the list of authorised Bluetooth
®
devic-
es.
2. Select the device you want in the list.
3. Select “
Connect”.
Data devices cannot be connected from the
list of devices; they can only be connected by
calling the appropriate application, for example when transferring a vCard.
Disconnecting an authorised and connected
Bluetooth
1. Open the list of authorised Bluetooth
®
device from the PCM
®
devic-
es.
2. Select the device you want in the list.
3. Select “
Disconnect”.
Renaming an authorised Bluetooth
1. Open the list of authorised Bluetooth
®
device
®
devic-
es.
2. Select the device you want in the list.
3. Select “
Rename”.
The input menu is opened.
4. Enter the name you want and confirm by selecting “
OK”.
The name of the device is now changed in the
PCM.
®
Deleting an authorised Bluetooth
device
from the list
1. Open the list of authorised Bluetooth
®
devic-
es.
2. Select the device you want in the list.
3. Select “
Delete”.
4. Confirm the prompt that appears by selecting
“
Yes”.
®
Deleting the list of authorised Bluetooth
devices
1. Open the list of authorised Bluetooth
®
devic-
es.
2. Select any device in the list.
3. Select “
4. Select “
Delete”.
Delete list”.
5. Confirm the prompt that appears by selecting
“
Delete all”.
Setting the profile of the authorised
Bluetooth
®
device
With mobile phones that support both the SIM Access Profile and the Hands-Free Profile you can
switch between the two profiles.
1. Open the list of authorised Bluetooth
®
devic-
es.
2. Select any device in the list.
3. Select “
SIM access on” or “SIM access off” de-
pending on whether you want to activate or deactivate SIM card access.
4. Confirm the prompt that appears by selecting
“
Yes”.
The switchover option is only available for mo-
bile phones that support both profiles. This
function is not available in all other cases.
96 PHONE
Page 97

Displaying details for the authorised
Bluetooth
®
device
1. Open the list of authorised Bluetooth
es.
2. Select any device in the list.
3. Select “
Device details”.
The following information is displayed:
– the device name,
–the Bluetooth
®
address,
– the connection quality as well as
– the supported services.
®
devic-
Adding a new Bluetooth® device
For the PCM to find your Bluetooth® device,
please ensure that the Bluetooth
device has been activated and set to “visible”.
If you want to connect a mobile phone using the
SIM Access Profile, external SIM mode needs to
be activated on some devices.
Further details can be found in the operating manual for your mobile phone.
1. Press the c button.
2. Press the i button or touch the tab of
the same name in the header.
3. Select “
SET PHONE”
>“
Bluetooth settings”
>“
New device”.
A search is started and a list of the devices found is displayed.
4. Choose the device you want by selecting it in
the list.
A Bluetooth
®
code is displayed that you must
enter in the corresponding Bluetooth
Once you have entered the code, successful
authorisation of the device is shown on the display.
®
function on the
®
device.
With some mobile phones, the connection re-
quest by the PCM must be explicitly confirmed
on the mobile phone. This may even have to
be done a number of times in some cases,
for example before transferring the phonebook.
To avoid this request, you can authorise the
PCM in your mobile phone’s list of devices.
The connection will then be established automatically in the future, without the need for further checks.
Further details can be found in the operating
manual for your mobile phone.
It can take a few seconds for the Bluetooth
device to be authorised.
If the list of authorised Bluetooth
®
devices is
full (max. 5 mobile phones), you must first delete a device from the list. An appropriate
message will be displayed. To find out more,
please refer to the section “Deleting an authorised Bluetooth
®
device from the list” on
page 96.
®
PHONE 97
Page 98

Setting visibility
To ensure that your PCM can be connected to other devices via the Bluetooth
“visible” (=recognisable) for other devices during
the connection operation.
To increase security, you can deactivate visibility
of the PCM after the connection operation.
To prevent further unwanted connection requests,
you can deactivate visibility of the PCM after the
connection operation.
1. Press the c button.
2. Press the i button or touch the tab of
the same name in the header.
3. Select “
SET PHONE”
>“
Bluetooth settings”.
>Select “
PCM visible” to activate ( ) or
deactivate ( ) visibility of the PCM.
®
interface, it must be
Finding the cordless handset
This function starts the search for the cordless
handset.
1. Press the c button.
2. Press the i button or touch the tab of
the same name in the header.
3. Select “
SET PHONE”
>“
Bluetooth settings”
>“
Find handset”.
The search is started. If the handset has
been found and is not in the charging cradle, it will ring in confirmation and to help
you locate it in the vehicle.
Phonebook settings
Setting the memory for the phonebook
You can set whether the phonebook entries on the
SIM card, the phonebook entries in the telephone
memory and/or the vCards stored in the PCM
should be used for the display in the phonebook.
This allows you to adapt the phonebook list of the
PCM to your list in the mobile phone.
1. Press the c button.
2. Press the i button or touch the tab of
the same name in the header.
3. Select “
4. Make the setting you want by selecting it.
If the transfer of the phonebook data from
SET PHONE”
>“
Phonebook settings”
>“
Phonebook memory”.
your mobile phone to the PCM fails, it may be
because your mobile phone is working with
security mechanisms that affect transfer using the “Phone Book Access Profile” (PBAP).
>>>
98 PHONE
Page 99

These security mechanisms require the PCM
to be authorised on your mobile phone. As
part of this, the telephone requests a “user ID”
and a “password” from the PCM. In order for
the PCM to gain access to the phonebook, it
must log into the telephone.
Since the PCM uses the fixed parameters
“UserID: PCM3” and “Pass: 0000” for this
login, these parameters must be preset as
permissible on your mobile phone.
Please refer to the operating instructions for
your mobile phone to find out whether these
settings are required on your mobile phone
and how to configure them.
Setting sorting
You can adapt the sorting of the phonebook and
call lists to the display on your mobile phone.
You have the following options for sorting the
phonebook:
–“
Standard”
The phonebook is sorted by surname.
–“
Alternative”
The phonebook is sorted by first name.
You have the following options for sorting the
call lists:
–“
Standard”
The call lists are sorted in the same order in
which the entries were transferred from the
mobile phone.
–“
Alternative”
The order of the entries transferred from the
mobile phone is reversed. This option supports
some mobile phones that transfer the oldest
entries first.
1. Press the c button.
2. Press the i button or touch the tab of
the same name in the header.
3. Select “
Setting sorting of the phonebook
4. Select “
5. Select the sorting you want.
Setting sorting of the call lists
4 Select “
5. Select the sorting you want.
SET PHONE”
>“
Phonebook settings”
>“
Sorting”.
Phonebook”.
Call lists”.
Setting automatic transfer of the
phonebook
If the “Auto update” function is activated, the
phonebook and the call lists of a mobile phone are
transferred as soon as the PCM is connected to
this mobile phone.
The data stored in the PCM is replaced by the current phonebook and current call lists from the mobile phone as soon as transfer is complete.
If the “
Auto update” function is deactivated, the
data will no longer be updated.
This function is not supported by all mobile
phones.
1. Press the c button.
2. Press the i button or touch the tab of
the same name in the header.
3. Select “
4. Select “
Your phonebook data can then only be ac-
SET PHONE”
>“
Phonebook settings”.
Auto update” to activate ( ) or
deactivate ( ) the function.
cessed when the corresponding mobile phone
is connected to the PCM.
PHONE 99
Page 100

Transferring the phonebook
This function transfers the phonebook and call
lists of the connected mobile phone into the PCM
again. The data stored in the PCM is replaced by
the current phonebook and current lists from the
mobile phone when transfer is complete.
1. Press the c button.
2. Press the i button or touch the tab of
the same name in the header.
3. Select “
SET PHONE”
>“
Phonebook settings”
>“
Transfer phonebook”.
Deleting the phonebook
The copy of the phonebook transferred to the
PCM can be deleted again.
Your mobile phone’s phonebook remains unchanged.
1. Press the c button.
2. Press the i button or touch the tab of
the same name in the header.
3. Select “
SET PHONE”
>“
Phonebook settings”
>“
Delete phonebook”.
Settings for messages and data
(PCM telephone)
This function is only available with the SIM
card inserted or with a connection using the
SIM Access Profile.
Changing the number of the SMS service
centre
1. Press the c button.
2. Press the i button or touch the tab of
the same name in the header.
3. Select “
4. Enter the telephone number you want and con-
SET PHONE”
>“
Messages/data”
>“
SMS service centre”.
The input menu for telephone numbers is
opened. The current number is entered in
the input field.
firm your entry by pressing “
OK”.
Switching the SMS signal tone on/off
The signal tone, which sounds when there is an incoming text message, can be switched on and off.
1. Press the c button.
2. Press the i button or touch the tab of
the same name in the header.
3. Select “
4. Select “
SET PHONE”
>“
Messages/data”.
SMS signal tone” to activate ( ) or
deactivate ( ) the function.
100 PHONE
 Loading...