

Page 1
221_AKB; 2; 3, en-GB
bjanott, Version: 2.11.7.7
2009-02-27T14:45:18+01:00 - Seite 115
i
To select the * character, press the
à button once. To select the + character, briefly press the à button twice.
X
To delete individual characters: press
the $ button.
X
To delete an entire word or number:
press and hold the $ button until the
entire word or number has been deleted.
Using the telephone via the Bluetooth® interface
Bluetooth® technology is the standard for
short-range wireless data transmission of up
to approximately 10 metres. Bluetooth® can
be used to exchange vCards or make calls
using a headset or handset, for example.
If your vehicle is equipped with convenience
telephony* and you would like to make calls
using the Bluetooth® interface, be sure that
your mobile phone is neither in the mobile
phone bracket* nor connected to it*. This
may result in a malfunction, depending on the
type of mobile phone.
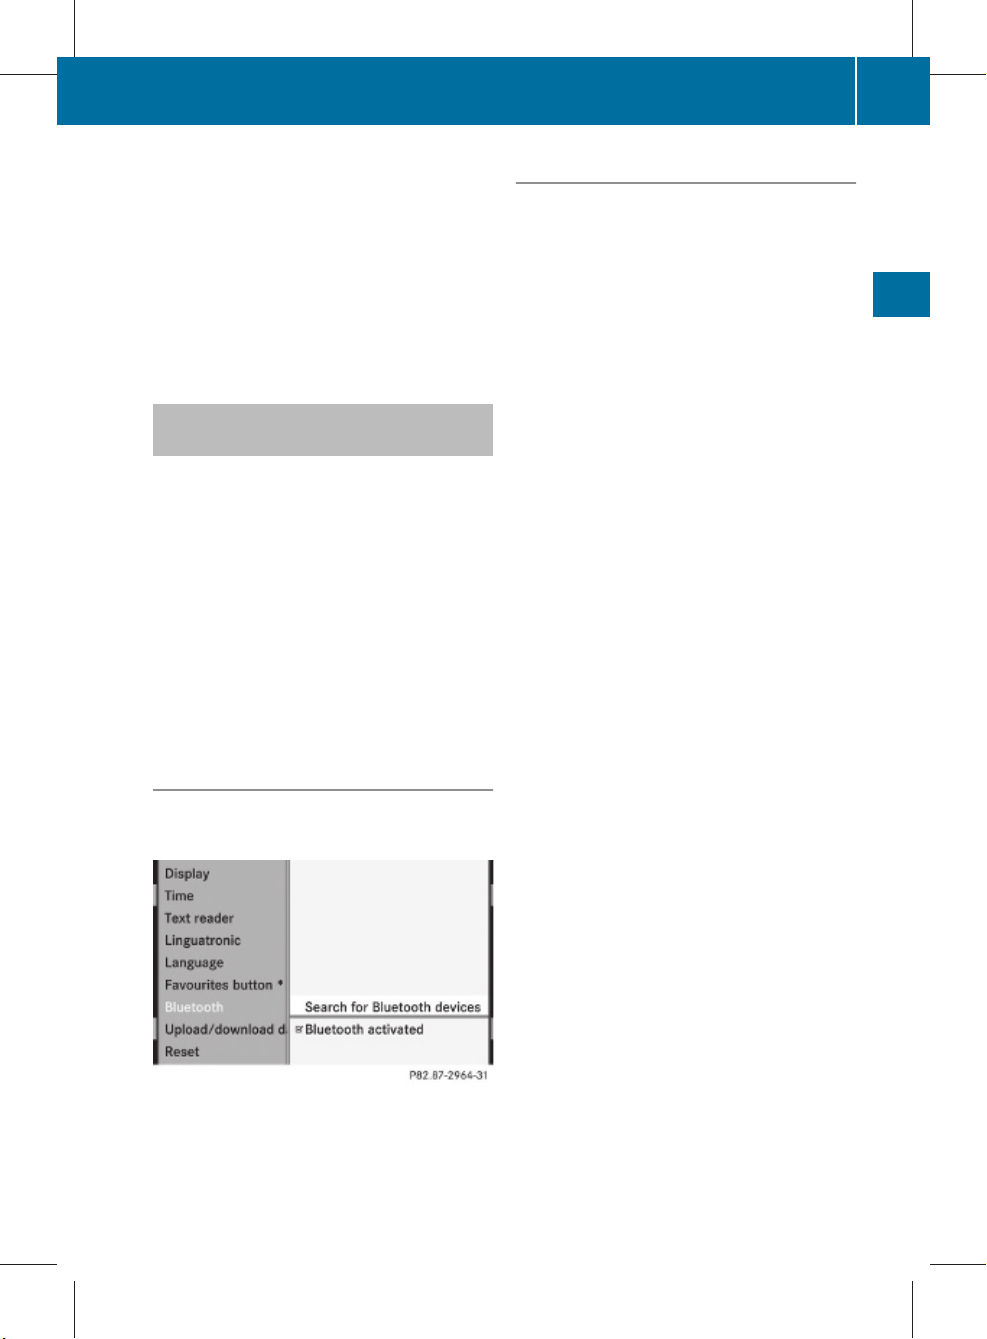
Activating/deactivating Bluetooth
X
Select Vehicle Q System Q Blue‐
®
tooth Q Bluetooth activated.
A tick appears when Bluetooth® is activated.
Telephone*
Mobile phone requirements
For telephony via COMAND's Bluetooth
interface, you require a Bluetooth®-capable
mobile phone.
i
Not all mobile phones available on the
market are equally suitable. You can obtain
more detailed information about suitable
mobile phones and about connecting Bluetooth®-capable mobile phones to
COMAND from your Mercedes-Benz
Service Centre or on the Internet
(www.mercedes-benz.com).
To avoid malfunctions, the mobile phone's
rechargeable battery must always be sufficiently charged.
In preparation for telephoning via the Bluetooth® interface you should check the following items on your mobile phone (see the
mobile phone operating instructions):
R
Hands-Free Profile
The mobile phone must support Hands-
Free Profile 1.0 or above.
i
Certain displays (e.g. the field strength
display or the mobile phone network provider) appear depending on the supported
version of the Hands-Free Profile.
R
Bluetooth® visibility
On certain mobile phones, the device itself
must be made "visible" for other devices,
as well as activating the Bluetooth® function.
R
Bluetooth® device name
Every Bluetooth® device has a Bluetooth
device name. This device name is freely
definable, but can be identical for all devices from the same manufacturer. It is a
good idea to choose a personalised name
by which you can identify your mobile
phone clearly.
®
115
COMAND
®
* optional
Z
Page 2
221_AKB; 2; 3, en-GB
bjanott, Version: 2.11.7.7
116
Telephone*
2009-02-27T14:45:18+01:00 - Seite 116
Connecting a mobile phone
X
Switch on the mobile phone and enter the
PIN, if necessary – see the mobile phone
operating instructions.
X
Activate the Bluetooth® functionality on
the mobile phone – see the mobile phone
operating instructions.
Bluetooth® is activated on COMAND as
standard. When the "Bluetooth®" function is
switched off on COMAND, the following message appears: Bluetooth not activated
COMAND
in system settings. Switch on Bluetooth® manually on COMAND (Y page 115).
Registering (authorising) the mobile
phone
Before you use your mobile phone with
COMAND for the first time, you must register
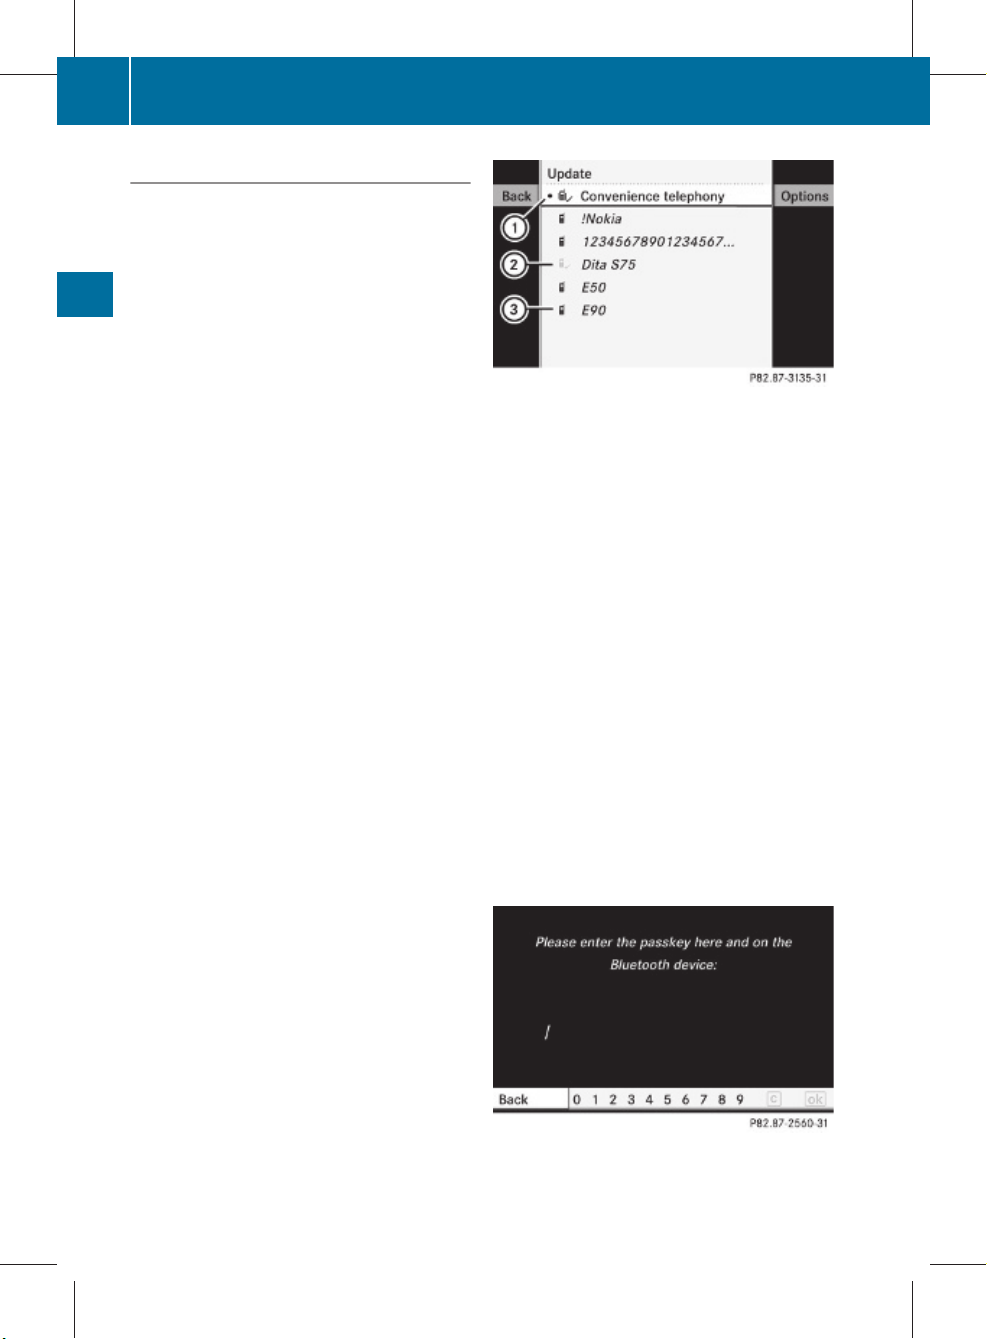
Example of display: Bluetooth® telephones list
:
Currently connected # and authorised
mobile phone L
;
Mobile phone not within range but previously authorised (L symbol appears in
grey)
=
Newly detected mobile phone in range,
not yet authorised
(authorise) it.
i
You can register more than one mobile
phone. A connection is always established to
the most recently connected mobile phone
within range.
If no connection can be made to the most
recently connected mobile phone, the system
searches for the mobile phone which was
connected before that one.
If you authorise a new mobile phone, it will be
automatically connected17.
X
Select Data/connectionsQBlue‐
tooth telephonesQ Update.
If the Bluetooth® telephone list is already
full, you will be asked to de-authorise a
Bluetooth® device (Y page 118). If
COMAND does not find your mobile phone,
external authorisation (Y page 117) is necessary.
X
To authorise: select not yet authorised
mobile phone = in the Bluetooth® telephones list and select
OptionsQAuthorise.
The passcode entry menu (detection, code)
appears.
COMAND looks for Bluetooth® devices
within range and adds them to the Bluetooth® phone list.
The duration of the search depends on the
number of Bluetooth® devices within range
and on the mobile phone characteristics
(Hands-Free-Profile version, any "visibility"
requirements).
17
This function is available if it is supported by the mobile phone.
* optional
Page 3

221_AKB; 2; 3, en-GB
bjanott, Version: 2.11.7.7
2009-02-27T14:45:18+01:00 - Seite 117
The passcode is any one to sixteen-digit number combination which you can determine
yourself. You must enter the same number
combination in COMAND and in the Bluetooth® device to be authorised; see the Bluetooth® device operating instructions.
It is a good idea to enter a passcode with at
least four digits to ensure a secure Bluetooth® connection.
Passcode input in COMAND
You can enter the passcode in COMAND with
the digits in the menu bar or with the telephone keypad.
X
Input via the menu bar: use the COMAND
controller to highlight digits; confirm the
selection.
or
X
Input via the telephone keypad: press
the respective buttons on the keypad.
X
To confirm: select ¬ in the menu bar.
or
X
Select the z or ; button on the tele-
phone keypad.
X
To delete the input: select F from the
menu bar and press W.
or
X
Select $ on the telephone keypad.
Passcode input on the keypad
If the Bluetooth® connection is successful,
you will be prompted by the mobile phone to
enter the passcode – see mobile phone operating instructions.
X
Enter the same passcode on the mobile
phone that you entered in COMAND.
i
After entering the passcode, you may also
need to enter a confirmation in your mobile
phone. Check the display of your mobile
phone.
If the Authorisation procedure unsuc‐
cessful message appears on the
COMAND display, you have either exceeded the allowed time or you have not
Telephone*
entered the passcode correctly. Repeat the
procedure.
The mobile phone is connected to COMAND
(authorised). You can now phone using the
COMAND hands-free system.
External authorisation
If COMAND does not detect your mobile
phone, this may be due to particular security
settings on your mobile phone. In this case,
you can test if your mobile phone can find
COMAND. COMAND's Bluetooth® device
name is MB Bluetooth.
X
Select Data/connectionsQBlue‐
tooth telephones.
X
Go to Update and select Options
QExternal authorisation.
X
Start the Bluetooth® search on the mobile
phone – see mobile phone operating
instructions.
X
Select MB Bluetooth on the mobile phone.
X
Input the passcode in COMAND when
requested to and then enter it on the
mobile phone (Y page 117).
Displaying details
There is a display showing the details for each
mobile phone in the Bluetooth® telephones
list.
X
Select Data/connectionsQBlue‐
tooth telephones.
X
Select the mobile phone from the list and
select Options QDetails.
The following information concerning the
selected mobile phone is shown:
R
Bluetooth® name
R
Bluetooth® address
R
availability
117
COMAND
* optional
Z
Page 4
221_AKB; 2; 3, en-GB
bjanott, Version: 2.11.7.7
118
Telephone*
R
authorisation
R
Bluetooth® class (e.g. telephone, notebook)
X
To close the display showing the
details: slide XVY.
De-registering (de-authorising) a mobile
phone
X
Select Data/connectionsQBlue‐
Telephone basic menu (Bluetooth®
interface)
If the mobile phone is ready for use, the following display appears:
2009-02-27T14:45:18+01:00 - Seite 118
mobile phone is indicated by the # dot in
the Bluetooth® telephones list
(Y page 116).
tooth telephones.
X
Select the mobile phone from the list and
COMAND
select Options QDe-authorise.
A prompt appears asking whether you
really wish to revoke authorisation for this
device.
X
Select Yes.
i
Before reauthorising the mobile phone,
also delete the MB Bluetooth device
names from the Bluetooth® list on the
mobile phone.
Connecting another mobile phone
If you have authorised several mobile phones,
you can switch between the individual
phones.
i
You can only switch to another authorised
mobile phone if no phone call is active.
X
Select Data/connectionsQBlue‐
tooth telephones.
X
Select the mobile phone from the Bluetooth® telephones list.
X
Confirm your selection.
If the selected mobile phone is within Bluetooth® range and Bluetooth® is activated,
a search is started and the phone is connected.
Only one mobile phone can be connected
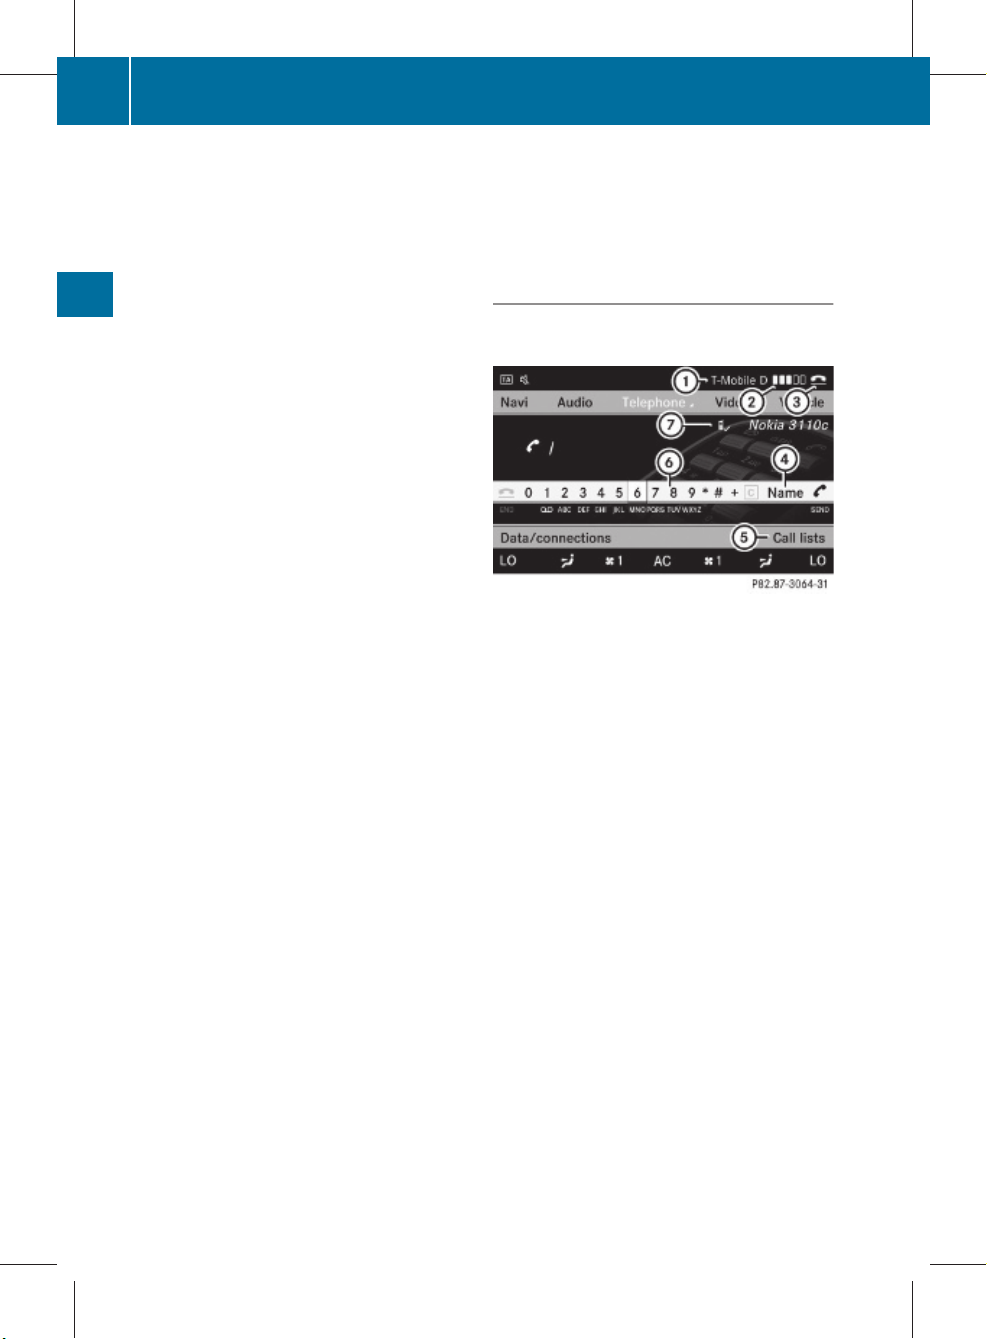
Example of display: telephone basic menu (Bluetooth® interface)
:
Display of mobile phone network pro-
18
vider
;
Signal strength of mobile phone network
18
Ä
=
Receiver symbol ¡ (active) or ¢ (not
active)
?
To display COMAND phone book
A
To display call lists
B
Input speller with characters for entering
telephone number
C
Bluetooth® name of the currently connected mobile phone
Bars ; display the current signal strength of
the mobile phone network. If all the bars are
filled, you have optimum reception. If all bars
are empty, there is very poor or no reception
at all.
at any one time. The currently connected
18
This function is only visible if it is supported by the mobile phone.
* optional
Page 5
221_AKB; 2; 3, en-GB
bjanott, Version: 2.11.7.7
2009-02-27T14:45:18+01:00 - Seite 119
Menu overview
Data/connections Call lists
Bluetooth® telephones
Address book
Incoming calls
Calls made
Importing contacts
Deleting contacts
Convenience telephony*
Using a mobile phone
For convenience telephony with COMAND,
you require a mobile phone bracket* and a
suitable mobile phone.
X
For information on inserting the mobile
Connecting a mobile phone
X
If the Bluetooth® interface is being
used for telephony: switch to the "Tele-
phone" menu, e.g. by pressing S.
X
Select TelephoneQData/connec‐
tionsQBluetooth tele‐
phonesQConvenience telephony.
phone bracket* into the armrest fixture,
see the separate assembly instructions for
the mobile phone bracket.
X
For information on switching the mobile
phone on manually, see the separate
mobile phone operating instructions.
Telephone basic menu for convenience
telephony
When the mobile phone is in the mobile phone
bracket* and operational, the following display is shown:
Telephone*
119
COMAND
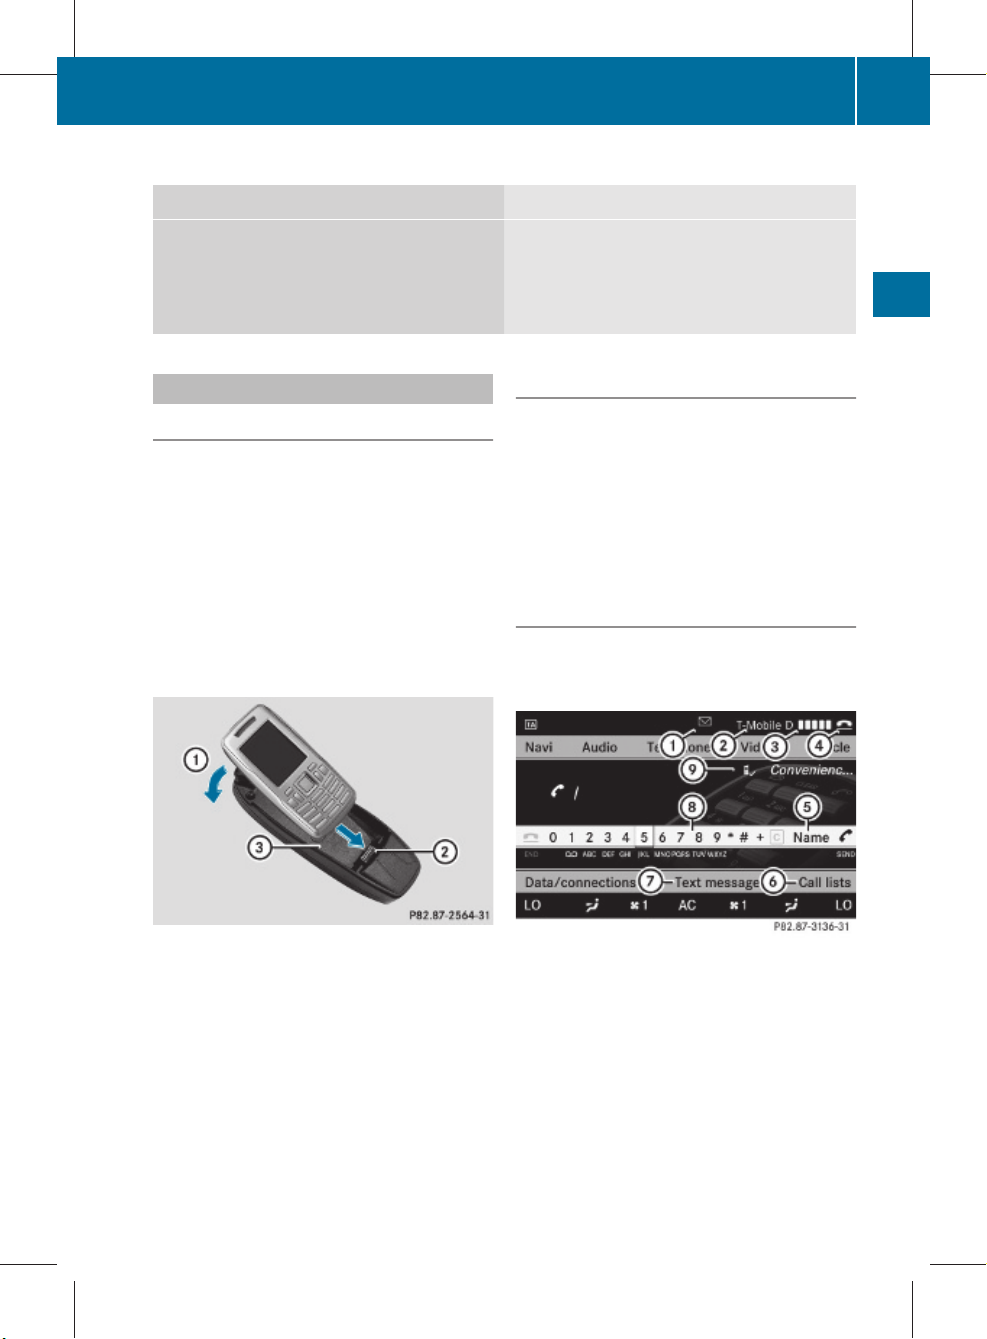
Example
X
Insert the mobile phone in the direction of
the arrow into connector contact ;.
X
Let the mobile phone snap into place in the
direction of arrow : in bracket =.
* optional
Example display: telephone basic menu, convenience telephony
:
Received text message (SMS) symbol
0
;
Mobile phone network provider
=
Signal strength of mobile phone network
Ä
?
Receiver symbol ¡ (active) or ¢ (not
active)
A
To display COMAND phone book
B
To display call lists
Z
Page 6

221_AKB; 2; 3, en-GB
bjanott, Version: 2.11.7.7
120
Telephone*
2009-02-27T14:45:18+01:00 - Seite 120
C
SMS menu
D
Input speller for entering telephone number
E
Convenience telephony display
Bars = display the current signal strength of
the mobile phone network. If all the bars are
filled, you have optimum reception. If all bars
are empty, there is very poor or no reception
at all.
Receiver symbol ? shows whether or not a
call is in progress or is being currently con-
COMAND
nected.
The 0 symbol is displayed if you have an
unread text message. The symbol disappears
Menu overview
Data/connections Text message
(SMS)
Bluetooth telephones
Address book
Importing contacts
Deleting contacts
Inbox
New
Drafts
Outbox
once you have read the text message. The
ú mail symbol is displayed when the text
message memory is full. The symbol disappears once you delete at least one text message.
The text message menu is available if this
function is supported by the convenience
telephone and bracket*. The text message
inbox is not available until all text messages
have been downloaded from the convenience
telephone. The Text message menu is not displayed during telephone calls using the Bluetooth® interface.
Call lists
Incoming calls
Dialled calls
Changing between Bluetooth® and
convenience telephony*
If your vehicle is equipped with convenience
telephony*, you can switch between telephony types. If you want to use another mobile
phone, you will first need to connect it
(Y page 116).
Switching telephony type during operation
During operation, you can switch from one
telephony type to another by connecting
another mobile phone or by making a selection from the list.
Switching telephony type when switching on
By default, COMAND performs the following
actions when it is switched on:
Mobile phone is inserted in mobile phone
bracket*
COMAND starts convenience telephony*.
If no mobile phone is inserted in the mobile
phone bracket*, the following message
appears: Telephone not inserted. This is
followed by a prompt asking you whether you
wish to switch to Bluetooth® telephony. If you
confirm by selecting Yes, the Ready for
Bluetooth telephony... message will
appear. COMAND will search for the two
mobile phones last connected via the Bluetooth® interface. If one of the two mobile
phones is found, the telephone basic menu
for Bluetooth® telephony (Y page 118)
* optional
Page 7

221_AKB; 2; 3, en-GB
bjanott, Version: 2.11.7.7
2009-02-27T14:45:18+01:00 - Seite 121
appears. If neither of the two mobile phones
is found, the Ready for Bluetooth tel‐
ephony... message remains on the display.
You now have to register your mobile phone
(Y page 116).
If there is a mobile phone in the bracket*, the
telephone basic menu for convenience telephony* (Y page 119) appears.
No mobile phone is inserted in mobile
phone bracket*
COMAND starts telephony via the Bluetooth® interface and searches for the last two
mobile phones to have been connected via
the Bluetooth® interface. If one of the two
mobile phones is found, the telephone basic
menu for Bluetooth® telephony
(Y page 118) appears. If neither of the two
mobile phones is found, the Ready for
Bluetooth telephony... message
remains on the display. You now have to register your mobile phone (Y page 116).
i
The Bluetooth® connection to the mobile
phone remains active until the next time
COMAND is switched off if you do not connect a different mobile phone via the phone
list.
Telephone*
Select Options Q Reception volume or
Transmission volume.
i
The Reception volume and Transmis‐
sion volume options only appear when
the selected mobile phone is authorised.
X
To set the volume on the scale: slide
ZVÆ and press W.
Using the telephone
Incoming call
121
COMAND
Reception and transmission volume
The following information is valid for Bluetooth® interface telephony and convenience
telephony*.
Incorrect reception and transmission volume
settings may result in serious impairment of
speech quality.
You can therefore optimise the settings. Find
out about the optimum setting for your mobile
phone from your Mercedes-Benz Service
Centre or on the Internet at
www.mercedes-benz.com.
X
Select Data/connectionsQBlue‐
tooth telephones.
X
Once the desired mobile phone has been
selected:
* optional
X
To accept: select Accept.
or
X
Press the 6 button on the telephone
keypad or the multi-function steering
wheel.
or
X
Accept via LINGUATRONIC* – see separate
operating instructions for LINGUATRONIC*.
Z
Page 8

221_AKB; 2; 3, en-GB
bjanott, Version: 2.11.7.7
122
Telephone*
2009-02-27T14:45:18+01:00 - Seite 122
X
To reject: select Reject.
or
X
Press the ~ button on the telephone
keypad or the multi-function steering
wheel.
Once you have accepted the call, you can
conduct your telephone call using the handsfree system. The call volume can be adjusted
(Y page 68). For more information, see the
"Functions during a single call connection"
section (Y page 123).
COMAND
The following information on an incoming call
appears in the display:
R
the phone number
R
the name and phone number if the entry is
stored in the address book
R
Call from Unknown if the telephone number is withheld
i
You can also accept a call when COMAND
is showing a display of a different main
function. The display switches to the telephone display after you accept the call.
After the call is finished, you see the display
of the previous main application again.
Outgoing call
X
Enter the phone number on the telephone
keypad.
or
X
Use the COMAND controller to select digits
via the telephone basic menu.
or
X
Use LINGUATRONIC* to enter digits or to
select names from the phone book – see
separate operating instructions.
X
To delete individual digits: briefly press
$ on the telephone keypad.
or
X
Select r from the telephone basic menu
and briefly press W.
X
To delete an entire phone number:press
and hold $ on the telephone keypad
until the number is deleted.
or
X
Select r from the telephone basic menu
and press and hold W until the phone num-
ber is deleted.
X
To place a call: press the 6 button on
the telephone keypad or on the multi-function steering wheel or select the 6 button from the telephone basic menu.
Redialling
X
Change to the telephone basic menu.
X
Press the 6 button on the telephone
keypad.
or
X
Select SEND from the telephone basic menu
and press W.
The list of dialled numbers appears. The
most recently dialled number is at the top.
X
To select and place a call: slide ZVÆ and
use W to select an entry, or press the
6 button on the COMAND control unit.
Calling voicemail19
You can only call voicemail if the voicemail
number on the SIM card is stored under the
4 button on your mobile phone.
X
Press and hold the 4 button on the tele-
phone keypad.
19
This function is only available if it is supported by the mobile phone network provider.
* optional
Page 9

221_AKB; 2; 3, en-GB
bjanott, Version: 2.11.7.7
2009-02-27T14:45:18+01:00 - Seite 123
Functions available during a single call
connection
Telephone operation with a single call
:
Person you are calling
;
Receiver symbol: here 6 indicating an
active phone connection
=
NEW to call other parties
?
To switch the microphone for the hands-
20
free system on/off
A
To send DTMF tones
B
To end a call
21
Switching the microphone for the handsfree system on/off
This function is also available during an active
phone call.
X
To switch off: select Mike off from the
telephone basic menu.
If the microphone is switched off, the display shows the Q symbol and the The
microphone is off message appears for
a short period.
X
To switch on: select Mike on from the
telephone basic menu.
The Q symbol goes out. You will briefly see
the The microphone is on message.
DTMF tone transmission21
Answering machines or other devices can be
controlled by DTMF tones, e.g. for remote
query functions.
Telephone*
Dial the respective number to listen to your
answering machine, for example.
X
Select DTMF from the telephone basic menu
during a conversation.
:
To transmit individual characters using
the input speller
;
To transmit a phone book entry as a character string
X
To send individual characters: select the
desired number buttons using input
speller :.
Every character selected will be transmitted immediately.
You can, for example, store the phone number of the answering machine in the phone
book. You can then search for the answering
machine phone number in the phone book.
X
Select Name.
X
Select the desired phone book entry.
The entry is immediately sent as a character string.
X
To return to the call display: select
B on the COMAND display.
i
DTMF tones can also be transmitted using
LINGUATRONIC*; see the separate operating instructions.
Ending an active call
X
Press the ~ button on the telephone
keypad or on the multi-function steering
123
COMAND
20
This function is only available if the telephone supports HFP1.5 and above.
21
Not available for all mobile phones.
* optional
Z
Page 10

221_AKB; 2; 3, en-GB
bjanott, Version: 2.11.7.7
124
Telephone*
2009-02-27T14:45:18+01:00 - Seite 124
wheel or select ~ from the telephone
basic menu.
Call waiting, toggling and conference
connections with several persons
You can be called by more than one person
(call waiting) while you are making a telephone call. In the same way, you can call
another party while already on the phone with
someone.
You can either toggle between these two con-
COMAND
versations or interconnect them to create a
conference call.
You can simultaneously switch back and forth
between two parties or conduct a conference
call with up to five others.
Toggling
24
If you are on the telephone and you receive
another call, the call waiting display will
appear. You also hear an acoustic signal.
X
To reject: select Reject.
or
X
Press the ~ button on the telephone
keypad or the multi-function steering
wheel.
X
To accept: select Accept.
or
X
Accept via LINGUATRONIC* – see separate
operating instructions.
or
X
Press the 6 button on the telephone
keypad or on the multi-function steering
wheel.
This will put the active call on hold. You now
have two calls. The call you have just accepted is active.
i
If your mobile phone does not support
HFP 1.5 or above, then the call which was
22, 23
active is cancelled as soon as the second
call is accepted.
Calling additional parties
You can call a second person while on the
phone with someone else. This action puts
the previous call on hold.
X
Select NEW from the telephone basic menu
and press W.
or
X
Select SEND on the telephone keypad.
X
Enter the phone number manually
(Y page 122) or using the phone book
(Y page 128).
Switching between two parties (toggling)
If you have added another party to your previously active call, the telephone menu then
looks like this:
:
Active party
;
Party on hold
X
To switch to the other party: use the
COMAND controller to select ;.
or
X
Select SEND on the telephone keypad.
or
X
Press the SEND button on the multi-function steering wheel.
22
These functions are only available if they are supported by the mobile phone network provider.
23
These functions are only available if the mobile phone supports HFP 1.5 and above.
24
This function is only available if Toggling has been activated on the mobile phone.
* optional
Page 11

221_AKB; 2; 3, en-GB
bjanott, Version: 2.11.7.7
2009-02-27T14:45:18+01:00 - Seite 125
Interconnection to create a conference
You can interconnect calls which are active
and those which are on hold. This permits
several parties to hear one another and speak
with one another.
:
Active party
;
Party on hold
=
To interconnect parties by creating a conference connection
X
To interconnect parties by creating a
conference connection: use the
COMAND controller to select Confer‐
ence =.
Switching between the hands-free system and the mobile phone (convenience telephony*)
During a call, you can also switch between the
mobile phone and the hands-free system.
From the hands-free system to the mobile
phone
X
Take the mobile phone out of the
bracket*.
The No telephone inserted message
appears in the COMAND display. Subsequent operation is only possible using the
mobile phone.
Telephone*
available to you which are described in the
"Functions during a single call connection"
section (Y page 123).
Text messages (SMS)* (convenience
telephony*)
Text message (SMS) functions
The following text message functions are
available:
R
receiving text messages
R
reading text messages
R
writing text messages
R
managing text messages
The following conditions must be fulfilled in
order to use the functions:
R
the mobile phone has been inserted in the
mobile phone bracket* and is switched on.
R
the PIN has been entered.
When the mobile phone is connected, the 200
most recent text messages which are currently stored on the phone are loaded to the
COMAND's text message (SMS) inbox and
displayed. This may take a few minutes.
When the mobile phone is connected to
COMAND via the bracket*, newly received
text messages will be displayed in COMAND's
text message inbox. An audible signal can
also be heard and the / symbol appears.
Text message (SMS) menu
X
Call up SMS from the telephone basic menu.
The text message menu appears.
125
COMAND
From the mobile phone to hands-free
mode
X
Insert the mobile phone into the bracket*.
Once the call has been transferred to
hands-free mode, all the functions will be
* optional
Z
Page 12

221_AKB; 2; 3, en-GB
bjanott, Version: 2.11.7.7
126
Telephone*
2009-02-27T14:45:18+01:00 - Seite 126
The sender display shows the sender of the
messages. If the sender is stored in the
COMAND phone book, the name is displayed.
Otherwise, the telephone number appears.
The text display shows the first few words of
the text message.
X
To switch to text display: select
Options Q Display text.
X
To switch to sender display: select
Options Q Display sender.
:
New text message (0 symbol for
COMAND
unread text message)
;
Number of text messages in the inbox
folder
=
Outbox
?
Drafts
A
To write a new text message
B
Text message inbox
Displaying details
COMAND can also show a shortened sender
display in full.
X
Select the desired text message from the
text message inbox.
X
Select Options Q Details.
The detailed view appears.
X
To close the detailed view: slide XVY.
Text message inbox
X
Select Inbox.
Reading a text message
X
Select the desired text message from the
text message inbox.
X
Press W.
X
To scroll through the display or to
select telephone numbers in the text:
slide ZVÆ.
The display scrolls up or down line by line,
or skips to the next or previous telephone
number and automatically highlights it.
X
To return to the list: slide XVY.
:
Text preview or sender of the selected
text message (SMS)
;
Reception date and time of the selected
text message
=
Highlighted text message/symbol 0
for unread text message
?
Text messages already read
Switching the display
You can switch between displaying the
Listening to a text message*
You can set the language (Y page 172) and
the speed of the read-aloud function* (Y page 169).
X
Select and open the desired text message
from the text message inbox.
X
Press W and select Read aloud.
X
To end reading aloud: press W and select
End reading aloud.
sender of the text message (SMS) and text
display.
* optional
Page 13

221_AKB; 2; 3, en-GB
bjanott, Version: 2.11.7.7
2009-02-27T14:45:18+01:00 - Seite 127
Writing a new text message
X
Select New from the "SMS" menu.
Entering the recipient
:
Recipient of the new text message
;
To enter a telephone number using the
address book
=
Input speller
X
To enter the text message recipient
from the phone book: select ; using the
COMAND controller.
X
Select the desired recipient from the phone
book (Y page 129).
X
To enter the recipient's phone number
manually: use the COMAND controller to
select the desired digits with input speller
=.
or
X
Use the telephone keypad to enter the
desired digits.
i
You can also respond directly to a text
message; the recipient will then be automatically accepted. To do so, simply select
OptionsQReply in the text message
inbox.
Telephone*
Entering the message
:
Input speller
;
Text field for the text message
=
To select or create text modules
?
To insert a line break
A
To switch between uppercase and lowercase letters
B
To switch between numbers and letters
C
To change the language of the characters
D
To delete characters
X
Use input speller : to enter the desired
text into text field ;.
X
Select ok.
The text message is sent.
Managing text messages
Calling a text message sender
X
Select the desired text message.
X
Press W and select Call.
Storing a text message sender in the
address book
X
Select the desired text message from the
text message inbox.
X
Press W and select Save number Q New
entry or Add telephone number.
X
Add the telephone number to the address
book (Y page 129).
127
COMAND
* optional
Z
Page 14

221_AKB; 2; 3, en-GB
bjanott, Version: 2.11.7.7
128
Telephone*
2009-02-27T14:45:18+01:00 - Seite 128
Deleting a text message25
X
Select the desired text message from the
text message inbox.
X
Select Options Q Delete.
A deletion prompt appears.
X
Select Yes.
Using the phone book and address
book
The COMAND phone book is an extract of
COMAND
those entries from the address book which
contain at least one telephone number.
In addition, the first entry is "MB Contact",
which can be used to place a call to the
Mercedes-Benz Hotline.
The address book organises and stores
entries which are entered from different sources (mobile phone, SD memory card, Bluetooth® import, COMAND phone book, navigation). You can use these entries to make
telephone calls, for navigation and for writing
(text messages).
Importing contacts automatically
If basic telephony is activated via the Bluetooth® interface or convenience telephony*
using the mobile phone bracket*, contacts
(phone book entries) are automatically imported from the respective mobile phone to the
COMAND phone book.
Depending on the mobile phone, this process
may take some time. Depending on the
mobile phone used, only the phone book
entries in the mobile phone or these entries
and the phone book entries in the SIM card
are imported.
Automatically imported contacts (phone
book entries) in COMAND can be identified
by the d/0 symbol. These entries are
only available in COMAND when telephony via
the Bluetooth® interface (basic telephony) or
using the mobile phone bracket* (convenience telephony*) is activated.
Importing contacts manually
i
Manually imported contacts are always
available. Automatically imported contacts
are available only when basic telephony via
the Bluetooth® interface or convenience
telephony* using the mobile phone
bracket* is activated.
You can import existing data manually:
R
from the memory card
R
via the Bluetooth® interface (e.g. Bluetooth® telephone, Bluetooth® PC)
X
To import data: load the memory card or
activate Bluetooth® in COMAND
(Y page 115) and on the Bluetooth® telephone or PC (see operating instructions of
the respective mobile phone/PC).
X
Select Data/connectionsQImport
contactsQFrom Memory card.
X
Select Add or Overwrite.
X
To cancel data import: press W.
or
X
Press the % button.
If the data has been imported, the Import
procedure successful message is displayed.
If the COMAND phone book memory is full,
this message appears in the display: Mem‐
25
This function is not supported by all mobile phones.
* optional
Page 15

221_AKB; 2; 3, en-GB
bjanott, Version: 2.11.7.7
2009-02-27T14:45:18+01:00 - Seite 129
ory full. Contacts could not be
completely imported.
i
If you switch over to another main function (e.g. navigation) while importing data,
the import will be cancelled. If you switch
to another function while importing vCards
from the memory card, the import will not
be cancelled.
Calling up contacts/details
You can call up contacts with the list or by
using the input speller.
Phone book/address book basic display
:
List
¤ Entry with navigable data*
\ Entry with voice tag – see separate
operating instructions for LINGUA-
TRONIC*
¥ Address book entry
d Mobile phone entry
0 SIM card entry
® Bluetooth® entry
¯ Memory card entry
G Entry with multiple phone numbers
;
Two-line speller
B To change the language of the char-
acters
p To select the character set
F To delete your selection
¬ To confirm your selection
% Back
Telephone*
Calling up contacts from a list
X
Phone book: select Name.
X
Address book: select Data/connections
Q Address book.
X
To switch from the input speller to the
list: press ZV until the input speller is hid-
den.
or
X
Select ¬.
X
To call up a contact: slide ZVÆ or turn
cVd and push W.
Calling up contacts using the input speller
X
Phone book: select Name.
X
Address book: select Data/connections
Q Address book.
X
To switch from the list to the input
speller: select Back from the list.
or
X
Press the % button.
X
To select characters: slide ZVÆ or XVY
and press W. Repeat this procedure until
COMAND automatically switches over to
the list.
You determine the first letter of the entry
you are looking for with the first character
you enter. If there are similar entries, the
next character which is different will be displayed and offered for selection.
i
You can also use the telephone number
pad to enter characters.
Displaying contact details
X
Select Options Q Details.
The detailed view appears.
X
To return to the list: slide XVY until the
list is highlighted.
Creating new contacts/changing contacts
i
In certain countries, this function is not
available if the vehicle is travelling at more
than approximately 5 km/h. As soon as the
129
COMAND
* optional
Z
Page 16

221_AKB; 2; 3, en-GB
bjanott, Version: 2.11.7.7
130
Telephone*
2009-02-27T14:45:18+01:00 - Seite 130
vehicle speed drops below about 3 km/h,
the function is available again.
i
You can enter address data directly in the
address book. If you store telephone numbers in the phone book, these are saved in
the address book. If you store a navigation
destination*, COMAND creates an address
book entry which includes the complete
navigable address data.
COMAND
X
Call up the contact (Y page 129).
X
Select OptionsQNew entry or Change.
The input menu with data fields appears.
F To delete your selection
¬ To confirm your selection
?
Preset phone category
X
Enter the respective data in the data fields.
X
To enter data in the data field: select the
respective characters from input speller
=.
X
To move the cursor in the data field:
select the respective characters from input
speller =.
X
To change data fields: slide ZV until the
input speller is hidden.
X
Slide ZVÆ and push W.
or
X
Press Æ in the input speller.
X
To cancel data entry:select Back.
If one of the data fields contains data, a
prompt will appear asking whether you
wish to store the entry.
26
X
To store data entry: select ¬.
The entry is created in the phone book and
in the address book.
:
Cursor
;
Data field
=
Two-line speller
B To select the language
p To select the character set
*/E To select uppercase and low-
ercase letters
% Back
26
Only available with the "Change contact" function.
Deleting contacts
X
To select a contact: select Data/connec‐
tions Q Delete contacts.
You can select and delete the following
types of contact here:
R
Internal contacts
R
Imported from the memory card
* optional
Page 17

221_AKB; 2; 3, en-GB
bjanott, Version: 2.11.7.7
2009-02-27T14:45:18+01:00 - Seite 131
R
Imported via Bluetooth
R
Delete all
X
To confirm your selection: press W.
A prompt appears asking whether the data
should be deleted.
X
Select Yes.
i
Automatically imported contacts cannot
be deleted (Y page 128).
Calling a number stored in an entry
Using the phone book
X
Select Name.
X
Call up the contact (Y page 129).
X
Contact with multiple phone numbers
(with G symbol): turn cVd and
press W.
or
X
Press SEND on the telephone keypad.
X
Contact with one telephone number
(without G symbol): press W.
or
X
Press SEND on the telephone keypad.
Using the address book
X
Select Data/connections.
X
Open Address book.
X
Call up the contact (Y page 129).
X
Press the W button.
X
Turn cVd and press W.
or
X
Press SEND on the telephone keypad.
Starting route guidance to an entry*
i
You can use this function once you have
stored a destination in the destination
memory (Y page 167). COMAND also
stores the destination with the complete
navigable address data in the address
book.
Telephone*
X
Search for an address book entry using the
¤ symbol.
X
Display the details about an entry and highlight the address data field.
X
Select OptionsQNavigateQStart.
i
You may only select Navigate if the
address data field contains complete, navigable data. This is indicated by the ¤ symbol.
Voice tags*
i
Voice tags are entered via LINGUATRONIC* – see the separate operating
instructions for LINGUATRONIC*
Adding or changing a voice tag
i
You can add one voice tag per address
book entry.
X
Search for an address book entry with or
without a voice tag (¦ symbol).
X
Select Options Q Voice tag Q Add or
Change.
The subsequent operation is voice-controlled. LINGUATRONIC* guides you through
the menus.
Deleting a voice tag
X
Search for an address book entry with a
voice tag.
X
Select Options QVoice tag Q
Delete.
A deletion prompt appears.
Listening to a voice tag
X
Search for an address book entry with a
voice tag.
X
Select Options Q Voice tag Q Lis‐
ten.
You will hear the voice tag.
131
COMAND
* optional
Z
Page 18

221_AKB; 2; 3, en-GB
bjanott, Version: 2.11.7.7
132
Telephone*
Using call lists
COMAND displays lists of calls received
X
X
(including missed calls) and made during
phone operation.
i
The respective menu item can only be
selected if calls have already been made or
received in COMAND or if the call lists have
been imported from the telephone.
Incoming calls which you could not or did not
want to answer are marked with a symbol in
front of the name or phone number.
Saving a list entry
2009-02-27T14:45:18+01:00 - Seite 132
To select a list entry: slide ZVÆ.
To dial a phone number: press the 6
button.
For an incoming call from a person who is not
Selecting an entry from the call list
X
COMAND
Press the S function button.
X
Select Call lists.
A menu appears.
in the address book, COMAND displays the
phone number in the call list. You can save
this entry. The entry will then appear in the
call list as the phone number (not used yet)
or as the name (already used).
Storing as a new entry in the address book
X
Open a call list.
X
Select the list entry.
X
Select OptionsQSave number.
X
Select New entry to create a new entry.
X
Select a number category, e.g. Home.
X
Select a telephone category, e.g. Mobile.
X
Select Incoming calls or Calls dial‐
led.
The corresponding list appears.
Example display: list of calls made
:
To close the list
;
Telephone number/name if known
=
Options (e.g. save)
Number category Display (telephone
and address book)
Not classified
Home
Work
Telephone category
Not classified
Mobile
Car
Landline tele‐
No symbol
6
\
Display (telephone
and address book)
No symbol
¢
^
¬
phone number
Preferred
O
* optional
Page 19

221_AKB; 2; 3, en-GB
bjanott, Version: 2.11.7.7
2009-02-27T14:45:18+01:00 - Seite 133
i
If you have not entered the phone number
in a number and telephone category,
the ; icon will appear in the display.
X
Select Next (save).
An input menu appears with data fields. The
data field for the telephone number is filled
in automatically.
:
Data fields for surname, first name and
company
;
Number category
=
Telephone category
?
Data field for telephone number (filled in
automatically)
A
Two-line speller
X
For the following steps, follow the instructions as described in the "Add new contact"
section (Y page 129):
R
switching the data field
R
entering data
R
deleting an entry
R
cancelling an entry
R
storing an entry
Adding to an existing entry in the address
book
X
Open a call list.
X
Select the list entry.
X
Select OptionsQSave number.
X
Select Add to add an entry.
X
Select a number category, e.g. Home.
X
Select a telephone category, e.g. Mobile.
Navigation system* (introduction)
X
Select Next (save).
The search menu for address book entries
appears.
X
Search for the desired entry (Y page 129).
X
Once the search is completed, confirm the
selection.
COMAND stores the data if there are fewer
than five numbers assigned to the entry you
are searching for in the selected number
category.
You will see a message to this effect.
If five numbers are stored for the entry you
are searching for, a prompt will appear asking whether you wish to overwrite one of
the existing numbers.
X
Select Yes or No.
X
Confirm your selection.
If you select Yes, a selection list with the
five existing numbers is displayed.
X
Select the number to be overwritten.
COMAND overwrites the selected number
with the new data.
Navigation system* (introduction)
Safety notes
Risk of accident
G
For safety reasons, only enter a new destination when the vehicle is stationary.
COMAND calculates the route to the destination without taking account of the following,
for example:
R
traffic lights
R
stop and give way signs
R
parking or stopping restrictions
R
lane narrowing
R
other road and traffic controls and regulations
For this reason, you must always observe the
respective road and traffic rules and regulations during your journey. Road and traffic
controls and regulations always have priority
133
COMAND
* optional
Z
 Loading...