

Page 1

TABLE OF CONTENTS
1 QUICK GUIDE 13
2 AUDIO SYSTEM 25
3 Bluetooth® HANDS-FREE SYSTEM 73
4
VEHICLE INFORMATION
5 SETUP 111
6 REAR VIEW MONITOR SYSTEM 143
7 NAVIGATION SYSTEM 157
107
8 APPLICATION 221
INDEX 247
1
Page 2
Introduction
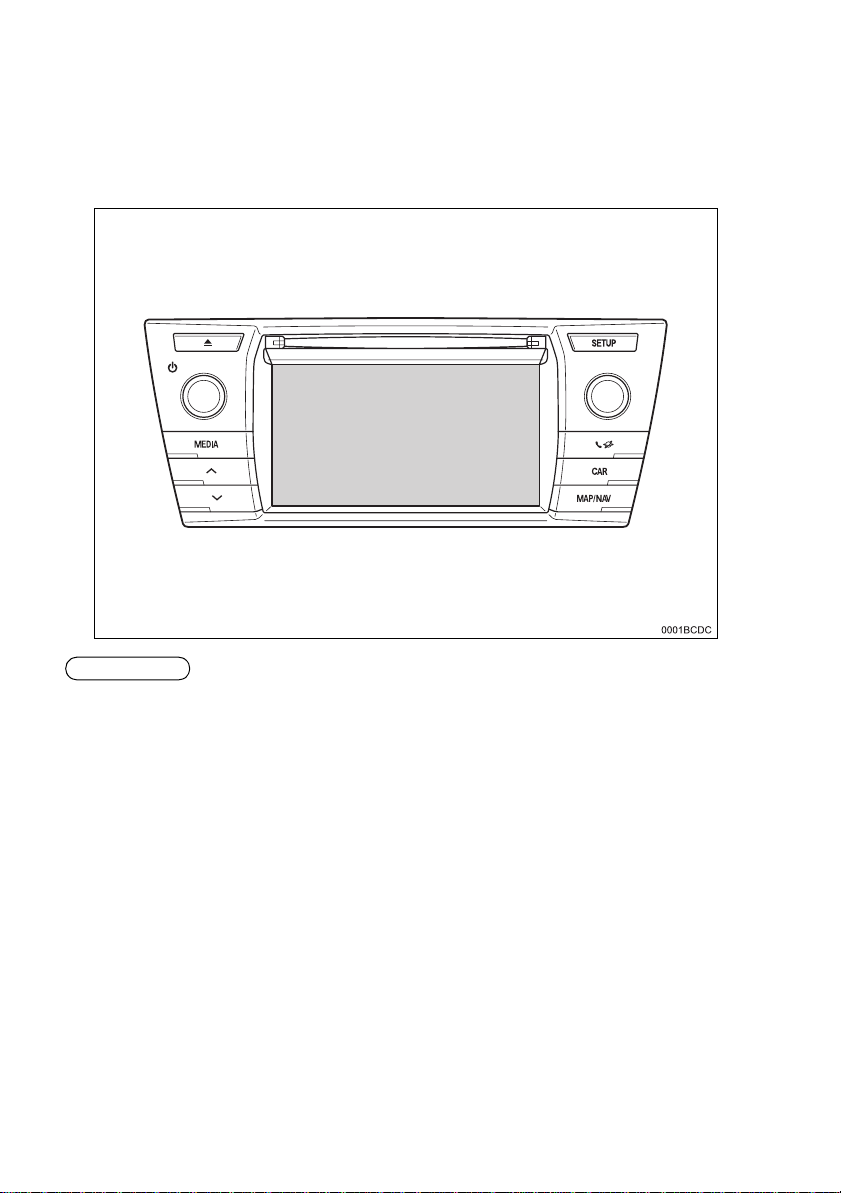
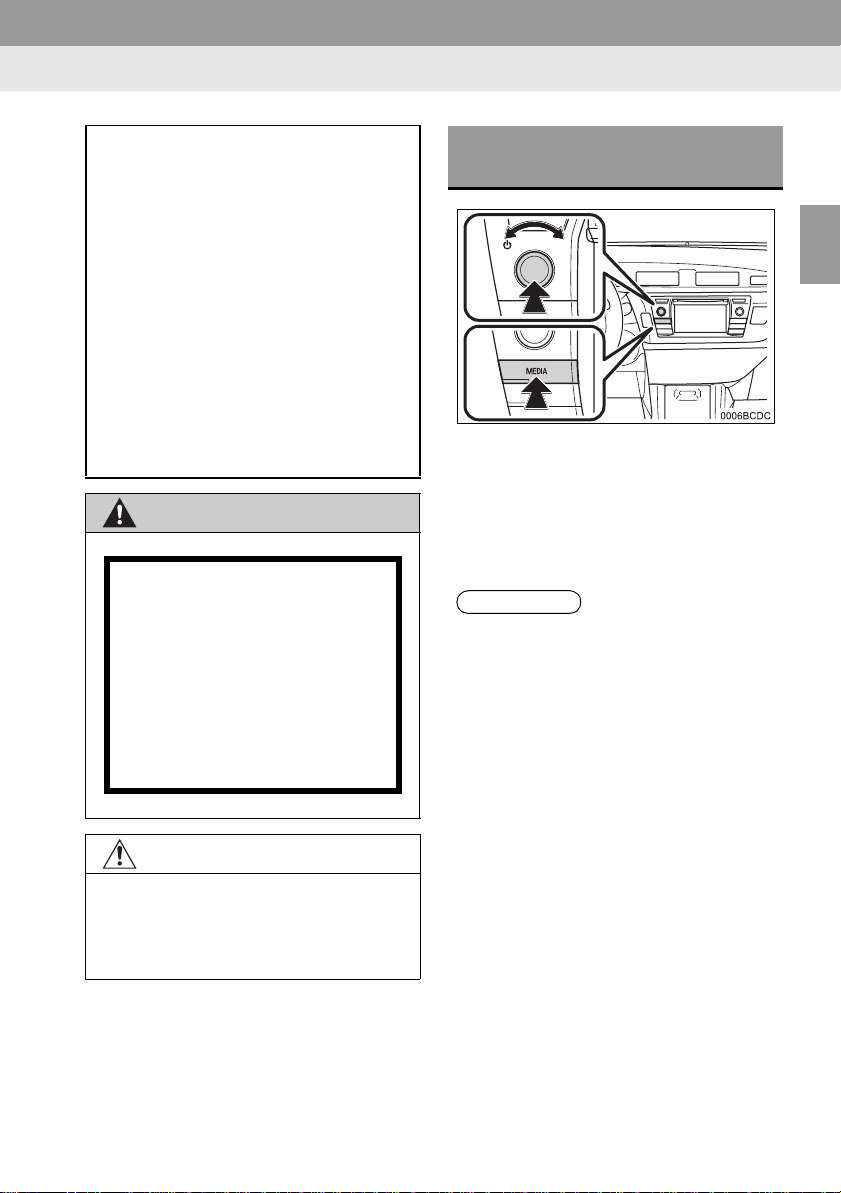
■EXISTENCE OF NAVIGATION CAPABILITIES
Existence of navigation capabilities can be confirmed by performing the following method:
INFORMATION
● This illustration is for le ft-han d dr ive vehicles.
● The button position s and shapes differ for right-han d dr ive vehicles.
2
Page 3

XVehicles without smart entry & start system
1 When the engine switch is turned to the “ACC” or “ON” position, the initial
screen will be displayed and the system will begin operating.
XVehicles with smart entry & start system
1 When the engine switch is turned to the ACCESSORY or IGNITION ON
mode, the initial screen will be displayed and the system will begin operating.
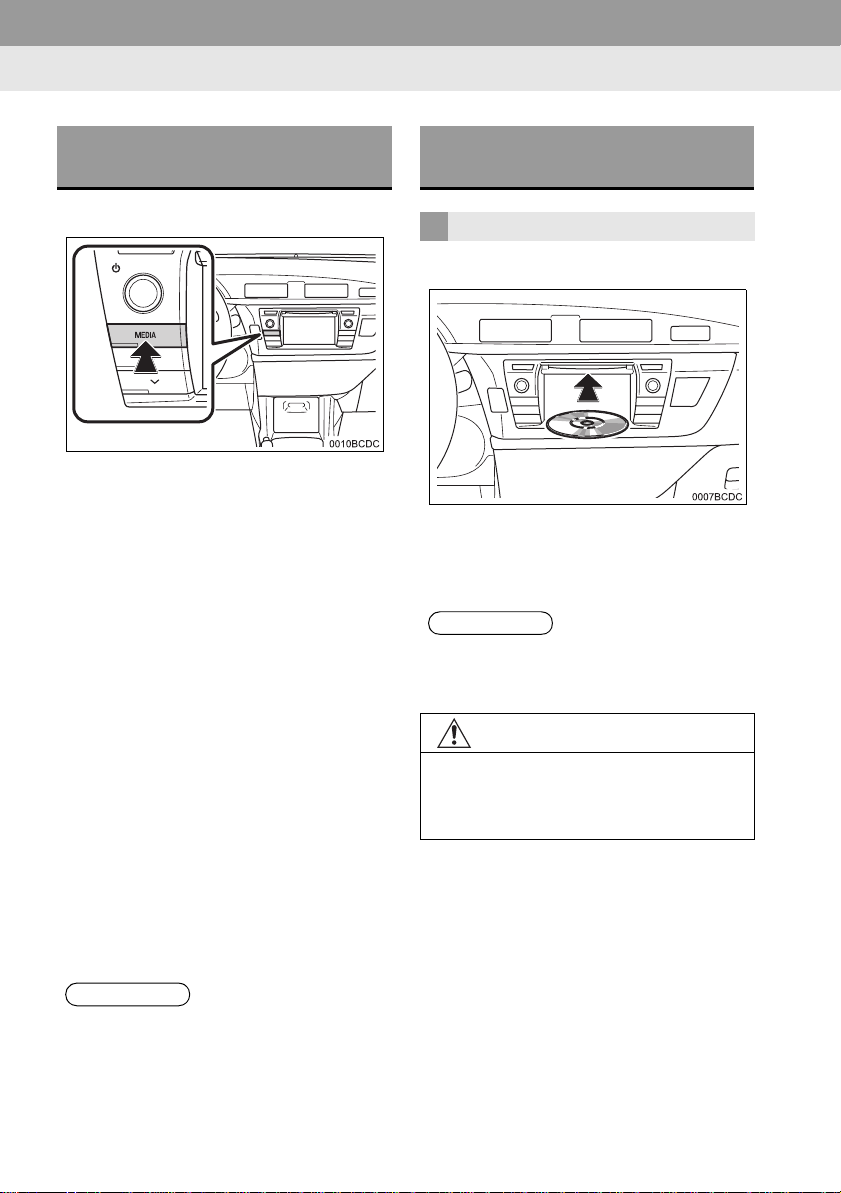
2 Press the “MAP/NAV” button.
z Either of the fo llo w in g sc re ens will be displayed.
XMultimedia system XNavigation system
3
Page 4
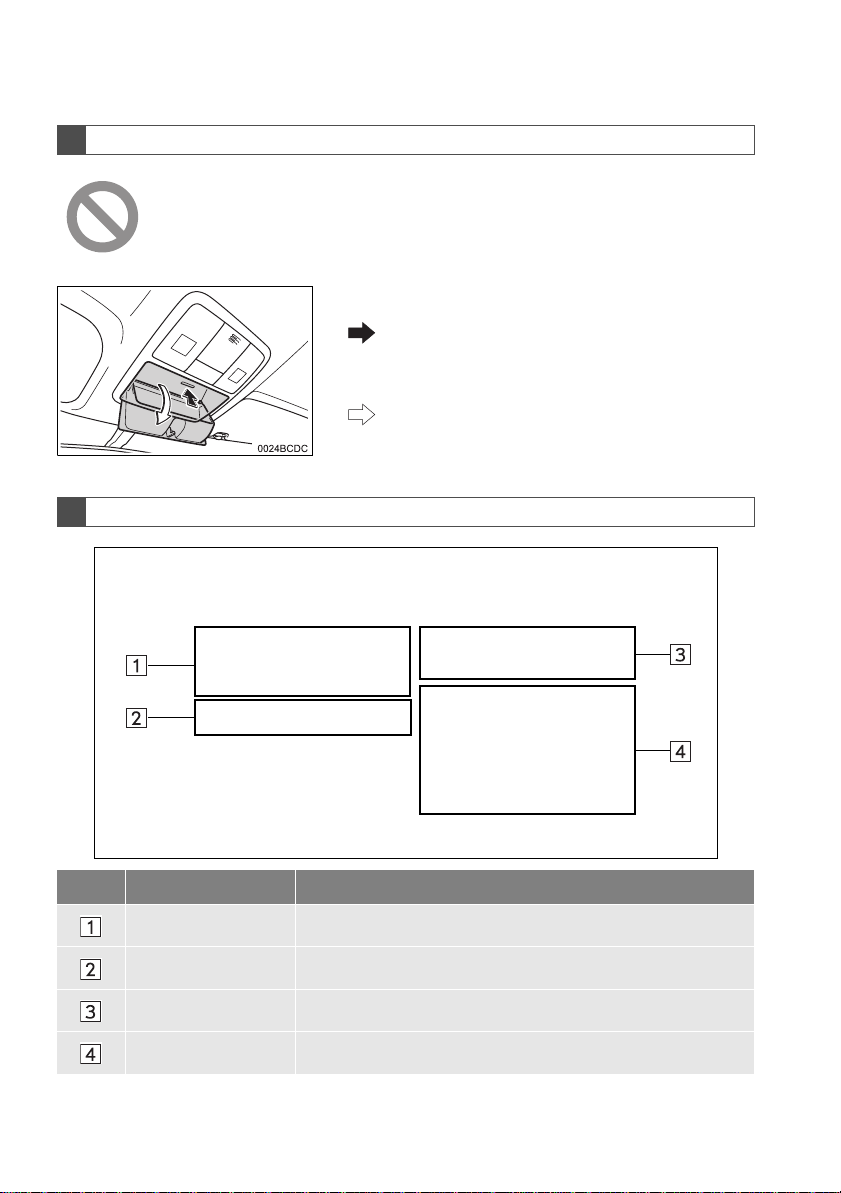
SYMBOLS USED IN ILLUSTRATIONS
Safety symbol
The symbol of a circle with a slash through it means “Do not”, “Do not
do this”, or “Do not let this happen”.
Arrows indicating operations
Indicates the action (pushing, turning, etc.)
used to operate switches and other
devices.
Indicates the outcome of an operation (e.g.
a lid opens).
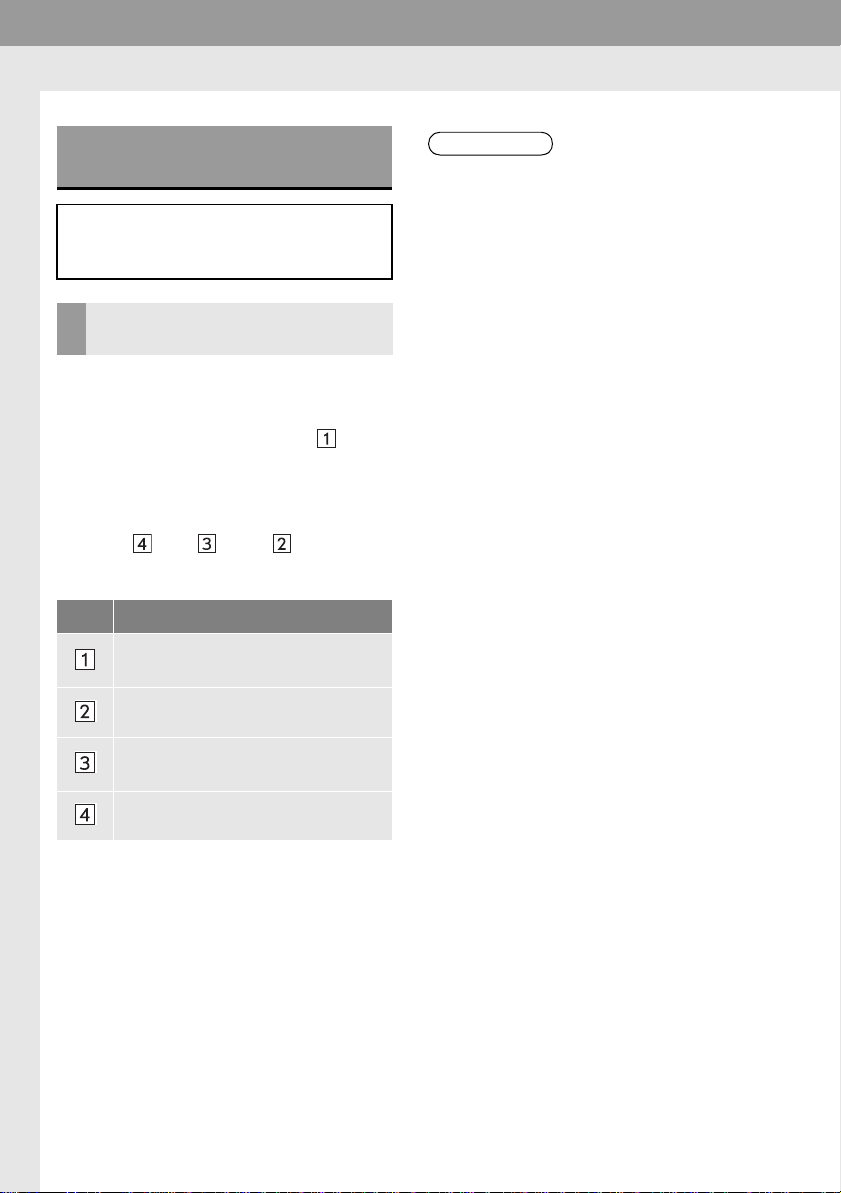
HOW TO READ THIS MANUAL
No. Name Description
Operational Outlines An outline of the operation is explained.
Main Operations The steps of an operation are explained.
Related Operations A main operation’s supplementary operations are described.
Information Useful information for the user is described.
4
Page 5
NAVIGATION SYSTEM OWNER’S MANUAL
navigation/multimedia
This manual explains the operation of the navigation/multimedia system.
Please read this manual carefully to ensure proper use. Keep this manual in
your vehicle at all times.
The screen shots in this document and the actual screens of the navigation/multimedia system differ depending on whether the functions and/or a contract existed and the map data available at the time of producing this document.
Please be aware that the content of this manual may be different from the nav-
igation system in some cases, such as when the system’s software is updated.
NAVIGATION SYSTEM
The Navigation System is one of the most tec hnologically advanced vehicle accessories ever developed. The system receives satelli te signals from the Global
Positioning System (GPS) operated by the U.S. Department of Defense. Using
these signals and other vehicle sensors, the system indicates your present position and assists in locating a desired destination.
The navigation system is designed to select efficient routes from your present
starting location to your destination. The system is also designed to direct you
to a destination that is unfamiliar to you in an efficient manner. The system is
developed by “Harman International” using “NAVTEQ” maps. The calculated
routes may not be the shortest nor the least traffic congested. Your own personal local knowledge or “short cut” may at times be faster than the c alculated
routes.
The navigation system’s database includes Point of Interest categories to allow
you to easily select destinations such as restaurants and hotels . If a des tination
is not in the database, you can enter the street address or a major intersection
close to it and the system will guide you there.
The system will provide both a visual map and audio i nstructions. The audio i nstructions will announce the distance remaining and the direction to turn in approaching an intersection. These voice instructions will help you keep your eyes
on the road and are timed to provide enough time to allow you to maneuver,
change lanes or slow down.
Please be aware that all current vehicle navigation systems have certain limitations that may affect their ability to perform properly. The accuracy of the vehicle’s position depends on the satellite condition, road configuration, vehicle
condition or other circumstances. For more information on the limitations of the
system, refer to page 217.
5
Page 6
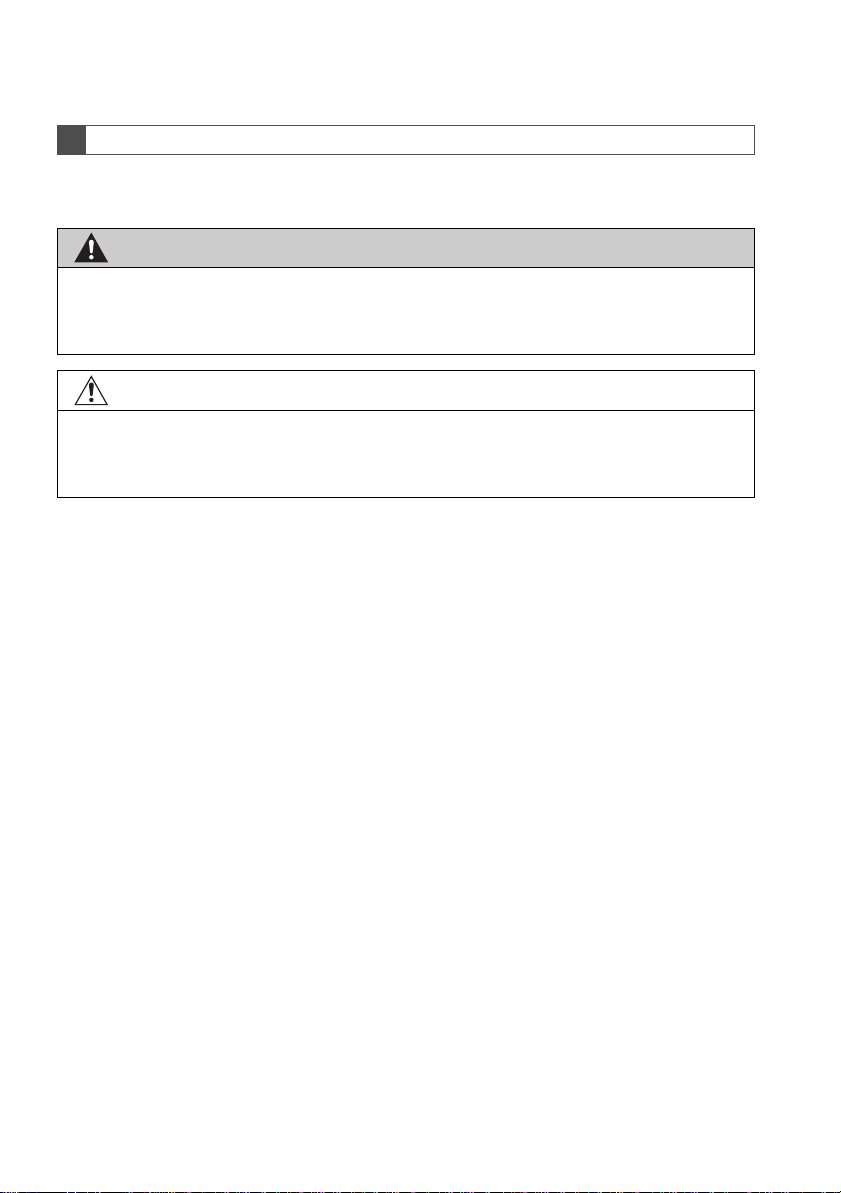
IMPORTANT INFORMATION ABOUT THIS MANUAL
For safety reasons, this manual indicates items requiring particular attention
with the following marks.
CAUTION
● This is a warning agai nst anything which may cause injury to peo ple if the warning is
ignored. You are informed about what you must or must not do in order to reduce the risk
of injury to yourself and others.
NOTICE
● This is a warning agai nst anything w hich may caus e damage to the vehicle or its equ ip-
ment if the warning is ignored. You are informed about wh at you must or must not d o in
order to avoid or reduce t he risk of damage to your vehicl e and its equipment.
6
Page 7

SAFETY INSTRUCTION (MULTIMEDIA SYSTEM)
To use this system in the safest possible
manner, follow all the safety tips shown
below.
Do not use any feature of this system to
the extent it becomes a distraction and
prevents safe driving. The first priority
while driving sh ould always be the saf e operation of the vehicle. While driving, be
sure to observe all traffic regulations.
Prior to the actual use of t his system , learn
how to use it and b ecome thoroughl y familiar with it. Read the entire Navigation system Owner's manual to make sure you
understand the system. Do n ot allow other
people to use this system until they have
read and understood the instructions in
this manual.
For your safety , some functions may become inoperable when driving. Unavailable screen buttons are dimmed.
CAUTION
● For safety, the driver should not operate
the multimedia system while he/she is
driving. Insufficient attention to the road
and traffic may cause an accident.
SAFETY INSTRUCTION (NAVIGATION SYSTEM)
To use this system in the safest possible
manner, follow all the safety tips shown
below.
This system is intended to assist in reaching the destination and, if used properly,
can do so. The driver is solely responsible
for the safe operation of your vehicle and
the safety of your passengers.
Do not use any feature of this system to
the extent it becomes a distraction and
prevents safe driving. The first priority
while driving should alw ays be the safe operation of the vehicle. While driving, be
sure to observe all traffic regulations.
Prior to the actual use of this system, le arn
how to use it and bec ome thoroughly f amiliar with it. Read the entire Navigation system Owner’s manual to make sure you
understand the syste m. Do not al low ot her
people to use this system until they have
read and understood the instructions in
this manual.
For your safety, some functions may become inoperable when driving. Unavailable screen buttons are dimmed.
7
Page 8

CAUTION
● For safety, the driver should not operate
the navigation system while he/she is
driving. Insufficient attent ion to the road
and traff i c may cause an accident.
● While driving, be sur e to obey the t raffic
regulations and maintain awareness of
the road conditions. If a traffic sign on
the road has been c hanged, route gu idance may not have the updated i nformation such as the direction of a one w ay
street.
While driving, listen to the voice instructions as much as possible and glance at
the screen briefly and only when it is safe.
However, do not totally rely on voice guidance. Use it just for reference. If the system cannot determine the current vehicle
position correctly, there is a possibility of
incorrect, late, or non- voice guidance.
The data in the system may occasionally
be incomplete. Road conditions, including
driving restrictio ns (no left t urns, stree t closures, etc.) frequently change. Therefore,
before following any instruction from the
system, look to see whether the instruction
can be done safely and legally.
This system cannot warn about such
things as the safe ty of an a rea, conditi on of
streets, and availability of emergency services. If unsure about the safety of an area, do not drive into it. Under no
circumstances is this system a substitute
for the driver’s personal judgement.
Use this sys tem only in locat ions w here it
is legal to do so.
8
Page 9

9
Page 10

TABLE OF CONTENTS
QUICK GUIDE
1
1. QUICK GUIDE............ ...... ...... ..... .... 14
SYSTEM FUNCTION INDEX................ 14
OVERVIEW BUTTONS.......... .. ............. 16
2. CONTROLS AND FEATURES........ 16
TOUCH SCREEN GESTURES............. 18
TOUCH SCREEN OPERATION ........... 19
AUDIO SYSTEM
2
1. BASIC OPERATION........................ 26
QUICK REFERENCE............................ 26
SOME BASICS...................................... 27
2. RADIO OPERATION................... .... 30
AM/FM RADIO............................... ....... 30
3. MEDIA OPERATION.............. ..... .... 36
CD......................................................... 36
USB MEMORY...................................... 42
iPod....................................................... 47
AUX....................................................... 52
Bluetooth
®
AUDIO................................. 55
4. AUDIO REMOTE CONTROLS........ 62
STEERING SWITCHES ........................ 62
5. TIPS FOR OPERATING
THE AUDIO SYSTEM.................... 64
OPERATING INFORMATION............... 64
Bluetooth® HANDS-FREE
3
SYSTEM
1. BASIC INFORMATION
BEFORE OPERATION ................. 74
QUICK REFERENCE............................ 74
HANDS-FREE SYSTEM............... .. . ...... 77
REGISTERING AN ENTRY................... 81
2. PHONE OPERATION ..................... 85
CALLING ON A Bluetooth® PHONE ..... 85
RECEIVING CALLS ON A
Bluetooth
TALKING ON A
Bluetooth
®
PHONE............................. 90
®
PHONE............................. 91
3. SHORT MESSAGE FUNCTION ..... 95
SHORT MESSAGE FUNCTION............ 95
4. WHAT TO DO IF........................... 100
TROUBLESHOOTING......................... 100
VEHICLE INFORMATION
4
1. VEHICLE INFORMATION............. 108
QUICK REFERENCE.......................... 108
FUEL CONSUMPTION............... .. .. ..... 109
10
Page 11

5
SETUP
NAVIGATION SYSTEM
7
1
1. SETUP OPERATION.................... 112
QUICK REFERENCE .......................... 112
GENERAL SETTINGS......................... 114
DISPLAY SETTINGS........................... 117
Bluetooth
CONNECTIVITY SETTINGS............... 126
TELEPHONE SETTINGS.................. .. 139
AUDIO SETTINGS............................... 140
VEHICLE SETTINGS........................... 142
6
®
SETTINGS......................... 119
REAR VIEW MONITOR
SYSTEM
1. REAR VIEW MONITOR
SYSTEM...................................... 144
REAR VIEW MONITO R SY ST EM ....... 144
REAR VIEW MONITO R SY ST EM
PRECAUTIONS ................................ 148
THINGS YOU SHOULD KNOW .......... 154
1. BASIC INFORMATION
BEFORE OPERATION................ 158
QUICK REFERENCE.......................... 158
DISPLAYING THE NAVIGATION
SCREEN........................................... 163
NAVIGATION SYSTEM FUNCTION
INDEX............................................... 165
2. MAP SCREEN OPERATION
AND MAP ICONS........................ 167
MAP SCREEN OPERATION.............. 167
MAP ICONS........................................ 170
3. DESTINATION SEARCH.............. 178
DESTINATION SEARCH INDEX........ 178
SEARCH OPERATION....................... 179
4. ROUTE GUIDANCE...................... 186
STARTING ROUTE GUIDA N C E......... 186
ROUTE GUIDANCE............................ 189
SETTING AND DELETING
THE ROUTE..................................... 192
5. MY DESTINATIONS...................... 200
REGISTERING AN ENTRY................ 200
DISPLAYING AND EDITING
THE ENTRY INFORMATION........... 206
SENDING AND RESTORING
STORED CONTACTS USING
A USB MEMORY.............................. 209
6. NAVIGATION SETTING................ 211
MAP SETTINGS.................................. 211
ROUTE SETTINGS............ .. ............... 214
TRAFFIC MESSAGE SET TI NG S ....... 215
7. NAVIGATION SYSTEM
INFORMATION............................ 217
LIMITATIONS OF THE
NAVIGATION SYSTEM.................... 217
NAVIGATION DATABASE
UPDATES......................................... 219
2
3
4
5
6
7
8
11
Page 12

TABLE OF CONTENTS
APPLICATION
8
1. APPLICATIONS OPERATION...... 222
QUICK REFERENCE.......................... 222
PICTURE SLIDESHOW ...................... 225
E-MAIL................................................ 227
MirrorLink.......................................... 229
TOYOTA EUROCARE........................ 230
2. CONNECTED SERVICE................ 232
CONNECTED SERVICE
OVERVIEW...................................... 232
BEFORE USING CONNECTED
SERVICE.......................................... 236
ONLINE SEARCH............................... 239
LOADING POIs/ROUTE...................... 244
OPERATING AN APPLICATION
USING CONNECTED SERVICE...... 245
INDEX
ALPHABETICAL INDEX................... 248
12
Page 13

1
QUICK GUIDE
1 QUICK GUIDE
1. SYSTEM FUNCTION INDEX......... 14
CONTROLS AND FEATURES
2
1. OVERVIEW BUTTONS ................. 16
2. TOUCH SCREEN GESTURES...... 18
3. TOUCH SCREEN
OPERATION............................. ... 19
ENTERING SCREEN OPERATION...... 20
LIST SCREEN OPERATION................. 21
1
2
3
4
5
6
7
8
13
Page 14

1. QUICK GUIDE
1. SYSTEM FUNCTION INDEX
AUDIO SYSTEM
To access the audio system, press the
“MEDIA” button. The audio control screen
will be displayed. (→P.25)
Bluetooth® HANDS-FREE SYSTEM
®
To access the Bluetooth
tem, press the button. Each time
the button is pressed, the screen
will change between the “Phone” menu
screen and the “Extras”/“Toyota online”
menu screen. The driver can make or receive phone calls without taking their
hands off the steering wheel. (→P.73)
hands-free sys-
VEHICLE INFORMATION
To access the veh ic le inf orm at i on syst em ,
press the “CAR” button. Fuel consumption can be checked. (→P.108)
SETUP
To customise the function settings, press
the “SETUP” button. (→P.111)
14
Page 15

1. QUICK GUIDE
REAR VIEW MONITOR SYSTEM
Shifting into the “R” position will automatically show the view behind the rear of the
vehicle on the display screen. (→P.143)
NAVIGATION SYSTEM
To access the navigation system, press
the “MAP/NAV” button. Each time the
“MAP/NAV” button is pres se d, th e sc ree n
will change between the map screen and
“Navigation” menu screen. (→P.157)
APPLICATION SYSTEM
To access the application system, press
the button. Each time the
button is pressed, the screen will change
between the “Phone” menu screen an d the
“Extras”/“Toyota online” menu screen. The
driver can use applications. (→P.221)
1
QUICK GUIDE
15
Page 16
2. CONTROLS AND FEATURES
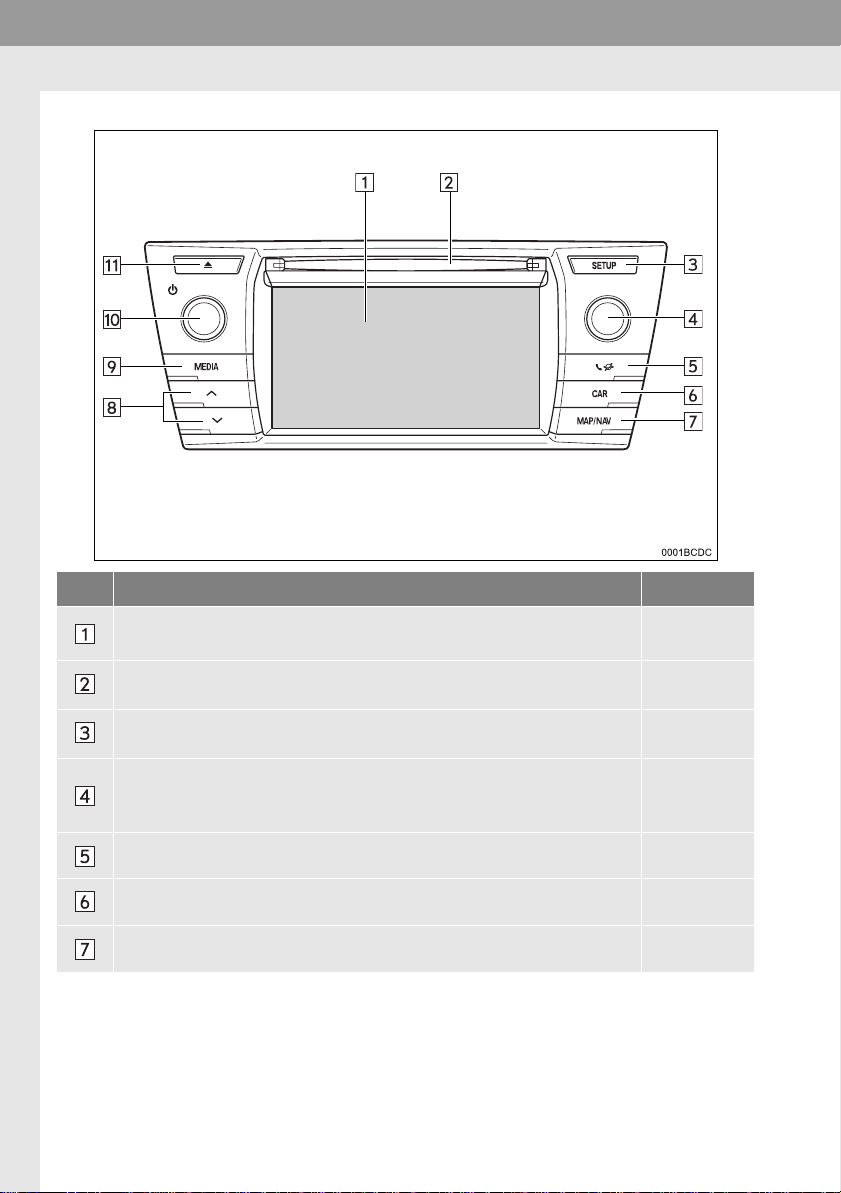
2. CONTROLS AND FEATURES
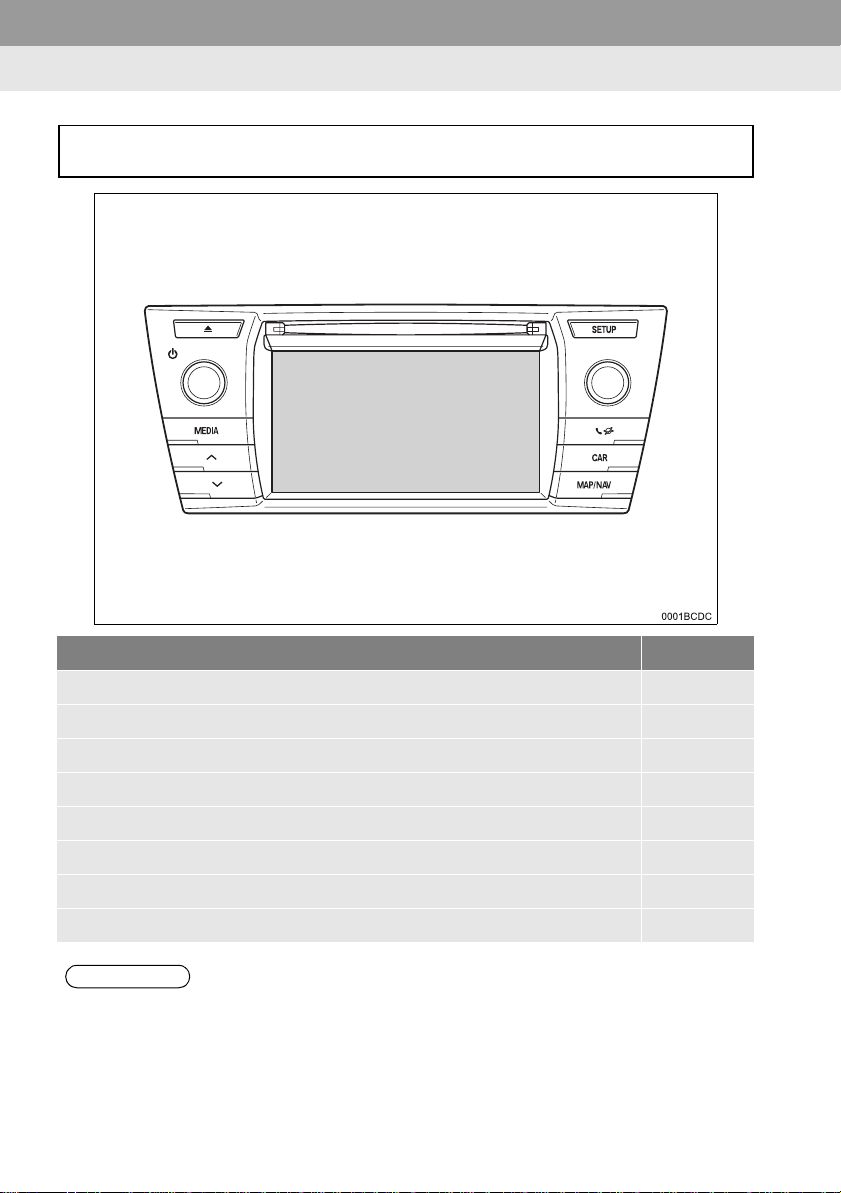
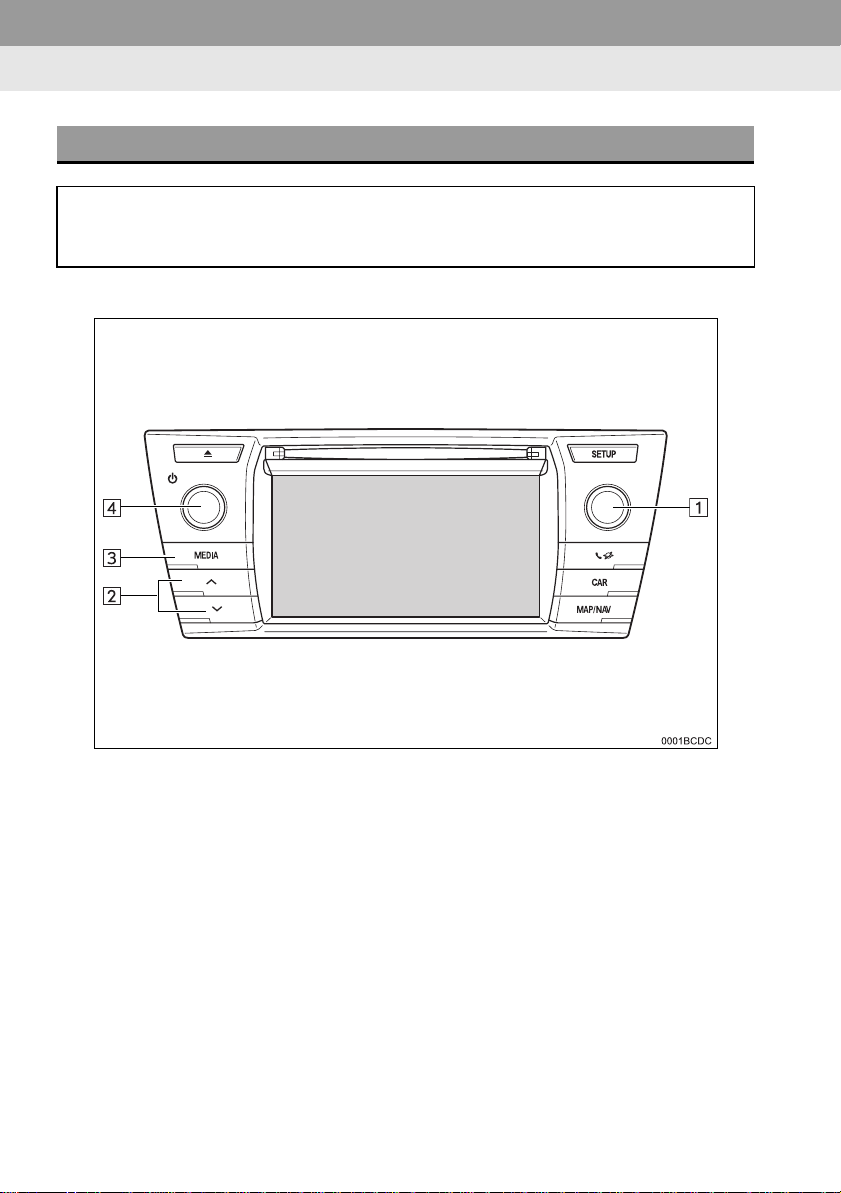
1. OVERVIEW BUTTONS
No. Function Page
16
By touching the screen with your finger, you can control the selected
functions.
Insert a disc into this slot. The CD player turns on immediately. 36
Press to customise the function settings. 111
Turn the tune/scroll knob to select a radio station or skip to the next or
previous track. This knob can also be used to magnify or reduce the map
scale. (Navigation system only)
Press to access the Bluetooth® hands-free system and applications. 73, 221
Press to access the vehicle information system. 108
Press to access the navigation system. (Navigation system only) 157
18
30, 168
Page 17
2. CONTROLS AND FEATURES
No. Function Page
Press the “ ” or “ ” button to seek up or down for a radio station or to
access a desired track or file.
Press to access the audio system. The audio system turns on in the last
mode used.
30, 36, 42,
47, 55
26, 27, 28
1
QUICK GUIDE
Press the power/volume knob to turn navigation/multimedia system on
and off, and turn it to adjust the volume.
Press to eject a disc. 29
INFORMATION
● This illustration is for left-hand drive vehicles.
● The button positions an d sh apes differ for right-hand drive ve hi cles.
27
17
Page 18
2. CONTROLS AND FEATURES
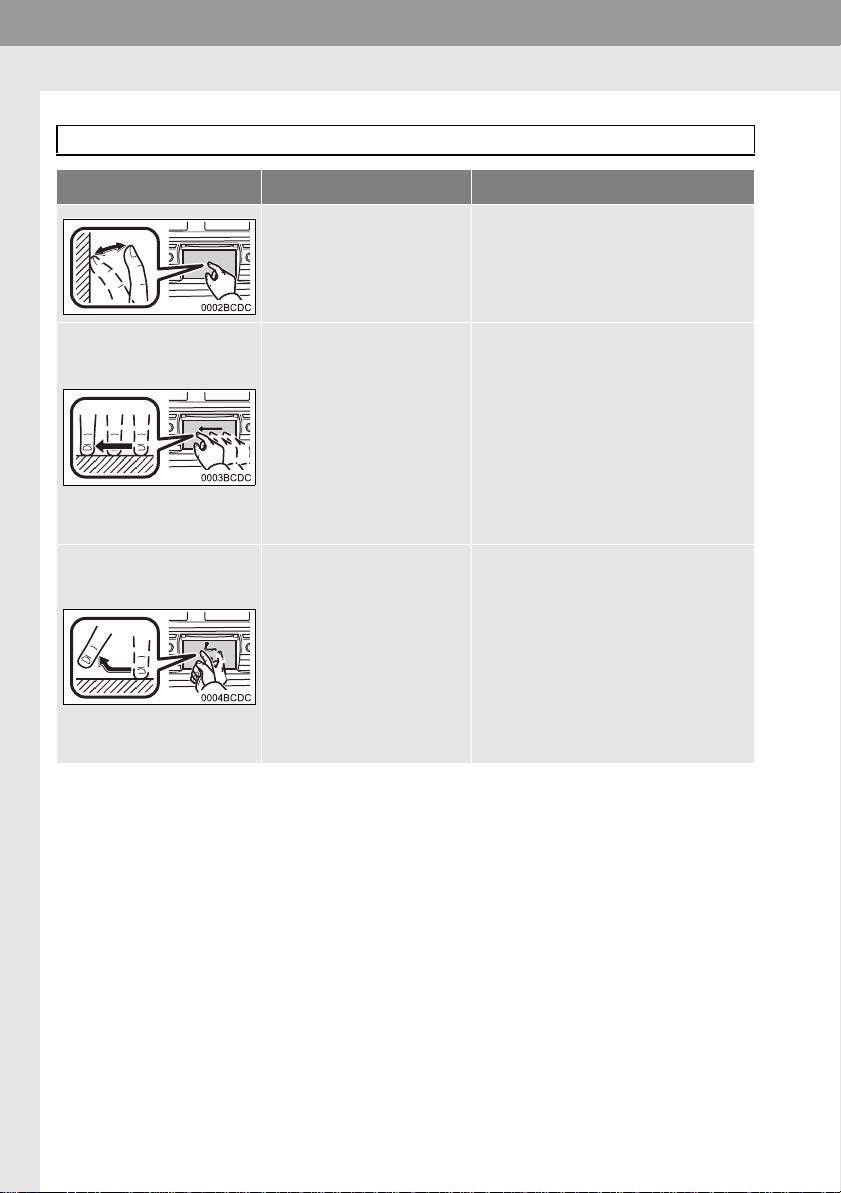
2. TOUCH SCREEN GESTURES
Operations are performed by touching the touch screen directly with your finger.
Operation method Outline Main use
Touch
Quickly touch and release
once.
Drag*
Touch the screen with
your finger, and move the
screen to the desired position.
Flick*
Quickly move the screen
by flicking with your finger.
Changing and selecting various settings.
• Scrolling the lists
• Using scroll bar in lists
• Adjusting the zoom bar of the map
(→P.168)
• Adjusting manual tune scales for
FM and AM (→P.33)
• Adjusting the displayed screen’s
position sliders (→P.117)
• Adjusting balance/fader (→P.141)
• Moving position of elements in the
stopover/destination list (→P.193,
194)
• Scrolling the main screen page
• Returning to the menu screen from
the sub-menu screen (screen one
level below)
• Going to the next/previous picture
(→P.225)
• Going to the next/previous traffic
message in the details view
(→P.175)
• Going to the next/previous route
segment in the full screen view
(turn list) (→P.196)
*: The above operations may not be performed on all screens.
18
Page 19
2. CONTROLS AND FEATURES
3. TOUCH SCREEN OPERATION
This system is operated mainly by the
screen buttons.
When a screen button is touched, a
beep sounds. (To set a beep sound,
→P.114.)
NOTICE
● To prevent damaging the screen, lightly
touch the screen buttons with your finger.
● Do not use objects other than your finger
to touch the screen.
● Wipe off fingerprints using a glass clean-
ing cloth. Do not use chemical clea ners
to clean the screen, as they may damage the touch screen.
● To prevent the battery from being dis-
charged, do not leave the system on
longer than necessary whe n the engine
is not running.
INFORMATION
● If the system does not respond to a
touch on a scre en button, m ove your finger away from the screen and then
touch it again.
● Dimmed screen buttons cannot be oper -
ated.
● The displayed image may become
darker and moving images may be
slightly distorted when the display is
cold.
● Under extremely cold conditions, the
screen may not be displayed and the
data input by a user may be deleted.
Also, the screen button s may be harder
than usual to depress .
● When you look at the screen through
polarized material such as polarized
sunglasse s, the scre en may be dark and
hard to see. If so, look at the screen
from different angle s, adjust the screen
settings (→P.117), or take off your sun -
glasses.
● Select to return to the previous
screen.
1
QUICK GUIDE
19
Page 20
2. CONTROLS AND FEATURES
ENTERING SCREEN OPERATION
When searching for a name, letters
and numbers, etc. can be entered via
the screen.
ENTERING LETTERS AND NUMBERS
1 Select the keys directly to enter letters
or numbers.
No. Function
Select to delete one letter. Select
and hold to continue deleting letters.
Select to enter symbols.
INFORMATION
● When a character is entered, a hint will
appear displaying a possible match for
the word to be searched.
● Currently unavailable screen buttons will
be dimmed.
● When an entry is too long to be dis-
played in the enter fi eld, the last sect ion
of the enter text will be displayed with
the initial section displayed as “...”.
● In the following situations, the enter
mode will automatically change between
upper and lower case.
• When the keyboard layout is changed
to upper case input, the layout will
automatically change back to lower
case input after one letter has been
entered.
• When “/”, “&”, “.” or “(” is entered,
the keyboard layout will automatically
be changed to upper case input.
• When all characters are deleted, the
keyboard layout will automatically
change to upper case input.
Select to select lower case or upper
case.
Select to change keyboard types.
2 Select “OK”.
20
Page 21
2. CONTROLS AND FEATURES
ENTERING FROM THE LIST OF MATCHING ENTRIES
On certain screens, a candidate entry
text or word prediction list based on the
input letters will be displayed. The desired item can be selected and entered.
1 Enter letters.
z If a candidate entry text displayed in the
enter field is what is desired , select “OK”
or the candidate entry text .
z Select to display the candi-
date entry text list . The number of m atching items is sho wn. Up to 300 items are
displayed.
z The list will be displayed automatically, if
the number of matching entries is 5 or
less.
2 Select the desired item.
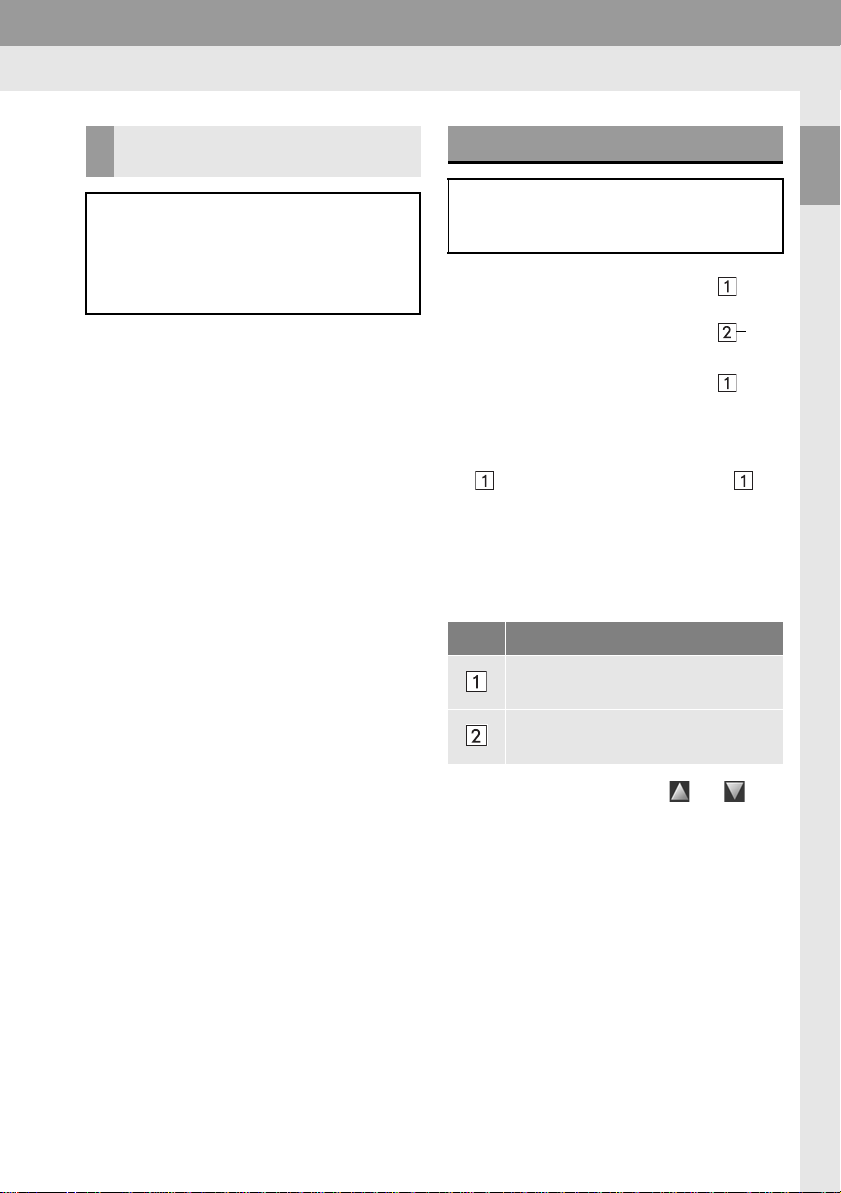
LIST SCREEN OPERATION
When a list is displayed, use the appropriate screen button to scroll through
the list.
No. Function
Select to shift to the next or previous
page.
This indicates the displayed
screen’s position.
z By selecting and holding or , the
screen can be scrolled up or down. Scrolling will automatically stop when the top/
bottom of the list is reached.
z Changing pages ca n also be changed the
following ways:
• Selecting the des ired point on the scroll
bar.
• Dragging the scroll bar marking to the
desired point.
1
QUICK GUIDE
21
Page 22

2. CONTROLS AND FEATURES
■AUTOMATIC TEXT SCROLLING
Entries that are too long to fit in the current field are scrolled automatically
from right to left.
This function is not available while driving.
INFORMATION
● This function can be changed to on or
off. (→P.114)
CHARACTER JUMP BUTTONS IN LISTS
Some lists contain character screen
buttons, “A-C”, “D-F” etc., which allow a direct jump to list entries that begin with the same letter as the
character screen button.
1 Select one of the character screen but-
tons.
INFORMATION
● Every time the same character screen
button is selected, the list starting with
the subsequent character is displayed.
22
Page 23
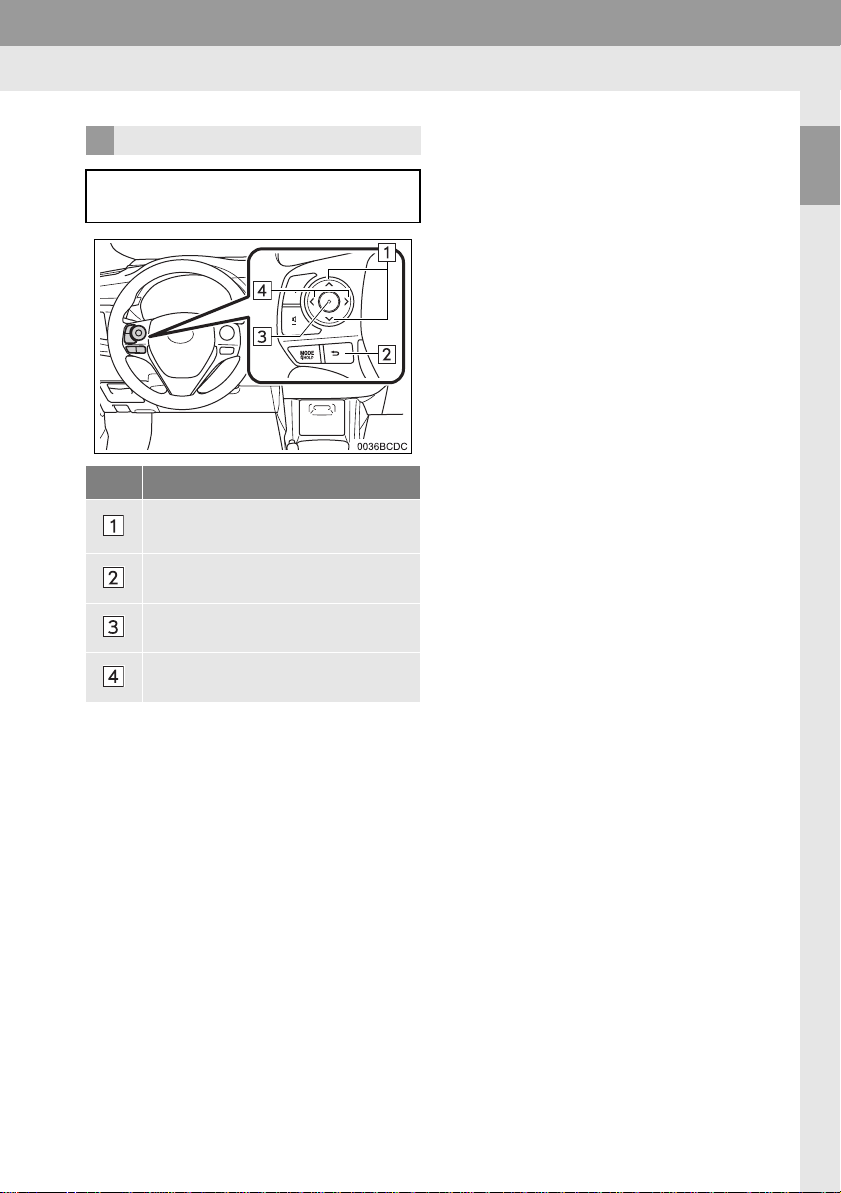
USING STEERING SWITCHES
On list screens, can be operated with
the switches on the steering wheel.
No. Function
Press: Cursor up/down
Press and hold: Page up/down
Return to the previous screen.
2. CONTROLS AND FEATURES
1
QUICK GUIDE
Select cursored entry
Change the tab
23
Page 24

24
Page 25

2
AUDIO SYSTEM
1 BASIC OPERATION
1. QUICK REFERENCE.................... 26
2. SOME BASICS.............................. 27
TURNING THE AUDIO SYSTEM
ON OR OFF ........................................ 27
SELECTING AN AUDIO SOURCE........ 28
INSERTING OR EJECTING A DISC ..... 28
USB/AUX PORT.................................... 29
RADIO OPERATION
2
1. AM/FM RADIO .............................. 30
OVERVIEW............................................ 30
PRESETTING A STATION.................... 33
MANUAL TUNING............................. .... 33
RDS (RADIO DATA SYSTEM) .............. 34
FM RADIO OPTIONS............................ 35
2. USB MEMORY .............................. 42
OVERVIEW........................................... 42
PLAYING A USB MEMORY.................. 46
USB MEMORY OPTIONS..................... 46
3. iPod ............................................ ... 47
OVERVIEW........................................... 47
iPod AUDIO........................................... 51
iPod AUDIO OPTIONS.............. .. .. ........ 51
4. AUX............................................. ... 52
OVERVIEW........................................... 52
5. Bluetooth® AUDIO........................ 55
OVERVIEW........................................... 55
CONNECTING Bluetooth
LISTENING TO Bluetooth
Bluetooth
4
®
AUDIO OPTIONS ............... 60
AUDIO REMOTE CONTROLS
®
AUDIO ....... 5 9
®
AUDIO ....... 6 0
1
2
3
4
5
6
7
8
MEDIA OPERATION
3
1. CD.................................................. 36
OVERVIEW............................................ 36
PLAYING AN AUDIO CD....................... 39
PLAYING AN MP3/W MA/AAC DISC ..... 39
AUDIO CD OR MP3/WMA/AAC
DISC OPTIONS.............. ............. ........ 40
1. STEERING SWITCHES................. 62
TIPS FOR OPERATING THE
5
AUDIO SYSTEM
1. OPERATING INFORMATION ....... 64
RADIO RECEPTION............................. 64
iPod....................................................... 66
CARING FOR YOUR CD PLAYER
AND DISCS........................................ 67
FILE INFORMATION............................. 69
CD-R AND CD-RW DISCS ................... 71
TERMS.................................................. 71
Some of the functions cannot be operated while driving.
25
Page 26
1. BASIC OPERATION
1. QUICK REFERENCE
To access the audio system, press the “MEDIA” button. The audio system turns
on in the last mode used.
Function Page
Using the radio 30
Playing an audio CD or MP3/WMA/AAC disc 36
Playing a USB memory 42
Playing an iPod 47
Using the AUX port 52
Playing a Bluetooth® device 55
Using the steering wheel audio switches 62
Audio settings 140
INFORMATION
● This illustration is for le ft-han d dr ive vehicles.
● The button position s and shapes differ for right-han d dr ive vehicles.
26
Page 27
1. BASIC OPERATION
2. SOME BASICS
This section describes some of the basic features of the audio system. Some
information may not pertain to your
system.
XVehicles without smart entry & start
system
Your audio system works when the engine switch is turned to the “ACC” or
“ON” position.
XV ehicles with smar t entry & start sys-
tem
Your audio system works when the engine switch is turned to ACCESSORY
or IGNITION ON mode.
CAUTION
CAUTION:
THIS PRODUCT IS A CLASS 1 LASER
PRODUCT. USE OF CONTROLS OR
ADJUSTMENTS OR PERFORMANC E
OF PROCEDURES OTHER THAN
THOSE SPECIFIED HEREIN MAY RESULT IN HAZARDOUS RADIATION
EXPOSURE. DO NOT OPEN COVERS
AND DO NOT REPAIR BY YOURSELF. REFER SERVICING TO QUALIFIED PERSONNEL.
TURNING THE AUDIO SYSTEM ON OR OFF
2
AUDIO SYSTEM
The power/volume knob: Press this knob
to turn the audio system on and off. Turn
this knob to adjust th e volume. The sy stem
turns on in the last mode used.
“MEDIA” button: Press this button to display screen buttons for the audio system.
INFORMATION
● If the volume is adjusted while musi c is
paused or muted, the pause or mute will
be cancelled.
NOTICE
● To prevent the battery from being dis-
charged, do not leave the audio system
on longer than necessary when the
engine is not running.
27
Page 28
1. BASIC OPERATION
SELECTING AN AUDIO SOURCE
1 Press the “MEDIA” button.
z The audio system turns on in the last
mode used.
2 Select or press the “MEDIA”
button to display the audio source selection screen.
INSERTING OR EJECTING A DISC
INSERTING A DISC
1 Insert a disc with the label side up.
z When a disc is correctly inserted into the
slot, the CD player will automatically start
playing from the first track or the first track
of the first folder on a disc.
INFORMATION
● If the label is facing down, “Disc error
occurred” will appear on the screen.
3 Select a desired audio source.
INFORMATION
● You cannot select dimmed screen but-
tons.
28
NOTICE
● Never try to di sassemble or oi l any part
of the CD player. Do not insert anyth ing
other than a disc into the sl ot.
Page 29
1. BASIC OPERATION
EJECTING A DISC
1 Press the button.
z The disc will be ejected.
USB/AUX PORT
1 Open the cover of t he auxiliary box and
then open the cover of the USB/AUX
port.
2 Connect a device.
z If a device is inserted, it starts playing
automatically. As soon as it is ready to
play, the audio control screen is shown
automatically.
z If a USB hub is plugged-in, two devices
can be connected at a time.
z Even if a USB hub is used to connect
more than two USB devices, only the first
two connected devices will be recognized.
2
AUDIO SYSTEM
29
Page 30
2. RADIO OPERATION
1. AM/FM RADIO
OVERVIEW
The radio operation screen can be reached by the following method:
Press the “MEDIA” button, then select “AM” or “FM” to display the radio control
screen.
■CONTROL PANEL
30
Page 31

■CONTROL SCREEN
トルツメ
XMultimedia system
2. RADIO OPERATION
2
AUDIO SYSTEM
XNavigation system
31
Page 32

2. RADIO OPERATION
No. Function
The tune/scroll knob:
• Preset tuning screen: Turn to select a preset station.
• Station list screen: Turn to move up/down the station list.
• Manual tuning screen: Turn to step up/down frequencies.
• Preset tuning screen: Press to move up/down the preset stations.
• Station list screen: Press to move up/down the station list.
• Manual tuning screen: Press and hold to seek up/down available stations while being
pressed.
• Press to display the media mode selection screen.
• Pressing the button again will display the radio control screen again.
The power/volume knob:
• Turn to adjust vol u me.
• Press to turn the audio system on/off.
Select to tune to preset stations.
Select to display the radio options screen.
Select to display the manual tuning screen.
Select to display the station list.
Select to display the preset station.
Select to display the audio source selection screen.
INFORMATION
● The radio automatically changes to stereo reception when a stereo broadcast is received.
32
Page 33

2. RADIO OPERATION
トルツメ
キャプションイキ
EN1017DC
EN1018DC
PRESETTING A STATION MANUAL TUNING
1 Tune in the desired station.
2 Select one of the station selector but-
tons (1-6) and hold it until a beep is
heard.
z The station’s frequency or name will be
displayed in the scre en bu tton.
z To change the preset station to a different
one, follow the same procedure.
XAM/FM
1 Select “Manual”.
2 Tune the desired station.
No. Function
• Select to move up/down a station.
• Select and hold to seek stations
non-stop. When released, the currently received station will be
selected.
2
AUDIO SYSTEM
• Select to step up/down frequencies.
• Select and hold to seek frequencies non-stop. When released, the
system will stop at the current frequency.
It is possible to drag and drop the
marker by sliding your finger on the
screen (in the area where the marker is shown). Relocating the marker
by a single select on the frequency
band is also possible.
33
Page 34

2. RADIO OPERATION
トルツメ
RDS (RADIO DATA SYSTEM)
Depending on the availability of RDS
infrastructure, the service may not
function.
FM ALTERNATIVE FREQUENCY (AF)
A better reception frequency of the
same broadcasting program will be automatically tuned if the reception of the
current frequency degrades.
REGIONAL CODE CHANGE
OFF mode: For switching over to a broa d-
casting stati on within the same RDS ne twork; convenient for following the
appropriate stations in a wide region.
ON mode: For switching over to a broadcasting stati on within the same local pr ogram network.
TA (TRAFFIC ANNOUNCEMENT) FUNCTION
The tuner will automatically seek a station that regularly broadcasts traffic information and the station broadcasts
when the traffic information program
starts.
1 A pop-up message is displayed on the
screen when the radio seeks out a TP
station.
2 Select “Continue”.
INFORMATION
● When TA is set to on (→P.35), the radio
will begin seeking a TP station.
● When the program ends, the initial oper-
ation resumes.
● EON (Enhanced Other Network) sys-
tem: If the RDS station ( with EON data)
currently being lis tened to is not broadcasting a traffic information program in
the TA (Traffic Announcement) mode,
the radio will be switched to the traffic
information program automatically by
using the EON AF list. After the traffic
information ends, the radio will return to
the initial program automatically.
■TRAFFIC ANNOUNCEMENT VOL-
UME
The volume level of a received traffic
information sound is stored in the
memory.
34
Page 35

FM RADIO OPTIONS
1 Display the FM radio control screen.
(→P.30)
2 Select .
3 Select the button to be set.
No. Function
Select to select “By broadcaster” or
“Alphabetical” for the listing order of
the station list.
2. RADIO OPERATION
2
AUDIO SYSTEM
The tuner will automatically seek a
station that regularly broadcasts
traffic information and the station
broadcasts when the traffic information program starts.
Select to set automatic selection of a
station providing good reception if
current reception worsens on/off.
Select to switch to a broadcasting
station within the same local program network.
Select to set the FM radio text feature on/off.
INFORMATION
● The current setting of each item is dis-
played on its right.
35
Page 36

3. MEDIA OPERATION
1. CD
OVERVIEW
The CD operation screen can be reached by the following methods:
XInserting a disc (→P.28)
XPress the “MEDIA” button, then select “CD” to display the CD control screen.
■CONTROL PANEL
36
Page 37

■CONTROL SCREEN
XAudio CD
3. MEDIA OPERATION
2
AUDIO SYSTEM
XMP3/WMA/AAC disc
37
Page 38

3. MEDIA OPERATION
No. Function
Select to display the audio setting screen.
The tune/scroll knob:
• Turn to select a track.
• Turn to move up/down the list.
• Press to select a track.
• Press and hold to fast forward/rewind.
• Press to display the media mode selection screen.
• Pressing the button again will display the audio CD, MP3/WMA/AAC disc control
screen again.
The power/volume knob:
• Turn to adjust vol u me.
• Press to turn the audio system on/off.
Press to eject a disc.
Disc slot
Shows progress
Select to display audio CD, MP3/WMA/AAC disc options screen.
• Audio CD: Select to display a track list.
• MP3/WMA/AAC disc: Select to display a folder list.
Select to set random playback.
Select to set repeat playback.
Select to display the media source selection screen.
Select to play/pause.
INFORMATION
● If a disc contains CD-DA files and MP3/WMA/AAC files, only the CD-DA files can be
played back.
● If a CD-TEXT disc is inserted, the title of the disc and track will be di s pl ayed.
● If the disc contains no CD-TEXT, only the track number would be displayed on the
screen.
38
Page 39

3. MEDIA OPERATION
PLAYING AN AUDIO CD
REPEATING
The track currently being listened to
can be repeated.
1 Select .
z Each time is selected, the mode
changes as follows:
• track repeat → off
RANDOM ORDER
Tracks can be automatically and randomly selected.
PLAYING AN MP3/WMA/AAC DISC
REPEATING
The track or folder currently being listened to can be repeated.
1 Select .
z Each time is selected, the mode
changes as follows:
• track repeat → folder repeat → off
2
AUDIO SYSTEM
1 Select .
z Each time is selected, the mode
changes as follows:
• random → off
39
Page 40

3. MEDIA OPERATION
RANDOM ORDER
Tracks can be automatically and randomly selected.
1 Select .
z Each time is selected, the mode
changes as follows:
• random →
off
AUDIO CD OR MP3/WMA/AAC DISC OPTIONS
1 Display the CD control screen.
(→P.36)
2 Select .
3 Select the button to be set.
40
Page 41

No. Function Page
• Audio CD: Select to
display a track list.
• MP3/WMA/AAC disc:
Select to display a
folder list.
Select to resume playback of tracks from the
beginning of the track
list when the playback
of the last track on the
list is finished.
3. MEDIA OPERATION
2
AUDIO SYSTEM
Select to set random
playback track.
Select to set repeat
playback track.
Select to set repeat
∗1
playback folder.
Select to set random
∗1, 2
and repeat playback
folder.
∗1
: MP3/WMA/AAC disc only
∗2
: Navigation system only
39,
40
39
39
39,
40
41
Page 42

3. MEDIA OPERATION
2. USB MEMORY
OVERVIEW
The USB memory operation screen can be reached by the following methods:
XConnecting a USB memory (→P.29)
XPress the “MEDIA” button, then select “USB” to display the USB memory con trol
screen.
■CONTROL PANEL
42
Page 43

■CONTROL SCREEN
3. MEDIA OPERATION
2
AUDIO SYSTEM
43
Page 44

3. MEDIA OPERATION
No. Function
Select to display the audio setting screen.
The tune/scroll knob:
• Turn to select a track.
• Turn to move up/down the list.
• Press to select a track.
• Press and hold to fast forward/rewind.
• Press to display the media mode selection screen.
• Pressing the button again will display the USB control screen again.
The power/volume knob:
• Turn to adjust vol u me.
• Press to turn the audio system on/off.
Shows progress
Select to display the USB options screen.
Select to display the browse options selection screen.
Select to set random playback.
44
Select to set repeat playback.
Select to display the media source selection screen.
Select to switch between “USB1” and “USB2” when 2 USB memory devices are connect-
ed.
Select to play/pause.
Page 45

3. MEDIA OPERATION
CAUTION
● Do not operate the player’s controls or connect the US B m em or y w hi le dr i vi ng .
NOTICE
● Depending on the s ize and shape of the USB me mory that is c onnected to th e system,
the auxiliary box may not cl os e fu lly.
In this case, do not forcibly close the auxiliary box as this may damage the USB memory
or the terminal, etc.
● Do not leave a portable p layer in the v ehicle. In particular, high temperat ures inside the
vehicle may damage the portable player.
● Do not push down on or apply unnecessary pressure to the portable player while it is con-
nected as this may damage the portable player or its connector.
● Do not insert foreign objects into the port as this may damage the portable player or its
connector.
INFORMATION
● Navigation system on ly : Th is system supports MTP devic es.
2
AUDIO SYSTEM
45
Page 46

3. MEDIA OPERATION
PLAYING A USB MEMORY
REPEATING
The track or folder currently being listened to can be repeated.
1 Select .
z Each time is selected, the mode
changes as follows:
• track repeat → off
RANDOM ORDER
Tracks can be automatically and randomly selected.
1 Select .
USB MEMORY OPTIONS
1 Display the USB memory control
screen. (→P.42)
2 Select .
3 Select the button to be set.
No. Function Page
Select to select a track.
Select to display the play
mode selection screen.
Select to resume playback
of tracks from the beginning of the track list when
the playback of the last
track on the list is finished.
Select to set random playback.
46
z Each time is selected, the mode
changes as follows:
• random → off
46
Select to set repeat playback track.
46
Page 47

3. MEDIA OPERATION
3. iPod
OVERVIEW
The iPod operation screen can be reached by the following methods:
XConnecting an iPod (→P.29)
XP ress the “MEDIA” button, then select “iPod” to display the iPod control screen.
■CONTROL PANEL
2
AUDIO SYSTEM
47
Page 48

3. MEDIA OPERATION
■CONTROL SCREEN
48
Page 49

No. Function
Select to display the audio setting screen.
The tune/scroll knob:
• Turn to select a track.
• Turn to move up/down the list.
• Press to select a track.
• Press and hold to fast forward/rewind.
• Press to display the media mode selection screen.
• Pressing the button again will display the iPod audio control screen again.
The power/volume knob:
• Turn to adjust volume.
• Press to turn the audio system on/off.
Shows progress
Select to display the iPod audio options screen.
Select to display the browse options selection screen.
Select to set random playback.
3. MEDIA OPERATION
2
AUDIO SYSTEM
Select to set repeat playback.
Select to display the media source selection screen.
• Displays cover art
• Select to display a track list.
Select to switch between “iPod1” and “iPod2” when 2 iPods are connected.
Select to play/pause.
49
Page 50

3. MEDIA OPERATION
CAUTION
● Do not operate the play er’s controls or connect the i Pod while driving.
NOTICE
● Depending on the size a nd sha pe of the iPod that is co nnected to the system , the au xil-
iary box may not clos e fu l ly.
In this case, do not forcibly close the auxiliary box as this may damage the iPod or the
terminal, etc.
● Do not leave a po rtable player in th e vehicle. In particular, high temp eratures inside the
vehicle may damag e th e portable player.
● Do not push down on or apply unnecessary pressure to the portable player while it is con-
nected as this may dam age the portable player or its conne ct or.
● Do not insert for eign objects into t he port as this m ay damage t he portable player or its
connector.
INFORMATION
● When an iPod is con nected u sing a genui ne iPod c able, the iPo d starts charging its bat-
tery.
● Depending on the iPo d and the songs in the iPod, iPod cove r art may be displayed. It
may take time to display iPod cover art, and the iPod may not be operated while the
cover art display is i n process. O nly iPod cov er art that is s aved in JPEG f ormat can be
displayed.
● When an iPod is connected and the audio source is changed to iPod mode, the iPod will
resume playing from th e same point it was last used.
● Depending on the iPod that is connected to the system, certain functions m ay not be
available.
50
Page 51

3. MEDIA OPERATION
iPod AUDIO
REPEATING
The track currently being listened to
can be repeated.
1 Select .
z Each time is selected, the mode
changes as follows:
• track repeat
→ off
RANDOM ORDER
Tracks can be automatically and randomly selected.
1 Select .
iPod AUDIO OPTIONS
1 Display the iPod control screen.
(→P.47)
2 Select .
3 Select the button to be set.
No. Function Page
Select to select a track.
Select to display the play
mode selection screen.
Select to resume playback
of tracks from the beginning of the track list when
the playback of the last
track on the list is finished.
Select to set random playback.
Select to set repeat playback track.
51
51
2
AUDIO SYSTEM
z Each time is selected, the mode
changes as follows:
• random
→ off
51
Page 52

3. MEDIA OPERATION
4. AUX
OVERVIEW
The AUX operation screen can be reached by the following methods:
XConnecting a device to the AUX port (→P.29)
XPress the “MEDIA” button, then select “AUX” to display the AUX control screen.
■CONTROL PANEL
52
Page 53

■CONTROL SCREEN
3. MEDIA OPERATION
2
AUDIO SYSTEM
No. Function
Select to display the audio setting screen.
• Press to display the media mode selection screen.
• Pressing the button again will display the AUX control screen again.
The power/volume knob:
• Turn to adjust volume.
• Press to turn the audio system on/off.
Select to display the media source selection screen.
53
Page 54

3. MEDIA OPERATION
CAUTION
● Do not connect portable a udi o device or operate the control s w hil e dr i vi ng.
NOTICE
● Depending on the size and shape of t he portable audio devi ce that is connect ed to the
system, the auxiliary box may not close fully.
In this case, do not forcibly close the auxiliary box as this may damage the portable audio
device o r the termin al, etc.
● Do not leave a portable aud io device in the vehicle. The temperature inside the ve hicle
may become high, re sulting in damage to the player.
● Do not push down on or apply unnecessary pressure to the portable audio device while it
is connected as this ma y dam age the portable audio device or its con nec t or.
● Do not insert fo reign objec ts into the port as this m ay dama ge the portable au dio devic e
or its connector.
54
Page 55

3. MEDIA OPERATION
5. Bluetooth® AUDIO
The Bluetooth® audio system enables users to enjoy listening to music that is
played on a portable player on the vehicle speakers via wireless communication.
This audio system supports Bluetooth®, a wireless data system capable of playing
portable audio music without cables. If your device does not support Bluetooth
the Bluetooth
OVERVIEW
The Bluetooth® audio operation screen can be reached by the following methods.
Depending on the type of portable player connected, some functions may not be
available and/or the screen may look differently than shown in this manual.
XC onnecting a Bluetooth® audio device (→P.59)
XPress the “MEDIA” button, then select “Bluetooth*” to display the Bluetooth
trol screen.
■CONTROL PANEL
®
audio system will not function.
®
con-
®
,
2
AUDIO SYSTEM
*: Bluetooth is a registered trademark of Bluetooth SIG, Inc.
55
Page 56

3. MEDIA OPERATION
■CONTROL SCREEN
56
Page 57

No. Function
Select to display the audio setting screen.
The tune/scroll knob:
• Turn to select a track.
• Turn to move up/down the list.
• Press to select a track.
• Press and hold to fast forward/rewind.
3. MEDIA OPERATION
2
AUDIO SYSTEM
• Press to display the media mode selection screen.
• Pressing the button again will display the Bluetooth
The power/volume knob:
• Turn to adjust volume.
• Press to turn the audio system on/off.
• Press and hold to restart the audio system.
Shows progress
Select to display the Bluetooth® audio options screen.
Select to display the playlist screen.
Select to set random playback.
Select to set repeat play.
Select to display the media source selection screen.
Select to play/pause.
®
audio control screen again.
57
Page 58

3. MEDIA OPERATION
CAUTION
● Do not operate the player’s controls or connect to the Bluetooth® audio system while driv-
ing.
● Your audio unit is fitted w ith Bluetoo th® antennas. People with implanted pacemakers or
cardiac defibrillators should maintain a reasonable distance between themselves and the
Bluetooth
● Before using Bluetooth
®
antennas. The radio waves may affect the operation of such devices.
®
devices, users of any electrical medical device other than
implanted pacemakers and implanted cardiac defibrillators should consult the manufacturer of the device for infor mat ion abo ut i ts operat ion unde r the influ ence o f radio waves .
Radio waves could have unexpected effects on the ope rati on of such medical devices.
NOTICE
● Do not leave a po rtable player in th e vehicle. In particular, high temp eratures inside the
vehicle may damag e th e portable player.
INFORMATION
● In the following conditions, this system may not function:
• The Bluetooth
• The Bluetooth
• The Bluetooth
● It may take time to connect th e te l ephone when Bluetooth
● For operati ng a portab l e player, see the instruction manual th at came with it.
● If the Bluetooth
work when the engine switch is in the following status, the system will automatically
reconnect to the portable pl ay er.
XVehicles without smart entry & start system
The engine switch is turned to the “ACC” or “ON” position.
XVehicles with smart entry & start system
The engine switch is turned to ACCESSORY or IGNITION ON mode.
● If the Bluetooth® device is disconnected by turning it off, automatic reconnection will not
take place. Reconnect the portable player manually.
● Bluetooth® device information is register ed whe n the portable player is connect ed to the
Bluetooth
Bluetooth
®
device is turned off.
®
device is not connected.
®
device has a low ba t tery.
®
device is disconne cted due to poor reception from the Bl uetooth® net-
®
audio system. When selling or disposing of the vehicle, remove the
®
audio information from the system.
®
audio is being played.
58
Page 59

3. MEDIA OPERATION
CONNECTING Bluetooth® AUDIO
In order to use the Bluetooth® audio
system, it is necessary to pair a portable player and connect the audio profile (A2DP) with the system.
Once you have connected a device
with audio profile (A2DP), you can enjoy your music on the vehicle’s audio
system.
If you have not yet connected a portable player with audio profile (A2DP),
you must first connect a portable player with audio profile (A2DP) according
to the following procedures. Connect
your portable player with audio profile
(A2DP) after bringing the vehicle to a
complete stop.
■IF NO DEVICE HAS BEEN CON-
NECTED
XMultimedia system (→P.120)
XNavigation system (→P.127)
■CONNECTING AN ADDITIONAL DE-
VICE
XMultimedia system (→P.120)
XNavigation system (→P.127)
■SELECTING A CONNECTED DE-
VICE
XMultimedia system (→P.124)
XNavigation system (→P.134)
2
AUDIO SYSTEM
59
Page 60

3. MEDIA OPERATION
LISTENING TO Bluetooth® AUDIO
REPEATING
The track currently being listened to
can be repeated.
1 Select .
z Each time is selected, the mode
changes as follows:
• track repeat
RANDOM ORDER
Tracks can be automatically and randomly selected.
→ off
Bluetooth® AUDIO OPTIONS
1 Display the Bl uetoot h
(→P.55)
®
control screen.
2 Select .
3 Select the button to be set.
No. Function Page
Select to select a track.
Select to display the play
mode selection screen.
Select to resume playback
of tracks from the beginning of the track list when
the playback of the last
track on the list is finished.
1 Select .
z Each time is selected, the mode
changes as follows:
• random → off
60
Select to set random playback.
Select to set repeat playback track.
60
60
Page 61

INFORMATION
● If a portable device supports AVRCP 1.4
and browsing, title list and browse for
music will be available. (If the device
does not support browsi ng, these menu
entries will be displayed gra yed out.)
Lower grade devices do not support
these features.
For these devices, the title list and
browse for music will be displayed
grayed out.
3. MEDIA OPERATION
2
AUDIO SYSTEM
61
Page 62

4. AUDIO REMOTE CONTROLS
1. STEERING SWITCHES
Some parts of the navigation/multimedia system can be adjusted with the switches
on the steering wheel.
No. Switch
Enter switch
“” “” “” “” switch
“MODE/HOLD” switch
Volume control switch
X“MODE/HOLD” switch
Mode Operation Function
AM/FM Radio,
AUX
Audio CD,
MP3/WMA/AAC
disc, USB, iPod,
Bluetooth
62
®
audio
Press Change audio modes
Press and hold Mute
Press Change audio modes
Press and hold Pause
Page 63

X“” “” switch
Mode Operation Function
Preset station up/down (Preset tuning screen)
Press
AM/FM Radio
Press and hold
Station list up/down (Station list screen)
Seek up/down (Manual tuning screen)
Seek up/down continuously while the switch is being
pressed (Manual tuning screen)
4. AUDIO REMOTE CONTROLS
2
AUDIO SYSTEM
Audio CD,
MP3/WMA/AAC
disc, USB, iPod,
Bluetooth
®
audio
Press Track up/down
Press and hold Fast forward/rewind
X“” “” switch
Mode Operation Function
Tab screen Press Change the tab
XEnter switch
Mode Operation Function
Control screen Press Show list screen
List screen Press Select cursor entry
XVolume control switch
Mode Operation Function
All Press Volume up/down
63
Page 64

5. TIPS FOR OPERATING THE AUDIO SYSTEM
1. OPERATING INFORMATION
NOTICE
● To avoid damaging the audio sy st em :
• Be careful not to spill beverages over
the audio system.
• Do not put anything oth er than appro-
priate discs into the CD pl ayer slot.
INFORMATION
● The use of a cellular phone inside or
near the ve hicle may cause a noise from
the speakers of the audio system w hich
you are listening to. Howeve r, this does
not indicate a malfunct i on.
RADIO RECEPTION
Usually, a problem with radio reception
does not mean there is a problem with
your radio it is just the normal result
of conditions outside the vehicle.
For example, nearby buildings and terrain can interfere with FM reception.
Power lines or telephone wires can interfere with AM signals. And of course,
radio signals have a limited range, and
the farther you are from a station, the
weaker its signal will be. In add ition, reception conditions change constantly
as your vehicle moves.
Here are some common reception
problems that probably do not indicate
a problem with your radio.
64
Page 65

5. TIPS FOR OPERATING THE AUDIO SYSTEM
FM AM
Fading and drifting stations: Generally,
the effective range of FM is about 25 miles
(40 km). Once ou tside this ra ng e, yo u ma y
notice fading and drifting, which increase
with the distance from the radio transmitter. They are often acco mpani ed by dist ortion.
Multi-path: FM si gnals are reflective , making it possible for two signa ls to reach your
antenna at the same time. If this happ ens ,
the signals will cancel each other out,
causing a momentary flutter or loss of reception.
Static and fluttering: These occur when
signals are blocked by buildings, trees, or
other large objects. Increasing the bass
level may reduce static and fluttering.
Station swapping: If the FM signal you
are listening to is in terrupted or weakene d,
and there is another strong station nearby
on the FM band, your radio m ay tune in the
second station until the original signal can
be picked up again.
Fading: AM broadcasts are reflected by
the upper atmosphere especially at
night. These reflected sig nals can interf ere
with those r ece ived dir ectly fro m th e radi o
station, causing the radio station to sound
alternately strong and weak.
Station interference: When a reflected
signal and a si gnal rece ived dire ctly fr om a
radio stati on a re v er y ne arl y t h e s am e fr e quency, they can int erfere wit h each oth er,
making it difficult to hear the broadcast.
Static: AM is easily affected by external
sources of electrical noise, such as high
tension power lines, lightening, or electrical motors. This results in static.
2
AUDIO SYSTEM
65
Page 66

5. TIPS FOR OPERATING THE AUDIO SYSTEM
●The Lightning connector works with iPhone 5, iPod touch (5th generation), and iPod
nano (7th generation).
●The 30-pin connector works with iPhone 4S, iPhone 4, iPhone 3GS, iPhone 3G, iPhone,
iPod touch (1st through 4th generation), iPod classic (except 5th generation), and iPod
nano (1st, 3rd, 4th, 5th and 6th generation).
●USB works with iPhone 5, iPhone 4S, iPhone 4, iPhone 3GS, iPhone 3G, iPhone, iPod
touch (1st through 5th generation), iPod classic (except 5th generation), and iPod nano
(1st, 3rd, 4th, 5th, 6th and 7th generation).
iPod
z “Made for iPod”, “Made for iPhone” and
“Made for iPad” mean that an electronic
accessory has been de signed to connect
specifically to iPod, iPhone, or iPad,
respectively, and has been certified by the
developer to meet Apple performance
standards.
z Apple is not responsible for the operation
of this device or its compliance with safety
and regulatory standards. Please note
that the use of this acces sory with iPod,
iPhone, or iPad may affect wireless performance.
z iPad, iPhone, iPod, iPod classic, iPod
nano, and iPod touch are trademarks of
Apple Inc., registered in the U.S. and
other countries. Lightning is a trademark
of Apple Inc.
COMPATIBLE MODELS
The following iPod®, iPod nano®, iPod
®
classic
, iPod touch® and iPhone® devic-
es can be used with this system.
Made for
• iPod touch (5t h generation)
• iPod touch (4t h generation)
• iPod touch (3rd generation)
• iPod touch (2nd generation)
• iPod touch (1st generation)
• iPod classic (e xcept 5th generation)
• iPod nano (7th generation )
• iPod nano (6th generation )
• iPod nano (5th generation )
• iPod nano (4th generation )
• iPod nano (3rd ge neration)
• iPod nano (1st generation )
• iPhone 5
• iPhone 4S
• iPhone 4
• iPhone 3GS
• iPhone 3G
•iPhone
Depending on differences between models or software versions etc., some models
might be incompatible with this system.
66
Page 67

5. TIPS FOR OPERATING THE AUDIO SYSTEM
CARING FOR YOUR CD PLAYER AND DISCS
z Extremely high temperatures can keep
your CD player from working. On hot
days, use air condi t i oning to cool the vehicle interior before you lis te n to a disc.
z Bumpy roads or other vibrations may
make your CD player skip.
z If moisture gets into your CD player, you
may not hear any sound e ven though your
CD player appears to be working. Remove
the discs f r om the CD player and wait until
it dries.
CAUTION
● CD player uses an invisibl e laser beam
which could cause ha zardous radiation
exposure if directed outside the unit. Be
sure to operate the CD play er cor re ct ly.
Audio CDs
XSpecial shaped discs
2
AUDIO SYSTEM
XTransparent/translucent discs
XLow quality discs
z Use only disc s marked as shown above.
The following products may not be playable on your CD player.
• SACDs
•dts CDs
• Copy-protect ed CD s
• Video CDs
XLabeled discs
67
Page 68

5. TIPS FOR OPERATING THE AUDIO SYSTEM
NOTICE
● Do not use special shape d, transparent/
translucent, low q uality or labeled discs
such as those shown in the illustrations.
The use of such discs ma y damage the
player, or it may be impossible to eject
the disc.
● This system is not designed for use of
Dual Disc. Do not use Dual Disc
because it may cause damage to the
player.
● Do not use discs with a pro te ct i on r in g.
The use of such discs ma y damage the
player, or it may be impossible to eject
the disc.
● Do not use printable disc s. The use of
such discs may dam age the play er, or it
may be impossibl e to eje ct th e disc.
Correct Wrong
z Handle discs carefully, especially when
you are inserting them . Hold them on the
edge and do not bend t hem. Av oid getti ng
fingerprints on them, particularly on the
shiny side.
z Dirt, scratches, warping, pin holes, or
other disc damage could cause the CD
player to skip or to repeat a section of a
track. (To see a pin hole, hold the disc up
to the light.)
z Remove discs from the CD player when
you are not using them. Store them in their
plastic cases away from moisture, heat,
and direct sunlight.
68
z To clean a disc: Wipe it with a soft, lint-
free cloth that has been dampened with
water. Wipe in a straight line from the centre to the edge of the disc (not in a cir cle).
Do not use a conventional record cleaner
or anti-static device.
Page 69

5. TIPS FOR OPERATING THE AUDIO SYSTEM
FILE INFORMATION
■COMPATIBLE USB DEVICES
USB communication formats
File formats FAT 16/32
Correspondence
class
USB 2.0 HS (480
Mbps) and FS (12
Mbps)
Mass storage class
■COMPATIBLE COMPRESSED
FILES
Item USB DISC
Compatible file
format (audio)
Folders in the
device
Files in the device
Files per folder
MP3/WMA/AAC
Maximum
3000
Maximum
9999
Maximum
255
Maximum
192
Maximum
255
■CORRESPONDING BIT RATES
File type Bit rate (kbps)
MP3 files:
MPEG 1 LAYER 3
MP3 files:
MPEG 2 LSF LAYER 3
WMA files:
Ver. 7, 8
WMA files:
Ver. 9 (9.1/9.2)
AAC files:
MPEG4/AAC-LC
(Variable Bit Rate (VBR) compatible)
32 - 320
8 - 160
CBR 48 - 192
CBR 48 - 320
16 - 320
2
AUDIO SYSTEM
■CORRESPONDING SAMPLING
FREQUENCY
File type Frequency (kHz)
MP3 files:
MPEG 1 LAYER 3
MP3 files:
MPEG 2 LSF LAYER 3
WMA files:
Ver. 7, 8, 9 (9.1/9.2)
AAC files:
MPEG4/AAC-LC
32/44.1/48
16/22.05/24
32/44.1/48
11.025/12/16/
22.05/24/32/
44.1/48
69
Page 70

5. TIPS FOR OPERATING THE AUDIO SYSTEM
z MP3 (MPEG Audio Layer 3), WMA
(Windows Media Audio) and AAC
(Advanced Audio Coding ) are audio compression standards.
z This system can play MP3/WMA/AAC files
on CD-R, CD-RW discs and USB memory .
z This system can p lay di sc rec or di ngs com-
patible with ISO 9660 level 1 and l evel 2
and with the Romeo and Joliet file system.
z When naming an MP3/WMA/AAC file, add
an appropriate file extension
(.mp3/.wma/.m4a).
z This system plays back files with
.mp3/.wma/.m4a file extensions as
MP3/WMA/AAC files respe ctively. To prevent noise and playback errors, use the
appropriate file extens ion.
z This system can play only the first session
when using multi-session compatible CDs.
z MP3 files are co mpatible with the ID3 Tag
Ver. 1.0, Ver. 1.1, Ver. 2.2 and Ver. 2.3 formats. This system cannot display disc
title, track title and artist name in other formats.
z WMA/AAC files ca n contain a WMA/AAC
tag that is used in the same way as an ID3
tag. WMA/AAC tags carry information
such as track title and arti st name.
z The emphasis function is available only
when playing MP3/WMA files recorded at
32, 44.1 and 48 kHz.
z This system can play back AAC files
encoded by i Tunes.
z The sound qu ality of MP3/W MA files gen-
erally improves with higher bit rates. In
order to achieve a reasonable level of
sound quality, discs recorded with a bit
rate of at least 128 kbps are recommended.
z M3u playl ists are not compatible with the
CD player.
z MP3i (MP3 interactive) an d MP3PRO f or-
mats are not compatible with the audio
player.
z The player is compatible with VBR (Va ri-
able Bit Rate).
z When play ing back files recorded as VBR
(Variable Bit Rate) files, the play time will
not be correctly displayed if the fast forward or reverse operations are used.
z It is not possible to check folders that do
not include MP3/WMA/AAC files.
z MP3/WMA/AAC files in folders up to 8 lev-
els deep can be played. However, the
start of playback may be delayed when
using discs containing n umerous le vels of
folders. For this reason, we recommend
creating discs with no more than 2 levels
of folders.
001.mp3
002.wma
Folder 1
003.mp3
Folder 2
004.mp3
005.wma
Folder 3
006.aac
z The play order of the compact disc with
the structure shown above is as follows:
001.mp3 002.wma . . . 006.aac
z The order chang es depending on the per-
sonal computer and MP3/WMA/AAC
encoding software you use.
70
Page 71

5. TIPS FOR OPERATING THE AUDIO SYSTEM
CD-R AND CD-RW DISCS TERMS
z CD-R/CD-RW discs that have not been
subject to the “finalizing process” (a process that allows discs to be pl ayed on a
conventional CD player) cannot be
played.
z It may not be possible to play CD-R/CD-
RW discs recorded on a music CD
recorder or a per sonal comput er because
of disc character i sti cs, scratches or dirt on
the disc, or dirt, condensation, etc. on the
lens of the unit.
z It may not be possible to play discs
recorded on a personal computer depending on the application settings and the
environment. Recor d with the correct format. (For details, contact the appro priate
application manufac turers of the ap plications.)
z CD-R/C D-RW discs may be damaged by
direct exposure to sunlig ht, high temperatures or other storage co nditions. Th e unit
may be unable to play some damaged
discs.
z If you ins ert a CD-RW disc into the MP3/
WMA player, playback will begin more
slowly than with a conventional CD or CDR disc.
z Recordings on CD-R/CD-RW cannot be
played using the DDCD (Double Density
CD) system.
PACKET WRITE
z This is a general term that describes the
process of writing data on -demand t o CDR, etc., in the same way that data is written to floppy or hard discs .
ID3 TAG
z This is a method of embedding track-
related information in an MP3 file. This
embedded information can include the
track title, the artist’s name, the album
title, the music genre, the y ear of production, comments, cover art and other d ata.
The contents can be freely edited using
software with ID3 tag editing functions.
Although the tags are restricted to the
number of characte rs, the infor mation can
be viewed when the trac k is pl ayed back.
WMA TAG
z WMA files can contain a WMA tag that is
used in the same way as an ID3 tag. WMA
tags carry information such as track title,
artist name.
2
AUDIO SYSTEM
71
Page 72

5. TIPS FOR OPERATING THE AUDIO SYSTEM
ISO 9660 FORMAT
z This is the international standard for the
formatting of CD-ROM folders and files.
For the ISO 9660 format, there are two
levels of regulations.
z Level 1: The file name is in 8.3 fo rmat (8
character file names, with a 3 character
file extension. File names must be composed of one-byte ca pi tal letters and numbers. The “_” symbol may also be
included.)
z Level 2: Th e file name c an have up t o 31
characters (includi ng the separation mark
“.” and file extension). Each folder must
contain fewer than 8 hierarchi es.
m3u
z Playlists created using “WINAMP” soft-
ware have a playlist file extension (.m3u).
MP3
z MP3 is an audio compression standard
determined by a working group (MPEG) of
the ISO (International Standard Organization). MP3 compresses audio data to
about 1/10 the size of that on conventional
discs.
WMA
z WMA (Windows Media Audio) is an audio
compression format developed by
Microsoft
smaller than that of MP3 files. The deco ding formats for WMA files are Ver. 7, 8,
and 9.
z This product is protected by certain intel-
lectual property rights of Mi crosoft Corporation and third parties. Use or d istributi on
of such technolog y outside of this p roduct
is prohibited without a license from
Microsoft or an authorized Microsoft subsidiary and third parties.
®
. It compresses files into a size
AAC
z AAC is short for Advanced Audio Coding
and refers to an audio compres sion technology standard used with MPEG2 and
MPEG4.
72
Page 73

3
Bluetooth® HANDS-FREE SYSTEM
BASIC INFORMA TION BEFORE
1
OPERATION
1. QUICK REFERENCE.................... 74
2. HANDS-FREE SYSTEM ............... 77
USING THE PHON E SW ITCH/
MICROPHONE.................................... 78
ABOUT THE PHONE BOOK IN THIS
SYSTEM.............................................. 79
WHEN YOU RELEASE YOUR CAR...... 79
CONNECTING A Bluetooth
3. REGISTERING AN ENTRY........... 81
REGISTER IN G A N EW ENTRY ............ 81
DISPLAYING AND EDITING
THE ENTRY IN FORMATION.............. 83
SENDING STORED CO NTACTS
TO A USB MEMORY .......................... 84
PHONE OPERATION
2
1. CALLING ON A Bluetooth®
PHONE........................................ 85
BY DIAL................................................. 85
BY CONTACTS LIST............................. 86
BY PHONE BOOK................................. 86
BY CALL LIS TS............................ ......... 87
CALLING USING A SHORT
MESSAGE........................................... 88
BY POI* CALL........................................ 88
BY SELECTING SOS SCREEN
BUTTON.............................................. 89
®
PHONE... 80
2. RECEIVING CALLS ON A
Bluetooth
3. TALKING ON A Bluetooth
®
PHONE.................... 90
®
PHONE........................................ 91
SENDING TONES................................. 92
DIALING A SECOND NUMBER............ 93
ADJUSTING THE RECEIVER
VOLUME............................................. 94
SHORT MESSAGE FUNCTION
3
1. SHORT MESSAGE FUNCTION.... 95
RECEIVING A SHORT MESSAGE....... 95
CHECKING RECEIVED SHORT
MESSAGES........................................ 95
CHECKING SENT SHORT
MESSAGES........................................ 96
SENDING A NEW SHORT
MESSAGE.......................................... 97
WHAT TO DO IF...
4
1. TROUBLESHOOTING................. 100
1
2
3
4
5
6
7
8
Some of the functions cannot be operated while driving.
*: Point of Interest
73
Page 74

1. BASIC INFORMATION BEFORE OPERATION
1. QUICK REFERENCE
■“Phone” MENU SCREEN
Pressing the
Each time the button is pressed, the screen will change between the
“Phone” menu screen and the “Extras”/“Toyota online” menu screen.
When the
shown.
Select to display the “Phone” menu screen.
button allows access to the “Phone” menu screen.
button is pressed, the screen that was last displayed will be
74
Page 75

1. BASIC INFORMATION BEFORE OPERATION
No. Function P age
Select to display the “Dial” screen.
A call can be made by dialing the number.
Select to display the “Contacts” screen.
An entry from the list of contacts in the “Stored” and “Phone book” screen
can be selected and called.
Select to display the “Call lists” screen.
An entry from the missed, received or dial call lists can be selected and
called.
Select to display the “Messages” screen.
A list of received and sent short messages and a menu to create new short
messages can be displayed.
Select the corresponding icon to change to the “Dial”, “Contacts”, “Call
lists” or “Messages” screen.
85
86
87
95
3
Bluetooth® HANDS-FREE SYSTEM
75
Page 76

1. BASIC INFORMAT ION BEFORE OPERATI ON
■“Dial” SCREEN
z This screen can be displaye d by selecting
on any of the phone screens.
■“Contacts” SCREEN
z This screen can be displaye d by selecting
on any of the phone screens.
■“Call lists” SCREEN
■“Messages” SCREEN
z This scr een can b e disp laye d by s elect ing
on any of the phone screens.
z This screen can be displaye d by selecting
on any of the phone screens.
76
Page 77

1. BASIC INFORMATION BEFORE OPERATION
2. HANDS-FREE SYSTEM
Bluetooth® hands-free system allows
you to make or receive a call without
taking your hands off the steering
wheel by connecting your cellular
phone.
This system supports Bluetooth
Bluetooth
®
is a wireless data system
®
by which you can call without your
cellular phone being connected with a
cable or placed on a cradle.
The operating procedure of the system
is explained in this section.
CAUTION
● Use a cellular phone or connect the
Bluetooth
legal to do so.
● Your audio unit is fitted w ith Bluetooth
antennas. People with implanted pacemakers or cardiac defibrillators should
maintain a reasonable distance between
themselves and the Bluetooth
nas. The radio waves may affect the
operation of such devices .
● Before using Bluetooth
of any electrical medical device other
than implanted pacemakers and
implanted cardiac defibrillators should
consult the manufacturer of the device
for information about its operation under
the influence of radio waves. Radio
waves coul d h ave u ne xpe c ted effect s on
the operation of such medical devices.
®
phone only when safe and
®
anten-
®
devices, users
INFORMATION
● If your cellular phone d oes not support
Bluetooth
● In the following conditions, the system
may not function:
.
®
• The cellular phone is turned off.
• The current position is outside the
• The cellular phone i s no t co nnected.
• The cellular phone ha s a l ow battery.
● When using Bluetooth
hands-free at the same time, the following problems may oc cur.
• The Bluetooth
• Noise may be hear d o n the B luetoo th
®
, this system will not func tion.
communication area.
®
cut.
audio playback.
connection may be
®
audio and
3
Bluetooth® HANDS-FREE SYSTEM
®
NOTICE
● Do not leave your cellular phone in the
vehicle. The temperature inside may rise
to a level that could damage t he phone.
77
Page 78

1. BASIC INFORMAT ION BEFORE OPERATI ON
USING THE PHONE SWITCH/ MICROPHONE
XSteering switch
By pressing the phone switch, a call
can be received or ended without taking your hands off the steering wheel.
Volume control switch
z Press the “+” side to inc re ase the volume.
z Press the “-” side to decrease the volume.
Off hook switch
On hook switch
XMicrophone
INFORMATION
● The other party’s voice will be heard
from the front s peakers. The audio s ystem will be muted during phone calls.
● Talk alternately with the other party on
the phone. If y ou talk at the same time,
your voices may not reach each other. (It
is not a malfun ction.)
● Keep the volume of receiving voice
down. Otherwise, an echo will be heard
and receiving voice can be heard outside of the vehicle. When you talk on the
phone, speak clearly towards the mic rophone.
● In the following situations, your voice
may not reach the othe r party.
• Driving on an unpaved road. (Due to
traffic noi s e .)
• Driving at high speed.
• A window is open.
• Turning the air-conditioning vents
towards the microphone.
• The sound of the air-conditioning fan is
loud.
• There is an effect from the cellular
phone network.
The microphone is used when talking
on the phone.
78
Page 79

1. BASIC INFORMATION BEFORE OPERATION
ABOUT THE PHONE BOOK IN THIS SYSTEM
z The follow ing data is stored for every r eg-
istered phone. When another phone is
connecting, you cannot read the registered data.
• Phone book da ta
• Call history data
INFORMATION
● When you delete the ph one, the abov e-
mentioned data is also deleted.
WHEN YOU RELEASE YOUR CAR
A lot of personal data is registered
when you use the Hands-free system.
When you release your car, initialize
your data. (→P.116)
z You can initialize the following data in the
system.
• Phone book data
• Call history da ta
• Volume setting
• Bluetooth
• All telephone settings
• Short message template
INFORMATION
● Once the data is initialized, all personal
data will be erased. Pa y due care when
initializing the data.
®
setting
3
Bluetooth® HANDS-FREE SYSTEM
79
Page 80

1. BASIC INFORMAT ION BEFORE OPERATI ON
CONNECTING A Bluetooth® PHONE
In order to use the hands-free system,
it is necessary to pair the phone and
connect the phone’s profile (HFP) with
the system.
Once the profile has been connected,
hands-free calls can be made.
If you have not yet connected any
Bluetooth
®
phones with phone profile
(HFP), you must first connect your
phone with phone profile (HFP)
according to the following procedure.
Connect your Bluetooth
®
phone with
phone profile (HFP) after bringing the
vehicle to a complete stop.
1 Press the button.
2 Select “Yes”.
z This scr een can b e displayed by pres sing
switch on the steering wheel.
the
3 Follow the steps “PAIRING A
Bluetooth® DEVICE”. (→P.120, 127)
80
Page 81

1. BASIC INFORMATION BEFORE OPERATION
3. REGISTERING AN ENTRY
REGISTERING A NEW ENTRY
Up to 200 numbers can be registered
with this system.
REGISTERING FROM THE “Contacts” SCREEN
1 Display the “Phone” menu screen and
select “Contacts”. (→P.74)
2 Select the “Stored” tab.
3 Select “Create new entry”.
4 Select one of 4 phone types ( ,
, or ) and enter a
number.
7 Check that the entry is registered in the
“Stored” list.
z Select to display and edit the
entry information. (→P.83)
REGISTERING FROM THE “Dial” SCREEN
1 Display the “Phone” menu screen.
(→P.74)
2 Select “Dial”.
3 Enter the numbers.
4 Select .
5 Follow the steps “REGISTERING
FROM THE “Contacts” SCREEN” from
“STEP 6”. (→P.81)
3
Bluetooth® HANDS-FREE SYSTEM
z You can enter one phone number for each
phone type.
5 Select .
6 Enter the entry name and then select
“OK”.
INFORMATION
● The phone type is regis te re d as .
81
Page 82

1. BASIC INFORMAT ION BEFORE OPERATI ON
REGISTERING FROM THE “Phone book” SCREEN
1 Search the entry by “Phone book”.
(→P.86)
2 Select for desired item.
3 Select “Add to stored contacts”.
4 Follow the steps “REGISTERING
FROM THE “Contacts” SCREEN” from
“STEP 6”. (→P.81)
INFORMATION
● The phone type is registered as .
● Navigation system only: If the contact
includes an address an d a phone number, they will be stored in the “Stored” list
on the “My destinations” screen and
“Contacts” screen. (→P.81, 200)
REGISTERING FROM THE “Call lists” SCREEN
1 Search for the entry by “Call lists”.
(→P.87)
REGISTERING FROM AN
EXTERNAL DEVICE
∗
“vCard” formatted data can be transferred from a USB memory to this system. Transferred addresses and
numbers will be stored in the “Stored”
list on the “My destinations” screen and
“Contacts” screen. (→P.81, 200)
2 Select next to the desired item.
3 Follow the steps “REGISTERING
FROM THE “Contacts” SCREEN” from
“STEP 6”. (→P.81)
INFORMATION
● The phone type is registered as .
82
∗
: Navigation system only
Page 83

1. BASIC INFORMATION BEFORE OPERATION
DISPLAYING AND EDITING THE ENTRY INFORMATION
Detailed information of entries in the
list can be displayed or edited.
1 Display the “Phone” menu screen and
select “Contacts”. (→P.74)
2 Select the “Stored” tab or the “Phone
book” tab.
3 Select next to the desired entry.
XEntry options screen of the “Stored” list
XEntry options screen of the “Phone
book” list
No. Function
Select to display the details of the
entry information.
• Select the desired entry to call it.
Select to change the entry name. (→
P.84)
3
Bluetooth® HANDS-FREE SYSTEM
Select to edit phone numbers. (→
P.84)
Select to delete the entry.
Select to delete all entries.
Select to register the entry in the
“Stored” list on the “My destinations”
screen (navigation system only) and
“Contacts” screen. (→ P.8 2, 200)
83
Page 84

1. BASIC INFORMAT ION BEFORE OPERATI ON
CHANGING THE ENTRY NAME
1 Select “Rename”.
2 Enter the entry name and then select
“OK”.
EDITING PHONE NUMBERS
1 Select “Edit phone numbers”.
2 Select one of 4 phone types and enter
a number and then .
INFORMATION
● If an entry that is transf erred from a c el-
lular phone is edited, the change will
affect the entry in the “ Stored” list on the
“My destinations” screen (navigation
system only) and “Contacts” screen.
(→P.81, 200)
SENDING STORED
CONTACTS TO A USB
MEMORY
The entries stored in the “Stored” list
on the “My destinations” screen and
“Contacts” screen can be transferred
to a USB memory. (→P.209)
∗
84
∗
: Navigation system only
Page 85

2. PHONE OPERATION
1. CALLING ON A Bluetooth® PHONE
After a Bluetooth® phone has been
connected, a call can be made using
the hands-free system.
How to make a call list Page
By dial 85
By contacts list 86
By phone book 86
By call lists 87
By using a short message 88
By POI call
By selecting SOS screen button
By using the Toyota Eurocare
∗
∗
88
∗
89
230
BY DIAL
1 Display the “P hone” menu scr een and
select “Dial”. (→P.74)
2 Enter a phone number.
3
Bluetooth® HANDS-FREE SYSTEM
3 Select .
4 Check that the connecting screen is
displayed.
z To cancel a call, select “End call”.
INFORMATION
● Depending on the type of Bluetooth
phone being connecte d, it may be necessary to perform additional steps on
the telephone.
● When “Dial” is selected, t he last dial ed
number will be shown grayed out. Select
to redial the number.
● Navigation system only: Select “0/+” to
enter “0”. Select and hold to enter “+” for
interna tional ca lls.
● When the missed calls ic on or new short
message icon is displayed at the bottom, selecting the icon will display the
list.
∗
: Navigation system only
®
85
Page 86

2. PHONE OPERATION
BY CONTACTS LIST
To use this function, it is necessary to
register the entry. (→P.81)
1 Display the “P hone” menu scr een and
select “Contacts”. (→P.74)
2 Select the “Stored” tab.
3 Select the desired entry.
z Select to display and edit the
entry information. (→P.83)
z If there are 2 or more phone numbers,
select the desired number in the list.
BY PHONE BOOK
Calls can be made using the phone
book data of the connected cellular
phone. The phone book changes depending on the phone connected.
1 Display the “ Phone” me nu screen an d
select “Contacts”. (→P.74)
2 Select the “Phone book” tab.
3 Select the desired entry.
z If there are 2 or more phone numbers,
select the desired number in the list.
“Search contact”: Select to search by the
contact’s name.
z Select to display and edit the
entry information. (→P.83)
4 Check that the connecting screen is
displayed.
z To cancel a call, select “End call”.
86
4 Check that the connecting screen is
displayed.
z To cancel a call, select “End call”.
Page 87

2. PHONE OPERATION
INFORMATION
● When a phone i s connected for the first
time, its phone book must be downloaded. If the phone book can not be
downloaded, a pop-up window will be
displayed.
● If the contact does not have phone num -
ber stored, the entry will be dimmed.
● The phone book list can be updated.
(→P.139)
BY CALL LISTS
Each call list (missed, received, and dialed) stores up to 15 entries.
1 Display the “P hone” menu scr een and
select “Call lists”. (→P.74)
2 Select the desired tab.
No. Function
Select to display all numbers.
Select to display missed calls.
Select to display received calls.
Select to display dialed numbers.
3
Bluetooth® HANDS-FREE SYSTEM
z The state of a call is shown by the follow-
ing icons.
: Missed
: Received
: Dialed
87
Page 88

2. PHONE OPERATION
z When is selected, the entry is
registered in the “Stored” list on the
“Contacts” screen. (→P.82)
3 Select the desired entry.
4 Check that the connecting screen is
displayed.
z To cancel a call, select “End call”.
CALLING USING A SHORT MESSAGE
Calls can be made to a short message
sender’s phone number. (→P.95)
1 Select “Call sender”.
2 Check that the connecting screen is
displayed.
z To cancel a call, select “End call”.
BY POI CALL
Calls can be made to a POI when its
details are displayed on the screen.
(
→P.173, 181)
∗
1 Select .
2 Check that the connecting screen is
displayed.
z To cancel a call, select “End call”.
88
∗
: Navigation system only
Page 89

2. PHONE OPERATION
EN2088DC
BY SELECTING SOS SCREEN
BUTTON
112 EMERGENCY CALL SUPPORT
This feature is used to make a 112
emergency call with the select of a button.
This function is not available when the
hands-free system is not connected.
This call can only be placed in a country where the 112 emergency call service is available.
∗
1 Display the “Phone” menu screen and
select “Dial”. (→P.74)
2 Select “SOS”.
z When “ ...” appear s on the screen, se lect
to display the following position details.
On freeways: Freeway number, driving
direction and next exit.
On other roads: Address i nf or m at ion.
Each time “...” is selected, the screen
changes between the geographical coordinates and position details.
3
Bluetooth® HANDS-FREE SYSTEM
3 Select “Yes” when the confirmation
screen appears.
4 The follow ing screen wi ll be displayed.
z The geographic coordinates of the current
location will be displayed at the top-left corner of the screen.
∗
: Navigation system only
89
Page 90

2. PHONE OPERATION
EN2089DC
2. RECEIVING CALLS ON A Bluetooth® PHONE
When a call is received, this screen is
displayed and a sound is heard.
1 Press the switch on the steering
wheel.
“Accept”: Select to talk on the phone.
“Reject”: Select to reject the call.
z The layout of the incoming call screen
may differ depending on the information
available from the connec t ed phone.
z Pressing the switch on the steering
wheel also reject a call.
z Ringtone vo lume can be adjuste d by turn-
ing the power/volum e kno b.
2 The followi ng screen is displayed.
XSingle call
XCall waiting
z The first call is put on hold and the infor-
mation of the party will be dimmed.
z For details abou t thi s sc re en: →P.91
INFORMATION
● During international telephone calls, the
other party’s name or number may not
be displayed correctly depe nding on the
type of cellular phone you h ave.
● Ringtone and ringt one volume can also
be set. (→P.139)
z For details about this sc re en: →P.91
90
Page 91

2. PHONE OPERATION
入れ替え
3
キャプション変更
キャプションイキ
EN2089DC
3. TALKING ON A Bluetooth® PHONE
While you are talking on a Bluetooth
phone, a telephone conversation
screen is displayed. The operations
outlined below can be performed on
this screen.
XSingle call
XCall waiting
®
No. Function
Select to hang up the phone.
• The switch on the steering
wheel can also be pressed to
hang up the phone.
Select to dial a second number.
(→P.93)
Select to put a call on hold. To
cancel this function, select “Acti-
vate”.
Select to send a tone. (→P.92)
Select to transfer the call. Select
“Transfer” to change from a
hands-free call to a cellular
phone call. Select “Hands-free”
to change from cellular phone
call to hands-free call.
Displays the other party’s information. The information shown
here may differ depending on the
information available from your
phone.
Displays a call duration.
3
Bluetooth® HANDS-FREE SYSTEM
Select to mute your voice to the
other party. The icon will be highlighted during mute mode. To
cancel muting your voice, select
this icon again.
Select to change parties.
Select to change to a conference
call.
91
Page 92

2. PHONE OPERATION
INFORMATION
● When you change from a cellular phone
call to a hands-free call, the ha nds-free
screen will be displayed and the call can
be operated on the scre en.
● Depending on the cellular phone con-
nected, the Bluetooth
be canceled if and when a call is transferred to the cellular phone.
● Transferring methods will be different
depending on the type of cellular phone
which you have.
● For the operation o f the cellular phone,
see the manual that comes with your
cellular phone.
®
connection may
SENDING TONES
1 Select “Keypad”.
2 Enter the numbers.
z Select to return the previous
screen.
92
Page 93

2. PHONE OPERATION
DIALING A SECOND NUMBER
1 Select “Dial”.
2 Select the desired method to call.
XWhen “Dial number” is selected
3 Enter the number and then select
.
XWhen “Dial from contacts” is selected
3 Select the desired list and then select
the desired entry.
3
Bluetooth® HANDS-FREE SYSTEM
XWhen “Dial from call lists” is selected
3 Select the desired list and then select
the desired entry.
4 Check that the connecting screen is
displayed.
z To cancel a call, select “End call”.
5 When a new call h as been estab lished,
the following screen will be displayed.
z The first call is put on hold and the infor-
mation of the party will be dimmed.
z The second call’s informat ion is displa yed
below the first call information.
93
Page 94

2. PHONE OPERATION
■CHANGING PARTIES
1 Select “Swap calls”.
z Every time “Swap calls” is selected, the
party who is on hold will be switched.
The other party can also be switched by
z
selecting the pict ure of t he d es ired party
(navigation system only) or pressing the
switch on the steering wheel.
■CHANGING TO A CONFERENCE
CALL
1 Select “Link calls”.
INFORMATION
● Interrupt call operation may differ
depending on yo ur phone c ompany and
cellular phone.
ADJUSTING THE RECEIVER VOLUME
1 Turn the power/vo lume kno b to adj ust
the volume of the other party’s voice.
INFORMATION
● The receiver volume can also be
adjusted using the volume control switch
on the steering wheel .
94
Page 95

3. SHORT MESSAGE FUNCTION
1. SHORT MESSAGE FUNCTION
Received short messages can be forwarded from the connected Bluetooth
®
phone, enabling checking and replying
using this system.
Depending on the type of Bluetooth
®
phone connected, received short message may not be transferred to the
message inbox.
If the phone does not support the short
message function, this function cannot
be used.
RECEIVING A SHORT MESSAGE
When a new short message is received, a pop-up window is displayed
on the screen.
1 Select “Show” to check a received
short message.
2 Check that the message is displayed.
CHECKING RECEIVED SHORT MESSAGES
1 Display the “P hone” menu scr een and
select “Messages”. (→P.74)
2 Select the “Inbox” tab.
3 Select the desired short message.
z The state of a message is shown by the
following icons.
: Read message
: Unread message
4 Check that the message is displayed.
3
Bluetooth® HANDS-FREE SYSTEM
INFORMATION
● This function can be set to on or off.
(→P.139)
No. Function
Select to call the sender.
Select to reply to the short message
by free text.
Select to reply to the short message
by template.
95
Page 96

3. SHORT MESSAGE FUNCTION
REPLYING TO A SHORT MESSAGE
1 Select “Reply free text” or “Reply
template”.
z When “Reply template” is selected,
select the desired tem pl at e.
2 Enter the message and then select
“OK”.
z The short mes sag e w i ll be sent .
INFORMATION
● “Reply free text” fun ction is not avail able
while driving.
CHECKING SENT SHORT MESSAGES
1 Display the “ Phone” me nu screen an d
select “Messages”. (→P.74)
2 Select the “Sent” tab.
3 Select the desired short message.
z Navigation system only: The state of a
message is shown by the fo llowing icons.
: Sent succeeded
: Sent fail ed
: Sending
4 Check that the message is displayed.
96
“Re-send”
sage.
z “Re-send” is displayed if sending the tex t
message has failed.
∗
: Select to re-send the mes-
∗
: Navigation system only
Page 97

3. SHORT MESSAGE FUNCTION
SENDING A NEW SHORT MESSAGE
1 Display the “Phone” menu screen and
select “Messages”. (→P.74)
2 Select the “Create new ” tab.
3 Select “Create message” or “Use
template”.
4 Enter the message and then select
“OK”. (→P.98)
5 Select the desired number/contact to
whom the short message should be
sent.
XWhen “New number” is selected
6 Enter the number and then select
“OK”.
z The short mes sag e w i ll be sent .
XWhen “Select contact” or “Select
from call lists” is selected
6 Select the desired list.
3
Bluetooth® HANDS-FREE SYSTEM
7 Select the desired contact.
z If there are 2 or more phone numbers,
select the desired number in the list.
z The short mes sag e w i ll be sent .
INFORMATION
● The “Create message” and “Prepare
template message” functions are not
available while driving.
97
Page 98

3. SHORT MESSAGE FUNCTION
CREATE A NEW SHORT MESSAGE
■WHEN “Create message” IS SE-
LECTED
1 Enter the message and then select
“OK”.
■WHEN “Use template” IS SELECT-
ED
1 Select the desired template.
INFORMATION
● 10 messages have al ready been regis-
tered to the message template screen.
● Navigation system only: When route
guidance is currently active, “I will arrive
at XX:XX.” template is available.
(“XX:XX” is the current estimated time of
arrival.) This template cannot be
deleted.
● The cursor’s pos ition can be moved by
selecting the desired location in the
enter screen.
● The short message s can contain up to
160 characters. If the entered text
exceeds the characters available for one
short message, a new short message
will begin automatically. This is indicated
by a separation line and a n icon in the
enter field, which is shown as soon as
there are only 10 cha racters left for the
short message.
: Select to delete the template.
2 Edit the short mes sage an d then se lect
“OK”.
98
● The number of characters left for the
short messag e i s displayed.
● A maximum of 3 short messages can be
written in series.
● Entering the text function is not available
while driving.
Page 99

REGISTER NEW TEMPLATES
New templates can be created. Up to
15 templates can be registered.
1 Select “Prepare template message”.
2 Enter the message and then select
“OK”.
z The me ss age is registered in the template
list.
3. SHORT MESSAGE FUNCTION
3
Bluetooth® HANDS-FREE SYSTEM
99
Page 100

4. WHAT TO DO IF...
1. TROUBLESHOOTING
If there is a problem with the hands-free system or a Bluetooth® device, first check
the table below.
XWhen using the hands-free system with a Bluetooth® device
Page
Symptom Likely cause Solution
Cellular
phone
This
system
The hands-free system or Bluetooth
device does not
work.
The connected device may not be a
compatible
Bluetooth
phone.
®
The Bluetooth® version of the connected
cellular phone may
be older than the
specified version.
®
cellular
For a list of specific
devices which operation has been confirmed on this
system, check with
your Toyota dealer.
Use a cellular phone
with Bluetooth
sion 1.1 or higher
(recommended: Ver.
3.0 +EDR or higher).
®
ver-
∗
∗ 122, 132
100
 Loading...