

Page 1

General Disclaimer regarding this document: Since this manual will be built into an XML database, and since the graphics will be
imported as SVG graphics, the appearance and format of this document is not in the Owner Manual’s final presentation.
The notes in blue italics are not meant to be printed.
This document is to be used for the textual content as the primary goal, and some graphical examples.
All graphics are considered placeholders. The structure/sequence of the document is subject to change, therefore there is no
TOC; however, the following is the current structure/sequence planned:
Introduction
Definitions
Features Matrix
Symbols and Illustrations
Warnings
Safety
Speed locked controls
Controls at a glance
Left Handlebar Controls
Right Handlebar Controls
Passenger Controls (If equipped)
Faceplate Buttons
Boom!™ Box 6.5 models
Boom!™ Box 4.3 models
Introduction to Voice Recognition (VR)
User ports and connectors
USB port
Headset connector
General Operation
Faceplate (4.3)
Touch Screen (6.5)
Using handlebar controls to select objects
Visual elements
Title bar
Buttons with checkboxes
Buttons for multiple options
On/Off buttons
Status bar
User settings (Setup Menu)
Audio Routing (Speaker/Headset)
Audio Setup
Bass & Treble adjustment
Fade adjustment (if equipped)
Speed Volume adjustment
1
Page 2

Display
Screen brightness
Button brightness
Colors
Day/Night Color mode
Background colors (if equipped)
Global presets
Enable/Disable global presets
Number of pages for global presets
Keyboard style (6.5)
Full keyboard
Large keyboard
Feedback settings
Enable/Disable Nav prompts (if equipped)
Prompts Volume adjustment
Beep Volume adjustment
Bluetooth® setup
Bluetooth® Enable/Disable
Paired devices
Pair a new device
List paired devices
Ring Tones
Measurement Unit System
English
Metric
Clock Setup
Sirius XM Setup (if equipped)
Traffic Setup (if equipped)
Navigation Setup (if equipped)
Rear Controls (if equipped)
System Information
Software
Hardware
EQ
2
Page 3

Navigation (if equipped)
Export Navigation Licensing
Language
Classic Mode
Introduction to Classic Mode
Classic Mode Enable/Disable
Audio System operation
Introduction
Switching the audio source
Usage of Presets
Usage of Favorites
Fav faceplate button
Favorites menu selection
Radio Operation
Band selection
FM Title bar menus
Cat
FM Menu
Seek/Scan/Presets
Scan
RBDS
Media device operation
Device selection
Media playback title bar menus
Find
Playlist
Artist
Album
Song
Genre
Media Menu
Seek/Presets
Scan
Track List
Repeat
Shuffle
Communication
Citizen Band (CB) radio (if equipped)
Adjusting Squelch
CB Transmitting
Adjusting CB Volume
Intercom (if equipped)
Adjusting VOX sensitivity
3
Page 4

Adjusting Rider Headset Volume
Adjusting Passenger Headset Volume
Phone
Making a phone call from the Phone Book
Making a phone call by dialing a number
Receiving a phone call
Ending a phone call
Viewing call history
Text Messages
Emergency Calls
Voice Recognition Operation
Phone commands (4.3 and 6.5 models)
Media commands (6.5 models only)
Tuner commands (6.5 models only)
Navigation commands (6.5 models only)
Navigation Operation (if equipped)
Selecting Navigation Main Menu
Last Audio Mode used (FM, for example)
Navigation Secondary Menu
Location
Import
Export
Displaying the Map screen
Points of Interest (POIs)
Harley-Davidson Dealerships
Destinations (Where To)
Recent Destinations
Emergency Destinations
Personal Navigation Device (PND)
Sirius XM Operation (If equipped)
Radio Services
Changing a Channel
Direct Tune
Artist/Song Tagging
Game Zone
Specialty Services
Traffic
Weather
4
Page 5

Fuel
Forecast
Vehicle Status
Air Temperature
Oil pressure
Engine Idle Management Strategy (EITMS)
Troubleshooting
Error Messages
Resetting
Default Settings
Device Compatibility
Care and cleaning
Warranty
Frequently Asked Questions (FAQ)
5
Page 6

WARNING
● This symbol represents a warning against any actions which may cause injury to people if the
and/or others.
Introduction
This manual explains the operation of the Boom!TM Box infotainment system. There are three different
versions: its 4.3, 6.5GT, and 6.5T model variants. Read this manual carefully and keep it in your
motorcycle at all times.
Definitions
• T = Touch Screen
• G = GPS Navigation database
• 4.3 = 4.3” Screen
• 6.5 = 6.5” screen
Product variants:
• Boom!™ Box 4.3
• Boom!™ Box 6.5GT
• Boom!™ Box 6.5T
Features Matrix
Note: For the matrix features see the spreadsheet loaded on eRoom.
https://eroom.harley-davidson.com/eRoom/1300/2013I/0_2bbe4
Filename: Radio Features Matrix for Users Manual.xls
Should this information be on a web site, instead of on the printed material?(The matrix is too big for printing it,
or inserting it into t he Owner’s manual).
Symbols and Illustrations
The illustrations in this manual show the typical layout. The actual design and button position may
differ slightly depending on your vehicle and system configuration.
Warnings
warning is ignored.
● You are informed about what you must or must not do in order to reduce the risk of injury to yourself
6
Page 7

WARNING
● For safety, the motorcycle rider should not program the navigation system while in motio n. Lack of
● While riding, be sure to obey the traffic regulations and maintain awareness of the road conditions.
Safety
Figure 1. Acceptance screen, 6.5 Models
Figure 2. Acceptance screen, 4.3 Models
Note: Randee to check with the Liability team, whether the 4.3 screen should be included, in addition to the 6.5
To use the Boom!TM Box infotainment system in the safest possible way follow all the warnings,
cautions and safety tips shown throughout this manual.
Do not use any feature of this system to the extent it becomes a distraction and prevents safe riding.
The first priority while riding should always be the safe operation of the vehicle. While riding, be sure
to observe all traffic regulations.
Practice using the system and become thoroughly familiar with it. Read the entire manual to make sure
you understand the functions. Do not allow other people to use this system until they have read and
understood the instructions in this manual.
While riding, you are solely responsi ble for the safe operation of your motorcycle.
For your safety, som e functions will become i noperable when the motorcy c le in motion.
attention to the road and traffic may cause an accident.
7
Page 8

If a traffic sign on the road has been changed, navigation route guidance may not have the updated
information.
While riding, listen to the voice instructions as much as possible. Glance at the screen briefly and only
when it is safe to do so.
Do not rely solely on voice guidance. Use it just for ref erence.
The data in the system may occasionally be incomplete. Road conditions, including restrictions (no left
turns, street closures, etc.) frequently change. Therefor e, before following any instruction from the
system, look to see whether the instruction can be done safely and legally.
This system cannot warn about such things as the safety of an area, road conditions and availability of
emergency servic es.
Use this system only in locations where it is legal to do so.
8
Page 9
WARNING
● For your own safety the keyboard is disabled to enter a name or number (e.g., street name, phone
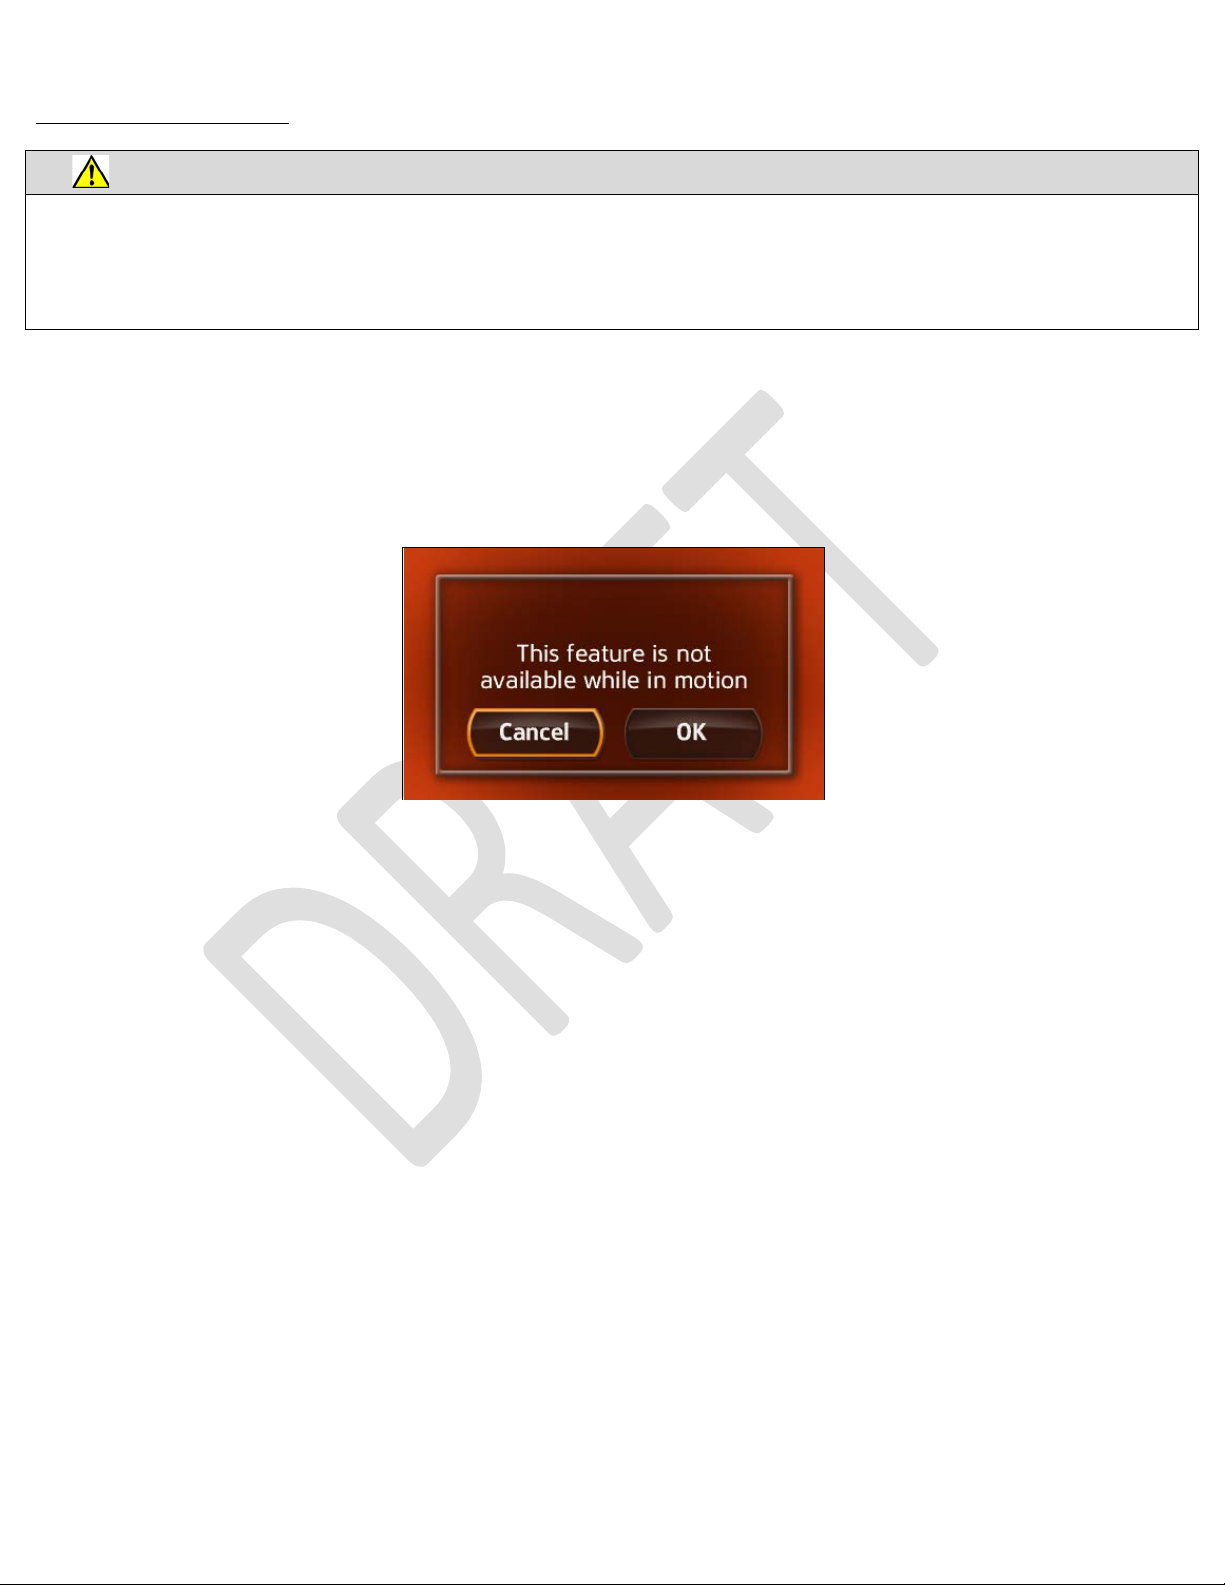
Speed Locked Controls
number, etc.), while the vehicle is in motion.
● Pull over at a safe location to enter data into the system.
Many features of this system are speed-dependent. The system will indicate when a certain feature is
not available while the vehicle is in motion, through a pop-up screen similar to the one shown on
Figure 3.
Figure 3. Unavailability of a feature while vehicle in motion.
9
Page 10
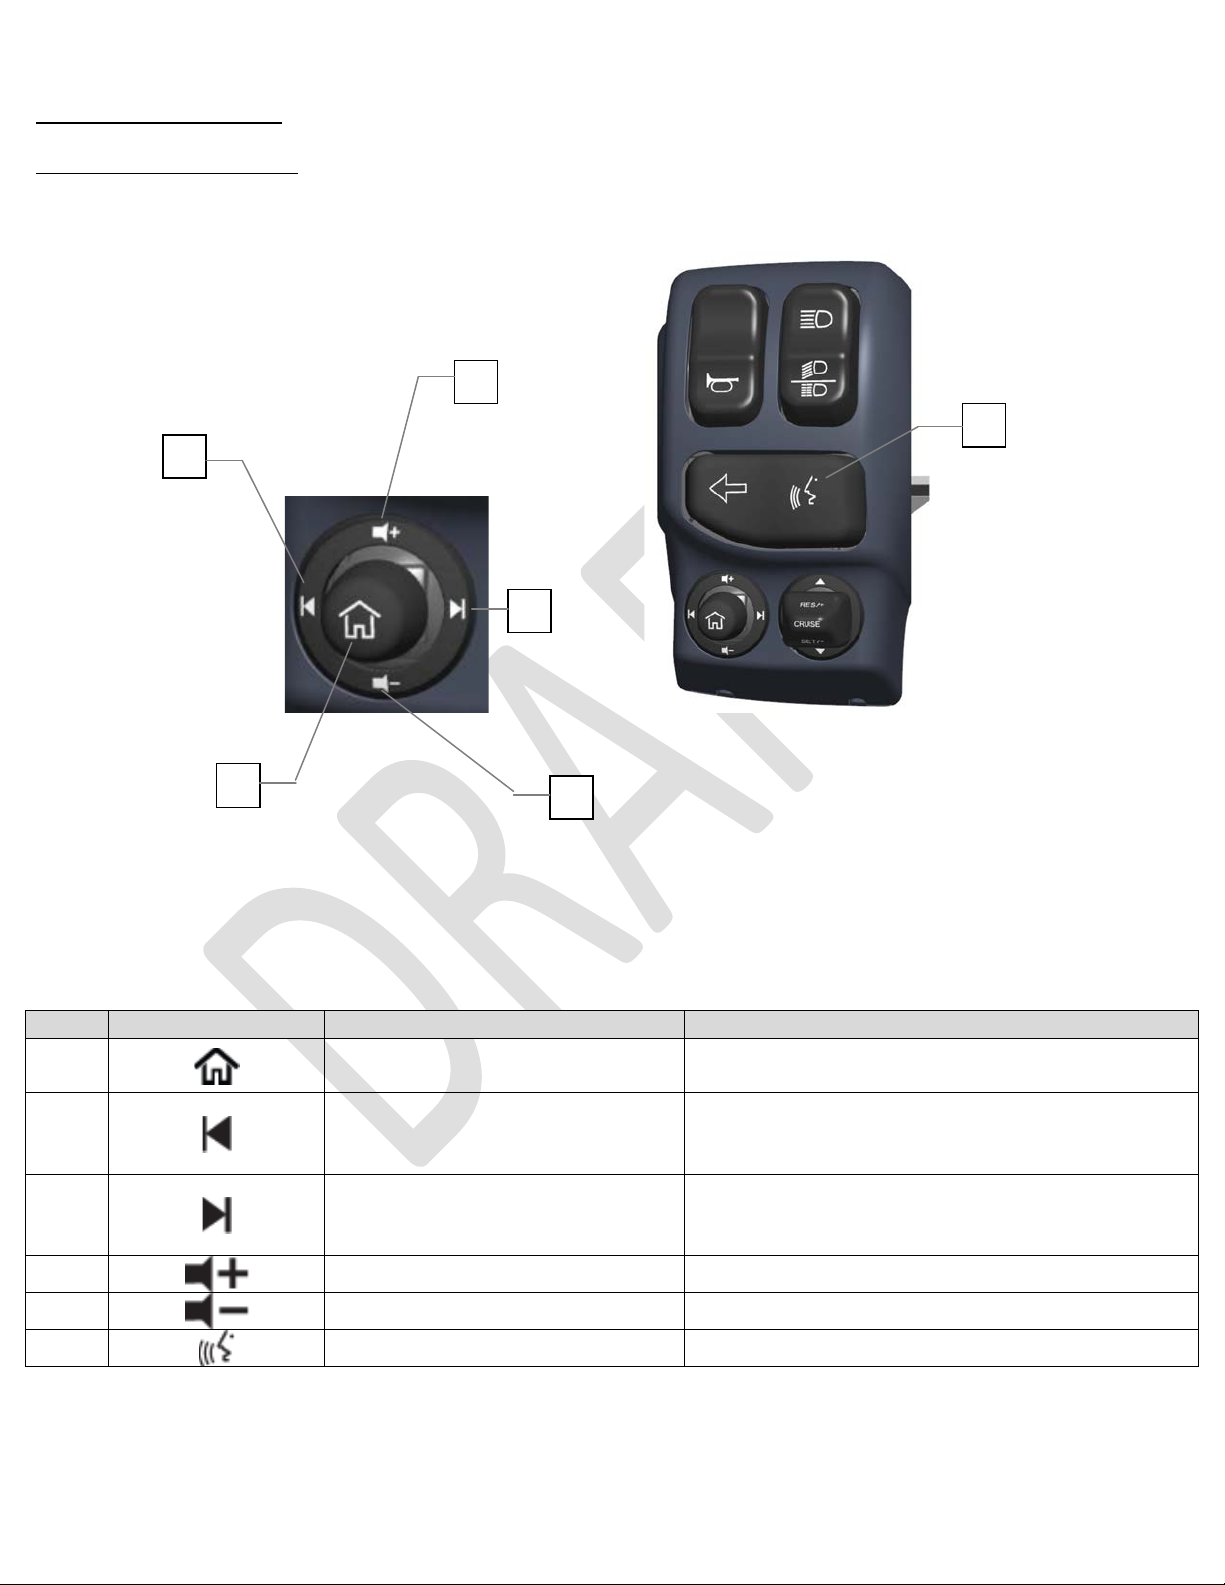
Table 1. Left handlebar control functions
Item
Control graphic
Control
Description
Toggles between current screen and the
Home screen.
Tuner: Seek down for a radio station
connected device.
Tuner: Seek up for a radio station
device.
Increases volume.
Decreases volume .
Initiates a voice comman d session.
5
4 3 6
2
1
Controls at a glance
Left Handlebar Controls
1
2
3
4
Figure 4. Left Handlebar Controls
Seek Down/Previous song
Home screen
Seek Up/Next song
Media: Plays previous song on the
Media: Plays next song on the connected
Volume Up
5
6
Volume Down
Voice Command
10
Page 11

8
7 5 6 1 2
4
3
9
Right Handlebar Controls
Figure 5. Right Handlebar Controls
11
Page 12
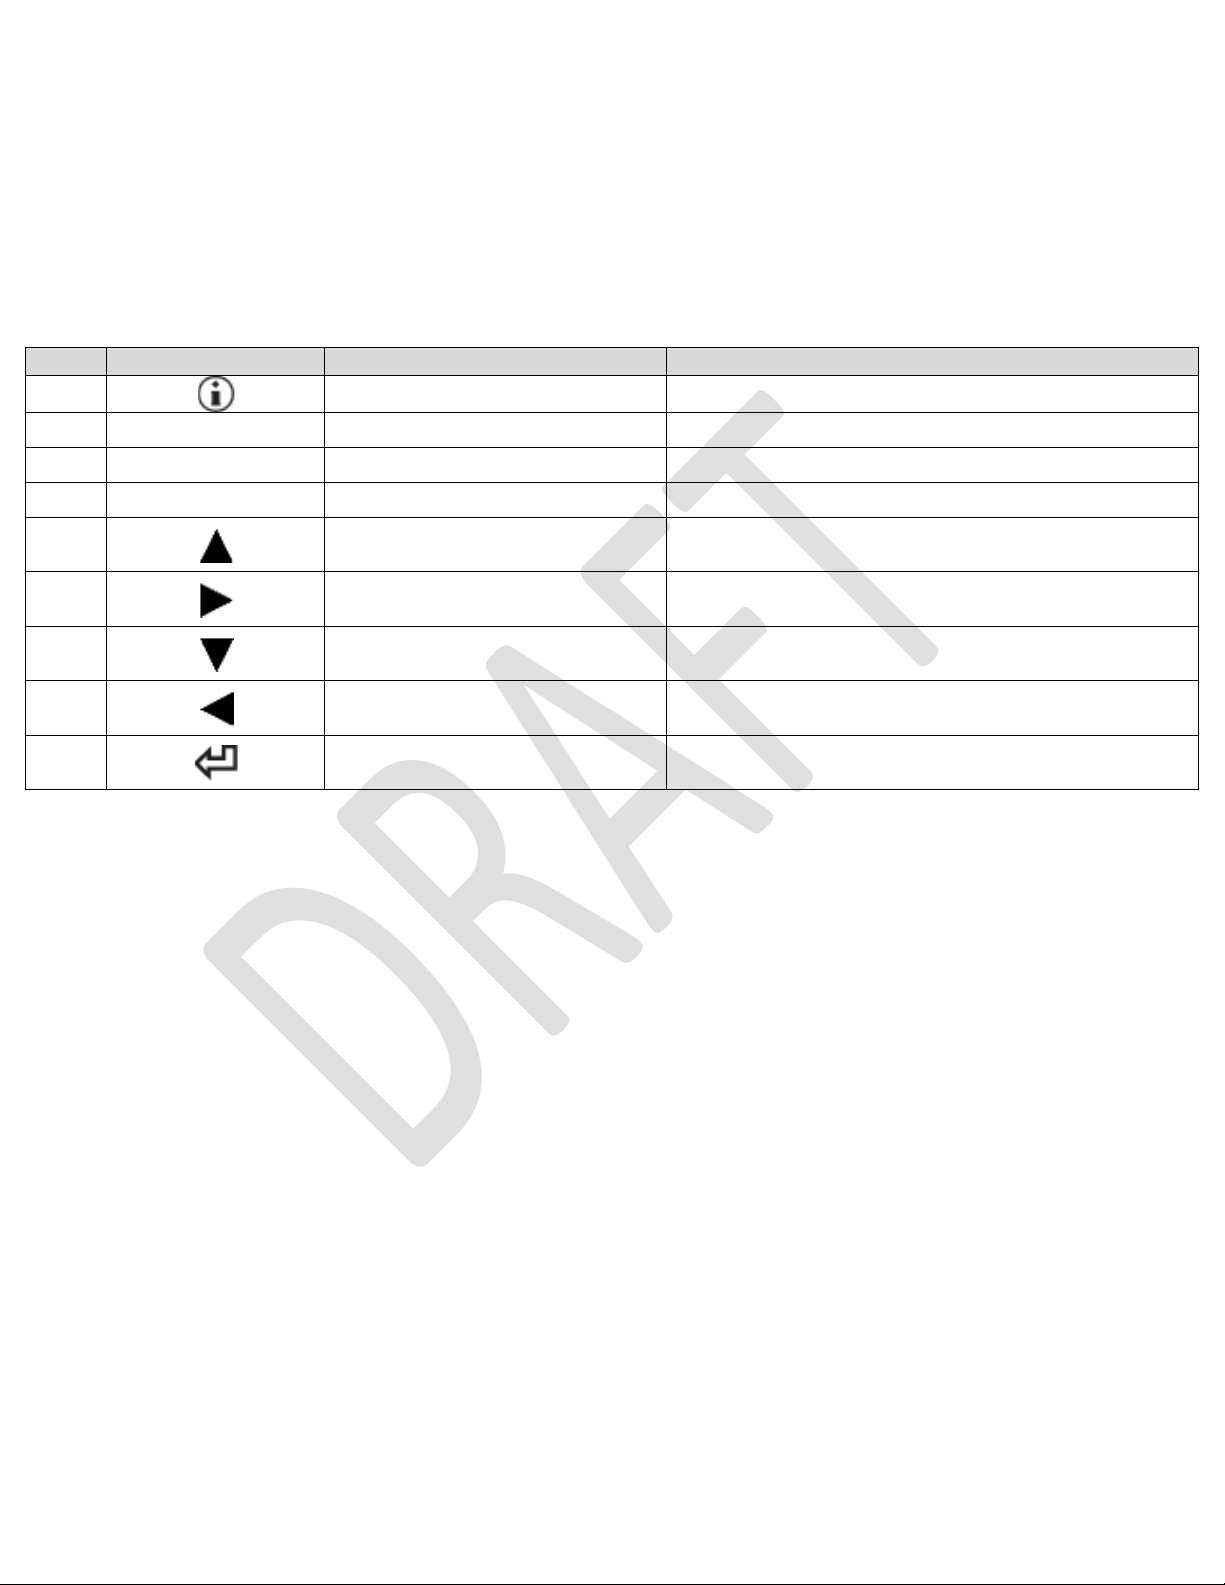
Table 2. Right handlebar control functions
Item
Control graphic
Control
Description
1
Displays/Exits Vehicle Information screen.
2
SQ+
Increases CB squelch l ev el.
3
SQ-
CB Squelch–
Decreases CB squelch level.
4
PTT
Press and hold to transmit over CB channel.
5
Moves the highlighting up through the
selections.
6
Moves the highlighting right through the
selections.
7
Moves the highlighting down through the
selections.
8
Moves the highlighting left through the
selections.
9
Selects the highlighted item in the screen.
Used to finish entering data into the system.
Information
CB Squelch+
CB Push To Talk
Cursor Up
Cursor Right
Cursor Down
Cursor Left
Select/Enter
12
Page 13
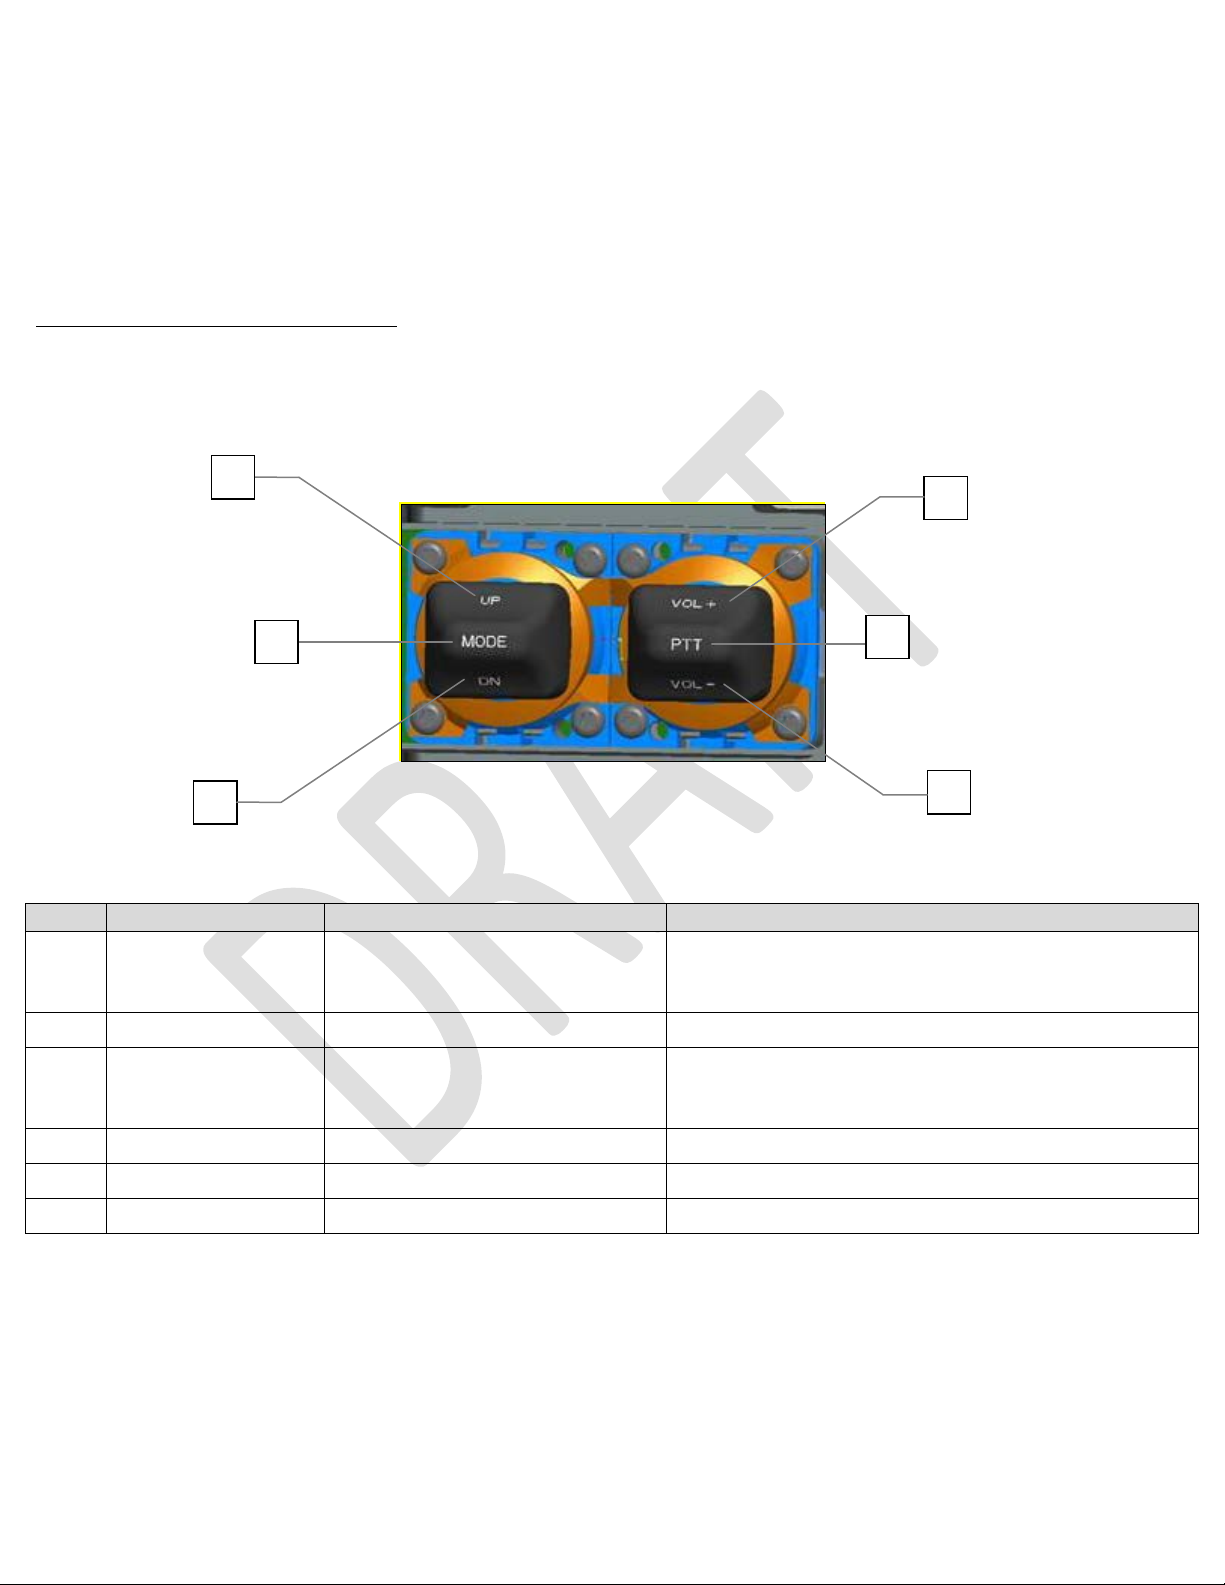
Table 3. Passenger controls functions
Item
Control graphic
Control
Description
1
Tuner: Seek up for a radio station
device.
2
MODE
Cycles to the next available audio source.
3
Tuner: Seek up for a radio station
device.
4
VOL+
Increases volume.
5
PTT
Press and hold to transmit over CB channel.
6
VOL-
Decreases volume.
3 6 4 5 1
2
Passenger controls (If equipped)
Note: This artwork would be more useful if it gave sense of location on the vehicle
UP
DN
Figure 6. Passenger Controls
Seek Up/Next song
Mode
Seek Down/Previ ou s song
Volume Up
CB Push to Talk
Volume Down
Media: Plays next song on the connected
Media: Plays next song on the connect ed
13
Page 14
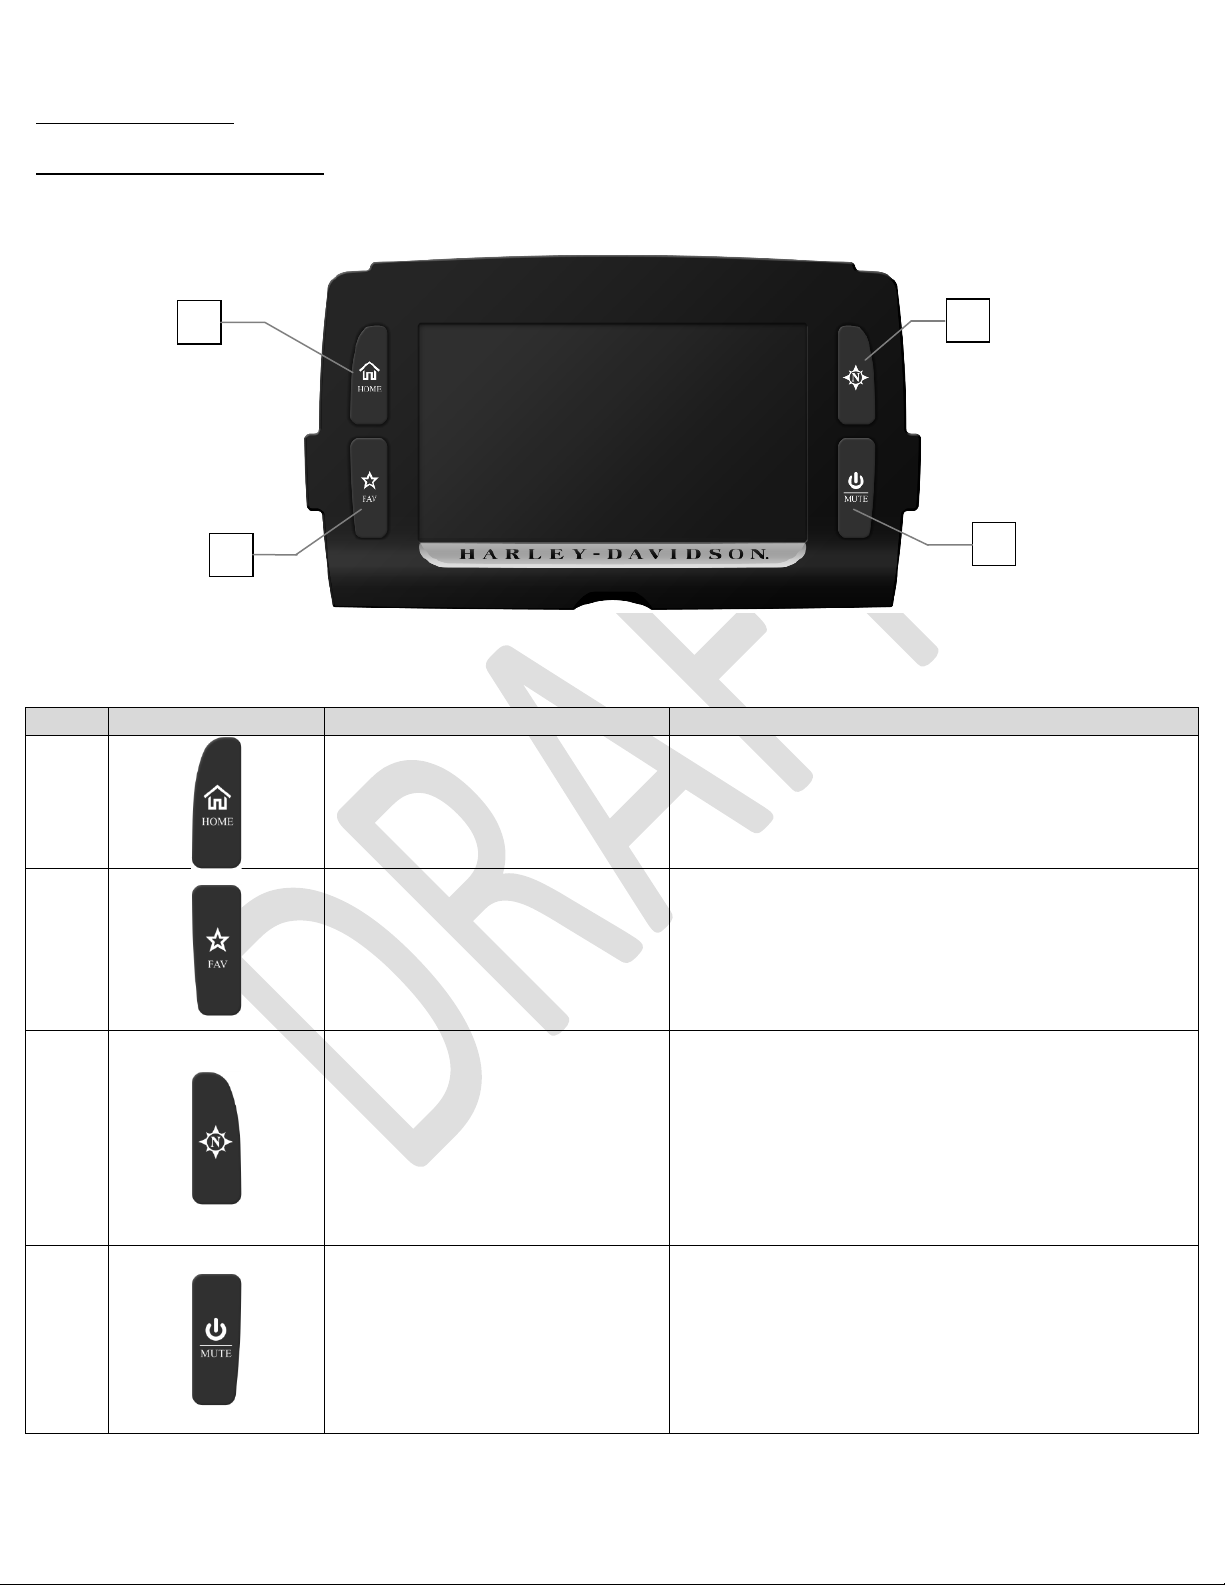
Table 4. Faceplate controls functions, 6.5 Models
Item
Control graphic
Control
Description
Pressing this button will toggle between any
A press and hold operation will allow the user
previously programmed favorite audio mode.
Models with Navigation:
compass screen.
When the system is ON:
system OFF.
3
4 1 2
Faceplate Buttons
Boom!™ Box 6.5 models
1
2
3
Figure 7. Faceplate Controls, 6.5 Models
screen and the Home screen.
Home screen
to program this button as a shortcut to a
Favorite
favorite audio mode.
A quick press will switch the system to the
Pressing this button will toggle between any
screen and the Navigation screen or the
Navigation/Compass
Map screen.
Models without Navigation:
Pressing this button will display the
4
Power/Mute
A quick press will mute or un-mutes audio.
Audio from connected devices will pause or
un-pause.
A press and hold operation (3 sec) will turn
14
Page 15

A quick press will turn system ON.
Table 5. Faceplate controls functions, 4.3 Models
Item
Control graphic
Control
Description
When the system is ON:
A quick press will turn system ON.
Pressing this button will toggle between any
A press and hold operation will allow the user to
previously programmed favorite audio mode.
These soft keys are dynamic. Their function
changes according to their alignment to the
1 2 3
4
Boom!™ Box 4.3 models
When the system is OFF:
1
2
3
Figure 8. Faceplate Controls, 4.3 Models
Power/Mute
Home screen
Favorite
A quick press will mute or un-mutes audio.
Audio from connected devices will pause or unpause.
A press and hold operation (3 sec) will turn
system OFF.
When the system is OFF:
screen and the Home screen.
program this button as a shortcut to a favorite
audio mode.
A quick press will switch the system to the
4 Soft key
15
Page 16

items in the screen.
Introduction to Voice Recognition (VR)
The Voice Recogniti on system gives the rider the ability to initia te voice-operated commands. The VR
commands interact with the connected devices and the navigation system (if equipped). These sets of
voice commands are initiated by pressing the Voice command button on the left handlebar controls.
For complete instructions and syntax of the voice-operated commands, read the Voice Recognition
Operation section of this manual.
Note: Mention the Ignition switch, where applicable (i.e. Software Update, or Power moding), but don’t include a
section for the igni t ion switch, since thi s belongs in the vehicle m anual section.
16
Page 17

Jukebox
USB port
User Ports and connectors
USB port
Your Boom!TM Box has a USB port that allows you to connect a compatible phone, media player or a
USB flash drive.
Note: reference the list of compatible devices on the web site.
The USB port is located inside the media compartment, called Jukebox.
The Jukebox is loca ted on the right side next to the Boom!
TM
Box system.
Check the following illustration for the location of the USB port and the Jukebox.
Note: Graphics need to be improved, to be able to locate the media compartment and USB cable.
Headset connector (if equipped)
Figure 9. Jukebox and USB port location
17
Page 18

On select model s, th e vehicle is equipp ed with a Headset connector . Refer to your vehicle manual for
the location of th e h ea dset connector, or to c h eck if the vehicle has it.
General Operation
Boom!™ Box 4.3 models faceplate
Select the item on t he scr een b y pressing the soft key that aligns with that item.
Figure 10. Item selection, 4.3 Models
Boom!™ Box 6.5 models Touch Screen
Select the item on the screen by pressing that item on the Touch Screen.
18
Page 19
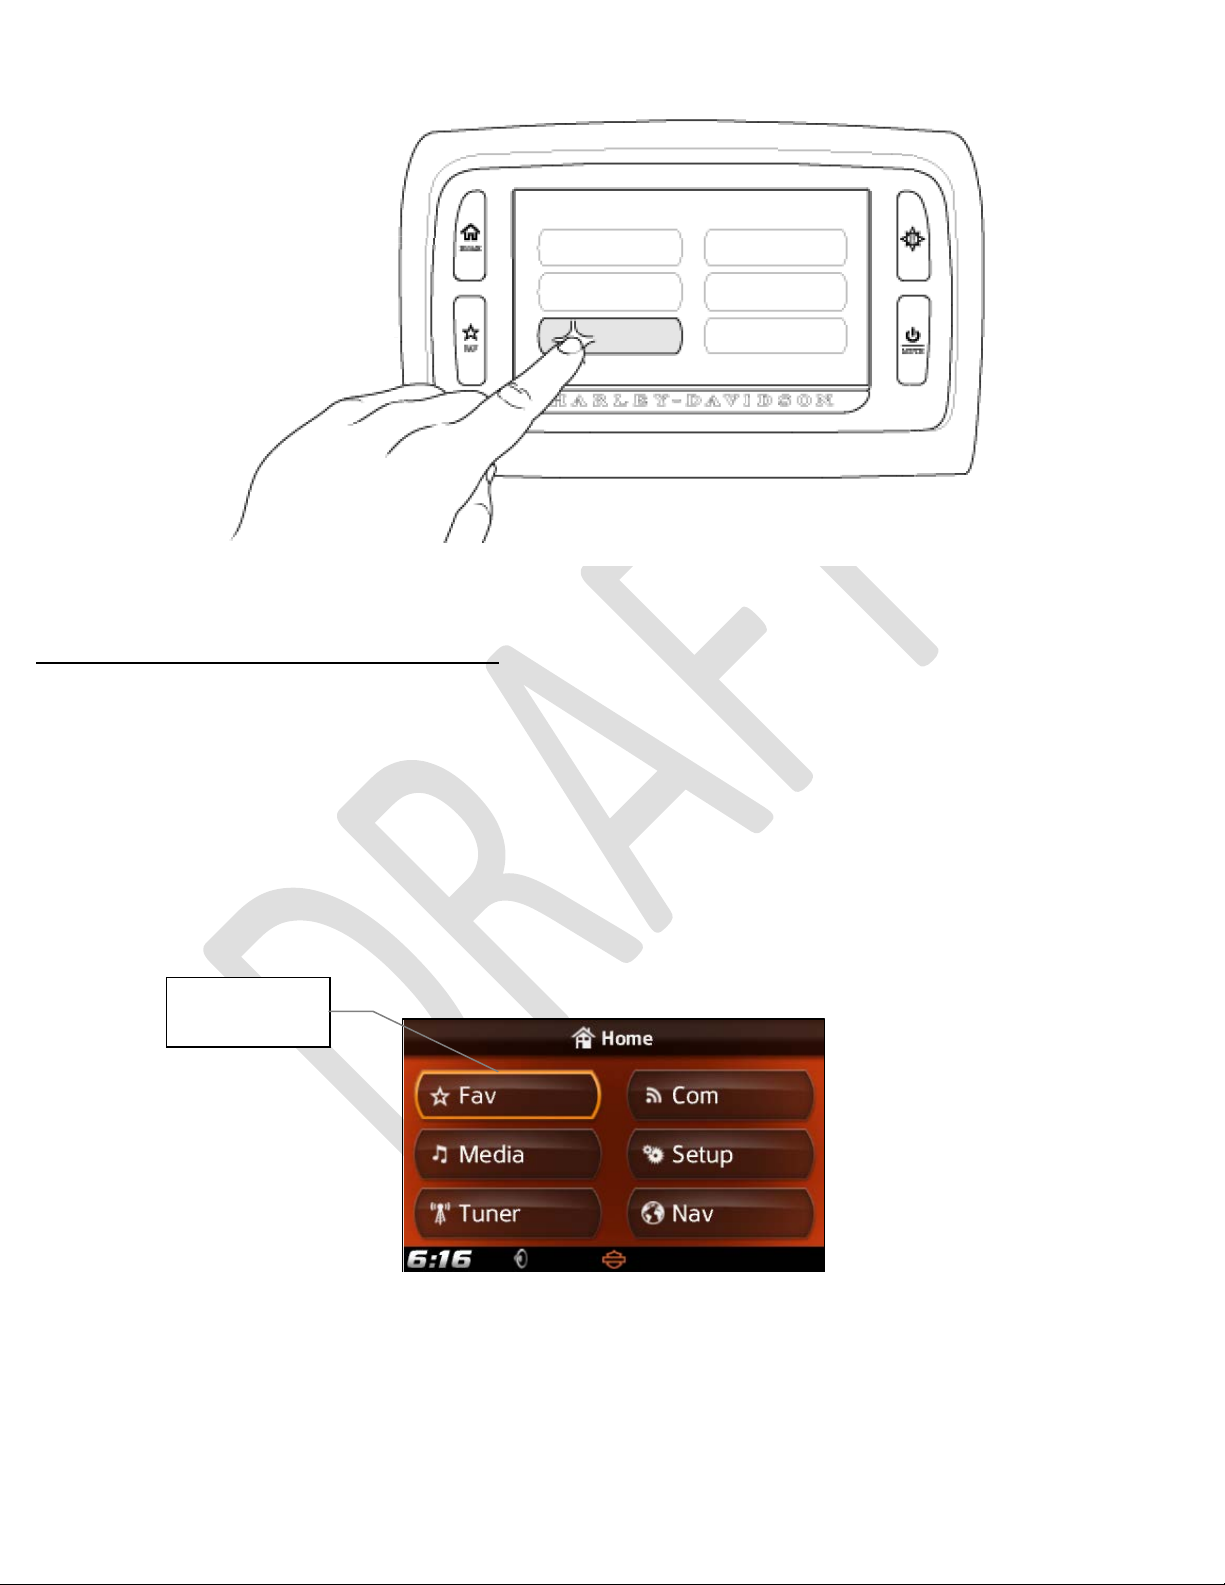
Highlighted
item
Figure 11. Item selection, 6.5 Models
Using handlebar controls to select objects
While the vehicle i s i n motion it is recommended to avoid using the Touch Screen or the faceplate
buttons since this implies releasing one of the hands from the handlebar.
While riding a safer method is to utilize the keys on the right handlebar controls to perform selections.
Refer to the right handlebar contr ol section of this manual for the keys location. The cursor movement
keys (Up, Down, Left, Right) can be used to highlight a different object in the screen. The Enter/Select
key can be used to select such object. Do this only when it is safe to do so.
The currently highlighted item will have a yellow box surrounding the object.
Figure 12. Example with Fav, as the highlighted item
19
Page 20

Visual elements
Title bar
The title bar is located in the upper part of the screen, in most screens. The title bar and its
components change according to the screen that the system is presenting.
The title, located on the center of the title bar, indicates the name of the screen or the function that
the screen represents. The title is not a selectable item. Some title bars may contain a left or a right
button, or both.
Figure 13. FM Title bar and menus
Buttons with checkboxes
Some system options are turned on or off by u se of a checkbox in the button.
20
Page 21
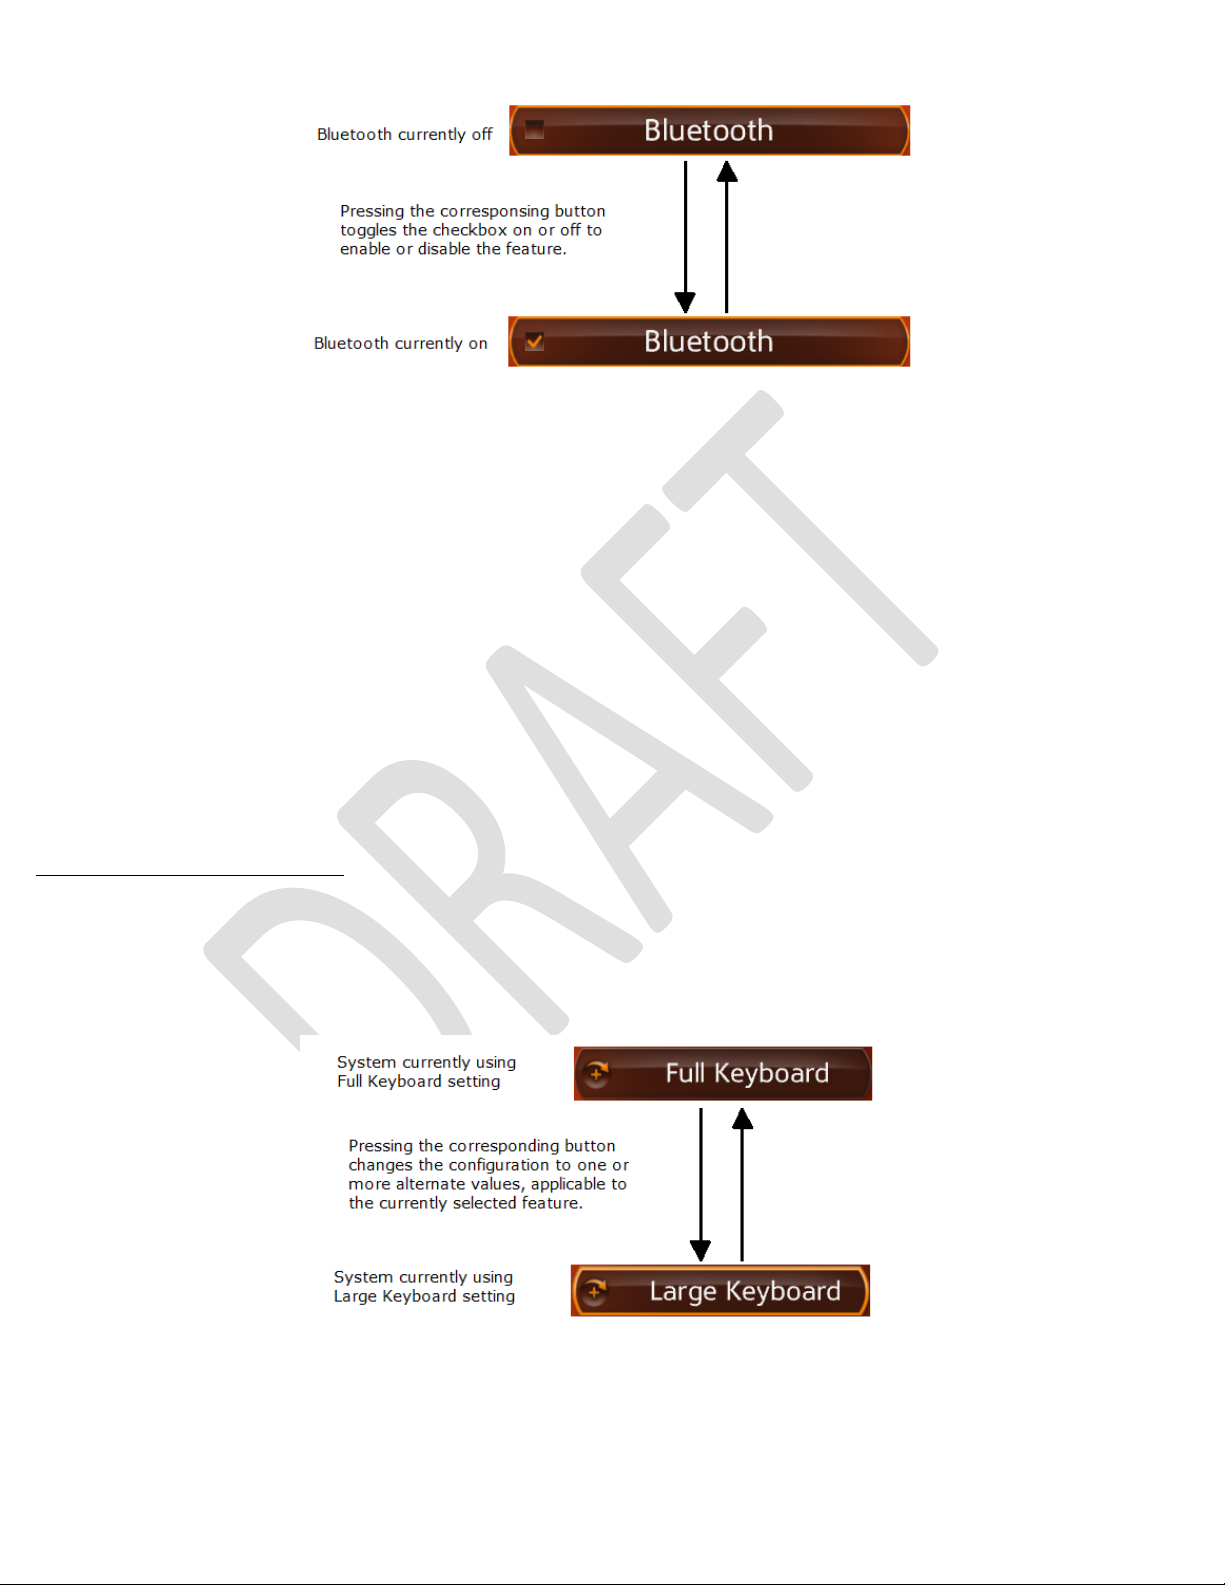
Figure 14. Use of a checkbox to toggle a function on or off
Buttons for multiple options
Some settings can be changed by use of multiple option buttons, identified by the + and arrow graphic
on the button.
Figure 15. Use of multiple option buttons to cycle through settings for a feature
21
Page 22
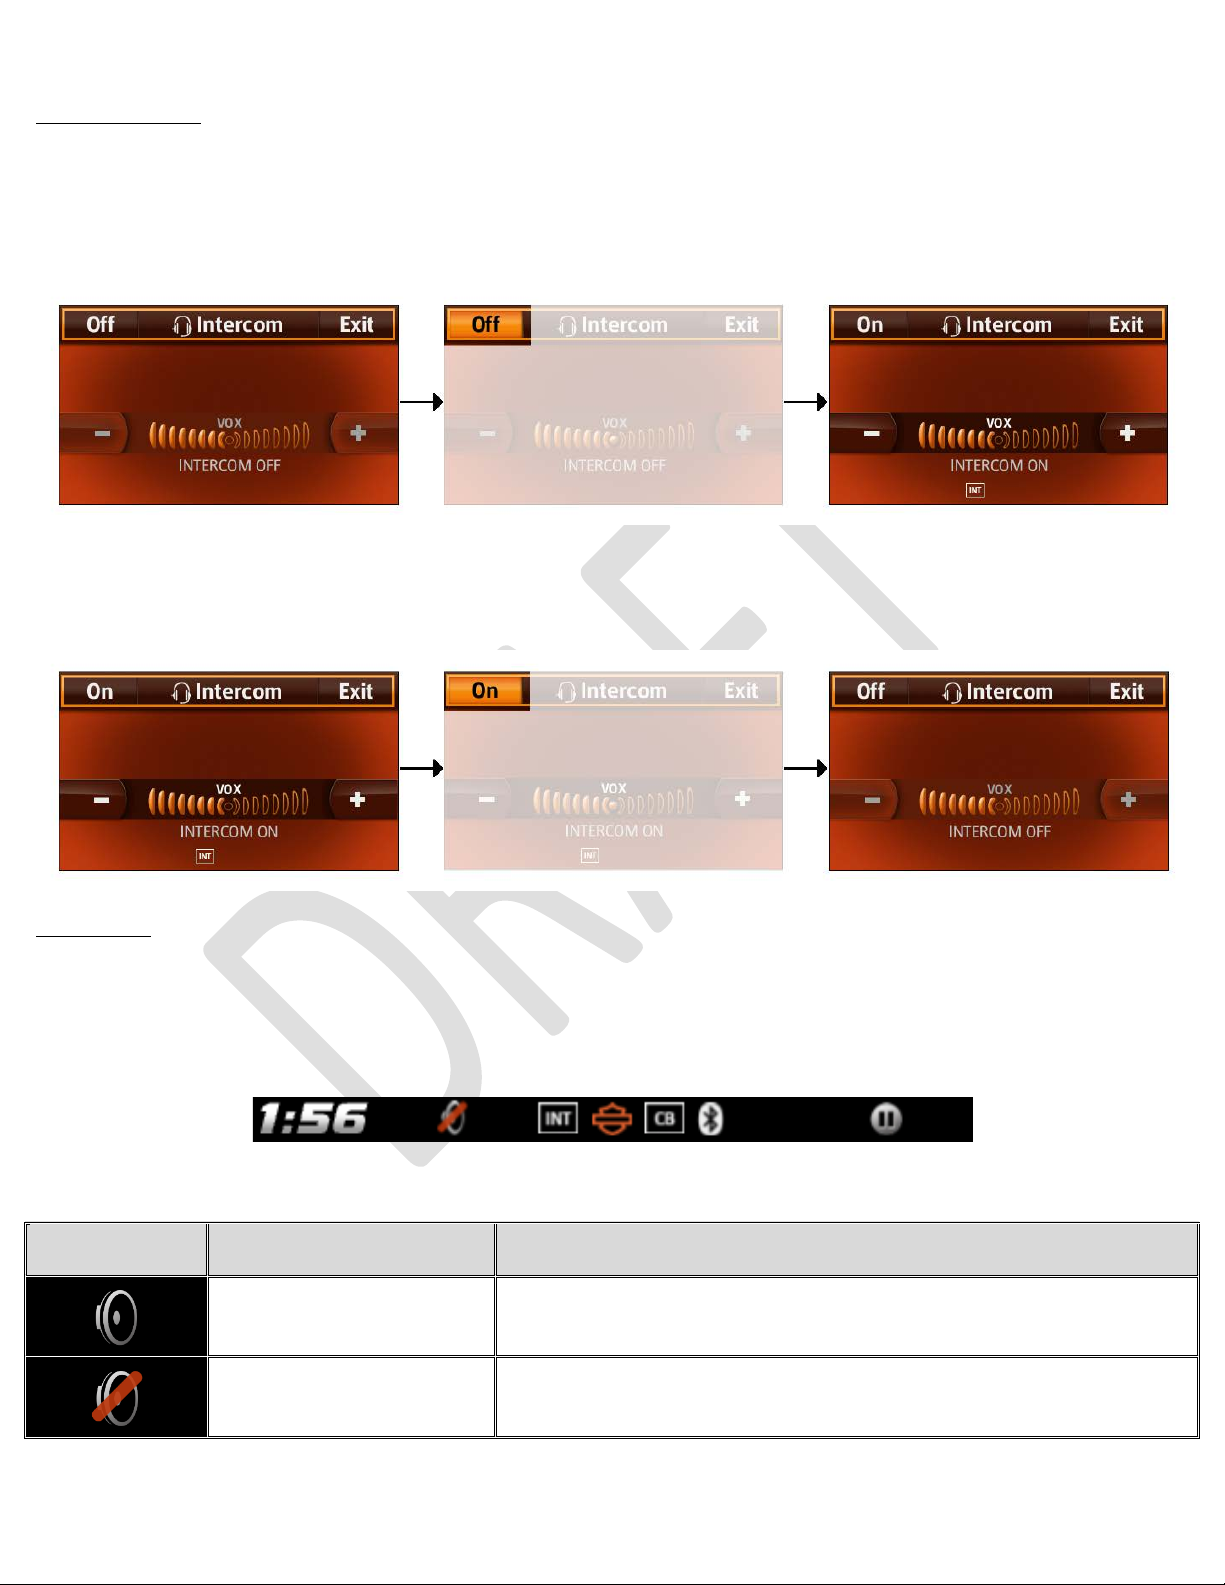
On/Off buttons
Some features are turned on or off by use of the On/Off buttons in the corresponding screens. One
example is the Intercom screen.
Figure 16. Turning Intercom On
Figure 17. Turning Intercom Off
Status bar
The status bar is located in the lower part of the screen, in most screens. The icons in the status bar
are indicators. None of the icons are selectable.
Figure 18. Status bar and icons
Table 6. Status bar icons
Icon graphic Status Description
Speakers not muted
Speakers muted
Music/Media audio is being routed to the speakers.
The speakers are currently not muted.
Music/Media audio is being routed to the speakers.
The speakers are currently being muted.
22
Page 23
On select markets: if a Sirius XM module is in stalle d, the
strength.
On select models: While there is not an active microphone
functionality has been disabled.
On select models: During an active microphone
disabled.
On select models and markets: while there is not an
disabled, or if the CB module is not installed.
Select models and markets: during an active CB
is not installed.
The Bluetooth® icon appears if a Bluetooth® device has been
or Phonebook icon.
Table 6. Status bar icons
Icon graphic Status Description
Headsets not muted
Headsets muted
Traffic Announcement
Traffic
Program
Sirius XM Signal
Strength
Intercom microphone
idle
Intercom microphone
active
Music/Media audio is being routed to the headsets.
The headsets are currently not muted.
Music/Media audio is being routed to the headsets.
The headsets are currently being muted.
On select markets: The tuned RDS station is actively
broadcasting an audio traffic announcement.
On select markets: The tuner is set to an RDS station that
regularly broadcasts traffic bulletins.
XM signal strength icon will appear. Filled bars indicate signal
transmission, the Intercom microphone idle icon will be
shown with white letters, in a black background in a white
outline box. This icon will not appear if the Intercom
transmission, the Intercom microphone active icon will be
shown with black letters, in a white background box. This
icon will not appear if the Intercom functionality has been
Harley-Davidson
Bar & Shield logo
The Harley-Davidson Bar & Shield logo is always present in
the center of the status bar.
active CB transmission, the CB idle icon will be shown with
CB idle
white letters, in a black background in a white outline box.
This icon will not appear if the CB functionality has been
transmission, the CB active icon will be shown with black
CB active
Bluetooth®
letters, in a white background box. This icon will not appear
if the CB functionality has been disabled, or if the CB module
connected. It will only appear if the system is not presenting
one of these statuses: Roaming, New Messages, Low Battery
Roaming
The Roaming icon appears in case the phone connected
through Bluetooth
23
®
is in a roaming area.
Page 24

Indicates that the phone connected through Bluetooth® has
message this icon will be removed.
The Phonebook icon will be displayed when a Bluetooth
®
icon disappears when that action completes.
The Heading North direction icon is displayed when the
direction is heading North.
The Heading South direction icon is displayed when the
direction is heading South.
The Heading East direction icon is displayed when the
direction is heading East.
The Heading West direction icon is displayed when the
direction is heading West.
The Heading North-East direction icon is displayed when the
direction is heading North-East.
The Heading South-West direction icon is displayed when the
direction is heading South-West.
The Heading South-East direction icon is displayed when the
direction is heading South-East.
The Heading South-West direction icon is displayed when the
direction is heading South-West.
The VR session active icon will appear after the Voice
has been executed or c a n cel led.
Shortly after the Boom!TM Box is powered up, the Voice
This icon gets displayed during the time of unavailability.
The media paused icon will be displayed whenever the media
will pause or un-pause media audio.
Table 6. Status bar icons
Icon graphic Status Description
N
S
E
W
New Messages
Low Battery
Phonebook
Heading North direction
Heading South direction
Heading East direction
Heading West direction
received an SMS text message (if supported).
When the user goes to the message list showing the new
The Low Battery icon appears if the phone connected
through Bluetooth
connected hands-free device’s phonebook data is currently
being synched or downloaded to your Boom!
Navigation subsystem has determined that your vehicle’s
Navigation subsystem has determined that your vehicle’s
Navigation subsystem has determined that your vehicle’s
Navigation subsystem has determined that your vehicle’s
®
has a low battery.
TM
Box. This
NE
NW
SE
SW
Heading North-East
direction
Heading North-West
direction
Heading South-East
direction
Heading South-West
direction
VR session active
VR system not ready
Media paused
Navigation subsystem has determined that your vehicle’s
Navigation subsystem has determined that your vehicle’s
Navigation subsystem has determined that your vehicle’s
Navigation subsystem has determined that your vehicle’s
Command button is pressed, to indicate that a VR session is
active. The icon will remain visible until the voice command
Recognition system will not be ready for a few minutes.
audio gets paused. Single pressing the Power/Mute button
24
Page 25

Other events, such as receiving a phone call would also
Scan Up icon will appear during a Scan Up operation of tuner
terminated or stopped.
Scan Down icon will appear during a Scan Down operation of
scan is terminated or stopped.
Seek Up icon will appear during a Seek Up operation of
when the Seek Up operation is complet ed .
Seek Down icon will appear during a Seek Down operation of
disappear when the Seek Down operation is completed.
Table 6. Status bar icons
Icon graphic Status Description
pause music playback.
Scan Up
Scan Down
Seek Up
Seek Down
Phone Signal Strength
or media. The Scan Up icon will disappear when the scan is
tuner or media. The Scan Down icon will disappear when the
tuner, media or Sirius XM. The Seek Up icon will disappear
tuner, media or Sirius XM. The Seek Down icon will
The Phone Signal strength icon is shown when a phone is
®
connected by Bluet oot h
. Filled bars indicate signal strength.
25
Page 26
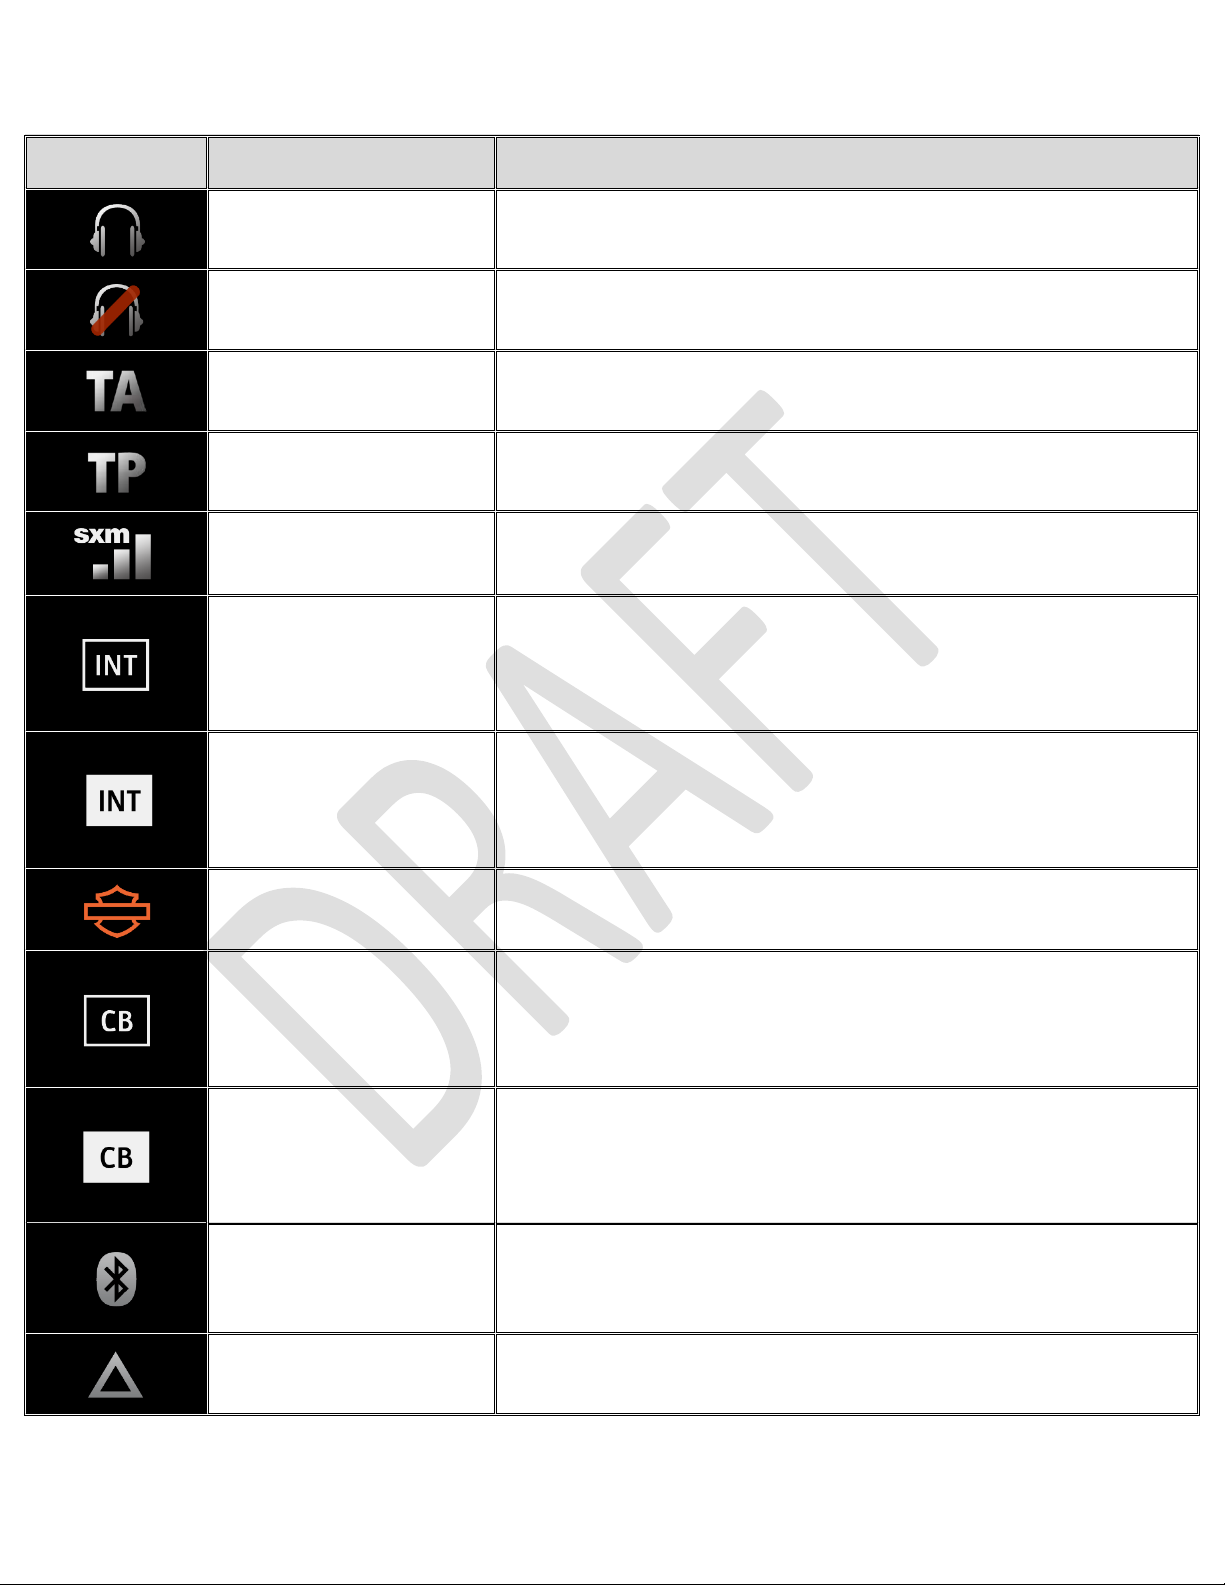
User setting s (Setup Menu)
To customize the Boom!TM Box settings:
• Bring up the Home screen
• Select Setup
• Select the desired setup section
Figure 19. Setup Menu selection, 4.3 models
Figure 20. Setup Menu selection, 6.5 models with Sirius XM
26
Page 27

Figure 21. Setup Menu overview
27
Page 28
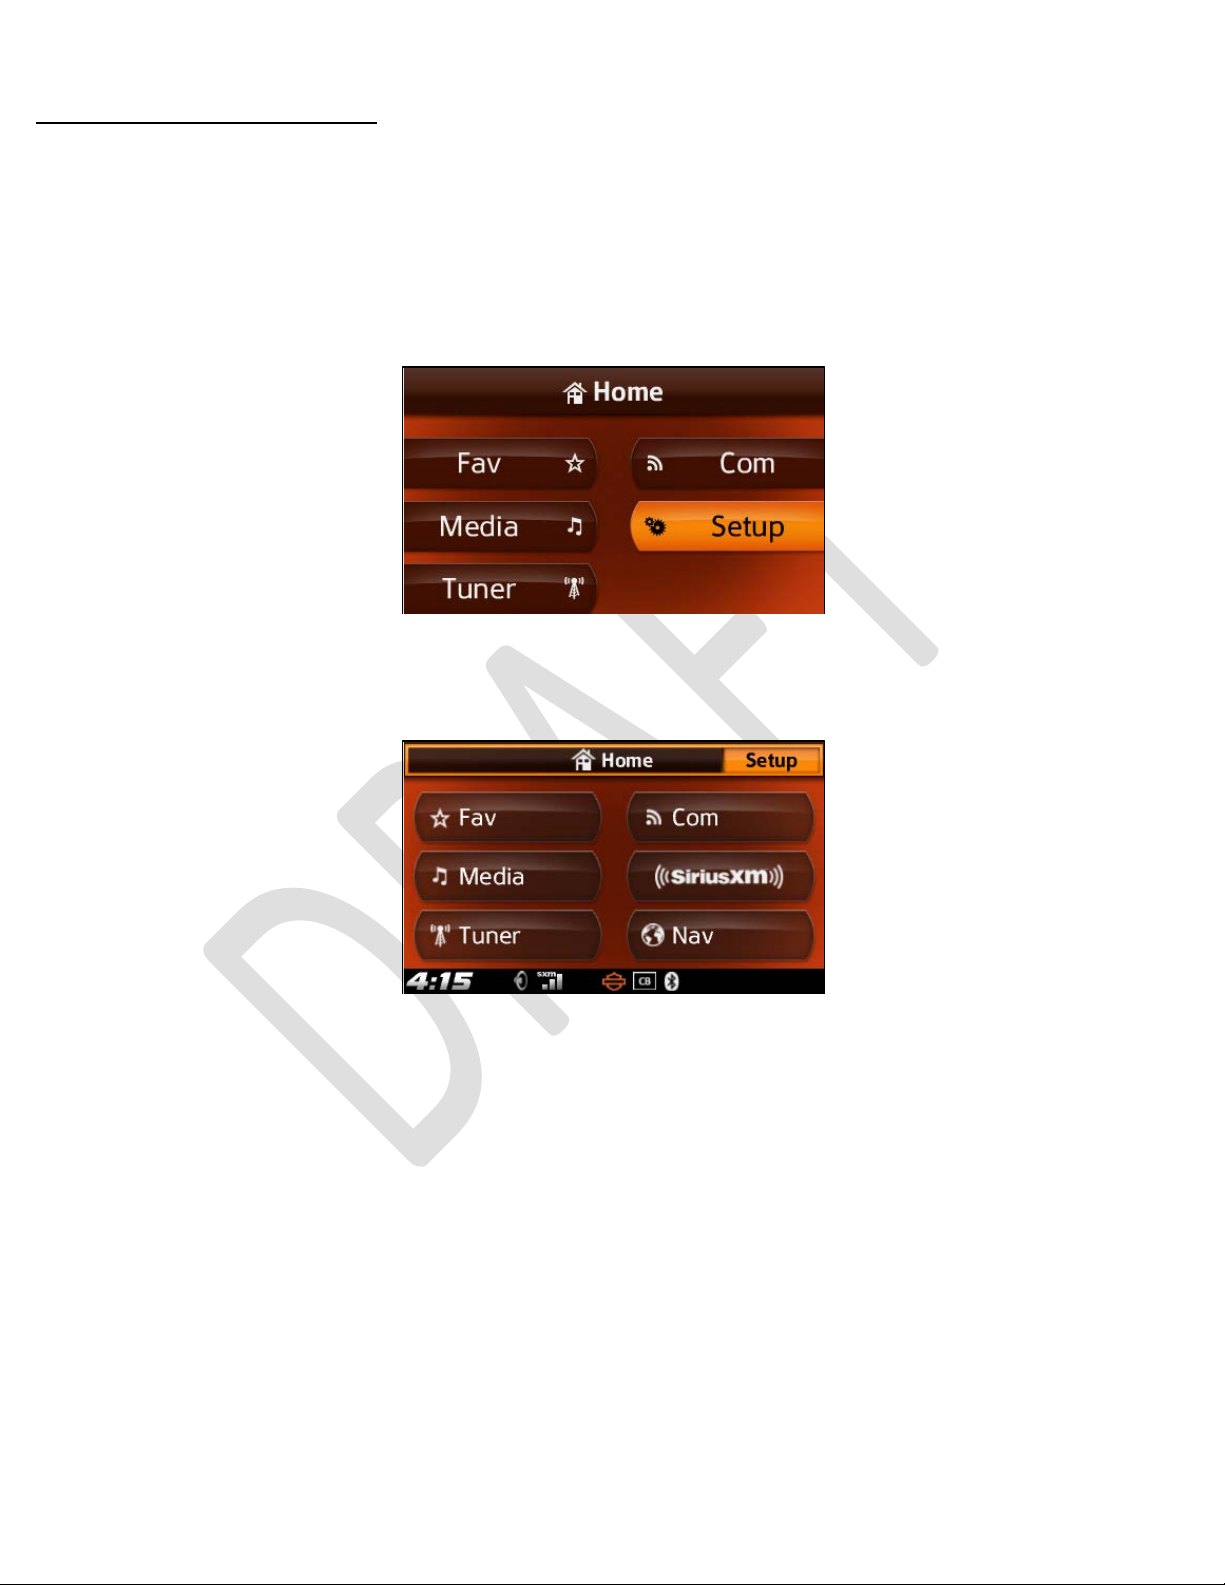
Audio Routing (Speaker/Headset)
The Speaker / Headset option under the Setup Menu allows selection of audio output through the
speakers or the headsets for music, communications and for system prompts.
Figure 22. Speaker / Headset
Select the speaker or the headset graphic, as desired for each audio source.
Figure 23. Audio Routing (Speaker / Headset selection)
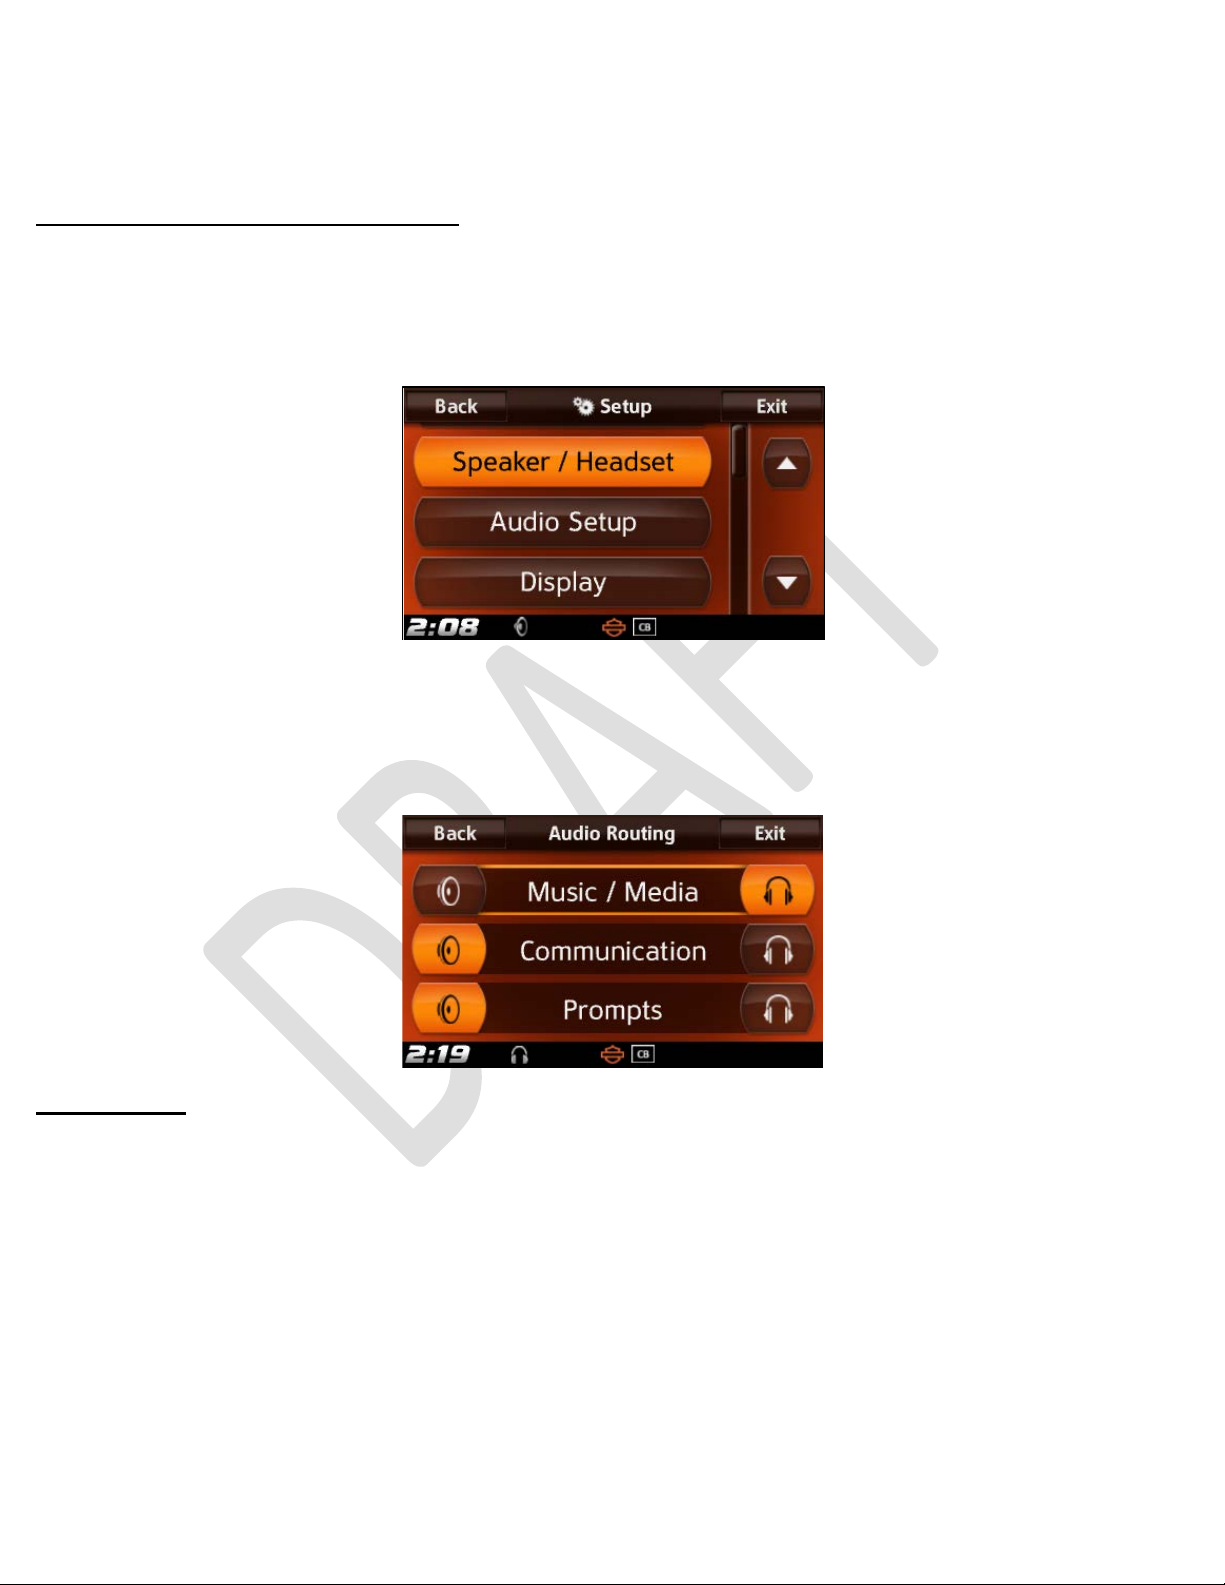
Audio Setup
The Audio Setup option under the Setup Menu allows adjustment of audio settings, such as bass,
treble, fader (on select models) and sp eed-dependent automatic volume control.
28
Page 29
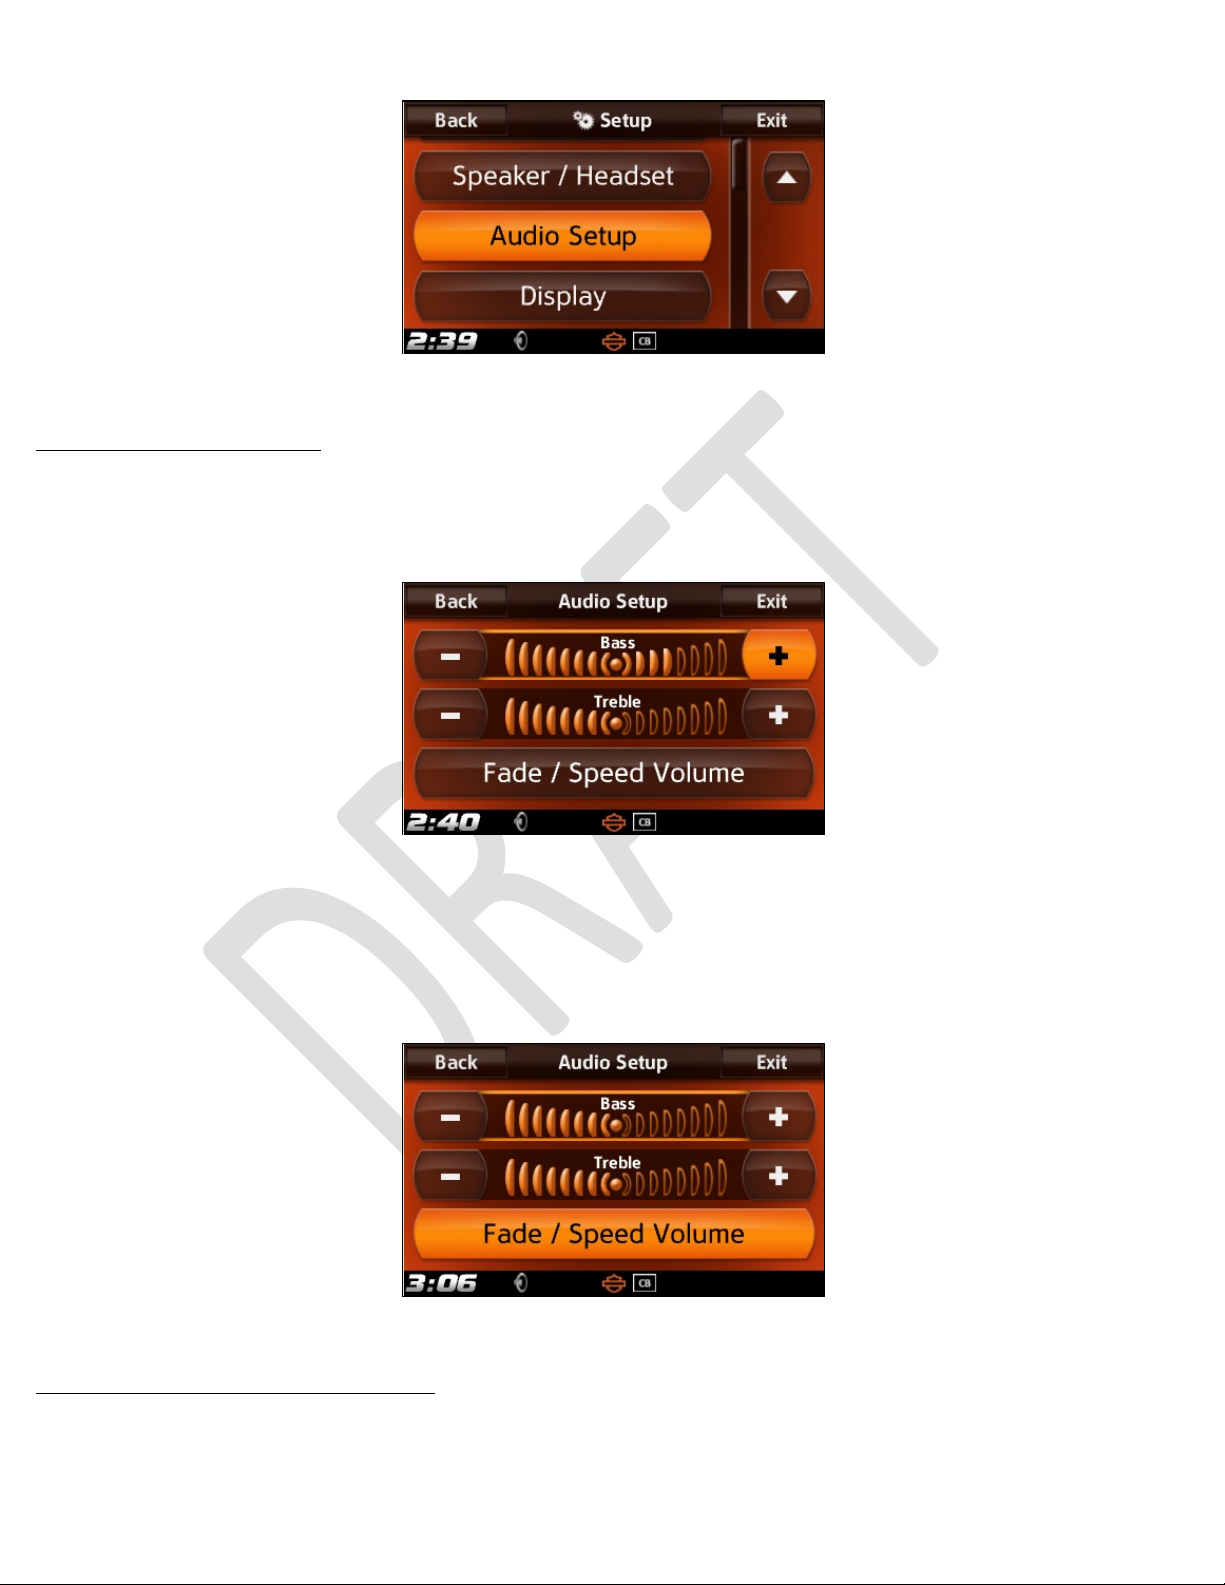
Figure 24. Audio Setup
Bass & Treble adjustment
Bass & Treble can be adjusted by pressing on the corresponding + or – buttons.
Figure 25. Bass & Treble adjustment
Pressing the Fade / Speed Volume button changes the page to adjust Fade (on select models) and
Speed Volume.
Fade adjustment (on select models)
Figure 26. Fade / Speed Volume
29
Page 30
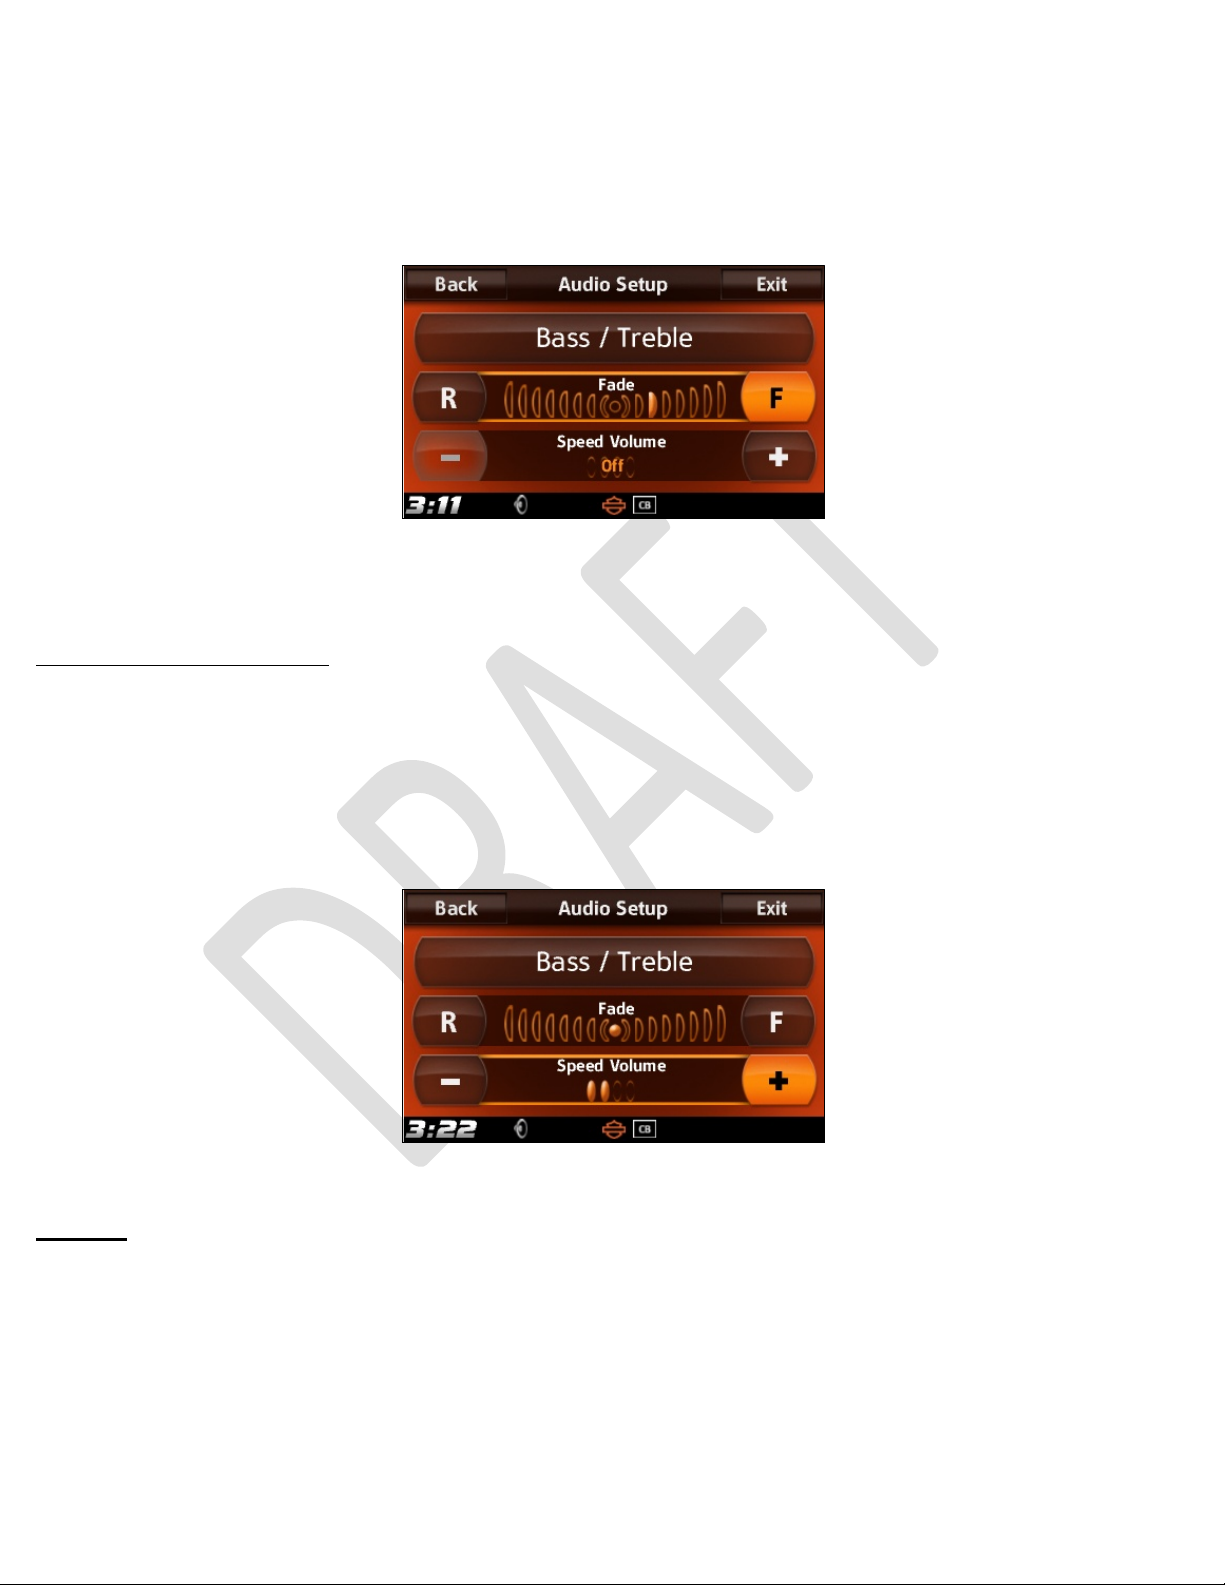
Fade adjusts the balance between rider and passenger speakers. Pressing F moves the balance to the
front speakers while pressing R moves the balance to the rear speakers. Equal volume in front and rear
speakers is indicated by the centered circle segment.
Figure 27. Fade adjustment
Speed Volume adjustment
The Speed Volume or Automatic Volume Control (AVC) function sets the volume level to compensa te
for the ambient noise associated with motorcycle speed. The AVC can be turned on or off, and the
compensation can be adjusted between four different compensation levels by pressing the + and buttons.
Figure 28. Speed Volume adjustment
Display
The Display menu allows the end user to change the LCD backlight and the hard key button
illumination on the faceplate. These adjustments are user-selectable only if they are configured as
manual mode. In automatic mode, these settings change according to the ambient light.
30
Page 31
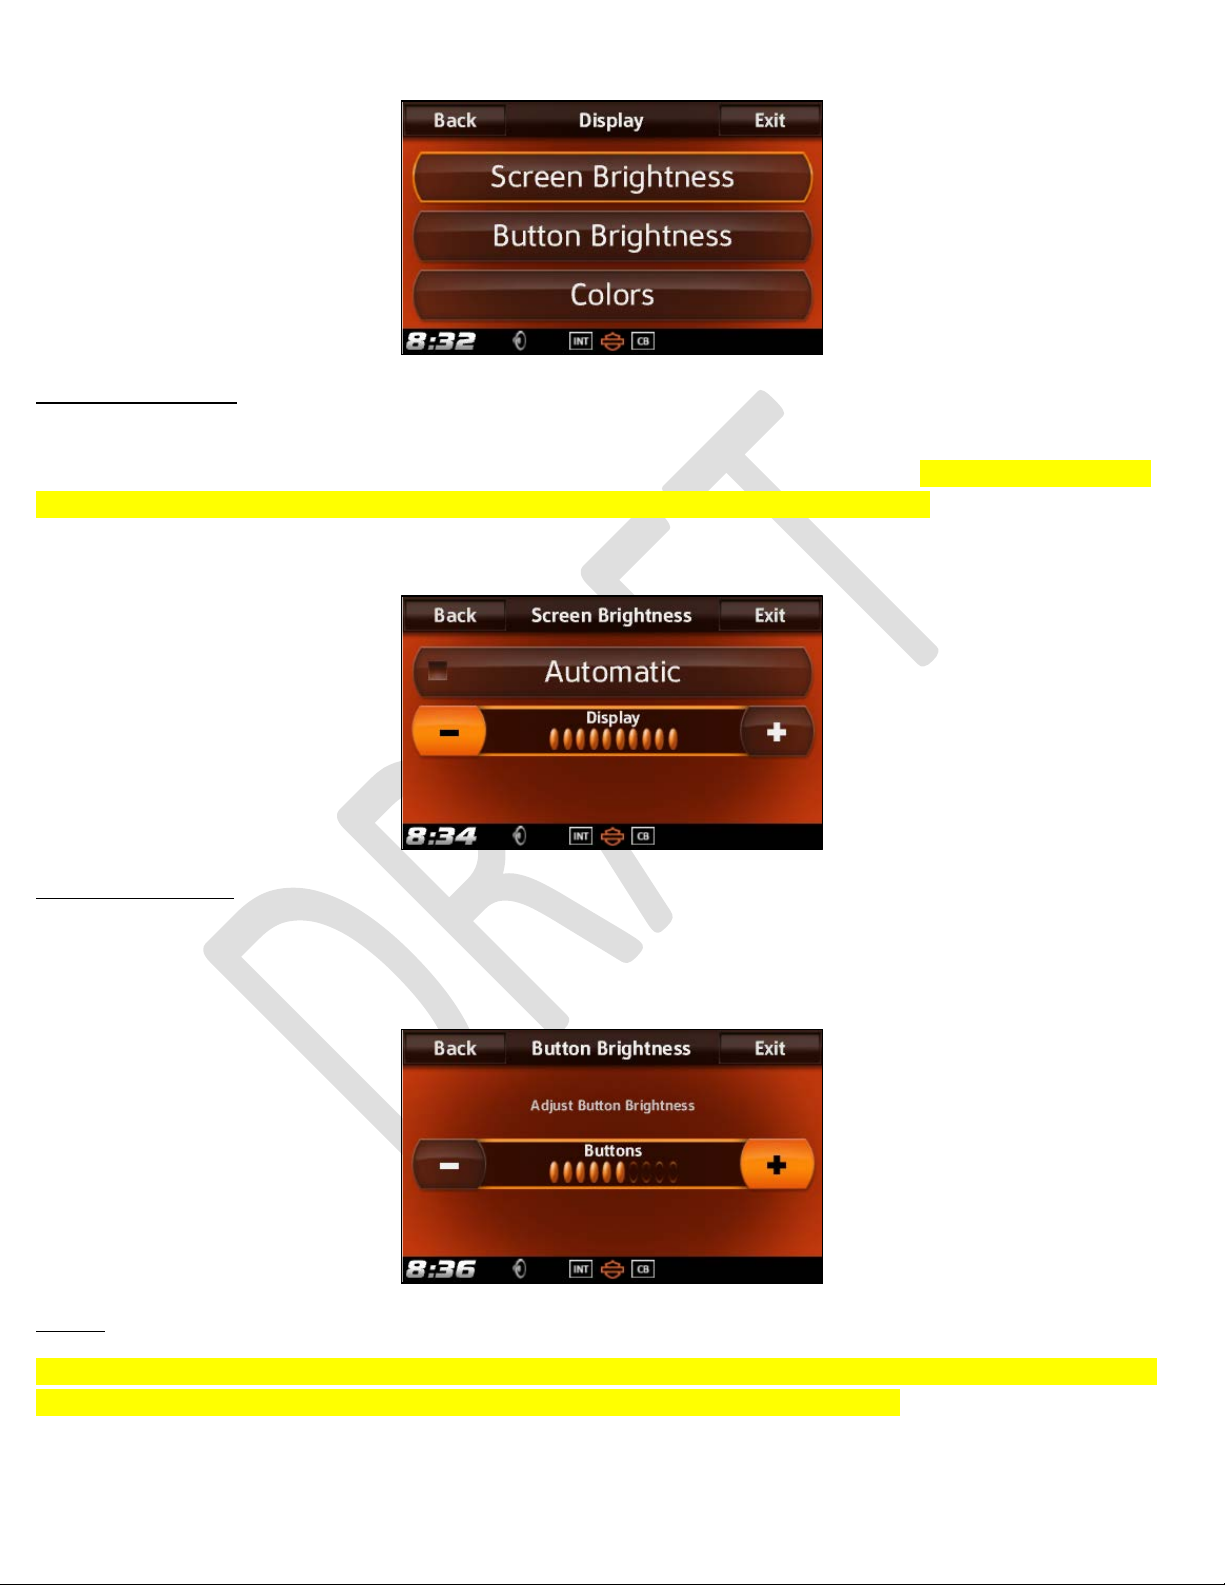
Figure 29. Display adjustment screen
Screen Brightness
In this screen, the screen brightness can be set to either Manual or Automatic mode. If Automatic
mode is not checked, the display backlight can be adjusted by pressing – or +. If Automatic mode is
checked, the display brightness will be adjusted depending on the ambient light.
Figure 30. Screen Brightness
Button Brightness
In this screen, the faceplate button brightness can be adjusted by pressing – or +.
Figure 31. Button Brightness
Colors
In this screen, the color mode can be set to Night Mode, Day Mode or Automatic mode. In Automatic
mode, Day or Night will be set automatically, depending on the ambient light.
31
Page 32

Figure 32. Colors screen with Automatic, Day Colors, Night and Background Color
Background Colors
The Background Color button prese nts a list of different built-in color schemes: Default, Blue, Brown,
Gold, Green, Gray, Purple and Red.
Figure 33. Background Color selection screen
Global presets
NOTE
See section Usage of P resets for information on Presets.
To enable Global Presets check Enable on the Global Presets screen. Press + or – for selection of t h e
number of pages. The range for number of pages allowed is 1 through 4.
Figure 34. Global Presets
32
Page 33

Global Presets allow the selection of presets from different audio sources on the same page. For the
example presented in Figure 35, there are presets from AM, FM, Sirius XM and USB connected devices
on the same FM screen .
Figure 35. Global Presets on the FM screen
Keyboard style
On 6.5 models, the keyboard style can be changed between Full Keyboard and Large Keyboard
Figure 36. Keyboard style
Full keyboard
This is the default keyboard, where all letters appear on the same screen.
33
Page 34

Figure 37. Full Keyboard
Large keyboard
Instead of the Full keyboard, the Large keyboard can be used if the rider’s gloves make it difficult to
select the letters with the Touch Screen. The letters do not appear on the same screen, they are
spread across three groups: A through I, J through R and S through Z.
Figure 38. Large Keyboard
34
Page 35

Feedback settings
The system has audible feedback for some functions, for example the beep heard when storing a
preset or the Navigation or Voice Recognition prompts.
Figure 39. Feedback settings
Prompts Volume
This control is used for adjusting the volume of all audible prompts: Navigation prompts (if equipped),
phone ring tones, weather alerts (if equipped) or traffic announcements (if equipped).
Enable Nav prompts (if equipped)
This control allows the user to enable or disable the Navigation prompts.
Beep Volume
This control is used for adjusting the volume of beeps in the system.
35
Page 36

Bluetooth® setup
NOTE
Bluetooth® is a registered trademark of Bluetooth SIG, Inc.
Bluetooth
®
setup controls are used to enable or disable Bluetooth®. Connecting Bluetooth® devices for
phone (HFP) or music (A2DP) usage or delete pairing of Bluetooth
paired. Through the Bluetooth
®
setup menu, the user can also load custom ring tones from a USB flash
drive.
Figure 40. Bluetooth Setup Menu
Bluetooth® Enable/Disable
®
devices that were previously
The Bluetooth® system can be enabled or disabled by checking or un-checking the checkbox in the
Bluetooth
®
button.
Figure 41. Bluetooth Enable/Disable
36
Page 37

Paired devices
Pair a new device
To pair a new Bluetooth® device, first make sure that your device has Bluetooth® turned on, and that it
is discoverable (read your device’s owner’s manual). From the Bluetooth
®
setup screen select List
Paired Devices, followed by Add New Device.
Figure 42. Add New Device
All discoverable devices in range will appear in the list of found devices. Select the device to be paired
from the list.
Figure 43. Select your device from the list of devices found
Once a selection has been made, follow the prompts on the Boom!
TM
Box and your device regarding
Personal Identification Numbers, to continue with the pairing process.
37
Page 38

Figure 44. Follow prompts regarding Personal Identification Numbers
Figure 45. Pairing a device
After a device has been paired, the system will prompt for an emergency number, if one has not been
previously provided.
Figure 46. Emergency Number prompt
After providing an emergency number, for example “911”, save the number by pressing the Save
button.
38
Page 39

Figure 47. Entering and saving an emergency number
List Paired devices
Use this button to see a list of the currently paired Bluetooth® devices. Up to 6 Bluetooth® devices can
be paired. When a device is paired, by default it is connected for phone usage, but not for music.
Figure 48. List Paired Devices
Once a device is paired, select it from the list and select Phone or Music usage or both, as desired and
supported by the device.
Figure 49. Connect or Disconnect for Phone or Music usage
NOTE
Depending on your device, Phone and/or Music usage buttons may not appear.
39
Page 40

Delete a paired device
To delete the pairing of a device, s elect the device from the list of paired devices and press the Delete
Pairing button. Provide confirmation by following the prompts.
Figure 50. Delete a paired device
40
Page 41

Ring Tones
The Boom!TM Box has the following built-in ring tones to choose from: Rain, Suspense, Rave and
Xylo. An audio file can be loaded from a USB flash drive as an additional ring tone. To select or import
a ring tone, press the Ring Tones button from the Bluetooth
®
setup menu.
Figure 51. Load Ring Tone
Measurement Unit System
The measurement unit system can be changed between English and Metric.
When the system is setup to use the English measurement system, the following units are used: miles,
yards, feet, MPH, °F and PSI, where applicable.
When the system is setup to use Metric measurement system, the following units are used: kilometers,
meters, kph, °C and Bar, where applicable.
41
Page 42

Figure 52. English / Metric Measuring Unit System
Clock Setup
The User Clock can be adjusted by using the – and + keys. To switch Daylight Savings Time (DST) on
or off, press the DST button to display the ON or OFF setting. The clock can also be adjusted for 12 or
24 hour format, by pressing the 12 Hour or 24 Hour button.
Figure 53. Clock Adjustment
GPS or User Time
The User Time is determined manually by the user, including setting the time zone.
In GPS Time, the time zone and the clock will be automatically adjusted according to your current
geographical location.
In GPS Time mode, the time displayed can be adjusted to be either behind (negative offset) or ahead
(positive offset) to the GPS reference ti me. When the tim e displayed has offset, t h e offset will be
displayed next to the – or + buttons.
42
Page 43

Figure 54. GPS clock adjusted with a 4 minute negative offset
Time Zone
The available time zones in User Time are: Eastern, Central, Mountain, Pacific, Alaska and Hawaii.
Sirius XM Setup (if equipped)
If your system has been equipped with a Sirius XM module, the module needs to be subscribed for
service. The subscription can be made for any or both of the following services:
• Radio service
• Specialty Services
Radio Sevice
To check if your unit has been subscribed for Radio service, follow the following steps:
• Go to: Home screen -> Setup -> SiriusXM Setup -> Subscript ion -> Radio
A screen similar to Figure 55 will appear, including your unit’s ESN number, and status of your
subscription for Radio Audio service:
Figure 55. Radio Service Subscription Information
Specialty Services
43
Page 44

To check if your unit has been subscribed for Specialty Services, follow the following steps:
• Go to: Home screen -> Setup -> SiriusXM Setup -> Subscript ion -> Specialty Services
A screen similar to Figure 56 will appear, including your unit’s ESN number, and status of your
subscription for each one of the specialty services: Fu el, Weather and For eca st.
Figure 56. Specialty Services Subscription Information
You can subscribe to the Sirius XM Radio or Specialty Services anytime by following these steps:
• Make sure that your Boom!
TM
Box wit h a S ir ius X M mo du le is turned o n, and receiving the Sirius
XM signal so that you can hear the Sirius XM audio (Channel 1 is useful for this step).
• Make a note of your Sirius XM module ESN Number.
• To subscribe:
o Online: Go to
www.siriusxm.com and click on “I want to subsc ribe”.
OR
o By phone: Call 1-800-XM-RADIO (1-800-967-2346).
• Activation usually takes 10 to 15 minutes, but may take up to an hour. We recommend that your
system remains on until subscribed.
44
Page 45

Traffic Setup (if equipped)
On select markets, traffic information will be received and displayed by the Boom!TM Box. To setup
how this inf ormation will be utilized,
• Go to: Home screen -> Setup -> Traffic
Figure 57. Traffic Setup
Traffic data utilization can be either enabled or disabled by checking or un-checking the checkbox in
the Traffic button.
If Traffic is enabled, this information can be used to re-route to avoid congested areas along a
Navigation route. The Re-route function can be set to OFF, AUTO or MANUAL.
45
Page 46

Traffic Notifications and the popup beep can be enabled or disabled by checking or un-checking the
checkbox in the Popup Beep button.
Figure 58. Traffic Notification Setup
Message Filter allows configuring the distance for the notification. The allowed options for the distance
are: Default (MAXIMUM), 6 Miles, 30 Miles and 60 Miles.
Navigation Setup (if equipped)
To setup the GPS Navigation system,
• Go to: Home screen -> Setup -> Navigation Setup
The setup options for Navigation deal with the appearance of the Navigation system and Route
Calculation.
Figure 59. Navigation Setup screen
Route Calculation
When the Navigation system is calculating a route, by default it picks the fastest way to reach the
destination. However, there are other routing options available: Scenic, Shortest and Twisty.
46
Page 47

Figure 60. Route Calculation Preferences
Other settings for route calculation include whether the system should calculate a one-way trip or a
round-trip.
A list of avoidances can be selected, from the following: Highways, Toll Roads, Ferries, Tunnels,
Car/Train, Unpaved Roads, Seasonal Restrictions and Borders.
Figure 61. Avoidances
Appearance
Selecting Appearance from the Navigation Setup Menu allows to setup how the Navigation map looks,
the available controls are: POI icons enable or disable options, selection between 2D or 3D Map styles,
Map orientation selection between North Up or direction heading up, and other options.
POI Icons
In the Navigation Map, there will appear icons for Points Of Interest (POIs), represented by an icon on
the map.
47
Page 48

The following are examples of POI icons:
Table 7. POI icons
Icon graphic Description
ATM/Banking
Automotive
Coffee Shops
Community
Entertainment
Gas Stations
Harley-Davidson
Health & Beauty
Highway Exit
Hospital
Hotels/Motels
Parking
Recreation
Restaurants
48
Page 49

Table 7. POI icons
Icon graphic Description
Shopping
Travel
NOTE
Depending on your location, POI icons may be different.
The POI icons can be enabled or disabled by checking or un-checking the corresponding checkbox for
each one of them.
Figure 62. Enable or disable POI icons
2D or 3D Map style
The map layout style can be changed between 2D and 3D.
49
Page 50

Figure 63. 2D or 3D Map style selection
Figure 64. 2D (left) and 3D (right) Map Styles
NOTE
When the map is configured for 3D, the only option for orientation available is Heading Up.
North Up or Heading Up Map orientation
The map orientation can be changed between North Up and Heading Up.
50
Page 51

Figure 65. North Up and Heading Up map orientation selection
Figure 66. North Up (left) and Heading Up (right) Map orientation
Motorcycle Icon
This control allows selection of three possible position icons: Blue Arrow, Electra Glide and Street Glide.
Figure 67. Motorcycle Icons
51
Page 52

Figure 68. Blue Arrow, Electra Glide and Street Glide position icons
52
Page 53

Additional Appearance options
Some additional appearance options, allow enabling or disabling presence of graphical items in the
map. Check the items to be displayed on the map screen, as preferred.
1. Current Street
2. Next Street
3. Audio Info
4. Left Data
5. Right Data
Figure 69. Enable or Disable Map graphical items
Figure 70. Appearance Options
53
Page 54

6. Lane Guidance
7. Signposts
8. Speed and Flow
Figure 71. Lane Guidance
Figure 72. Signposts
54
Page 55

Figure 73. Speed and Flow
Rear Controls (if equipped)
The Passenger controls can be enabled or disabled by checking or un-checking the checkbox in the
Rear Controls button.
Figure 74. Rear Controls Enable / Disable
System Information
This option provides version information regarding your Boom!TM Box Infotainment Head Unit, such
as: software, hardware, your unit’s serial number and EQ (EQualization) version.
Figure 75. System Information items
If your unit is equipped with Navigation System, there will also be a button for Navigation Database
and software version information.
55
Page 56

Figure 76. Navigation Software and Database Information.
The Export For Update option under this menu, will export important information regarding your
Navigation Database. This information is required during database updates, or when buying maps to
match your license. Refer to
www.naviextras.com for additional information.
Language
Use this setting to change the language for the Boom!TM Box. The supported languages are the
following: English (US), English (UK), French (CA), French (FR), German, Italian, Spanish (ES),
Spanish (MX) and Portuguese.
Figure 77. Set Language screen
Classic Mode
When Classic Mode is enabled pressing the Home Screen button will cycle through all the available
audio sources bypassing the Home Screen. In Classic Mode the Home Screen can still be invoked if
the Home Screen button is pressed and held for a few seconds.
56
Page 57

Figure 78. Classic Mode Enable / Disable
Classic Mode can be enabled or disabled by checking or un-checking the checkbox in the Classic
Mode button.
Audio System operation
NOTE
To prevent the battery from being discharged, do not leave the audio system on longer than necessary
when the engine is not running.
Introduction
The Boom!TM Box 4.3, 6.5GT and 6.5T, have the capability of playing audio from different available
audio sources, such as:
• Tuner (AM, FM, WB, etc.)
• Media (audio played from connected devices through USB or Bluetooth
®
)
• Sirius XM (if available).
Each individual audio source has its own screen layout. Some examples are shown:
57
Page 58

Figure 79. FM tuner mode screen
Figure 80. Mode screen for a connected device
NOTE
On Boom!
TM
Box 6.5 models, in cases where the album art is available for the media songs being
played, the graphics for the album art will be displayed.
Each individual source has context menus on the top-left or top-right portion of the screen, in the title
bar. Additional functions related to that audio source are presented in those context menus.
Switching the audio source
NOTE
58
Page 59

The following examples are given for when the audio system is configured with Classic Mode turned
off, which is the default setting. Refer to the Classic Mode description in the User Setup section for
more information.
The audio sources can be selected through the Home screen, by pressing the Home screen key on
either the handlebar controls or radio faceplate button. Once the Home screen is visible, the following
options can be sel ec ted: u n d er tuner – AM, FM, WB, etc. Under Media – a list of plugged in devices.
Figure 81. Home screen
The Boom!
TM
Box 4.3 models don’t support Sirius XM.
Following are some examples of switching the audio source, and the required user actions to do so:
From FM to AM: Home screen -> Tuner -> AM
• Bring up the Home screen
• Select Tuner
• Select AM.
From FM to USB device: Home screen -> Media -> (select USB device name)
• Bring up the Home screen
• Select Media
• Select the name of th e desired device.
From FM to a Bluetooth
®
device: Home screen -> Media -> (select Bluetooth® device name)
• Bring up the Home screen
• Select Media
• Select the name of t h e d esired device.
59
Page 60
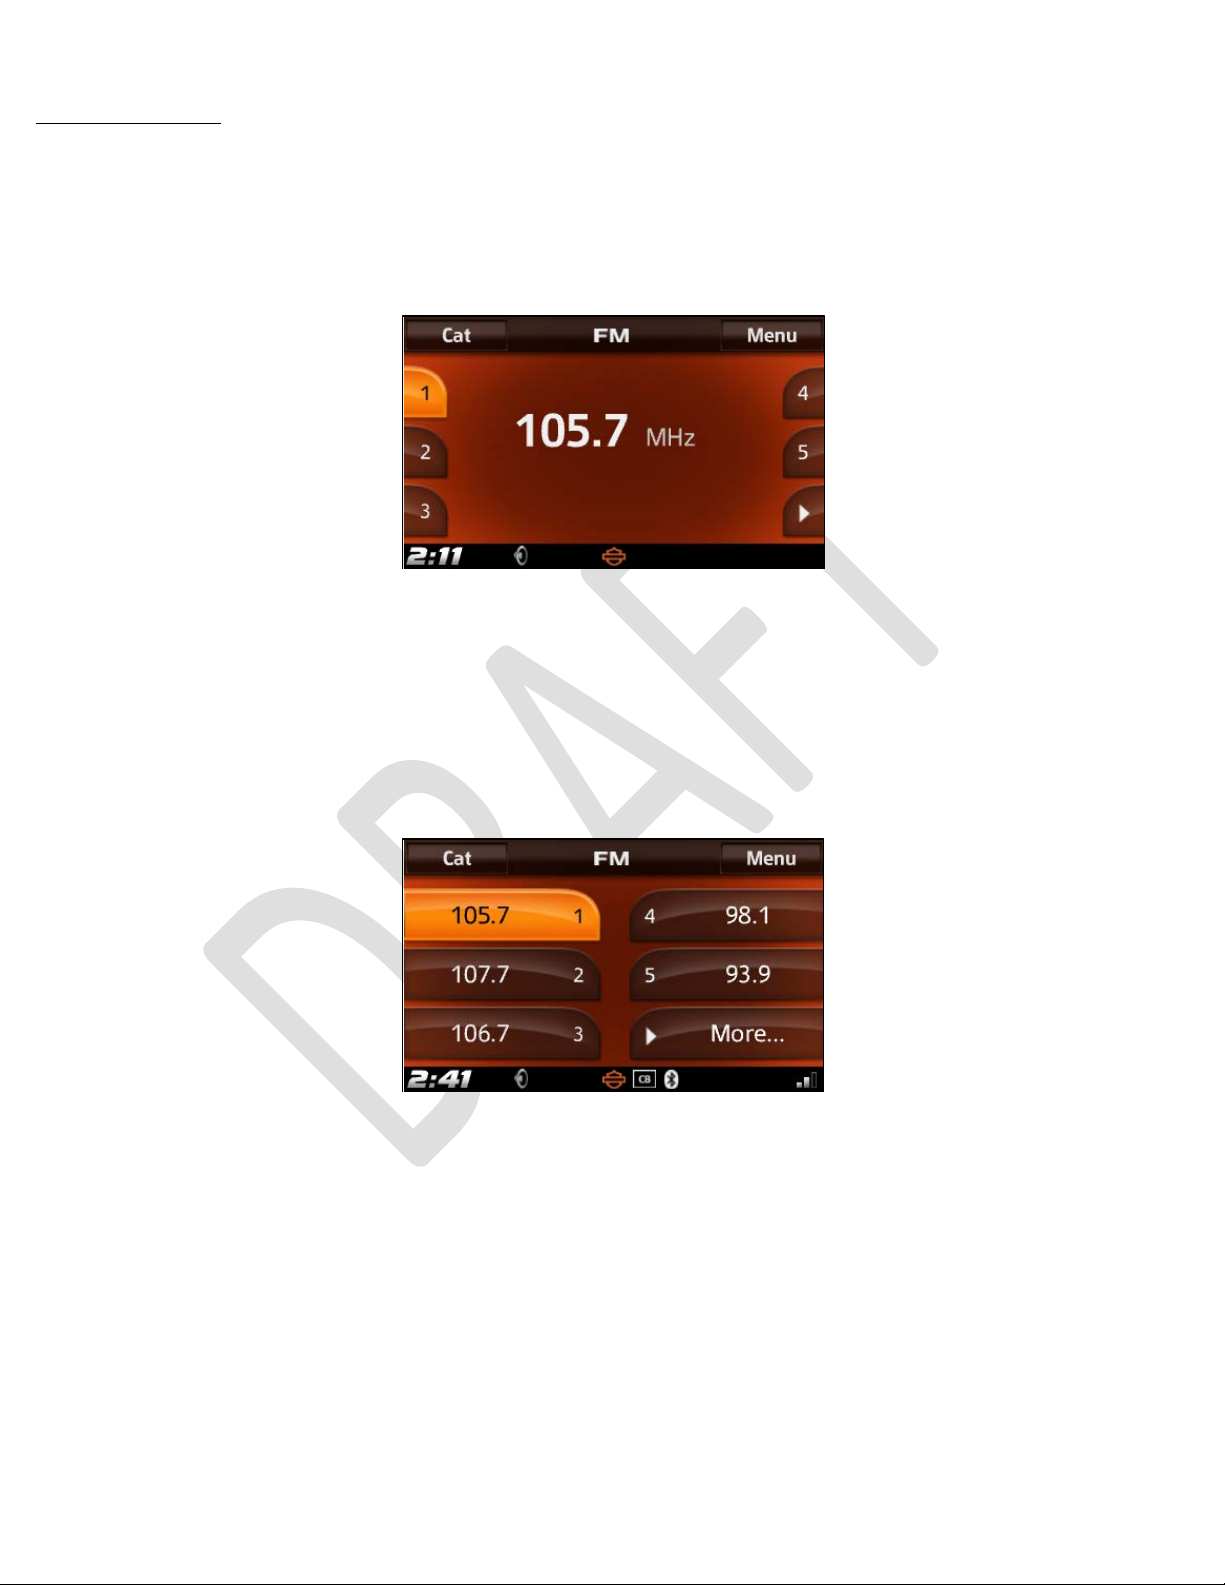
Usage of Presets
In the following graphical example, the numbers (1 - 5) that appear on both sides of the screen are
called presets. The presets allow the user to store preferred radio stations or audio media for easy
future access.
Figure 82. Presets on the FM screen
With the exception of Bluetooth
®
audio streaming devices, all audio sources can be saved as presets
for future recall. To store a preset, switch the audio system to the desired audi o source mode, or to the
desired radio station that is desired to be saved. Touch and hold one of the preset selectors (1 – 5)
until a beep is heard. The presets slide-out in the screen to show their content.
Figure 83. Expanded Presets on the FM screen
To recall the preset, perform a short press on the desired preset number.
Note that on Boom!
TM
Box 4.3 models, you must use the faceplate soft button that aligns with the
desired preset number to save and recall the corresponding preset.
The audio system has three pages of presets for a total of 15, to access the second and third preset
pages, select the right arrow graphic that appears under the preset-5.
NOTE
60
Page 61

The above description is for Local Presets. For Global Presets, see the corresponding section in the
Setup Menu.
Usage of Favorites
Favorites work in a similar way to Presets. Favorites are programmable shortcuts to directly access
radio stations, connected devices or songs that are listened to frequently. In select markets, an aud io
channel from Sirius XM can also be programmed as a Favorite. There are two locations of Favorites:
the Fav faceplate button, and the list of Favorites under the Fav in the Home screen.
The usage is the same for both types of Favorites.
NOTE
Storing items from a removable device as a Favorite is possible. T he items can be recalled only while
the source device is connected to the system.
Fav faceplate button
For the location of the Fav button, see the faceplate buttons section. Only one Favorite item can be
stored under the Fav faceplate button.
Favorites menu selection
For more than one Favorites, a list of items can be stored under the Fav button in the Home screen.
Figure 84. Fav button in the Home Screen
Following are some examples of storing and recalling Favorites, and the required user actions to do so:
NOTE
All examples described assume the source device has been previously been connec t ed to the system.
Storing/recalling a connected device using the Fav faceplate button:
• Press and hold the Fav faceplate button.
61
Page 62

• Select Media, followed by the name of the device.
Figure 85. Select Media from Set Favorite screen
Figure 86. Select the name of the connected device
• To recall the device press the Fav faceplate button.
Storing/recalling a song from a connected device using the Fav button in the Home screen:
• Begin with the system playing the favorite song to store.
Figure 87. System playing a song for storage as a Favorite
• Press the Home button to bring up the Home screen.
• Press the Fav button.
• Press and hold the button for the desired location in the list presented.
62
Page 63

Figure 88. Select the desired location for storing the favorite item
• Select the name of the song to be saved.
Figure 89. Select the name of the song to be saved
• To recall the stored song from the device press the Fav in the Home screen.
• Select the name of the song from the stored location.
Radio Operation
Band selection
See section switching the audio source for instructions on how to select a different tuner band, for
example changing from FM to AM.
FM title bar menus
Figure 90. FM Title bar and menus
63
Page 64

Cat
In FM radio mode the following PTY (Program Type) categories are available: News, Information,
Sports, Talk, Rock, Classic Rock, Adult Hits, Soft Rock, Top 40 , Country, Oldies, Soft, Nostalgia, Jazz,
Classical, Rhythm & Blues, Soft Rhythm & Blues, Foreign Language, Religious Music, Religious Talk,
Personality, Public, College, Weather, Emergency test and Emergency.
Figure 91. Categories
Making a selection of only the favorite PTY categories will make the system stop, when seeking or
scanning, only on the radio stations identified with the selected PTY categories.
NOTE
Radio stations broadcasting PTY may not be available in your listening area.
To make a selection of stations in PTY categories:
• Press the Cat button to view the current selection.
• When none of the categories are checked, the radio system stops on every station available.
• Make selections by checking only the desired categories.
• Set all will check all the categories in the list.
FM Menu
The FM Menu contai n s controls related to Seek/Tune/Presets, Scan and RBDS functions.
64
Page 65

Figure 92. FM Menu
Seek/Tune/Presets
This button changes the functionality of the Seek Up and Seek Down buttons on the left handlebar
controls or on the passenger controls (if equipped ).
• Seek: Tunes in to the next or previous strong station.
• Tune: Manual tuning, adjusting the frequency up or down.
• Presets: Increments or decrements the current radio station Preset (See Usage of Presets
section for additional information).
Scan
This button begins a Scan operation. The radio continuously tunes from one strong station to the next
one until the Scan operation is cancelled. Each strong station remains tuned in for 5 seconds before the
radio scans to the next station. The receiver will continue to scan until cancelled. To select a station,
cancel the Scan operation while the radio is tuned to that station. Press a key on the right handlebar
controls (i.e. the Enter/Select key) to cancel Scan.
RBDS
When RBDS is checked the station name a nd song informat ion (if ava ilable) w ill be d isplayed in the FM
screen. If un-checked, only the radio frequency will be displayed.
Note: Consider referring the user to use the charts where the buttons are described. Use bullet lists.
Media device operation
65
Page 66

®
Connecting Flash drives, cell phones and other USB or Bluetooth
compatible devices, allows playback
through the audio system speakers, or through the headsets. Control of the device is performed
through the handlebar controls, touch screen, soft keys and passenger controls (if equipped).
Device selecti on
See section switching the audio source for instructions on how to select a different media devi ce, for
example changing from FM to USB device.
Media playback title bar menus
Figure 93. Media Title bar and menus
NOTE
The functions described in this section are not available for Bluetooth
®
connected devices.
Find
On devices connected through USB, it is possible to browse through the media by different criteria:
playlist, artist, album, song or genre.
Figure 94. Find criteria for USB Media
66
Page 67

Playlist
If the device contain s playlists, selecting Playlist from the Find Menu will present a list with the
available playlists.
Figure 95. Playlists selection screen
Artist
Selecting Artist from the Find menu will present a list with the available artists. Since the list can be
extensive a letter jump option is available by pressing the letter between the page up/page down
scrolling arrows.
Figure 96. Artist selection screen with letter-jump
67
Page 68

Figure 97. Letter-jump selection
Figure 98. Artist selection after letter-jump
Album
Selecting Album will present a list of the available albums. Letter jump option is available.
Figure 99. Album selection screen
Song
Selecting Song will present a list of the available songs. Letter jump option is available.
68
Page 69

Figure 100. Song selection screen
Genre
Selecting Genre will present a list of the available genres. Letter jump option is available.
Figure 101. Genre selection screen
Media Menu
NOTE
Some of the functions described in this section are not available for Bluetooth
®
connected devices.
The Media Menu contains controls related to Seek/Presets, Scan, Track list, Repeat and shuffle
functions.
69
Page 70

Figure 102. Media Menu, for devices connected through USB
Figure 103. Media Menu, for devices connected through Bluetooth®
Seek/Presets
This button changes the functionality of the Seek Up and Seek Down buttons on the left handlebar
controls or on the passenger controls (if equipped).
• Seek: begins playback of the previous, current or next song.
• Presets: Increments or decrements song playback according to the Preset number (See Usage of
Presets section for additional information).
Scan
This button begins a Scan operation. The audio system continuously changes from one song to the
next one until the Scan operation is cancelled. Each song remains playing for 5 seconds before the
system scans to the next song. The system will continue to scan until cancelled. To select a song,
cancel the Scan operation while the system is playing that song. Press a key on the right handlebar
controls (i.e. the E n ter/Select key) to canc el Scan.
Track List
This button presents a list of songs on t h e device connected thr ough USB. Selection of the “i” between
the Page Up / Page Down scrolling arrows will present song information.
70
Page 71

Figure 104. Track List screen
Figure 105. Song information screen
Repeat
Pressing the Repeat button will enable or disable the repeat song option. When the checkbox in this
button is checked, the current song will repeat.
Shuffle
Pressing the Repeat button will enable or disable the Shuffle option. When the checkbox in this button
is checked, the sequence of the songs will change.
71
Page 72

Communication
There are three possible devices for com mu n ications: Citizen B and r a dio (if equipped), Int er c om (if
equipped) and Phone connected through Bluetooth
®
.
NOTE
The Intercom and CB can be activated at the same time with the receiver modes. The Intercom and CB
signals are passed to the audio circuits only if the signal strength exceeds the threshold established by
CB squelch or VOX microphone sensitivity levels.
To select Communication devices,
• Go to: Home screen -> Com
• Select the communication device, if available.
Figure 106. Communication Screen
Citizen Band (CB) radio (if equipped)
If the CB is OFF, press the upper-left corner button labeled Off, so that it reads On. This button toggles
the CB between the ON and OFF state.
Figure 107. Turning CB On
72
Page 73

Once activated, the CB will retain the squelch threshold and channel settings from previous use.
Channels are selected by use of the Left handlebar controls Seek Down and Seek Up buttons. Favorite
CB channels can be saved as Presets.
It is possible to change the Mode to other audio sources (AM, FM, Media), leavin g the CB active.
The CB signal is passed to the speakers or headsets, depending on Speaker/Headset selection, from
the Setup Menu.
Adjusting Squelch
The squelch threshold can be adjusted using the SQ+ and SQ- buttons from the Right handlebar
controls. A scale of the CB squelch will be visible during the adjustment.
Figure 108. Adjusting CB Squelch
Only when the CB signal strength exceeds the threshold set, received signal will be passed to the
speakers or headsets.
CB Transmitting
To transmit, press and hold the PTT button in the Right handlebar controls, or in the Passenger
controls (if equip p ed). To end transmission, release the PTT button.
Adjusting CB Volume
To adjust volume of the C B in speakers or headsets, press Volume Up or Volume Down in the L ef t
handlebar controls, when the CB screen is visible. A scale of the CB volume will be visible during the
adjustment.
73
Page 74

Figure 109. Adjusting CB Volume
Intercom (if equipped)
On select models, the Intercom functionality allows Rider and Passenger voice communication through
their respective h eadsets/microphon es.
NOTE
Some local governments prohibit or restrict the use of headset (helmet-mounted) speakers. Check with
local authorities and obey all applicable laws and regulations.
With the headsets/microphones plugged into the rider and/or passenger intercom sockets, the
Intercom is voice activated (VOX).
If the Intercom is OFF, press the upper-left corner button labeled Off, so that it reads On. This button
toggles the Intercom between the ON and OFF state.
Figure 110. Turning Intercom On
Adjusting VOX sensitivity
VOX sensitivity should be adjusted so that the microphones break VOX at a normal voice level. The
Intercom icon in the status bar should be helpful for performing the adjustment (See Table 6, for
description of status bar icons). In the Intercom screen, press on the – or + buttons to adjust the VOX
sensitivity level.
74
Page 75

Figure 111. Adjusting VOX Sensitivity
NOTES
VOX sensitivity may need to get re-adjusted if either microphone is unintentionally activated because
the microphone misinterprets radio, road or background sound as conversation.
During regular ignition cycles, the system retains the VOX sensitivity level from the previous setup.
Adjusting Rider Headset Volume
Enter the Intercom Screen, speak into the passenger microphone and adjust the Intercom volume wit h
the Volume Up/Volume Down buttons in the Left handlebar controls. The Rider Intercom volume i s
adjustable from the Intercom Screen, or when Intercom audio is being received. During the adjustment
of the Rider Intercom volume, the bar-graph labeled F (Front) will increment or decrement accordingly.
Figure 112. Adjusting Intercom Volume
Adjusting Passenger Headset Volume
Enter the Intercom Screen, speak into the rider microphone and adjust the Intercom volume with the
Volume Up/Volu me Down buttons in t h e Passeng er con trols. The passenger Intercom volume is
adjustable from the Intercom Screen, or when Intercom audio is being received. During the adjustment
of the Passenger Intercom volume, the bar-graph labeled R (Rear) will increment or decrement
accordingly.
75
Page 76

Phone
With the Bluetooth® hands-free system and a connected compatible phone, it is possible to make or
receive phone calls without taking the hands off the handle bar.
NOTE
This section assumes that a compatible phone has been previously paired and connected through
Bluetooth
®
for phone usage. See Bluetooth® Setup section under User Settings for instructions on
pairing and connecting a phone.
To see the function s op tions available for phone,
Go to: Home screen -> Com -> Phone
This will bring the Phone Menu screen, with the name of your phone in the title.
Figure 113. Phone Menu
The Phone Menu has the following options:
• Contacts – Phone calls by using the Phone Book that got synched from the connected phone.
• Keypad – Phone calls by using the dialing keypad.
• Calls – To check for past incoming, outgoing or missed phone calls.
• Message – To enable and using Short Message Service (SMS)
• SOS – To dial or edit an Emergency number.
• Bluetooth – To Setu p B luetooth®.
76
Page 77

Making a phone call from the Phone Book
Under Contacts, the following options are available: Phone Book, Saved and Refresh Phone Book.
Calls can be made using the phone book data of the connected phone by selecting Contacts from the
Phone Menu, followed by Phone Book.
Figure 114. Phone Book selection under Contacts
The phone book changes depending on the phone connected. If a contact entry in the phone’s phone
book does not have a phone number stored, the entry will not be listed.
Figure 115. Contacts in a Phone Book list
Depending on the en t ry in the connected ph one, the Phone Book is displayed with i c ons for h ome,
cellular, work or other phone numbers.
77
Page 78

Table 8. Contact phone number icons
Icon graphic Description
Home
Cellular
Work
Other
To make a phone call simply select the phone number stored under the contact name.
Figure 116. Making a phone call from Phone Book
Show Details displays other information that belongs to the selected contact, such as other phone
numbers for the same contact or an address.
The selected contact can also be saved to a local list in the Boom!
TM
Box unit, by selecting Add to
Saved Contacts.
78
Page 79
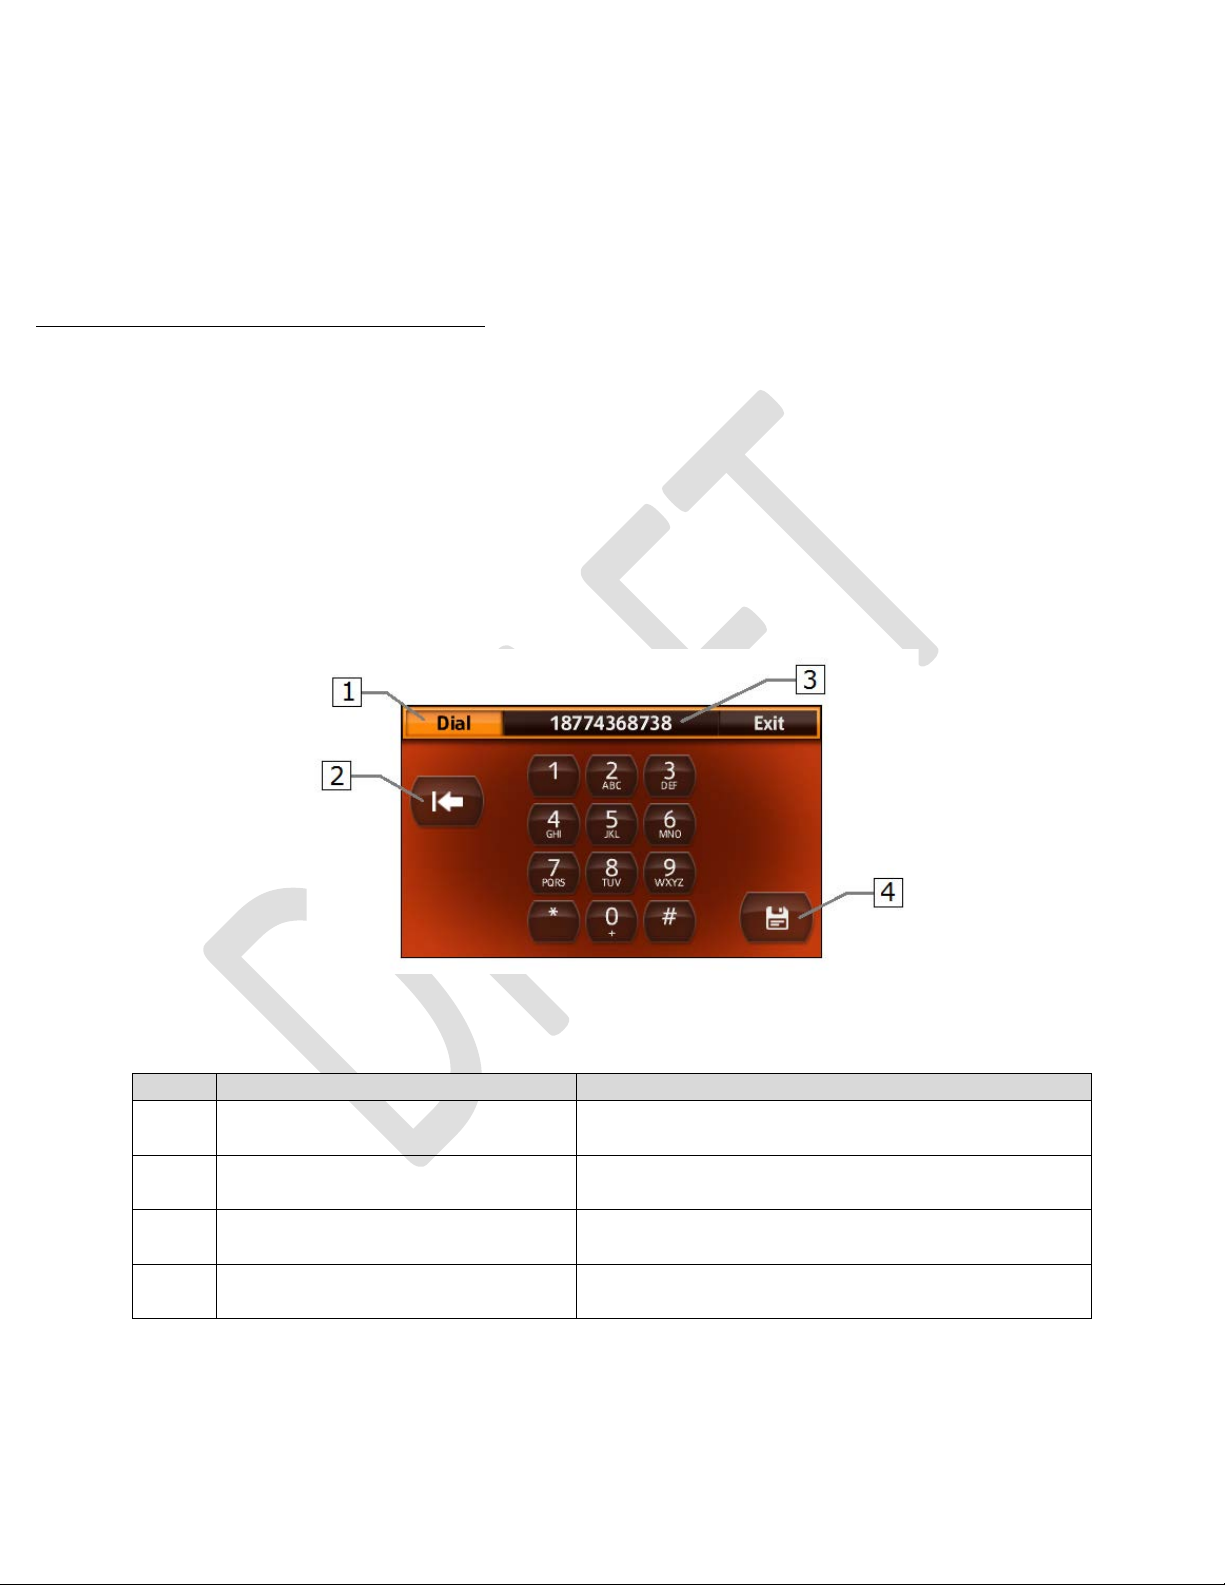
Table 9. Keypad controls
Item
Control
Description
Press this button to dial the number that
was entered.
Press this button to erase the last digit, or
digits pressed.
The entered phone number appears on the
title of the screen.
Use this button to save the entered
number.
Making a phone call by dialing a number
When the number to call is not on the Phone Book, it should be possible to dial it by using the keypad
in the system. To select the Keypad,
Go to: Home screen -> Com -> Phone -> Keypad
Once the screen with the keypad appears, the number can be typed. If a mistake has been made, it is
possible to delete the last digit or digits by using the backspace key. Once the number is entered it can
be saved or it can be dialed.
Figure 117. Using the keypad to dial or save a phone number
1 Dial
2 Backspace
3 Phone number entered
4 Save
79
Page 80

Receiving a phone call
When a call is received on a compatible and connected phone, this screen is displayed and a ring tone
is heard. The rider can choose to answer or ignore the incoming phone call.
Figure 118. Receiving a phone call
Ending a phone call
During an active phone call, the call can be ended by pressing the End button in the upper-left corner.
Figure 119. Ending a phone call
80
Page 81

Viewing call history
To display a list of received, made and missed phone calls,
Go to: Home screen -> Com -> Phone -> Calls
The list of all calls is displayed:
Figure 120. Displaying all calls
Note that on the top-right corner the button titled Missed, pressing this button filters the list to display
only the missed calls. Depending on which screen is being displayed, this button changes between: All,
Missed, Received and Dialed.
Figure 121. Missed, received and dialed call lists
81
Page 82

Any of the displayed contacts or numbers can be dialed just by pressing the corresponding button.
Text Messages
If the Bluetooth® connected phone is compatible, receiving and replying short messages can be
forwarded to the Boom!
TM
Box system.
NOTE
Not all phones in the market are compatible or support this function. Notifications under Bluetooth
must be enabled on the connected phone for this function to work. Read your phone’s owner’s manual.
To enable the Text Message function,
Go to: Home screen -> Com -> Phone -> Message, and check the check-box next to Enable SMS.
Figure 122. Text Messaging
Inbox
Upon receiving one or more SMS messages, the New Messages icon will be displayed in the status bar.
The Inbox will display the number of unread received messages.
82
Page 83

Figure 123. Unread Messages and Inbox
To see the list of received messages, press the Inbox button. Selecting a message from the screen will
open that message. A Text-To-Speech (TTS) engine on the system will read the message and this will
be heard through the speakers or headsets, depending on the Speaker/Headset selection for prompts
in the Setup Menu. The message can be heard again by pressing Repeat, from the upper-right corner
in the Inbox screen.
Figure 124. Inbox message selection and Text-To-Speech read-out Repeat
To see information from a selected message, press the button labeled “i” from the screen.
83
Page 84

Figure 125. Message Information
SMS Setup
To enable, view or edit an Auto-Reply message,
Go to: Home screen -> Com -> Phone -> Message -> SMS Setup
Figure 126. SMS Setup: Enable, Edit and View Auto-Reply Message
NOTE
Even if incoming text messaging over Bluetooth is supporte d on the connected phone, the auto-reply
feature may still not be supported by the device. Read your phone’s owner’s manual.
84
Page 85

Select View Reply Message to display the text that will be sent auto matically if the Auto -Reply function
is enabled, after receiving a text message.
Figure 127. Viewing the current Auto-Reply Message text
To Edit the Auto-Reply Message, select Edit Re ply Message, from the screen. The current message will
appear in the title of the screen, and a keyboard will be displayed to allow typing a new message.
Select OK after typing the desired text to save it.
Emergency calls
Figure 128. Editing Auto-Reply Message text
85
Page 86

TM
The Boom!
Box prompts for an Emergency Number in case that there is not one already one
provided. This prompt appears when a phone is paired and connected through Bluetooth, in case no
Emergency number has been provided.
Figure 129. Prompt for Emergency Number
Follow the prompts that follow to enter an Emergency number.
To dial the Emergency Number that was stored,
Go to: Home screen -> Com -> Phone -> SOS
Then select Dial
Figure 130. Select SOS for Emergency Numbers
86
Page 87

WARNING
● Any voice commanded system should be used only in safe driving conditions following local laws.
● All attention should be kept on the roadway ahead.
Figure 131. Dialing the Emergency Number
From this screen, editing or clearing the Emergency number can be done by selecting Edit # or Clear.
Voice Recognition Operation
The Voice Recognition system allows control over AM, FM radio, Sirius XM (if equipped), multimedia
player and navigation system (if equipped).
NOTE
Always speak into the headset microphone as calmly and normally as possible. Rapid speech or a
raised voice level will degrade voice recognition capability.
When the Voice Command button is pressed on the Left handlebar controls, a beep will sound. The
beep is a prompt to speak a command. The system will present a list of possible commands.
87
Page 88

Pressing the Voice Command button while the system is speaking is known as “barging in”. The system
will be interrupted and you can add or change commands.
NOTE
4.3 Models use Voice Recognition for Phone functions, in US English language only.
6.5 Models use Voice Recognition for Phone and other functions in all the supported languages.
The voice commands are classified by functions, which are:
• Phone commands (4.3 and 6.5 models)
• Media commands (6.5 models only)
• Tuner commands (6.5 models only)
• Navigation commands (6.5 models only)
• Other commands (6.5 models only)
• Help commands (6.5 models only)
NOTE
Maybe will need to rephrase this, but want to capture the idea:
VR commands are global in nature, as opposed to mode specific. For example, the rider should not
have to say “XM” before saying “Channel Up”; the system could be in any Tuner or Media mode and
simply say “Channel Up”, and a switch to Sirius XM mode is implicit.
Phone commands (4.3 and 6.5 models)
These commands are useful for controlling Phones connected through Bluetooth®:
• CALL (followed by contact name) – Dials the contact’s phone number as entered on your phone
book.
• DIAL (followed by a phone number) – Dials the specified phone number.
• REDIAL – Dials again the last number dialed.
Media Commands (6.5 models only)
These commands are useful for controlling audio devices connected through Bluetooth® or USB.
In this mode you may say the following commands:
• PLAY (followed by artist, album or song) – to play music, according to selection.
88
Page 89

• ARTIST (followed by artist) – to play songs from a specific artist.
• ALBUM (followed by album) – to play songs from a specific album.
• SONG (followed by song) – to play the commanded song.
• SEARCH FOR MUSIC (foll ow ed by song, or LIST ALL) – to search for a song or list all songs.
• GENRE (followed by genre name, or LIST ALL) – to search for songs of specific genre, or list all
available genres.
• PLAY PLAYLIST (followed by playlist name) – to play songs from the mentioned playlist.
• NEXT TRACK – to play the next track.
• PREVIOUS TRACK – to play the previous track.
• ALL SONGS – to play all songs.
• MEDIA – to change to Media mode.
Tuner commands (6.5 models only)
These commands are useful for selecting radio bands and stations.
• TUNE TO (followed by the radio station frequency) – to change the radio frequency.
• SEEK UP – To select the next radio station.
• SEEK DOWN – To select the previous radio station.
• NEXT PRESET – To select the next Preset.
• PREVIOUS PRESET – To select the previous Preset.
• A M – To select AM band.
• F M – To select FM band.
Tuner commands for Sirius XM (if equipped)
• X M – To change mode to Sirius XM (alternative commands: SIRIUS, SAT, SATELLITE).
• CHANNEL (followed by channel name or number) – To go to the requested Sirius XM channel.
• CHANNEL UP – To select the next Sirius XM channel.
• CHANNEL DOWN – To select the previous Sirius XM channel.
• CHANNEL SCAN – To scan through the Sirius XM channel list.
Navigation commands (6.5 models only)
• HOME – Once a Home address has already been defined, this command will set that address as
the Navigation destination.
• DESTINATION (followed by address) – Sets the spoken address as a Navigation destination.
NOTE
As a recommendation, enter a destination in one shot as in the following example (excluding the
ZIP code): say “DESTINATION 400 West Canal Street Milwaukee, Wisconsin”.
89
Page 90

• FAVORITE (followed by th e f a vorite name) – Sets the destination to a favorite address in the
favorite list.
• FIND NEXT (followed by a POI name) – finds the closest location for a given POI, or brand.
• SHOW MAP – This command is useful to switch to the Navigation map, when it is not currently
visible.
• CANCEL ROU T E GUIDANCE – Cancels the current route guidance.
• REPEAT INSTRUCTIONS – Repeats the last voice instruction provided by the Navigation route
guidance.
Any of the following commands enters an interactive destination address entry dialog:
• ENTER COUNTRY
• ENTER STATE
• ENTER CITY
• ENTER ZIP CODE
• ENTER STREET
• ENTER HOUSE NUMBER
Navigation Operation (if equipped)
Your navigation system receives GPS signals from an array of positional satellites to display the
geographical position of your vehicle.
When you input a destination, the navigation system uses a map database to calculate a route.
The system’s database includes Point of Interest (POI) categories to allow you to easily select
destinations such as restaurants, hotels and other common destinations. If a destination is not in the
90
Page 91

database, you can enter the street address or a major intersection close to it and the system will guide
you to reach such destination.
As you ride along your chosen route, you are guided with pictorial displays and voice prompts.
The system will provide both a visual map and audio instructions. The audio instructions will announce
the distance remaining and the direction to turn in approaching an intersection. These voice
instructions will help you keep your eyes on the road.
The system has several options for Navigation. Read the User settings Navigation section for more
information on th ese settings.
NOTE
TM
After the Bike or the Boom!
Box has just recently been powered on, the N avigation System needs
some time to initialize. To begin using the N avigation system, wait until the system has finished the
initialization process.
Selecting Navigation Main Menu
The Navigation Main Menu can be reached by pressing the Navigation/Compass hard key on the
faceplate, or by selecting Nav from the Home Screen.
Figure 132. Navigation Main Menu
The Navigation Main Menu has six menu items on the center of the Navigation Main Menu screen:
Map, POI, Dealerships, Where To, Recent and Emergency.
In addition to the items mentioned above, the Navigation Main Menu has two items on the title bar:
On the left side, there is a way to go back to the last active audio mode (FM shown in the picture).
On the right side, there is a Menu with options pertaining Navigation. For instructional purposes within
this manual, this will be referred as the Navigation Secondary Menu.
All this items are explained in the following sections:
91
Page 92

Last Audio Mode used (FM, f or example)
Selecting the top-left item in the title bar of the Navigation Main Menu allows the user to go back to the
last audio source mode (AM, FM, USB device, etc…).
Navigation Secondary Menu
Selecting Menu on the top-right item in the title bar of the Navigation Main Menu screen, allows the
user to use the following features: Location, Import and Export.
Figure 133. Navigation Secondary Menu
Figure 134. Navigation Secondary Menu items
Location
Selecting Location from the Navigation Secondary Menu allows the user to see the Location
screen. This screen will show a bar-graph with the GPS signal strength. Provided that there is good
signal reception, information for the current geographical location will be displayed, such as the
address (if found in the Navigation database), and the geographical coordinates (geo-coordinates).
92
Page 93

Figure 135. Current Location information
Note that there is a button on the left side of the geo-coordinates. Pressing this button will give access
to some additional functions related to the current location. such as: POIs Nearby, Map, Save and GPS.
In this screen it should also be possible to change the geo-coordinates formatting between: h ddd
mm.mmm and h ddd.ddddd. Note that the location screen will continue to be in the format of h
ddd.ddddd.
Import
Note: As of Radio SW 1.16.8, this feature is not clear. Need to verify with the SW development team.
Export
Note: As of Radio SW 1.16.8, this feature is not clear. Need to verify with the SW development team.
Displaying the Map screen
To display the Map screen, press Map from the Navigation Main Menu
93
Page 94

Figure 136. Select Map from the Navigation Main Menu to display the Map screen
Figure 137. Navigation Map screen
The Map screen contains different elements that are useful to accomplish specific tasks, such as:
• Back: located on the top-left corner of the screen, this title bar button will go back to the
Navigation Main Menu.
• Zoom “+” button: This button zooms in the map.
• Zoom “-“ button: This button zooms out the map.
• Left data field: This field (clock shown in Figure 137) is configurable to display from a list of
options. Tap on this field to make a selection.
• Right data field: This field (GPS accuracy shown in Figure 137) is configurable to display from
a list of options. Tap on this field to make a selection.
• Audio Info: This field (FM 105.7 shown in Figure 137) displays the current audio mode. Tap on
this field to display the corresponding screen for the current audio mode.
• Navigation Slide-out menu: The Navigation slide-out menu contains the following Navigation
options:
o POIs Near: Equivalent to selecting POIs from the Navigation Main Menu.
o Appearance: Equivalent to selecting Appearance from the Navigation Setup Menu.
o Trip Summary: This screen provides information for a current trip, containing start and
end time, average speed, fuel used, and mileage (if available).
o Record On: Checking this option will draw a line on the map for roads that have been
used in the past.
o Compass: Accessing this menu item will display the Compass screen.
94
Page 95

o Weather (if available): Accessing this menu item will display the Weather overlay on
the map (if available).
Figure 138. Press the Navigation slide-menu button to display the slide-menu
Points of Interest (POIs)
Selecting POIs fr om the Navigation Main Menu (or from the Slide-out Menu), will allow the user to
find Points of Interest, such as Restaurants, Gas Stations, Hotels, Shopping and other typical
categories. Once the desired POI is found and selected, the Navigation system can calculate a route to
go from current location to the destination address of such POI.
The Point Of Interest can be searched by Category, by the business phone number or by spelling the
POI name. The system defaults to the current location. Pressing the button that is labeled Near Your
Location… will allow to choose between around a specific city, or around a route (if active). If there is
already a destination set, the system can find for POIs around the destination address.
If a preferred category has been saved from previous POI searches, this list of categories can be found
under Preferred for a subsequent search.
Figure 139. POI screen
Harley-Davidson Dealerships
Selecting Dealerships from the Navigation Main Menu will provide a list of Harley-Davidson
dealerships locations. This list will be sorted to display the closest dealerships to your current
location on top of the list.
Destinations (Where To)
95
Page 96

Selecting Where To from the Navigation Main Menu, will display the Destinations screen.
Figure 140. Destinations Screen
The Destinations screen presents different options to set a destination:
• Address: If the destination address is known, it can be directly entered after selecting Address.
• Saved: If previously saved, the user can retrieve a saved destination.
• X-Road: This option is used to indicate an intersection of two streets, as the destination.
• Home: If a home address has already been set, selecting Home is useful for selecting that
home address as the destination.
• Book: Displays a list of addresses saved on an address book from a Bluetooth
phone, or from an address book saved on the Boom!
TM
Box.
®
connected
• Trips: This options allows the user to store a number of addresses, under a given trip name.
• Trails: This option allows saving a calculated route, or retrieving a saved route.
• GEO: This option is useful in cases where an address is not known. The latitude/longitude geo-
coordinates can be provided to the navigation system to route to that specific geographical
location.
Recent Destinations
Selecting Recent from the Navigation Main Menu displays a list of recently found or used addresses
or locations. These locations can be set as destinations.
96
Page 97

Emergency Destinations
Selecting Emergency from the Navigation Main Menu is a quick way of finding emergency help
provider locations for Hospital, Police and Fire Department close to the present location.
Figure 141. Emergency destination warning.
Figure 142. Emergency screen
97
Page 98

PND (Personal Navigation Device)
98
Page 99

Sirius XM Operation (If equipped)
On select model s, a Si rius XM receiver has been included in your Boom!TM Box Infotainment unit.
Sirius XM features Radi o Ser vices and Specialty Services.
Radio Services allows you to listen to a variety of music and audio programs provided on the Sirius XM
channel line-up.
Specialty Services include: Traffic, Weather, Fuel and Forecast information.
Radio Services
To listen to Sirius XM Radio,
Go to: Home screen -> Sirius XM -> Radio
Changing a channel
To change the audio channel select Channel from the top-left screen, and make your selection from
the list.
Figure 143. Changing a Channel
99
Page 100

Direct Tune
Figure 144. Making a channel selection
Figure 145. Channel selected
If you are familiar with the channel number you want to hear, it is possible to directly enter the
number. To do this,
• Select Menu from the Siri u s X M screen (see figure 134).
• Select Direct Tune.
• Enter the channel number.
• Select Tune.
100
 Loading...