

Page 1

CONTENTS
Uconnect™ ACCESS USER’S MANUAL
1
•
Identifying
Your
Radio
. . . . . . . . . . . . . . . . . . . . .3
•
Safety
Guidelines
. . . . . . . . . . . . . . . . . . . . . . . . .6
•
Uconnect™ Access
Overview . . . . . . . . . . . . . . .10
▫
How to
Register
with
Uconnect™
Access: . . . . .10
▫
Uconnect™ Access In-Vehicle
Assistance
Featu res
. . . . . . . . . . . . . . . . . . . . . . . . . . . .
.11
▫
Uconnect™ Access In-Vehicle
Connectivity
Services . . . . . . . . . . . . . . . . . . . . . . . . . . . .
.13
▫
Uconnect™ Access Additional
Information . . . .13
•
Uconnect™ 3.0
. . . . . . . . . . . . . . . . . . . . . . . . . .15
▫
Uconnect™
3.0 System. . . . . . . . . . . . . . . . . . .15
▫
Radio Mode . . . . . . . . . . . . . . . . . . . . . . . . . .17
▫
Media Mode
. . . . . . . . . . . . . . . . . . . . . . . . . .19
•
Uconnect™ 5.0
. . . . . . . . . . . . . . . . . . . . . . . . . .23
▫
Uconnect™
5.0 System. . . . . . . . . . . . . . . . . . .23
▫
Radio Mode . . . . . . . . . . . . . . . . . . . . . . . . . .24
▫
Media Mode
. . . . . . . . . . . . . . . . . . . . . . . . . .28
▫
Uconnect™ Phone
. . . . . . . . . . . . . . . . . . . . . .32
▫
Uconnect™
Voice Command . . . . . . . . . . . . . .35
▫
Settings
Main Menu . . . . . . . . . . . . . . . . . . . .39
Page 2

2 Uconnect™ ACCESS USER’S MANUAL
▫
More Main Menu . . . . . . . . . . . . . . . . . . . . . .40
•
Uconnect™
8.4A . . . . . . . . . . . . . . . . . . . . . . . .41
▫
Uconnect™ 8.4A
System . . . . . . . . . . . . . . . . .41
▫
Radio Mode . . . . . . . . . . . . . . . . . . . . . . . . . .42
▫
Media Mode
. . . . . . . . . . . . . . . . . . . . . . . . . .54
▫
Uconnect™ Phone
. . . . . . . . . . . . . . . . . . . . . .62
▫
Uconnect™
Voice Command . . . . . . . . . . . . . .93
▫
Navigation
. . . . . . . . . . . . . . . . . . . . . . . . . .106
▫
Security Featu res
. . . . . . . . . . . . . . . . . . . . . .264
▫
Remote Service Featu res
. . . . . . . . . . . . . . . . .270
•
Uconnect™
8.4AN . . . . . . . . . . . . . . . . . . . . . .158
▫
Uconnect™ 8.4AN
System . . . . . . . . . . . . . . .158
▫
Radio Mode . . . . . . . . . . . . . . . . . . . . . . . . .159
▫
Media Mode
. . . . . . . . . . . . . . . . . . . . . . . . .171
▫
Uconnect™ Phone
. . . . . . . . . . . . . . . . . . . . .179
▫
Uconnect™
Voice
Command
. . . . . . . . . . . . . .206
▫
Navigation
. . . . . . . . . . . . . . . . . . . . . . . . . .219
▫
Security Featu res
. . . . . . . . . . . . . . . . . . . . . .264
▫
Remote Service Featu res
. . . . . . . . . . . . . . . . .270
Page 3

Uconnect™ ACCESS USER’S MANUAL 3
•
SiriusXM™
Optional
Uconnect™
5.0
Identifying Your Radio
Uconnect™
3.0
1
Key Features
•
3” Screen
•
Two
hard-keys
on either side of the display
Key Features
•
5” Touch-Screen
•
Three
hard-keys
on either side of the display
Page 4

4 Uconnect™ ACCESS USER’S MANUAL
•
Hands -fr
ee/Bluetooth
®
•
SiriusXM™
Optional
Uconnect™
8.4A
Key Features
NOTE: The
8.4A
and
8.4AN appearance
is the
same,
but
the listed
featu res provide
the differences.
•
8.4” Touch-Screen
•
Navigation -Read y,
see your
dealer
for details
•
Hands -fr
ee/Bluetooth
®
•
Touchsc reen Climate
Controls
•
SiriusXM™
•
Embedded Connectivity
(US
Market
Only)
Uconnect™
8.4AN
Key Features
•
8.4” Touch-Screen
•
Navigation
Standard
•
Hands -fr
ee/Bluetooth
®
•
Touchsc reen Climate
Controls
•
HD Radio
Page 5

Uconnect™ ACCESS USER’S MANUAL 5
•
SiriusXM™
•
SiriusXM™
Traffic
1
•
Embedded Connectivity
(US
Market
Only)
Page 6

6 Uconnect™ ACCESS USER’S MANUAL
Safety Guidelines
WARNING!
•
Stop use
immediately
if a
problem
occurs. Failure to
do so may cause injury or damage to the product.
Return
it to your
authorized dealer
to repair.
ALWAYS drive safely with your hands
on the wheel.
You have full
responsibility
and assume all risks
related to the use of the Uconnect™ features and
applications in this vehicle. Only use Uconnect™
when
it is
safe
to do so.
Failure
to do so
may result
in
an
accident involving serious injury
or death.
Ensu re
that all
persons
read this
manual carefully
before
using the radio system.Itcontains inst ructionsonhow
to
use the
system
in a safe and
effective
manner.
Please read and follow these safety
precautions.
Failure
to do so may resultin injury or
property
damage.
•
Glance
at the screen only when
necessary
and safe to
do so. If
prolonged viewing
of the
screen
is necessary,
park in a safe
location
and set the
parking
brake.
•
Make certain
that the
volume level
of the
system
is set
to a level that still allows you to hear outside traffic
and
eme rgency
vehicles.
Safe
Usage
of the
Uconnect™ Access
System
•
Read all
inst ructions
in this manual carefully before
using your
systemtoensu re proper
usage!
•
Your system is a
sophisticated
electronic device. Do
not let
young child ren
use your system.
•
Permanent
hearing loss may occur if you play your
music
or the
systematloud volumes. Exe rcise
caution
when
setting
the
volume
on your system.
Page 7

Uconnect™ ACCESS USER’S MANUAL 7
•
Driving is a complex activity that requires your full•Do not spray any liquid or caustic
chemicals
directly
attention.Ifyou’ re engagedindriving
or any activity
that
requi res
your full
attention,werecommend
that
you not use your system.
NOTE: Many features of this system are speed dependent. For your own
safet y,
it is not
possible
to use some
of the touch screen features while the vehicle is in
motion.
•
Keep drinks, rain,
and
other sou rcesofmoistu re
away
from your system. Besides damage to your system,
moisture can cause electric shocks as with any electronic device.
Touch
Screen
•
Do
not touch
the
screen with any hardorsharp
objects
(pen, USB stick,
jewelr y,
etc.) which could
scratch
the
touch
screen
surface!
on the screen! Use a clean and dry micro fiber lens
1
cleaning
cloth in order to clean the touch screen.
•
If necessary, use a lint-free cloth dampened with a
cleaning solution, such as isopropyl alcohol, or an
isop ropyl alcohol
and
water solution
ratio of
50:50.
Be
sure to
follow
the
solvent manufactu rer’s
precautions
and directions.
Disc Drive
•
Do not insert any damaged, warped, scratched
or dirty
Discs into the Disc player.
•
Discs that have been
modified
with an
adhesive
label
should
not be used in the Disc player.
•
Do not insert more than one Disc at a time into the
drive slot.
FCC Declaration
Page 8

8 Uconnect™ ACCESS USER’S MANUAL
This device complies with Part 15 of the FCC Rules
and RSS 210 of Industry Canada.
Operationissubject
to the
following
two
conditions:
(1) this device may not
cause
harmful interfe rence,
and (2)
this device must
accept any interfe rence received,
including interference
that may cause undesired operation. Modifications
not expressly approved by the radio
manufactu rer
could void the
user
’s
authority
to operate the
equipment.
Le présent appareil est conforme aux CNR d'Industrie
Canada applicables aux appareils radio exempts de
licence. L'exploitation est autorisée aux deux
conditions suivantes: (1) l'appareil ne doit pas
produire de brouillage, et (2) l'utilisateur de l'appareil
doit accepter tout brouillage radioélectrique subi,
même si le brouillage est susceptible d'en
compromettre le fonctionnement.
NOTE: This equipment has been tested and found to
comply with the limits for a Class B digital device,
pursuant to Part 15 of the FCC Rules. These limits are
designedtoprovide reasonable protection against
harm-
ful
interfe rence
in a
residential installation.
This equipment generates, uses and can radiate radio frequency
ene rgy
and, if not
installed
and used in
acco rdance
with
the
inst ructions, may cause harmful interfe rence
to radio
communications.
However, there is no guarantee that
interfe rence
will not occur in a
particular
installation.
If this equipment does cause harmful interference to
radioortelevision reception, which canbedetermined
by
turning
the
equipment
off
and
on, the
user
is encouraged
to try to correct the
interfe rence
by one or more of the
following measures: - Increase the separation between
the
equipment
and receiver. - Consult the dealer or an
experienced
radio
technician
for help.
Page 9

Uconnect™ ACCESS USER’S MANUAL 9
•
Driving is a complex activity that requires your full•Do not spray any liquid or caustic
chemicals
directly
Safety Information
Exposu re
to Radio
Frequency R
adiation
The
radiated
output power of the internal wireless
radio is far below the FCC radio frequency
exposure limits.
Nevertheless,
the
wireless
radio shall
be used in
suchamanner
that the
radio
is 20 cm or
further from
the
human
body.
Page 10

Page 11

Uconnect™ ACCESS USER’S MANUAL 9
The internal wireless radio operates within guidelines
found in radio frequencysafety standards and recom-
1
mendations, which reflect
the
consensus
of the scientific
communit y.
The radio
manufactu rer be li ev es
the internal wireless
radio is safe for use by
consumers.
The level of energy
emitted
is far less than the
elect romagnetic ene rgy
emit-
ted by
wireless devices suchasmobile phones.
However,
the use of wireless radios may be restricted in some
situationsorenvi ronments,
such as aboard
airplanes.
If
you are
unsu reofrestrictions,
you are
encouraged
to ask
for
authorization befo re turning
on the
wireless
radio.
Page 12

10 Uconnect™ ACCESS USER’S MANUAL
Uconnect™ Access Overview
Uconnect™ Access (AvailableonUconnect™
8.4A and
Uconnect™
8.4AN)
With
Uconnect™
Access, owners have emergency and
remote vehicle featu res available. These featu res
include
9-1-1 Call, Roadside Assistance, Uconnect™ Care and
Vehicle Care. With the Uconnect™ Access, your vehicle
is
also
capableofremote vehicle featu res
like
Remote
Start,
Remote Door Lock/Unlock, and Remote Horn and
Lights. Once registered, Uconnect™ Access customers
can
purchase packages
and apps at any time. For addi-
tional information, contact Uconnect™ Customer Care
at
855-792-4241, or visit Owner Connect (www.MoparOwnerConnect.com).
How to Register with Uconnect™ Access:
1. With the vehicle parked and the radio powered on,
select the
“Apps” soft -key located
near the
bottom
of
the radio touch screen.
2.
Select
the
“Uconnect Registration”
App
soft -key
from
the Appslist.
3. The
Uconnect™ Registration
App will open and pro-
vide
step -by-step inst ructions
on how to enter your
email
add ress
to begin the
registration
process.
4. You will receive a secured registration email from
Uconnect™
Access
containing
a link for completing
your
Uconnect™
Access
Registration
on-line. For security reasons, this email link will be valid for 24
hours.
5.
Follow
the link to
complete
the final step of registra-
tion and to begin using
Uconnect™
Access
Page 13

Uconnect™ ACCESS USER’S MANUAL 11
For additional registration assistance whileinthe
vehicle,
push the ASSIST buttontocontact Uconnect™
Customer
1
Care.
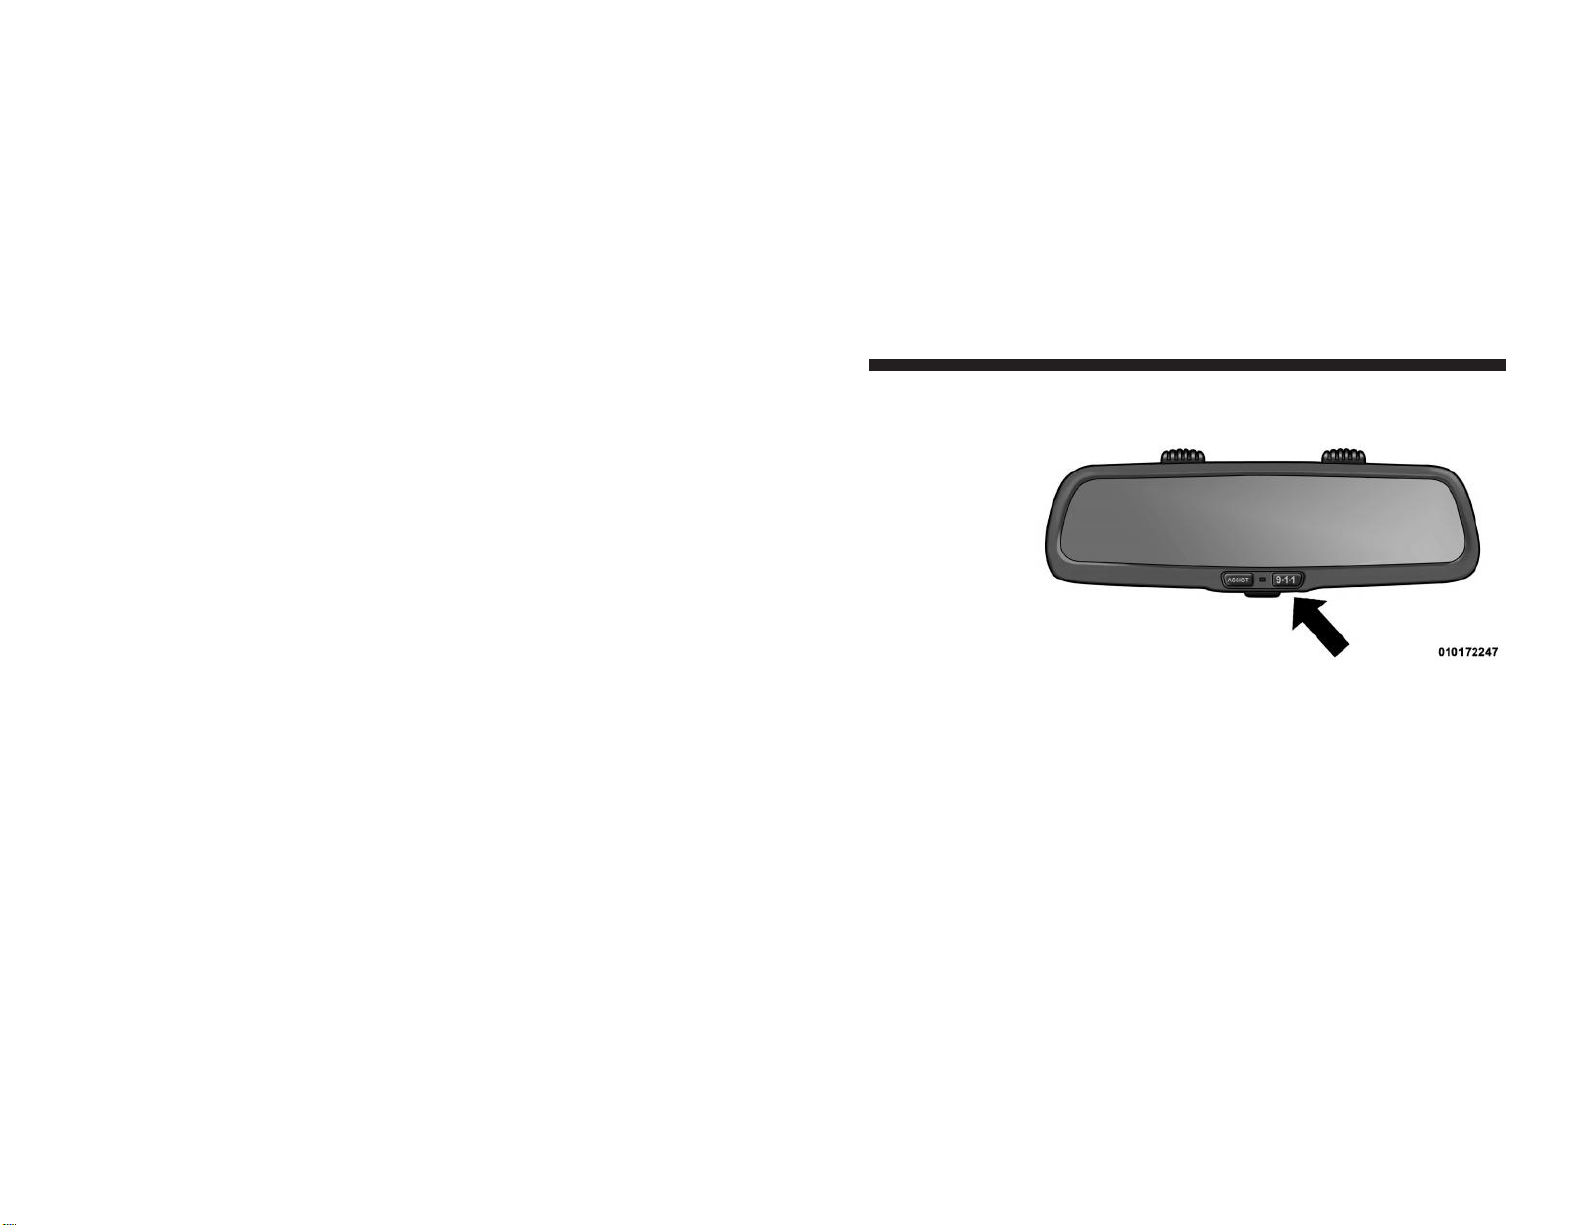
Uconnect™ Access In-Vehicle Assistance
Features
With
Uconnect™
Access, your vehicle has an on-board
assistance feature located on the rear view mirror designedtoenhance your driving experience
if you should
ever need
assistance
or support.
ASSIST Call
Assist Call button
The rear view mirror contains an ASSIST push button
which
automatically
connects the vehicle occupants to
one of several predefined destinations for immediate
support:
Page 14
12 Uconnect™ ACCESS USER’S MANUAL
1.
Roadside Assistance Call
– If
you getaflat tire,
or need
a tow, you’ll be
connectedtosomeone
who can help
anytime. Roadside Assistance
will
know what
vehicle
you’re driving and its
location. Additional
fees may
apply for
roadside
Assistance.
2.
Uconnect™
Customer Care – In-vehicle support for
Uconnect™ Access System,
Apps and Features.
3. Vehicle Customer Care – Total support for your
Chrysler Group
vehicle.
9–1–1
Call
9–1–1 Call button
Places a direct call to local 9–1–1
eme rgency
authority.
Page 15

Uconnect™ ACCESS USER’S MANUAL 13
Uconnect™ Access In-Vehicle Connectivity
Services
Uconnect™ Access brings
the
power
of the
internet
into
your vehicle with exciting features, remote capabilities,
theft alarm notification, and stolen vehicle assistance
applications through on -boa rd connectivity service.
Once
registered with
Uconnect™
Access, you can customize
the capabilities of your vehicle system using your
Uconnect™ Access account
from the
vehicle,
the web, or
your Smartphone.
Please refer to your Uconnect™ Access account for
informationonavailable subscriptions, applications
and
packages for your vehicle. For additional information,
contact
Uconnect™
Customer Care at
855 -792 -4241,
or
visit
Owner Connect (ww w.MoparOwnerConnect.com).
Uconnect™ Access Additional Information
My
Uconnect™
Account
To use the
Uconnect™ Featu res
and
Services,
you must
first register your vehicle with Uconnect™ Access.
Please
1
refer to the
“Register
with
Uconnect
Access” section of
this
User’s Manual
to start
registration.
Once registered,
you can
personalize
your
vehicle Uconnect™ System
as
desi red.
How to
PurchaseorCancel
an App
From your
Uconnect™
Access Account, you can easily
purchaseorcancel Applicationsorsubscriptions.
Simply
log -intoyour Uconnect™ Access Account
and
visit
your
Uconnect™
Store.
Correcting a Download Error - How to Reset the
Uconnect™ Access
System
You can easily cor rect any App related issues
by resetting
the App. Simply log-in to your
Uconnect™
Access Ac-
count and visit the
Uconnect™ Sto re,
click on My Apps,
click on Settings, and then choose Reset/Reinstall. In
minutes
your App will be
reinstalled
and readyto go.
Page 16

14 Uconnect™ ACCESS USER’S MANUAL
Selling my Vehicle- How to
Completely Remove
My
Uconnect™ Account
To
completely remove your Uconnect™ Account,
simply
log-in to your Uconnect™ Account and visit the
Uconnect™
Store, click on My Apps, click on Settings,
and then choose Remove
Uconnect™ Account.
In min-
utes your entire
Uconnect™
Account and information
will be
removed
from your vehicle.
For further assistance call 855-792-4241, or go to the
Mopar Owner Connect site at
(ww w.MoparOwnerCon -
nect.com).
Page 17

Uconnect™ ACCESS USER’S MANUAL 15
Press
the
RADIO hard -keytoenter
the
Radio Mode.
The
Uconnect™ 3.0
Uconnect™ 3.0 System
1. RADIO
different tuner modes; AM,
FM and
SXM
can be selected
1
by touching the
cor responding
soft-keys in the Radio
Mode.
2.
INFO
Press the INFO
button
for an RDS
station
(one with call
letters displayed). The radio will return a Radio Text
message broadcast
from an FM
station
(FM modeonly).
3. A-B-C
Press the A-B-C
hard-key
to select the A, B or C preset
list.
4.
ENTER/BROWSE&TUNE/SCROLL
Press the ENTER/BROWSE button to accept a highlighted selection on the screen. Rotate the
TUNE/
SCROLL
rotary knob to scroll through a list or tune a
radio station.
Page 18

16 Uconnect™ ACCESS USER’S MANUAL
5.
SEEK
UP
Press the Seek Up
soft -key
to tune the radio to the next
listenable station
or channel.
6. BACK
Press the BACK
button
to return to a
previous
menu or
screen.
7. MENU
Press the MENU button allows to scroll between the
setting
sub-menus.
8. PLAY/PAUSE/MUTE
Press to Play, Pause or Mute the music.
9. AUDIO
Press the
AUDIO
button to adjust the Bass, Mid Range,
Treble, Balance
or Fade.
10.
SEEK
DOWN
Press the Seek Down soft-key to tune the radio to the
previous listenable station
or channel.
11.
ON/VOLUME
Push the ON/VOLUME control knob to turn on the
radio. Push the ON/VOLUME control knob a second
time to turn off the radio.
The electronic volume control turns
continuously
(360
deg rees)ineither direction without stopping. Turning
the
ON/VOLUME control knob to the right increases the
volume
and to the left
dec reases
it.
12.
PRESETS
1–6
These buttons tune the radio to the stations that you
committopushbutton memory
AM (A, B, C), FM (A, B,
C) and
Satellite
— 18 AM, 18 FM and 18 SAT stations.
13.
MEDIA
Page 19

Uconnect™ ACCESS USER’S MANUAL 17
Pressing the MEDIA button will allow youtoswitch
from
•
When
the
audio systemisturned
on, the
sound will
be
AM/FM modes to Media mode (CD, USB/iPOD, AUX,
Bluetooth).
Radio Mode
The radio is
equipped
with the
following
modes:
•
FM
•
AM
•
SXM SiriusXM™
Satellite
Radio (if equipped)
Touch
the
RADIO button,
to enter the Radio
Mode.
The
different
tuner
modes;
AM, FM, and SXM, can then, be
selectedbytouching
the
cor responding soft -keys
in the
Radio mode.
ON/OFF&Volume
Control
•
Push
the ON/OFF
Volume cont rol knobtoturn
on the
radio. Push the ON/OFF Volume control knob a
second
time to turn off the radio.
set at the same
volume
level as last played.
1
Enter/Browse&Tune/Scroll
Control
•
Turn the rotary TUNE/SCROLL control knob clock-
wise to increase or
counte rclockwise
to decrease the
radio station frequency. Push the ENTER/BROWSE
buttontochoose
a selection.
Seek Functions
Seek Up
•
Touch and release the Seek Up buttontotune the
radio
to the next
listenable station
or channel.
•
During a Seek Up function, if the radio reaches the
starting
station after
passing th rough
the entire band
two times, the radio will stop at the station where it
began.
Seek Down
Page 20

18 Uconnect™ ACCESS USER’S MANUAL
•
Touch and release the Seek Down button to tune the
radio to the next
listenable station
or channel.
•
During
a Seek
Down function,
if the
radio reaches
the
starting
station after
passing through
the entire band
two times, the radio will stop at the station where it
began.
Setting
Presets
The Presets are available for all Radio Modes, and are
activatedbytouching
any of the six Preset buttons.
When you are receiving a station that you wish to
commit into
memor y,
press and hold the desired num-
bered button
for
mo re
that 2
seconds
or until you hear a
confirmation
beep.
The Radio stores up to 18 presets in each of the Radio
modes.
Press the A-B-C
hard-key
to select the A, B or C
preset list.
SiriusXM™ Satellite
Radio Mode
SiriusXM™ Satellite Radio uses direct satellite -to-receiver
broadcasting technology
to provide clear digital sound,
coast to coast. The
subscription
service
provider
is SiriusXM™ Satellite Radio. This service offers over 130
channels of music, sports, news, entertainment, and
programming
for
child ren, directly from
its
satellites
and
broadcasting studios. A one-year SiriusXM™ Satellite
Radio
subscription
is included.
SiriusXM™
and all related marks and logos are trademarks of SiriusXM™ Radio Inc. and its subsidiaries.
SiriusXM™
Satellite Radio requires a
subscription,
sold
separately
after trial
subscription included
with vehicle
purchase. Prices and programming are provided by
SiriusXM™ and are subject to change. Subscriptions
governed by Terms&Conditions available
at sirius.com/
serviceterms. SiriusXM™
Radio U.S. service only avail-
able to
thoseatleast18years
of age in the 48 contiguous
United States, D.C.,
and PR.
Service available
in Canada;
see www.siriuscanada.ca.
Page 21

Uconnect™ ACCESS USER’S MANUAL 19
This
functionality
is only
available
for radios equipped Clock Setting
withaSatellite receive r.Inordertoreceive satellite
radio,
the vehicle needs to be
outside
with a clear view to the
sky.
If the
screen shows Acquiring Signal,
you
might
have to
change
the
vehicle’s positioninordertoreceive
a signal.
In
most cases,
the
satellite radio does
not
receive
a signal
in
unde rground parking garages
or tunnels.
Audio
1. Press the
AUDIO button
at the
button
of the radio.
2.
The Audio Menu shows
the
following options
for you
to
customize
your audiosettings.
Mid, Bass, Fade, Balance
•
Select the desired setting to adjust, then touch the
Enter/Browse button. Turn the Tune/Scroll knob to
adjust
the
setting
+ or - 9.
Press
the back
button
when
done.
1.
Press
the
Menu button
at the
bottom
of the
radio,
next
1
select the Time Format setting and then select Set
Time.
2. Adjust the hours or minutes by turning theTune/
Scroll knob, then pressing
the Enter/Browse
button
to
movetothe next entr y. You can also select 12hr
or 24hr
formatbyturning
the Tune/Scroll
knob, then
pressing
the Enter/Browse
button
on the
desi red
selection.
3.
Once
the
time
is set
press
the
“Back” buttontoexit
the
time screen.
Media Mode
Media Mode is entered by touching the Media button
located
on the side of the
displa y.
Once in
Media
Mode,
select your media Source by rotating the Scroll rotary
knob and
pushing
the Enter button.
Common Media Functions
Page 22

20 Uconnect™ ACCESS USER’S MANUAL
Seek Up/Down
Touch and release the right arrow soft-key for the next
selection. Touch and release the left arrow soft-key to
return
to the
beginning
of the
cur rent selection,
or return
to the
beginning
of the
previous selection
if the Disc is
within
the first
second
of the
cur rent
selection.
Fast Seek Up: Touch and hold the right arrow soft-key
and the
desi red mode
will
begin
to fast
forwa rd
through
the
cur rent
track until the
soft -key
is released.
Fast Seek
Down: Touch
and hold the left arrow soft-key
and the
desi red
mode will begin to
rewind through
the
cur rent
track until the
soft -key
is released.
Sou rce
Touch the Source soft-key to select the desired audio
source, Disc, AUX or USB/iPod®.
This screen will time
out after a few seconds and return to the main radio
screen
if no
selection
is made.
Info
Touch the Info soft-key to display the current track
information. Touch the “X” soft -keytocancel this
feature.
Shu ffle
Touch the shuffle soft-key to play the
selections
on the
USB/iPod®deviceinrandom
order to
provide
an inter-
esting changeofpace. Touch the soft -keyasecond time
to
turn this
featu re
off.
Audio
Refer to Radio Mode for
adjusting
the audio settings.
Disc Mode
If
equipped, your vehicle may havearemote Disc
player
located
in the lower center
console storage
bin.
Disc Mode is entered by either inserting a Disc or by
touching the Media button located on the side of the
displa y.
Once in
Media Mode,
select Disc mode.
Page 23

Uconnect™ ACCESS USER’S MANUAL 21
Eject
Button–Ejecting
a Disc
Inserting Compact
Disc
Gently insert
one Disc into the Disc
player
with the Disc
label
following
the
illustration
indicated on the player.
The Disc will automaticallybepulled into the Disc
player
and the Disc icon will
illuminate
on the radio
displa y.
If
a
Disc does
not go into the slot
more than
1.0 in (2.5 cm),
a disc may
alreadybeloaded
and
mustbeejected
before
a new Disc can be loaded.
If you insert a Disc with the
ignition
ON and the radio
ON, the unit will
switch
to CD/Disc
mode
and begin to
play when you insert
the
Disc. The display will show
the
track number, and index time in minutes and seconds.
Play will begin at the start of track 1.
Browse
Touch
the
browse soft -key
to scroll
through
and select a
desi red
track on the Disc. Touch the exit
soft -key
if you
wish to cancelthe
browse
function.
Press the EJECT button to eject the Disc. If you have
1
ejectedaDisc and have not removeditwithin
10 seconds,
it will be
reloaded.
If the Disc is not
removed,
the radio
will
reinsert
the Disc but will not play it.
A Disc can be
ejected
with the radio and
ignition
OFF.
USB/iPod®Mode
USB/iPod®Mode is entered by either inserting a USB
Jump Drive or
iPod®cable into the USB port or by
touching the Media button located left of the display.
OnceinMedia Mode, touch the sou rce soft -key and
select
USB/iPod®.
Inserting
USB/iPod®Device
Gently insert
the USB/iPod®device
into the USB
Port.
If
you insert
a USB/iPod®device with
the
ignition
ON and
the radio ON, the unit will switch to USB/iPod®mode
and begin to play when you insert the device. The
Page 24

22 Uconnect™ ACCESS USER’S MANUAL
display will show the track number, and index time in
minutes
and
seconds.
Play will
begin
at the start of track
1.
Browse
Touch the Browse soft-key to select Artist, Albums,
Gen res,
Songs,
PlaylistsorFolders
from the USB/iPod
®
device. Once
the
desi red selectionismade
you can chose
from
the
available mediabytouching
the
soft -key.
Touch
the exit
soft -key
if you wish to cancel the browse func-
tion.
AUX Mode
AUX Modeisente redbyinsertingaAUX device using
a
cable with a 3.5 mm audio jack into the AUX port or by
touching the Media button located left of the display.
OnceinMedia Mode, touch the sou rce soft -key and
select
AUX.
Inserting Auxiliary
Device
Gently insert the Auxiliary device cable into the AUX
Port.Ifyou insert a Auxiliary device with the ignition
ON
and
the
radio ON,
the
unit will switchtoAUX mode
and
begin to play whenyou insert the
device
cable.
Cont rolling
the
Auxiliary
Device
The control of the
auxiliary
device (e.g.,
selecting
play-
lists, play, fast
forwa rd,
etc.) cannot be
provided
by the
radio;
use the
device cont rols instead. Adjust
the volume
with the ON/OFF VOLUME rotary knob, or with the
volume
of the
attached
device.
NOTE: The
vehicle
radio unit is acting as the amplifier
for audio
output
from the
Auxiliary device. The refo re
if
the
volume cont rolonthe Auxiliary device
is set too low,
the re willbeinsu fficient audio signal
for
the radio unit
to
play the music on the device.
Page 25

Uconnect™ ACCESS USER’S MANUAL 23
Press
the
RADIO hard -keytoenter
the
Radio Mode.
The
Uconnect™ 5.0
Uconnect™ 5.0 System
1. RADIO
different tuner modes; AM,
FM and
SXM
can be selected
1
by touching the
cor responding
soft-keys in the Radio
Mode.
2.
COM P
ASS
Press the COMPASS hard-key to display the current
direction
of the vehicle.
3.
SETTINGS
Press the
SETTINGS hard -key
to access the
Settings
list.
Clock,
Displa y,
Audio,
Bluetooth
and Sirius
Settings
are
described
in this manual.
4.
MORE
Press the
MORE hard-key
to access
additional
options.
5.
ENTER/BROWSE&TUNE/SCROLL
Page 26

24 Uconnect™ ACCESS USER’S MANUAL
Press the ENTER/BROWSE button to accept a highlighted selection on the screen. Rotate the
TUNE/
SCROLL
rotary knob to scroll through a list or tune a
radio station.
6.
BACK
Press the BACK
button
to return to a
previous
menu or
screen.
7.
SCREEN
OFF
Press the SCREEN OFF hard-keytoturn the
touch-screen
OFF. To turn the
screen
back ON, just touch the screen.
8.
VOLUME&MUTE
Rotate the rotary knob to adjust the Volume. Press the
Mute
button
to mute the system.
9.
PHONE
Press the Phone button to access the
Uconnect™
Phone
feature.
10.
MEDIA
Pressing
the
MEDIA
button will allow you to switch to
Media
mode (CD, USB/iPOD, AUX,
Bluetooth).
Radio Mode
The radio is
equipped
with the
following
modes:
•
FM
•
AM
•
SXM SiriusXM™
Satellite
Radio (if equipped)
Touch the RADIO hard -ke y,toenter the Radio Mode.
The
different
tuner
modes;
AM, FM, and SXM, can then, be
selectedbytouching
the
cor responding soft -keys
in the
Radio mode.
Volume
& Mute
Page 27

Uconnect™ ACCESS USER’S MANUAL 25
•
Rotate
the
rotary knobtoadjust
the
Volume. When
the
•
During a Seek Up function, if the radio reaches the
audio systemisturned
on, the
sound
will be set at the
same
volume
level as last played.
•
Press the Mute button to mute the system. Press the
Mute
button
again to
un-mute
the system.
Enter/Browse&Tune/Scroll
Control
•
Turn the rotary TUNE/SCROLL control knob clock-
wise to increase or
counte rclockwise
to decrease the
radio station frequency. Push the ENTER/BROWSE
buttontochoose
a selection.
Seek Functions
Seek Up
•
Touch and release the Seek Up soft-key to tune the
radio to the next
listenable station
or channel.
starting
station after
passing th rough
the entire band
1
two times, the radio will stop at the station where it
began.
Fast Seek Up
•
Touch and hold the Seek Up
soft -keytoadvance
the
radio through the available stations or channels at a
faster
rate, the
radio stops
at the next
available
station
or
channel
when the
soft -key
is released.
Seek Down
•
Touch
and
release
the Seek
Down soft -key
to tune the
radio to the next
listenable station
or channel.
•
During
a Seek
Down function,
if the
radio reaches
the
starting
station after
passing through
the entire band
two times, the radio will stop at the station where it
began.
Fast Seek Down
Page 28

26 Uconnect™ ACCESS USER’S MANUAL
•
Touch and hold the Seek Down soft -keytoadvance
the
radio through the available stations or channel at a
faster
rate, the
radio stops
at the next
available
station
or
channel
when the
soft -key
is released.
Setting
Presets
The Presets are available for all Radio Modes, and are
activated by touching any of the four Preset soft keys,
located
at the top of the screen.
When you are receiving a station that you wish to
commit into
memor y,
press and hold the desired num-
bered
soft -key
for more that 2
seconds
or until you hear
a
confirmation
beep.
The Radio stores up to 12 presets in each of the Radio
modes.4presets
are
visible
at thetop of the
radio
screen.
Touching
the
“all” soft -key
on the
radio home screen
will
display
all of the preset
stations
for that mode.
SiriusXM™ Satellite
Radio Mode
SiriusXM™ Satellite Radio uses direct satellite -to-receiver
broadcasting technology
to provide clear digital sound,
coast to coast. The
subscription
service
provider
is SiriusXM™ Satellite Radio. This service offers over 130
channels of music, sports, news, entertainment, and
programming
for
child ren, directly from
its
satellites
and
broadcasting studios. A one-year SiriusXM™ Satellite
Radio
subscription
is included.
SiriusXM™
and all related marks and logos are trademarks of SiriusXM™ Radio Inc. and its subsidiaries.
SiriusXM™
Satellite Radio requires a
subscription,
sold
separately
after trial
subscription included
with vehicle
purchase. Prices and programming are provided by
SiriusXM™ and are subject to change. Subscriptions
governed by Terms&Conditions available
at sirius.com/
serviceterms. SiriusXM™
Radio U.S. service only avail-
able to
thoseatleast18years
of age in the 48 contiguous
United States, D.C.,
and PR.
Service available
in Canada;
see www.siriuscanada.ca.
Page 29

Uconnect™ ACCESS USER’S MANUAL 27
This
functionality
is only
available
for radios equipped•Touch the
Equalizer
soft-key to adjust the Bass, Mid
withaSatellite receive r.Inordertoreceive satellite
radio,
the vehicle needs to be
outside
with a clear view to the
sky.
If the
screen shows Acquiring Signal,
you
might
have to
change
the
vehicle’s positioninordertoreceive
a signal.
In
most cases,
the
satellite radio does
not
receive
a signal
in
unde rground parking garages
or tunnels.
Audio
1. Press the
SETTINGS ha rd-key
on the rightside of the
unit.
2. Then scroll
down
and pressthe
Audio soft -key
to get
to the
Audio
menu.
3.
The Audio Menu shows
the
following options
for you
to
customize
your audiosettings.
Equalizer
and Treble. Use the + or - soft-key to adjust the
1
equalizer to your desired settings. Press the back
arrow
soft -key
when done.
Balance/Fade
•
Touch the Balance/Fade
soft -key
to adjust the sound
from
the
speakers. Use
the
arrow soft -keytoadjust
the
sound level from the front and rear or right and left
side
speakers.
Touch the Center "C" soft-key to reset
the balance and fade to the factory setting. Press the
back arrow
soft -key
when done.
Speed
Adjustable
•
Touch the Speed Adjusted Volume soft-key to select
between OFF, 1, 2 or 3. This will decrease the radio
volume relative to a
dec rease
in vehicle speed. Press
the back arrow
soft -key
when done.
Loudness
Page 30

28 Uconnect™ ACCESS USER’S MANUAL
•
Touch the Loudness soft-key to select the Loudness
feature. When this feature is activated it improves
sound quality
at lower volumes.
Clock Setting
There are two ways to enter the clock
setting
procedure
on the
Uconnect™
5.0 system.
1. Press the More hard-key on the right side of the
display, next press the Time soft-key and then press
the Set
soft -key.
OR
Press
the
Settings hard -key
on the
right
side of the
displa y, then press
the
Clock
soft-key.
The
Time setting screenisdisplayed
and the
clock
can
be
adjustedasdescribed
in the
following
procedure.
NOTE: In the Clock Setting Menu you can also select
Display
Clock.
Display
Clock turns the clock
display
in
the status bar on or off.
2. Touch the Up or Down
arrows
to adjust the hours or
minutes,
next select the AM or PM
soft -key.
You can
also select 12hror24hr formatbytouching
the desires
soft-key.
3. Once the time is set press the
“Done” soft -key
to exit
the time screen.
Media Mode
Media
Mode is
ente redbytouching
the
Media
hard-key
located
on the side of the
displa y.
Once in
Media
Mode,
touch Source soft-key and the desired mode soft-key.
Disc, USB, AUX and Bluetooth are the Media sources
available.
Common Media
Functions
Seek Up/Down
Touch and release the right arrow soft-key for the next
selection. Touch and release the left arrow soft-key to
return
to the
beginning
of the
cur rent selection,
or return
Page 31

Uconnect™ ACCESS USER’S MANUAL 29
to the
beginning
of the
previous selection
if the Disc is Shuffle
within
the first
second
of the
cur rent
selection.
Fast Seek Up: Touch and hold the right arrow soft-key
and the
desi red mode
will
begin
to fast
forwa rd
through
the
cur rent
track until the
soft -key
is released.
Fast Seek
Down: Touch
and hold the left arrow soft-key
and the
desi red
mode will begin to
rewind through
the
cur rent
track until the
soft -key
is released.
Sou rce
Touch the Source soft-key to select the desired audio
source, Disc, AUX or USB/iPod®.
This screen will time
out after a few seconds and return to the main radio
screen
if no
selection
is made.
Info
Touch the Info soft-key to display the current track
information. Touch the “X” soft -keytocancel this
feature.
Touch the shuffle soft-keyto play the
selections
on the
1
USB/iPod®deviceinrandom
order to
provide
an inter-
esting changeofpace. Touch the soft -keyasecond time
to
turn this
featu re
off.
Audio
RefertoOperating Inst ructions–Radio Mode
for adjust-
ing the audiosettings.
Disc Mode
If
Equipped, your vehicle may havearemote Disc
player
located
in the lower center
console storage
bin.
Disc Modeisente redbyeither inserting
a CD/Disc or by
touching
the Media
hard-key
located on the side of the
displa y.
Once in Media Mode, touch the
sou rce
soft-key
and select Disc.
Inserting Compact
Disc
Page 32

30 Uconnect™ ACCESS USER’S MANUAL
Gently insert
one Disc into the Disc
player
with the Disc
label
following
the
illustration
indicated on the player.
The Disc will automaticallybepulled into the Disc
player
and the Disc icon will
illuminate
on the radio
displa y.
If
a
Disc does
not go into the slot
more than
1.0 in (2.5 cm),
a disc may
alreadybeloaded
and
mustbeejected
before
a new Disc can be loaded.
If you insert a Disc with the
ignition
ON and the radio
ON, the unit will
switch
to Disc
mode
and
begin
to play
when you insert the Disc. The display will show the
track
number, and index time in minutes and seconds. Play
will begin at the start of track 1.
Browse
Touch
the
browse soft -key
to scroll
through
and select a
desi red
track on the Disc. Touch the exit
soft -key
if you
wish to cancelthe
browse
function.
Eject
Button–Ejecting
a Disc
Press the EJECT button to eject the Disc. If you have
ejectedaDisc and have not removeditwithin
10 seconds,
it will be
reloaded.
If the Disc is not
removed,
the radio
will
reinsert
the Disc but will not play it.
A Disc can be
ejected
with the radio and
ignition
OFF.
USB/iPod®Mode
USB/iPod®Mode is entered by either inserting a USB
Jump Drive or
iPod®cable into the USB port or by
touching
the Media
hard-key located
left of the display.
OnceinMedia Mode, touch the sou rce soft -key and
select
USB/iPod®.
Inserting
USB/iPod®Device
Gently insert
the USB/iPod®device
into the USB
Port.
If
you
insert
a USB/iPod®device with
the
ignition ON,
the
unit will switch to USB/iPod®mode and begin to play
Page 33

Uconnect™ ACCESS USER’S MANUAL 31
when you insert the device. The display will show the Gently insert the Auxiliary device cable into the AUX
track number, and index time in minutes and seconds.
Play will begin at the start of track 1.
Browse
Touch the Browse soft-key to select Artist, Albums,
Gen res,
Songs,
PlaylistsorFolders
from the USB/iPod
®
device. Once
the
desi red selectionismade
you can chose
from
the
available mediabytouching
the
soft -key.
Touch
the exit
soft -key
if you wish to cancel the browse func-
tion.
AUX Mode
AUX Modeisente redbyinsertingaAUX device using
a
cable with a 3.5 mm audio jack into the AUX port or by
touching
the Media
hard-key located
left of the display.
OnceinMedia Mode, touch the sou rce soft -key and
select
AUX.
Inserting Auxiliary
Device
Port. If you insert a Auxiliary device with the ignition
1
ON, the unit will
switchtoAUX mode
and
begin
to play
when you insertthe
device
cable.
Cont rolling
the
Auxiliary
Device
The control of the
auxiliary
device (e.g.,
selecting
play-
lists, play, fast
forwa rd,
etc.) cannot be
provided
by the
radio;
use the
device cont rols instead. Adjust
the volume
with the VOLUME rotary knob,orwith the volume
of the
attached
device.
NOTE: The
vehicle
radio unit is acting as the amplifier
for audio
output
from the
Auxiliary device. The refo re
if
the
volume cont rolonthe Auxiliary device
is set too low,
the re willbeinsu fficient audio signal
for
the radio unit
to
play the music on the device.
Bluetooth®Mode
Page 34

32 Uconnect™ ACCESS USER’S MANUAL
Bluetooth®Streaming Audio (BTSA)orBluetooth®Mode
is entered by pairing a
Bluetooth®device, containing
music,
to the
Uconnect™ Access
system.
Before proceeding, the
Bluetooth®device needs to be
pai red through Uconnect™ Phoneinorder
to communi-
cate with the
Uconnect™ Access
System.
NOTE: See the
pairing procedu re
in the in this manual
for
further
details.
Once the
Bluetooth®device is paired to the Uconnect™
Access System, touch
the
Media hard-key located
on the
left side of the
displa y.
Once in Media Mode, touch the
sou rce soft -key
and select
Bluetooth®.
Uconnect™ Phone
The
Uconnect™
Phone is a
voice -activated,
hands-free,
in-vehicle communications system with Voice
Command
Capability
(see Voice
Command
section).
The Uconnect™ Phone allows you to dial a phone
number with your mobile phone using simple voice
commands.
NOTE:
•
The Uconnect™ Phone requires a mobile phone
equipped with the
Bluetooth®Hands-Free Profile,
Version 1.0 or higher. For
Uconnect™ customer
sup-
port, call 1–877–855–8400 or visit
ww w.Uconnect -
Phone.com.
•
Prior to starting the pairing procedure, ensure all
additional
Bluetooth®devices or phones within the
vehicle
have their
Bluetooth®disabled.
Pairing
a Phone
To use the
Uconnect™ Phone featu re,
you
must
first pair
your
Bluetooth®phone with the Uconnect™ system.
Refertoww w.UconnectPhone.com
for
pairing
procedure
unique
to your phone.
Page 35

Uconnect™ ACCESS USER’S MANUAL 33
NOTE: For assistance in pairing your phone, contact
Start
Pairing
Procedure
•
Press the
“Phone” button
to begin.
•
Wait for the
“ready” prompt
and BEEP.
•
(After the
BEEP),
say
“Setup Phone
Pairing”.
•
(After the
BEEP),
say “Pair a Phone”.
•
Follow
the
audible
prompts.
•
You will thenbeaskedifpai red device should
be set to
favorite.
Device
•
Uconnect™ Phone will say "Start pairing procedu re
on
device"
•
Search for available devices on your
Bluetooth®en-
abled mobile phone.
This is
usually within Settings
or
Options
under
“Bluetooth”.
See your mobile phone’s
manual
for details.
Uconnect™ customer supportat1–877 –855 –8400
or visit
1
ww w.UconnectPhone.com
for
phone compatibilit y,
pair-
ing
inst ructions
and details.
•
When your phone finds
the
system, select
“Uconnect”
as the
pai red
device.
•
When
prompted
on the phone, enter the 4-digit PIN
number shown
on the radio display.
•
If your
phone
asks you to
acceptaconnection
request
from Uconnect, select “Yes”.Ifavailable, check
the box
telling it not to ask again – that way your phone will
automatically connect
each time you start the vehicle.
Phonebook Download – Phonebook Transfer From
Mobile
Phone
If
equipped
and
specifically supported
by your phone,
Uconnect™ Phone
will ask you if you
want
to download
Page 36

34 Uconnect™ ACCESS USER’S MANUAL
names (text names) and number entries from your
mobile
phone’s phonebook. Specific
Bluetooth®Phones with
Phone Book Access Profile
may
support
this
featu re.
See
ww w.UconnectPhone.com
for
supported
phones.
Download
and update, if
supported,
begins as soon as
the
Bluetooth®wireless phone connectionismade
to the
Uconnect™
Phone, for example, after you start the ve-
hicle.
NOTE:
•
You maybeasked
for
permissiontoinitiate
the phone-
book download.
•
A
maximum
of 1000
entries
per phone will be down-
loaded
and
updated
every time a phone is connected
to the
Uconnect™
Phone.
•
Depending
on the
maximum numberofentries
down-
loaded, there may be a short delay before the latest
downloaded
names can be used. Until then, if avail-
able, the
previously downloaded phonebook
is avail-
able for use.
•
Only the phonebookofthe cur rently connected
mobile
phone
is accessible.
•
Only the mobile phone’s
phonebook
is downloaded.
SIM card phonebook is not part of the Mobile
phonebook.
•
This downloaded phonebook cannot be edited or
deleted on the
Uconnect™
Phone. These can only be
edited on the mobile phone. The changes are transferred and
updatedtoUconnect™
Phone on the next
phone connection.
MakingAPhone
Call
Press the
“Phone”
button.
(After the
BEEP),
say “dial” (or “call”a name).
Page 37

Uconnect™ ACCESS USER’S MANUAL 35
Receiving
A Call –
Accept
(And End)
When an incoming call rings or is announced on
Uconnect™,
press the
Phone
button.
To
endacall, press the Phone buttononsteering wheel
or
the
Phone soft -key
on the radio screen.
Mute (Or
Unmute) Microphone During
Call
During
a call, press the
“Voice Command”
button.
(After the
BEEP),
say
“mute”
(or
“mute
off”).
Transfer Ongoing
Call
Between Handset
And Vehicle
During
a call, press the
“Voice Command”
button.
(After the
BEEP),
say
“transfer
call”.
Changing
The Volume
Start a dialogue by pressing the “Phone” button , then
adjust the
volume duringanormal
call.
Use the radio VOLUME rotary knobtoadjust the
volume
to a
comfortable
level while the
Uconnect™
system is
1
speaking. Please
note the
volume setting
for Uconnect™
is
different
than the audio system.
Uconnect™ Voice Command
The
Uconnect™
Voice
Command
system allows you to
control your AM, FM, satellite radio, CD player,
Uconnect™ Phone and supported portable media devices.
When you press the “ Voice Command” button located
on
the steering wheel, you will hearabeep. The beep
is your
signal
to give a
command.
If you do not say a command
within
a few
seconds,
the
system
will
present
you
with
a
list of
options.
If you ever wish to
inter rupt
the system
whileitlists options, press
the
“Voice Command”
button
, listen for the BEEP, and say your command.
Voice
Command Operation
Page 38

36 Uconnect™ ACCESS USER’S MANUAL
Start a dialogue by pressing the “Voice Command”
button
, you will hear a beep. The beep is your
signal
to
give a
command. Below
are a list of
voice commands
for
each of the
diffe rent
modes.
NOTE: To access the tutorial, press the “Voice Command” button
. After the
BEE P,
say
“tutorial”.
Press any
hard-key/button or touch the
display (Touch -Screen
ra-
dio) to cancel the tutorial.
Common
Voice
Commands
(Examples)
Main Menu
“Radio
AM” (to
switch
to the AM mode)
“Radio
FM” (to
switch
to the FM mode)
“Satellite Radio”
(to
switch
to the
Satellite mode)
“Disc”
(to
switch
to the disc
mode)
“USB”
(to
switch
to the USB
mode)
“Bluetooth Streaming”
(to
switch
to the
Bluetooth Streaming mode)
“Memo”
(to
switch
to the
memo reco rder)
“System Setup”
(to
switchtosystem setup)
Page 39

Uconnect™ ACCESS USER’S MANUAL 37
Radio
AM, RadioFM
Modes
“Frequency
97.1” (to
change
to radio
station 97.1)
“Frequency”
(to
change
the
frequency)
“Next
Station”
(to select the next
station)
“Previous Station”
(to select the
previous station)
“Radio Menu”
(to
switch
to the radio
menu)
“Main Menu”
(to
switch
to the main
menu)
SiriusXM™ Satellite Ra -
dio
Mode
“Channel Number”
(to
change
the
channel
by its
spoken number)
“Next
Channel”
(to select the next
channel)
“Previous Channel”
(to select the
previous channel)
“List
Channel”
(to hear a list of
available channels)
“Channel Name”
(to
change
the
channel
by its
spoken name)
“Radio Menu”
(to
switch
to the radio
menu)
“Main Menu”
(to
switch
to the main
menu)
Disc Mode
“Track”
(#) (to
change
the
track)
“Next
Track”
(to play the next
track)
“Previous Track”
(to play the
previous track)
“Main Menu”
(to
switch
to the main
menu)
1
Page 40

38 Uconnect™ ACCESS USER’S MANUAL
USB Mode
“Next
Track”
(to play the next
track)
“Previous Track”
(to play the
previous track)
“Play”
(to play a Artist
Name, Playlist Name, Album Name,
Track
Name, etc.)
“List” (to List a
Artist, Playlist, Album, Track, etc.)
Bluetooth®Streaming
(BT)
Mode
“Next
Track”
(to play the next
track)
“Previous Track”
(to play the
previous track)
SMS (Text
Messaging)
If equipped with Uconnect™ Voice Command, your
radio may be able to play incoming Short Message
Service (SMS) messages (text messages) through the
vehicle’s sound
system.
It also allows you to
respondbyselecting
from various
pre-defined
phrases.
Not all
phones
are
compatible
with this
featu re. Refer
to
the phone compatibility list at
ww w.Uconnect Phone.com. Connected mobile phones must be
bluetooth -compatible,
and
pai red
with your radio.
Press the “Voice
Command”
button and after the BEEP,
say
“SMS”
to get started.
WARNING!
ALWAYS drive safely with your hands
on the wheel.
You have full
responsibility
and assume all risks
related to the use of the Uconnect™ features and
applications in this vehicle. Only use Uconnect™
when
it is
safe
to do so.
Failure
to do so
may result
in
an
accident involving serious injury
or death.
Page 41

Uconnect™ ACCESS USER’S MANUAL 39
Settings Main Menu
Press the
Settings hard -keytodisplay
the
Settings
Main
Menu. The Settings Main Menu contains the following
options:
•
Display
— Refer to
“Understanding
Your Instrument
Panel”,
“Uconnect™
Access System” section in your
vehicle Owner’sManual
on the DVD for details.
•
Clock — Refer to the
“Radio” section
for details.
•
Safety/Assistance — Refer to
“Understanding
Your
Inst rument
Panel”,
“Uconnect™
Access System” sec-
tion in your
vehicle Owner’sManual
on the DVD for
details.
•
Lights — Refer to
“Understanding
Your Instrument
Panel”,
“Uconnect™
Access System” section in your
vehicle Owner’sManual
on the DVD for details.
•
Doors & Locks — Refer to “Understanding Your
Inst rument
Panel”,
“Uconnect™
Access System”sec-
1
tion in your
vehicle Owner’sManual
on the DVD for
details.
•
Heated Seats—Referto“Understanding The
Features
Of Your Vehicle”, “Seats” section in your vehicle
Owner’s
Manual
on the DVD for details.
•
Engine Off
Options
— Refer to
“Understanding
Your
Inst rument
Panel”,
“Uconnect™
Access System” sec-
tion in your
vehicle Owner’sManual
on the DVD for
details.
•
Compass Settings — Refer to
“Understanding
Your
Inst rument
Panel”,
“Uconnect™
Access System” sec-
tion in your
vehicle Owner’sManual
on the DVD for
details.
•
Audio — Refer to the
Operating Inst ructions
– Radio
section
in this
manual
for details.
Page 42

40 Uconnect™ ACCESS USER’S MANUAL
•
Phone/Bluetooth
— Refer to the
“Uconnect™
Phone”
section
in this
manu al
for details.
•
Sirius Setup — Refer to the “Radio” section in this
manual
for details.
More Main Menu
Press the Mo re hard-keytodisplay the Mo re Main
Menu.
The More Main Menu
contains
the
following
options:
•
Phone — Refer to the
“Uconnect™ Phone” section
in
this
manual
for details.
•
Outlet (If
Equipped)
— Refer to
“Understanding
The
Featu resOfYour Vehicle”, “Power Inverter” section
in
your
vehicle Owner’sManual
on the
DVD
for details.
•
Time — Refer to the
Uconnect™
5.0 “Radio Mode”
section
in this
manual
for details.
Page 43

Uconnect™ ACCESS USER’S MANUAL 41
Touch the Radio
soft -key
to enter the Radio Mode. The
Uconnect™ 8.4A
Uconnect™ 8.4A System
1. Radio
different tuner modes; AM,
FM and
SXM
can be selected
1
by touching the
cor responding
soft-keys in the Radio
Mode.
2.
Media
Touch the Media soft-key to access media sources such
as: Disc, USB Device and AUX as long as the requested
media
is present.
3.
Climate
Refer to Climate Controls in your vehicles
Owner
’s
Manual
on the DVD for
further
details.
4. Nav (If
Equipped)
The Uconnect™ 8.4A System is
Navigation -read y,
see
your
authorized dealer
for details.
5.
Phone
Page 44

42 Uconnect™ ACCESS USER’S MANUAL
Touch the Phone soft -keytoaccess the Uconnect™
Phone
feature.
6.
Apps
Touch the Apps soft-key to access Smartphone and
Connected vehicle
options.
7.
Settings
Touch
the
Settings soft -keytodisplay
the list of available
settings.
Refer to
Understanding
Your
Inst rument
Panel
sectioninyour vehicles Owner’s Manual
on the
DVD
for
further
details.
8.
ENTER/BROWSE&TUNE/SCROLL
Press the ENTER/BROWSE button to accept a highlighted selection on the screen. Rotate the
TUNE/
SCROLL
rotary knob to scroll through a list or tune a
radio station.
9.
BACK
Press the BACK
button
to return to a
previous
menu or
screen.
10.
SCREEN
OFF
Press the SCREEN OFF hard-keytoturn the
touch-screen
OFF. To turn the
screen
back ON, just touch the screen.
11.
VOLUME
& MUTE
Rotate the rotary knob to adjust the Volume. Press the
Mute
button
to mute the system.
Radio Mode
The radio is
equipped
with the
following
modes:
•
FM
•
AM
•
SiriusXM™ Satellite
Radio (if equipped)
Page 45

Uconnect™ ACCESS USER’S MANUAL 43
Touch the RADIO Soft Key, bottom left corner,to enter Turn the rotaryTUNE/SCROLL
cont rol
knob clockwise
the Radio Mode. The different tuner modes; AM, FM,
and
SAT,
can
then,beselectedbytouching
the
cor responding
soft -keys
in the Radio mode.
ON/OFF&Volume
Control
Push the ON/OFF Volume control knob to turn on the
radio. Push the ON/OFF
Volume cont rol
knob a second
time to turn off the radio.
The electronic volume control turns
continuously
(360
degrees) in either direction, without stopping. Turning
the
Volume cont rol knob clockwise inc reases
the volume,
and
counte r-clockwise dec reases
it.
When the audio system is turned on, the sound will be
set at the same
volume
level as last played.
Tune/Scroll
Control
to increase or
counte rclockwise
to decrease the radio
1
station
frequenc y.
Push the ENTER/BROWSE button to
chooseaselection.
Screen
Close
The Red X Soft key at the top
right, providesameans
to
close
the
Direct Tune Screen.
The
Direct Tune Screen
also
auto closesif no
activity occurs within
10 seconds.
Seek and
Direct
Tune
Functions
The Seek Up and Down functions are activated by
touching
the
double arrow soft -keys
to the right and left
of the radio station display, or by pressing the left
Steering Wheel Audio Cont rol
(if
equipped)
up or down.
Seek Up
Touch
and
release
the Seek Up
soft -key
to tune the radio
to the next
listenable
station or
channel.
During a Seek
Page 46

44 Uconnect™ ACCESS USER’S MANUAL
Up
function,
if the
radio reaches
the
starting station
after
passing through
the
enti re band two times,
the
radio
will
stop at the
station whe re
it began.
Fast Seek Up
Touch and hold the Seek Up soft -keytoadvance the
radio
through
the
available stationsorchannels
at a
faster
rate,
the radio stops at the next available station or channel
when the
soft -key
is released.
Seek Down
Touch and release the Seek Down soft-key to tune the
radio to the next
listenable
station or
channel. During
a
Seek Down function, if the radio reaches the starting
station after
passing through
the entire band two times,
the radio will stop at the
station whe re
it began.
Fast Seek Down
Touch and hold the Seek Down
soft -keytoadvance
the
radio through
the
available stationsorchannel
at a faster
rate, the radio stops at the next available station or
channel
when the
soft -key
is released.
Direct
Tune
Press
the
Tune soft -key located
at the
bottom
of the radio
screen. The Direct Tune soft-key screen is available in
AM,
FM, and
SAT radio modes
and can be
used
to direct
tune the radio to a
desi red station
or channel.
Press the
available number soft -key
to begin
selecting
a
desired station. Once a number has been entered, any
numbers
that are no
longer possible (stations
that cannot
be
reached)
will
become deactivated/grayed
out.
Undo
You can
backspace
an entry by
touching
the
bottom
left
Undo soft key.
GO
Page 47

Uconnect™ ACCESS USER’S MANUAL 45
When
touched,
the green GO soft key
allows
the you to You can
switch between
the two radio
presets
by touch-
commitanentr y,atwhich
time the
radio
will tune to the
entered station or channel and close the Direct Tune
Screen.
The
selected
Station or
Channel numberisdisplayed
in
the DirectTune text box.
Setting Presets
The Presets are available for all Radio Modes, and are
activated by touching any of the six Preset soft keys,
located
at the top of the screen.
When you are receiving a station that you wish to
commit into
memor y,
press and hold the desired num-
bered
soft -key
for more that 2
seconds
or until you hear
a
confirmation
beep.
The Radio stores up to 12 presets in each of the Radio
modes. A
set of 6
presets are visibleatthe topofthe
radio
screen.
ing the arrow soft key locatedin the upper right of the
1
radio screen.
BrowseinAM/FM
Whenineither
AM or FM, the
Browse Screen provides
a
means
to edit the
Presets
List and is
ente red
by touching
the
browse
soft key.
Scrolling Preset
List
Once in the Browse Presets screen, you can scroll the
preset list by
rotation
of the Tune Knob, or by touching
the Up and
Down arrow keys, located
on the
right
of the
screen.
Preset Selection
from List
A Preset can be selected by touching any of the listed
Presets,
or by
pressing
the ENTER/BROWSE button on
the Tune
Knobtoselect
the
cur rently highlighted
Preset.
Page 48

46 Uconnect™ ACCESS USER’S MANUAL
When selected, the radio tunestothe station sto red
in the
Preset and
returns
to the main radio screen.
Deleting
Presets
A Preset can be
deleted
in the
Presets Browse
screen by
touching the Trash Can Icon for the cor responding
Preset.
Return to Main Radio Screen
You can return
to the
Main Radio Screen,bytouching
the
X soft key when in the
Browse Presets
screen.
SiriusXM™ Satellite Radio Mode
SiriusXM™ Satellite radio uses di rect satellite -to-receiver
broadcasting technology
to provide clear digital sound,
coast to coast. The
subscription
service
provider
is SiriusXM™ Satellite Radio. This service offers over 130
channels of music, sports, news, entertainment, and
programming
for
child ren, directly from
its
satellites
and
broadcasting studios. A one-year SiriusXM™ Satellite
Radio
subscription
is included.
SiriusXM™
and all related marks and logos are trademarks of SiriusXM™ Radio Inc. and its subsidiaries.
SiriusXM™ Radio requires a subscription, sold separately after trial
subscription included
with
vehicle
pur-
chase. Prices and
programming
are provided by SiriusXM™ and are subject to change. Subscriptions
governed by Terms&Conditions available
at sirius.com/
serviceterms. SiriusXM™
Radio U.S. service only avail-
able to
thoseatleast18years
of age in the 48 contiguous
United States, D.C.,
and PR.
Service available
in Canada;
see www.siriuscanada.ca.
This
functionality
is only
available
for radios equipped
withaSatellite receive r.Inordertoreceive satellite
radio,
the vehicle needs to be
outside
with a clear view to the
sky.
Page 49

Uconnect™ ACCESS USER’S MANUAL 47
If the
screen shows Acquiring Signal,
you
might
have to When in
Satellite
mode:
change
the
vehicle’s positioninordertoreceive
a signal.
In
most cases,
the
satellite radio does
not
receive
a signal
in
unde rground parking garages
or tunnels.
No
Subscription
Radios equipped with a Satellite receiver, require a
subscription
to the Sirius
Service.
When the Radio does
not have the
necessary subscription,
the
Radio
is able to
receive
the Traffic/Weather
channel
only.
Acquiring SiriusXM ™ Subscription
To activate the Sirius subscription, call the toll free
number on the Weather
channel.
You will need to provide the Sirius ID (SID) located at the bottom of the
Channel
0 screen.
The Satellite Mode is activated by a touch of the SAT
soft -key.
•
The SAT
buttonishighlighted
blue. 1
•
The
SiriusXM™ Presets
are
displayed
at the top of the
screen.
•
The Genreis
displayed
below the
Presets
Bar.
•
The
SiriusXM™ Channel Numberisdisplayed
in the
center.
•
The Program Informationisdisplayedatthe bottom
of
the
Channel
Number.
•
The
SiriusXM™
function soft-keysare
displayed
be-
low the
Program
Information.
Tuning
is done by
operating
the Tune Knob or by Direct
Tune,
similar
to other Radio
Bands,
see
Presets,
browse,
Tune Knob, and DirectTune.
Page 50

48 Uconnect™ ACCESS USER’S MANUAL
In
addition
to the
tuning Operation functions common
to
all Radio modes, the replay, Traffic/Weather Jump, and
fav
soft -key functions
are
availableinSiriusXM™
Mode.
Replay
The replay function providesameanstosto re and
replay
up to 22
minutes
of music audio and 48
minutes
of talk
radio. Once the channel is switched, content in replay
memory
is lost
Touch the replay soft-key. The play/pause, rewind/
forwa rd
and live
soft -keys
will
display
at the top of the
screen,
along with the
replay
time.
You can exit by touching the replay soft-key, any time
during
the
Replay
mode.
Play/Pause
Touch
the
Pause
or Play
soft -keytopause playing
of the
content at any time that the content is playing live or
rewound content. Play canberesumed again
by touching
of the Pause/Play soft-key.
Rewind
Touch
the RW
soft -keytorewind
the
content
in steps of
5 seconds. Touching the RW soft-key for more than 2
seconds
rewinds
the content. The Radio begins playing
the
content
at the point at which the touch is released.
Forward
Each touch of the FW soft-key
forwa rds
the content in
steps
of 5
seconds. Forwa rding
of the
content can only
be
done when the content is previously rewound, and
the refo re,
can not be done for live
content.
A continuous
touch of the FW
soft -key
also
forwa rds
the
content.
The
Radio begins playing the contentatthe pointatwhich
the
touch is release.
Page 51

Uconnect™ ACCESS USER’S MANUAL 49
Fav. Artist While the song is playing to set a Favorite
Live
Touch the Live soft-key to resume playing of Live content.
Favorites
Touch the fav. soft-key to activate the favorites menu,
which will time out in 5 seconds in absence of user
interaction.
You can exit the Favorites Menu
by a
touchofthe
X in the
top right corner.
The
favorites featu re enables
you to set a
favorite
artist,
or
song thatiscur rently playing. The Radio then uses
this
informationtoalert you when either
the
favorite song,
or
favorite artist
are
being played
at any time by any of the
SIRIUS
Channels.
The
maximum numberoffavorites
that can be
sto red
in
the Radio is 50.
Artist, touch the fav. soft-key and then the Fav. Artist
1
soft -key.
Fav. Song While the song is playing to set a Favorite
Song, touch the fav. soft-key and then the Fav Song
soft-key.
Traffic & Weather
Touch the Traffic & Weather soft-key to tune to a SiriusXM™
Traffic and
Weather channel.
To set a Traffic &
Weather alert for any oneofthe citiesinthe Jump
Browse
list, see
Browse
in SAT.
When the Traffic & Weather soft-key is touched, the
Traffic&Weather channel
is tuned.
If the Traffic & Weather alert City is not set, you are
presented with a pop up to allow you to select the
favorite
city using the
Browse
Screen.
Page 52

50 Uconnect™ ACCESS USER’S MANUAL
Browse in SAT
Touch the browse soft-key to edit Presets, Favorites,
Game Zone, and Jump settings, along with providing
the
SiriusXM™ Channel
List.
This Sc reen contains many sub menus. You can exit
a sub
menutoget back
to a
parent menu
by a
touchofthe
Back
Arrow.
All
Touch
the All
soft -key
at the left of the
Browse
Screen.
Channel
List
Touch the Channel List to display all the SiriusXM™
Channel Numbers
along with the
cor responding
Genre.
You can scroll the
Channel
list by
touching
the up and
down arrows, located on the right side of the screen.
Scrolling
can also be done by
operating
the Tune/Scroll
Knob.
Genre
Touch the Genre button to
display
a list of
Gen res.
You
can select any desi red Gen re by touching the Gen re list,
at
which point, the Radio tunes to a channel with the
content
in the
selected
Genre.
Presets
Touch the Presets soft-key located at the left of the
Browse
screen.
You can
scroll
the
Presets
list
touching
the up and down
arrows, located at the right side of the screen. Scrolling
can also be done by
operating
the Tune/Scroll Knob as
well.
Preset
Selection
A Preset can be selected by touching any of the listed
Presets,
or by
pressing
the ENTER/BROWSE button on
the Tune
Knobtoselect
the
cur rently highlighted
Preset.
Page 53

Uconnect™ ACCESS USER’S MANUAL 51
When
selected,
the Radio tunes to the station stored in
the
Preset,
and
returns
to the main Radioscreen.
Deleting
a Preset
A Preset can be
deleted
in the
Presets Browse
screen by
touching the Trash Can Icon for the cor responding
Preset.
Favorites
Touch the Favorites soft-key, located at the left of the
Browse
screen.
The
Favorites menu providesameans
to Edit the Favor-
ites list and to
configu re
the Alert Settings, along with
providing
a list of
Channels cur rently
airing any of the
items in the
Favorites
list.
You can scroll the Favorites list touching the up and
down arrows, located at the right side of the screen.
Scrolling
can also be done by
operating
the Tune/Scroll
Knob as well.
Remove Favorites
Touch
the
Remove Favorites
tab at the top of the screen.
1
Touch
the
Delete
All
soft -keytodelete
all of the Favorites
or touch the Trash Can icon next to the Favorite to be
deleted.
Alert
Settings
Touch the Alert
Setting
tab at the top of the
screen.
The
Alert
Settings
menu
allows
you to
choose
from a Visual
alert or Audible and Visual alert when one of your
favorites
is airing on any of the
SiriusXM™
channels.
Game Zone
Touch the Game Zone
soft -ke y, located
at the left of the
Browse screen. This featu re provides you with
the ability
to select
teams,
edit the
selection,
and set alerts.
On Air
Page 54

52 Uconnect™ ACCESS USER’S MANUAL
Touch
the
On -Air
tab at the top of the
screen. The
On-Air
list
provides
a list of
Channels cur rently airing any
of the
items
in the
Selections
list, and
touching
any of the items
in the list tunes the radio to that channel.
Select Teams
Touch the Select Teams soft-key to activate the League
Scroll
list.
Touch
the
chosen league
and a
scroll
list of all
teams within
the
league
will
appea r,
then you can select
a
teambytouching
the
cor responding box. A check
mark
appears
for all teams that are chosen.
Remove Selection
Touch
the
Remove Selection
tab at the top of the screen.
Touch the Delete All soft -keytodelete allofthe
Selections
or touch the Trash Can icon next to the
Selection
to be
deleted.
Alert
Settings
Touch the Alert
Setting
tab at the top of the
screen.
The
Alert Settings menu allows youtochoose from “Alert
me
to
on-air games upon start”or“Alert upon sco re
update”
or both
when
one or
mo re
of your
selectionsisairing
on
any of the
SiriusXM™
channels.
Audio
Touchofthe Audio soft -keytoactivate the Audio
settings
screen to adjust Balance\Fade, Equalizer, And Speed
Adjusted
Volume.
You can return to the Radio screen by touching the X
located
at the top right.
Balance/Fade
Page 55

Uconnect™ ACCESS USER’S MANUAL 53
Touch the Balance/Fade soft-key to Balance audio between the front
speakers
or fade the audio
between
the
rear and front speakers.
Touching the Front, Rea r, Left,orRight soft -keys
or touch
and drag the blue Speaker Icon to adjust the Balance/
Fade.
Equalizer
1
Touch the Equalizer soft-key to activate the Equalizer
screen.
Touch the + or -
soft -keys,
or by
touching
and dragging
over the level bar for each of the
equalizer
bands. The
level
value, which spans between
±9, is
displayed
at the
bottom
of each of the Bands.
Page 56
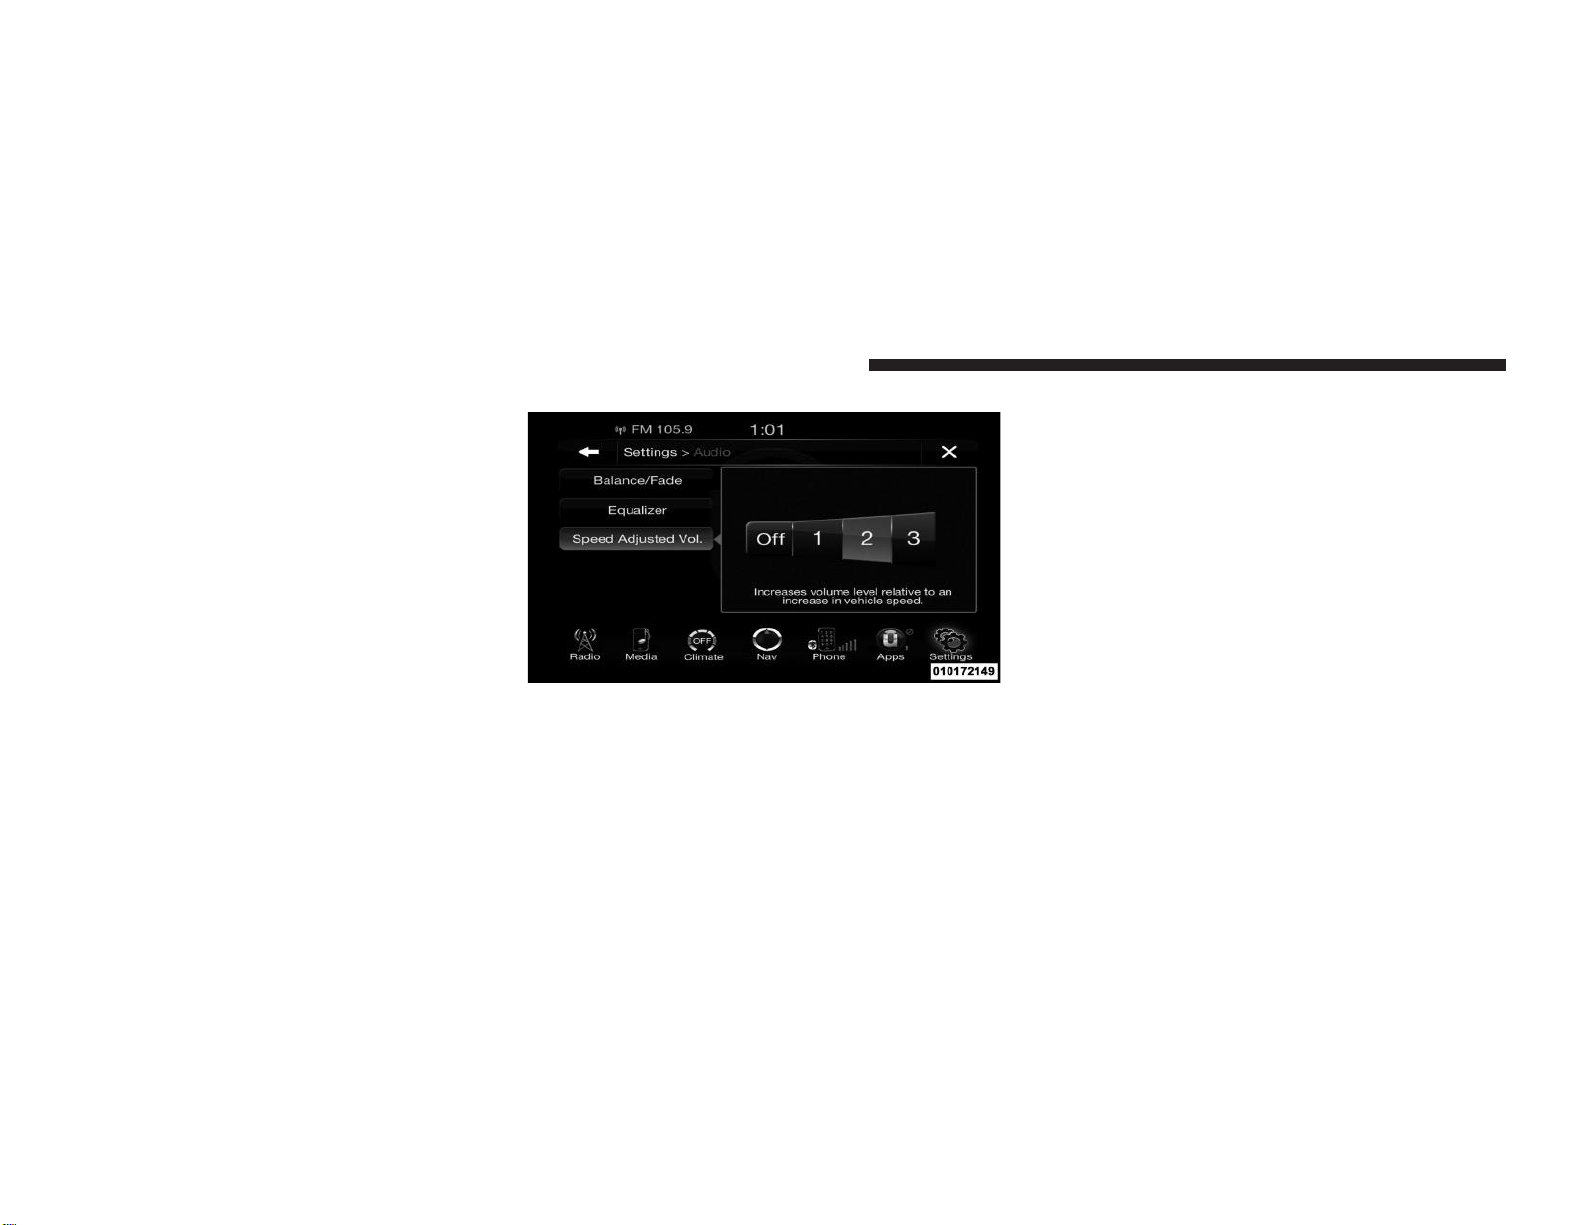
54 Uconnect™ ACCESS USER’S MANUAL
Speed Adjusted
Volume
Touch the Speed Adjusted Volume soft -keytoactivate
the
Speed Adjusted Volume
screen.
The Speed
Adjusted Volumeisadjustedbytouching
of
the+and-buttons
or by
touching, and dragging over
the
Level Bar This alters the automatic adjustment of the
audio volume with variation to vehicle speed. Volume
increases automatically
as speed
inc rease
to compensate
for
normal
road noise.
Surround System
(If
Equipped)
Touch the On soft -keytoactivate Sur round Sound.
Touch
Off to
deactivate
this feature.
When Sur round SoundisOn, you can hear audio
coming
from every direction as in a movie theatre or home
theat re
system.
Media Mode
OPERATING INSTRUCTIONS – DISC MODE
Overview
Disc Mode is
ente red
by either
inserting
a Disc or touch
the Disc
soft -key
on the left side of the
displa y.
Once in
Media Mode,
touch the
sou rce soft -key
and select Disc.
Page 57

Uconnect™ ACCESS USER’S MANUAL 55
A “No Disc”
message
will be
displayed
on the
screen
in
the Disc mode when a Disc is not
present
in the Radio.
Seek
Up/Down
Touch and release the right arrow soft-key for the next
selection on the Disc. Touch and release the left arrow
soft -key
to return to the
beginning
of the current selec-
tion, or
return
to the
beginning
of the
previous
selection
if the Disc is within the first second of the current
selection.
Browse
Touch the browse soft -keytodisplay the browse
window.
The left sideofthe browse window displaysalist
of ways
you can browse through the contents of the Disc. If
supported by the device, you can browse by Folders,
Artists,
Playlists, Albums,
Songs, etc. Touch the desired
soft -key
on the left side of the screen. The center of the
browse window shows items and it’s sub-functions,
which can be scrolled by touching the Up and Down
soft -keys
to the right. The Scroll/Tune knob can also be
1
used to scroll.
Source
Touch the Source soft-key to select the desired audio
source, Disc, USB/iPod®,
SD Card, AUX or
Bluetooth®.
This
screen
will time out after a few
seconds
and return
to the main radio
screen
if no
selection
is made.
Repeat
Touch the repeat
soft -key
to toggle the repeat function-
alit y. The Repeat soft -keyishighlighted when active.
The
Radio
will
continue
to play the
cur rent track,
repeatedly,
as long as the
repeat
is active.
Shu ffle
Page 58

56 Uconnect™ ACCESS USER’S MANUAL
Touch the shuffle soft-key to play the
selections
on the
compact
disc in
random
order to
provide
an interesting
changeofpace. Touch
the
soft -keyasecond
time to turn
this
featu re
off.
Info
Touch the Info soft-key to display the current track
information.
Touch the Info soft-key a second time to
cancel this feature.
Tracks
Touch
the
trks soft -keytodisplayapopupwith
the Song
List.
The
cur rently playing songisindicated
by an arrow
and lines above and below the song title.
OPERATING INSTRUCTIONS –
USB/iPod
®
MODE
Overview
USB/iPod®Mode is entered by either inserting a USB
deviceoriPod®and
cable
into the USB Port or
touch
the
iPod®soft-key on the left side of the display. Once in
Media Mode, touch
the
sou rce soft -key
and
select iPod®.
Seek
Up/Down
Touch and release the right arrow soft-key for the next
selectiononthe USB
device/iPod®. Touch and release
the
left arrow soft-key to return to the beginning of the
current selection, or return to the beginning of the
previous selection
if the USB
device/iPod®is
within
the
first
second
of the
cur rent
selection.
Browse
Touch the browse soft -keytodisplay the browse
window.
The left sideofthe browse window displaysalist
of ways
you can
browse through
the
contents
of the USB
device/
iPod®.Ifsupported
by the device, you can browse by
Folders, Artists, Playlists, Albums, Songs,
etc. Touch the
Page 59

Uconnect™ ACCESS USER’S MANUAL 57
desi red soft -key
on the left side of the
screen.
The center Touch the shuffle soft-key to play the
selections
on the
of the browse window shows items and it’s subfunctions, which
can be
scrolledbytouching
the Up and
Down
soft -keys
to the right. The Scroll/Tune knob can
also be used to scroll.
Source
Touch the Source soft-key to select the desired audio
source, Disc, USB/iPod®,
SD Card, AUX or
Bluetooth®.
This
screen
will time out after a few
seconds
and return
to the main radio
screen
if no
selection
is made.
Repeat
Touch the repeat
soft -key
to toggle the repeat function-
alit y. The Repeat soft -keyishighlighted when active.
The
Radio
will
continue
to play the
cur rent track,
repeatedly,
as long as the
repeat
is active.
Shu ffle
USB/iPod®deviceinrandom
order to
provide
an inter-
1
esting changeofpace. Touch the soft -keyasecond time
to
turn this
featu re
off.
Info
Touch the Info soft-key to display the current track
information.
Touch the Info soft-key a second time to
cancel this feature.
Tracks
Touch
the
trks soft -keytodisplayapopupwith
the Song
List.
The
cur rently playing songisindicated
by an arrow
and lines above and below the song title. When in the
Tracks List screen you can rotate the TUNE/SCROLL
knobtohighlightatrack (indicatedbythe line above
and
below the track name) and then press the ENTER/
BROWSE
knob to start
playing
that track.
Page 60

58 Uconnect™ ACCESS USER’S MANUAL
Touching
the trks
soft -key while
the pop up is displayed
will close the pop up.
Audio
Refer to Radio Mode for
adjusting
the audio settings.
OPERATING INSTRUCTIONS – AUX MODE
Overview
AUX
Modeisente redbyinserting
an AUX
device
using
a cable with a 3.5 mm audio jack into the AUX port or
touch the AUX soft-key on the left side of the display.
OnceinMedia Mode, touch the sou rce soft -key and
select
AUX.
Inserting Auxiliary
Device
Gently insert the Auxiliary device cable into the AUX
Port. If you insert an
Auxiliary
device with the ignition
ON and the
radio ON,
the
unit
will
switchtoAUX
mode
and beginto play when you insert the
device
cable.
Controlling
the
Auxiliary
Device
The control of the
auxiliary
device (e.g.,
selecting
play-
lists, play, fast
forwa rd,
etc.) cannot be
provided
by the
radio;
use the
device cont rols instead. Adjust
the volume
with the ON/OFF VOLUME rotary knob, or with the
volume
of the
attached
device.
NOTE: The
vehicle
radio unit is acting as the amplifier
for audio
output
from the
Auxiliary device. The refo re
if
the
volume cont rolonthe Auxiliary device
is set too low,
the re willbeinsu fficient audio signal
for
the radio unit
to
play the music on the device.
Source
Touch the Source soft-key to select the desired audio
source, Disc, USB/iPod®,
SD Card, AUX or
Bluetooth®.
This
screen
will time out after a few
seconds
and return
to the main radio
screen
if no
selection
is made.
Audio
Page 61

Uconnect™ ACCESS USER’S MANUAL 59
Touch the browse soft -keytodisplay the browse
window.
Refer to Radio Mode for
adjusting
the audio settings.
OPERATING INSTRUCTIONS – SD CARD
MODE
Overview
SD Card Mode is
ente red
by either
inserting
a SD Card
into the USB Port or touch the SD Card
soft -key
on the
left side of the
displa y.
Once in Media Mode, touch the
sou rce soft -key
and select SD Card.
Seek
Up/Down
Touch and release the right arrow soft-key for the next
selection on the SD Ca rd. Touch and release the left
arrow
soft -key
to return to the
beginning
of the current selec-
tion, or
return
to the
beginning
of the
previous
selection
if the SD Card is within the first second of the current
selection.
Browse
The left sideofthe browse window displaysalist
of ways
1
you can
browse through
the
contents
of the SD Card. If
supported by the device, you can browse by Folders,
Artists,
Playlists, Albums,
Songs, etc. Touch the desired
soft -key
on the left side of the screen. The center of the
browse window shows items and it’s
sub -functions,
which can be scrolled by touching the Up and Down
soft -keys
to the right. The Scroll/Tune knob can also be
used to scroll.
Source
Touch the Source soft-key to select the desired audio
source, Disc, USB/iPod®,
SD Card, AUX or
Bluetooth®.
This
screen
will time out after a few
seconds
and return
to the main radio
screen
if no
selection
is made.
Repeat
Page 62

60 Uconnect™ ACCESS USER’S MANUAL
Touch the repeat
soft -key
to toggle the repeat function-
alit y. The Repeat soft -keyishighlighted when active.
The
Radio
will
continue
to play the
cur rent track,
repeatedly,
as long as the
repeat
is active.
Shu ffle
Touch the shu ffle soft -keytoplay the selectionsonthe
SD
Card device in random order to provide an interesting
changeofpace. Touch
the
soft -keyasecond
time to turn
this
featu re
off.
Info
Touch the Info soft-key to display the current track
information.
Touch the Info soft-key a second time to
cancel this feature.
Tracks
Touch
the
trks soft -keytodisplayapopupwith
the Song
List.
The
cur rently playing songisindicated
by an arrow
and lines above and below the song title. When in the
Tracks List screen you can rotate the TUNE/SCROLL
knobtohighlightatrack (indicatedbythe line above
and
below the track name) and then press the ENTER/
BROWSE
knob to start
playing
that track.
Touching
the trks
soft -key while
the pop up is displayed
will close the pop up.
Audio
Refer to Radio Mode for
adjusting
the audio settings.
OPERATING INSTRUCTIONS –
Bluetooth
®
MODE
Overview
Bluetooth®Streaming Audio (BTSA)orBluetooth®Mode
is entered by pairing a
Bluetooth®device, containing
music,
to the
Uconnect™ Access
system.
Page 63

Uconnect™ ACCESS USER’S MANUAL 61
Before proceeding, the
Bluetooth®device needs to be Touch the Source soft-key to select the desired audio
pai red through Uconnect™ Phoneinorder
to communi-
cate with the
Uconnect™ Access
System.
NOTE: See the pairing procedure in the Uconnect™
Phone section
for more details.
To access Bluetooth®mode, touch the Bluetooth®soft-key
on the left side of the display.
Seek
Up/Down
Touch and release the right arrow soft-key for the next
selection
on the
Bluetooth®device. Touch and release
the
left arrow soft-key to return to the beginning of the
current selection, or return to the beginning of the
previous selection
if the
Bluetooth®device is within the
first
second
of the
cur rent
selection.
Source
sou rce,
Disc, USB/iPod®,SDCard,
AUX or
Bluetooth®.
1
This
screen
will time out after a few
seconds
and return
to the main radio
screen
if no
selection
is made.
Tracks
Touch
the
trks soft -keytodisplayapopupwith
the Song
List. The currently playing song is
indicated
by a blue
arrow and lines aboveand below the song title.
Touching
the trks
soft -key while
the popup is displayed
will close the pop up.
Audio
Refer to Radio Mode for
adjusting
the audio settings.
Page 64

62 Uconnect™ ACCESS USER’S MANUAL
Uconnect™ Phone
Uconnect Phone™ Overview
Uconnect™ Phone is a
voice -activated,
hands-free, in-
vehicle
communications
system.
Uconnect™
Phone allows you to dial a phone number with your mobile
phone.
Uconnect™ Phone supports
the
following
features:
Voice
Activated Features:
•
Hands Free dialingvia Voice (“Call John SmithsMobile” or, “Dial 248 555-1212”).
•
Hands Free text to
speech listening
of your incoming
SMS
messages.
•
Hands
Free text
messaging (“Sendamessage
to John
Smiths Mobile”).
•
Redialing
last
dialed numbers
(“Redial”).
•
Calling Back the last incoming call number (“Call
Back”).
•
View Call logs on screen (“Show incoming calls”,
“Show
Outgoing
calls”, “Show missed Calls”, “Show
Recent
Calls”).
•
Sea rching
Contacts phone number (“Search for John
Smith Mobile”).
Screen Activated
Features
•
Dialing
via
Keypad
using touch-screen.
•
Viewing and Calling contacts from
Phonebooks
dis-
played
on the touch-screen.
•
Setting Favorite Contact Phone numbers so the are
easily
accessible
on the Main
Phone
screen.
•
Viewing
and
Calling contacts
from
Recent
Call logs.
•
Reviewing
your recent
Incoming
SMS.
Page 65
Uconnect™ ACCESS USER’S MANUAL 63
Uconnect™
Phone allows you to transfer calls between
•
Sending
a text
message
via the touch-screen.
•
Listen to Music on your Bluetootht Device via the
touch-screen.
•
Pairing
up to 10 phones/audio
devices
for
easy
access
to
connect
to them quickly.
NOTE: Your phone must be
capable
of SMS messaging
via
Bluetooth®for
messaging featu res
to work properly.
Your mobile
phone’s
audio is
transmitted through
your
vehicle’s audio system; the system will automatically
mute your radio whenusing the
Uconnect™
Phone.
For Uconnect™ customer support, visit the following
website:
•
ww w.UconnectPhone.com
•
or call
1–877 –855 –8400
the system and your mobile phone as you enter or exit
1
your vehicle and enables you to mute the system’s
mic rophone
for
private conversation.
WARNING!
Any voice
commanded
system should be used only
in
safe driving conditions and
all
attention should
be
kept on the roadway ahead. Failure to do so may
result
in an
accident causing serious injury
or death.
The Uconnect™ Phone is driven through your
Bluetooth
®
“Hands-Free Profile” mobile phone.
Uconnect™
features
Bluetooth®technology
- the global
standa rd
that
enables different elect ronic devices
to con-
nect to each other
without wi res
or a
docking station,
so
Uconnect™ Phone worksnomatter whe re you stow
your
mobile
phone (be it your purse,
pocket,orbriefcase),
as
long as your
phoneisturned
on and has been
pai red
to
Page 66

64 Uconnect™ ACCESS USER’S MANUAL
the
vehicle’s Uconnect™
Phone. The
Uconnect™
Phone
allows up to ten mobile phones or audio devices to be
linked
to the
system.
Only one
linked
(or
pai red)
mobile
phone and one audio device
can be
used with
the system
at a time. The
systemisavailableinEnglish, Spanish,
or
French
languages.
Uconnect™ Phone
Button
The Uconnect™
Phone
Buttonisused
to get
into the phone mode and make calls, show
recent,
incoming, outgoing
calls, view phone-
book etc.,
When
you press the
button
you will
hearaBEE P.
The
beepisyour signaltogive
a command.
Uconnect™ Voice Command
Button
The
Uconnect™
Voice Command
Button
is only used for “barge in” and when you are
already
in a
call and you wanttosend Tones
or
make
another
call.
The button is also used to access the Voice Commands for the
Uconnect™
Voice Command features if
your vehicleisequipped. Please see the Uconnect™
Voice
Command section for direction on how to use the
button.
The
Uconnect™ Phone
is fully
integrated
with the vehi-
cle’s audio system.
The
volume
of the
Uconnect™
Phone
can be adjusted either from the radio volume control
knob or from the steering wheel radio control (right
switch),
if so equipped.
Operation
Voice
commands
can be used to
operate
the Uconnect™
Phone and to navigate through the
Uconnect™
Phone
menu structu re. Voice commands
are
requi red after
most
Uconnect™ Phone prompts. The re
are
two general
meth-
ods for how Voice
Command
works:
Page 67

Uconnect™ ACCESS USER’S MANUAL 65
say
each
part of the
command when
you are
asked
for
1. Say
compound commands
like “Call John Smith mo-
bile”.
2.
Say
the
individual commands and allow
the
system
to
guide you to
complete
the task.
You will be
prompted
for a
specific command
and then
guided through
the
available
options.
•
Priortogivingavoice command, one must wait for
the
beep, which follows the “Listen” prompt or another
prompt.
•
For certain
operations, compound commands
can be
used. For
example, instead
of saying “Call” and then
“John Smith” and then
“mobile”,
the
following
compound command can be said: “Call John Smith
mobile”.
•
For each feature
explanation
in this section, only the
compound command
form of the voice
command
is
given. You can also break the commands into parts
and
it. For
example,
you can use the
compound
command
1
form voice
command “Sea rch
for John
Smith”,
or you
can break the compound command form into two
voice
commands:
“Search Contact” and when asked
“John Smith”. Please remembe r, the Uconnect™
Phone
works best whenyou talk in a
normal
conversational
tone, as if speaking to someone sitting a few
feet/
meters
away from you.
Natural
Speech
Your Uconnect™ Phone Voice system uses a Natural
Language
Voice
Recognition
(VR) engine.
Natural speech allows the user to speak
commands
in
phrases or complete sentences. The system filters out
certain non-word utterances and sounds such as “ah”
and “eh”. The system handles fill-in words such as “I
would
like to”.
Page 68

66 Uconnect™ ACCESS USER’S MANUAL
The system
handles multiple
inputs in the same phrase
or
sentence
such as “make a phone call” and “to Kelly
Smith”. For
multiple
inputs in the same phrase or sentence, the system identifies the topic or context and
provides
the
associated follow -up prompt
such as “Who
do you
wanttocall?”
in the case
whe reaphone
call was
requested
but the
specific
name was not recognized.
The
system utilizes continuous dialog;
when the system
requires more
information
from the user it will ask a
questiontowhich
the
user
can
respond without
pressing
the Voice Command button.
Voice CommandTr
ee
Refer to
“Voice
Tree” in this section.
Help Command
If you need
assistance
at any
prompt,
or if you want to
know your options
at any
prompt,
say
“Help”
following
the beep.
To
activate
the
Uconnect™ Phone from idle, simply
press
the button and say a command or say “help”. All
Uconnect™ Phone sessions begin with a press of the
button
on the radio
cont rol
head.
Cancel Command
At any
prompt, after
the
beep,
you can say
“Cancel”
and
you will be
returned
to the main menu.
You can also press the or buttons when the
system is
listening
for a
command andbereturned
to the
main
or previous
menu.
NOTE:
Pressing
the or
buttons while the system
is
playingisknownas“Ba rging
In”,
referto“Ba rge
In —
Overriding Prompts”
for
further
information.
Pair
(Link) Uconnect™ Phone
To A
Mobile
Phone
To begin using your
Uconnect™
Phone, you must pair
your
compatible Bluetooth®enabled mobile
phone.
Page 69

Uconnect™ ACCESS USER’S MANUAL 67
•
If No is
selected,
touch the
“Settings” soft -key
from
To
complete
the
pairing process,
you will need to refer-
ence your mobile phone Owner’s Manual. The
Uconnect™
website may also provide detailed instruc-
tions for pairing.
NOTE:
•
You must have
Bluetooth®enabled
on your phone to
complete
this procedure.
•
The
vehicle
must be in PARK.
1. Press the
“Phone” soft -key
on the
screen
to begin.
2. If there is no phone currently connected with the
system,apop -up
will appear.
3. Select Yes to begin the pairing process. Then, search
for available devices on your
Bluetooth®enabled
mobile phone. When
prompted
on the phone, enter
the name and PIN shown on the
Uconnect
Touch™
screen.
the
Uconnect™ Phone
main screen,
1
•
Touch
the “Add
Device”
soft-key,
•
Search for available devices on your
Bluetooth
®
enabled mobile phone. When prompted on the
phone, enter the name and PIN shown on the
Uconnect Touch™
screen,
•
See Step 4 to
complete
the process.
4.
Uconnect™
Phone will
display
an in
progress
screen
while the
system
is connecting.
5.
When
the
pairing process
has
successfully
completed,
the
system
will
prompt
you to
choose whether
or not
this is your favorite phone. Selecting Yes will make
this phone the highest priority. This phone will take
precedence
over other
pai red phones within
range.
Page 70

68 Uconnect™ ACCESS USER’S MANUAL
Pair
Additional Mobile
Phones
•
Touch the “Settings” soft-key from the Phone main
screen,
•
Next, touch the
“Phone/Bluetooth®”
soft-key,
•
Touch
the “Add
Device”
soft-key,
•
Search for available devices on your
Bluetooth®en-
abled mobile phone. When
prompted
on the phone,
enter the name and PIN shown on the Uconnect
Touch™
screen,
•
Uconnect™
Phone will display an in process screen
while the
system
is connecting,
•
When
the
pairing process
has
successfully
completed,
the
system
will
prompt
you to
choose whether
or not
thisisyour favorite phone. Selecting Yes will make
this
phone the highest priority. This phone will take precedence
over other
pai red phones within
range.
NOTE: For phones which are not made a favorite, the
phone priorityisdeterminedbythe o rderinwhich
it was
paired. The latest phone paired will have the higher
priority.
You can also use the following VR commandstobring
up
the
Paired Phone screen
from any
screen
on the radio:
Page 71

Uconnect™ ACCESS USER’S MANUAL 69
•
Uconnect™
Phone will display an in process screen
•
“Show Pai red Phones”
or
•
“Connect
My Phone”
Pair A
Bluetooth®Streaming Audio
Device
•
Touch
the
“Player”or“Media” soft -key
to begin,
•
Change
the
Sou rcetoBluetooth®,
•
Touch
the
“Bluetooth®” soft -keytodisplay
the Paired
Audio Devices
screen,
•
Touch
the “Add
Device”
soft-key,
NOTE: If
the re
is no
device cur rently connected with
the
system,apop -up
will appear.
•
Search for available devices on your
Bluetooth®enabled audio device. When prompted on the device,
enter the name and PIN shown on the Uconnect
Touch™
screen,
while the
system
is connecting,
1
•
When
the
pairing process
has
successfully
completed,
the
system
will
prompt
you to
choose whether
or not
this is your favorite device. Selecting Yes will make
this device the highest priority. This device will take
precedence
over other
pai red devices within
range.
NOTE: For devices which are not made a favorite, the
device priorityisdetermined by the orderinwhich
it was
paired. The latest device paired will have the higher
priority.
You can also use the
followingVRcommandtobring
up
a list of
paired
audio devices.
•
“Show Pai red Audio
Devices”
Page 72

70 Uconnect™ ACCESS USER’S MANUAL
Connecting
To A Particular
Mobile PhoneOrAudio
Device
Uconnect™ Phone will automatically connect to the
highest priority paired phone and/or Audio Device
within range. If you would need to choose a particular
phoneorAudio Device follow
these steps:
•
Touch
the
“Settings”
soft-key,
•
Touch
the
“Phone/Bluetooth®”
soft-key,
•
Touch to select the particular Phone or the “Paired
Audio Sou rces” soft -key
and then an
Audio Device,
•
Touch
the X to exit out of the
Settings
screen.
DisconnectingAPhoneorAudio Device
•
Touch
the
“Settings”
soft-key,
•
Touch
the
“Phone/Bluetooth®”
soft-key,
•
Touch
the +
soft -key located
to the right of the device
name,
•
The
options pop -up
will be displayed,
•
Touch
the
“Disconnect Device”
soft-key,
•
Touch
the X to exit out of the
Settings
screen.
DeletingAPhoneOrAudio
Device
•
Touch
the
“Settings”
soft-key,
•
Touch
the
Phone/Bluetooth®soft-key,
•
Touch
the +
soft -key located
to the right of the device
name for a
different
Phone or Audio Device than the
cur rently connected
device,
•
The
options pop -up
will be displayed,
•
Touch
the
“Delete Device”
soft-key,
•
Touch
the X to exit out of the
Settings
screen.
Page 73

Uconnect™ ACCESS USER’S MANUAL 71
phonebook. Specific Bluetooth®Phones with Phone
Book
MakingAPhoneOrAudio Device
A Favorite
•
Touch
the
“Settings”
soft-key,
•
Touch
the
“Phone/Bluetooth®”
soft-key,
•
Touch
the +
soft -key located
to the right of the device
name,
•
The
options pop -up
will be displayed,
•
Touch the “Make
Favorite” soft -key;
you will see the
chosen device
move to the top of the list,
•
Touch
the X to exit out of the
Settings
screen.
Phonebook Download—Automatic Phonebook
Transfer From Mobile Phone
If
equipped
and
specifically supported
by your phone,
Uconnect™ Phone automatically downloads names
(text
names) and number entries from the mobile phone’s
Access Profile
may
support
this
featu re.
See Uconnect™
1
website
for
supported
phones.
•
To call a
name fromadownloaded mobile
phonebook,
follow the procedure in “Call by Saying a Name”
section.
•
Automatic download and update,ifsupported,
begins
as
soon
as the
Bluetooth®wi reless phone connection
is
made
to the
Uconnect™ Phone,
for
example, after
you
start the vehicle.
•
A
maximum
of 1000
entries
per phone will be down-
loaded
and
updated
every time a phone is connected
to the
Uconnect™
Phone.
•
Depending
on the
maximum numberofentries
down-
loaded, there may be a short delay before the latest
Page 74

72 Uconnect™ ACCESS USER’S MANUAL
downloaded
names can be used. Until then, if avail-
able, the
previously downloaded phonebook
is avail-
able for use.
•
Only the phonebookofthe cur rently connected
mobile
phone
is accessible.
•
This downloaded phonebook cannot be edited or
deleted on the
Uconnect™
Phone. These can only be
edited on the mobile phone. The changes are transferred and
updatedtoUconnect™
Phone on the next
phone
connection.
Managing Your
Favorite Phonebook
There are three ways you can add an entry to your
Favorite
Phonebook.
1.
During
an active call of a
number
to make a favorite,
touch and hold a favorite button on the top of the
phone
main screen.
2. After loading the mobile phonebook, select phonebook from the Phone main screen, then select the
app ropriate numbe r.
Touch the + next to the selected
numbertodisplay
the
options pop -up.
In the pop-up
select “Add to Favorites”.
NOTE: If the
Favorites
list is full, you will be asked to
removeanexisting
favorite.
3.
From
the
Phone
main
screen, select phonebook.
From
the
phonebook
screen, select the
“Favorites”
soft-key
and then select the+soft -key locatedtothe right
of the
phonebook
record. Select an empty entry and touch
the + on
that selected entr y. When
the
Options
pop-up
appears,
touch “Add from
Mobile”.
You will then be
asked which contact
and
numbertochoose from
your
mobile
phonebook.
When
complete
the new favorite
will be shown.
Page 75

Uconnect™ ACCESS USER’S MANUAL 73
For
example,
if your
mobile service
plan
provides
three-
To
Remove
A Favorite
•
To remove a Favorite, select phonebook from the
Phone
main screen.
•
Next
select Favorites
on the left sideof the
screen
and
then touchthe +
Options
soft-key.
•
Touch the + next to the Favorite you would like to
remove.
•
The Options pop -up will displa y, touch “Remove
from
Favs”.
Phone Call Features
The following features can be accessed through the
Uconnect™ Phone if the feature(s) are available and
supported by
Bluetooth®on your mobile service plan.
way calling, this feature can be accessed through the
1
Uconnect™ Phone. Check
with your
mobile service
pro-
vider for the
featu res
that you have.
Ways To Initiate A
Phone
Call
Listed below are
all
the ways you can initiateaphone
call
with
Uconnect™
Phone.
•
Redial
•
Dial by
touching
in the number
•
Voice Commands (Dial by Saying a Name, Call by
SayingaPhonebook Name, Redial,
or Call
Back)
•
Favorite
Phonebook
•
Mobile
Phonebook
•
Recent
Call Log
•
SMS
Message
Viewer
Page 76

74 Uconnect™ ACCESS USER’S MANUAL
NOTE: All of the
above operations except Redial
can be
done with 1 call or less active.
Dial By
Saying
A Number
•
Press the
button
to begin,
•
After the
“Listening” prompt
and the
following
beep,
say “Dial 248-555-1212”,
•
The
Uconnect™
Phone will dial the
number
248-555-
1212.
Call By
SayingAPhonebook
Name
•
Press the
button
to begin,
•
After the
“Listening” prompt
and the
following
beep,
say “Call John Doe Mobile”,
•
The Uconnect™ Phone will dial the number
associated
with John Doe,
or if
there
are
multiple numbers
it will
ask which
number
you want to call for John Doe.
Call Controls
The
touch -screen allows
you to
cont rol
the
following
call
features:
•
Answer
•
End
•
Ignore
•
Hold/unhold
•
Mute/unmute
•
Transfer
the call to/from the phone
•
Swap 2 active calls
•
Join 2 active calls together
Page 77

Uconnect™ ACCESS USER’S MANUAL 75
•
Missed
Calls
Touch - Tone Number
Entry
•
Touch
the
“Phone”
soft-key,
•
Touch
the
“Dial”
soft-key,
•
The
Touch -Tone screen
will be displayed,
•
Use the
numbe red soft -keys
to enter the
number
and
touch “Call”.
To
sendatouch tone using Voice Recognition (VR),
press
the
button
while in a call and say “Send 1234#” or
you can say “Send Voicemail Password” if Voicemail
passwo rdissto red
in your
mobile
phonebook.
Recent
Calls
You may browse up
to 34 of
the most recentofeach
of the
following
call types:
•
Incoming
Calls
•
Outgoing
Calls
•
All Calls 1
These can be accessed by touching the “recent calls”
soft -key
on the
Phone
main screen.
You can also press the button and say “Show my
incoming
calls” from any screen and the
Incoming
calls
will be displayed.
You can also press the button and say “Show my
recent calls” from
any
screen
and
the
All
calls screen
will
be displayed.
NOTE:
Incoming
can also be
replaced with
“Outgoing”,
“Recent”
or “Missed”.
Page 78

76 Uconnect™ ACCESS USER’S MANUAL
AnswerOrIgno re An Incoming
Call — No Call
Cur rently
In Pr
og ress
When you receive a call on your mobile phone, the
Uconnect™
Phone will
inter rupt
the vehicle audio sys-
tem, if on, and will ask if you would like to
answer
the
call. Press the
buttontoaccept
the call. To
igno re
the
call, touch
the
“Igno re” soft -key
on the
touch -sc reen.
You
can also touch the
“answer” soft -key
or touch the caller
ID box.
AnswerOrIgno re An Incoming
Call — Call
Cur rently
In Pr
og ress
If a call is currently in progress and you have another
incoming
call, you will hear the same
network
tones for
call waiting that you normally hear when using your
mobile phone. Press the phone button, answer
soft -
keyorcaller
ID box to
place
the
cur rent
call on hold and
answer
the
incoming
call.
NOTE:
The Uconnect™ Phone compatible phones
in the
market today do not
support rejectinganincoming
call
when
another
call is in
prog ress. The refo re,
the user can
only
answeranincoming
call or
igno re
it.
MakingASecond
Call
While Cur rent
Call Is In
Pr
og ress
To make a
second
call while you are
currently
on a call,
press the
button
and say
“Dial”or“Call” followed
by the phone number or
phonebook
entry you wish
to
call.
The first call will be on
hold while
the
second
call is
in
progress.
Or you can place a call on hold by touching
the Hold
soft -key
on the
Phone
main
screen,
then dial a
number from the dialpad, recent calls, SMS Inbox
or from
the phonebooks. To go back to the first call, refer to
“Toggling Between Calls”inthis section.Tocombine
two
calls, refer to “Join Calls”in this section.
Page 79

Uconnect™ ACCESS USER’S MANUAL 77
terminated
and if there is a call on hold, it will become
Place/Retrieve
A Call
From
Hold
During an active call, touch the “Hold”
soft -key
on the
Phone
main screen.
Toggling Between
Calls
If two calls are in
progress
(one
active
and one on hold),
touch the “Swap” soft-key on the Phone main screen.
Only one call can be
placed
on hold at a time.
You can also press the button to toggle
between
the
active and held
phone
call.
Join Calls
When two calls are in progress (one active and one on
hold), touch
the “Join
Calls” soft -key
on the
Phone
main
screentocombine
all calls into a
Confe rence
Call.
CallTermination
To end a call in
progress, momentarily
press the but-
ton or the end soft-key. Only the active call(s) will be
the new
active
call. If the
active
call is
terminated
by the
1
far end, a call on hold may not
become
active automati-
cally. This is cell
phone -dependent.
Redial
•
Press the
“Redial”
soft-key,
•
or press the and after the
“Listening” prompt and
the following
beep, say “Redial”,
•
After the
“Listening” prompt
and the
following
beep,
say “Redial”,
•
The
Uconnect™
Phone will call the last number that
was
dialed
from your
mobile
phone.
Call
Continuation
Call continuationisthe p rog ression
of a
phone call
on the
Uconnect™ Phone after
the
vehicle ignition
key has been
switched
to OFF.
Page 80

78 Uconnect™ ACCESS USER’S MANUAL
NOTE: The call will remain within the vehicle audio
system until the phone becomes out of range for the
Bluetooth®connection.
It is
recommended
to press the
“transfer” soft -key
when
leaving
the vehicle.
Uconnect™ Phone Features
Roadside Assistance
If you need
towing assistance:
•
Press the
button
to begin.
•
After the
“Listening” prompt
and the
following
beep,
say
“Roadside
Assistance”.
NOTE:
•
The
roadside assistance
call may also be initiated by
touch.
•
The
roadside assistance number dialedisbased
on the
country where the vehicle is purchased (1-800-5282069 for the U.S.,
1-877 -213 -4525
for Canada, 55-14-
3454 for Mexico City and
1-800 -712 -3040
for outside
Mexico City in Mexico). Please refer to the Chrysler
Group LLC
24-Hour “Roadside Assistance”
coverage
detailsinthe Warranty Information Booklet and
on the
24–Hour Roadside Assistance
Card.
Voice
Mail
Calling
To
learn howtoaccess your voice mail, refer
to “Working
with
Automated
Systems”.
Working
With
Automated Systems
This methodisusedininstances whe re one generally
has
to press numbers on the mobile phone keypad while
navigating th roughanautomated telephone
system.
You can use your
Uconnect™
Phone to access a voice
mail system or an
automated
service, such as a paging
Page 81

Uconnect™ ACCESS USER’S MANUAL 79
service or automated customer service line. Some services require immediate response selection. In some
instances, that may be too quick for use of the
Uconnect™
Phone.
When callinganumber with your Uconnect™ Phone
that
normally requi res
you to enter in a
touch -tone
sequence
on your mobile phone keypad, you can utilize the
touch -screen
or press the button and say the word
“Send” then the sequence you wishtoente r. For
example,
if
requi redtoenter your PIN followed withapound,
(3 7
4 6 #), you can
press
the
button
and say,
“Send
3 7 4
6 #”.
Saying “Send” followed byanumbe r,orsequence
of
numbers, is also to be used for
navigating
through an
automated customer
service center menu
structu re,
and
to leave a
number
on a pager.
You can also send stored mobile
phonebook
entries as
tones for fast and easy access to voice mail and pager
entries.
For
example,
if you
previously created
a Phone-
book entry with First and/or Last Name as “Voicemail
1
Passwo rd”,
then if you press the button and say
“Send
Voicemail Passwo rd”
the
Uconnect™
Phone will
then send the
cor responding
phone number associated
with the
phonebook
entry, as tones over the phone.
NOTE:
•
The first
number encounte red
for that
contact
will be
sent.
All
other numbers ente red
for
that contact will
be
ignored.
•
You may
not
hear
all of the
tones
due to
mobile
phone
network configurations.
This is normal.
•
Some paging and voice mail systems have system
time
out
settings
that are too short and may not allow the
use of this feature.
Page 82
80 Uconnect™ ACCESS USER’S MANUAL
•
Pauses,
wait or
other characters
that are
supported
by
some phones are not supported over
Bluetooth®.
These additional symbols will be igno redinthe
dialing
a
numbe red
sequence.
Ba rge
In —
Overriding
Prompts
The
button
can be
used when
you
wish
to skip
part
of a
prompt and issue your voice command immediatel y.
For
example,
if a
promptisasking “The re
are 2 numbers
with the name John. Say the full
name”
you could press
the button and say, “John Smith” to select that
option without having to listen to the rest of the voice
prompt.
Voice Response Length
It is possible for you to choose between Brief and
Detailed
Voice
Response
Length.
•
Touch the “More” soft-key (where available), then
touch the
“Settings”
soft-key,
•
Touch the “Display” soft -ke y, then scroll down
to Voice
Response
Length,
•
Select either “Brief”or“Detailed”bytouching
the box
next to the selection. A check-mark will appear to
show your selection.
Phone And Network
Status
Indicators
Uconnect™ Phone will provide notification to inform
you of your phone and network status when you are
attempting to make a phone call using Uconnect™
Phone. The status is given for network signal strength
and
phone battery
strength.
Dialing Using The Mobile Phone Keypad
WARNING!
Your new
vehicle
has many
features
for the comfort
(Continued)
Page 83

Uconnect™ ACCESS USER’S MANUAL 81
WARNING! (Continued)
and
convenience
of you and your
passengers.
Some
of these should not be used when driving because
they take your eyes from the road or your attention
from driving. Never dial using the mobile phone
keypad
while driving.
You can dial a phone number with your mobile phone
keypad and still use the Uconnect™ Phone (while
dialing
via the mobile phone keypad, the user must exercise
caution and take precautionary safety measures). By
dialing a number with your paired
Bluetooth®mobile
phone, the audio will be played
through
your vehicle’s
audio system. The Uconnect™ Phone will work
the same
as if you dial the
number
using voice a command.
NOTE:
Certain brandsofmobile phonesdonot send
the
dial ringtothe Uconnect™ Phonetoplayiton the
vehicle
1
audio system,so you will not hear it. Under this situation, after successfully dialinganumber the user may
feel
that
the call did not go
through even though
the call is in
progress.
Once your call is
answe red,
you will hear the
audio.
Mute/Un -Mute (Mute ON/OFF)
When you mute the
Uconnect™ Phone,
you will still be
able to hear the conversation coming from the other
part y,
but the
other party
will not be able to hear you. In
order to mute the
Uconnect™
Phone simply touch the
Mute
button
on the
Phone
main screen.
Advanced Phone Connectivity
Transfer
Call To
And From Mobile Phone
The
Uconnect™
Phone
allows ongoing
calls to be trans-
ferred from your mobile phone
to the
Uconnect™
Phone
Page 84

82 Uconnect™ ACCESS USER’S MANUAL
without terminating
the call. To
transferanongoing
call
from your paired mobile phone
to the
Uconnect™
Phone
or vice versa, press the Transfer button on the Phone
main screen.
ConnectOrDisconnect Link Between The Uconnect™
Phone And Mobile
Phone
If
you would liketoconnectordisconnect the Bluetooth
®
connection
between a
Uconnect™
Phone paired mobile
phone and
the
Uconnect™ Phone, follow
the instructions
described
in your
mobile phone User’s
Manual.
Things You Should Know About Your Uconnect™
Phone
Voice Command
•
For best
performance,
adjust the rearview mirror to
provideatleast
½ in (1 cm) gap
between
the overhead
console
(if
equipped)
and the mirror.
•
Always
wait for the beep
befo re
speaking.
•
Speak
normall y,
without pausing, just as you would
speak
to a
person sitting
a few feet/meters
away
from
you.
•
Make sure that no one other than you is speaking
during
a voice
command
period.
•
Performanceismaximized under:
•
low -to -medium blower
setting,
•
low -to -medium vehicle
speed,
•
low road noise,
•
smooth
road surface,
•
fully
closed
windows,
•
dry
weather
condition.
•
Even though the systemisdesigned for users
speaking
in North
American
English, French, and Spanish ac-
cents, the
system
may not
always
work for some.
Page 85

Uconnect™ ACCESS USER’S MANUAL 83
•
When
navigating throughanautomated
system such
as
voice mail,orwhen sendingapage, befo re
speaking
the digit
string,
make sure to say “Send”.
•
It is
recommended that youdonot sto re names
in your
favorites phonebook
while the
vehicle
is in motion.
•
Phonebook
(Mobile and
Favorites)
name recognition
rate is
optimized
when the
entries
are not similar.
•
You can say “O” (letter“O”) for “0” (zero).
•
Even though
international
dialing for most number
combinations is supported, some shortcut dialing
number combinations
may not be supported.
•
In a
convertible
vehicle, system
performance
may be
comp romised
with the
convertible
top down.
Far
End Audio
Performance
•
Audio qualityismaximized
under:
•
low -to -medium blower setting,
•
low -to -medium vehicle
speed,
•
low road noise,
1
•
smooth
road surface,
•
fully
closed
windows,
•
dry
weather conditions,
and
•
operation
from the
driver’s
seat.
•
Performance, suchasaudio clarit y, echo, and
loudness
to a large
deg ree
rely on the
phone
and
network,
and
not the
Uconnect™
Phone.
•
Echo at the far end can sometimes be reduced by
lowering
the
in-vehicle
audio volume.
•
In a
convertible
vehicle, system
performance
may be
comp romised
with the
convertible
top down.
SMS
Uconnect™
Phone can read or send new messages on
your phone.
Page 86

84 Uconnect™ ACCESS USER’S MANUAL
Your
phone
must
support
SMS over
Bluetooth®in order
to use this
featu re.
If the
Uconnect™
Phone determines
your
phone
is not
compatible
with SMS
messaging
over
Bluetooth®the
“Messaging”
button will be greyed out
and the
featu re
will not be
available
for use.
NOTE:
Uconnect™
Phone SMS is only available when
the
vehicle
is not in moving.
Read
Messages:
If you receive a new text
message
while your phone is
connectedtoUconnect™
Phone, an
announcement
will
be
madetonotify
you that you
haveanew
text message.
Once a message is received and viewed or listened to,
you will have the
following
options:
•
Send a Reply
•
Forwa rd
•
Call
Send
Messages
Using Soft-Keys:
You can send messages using Uconnect™ Phone.
To send
a new message:
•
Touch
the
“Phone”
soft-key,
•
Touch
the
“messaging” soft -key then “New
Message”,
•
Touch one of the 18 preset
messages
and the person
you wish to send the
message
to,
•
If
multiple numbers
are
available
for the
contact
select
which number you would like to have the message
sent,
•
Press
“Send”
or “Cancel”.
Send
Messages
Using Voice Commands:
•
Press the button,
•
After the
“Listening” prompt
and the
following
beep,
say “Send
message
to John Smith mobile”,
Page 87

Uconnect™ ACCESS USER’S MANUAL 85
•
After the system
prompts
you for what
message
you 7. I’m on my way.
wanttosend,
say the
message you wishtosend
or say
“List”.
There are 18 presetmessages.
While the listofdefined messages are being read, you
can
interrupt the system by pressing the button and
saying
the
message
you want to send.
After the system confirmsthat you want to send your
message
to John
Smith,
your
message
will be sent.
List of Preset
Messages:
1. Yes.
2. No.
3. Okay.
4. I can’t talk right now.
5. Call me.
6. I’ll call you later.
8. Thanks.
1
9. I’ll be late.
10. I will be <number>
minutes
late.
11. See you in <number> minutes.
12. Stuck in traffic.
13. Start
without
me.
14.
Whe re
are you?
15. Are you there yet?
16. I need directions.
17. I’m lost.
18. See you later.
Page 88

86 Uconnect™ ACCESS USER’S MANUAL
Bluetooth®Communication
Link
Mobile phones have been foundtolose connection
to the
Uconnect™
Phone. When this happens, the connection
can generally be
reestablished
by switching the phone
OFF/ON.
Your mobile phoneisrecommended
to remain
in
Bluetooth®ON mode.
Power -Up
After
switching
the
ignition
key from OFF to either the
ON or ACC position, or after a language change, you
must wait at least 15
seconds
prior to using the system.
Page 89

Uconnect™ ACCESS USER’S MANUAL 87
VoiceTr
ee
1
Page 90

88 Uconnect™ ACCESS USER’S MANUAL
NOTE:
•
You can
replace
“John
Smith”
with any name in your
mobileorfavorite phone book. You
can
also
say “Send
a
messagetoJohn Smith”
and the
system
will ask you
which phone
number
you want to send a
message
to
for John Smith.
•
You can replace “Mobile” with “Home”, “Work” or
“Other”.
•
You can replace “Incoming Calls” with “Outgoing
Calls” or
“Missed
Calls”.
•
You can replace “248 555 1212” with any phone
number supported
by your
Mobile
phone.
•
These commands canbeused duringaphone call
after
pushing the
Uconnect™
Voice Command button on
the
steering wheel.
Please note the call will be muted
while the VR
session
is active.
•
Send dial tones for automated systems is available
while a call is active. This is an example that uses a
Phonebook Reco rd named “Voicemail
Password.”
•
Storing Dial tonesincontact namesispossible but
only
the
first number encounte red
in a
contact name will
be
sent. For example if there is a number stored in the
Home and Work
numbers
for the contact “Voicemail
passwo rd”
only the Home
number
will be sent
•
If your
phone
does not
support phonebook
download
or call log
download
over
Bluetooth
than these com-
mands
will
returnaresponse
that the
contact does
not
exist in the phonebook.
•
Emergency and Towing assistance are contacts that
have been
pre-loaded
in the
phonebooks.
Commands
such as “Call
Eme rgency”
and “Call Towing Assis-
tance”
will call the
cor responding number sto red
with
those contacts.
Page 91

Uconnect™ ACCESS USER’S MANUAL 89
NOTE: Available Voice
Commands
are shown in bold
face and
underlined
in the gray
shaded
boxes.
1
Page 92

90 Uconnect™ ACCESS USER’S MANUAL
Page 93

Uconnect™ ACCESS USER’S MANUAL 91
•
You can
replace
“4” withany
message number
shown
NOTE:
•
You can
replace
“John
Smith”
with any name in your
mobileorfavorite phone book. You
can
also
say “Send
a
messagetoJohn Smith”
and the
system
will ask you
which phone
number
you want to send a
message
to
for John Smith.
•
You can replace “Mobile” with “Home”, “Work” or
“Other”.
•
You can replace “Incoming Calls” with “Outgoing
Calls” or
“Missed
Calls”.
•
Messaging commands
only work if the
Uconnect
system is equipped with this feature and the mobile
phone supports messaging
over Bluetooth.
•
You can replace “248 555 1212” with any phone
number supported
by your
Mobile
phone.
on the screen.
1
•
If your
phone
does not
support phonebook
download
or call log
download
over
Bluetooth
than these com-
mands
will
returnaresponse
that the
contact does
not
exist in the phonebook.
Page 94

92 Uconnect™ ACCESS USER’S MANUAL
Page 95

Uconnect™ ACCESS USER’S MANUAL 93
NOTE: Available Voice
Commands
are shown in bold Uconnect™ Voice Command
face and
underlined
in the gray
shaded
boxes.
Voice Command Overview 1
The Uconnect™ Voice Command system allows you to
cont rol your
AM, FM
radio,
satel-
lite
radio,
disc
playe r,SDCard,
USB/iPod and
Sirius
Travel
Link.
NOTE: Take care to speak into the Voice Command
systemascalmly
and
normallyaspossible.
The
ability
of
the Voice Command system to recognize user voice
commands maybenegatively affectedbyrapid
speaking
or a raised voice level.
WARNING!
ALWAYS drive safely with your hands
on the
wheel.
You have full
responsibility
and assume all
risks
(Continued)
Page 96
94 Uconnect™ ACCESS USER’S MANUAL
WARNING!
(Continued)
related to the use of the Uconnect™ features and
applications in this vehicle. Only use Uconnect™
when
it is
safe
to do so.
Failure
to do so
may result
in
an
accident involving serious injury
or death.
When you press the Uconnect™ Voice Command
button, you will hearabeep. The beepisyour signal
to give a command.
If no
commandisspoken
the
system
will say one of two
responses:
•
I didn’t
understand
•
I didn’t get that, etc.,
If a
command
is not spoken a second time, the system
will respond with an error and give some direction as
what can be said based on the
context
you are in. After
three
consecutive failu res
of a
spoken command
the VR
session
with end.
Pressing the Uconnect™ Voice Command button
while the system is
speaking
is known as
“ba rging
in.”
The system will be
inter rupted,
and after the beep, you
can say a
command.
This will
become helpful
once you
start to learn the options.
NOTE: At any time,you can say the
wo rds “Cancel”
or
“Help”.
These commands are universal and canbeused from
any
menu.
All
other commands
can be
used depending
upon
the active application.
When using
this
system,
you
should speak clearly
and at
a
normal speaking
volume.
Page 97

Uconnect™ ACCESS USER’S MANUAL 95
The system will best
recognize
your speech if the win- Smith”. For
multiple
inputs in the same phrase or sen-
dows are closed, and the heater/air
conditioning
fan is
set to low.
At any point,ifthe system does not recognize one
of your
commands,
you will be
promptedtorepeat
it.
To
hear available commands, press
the
Uconnect™
Voice
Command button and say “Help”. You will hear
available commands
for the
screen
displayed.
Natural
Speech
Natural speech allows the user to speak
commands
in
phrases or complete sentences. The system filters out
certain non-word utterances and sounds such as “ah”
and “eh”. The system handles fill-in words such as “I
would
like to”.
The system
handles multiple
inputs in the same phrase
or
sentence
such as “make a phone call” and “to Kelly
tence, the system identifies the topic or context and
1
provides
the
associated follow -up prompt
such as “Who
do you
wanttocall?”
in the case
whe reaphone
call was
requested
but the
specific
name was not recognized.
The
system utilizes continuous dialog;
when the system
requires more
information
from the user it will ask a
questiontowhich
the
user
can
respond without
pressing
the
Uconnect™
Voice Command button.
Uconnect™ Voice Commands
The Uconnect™ Voice Command system understands
two types of
commands. Universal commands
are available at all times. Local commands are available if the
supported
radio modeis active.
Start a
dialoguebypressing
the
Uconnect™
Voice Com-
mand button.
Page 98

96 Uconnect™ ACCESS USER’S MANUAL
Changing
theVolume
1. Start a dialogue by pressing the Voice Command
button.
2. Say a
command
(e.g., “Help”).
3. Use the ON/OFF
VOLUME rotary
knob to
adjust
the
volume to a
comfortable
level while the Voice Command system is speaking. Please note the volume
setting
for
Voice Commandisdifferent than
the audio
system.
Starting Voice Recognition (VR) Session
in
Radio/Player Modes
In this
mode,
you can say the
following
commands:
NOTE: The
commands
can be said on any
screen
when
a call is not active after pushing the
Uconnect™
Voice
Command button.
Disc
To
switch
to the
disc mode,
say
“Change sou rce
to Disc”.
This
command
can be given in any mode or screen:
•
“Track”
(#) (to
change
the track)
Page 99
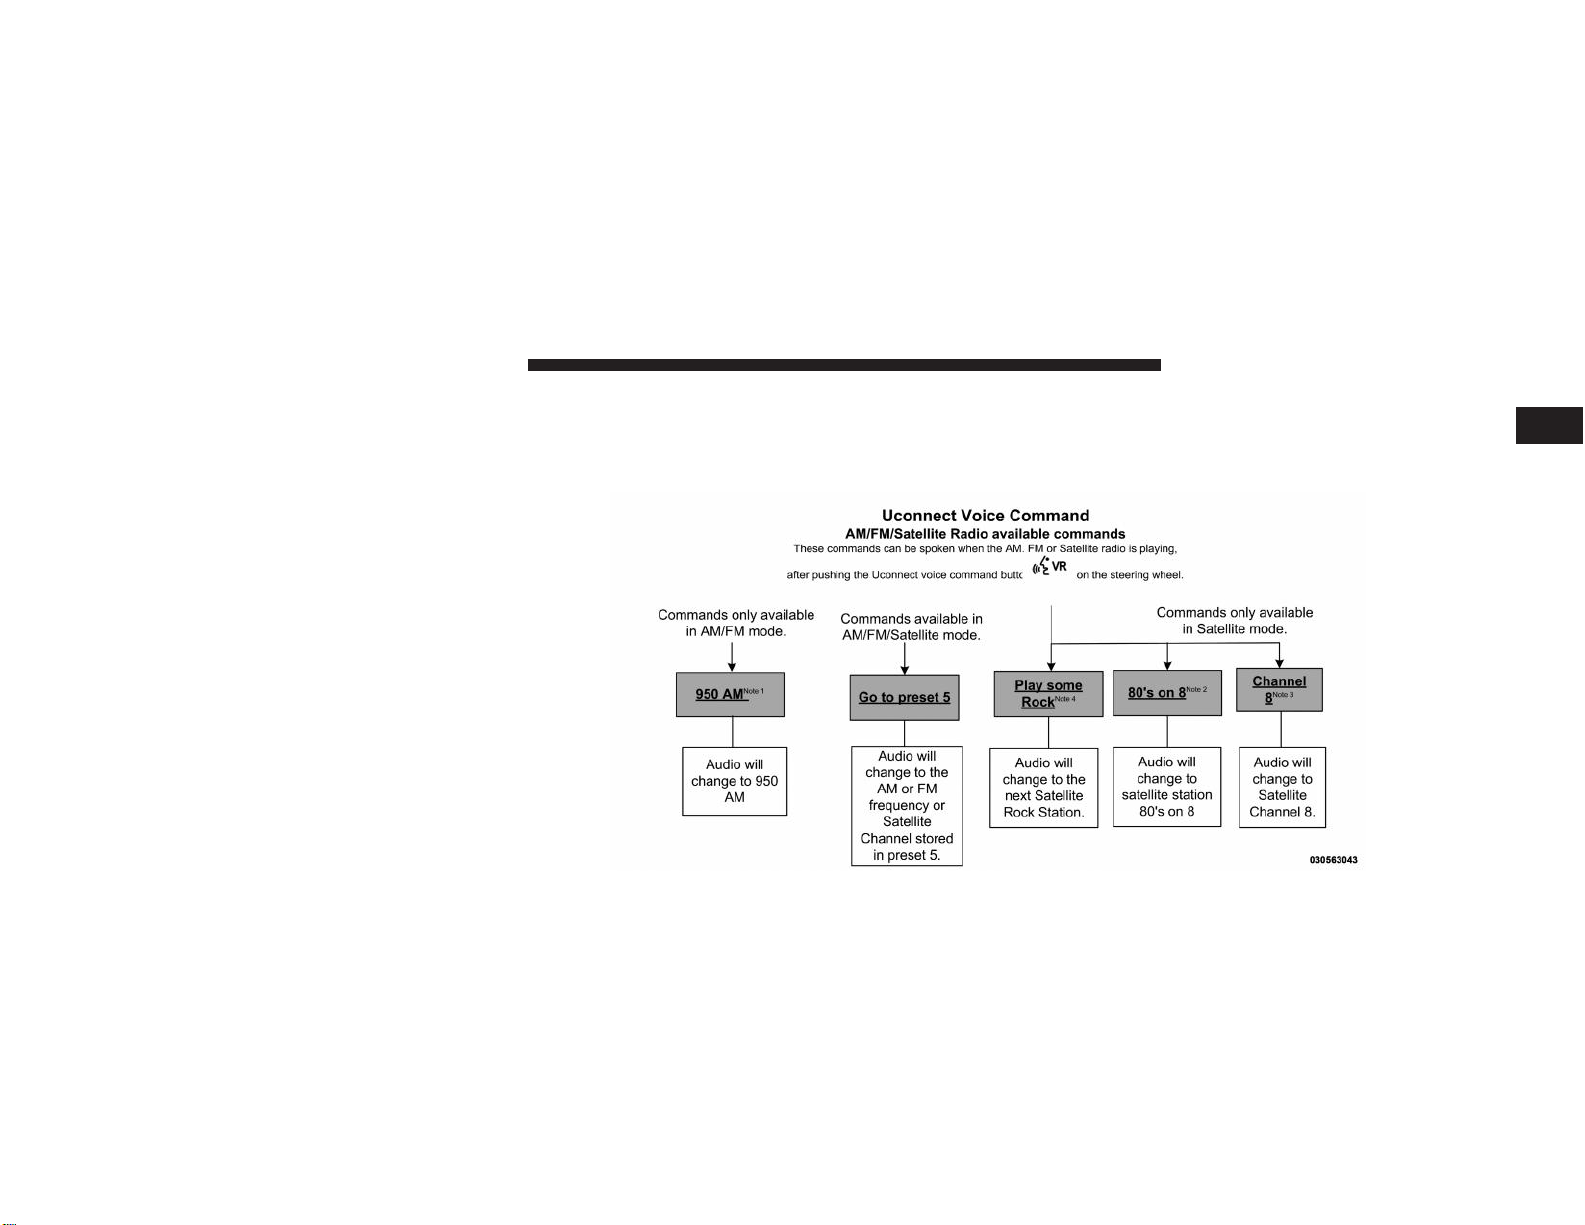
Uconnect™ ACCESS USER’S MANUAL 97
VoiceTr
ee
1
Page 100

98 Uconnect™ ACCESS USER’S MANUAL
NOTE:
1. You can
replace
“950 AM” with any
other
AM or FM
frequenc y,
such as “98.7 FM”.
2. You can replace “80’s on 8” with any other satellite
station
name
received
by the radio.
3. You can replace “8” with any other satellite station
named received
by the radio.
4. You can
replace “rock”
with any of the
satellite
music
types.
NOTE: Available Voice
Commands
are shown in bold
face and
shaded
grey.
 Loading...