

Page 1

WITH NAVIGATION (2ND SECTION)
TABLE OF CONTENTS
1 QUICK GUIDE 9
2 APPLICATION-“Map” 19
3 APPLICATION-THE OTHERS 73
4 AUDIO SYSTEM 99
5 Bluetooth® HANDS-FREE SYSTEM 153
6 VOICE COMMAND SYSTEM 185
7 VEHICLE INFORMATION 189
8 SETUP 195
9 REAR VIEW MONITOR SYSTEM 213
INDEX 221
1
Page 2

1. BASIC INFORMATION BEFORE OPERATION
Introduction
DISPLAY AUDIO SYSTEM OWNER’S MANUAL
This manual explains the operation of the Display Audio system. Please read
this manual carefully to ensure proper use. Keep this manual in your vehicle at
all times.
The screen shots in this document and the actual screens of the Display Audio
system differ depending on whether the functions and/or a contract existed and
the map data available at the time of producing this document.
NAVIGATION SYSTEM
The Navigation System is one of the most technologically advanced vehicle accessories ever developed. The system receives satellite signals from the Global
Positioning System (GPS) operated by the U.S. Department of Defense. Using
these signals and other vehicle sensors, the system indicates your present position and assists in locating a desired destination.
The navigation system is designed to select efficient routes from your present
starting location to your destination. The system is also designed to direct you
to a destination that is unfamiliar to you in an efficient manner. The system is
developed by “Harman International” using “Navteq” maps. The calculated
routes may not be the shortest nor the least traffic congested. Your own personal local knowledge or “short cut” may at times be faster than the calculated
routes.
The navigation system’s database includes Point of Interest categories to allow
you to easily select destinations such as restaurants and hotels. If a destination
is not in the database, you can enter the street address or a major intersection
close to it and the system will guide you there.
The system will provide both a visual map and audio instructions. The audio instructions will announce the distance remaining and the direction to turn in approaching an intersection. These voice instructions will help you keep your eyes
on the road and are timed to provide enough time to allow you to maneuver,
change lanes or slow down.
Please be aware that all current vehicle navigation systems have certain limitations that may affect their ability to perform properly. The accuracy of the vehicle’s position depends on the satellite condition, road configuration, vehicle
condition or other circumstances. For more information on the limitations of the
system, refer to page 66.
2
Page 3

1. BASIC INFORMATION BEFORE OPERATION
IMPORTANT INFORMATION ABOUT THIS MANUAL
For safety reasons, this manual indicates items requiring particular attention
with the following marks.
CAUTION
● This is a warning against anything which may cause injury to people if the warning is
ignored. You are informed about what you must or must not do in order to reduce the risk
of injury to yourself and others.
NOTICE
● This is a warning against anything which may cause damage to the vehicle or its equip-
ment if the warning is ignored. You are informed about what you must or must not do in
order to avoid or reduce the risk of damage to your vehicle and its equipment.
3
Page 4

1. BASIC INFORMATION BEFORE OPERATION
SAFETY INSTRUCTION
To use this system in the safest possible
manner, follow all the safety tips shown
below.
This system is intended to assist in reaching the destination and, if used properly,
can do so. The driver is solely responsible
for the safe operation of your vehicle and
the safety of your passengers.
Do not use any feature of this system to
the extent it becomes a distraction and
prevents safe driving. The first priority
while driving should always be the safe operation of the vehicle. While driving, be
sure to observe all traffic regulations.
Prior to the actual use of this system, learn
how to use it and become thoroughly familiar with it. Read the entire Display Audio
system Owner’s manual to make sure you
understand the system. Do not allow other
people to use this system until they have
read and understood the instructions in
this manual.
For your safety, some functions may become inoperable when driving. Unavailable screen buttons are dimmed. Only
when the vehicle is not moving, can the
destination and route selection be done.
CAUTION
● For safety, the driver should not operate
the Display Audio system while he/she
is driving. Insufficient attention to the
road and traffic may cause an accident.
● While driving, be sure to obey the traffic
regulations and maintain awareness of
the road conditions. If a traffic sign on
the road has been changed, route guidance may not have the updated information such as the direction of a one way
street.
While driving, listen to the voice instructions as much as possible and glance at
the screen briefly and only when it is safe.
However, do not totally rely on voice guidance. Use it just for reference. If the system cannot determine the current vehicle
position correctly, there is a possibility of
incorrect, late, or non-voice guidance.
The data in the system may occasionally
be incomplete. Road conditions, including
driving restrictions (no left turns, street closures, etc.) frequently change. Therefore,
before following any instruction from the
system, look to see whether the instruction
can be done safely and legally.
This system cannot warn about such
things as the safety of an area, condition of
streets, and availability of emergency services. If unsure about the safety of an area, do not drive into it. Under no
circumstances is this system a substitute
for the driver’s personal judgement.
Use this system only in locations where it
is legal to do so. Some states/provinces
may have laws prohibiting the use of video
and navigation screens next to the driver.
4
Page 5

1. BASIC INFORMATION BEFORE OPERATION
5
Page 6

TABLE OF CONTENTS
QUICK GUIDE
1
1. CONTROLS AND FEATURES ........ 10
OVERVIEW BUTTONS ......................... 10
SYSTEM FUNCTION INDEX................. 12
TOUCH SCREEN OPERATION............ 14
2 APPLICATION-“Map”
1. NAVIGATION OPERATION ............ 20
QUICK REFERENCE ............................ 20
NAVIGATION SYSTEM
FUNCTION INDEX.............................. 23
MAP SCREEN OPERATION ................. 25
MAP ICONS........................................... 29
2. DESTINATION SEARCH................. 33
DESTINATION SEARCH ....................... 33
3. ROUTE GUIDANCE......................... 42
STARTING ROUTE GUIDANCE ........... 42
ROUTE GUIDANCE .............................. 44
SETTING AND DELETING
THE ROUTE........................................ 46
4. MY DESTINATIONS ........................ 52
REGISTERING A ENTRY...................... 52
DISPLAYING AND EDITING
THE ENTRY INFORMATION.............. 58
SENDING STORED CONTACTS
TO A USB MEMORY .......................... 60
APPLICATION-THE OTHERS
3
1. APPLICATIONS OPERATION........ 74
QUICK REFERENCE............................. 74
PICTURE SLIDESHOW......................... 75
EMAIL..................................................... 77
CALENDAR............................................ 79
2. ENTUNE SERVICE ......................... 80
ENTUNE SERVICE................................ 80
OPERATING NAVIGATION FUNCTION
USING ENTUNE SERVICE................. 83
OPERATING AN APPLICATION
USING ENTUNE SERVICE................. 93
AUDIO SYSTEM
4
1. AUDIO SYSTEM OPERATION ..... 100
QUICK REFERENCE........................... 100
SOME BASICS..................................... 102
RADIO OPERATION............................ 106
RADIO OPERATION (XM
Radio BROADCAST)......................... 112
CD PLAYER OPERATION................... 117
USB MEMORY/iPod OPERATION ...... 123
AUX DEVICE OPERATION ................. 130
®
Bluetooth
STEERING SWITCHES ....................... 141
AUDIO SYSTEM
OPERATING HINTS.......................... 144
AUDIO OPERATION ......... 132
®
Satellite
5. NAVIGATION SETTING .................. 61
MAP SETTINGS.................................... 61
ROUTE SETTINGS ............................... 64
6. NAVIGATION SYSTEM
INFORMATION .............................. 66
LIMITATIONS OF THE NAVIGATION
SYSTEM.............................................. 66
MAP INFORMATION............................. 68
6
Page 7

Bluetooth® HANDS-FREE
5
SYSTEM
1. BASIC INFORMATION
BEFORE OPERATION ................ 154
QUICK REFERENCE.......................... 154
HANDS-FREE SYSTEM ..................... 157
CONNECTING A
Bluetooth
REGISTERING A ENTRY ................... 165
®
PHONE ........................... 161
2. TELEPHONE OPERATION........... 170
CALLING ON A Bluetooth® PHONE ... 170
RECEIVING CALLS ON A
Bluetooth
TALKING ON A Bluetooth
®
PHONE ........................... 175
®
PHONE ... 176
3. SHORT MESSAGE FUNCTION .... 179
SHORT MESSAGE FUNCTION.......... 179
6 VOICE COMMAND SYSTEM
1. VOICE COMMAND SYSTEM
OPERATION ................................ 186
VOICE COMMAND SYSTEM.............. 186
SETUP
8
1. SETUP OPERATION .................... 196
QUICK REFERENCE .......................... 196
GENERAL SETTINGS ......................... 197
DISPLAY SETTINGS........................... 200
®
Bluetooth
PHONE SETTINGS ............................. 209
AUDIO SETTINGS............................... 210
VEHICLE SETTINGS........................... 211
SETTINGS......................... 202
REAR VIEW MONITOR
9
SYSTEM
1. REAR VIEW MONITOR
SYSTEM ...................................... 214
REAR VIEW MONITOR SYSTEM
OPERATION ..................................... 214
DRIVING PRECAUTIONS
(WITH REAR VIEW MONITOR
GUIDE LINES) .................................. 218
INDEX
1
2
3
4
5
6
7
8
7 VEHICLE INFORMATION
1. VEHICLE INFORMATION ............. 190
QUICK REFERENCE.......................... 190
FUEL CONSUMPTION ....................... 191
TIRE PRESSURE WARNING
SYSTEM ........................................... 193
ALPHABETICAL INDEX................... 222
9
7
Page 8

8
Page 9

1
QUICK GUIDE
1 CONTROLS AND FEATURES
1
2
1. OVERVIEW BUTTONS ................. 10
2. SYSTEM FUNCTION INDEX......... 12
3. TOUCH SCREEN OPERATION .... 14
INPUT SCREEN OPERATION .............. 14
LIST SCREEN OPERATION ................. 16
3
4
5
6
7
8
9
9
Page 10

1. CONTROLS AND FEATURES
1. OVERVIEW BUTTONS
z The actual design and button position may differ depending on the vehicle. For
details, see Section 3 of “Owner’s Manual”.
No. Name Function Page
Touch screen
display
Disc slot
“TUNE SCROLL”
knob
“AUDIO” button
button*
button
By touching the screen with your finger, you can
control the selected functions.
Insert a disc into this slot. The CD player turns on
immediately.
Turn this knob to select radio station bands,
tracks and files. Also, the knob can be used for
selection from the list display.
Press this button to access the audio system. The
audio system turns on in the last mode used.
Press this button to pause or resume playing the
music.
Press this button to access the Bluetooth
hands-free system.
14
117
103
100, 102,
103
—
®
154
10
“SETUP” button
Press this button to customize the function settings.
196
Page 11

1. CONTROLS AND FEATURES
No. Name Function Page
“SEEK/TRACK”
button
Press the “ ” or “ ” button to seek up or down for
a radio station, or to access a desired track or file.
107, 114,
119, 121,
124, 137
1
QUICK GUIDE
“CAR” button*
“APPS” button Press to display a list of applications. 20, 74
“PWR VOL” knob
*: If equipped
Press this button to access the vehicle information system.
Press this knob to turn the audio system on and
off, and turn it to adjust the volume.
190
102
button Press this button to eject a disc. 117
11
Page 12
1. CONTROLS AND FEATURES
2. SYSTEM FUNCTION INDEX
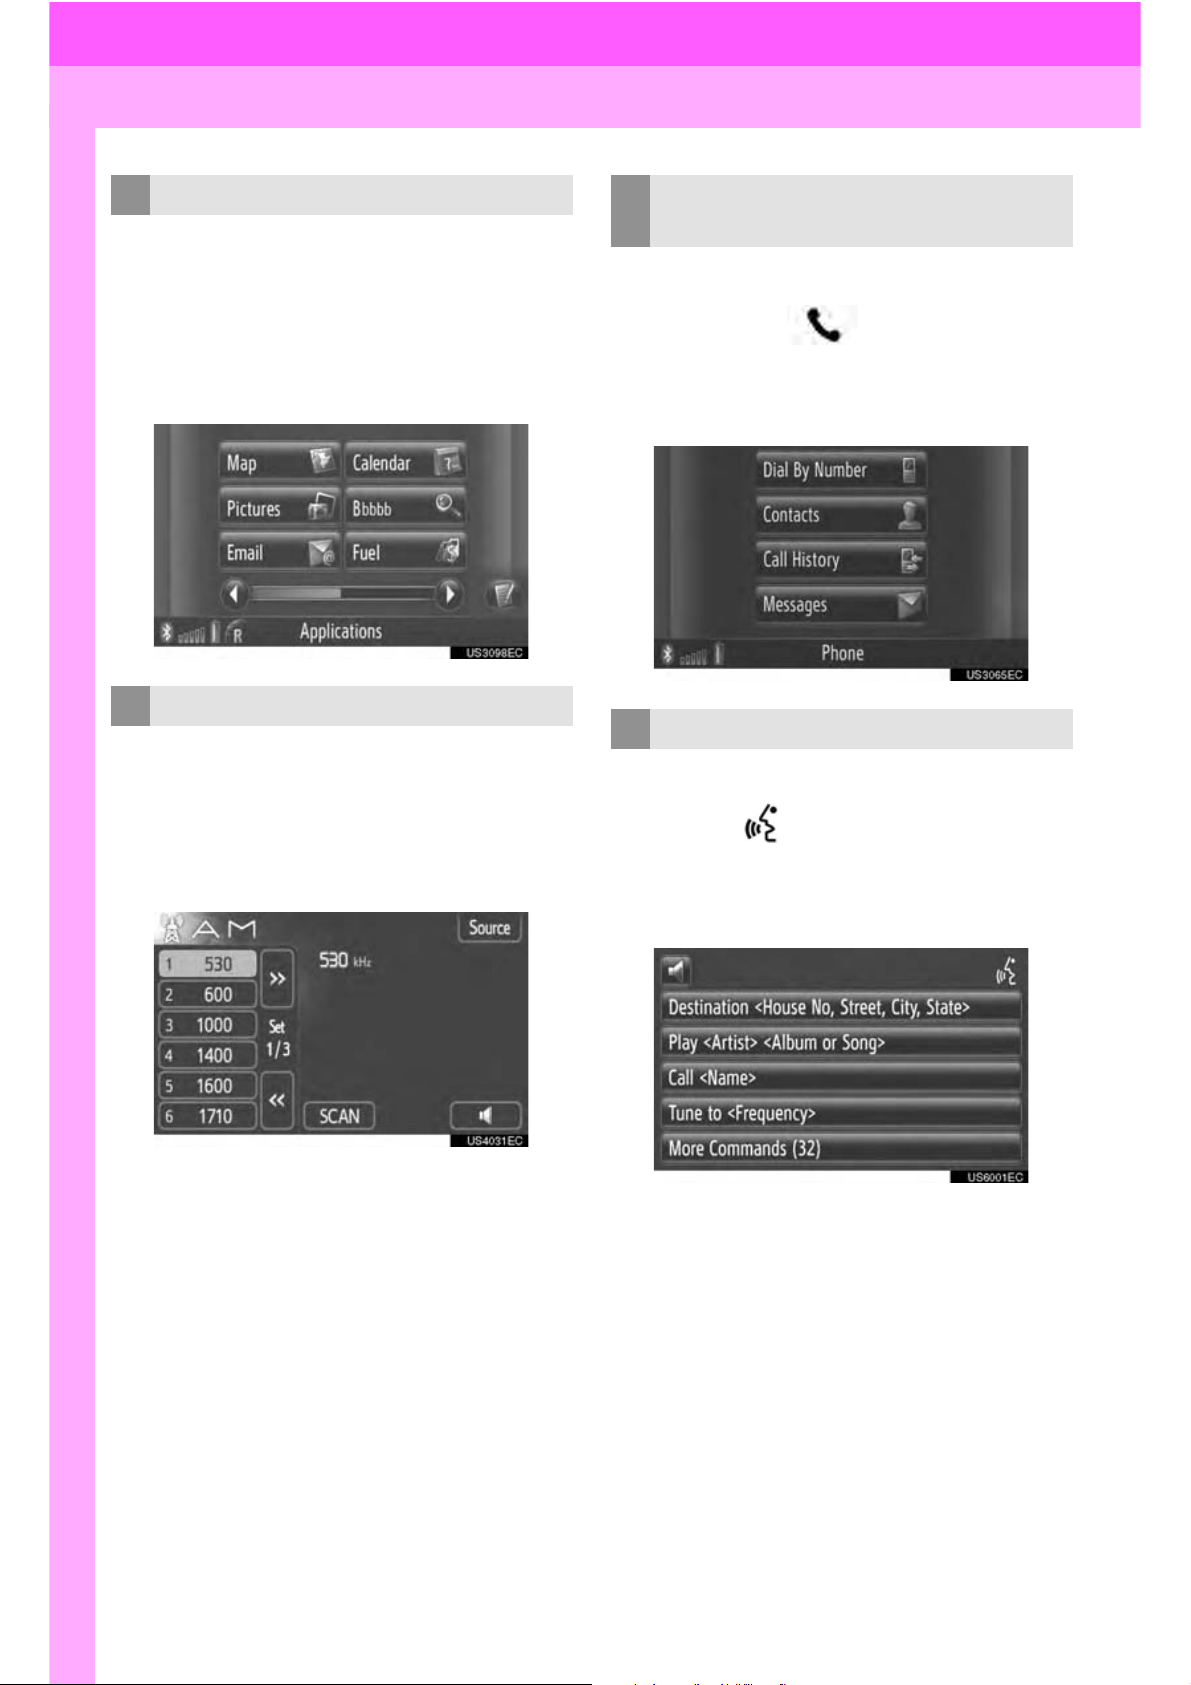
APPLICATION SYSTEM
To access the application system, press
the “APPS” button. The “Applications”
menu screen will be displayed. The driver
can use the navigation system and the other applications. For details, see page 19,
73.
AUDIO SYSTEM
To access the audio system, press the
“AUDIO” button. The audio control screen
will be displayed. Audio sources: Radio,
®
CDs, iPod, USB, AUX and Bluetooth
dio. For details, see page 99.
au-
Bluetooth® HANDS-FREE
SYSTEM
®
To access the Bluetooth
tem, press the button. The driver
can make or receive phone calls without
taking their hands off the steering wheel.
For details, see page 153.
hands-free sys-
VOICE COMMAND SYSTEM
To access the voice command system,
press the switch on the steering
wheel. The driver can operate the Display
Audio system by giving a command. For
details, see page 185.
12
Page 13

1. CONTROLS AND FEATURES
VEHICLE INFORMATION
(IF EQUIPPED)
To access the vehicle information system,
press the “CAR” button. Fuel consumption and tire pressure can be checked. For
details, see page 189.
SETUP
To customize the function settings, press
the “SETUP” button. The interface lan-
guage can also be changed from the setup
menu. For details, see page 195.
REAR VIEW MONITOR SYSTEM
Shifting into the “R” position will automatically show the view behind the rear of the
vehicle on the display screen. For details,
see page 213.
1
QUICK GUIDE
13
Page 14
1. CONTROLS AND FEATURES
3. TOUCH SCREEN OPERATION
This system is operated mainly by the
screen buttons on the screen.
z To prevent damage to the screen, lightly
touch screen buttons on the screen with
the finger. When a screen button on the
screen is touched, a beep sounds. (To set
a beep sound, see page 197.)
z Do not use objects other than your finger
to touch the screen.
NOTICE
● To prevent the 12-volt battery from being
discharged, do not leave the system on
longer than necessary when the engine
is not running.
INFORMATION
● If the system does not respond to a
touch on a screen button, move the finger away from the screen and then
touch it again.
● Dimmed screen buttons cannot be oper-
ated.
● Wipe off fingerprints using a glass clean-
ing cloth. Do not use chemical cleaners
to clean the touch screen.
● The displayed image may become
darker and moving images may be
slightly distorted when the display is
cold.
● Under extremely cold conditions, the
screen may not be displayed and the
data input by a user may be deleted.
Also, the screen buttons may be harder
than usual to depress.
● When you look at the screen through
polarized material such as polarized
sunglasses, the screen may be dark and
hard to see. If so, look at the screen
from different angles, adjust the screen
settings (See “DISPLAY SETTINGS” on
page 200.), or take off your sunglasses.
INPUT SCREEN OPERATION
When searching for an address or a
name, letters and numbers can be input via the screen.
INFORMATION
● Letters cannot be input while driving.
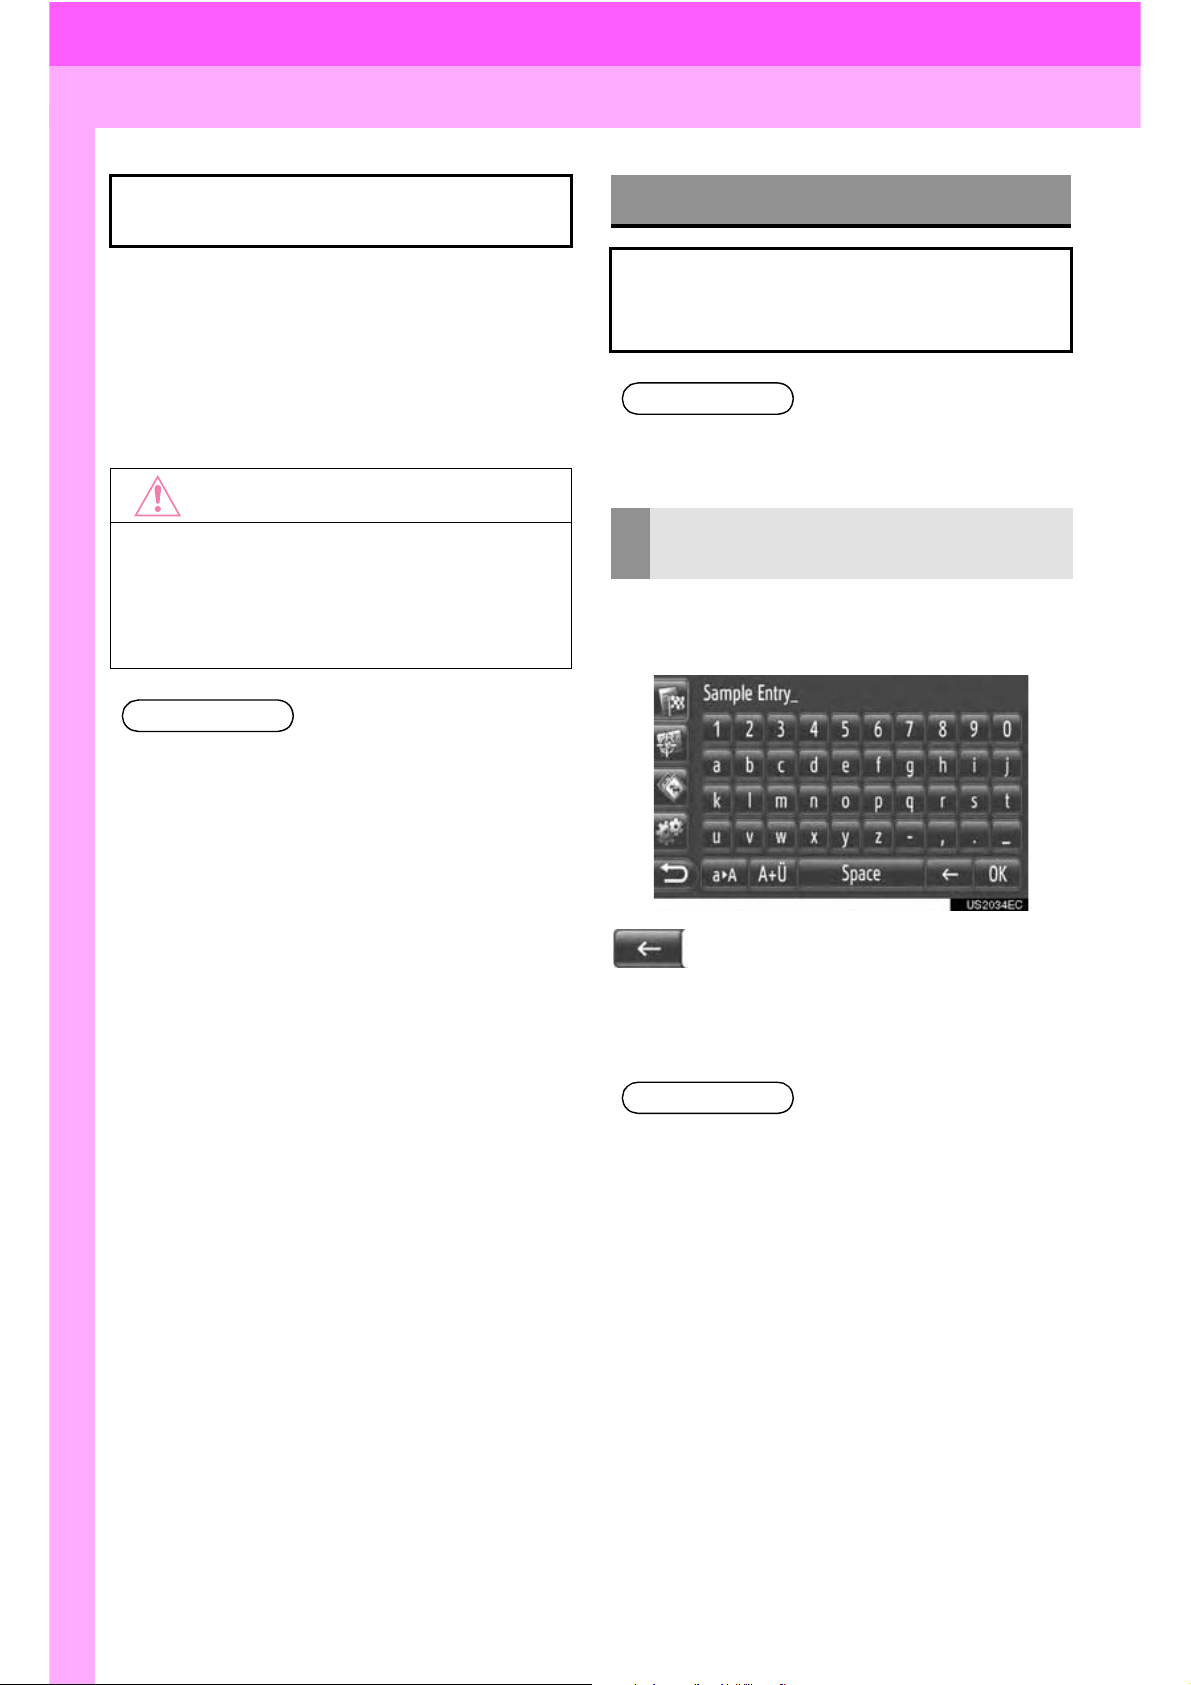
INPUTTING LETTERS AND
NUMBERS
1 Touch the keys directly to input letters
or numbers.
: Touch to delete one letter. Touch
and hold to continue deleting letters.
2 Touch “OK”.
INFORMATION
● When a character is input, a hint will
appear displaying a possible match for
the word to be searched.
● Currently unavailable screen buttons will
be dimmed.
● When an entry is too long to be dis-
played in the input field, the last section
of the input text will be displayed with
the initial section displayed as “...”.
● If the vehicle starts moving while letters
are being input, a warning message will
be displayed and letters cannot be input.
Touch “Previous” to return to the previous screen.
14
Page 15

■CHANGING BETWEEN LOWER
CASE AND UPPER CASE
1. CONTROLS AND FEATURES
■INPUTTING SYMBOLS
1
1 Touch .
QUICK GUIDE
1 Touch or .
: Touch to enter in lower case.
: Touch to enter in upper case.
z Each time or is touched,
input will change between upper case and
lower case input.
INFORMATION
● In the following situations, the input
mode will automatically change between
upper and lower case.
• When the keyboard layout is
changed to upper case input, the layout will automatically change back to
lower case input after one letter has
been entered.
• When “/”, “&”, “.” or “(” is input, the
keyboard layout will automatically be
changed to upper case input.
• When all characters are deleted, the
keyboard layout will automatically
change to upper case input.
2 Touch ( ) or .
X ( ) keyboard layout
X keyboard layout
3 Touch the symbol keys directly to input
symbols.
15
Page 16
1. CONTROLS AND FEATURES
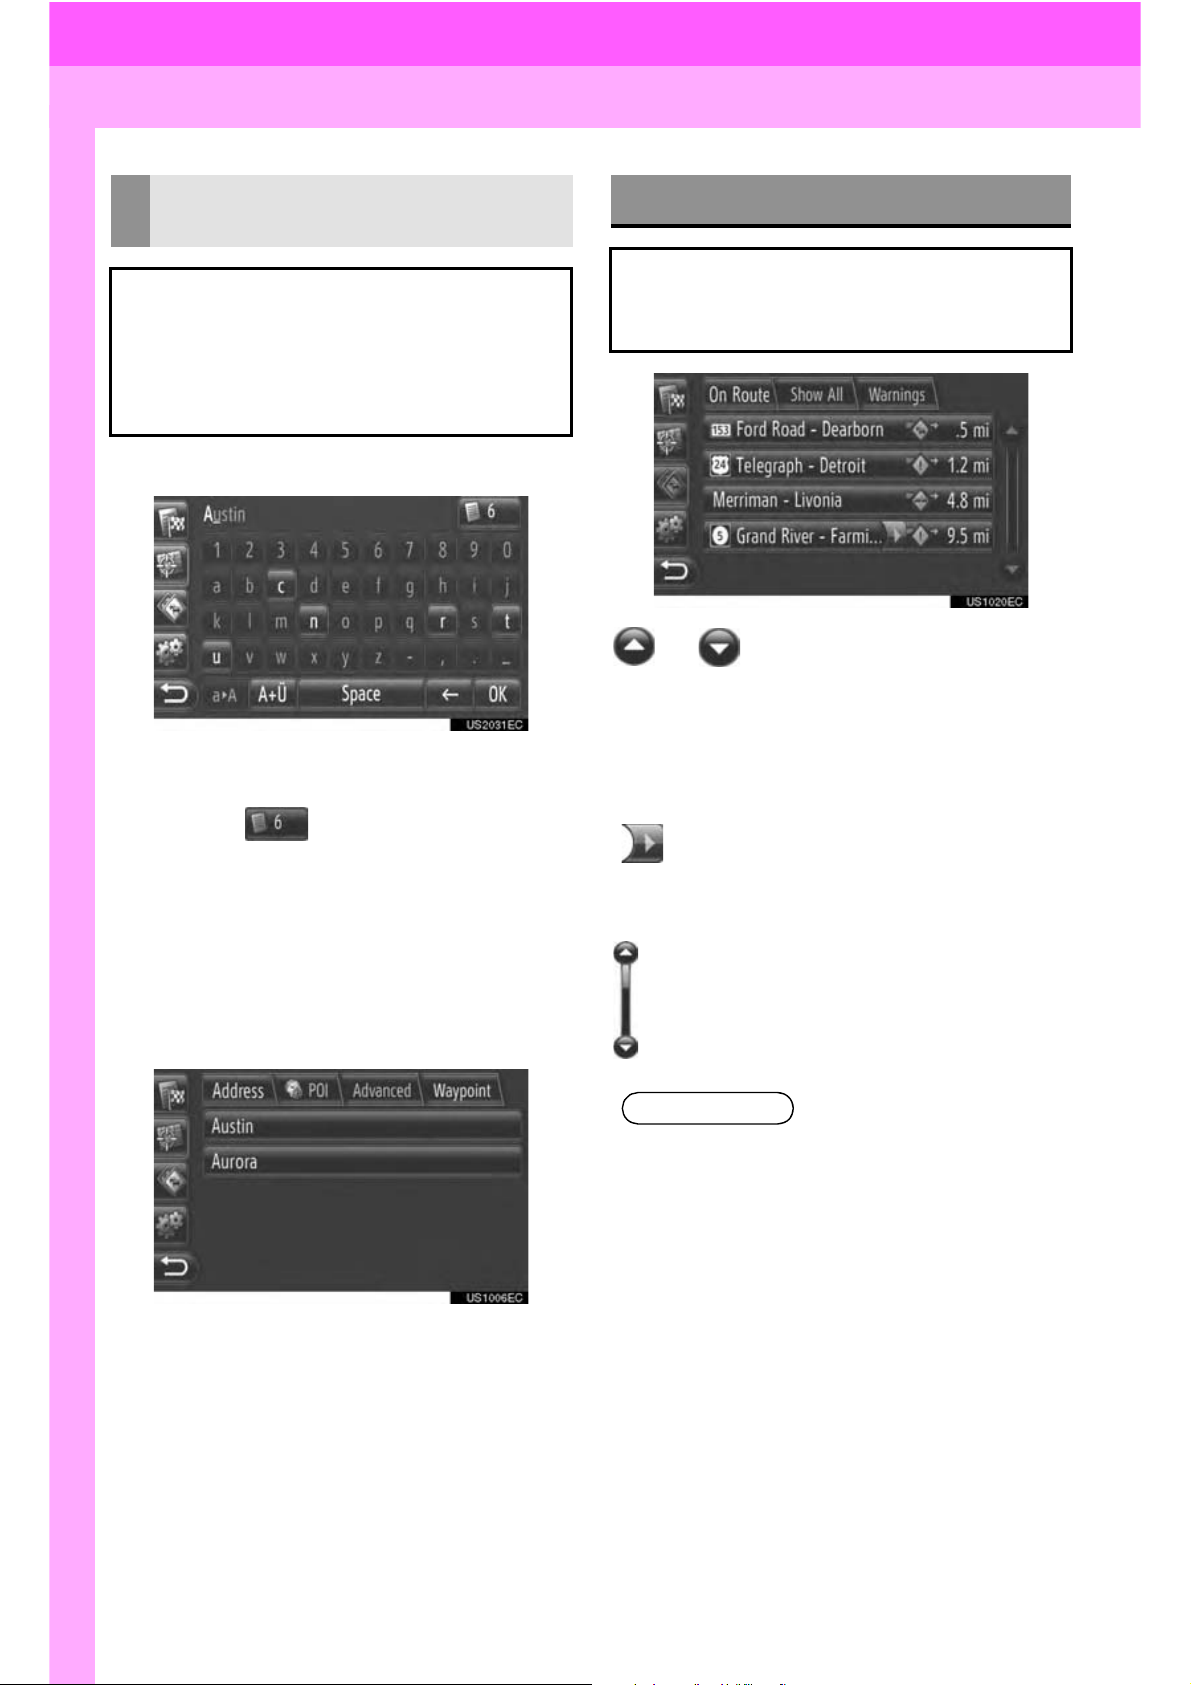
ENTERING FROM THE LIST OF
MATCHING ENTRIES
On certain screens, a candidate entry
text or word prediction list based on the
input letters will be displayed. The desired item can be selected and entered.
1 Enter letters.
z If a candidate entry text displayed in the
input field is what is desired, touch “OK”.
LIST SCREEN OPERATION
When a list is displayed, use the appropriate screen button to scroll through
the list.
or : Touch to shift to the next or
previous page.
z By touching and holding this screen but-
ton, the screen can be scrolled up or
down. Scrolling will automatically stop
when the top/bottom of the list is reached.
z Touching displays the candidate
entry text list. The number of matching
items is shown. Up to 300 items are displayed.
z The list will be displayed automatically, if
the number of matching entries is 5 or
less.
2 Touch desired item.
:Touch to have entries that are too
long to fit in the current field scrolled
automatically from right to left.
:This indicates the displayed screen’s
position.
INFORMATION
● While driving, changing pages will be
limited.
16
Page 17

CHARACTER JUMP BUTTONS
IN LISTS
1. CONTROLS AND FEATURES
1
Some lists contain character screen
buttons, “ABC”, “DEF” etc., which allow a direct jump to list entries that begin with the same letter as the
character screen button.
1 Touch one of the character screen but-
tons.
INFORMATION
● Every time the same character screen
button is touched, the list starting with
the subsequent character is displayed.
QUICK GUIDE
17
Page 18

1 NAVIGATION OPERATION
1. QUICK REFERENCE .................... 20
2. NAVIGATION SYSTEM
FUNCTION INDEX ...................... 23
3. MAP SCREEN OPERATION......... 25
TO DISPLAY MAP SCREEN ................. 25
MAP SCREEN OPERATION ................. 25
4. MAP ICONS................................... 29
POI* ICONS ........................................... 29
DESTINATION SEARCH
2
1. DESTINATION SEARCH............... 33
DESTINATION SEARCH ON THE
“My Destinations” SCREEN................. 33
DESTINATION SEARCH ON THE
“Enter Destination” SCREEN............... 35
*: Point of Interest
18
Page 19

2
APPLICATION-“Map”
1
2
3 ROUTE GUIDANCE
1. STARTING ROUTE
GUIDANCE .................................. 42
STARTING ROUTE GUIDANCE
SCREEN ............................................. 42
SETTING THE ROUTE ......................... 43
2. ROUTE GUIDANCE....................... 44
ROUTE GUIDANCE SCREEN.............. 44
VOICE GUIDANCE ............................... 45
3. SETTING AND DELETING
THE ROUTE................................. 46
SETTING FROM THE “Options”
SCREEN ............................................. 46
ADDING DESTINATIONS..................... 49
DETOURING A SEGMENT ON THE
ROUTE................................................ 51
5 NAVIGATION SETTING
1. MAP SETTINGS ............................ 61
SETTING THE MAP .............................. 61
2. ROUTE SETTINGS ....................... 64
SETTING THE ROUTE OPTIONS ........ 64
NAVIGATION SYSTEM
6
INFORMATION
1. LIMITATIONS OF THE
NAVIGATION SYSTEM .............. 66
2. MAP INFORMATION..................... 68
3
4
5
6
7
8
MY DESTINATIONS
4
1. REGISTERING A ENTRY .............. 52
REGISTERING A NEW ENTRY............ 52
2. DISPLAYING AND EDITING
THE ENTRY
INFORMATION............................ 58
DISPLAYING AND EDITING THE
ENTRY INFORMATION...................... 58
3. SENDING STORED CONTACTS
TO A USB MEMORY ................... 60
SENDING STORED CONTACTS TO A
USB MEMORY.................................... 60
9
19
Page 20

1. NAVIGATION OPERATION
1. QUICK REFERENCE
The navigation application and several other applications can be accessed by
pressing the “APPS” button.
When the “APPS” button is pressed, the “Applications” menu screen that was last
displayed is returned to. Touch to display the “Applications” menu screen.
X“Applications” menu screen
No. Function Page
Press to display a list of applications.
“Map” provides the user with navigation, route calculation, destination
entry (manually or via voice recognition), turn by turn directions, and
real-time traffic.
Touch to view pictures stored on a USB memory. 75
Touch to display Emails. 77
Touch to access the connected phone’s calendar, tasks and notes. 79
Touch to access the applications. 83, 85, 93
Touch to close or delete the applications. 93, 94
Touch to shift to the next or previous page.
25
20
Page 21

1. NAVIGATION OPERATION
To display the “Navigation” menu screen, touch “Dest” on the map. From this
screen, destinations can be entered and route-related settings can be changed.
X“Navigation” menu screen
2
APPLICATION-“Map”
No. Function Page
Touch to display the “My Destinations” screen.
A destination can be entered by selecting an item from the list of stored
destinations, previous destinations or the addresses from the connected phone’s phone book.
Touch to display the “Enter Destination” screen.
A destination can be entered by address, POI or using advanced options. It can also be added as a waypoint to a destination.
Touch to display the “Traffic Messages” screen.
Traffic messages function is using Entune service.
It contains a list of traffic messages relating to the set route, all traffic
messages and warnings.
Touch to display the “Route Options” screen.
The route preferences, avoidance criteria and traffic messages function can be adjusted.
Touch the corresponding icon to change to the “My Destinations”, “Enter Destination”, “Traffic Messages” or “Route Options” screen.
33
35, 49
86
64
33, 35, 49,
64, 86
21
Page 22
1. NAVIGATION OPERATION
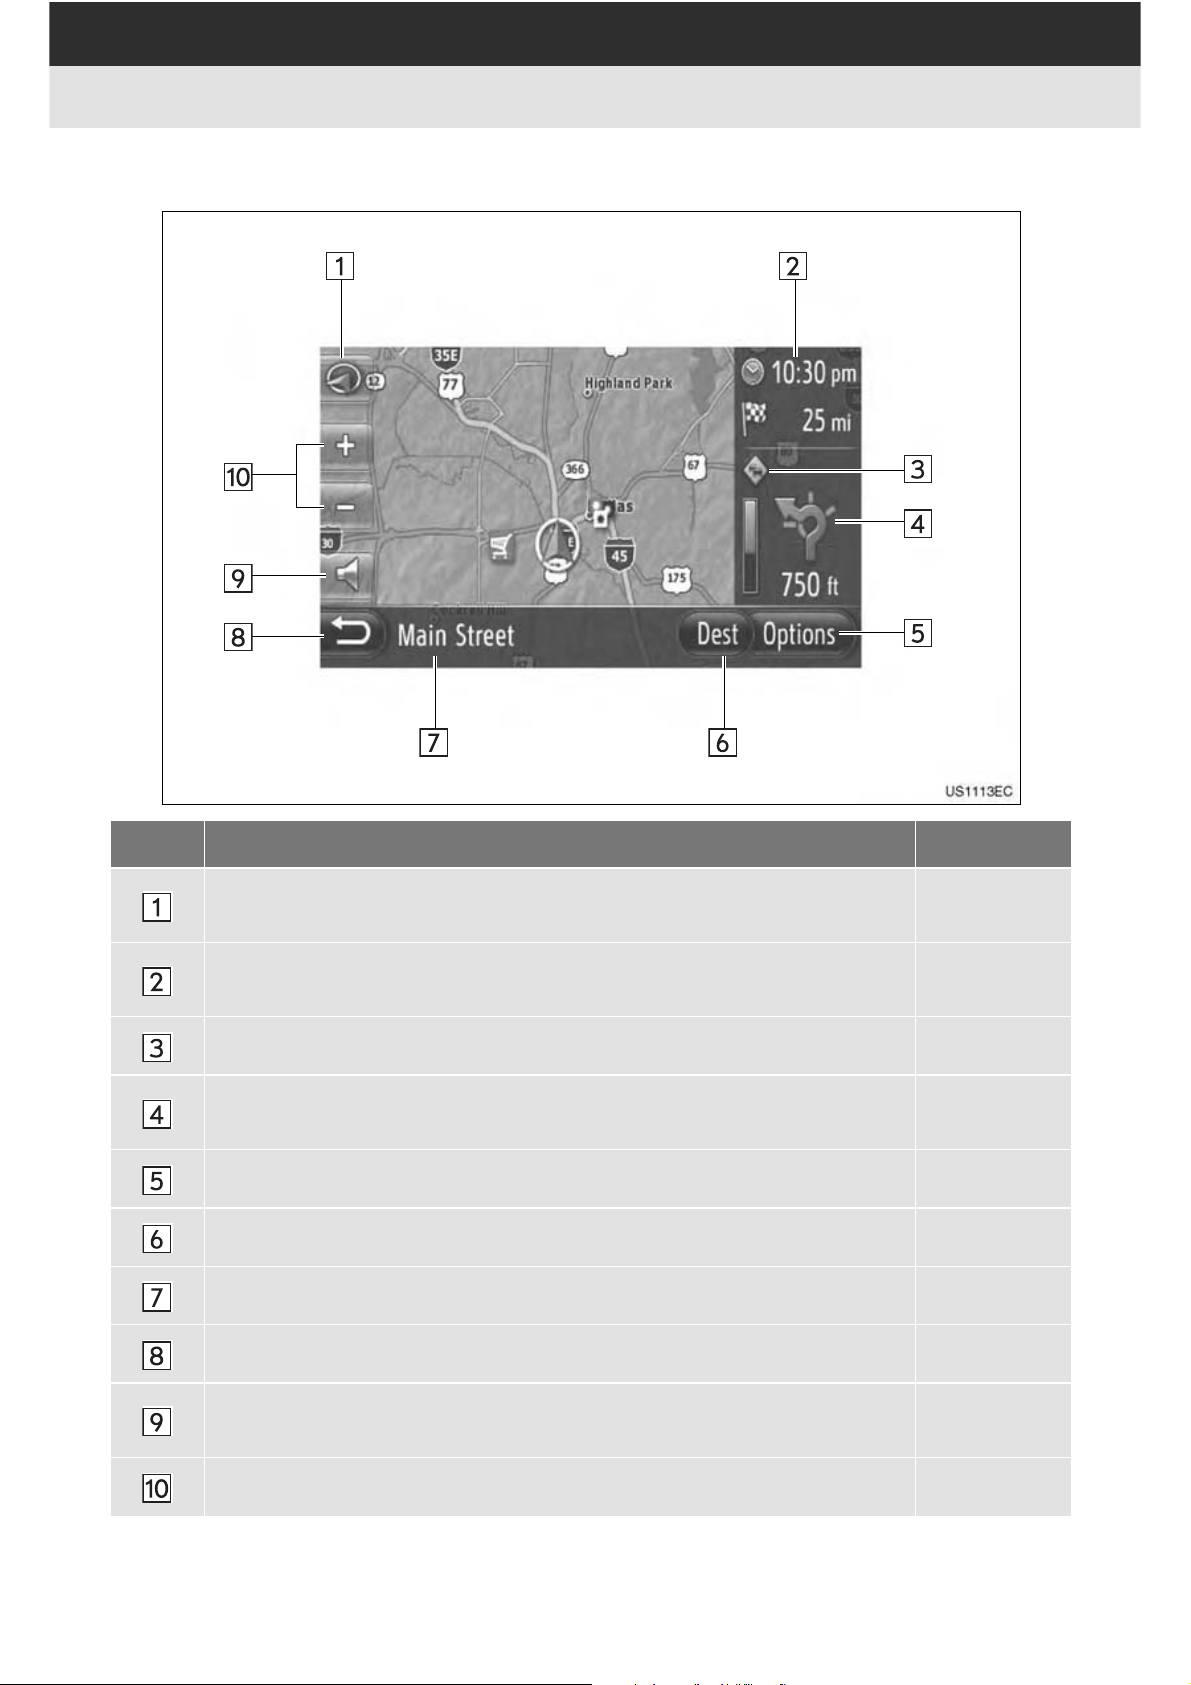
XOverview guidance screen
No. Function Page
This symbol indicates a map layout. Touching this symbol changes the
map layout.
Displays the distance, the estimated travel time to the destination, or
the estimated arrival time at the destination.
Displays traffic information on the route. 86
Displays the distance to the next turn with the arrow indicating the turn
direction.
Touch to display the “Options” screen. 46
Touch to display the “Navigation” menu screen. 21
Displays the current street name. 44
Touch to display the “Applications” menu screen. 20, 74
Touch to hear voice guidance and/or adjust the volume of voice guidance.
28
44
44
45
22
Touch to change the map scale. 27
Page 23

1. NAVIGATION OPERATION
2. NAVIGATION SYSTEM FUNCTION INDEX
XMap
Displaying maps Page
Viewing the map screen 25
Displaying the current vehicle position 25
Viewing the current vehicle position vicinity map 27
Changing the scale 27
Changing the map layout 27
Displaying Point of Interest Icons 29
Viewing traffic messages 86
Searching destination Page
Searching the destination 33
Setting the entry registered with the system as the destination 33
XRoute guidance
Before starting route guidance Page
Recalculating the route 43
Viewing alternative routes 42
2
APPLICATION-“Map”
Starting route guidance 42
Before starting or during route guidance Page
Viewing the route 46
Adding destinations 49
Recalculating the route 47
Changing the estimated travel/arrival time display 63
23
Page 24

1. NAVIGATION OPERATION
During route guidance Page
Stopping route guidance 46
Adjusting route guidance volume 45
Displaying the entire route map 46
XMemory point
Memory point Page
Registering the entry 52
Editing the entry 58
Loading the entry from external devices 56
24
Page 25

1. NAVIGATION OPERATION
3. MAP SCREEN OPERATION
TO DISPLAY MAP SCREEN
1 Press the “APPS” button.
z When the “APPS” button is pressed, the
“Applications” menu screen that was last
displayed will be returned to. Touch
until the “Applications” menu
screen is displayed.
2 Touch “Map”.
INFORMATION
● The “CAUTION” screen will be displayed
when the screen is changed to the map
screen for the first time after the engine
switch has been in the “ACC” or “ON”
position.
● If “Map” is touched while the map is
loading or an application is in use, a
pop-up window will be displayed. When
the loading process is complete, the
map screen will be displayed.
MAP SCREEN OPERATION
CURRENT VEHICLE POSITION
DISPLAY
When starting the navigation system,
the current position is displayed first.
This screen displays the current vehicle position and a map of the surrounding area.
2
APPLICATION-“Map”
3 Touch “Confirm”.
z After about a few seconds, the “CAU-
TION” screen automatically switches to
the map screen.
z The current vehicle position mark
appears in the center of the map screen.
25
Page 26
1. NAVIGATION OPERATION
INFORMATION
● The vehicle icon can be changed. (See
page 61.)
● While driving, the current vehicle posi-
tion mark is fixed on the screen and the
map moves.
● The current position is automatically set
as the vehicle receives signals from the
GPS (Global Positioning System). If the
current position is not correct, it is automatically corrected after the vehicle
receives signals from the GPS.
● After 12-volt battery disconnection, or on
a new vehicle, the current position may
not be correct. As soon as the system
receives signals from the GPS, the correct current position is displayed.
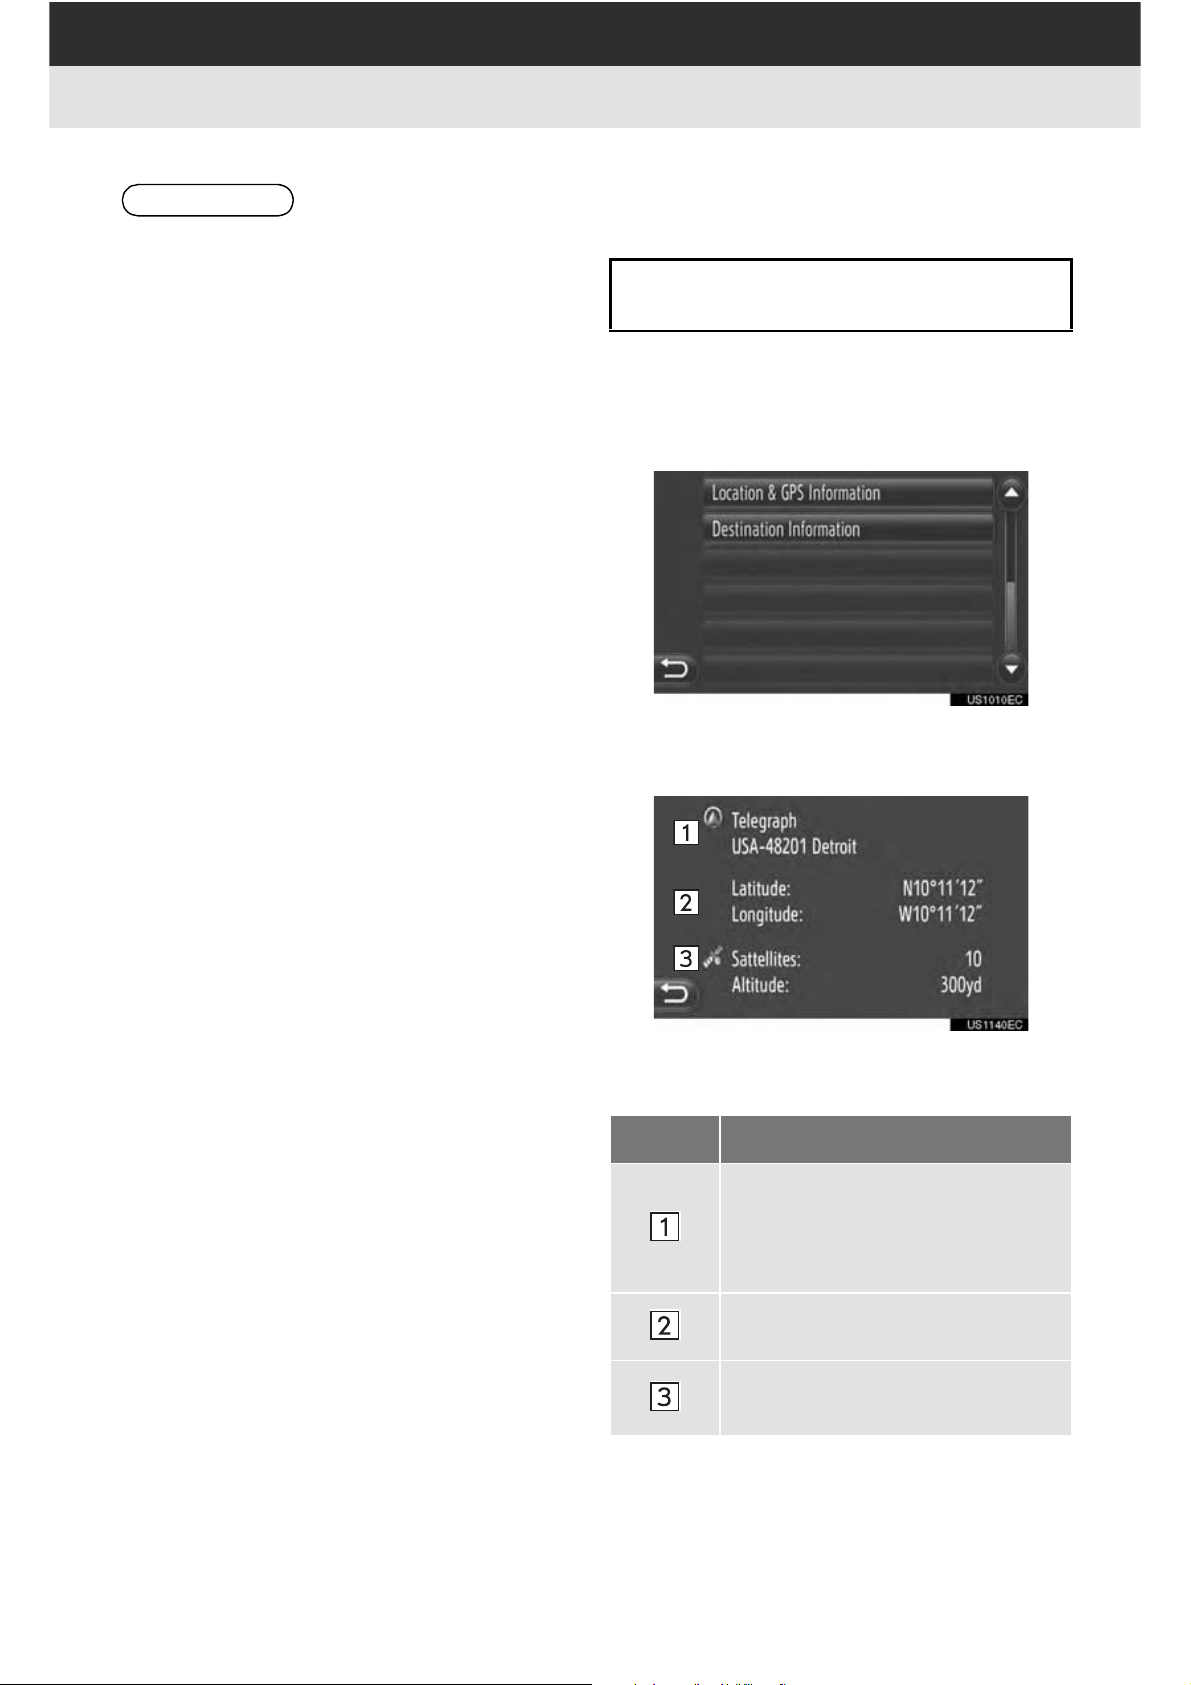
■CURRENT LOCATION AND GPS IN-
FORMATION
Current location, geo-coordinates and
GPS information are displayed.
1 Touch “Options” on the map.
2 Touch “Location & GPS Informa-
tion”.
3 An information screen will be dis-
played.
26
z On this screen, the following information is
displayed.
No. Information
The information provided varies,
depending whether the road currently being travelled on is a freeway or a street.
Latitude and Longitude
Amount of available satellites
and the altitude.
Page 27
1. NAVIGATION OPERATION
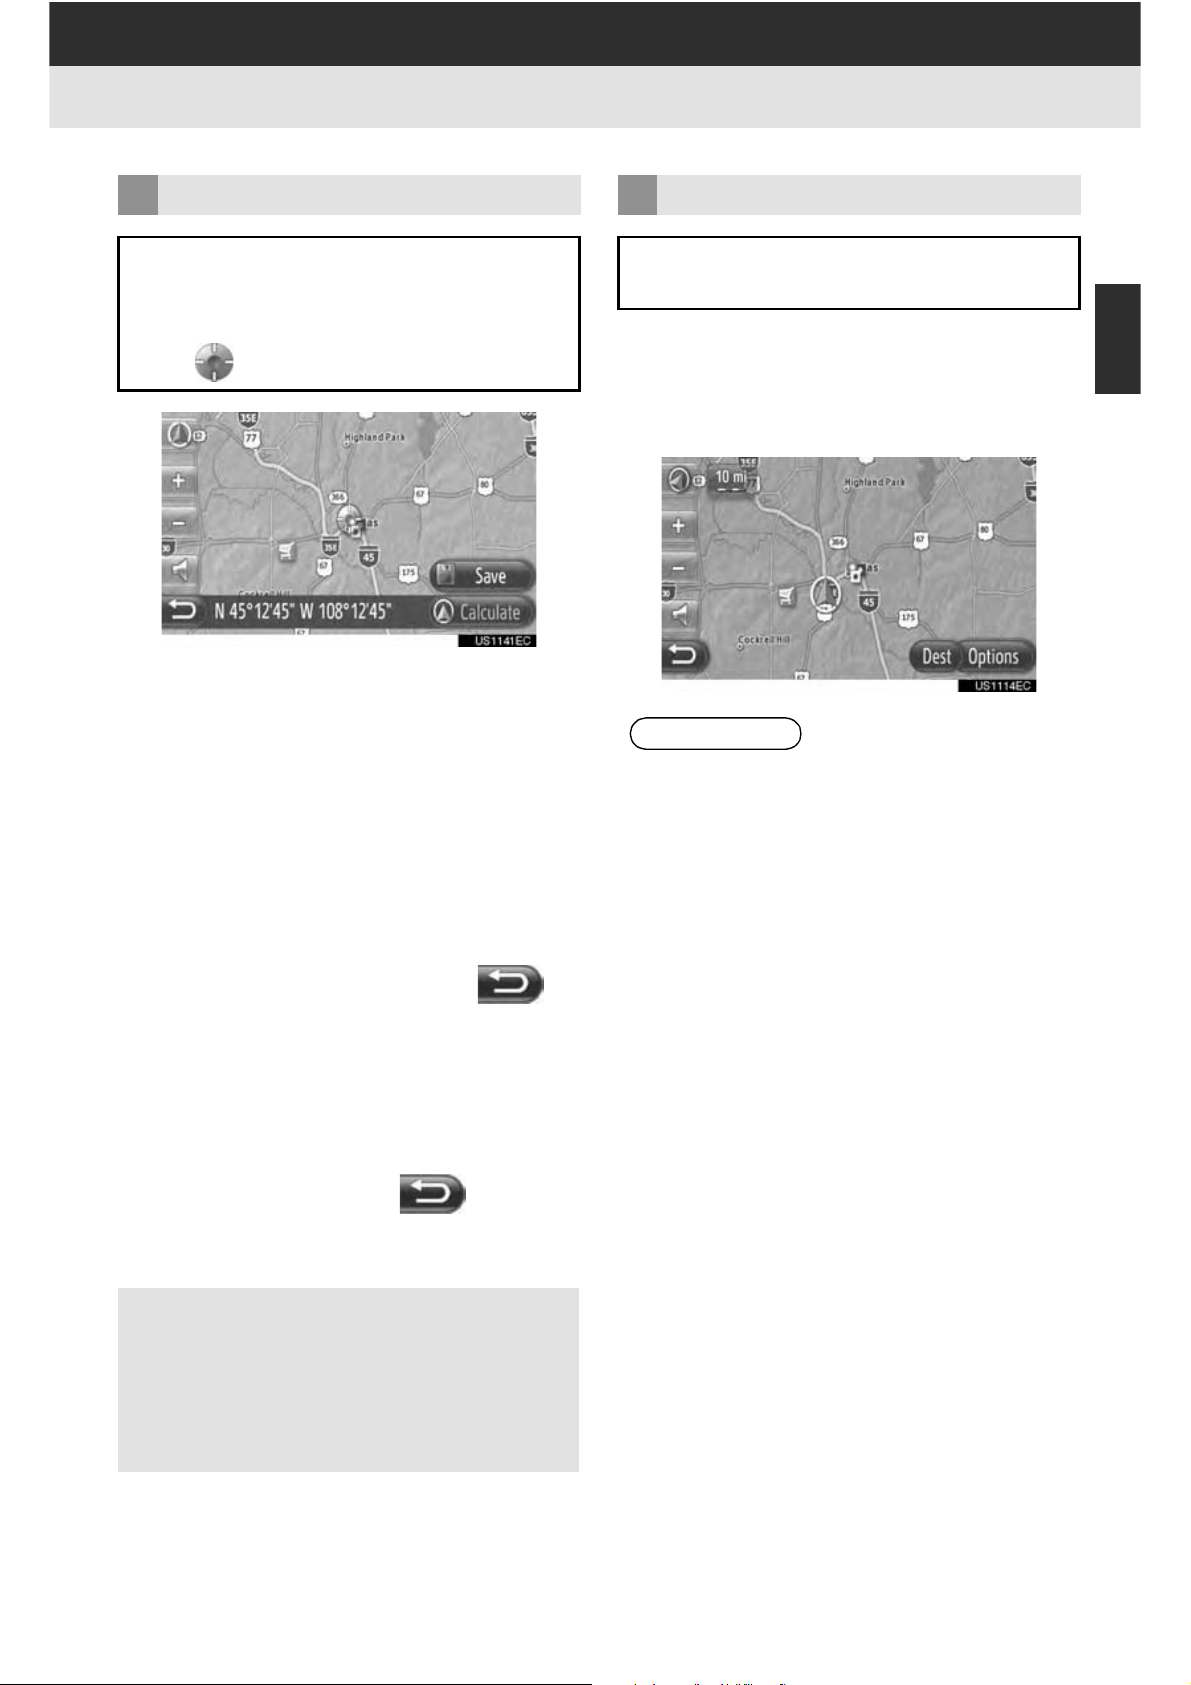
SCREEN SCROLL OPERATION
When any point on the map is touched,
that point moves to the center of the
screen and is shown by the cursor
mark .
z If a finger is continuously held on the
screen, the map will continue scrolling in
that direction until the finger is removed.
z A street name or geo-coordinates of the
touched point will be shown, depending
on the scale of the map.
z After the screen is scrolled, the map
remains centered at the selected location
until another function is activated. The current vehicle position mark will continue to
move along your actual route and may
MAP CONFIGURATIONS
Any of the following map configurations can be selected.
■MAP SCALE
1 Touch “+” or “-” to change the scale of
the map screen.
INFORMATION
● The scale range is from 150 ft to 250
miles.
● After the scale has been changed, the
new scale indicator will be displayed in
the upper left area of the screen for a
while.
2
APPLICATION-“Map”
move off the screen. When is
touched, the current vehicle position mark
returns to the center of the screen and the
map moves as the vehicle proceeds along
the designated route.
z When the scroll feature is used, the cur-
rent vehicle position mark may disappear
from the screen. Touch to display
the current vehicle position on the map
screen.
z When “Calculate” is touched, the start-
ing route guidance screen is displayed.
(See page 42.)
z When “Save” is touched, the point is
registered in the “Stored” list on the “My
Destinations” screen. (See page 54.)
27
Page 28
1. NAVIGATION OPERATION
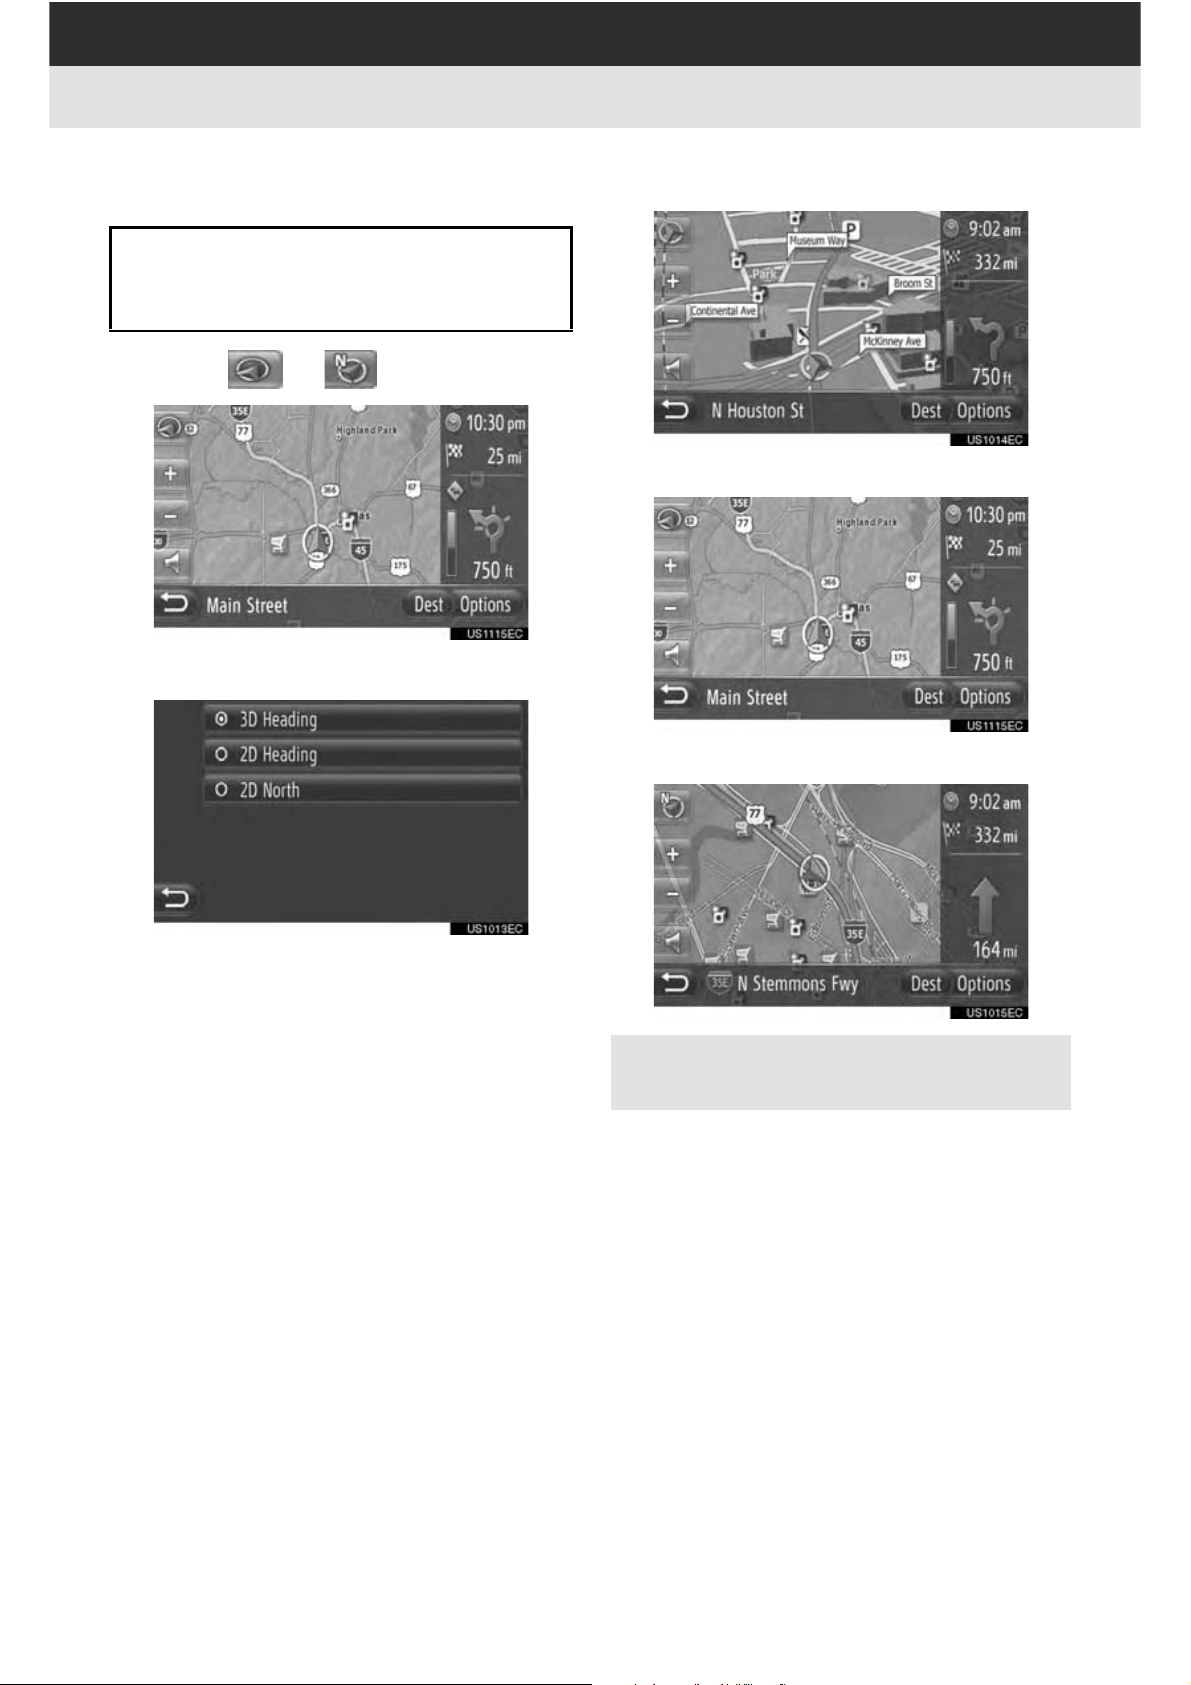
■MAP LAYOUT
The map layout can be changed from
“3D Heading”, “2D Heading” or “2D
North”.
1 Touch or .
2 Touch the desired map layout.
X3D Heading
X2D Heading
X2D North
“3D Heading”: Touch to display 3D map.
The direction of vehicle travel is always up.
“2D Heading”: Touch to display 2D map.
The direction of vehicle travel is always up.
“2D North”: Touch to display 2D map. Regardless of the direction of vehicle travel,
north is always up.
z Map layout can be also changed by
“Map Settings”. (See page 61.)
28
Page 29
1. NAVIGATION OPERATION
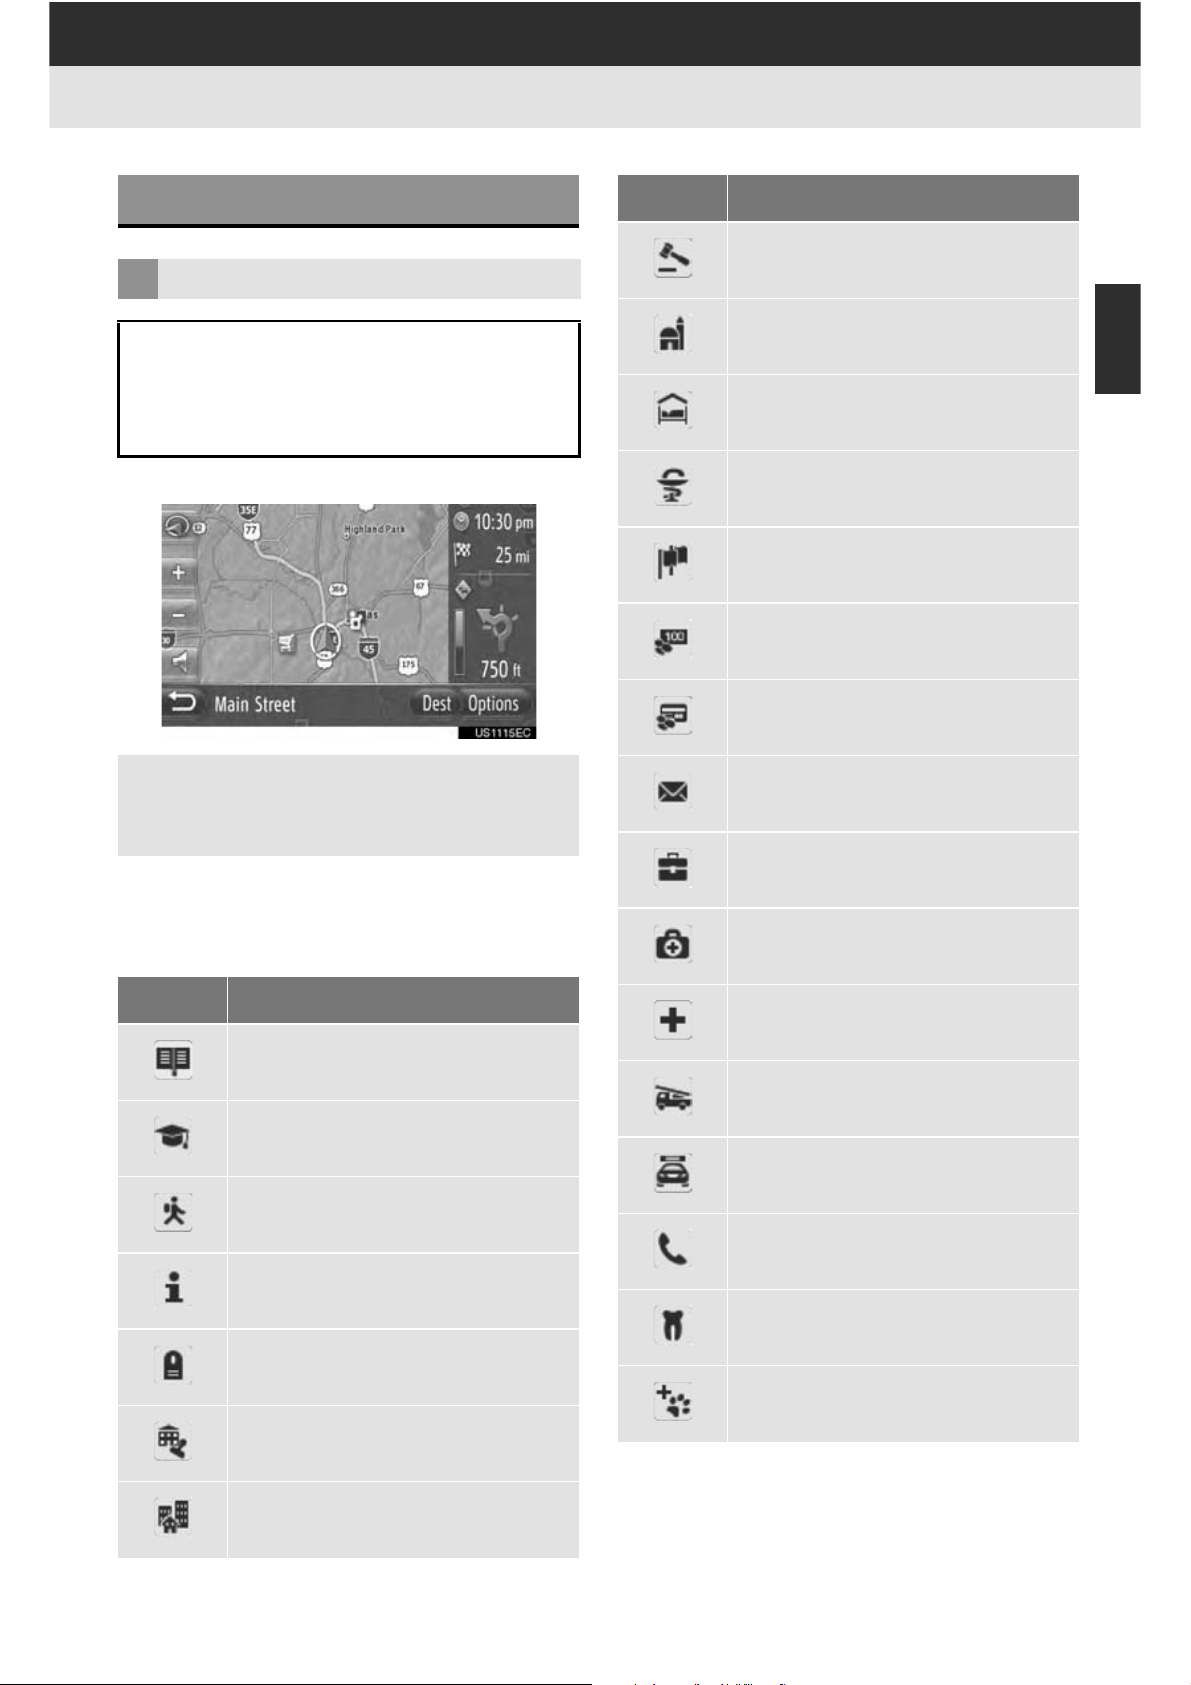
4. MAP ICONS
POI ICONS
DISPLAY POI ICONS
Points of Interest such as gas stations
and restaurants can be displayed on
the map screen. Their location can
also be set as a destination.
z POI icons are displayed on the map.
Icon Name
Court house
Place of worship
Accommodation, Hotel/Motel
Pharmacy
Convention Center, Exhibition
Center
Finance, Bank
Cash Dispenser
2
APPLICATION-“Map”
z You can select a particular type of Point
of Interest displayed on the screen.
(See page 61.)
■LIST OF POI ICONS
XPublic
Icon Name
Library
College/University
School
Tourist office
Post Office
Business, B. General, B. facility
Medical, Doctor, Health & Care
Ambulance, Hospital/Polyclinic
Fire Station
Police Station
Phone Box, Communication
Dentist
Cemetery, funeral director
Government Office, Institution,
City hall, Community gen.
Community
Veterinarian
29
Page 30

1. NAVIGATION OPERATION
XTraffic
Icon Name
Car Dealer/Repairer, Repair Facility, Repair General, Car Wash,
Tire Repair
Car Dealer
Highway Exit
Airport, Dep. /Arrival, Ground, International, Domestic
Bus Terminal, Bus Stop, Transportation, Public Transp. Stop,
Transport general
Railway Station
Icon Name
Motorcycle Dealer
XClubbing
Icon Name
Multiple POI
Bar, Nightlife
Leisure, Cultural Center, Theater, Music Center, Concert Hall
Cinema
Casino
Metropolitan Train
Gas Station
Rent-a-Car,-Facility, -Parking
Ferry Terminal
Parking, Open Parking Area, P.
Area general
Parking Garage
Open P.A. P+P
Rest Area
Motoring Organization, Automobile Club
Cafe/Bar, Cafe
Restaurant, French, Belgian,
Chinese, German, Greek, Vegetarian, Fast Food, Grill, Sea
Food, Sandwich, Steak...
XSport
Icon Name
Sport, Sport General, sport activities
Golf Course
Race Track
Stadium, Sports Center, Hippodrome
Water Sports
30
Mover, Moving Company
Bowling
Page 31

1. NAVIGATION OPERATION
XLeisure
Icon Name
Amusement Park
Winery
Museum
Shopping, Market Place, Shopping Center, Factory Outlet
Shop, Department Store, Drivethrough-bottle-shop
Tourist Attractions, Important
Tourist Attractions
Park/Recreational Area
Icon Name
Clothing
Cleaning & Laundry
2
APPLICATION-“Map”
Yacht Basin, Harbour
Camping Ground
Grocery Store
Historical Monument
RV Park, Camping
Bookstore
Hair & Beauty
Photography
Shoestore
Wine & Liquor
31
Page 32

1. NAVIGATION OPERATION
DISPLAYING POI
INFORMATION
1 Touch the desired POI icon on the
map.
2 Touch .
XOne POI
XMultiple POI
3 POI information will be displayed.
z When “Calculate” is touched, the start-
ing route guidance screen is displayed.
(See page 42.)
z When “Save” is touched, the point is
registered in the “Stored” list on the “My
Destinations” screen. (See page 54.)
z When is touched, the registered
telephone number is called.
32
Page 33

2. DESTINATION SEARCH
1. DESTINATION SEARCH
DESTINATION SEARCH ON
THE “My Destinations”
SCREEN
There are several ways to search a
destination.
(a)Destination search by stored desti-
nations
(b)Destination search by previous des-
tinations
(c)Destination search by the connect-
ed phone’s phone book
1 Touch “Dest” on the map.
2 Touch “My Destinations”.
DESTINATION SEARCH BY
“Stored”
Destinations can be selected from the
destinations registered with the system. To use this function, it is necessary to register the entry. (See page
52.)
1 Touch “Stored” on the “My Destina-
tions” screen.
2 Touch the desired entry.
2
APPLICATION-“Map”
z The “My Destinations” screen can be dis-
played by touching on any of the
“Navigation” screens.
3 Touch the tab for the desired method.
z Please refer to the following pages for a
description of each operation.
z Touch to display and edit the entry
information. (See page 58.)
3 The starting route guidance screen will
be displayed. (See page 42.)
INFORMATION
● If “Home” has not been registered, a
message will be displayed and the
setting screen will automatically
appear. (See page 53.)
33
Page 34

2. DESTINATION SEARCH
DESTINATION SEARCH BY
“Previous”
A destination can be selected from the
past destination list.
1 Touch “Previous” on the “My Destina-
tions” screen.
2 Touch the desired entry.
z Touch to display and edit the entry
information. (See page 58.)
DESTINATION SEARCH BY
“Phone Book”
A destination can be set using the
address of a contact from the phone
book of a connected cellular phone.
Before using this function, connect a
Bluetooth
®
phone with a phone profile.
(See page 203.)
If a contact does not have address in-
formation stored, the entry will be
dimmed.
1 Touch “Phone Book” on the “My Des-
tinations” screen.
2 Touch the desired entry.
3 The starting route guidance screen will
be displayed. (See page 42.)
INFORMATION
● The list can contain a maximum of
100 entries. When the maximum is
reached, the oldest destination is
deleted, making room for the new destination to be stored in the list.
z To u ch “Search Contact” to search by
the contact's name.
z Touch to display and edit the entry
information. (See page 58.)
3 The starting route guidance screen will
be displayed. (See page 42.)
INFORMATION
● “Search Contact” cannot be oper-
ated while driving.
34
Page 35

2. DESTINATION SEARCH
DESTINATION SEARCH ON
THE “Enter Destination”
SCREEN
There are several ways to search a
destination.
(a)Destination search by address
(b)Destination search by POI
(c)Destination search by advanced
1 Touch “Dest” on the map.
2 Touch “Enter Destination”.
DESTINATION SEARCH BY
“Address”
A destination can be searched using a
city name or zip code.
1 Touch “Address” on the “Enter Desti-
nation” screen.
2 Touch “Country”.
3 Touch the desired country.
2
APPLICATION-“Map”
z The “Enter Destination” screen can be dis-
played by touching on any of the
“Navigation” screens.
3 Touch the tab for the desired method.
z Please refer to the following pages for a
description of each operation.
4 Touch “State” and enter the desired
state (USA and Mexico) or province
(Canada).
35
Page 36

2. DESTINATION SEARCH
5 Touch “City” or “Zip” to enter the city
name or zip code.
z When either a “City” or “Zip” is entered,
the other will be entered automatically.
6 Touch “Street” to enter the street
name.
7 Touch “No.” to enter the street No.
8 Touch “Calculate Route”.
9 The starting route guidance screen will
be displayed. (See page 42.)
DESTINATION SEARCH BY
“POI”
POIs in a specific area can be
searched by category, name or from
the map.
■SEARCHING “By Category”
1 Touch “POI” on the “Enter Destina-
tion” screen.
2 Touch “By Category”.
INFORMATION
● “Calculate Route” can be selected
once a “City” or “Zip” has been
entered. If “Calculate Route” is
touched when only “City” or “Zip” has
been entered, a route search starts with
the center of the city entered as the destination.
● While driving, screen buttons other than
“Country” cannot be selected.
3 Touch the desired item to search the
area. (See page 38.)
4 Touch the desired category.
36
Page 37

2. DESTINATION SEARCH
5 Touch for the desired item.
z If you touch the desired item, the starting
route guidance screen will be displayed
directly.
(See page 42.)
6 Touch “Calculate”.
■SEARCHING “By Name”
1 Touch “POI” on the “Enter Destina-
tion” screen.
2 Touch “By Name” on the “POI”
screen.
3 Touch the desired item to search the
area. (See page 38.)
4 Input POI name.
2
APPLICATION-“Map”
z When “Save” is touched, the point is
registered in the “Stored” list on the “My
Destinations” screen. (See page 54.)
z When is touched, the registered
telephone number is called.
7 The starting route guidance screen will
be displayed. (See page 42.)
INFORMATION
● The POI search result list is sorted by
distance to the POI. The distance can be
sorted by the following methods:
• When the search area is set to “At
Current Position”, “Around” or
“Along Route”, the distance will be
calculated from the current position to
the POI.
• When the search area is set to “At
Destination”, the distance will be
calculated from the destination to the
POI.
5 Touch “OK”.
6 Follow the steps “SEARCHING “By
Category”” from “STEP 5”. (See page
36.)
INFORMATION
● Searching “By Name” cannot be
operated while driving.
37
Page 38

2. DESTINATION SEARCH
■SELECTING “By Map”
1 Touch “POI” on the “Enter Destina-
tion” screen.
2 Touch “By Map” on the “POI” screen.
3 Touch the desired item to search the
area. (See page 38.)
4 Touch the desired POI icon on the
map.
5 Follow the steps “SEARCHING “By
Category”” from “STEP 5”. (See page
36.)
INFORMATION
● Depending on the current map scale,
not all POI icons will be available for
selection.
■SELECTING THE SEARCH AREA
1 Touch “By Category”, “By Name” or
“By Map”.
2 Touch the desired item to search the
area.
“At Current Position”: Around the current position
“Around”: Around the defined country
(See page 39.)
“At Destination”: Around the main destination
“Along Route”: Along the current route
INFORMATION
● When route guidance is not in use, “At
Destination” and “Along Route” cannot be selected.
● When “At Destination” is selected,
POIs around the destination will be
searched. POIs around waypoints will
not be searched.
38
Page 39

2. DESTINATION SEARCH
XSelecting “Around” area
If you select “Around”, touch “De-
fine” to select the desired search area.
1 Touch “Country” to select a country.
2 Touch “State” and enter the desired
state (USA and Mexico) or province
(Canada).
3 Touch “City” or “Zip” to enter the
name or zip code.
■ONLINE SEARCH
A destination can be selected via Entune service. For detailed information
about “Online Search”, see page 83.
2
■FUEL PRICES
APPLICATION-“Map”
Fuel Prices function is using Entune
service. It enables the navigation system to display current fuel prices and
gas station locations, which can be set
as a destination if desired.
For detailed information about “Fuel
Prices”, see page 85.
z When either a “City” or “Zip” is entered,
the other will be entered automatically.
4 Touch “Define as Search Area”.
INFORMATION
● If only country is selected, a countrywide
POI search is possible.
39
Page 40

2. DESTINATION SEARCH
DESTINATION SEARCH BY
“Advanced”
1 Touch “Advanced” on the “Enter Des-
tination” screen.
2 Touch the desired method to search
the destination.
z Please refer to the following pages for a
description of each operation.
■SELECTING ON MAP
1 Touch “Select Point on Map” on the
“Advanced” screen.
2 Touch the desired point on the map.
3 Touch “Calculate”.
z When “Save” is touched, the point is
registered in the “Stored” list on the “My
Destinations” screen. (See page 54.)
4 The starting route guidance screen will
be displayed. (See page 42.)
40
Page 41

2. DESTINATION SEARCH
■ENTER GEO-COORDINATES
Geo coordinates can be entered in
DMS format (Degrees
onds”). Only coordinate values that
can potentially exist are able to be entered. Impossible coordinate values
and their relevant screen buttons will
be dimmed.
q
, Minutes’, Sec-
1 Touch “Enter Geo-coordinates” on
the “Advanced” screen.
2 Touch “N” or “S”.
INFORMATION
● If a destination that is not located on a
road is set, the vehicle will be guided to
the point on a road nearest to the destination.
● This function cannot be operated while
driving.
■ENTER INTERSECTION
1 Touch “Enter Intersection” on the
“Advanced” screen.
2 Touch “Country” to select a country.
2
APPLICATION-“Map”
3 Input the latitude (Degrees
Seconds”).
q
, Minutes’,
4 Touch “W” or “E”.
5 Input the longitude (Degrees
utes’, Seconds”).
q
, Min-
6 Touch “OK”.
7 Touch “Calculate”.
z When “Save” is touched, the point is
registered in the “Stored” list on the “My
Destinations” screen. (See page 55.)
3 Touch “State” and enter the desired
state (USA and Mexico) or province
(Canada).
4 Touch “City” or “Zip” to enter the city
name or zip code.
5 Touch “Street” to input the name of
the first intersecting street and then
touch “OK”.
6 Touch “Street” to input the name of
the second intersecting street and then
touch “OK”.
7 Touch “Start Calculation”.
8 The starting route guidance screen will
be displayed. (See page 42.)
8 The starting route guidance screen will
be displayed. (See page 42.)
41
Page 42

3. ROUTE GUIDANCE
1. STARTING ROUTE GUIDANCE
STARTING ROUTE
GUIDANCE SCREEN
After searching the destination, the
starting route guidance screen will be
displayed.
According to the setting, either the normal screen or route alternatives screen
will be displayed. (See page 64.)
CAUTION
● Be sure to obey traffic regulations and
keep road conditions in mind while driving. If a traffic sign on the road has been
changed, the route guidance may not
indicate such changed information.
INFORMATION
● The default recommended route can be
changed. (See pages 43 and 64.)
● The arrival time or the remaining time
will be displayed in the upper right area
of the map. Each time the area is
touched, the display switches between
displaying the arrival time and remaining
time.
● Distance of the entire route is displayed
on the map.
● The starting route guidance screen will
always be displayed in 2D North.
ROUTE ALTERNATIVES
SCREEN
Three recommended routes are displayed on the map.
NORMAL SCREEN
The recommended route will be displayed on the map.
1 Touch “Start”.
z “Preferences”: Touch to adjust the
route preferences before starting the
route guidance. (See page 43.)
z “Avoid”: Touch to adjust the avoidance
criteria before starting the route guidance. (See page 43.)
2 Starts route guidance. (See page 44.)
1 Touch one of the three recommended
routes to select it.
z “Avoid”: Touch to adjust the avoidance
criteria before starting the route guidance. (See page 43.)
2 Start route guidance. (See page 44.)
INFORMATION
● The arrival time and distance of the
entire route will be displayed in the list.
● The starting route guidance screen will
always be displayed in 2D North.
42
Page 43

3. ROUTE GUIDANCE
SETTING THE ROUTE
SETTING THE ROUTE
PREFERENCES
1 Touch “Preferences” on the starting
route guidance screen.
2 Touch the desired item.
“Fast Route”: Touch to calculate the fast-
est route.
“Short Route”: Touch to calculate the
shortest route.
SETTING THE AVOIDANCE
CRITERIA
1 Touch “Avoid” on the starting route
guidance screen.
2
2 Touch the desired item.
APPLICATION-“Map”
“Avoid Freeways”: Touch to avoid
freeways.
“Avoid Toll Roads”: Touch to avoid toll
roads.
“Avoid Tunnels”: Touch to avoid tun-
nels.
“Ecological Route”: Touch to calculate
an ecological route.
3 The route will be recalculated.
“Avoid Ferries”: Touch to avoid ferries.
“Avoid Border Crossings”: Touch to
avoid border crossings.
3 Touch .
4 The route will be recalculated.
INFORMATION
● Setting the route preference and avoid-
ance can be also changed from the
“Route Options” screen. (See page 64.)
43
Page 44

3. ROUTE GUIDANCE
2. ROUTE GUIDANCE
ROUTE GUIDANCE SCREEN
While guiding the route, the following
screen will be displayed.
z On this screen, the following information is
displayed.
No. Information
Distance and travel/arrival time to
the destination
■SIGNPOSTS
When approaching the turn, a signpost
will automatically be displayed.
■LANE RECOMMENDATION
When approaching a maneuver, the
lane recommendation will automatically be displayed.
Traffic message on the route (See
page 86.)
The colored section of the bar reduces as the vehicle approaches
the next turn
Distance to the next turn with the arrow indicating the turn direction
The name of the road currently being travelled on
Guidance route
Current position
INFORMATION
● If the vehicle goes off the guided route,
the route will be recalculated.
● For some areas, the roads have not
been completely digitized in our database. For this reason, the route guidance may select a road that should not
be traveled on.
● The above items will be displayed
depending on the map scale.
● The displaying of the above items can
be switched off. (See page 61.)
44
Page 45

3. ROUTE GUIDANCE
VOICE GUIDANCE
The voice guidance provides various
messages as you approach an intersection, or other points where maneuvering the vehicle is necessary.
z When is touched while route guid-
ance is active, the last navigation
announcement will be repeated.
CAUTION
● Be sure to obey the traffic regulations
and keep the road condition in mind
especially when you are driving on IPD
roads. The route guidance may not have
the updated information such as the
direction of a one way street.
2
APPLICATION-“Map”
z After touching , touch “+” or “-” to
adjust the volume level of the navigation
announcements.
z After touching “+” or “-”, short audible
information will be given to control the current volume level (e.g. turn up/turn down).
INFORMATION
● The street names may not be pro-
nounced correctly or clearly due to the
text to-speech function.
● On freeways, interstates or other high-
ways with higher speed limits, the voice
guidance will be made at earlier points
than on city streets in order to allow time
to maneuver the vehicle.
● If the system cannot determine the cur-
rent vehicle position correctly (in cases
of poor GPS signal reception), the voice
guidance may be early or delayed.
45
Page 46

3. ROUTE GUIDANCE
3. SETTING AND DELETING THE ROUTE
Routes can be checked, changed and
recalculated during route guidance.
SETTING FROM THE
“Options” SCREEN
Checking and setting routes is mainly
performed from the “Options” screen.
1 Touch “Options”.
No. Function
Touch to change the map setting.
(See page 61.)
Touch to stop the current route guidance.
Touch to set the route preferences
and the avoidance criteria for the
route calculation. (See page 47.)
(The current status is displayed on
the right of the item.)
Touch to display a list of the different
segments of the route. It is also possible to define a detour. (See page
47.) (The current status is displayed
on the right of the item.)
Touch to display the complete route.
2 Touch the desired items.
z On this screen, the following functions can
be operated.
Touch to block a fixed distance on
the road ahead. (See page 48.) (The
current status is displayed on the
right of the item.)
Touch to display the current location, geo-coordinates and GPS information. (See page 26.)
Touch to display the destination’s information. (See page 48.)
46
Page 47

3. ROUTE GUIDANCE
SETTING THE ROUTE
PREFERENCE OR AVOIDANCE
CRITERIA
1 Touch “Route Options For Current
Route” on the “Options” screen.
2 Touch the desired item to change the
route setting.
“Preferences”: Touch to adjust the route
preferences. (See page 43.)
“Avoid”: Touch to adjust the avoidance
criteria. (See page 43.)
DISPLAYING THE ROUTE LIST
A list of the different segments of the
route can be displayed.
1 Touch “Route List” on the “Options”
screen.
2 Touch the desired item to display the
segment.
z Guidance arrow, street name, distance to
the point are displayed.
3 The detail of the segment is displayed.
2
APPLICATION-“Map”
3 The route will be recalculated.
or : Touch to display the next or pre-
vious segment.
z To uch “Detour” to detour the desired
segment. (See page 51.)
47
Page 48

3. ROUTE GUIDANCE
BLOCK ROAD AHEAD
A fixed distance on the road ahead can
be blocked.
1 Touch “Block Road Ahead” on the
“Options” screen.
2 Touch the desired item to select the
desired detour distance.
“Deactivate Block Road Ahead”: Touch
to deactivate the function.
DISPLAYING THE
DESTINATION INFORMATION
The destination information is displayed.
1 Touch “Destination Information” on
the “Options” screen.
2 The destination information screen will
be displayed.
“Block Next 1 mi” ~ “Block Next 12mi”:
Touch to detour the next 1 mile ~ 12 miles
of the current route (road).
z “Deactivate Block Road Ahead” can be
selected when the block road ahead function has been activated.
3 The route will be recalculated.
z A blocked route will be marked in the map.
z After the blocked route has been
detoured, the block road ahead function
will automatically be deactivated.
z On this screen, the following information is
displayed.
No. Information
Address of destination
Selected route preference
Selected avoidance criteria
Arrival time, remaining time and
distance to destination
48
Address of each waypoint (if entered)
Page 49

3. ROUTE GUIDANCE
ADDING DESTINATIONS
Destinations can be added and the
route changed accordingly.
1 Touch “Dest” on the map.
2 Touch “Enter Destination”.
z The “Enter Destination” screen can be dis-
played by touching on any of the
“Navigation” screens.
XIf you search the destination by “Enter
Address”
5 Touch “Add as Waypoint”.
XIf you search the destination by “Select
Point on Map” or “Enter Geo-coordinates”
5 Touch “Add”.
XIf you search the destination by the other
methods
5 Touch the desired entry.
6 Touch “Insert Waypoint” to select the
position of the waypoint.
2
APPLICATION-“Map”
3 Touch “Waypoint” on the “Enter Des-
tination” screen.
4 Touch the desired method to search
the destination.
z For detailed information about searching
the destination on the map, see page 33.
7 The route will be recalculated.
INFORMATION
● In addition to the main destination, a
maximum of 4 waypoints can be set.
● The main destination is marked by ,
the waypoints are marked by .
49
Page 50

3. ROUTE GUIDANCE
EDITING DESTINATIONS
1 Touch “Show Destination List” on
the “Waypoint” screen.
2 Touch the desired destination to be ed-
ited.
z On this screen, the following functions can
be operated.
No. Function
Touch to register the point in the
“Stored” list on the “My Destinations” screen. (See page 55.)
Touch to change the order of the
destinations. Touch or to
move the destination up or down the
order displayed on the next screen.
Touch to delete the destination.
Touch to delete all waypoints.
INFORMATION
3 Touch desired item.
● If the main destination is deleted, the
last waypoint before the deleted destination will become the new main destination.
50
Page 51

3. ROUTE GUIDANCE
DETOURING A SEGMENT ON
THE ROUTE
When detouring a segment, the detour
route can be changed.
DETOURING THE SEGMENT
1 Display the route list. (See page 47.)
2 Touch the desired segment to detour.
CANCELLING THE DETOURED
SEGMENT
1 Display the route list. (See page 47.)
2 Touch “Detours”.
3 Touch “Detour Off”.
2
APPLICATION-“Map”
3 Touch “Detour”.
or : Touch to display the next or
previous segment.
4 The route will be recalculated.
z If there is more than one point to detour, a
list of points to detour will be displayed.
Select points from the list to cancel
detouring them.
4 The route will be recalculated.
51
Page 52

4. MY DESTINATIONS
1. REGISTERING A ENTRY
REGISTERING A NEW ENTRY
Up to 200 destinations can be registered with this system.
INFORMATION
● This function cannot be operated while
driving.
REGISTERING FROM THE “My
Destinations” SCREEN
1 Touch “Dest” on the map.
2 Touch “My Destinations”.
5 Input the entry address. (See page 35.)
6 Touch “Save New Entry”.
7 Input the entry name.
z The “My Destinations” screen can be dis-
played by touching on any of the
“Navigation” screens.
3 Touch “Stored” on the “My Destina-
tions” screen.
4 Touch “Create New Entry”.
8 Touch “OK”.
9 The entry is saved in the “Stored” list.
z Touch to display and edit the entry
information. (See page 58.)
52
Page 53

4. MY DESTINATIONS
■REGISTERING “Home”
If “Home” has not been registered,
touching “Home” allows a home address to be registered.
1 Touch “Home”.
2 Touch “Yes”.
XIf you search the destination by “Enter
Address”
4 Touch “Save as Home Address”.
XIf you search the destination by “Select
Point on Map” or “Enter Geo-coordinates”
4 Touch “Save”.
XIf you search the destination by the other
methods
4 Touch the desired entry from the list.
5 The entry is registered as “Home” in
the “Stored” list.
z Touch to display and edit the entry
information. (See page 58.)
2
APPLICATION-“Map”
3 Touch the desired method to search
the point.
z For details about searching the point on
the map, see page 33.
53
Page 54

4. MY DESTINATIONS
REGISTERING FROM THE MAP
1 Touch the desired point on the map.
2 Touch “Save”.
3 Follow the steps “REGISTERING
FROM THE “My Destinations”
SCREEN” from “STEP 7”. (See page
52.)
REGISTERING FROM POI
REGISTERING FROM THE LIST
■REGISTERING FROM THE LIST ON
THE “Previous” OR “Phone Book”
SCREEN
1 Search the point by “Previous” or
“Phone Book”. (See pages 34 and 34.)
2 Touch next to the desired item.
3 Touch “Add to Stored Destinations”.
1 Search the point by “POI”. (See pages
32 and 36.)
2 Touch “Save”.
3 Follow the steps “REGISTERING
FROM THE “My Destinations”
SCREEN” from “STEP 7”. (See page
52.)
4 Follow the steps “REGISTERING
FROM THE “My Destinations”
SCREEN” from “STEP 7”. (See page
52.)
INFORMATION
● If the contact includes an address and a
phone number, they will be stored in the
“Stored” list on the “My Destinations”
screen and “Contacts” screen. (See
pages 52 and 165.)
54
Page 55

4. MY DESTINATIONS
■REGISTERING FROM THE DESTI-
NATION LIST
1 Display the “Show Destination List”
screen. (See page 50.)
2 Touch the desired destination.
3 Touch “Add to Stored Destinations”.
REGISTERING FROM GEOCOORDINATES
1 Search the point by “Enter Geo-coor-
dinates”. (See page 41.)
2
2 Touch “Save”.
APPLICATION-“Map”
3 Follow the steps “REGISTERING
FROM THE “My Destinations”
SCREEN” from “STEP 7”. (See page
52.)
4 Follow the steps “REGISTERING
FROM THE “My Destinations”
SCREEN” from “STEP 7”. (See page
52.)
55
Page 56

4. MY DESTINATIONS
REGISTERING FROM AN
EXTERNAL DEVICE
“vCard” formatted data can be transferred from a USB memory to this system. Transferred addresses and
numbers will be stored in the “Stored”
list on the “My Destinations” screen
and “Contacts” screen. (See pages 52
and 165.)
■LOADING ADDRESSES VIA A USB
MEMORY
1 Open the cover of the USB/AUX port
and connect a USB memory.
4 Touch “Advanced” on the “Enter Des-
tination” screen.
5 Touch “Load Contacts from USB”.
6 The following screen will be displayed
while loading the data.
z The USB/AUX port is located on the
instrument panel, or in the console box or
glove box etc. The location and design are
different depending on the vehicle. For
details, see the Pictorial index of “Owner’s
Manual”.
2 Touch “Dest” on the map.
3 Touch “Enter Destination”.
z To cancel this function, touch “Cancel”.
7 The following screen will be displayed
when loading is complete.
8 The entry is registered in the “Stored”
list on the “My Destinations” screen
and “Contacts” screen. (See pages 52
and 165.)
NOTICE
z The “Enter Destination” screen can be dis-
played by touching on any of the
“Navigation” screens.
56
● Do not turn off the engine while down-
loading.
Page 57

INFORMATION
● If a message similar to the one below is
displayed, delete X item(s) in the
“Stored” list on the “My Destinations”
screen and “Contacts” screen to make
room for the new destination(s). (See
pages 58 and 168.)
4. MY DESTINATIONS
2
APPLICATION-“Map”
■LOADING ADDRESSES FROM A
PHONE
Address and number will be stored in
the “Stored” list on the “My Destinations” screen and “Contacts” screen.
(See pages 52 and 165.) For detailed
information about “Load Addresses
from Phone”, see page 91.
57
Page 58

4. MY DESTINATIONS
2. DISPLAYING AND EDITING THE ENTRY INFORMATION
DISPLAYING AND EDITING
THE ENTRY INFORMATION
Detailed information of entries in the
list can be displayed or edited.
1 Touch next to the desired item on
the “My Destinations” screen.
XThe entry options screen of “Stored” list
XThe entry options screen of “Phone
Book” list
z On this screen, the following functions can
be operated.
NO. Function
Touch to display the details of
the entry information. (See page
59.)
Touch to change the entry name.
(See page 59.)
XThe entry options screen of “Previous”
list
Touch to edit the address. (See
page 59.)
Touch to delete the entry.
Touch to delete all entries.
Touch to register the entry in the
“Stored” list on the “My Destinations” screen and “Contacts”
screen. (See page 54.)
58
Page 59

4. MY DESTINATIONS
SHOW DETAILS OF THE
ENTRY
1 Touch “Show Details” on the entry
options screen.
2 This screen will be displayed.
z The address will be marked on the map.
z The address and a picture, if available, of
the contact from the system’s phone book
will be displayed.
z When you touch “Start”, the starting
route guidance screen will be displayed.
CHANGING THE ENTRY NAME
EDITING THE ADDRESS
1 Touch “Edit Address” on the entry
options screen.
2 Input the new address. (See page 35.)
3 Touch “Save Changes”.
INFORMATION
● This function cannot be operated while
driving.
● If an entry that is transferred from a cel-
lular phone is edited, the change will
affect the entry in the “Stored” list on the
“My Destinations” screen and “Contacts”
screen. (See pages 52 and 165.)
2
APPLICATION-“Map”
1 Touch “Rename XX” on the entry op-
tions screen.
2 Input the new name.
3 Touch “OK”.
INFORMATION
● This function cannot be operated while
driving.
59
Page 60

4. MY DESTINATIONS
3. SENDING STORED CONTACTS TO A USB MEMORY
SENDING STORED
CONTACTS TO A USB
MEMORY
The entries stored in the “Stored” list
on the “My Destinations” screen and
“Contacts” screen (See pages 52 and
165.) can be transferred to a USB
memory.
1 Open the cover of the USB/AUX port
and connect a USB memory.
3 Touch “General”.
4 Touch “Send Stored Contacts to
USB”.
z The USB/AUX port is located on the
instrument panel, or in the console box or
glove box etc. The location and design are
different depending on the vehicle. For
details, see the Pictorial index of “Owner’s
Manual”.
2 Press the “SETUP” button.
5 The following screen will be displayed
while sending the data.
z To cancel this function, touch “Cancel”.
6 The following screen will be displayed
when sending data to the USB memory
is complete.
60
Page 61

5. NAVIGATION SETTING
1. MAP SETTINGS
SETTING THE MAP
1 Touch “Options”.
2 Touch “Map Settings”.
z On this screen, the following functions can
be set.
No. Function
Touch to change the map layout.
(See page 28.)
Touch to set the display of POI
icon categories. (See page 62.)
Touch to change the vehicle
icon. (See page 62.)
Touch to change the screen to
“Day” or “Night”. (See page
63.)
Touch to change the estimated
time between “Arrival Time/Dis-
tance” and “Remaining Time/
Distance” to the destination.
(See page 63.)
2
APPLICATION-“Map”
3 Touch the item to be set.
Touch to set the display of the
route guidance arrow on or off.
(See page 44.)
Touch to set the display of the
name of the road currently being
travelled on to on or off. (See
page 44.)
Touch to set the display of signposts on or off. (See page 44.)
Touch to set the display of the
lane recommendation on or off.
(See page 44.)
Touch to set the display of the
traffic message icons on or off.
(See page 44.)
INFORMATION
● The current setting of each item is dis-
played on its right.
● Selected item’s checkboxes will change
to when the item has been
selected. All selected items will be activated simultaneously.
61
Page 62

5. NAVIGATION SETTING
POIS ON MAP
POI categories displayed on the map
can be selected.
1 Touch “POIs on Map” on the “Map
Settings” screen.
2 Select the POI categories.
z On this screen, the following functions can
be operated.
VEHICLE ICONS
The vehicle icon can be changed.
1 Touch “Vehicle Icons” on the “Map
Settings” screen.
2 Touch the desired icon.
3 Touch .
No. Function
Touch to display all categories.
Touch to hide all icons.
Touch to display the selected
icons.
Touch to select items from other
categories.
3 Touch .
62
Page 63

5. NAVIGATION SETTING
DAY/NIGHT MODE
The screen can be changed to day
mode or night mode.
1 Touch “Day/Night Mode” on the “Map
Settings” screen.
2 Touch the desired item.
“Automatic”: Touch to change the screen
to day or night mode depending on the position of the headlight switch.
“Day”: Touch to always display the map in
day mode.
“Night”: Touch to always display the map
in night mode.
3 Touch .
ARRIVAL INFORMATION
The estimated time to the destination
can be changed between arrival time/
distance and remaining time/distance.
It can also be turned off.
1 Touch “Arrival Information” on the
“Map Settings” screen.
2 Touch the desired item.
“Off”: Touch to turn off the estimated time/
distance.
“Arrival Time/Distance”: Touch to dis-
play the arrival time in the upper right area
of the map. The distance to the destination
will also be displayed.
“Remaining Time/Distance”: Touch to
display the remaining time to reach the
destination in the upper right area of the
map. The distance to the destination will
also be displayed.
2
APPLICATION-“Map”
3 Touch .
63
Page 64

5. NAVIGATION SETTING
2. ROUTE SETTINGS
SETTING THE ROUTE
OPTIONS
SETTING THE ROUTE
CALCULATION
The route preferences for the route calculation can be set.
1 Touch “Dest” on the map.
2 Touch “Route Options”.
“Route Type”: Touch to select the route
type between “Fast Route”, “Short
Route” and “Ecological Route”.
“Show Route Alternatives”: Touch to
display 3 routes (fastest, shortest and ecological) on the map after a route calculation.
“Make a Round Trip”: Touch to have the
route automatically calculated back to the
starting point after the set destination has
been reached.
z Entered waypoints will also be considered
on the way back to the starting point.
5 Touch .
INFORMATION
● “Show Route Alternatives” and
“Make a Round Trip” are not selectable at the same time.
z The “Route Options” screen can be dis-
played by touching on any of the
“Navigation” screens.
3 Touch “Preferences” on the “Route
Options” screen.
4 Touch the desired item.
64
Page 65

SETTING THE AVOIDANCE
CRITERIA FOR THE ROUTE
CALCULATION
5. NAVIGATION SETTING
The avoidance criteria for the route calculation can be set.
1 Touch “Dest” on the map.
2 Touch “Route Options”.
z The “Route Options” screen can be dis-
played by touching on any of the
“Navigation” screens.
3 Touch “Avoid” on the “Route Options”
screen.
2
APPLICATION-“Map”
4 Touch the desired item.
“Avoid Freeways”: Touch to avoid free-
ways.
“Avoid Toll Roads”: Touch to avoid toll
roads.
“Avoid Tunnels”: Touch to avoid tunnels.
“Avoid Ferries”: Touch to avoid ferries.
“Avoid Border Crossings”: Touch to
avoid border crossings.
5 Touch .
65
Page 66

6. NAVIGATION SYSTEM INFORMATION
1. LIMITATIONS OF THE NAVIGATION SYSTEM
This navigation system calculates the
current vehicle position using satellite
signals, various vehicle signals, map
data, etc. However, an accurate position may not be shown depending on
satellite condition, road configuration,
vehicle condition or other circumstances.
The Global Positioning System (GPS) developed and operated by the U.S. Department of Defense provides an accurate
current vehicle position, normally using 4
or more satellites, and in some case 3 satellites. The GPS system has a certain level
of inaccuracy. While the navigation system
will compensate for this most of the time,
occasional positioning errors of up to 300
feet (100 m) can and should be expected.
Generally, position errors will be corrected
within a few seconds.
The GPS signal may be physically obstructed, leading to inaccurate vehicle position on the map display. Tunnels, tall
buildings, trucks, or even the placement of
objects on the instrument panel may obstruct the GPS signals.
The GPS satellites may not send signals
due to repairs or improvements being
made to them.
Even when the navigation system is receiving clear GPS signals, the vehicle position may not be shown accurately or
inappropriate route guidance may occur in
some cases.
NOTICE
● The installation of window tinting may
obstruct the GPS signals. Most window
tinting contains some metallic content
that will interfere with GPS signal reception of the antenna. We advise against
the use of window tinting on vehicles
equipped with navigation systems.
z Accurate current vehicle position may not
be shown in the following cases:
• When driving on a small angled Yshaped road.
• When driving on a winding road.
• When driving on a slippery road such as
in sand, gravel, snow, etc.
• When driving on a long straight road.
• When motorway and surface streets run
in parallel.
• After moving by ferry or vehicle carrier.
• When a long route is searched during
high speed driving.
• When driving without setting the current
position calibration correctly.
• After repeating a change of direction by
going forward and backward, or turning
on a turntable in the parking lot.
• When leaving a covered parking lot or
parking garage.
• When a roof carrier is installed.
• When driving with tire chains installed.
• When the tires are worn.
• After replacing a tire or tires.
• When using tires that are smaller or
larger than the factory specifications.
• When the tire pressure in any of the four
tires is not correct.
66
Page 67

z Inappropriate route guidance may occur in
the following cases:
• When turning at an intersection off the
designated route guidance.
• If you set more than one destination but
skip one of them, auto reroute will display a route returning to the destination
that was skipped.
• When turning at an intersection for which
there is no route guidance.
• When passing through an intersection
for which there is no route guidance.
• During auto reroute, the route guidance
may not be available for the next turn to
the right or left.
• It may take a long time to operate auto
reroute during high speed driving. In
auto reroute, a detour route may be
shown.
• After auto reroute, the route may not be
changed.
• An unnecessary U-turn may be shown or
announced.
• A location may have multiple names and
the system will announce one or more.
• Some routes may not be searched.
• If the route to your destination includes
gravel, unpaved roads or alleys, the
route guidance may not be shown.
• Your destination point might be shown
on the opposite side of the street.
• When a portion of the route has regulations prohibiting the entry of the vehicle
that vary by time or season or other reasons.
• The road and map data stored in the
navigation system may not be complete
or may not be the latest version.
6. NAVIGATION SYSTEM INFORMATION
2
APPLICATION-“Map”
INFORMATION
● This navigation system uses tire turning
data and is designed to work with factory-specified tires for the vehicle.
Installing tires that are larger or smaller
than the originally equipped diameter
may cause inaccurate display of the current vehicle position. The tire pressure
also affects the diameter of the tires so
make sure the tire pressure of all four
tires is correct.
67
Page 68

6. NAVIGATION SYSTEM INFORMATION
2. MAP INFORMATION
END-USER TERMS
The data (“Data”) is provided for your
personal, internal use only and not for
resale. It is protected by copyright, and
is subject to the following terms and
conditions which are agreed to by you,
on the one hand, and Harman
(“Harman”) and its licensors (including
their licensors and suppliers) on the
other hand.
© 2011 NAVTEQ B.V., © Bundesamt
für Eich- und Vermessungswesen, ©
EuroGeographics, source: © IGN 2009
– BD TOPO
wurden mit
Genehmigung der zustaendigen
Behoerden entnommen, Contains
Ordnance Survey data © Crown
copyright and database right 2010
Contains Royal Mail data © Royal Mail
copyright and database right 2010,
Copyright Geomatics Ltd., Copyright ©
2003; Top-Map Ltd., La Banca Dati
Italiana è stata prodotta usando quale
riferimento anche cartografia numerica
ed al tratto prodotta e fornita dalla
Regione Toscana., Copyright © 2000;
Norwegian Mapping Authority, Source:
IgeoE – Portugal, Información
geográfica propiedad del CNIG, Based
upon electronic data Ó National Land
Survey Sweden., Topografische
Grundlage: Ó Bundesamt für
Landestopographie.. All rights
reserved.
®
, Die Grundlagendaten
TERMS AND CONDITIONS
PLEASE READ THIS END USER
LICENSE AGREEMENT
CAREFULLY BEFORE USING THE
NAVTEQ DATABASE
NOTICE TO THE USER
THIS IS A LICENSE AGREEMENT AND NOT AN AGREEMENT FOR
SALE – BETWEEN YOU AND
NAVTEQ B.V. FOR YOUR COPY OF
THE NAVTEQ NAVIGABLE MAP
DATA-BASE, INCLUDING
ASSOCIATED COMPUTER
SOFTWARE, MEDIA AND
EXPLANATORY PRINTED
DOCUMENTATION PUBLISHED BY
NAVTEQ (JOINTLY “THE
DATABASE”). BY USING THE
DATABASE, YOU ACCEPT AND
AGREE TO ALL TERMS AND
CONDITIONS OF THIS END USER
LICENSE AGREEMENT
(“AGREEMENT”). IF YOU DO NOT
AGREE TO THE TERMS OF THIS
AGREEMENT, PROMPTLY RETURN
THE DATABASE, ALONG WITH ALL
OTHER ACCOMPANYING ITEMS,
TO YOUR SUP-PLIER FOR A
REFUND.
OWNERSHIP
The Database and the copyrights and
intellectual property or neighboring
rights therein are owned by NAVTEQ
or its licensors. Ownership of the media
on which the Database is contained is
retained by NAVTEQ and/or your
supplier until after you have paid in full
any amounts due to NAVTEQ and/or
your supplier pursuant to this
Agreement or similar agreement(s)
under which goods are provided to you.
68
Page 69

6. NAVIGATION SYSTEM INFORMATION
LICENSE GRANT
NAVTEQ grants you a non-exclusive
license to use the Database for your
personal use or, if applicable, for use in
your business’ internal operations. This
license does not include the right to
grant sub-licenses.
LIMITATIONS ON USE
The Database is restricted for use in
the specific system for which it was
created. Except to the extent explicitly
permitted by mandatory laws (e.g.
national laws based on the European
Software Directive (91/250) and the
Database Directive (96/9)), you may
not extract or reutilize substantial parts
of the contents of the Database nor
reproduce, copy, modify, adapt,
translate, disassemble, decompile,
reverse engineer any portion of the
Database. If you wish to obtain
interoperability information as meant in
(the national laws based on) the
European Software Directive, you shall
grant NAVTEQ reasonable opportunity
to provide said information on
reasonable terms, including costs, to
be determined by NAVTEQ.
TRANSFER OF LICENSE
You may not transfer the Database to
third parties, except when installed in
the system for which it was created or
when you do not retain any copy of the
Database, and provided that the
transferee agrees to all terms and
conditions of this Agreement and
confirms this in writing to NAVTEQ.
Multi-disc sets may only be transferred
or sold as a complete set as provided
by NAVTEQ and not as subset thereof.
LIMITED WARRANTY
NAVTEQ warrants that, subject to the
warnings set out below, for a period of
12 months after acquisition of your
copy of the Database, it will perform
substantially in accordance with
NAVTEQ’s Criteria for Accuracy and
Completeness existing on the date you
acquired the Database; these criteria
are available from NAVTEQ at your
request. If the Database does not
perform in accordance with this limited
warranty, NAVTEQ will use reasonable
efforts to repair or replace your nonconforming copy of the Database. If
these efforts do not lead to
performance of the Database in
accordance with the warranties set out
herein, you will have the option to either
receive a reasonable refund of the
price you paid for the Database or to
rescind this Agreement. This shall be
NAVTEQ’s entire liability and your sole
remedy against NAVTEQ. Except as
expressly provided in this section,
NAVTEQ does not warrant nor make
any representations regarding the use
of results of the use of the Database in
terms of its correctness, accuracy,
reliability, or otherwise. NAVTEQ does
not warrant that the Database is or will
be error free. No oral or written
information or advice provided by
NAVTEQ, your supplier or any other
person shall create a warranty or in any
way increase the scope of the limited
warranty described above. The limited
warranty set forth in this Agreement
does not affect or prejudice any
statutory legal rights that you may have
under the legal warranty against
hidden defects.
2
APPLICATION-“Map”
69
Page 70

6. NAVIGATION SYSTEM INFORMATION
If you did not acquire the Database
from NAVTEQ directly, you may have
statutory rights against the person from
whom you have acquired the Database
in addition to the rights granted by
NAVTEQ hereunder according to the
law of your jurisdiction. The above
warranty of NAVTEQ shall not affect
such statutory rights and you may
assert such rights in addition to the
warranty rights granted herein.
LIMITATION OF LIABILITY
The price of the Database does not
include any consideration for
assumption of risk of consequential,
indirect or unlimited direct damages
which may arise in connection with
your use of the Database. Accordingly,
in no event shall NAVTEQ be liable for
any consequential or indirect damages,
including without limitation, loss of
revenue, data, or use, incurred by you
or any third party arising out of your use
of the Database, whether in an action in
contract or tort or based on a warranty,
even if NAVTEQ has been advised of
the possibility of such damages. In any
event NAVTEQ’s liability for direct
damages is limited to the price of your
copy of the Database.
THE LIMITED WARRANTY AND
LIMITATION OF LIABILITY, SET
FORTH IN THIS AGREE-MENT, DO
NOT AFFECT OR PREJUDICE YOUR
STATUTORY RIGHTS WHERE YOU
HAVE ACQUIRED THE DATABASE
OTHERWISE THAN IN THE COURSE
OF A BUSINESS.
WARNINGS
The Database may contain inaccurate
or incomplete information due to the
passage of time, changing
circumstances, sources used and the
nature of collecting comprehensive
geographic data, any of which may
lead to incorrect results. The Database
does not include or reflect information
on - inter alia - neighborhood safety;
law enforcement; emergency
assistance; construction work; road or
lane closures; vehicle or speed
restrictions; road slope or grade; bridge
height, weight or other limits; road or
traffic conditions; special events; traffic
congestion; or travel time.
GOVERNING LAW
This Agreement shall be governed by
the laws of the jurisdiction, in which you
reside at the date of acquisition of the
Database. Should you at that moment
reside outside the European Union or
Switzerland, the law of the jurisdiction
within the European Union or
Switzerland where you acquired the
Database shall apply. In all other
cases, or if the jurisdiction where you
acquired the Database cannot be
defined, the laws of the Netherlands
shall apply. The courts competent at
your place of residence at the time you
acquired the Database shall have
jurisdiction over any dispute arising out
of, or relating to this Agreement,
without prejudice to NAVTEQ’ right to
bring claims at your then current place
of residence.
70
Page 71

6. NAVIGATION SYSTEM INFORMATION
2
APPLICATION-“Map”
71
Page 72

6. NAVIGATION SYSTEM INFORMATION
72
Page 73

3
APPLICATION-THE OTHERS
1 APPLICATIONS OPERATION 2 ENTUNE SERVICE
1
2
1. QUICK REFERENCE..................... 74
2. PICTURE SLIDESHOW ................. 75
DISPLAYING THE PICTURES.............. 75
PLAYING PICTURE SLIDESHOWS ..... 76
3. EMAIL ............................................ 77
RECEIVING A NEW EMAIL .................. 77
CHECKING “Email” ............................... 77
4. CALENDAR ................................... 79
CHECKING CALENDAR ....................... 79
1. ENTUNE SERVICE ....................... 80
BEFORE USING ENTUNE .................... 80
AVAILABILITY OF SERVICE................. 82
INITIALIZING PERSONAL DATA.......... 82
2. OPERATING NAVIGATION
FUNCTION USING ENTUNE
SERVICE..................................... 83
ONLINE SEARCH.................................. 83
FUEL PRICES ....................................... 85
TRAFFIC MESSAGES........................... 86
LOADING ADDRESSES FROM A
PHONE................................................ 91
3. OPERATING AN APPLICATION
USING ENTUNE SERVICE......... 93
OPERATING AN APPLICATION ........... 93
IF A MESSAGE APPEARS ON THE
SCREEN ............................................. 95
3
4
5
6
7
8
73
9
Page 74

1. APPLICATIONS OPERATION
1. QUICK REFERENCE
The navigation application and several other applications can be accessed by
pressing the “APPS” button.
When the “APPS” button is pressed, the “Applications” menu screen that was last
displayed is returned to. Touch to display the “Applications” menu screen.
X“Applications” menu screen
No. Function Page
Press to display a list of applications.
“Map” provides the user with navigation, route calculation, destination
entry (manually or via voice recognition), turn by turn directions, and
real-time traffic.
Touch to view pictures stored on a USB memory. 75
Touch to display Emails. 77
Touch to access the connected phone’s calendar, tasks and notes. 79
Touch to access the applications. 83, 85, 93
Touch to close or delete the applications. 93, 94
Touch to shift to the next or previous page.
25
74
Page 75

1. APPLICATIONS OPERATION
2. PICTURE SLIDESHOW
When the vehicle is stopped, pictures
stored on a USB memory can be
viewed.
INFORMATION
● Images cannot be viewed while driving.
● When the vehicle starts moving while
viewing pictures, a pop-up window will
be displayed and pictures cannot be displayed. Touch “Previous” to return to
the previous screen.
● Available image data format: JPEG,
PNG and BMP
2 Press the “APPS” button to display
the “Applications” menu screen.
3
APPLICATION-THE OTHERS
z If the “Applications” menu screen is not
displayed, touch until it is displayed.
3 Touch “Pictures”.
DISPLAYING THE PICTURES
1 Open the cover of the USB/AUX port
and connect a USB memory.
z The USB/AUX port is located on the
instrument panel, or in the console box or
glove box etc. The location and design are
different depending on the vehicle. For
details, see the Pictorial index of “Owner’s
Manual”.
4 The slideshow starts automatically.
: Touch to stop the slideshow.
INFORMATION
● All readable pictures on the device are
displayed in chronological order. The
slideshow will repeat when it is finished.
● The pictures will be changed every few
seconds.
75
Page 76

1. APPLICATIONS OPERATION
PLAYING PICTURE
SLIDESHOWS
A slideshow can be played, paused,
and desired images can be selected.
1 Touch “Show”.
2 Operating switches will be displayed.
“Hide”: Touch to close the slideshow op-
tions.
: Touch to pause the slideshow.
: Touch to play the slideshow
again.
: Touch to display the previous
picture.
: Touch to display the next pic-
ture.
INFORMATION
● When the slideshow is playing, the
pause and skip screen buttons disappear automatically after a few seconds.
76
Page 77

1. APPLICATIONS OPERATION
3. EMAIL
Incoming Emails to a connected
Bluetooth
®
capable phone can be
downloaded. Before using this
application, connect the Bluetooth
phone with phone profile. (See page
203.)
RECEIVING A NEW EMAIL
When a new Email is received, a pop-up
window is displayed on the screen.
CHECKING “Email”
1 Press the “APPS” button to display
®
the “Applications” menu screen.
3
APPLICATION-THE OTHERS
z If the “Applications” menu screen is not
displayed, touch until it is displayed.
2 Touch “Email”.
z This function can be set to “On” or
“Off”. (See page 209.)
z When the downloading of an Email has
been completed, the mail list will be displayed.
3 Touch the desired Email.
77
Page 78

1. APPLICATIONS OPERATION
z The state of Email is shown by the follow-
ing icons.
: Unread mail
: Read mail
: Important mail
4 The text of the Email is displayed.
: Touch to have the Email read out.
To cancel this function, touch .
NOTICE
● Do not turn off the engine while down-
loading.
INFORMATION
● Email cannot be sent.
78
Page 79

1. APPLICATIONS OPERATION
4. CALENDAR
Calendar entries, tasks and notes from
a connected Bluetooth
®
capable
phone can be downloaded. Before
using this application, connect the
®
Bluetooth
phone with phone profile.
(See page 203.)
CHECKING CALENDAR
1 Press the “APPS” button to display
the “Applications” menu screen.
z When the downloading of the calendar is
complete, the current day’s calendar
entries will be displayed.
3 When a displayed schedule entry is
touched, the entry’s detailed information is displayed.
3
APPLICATION-THE OTHERS
: Touch to display the previous day’s
schedule.
: Touch to display the following day’s
schedule.
: Touch to display the current day’s
tasks.
z If the “Applications” menu screen is not
displayed, touch until it is displayed.
2 Touch “Calendar”.
: Touch to display the notes.
NOTICE
● Do not turn off the engine while down-
loading.
INFORMATION
● Calendar entries cannot be edited.
79
Page 80

2. ENTUNE SERVICE
1. ENTUNE SERVICE
BEFORE USING ENTUNE
USER REGISTRATION
When purchasing the vehicle, an email
address is registered at your Toyota
dealer. If your email address was not
registered at your Toyota dealer, your
email address can be registered at the
Entune website. A user registration
guidance email containing a web address will be sent.
1 Perform user registration from the des-
ignated web address.
2 Input the username and then touch
“OK”.
3 Touch “enTune Password”.
4 Input the password and then touch
“OK”.
5 Touch “Confirm Login Information”.
LOGIN PROCESS TO ENTUNE
SERVICE
If the following screen is displayed
when you use the Entune service, enter the login information.
1 Touch “enTune Username”.
z When “Remember Password” is on, the
entered user login information will be
remembered for every login.
80
: Entune is available in the 48 states, D.C. and Alaska.
Page 81

2. ENTUNE SERVICE
REGISTERING THE
DOWNLOADED ENTUNE
APPLICATION
1 Download the Entune application using
your cellular phone.
2 Run the Entune application on your
cellular phone.
3 Enter a user name and password into
the Entune application on your cellular
phone.
INFORMATION
● If your email address was not registered
at your Toyota dealer when the vehicle
was purchased, an email address can
be registered at http://www.toyota.com/
entune/.
● Entune operational procedures can also
be confirmed by visiting http://
www.toyota.com/entune/.
● This system supports the following ser-
vice.
• Bluetooth
Ver.1.1 or higher
(Recommended: Ver.2.1 + EDR or
higher)
•Profiles
HFP (Hands Free Profile)
Ver.1.0 or higher
(Recommended: Ver.1.5 or higher)
DUN (Dial-Up Networking Profile)
Ver.1.1 or higher
PAN (Personal Area Network)
Ver. 1.0
PBAP (Phone Book Access Profile)
Ver.1.0 or higher
SSP (Serial Port Profile)
MAP (Message Access Profile)
•Application
PIM (Personal Information Manager)
● If your cellular phone does not support
HFP, you cannot register the Bluetooth
phone, or use DUN/PAN or PBAP profiles individually.
● If the connected Bluetooth
sion is older than recommended or
incompatible, this function may not be
used.
®
Specification
®
phone ver-
3
APPLICATION-THE OTHERS
®
81
Page 82

2. ENTUNE SERVICE
AVAILABILITY OF SERVICE
z Entune is available in the 48 states,
D.C. and Alaska.
INFORMATION
● When using Entune, depending on the
details of your cellular phone contract,
data usage fees may apply. Confirm
data usage fees before using this service.
● In this section, the required operations
to activate application, connect a cellular
phone to the navigation system and registration steps for Entune are explained.
For details regarding Entune operations
and each of the application, refer to
http://www.toyota.com/entune/
.
INITIALIZING PERSONAL
DATA
The personal data used in application
can be reset. (See “DELETE PERSONAL DATA” on page 199.)
z The following personal data can be
deleted and returned to their default settings:
• Downloaded contents
• Radio stations that were listened to
• Input history
INFORMATION
● Once initialized, data will be erased. Pay
close attention when initializing the data.
82
Page 83

2. ENTUNE SERVICE
2. OPERATING NAVIGATION FUNCTION USING ENTUNE SERVICE
ONLINE SEARCH
A destination can be selected via online search.
Before using this function, connect a
Bluetooth
file. (See page 203.)
1 Touch “Dest” on the map.
2 Touch “Enter Destination”.
®
phone with an internet pro-
z When the cost warning or roaming warn-
ing screen is displayed, touch “Con-
tinue”. This function can be set to on or
off. (See page 208.)
5 Touch “Search Area”.
3
APPLICATION-THE OTHERS
z The “Enter Destination” screen can be dis-
played by touching on any of the
“Navigation” screens.
3 Touch “POI” on the “Enter Destina-
tion” screen.
4 Touch “Online Search by Xxxx”.
z Online search can be entered on the
“Applications” menu screen.
z When the following screen is displayed,
enter the user login information and then
touch “Confirm Login Information”.
(See page 80.)
6 Select the desired search area.
“At Current Position”: Touch to define
the area at the current position.
“Define City”: Touch to define the area by
city name. Input the city name and then
touch “OK”.
“From Map”: Touch to define the area on
map. Touch the desired city on the map
and then touch “Select”.
“At Destination”: Touch to define the
area around the main destination. When
route guidance is not in use, “At Destina-
tion” cannot be selected.
83
Page 84

2. ENTUNE SERVICE
7 Touch “Enter Search Word”.
8 Input the search word and then touch
“OK”.
9 The search results will be displayed.
Touch the desired item.
11The starting route guidance screen will
be displayed. (See page 42.)
INFORMATION
● The color of indicates if online con-
nection is active or not. After a timeout
of 1 minute, an active online connection
will automatically be terminated.
z Up to 20 items will be searched when per-
forming an online search.
“Download More”: Touch to search up to
20 new items. Up to 60 items can be downloaded.
“Previous Results”: Touch to display the
previous result.
“Next Results”: Touch to display the next
result.
10Touch “Calculate”.
“Details”: Touch to display the details of
the point information.
: Touch to call the registered tele-
phone number.
84
Page 85

2. ENTUNE SERVICE
FUEL PRICES
It enables the navigation system to display current fuel prices and gas station
locations, which can be set as a destination if desired.
Before using this function, connect a
®
Bluetooth
phone with an internet pro-
file. (See page 203.)
1 Touch “Dest” on the map.
2 Touch “Enter Destination”.
5 Touch for the desired item.
z On this screen, the following functions can
be operated.
No. Function
Touch to display search result list
sorted by company brand.
Touch to display search result list
sorted by the price.
Touch to display search result list
sorted by the distance.
3
APPLICATION-THE OTHERS
z The “Enter Destination” screen can be dis-
played by touching on any of the
“Navigation” screens.
3 Touch “POI” on the “Enter Destina-
tion” screen.
4 Touch “Fuel Prices” on the “POI”
screen.
z When the login information screen is dis-
played, enter the user login information
and then touch “Confirm Login Informa-
tion”. (See page 80.)
z When the cost warning or roaming warn-
ing screen is displayed, touch “Con-
tinue”. This function can be set to on or
off. (See page 208.)
Touch to select the desired fuel
type.
z If you touch the desired item, the starting
route guidance screen will be displayed
directly. (See page 42.)
6 Touch “Calculate”.
z When “Save” is touched, the point is
registered in the “Stored” list on the “My
Destinations” screen. (See page 54.)
z When is touched, the registered
telephone number is called.
7 The starting route guidance screen will
be displayed. (See page 42.)
85
Page 86

2. ENTUNE SERVICE
TRAFFIC MESSAGES
It contains a list of traffic messages relating to the set route, all traffic messages and warnings.
Before using this function, connect a
Bluetooth
®
phone with an internet pro-
file. (See page 203.)
DISPLAYING TRAFFIC
MESSAGES
1 Touch “Dest” on the map.
2 Touch “Traffic Messages”.
3 Touch “On Route”, “Show All” or
“Warnings” to select the desired list.
“On Route”: During route guidance, the
traffic messages relating to the set route
will be displayed.
“Show All”: All traffic messages will be
displayed.
“Warnings”: Traffic messages with warnings will be displayed.
4 Touch the desired message.
z The “Traffic Messages” screen can be dis-
played by touching on any of the
“Navigation” screens or “Traffic” on the
“Applications” menu screen.
z When the login information screen is dis-
played, enter the user login information
and then touch “Confirm Login Informa-
tion”. (See page 80.)
z When the cost warning or roaming warn-
ing screen is displayed, touch “Con-
tinue”. This function can be set to on or
off. (See page 208.)
86
Page 87

2. ENTUNE SERVICE
z On this screen, the following information is
displayed.
No. Information
Street number
Route segment
If route segment is not available,
information such as street name,
city name, region or country will
be displayed.
: Icon of an incident
: Icon of an incident on the
route
: Icon of an incident on the
detoured route
■LIST OF TRAFFIC MESSAGE
ICONS
Icon Name
Slippery
Bad weather
3
Wind
APPLICATION-THE OTHERS
Snow fall
Traffic
Heavy traffic
Distance to incident
5 The traffic message will be displayed.
or : Touch to display next or pre-
vious traffic message.
: Touch to have the traffic message
read out. To cancel this function, touch
.
Accident
Road construction
Narrow track
Warning
Blockage
Security checkpoint
Information
“More”: Touch to display all messages.
87
Page 88

2. ENTUNE SERVICE
DETOURING A SEGMENT
FROM A TRAFFIC MESSAGE
LIST
If a traffic message relates to the route
being travelled, the desired segment
can be detoured.
■DETOURING THE SEGMENT
1 Displaying the traffic information list.
(See page 86.)
2 Touch “On Route” on the “Traffic
Messages” screen.
3 Touch the desired segment to detour.
5 The route will be recalculated.
z The mark of the TMC on the “On Route”
screen changes into .
■CANCELLING THE DETOURED
SEGMENT
1 Touch the detoured segment on the
“On Route” screen.
2 Touch “Detour Off”.
4 Touch “Detour”.
or : Touch to display the next or
previous message.
: Touch to have the traffic message
read out. To cancel this function, touch
or : Touch to display the next or
previous message.
: Touch to have the traffic message
read out. To cancel this function, touch
.
“More”: Touch to display all traffic messages.
3 The route will be recalculated.
z The mark of the TMC on the “On Route”
screen changes to .
.
“More”: Touch to display all traffic messages.
88
Page 89

2. ENTUNE SERVICE
RECALCULATING THE ROUTE
BY THE TRAFFIC MESSAGES
You will be informed about relevant
traffic messages on the route by a popup window.
A pop-up window may differ depending
on the traffic message settings. (See
page 91.)
■IF “Automatic” IS SELECTED
1 The following screen will be displayed.
XIf “Consider” is selected
2 Touch “Ignore” or “Detour”.
“Ignore”: Touch to ignore the message.
“Detour”: Touch to recalculate the route.
3
APPLICATION-THE OTHERS
2 The route will be recalculated automat-
ically.
■IF “Manual” IS SELECTED
1 The following screen will be displayed.
“Consider”: Touch to display with the cur-
rent route, the TMC event and the suggested detour.
“Ignore”: Touch to ignore the message.
89
Page 90

2. ENTUNE SERVICE
TRAFFIC MESSAGE SETTINGS
1 Touch “Dest” on the map.
2 Touch “Route Options”.
z The “Route Options” screen can be dis-
played by touching on any of the
“Navigation” screens.
3 Touch “Settings”.
■SETTING “Radius Filter”
Once the radius filter has been set,
only traffic messages within the radius
will be displayed in the traffic message
list.
1 Touch “Radius Filter” on the “Set-
tings” screen.
2 Touch desired item.
“Off”: Touch to deactivate the function.
z Please refer to the following pages for a
description of each setting.
“6 mi” ~ “60 mi”: Touch to set the radius
from 6 miles to 60 miles.
3 Touch .
90
Page 91

2. ENTUNE SERVICE
■SETTING “Dynamic Reroute”
The method of reroute can be set.
1 Touch “Dynamic Reroute” on the
“Settings” screen.
2 Touch the desired item.
“Off”: Touch to disable receiving traffic
messages and no reroute will be calculated.
“Automatic”: Touch to enable relevant
traffic messages on the route to be displayed as a pop-up window and activate
automatic reroute calculation.
“Manual”: Touch to enable relevant traffic
messages on the route to be displayed as
a pop-up window but disable automatic reroute calculation. The user decides if reroute calculation is desirable or not.
LOADING ADDRESSES
FROM A PHONE
Addresses and numbers will be stored
in the “Stored” list on the “My Destinations” screen and “Contacts” screen.
(See pages 52 and 165.)
1 Touch “Dest” on the map.
2 Touch “Enter Destination”.
z The “Enter Destination” screen can be dis-
played by touching on any of the
“Navigation” screens.
3 Touch “Advanced” on the “Enter Des-
tination” screen.
4 Touch “Load Addresses from
Phone”
3
APPLICATION-THE OTHERS
3 Touch .
z When the login information screen is dis-
played, enter the user login information
and then touch “Confirm Login Informa-
tion”. (See page 80.)
91
Page 92

2. ENTUNE SERVICE
z When the cost warning or roaming warn-
ing screen is displayed, touch “Con-
tinue”. This function can be set to on or
off. (See page 208.)
5 The following screen will be displayed
when loading is complete.
6 The entry is registered in the “Stored”
list on the “My Destinations” screen
and “Contacts” screen. (See pages 52
and 165.)
INFORMATION
● If a message similar to the one below is
displayed, delete X item(s) in the
“Stored” list on the “My Destinations”
screen and “Contacts” screen to make
room for the new destination(s). (See
pages 58 and 168.)
NOTICE
● Do not turn off the engine while down-
loading.
92
Page 93

2. ENTUNE SERVICE
3. OPERATING AN APPLICATION USING ENTUNE SERVICE
OPERATING AN
APPLICATION
Before using applications, connect the
Bluetooth
profile. (See page 203.) If a Bluetooth
®
phone with an internet
®
connection with an internet profile is
not currently active, applications will be
dimmed.
OPENING/CLOSING AN
APPLICATION
■OPENING AN APPLICATION
1 Press the “APPS” button to display
the “Applications” menu screen.
z When the cost warning or roaming warn-
ing screen is displayed, touch “Con-
tinue”. This function can be set to on or
off. (See page 208.)
z Several downloaded applications can be
opened at the same time and the desired
application can be selected.
z is displayed on the left side of applica-
tion names that are currently open.
3
3 The application is opened.
APPLICATION-THE OTHERS
z If the “Applications” menu screen is not
displayed, touch until it is displayed.
2 Touch the desired application.
(on some applications): Touch to up-
date the data
■CLOSING AN APPLICATION
1 Touch .
2 Touch “Close” on the right side of the
application to be closed.
z When the login information screen is dis-
played, enter the user login information
and then touch “Confirm Login Informa-
tion”. (See page 80.)
93
Page 94

2. ENTUNE SERVICE
DELETING AN APPLICATION
1 Touch .
2 Touch “Delete” on the right side of the
application to be deleted.
z Applications that displayed “Delete” on the
right side of the application can be
removed.
3 The following confirmation screen will
be displayed. Touch “Yes”.
94
Page 95

2. ENTUNE SERVICE
IF A MESSAGE APPEARS ON THE SCREEN
When problems occur starting up the application player, a message will appear on
the screen. Referring to the table below to identify the problem, take the suggested
corrective action.
Message Display conditions Corrective action
“This feature is unavailable
while transferring contacts.”
“There is a problem with the
Bluetooth
For troubleshooting
assistance, please visit
toyota.com or call 1-800-331-
4331.”
“This feature is unavailable
during a handsfree call.”
To use the services, an active
application needs to be running on your phone. For more
information, please visit
toyota.com.
Apps connection was
dropped.
Please check your phone.
connection.
Contacts are being transferred manually from the
phone book.
The cellular phone cannot be
connected.
A hands-free call is in
progress.
The Entune application cannot be connected to SSP.
Communication was disconnected.
When the transfer of contacts
is complete, perform the operation.
Refer to http://
www.toyota.com/entune/ to
confirm if the phone is
compatible or not.
After the hands-free call is finished, perform the operation.
Refer to http://
www.toyota.com/entune/ to
confirm if the phone is SSP
compatible or not, and then
activate the Entune application.
After a few moments, retry
the operation.
3
APPLICATION-THE OTHERS
: Bluetooth is a registered trademark of Bluetooth SIG, Inc.
95
Page 96

2. ENTUNE SERVICE
96
Page 97

2. ENTUNE SERVICE
3
APPLICATION-THE OTHERS
97
Page 98

1 AUDIO SYSTEM OPERATION
1. QUICK REFERENCE .................. 100
2. SOME BASICS............................ 102
TURNING THE AUDIO SYSTEM
ON OR OFF....................................... 102
CONTROLS USING THE
“TUNE SCROLL” KNOB.................... 103
SWITCHING AUDIO SOURCE............ 103
DSP CONTROL ................................... 104
TONE AND BALANCE......................... 105
3. RADIO OPERATION ................... 106
SWITCHING TO RADIO MODE........... 106
PRESETTING A STATION .................. 106
SELECTING A STATION ..................... 107
RADIO BROADCAST DATA
SYSTEM ............................................ 107
TRAFFIC ANNOUNCEMENT .............. 108
USING HD Radio™ TECHNOLOGY.... 109
98
Page 99

4
AUDIO SYSTEM
1
2
4. RADIO OPERATION
®
Satellite Radio
(XM
BROADCAST) ........................... 112
HOW TO SUBSCRIBE TO AN
®
Satellite Radio .......................... 112
XM
DISPLAYING THE RADIO ID.............. 112
SWITCHING TO SATELLITE RADIO
MODE ............................................... 113
CHANNEL CATEGORY ...................... 113
PRESETTING A CHANNEL ................ 113
SELECTING A CHANNEL................... 114
DISPLAYING THE TITLE
AND NAME ....................................... 114
IF THE SATELLITE RADIO TUNER
MALFUNCTIONS.............................. 115
5. CD PLAYER OPERATION .......... 117
INSERTING OR EJECTING A DISC... 117
SWITCHING TO CD MODE ................ 118
PLAYING AN AUDIO CD .................... 118
7. AUX DEVICE OPERATION......... 130
CONNECTING A PORTABLE
AUDIO DEVICE................................. 130
SWITCHING TO AUX MODE .............. 131
PLAYING A PORTABLE
AUDIO DEVICE................................. 131
8. Bluetooth® AUDIO
OPERATION ............................. 132
SWITCHING TO Bluetooth
AUDIO MODE ................................... 133
CONNECTING Bluetooth
PLAYING Bluetooth
®
®
®
AUDIO ...... 134
AUDIO............... 137
9. STEERING SWITCHES............... 141
STEERING SWITCHES
(WITH TWO DIRECTION
STEERING SWITCH)........................ 141
STEERING SWITCHES
(WITH FOUR DIRECTION
STEERING SWITCH)........................ 142
3
4
5
6
7
8
PLAYING A MP3/WMA DISC.............. 120
6. USB MEMORY/iPod
OPERATION.............................. 123
CONNECTING A USB
MEMORY OR iPod ........................... 123
SWITCHING TO
USB OR iPod MODE ........................ 124
PLAYING A USB
MEMORY OR iPod ........................... 124
10. AUDIO SYSTEM
OPERATING HINTS.................. 144
RADIO RECEPTION............................ 144
iPod...................................................... 145
USB MEMORY .................................... 146
CARING FOR YOUR CD PLAYER
AND DISCS....................................... 146
MP3/WMA FILES................................. 148
CD-R AND CD-RW DISCS .................. 149
TERMS ................................................ 150
®
Gracenote
.......................................... 151
9
99
Page 100

1. AUDIO SYSTEM OPERATION
1. QUICK REFERENCE
To access the audio system, press the “AUDIO” button. The audio system turns
on in the last mode used.
z The actual design and button position may differ depending on the vehicle. For
details, see Section 3 of “Owner’s Manual”.
No. Name Function Page
Audio control
screen
Disc slot
“Source”
“TUNE SCROLL”
knob
“AUDIO” button
button* Press to pause or resume playing the music.
A selected audio source is displayed, and it can
be operated with the touch screen controls.
Insert a disc into this slot. The CD player turns on
immediately.
Touch to select your desired audio sources. The
audio source selection screen will be displayed.
Turn to select radio station bands, tracks and
files. Also, the knob can be used for selection
from the list display.
Press to display the audio control screen. The audio system turns on in the last mode used.
117
103
103
102103
100
 Loading...