

Page 1

Conte nts
N
t
Owner's Handbook
A-Z
o
final
The Ultimate Driving
Machine
NAVIGAT ION,
NAVIGAT ION,
ENTERTAINMENT,
ENTERTAINMENT,
COMMUNICATION.
COMMUNICATION.
OWNER'S HANDBOOK.
OWNER'S HANDBOOK.
Online Edition for Part no. 01 40 2 912 836 - 07 12 510
Page 2

Navigation, Entertainment, Communication Owner's
Handbook
Congratulations on your choice of a BMW.
The mo re fa miliar you a re with the sys te ms of yo ur BMW, the
more you can ma ster their operation. We would t herefore like to
offer you the f ollowing advice:
Pl ease read the Owner's Handbook befor e setti ng out i n y our new
BM W . A l so use the i ntegrat ed Owner's Handbook i n y our v ehi cl e.
It contai n s import ant not es on how to operate y our Navigation,
Enter tai nment, Communi cations systems, enabl ing you to derive
max imum benefit from the technical advantages of these system s .
U pdates to t he pr inted or integr ated Ow ner ' s Handbo ok after going to press are located as needed i n the appendi x to the pri nted
quick reference to t he vehicle.
Su pplem e ntary in forma tion is p ro vid ed in the oth er d ocu me nts of
on-board lit erature.
We wish you a safe and enjoy able journey,
BMW AG
Online Edition for Part no. 01 40 2 912 836 - 07 12 510
Page 3

© 2012 Bayerische Moto ren Werke
Akt ie nge s e lls chaft
Munich, Germany
Not to be reproduced, whol ly or in part, without wri t ten
permission f rom BM W AG, Munich.
English VI/12, 07 12 510
Printed on environmentally friendly paper, bleached
wit h o u t chlorin e , s uitable fo r re cycling.
Online Edition for Part no. 01 40 2 912 836 - 07 12 510
Page 4

Conte nts
For quick access to a particul ar topi c or it em,
please consul t the detail ed alphabetical index,
see page 132.
Na vigat io n
8 Navigatio n system
9 De s tination inp ut
18 Route guidance
21 Map view
24 Traffic information
27 N avigation data
28 W h at to do if.. .
Ent e rt ainm e n t
32 Sound
35 Radio
41 CD/DVD
49 M usic collection
56 External devices
64 Television, TV
68 Audi o remote control in the rear
69 Rear entertainment
Communication
78 Telephone
88 Office
99 Contacts
102 ConnectedDrive
112 Exten de d BMW Online servic es
113 Rear telephone
Re fere nc e
132 From A to Z
Online Edition for Part no. 01 40 2 912 836 - 07 12 510
Page 5

Online Edition for Part no. 01 40 2 912 836 - 07 12 510
Page 6
Na vig atio n
Various examples of how the navigation system
re liab ly g uid es you to your de s tinatio n are sh own
here.
Online Edition for Part no. 01 40 2 912 836 - 07 12 510
Page 7

Na vig a t io n Navigation system
Navigation system
Vehicle Equipment
Thi s chapt er describes al l standar d, nat i onal and
sp e cial e quipm en t provide d in th e m odel s e rie s .
Theref ore equi pment not avail abl e i n a v ehi cl e i s
also de scri b ed, f o r examp le th e select ed spec ial
equipment or national v er si on. That also appl i es
to safety-r elevant functi ons and systems.
Ge n e ra l
The navigation sy stem can determine the precis e pos itio n of th e veh icle by me an s of s ate llite s
and v ehi cl e sensors and gui de y ou r el i abl y to a ny
sp e cifie d d e stin ation .
Nav igation data i s sav ed in the vehicle and can
be updated.
No t e
Inputs when the vehicle is stationary
Only enter data when the car is stati onary,
and al w ays obey the tr affic regulati ons and ro ad
signs in the event of any contradiction between
the traff i c si tuation and the i nstructions gi v en by
the navigation system. You could otherwise
commit an offence and put vehicle occupants
and other road users at risk.◀
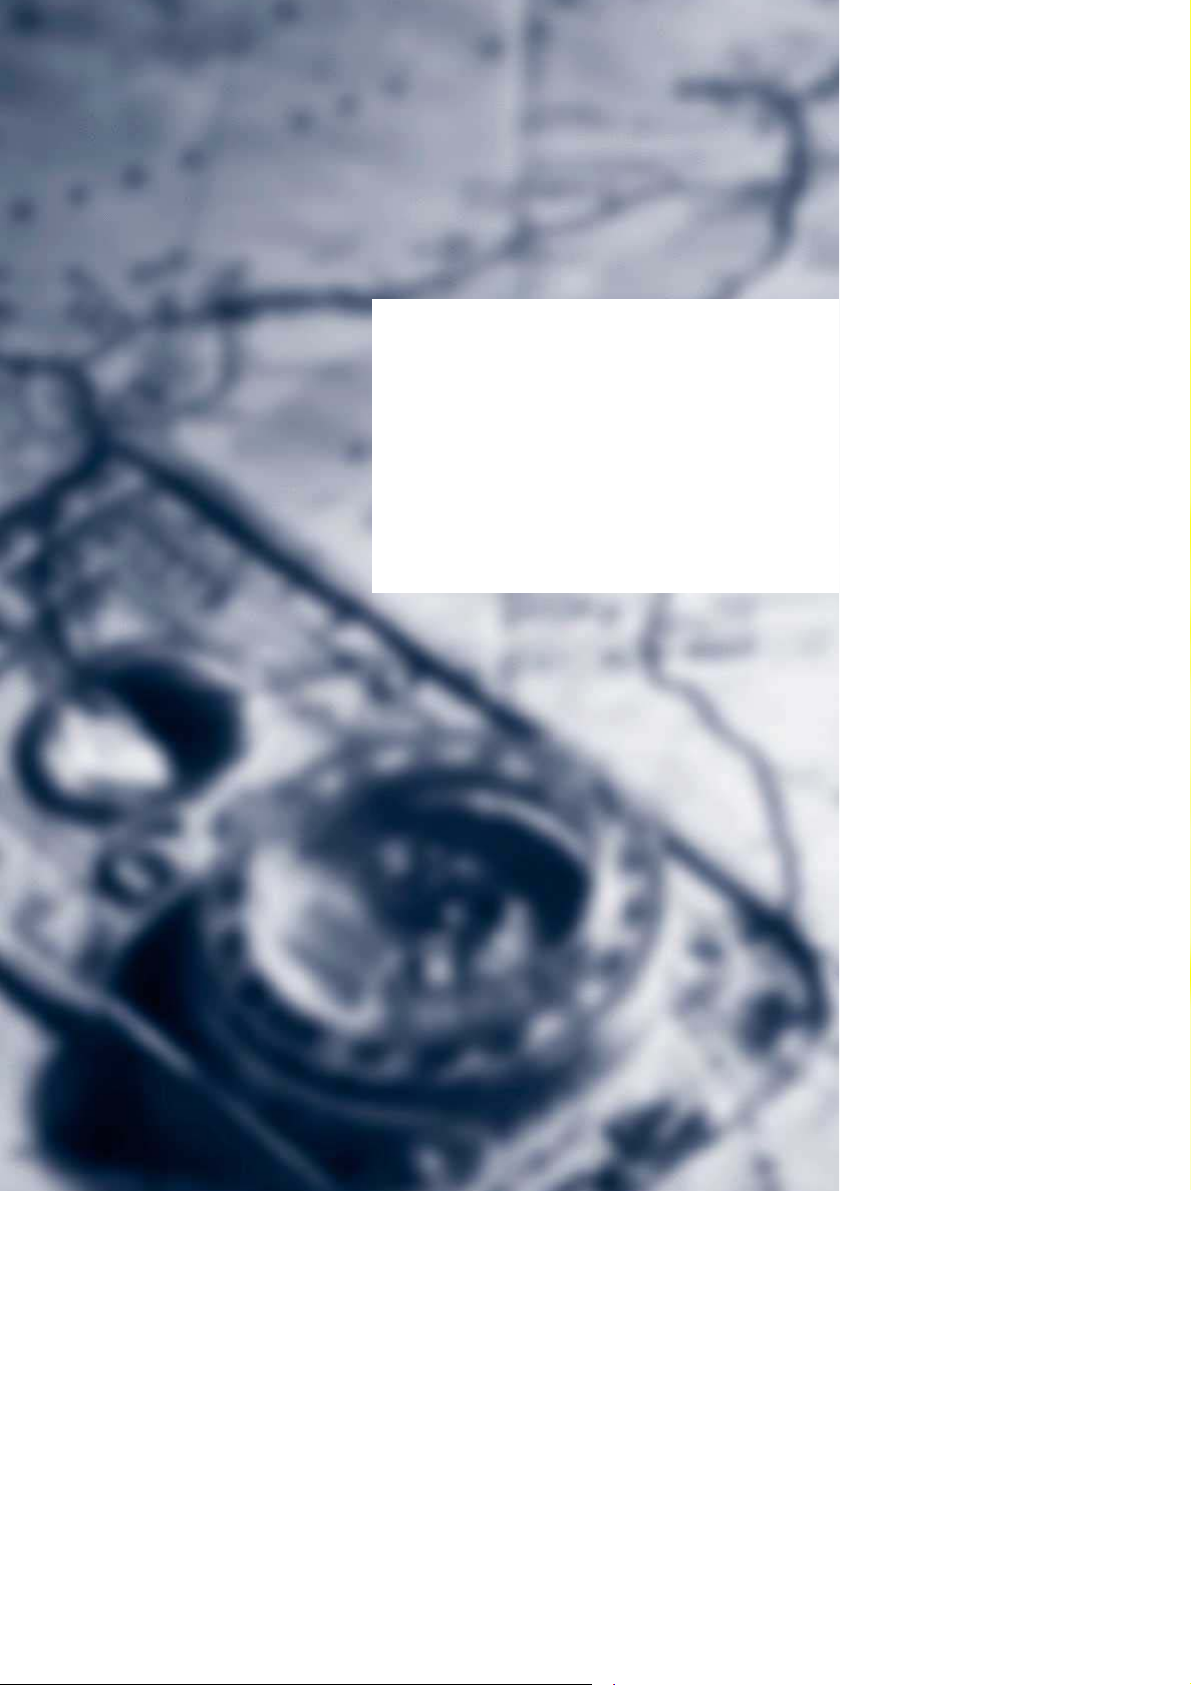
Call up navigation system
1. Press the button on t he controller.
2. "Na viga tion"
The navigati on system can al so be di r ectl y
called up with the button on the control ler.
8
Online Edition for Part no. 01 40 2 912 836 - 07 12 510
Page 8
Destination input
Destination input Naviga tio n
Vehicle Equipment
This cha pte r de scribe s all stand ard, n ation al an d
sp e cial e quipm en t provided in the m ode l s e rie s .
Theref or e equ ipment no t a v ailable i n a v eh icl e is
al so described, for exampl e the sel ected specia l
equi pment or n ational v er si on. T hat also applies
to safety-relevant functions and systems.
Manual des tination input
Ge n e ra l
When you are entering a town/city or street
na me, the system supp orts you, for example,
with automati c name completion.
Saved t ow n /ci t y and str eet names can be call ed
up quick ly.
▷ You can skip input of t he country, town or
city if you wish to retain previous inputs.
▷ If only t he town /city h a s been en t ered, route
guidance to the town/city centre is started.
▷ If part of an address is not entered or not
uniquely entered, a list with corresponding
se le ctio ns is sh own whe n the des tina tion is
accepted . If cities or address are pr esent
more than once, these are shown in split
screen.
For inform ation on th e s p lit s cree n, s ee
Own er's H andbook for the vehicle.
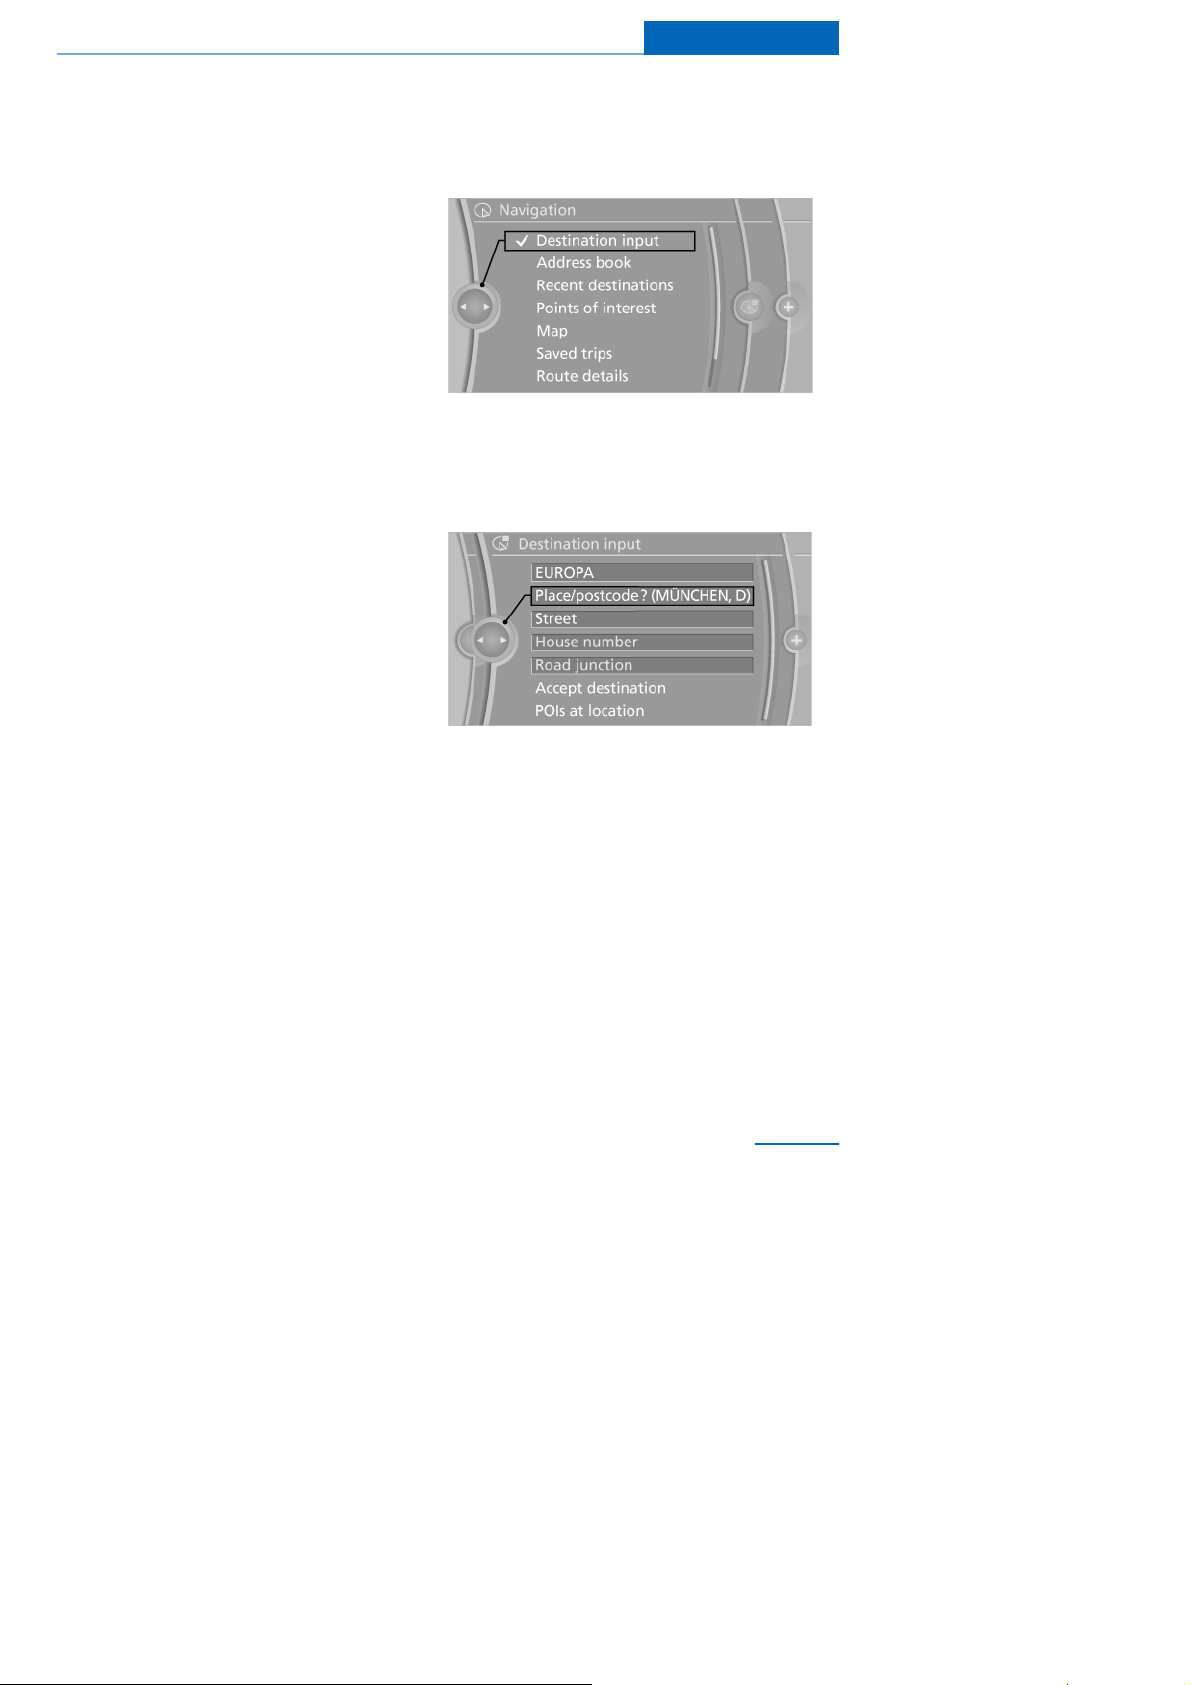
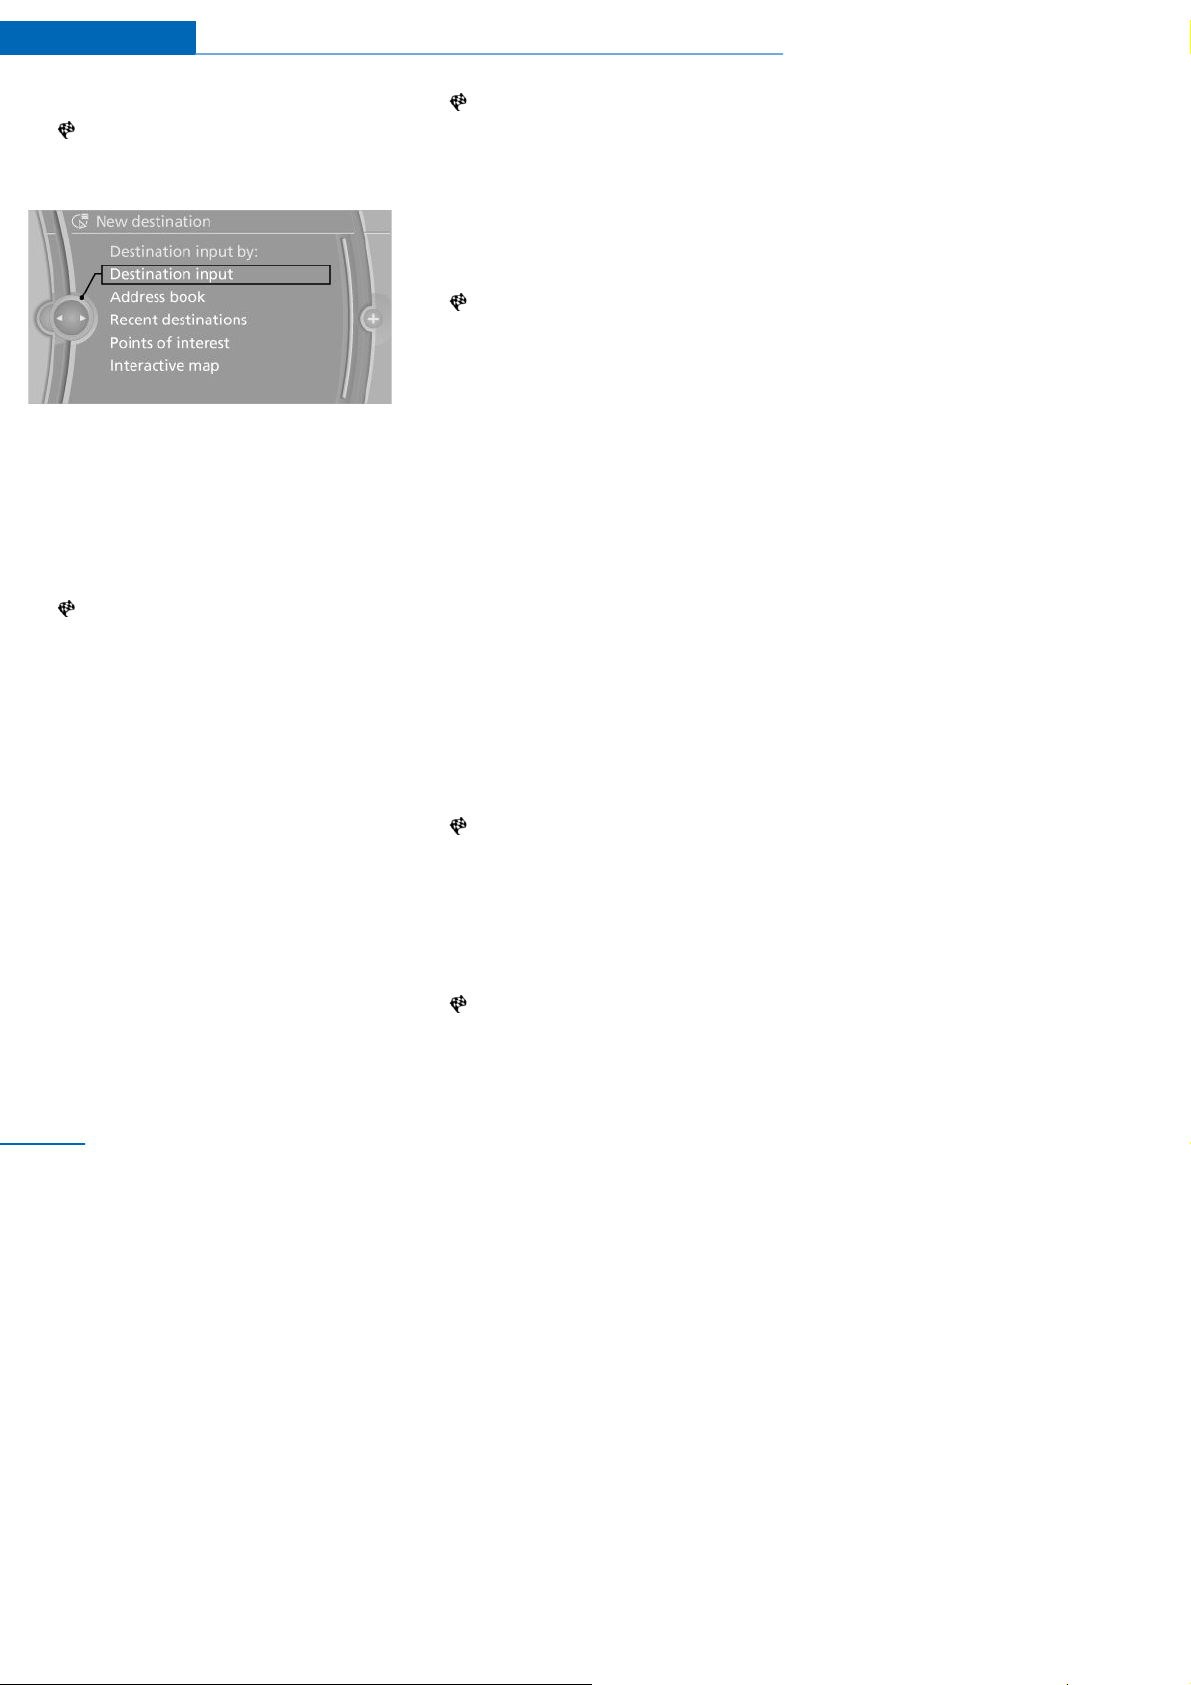
Country input
1. "Na viga tion"
2. "Destination input"
3. Select "Country" or the country displayed.
Entering a town/city
1. Select "Place/postcode" or the town/ci ty
dis played.
2. Se le ct le tte rs, if ap plic able .
The lis t is g ra dually narrowe d down with
each input.
3. Tilt the controller to the right.
4. Sel ect the name of a town/ city from the l ist.
If there are several places with t he same na me:
1. Move to the list of place names.
2. Sel ect the town/city.
Entering the postcode
1. Select "Place/postcode" or the town/ci ty
dis played.
2. Sel ect digits.
Online Edition for Part no. 01 40 2 912 836 - 07 12 510
9
Page 9
Na vig a t io n Destination input
3. Mov e to the l ist of postcodes and towns/ci t-
ies .
4. Select an entry.
Entering a hous e number and s treet
1. Select "Street" or the displayed street.
2. Enter street in the same way as town/city.
3. "House number"
4. Select digits.
5. Move to the l ist of house numbers.
6. Sel ect the house number or a r ange of house
numbe rs.
Alternative: entering a street and
junction
1. Select "Street" or the displayed street.
2. Enter the street or junction in the same way
as the town/ city.
If there ar e several streets with t he same name:
1. Mov e to the li st of street names.
2. Select the street.
Searching by street
The desired road /street is not in the entered
town/city be cau se it is pa rt of an othe r city dis tric t.
1. "Na viga tion"
2. "Destination input"
3. Select "Street" or the displayed street.
4. Mov e to the li st of street names.
5. "In" select country listed.
Al l t h e road s/streets of the sel ec ted c o u n t ry
are offered. The respective town or city is
shown af ter the street name.
6. Sel ect the letters.
7. Mov e to the li st of street names.
8. Select the street.
Starting route guidance
1. "Accept destination"
2. "Start guidance" or "A dd as another
de s tinatio n"
Ent er, see page 16, d es tin ation as a fur-
the r d es tin ation .
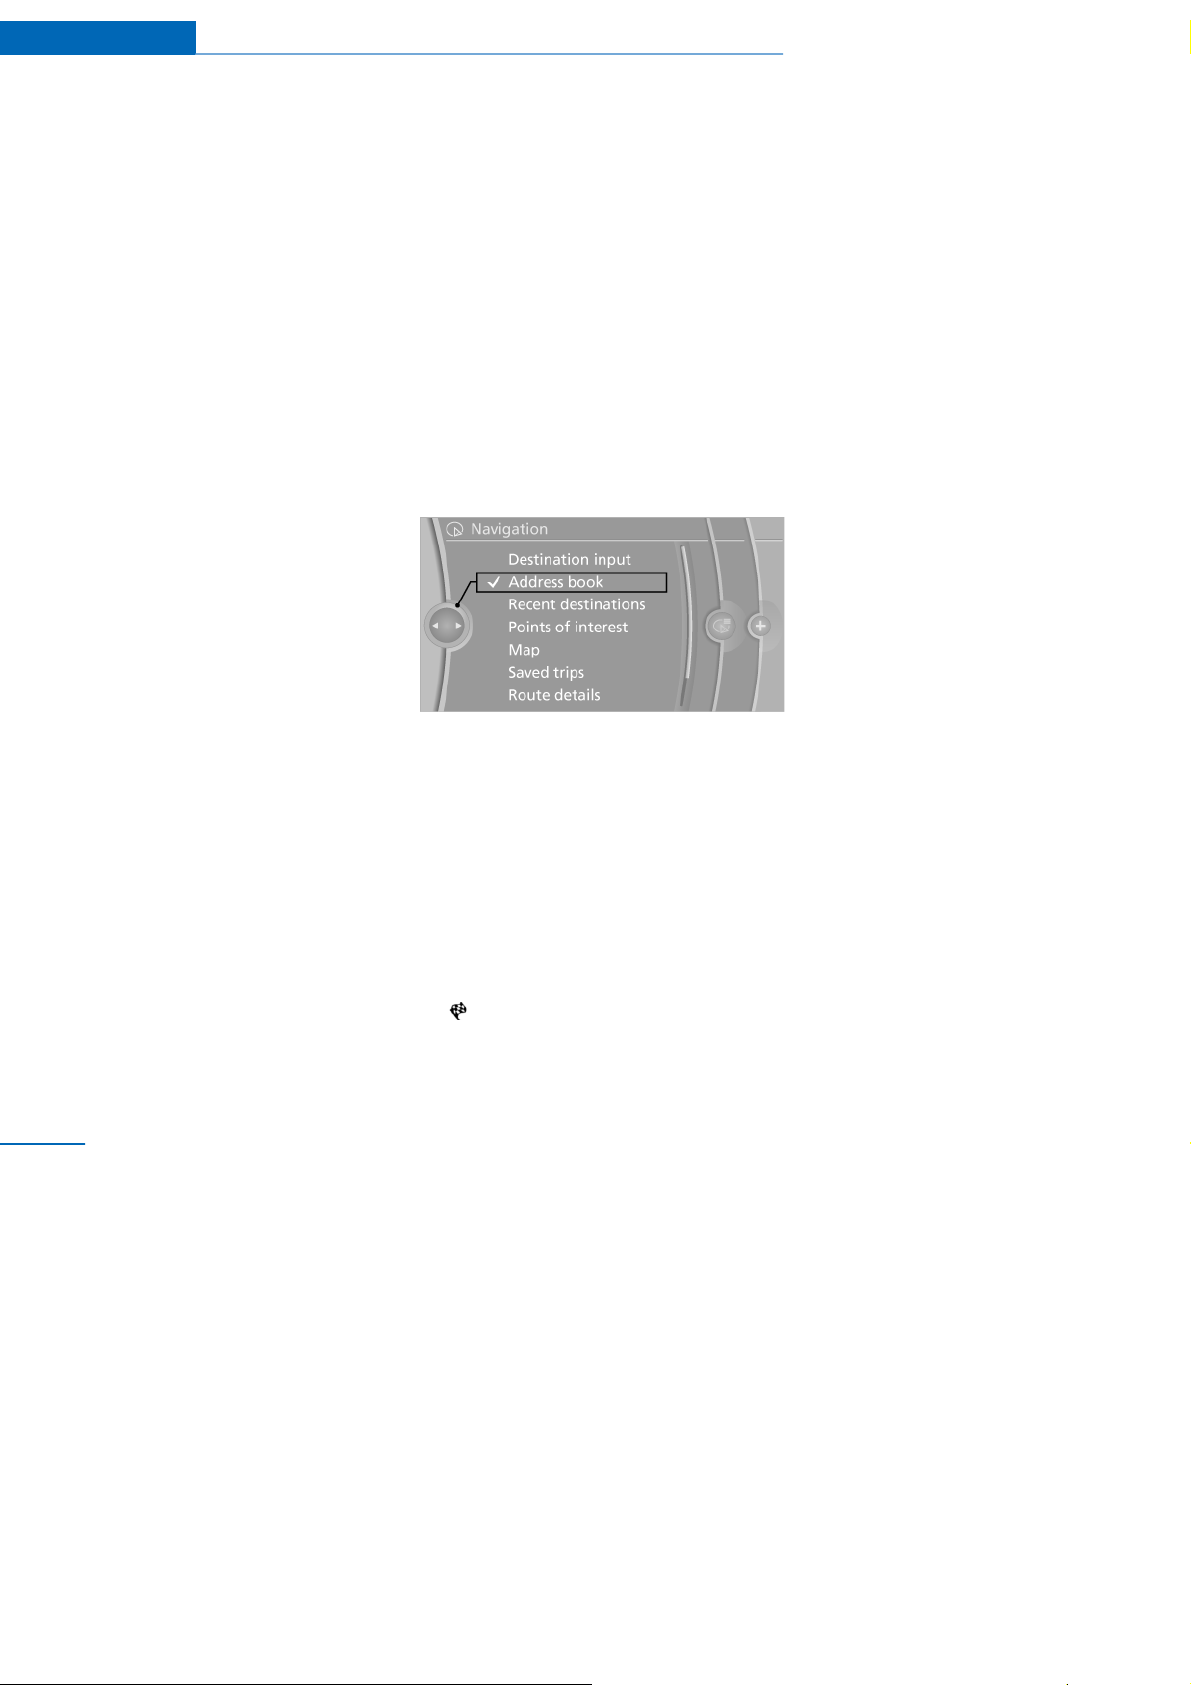
Address book
Sele cting a destina tion from the
address book
1. "Naviga tion"
2. "Address book"
Cont acts wit h addresses are display e d if
th ese add resses for t h e co n t a ct s h ave been
che cke d a s d estin ation s.
3. Sel ect a contact from the list or use "A -Z
search".
4. W here applicable, "Work address" or
"Home a ddress"
Saving a destination in the addres s
book
Afte r de stin atio n inp ut, s a ve the de s tina tion in
the address book.
1. "Naviga tion"
2. "Map"
"G uidance"
3.
4. Call up "Options".
10
Online Edition for Part no. 01 40 2 912 836 - 07 12 510
Page 10

Destination input Naviga tio n
5. "Save as new contact" or "Add to contact"
6. If app licab le , s e lec t an existin g c ontact.
7. "Work address" or "Home address"
8. Ente r "S urnam e " and , if app licab le , "Firs t
name".
9. "Save contact in vehicle"
Saving position
The cur r ent posi tion can be saved in the addr ess
book.
1. "Na viga tion"
2. Call up "Optio ns ".
3. "Save position as contact " or "Add position
to contact"
4. Call up "Options".
5. "Edit in Contacts" or "Delete entry"
Accepting y our home addr ess as a
destination
The home address must be created.
1. "Navigation"
2. "Address book"
3. "Home address"
4. "Start guidance"
Last destinations
Ge nera l
The las t de s tina tions reached are s a ve d au tomatically.
These destinations can be called up and i ncorpor a ted i n t o route guidance.
4. Select an existing contr act from the l ist, de-
pending on the selection. Select ty pe of address and enter surname a nd first names.
5. "Save in car"
Edit or delete the address
1. "Na viga tion"
2. "Address book"
3. Mark entry.
Online Edition for Part no. 01 40 2 912 836 - 07 12 510
Calling u p la s t des tinations
1. "Navigation"
2. "Recent d esti nations"
11
Page 11

Na vig a t io n Destination input
Starting route guidance
1. "Na viga tion"
2. "Rec ent de stinatio ns "
3. Se le ct d e stin ation .
4. "Start guidance"
Editing a destination
1. "Na viga tion"
2. "Rec ent de stinatio ns "
3. Hig hlig ht de s tina tion.
4. Call up "Op tions ".
5. "Edit de s tina tion"
De leting the la s t des tinations
1. "Na viga tion"
2. "Rec ent de stinatio ns "
3. Hig hlig ht de s tina tion.
4. Call up "Op tions ".
5. "Delete entry" or "Delete all recent de st."
Points of interes t
Ge n e ra l
Ev en with the most up-to-date navigation data,
inform ation on ind ivid ual p oints of inte re s t ma y
hav e changed, f or ex ampl e, serv i ce stat i ons may
not b e in op eratio n.
Searching points of interest
Selection of poi nt s of inter est, for example hotels or sights:
1. "Na viga tion"
2. "Points of interest"
3. Select search.
Google™ local search
1. "Google™ Local Search"
2. "Location"
Se le ct o r e nte r loca tion.
3. "Search term"
4. Enter keyword.
Suggestions are displayed .
5. Select suggestion.
The lis t of p oints of inte re s t is dis pla ye d.
6. Se le ct a point of intere s t.
De tails are dis p layed .
If se ve ral de ta ils a re inc lude d , you c an
browse through the tabs.
I f a phone number is sav ed, a tel ephone con-
necti on can be established.
7.
Select the symbol.
"Start guidance" or "A dd as another
de s tinatio n"
Ente r d es tin ation as a furth er de s tina tion,
see page 16.
A-Z se arch
1. "A -Z search"
2. "Location"
Se le ct o r e nte r loca tion.
3. "Cate g o ry"
4. Se le ctin g a c ate go ry.
5. "Cate gory de tails "
12
Online Edition for Part no. 01 40 2 912 836 - 07 12 510
Page 12

Destination input Naviga tio n
Se veral ca te gory de tails ca n be s e lec te d fo r
ce rtain p oints of inte re s t. Tilt the co ntrolle r
to the left to exit the category details.
6. "Search term"
7. Enter keyword.
The lis t of p oints o f inte res t is d isp laye d.
8. Se le ct a point of intere s t.
De tails are dis pla yed.
If se ve ral de tails a re inc lude d , you c an
browse through the tabs.
If a phone number is saved, a telephone
connection can be established.
Additional information can be shown for
many special destinations through BMW
Online .
Many sp ec ial d es tinations c an b e s a ve d
as a contact in the addr ess book.
Select the sym bol.
9.
"Start guidance" or "Add as anot her
de s tinatio n"
Ente r d es tin ation as a furth er de s tina tion,
see page 16.
"Start search": without enteri ng a search term,
the sea rc h is re pe ated us ing the las t stored
search term.
Category search
1. "Category search"
2. "Location"
Se le ct o r e nte r loca tion.
3. "Catego ry"
4. Sel ecting a category.
5. "Cate go ry de tails "
Se veral ca te gory de tails ca n be s e lec te d fo r
ce rtain p oints of inte re s t. Tilt the co ntrolle r
to the left to exit the category details.
6. "Start search"
The lis t of p oints o f inte res t is d isp laye d.
7. Se le ct a point of intere s t.
De tails are dis pla yed.
If se ve ral de ta ils a re inc lude d , you c an
brow se through the tabs.
If a phone number is saved, a t elephone
connection can be established.
Additional inf ormation can be shown for
man y s p ec ial des tina tions th ro ugh BMW
Online .
Ma ny sp ecial d es tination s c an b e sa ve d
as a contact in t he address book.
8.
Select the symbol.
"Start guidance" or "Add as another
de stinatio n"
Enter d es tination as a furthe r de s tinatio n,
see page 16.
Displ aying points of interest
Lis t of p oints o f inte res t: p oints o f inte res t are
arr anged according to di stance and mark ed wi t h
an arrow showing the direction.
In the s p lit s cree n, poin ts of intere st in the se lec ted ca te gory are d isp layed as s ymbo ls in the
map view. The display depends on the map
scale and the category.
Destination input via BMW Assist
1. "Navigation"
2. "Destination input"
3. "BMW Assi s t dest. inpu t"
A conne ctio n to th e in formation s e rvice is es tablis he d .
Dis playing p oints of inte rest in the ma p
The categories of t h e points of interest can be
shown as symbols on the map.
Set categories:
1. "Navigation"
2. "Map"
3. Call up "Options".
4. "Dis pla y point s o f inte res t"
5. Sel ect the setting.
Online Edition for Part no. 01 40 2 912 836 - 07 12 510
13
Page 13
Na vig a t io n Destination input
▷ "All"
▷ "None "
▷ "Sel ected": up to five categories can be
pres et.
The displays can be switched on and off in the
map view, see page 22.
Des tination input via map
Sele cting a d e stina tion
1. "Na viga tion"
2. "Map"
The curr ent posi tion of t he v ehicle is shown
in the ma p.
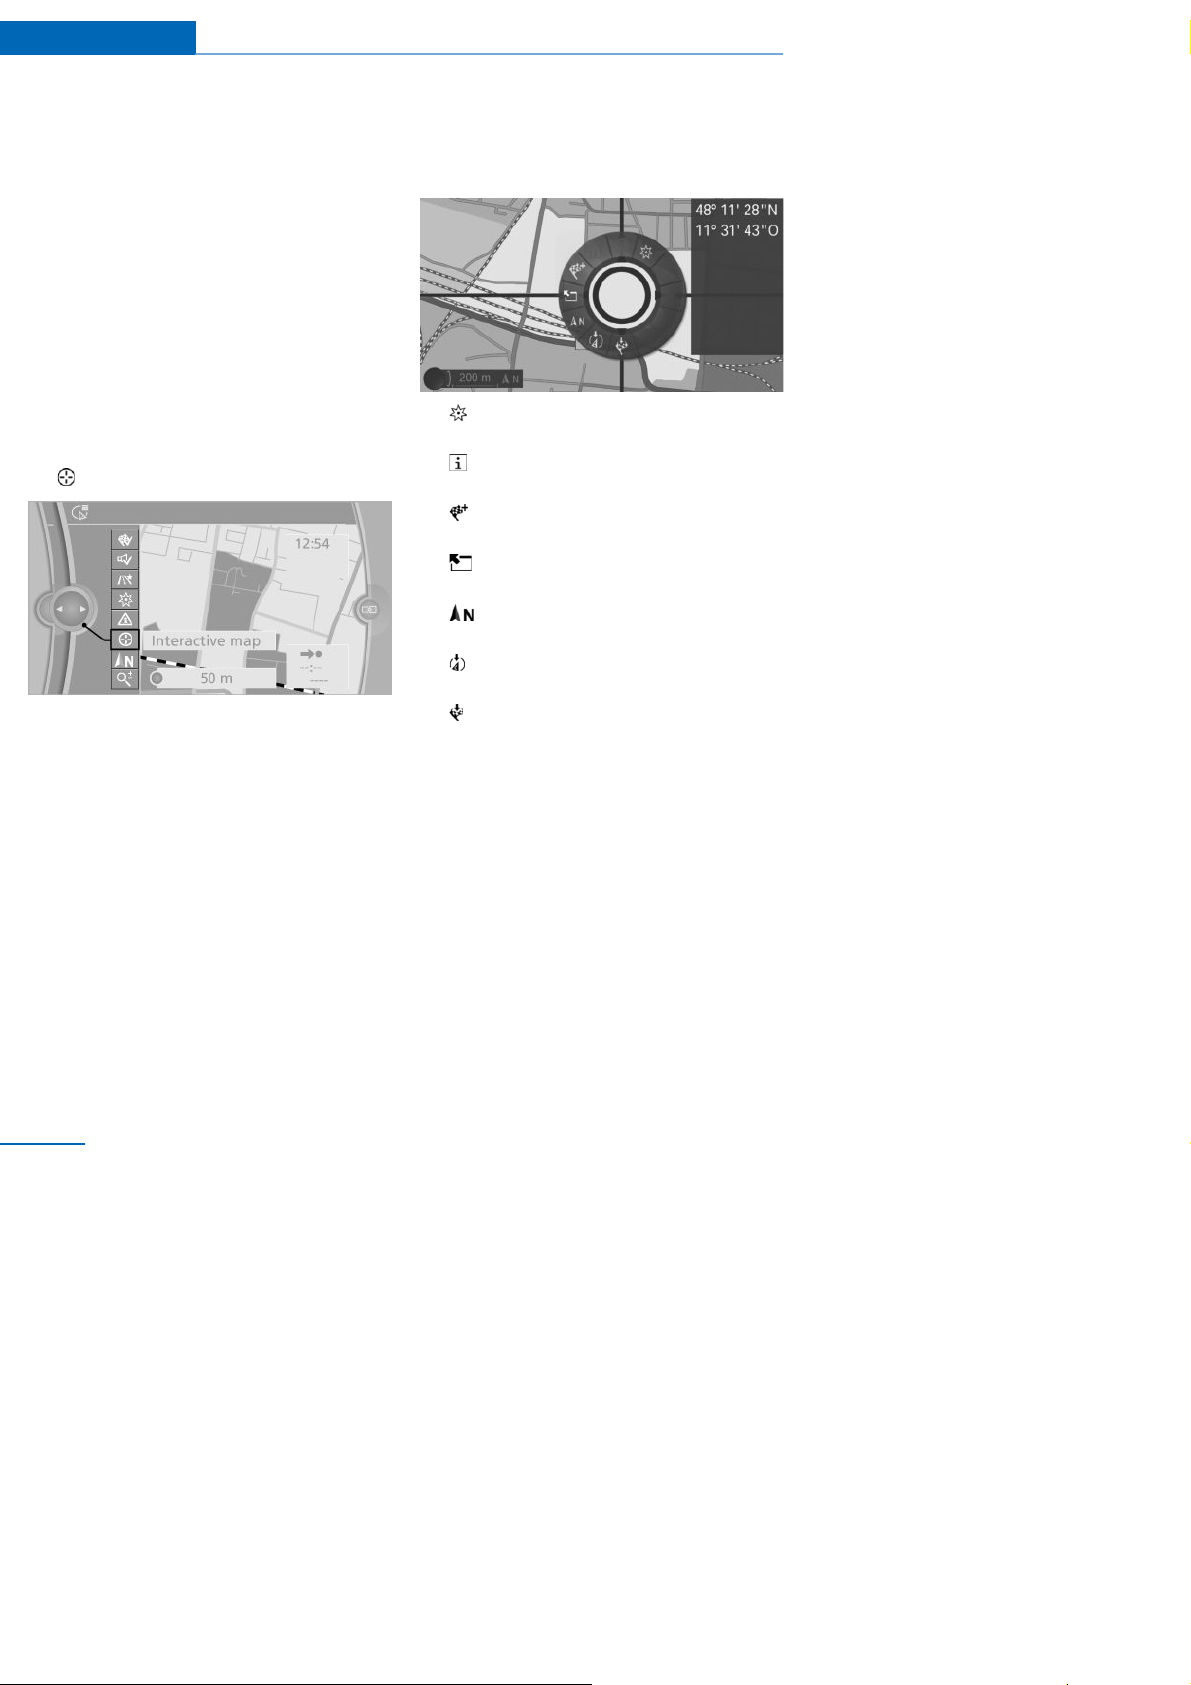
3.
"Interactive map"
4. Se le ct the de stination with the c ro ss -h airs.
▷ To change the scale: turn the controller.
▷ To m ove the m ap: tilt the controller in the
corresponding direction.
▷ To m ove the m ap d iag ona lly: tilt the con -
tro ller in the corre s pon ding direction
and turn it.
Specifying the street/road
If the system does not detect a street/road, one
of the following item s of information is dis played:
▷ A street name in the vicinity.
▷ The county.
▷ The co-ordina tes of the de s tinatio n.
Additional functions
Press the contro ller to ac cess the following addition al functio ns availab le in the inte ractive
map:
▷ "Points of interest in vicinity": search for
poin ts of interes t is s tarte d.
▷
"Sh ow de tails ": a ny de tails on the de s ti-
nation can be shown.
▷
"Start guidance": route gui dance is star-
ted.
▷
"Exit interactive map": changes back to
the map view.
▷
"Change map view": changes to map
view pointing north.
▷
"Dis pla y c urre nt lo catio n": th e m ap se c-
ti on ar ound the current l ocation i s displ ay ed.
▷
"Show destinati on": map section around
the de s tination is dis pla yed .
De stination input by voice
control
Ge nera l
▷ For the handbook for the voice control sy s-
tem, see Owner's H andbook for the vehicle.
▷ A changeover between voice operatio n and
iDrive is possible when entering destinations using spoken commands.
▷ Hav e possible voice commands r ead
aloud: ›Voi ce commands‹
14
Online Edition for Part no. 01 40 2 912 836 - 07 12 510
Page 14

Destination input Naviga tio n
Voice commands
▷ The location, str eet and house number can
be entered in a single command.
▷ Countr ies, locations, roads and j unct ions
can be spoken as whole words in the language of th e system or spelled out.
Example: to enter a town/ city withi n G ermany as an enti re wor d, the language of the
system m ust be German.
▷ Sp ell out th e in put if the lan gua ge s poke n
and the l anguage of the system differ.
▷ Pronounce letters fluently and avoid exces-
sive intonati on and pauses.
▷ The options for i nput depend on the specif i c
navigation data, country and language settings .
En tering an addr ess in a command
1. Press the button on the steering
whee l.
2. ›Destination input‹
3. Wait for the sy stem prompt.
4. Say t he addr ess al oud in the sequence sug-
gested.
5. Contin ue inpu t as s pe cified b y the sys te m.
If required , say each part of the add ress separately, for example town/city.
Entering name of town/city on its own
The place name can be spoken as a word or
sp e lled out.
Whe n th e de stination inpu t me nu is d isplaye d:
1.
2. ›Place‹ or ›Spell name of place‹.
3. Wait for the system to ask for the town/ci ty.
4. Say the name of the town/city or say at least
Press the button on the steering
whee l.
the fi rst three letters.
D epending on the input, up t o 20 t owns/ cities are suggested.
5. Sel ect the town/city.
▷ Sel ecting the suggested town /
city: ›Yes‹
▷ Se le ctin g a d iffe rent town/city: ›Ne w
entry‹
▷ Select an entry, ›Entry ...‹ , f or example
ent ry 2
▷ Sp e ll the input: ›Sp ell n ame of plac e‹
6. Contin ue inpu t as s pe cified by the s yste m .
If there are several places with t he same na me:
Where applicable, places that sound the same
ar e shown in a list and displayed as a place fol lowed by th ree dots.
1. Select the entry: ›Yes ‹ or ›Entry ...‹ e.g. En-
try 2.
2. Sel ect the desired location.
Entering street or junction on its own
Enter t he street or junction in the same way as
the town/ city.
Entering house number on i ts own
D ependi ng on t he data pr esent in the nav igati o n
system, house numbers u p to 2000 can be entered .
1. ›Hou s e n u mbe r‹
2. Say the house number.
3. Contin ue inpu t as s pe cified by the s yste m .
Planning a trip
Ge nera l
To plan a trip, mor e than one stopover can be
entered.
New trip
1. "Navigation"
2. "Map"
Online Edition for Part no. 01 40 2 912 836 - 07 12 510
15
Page 15
Na vig a t io n Destination input
3. If nec e ss ary, tilt the contro ller to th e le ft.
"G uidance"
4.
5. "Ente r ne w de s tina tion"
6. Se le ct th e m od e o f de s tina tion e ntry.
7. Ente r a n inte rme diate d es tin ation.
8. "Start guidance"
E n te ring a trip de s tination
For one tr i p, a maxi mum of 20 i nt ermedi ate destinations can be entered.
1. "Map"
"G uidance"
2.
3. "Ente r ne w de s tina tion"
4. Se le ct th e m od e o f de s tina tion e ntry.
5. Ente r a n inte rme diate d es tin ation.
6. "Add as another desti nat ion"
The inte rme diate d estination is add e d to the
de s tinatio ns lis t and is h ighlig hte d.
7. Turn the co ntroller un til the inte rme diate
stop appears at the desired location in the
list.
8. Press the co ntroller.
Starting the trip
1. Highl ight the first destination after entering
all inte rme dia te destin ation s .
If, for example, th e sec ond intermed iate
de s tinatio n is the one h ighlig hte d whe n you
sta rt route g uidance, the first intermediat e
de s tinatio n is s kippe d.
2. "Start guidance"
symbol indicates the active stage of the
trip.
Saving a trip
Up to 30 trips can be s tored in the trip lis t. If
necessary, delete ex i sti ng tri ps so that new tri ps
can be saved.
1. "Map"
2.
"G uidance"
3. Call up "Options".
4. "Sa ve in My trips "
5. Enter names.
6. "OK"
Sele cting a trip s aved in me mory
1. "Naviga tion"
2. "Saved trips"
U n til th e r o ut e ca t ego r y is op ened , t h e nu mber of newly arrived rout es is shown behind
the relevant category.
3. Sel ect route category.
4. Se le ct trip.
5. "Start guidance"
Re versin g the trip direction
The i nt ermediate destinations are shown in the
list in re verse ord er.
1. "Map"
"G uidance"
2.
3. Call up "Options".
4. "Reverse sta g e d est. or d er"
Options for the intermediate
destinations
1. "Map"
2.
"G uidance"
3. "Dis pla y a ll s tage des tin."
4. Se le ct a n inte rme dia te de stin ation .
▷ "Edit de s tina tion"
16
Online Edition for Part no. 01 40 2 912 836 - 07 12 510
Page 16

Destination input Naviga tio n
▷ "Reposition stage d est.": move th e in-
terme d iate de s tination in th e lis t.
▷ "Delete stage dest ination"
▷ "Sk ip stage destination"
Some options are not possible for some trips.
De leting a trip s aved in me mory
1. "Saved trips"
2. Highli gh t the desired trip.
3. Call up "Optio ns ".
4. "Delete all trips" or "Delete trip"
Importing trips via a USB medium
1. Switch on ignition.
2. Connect USB medi um to t he USB interface
in the ce ntre armres t.
3. "Na viga tion"
4. "Saved trips"
5. "Import trips"
6. "USB"
7. "OK"
The maximum number of tr i ps that can be saved
on the USB medium and in the navigation system tog ethe r is 3 0, othe rwis e imp ort is not p os sible.
Importing trips via BMW Online
1. "Na viga tion"
2. "Saved trips"
3. "Import trips"
4. "BMW Online "
BMW Routes
Ge nera l
Recommended routes can be taken up in the
route guidance.
Start BMW rou te
1. "Navigation"
2. "Saved trips"
U nt il route categories are opened, t he number of newl y arrived routes is shown behi nd
the relevant cat egory.
3. "BMW R outes"
Th e routes available are shown with th e
followin g informatio n:
▷ Re gion
▷ Remov al of the starting point of the
rout e
▷ Name of route
The ti me and di stance are shown i n the spl it
screen for the relevant route.
4. Sel ect desired r o u te.
5.
"Star t guidance"
6. "Start guidance"
Ending route guidance
1. "Navigation"
2. "Map"
3.
"Guidance"
4. "Stop guidance"
Call u p las t trip
1. "Na viga tion"
2. "Saved trips"
3. "L ast trip"
4. Se le ct a stage d de s tinatio n.
5. "Start guidance"
Online Edition for Part no. 01 40 2 912 836 - 07 12 510
17
Page 17
Na vig a t io n Route guidan ce
Route guidance
Vehicle Equipment
Thi s chapt er describes al l standar d, nat i onal and
sp e cial e quipm en t provide d in th e m odel s e rie s .
Theref ore equi pment not avail abl e i n a v ehi cl e i s
also de scri b ed, f o r examp le th e select ed spec ial
equipment or national v er si on. That also appl i es
to safety-r elevant functi ons and systems.
Route guidance
Starting
1. "Na viga tion"
2. Ent er destination, see page 9.
3. "Acc ep t de s tinat ion"
4. "Start guidance"
▷ The route i s di spl ay ed on the control di spl ay.
▷ The distance to the destination/intermedi-
ate destinati on and the estimated time of arrival are shown in th e map view.
▷ An arrow vie w is d is playe d in the ins trume nt
cl u ster , and o n th e contr ol display and in the
He ad -U p Display and as appropr iate. Arrow
view, see page 19.
End
1. "Na viga tion"
2. "Map"
3.
"G uidance"
4. "Stop guidance"
Continue
If you di d not reach your desti nat ion during the
last j ourney, route guidance may be continued.
"Continue guidance"
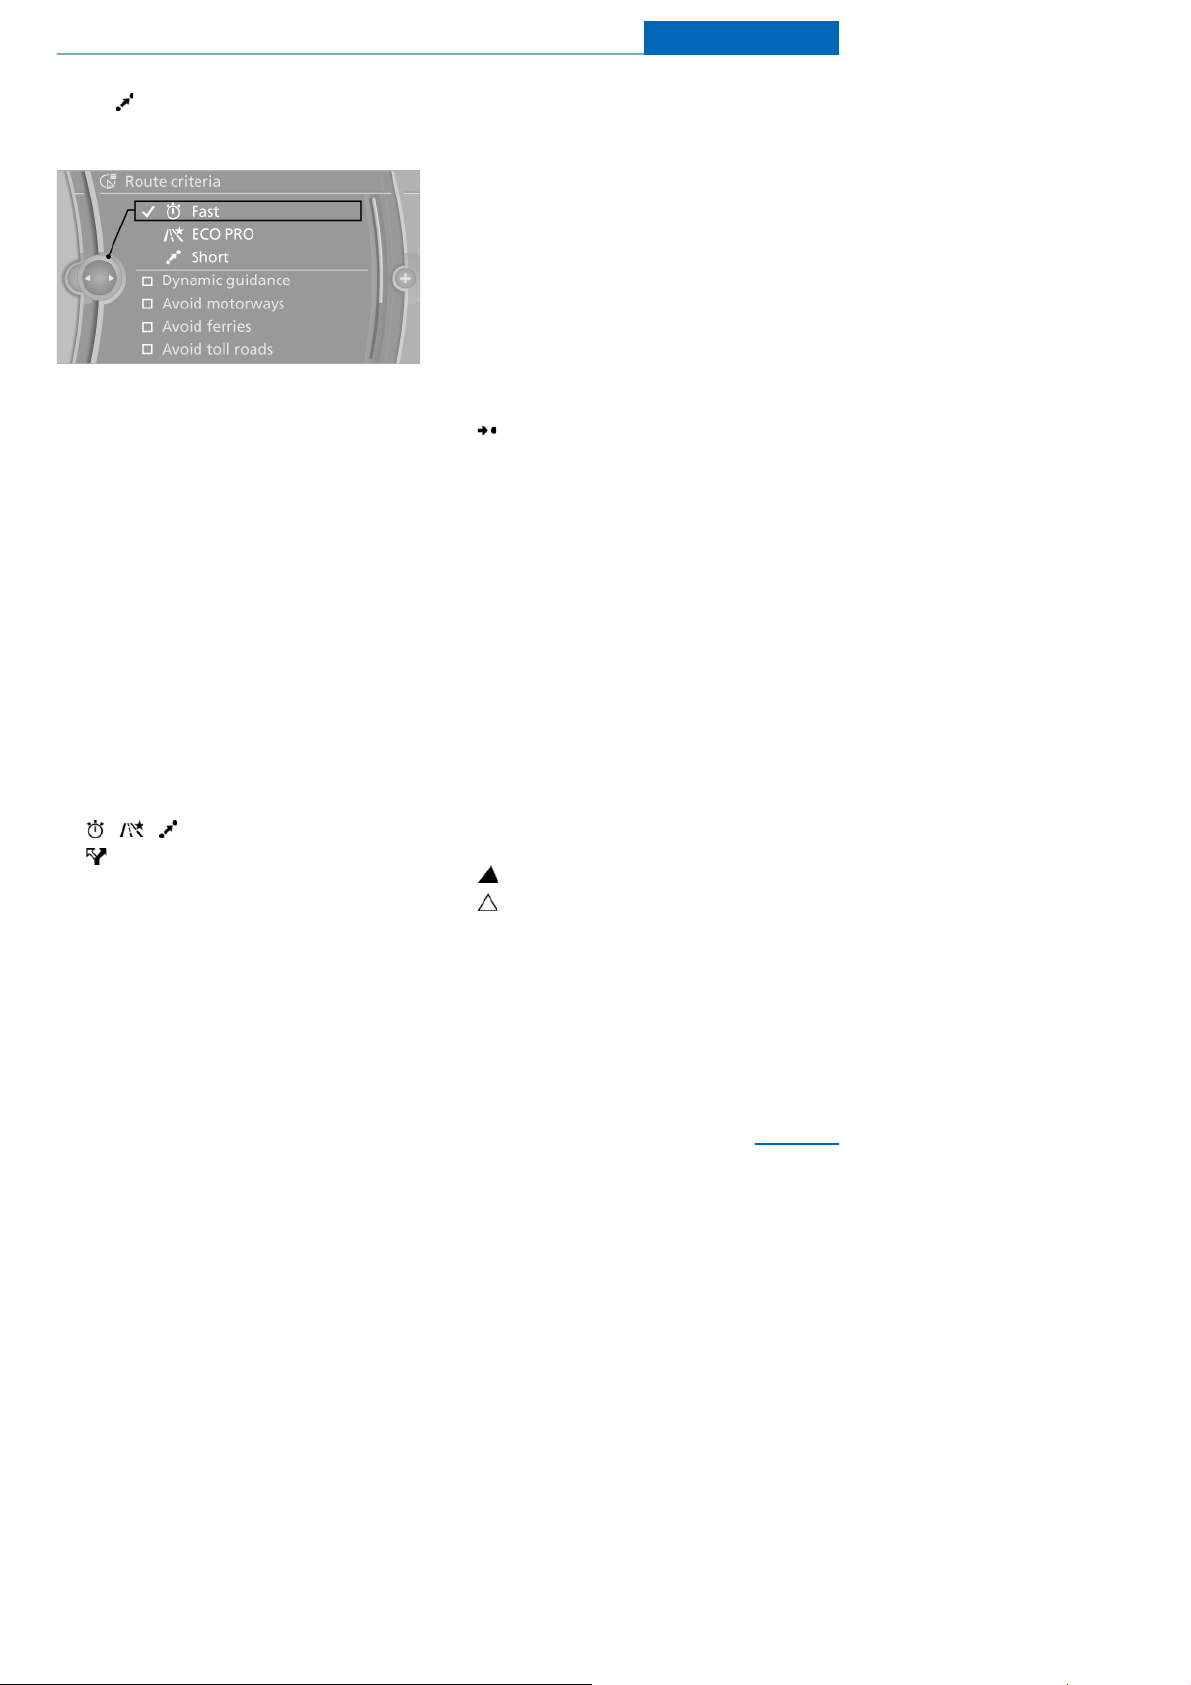
Route criteria
Ge nera l
You can i nfluence the route that i s cal culated by
se le ctin g vario us crite ria .
You can change the route cr i ter i a as of ten as you
like during destination input or during route
guidance.
Roa d t ypes form part of the nav igation data and
are taken into account in route planning, for exampl e avoid motorways.
Route guidance with traf fi c inf ormation, see
page 25.
No t es
The suggested route can differ f rom your personal experience.
Th e settings are saved for the remote con trol
cur rently in use.
For BMW Routes the route criteria cannot be
changed.
Chan ge
1. "Naviga tion"
2. "Map"
"Ro ute criteria"
3.
4.
"Ro ute criteria"
5. Se le ct a criterion:
▷
"Fast": ti me-optimised route resulting from a combi n ation of a rou te as
shor t as feasible and fast ro ads.
▷
"ECO PRO": fue l-op timis e d route
resulting f rom a combination of a route
low e st possible f uel consump tion and
fast roads.
18
Online Edition for Part no. 01 40 2 912 836 - 07 12 510
Page 18
Route guidance Na vig at io n
▷ "Short": distance-optimised route
re s ulting from a co mb inatio n of a route
as short as feasible and fast roads.
6. To select supp lemen tary route criteria, if
necessary:
▷ "Dynamic guidance": tra ffic information
can aut omatical ly be tak en into account ,
see page 25, with rout e guidance.
▷ "Avoid moto rways": motorway s are
avoided as far a s possible.
▷ "Avoid ferries": ferries are avoided as far
as po ss ib le.
▷ "Avoid toll roa ds ": route s with tolls are
avoided as far a s possible.
▷ "Avoid tax vignette roads": routes with
l ong-term tol ls are avoi ded as far as possible.
Alternative Routes
When route guidance is active, alternative
r ou t es are suggested if possible.
"Route c riteria"
1.
"Alternat. routes"
2.
An over vi ew of the current route and the
proposed alter native rout es i s shown. In addition, detai ls such a travel time and route
length and with alternativ e routes any data
on f uel consumpti on compared wi th the current route are shown. The rout es are illustra ted in c olou r in the s plit s cre en .
3. Sele ct to take an alternative route .
Course of route
Various views of the course of the r oute are
available dur ing route guidance:
▷ Arrow d isplay in the in strum e nt clu ster and
on the control display .
▷ L ist of routine sections.
▷ M ap vi ew, see page 21.
▷ D epending on equipment, arrow view in
Head-Up Display.
Arrow view
The follo wing informatio n is dis pla ye d during
route guidance:
▷
Symbol for active route guidanc e with
remaining travel ti me and di stance to destination.
▷ Small arrow: instruction, for example, to next
tur n gi ving the distance and name of the new
road.
▷ Large ar row: current heading.
▷ Road name of t he road you are currently
tr avelling along.
▷ Traffic information.
De pe nd ing on road guid anc e, the illus tratio n
changes to junction v iew. Any lane infor mation
is also shown here.
Show, see page 23, arro w vie w in split s cre en.
Driving lane inform atio n
In arrow vie w, a triangle ind icates the rec om me nded lane on a mu ltilane ca rriag ewa y.
▷
Optimum lane.
Lane that is also p ossible. But a lane
▷
change might soon be necessary.
Dis play list of routine s e ctions
With active route planning, a list of the route
section s can be di spl ay ed. F or each r oute stage,
the distance to be driven and th e traffic information are displayed.
1. "Navigation"
Online Edition for Part no. 01 40 2 912 836 - 07 12 510
19
Page 19

Na vig a t io n Route guidan ce
2. "Route details"
3. Mark route s ection.
The secti on of the route i s al so shown i n the
split screen.
Bypassing a section of the route
Ca lculate a new route for a route stage.
1. "Na viga tion"
2. "Route details"
3.
"New route for"
4. Turn the controll er. Enter the di stance
withi n which you want to return to the original route.
5. Press the co ntroller.
Cancelling a bypass
In c ase y o u n o lon ger w ish t o by pa ss t his sect ion
of t he r out e:
1. "Na viga tion"
2. "Route details"
3.
"New route for:"
4. "Cancel closure"
Refuelling recommendation
The re m ainin g rang e is ca lcula te d an d, as nee ded, service stat ions along the way are displayed.
Ev en with the most up-to-date navigation data,
inform ation on ind ivid ual s e rvice s tatio ns may
hav e changed, f or ex ampl e, serv i ce stat i ons may
not b e in op eratio n.
1. "Na viga tion"
2. "Route details"
3.
"Re fu ellin g rec om me nd ."
A lis t of s e rvice s tations is d is playe d.
4. Hig hlig ht the s e rvice s tation .
The position of the service stat io n is shown
in the s plit- sc re e n.
5. Se le ct th e s e rvice s tatio n.
6.
Select the symbol.
7. "Start guidance": route gui dance to the
service st ation y ou selected is started .
"Add as another destination": the ser vice
station is added to the course of the route.
Voice ins truction
Switching on/off
The setting is saved for the remote control currently in use.
1. "Naviga tion"
2. "Map"
3.
"S poke n ins tructions "
Re pe a t
1. "Naviga tion"
2. "Map"
3.
Highlight the symbol.
4. Pres s the controlle r twic e .
Volume control
Tur n th e volume knob during the voice instructions until the de s ire d volum e is o btained.
Store in fa vo urite s bu ttons
The func tion Enable/dis able voice ins tructio ns
can be sav ed to a favo ur ites button for quick access.
20
Online Edition for Part no. 01 40 2 912 836 - 07 12 510
Page 20
Map view
Map view Navig at io n
Vehicle Equipment
This cha pte r de scribe s all stand ard, n ation al an d
sp e cial e quipm en t provided in the m ode l s e rie s .
Theref or e equ ipment no t a v ailable i n a v eh icl e is
al so described, for exampl e the sel ected specia l
equi pment or n ational v er si on. T hat also applies
to safety-relevant functions and systems.
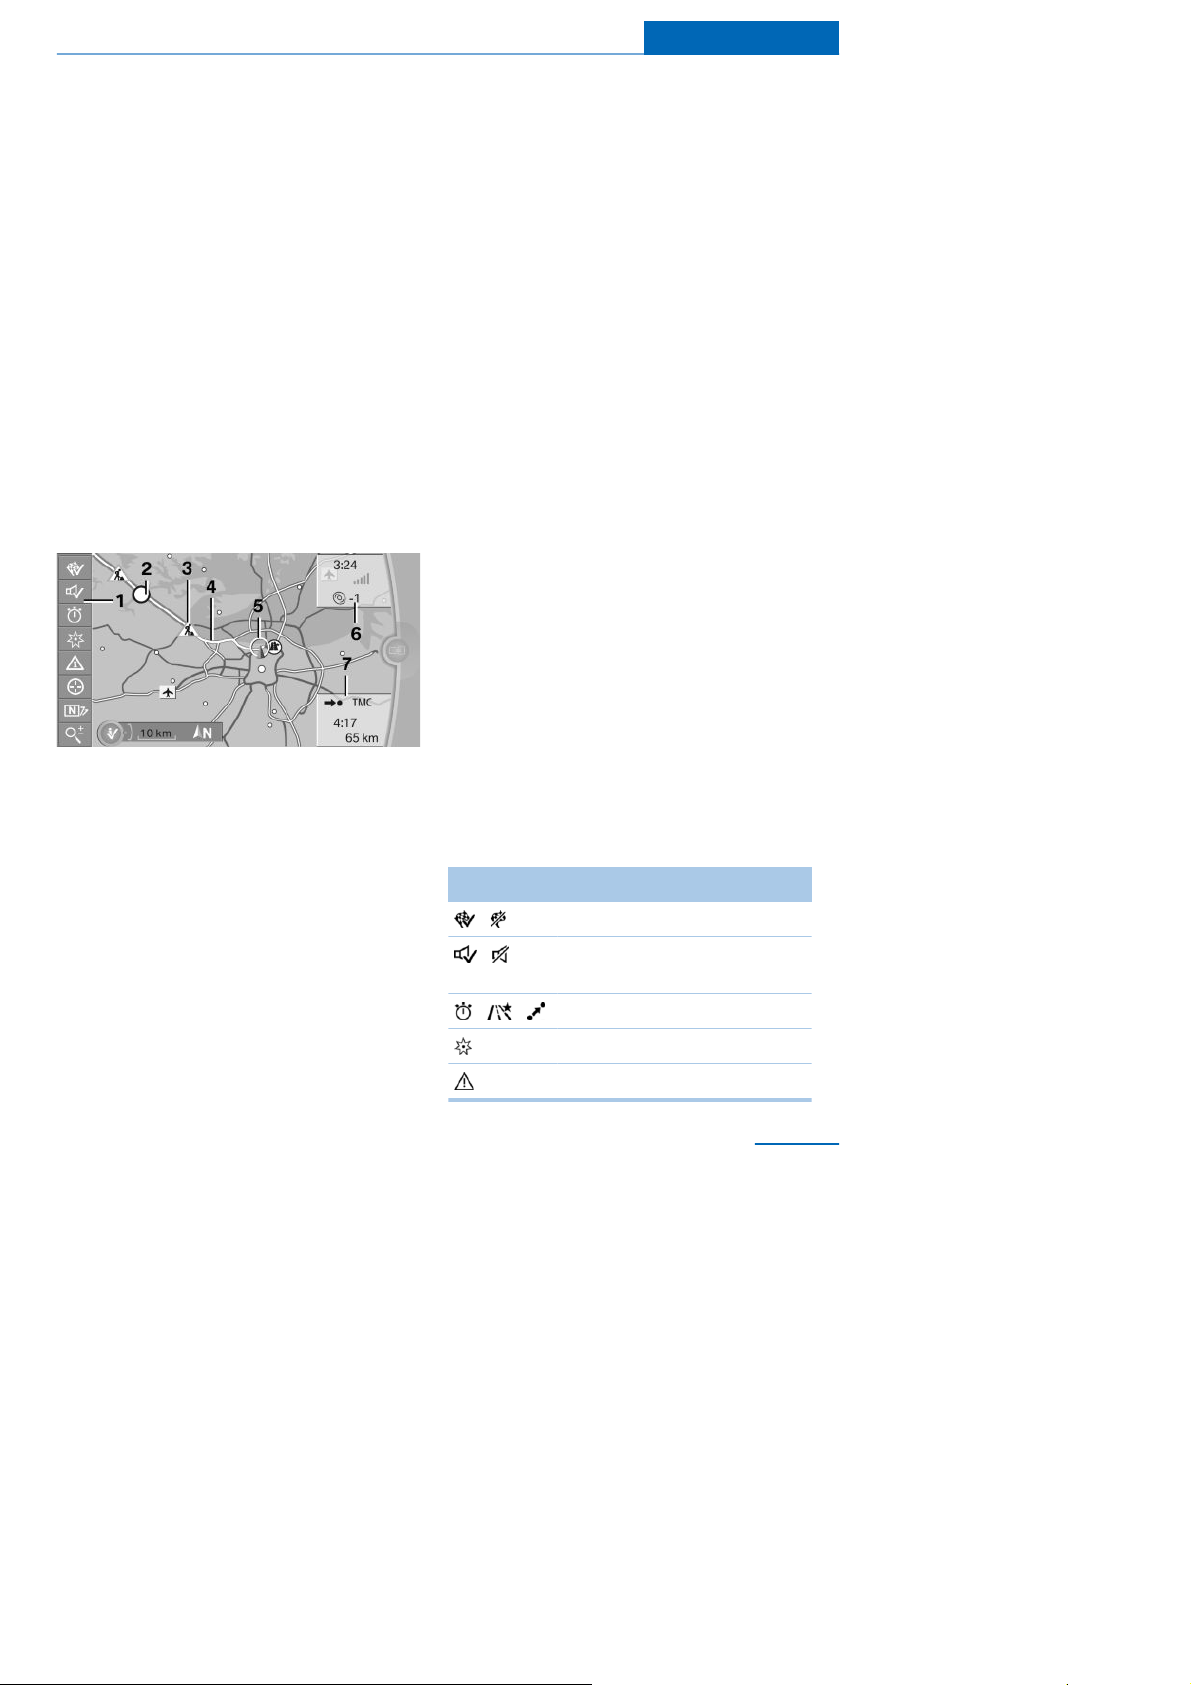
Dis pla ys
1. "Na viga tion"
2. "Map"
Overview
1 Function bar
2 Route sta ge with t raffic obstru ction
3 Road si gn f or t raffic obstr u c tion
4 Planned route
5Location
6 Upper stat u s fiel d
7Lower status field
Lines on the m ap
R oads and streets are displayed in various colours and lines in accordance with thei r cl assification. Dotted lines denote train and f erry connecti ons. National borders are denoted by thin
line s.
Traffic obstructions
Whe n re ce ivin g traffic info rm atio n from a ra dio
stati on, t raff i c obstr uctions can be shown on the
map, see page 24.
Lines along the planned rout e denote route
stages with traffic obstr u c tions, depending on
the map scale. The position of the lines on the
route show the direction of the obstruction.
Road signs classify the obstru ctions.
▷ Red road sign: the obstruction aff ect s the
planned route or direction of travel.
▷ Grey r oad si gn: the obstruction does not af-
fect the planned route or direction of travel.
Planned route
A fter starting route gui dance, the planned route
is shown on the map.
Status fields
Display/hide: pre ss the controller.
▷ Upper status field: time, telephone and en-
tertainment details.
▷ L ower status field: symbol f or active route
gui dance, status of tr af f i c i nf ormati on, arr i v al
time and distance to destinati o n.
Function bar
The follo wing functio ns are ava ilable us in g the
function bar:
Symbol Function
Rout e guidance active/inactive.
Voice ins tru ctio ns active/inac-
tive.
Chan ge route criteria.
Se arch for po int of inte re s t.
Traffic information functions.
Online Edition for Part no. 01 40 2 912 836 - 07 12 510
21
Page 21

Na vig a t io n Ma p view
Symbol Function
Proposed di ver sions are avail-
able.
Int e ra c tive m ap .
Set map view.
To switch to the toolbar, tilt the controller to the
left.
Chan ges th e scale.
Map section
Chang e
"Interactiv e map"
▷ To m ove the m ap: tilt the con tro ller in th e
correspondi ng direction.
▷ To m ove the m ap d iag onally: tilt the con tro l-
ler in th e c orre s pondin g dire ction and turn it.
Settings
The settings are saved for the remote control
curre n tly in us e.
1. "Na viga tion"
2. "Map"
3.
Set map view.
▷
▷
▷
▷
▷
"Map views"
"North-ori ented"
"In direct. of tr avel"
"Perspective"
"Traffic info map": information on traffic
flow is s hown in a s pe cia l map vie w. Th e
symbo ls of the other additiona l informat ion
set are also sh ow n.
"Additional info"
▷
"Points of interest": symbols for
points of i nterest are shown. Set displ ay,
see page 13.
"Traffic eve nts": symbols for traffic
▷
information, see page 24, are shown.
"Traffic flow": depending on the
▷
scale, the length, direction and effect, a
traffic obstruction are indicated by road
signs in the map or coloured l ines along
the calculated route. Inf ormation on traf fic flow in the map view, see page 25.
▷
"Weather": weath er sym bols are
shown on the map.
D i sp l a y ed sy mbo l s: clear sk ies, over ca st
skies, rain, th under storms and snow,
with the curr ent temperature in each
case.
The wea the r in formation is au tomatically updated.
The s ym bo ls are d isp layed in s p ec ific
select ed scales.
"Sa tellite im ages ": d ep e ndin g on
▷
ava ilability a nd re solution, s a tellite im ages are shown as the background in
several scales.
▷ 3D "Pe rsp ec . view in 3D": dis tinc tive lo-
cati ons i n the nav igati on data are shown
on the map in 3D.
▷
"Map mo de ": ac co rd ing to lighting c on-
ditions, select and make settin gs.
▷
"Day"
▷
"Night"
▷
"Automatic"
"S tatus info": fade in/out s tatus fields .
▷
Status fields, see page 21.
Scale
Chan ge
1. Select the symbol.
2. To change the scale: turn the controller.
22
Online Edition for Part no. 01 40 2 912 836 - 07 12 510
Page 22

Map view Navig at io n
Automatically set scale
"A u toscal e": in the nor th-pointi ng map view,
the route between location and destination is
sho wn . T his v iew i s a l so select ed w hen t he sca le
is se t s o wide th at the fo llowing is sh own:
"AUTO".
Map view for split-s creen
R egar dless of t he ma i n sc r een, th e map v i ew can
be selected for the split-screen.
1. Call up "Optio ns ".
2. "Sp lit s cree n"
3. Tilt the co ntroller re pe ate dly to th e righ t until
the sp lit s cree n is s e lecte d.
4. Press the controller.
5. Select map view.
▷ "Arrow vi ew"
▷ "Map north-oriented"
▷ "M ap in direction of travel"
▷ "Map perspective"
▷ "Pos itio n"
▷ "G uidi ng Plus": selected secti ons of
route, for examp le mo torway intersections, are shown in perspecti ve.
▷ "Tra ffic inform ation map ": ma p is op ti-
mised to the displ ay of traffic information.
6. To change the scale: sw itch to split screen
and turn controller.
4. "Pictures at destin ation "
5. Depending on the offering, various photos
can be selected.
Images to the destination
Dis pla ys
Photos can be displa yed for cer tain desti nat i o ns
w hen route guidan ce is active.
1. "Na viga tion"
2. "Map"
3. "Guidance "
Online Edition for Part no. 01 40 2 912 836 - 07 12 510
23
Page 23

Na vig a t io n Traffic information
Traffic information
Vehicle Equipment
Thi s chapt er describes al l standar d, nat i onal and
sp e cial e quipm en t provide d in th e m odel s e rie s .
Theref ore equi pment not avail abl e i n a v ehi cl e i s
also de scri b ed, f o r examp le th e select ed spec ial
equipment or national v er si on. That also appl i es
to safety-r elevant functi ons and systems.
Ge n e ra l
Traffic i nformation from radio stations sending
a tr aff ic war ning serv ice o n t he Traff ic Message
Chan ne l, TMC, is s ho wn in the map view an d
con sid e re d wh en calc ulatin g route . Informatio n
on traffic obstructions and dangers i s continuously updated.
Tra ffic info rm ation is dis playe d o n the ma p b y
symbols.
Tra ffic info rm ation for the vic inity is sto re d in a
list.
Dis pla y
The symbol in the functi on bar of the map
vie w turns ye llow, if the traffic info rm ation con cerns the calculated rout e and th e ex pected del a y is l e ss th an 20 m inut es. T h e sy mbo l tu r ns red
if the e xpe cted de lay is m ore than 2 0 m inute s or
the r out e is blocked or there i s a dan ger m essage for the route.
Th e symbol sho ws tha t t h ere ar e su ita b le diversions from the traffic information.
Real-Time Traffic In formation, RTTI
In some countries addit ional bookable services
se nd real-time traffic info rm atio n, RTT I, which is
then used and sh own instead of traffic information from the radio station.
The location of traffic obs truc tions is s pe cified
more comprehensively and precisely wi th realtime traffic information. In addition, the traffic
situati on off the motorways, f or example, on side
streets and urban roads, is extensively recorded
and shown. D iver si on recommendati ons can be
calculated more precisely on the basis of this
informa tion. This lo wers t he ris k of c om ing
across another tr af fic obstruction on di v ersi ons.
Several recommended diversions or further infor mation may be provided.
Whe n d riving in countries in whic h rea l-tim e traffic informatio n is availab le, the traffic info rm ation
continues to use radio stations.
It is shown in the low er status field, see
page 21, in map view whether TMC or RTTI in-
format ion is us e d.
Re c ep t io n
Switching on/off
1. "Naviga tion"
2. Call up "Options".
3. "Receive traffic info"
Traffic information list
Dis play s
1. "Naviga tion"
2. "Map"
3.
"Traffic information"
"Traffic reports"
4.
With acti ve route guidance traffic information affecting the computed route is f irst
sho wn wit h red sy m b ols. The n t h e tra ffi c information not affecting the route with grey
symbo ls. The variou s items of traffic information are sorted by distance from th e vehicle's current position.
5. Se le ct th e it em of t ra ffic informa tion.
24
Online Edition for Part no. 01 40 2 912 836 - 07 12 510
Page 24

Traffic information Naviga tion
"More info rm atio n": dis p lays further in-
formation.
6.
If appli cable, br o wse to the next or
the prec eding item of traffic informatio n.
Recommended diversions
Dis pla ys
1. "Na viga tion"
2. "Map"
3.
"Diversion": a li st of recommended di-
ve rs io ns is sh own.
Traffic information in the map
Traffic overview
With the function switched on, the map v iew
changes to grey scale, set to point north and
changes the scale as needed. Th e symbols for
additional information are greyed out. This opti mi ses the traf fic i nformati on di splay. D ay/night
mode i s not tak en i nto considerat i on f or thi s setting.
Information on traffic flow in the map
view
Dependi ng on the scale, the length, directi on
and ef fect of a traffic obstruction are indicated
by roa d signs in the map o r coloured lines a long
the calcul at ed route.
▷ Black: obstruction.
▷ Re d: traffic jam.
▷ Orange: queuing traffic.
▷ Yellow: he avy traffic.
▷ Green: free -flowing traffic.
▷ Grey: g ene ral traffic inform ation, for e xam-
ple roadworks.
The inf ormation displayed depend on the specific traffic information s ervice.
Traffic information with route
guidance
Principle
If there is inform ation on traffic ob stru ction s, the
system calculates the possi ble proposed diversions.
Show traffic ov erview
1. "Na viga tion"
2. "Map"
3.
"Traffic information"
"Tra ffic info m ap "
4.
Leave traffic overview
Tilt the co ntroller to the left. Th e orig inal m ap
view is shown.
Symbols in the map v iew
D epending on the scal e of the map and locati on
of the traf fic obstruction in relati on to the route,
the symbols f or traffic obstru ctions are displayed.
Online Edition for Part no. 01 40 2 912 836 - 07 12 510
Ge nera l
Tw o types of r oute guidance are possi ble.
▷ Partially dyna mic rout e guidance: diver sion
sug gestions from the navigation system
may be t a ken.
▷ Dynamic route guidance: diver sion sugges-
ti ons are automatical ly recorded in the route
guidance.
Pa rtially d yna mic route g uid an ce
Partia lly d ynamic route guidan ce is active whe n
tra ffic information re ce ption is s witche d o n.
The systems takes into account the existing
tr affic i nformation during the route gui dance. A
message is displayed depending on the route,
the tra ffic info rm ation and the pos sib le dive rs ion
25
Page 25

Na vig a t io n Traffic information
routes. I f there is a traf fi c obstructi on, a di versi on
is offe red if po s sib le .
For particular dangers, for example objects on
the r o ad, a message is displayed with no div ersion option.
The upper pa rt of the message shows:
▷ Symbol of th e first traffic disruption, or with
distance to the start of the traffic di srupti on.
▷ Distance to the start of the diversion.
The lower part of the message shows:
▷ Remai n i ng r oute t o be dri v en an d ar riv al time
on th e o rig inal route , with white symbol.
▷ Differe nce in route le ng th a nd g ain in time of
the diversion compared wi th the original
route, with coloured symbol.
The follo wing is s hown in the s plit s creen:
▷ Original route, white .
▷ Diversion, coloured.
Accepting a diversion
In the me ssage:
"Diver sion"
Via t he t oo lb ar:
als o po s sib le that th e route is calculate d s o
that it cuts across the traffic congestion.
▷ Particul ar dangers are displa yed independ-
ently of the setting.
Activating dynamic route guidance
1. "Naviga tion"
2. "Map"
3.
"Ro ute criteria"
"Ro ute criteria"
4.
5. "Dynam ic g uida nce "
Country-specific information
via BMW Online
Specific i nformation on countr ies can be tr ansferred via BMW Online , for examp le s p ee d limits
on B roads.
1. "Naviga tion"
2. Call up "Options".
3. "Country info (BM W Online)"
1. "Na viga tion"
2. "Map"
3.
"Traffic information"
4.
"Diversion"
5. Open desi red diversi on.
6.
"Diversion"
Dynamic route guidance
The ro ute is auto matically cha nged if a traffic
obstruction is encountered.
▷ The sy stem does not indicate traff ic ob-
structions on the original route.
▷ Traffic inform ation is s till d is playe d o n the
map.
▷ Dependi ng on th e type of road and the na-
ture and l ength of the traffic congesti on, it is
26
Online Edition for Part no. 01 40 2 912 836 - 07 12 510
Page 26

Navigation data
Navigation data Navigat io n
Vehicle Equipment
This cha pte r de scribe s all stand ard, n ation al an d
sp e cial e quipm en t provided in the m ode l s e rie s .
Theref or e equ ipment no t a v ailable i n a v eh icl e is
al so described, for exampl e the sel ected specia l
equi pment or n ational v er si on. T hat also applies
to safety-relevant functions and systems.
Information on navigation
data
1. "Na viga tion"
2. Call up "Optio ns ".
3. "Na viga tion s ys tem version" Inform ation re -
gar ding the versio n of the data is displayed.
Updating
Ge n e ra l
N avigation data is saved in the vehicl e and ca n
be updated using USB medium.
You can obtain up-to-date navigation data and
the acti vation code from your Service centre.
Updating
1. Connect USB medi um with the new naviga-
tion data to the USB interface in the centre
armres t.
2. Follow th e in struc tions o n the c ontrol d is-
play.
3. Enter activ ati on code f or the navi gati on data.
The naviga tion data are updated. After an
inte rrup tion in the trip, follow the in struc tions on the control display.
4. A fter updating, r emove the media with nav-
igatio n data.
Checking status
1. Press the button.
2. "Nav igation update"
No t e s
D epending on the volume of data, u pda ting the
data can take several hours.
Update whi l e the v ehicl e is i n motion, to save the
batte ry.
Only the basic functions of the navigation system are ava ilable while an upd ate is in prog re s s .
You can check the status of t he update pr ocess.
Online Edition for Part no. 01 40 2 912 836 - 07 12 510
27
Page 27

Na vig a t io n Wha t to do if...
What to do if...
Vehicle Equipment
Thi s chapt er describes al l standar d, nat i onal and
sp e cial e quipm en t provide d in th e m odel s e rie s .
Theref ore equi pment not avail abl e i n a v ehi cl e i s
also de scri b ed, f o r examp le th e select ed spec ial
equipment or national v er si on. That also appl i es
to safety-r elevant functi ons and systems.
What to do if...
▷ The curr ent posi t ion cannot be displ ayed.
Th e c ar is in a n are a no t c o ve red b y th e d at a ,
is in a poor re c ep tion a rea o r the s ys tem is
currently c alcu lating the po sition. Rece p tion
will normally be p os sible outd oors .
▷ A destination without a street is not trans-
ferred to the route guidance system.
No city centre can be determined for the
place enter ed.
Enter any street in the place selected and
start route guidance.
▷ A destination is not transferred to the route
guidanc e system.
The da ta fo r th e d e stinatio n is not a vailable
i n the navigation data. Choose a destination
as close as possible to the original one.
▷ Le tte rs canno t be s ele c ted for de s tination
inpu t.
The data stor ed do not contain the desti na-
tion data.
Choo se a de s tinatio n as c los e as pos s ible to
the origina l one .
▷ Map view shown in grey scales?
"Traffic info map" Active: indications on the
Control Displ a y are toggled to grey - scale.
This fac ilitate s op timum traffic info rm atio n
dis pla y. De ac tiva te tra ffic informa tion m ap ,
see page 25.
▷ S p oken ins tructions ce as e to be given im-
mediately before junctions during route
guid ance?
Area is not f ully recorded, or you have deviated fr om t he sug gested route and the sy s tem requi res a few seconds to calculate a
new route.
28
Online Edition for Part no. 01 40 2 912 836 - 07 12 510
Page 28

Wha t to do if... Navig at io n
Online Edition for Part no. 01 40 2 912 836 - 07 12 510
29
Page 29

Online Edition for Part no. 01 40 2 912 836 - 07 12 510
Page 30

En te rt a in m e n t
This chapter ensures your enjoyment when
re ce iving radio and te levisio n s tatio ns or when
playing CD s, DVDs and tracks from the music
collection.
Online Edition for Part no. 01 40 2 912 836 - 07 12 510
Page 31

Ente rt ainm e nt Sound
Sound
Vehicle Equipment
Thi s chapt er describes al l standar d, nat i onal and
sp e cial e quipm en t provide d in th e m odel s e rie s .
Theref ore equi pment not avail abl e i n a v ehi cl e i s
also de scri b ed, f o r examp le th e select ed spec ial
equipment or national v er si on. That also appl i es
to safety-r elevant functi ons and systems.
Ge n e ra l
The sound settings are saved for the remote
con tro l currently in us e.
Sound settings
Call up
1. "Multimedia", "Radio" or "Settings"
2. "So u nd "
Rese ttin g
1. "So u nd "
2. "Rese t"
Adju st ing
1. "Multimedia", "Radio" or "Settings"
2. "Sound"
3. Sel ect the desired sound setting.
4. Adjustin g: tu rn the con tro ller.
5. Saving: pr ess the controller.
Treble, bass, balance, fader
Ge n e ra l
▷ "Treble": tr eble adjustment.
▷ "Bass": bass adjus tment.
▷ "Balanc e": left/right volum e d is trib ution .
▷ "Fader ": front/rear vol u me distribution.
32
Online Edition for Part no. 01 40 2 912 836 - 07 12 510
Eq u alis e r
Setting for individual sound frequency ranges.
Adju st ing
1. "Multimedia", "Radio" or "Settings"
2. "Sound"
3. "Eq ualis e r"
Page 32

Sound Ent e rt ainm e n t
4. Sel ect the desired setting.
5. Adju sting: tu rn the con tro ller.
6. Saving: press the controller.
Multichannel reproduction,
surround
Ge n e ra l
Choice of stereo and multichannel reproduction, surr ound.
Ad ju s t in g
1. "Multimedia", "Radio" or "Settings"
2. "Sound"
3. "Surround" or" L7 surround"
When surround is activated, multichannel repro duction is simu lated wh en playing an audio
track in stereo.
LOGIC7 an d the LOGIC7 lo go are registered
trademarks of Lexicon, Inc., a company of the
Harman International Gr oup.
Bang & Olufsen High End
Surround Sound System
The s ettin gs for lou ds pe ake r illumination are
saved for the remote control currently in use.
3. "Bang & Olufsen"
4. Sel ect the desired sound setting.
▷ "Studio": studio sound.
▷ "Ex pa nded": o pen room sound.
Center s peaker
An ad ditio nal s p ea ker is p rovid ed in th e c entre
of th e in strum e nt pa ne l. This auto matically e xtends when Enter tainment is swi tched on and i s
illumin ate d a cco rd ing to the illum ination s e tting.
With Entertainment switched off or mute
sw itching, the speake r contracts again.
Volume
Ge nera l
▷ "Speed volume": adaptation of the volume
dependi n g o n speed.
▷ W ith Bang & Olufsen High End Surr ound
Sound System: aut omati c adj ustment of t he
v ol ume dependi ng on dr i v e noi ses audi ble i n
th e interi o r , f o r example w ind no ise, no extr a
setting needed thr ough Speed Volume.
▷ "PDC ": volume of the PD C sound signal rel -
ative to the sound output from the entertainmen t system.
▷ "Gong": v olume of t h e sound si gnal, for ex-
amp le for s ea t be lt rem ind er, in re lation to
the sound output from the entertainment
system.
▷ "M i cr ophone": mi cr ophone volume during a
tele phone c all.
▷ "L oudspeak." : loudspeaker v olume during a
tele phone c all.
The follo wing volum es are stored only for the
respective connected tel ephone:
"Microphone", "Loudspeak.".
Setting the so und
1. "Multimedia", "Radio" or "Settings"
2. "Sound"
Online Edition for Part no. 01 40 2 912 836 - 07 12 510
Adju st ing
1. "Multimedia", "Radio" or "Settings"
2. "Sound"
33
Page 33

Ente rt ainm e nt Sound
3. "Volu me setti ngs"
4. Sel ect the desired volume setting.
5. Adjusting: turn the controller.
6. Sa ving: p re s s the con tro ller.
34
Online Edition for Part no. 01 40 2 912 836 - 07 12 510
Page 34

Ra dio
Rad io Ent e rt a inme n t
Vehicle Equipment
This cha pte r de scribe s all stand ard, n ation al an d
sp e cial e quipm en t provided in the m ode l s e rie s .
Theref or e equ ipment no t a v ailable i n a v eh icl e is
al so described, for exampl e the sel ected specia l
equi pment or n ational v er si on. T hat also applies
to safety-relevant functions and systems.
Control functions
Press the button Function
Press: switch sound output
on/off.
Turn: set volume.
Switches en tertainmen t
sources.
Change station/track
Fav ourites buttons
Traffic information on/o ff
Sound output
Switching on/off
With the i gnition switched of f:
pr ess button .
Mu t ing
With the i gnition switched on, or
engine running: press button.
AM/FM stations
Se lecting s tation
1. "Radio"
2. "FM" or "AM"
The station last play ed is pl ay ed and shown.
Change w aveband
Ej ect CD/DVD
Online Edition for Part no. 01 40 2 912 836 - 07 12 510
35
Page 35

Ente rt ainm e nt Ra d io
3. "FM stations", "AM stations" or
"Sav ed stations".
4. Select the desired station.
The s ele ct ed station is s ave d fo r th e re mote
con tro l currently in us e.
Changing stations
Select symbol or .
Using buttons on the radio:
Press the button.
4. Highlight the desired station.
5. Pres s an d ho ld do wn the controlle r.
6. Mark d e sired stor age pla ce an d press con -
tro ller.
The stati ons are saved f or the remote control
cur rently in use.
The stati ons can also be saved on the fav our ites
buttons.
With n a vigatio n system: Th e station can a lso b e
stored on the favourite buttons.
Man ual sta tion sele ction
Station selection via f requency.
1. "Radio"
2. "FM" or "A M"
3.
"FM stations" or "AM stations"
4. "M anual search"
5. Select another band as necessary.
6. To select the f requency: t u rn the controll er .
Saving stations
1. "Radio"
2. "FM" or "A M"
3.
"FM stations" or "AM stations"
36
Online Edition for Part no. 01 40 2 912 836 - 07 12 510
Save frequency: hold down controller.
Page 36

Rad io Ent e rt a inme n t
Rename station
A stati on with changing stati on names can be
renamed.
1. "Radio"
2. "FM"
3. Select the desired st ation.
4. Call up "Optio ns ".
5. "R ename as:"
Wait until the d es ired nam e is d is playe d.
The s ele cted station nam e is in the lis t o f cu rre nt
stations an d the stored st ation is selected.
Displaying additional information
If a radio stati on broadcasts a radio text or radio
tex t plus, this information can be shown, for example, titl e or performer of a piece of music.
Ava ilability, conten t and s eq ue nce d ep e nd o n
the radio station.
1. "Radio"
2. "FM"
3.
"FM stations"
4. Se le ct s ta tion.
5. Call up "Optio ns ".
6. "Station information"
RDS
Principle
RDS broadcasts additional inf ormation in the
FM waveband, for ex ample the station name.
For a station with a number of frequencies, an
automati c changeover to the fr equency w i th the
best reception quali ty t akes place if required.
4. Call up "Options".
5. "RDS"
The setting is sav ed for the remote control curre ntly in us e .
Digital radio DAB, DAB/DMB
Principle
Digi tal stations are bundl ed i nto w hat ar e know n
as bouquets. Some stations feature additional
programmes. Spor t s stations, f o r ex ample, may
broadcast various sports ev ents at the same
time .
D epending on wh at the station pr o vides, additi onal i nf ormati on or ev en i mages transmi tted by
the station can be shown.
Se lecting s tation
1. "Radio"
2. "DAB/DMB"
3.
"DAB/DMB stations"
Sw itching on/off
It is r ecommended that you switch on RDS.
1. "Radio"
2. "FM"
"FM stations"
3.
Online Edition for Part no. 01 40 2 912 836 - 07 12 510
37
Page 37

Ente rt ainm e nt Ra d io
4. Sel ect the top entry in the l ist: "All
ensem bles" o r everything shown.
5. Select the desired station.
So me inform atio n on th e s ta tion p laying a nd
sc he du le is s ho wn. Th e t yp e of informatio n de pe nds o n what the st ation is se nd ing.
4. Sel ect the desired station.
5. Press the controller again.
6. Sel ect t h e desir ed memory location.
The stati ons are saved f or the remote control
cur rently in use.
The stati ons can also be saved on the fav our ites
buttons or r adio station buttons.
Additional information
If a radi o station broadcasts a ra dio text or radio
tex t pl us, this information can be shown, for examp le, title or performer of a piece of music or
the tel ephone number or e-mail address of t he
radio s ta tion. Ava ilability, con te nt an d s e que nc e
depend on the ra dio station.
Changing stations
Select symbol or .
Or
Press the button.
Changing the ensemble
It is o nly pos s ible to cha nge the e ns e mb le if the
followin g ha s b e en se le cte d : "All e ns em ble s ".
Press and hold down the button.
Saving stations
1. "Radio"
2. "DAB/DMB"
3.
"DAB/DMB stations"
38
Online Edition for Part no. 01 40 2 912 836 - 07 12 510
1. "Radio"
2. "DAB/DMB"
3.
"D AB/DMB stations"
4. Sel ect the desired station.
5. Call up "Options".
6. "Station information"
Page 38

Rad io Ent e rt a inme n t
Automatic station following
Ge n e ra l
With station followi ng activated, the radio automatically s witche s to a n ew s tatio n whe n the
prev ious one can no longer be received.
Firs t o f all, a s ea rc h is run for the s tatio n in an othe r en se m ble . If it is n ot availab le in ano the r
ensem ble, the sta tion's analog ue freq uenc y is
searched for.
Automatic changeover is only possible if the
corres po ndin g s tatio n's s ign al is available in adequate quali ty and the I D s of the stati ons match.
En abling automatic station follo wing
1. "Radio"
2. "DAB/DMB"
3. Call up "Optio ns ".
4. "Station switching"
Symbol Meaning
for exampl e, may broadcast vari o u s spor ts
events at the sam e time.
1. "Radio"
2. "DAB/DMB"
"DAB/DMB stations"
3.
4. Sel ect the desired station.
5. Press the controll er.
6. Select the addit ional station.
Electronic Programme Guide
Several stati ons broadcast their pr ogramme
guid e e le ctron ically.
1. "Radio"
2. "DAB/DMB"
"Programme"
3.
The radio schedule for the programme on now
and next is shown.
Enlarge image
If a radio station transmits images, th e se are
shown. The image di splay can be shown enlarge d.
1. "Radio"
2. "DAB/DMB"
"Enlar ge image"
3.
Reduce image again: tip controller t o the left.
A digital station is reproduced in an-
alogue.
A digital station is reproduced digi-
tally in ano the r gro up.
The setting is sav ed for the remote control curre ntly in us e .
Additional programmes
Sy mb o l indica t es t h at a selected sta t ion co n -
tai ns additional programmes. Sports stations,
Online Edition for Part no. 01 40 2 912 836 - 07 12 510
Saved stations
Ge nera l
Fort y stations can be saved.
Calling up a s tation
1. "Radio"
2. "Saved stations"
3. Sel ect the desired station.
39
Page 39

Ente rt ainm e nt Ra d io
Saving stations
The curren tly se le cte d s ta tion is s aved .
1. "Radio"
2. "Sav ed stations"
3. "Sav e station"
4. Select the desi red memor y l o ca tion.
Th e list of saved st at ion s is saved for t he r em ot e
con tro l currently in us e.
The stati ons can also be saved on the f avourites
buttons.
Without navigation system and
telephone: store station on radio
station butto ns
1. Select the desired station.
2.
To call up a stored stat io n, briefly pressure the
cor responding button.
Press the desired button for longer
than two seconds.
Traffic reports
Display in the status field
▷ T P white : t ra ffic ra dio s witched on , traffic
ra dio s ta tion a vailable .
▷ TP grey: traffic radio switched on, no traffic
ra dio s ta tion a vailable .
▷ No d is play: T ra ffic Program is s witche d o ff.
Switching on/off
Press the button.
The traff ic report station wi th the stron-
gest reception is chosen.
The setting is saved for the remote control currently in use.
Inte rru ptin g
Press one of the fol lowing buttons during a traffic radio report:
▷
▷
Adjusting the volume
Tur n t he knob during a traffic report unt il the de s ire d volum e is
obtained .
Deleting a station
1. "Radio"
2. "Sav ed stations"
3. Select the desired station.
4. Call up "Op tions ".
5. "Delete entr y"
40
Online Edition for Part no. 01 40 2 912 836 - 07 12 510
Page 40

CD/DVD
CD/DVD Ent e rta inm e n t
Vehicle Equipment
This cha pte r de scribe s all stand ard, n ation al an d
sp e cial e quipm en t provided in the m ode l s e rie s .
Theref or e equ ipment no t a v ailable i n a v eh icl e is
al so described, for exampl e the sel ected specia l
equi pment or n ational v er si on. T hat also applies
to safety-relevant functions and systems.
Control functions
Press the button Function
Press: switch sound output
on/off.
Turn: set volume.
Switches en tertainmen t
sources.
Change station/track
Fav ourites buttons
Traffic information on/o ff
Change w aveband
Ej ect CD/DVD
Sound output
Switching on/off
With the i gnition switched of f:
pr ess button .
Mu t ing
With the i gnition switched on, or
engine running: press button.
Playback
Ins erting a CD/ DVD
Insert the CD/DVD with the label si de uppermost.
The disk begins to play automatically.
It may take a few mi nutes to read compressed
aud io file s .
Starting play
A CD/DVD is in the CD/DVD playe r or the DVD
changer.
1. "Multimed ia"
2. "CD/DVD"
Online Edition for Part no. 01 40 2 912 836 - 07 12 510
41
Page 41

Ente rt ainm e nt CD/DVD
3. Select the desired CD or DVD.
Symbol Meaning
CD/DVD player
... DVD change r
CD/D VD play er in the r ear
Formats that can be played
▷ DVD-ROM, DVD-R, DVD+R, DVD-RW, DVD
+RW, DVD-R DL, DVD+R DL, DVD-Audio,
DVD-Video.
▷ CD: CD-ROM, CD-R , CD-RW, CD-DA.
▷ Compressed audio files: mp3, w ma, aac,
m4a, m4b, ogg.
Sele cting a tra ck using iDrive
Audio CDs
Sel ect the desired track to start play back.
CDs/DVDs wit h co m pressed au dio files
D epending on the data, i t might occur that not
al l characters on the CD/DVD ar e di spl ay ed correc tly.
1. Sel ect the directory as appro pri ate.
To change t o a higher-level di r ector y : ti lt the
con tro ller to th e le ft.
Remove the CD/DVD
1. Press the bu tton.
The CD/DVD is p us he d o ut s light ly.
2. Remove the CD/DVD.
Au dio
Sele cting a track using button
Press button repeatedly unt il the desired track is played.
42
Online Edition for Part no. 01 40 2 912 836 - 07 12 510
2. Sel ect the desired track to start playback.
Page 42

CD/DVD Ent e rta inm e n t
Displaying track info rmatio n
If informa tion is s aved for a track, this is d is played automat ically:
▷ Artist.
▷ Album name
▷ Number of tracks on the CD /DVD.
▷ File name of the track.
▷ Track i mage of t he CD /DVD.
Updating a lbum info rmatio n
The alb um in forma tion for a CD is s ho wn aut omatically. If the a lbum info rm ation is not s ho wn
correctly, because there are several similar albums, t h e album information can be updated.
1. "Multimed ia"
2. "CD/DVD"
3. Call up "Optio ns ".
4. "Album inform atio n"
5. Select the desired entry .
4. Call up "Options".
5. "Random"
Fast forward/rewind
Keep button pressed.
Vide o
Ge nera l
The video image is shown on the front control
display up to a speed of a pproximately 3 km/h.
In som e countries , it is o nly sh own with th e p arking brake engaged or in gear position P.
Country codes
Only DVDs with the code of your home region
can be played. See al so the i nformation on y our
DVD.
Code Region
Random playback
A ll the tracks on the CD/DVD are played i n r andom order.
1. "Multimed ia"
2. "CD/DVD"
3. Select the desired C D or DVD.
Online Edition for Part no. 01 40 2 912 836 - 07 12 510
1USA, Canada
2 J apan, Europe, Middle East, South Af-
rica
3 South-East Asia
4 Australia, Central and South America,
New Zealand
5North-West Asia, North Africa
6China
0 All regions
43
Page 43

Ente rt ainm e nt CD/DVD
Playback
1. "Multimed ia"
2. "CD/DVD"
3. Select a DVD with video content.
4. "Play"
Video menu
To open the Video menu:
Press button du ri ng playba ck.
Symbol Function
Calls up the DVD menu.
Starts playback.
Pause
Stop
Next chapter
Previous chapter
Fast forward
Rewind
For fast forward/rewind: each time the controll er
is pr essed, the speed increases. To stop, sta rt
playback.
Sele cting langu ag e
The languages available depend on th e DV D.
1. Turn the co ntroller while the DVD is pla ying.
2. Call up "Options".
3. "Audio/language"
4. Sel ect the desired language.
Sele cting sub title s
The available subtitles depend on the DVD.
1. Turn the co ntroller while the DVD is pla ying.
2. Call up "Options".
3. "Sub title s "
4. Sel ect the desired language or "Do not
dis pla y s ub title s ".
DVD menu
Many DVDs hav e their own menu. The display
depends on the contents of the D VD .
1. Pr ess
2.
3. To s e lec t me nu item s : tilt and p re s s the con-
tro ller.
button to cal l up the video menu.
"DVD menu"
DVD Setting s
Depending on t he DVD, some settings are only
possible vi a th e D VD m enu , see a lso infor m at ion
on your DVD.
44
Online Edition for Part no. 01 40 2 912 836 - 07 12 510
Setti ng the brightness, contr ast, col our
1. Turn the co ntroller while the DVD is pla ying.
2. Call up "Options".
3. "Display settings"
Page 44

CD/DVD Ent e rta inm e n t
4. "Brightness", "Contrast" or "Colour"
5. Turn the controller until the desired setting
is reached an d press the controller.
Sele cting zoom
Display video pictu re over full screen.
1. Turn the co ntrolle r while the DVD is pla yin g.
2. Call up "Optio ns ".
3. "Further options"
4. "Zoom mode"
Select camera angle
The ava ilab ility o f an alte rn ative ca me ra ang le
depends on the DVD and the current track on
the DVD.
1. Turn the co ntrolle r while the DVD is pla yin g.
2. Call up "Options".
3. "Further options"
4. "Viewing angle"
5. Sel ect the desired angle of view.
Calling up the main menu, Back
Th ese func t ions a re not in cluded o n ever y DVD.
Ther efore, they may not be avail able for use.
DVD changer
Ge nera l
The DVD cha nge r is loca ted , d e pe nd ing o n the
vehicle, in the glov e box, thro ugh the glove box
or in the boot behind the left side trim.
Overview
Sele cting title
DVD video:
1. With the DVD menu displayed, turn the con-
tro ller.
2. Call up "Optio ns ".
3. "Further options"
4. "Select ti tle"
5. Sel ect the desired ti tle.
Online Edition for Part no. 01 40 2 912 836 - 07 12 510
1 Emptyi ng the DVD compartments
2 LE D on the DVD compartment
3 Buttons f or DVD compartments
4DVD compartment
5 Filling the DVD com partme n ts
45
Page 45

Ente rt ainm e nt CD/DVD
Filling the DVD co mp artme nts
individually
1. Press the button once.
The L E D on the first vacant compartment
flashes.
2. Select a di f f er ent compart ment i f necessary .
3. Wait until the LEDs on the DVD compart-
ment flash.
4. Insert a sin gle CD or DVD in the centre.
The CD/DVD is p ulle d in automatic ally and
sto red in the selected c ompartmen t.
Inserting CDs/DVDs
Only ins ert CD/DVD if th e LEDs on th e
DVD c ompa rtmen t are f lashing, otherwise th e
CD / D V D or t he DVD changer could be damaged.
Do not force the CD/DVD into the drive; it could
jam and you might no t be able to eject it. ◀
Filling all the availa ble DVD
compartments
1. Hold down the button once.
Th e LEDs on the vacant compartments
flash.
2. Wait until the LEDs on the DVD compart-
ment flash and then i nsert a CD or DVD,
making s ure it is centre d.
The CDs/DVDs are drawn in automatic ally
and sto wed in th e empty compartments.
Inserting CDs/DVDs
Only ins ert CD/DVD if th e LEDs on th e
DVD c ompa rtmen t are f lashing, otherwise th e
CD / D V D or t he DVD changer could be damaged.
Do not force the CD/DVD into the drive; it could
jam and you might no t be able to eject it. ◀
It may take a few mi nutes to read the CDs/D VDs
after loading.
Removing CDs/DVDs individually
1. Press the button once.
2. Sel ect the DVD compartment.
The CD/DVD is pushed out slight ly.
3. Remove the CD/DVD.
Removing all CDs/DVDs
1. Hold down the button once.
2. Remove the CDs/DVDs.
Interrupt function
Filling the DVD trays or re mo ving the CDs/DVDs
may be interrupted.
Press the appr o pri a te button.
▷
▷
Fau lts
If the LED s on the DVD slot and the LED s on the
DVD tr ays f lash rapidly, there is a fault.
Re p airing the fault:
1. Press one of the following buttons:
▷
▷
The las t CD/DVD ins e rte d is p us he d out
slig htly.
2. Remove the CD/DVD.
When the LEDs ar e no longer flashing qui ckly,
the D VD changer is operational again.
Playing audio tracks
The audi o track of a DVD can be pl ayed even if
video playba ck is not possible in the v ehicle.
Only the main film is p layed , witho ut intro or e xtras.
46
Online Edition for Part no. 01 40 2 912 836 - 07 12 510
Page 46

CD/DVD Ent e rta inm e n t
Starting play
There is a DV D in the DV D changer.
1. "Multimed ia"
2. "CD/DVD"
3. Select the desired DV D.
Selecting a chapter using the button
Press button repeatedly until the desired chapt er is play ed.
Sele cting a c ha pter using iDrive
1. "Multimed ia"
2. "CD/DVD"
3. Select the desired DV D.
4. Sel ect the desired chapter .
Fast forward/rewind
Keep button pressed.
Sele cting langu ag e
The languages available depend on the DVD.
1. "Multimed ia"
2. "CD/DVD"
3. Select the desired DV D.
4. Call up "Optio ns ".
5. "Audio/language"
6. Se le ct th e d e sire d la ngu age .
CDs and DVDs
Using CDs/DVDs
▷ Do not use CDs/DVDs with adhesive
labels that have been affixed subseque ntly, as the s e m ay pe e l off while in
th e dr ive as a result o f the temper atu res to which these media are exposed during pl ay ing. T hi s could damage the system irreparably.
▷ Use only round CDs/DVDs with a standard
di ameter of 12 cm and do not use CDs/ D V D s
in conjunction with adapters, for example
CD singles. Otherwise the CDs or t he
adapter could jam an d be impossible to
eject.
▷ Do not use combined CD/ D V D s, f or ex ampl e
DVD Plus, as otherwise the CD/DVD could
jam and be impossible to eject.◀
General malfunctions
▷ The CD/DVD play ers and changers have
been opti mi sed for operati on i n y our v ehicle.
In some instances, they ma y be more sensitive to fault y CDs/ DVD s tha n devices for
stationary u se.
▷ If a CD/DVD cannot be played back, first
check whether it has been inserted cor rec tly.
Atmospheric humidity
The CD/DVD or the focussing lens can carry
condensati on du e to hi gh h umi di ty and playba ck
may temporarily not be possible.
No t es
CD/DVD player and changer
Do not re move the cover
All BMW CD/DVD play ers and changers
are Class 1 laser products. Do not operate when
the cover is damaged, ot herw ise i t could cause
severe eye injuries.◀
Online Edition for Part no. 01 40 2 912 836 - 07 12 510
M alfun ctio ns w ith i n div idua l C D s/D VD s
If malfunctions occur only w ith individual CDs/
DVDs, this can be due to one of the following:
Self-recorded CDs/DVDs
▷ With self-recorded CDs/ DVDs, possi ble
cau se s inc lude inc ons is te nt d ata- crea tion
or burning process, low qua lity or high age
of the CD/DVD blank.
47
Page 47

Ente rt ainm e nt CD/DVD
▷ Only write on the upper side of CDs/DVDs
us ing a s pe cial marker pen.
Da mage
▷ Avoid causing f ingerprints and prot ect
against dust, scratches and moisture.
▷ Sto re CDs/DVDs in a c ase.
▷ Do not expose CDs/DVDs to temperatures
abov e 50 ℃, hig h le ve ls of h umid ity or direc t
su nligh t.
CDs/DVDs with copy protection
CDs/DVDs are often copy-protected by the
manufacturer. This could result in CDs/DVDs
be ing impo s sib le to pla y, or only be ing pla ya ble
wi th restrictions.
MACR O VIS ION
This product contains copyrighted technology
based on a number of regi ster ed U S patents and
inte llectua l prope rty o f the Mac ro vis ion C orporation and other manufacturers. The use of this
copy protection must be approved by Macrovision. Media w ith the corresponding pr otecti on –
unl ess otherwi se agreed wi th Macr ovision – may
only be s hown p rivate ly. It is prohibited to c opy
this technology.
DTS Digital Surround™
Manufactured under li cence of US pat-
ent nu mbers: 5,451,942; 5, 956,674;
5, 974,380; 5,978,762; 6,487,535 & and other
patents issued and applied for i n the USA and
w orldwide. DTS and the logo are registered
tr ademark s & D TS D i gi t al Surr oun d and the D TS
l ogos ar e tr ademark s of D TS Inc. © D TS, Inc. Al l
rights reserved.
48
Online Edition for Part no. 01 40 2 912 836 - 07 12 510
Page 48

Music collection
Mus ic collection Ent e rt a inmen t
Vehicle Equipment
This cha pte r de scribe s all stand ard, n ation al an d
sp e cial e quipm en t provided in the m ode l s e rie s .
Theref or e equ ipment no t a v ailable i n a v eh icl e is
al so described, for exampl e the sel ected specia l
equi pment or n ational v er si on. T hat also applies
to safety-relevant functions and systems.
Music memory
Principle
Tracks from CDs/DVDs and USB medi a ca n be
saved in the music collection on a hard disk in
the vehicle and play ed from there.
Ge n e ra l
▷ Audio CD: tracks are converted into a com-
pressed audi o format . Information on th e album , for e xa mp le a rtis t, is sa ve d, if ap plic able .
▷ CD/DVD or US B medium with compres se d
audio f i l es: the enti re content of the CD/ D V D
or USB medi um is saved as an album in the
ve hicle. All audio files with th e formats s up por ted, see page 42, in the vehicle are
stor ed. Tracks and directo ries can be delete d late r individ ually, De le te trac ks a nd d irect o ry, see page 54.
ognition technol ogy and related content delivery. For more information, please visit
www.grac eno t e.co m.
CD and musi c-r el at ed data f r om G racenot e, Inc. ,
copyr ight © 2000-2009 Gracenot e. Gracenote
Softwar e, copyrig ht © 2000-2009 Gra cen o te.
This product and servi ce may practice one or
mor e of the f ollowing U.S. Pat ents: #5.987. 525;
#6. 061.680; #6.154.773, #6.161.132,
#6. 230.192, #6.230.207, #6.240.459,
#6. 330.593, a nd other patents issued or pending. Some s e rvice s su pplied und er lice ns e from
Open Globe, Inc. for U.S. Pat ent : #6. 304.523.
Saving from CD/DVD
1. Insert a CD or DV D in the CD/DVD player.
2. "Multimed ia"
3. "CD/DVD"
4.
Sel ect the symbol f or the CD/D V D pl ayer.
5. "Save in vehicle"
No t e s
Tracks w ith copy protection, DRM, are saved,
but cann ot be pl a yed.
Backin g u p mu sic data
Back up musi c data regul ar l y , as otherwise
it cou ld be lo st in the event of a fault in the hard
dis k.◀
Music recognition t echnology and rel at ed data ar e pro v i ded by Gr acenot e®.
Grac en ote is the indu st ry s tand ard in m us ic re c-
Online Edition for Part no. 01 40 2 912 836 - 07 12 510
The mus ic colle c tion is dis p layed and the first
track of the CD/DVD is pla yed. The tracks ar e
played in the normal order during saving.
During saving, bear the following in mind:
Do not s witch to the CD/DVD player and do not
remove the CD from the CD/ D VD pl ayer, as otherw ise saving is int e rrupted. It is possible to
change over to the other audio sources without
interrupting saving. Tracks of the current CD/
D VD that h a ve already been saved can also be
calle d up.
49
Page 49

Ente rt ainm e nt Music collection
Interrupting saving
1. "Multimed ia"
2. "CD/DVD"
3. "Saving..."
4. "Cancel saving"
The sav ing process is interrupted and can be
continued at any time.
Resumin g saving
1. "Multimed ia"
2. "CD/DVD"
3.
Sel ect the symbol f or the CD/D V D pl ayer.
4. "Continue saving"
CD /DVD saving is continued at the start of the
track for which saving was interr upted.
▷ S uitable m ed ia: USB m as s storage facilitie s ,
for example USB memory sticks or MP3
players with USB interface.
▷ Unsuitable media: USB hard disks, USB
hubs, USB memory card reade rs with a
number of bays, Apple i Pod/iPhone. Music
f rom an A pple iPod/iPhone can be played in
the AUX-I N port or USB interface in the centre armrest.
▷ File systems: cur rent file systems for USB
devices are suppor ted. FAT 32 for mat is
recommended.
1. Connect USB medium to the USB interf ace
in the centre armrest.
2. "Multimed ia"
3. "Mus ic colle ction"
4. Call up "Options".
5. "Mus ic data imp ort/e xpo rt"
6. "Import music (USB)"
Information o n th e a lbum
During the saving process, the infor mation, for
example th e name o f the artist , is saved for the
tra cks if this inform atio n is availab le in the dat abase in the vehicle or on the CD.
To update the database, contact your Serv ice
centre.
If no inform atio n is sa ve d for the tracks, it mig ht
be possible t o upda t e the entire album information, see page 54, of the CD via BMW Online.
Saving from a USB medium
To sav e music, a suitable medium must be connected to the USB interface in the centre armre st.
50
Online Edition for Part no. 01 40 2 912 836 - 07 12 510
Playing music
Music search
All tracks for which info rm ation is sa ve d c an be
calle d up via music sea rc h. All tra cks for wh ich
no inform atio n is s ave d can be calle d up via the
musi c directory.
1. "Multimed ia"
2. "Mus ic colle ction"
Page 50

Mus ic collection Ent e rt a inmen t
3. "Music search"
4. Sel ect the desired categor y.
5. Select the desired entry :
▷ Select "A-Z search" and make the de-
sir ed entr y.
All entries containing the character
string entered are listed, even if this is
not at the start of the entry.
▷ Sel ect the desired entry from the list.
6. Select further cat egories as appropriate.
The tracks found are listed in alphabetical
order.
7. "Play s e lec tion"
Starting new music search
"Reset search"
Music search using voice control
For t he handbook for the voice control system,
see Ow ner's H a n dbo ok for the vehicle.
1.
2. ›Music search‹
Press the button on the steering
whee l.
3. Call up the desi red category, for exam-
ple ›Select artist‹.
4. Say the desired entry from the list.
5. Select further categories as appropriate.
Selecting the track directly: › Track ...‹.
Say the spoken command and the name of the
desired track together in one command.
Music Directory
All alb ums s tore d a re lis te d in the mus ic direc tory.
1. "Multimed ia"
2. "Mus ic colle c tion"
3.
"Music search"
4. "Search folder"
All dire ctorie s sto re s are sh own as a lis t.
5. Sel ect desired directory.
To ch an ge t o a h igher - lev el dir ect o r y: t il t t he
con tro ller to the left.
Symbol Format
Audio CD
Com pres s e d au dio files
Sort music directory
The list can be s orted alph abe tic ally by nam e o r
by storage date.
1. "So rting"
2. "By name" or "By date"
Currently playing
Lis ting of the track whic h is curren tly bein g
pl ay ed back. For ex ampl e, the l i st of t rack s f ound
via th e m us ic s e arch, a p laylist o r lis t of s imilar
tracks found.
1. "Multimed ia"
2. "Mus ic colle c tion"
Online Edition for Part no. 01 40 2 912 836 - 07 12 510
51
Page 51

Ente rt ainm e nt Music collection
3. "Cu rre ntly playing "
4. If app licab le , s e lec t the de s ired tra ck.
Playlists
1. "Multimed ia"
2. "Mu sic co llec tion"
3.
"Playlis ts "
The follo wing lis ts are s ho wn:
▷ "My favourites"
All tracks which h ave b ee n m arke d as favourite.
▷ "To p 50"
Th e 50 most played tracks.
▷ "Mo re music like th is"
All pla ylis ts whic h have be auto matically cre ated by searching for similar mu sic.
Delete playlist
1. "Playlis ts "
2. Ma rk pla ylis t whic h is to b e d elete d.
3. Call up "Op tions ".
4. "Delete playlist"
Similar music
Music stored in the v ehicle similar to the track
currently playing can be searched fo r.
1. "Multimed ia"
2. "Mu sic co llec tion"
3.
"Mo re like this (loc al)"
A playlist with the track found i s stored.
A maxi mum o f 100 titles are stor ed. Th e number
of playlists is restricted and an old playlist may
be del eted when storing a new one.
Favourites
If a tr a ck i s currently being played, this can be
marked and stored as a favourite.
Store track as a favourite
A track mu st be currently be playing to store it
as a favourite.
1. "Multimed ia"
2. "Mus ic colle ction"
3.
"Add to favourites"
Calling up s tored favourite s
1. "Multimed ia"
2. "Mus ic colle ction"
3.
"Playlis ts "
4. "My favourites"
5. Sel ect the desired ti tle.
The favourites can be stored in t he vehicle as a
playli st, see page 52.
Deleting ind ividual tra cks from
fav our ites
1. The track which is to be de le te d from the lis t
of fa vourites is to b e c alle d up .
2.
"Delete fro m favourites"
De lete individual track from favourites
Individual or ot her tracks can be deleted f rom
favourites .
"Playlis ts "
1.
2. "My favourites"
3. Call up "Options".
4. "Delete a ll tracks from favourites"
52
Online Edition for Part no. 01 40 2 912 836 - 07 12 510
Page 52

Mus ic collection Ent e rt a inmen t
Store favourites as p laylists
The lis t of fa vourites ca n be s tore d in the veh icle
as a playlist.
1. "M y favourites"
2. Call up "Optio ns ".
3. "Save as pl aylist"
Audio books and podcasts
A udi o book s and podcasts can be cal l ed up separately.
"More media"
1.
2. Call up desi red entry:
▷
"Audio books"
▷
"Podcasts"
3. Sel ect the directory as appro pria te.
4. Call up de s ire d file.
Random playback
All the tracks in the s ele c tion a re pla ye d in random order.
1. "Multimed ia"
2. "Mu sic colle ction"
3. Call up "Optio ns ".
4. "Rand om "
Managing music
Music Directory
Rename folder or track
If applicable, the name of t h e album is entered
automatically during saving. If the name is unkn o wn it can also be changed.
1. "Multimed ia"
2. "Mus ic colle c tion"
"Music search"
3.
4. "Search folder"
5. Mark des ired folder or title.
6. Call up "Options".
7. "Rename track" or "Rename folder"
8. Se le ct th e le tte rs in divid ua lly.
Delete directory
A di rectory cannot be del eted if a track is being
played back directly from it.
1. "Multimed ia"
2. "Mus ic colle c tion"
3.
"Music search"
4. "Search folder"
5. Mark desired directory.
6. Call up "Options".
7. "Delete directory"
Online Edition for Part no. 01 40 2 912 836 - 07 12 510
53
Page 53

Ente rt ainm e nt Music collection
De lete track and folde r
It may not be possi ble to delete a track while it
is being played. A folder cannot be del eted if a
track is being play ed back directly from it.
1. "Multimed ia"
2. "Mu sic co llec tion"
"Music search"
3.
4. "Sear ch folder"
5. Hig hlig ht the fo lde r or trac k.
6. Call up "Op tions ".
7. "Delete folder" or "Delete track"
Album information
I f no i nf ormation was sav ed for audi o CD s duri ng
saving, it can be updated later vi a BMW Online
as required.
The update ta kes place for each individual album.
Updating album information via BMW
Online
1. "Multimed ia"
2. "Mu sic co llec tion"
3.
"Music search"
4. "Sear ch folder"
5. Highligh t the desired album.
6. Call up "Op tions ".
7. "Albu m inform atio n"
8. "Update album information"
If it was pos s ib le to s ave the a lbum info rm atio n,
the name of the album is di spl ayed.
Free capacity
Dis pla y fre e capac ity in the mus ic colle ct ion.
1. "Multimed ia"
2. "Mu sic co llec tion"
3. Call up "Op tions ".
4. "Manage music collection"
5. "Memory available"
Music collection
Backing up music colle ction
The entire musi c coll ection can be backed up on
a USB medium. E nsure that the USB medium
ha s adequ ate fr ee c apac it y.
D epending on the number of tra ck s, backing up
the music collection can tak e up to two hours.
This is why it is best to m ake the backup d uring
a longer journey. If the backup cannot be created, do not remove USB medium, t h e back-up
will be continue d o n the ne xt jou rn ey.
1. Start the engine.
2. Connect USB medium to the USB interf ace
in the centre armrest.
3. "Multimed ia"
4. "Mus ic colle ction"
5. Call up "Options".
6. "Mus ic data imp ort/e xpo rt"
7. "B ackup music on USB"
Saving music collection to the vehicle
Whe n th e mus ic colle ction is s aved from a US B
medi um to the vehicle the existi ng music collec tion in the ve hicle is rep lace d . It is be s t to
make the backup during a longer journey. If it
cannot be saved, do not remove USB medium,
the saving will be c ontinu ed on the ne xt jou rn ey.
1. "Multimed ia"
2. "Mus ic colle ction"
3. Call up "Options".
54
Online Edition for Part no. 01 40 2 912 836 - 07 12 510
Page 54

4. "Mu sic data imp ort/e xport"
5. "Restore music f rom USB"
Deleting music collection
1. "Multimed ia"
2. "Mu sic colle ction"
3. Call up "Optio ns ".
4. "Manage music col lection"
5. "Delete music"
6. Select any category , the track s of which are
to be deleted.
7. "Delete music"
Mus ic collection Ent e rt a inmen t
Online Edition for Part no. 01 40 2 912 836 - 07 12 510
55
Page 55

Ente rt ainm e nt External devices
External devices
Vehicle Equipment
Thi s chapt er describes al l standar d, nat i onal and
sp e cial e quipm en t provide d in th e m odel s e rie s .
Theref ore equi pment not avail abl e i n a v ehi cl e i s
also de scri b ed, f o r examp le th e select ed spec ial
equipment or national v er si on. That also appl i es
to safety-r elevant functi ons and systems.
Principle
Various external dev ices can be connected to
the vehi cle. Sound output i s via the vehi cl e l oudspeakers. Depending on ho w the external dev ice is connected to the v ehicle, it can be operating us ing iDrive .
Symbol Meaning
AUX-IN port
USB audio interface
Music inter face for smartphones
Bluetooth audio
AUX-IN port
Overview
▷ Conn ec tion o f au dio d e vice s is poss ible, for
example MP3 players. The so und output is
via the vehicle loudspe akers .
▷ Recommendation: medium sound and vol-
ume settings on the audi o dev ice. The
sound might depend on the quality of the
aud io file s .
Connecting
AUX-IN p ort is in the ce ntre console.
Connect the headphones or li neout connection of the equipment
to the jack connector.
Playback
1. Connect the audio device, switch it on and
select a track.
2. "Multimed ia"
3. "External devices"
"A UX front"
4.
Volume control
The volume of the sound output depends on the
audio device. If this volume differs significantly
f r om other audi o sources, it makes sense to bal ance the volumes.
Adjust volume
1. "Multimed ia"
2. "External devices"
3.
"A UX front"
4.
"Vol ume"
56
5. Turn the controller un til the de s ired volum e
setting is reached and press the contr oller.
Online Edition for Part no. 01 40 2 912 836 - 07 12 510
Page 56

External devices Ent e rt a inmen t
USB audio interface /music
interface for smartphones
Overview
External dev ices can be connected, Operation
is done us ing the iDrive. The s ound output is via
the vehicle loudspeaker s.
Connection options for external
devices
▷ Connection is via USB audio interface: Ap-
ple iPod/iPhone, USB devices, for example
MP 3 p layer, US B me m ory s tic ks or m ob ile
phones that a re suppor ted by the U SB audio
inte rface .
▷ Connection via snap-in adapter, for equip-
ment with music interface for smartphones:
Apple iPhone or mobil e phon es.
Due to the large var iety of the audio devices
availabl e on the market, operation using the v ehi cle cannot be ensured f or ever y dev ice/mobile
phone.
Ask at your Service centre re garding suitable
devices/mobile phones.
Audio files
Normal audio files, video files and playlists can
be reproduced.
Connect A pple iPod/ iPhone to
the USB interface.
The menu structure of the Appl e
iPod/iPhone is supported by the
U SB au dio interface.
Connection of USB device via USB
audio interface
The US B audio in terfac e is lo ca ted in the c en tre
armre st.
U se a flexible adapter cable for connecting, t o
protect the USB interface and the USB device
from mechanical damage, for example, the
adapter cable supplied with the USB device.
Connect the USB device to the
U SB interface.
The menu structure of the Appl e
iPod/iPhone is supported by the
U SB au dio interface.
After connecting for the first time
Informati on on all titles, e.g. artist, genre or ti tle,
as well as the playback lists are tr an sferred to
the vehicl e. Thi s might take some ti me, dependi ng o n the U SB dev i ce an d the number of t r ack s.
Dur ing transfer, the tracks can be called up via
the file direc tory.
File systems
Cur rent file systems for USB devices a re suppor ted. Format s FAT 32 and NTFS are recommended.
Connection of Apple iPod/iPhone via
USB audio interface
The US B audio interface is locate d in the c entre
armres t.
U se a flexibl e adapter cable for connecting, for
example, the ori ginal adapter cable of the iPod/
iPho ne .
Online Edition for Part no. 01 40 2 912 836 - 07 12 510
Number of tra cks
The information from up to four USB devices or
f or a tot al of approx imatel y 40,000 tra ck s can be
saved i n the vehi cle. I f a fif th devi ce i s connected
or if more than 40,000 tracks are saved, the informa tion for e xis tin g tracks is de le te d.
Copy protection
Music tr acks wi th i ntegrated Di gi tal R i ghts Management, (DRM), cannot b e played.
Playback
1. "Multimed ia"
2. "Ex ternal devi ces"
57
Page 57

Ente rt ainm e nt External devices
3. Select symbol or .
Playba c k is star ted.
Searching for tracks
The titles are displayed if they have been created with Roman letters.
1. "Multimed ia"
2. "Ex ternal devices"
3. Select the
4.
"Music search"
or symbol.
Search for track by information
1. Select the desired category, for example
"Genre" or "Arti st".
All e ntries are s hown in a lis t.
▷ Call up "A-Z search" and make the de-
sired en t ry. W h en you ent er a ch a racter,
a filte r is run o n the b as is of th is c harac ter as the first letter. When you enter
se veral ch aracte rs, all th e re su lts that
contain this character str ing are di splayed.
▷ Sel ect the desired entry from the list.
2. Select further categories as appropriate.
Not al l categori es need to be selected. If, for
example, all the track s of a certain artist are
to be d isp laye d, it is s ufficie nt to call u p only
this artist. All trac ks b y th at artis t will be dis played.
3. "Play s elec tion"
Starting a new track search
"Reset search"
Search through directory
When connecti ng using t he USB audi o i nt erf ace
in the centre armrest, the file directory of the
device is shown.
"Search directory"
A lis t of d ire cto ries and tracks is d is playe d.
This symbol mark s directo ri es.
Select track:
Select desired track or directory.
To change t o a h igher- level directory tilt the
controller to the left.
Playlists
Calling up p laylis ts.
1. "Multimed ia"
2. "External devices"
3. Select th e
4.
"Playlis ts "
5. Sel ect desired play list.
or symbol.
More media, audio books, podcasts,
videos
A udio book s, podcasts and v ideos can be cal led
up separately on the device.
1. "Multimed ia"
2. "External devices"
3. Select th e
"More media"
4.
5. Call up desired medium:
▷
or symbol.
"Audio books"
58
Online Edition for Part no. 01 40 2 912 836 - 07 12 510
Page 58

External devices Ent e rt a inmen t
▷ "Podcasts"
"Vide o"
▷
Video playback
Overview
Vi deo play ba ck is possible under the foll owing
preconditions:
▷ iPod/iPhone: connection v ia snap-in
adapter.
▷ U SB devices: connect vi a USB interface or
snap-in adapter.
Playback
The video image i s shown on the front control
display up to a speed of approximately 3 km/h.
In so me countries , it is o nly sh own with th e p arking brake engaged or in gear position P.
1. "Multimed ia"
2. "Ex ternal devices"
3. Select symbol
"More media"
4.
5.
"Vi deo"
6. Sel ect the directory as appro pria te.
To c ha nge t o a high er -lev el dir ect or y: tilt th e
con tro ller to th e le ft.
7. Sel ect the desired video file to start play-
back.
or .
Video m e nu
Symbol Function
Next vide o file
Pre vio us vid eo file
Sel ect symbol tw ice to play back the
previous vide o file .
Currently playing
Lis ting of the track whic h is curren tly bein g
pl ay ed back. For ex ampl e, t he l i st of tr acks w hi ch
are found through the track sear ch o r a playlist.
1. "Multimed ia"
2. "Ex ternal devi ces"
3. Select the
"Curre ntly pla ying"
4.
or symbol.
Random playback
The curren t list of tracks is playe d in random order.
1. "Multimed ia"
2. "Ex ternal devi ces"
3. Call up "Options".
4. "Random"
iPod /iP hon e : the playb ack lis t is s hown in random or der and the tracks are played according
to that order.
U SB device: t h e playback list is shown in the
conventional order and the tracks are played in
random order.
Fast forward/rewind
Keep button pressed.
No t es
▷ Do not expose the audio device to ex treme
environm en tal conditions , for exa mp le very
high temperatures, see th e operating instruct ions of t he audio device.
▷ Depending on the format of the audio and
video files perfect playback cannot be ensured in every case; for example bit rates
higher than 256 Kbi t /s or various compression techniques.
▷ Audio playback is only po ssible if no audio
device is connected to the AUX-IN port.
Online Edition for Part no. 01 40 2 912 836 - 07 12 510
59
Page 59

Ente rt ainm e nt External devices
N ot es on connecting
▷ The connected audio dev i ce is supplied wi th
a maxi mum of 500 mA if the dev ice suppor ts
this. Do not, th er efore, also connect the device to a s ocket in the ve hicle as otherwise
perfect pl a yback cannot be guaranteed.
▷ Do not inse rt the plug fo rc ibly in the USB in-
terface.
▷ Do not connect any devices such as f ans or
lights to the US B aud io inte rfac e.
▷ Do not connect up USB hard drives.
Bluetooth audio
Overview
▷ Playback of music files from exter nal devi-
ces such as audi o devices or mobi le phones
v ia Bluetooth is possi ble.
▷ Th e sound output is v ia the vehicle loud-
speakers.
▷ The v ol u me of t he sound output depends on
the devi ce. If appl i cabl e, change v ol ume settings on the device.
▷ U p to f our ex ter nal dev i ces can be regi stered
with the vehicle.
Req u ire me nt s
▷ Suitable device. Visit www.bmw.com/blue-
tooth for more information.
▷ Device ready for operation.
▷ Ignit ion swi t ched on.
▷ Bluetooth in the vehicle, see page 79, and
device activated.
▷ Bluetooth pr esetti ngs must be made on the
device, for ex ample connect without confirmation or vis ib ility, s ee Owne r's Handb oo k
of the device.
▷ A number with a mi nimum of 4 and a maxi-
mum 16 positions is specif ied as the Bluetooth passkey . Only requi red for non-recurring registration.
▷ Ve hic le is a t re s t.
Connecting
Connecting the device
Only connect the device when the vehi cle
is stationary . Otherwise, you may become distr acted and endanger the v ehicl e occupants and
other road users.◀
1. "Se ttings"
2. "Connections"
3. "Blue to ot h"
4. "Add new dev ice"
The Bluetooth name of the vehicle is displaye d in t he con tro l dis play.
5. To perform other operations on the device;
see th e Ow n er 's H a nd bo ok o f t he d ev ice: f or
example finding/connecting Bluetooth device or new device.
The Bluetooth name of the v ehicle is shown
on the displ a y of the device.
6. Select the Bluetooth name of the v ehicle on
the display of the device.
7. Re q ue st us ing th e iDrive or m ob ile pho ne to
enter the same Bluetooth passkey. Enter
and confi rm passkey .
Or
Compare the control number in the vehicle
dis pla y with the contro l num be r in the mobile phone dis p lay. Co nfirm the c ontrol number i n th e m obile phon e and o n th e vehicle.
"OK"
8. Select f uncti ons f or w hi ch the devi ce i s to be
used, for ex ample "Bluet oot h aud io".
9. "OK"
If con nection was successful, the device is
shown as connected.
W hite symbol : device active as audi o source.
I f connection was uns uccessful: What to do if ...,
see page 62.
60
Online Edition for Part no. 01 40 2 912 836 - 07 12 510
Page 60

External devices Ent e rt a inmen t
Connecting a certain device
A n already connected device can be connected
as an active audio source.
Connecti on n ot possi ble if data is exchanged
using a mobile phone equipped with Bluetooth.
Re qu irem e nt s
If necessary , activate the audio connection of
the desired device fr om the list of connected
devices.
1. "Se ttings"
2. "Connections"
3. "Blue to o th"
4. Call up "Optio ns ".
5. "Configure device"
6. "Audio"
7. "OK"
Connecting a device
1. "Se ttings"
2. "Connections"
3. "Blue to o th"
4. Sel ect the device to be connected.
W hite symbol : device active as audio source.
Playback
Ge n e ra l
▷ The following functions are dependent on
the de vic e: dis play of track info rm ation , fas t
forward/rewind, random playback.
▷ Can be operated using the device or iDrive.
▷ Playb ack is inte rrup te d if d ata is e xch ang e d
using a mobile phone equipped with Bluetooth.
Starting play
1. Connecting a devi ce.
2. "Multimed ia"
3. "Ex ternal devi ces"
4.
Select the symbol.
Playback is automatically started.
Changing the track
No t all fun ctio ns may be availab le , dep en ding on
the device.
Symbol Function
Next track
Previous title
Fast forward/rewind
Keep button pressed.
Random playback
1. "Multimed ia"
2. "Ex ternal devi ces"
3.
Select the symbol.
4. Call up "Options".
5. "Random"
Disconnecting audio connection
1. "Se ttings"
2. "Connections"
3. "Bluetooth"
4. Highlight the desired device.
5. Call up "Options".
6. "Configure device"
Online Edition for Part no. 01 40 2 912 836 - 07 12 510
61
Page 61

Ente rt ainm e nt External devices
7. "Audio"
8. "OK"
Disconnecting a device
1. "Se ttings"
2. "Connections"
3. "Blue to o th"
4. Highligh t the mobile phone t o be discon-
necte d.
5. Call up "Op tions ".
6. "Delete device"
What to do if...
Visit www.bmw.com/bluetooth for more infor mation on c o mp a tibl e devices.
Com patible mobile pho ne s , s e e pag e 78
Device not supported by the vehicle.
▷ If appl icabl e, per f or m a sof t wa r e update, see
page 62.
Device not registered or paired.
▷ Do t he Bluetooth passkeys for device and
vehicle match. E nter the sa me passkey o n
the dev ice and using i Drive.
▷ Duration f or passkey input longer than
30 seconds. Repeat the connection attem pt.
▷ Is the mobile phone in power-sav e mode or
i s the battery low? Charge the mobi l e phone
using the snap-i n adapter or the charging
cable .
▷ Is the device no longer responding. Switch
the device off and on again.
▷ Repeat the connection attempt.
No musi c ca n be played back.
▷ Star t the program for pla yin g back music
file s on the d evice an d if n ec ess ary, s e lect a
track via the dev ice.
▷ Switch the radio off and on again .
Mu sic files are played back, bu t o n ly at low vol ume.
▷ Adjus t th e volum e con tro ls on th e d evice .
Play ba ck is disrupted when a button is pressed
on t he d ev ice o r if ot her messag es ar e issued via
the device.
▷ Switch off keypad acknowledgement tones
and other audio output at t h e device.
Playback is inte rrup ted by ph one ca lls o r traffic
announcements and does not r esume automatically.
▷ Switch the radio off and on again.
Playback is not possible if the mobile phone is
connected v ia Bluetooth A udio and via the USB
interface or snap-in adapter at the same time.
▷ Disconnect one of the tw o pairing connec-
ti ons, f or exampl e di sconnect audi o connection, see page 61, and restart playback .
If all the poin ts on the lis t ha ve be e n reviewe d
and th e desired function cannot be run, contact
Ho tline or Servic e C en tre .
Software update
Dependi ng on the current software, t he vehicle
sup ports different externa l d evices. A software
update may be support ed, f o r ex a mpl e, by a new
mobi le phone or new ext ernal dev ices of the v ehicle , wh ich m ay imp rove co mp atibility with the
vehicle.
The software is updated via:
▷ US B.
U pda tes and related, up- to-date information is a vaila ble on the web site
www.bmw .co m/updat e.
▷ BMW T ele S e rvice s
The avail able sof tware can be updated directly through the v ehicle.
No t e
The inst allation must only be done when stati onary. To complete the i nstal l ati on, the igni ti on
must be switched off.
62
Online Edition for Part no. 01 40 2 912 836 - 07 12 510
Page 62

External devices Ent e rt a inmen t
Show current version
The information about the version of the software c urre ntly ins talle d is d is playe d.
1. "Se ttings"
2. "Software update"
3. "Show current v er sion"
If an updat e has al ready been appl ied, sel ect t he
desired version to show ad ditional inf ormation.
Updat e software via USB
Do not attempt to update the software unless
the ve hicle is at a stand still.
1. Store the file for the software update onto a
US B data s tore in the main fo lde r.
2. Connect USB drive to the USB interface i n
the centre armrest.
3. "Se ttings"
4. "Software update"
5. "Update software"
6. If app licab le , "USB"
7. "Insta ll so ftware"
8. "OK"
9. Switch of ignition and wait until the control
dis pla y is s witche d off.
software must only be done when stationary.
Ther e must be mobile reception f o r the update.
1. Switch on ignition.
2. "Se ttings"
3. "Software update"
4. "Update software"
5. "BMW Tele S e rvice s "
6. "Transfer software"
7. Interrupt the trip as necessary, the install a-
tion must only be done when stationary.
8. "Install software"
9. "OK"
10. Switc h of ignitio n an d wait u ntil the control
dis pla y is s witch ed off.
Restore software version
The softwar e version b efore the la st software
update or the version before the first software
update can be restored.
Do not attempt to restore the software unless
the ve hicle is a t a s tan ds till.
1. "Se ttings"
2. "Software update"
3. "Restore software"
4. "Pr evious v ersion " or " Software factory
settings"
5. "Remove software"
6. "OK"
7. Switc h of ignitio n an d wait u ntil the control
dis pla y is s witch ed off.
Update software via BMW TeleServices
It is possi ble to transf er the sof twar e when travel ling and i s also automatically continued after
the trip is inte rrup ted . The in st allatio n of the
Online Edition for Part no. 01 40 2 912 836 - 07 12 510
63
Page 63

Ente rt ainm e nt Television, TV
Television, TV
Vehicle Equipment
Thi s chapt er describes al l standar d, nat i onal and
sp e cial e quipm en t provide d in th e m odel s e rie s .
Theref ore equi pment not avail abl e i n a v ehi cl e i s
also de scri b ed, f o r examp le th e select ed spec ial
equipment or national v er si on. That also appl i es
to safety-r elevant functi ons and systems.
Ge n e ra l
For your own safety, the TV picture is only displayed up to approx. 3 km/h. On some national
ve rs io ns , it is on ly d is playe d whe n the p arkin g
bra ke i s engaged or gear position P is engaged.
Selecting program
All re c eivable TV c hann els a nd rad io s tation are
shown in a l ist. The radio stations are shown at
the end o f the list.
In certain circumstances, the list of channels
that can be received might not be upda ted automatically. Update the list with station search,
see page 64, if nec essary .
Symbol Meaning
Digital TV channel
No symbol Analogue TV channel
D igital radio station
1. "Multimed ia"
2. "TV"
3.
"All st ation s"
The cha nne l las t s e en is d is playe d.
4. Sel ect the desired channel.
A fter a short time, the displ ay changes to full
screen mode. To c o ntinue showing the navigation bar: press controller.
Informa tio n b ox
Af ter changing to a new channel, a box with informat ion on the s e lec ted ch anne l is s ho wn
briefly.
Symbol Meaning
Chann el in forma tion availa ble
Digi t al TV channel
TV radio station
Multiple sound tracks available
Sound tra ck in m ulti-c hannel re pro-
duction, surround, av ailabl e
Su btitle s availab le
Station search
The station search takes up to 2 min ute s depending on the number of channels offered. If
not all offer ed channels are listed, it might be
64
Online Edition for Part no. 01 40 2 912 836 - 07 12 510
Page 64

Television, TV En t e rta inm e n t
necessary to r eset the TV region, see
page 66.
1. "Multimed ia"
2. "TV"
3. Call up "Optio ns ".
4. "Station scan"
Cancelling the station search
"Cancel st ation search"
Changing the channel
1. "Multimed ia"
2. "TV"
3. Carry out one of the following points:
▷
"Next progr a mme" or "Previous
programme"
▷
▷ Turn the controller.
The next or previous pr ogramme from the last
se le cte d list o f all p ro gramm e s or s a ve d p ro gra mmes is displayed.
Press the button.
Saving the channel
1. "Multimed ia"
2. "TV"
3.
"All station s"
4. Sel ect the desired channel.
5. Call up "Optio ns ".
6. "Save programme"
7. Sel ect the desired memor y lo ca tion.
The saved channels are stored for the remote
con tro l currently in use.
Electronic Programme Guide
Many stati ons provide and electr onic program
guide.
1. "Multimed ia"
2. "TV"
3.
"Programme"
The TV schedul e f or t he programme on now and
next is shown.
If some characters are not correctly displayed
adjust TV r egion, see page 66.
Dis playing d aily s ched ule
De pe nd ing on th e in format ion th e s ta tion transmits , the e nt ire da ily s c he dule of the sta tion is
shown
Se le ct s tation name s to d isp lay the da ily s c he dule.
Show programme information
Dependi ng on the information a station transmi ts, more detai led i nf or mati on on a progr amme
can be shown.
Sel ect programme to show the more detailed
informa tion.
Or thi s can be cha nge di r ectl y i n th e progr amme:
select
symbol.
Online Edition for Part no. 01 40 2 912 836 - 07 12 510
65
Page 65

Ente rt ainm e nt Television, TV
Saved channels
Twen ty-five ch annels ca n be s aved .
1. "Multimed ia"
2. "TV"
"Saved programmes"
3.
4. Select the desired channel.
Deleting channels
1. "Multimed ia"
2. "TV"
3.
"Saved programmes"
4. Highlight the channel to be del eted.
5. Call up "Op tions ".
6. "Delete"
Adjusting TV
Brightness and contrast
1. "Multimed ia"
2. "TV"
3. Select the
or symbol.
4. "Colour"
5. Adjustin g: tu rn the con tro ller.
6. Saving: pr ess the controller.
Zoom
Sh owing a n e nlarge d TV imag e.
1. "Multimed ia"
2. "TV"
3. Call up "Options".
4. "Zoom mode"
TV Region
The TV region is not the same in every country.
Th e TV receiver can be adjusted to the d esired
region.
For more info rm ation: www.b mw.c om /tvre gio n
1. "Multimed ia"
2. "TV"
3. Call up "Options".
4. "TV region"
5. Sel ect the desired region.
The setting is saved for the remote control currently in use.
4. Turn the controller until the desir ed setti ng
is reached and press the controller.
Colour
1. "Multimed ia"
2. "TV"
3. Call up "Op tions ".
66
Online Edition for Part no. 01 40 2 912 836 - 07 12 510
Sele cting the a udio tra ck
The range of audio tracks available depends on
the TV programme and time of day.
1. "Multimed ia"
2. "TV"
3. Call up "Options".
Page 66

4. "Audio track"
5. Sel ect the desired audio track.
Show s ubtitles
Showing subtit les depends on the TV channel
and time.
1. "Multimed ia"
2. "TV"
3. Call up "Optio ns ".
4. "Su b titles"
5. Se le ct th e d e sire d la ngu age o r "S ub title s
off".
Television, TV En t e rta inm e n t
Online Edition for Part no. 01 40 2 912 836 - 07 12 510
67
Page 67

Ente rt ainm e nt Audio remo te co ntro l in the rea r
Audio remote control in the rear
Vehicle Equipment
Thi s chapt er describes al l standar d, nat i onal and
sp e cial e quipm en t provide d in th e m odel s e rie s .
Theref ore equi pment not avail abl e i n a v ehi cl e i s
also de scri b ed, f o r examp le th e select ed spec ial
equipment or national v er si on. That also appl i es
to safety-r elevant functi ons and systems.
Principle
The foll owing audio f unct i ons at the fr ont can be
con tro lled us ing the aud io rem ote co ntrol in th e
re ar:
▷ "Radio"
▷ "Multimed ia"
The operation is the same as for the correspond ing keys on the CD/DVD player.
The re m ote control is acc omm od ate d in the
centre armrest in the back.
Menu guidance
Press the button Function
Tur n the wheel: adjusts the
volume.
Press middle button:
switches the sound on/off.
tur ning the relevant button again allows a f unction to be executed agai n.
Changing the batteries
No rechargeable batteries
Do no t use r echargeabl e batteries, other-
wise their contents can cause damage.◀
1. Remove the cover. To do so, pre ss the
cover, arrow 1, and push forwards, arrow 2.
2. Insert batteries of th e same ty pe.
3. Close the cover .
Dispose of ol d batt eries at an auth or i sed
colle cting p oint o r h and the m in to a
Service centre.
Switches entertainment
sources .
Switches stati on s, t r ack s or
chapters.
Keep bu tton pressed: fast
forward/rewind.
The s en d tim e o f the rem ote control is lim ite d in
acc ordan ce with le gal re gula tions . Pres s ing or
68
Online Edition for Part no. 01 40 2 912 836 - 07 12 510
Page 68

Rear entertainment
Rear entertainment En te rt a inm e n t
Vehicle Equipment
This cha pte r de scribe s all stand ard, n ation al an d
sp e cial e quipm en t provided in the m ode l s e rie s .
Theref or e equ ipment no t a v ailable i n a v eh icl e is
al so described, for exampl e the sel ected specia l
equi pment or n ational v er si on. T hat also applies
to safety-relevant functions and systems.
Control functions
Contr ol Place of installation
Screens On the backrest of
the front seats.
CD/DVD player in the
rea r
Controller in the rear Between the rear
Remote control In the centre armrest
On the cent re console.
seats.
in the rear
CD/DVD pla yer in the rear
5 Cinch sockets
6 Headphone connection, left
Switching system on/off
Press the button on the lower edge of
the screen.
The rear entertainment and relevant screens are
switched on/off.
A fter the i gnition is switched of f the system
must be switched on again.
Screens
Adju st ing
Risk o f sustaining burns with th e screen
folded out
Do not reach behind the screen; otherwise
bur n s could result. T h e back of the screen can
get very hot.◀
1 CD/DV D compartment
2Ejecting CD/DVD
3 Headphone connection, right
4USB interface
Online Edition for Part no. 01 40 2 912 836 - 07 12 510
▷ To fo ld out: p ull the lowe r ed ge .
▷ To fo ld in: pres s ag ains t th e lower edge .
No t es
▷ W hen loading the r ear seats and adjusting
the backrests of the front seat, fold in the
screens.
69
Page 69

Ente rt ainm e nt Rear ent ertainment
▷ Please fold in the display screens when
making use of the through-l oading system.
▷ Fold in the dis pla y scre e ns be fore fold ing
down the rear back rest.
▷ To c lean t h e screens, c omp ly w ith t h e infor-
mation regarding care, see Owner's
Han dboo k for the vehicl e.
Controller in the rear
Ope ration is the s ame as for iDrive at the front.
▷ To adjust the volume: turn, arrow 1.
▷ A ctivate the controller and switch between
the screens: press the button, arro w 2.
A green LED in dica te s whic h s ide is ac tive
and can be operated usi n g the i Drive in the
rea r.
M enu guidance
Press the button
Function
Opera ting pr inciple as front
controller.
Turn the whe el: high lights a
menu item.
Press middle butt o n: confirm
se le ctio n.
Pressing the arrow buttons
corresponds to tipping the
Controller, change between
screens.
Call up the ma in m en u.
Displays the previous menu.
Calls up the "Options" menu.
Switches stations, tracks or
chapters.
Keep button pressed: fast
forward/re wind.
Adjusts the volume.
Remote control
In the centre armrest in the rear
The re m ote control is in the ce ntre armres t.
70
Online Edition for Part no. 01 40 2 912 836 - 07 12 510
Toggling between the
screens.
The s end tim e o f the rem ote control is limited in
acc ordan ce with le gal re gula tions . Pres s ing or
tur ning the relevant button again allows a f unction to be executed agai n.
Changing the batteries
No rechargeable batteries
Do no t use r echargeabl e batteries, other-
wise their contents can cause damage.◀
Page 70

1. Remove the cover. To do so, pre ss the
cover , arrow 1, and push forwards, arrow 2.
2. Insert batteri es of the same type.
3. Close the cover .
Dispose of ol d batt eries at an aut hor i sed
colle cting p oint o r h and the m in to a
Service centre.
Controls
A lmost all f u nct ions c an b e operated in th e same
w ay a s at t he f ront . Special f eat u r es o f oper a tion
in the rea r a re lis te d in the follo wing s e ctio n.
Audio/vi deo playback
Audio and v ideo can be played in the rear from
the following sou rces:
▷ Rad io
▷ DV D changer
▷ Music collection
▷ Tel evision, TV
▷ CD/D VD player in the r ear
▷ US B aud io inte rfac e in the re ar
▷ AUX-I n port in the rear
Rad io
If the same radio so urce is selected at the fro nt
and in th e rear (f or example FM/AM), th e sa me
r adio station is played.
Operation is the same as for the radio at the
front.
Rear entertainment En te rt a inm e n t
Multime d ia
CD/DVD
The s ame th ing is s ho wn in the fron t and rear
when the same box of the DVD changer is selec ted.
Operation is same as in front.
Symbol Meaning
... DVD changer
CD/DVD player in t he rear
Music collection
It is only possible to save music or export a nd
i mpor t data vi a th e CD / D VD pl a yer at the front or
via the USB i nterface i n the centre armrest.
If the m us ic c olle ctio n is s ele cted at the fron t and
in the rear, playback is independent.
Ope ration is the s ame as for m us ic co llec tion at
the front.
TV
If TV is selected at the front and in the rear, the
sa me channel is pla ye d .
Operation is the same as for TV at the front.
Sound
For headphones i n the r ear, only tr ebl e and bass
ca n be set . Th e setting is made separat ely f or
the headphones on the lef t and right.
Operation is the same as for the sound settings
at the f ront.
Multi-channel playback, set surround
for headphones
1. "Se ttings"
2. "Sound"
3. "H eadphones surround"
Telep hone
Telephoning via the telephone i n t he rear.
Online Edition for Part no. 01 40 2 912 836 - 07 12 510
71
Page 71

Ente rt ainm e nt Rear ent ertainment
An incoming call can be accepted or rejected
without a tel ephone in the rear. Operation same
as front tel ephone.
Na vigat io n
Route pl anning is possi ble separat el y i n t he rear
left /right. It is only possi ble to start t he r out e
guidance at the fro n t.
Operation is the same as for navi gation at the
front.
Suggesting a destination
A destination or trip can be forw arded to the
front as a suggestion. The suggestion ca n be
accepted at the front and sav ed or cancell ed.
This fun ction is not available with the follo wing
setting: "Driver has priority"
1. Ente r d es tination.
2. "Suggest destination"
ConnectedDrive
Ope ration is the s ame as for Con ne cte dDrive at
the front.
Settings
The follo wing s e tting s are p os s ible :
▷ "Rear display"
▷ "Language/units": the language can be set
jointly for a ll sc re e ns .
▷ "So u nd "
▷ "Clima te"
▷ "Connections"
Vehicle information
Content of t he on-board computer can be displayed. Operation is only possible at the front.
Ena b lin g
Enabling the rear
Only pos s ible us ing the iDrive at the front.
1. "Se ttings"
2. "Rear controller mode"
3. Sel ect the desired prior ity.
Enable options
Driver has priority
▷ The sour ce selected at the fr ont with iDrive
is played over the vehicle loud speakers. It
can be selected from the rear passenger
compartment but it cannot be operated from
there. Other audio or video sources may be
operated.
▷ Sound output i n t he r ear is only possibl e via
headphones.
▷ iDriv e at the f ront can be used to select the
so urce that is to be disp layed in th e re ar.
Setti ng the source i n the rear usi ng the iD r ive at
the f ront:
1. "Multimedia" or "Radio"
2. "Rear"
3. Select the desi red audi o or video source.
Options menu
No sp lit s cree n p os s ible .
Operation is the same as for the options menu
at the f ront.
72
Online Edition for Part no. 01 40 2 912 836 - 07 12 510
Sam e priority
▷ All t he audio and video sources can be op-
er at ed vi a th e iDri ve i n th e f ront or in t h e r ear .
Page 72

Rear entertainment En te rt a inm e n t
▷ Sound output i n the rear via headphones:
the so urce sele cte d us ing th e iDrive at the
front is output via the vehicl e loudspeakers.
▷ Sound output via loudspeakers: t he source
las t s ele cted us ing the iDrive at the fron t or
in the rear is output via the v ehicle loudspeakers.
Rear has priority
▷ The source that w as sel ected i n the r ear can
be s ele cted from th e fron t us ing iDrive .
However, it cannot be o per ated from there.
Other au dio or video sources may be operated.
▷ Sound output i n the rear via headphones:
the so urce sele cte d us ing th e iDrive at the
front is output via the vehicl e loudspeakers.
▷ Sound output via loudspeakers: t he source
se le cte d in the re ar is ou tput via the ve hicle
loudspeakers. No audio or video sources
can be selected using the i Dri ve at the f r ont.
Switching off the rear DVD
▷ The r ear enter tainment is switch ed off.
▷ Switching on rear entertainment again: se-
lec t ano the r p riorit y using the iDrive at the
front and switch on the system, see
page 69.
Volume limit for he ad phone s
The maxi mum possible vo lume for the headphones in the rear can be set.
1. "Se ttings"
2. "Rear controller mode"
3. "Volume lim itation"
Headphones, vehicle
louds peake rs
Connecting headphones
Normal headphones
Connection is via jack connector 3.5 mm, see
page 69, on the CD/DVD player in the rear
Wireless headphones
You can get suitabl e wireless headphones from
your Service centre.
Connect headphones
Up t o 3 sets of wireless headphones can be
connecte d.
1. Switch on headphones.
2. "Se ttings"
3. "Connections"
4. "Head p h on e s/remo te "
5. Hold down on button on headphones, LED
on the headphones flashes rapidly.
6. "Add new device"
7. Select with which side the headphones are
to be connected.
The headphones are shown on the list of connected device s. Information regarding the connected headphones is di splayed.
Symbol Meaning
Headphones
Battery charge state
L Con ne ctio n to le ft s ide
R Connection to right side
Online Edition for Part no. 01 40 2 912 836 - 07 12 510
73
Page 73

Ente rt ainm e nt Rear ent ertainment
Rename headphones
The name shown with the headphones can be
changed.
1. "Se ttings"
2. "Connections"
3. "Headphones "
4. Highlight the headphones you w ant t o re-
name.
5. Call up "Op tions ".
6. "Ren am e"
7. Ent er desired names.
D el eti ng connecti on of the headphones
Th e con nec tion w i t h t he vehicle may b e deleted.
1. "Se ttings"
2. "Headphones "
3. Highligh t the headphones you want t o de-
lete.
4. Call up "Op tions ".
5. "Delete device"
Selecting page
A set of headphones can be connected to the
left or right side of the rear entertainment. The
side can be changed at any t ime. T h e headphones need to be swit ched on.
1. "Se ttings"
2. "Headphones "
3. Highlight the headphones f or which you
want to change sides.
4. Call up "Op tions ".
5. "Switch side"
Sound output via headphones of
vehicle loudspeakers
Ope ration is o nly pos s ible in th e re ar.
1. Call up "Op tions ".
2. "Headphones" or "Loudspeakers"
With the following setti ng, sound output in the
re ar is not p os s ible us ing the ve hic le loud speake r: "Driv er has priority".
Extern al devices
Ge nera l
▷ Connection of external audio or video dev i-
ces or digit al camer as using Cinch terminals, see page 69, to the CD/ DVD play er in
the rear. Th e operation is done via t he external device.
▷ Connection of external devices via USB au-
dio interface to the CD/DVD player in the
re ar. O pe ration is the s am e as front, se e
page 57.
D ue to the large number o f audio and v ideo dev ices avail a ble on the market, faultless pl ayback
v i a the screen cannot be ensured for ever y audi o
and video device.
Connecting an external device
1. Fol d dow n the cover of t he ci nch sockets on
the CD/ DVD player.
2. Connect the external device to the cinch
sockets.
▷ Video: yello w so cket.
▷ Audio: white and red socket.
Starting play
1. "Multimed ia"
2. "External devices"
3. "A UX rear"
Volume control
The volume of the sound output depends on the
audio device. If this volume differs significantly
f r om other audi o sources, it makes sense to bal ance the volumes.
74
Online Edition for Part no. 01 40 2 912 836 - 07 12 510
Page 74

Adjus t volume
1. "Multimed ia"
2. "Ex ternal devices"
3. "AUX rear"
4. "Volume "
5. Turn the controlle r un til the de s ired volum e
setting is reached and press the controller.
What to do if...
You can only see a black screen.
▷ Switch on system.
N ot h ing can be detected on the screen.
▷ Toggling between the screens.
Radi o or TV channel s are greyed out and cannot
be selected.
▷ Fu n ct io n is restr icted based o n the selected
priority. Change prior ity.
D VD does not play back.
▷ The disk does not begin to play automati-
cally. Sta rt DVD m anua lly.
V ehi cle loudspeaker v ol ume cannot be adjusted
in the rear.
▷ Sound output i n the rear is done over the
headphones. Change any priority and output the sound over the vehicle loudspeakers.
Rear entertainment En te rt a inm e n t
Online Edition for Part no. 01 40 2 912 836 - 07 12 510
75
Page 75

Online Edition for Part no. 01 40 2 912 836 - 07 12 510
Page 76

Communication
All of the p os s ibilitie s availab le for mob ile
communication wi th y our f ami l y , f ri ends, busi ness
partners or ser vice providers are su mmarised in
thi s chapter.
Online Edition for Part no. 01 40 2 912 836 - 07 12 510
Page 77

Communication Te leph on e
Te lepho ne
Vehicle Equipment
Thi s chapt er describes al l standar d, nat i onal and
sp e cial e quipm en t provide d in th e m odel s e rie s .
Theref ore equi pment not avail abl e i n a v ehi cl e i s
also de scri b ed, f o r examp le th e select ed spec ial
equipment or national v er si on. That also appl i es
to safety-r elevant functi ons and systems.
Principle
Mo biles or o ther external devices, e. g. audio
pl ayer, can be connected to t he v ehicl e by B luetooth.
After single registration, these devices are automatically detected with the igniti on switched
on. As soon a s they are in th e vehicle, they can
be operated thr ough iDrive, the buttons on the
steering wheel and by voice.
Ge n e ra l
External devices can be used dependi ng o n
functionality of the device as a telephone or as
an audio source through the vehicle.
U p to four external devices can be register ed. If
the rear telephone i s registered, three more exter n a l devices can be registered.
No t es
Using the telephone whil e the vehicle is in
motion
Only ma ke inp uts whe n traffic activity pe rmits .
As the driver, do not make telephone cal ls with
the mo bile pho ne in your han d while the ve hic le
is in mo ti on; use the hands-free speaking system. The vehicle occupants and other road
users could otherwise be endangered.◀
It mi ght be necessar y to have certain functions
enable d by the mob ile pho ne or se rvic e p rovider.
At high temperat ures, the charging function of
the mobile can be restricted and no longer operate.
When using the mobile thr ough t he v ehicle, fol low the user manual of the mobile.
Compatible mobile phones
Visit www. bmw.com/bluetooth for detailed inf or mati on about the mobi l e phones and ext ernal
dev ices with Bluetooth interface that are suppor ted by th e mobile phone preparation option.
Viewing vehicle identification number
(VIN) and s of tware part num be r
The vehi cl e i denti ficati on number ( V IN) and sof twar e part number ar e necessary so that you can
check which mobile phones are supported by
the mobil e phone pr epar ation option. You might
al so need details about the mobi le phone's software version.
1. "Se ttings"
2. "Connections"
3. Call up "Options".
4. "Blu etooth info"
5. "Dis pla y s ys tem inform atio n"
These suit able mobi le phones have a cert ain
software version t hat support s the functions of
the vehicle described below.
Malfun ctions may occur when using other mobile phones or soft ware versions.
Do not oper at e a connected mobile phone with
the keypad of the phone to avoid malfunctions.
You have the option of performing a soft ware
update, see page 62.
78
Online Edition for Part no. 01 40 2 912 836 - 07 12 510
Page 78

Tele phone Communication
Functions
The following functions can be assigned to a
mobile when registering.
Telephone and additional telephone
A mobile phone can be assigned the telephone
or supplementary telephone f unct ion.
Data transfer
A mobile phone assi gned the telephone or supplementary telephone f unction may also be assigned the data transmission function. For data
tra ns mis s ion, this c an re su lt in c all ch arge s , fo r
example, with a r oaming connection.
A data trans miss ion is dis playe d in th e sta tus
box , see Owner's H andbook for the vehicle.
The serv i ces breakdown assi stance, hotl i ne, teles e rvice ca ll, a utom atic tele s e rvice call, Inte rn et
and B MW Live can be used via the mobile
phone. Using the services does not require a
valid BM W Assist c ontr act .
The availab ility o f the fu nction d ep en ds on the
country and is series-specific. The mobile
phone must be compatibl e with an d support th e
required Bluetooth radio standards, equi pped
with a c orre s pon ding mo bile tariff a nd h ave s uitable Internet settings.
A n ex i sting data transmission can be termi nated
immediatel y, for example, to avoid roaming
costs.
1. Call up "Optio ns ".
2. "Transferring data via device"
The data transf er supplementary functi on i s deactivated and can be assi gn ed t o a n other tel ephone.
Connecting/disconnecting
the mobile phone
Operating requirements
▷ Sui table mobile phone.
▷ Mobil e phone operational.
▷ Ignit ion swi t ched on.
▷ Bluetooth in the vehicle and mobile phone
activated.
▷ Bluetooth presettings must be made on the
mobi le phone, for example connect without
con firm atio n or vis ibility; se e Owne r’s
Handbook of the device.
▷ If applicable deacti vate Bluetooth audio.
▷ A ny number with a minimum of 4 and a max -
imum 16 posit ions is specif ied as the Bluetooth passkey . Only requi red for non-recurring registration.
▷ Vehic le is at re s t.
Activating/deactivating Bluetooth
connection
Bluetooth use i s not permitted everywh ere.
Com ply with rele va nt loc al laws .
1. "Se ttings"
2. "Connections"
3. "Bluetooth"
4. "Bluetooth"
Enabling/disabling functions
A c tiv at e functions bef o re registering, to be able
to assign these to a mobile phone.
Information about suit able mobile phones that
support this function, see page 78.
Bluetooth audio
A mobile phone can be assigned the Bluetooth
Audi o functi on. The mobi le phone can then be
used as an audio source, see page 60.
Online Edition for Part no. 01 40 2 912 836 - 07 12 510
1. "Se ttings"
2. "Connections"
3. "Bluetooth"
4. Call up "Options".
5. "Configure Bluetooth"
79
Page 79

Communication Te leph on e
6. Select desired functions.
▷ "Bluetooth audio"
▷ "Office "
▷ "Secondary t elephone"
▷ "Show pictures"
7. Tilt the co ntrolle r to the left.
Connecting
Connecti ng t he mobile phone
Only connect the mobile phone when the
v ehicle is stationary. Otherwise, you may becom e distracted and endang er the vehicle occupants and other road users. ◀
Perf orm the connection in full at ei t her th e front
or rear control display.
1. "Se ttings"
2. "Connections"
3. "Blue to o th"
4. "Add new device"
The Bluetooth name of the v ehicle is di splaye d in th e c ontrol d is play.
5. Perf orm other operations on the mobile
phone, see the Owner's Handbook of the
mobile phone: for example f indi ng/ connecting Bluetoot h device or new device.
The Bluetooth name of the v ehicle is shown
on the di splay of the mobile phone.
6. Select the Bluetooth name of the vehi cle on
the di splay of the mobile phone.
7. Enter the same passkey on the mobile
phone and via iDriv e and confirm.
Or
Co m p a re th e c ont rol numb er on the cont rol
display with the control number in the mobi l e phone di splay . Confirm the contr ol number in the mobile phone and on th e con trol
dis play.
"OK"
8. Se le ct th e function fo r wh ich you wo uld like
to use the mo bile phone.
9. "OK"
The mobile phone is connected and shown
in the f irst position on the list of mobi le
phones.
U p to three mobile phones can be connected to
the vehicle at the same time.
If the registration w a s u nsuc c essful: W h at to d o
if..., see page 81.
Display of supported functions
Functions support ed by the mobile phone are
sho wn as a symbol when r e gisteri ng.
White symbol: function i s active.
Grey symbol: functi on is inactive.
Symbol Function
Telephone.
Additional telephone.
Data transfer.
Audio source .
After connec ting for the firs t tim e
The mob ile pho ne is p aired in the vehic le afte r a
short delay when the engine is running o r the
ignition switched on.
Phonebook entri es on the telephone's SIM card
or t he mobile phone itsel f are transferr ed to the
v ehi cle af ter i t has been detected, dependi ng on
the mob ile pho ne .
For a few mobile phones, certain settings are
needed, for exampl e, authorisation or secure
connection, see instruction manual of the mobile phone.
Connecting a certain mobile phone
1. "Se ttings"
2. "Connections"
80
Online Edition for Part no. 01 40 2 912 836 - 07 12 510
Page 80

Tele phone Communication
3. "Blue to o th"
4. Sel ect the mobile phone to be connected.
Functions assi gned to the mobile phone befor e
disconnection are reassi gn ed t o the mobile
phone upon r econnecti on. I f applicable, this
f unction was deactivated for a previousl y connected mobile phone.
Configuring mobile phone
Functions can be activated or deactivat ed with
a r egistered and conn ect ed mobile phone.
1. "Se ttings"
2. "Connections"
3. "Blue to o th"
4. Hig hlight mo bile phone to b e c onfigured .
5. Call up "Optio ns ".
6. "Configure device"
7. At least one function must be selected.
▷ "Telephone "
▷ "Secondary telephone"
▷ "Data transfer"
▷ "Audio"
8. "OK"
If a functi on is assigned to a mobi le phone, then
this is deactiv ated for the already connected
mobile phone and the mobile phone is logged
off.
Switching telephone and additional
telepho ne
The function of the tel ephone and addi ti onal telephone can be switched automatically.
1. "Se ttings"
2. "Connections"
3. "Blue to o th"
4. "Swap phone/second. phone"
Disconnecting a mobile phone
1. "Se ttings"
2. "Connections"
3. "Bluetooth"
4. Highl ight the mobile phone to be discon-
nected .
5. Call up "Options".
6. "Delete device"
What to do if...
Information about suit able mobile phones, see
page 78.
M obile phone not registered or paired.
▷ Is Bl uetooth acti vated in the vehi cle and the
mobi le phone? Activate Bluetooth i n the v ehicle and the mobile phone.
▷ Do the Bluetooth passkeys for the mobile
phone and vehicl e match. Enter the same
passkey on the mobil e phon e and usi n g
iDrive .
▷ D u ration for passkey input longer t h a n
30 seconds. Repeat the connection attem pt.
▷ Does t he control number on the mobile
phone and vehicle agree? Repeat the connection attempt.
▷ Too many B luetooth devices paired to the
mobi le phone or th e vehi cle? If necessary
de lete th e p airing in formation fo r s o me
other device.
▷ Is Bluetooth audio activated? Deactivate
Bluetooth audio.
▷ Is the mobi le phone in power-save mode or
i s the battery low? Charge the mobile phone
using the snap-i n adapt er or the charging
cable.
▷ If appr opr i at e, on l y one mobi le phone can be
connected to the vehicle, depending on the
mobi l e phone. D e-regi ster the mobile phone
from t he vehicle and only r egister a n d connect one mobi le phone.
The mo bile ph one is no lo nge r re s pondin g.
Online Edition for Part no. 01 40 2 912 836 - 07 12 510
81
Page 81

Communication Te leph on e
▷ Switch the mobil e phone off a n d on aga in.
▷ Too high or low ambient temperatur es? Do
not subject the mobile phone to ext reme
ambient conditi ons.
Telephone functions not possible.
▷ Configure mobi le phone and connect with
the telephone or additional telephone function.
No pho ne boo k entrie s , no t all e ntrie s o r in com plete en tries ar e displayed .
▷ Transfer of the phone book entries has not
comple ted.
▷ U nder cer tai n ci r cumstances onl y the phone
book entries saved in the mobile phone or
on the SIM card are transferred.
▷ I t might be that phone book entries wi th spe-
cial characters cannot be displayed.
▷ Number of phone book entri es to be stored
is too hig h.
▷ Data volume of the contact too large, e.g.
due to stored information such as n otes?
Reduce data volume of the contact.
▷ Mobil e phone connected as audi o sour ce?
Configure mobi le phone and connect with
the telephone or additional telephone function.
Qualit y of the phone connection is poor.
▷ Bluetooth signal strength can be adjusted
on mobile phone, depends on the model.
▷ Place the mobile ph one in the snap-in
adapter or close to the centre console.
▷ Adj ust the volume of the microphone and
spea ker se parately.
If all the points on the lis t ha ve be e n reviewe d
and the desired function cannot be r un, contact
Ho tline or Se rvic e Ce ntre .
Controls
Adjusting the volume
Turn the knob until the desired volume is
reached. The setting is saved for the remote
control currently in us e.
Automatic volume equalisation
The vehicle adjusts the volume of the microphone on the telephone and the volume of the
other par t y automatically. Dependin g on the
mobi le phone, it may be necessary to adapt the
v o lum es. Sett ings a re possible on ly du ri n g a c all
and must be adj usted separat el y f or each mobi le
phone. The settings are deleted as soon as the
mobi le phone is de-registered.
1. "Se ttings"
2. "Sound"
3. "Vol ume settings"
4. Select desired setting: " Microphone" or
"Loudspe ak."
5. Adjustin g: tu rn the con tro ller.
6. Saving: pr ess the controller.
Inc o m ing call
Re ceiving a call
If the n umb er o f the ca ller is sa ve d in the telephone book and i s transf err ed fr om the networ k,
the name of the contact and the telephone number is displ a yed. Otherwise, only the phone
num be r is d isplaye d.
Accepting a call
Us ing iDrive
"Accept"
82
Online Edition for Part no. 01 40 2 912 836 - 07 12 510
Page 82

Via button on the steering wheel
Press the b utton .
Via instrument cluster
"Accept"
Rejecting a call
Us ing iDrive
"Reject"
Via instrument cluster
"Reject "
Ending a call
Us ing iDrive
"Hang up"
Tele phone Communication
Via in st ru me nt c lus te r
"Hang up"
Dialling a number
1. "Telephone "
2. "Dial n um be r"
3. Sel ect the digits in dividuall y.
Se le ct th e s ymb ol. The call is m ad e u sin g
4.
the mobile phone assi gned to the tel ephone
function.
If a cal l i s to be made thr ough the suppl ementar y
telepho ne :
1. Sel ect the digits in dividuall y.
2. Call up "Options".
3. "via "
The phone number can al so be entered using
the voice c ontro l sys te m. The ca ll is m ad e usin g
the mobile phone assigned to the telephone
function.
Via button on the steering wheel
Press the b utton .
Online Edition for Part no. 01 40 2 912 836 - 07 12 510
Calls with a numbe r of pa rticipa nts
Ge nera l
It is pos sible to s witch b e twee n c alls or me rg e
two call s to set up a conference. The functions
must be suppor t ed by t h e mobile phone and
service pr ovider.
Accepting a call during another call
If there is a second call during an ongoing call
yo u he ar a c all waitin g s ignal, if applica ble .
"A ccept"
The call is a cce p ted and the e xis ting c all is he ld.
83
Page 83

Communication Te leph on e
Setting up a second call
Set up another call during a call.
1. "Telephone"
2. "Active c alls "
3. Dial a new phone number or select from a
list.
Switching between two calls,
alternating
You can swit ch b etwe e n two calls . The calls c an
be made usi n g bo th connected mobile phones.
Active c all is dis played in co lour.
Call on hold is d is playe d in g rey.
"Swap ca lls"
The pho ne s witche s to the call that is in progress.
Setting up a conference
Two calls can be merged to set up a telephone
conference. Th e calls must b e made through a
mobile phone.
1. Setti ng up two calls.
2.
"Place conference call"
On te rmina tion, both calls a re always te rm inated . If one call is te rmina te d by an othe r s ubsc ribe r, the othe r call is co ntinued , if re qu ire d .
DTMF overlap dialling
Us ing DTMF overlap diallin g to acc es s ne twork
services or to control de vices, e.g. remote answer phone access. T his requi res the D T MF
code.
1. "Telephone"
2. Se le ctin g a c ontact from a lis t o r "Dial
number".
3.
"DTMF s uffix diallin g"
4. Ent er DT MF code via iDrive.
Phone book
Ge nera l
The phone book has access to the contacts
stored in the vehicle and contacts of the mobile
phones assi gned the function telephone or supplementar y telephone. All c ontacts for wh ich a
phone number is entered are displayed. T he
contacts saved with B MW Online are also
shown.
Dis play s
1. "Telephone"
2. "Phone book"
The symbols mark the storage l ocation of t he
contacts.
Setting the microphone to mute
The microphone can be muted during active
calls .
1. "Telephone"
2. "Active c alls "
3.
"M icrophone muted"
The mute microphone is automatically activated :
▷ When a ne w call is s et up.
▷ When a lte rnating be twee n c all p arties .
84
Online Edition for Part no. 01 40 2 912 836 - 07 12 510
Symbol St orage loc ation
Ve hic le .
Mobile phone.
BMW Online address book.
Page 84

Tele phone Communication
Ma king a call
The entries can be selected and a call set up.
Symbol Meaning
Contact w ith a stored number.
Contact with more than one stor ed
number.
Cal l not possibl e, mobi l e phone wi th-
out r eception or network, Teleservice Call or dat a transfer activ e.
Phone book entries with a stored phone number: select desired entry.
Phone book entri es wi th more than one stored
phone number: select desired entr y and then
phone number .
The call is m ade us ing the mobile ph one as signed to the telephone functi on.
If the call is to be made using the mobile phone
assi gned to the supplementary telephone function:
1. Highli gh t contact, an d highlight the desired
pho ne number if there are more than one.
2. Call up "Optio ns ".
3. "via "
Ed iting c ontacts
Changing the entries in the "Contacts" menu. If
a contact i s changed, t he changes are not sav ed
on the mobil e phone. A copy of the entry i s saved
in the ve hic le.
1. Highl ight the contact.
2. Call up "Optio ns ".
3. "Edit entry "
The contact can be edit ed.
Re dialling
tary telephone, are transferred to the vehicle.
The last 20 numbers dialled are displayed for
each mobile phone.
Dialling numbers via the instrument
clus ter
Pos s ible if no ca ll is c urre ntly ac tive .
1. Press ke y on t he steering wheel.
2. Sel ect the desired phone number.
The cal l is made through the mobi le phone from
the list of whic h the num be r com e s.
Dial number using iDrive
1. "Telephone "
2. "Last number redial"
3. Select the desired entry and telephone
number as necessary.
The call i s made usi ng the mobi le phone as-
signed to the telephone functi on.
If the c all is to b e m ad e u sin g th e m obile p hone
assigned t o t h e su pp lemen t a ry t eleph o ne func tion:
1. Mark entry.
2. Call up "Options".
3. "via "
Saving an entry in Contacts
1. Mark entry.
2. Call up "Options".
3. "Save as contact" or "A dd to contact"
4. If necessar y, select contact.
5. Select the ty pe of number: "Home", " W or k" ,
"Mobile" or "Others"
6. If necessary, complete the entries.
7. "Save contact"
Ge n e ra l
Lists of nu mber dial led on the mobile phones
assi gned the f unction telephone or suppl emen-
Online Edition for Part no. 01 40 2 912 836 - 07 12 510
85
Page 85

Communication Te leph on e
Incoming calls
Ge n e ra l
Lis ts of in com ing calls on the mobile ph one s as signed the f uncti on tel ephone or suppl ementar y
telephone, are transferred to the vehicl e. The
las t 20 incomin g ca lls are d isp layed for e ach
mobile phone.
Dial number using iDrive
1. "Telephone"
2. "Rec eived calls "
3. Select the desired entry and telephone
nu mber as nece ssary.
The call is m ade u sin g the m obile p hone a s-
signed to the tel ephone function.
If the call is to be ma de us ing the mobile phone
assi gned to the supplementary t el ephone f unction:
1. Mark entry.
2. Call up "Op tions ".
3. "via "
Saving an entry in Contac ts
1. Mark entry.
2. Call up "Op tions ".
3. "Sav e as contact" or "A dd to cont a ct "
4. If necessary, select contact.
5. Sel ect the type of number: "H ome", " W ork ",
"Mobile" or "Others"
6. If necessary, complete the entries.
7. "Sav e contact"
Hands-free system
Ge n e ra l
Calls taken via the hands-free system can be
continued via the mobi le phone and vice v ersa.
From mobile phone to the hands-free
system
Calls that w ere started outside the Bl uetooth
range of the vehicle can be conti nued v ia the
ha nds- f r ee sy st em w he n th e ignit i o n is sw i t che d
on.
Dependi ng in the mobile phone, ther e is an automatic switch to the hands-free mode.
If it is no t auto ma tically to ggle d , fo llow what is
di splayed on the mobi le phone screen, and also
see the i nstructi on manual for the mobi l e phone.
Fr om the hands-free system to the
mobile phone
Calls taken via the hands-f ree system can also
be continued via the mobile phone, depending
on the mobile phone.
The n follo w what is dis p layed on th e m ob ile
phone, and also see the instruction manual of
the mob ile pho ne .
Snap-in adapter
Principle
The snap-in adapter enables:
▷ Storage o f the mobile pho ne.
▷ Charging of the battery .
▷ Connection to the external aerial of the ve-
hicle.
This ensures better network reception and uniform reproduction quality.
Ge nera l
Mo re de ta iled info rm atio n on the sn ap- in ad ap ters which compatibly support the functions of
the handy can be obtained f rom the Serv i ce centre.
No t es
A t high temperatur es, the charging functions of
the mobile can be restricted and no longer operate.
86
Online Edition for Part no. 01 40 2 912 836 - 07 12 510
Page 86

Tele phone Communication
Installed position
In the front centre armr est. T he direction of instal lati on in the centre armr est v ar ies f r om v ehicle to vehicle.
Inserting the snap-in adapter
1. Press the button and take out the cover.
2. Insert snap-in adapter at t h e front, arrow 1,
and press to the bottom, arr ow 2, until the
adapter engages.
nections, arr o w 1, a n d pu sh down, arrow 2,
until it e ng ag es .
Removing the mobile phone
Press the button and pi ck up the mobile phone.
Inserting th e mobile phone
1. Dependi ng on the mobile phone, remove
th e p rotecti ve cap fr o m t h e a erial connec tor
and f rom the USB port of the mobile phone
if nec essary .
2. Push the mobi le phone wi th buttons up-
wards in the directi on of the electrical con-
Online Edition for Part no. 01 40 2 912 836 - 07 12 510
87
Page 87

Communication Office
Office
Vehicle Equipment
Thi s chapt er describes al l standar d, nat i onal and
sp e cial e quipm en t provide d in th e m odel s e rie s .
Theref ore equi pment not avail abl e i n a v ehi cl e i s
also de scri b ed, f o r examp le th e select ed spec ial
equipment or national v er si on. That also appl i es
to safety-r elevant functi ons and systems.
Principle
Contacts, appoi ntments, tasks, notes, text messages and e-mai l s fr om the mobile phone can be
vie wed on the con tro l dis pla y if the mo bile ph one
support s these fun ctions and i s compatibl e w i t h
the correspondi ng B luetooth standar ds. F uncti ons have to be released separatel y as requir ed.
Transmission can take a few mi nutes after the
first time a mobile phone is paired.
Ge n e ra l
Information on which mobi le phones support
which Office functions can be found under
www.bm w.co m/bluet o o t h .
Conte nts a re co mp letely dis p layed when the
ve hicle is at s ta nds till.
Operating requirements
▷ Offi ce is activ a ted, see page 79.
▷ A com pa tible mo bile pho ne is re gis te red
and connected to the vehicle. The mobi le
phone is assi gned the f unction telephone or
supplementary telephone.
▷ For some mobile phones, dat a a ccess must
be confirmed on the mobile phone.
▷ Ti me, time zone and dat e are correctly set
on the Co ntrol Disp lay and on the m obile
phone, for ex ample to display appointments
c orrectly.
Updating
The data is updated every time the mobile
phone is connected to the vehicle. Appointments, tasks, notes and reminders can be updated separat ely.
1. "Office "
2. "Office today", "Cal endar", "Tasks",
"N ot es/voice memos" or " Reminders"
3. Call up "Options".
4. "Update data"
Data f rom the mobil e phone i s transferr ed to
the vehicle again.
No t es
Do not oper ate Office while the vehicle is
in mo tion.
Only make adjustments if the traffic condit ions
are appropriate. Otherwise, you may become
distracted and endanger the vehicle occupants
and other road users.◀
88
Online Edition for Part no. 01 40 2 912 836 - 07 12 510
Office update
The number of unread messages and active
tasks as wel l as appoi ntments coming up are
dis played.
1. "Office "
2. "Office today"
Page 88

Offic e Communication
3. Se le ct th e d e sire d e ntry to d isplay de tails.
Contacts
Ge n e ra l
Contacts can be created an d edited. Th e contacts from the mobile phone assi gned the f unction telephone or supplementary t elephone are
also shown, as are the contacts from the BMW
Online address book. The addresses can be
used as navigation destinations and the phone
numbers dialled directly.
Displaying contacts
1. "Office "
2. "Contacts"
All contac ts a re lis te d in alphabe tical orde r.
The A-Z search function is offere d, d epe nding on the number of contacts.
It can be selected whether the contacts are to
be transferred from a mobil e. The contacts can
also be transferr ed from both connected mobiles.
1. Call up "Optio ns ".
2. Se le ct m ob ile from whic h the contacts are
to be transferred.
A symbol indicates the storage locati on of the
contacts:
Symbol Storage location
Ve hic le .
Mo bile p hone.
BMW O n line address book .
Displ aying contacts from BMW Online
To display contacts from BMW Online, when
loggi ng on to B MW Online the function "Log in
auto matic ally" must b e en able d.
Dial a phone number
1. Sel ect the desired conta ct.
2. Select the phone number.
The con ne ctio n is es tablis he d.
If a cal l i s to be made thr ough the suppl ementar y
telepho ne :
1. Sel ect the desired conta ct.
2. Highl ight phone number.
3. Call up "Options".
4. "via "
Ed iting contacts
No t e
If a contact that comes from the mobile phone
or BMW Online is e dite d, the ch ang es a re no t
sa ve d o n the mobile ph one or at BMW On line . A
copy of the entry is saved i n the vehi cle.
Online Edition for Part no. 01 40 2 912 836 - 07 12 510
89
Page 89

Communication Office
Edit
1. Select the desired contact.
2. "Edi t contact"
3. Change entries.
4. "Sav e contact in v eh."
Selecting a contact as navigation
destination
1. Select the desired contact.
2. Select address.
In the case of contact s from the mobile
phone and BMW Online address book , the
address might have to be matched to the
navigation data in the vehicle. If that i s the
case:
Correct the address.
3. "Start guidance" or "Add as another
de s tinatio n"
Checking address as destination
A n addr ess that is to be added to the r out e gui dance must match the navigation data contained
in the vehicle. H ere, th e address can be
checked.
1. Select the desired contact.
2. Highligh t address.
3. Call up "Op tions ".
4. "Check as destination"
5. If necessary, corr ect and save the address.
If t h e address is cor rected and saved, a co py is
created in the vehicle. The address is not
changed on the mobile phone or BMW Online.
Display the Internet address of a
contact
Th e In t er n et ad dress sto r ed for a co nt a ct c an be
calle d up.
1. Sel ect the desired contact .
2. Sel ect Int ernet address.
Th e selected Internet address is display ed
in the brows e r.
Displaying additional information from
BMW Online
Dis pla y of ad ditio nal in formation fo r a co ntac t if
present at BMW On line.
1. Sel ect the desired contact .
2. Call up "Options".
3. "Add it. info (BMW Onlin e)"
New contact
Attaching
1. "Office "
2. "Contacts"
3. Call up "Options".
4. "New contact"
5. Input b oxe s s till sh ow pre viou s in put: "Clear
fields"
6. Comp le te input boxe s : s e lect inp ut bo x.
7. Enter text and make any assignment.
8. In the nav igation system: enter address.
On ly add resses tha t are p resent in the car's
navigation data can be entered. Th is ensures that route gu idance is possible for all
addres ses .
If app licab le , "Ac ce pt"
9. "Save contact in veh."
The entries for a cont act are assigned by t he
following symbols.
90
Online Edition for Part no. 01 40 2 912 836 - 07 12 510
Page 90

Offic e Communication
Symbol Meaning
Private phone number
Work phone number
Mobile phone number
Other phone number
Private address
Work address
E-mail addres s
Internet address
Specifying home address
A home address can be sa ved in m e mory. This
home address appears at the top of the list of
contacts.
1. "Office "
2. "Contacts"
3. "H ome addr ess"
4. Create contact.
5. "Save contact in veh."
Sele cting sort ord e r for name s
N ames can be displayed in a different order.
1. "Office "
2. "Contacts"
3. Call up "Optio ns ".
4. "Displ ay surname first" or "Display first
name first"
The sort or der for n ames mi ght not be the same
as the selected sort order , depending on how
contacts are saved on your mobil e phone.
Display contact images
Photos saved for contacts are saved in the vehicle w hen th e mob il e p hon e is con nec ted to th e
vehicle.
1. "Se ttings"
2. "Connections"
3. "Bluetooth"
4. Call up "Options".
5. "Configure Bluetooth"
6. "Show pictures"
Dis pla ying all c ontact im ag es is ac tiva ted or de activated.
E xporting/importing contacts
Cont acts can be ex po r ted and imported via Person a l Prof ile. The contacts stored in t h e vehicle
are ex ported, not t h e contacts f rom the mobile
phone or BM W Online.
Deleting contacts
Only cont acts saved in the vehicle ar e deleted.
The contacts from the mobi le phone or B MW
Online cannot be deleted.
1. "Office "
2. "Contacts"
3. Highl ight the contact.
4. Call up "Options".
5. "Delete contact" or "Delete all conta cts".
6. If applicable, "Yes"
Messages
Ge nera l
M essages are only displ a yed when t h ey ar e
complete.
Displaying messages
1. "Office "
2. "Messages"
Online Edition for Part no. 01 40 2 912 836 - 07 12 510
91
Page 91

Communication Office
The latest messages a re shown.
It can be selecte d whether the messa ges are to
be t r an sf err ed fr om a mo bil e . Th e messa ges c an
also be transferred from both connected mobile s .
If a mo bile pho ne is as sig ne d to more than one
e-mail account, the desi r ed e-mai l account must
be selected.
1. Call up "Op tions ".
2. Select mobile and which account from
w hich the messages are to be transferred.
A Symbol design ated the message type.
Symbol Message ty pe
SMS.
My Info
Message f rom infor mation service.
E-m ail from m ob ile p hon e
Se le ct this to d isp lay a m es s ag e.
Filter message list
Th e messag e l ist can be fi lt er ed if m or e t ha n o ne
typ e of m ess age is ava ilable . Filte rin g can b e
combi ned betw een message ty pe and message
status.
1. "Filte r:"
2. Select type of message .
▷ "All message types"
All messages are di splayed.
▷ "E-mail"
Only E -mails from the mobile phone are
dis played.
▷ "Text message"
Only SMS messag e s are displayed.
▷ "S ervice messages"
Only service messages are displayed.
Select m essage status.
▷ "Unread messages"
Only unread messages are sho wn.
▷ "Since start of j ourney"
All SMS and E-mails received si n ce the
start of the tri p are shown.
▷ "All me s s age s "
All me s s age s are dis playe d.
Deleting messa ges
Ge nera l
A ll message types can be del eted in the v ehicl e.
SMS and E -mail s transfer red f rom the mobi le to
the vehicl e are also del eted on the mobil e.
Deleting a serv ice message
1. Sel ect the desired service message.
2. Call up "Options".
3. "Delete messag e"
Delete all service messages
1. Call up "Options".
2. "Delete all messages" or "Del ete
messages"
SMS
Ge nera l
SMS messa ges transferred from t he mobile
phone to the vehi cle.
Additional functions
Th e following func tions are av ailable when an
SMS messa ge is selected:
92
Online Edition for Part no. 01 40 2 912 836 - 07 12 510
Page 92

Offic e Communication
Symbol Function
Browse i n the SMS
"Play", see page 97.
"Call se nde r"
"Use contact da ta", see page 97.
"Mar k as unread"
"Delete message"
E-m a il
Ge n e ra l
E-mail messages transferr ed from the mobile
phone to the vehicle.
Deactivate complete display
Ope nin g an E-ma il in the vehic le com ple te ly
transfers it to the vehicle. This may be subject
to charges.
1. "Office "
2. "Messages"
3. Call up "Optio ns ".
4. "Fully downlo ad e- mails "
Only part o f the E-m ail is loa de d from the
mob ile pho ne into th e veh icle .
A dditional functions
Th e foll o w ing funct ion s are av a ilable w hen an email me s sa ge is s ele cted :
Symbol Function
B row se in the e- m ail
"Play", see page 97.
Symbol Function
"Mark as unread"
"Delete e-mail"
My Info
Ge nera l
My Info messages from the BMW Assist Po rta l.
Re plyin g
Send a predefined reply.
1. Select the desired message.
2. Call up "Options".
3. "Answe r"
Additional functions
The following fun ction s a re available w hen a
messa ge is selected :
Symbol Function
"Start guidance" or "Add as another
de s tinatio n"
"Call"
A phone connecti on is established if
the message contains a number.
"Select phon e number"
Select the desired number f rom the
list if the messa ge contains more
than one number. Telephone conne ction is se t up .
"S e nd e-mail (BMW O nline )"
"Op e n link in brows e r"
"Sender/recipient"
Contact data are shown
"Use contact da ta", see page 97.
Online Edition for Part no. 01 40 2 912 836 - 07 12 510
Messa ge from information s er vice
Ge nera l
Me s s age s from BMW inform ation s ervic e.
93
Page 93

Communication Office
Saving an address
1. Select the desi red message.
2. Call up "Op tions ".
3. "Sav e contact in v eh."
A dditional f unctions
The followin g fun ctions are available when a
message is selected:
Symbol Function
"Start guidance" or "Add as another
destination"
"Call"
A phone connecti on is established i f
the message contai ns a number.
"Select phone number"
Sel ect the desired number from the
list if the me s s age contains more
than one number. Telephone connection is set up.
"S e nd e- mail (BMW Online )"
"Ope n link in b rowse r"
Call up Interne t a ddre s s.
It can be sel ected wheth er t he appoi nt ments ar e
to be transferred from a mobile. The appointments can also be transferred from both connecte d m obiles .
1. Call up "Options".
2. Se le ct m ob ile p hon e fro m whic h the ap -
pointments are to be transferred.
Scroll to the current week, or
"Previous days": shows the last 7 days.
"Next days": shows the next 7 days.
Show calendar month
1. Select date.
The curr ent month is shown. Appointments
are entered on the highlighted calendar
dates.
2. Turn controller until the pr evious or next
month is shown.
Show calendar day
1. Show calendar month.
2. Sel ect desired day.
The appointments of the selected d ay are
shown.
"Further information"
Dis pla y add itiona l info rm ation
Cale ndar
Principle
The last 30 days and the next 90 days can be
dis played.
Dis pla y s
1. "Office "
2. "Calend a r"
Yesterday, today and the next five days are
shown.
94
Online Edition for Part no. 01 40 2 912 836 - 07 12 510
Appoin tme nt
Dis play s
Sel ect the desired appointment.
Additional functions
The follo wing functio ns are ava ilable for the appointment entry selected:
Page 94

Offic e Communication
Symbol Function
Brows e in the ap pointme nt
"Read out" , see page 97.
"Use contact data", see page 97.
Tas ks
Display task list
1. "Office "
2. "Tas ks "
It can be selected whether the tasks are to be
transfer red fro m a mo bile. T h e t a sk s c an a lso be
tr ansferr ed from both connected mobi les.
1. Call up "Optio ns ".
2. Se le ct m ob ile p hone fro m whic h the ta s ks
are to be transferred.
Sort task list
1. Sel ect headers in the task list.
Additional functions
The following fun ction s a re available w hen a
ta sk is selected:
Symbol Function
Browse in the task
"Read out", see page 97.
"Use contact data", see page 97.
No t es
Displ ay notes
1. "Office "
2. "Notes/voice memos"
All te xt me m os from th e m ob ile p hon e a nd
voice memos recorded in the vehicle are
shown.
It can be selected whether the notes are to be
tr ansf err ed f rom a mobi le. The notes can al so be
transferred from both connected mobiles.
1. Call up "Options".
2. Sel ect mobi le phone fr om which the memos
are to be transf erred.
2. Se le ct s o rt c rite rion:
▷ "Priority (!)"
▷ "Su b ject"
▷ "Due date"
Display task
Select the desired task .
Online Edition for Part no. 01 40 2 912 836 - 07 12 510
Text memos
Show text memos
Sel ect desired text memo.
Additional functions
The following functions are possi ble wi t h a selected text memo:
Symbol Function
Browse in the memo
"Read out", see page 97.
"Use contact data", see page 97.
95
Page 95

Communication Office
Voice memos
Ge n e ra l
A voice memo can b e recorded. These are
sto red in the vehicle and can be exported
through the USB i nterface.
Record voice note
1. "Office "
2. "N ot es/ voice memos"
3. "New voice memo"
4.
"Record voice memo"
Func tion s elec tion
Symbol Function
"Record"
Start recording. After the voice
memo can be r ecorded after the
tone .
"Pause"
Pressing again restarts the recording.
"Play"
The recording cannot be continued
after starting playback.
"To beginning"
"Fast reverse"
"Fast forward"
"Delete"
"OK"
Finish recording.
Displaying voice memo
Sel ect desired voice memo.
Additional functions
The following funct ions ar e possible with a selec ted vo ice mem o:
Symbol Function
"Play"
"Pause"
"To beginning"
"Fast reverse"
"Fast forward"
"Delete"
Export voice note
To export voice memos through the USB c onnecti on i n the centre console, a suit abl e medi um
must be connected to the USB interface.
▷ S uitable m ed ia: USB m as s storage facilitie s ,
for example USB memory sticks or MP3
players with USB interface.
▷ Unsuitable media: USB hard disks, USB
hubs, USB memory card reade rs with a
number of bays, Apple i Pod/iPhone.
▷ File systems: cur rent file systems for USB
devices are suppor ted. FAT 32 for mat is
recommended.
1. Connect USB medium to the USB interf ace
in the centre armrest, see page 57.
2. "Office "
3. "N ot es/voice memos"
4. Highlight desired voi ce memo.
5. Call up "Options".
6. "Export all mem os (USB)" or "Export voice
memo (USB)"
All voice notes are exported and/or the pr e -
viou sly-m arke d voic e note is exporte d.
De lete voice note
1. Mark desired voice note.
2. Call up "Options".
96
Online Edition for Part no. 01 40 2 912 836 - 07 12 510
Page 96

Offic e Communication
3. "Delete all voice memo s" or "Delet e voice
memo"
4. "OK"
Re mind e rs
Ge n e ra l
Reminders connected to appointments and
tasks are displayed. After an a ppo intment or
task deadline has elapsed, the remind er is no
longer displayed.
Display reminders
1. "Office "
2. "Rem inde rs "
3. Select the desired reminder.
The r elevan t a ppointment or task is displayed.
It can be selected whether the reminders are to
be tr ansf err ed f r om a mobil e. The r emi nder s can
also be transferr ed from both connected mobiles.
1. Call up "Optio ns ".
2. Se le ct m ob ile p hon e fro m whic h the rem ind -
ers are to be transferred.
Activate/deactivate pop-u p remind er
1. "Office "
2. Call up "Optio ns ".
3. "Remi nder pop-up"
All re m inde rs for app ointme nts and tas ks
are s ho wn in a lis t o n the c ontrol d isp lay
w hen they are due.
Close all reminders
1. "Office "
2. "Rem inde rs "
3. "Clos e all rem inde rs "
Use contact data
Ge nera l
Contact data from appointments, tasks, SMS,
E‑mails and notes can be stored or sel ected.
Display contact or dial telephone
number
1. "Use contact data"
2. Display contact or dial telephone number:
▷ Se le ct c onta ct to dis pla y a de taile d view
of the contact.
▷ Select tel ephone number to mak e a di-
rect connection.
Store co ntact data
1. "Use contact data"
2. Hig hlight te lep hon e n umb e r o r e -m ail ad -
dres s.
3. Call up "Options".
4. "Add to contact" or "Save as contact"
Reading out
Ge nera l
SMS, E -mail s, app oi n tment s, t ask s, memo s and
voice memos can be read out or played back.
Reading out
1. Select de sired element.
"R ead out"
2.
The follo wing p os sibilitie s are availa ble when
r eading out or pl ayi ng back:
▷
"Pause"
Interr upt reading out. Sel ect again to restar t
reading out.
▷
"To beginning"
Read out again from the beginning.
▷
"Next paragraph"
Skip paragraph.
Online Edition for Part no. 01 40 2 912 836 - 07 12 510
97
Page 97

Communication Office
▷ "Previous paragraph"
Return to last paragraph.
▷ To end reading out or playback, ti p th e con-
troller to the left.
What to do if...
Information about su itable m ob ile p hon es , see
page 78.
A ppoi ntments, tasks, reminders, memos, or
messages from the mobile phone ar e not displayed?
▷ Mobil e phone is not suitable for the missi ng
function or it is not connected correctly?
▷ Mo bile ph one is als o c onn ec te d by WLAN.
▷ Office functi on is deactivated.
▷ Mo bile ph one is not s e le cte d for tra ns fe rring
the desi red elements.
▷ A ppointments are more than 30 days old/
more than 90 day s ahead.
▷ Ta sks are marked as d one.
▷ Not all stored appointments, tasks, notes,
messages i n the mobi le phone are displ ayed
in the vehicle, depending on the number of
stored appointments.
A re not all appoi ntments, tasks and reminders
from the mobi le phone displayed at the correct
time ?
▷ Time zone, time or date is not correctly set
on th e c ontrol d isp lay and the mo bile phone .
The E-ma il attachm en t is not d isp layed.
▷ E-mails are transf erred without attach-
ments.
Texts of e ntries are not fully dis playe d.
▷ Tex ts ar e abr idged before they are tr ansf er -
r ed from the mobile phone.
▷ Sync hronis atio n be twe en mobile pho ne and
v ehicle might take several minutes to complete.
Contact photos are not di splay ed.
▷ For each mobile pho ne connected, a maxi-
mum of 200 contact images are transferred
to th e vehicle.
Are E-m ails dis p layed with a de lay?
▷ Check E-mail settings on the mobile phone
and adju st , if a pp licab le.
If all the poin ts on the lis t ha ve be e n reviewe d
and th e desired function cannot be run, contact
Ho tline or Servic e C en tre .
98
Online Edition for Part no. 01 40 2 912 836 - 07 12 510
Page 98

Contacts
Conta cts Communication
Vehicle Equipment
This cha pte r de scribe s all stand ard, n ation al an d
sp e cial e quipm en t provided in the m ode l s e rie s .
Theref or e equ ipment no t a v ailable i n a v eh icl e is
al so described, for exampl e the sel ected specia l
equi pment or n ational v er si on. T hat also applies
to safety-relevant functions and systems.
Ge n e ra l
Contacts can be created an d edited. Th e conta ct s f r om th e mo bi le are also sh ow n. Add r esses
can be used as navigation destinations and the
phone number s dialled dir ectly.
Operating requirements
This description of the conta cts applied with
equipment with hands-f r ee system wi th U SB i nterfa ce or without a mo bile ph one provisio n.
New contact
Attaching
1. "Contacts"
2. "N ew contact"
4. To complete the i nput f i elds: select the sym-
bol beside the input field.
5. Enter text.
6. If equipped with navigation system: Enter
add ress. O nly a ddresses th a t ar e p resent in
the car's navigation data can be entered.
Th is ensu r es t h at r o u te g uida nc e is po ssible
for all addresses.
7. If a pplicable, "Save"
8. "Save contact in veh."
Specifying home address
A home addr ess can be sav ed in memory. This
home addr ess appears at the top of the list of
contacts.
1. "Home address"
2. Create contact.
3. "Save contact in veh."
3. Input b oxe s s till sh ow pre viou s in put: "Cle ar
fields"
Online Edition for Part no. 01 40 2 912 836 - 07 12 510
My contacts
Ge nera l
List of all contacts saved in the vehicle.
Displaying contacts
1. "Contacts"
99
Page 99

Communication Conta cts
2. "My contacts"
All co ntac ts are lis te d in alphabetic al orde r. Th e
A -Z search f uncti on i s of f ered, depending on the
number of contacts.
A symbol indicat es the storage location of the
contacts:
Symbol Storage locat ion
Ve hic le .
Mo bile phone .
Dial a phone number
1. Select the desired contact.
2. Select the phone number.
Th e connection is established.
Editing contacts
1. Select the desired contact.
2. "Edi t contact"
If a con tact t hat comes fr om th e mobi le phone i s
edited , t h e c h an ges a r e no t saved on t he mo bile
phone. A copy of the entr y is saved i n the v ehicle
and only t h e copy is displ a yed. Under certain
circumstances an identical cont act entry is created.
Selecting a contact as navigation
destination
1. Sel ect the desired contact .
2. Select address.
In the case of contacts from the mobile
phone, the address mi ght have to be
matched to the navigation data in the vehicle. In t h is case: cor rect t he address.
3. "Start guidance" or "A dd as another
de s tinatio n"
Checking address as destination
A n addr ess that is to be added to the r out e gui dance must match the navigation data contained
in the vehicle. Here, the address can b e
checked.
1. Select the desi red contact and highli ght the
addres s.
2. Call up "Options".
3. "Che ck as de s tina tion"
4. If necessa ry , corr ect a nd save the address.
If the address is corrected and saved, a co py i s
created in the vehicle. The a d dr ess is no t
changed on the mobi le phone.
3. Change entries.
4. Tilt the co ntrolle r to the left.
5. "Yes "
100
Online Edition for Part no. 01 40 2 912 836 - 07 12 510
Sele cting sort ord e r for name s
N ames can be displayed in a different order .
1. "My contacts"
2. Call up "Options".
3. "Dis pla y s urna me first" or "Dis play firs t
name first"
The sort order for n ames mi ght not be the same
as the sel ect ed sort order, depending on how
contacts are saved on your mobile phone.
Page 100

Exporting/importing contacts
Cont acts can be ex por t ed and imported v ia Personal Pr ofile, see Owner's H andbook for the vehicle .
Deleting contacts
On ly contacts saved in th e vehicle are deleted.
I t is not possi bl e to delete contacts from the mobile phone.
1. "M y contacts"
2. Highl ight the contact.
3. Call up "Optio ns ".
4. "Delete contact" or "Delete all conta cts"
Conta cts Communication
Online Edition for Part no. 01 40 2 912 836 - 07 12 510
101
 Loading...