

Page 1
Contents
Not final
Owner's Handbook
A-Z
The Ultimate Driving
Machine
NAVIGATION,
NAVIGATION,
ENTERTAINMENT,
ENTERTAINMENT,
COMMUNICATION.
COMMUNICATION.
OWNER'S HANDBOOK.
OWNER'S HANDBOOK.
Online Edition for Part no. 01 40 2 912 836 - 07 12 510
Page 2

Page 3

Navigation, Entertainment, Communication Owner's
Handbook
Congratulations on your choice of a BMW.
The more familiar you are with the systems of your BMW, the
more you can master their operation. We would therefore like to
offer you the following advice:
Please read the Owner's Handbook before setting out in your new
BMW. Also use the integrated Owner's Handbook in your vehicle.
It contains important notes on how to operate your Navigation,
Entertainment, Communications systems, enabling you to derive
maximum benefit from the technical advantages of these sys‐
tems.
Updates to the printed or integrated Owner's Handbook after go‐
ing to press are located as needed in the appendix to the printed
quick reference to the vehicle.
Supplementary information is provided in the other documents of
on-board literature.
We wish you a safe and enjoyable journey,
BMW AG
Online Edition for Part no. 01 40 2 912 836 - 07 12 510
Page 4

© 2012 Bayerische Motoren Werke
Aktiengesellschaft
Munich, Germany
Not to be reproduced, wholly or in part, without written
permission from BMW AG, Munich.
English VI/12, 07 12 510
Printed on environmentally friendly paper, bleached
without chlorine, suitable for recycling.
Online Edition for Part no. 01 40 2 912 836 - 07 12 510
Page 5

Contents
For quick access to a particular topic or item,
please consult the detailed alphabetical index,
see page 132.
Navigation
8 Navigation system
9 Destination input
18 Route guidance
21 Map view
24 Traffic information
27 Navigation data
28 What to do if...
Entertainment
32 Sound
35 Radio
41 CD/DVD
49 Music collection
56 External devices
64 Television, TV
68 Audio remote control in the rear
69 Rear entertainment
Communication
78 Telephone
88 Office
99 Contacts
102 ConnectedDrive
112 Extended BMW Online services
113 Rear telephone
Reference
132 From A to Z
Online Edition for Part no. 01 40 2 912 836 - 07 12 510
Page 6
Online Edition for Part no. 01 40 2 912 836 - 07 12 510
Page 7
Navigation
Various examples of how the navigation system
reliably guides you to your destination are shown
here.
Online Edition for Part no. 01 40 2 912 836 - 07 12 510
Page 8

Navigation Navigation system
Navigation system
Vehicle Equipment
This chapter describes all standard, national and
special equipment provided in the model series.
Therefore equipment not available in a vehicle is
also described, for example the selected special
equipment or national version. That also applies
to safety-relevant functions and systems.
General
The navigation system can determine the pre‐
cise position of the vehicle by means of satellites
and vehicle sensors and guide you reliably to any
specified destination.
Navigation data is saved in the vehicle and can
be updated.
Note
Inputs when the vehicle is stationary
Only enter data when the car is stationary,
and always obey the traffic regulations and road
signs in the event of any contradiction between
the traffic situation and the instructions given by
the navigation system. You could otherwise
commit an offence and put vehicle occupants
and other road users at risk.◀
Call up navigation system
1. Press the button on the controller.
2. "Navigation"
The navigation system can also be directly
called up with the button on the controller.
8
Online Edition for Part no. 01 40 2 912 836 - 07 12 510
Page 9
Destination input
Destination input Navigation
Vehicle Equipment
This chapter describes all standard, national and
special equipment provided in the model series.
Therefore equipment not available in a vehicle is
also described, for example the selected special
equipment or national version. That also applies
to safety-relevant functions and systems.
Manual destination input
General
When you are entering a town/city or street
name, the system supports you, for example,
with automatic name completion.
Saved town/city and street names can be called
up quickly.
▷ You can skip input of the country, town or
city if you wish to retain previous inputs.
▷ If only the town/city has been entered, route
guidance to the town/city centre is started.
▷ If part of an address is not entered or not
uniquely entered, a list with corresponding
selections is shown when the destination is
accepted. If cities or address are present
more than once, these are shown in split
screen.
For information on the split screen, see
Owner's Handbook for the vehicle.
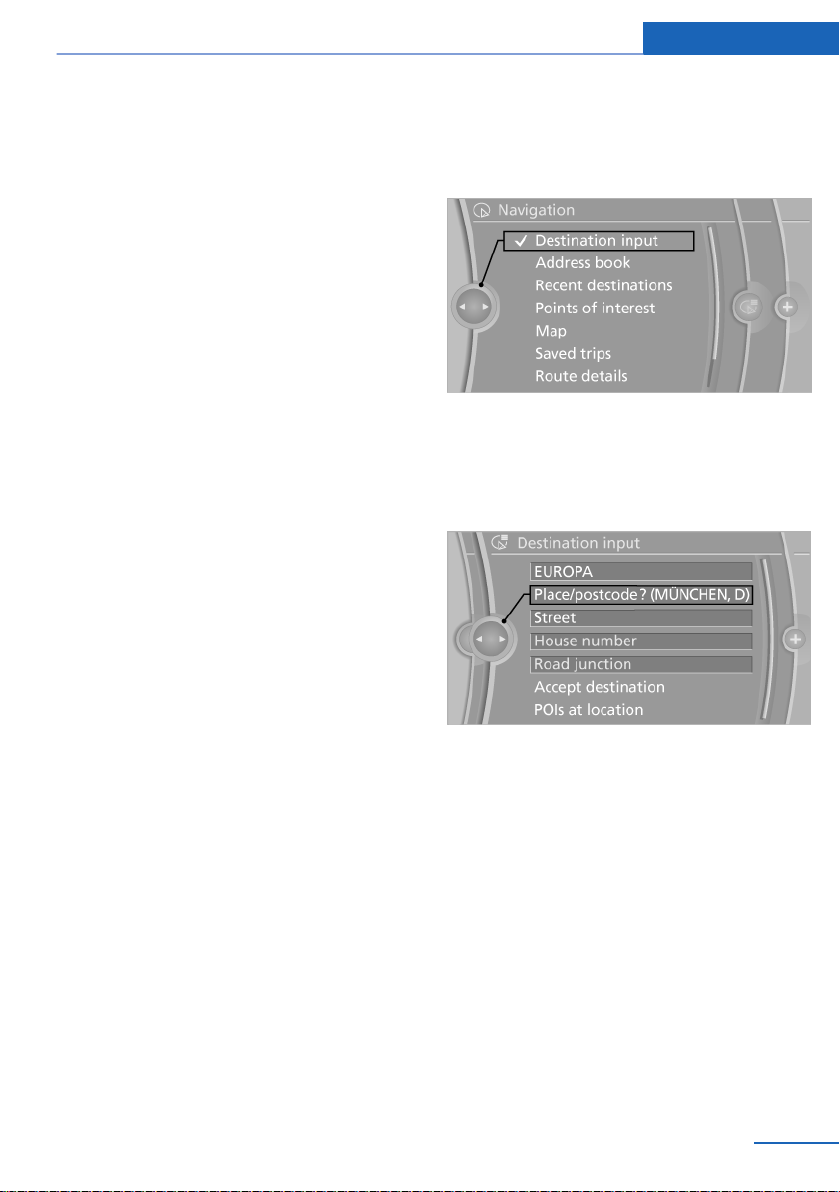
Country input
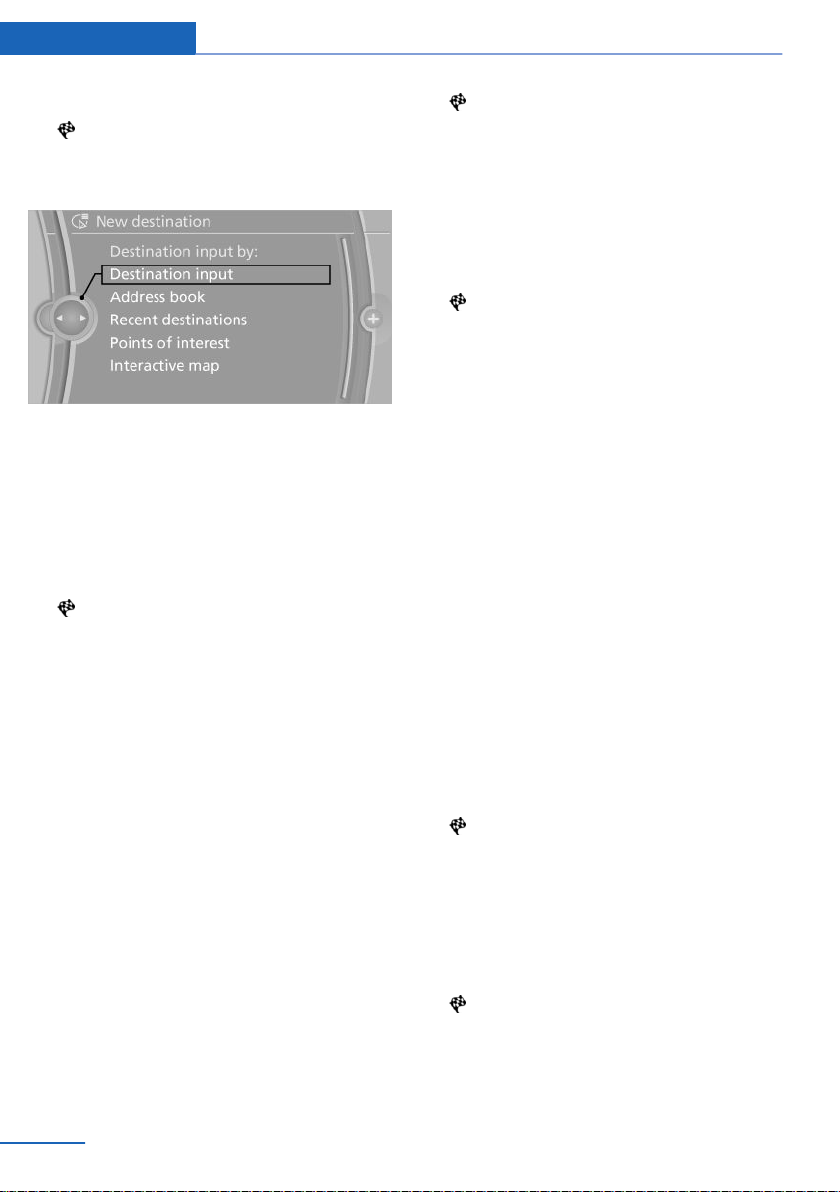
"Navigation"
1.
2. "Destination input"
3. Select "Country" or the country displayed.
Entering a town/city
Select "Place/postcode" or the town/city
1.
displayed.
2. Select letters, if applicable.
The list is gradually narrowed down with
each input.
3. Tilt the controller to the right.
4. Select the name of a town/city from the list.
If there are several places with the same name:
Move to the list of place names.
1.
2. Select the town/city.
Entering the postcode
Select "Place/postcode" or the town/city
1.
displayed.
2. Select digits.
Online Edition for Part no. 01 40 2 912 836 - 07 12 510
9
Page 10
Navigation Destination input
3. Move to the list of postcodes and towns/cit‐
ies.
4. Select an entry.
Entering a house number and street
1. Select "Street" or the displayed street.
2. Enter street in the same way as town/city.
3. "House number"
4. Select digits.
5. Move to the list of house numbers.
6. Select the house number or a range of house
numbers.
Alternative: entering a street and
junction
Select "Street" or the displayed street.
1.
2. Enter the street or junction in the same way
as the town/city.
If there are several streets with the same name:
Move to the list of street names.
1.
2. Select the street.
Searching by street
The desired road/street is not in the entered
town/city because it is part of another city dis‐
trict.
"Navigation"
1.
2. "Destination input"
3. Select "Street" or the displayed street.
4. Move to the list of street names.
5. "In" select country listed.
All the roads/streets of the selected country
are offered. The respective town or city is
shown after the street name.
6. Select the letters.
7. Move to the list of street names.
8. Select the street.
Starting route guidance
1. "Accept destination"
2. "Start guidance" or "Add as another
destination"
Enter, see page 16, destination as a fur‐
ther destination.
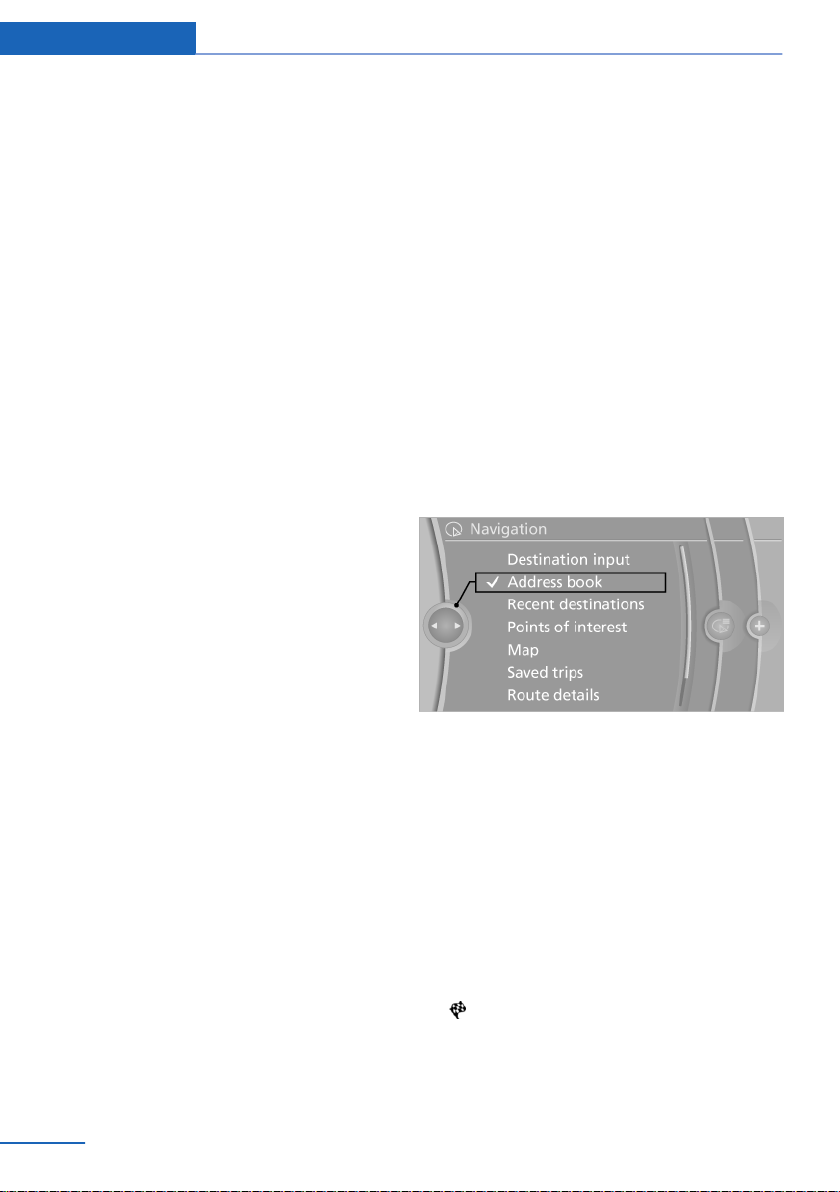
Address book
Selecting a destination from the
address book
"Navigation"
1.
2. "Address book"
Contacts with addresses are displayed if
these addresses for the contacts have been
checked as destinations.
3. Select a contact from the list or use "A-Z
search".
4. Where applicable, "Work address" or
"Home address"
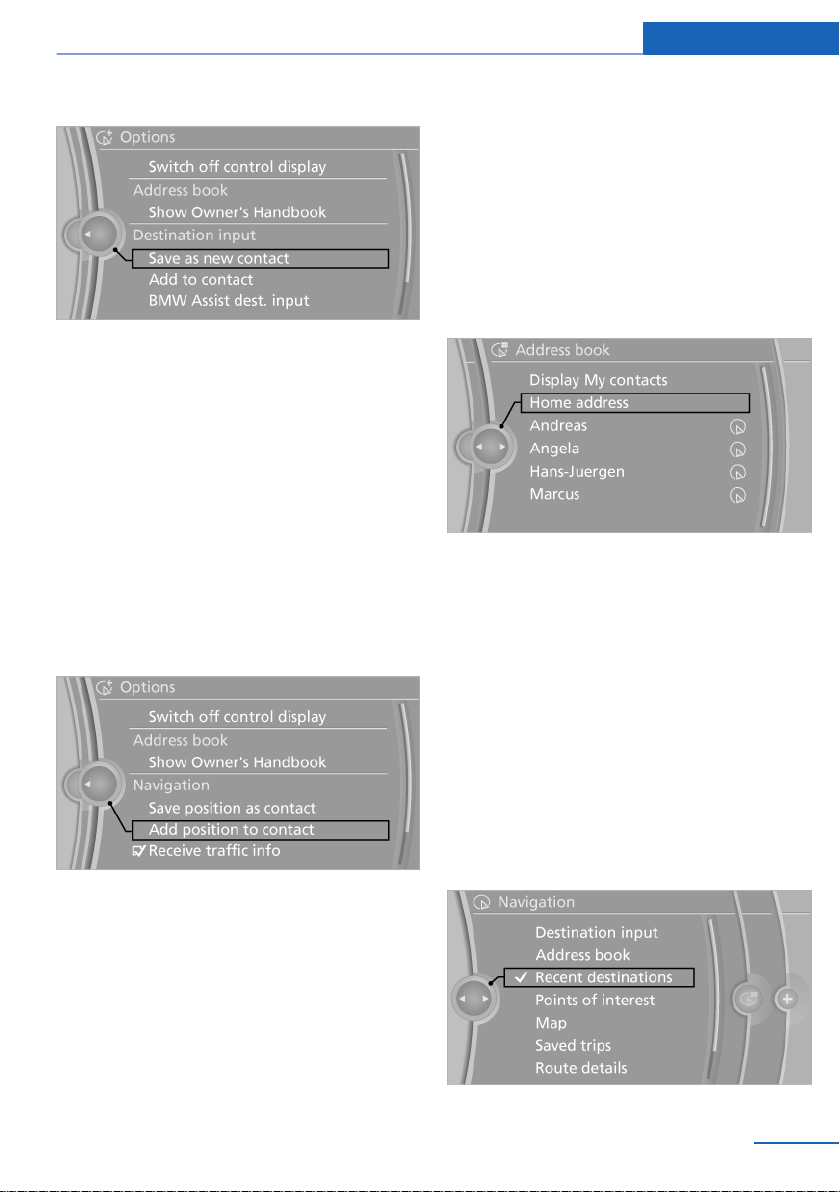
Saving a destination in the address
book
After destination input, save the destination in
the address book.
"Navigation"
1.
2. "Map"
3. "Guidance"
4. Call up "Options".
10
Online Edition for Part no. 01 40 2 912 836 - 07 12 510
Page 11
Destination input Navigation
5. "Save as new contact" or "Add to contact"
6. If applicable, select an existing contact.
7. "Work address" or "Home address"
8. Enter "Surname" and, if applicable, "First
name".
9. "Save contact in vehicle"
Saving position
The current position can be saved in the address
book.
"Navigation"
1.
2. Call up "Options".
3. "Save position as contact" or "Add position
to contact"
4. Call up "Options".
5. "Edit in Contacts" or "Delete entry"
Accepting your home address as a
destination
The home address must be created.
1. "Navigation"
2. "Address book"
3. "Home address"
4. "Start guidance"
Last destinations
General
The last destinations reached are saved auto‐
matically.
These destinations can be called up and incor‐
porated into route guidance.
4. Select an existing contract from the list, de‐
pending on the selection. Select type of ad‐
dress and enter surname and first names.
5. "Save in car"
Edit or delete the address
"Navigation"
1.
2. "Address book"
3. Mark entry.
Online Edition for Part no. 01 40 2 912 836 - 07 12 510
Calling up last destinations
"Navigation"
1.
2. "Recent destinations"
11
Page 12
Navigation Destination input
Starting route guidance
1. "Navigation"
2. "Recent destinations"
3. Select destination.
4. "Start guidance"
Editing a destination
1. "Navigation"
2. "Recent destinations"
3. Highlight destination.
4. Call up "Options".
5. "Edit destination"
Deleting the last destinations
"Navigation"
1.
2. "Recent destinations"
3. Highlight destination.
4. Call up "Options".
5. "Delete entry" or "Delete all recent dest."
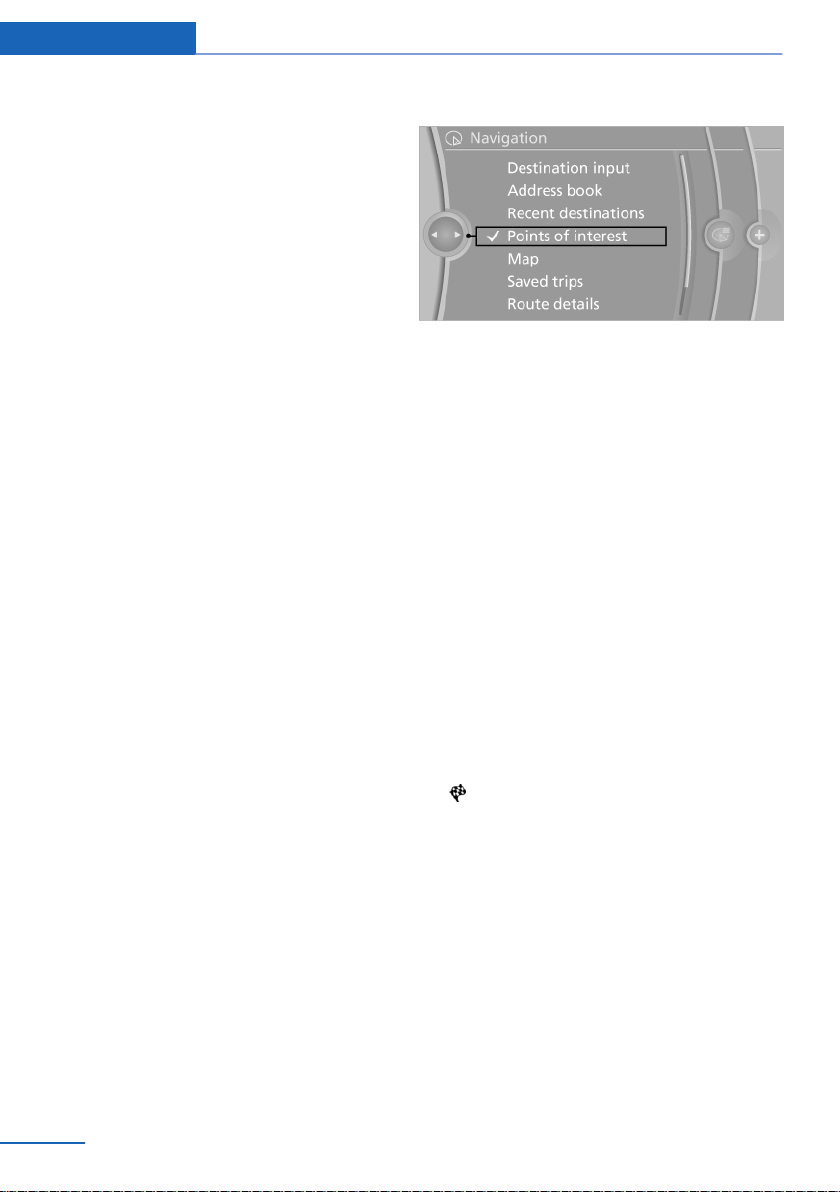
Points of interest
General
Even with the most up-to-date navigation data,
information on individual points of interest may
have changed, for example, service stations may
not be in operation.
Searching points of interest
Selection of points of interest, for example ho‐
tels or sights:
"Navigation"
1.
2. "Points of interest"
3. Select search.
Google™ local search
"Google™ Local Search"
1.
2. "Location"
Select or enter location.
3. "Search term"
4. Enter keyword.
Suggestions are displayed.
5. Select suggestion.
The list of points of interest is displayed.
6. Select a point of interest.
Details are displayed.
If several details are included, you can
browse through the tabs.
If a phone number is saved, a telephone con‐
nection can be established.
7. Select the symbol.
"Start guidance" or "Add as another
destination"
Enter destination as a further destination,
see page 16.
A-Z search
"A-Z search"
1.
2. "Location"
Select or enter location.
3. "Category"
4. Selecting a category.
5. "Category details"
12
Online Edition for Part no. 01 40 2 912 836 - 07 12 510
Page 13

Destination input Navigation
Several category details can be selected for
certain points of interest. Tilt the controller
to the left to exit the category details.
6. "Search term"
7. Enter keyword.
The list of points of interest is displayed.
8. Select a point of interest.
Details are displayed.
If several details are included, you can
browse through the tabs.
If a phone number is saved, a telephone
connection can be established.
Additional information can be shown for
many special destinations through BMW
Online.
Many special destinations can be saved
as a contact in the address book.
9. Select the symbol.
"Start guidance" or "Add as another
destination"
Enter destination as a further destination,
see page 16.
"Start search": without entering a search term,
the search is repeated using the last stored
search term.
Category search
"Category search"
1.
2. "Location"
Select or enter location.
3. "Category"
4. Selecting a category.
5. "Category details"
Several category details can be selected for
certain points of interest. Tilt the controller
to the left to exit the category details.
6. "Start search"
The list of points of interest is displayed.
7. Select a point of interest.
Details are displayed.
If several details are included, you can
browse through the tabs.
If a phone number is saved, a telephone
connection can be established.
Additional information can be shown for
many special destinations through BMW
Online.
Many special destinations can be saved
as a contact in the address book.
8. Select the symbol.
"Start guidance" or "Add as another
destination"
Enter destination as a further destination,
see page 16.
Displaying points of interest
List of points of interest: points of interest are
arranged according to distance and marked with
an arrow showing the direction.
In the split screen, points of interest in the se‐
lected category are displayed as symbols in the
map view. The display depends on the map
scale and the category.
Destination input via BMW Assist
"Navigation"
1.
2. "Destination input"
3. "BMW Assist dest. input"
A connection to the information service is es‐
tablished.
Displaying points of interest in the map
The categories of the points of interest can be
shown as symbols on the map.
Set categories:
"Navigation"
1.
2. "Map"
3. Call up "Options".
4. "Display points of interest"
5. Select the setting.
Online Edition for Part no. 01 40 2 912 836 - 07 12 510
13
Page 14
Navigation Destination input
▷ "All"
▷ "None"
▷ "Selected": up to five categories can be
preset.
The displays can be switched on and off in the
map view, see page 22.
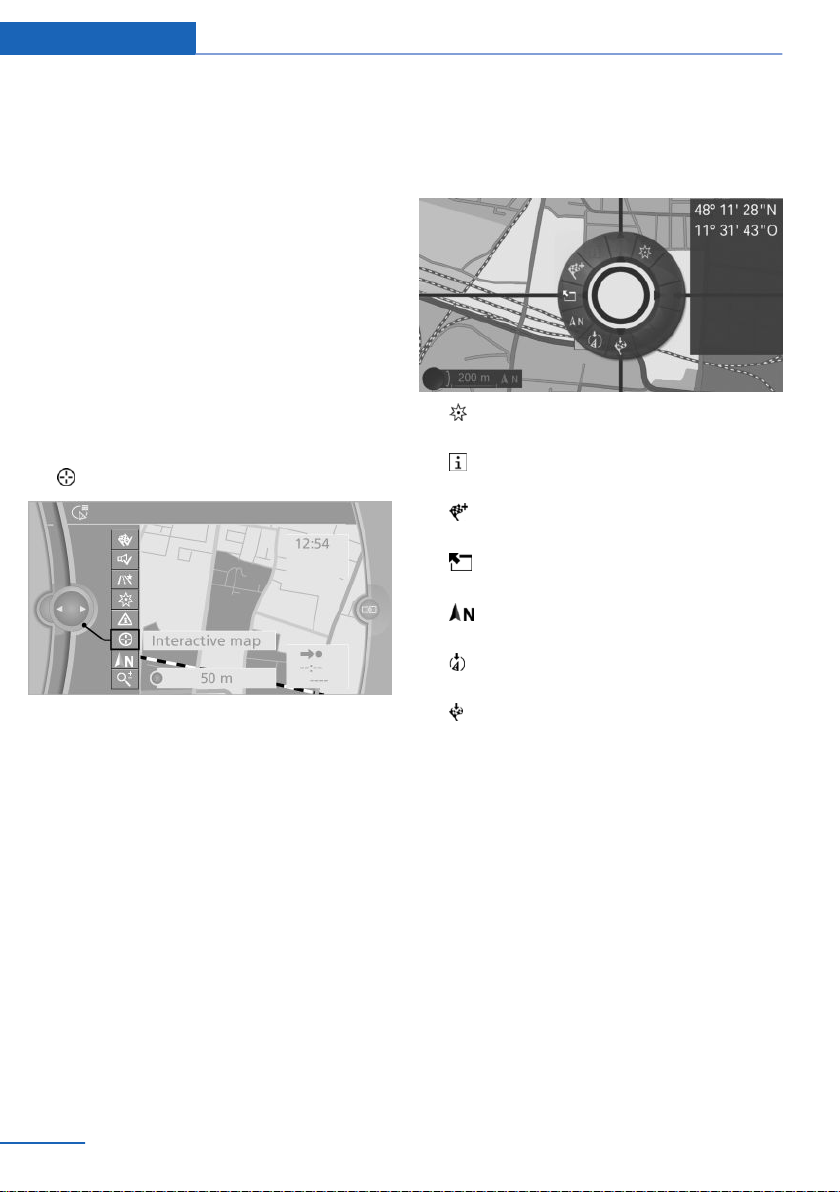
Destination input via map
Selecting a destination
1. "Navigation"
2. "Map"
The current position of the vehicle is shown
in the map.
3. "Interactive map"
4. Select the destination with the cross-hairs.
▷ To change the scale: turn the controller.
▷ To move the map: tilt the controller in the
corresponding direction.
▷ To move the map diagonally: tilt the con‐
troller in the corresponding direction
and turn it.
Specifying the street/road
If the system does not detect a street/road, one
of the following items of information is dis‐
played:
▷ A street name in the vicinity.
▷ The county.
▷ The co-ordinates of the destination.
Additional functions
Press the controller to access the following ad‐
ditional functions available in the interactive
map:
▷ "Points of interest in vicinity": search for
points of interest is started.
▷ "Show details": any details on the desti‐
nation can be shown.
▷ "Start guidance": route guidance is star‐
ted.
▷ "Exit interactive map": changes back to
the map view.
▷ "Change map view": changes to map
view pointing north.
▷ "Display current location": the map sec‐
tion around the current location is displayed.
▷ "Show destination": map section around
the destination is displayed.
Destination input by voice control
General
▷ For the handbook for the voice control sys‐
tem, see Owner's Handbook for the vehicle.
▷ A changeover between voice operation and
iDrive is possible when entering destina‐
tions using spoken commands.
▷ Have possible voice commands read
aloud: ›Voice commands‹
14
Online Edition for Part no. 01 40 2 912 836 - 07 12 510
Page 15

Destination input Navigation
Voice commands
▷ The location, street and house number can
be entered in a single command.
▷ Countries, locations, roads and junctions
can be spoken as whole words in the lan‐
guage of the system or spelled out.
Example: to enter a town/city within Ger‐
many as an entire word, the language of the
system must be German.
▷ Spell out the input if the language spoken
and the language of the system differ.
▷ Pronounce letters fluently and avoid exces‐
sive intonation and pauses.
▷ The options for input depend on the specific
navigation data, country and language set‐
tings.
Entering an address in a command
1. Press the button on the steering
wheel.
2. ›Destination input‹
3. Wait for the system prompt.
4. Say the address aloud in the sequence sug‐
gested.
5. Continue input as specified by the system.
If required, say each part of the address sepa‐
rately, for example town/city.
Entering name of town/city on its own
The place name can be spoken as a word or
spelled out.
When the destination input menu is displayed:
1. Press the button on the steering
wheel.
2. ›Place‹ or ›Spell name of place‹.
3. Wait for the system to ask for the town/city.
4. Say the name of the town/city or say at least
the first three letters.
Depending on the input, up to 20 towns/cit‐
ies are suggested.
5. Select the town/city.
▷ Selecting the suggested town/
city: ›Yes‹
▷ Selecting a different town/city: ›New
entry‹
▷ Select an entry, ›Entry ...‹, for example
entry 2
▷ Spell the input: ›Spell name of place‹
6. Continue input as specified by the system.
If there are several places with the same name:
Where applicable, places that sound the same
are shown in a list and displayed as a place fol‐
lowed by three dots.
Select the entry: ›Yes‹ or ›Entry ...‹ e.g. En‐
1.
try 2.
2. Select the desired location.
Entering street or junction on its own
Enter the street or junction in the same way as
the town/city.
Entering house number on its own
Depending on the data present in the navigation
system, house numbers up to 2000 can be en‐
tered.
›House number‹
1.
2. Say the house number.
3. Continue input as specified by the system.
Planning a trip
General
To plan a trip, more than one stopover can be
entered.
New trip
"Navigation"
1.
2. "Map"
Online Edition for Part no. 01 40 2 912 836 - 07 12 510
15
Page 16
Navigation Destination input
3. If necessary, tilt the controller to the left.
4. "Guidance"
5. "Enter new destination"
6. Select the mode of destination entry.
7. Enter an intermediate destination.
8. "Start guidance"
Entering a trip destination
For one trip, a maximum of 20 intermediate des‐
tinations can be entered.
"Map"
1.
2. "Guidance"
3. "Enter new destination"
4. Select the mode of destination entry.
5. Enter an intermediate destination.
6. "Add as another destination"
The intermediate destination is added to the
destinations list and is highlighted.
7. Turn the controller until the intermediate
stop appears at the desired location in the
list.
8. Press the controller.
Starting the trip
Highlight the first destination after entering
1.
all intermediate destinations.
If, for example, the second intermediate
destination is the one highlighted when you
start route guidance, the first intermediate
destination is skipped.
2. "Start guidance"
symbol indicates the active stage of the
trip.
Saving a trip
Up to 30 trips can be stored in the trip list. If
necessary, delete existing trips so that new trips
can be saved.
1. "Map"
2. "Guidance"
3. Call up "Options".
4. "Save in My trips"
5. Enter names.
6. "OK"
Selecting a trip saved in memory
"Navigation"
1.
2. "Saved trips"
Until the route category is opened, the num‐
ber of newly arrived routes is shown behind
the relevant category.
3. Select route category.
4. Select trip.
5. "Start guidance"
Reversing the trip direction
The intermediate destinations are shown in the
list in reverse order.
"Map"
1.
2. "Guidance"
3. Call up "Options".
4. "Reverse stage dest. order"
Options for the intermediate
destinations
"Map"
1.
2. "Guidance"
3. "Display all stage destin."
4. Select an intermediate destination.
▷ "Edit destination"
16
Online Edition for Part no. 01 40 2 912 836 - 07 12 510
Page 17

Destination input Navigation
▷ "Reposition stage dest.": move the in‐
termediate destination in the list.
▷ "Delete stage destination"
▷ "Skip stage destination"
Some options are not possible for some trips.
Deleting a trip saved in memory
1. "Saved trips"
2. Highlight the desired trip.
3. Call up "Options".
4. "Delete all trips" or "Delete trip"
Importing trips via a USB medium
Switch on ignition.
1.
2. Connect USB medium to the USB interface
in the centre armrest.
3. "Navigation"
4. "Saved trips"
5. "Import trips"
6. "USB"
7. "OK"
The maximum number of trips that can be saved
on the USB medium and in the navigation sys‐
tem together is 30, otherwise import is not pos‐
sible.
Importing trips via BMW Online
"Navigation"
1.
2. "Saved trips"
3. "Import trips"
4. "BMW Online"
BMW Routes
General
Recommended routes can be taken up in the
route guidance.
Start BMW route
1. "Navigation"
2. "Saved trips"
Until route categories are opened, the num‐
ber of newly arrived routes is shown behind
the relevant category.
3. "BMW Routes"
The routes available are shown with the
following information:
▷ Region
▷ Removal of the starting point of the
route
▷ Name of route
The time and distance are shown in the split
screen for the relevant route.
4. Select desired route.
5. "Start guidance"
6. "Start guidance"
Ending route guidance
"Navigation"
1.
2. "Map"
3. "Guidance"
4. "Stop guidance"
Call up last trip
"Navigation"
1.
2. "Saved trips"
3. "Last trip"
4. Select a staged destination.
5. "Start guidance"
Online Edition for Part no. 01 40 2 912 836 - 07 12 510
17
Page 18
Navigation Route guidance
Route guidance
Vehicle Equipment
This chapter describes all standard, national and
special equipment provided in the model series.
Therefore equipment not available in a vehicle is
also described, for example the selected special
equipment or national version. That also applies
to safety-relevant functions and systems.
Route guidance
Starting
"Navigation"
1.
2. Enter destination, see page 9.
3. "Accept destination"
4. "Start guidance"
▷ The route is displayed on the control display.
▷ The distance to the destination/intermedi‐
ate destination and the estimated time of ar‐
rival are shown in the map view.
▷ An arrow view is displayed in the instrument
cluster, and on the control display and in the
Head‐Up Display and as appropriate. Arrow
view, see page 19.
End
"Navigation"
1.
2. "Map"
3. "Guidance"
4. "Stop guidance"
Continue
If you did not reach your destination during the
last journey, route guidance may be continued.
"Continue guidance"
Route criteria
General
You can influence the route that is calculated by
selecting various criteria.
You can change the route criteria as often as you
like during destination input or during route
guidance.
Road types form part of the navigation data and
are taken into account in route planning, for ex‐
ample avoid motorways.
Route guidance with traffic information, see
page 25.
Notes
The suggested route can differ from your per‐
sonal experience.
The settings are saved for the remote control
currently in use.
For BMW Routes the route criteria cannot be
changed.
Change
"Navigation"
1.
2. "Map"
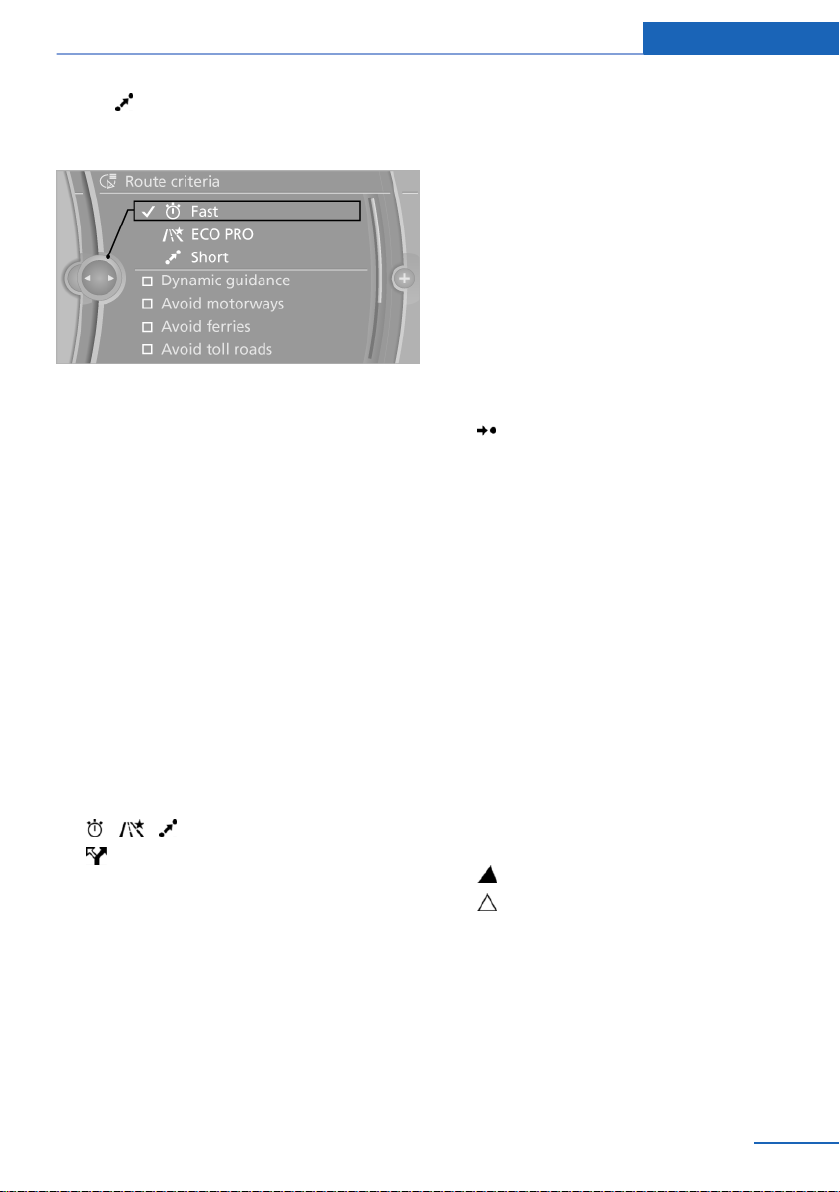
3. "Route criteria"
4. "Route criteria"
5. Select a criterion:
▷ "Fast": time-optimised route result‐
ing from a combination of a route as
short as feasible and fast roads.
▷ "ECO PRO": fuel-optimised route
resulting from a combination of a route
lowest possible fuel consumption and
fast roads.
18
Online Edition for Part no. 01 40 2 912 836 - 07 12 510
Page 19
Route guidance Navigation
▷ "Short": distance-optimised route
resulting from a combination of a route
as short as feasible and fast roads.
6. To select supplementary route criteria, if
necessary:
▷ "Dynamic guidance": traffic information
can automatically be taken into account,
see page 25, with route guidance.
▷ "Avoid motorways": motorways are
avoided as far as possible.
▷ "Avoid ferries": ferries are avoided as far
as possible.
▷ "Avoid toll roads": routes with tolls are
avoided as far as possible.
▷ "Avoid tax vignette roads": routes with
long-term tolls are avoided as far as pos‐
sible.
Alternative Routes
When route guidance is active, alternative
routes are suggested if possible.
"Route criteria"
1.
2. "Alternat. routes"
An overview of the current route and the
proposed alternative routes is shown. In ad‐
dition, details such a travel time and route
length and with alternative routes any data
on fuel consumption compared with the cur‐
rent route are shown. The routes are illus‐
trated in colour in the split screen.
3. Select to take an alternative route.
Course of route
Various views of the course of the route are
available during route guidance:
▷ Arrow display in the instrument cluster and
on the control display.
▷ List of routine sections.
▷ Map view, see page 21.
▷ Depending on equipment, arrow view in
Head-Up Display.
Arrow view
The following information is displayed during
route guidance:
▷ Symbol for active route guidance with
remaining travel time and distance to desti‐
nation.
▷ Small arrow: instruction, for example, to next
turn giving the distance and name of the new
road.
▷ Large arrow: current heading.
▷ Road name of the road you are currently
travelling along.
▷ Traffic information.
Depending on road guidance, the illustration
changes to junction view. Any lane information
is also shown here.
Show, see page 23, arrow view in split screen.
Driving lane information
In arrow view, a triangle indicates the recom‐
mended lane on a multilane carriageway.
▷ Optimum lane.
▷ Lane that is also possible. But a lane
change might soon be necessary.
Display list of routine sections
With active route planning, a list of the route
sections can be displayed. For each route stage,
the distance to be driven and the traffic infor‐
mation are displayed.
"Navigation"
1.
Online Edition for Part no. 01 40 2 912 836 - 07 12 510
19
Page 20

Navigation Route guidance
2. "Route details"
3. Mark route section.
The section of the route is also shown in the
split screen.
Bypassing a section of the route
Calculate a new route for a route stage.
1. "Navigation"
2. "Route details"
3. "New route for"
4. Turn the controller. Enter the distance
within which you want to return to the origi‐
nal route.
5. Press the controller.
Cancelling a bypass
In case you no longer wish to bypass this section
of the route:
"Navigation"
1.
2. "Route details"
3. "New route for:"
4. "Cancel closure"
Refuelling recommendation
The remaining range is calculated and, as nee‐
ded, service stations along the way are dis‐
played.
Even with the most up-to-date navigation data,
information on individual service stations may
have changed, for example, service stations may
not be in operation.
"Navigation"
1.
2. "Route details"
3. "Refuelling recommend."
A list of service stations is displayed.
4. Highlight the service station.
The position of the service station is shown
in the split-screen.
5. Select the service station.
6. Select the symbol.
7. "Start guidance": route guidance to the
service station you selected is started.
"Add as another destination": the service
station is added to the course of the route.
Voice instruction
Switching on/off
The setting is saved for the remote control cur‐
rently in use.
1. "Navigation"
2. "Map"
3. "Spoken instructions"
Repeat
"Navigation"
1.
2. "Map"
3. Highlight the symbol.
4. Press the controller twice.
Volume control
Turn the volume knob during the voice instruc‐
tions until the desired volume is obtained.
Store in favourites buttons
The function Enable/disable voice instructions
can be saved to a favourites button for quick ac‐
cess.
20
Online Edition for Part no. 01 40 2 912 836 - 07 12 510
Page 21
Map view
Map view Navigation
Vehicle Equipment
This chapter describes all standard, national and
special equipment provided in the model series.
Therefore equipment not available in a vehicle is
also described, for example the selected special
equipment or national version. That also applies
to safety-relevant functions and systems.
Displays
1. "Navigation"
2. "Map"
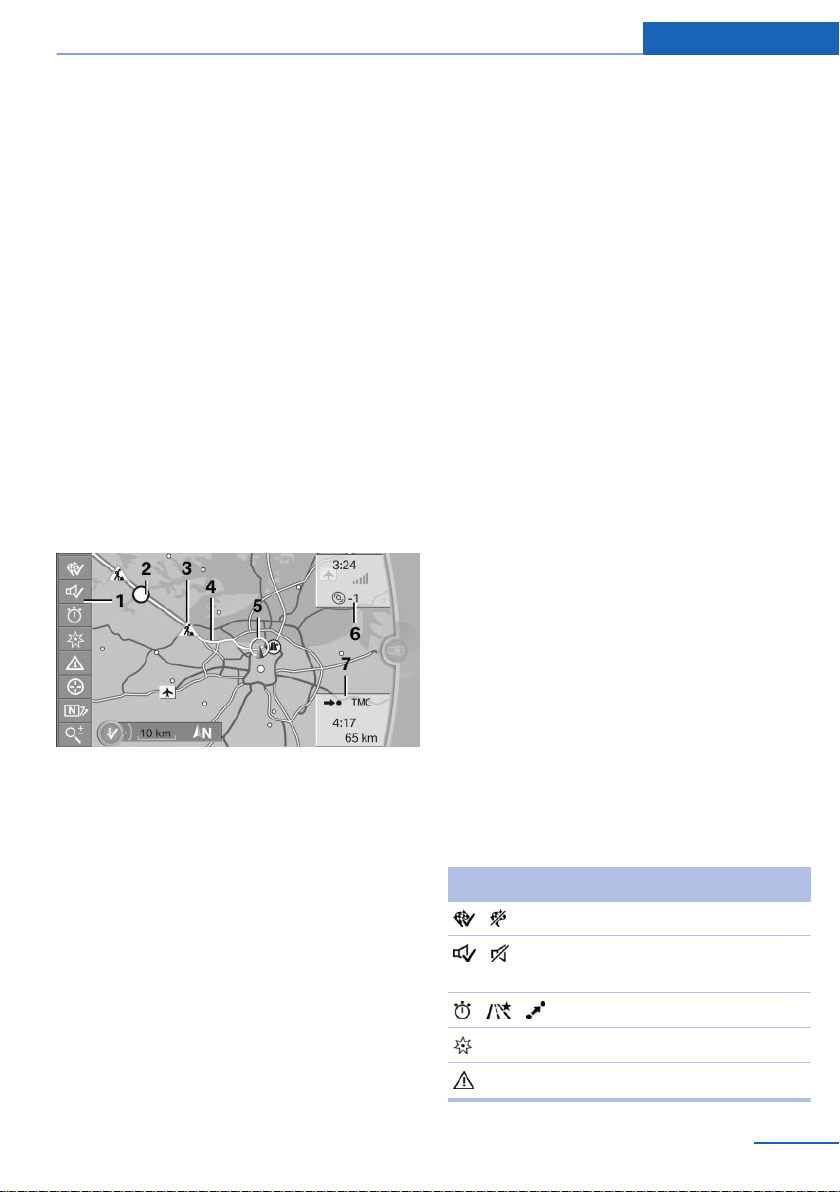
Overview
1 Function bar
2 Route stage with traffic obstruction
3 Road sign for traffic obstruction
4 Planned route
5 Location
6 Upper status field
7 Lower status field
Lines on the map
Roads and streets are displayed in various col‐
ours and lines in accordance with their classifi‐
cation. Dotted lines denote train and ferry con‐
nections. National borders are denoted by thin
lines.
Traffic obstructions
When receiving traffic information from a radio
station, traffic obstructions can be shown on the
map, see page 24.
Lines along the planned route denote route
stages with traffic obstructions, depending on
the map scale. The position of the lines on the
route show the direction of the obstruction.
Road signs classify the obstructions.
▷ Red road sign: the obstruction affects the
planned route or direction of travel.
▷ Grey road sign: the obstruction does not af‐
fect the planned route or direction of travel.
Planned route
After starting route guidance, the planned route
is shown on the map.
Status fields
Display/hide: press the controller.
▷ Upper status field: time, telephone and en‐
tertainment details.
▷ Lower status field: symbol for active route
guidance, status of traffic information, arrival
time and distance to destination.
Function bar
The following functions are available using the
function bar:
Symbol Function
Route guidance active/inactive.
Voice instructions active/inac‐
tive.
Change route criteria.
Search for point of interest.
Traffic information functions.
Online Edition for Part no. 01 40 2 912 836 - 07 12 510
21
Page 22

Navigation Map view
Symbol Function
Proposed diversions are avail‐
able.
Interactive map.
Set map view.
To switch to the toolbar, tilt the controller to the
left.
Changes the scale.
Map section
Change
"Interactive map"
▷ To move the map: tilt the controller in the
corresponding direction.
▷ To move the map diagonally: tilt the control‐
ler in the corresponding direction and turn it.
Settings
The settings are saved for the remote control
currently in use.
"Navigation"
1.
2. "Map"
3. "Map views"
Set map view.
▷ "North-oriented"
▷ "In direct. of travel"
▷ "Perspective"
▷ "Traffic info map": information on traffic
flow is shown in a special map view. The
symbols of the other additional information
set are also shown.
▷ "Additional info"
▷ "Points of interest": symbols for
points of interest are shown. Set display,
see page 13.
▷ "Traffic events": symbols for traffic
information, see page 24, are shown.
▷ "Traffic flow": depending on the
scale, the length, direction and effect, a
traffic obstruction are indicated by road
signs in the map or coloured lines along
the calculated route. Information on traf‐
fic flow in the map view, see page 25.
▷ "Weather": weather symbols are
shown on the map.
Displayed symbols: clear skies, overcast
skies, rain, thunderstorms and snow,
with the current temperature in each
case.
The weather information is automati‐
cally updated.
The symbols are displayed in specific
selected scales.
▷ "Satellite images": depending on
availability and resolution, satellite im‐
ages are shown as the background in
several scales.
▷ 3D "Perspec. view in 3D": distinctive lo‐
cations in the navigation data are shown
on the map in 3D.
▷ "Map mode": according to lighting con‐
ditions, select and make settings.
▷ "Day"
▷ "Night"
▷ "Automatic"
▷ "Status info": fade in/out status fields.
Status fields, see page 21.
Scale
Change
Select the symbol.
1.
2. To change the scale: turn the controller.
22
Online Edition for Part no. 01 40 2 912 836 - 07 12 510
Page 23

Map view Navigation
Automatically set scale
"Autoscale": in the north-pointing map view,
the route between location and destination is
shown. This view is also selected when the scale
is set so wide that the following is shown:
"AUTO".
Map view for split-screen
Regardless of the main screen, the map view can
be selected for the split-screen.
1. Call up "Options".
2. "Split screen"
3. Tilt the controller repeatedly to the right until
the split screen is selected.
4. Press the controller.
5. Select map view.
▷ "Arrow view"
▷ "Map north-oriented"
▷ "Map in direction of travel"
▷ "Map perspective"
▷ "Position"
▷ "Guiding Plus": selected sections of
route, for example motorway intersec‐
tions, are shown in perspective.
▷ "Traffic information map": map is opti‐
mised to the display of traffic informa‐
tion.
6. To change the scale: switch to split screen
and turn controller.
4. "Pictures at destination"
5. Depending on the offering, various photos
can be selected.
Images to the destination
Displays
Photos can be displayed for certain destinations
when route guidance is active.
"Navigation"
1.
2. "Map"
3. "Guidance"
Online Edition for Part no. 01 40 2 912 836 - 07 12 510
23
Page 24

Navigation Traffic information
Traffic information
Vehicle Equipment
This chapter describes all standard, national and
special equipment provided in the model series.
Therefore equipment not available in a vehicle is
also described, for example the selected special
equipment or national version. That also applies
to safety-relevant functions and systems.
General
Traffic information from radio stations sending
a traffic warning service on the Traffic Message
Channel, TMC, is shown in the map view and
considered when calculating route. Information
on traffic obstructions and dangers is continu‐
ously updated.
Traffic information is displayed on the map by
symbols.
Traffic information for the vicinity is stored in a
list.
Display
The symbol in the function bar of the map
view turns yellow, if the traffic information con‐
cerns the calculated route and the expected de‐
lay is less than 20 minutes. The symbol turns red
if the expected delay is more than 20 minutes or
the route is blocked or there is a danger mes‐
sage for the route.
The symbol shows that there are suitable di‐
versions from the traffic information.
Real-Time Traffic Information, RTTI
In some countries additional bookable services
send real-time traffic information, RTTI, which is
then used and shown instead of traffic informa‐
tion from the radio station.
The location of traffic obstructions is specified
more comprehensively and precisely with realtime traffic information. In addition, the traffic
situation off the motorways, for example, on side
streets and urban roads, is extensively recorded
and shown. Diversion recommendations can be
calculated more precisely on the basis of this
information. This lowers the risk of coming
across another traffic obstruction on diversions.
Several recommended diversions or further in‐
formation may be provided.
When driving in countries in which real-time traf‐
fic information is available, the traffic information
continues to use radio stations.
It is shown in the lower status field, see
page 21, in map view whether TMC or RTTI in‐
formation is used.
Reception
Switching on/off
"Navigation"
1.
2. Call up "Options".
3. "Receive traffic info"
Traffic information list
Displays
"Navigation"
1.
2. "Map"
3. "Traffic information"
4. "Traffic reports"
With active route guidance traffic informa‐
tion affecting the computed route is first
shown with red symbols. Then the traffic in‐
formation not affecting the route with grey
symbols. The various items of traffic infor‐
mation are sorted by distance from the ve‐
hicle's current position.
5. Select the item of traffic information.
24
Online Edition for Part no. 01 40 2 912 836 - 07 12 510
Page 25
Traffic information Navigation
"More information": displays further in‐
formation.
6. If applicable, browse to the next or
the preceding item of traffic information.
Recommended diversions
Displays
1. "Navigation"
2. "Map"
3. "Diversion": a list of recommended di‐
versions is shown.
Traffic information in the map
Traffic overview
With the function switched on, the map view
changes to grey scale, set to point north and
changes the scale as needed. The symbols for
additional information are greyed out. This op‐
timises the traffic information display. Day/night
mode is not taken into consideration for this set‐
ting.
Information on traffic flow in the map
view
Depending on the scale, the length, direction
and effect of a traffic obstruction are indicated
by road signs in the map or coloured lines along
the calculated route.
▷ Black: obstruction.
▷ Red: traffic jam.
▷ Orange: queuing traffic.
▷ Yellow: heavy traffic.
▷ Green: free-flowing traffic.
▷ Grey: general traffic information, for exam‐
ple roadworks.
The information displayed depend on the spe‐
cific traffic information service.
Traffic information with route guidance
Principle
If there is information on traffic obstructions, the
system calculates the possible proposed diver‐
sions.
Show traffic overview
"Navigation"
1.
2. "Map"
3. "Traffic information"
4. "Traffic info map"
Leave traffic overview
Tilt the controller to the left. The original map
view is shown.
Symbols in the map view
Depending on the scale of the map and location
of the traffic obstruction in relation to the route,
the symbols for traffic obstructions are dis‐
played.
Online Edition for Part no. 01 40 2 912 836 - 07 12 510
General
Two types of route guidance are possible.
▷ Partially dynamic route guidance: diversion
suggestions from the navigation system
may be taken.
▷ Dynamic route guidance: diversion sugges‐
tions are automatically recorded in the route
guidance.
Partially dynamic route guidance
Partially dynamic route guidance is active when
traffic information reception is switched on.
The systems takes into account the existing
traffic information during the route guidance. A
message is displayed depending on the route,
the traffic information and the possible diversion
25
Page 26

Navigation Traffic information
routes. If there is a traffic obstruction, a diversion
is offered if possible.
For particular dangers, for example objects on
the road, a message is displayed with no diver‐
sion option.
The upper part of the message shows:
▷ Symbol of the first traffic disruption, or with
distance to the start of the traffic disruption.
▷ Distance to the start of the diversion.
The lower part of the message shows:
▷ Remaining route to be driven and arrival time
on the original route, with white symbol.
▷ Difference in route length and gain in time of
the diversion compared with the original
route, with coloured symbol.
The following is shown in the split screen:
▷ Original route, white.
▷ Diversion, coloured.
Accepting a diversion
In the message:
"Diversion"
Via the toolbar:
"Navigation"
1.
2. "Map"
3. "Traffic information"
4. "Diversion"
5. Open desired diversion.
6. "Diversion"
also possible that the route is calculated so
that it cuts across the traffic congestion.
▷ Particular dangers are displayed independ‐
ently of the setting.
Activating dynamic route guidance
1. "Navigation"
2. "Map"
3. "Route criteria"
4. "Route criteria"
5. "Dynamic guidance"
Country-specific information via BMW Online
Specific information on countries can be trans‐
ferred via BMW Online, for example speed limits
on B roads.
"Navigation"
1.
2. Call up "Options".
3. "Country info (BMW Online)"
Dynamic route guidance
The route is automatically changed if a traffic
obstruction is encountered.
▷ The system does not indicate traffic ob‐
structions on the original route.
▷ Traffic information is still displayed on the
map.
▷ Depending on the type of road and the na‐
ture and length of the traffic congestion, it is
26
Online Edition for Part no. 01 40 2 912 836 - 07 12 510
Page 27

Navigation data
Navigation data Navigation
Vehicle Equipment
This chapter describes all standard, national and
special equipment provided in the model series.
Therefore equipment not available in a vehicle is
also described, for example the selected special
equipment or national version. That also applies
to safety-relevant functions and systems.
Information on navigation data
1. "Navigation"
2. Call up "Options".
3. "Navigation system version" Information re‐
garding the version of the data is displayed.
Updating
General
Navigation data is saved in the vehicle and can
be updated using USB medium.
You can obtain up-to-date navigation data and
the activation code from your Service centre.
Updating
1. Connect USB medium with the new naviga‐
tion data to the USB interface in the centre
armrest.
2. Follow the instructions on the control dis‐
play.
3. Enter activation code for the navigation data.
The navigation data are updated. After an
interruption in the trip, follow the instruc‐
tions on the control display.
4. After updating, remove the media with nav‐
igation data.
Checking status
1. Press the button.
2. "Navigation update"
Notes
Depending on the volume of data, updating the
data can take several hours.
Update while the vehicle is in motion, to save the
battery.
Only the basic functions of the navigation sys‐
tem are available while an update is in progress.
You can check the status of the update process.
Online Edition for Part no. 01 40 2 912 836 - 07 12 510
27
Page 28

Navigation What to do if...
What to do if...
Vehicle Equipment
This chapter describes all standard, national and
special equipment provided in the model series.
Therefore equipment not available in a vehicle is
also described, for example the selected special
equipment or national version. That also applies
to safety-relevant functions and systems.
What to do if...
▷ The current position cannot be displayed.
The car is in an area not covered by the data,
is in a poor reception area or the system is
currently calculating the position. Reception
will normally be possible outdoors.
▷ A destination without a street is not trans‐
ferred to the route guidance system.
No city centre can be determined for the
place entered.
Enter any street in the place selected and
start route guidance.
▷ A destination is not transferred to the route
guidance system.
The data for the destination is not available
in the navigation data. Choose a destination
as close as possible to the original one.
▷ Letters cannot be selected for destination
input.
The data stored do not contain the destina‐
tion data.
Choose a destination as close as possible to
the original one.
▷ Map view shown in grey scales?
"Traffic info map" Active: indications on the
Control Display are toggled to grey-scale.
This facilitates optimum traffic information
display. Deactivate traffic information map,
see page 25.
▷ Spoken instructions cease to be given im‐
mediately before junctions during route
guidance?
Area is not fully recorded, or you have devi‐
ated from the suggested route and the sys‐
tem requires a few seconds to calculate a
new route.
28
Online Edition for Part no. 01 40 2 912 836 - 07 12 510
Page 29

What to do if... Navigation
Online Edition for Part no. 01 40 2 912 836 - 07 12 510
29
Page 30

Online Edition for Part no. 01 40 2 912 836 - 07 12 510
Page 31

Entertainment
This chapter ensures your enjoyment when
receiving radio and television stations or when
playing CDs, DVDs and tracks from the music
collection.
Online Edition for Part no. 01 40 2 912 836 - 07 12 510
Page 32

Entertainment Sound
Sound
Vehicle Equipment
This chapter describes all standard, national and
special equipment provided in the model series.
Therefore equipment not available in a vehicle is
also described, for example the selected special
equipment or national version. That also applies
to safety-relevant functions and systems.
General
The sound settings are saved for the remote
control currently in use.
Sound settings
Call up
"Multimedia", "Radio" or "Settings"
1.
2. "Sound"
Resetting
"Sound"
1.
2. "Reset"
Adjusting
1. "Multimedia", "Radio" or "Settings"
2. "Sound"
3. Select the desired sound setting.
4. Adjusting: turn the controller.
5. Saving: press the controller.
Treble, bass, balance, fader
General
▷ "Treble": treble adjustment.
▷ "Bass": bass adjustment.
▷ "Balance": left/right volume distribution.
▷ "Fader": front/rear volume distribution.
32
Online Edition for Part no. 01 40 2 912 836 - 07 12 510
Equaliser
Setting for individual sound frequency ranges.
Adjusting
"Multimedia", "Radio" or "Settings"
1.
2. "Sound"
3. "Equaliser"
Page 33

Sound Entertainment
4. Select the desired setting.
5. Adjusting: turn the controller.
6. Saving: press the controller.
Multichannel reproduction, surround
General
Choice of stereo and multichannel reproduc‐
tion, surround.
Adjusting
"Multimedia", "Radio" or "Settings"
1.
2. "Sound"
3. "Surround" or"L7 surround"
When surround is activated, multichannel re‐
production is simulated when playing an audio
track in stereo.
LOGIC7 and the LOGIC7 logo are registered
trademarks of Lexicon, Inc., a company of the
Harman International Group.
Bang & Olufsen High End Surround Sound System
The settings for loudspeaker illumination are
saved for the remote control currently in use.
3. "Bang & Olufsen"
4. Select the desired sound setting.
▷ "Studio": studio sound.
▷ "Expanded": open room sound.
Center speaker
An additional speaker is provided in the centre
of the instrument panel. This automatically ex‐
tends when Entertainment is switched on and is
illuminated according to the illumination setting.
With Entertainment switched off or mute
switching, the speaker contracts again.
Volume
General
▷ "Speed volume": adaptation of the volume
depending on speed.
▷ With Bang & Olufsen High End Surround
Sound System: automatic adjustment of the
volume depending on drive noises audible in
the interior, for example wind noise, no extra
setting needed through Speed Volume.
▷ "PDC": volume of the PDC sound signal rel‐
ative to the sound output from the enter‐
tainment system.
▷ "Gong": volume of the sound signal, for ex‐
ample for seat belt reminder, in relation to
the sound output from the entertainment
system.
▷ "Microphone": microphone volume during a
telephone call.
▷ "Loudspeak.": loudspeaker volume during a
telephone call.
The following volumes are stored only for the
respective connected telephone:
"Microphone", "Loudspeak.".
Setting the sound
"Multimedia", "Radio" or "Settings"
1.
2. "Sound"
Online Edition for Part no. 01 40 2 912 836 - 07 12 510
Adjusting
"Multimedia", "Radio" or "Settings"
1.
2. "Sound"
33
Page 34

Entertainment Sound
3. "Volume settings"
4. Select the desired volume setting.
5. Adjusting: turn the controller.
6. Saving: press the controller.
34
Online Edition for Part no. 01 40 2 912 836 - 07 12 510
Page 35

Radio
Radio Entertainment
Vehicle Equipment
This chapter describes all standard, national and
special equipment provided in the model series.
Therefore equipment not available in a vehicle is
also described, for example the selected special
equipment or national version. That also applies
to safety-relevant functions and systems.
Control functions
Press the button Function
Press: switch sound output
on/off.
Turn: set volume.
Switches entertainment
sources.
Change station/track
Favourites buttons
Traffic information on/off
Sound output
Switching on/off
With the ignition switched off:
press button.
Muting
With the ignition switched on, or
engine running: press button.
AM/FM stations
Selecting station
"Radio"
1.
2. "FM" or "AM"
The station last played is played and shown.
Change waveband
Eject CD/DVD
Online Edition for Part no. 01 40 2 912 836 - 07 12 510
35
Page 36

Entertainment Radio
3. "FM stations", "AM stations" or
"Saved stations".
4. Select the desired station.
The selected station is saved for the remote
control currently in use.
Changing stations
Select symbol or .
Using buttons on the radio:
Press the button.
4. Highlight the desired station.
5. Press and hold down the controller.
6. Mark desired storage place and press con‐
troller.
The stations are saved for the remote control
currently in use.
The stations can also be saved on the favourites
buttons.
With navigation system: The station can also be
stored on the favourite buttons.
Manual station selection
Station selection via frequency.
"Radio"
1.
2. "FM" or "AM"
3. "FM stations" or "AM stations"
4. "Manual search"
5. Select another band as necessary.
6. To select the frequency: turn the controller.
Saving stations
"Radio"
1.
2. "FM" or "AM"
3. "FM stations" or "AM stations"
36
Online Edition for Part no. 01 40 2 912 836 - 07 12 510
Save frequency: hold down controller.
Page 37

Radio Entertainment
Rename station
A station with changing station names can be
renamed.
1. "Radio"
2. "FM"
3. Select the desired station.
4. Call up "Options".
5. "Rename as:"
Wait until the desired name is displayed.
The selected station name is in the list of current
stations and the stored station is selected.
Displaying additional information
If a radio station broadcasts a radio text or radio
text plus, this information can be shown, for ex‐
ample, title or performer of a piece of music.
Availability, content and sequence depend on
the radio station.
"Radio"
1.
2. "FM"
3. "FM stations"
4. Select station.
5. Call up "Options".
6. "Station information"
RDS
Principle
RDS broadcasts additional information in the
FM waveband, for example the station name.
For a station with a number of frequencies, an
automatic changeover to the frequency with the
best reception quality takes place if required.
4. Call up "Options".
5. "RDS"
The setting is saved for the remote control cur‐
rently in use.
Digital radio DAB, DAB/DMB
Principle
Digital stations are bundled into what are known
as bouquets. Some stations feature additional
programmes. Sports stations, for example, may
broadcast various sports events at the same
time.
Depending on what the station provides, addi‐
tional information or even images transmitted by
the station can be shown.
Selecting station
"Radio"
1.
2. "DAB/DMB"
3. "DAB/DMB stations"
Switching on/off
It is recommended that you switch on RDS.
"Radio"
1.
2. "FM"
3. "FM stations"
Online Edition for Part no. 01 40 2 912 836 - 07 12 510
37
Page 38

Entertainment Radio
4. Select the top entry in the list: "All
ensembles" or everything shown.
5. Select the desired station.
Some information on the station playing and
schedule is shown. The type of information de‐
pends on what the station is sending.
Changing stations
Select symbol or .
Or
Press the button.
Changing the ensemble
It is only possible to change the ensemble if the
following has been selected: "All ensembles".
Press and hold down the button.
4. Select the desired station.
5. Press the controller again.
6. Select the desired memory location.
The stations are saved for the remote control
currently in use.
The stations can also be saved on the favourites
buttons or radio station buttons.
Additional information
If a radio station broadcasts a radio text or radio
text plus, this information can be shown, for ex‐
ample, title or performer of a piece of music or
the telephone number or e-mail address of the
radio station. Availability, content and sequence
depend on the radio station.
"Radio"
1.
2. "DAB/DMB"
3. "DAB/DMB stations"
4. Select the desired station.
5. Call up "Options".
6. "Station information"
Saving stations
"Radio"
1.
2. "DAB/DMB"
3. "DAB/DMB stations"
38
Online Edition for Part no. 01 40 2 912 836 - 07 12 510
Page 39

Radio Entertainment
Automatic station following
General
With station following activated, the radio auto‐
matically switches to a new station when the
previous one can no longer be received.
First of all, a search is run for the station in an‐
other ensemble. If it is not available in another
ensemble, the station's analogue frequency is
searched for.
Automatic changeover is only possible if the
corresponding station's signal is available in ad‐
equate quality and the IDs of the stations match.
Enabling automatic station following
"Radio"
1.
2. "DAB/DMB"
3. Call up "Options".
4. "Station switching"
Symbol Meaning
for example, may broadcast various sports
events at the same time.
1. "Radio"
2. "DAB/DMB"
3. "DAB/DMB stations"
4. Select the desired station.
5. Press the controller.
6. Select the additional station.
Electronic Programme Guide
Several stations broadcast their programme
guide electronically.
"Radio"
1.
2. "DAB/DMB"
3. "Programme"
The radio schedule for the programme on now
and next is shown.
Enlarge image
If a radio station transmits images, these are
shown. The image display can be shown en‐
larged.
"Radio"
1.
2. "DAB/DMB"
3. "Enlarge image"
Reduce image again: tip controller to the left.
A digital station is reproduced in an‐
alogue.
A digital station is reproduced digi‐
tally in another group.
The setting is saved for the remote control cur‐
rently in use.
Additional programmes
Symbol indicates that a selected station con‐
tains additional programmes. Sports stations,
Online Edition for Part no. 01 40 2 912 836 - 07 12 510
Saved stations
General
Forty stations can be saved.
Calling up a station
"Radio"
1.
2. "Saved stations"
3. Select the desired station.
39
Page 40

Entertainment Radio
Saving stations
The currently selected station is saved.
1. "Radio"
2. "Saved stations"
3. "Save station"
4. Select the desired memory location.
The list of saved stations is saved for the remote
control currently in use.
The stations can also be saved on the favourites
buttons.
Without navigation system and
telephone: store station on radio
station buttons
Select the desired station.
1.
2.
To call up a stored station, briefly pressure the
corresponding button.
Press the desired button for longer
than two seconds.
Traffic reports
Display in the status field
▷ TP white: traffic radio switched on, traffic
radio station available.
▷ TP grey: traffic radio switched on, no traffic
radio station available.
▷ No display: Traffic Program is switched off.
Switching on/off
Press the button.
The traffic report station with the stron‐
gest reception is chosen.
The setting is saved for the remote control cur‐
rently in use.
Interrupting
Press one of the following buttons during a traf‐
fic radio report:
▷
▷
Adjusting the volume
Turn the knob during a traffic re‐
port until the desired volume is
obtained.
Deleting a station
"Radio"
1.
2. "Saved stations"
3. Select the desired station.
4. Call up "Options".
5. "Delete entry"
40
Online Edition for Part no. 01 40 2 912 836 - 07 12 510
Page 41

CD/DVD
CD/DVD Entertainment
Vehicle Equipment
This chapter describes all standard, national and
special equipment provided in the model series.
Therefore equipment not available in a vehicle is
also described, for example the selected special
equipment or national version. That also applies
to safety-relevant functions and systems.
Control functions
Press the button Function
Press: switch sound output
on/off.
Turn: set volume.
Switches entertainment
sources.
Change station/track
Favourites buttons
Traffic information on/off
Change waveband
Eject CD/DVD
Sound output
Switching on/off
With the ignition switched off:
press button.
Muting
With the ignition switched on, or
engine running: press button.
Playback
Inserting a CD/ DVD
Insert the CD/DVD with the label side upper‐
most.
The disk begins to play automatically.
It may take a few minutes to read compressed
audio files.
Starting play
A CD/DVD is in the CD/DVD player or the DVD
changer.
"Multimedia"
1.
2. "CD/DVD"
Online Edition for Part no. 01 40 2 912 836 - 07 12 510
41
Page 42

Entertainment CD/DVD
3. Select the desired CD or DVD.
Symbol Meaning
CD/DVD player
... DVD changer
CD/DVD player in the rear
Formats that can be played
▷ DVD-ROM, DVD-R, DVD+R, DVD-RW, DVD
+RW, DVD-R DL, DVD+R DL, DVD-Audio,
DVD-Video.
▷ CD: CD-ROM, CD-R, CD-RW, CD-DA.
▷ Compressed audio files: mp3, wma, aac,
m4a, m4b, ogg.
Selecting a track using iDrive
Audio CDs
Select the desired track to start playback.
CDs/DVDs with compressed audio files
Depending on the data, it might occur that not
all characters on the CD/DVD are displayed cor‐
rectly.
Select the directory as appropriate.
1.
To change to a higher-level directory: tilt the
controller to the left.
Remove the CD/DVD
1. Press the button.
The CD/DVD is pushed out slightly.
2. Remove the CD/DVD.
Audio
Selecting a track using button
Press button repeatedly until the de‐
sired track is played.
42
Online Edition for Part no. 01 40 2 912 836 - 07 12 510
2. Select the desired track to start playback.
Page 43

CD/DVD Entertainment
Displaying track information
If information is saved for a track, this is dis‐
played automatically:
▷ Artist.
▷ Album name
▷ Number of tracks on the CD/DVD.
▷ File name of the track.
▷ Track image of the CD/DVD.
Updating album information
The album information for a CD is shown auto‐
matically. If the album information is not shown
correctly, because there are several similar al‐
bums, the album information can be updated.
"Multimedia"
1.
2. "CD/DVD"
3. Call up "Options".
4. "Album information"
5. Select the desired entry.
4. Call up "Options".
5. "Random"
Fast forward/rewind
Keep button pressed.
Video
General
The video image is shown on the front control
display up to a speed of approximately 3 km/h.
In some countries, it is only shown with the park‐
ing brake engaged or in gear position P.
Country codes
Only DVDs with the code of your home region
can be played. See also the information on your
DVD.
Code Region
Random playback
All the tracks on the CD/DVD are played in ran‐
dom order.
"Multimedia"
1.
2. "CD/DVD"
3. Select the desired CD or DVD.
Online Edition for Part no. 01 40 2 912 836 - 07 12 510
1 USA, Canada
2 Japan, Europe, Middle East, South Af‐
rica
3 South-East Asia
4 Australia, Central and South America,
New Zealand
5 North-West Asia, North Africa
6 China
0 All regions
43
Page 44
Entertainment CD/DVD
Playback
1. "Multimedia"
2. "CD/DVD"
3. Select a DVD with video content.
4. "Play"
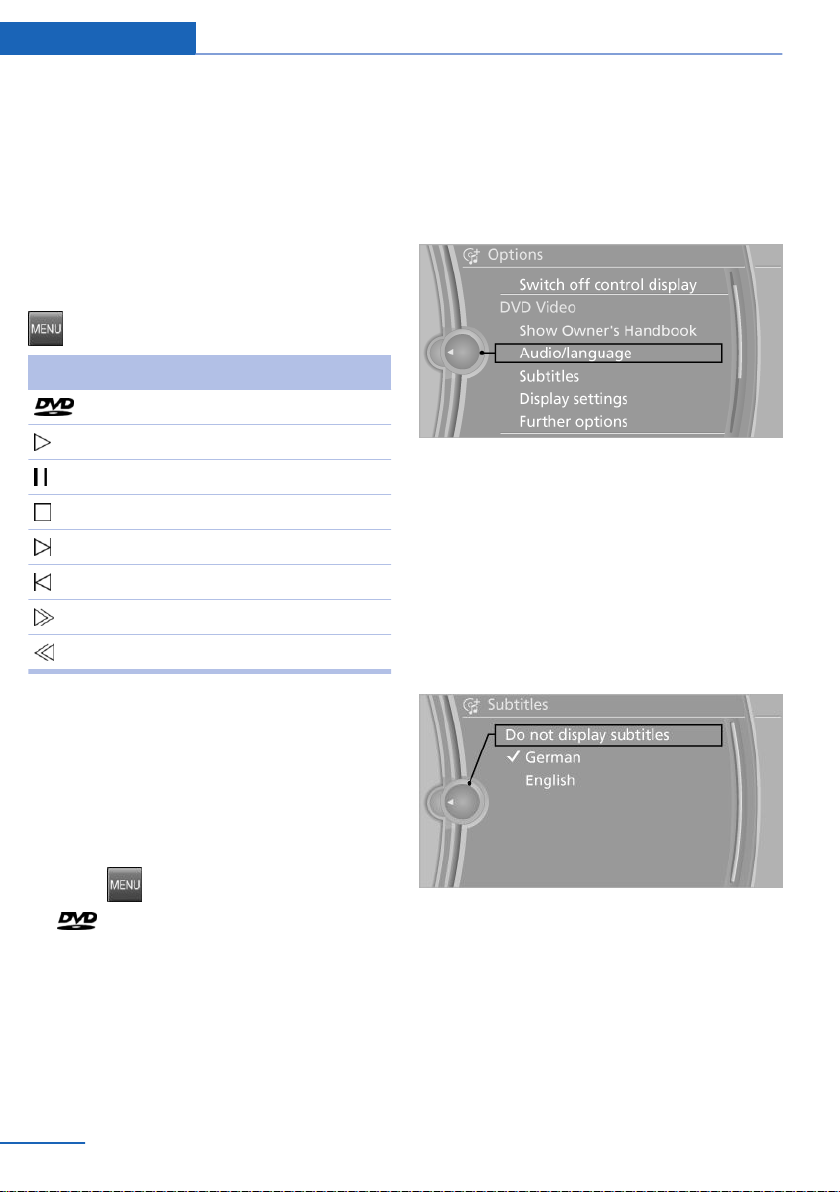
Video menu
To open the Video menu:
Press button during playback.
Symbol Function
Calls up the DVD menu.
Starts playback.
Pause
Stop
Next chapter
Previous chapter
Fast forward
Rewind
For fast forward/rewind: each time the controller
is pressed, the speed increases. To stop, start
playback.
Selecting language
The languages available depend on the DVD.
1. Turn the controller while the DVD is playing.
2. Call up "Options".
3. "Audio/language"
4. Select the desired language.
Selecting subtitles
The available subtitles depend on the DVD.
Turn the controller while the DVD is playing.
1.
2. Call up "Options".
3. "Subtitles"
4. Select the desired language or "Do not
display subtitles".
DVD menu
Many DVDs have their own menu. The display
depends on the contents of the DVD.
1. Press button to call up the video menu.
2. "DVD menu"
3. To select menu items: tilt and press the con‐
troller.
DVD Settings
Depending on the DVD, some settings are only
possible via the DVD menu, see also information
on your DVD.
44
Online Edition for Part no. 01 40 2 912 836 - 07 12 510
Setting the brightness, contrast, colour
Turn the controller while the DVD is playing.
1.
2. Call up "Options".
3. "Display settings"
Page 45

CD/DVD Entertainment
4. "Brightness", "Contrast" or "Colour"
5. Turn the controller until the desired setting
is reached and press the controller.
Selecting zoom
Display video picture over full screen.
Turn the controller while the DVD is playing.
1.
2. Call up "Options".
3. "Further options"
4. "Zoom mode"
Select camera angle
The availability of an alternative camera angle
depends on the DVD and the current track on
the DVD.
1. Turn the controller while the DVD is playing.
2. Call up "Options".
3. "Further options"
4. "Viewing angle"
5. Select the desired angle of view.
Calling up the main menu, Back
These functions are not included on every DVD.
Therefore, they may not be available for use.
DVD changer
General
The DVD changer is located, depending on the
vehicle, in the glove box, through the glove box
or in the boot behind the left side trim.
Overview
Selecting title
DVD video:
With the DVD menu displayed, turn the con‐
1.
troller.
2. Call up "Options".
3. "Further options"
4. "Select title"
5. Select the desired title.
Online Edition for Part no. 01 40 2 912 836 - 07 12 510
1 Emptying the DVD compartments
2 LED on the DVD compartment
3 Buttons for DVD compartments
4 DVD compartment
5 Filling the DVD compartments
45
Page 46

Entertainment CD/DVD
Filling the DVD compartments
individually
1.
Press the button once.
The LED on the first vacant compartment
flashes.
2. Select a different compartment if necessary.
3. Wait until the LEDs on the DVD compart‐
ment flash.
4. Insert a single CD or DVD in the centre.
The CD/DVD is pulled in automatically and
stored in the selected compartment.
Inserting CDs/DVDs
Only insert CD/DVD if the LEDs on the
DVD compartment are flashing, otherwise the
CD/DVD or the DVD changer could be damaged.
Do not force the CD/DVD into the drive; it could
jam and you might not be able to eject it.◀
Filling all the available DVD
compartments
1. Hold down the button once.
The LEDs on the vacant compartments
flash.
2. Wait until the LEDs on the DVD compart‐
ment flash and then insert a CD or DVD,
making sure it is centred.
The CDs/DVDs are drawn in automatically
and stowed in the empty compartments.
Inserting CDs/DVDs
Only insert CD/DVD if the LEDs on the
DVD compartment are flashing, otherwise the
CD/DVD or the DVD changer could be damaged.
Do not force the CD/DVD into the drive; it could
jam and you might not be able to eject it.◀
It may take a few minutes to read the CDs/DVDs
after loading.
Removing CDs/DVDs individually
1.
Press the button once.
2. Select the DVD compartment.
The CD/DVD is pushed out slightly.
3. Remove the CD/DVD.
Removing all CDs/DVDs
1.
Hold down the button once.
2. Remove the CDs/DVDs.
Interrupt function
Filling the DVD trays or removing the CDs/DVDs
may be interrupted.
Press the appropriate button.
▷
▷
Faults
If the LEDs on the DVD slot and the LEDs on the
DVD trays flash rapidly, there is a fault.
Repairing the fault:
Press one of the following buttons:
1.
▷
▷
The last CD/DVD inserted is pushed out
slightly.
2. Remove the CD/DVD.
When the LEDs are no longer flashing quickly,
the DVD changer is operational again.
Playing audio tracks
The audio track of a DVD can be played even if
video playback is not possible in the vehicle.
Only the main film is played, without intro or ex‐
tras.
46
Online Edition for Part no. 01 40 2 912 836 - 07 12 510
Page 47

CD/DVD Entertainment
Starting play
There is a DVD in the DVD changer.
1. "Multimedia"
2. "CD/DVD"
3. Select the desired DVD.
Selecting a chapter using the button
Press button repeatedly until the de‐
sired chapter is played.
Selecting a chapter using iDrive
"Multimedia"
1.
2. "CD/DVD"
3. Select the desired DVD.
4. Select the desired chapter.
Fast forward/rewind
Keep button pressed.
Selecting language
The languages available depend on the DVD.
"Multimedia"
1.
2. "CD/DVD"
3. Select the desired DVD.
4. Call up "Options".
5. "Audio/language"
6. Select the desired language.
CDs and DVDs
Using CDs/DVDs
▷ Do not use CDs/DVDs with adhesive
labels that have been affixed subse‐
quently, as these may peel off while in
the drive as a result of the tempera‐
tures to which these media are ex‐
posed during playing. This could dam‐
age the system irreparably.
▷ Use only round CDs/DVDs with a standard
diameter of 12 cm and do not use CDs/DVDs
in conjunction with adapters, for example
CD singles. Otherwise the CDs or the
adapter could jam and be impossible to
eject.
▷ Do not use combined CD/DVDs, for example
DVD Plus, as otherwise the CD/DVD could
jam and be impossible to eject.◀
General malfunctions
▷ The CD/DVD players and changers have
been optimised for operation in your vehicle.
In some instances, they may be more sen‐
sitive to faulty CDs/DVDs than devices for
stationary use.
▷ If a CD/DVD cannot be played back, first
check whether it has been inserted cor‐
rectly.
Atmospheric humidity
The CD/DVD or the focussing lens can carry
condensation due to high humidity and playback
may temporarily not be possible.
Notes
CD/DVD player and changer
Do not remove the cover
All BMW CD/DVD players and changers
are Class 1 laser products. Do not operate when
the cover is damaged, otherwise it could cause
severe eye injuries.◀
Online Edition for Part no. 01 40 2 912 836 - 07 12 510
Malfunctions with individual CDs/DVDs
If malfunctions occur only with individual CDs/
DVDs, this can be due to one of the following:
Self-recorded CDs/DVDs
▷ With self-recorded CDs/DVDs, possible
causes include inconsistent data-creation
or burning process, low quality or high age
of the CD/DVD blank.
47
Page 48

Entertainment CD/DVD
▷ Only write on the upper side of CDs/DVDs
using a special marker pen.
Damage
▷ Avoid causing fingerprints and protect
against dust, scratches and moisture.
▷ Store CDs/DVDs in a case.
▷ Do not expose CDs/DVDs to temperatures
above 50 ℃, high levels of humidity or direct
sunlight.
CDs/DVDs with copy protection
CDs/DVDs are often copy-protected by the
manufacturer. This could result in CDs/DVDs
being impossible to play, or only being playable
with restrictions.
MACROVISION
This product contains copyrighted technology
based on a number of registered US patents and
intellectual property of the Macrovision Corpo‐
ration and other manufacturers. The use of this
copy protection must be approved by Macrovi‐
sion. Media with the corresponding protection –
unless otherwise agreed with Macrovision – may
only be shown privately. It is prohibited to copy
this technology.
DTS Digital Surround™
Manufactured under licence of US pat‐
ent numbers: 5,451,942; 5,956,674;
5,974,380; 5,978,762; 6,487,535 & and other
patents issued and applied for in the USA and
worldwide. DTS and the logo are registered
trademarks & DTS Digital Surround and the DTS
logos are trademarks of DTS Inc. © DTS, Inc. All
rights reserved.
48
Online Edition for Part no. 01 40 2 912 836 - 07 12 510
Page 49

Music collection
Music collection Entertainment
Vehicle Equipment
This chapter describes all standard, national and
special equipment provided in the model series.
Therefore equipment not available in a vehicle is
also described, for example the selected special
equipment or national version. That also applies
to safety-relevant functions and systems.
Music memory
Principle
Tracks from CDs/DVDs and USB media can be
saved in the music collection on a hard disk in
the vehicle and played from there.
General
▷ Audio CD: tracks are converted into a com‐
pressed audio format. Information on the al‐
bum, for example artist, is saved, if applica‐
ble.
▷ CD/DVD or USB medium with compressed
audio files: the entire content of the CD/DVD
or USB medium is saved as an album in the
vehicle. All audio files with the formats sup‐
ported, see page 42, in the vehicle are
stored. Tracks and directories can be de‐
leted later individually, Delete tracks and di‐
rectory, see page 54.
ognition technology and related content deliv‐
ery. For more information, please visit
www.gracenote.com.
CD and music-related data from Gracenote, Inc.,
copyright © 2000-2009 Gracenote. Gracenote
Software, copyright © 2000-2009 Gracenote.
This product and service may practice one or
more of the following U.S. Patents: #5.987.525;
#6.061.680; #6.154.773, #6.161.132,
#6.230.192, #6.230.207, #6.240.459,
#6.330.593, and other patents issued or pend‐
ing. Some services supplied under license from
Open Globe, Inc. for U.S. Patent: #6.304.523.
Saving from CD/DVD
Insert a CD or DVD in the CD/DVD player.
1.
2. "Multimedia"
3. "CD/DVD"
4. Select the symbol for the CD/DVD player.
5. "Save in vehicle"
Notes
Tracks with copy protection, DRM, are saved,
but cannot be played.
Backing up music data
Back up music data regularly, as otherwise
it could be lost in the event of a fault in the hard
disk.◀
Music recognition technology and re‐
lated data are provided by Gracenote®.
Gracenote is the industry standard in music rec‐
Online Edition for Part no. 01 40 2 912 836 - 07 12 510
The music collection is displayed and the first
track of the CD/DVD is played. The tracks are
played in the normal order during saving.
During saving, bear the following in mind:
Do not switch to the CD/DVD player and do not
remove the CD from the CD/DVD player, as oth‐
erwise saving is interrupted. It is possible to
change over to the other audio sources without
interrupting saving. Tracks of the current CD/
DVD that have already been saved can also be
called up.
49
Page 50

Entertainment Music collection
Interrupting saving
1. "Multimedia"
2. "CD/DVD"
3. "Saving..."
4. "Cancel saving"
The saving process is interrupted and can be
continued at any time.
Resuming saving
"Multimedia"
1.
2. "CD/DVD"
3. Select the symbol for the CD/DVD player.
4. "Continue saving"
CD/DVD saving is continued at the start of the
track for which saving was interrupted.
▷ Suitable media: USB mass storage facilities,
for example USB memory sticks or MP3
players with USB interface.
▷ Unsuitable media: USB hard disks, USB
hubs, USB memory card readers with a
number of bays, Apple iPod/iPhone. Music
from an Apple iPod/iPhone can be played in
the AUX-IN port or USB interface in the cen‐
tre armrest.
▷ File systems: current file systems for USB
devices are supported. FAT 32 format is
recommended.
1. Connect USB medium to the USB interface
in the centre armrest.
2. "Multimedia"
3. "Music collection"
4. Call up "Options".
5. "Music data import/export"
6. "Import music (USB)"
Information on the album
During the saving process, the information, for
example the name of the artist, is saved for the
tracks if this information is available in the data‐
base in the vehicle or on the CD.
To update the database, contact your Service
centre.
If no information is saved for the tracks, it might
be possible to update the entire album informa‐
tion, see page 54, of the CD via BMW Online.
Saving from a USB medium
To save music, a suitable medium must be con‐
nected to the USB interface in the centre arm‐
rest.
50
Online Edition for Part no. 01 40 2 912 836 - 07 12 510
Playing music
Music search
All tracks for which information is saved can be
called up via music search. All tracks for which
no information is saved can be called up via the
music directory.
"Multimedia"
1.
2. "Music collection"
Page 51

Music collection Entertainment
3. "Music search"
4. Select the desired category.
5. Select the desired entry:
▷ Select "A-Z search" and make the de‐
sired entry.
All entries containing the character
string entered are listed, even if this is
not at the start of the entry.
▷ Select the desired entry from the list.
6. Select further categories as appropriate.
The tracks found are listed in alphabetical
order.
7. "Play selection"
Starting new music search
"Reset search"
Music search using voice control
For the handbook for the voice control system,
see Owner's Handbook for the vehicle.
1. Press the button on the steering
wheel.
2. ›Music search‹
3. Call up the desired category, for exam‐
ple ›Select artist‹.
4. Say the desired entry from the list.
5. Select further categories as appropriate.
Selecting the track directly: ›Track ...‹.
Say the spoken command and the name of the
desired track together in one command.
Music Directory
All albums stored are listed in the music direc‐
tory.
1. "Multimedia"
2. "Music collection"
3. "Music search"
4. "Search folder"
All directories stores are shown as a list.
5. Select desired directory.
To change to a higher-level directory: tilt the
controller to the left.
Symbol Format
Audio CD
Compressed audio files
Sort music directory
The list can be sorted alphabetically by name or
by storage date.
"Sorting"
1.
2. "By name" or "By date"
Currently playing
Listing of the track which is currently being
played back. For example, the list of tracks found
via the music search, a playlist or list of similar
tracks found.
"Multimedia"
1.
2. "Music collection"
Online Edition for Part no. 01 40 2 912 836 - 07 12 510
51
Page 52

Entertainment Music collection
3. "Currently playing"
4. If applicable, select the desired track.
Playlists
"Multimedia"
1.
2. "Music collection"
3. "Playlists"
The following lists are shown:
▷ "My favourites"
All tracks which have been marked as fa‐
vourite.
▷ "Top 50"
The 50 most played tracks.
▷ "More music like this"
All playlists which have be automatically cre‐
ated by searching for similar music.
Delete playlist
"Playlists"
1.
2. Mark playlist which is to be deleted.
3. Call up "Options".
4. "Delete playlist"
Similar music
Music stored in the vehicle similar to the track
currently playing can be searched for.
"Multimedia"
1.
2. "Music collection"
3. "More like this (local)"
A playlist with the track found is stored.
A maximum of 100 titles are stored. The number
of playlists is restricted and an old playlist may
be deleted when storing a new one.
Favourites
If a track is currently being played, this can be
marked and stored as a favourite.
Store track as a favourite
A track must be currently be playing to store it
as a favourite.
1. "Multimedia"
2. "Music collection"
3. "Add to favourites"
Calling up stored favourites
"Multimedia"
1.
2. "Music collection"
3. "Playlists"
4. "My favourites"
5. Select the desired title.
The favourites can be stored in the vehicle as a
playlist, see page 52.
Deleting individual tracks from
favourites
The track which is to be deleted from the list
1.
of favourites is to be called up.
2. "Delete from favourites"
Delete individual track from favourites
Individual or other tracks can be deleted from
favourites.
"Playlists"
1.
2. "My favourites"
3. Call up "Options".
4. "Delete all tracks from favourites"
52
Online Edition for Part no. 01 40 2 912 836 - 07 12 510
Page 53

Music collection Entertainment
Store favourites as playlists
The list of favourites can be stored in the vehicle
as a playlist.
1. "My favourites"
2. Call up "Options".
3. "Save as playlist"
Audio books and podcasts
Audio books and podcasts can be called up sep‐
arately.
1. "More media"
2. Call up desired entry:
▷ "Audio books"
▷ "Podcasts"
3. Select the directory as appropriate.
4. Call up desired file.
Random playback
All the tracks in the selection are played in ran‐
dom order.
"Multimedia"
1.
2. "Music collection"
3. Call up "Options".
4. "Random"
Managing music
Music Directory
Rename folder or track
If applicable, the name of the album is entered
automatically during saving. If the name is un‐
known it can also be changed.
1. "Multimedia"
2. "Music collection"
3. "Music search"
4. "Search folder"
5. Mark desired folder or title.
6. Call up "Options".
7. "Rename track" or "Rename folder"
8. Select the letters individually.
Delete directory
A directory cannot be deleted if a track is being
played back directly from it.
"Multimedia"
1.
2. "Music collection"
3. "Music search"
4. "Search folder"
5. Mark desired directory.
6. Call up "Options".
7. "Delete directory"
Online Edition for Part no. 01 40 2 912 836 - 07 12 510
53
Page 54

Entertainment Music collection
Delete track and folder
It may not be possible to delete a track while it
is being played. A folder cannot be deleted if a
track is being played back directly from it.
1. "Multimedia"
2. "Music collection"
3. "Music search"
4. "Search folder"
5. Highlight the folder or track.
6. Call up "Options".
7. "Delete folder" or "Delete track"
Album information
If no information was saved for audio CDs during
saving, it can be updated later via BMW Online
as required.
The update takes place for each individual al‐
bum.
Updating album information via BMW
Online
"Multimedia"
1.
2. "Music collection"
3. "Music search"
4. "Search folder"
5. Highlight the desired album.
6. Call up "Options".
7. "Album information"
8. "Update album information"
If it was possible to save the album information,
the name of the album is displayed.
Free capacity
Display free capacity in the music collection.
"Multimedia"
1.
2. "Music collection"
3. Call up "Options".
4. "Manage music collection"
5. "Memory available"
Music collection
Backing up music collection
The entire music collection can be backed up on
a USB medium. Ensure that the USB medium
has adequate free capacity.
Depending on the number of tracks, backing up
the music collection can take up to two hours.
This is why it is best to make the backup during
a longer journey. If the backup cannot be cre‐
ated, do not remove USB medium, the back-up
will be continued on the next journey.
1. Start the engine.
2. Connect USB medium to the USB interface
in the centre armrest.
3. "Multimedia"
4. "Music collection"
5. Call up "Options".
6. "Music data import/export"
7. "Backup music on USB"
Saving music collection to the vehicle
When the music collection is saved from a USB
medium to the vehicle the existing music col‐
lection in the vehicle is replaced. It is best to
make the backup during a longer journey. If it
cannot be saved, do not remove USB medium,
the saving will be continued on the next journey.
"Multimedia"
1.
2. "Music collection"
3. Call up "Options".
54
Online Edition for Part no. 01 40 2 912 836 - 07 12 510
Page 55

4. "Music data import/export"
5. "Restore music from USB"
Deleting music collection
1. "Multimedia"
2. "Music collection"
3. Call up "Options".
4. "Manage music collection"
5. "Delete music"
6. Select any category, the tracks of which are
to be deleted.
7. "Delete music"
Music collection Entertainment
Online Edition for Part no. 01 40 2 912 836 - 07 12 510
55
Page 56

Entertainment External devices
External devices
Vehicle Equipment
This chapter describes all standard, national and
special equipment provided in the model series.
Therefore equipment not available in a vehicle is
also described, for example the selected special
equipment or national version. That also applies
to safety-relevant functions and systems.
Principle
Various external devices can be connected to
the vehicle. Sound output is via the vehicle loud‐
speakers. Depending on how the external de‐
vice is connected to the vehicle, it can be oper‐
ating using iDrive.
Symbol Meaning
AUX-IN port
USB audio interface
Music interface for smartphones
Bluetooth audio
AUX-IN port
Overview
▷ Connection of audio devices is possible, for
example MP3 players. The sound output is
via the vehicle loudspeakers.
▷ Recommendation: medium sound and vol‐
ume settings on the audio device. The
sound might depend on the quality of the
audio files.
Connecting
AUX-IN port is in the centre con‐
sole.
Connect the headphones or lineout connection of the equipment
to the jack connector.
Playback
1. Connect the audio device, switch it on and
select a track.
2. "Multimedia"
3. "External devices"
4. "AUX front"
Volume control
The volume of the sound output depends on the
audio device. If this volume differs significantly
from other audio sources, it makes sense to bal‐
ance the volumes.
Adjust volume
"Multimedia"
1.
2. "External devices"
3. "AUX front"
4. "Volume"
56
5. Turn the controller until the desired volume
setting is reached and press the controller.
Online Edition for Part no. 01 40 2 912 836 - 07 12 510
Page 57

External devices Entertainment
USB audio interface /music interface for smartphones
Overview
External devices can be connected, Operation
is done using the iDrive. The sound output is via
the vehicle loudspeakers.
Connection options for external
devices
▷ Connection is via USB audio interface: Ap‐
ple iPod/iPhone, USB devices, for example
MP3 player, USB memory sticks or mobile
phones that are supported by the USB audio
interface.
▷ Connection via snap-in adapter, for equip‐
ment with music interface for smartphones:
Apple iPhone or mobile phones.
Due to the large variety of the audio devices
available on the market, operation using the ve‐
hicle cannot be ensured for every device/mobile
phone.
Ask at your Service centre regarding suitable
devices/mobile phones.
Audio files
Normal audio files, video files and playlists can
be reproduced.
Connect Apple iPod/iPhone to
the USB interface.
The menu structure of the Apple
iPod/iPhone is supported by the
USB audio interface.
Connection of USB device via USB
audio interface
The USB audio interface is located in the centre
armrest.
Use a flexible adapter cable for connecting, to
protect the USB interface and the USB device
from mechanical damage, for example, the
adapter cable supplied with the USB device.
Connect the USB device to the
USB interface.
The menu structure of the Apple
iPod/iPhone is supported by the
USB audio interface.
After connecting for the first time
Information on all titles, e.g. artist, genre or title,
as well as the playback lists are transferred to
the vehicle. This might take some time, depend‐
ing on the USB device and the number of tracks.
During transfer, the tracks can be called up via
the file directory.
File systems
Current file systems for USB devices are sup‐
ported. Formats FAT 32 and NTFS are recom‐
mended.
Connection of Apple iPod/iPhone via
USB audio interface
The USB audio interface is located in the centre
armrest.
Use a flexible adapter cable for connecting, for
example, the original adapter cable of the iPod/
iPhone.
Online Edition for Part no. 01 40 2 912 836 - 07 12 510
Number of tracks
The information from up to four USB devices or
for a total of approximately 40,000 tracks can be
saved in the vehicle. If a fifth device is connected
or if more than 40,000 tracks are saved, the in‐
formation for existing tracks is deleted.
Copy protection
Music tracks with integrated Digital Rights Man‐
agement, (DRM), cannot be played.
Playback
"Multimedia"
1.
2. "External devices"
57
Page 58

Entertainment External devices
3. Select symbol or .
Playback is started.
Searching for tracks
The titles are displayed if they have been cre‐
ated with Roman letters.
"Multimedia"
1.
2. "External devices"
3. Select the or symbol.
4. "Music search"
Search for track by information
Select the desired category, for example
1.
"Genre" or "Artist".
All entries are shown in a list.
▷ Call up "A-Z search" and make the de‐
sired entry. When you enter a character,
a filter is run on the basis of this charac‐
ter as the first letter. When you enter
several characters, all the results that
contain this character string are dis‐
played.
▷ Select the desired entry from the list.
2. Select further categories as appropriate.
Not all categories need to be selected. If, for
example, all the tracks of a certain artist are
to be displayed, it is sufficient to call up only
this artist. All tracks by that artist will be dis‐
played.
3. "Play selection"
Starting a new track search
"Reset search"
Search through directory
When connecting using the USB audio interface
in the centre armrest, the file directory of the
device is shown.
"Search directory"
A list of directories and tracks is displayed.
This symbol marks directories.
Select track:
Select desired track or directory.
To change to a higher-level directory tilt the
controller to the left.
Playlists
Calling up playlists.
"Multimedia"
1.
2. "External devices"
3. Select the or symbol.
4. "Playlists"
5. Select desired playlist.
More media, audio books, podcasts,
videos
Audio books, podcasts and videos can be called
up separately on the device.
"Multimedia"
1.
2. "External devices"
3. Select the or symbol.
4. "More media"
5. Call up desired medium:
▷ "Audio books"
58
Online Edition for Part no. 01 40 2 912 836 - 07 12 510
Page 59

External devices Entertainment
▷ "Podcasts"
▷ "Video"
Video playback
Overview
Video playback is possible under the following
preconditions:
▷ iPod/iPhone: connection via snap-in
adapter.
▷ USB devices: connect via USB interface or
snap-in adapter.
Playback
The video image is shown on the front control
display up to a speed of approximately 3 km/h.
In some countries, it is only shown with the park‐
ing brake engaged or in gear position P.
"Multimedia"
1.
2. "External devices"
3. Select symbol or .
4. "More media"
5. "Video"
6. Select the directory as appropriate.
To change to a higher-level directory: tilt the
controller to the left.
7. Select the desired video file to start play‐
back.
Video menu
Symbol Function
Next video file
Previous video file
Select symbol twice to play back the
previous video file.
Currently playing
Listing of the track which is currently being
played back. For example, the list of tracks which
are found through the track search or a playlist.
1. "Multimedia"
2. "External devices"
3. Select the or symbol.
4. "Currently playing"
Random playback
The current list of tracks is played in random or‐
der.
"Multimedia"
1.
2. "External devices"
3. Call up "Options".
4. "Random"
iPod/iPhone: the playback list is shown in ran‐
dom order and the tracks are played according
to that order.
USB device: the playback list is shown in the
conventional order and the tracks are played in
random order.
Fast forward/rewind
Keep button pressed.
Notes
▷ Do not expose the audio device to extreme
environmental conditions, for example very
high temperatures, see the operating in‐
structions of the audio device.
▷ Depending on the format of the audio and
video files perfect playback cannot be en‐
sured in every case; for example bit rates
higher than 256 Kbit/s or various compres‐
sion techniques.
▷ Audio playback is only possible if no audio
device is connected to the AUX-IN port.
Online Edition for Part no. 01 40 2 912 836 - 07 12 510
59
Page 60

Entertainment External devices
Notes on connecting
▷ The connected audio device is supplied with
a maximum of 500 mA if the device supports
this. Do not, therefore, also connect the de‐
vice to a socket in the vehicle as otherwise
perfect playback cannot be guaranteed.
▷ Do not insert the plug forcibly in the USB in‐
terface.
▷ Do not connect any devices such as fans or
lights to the USB audio interface.
▷ Do not connect up USB hard drives.
Bluetooth audio
Overview
▷ Playback of music files from external devi‐
ces such as audio devices or mobile phones
via Bluetooth is possible.
▷ The sound output is via the vehicle loud‐
speakers.
▷ The volume of the sound output depends on
the device. If applicable, change volume set‐
tings on the device.
▷ Up to four external devices can be registered
with the vehicle.
Requirements
▷ Suitable device. Visit www.bmw.com/blue‐
tooth for more information.
▷ Device ready for operation.
▷ Ignition switched on.
▷ Bluetooth in the vehicle, see page 79, and
device activated.
▷ Bluetooth presettings must be made on the
device, for example connect without confir‐
mation or visibility, see Owner's Handbook
of the device.
▷ A number with a minimum of 4 and a maxi‐
mum 16 positions is specified as the Blue‐
tooth passkey. Only required for non-recur‐
ring registration.
▷ Vehicle is at rest.
Connecting
Connecting the device
Only connect the device when the vehicle
is stationary. Otherwise, you may become dis‐
tracted and endanger the vehicle occupants and
other road users.◀
1. "Settings"
2. "Connections"
3. "Bluetooth"
4. "Add new device"
The Bluetooth name of the vehicle is dis‐
played in the control display.
5. To perform other operations on the device;
see the Owner's Handbook of the device: for
example finding/connecting Bluetooth de‐
vice or new device.
The Bluetooth name of the vehicle is shown
on the display of the device.
6. Select the Bluetooth name of the vehicle on
the display of the device.
7. Request using the iDrive or mobile phone to
enter the same Bluetooth passkey. Enter
and confirm passkey.
Or
Compare the control number in the vehicle
display with the control number in the mo‐
bile phone display. Confirm the control num‐
ber in the mobile phone and on the vehicle.
"OK"
8. Select functions for which the device is to be
used, for example "Bluetooth audio".
9. "OK"
If connection was successful, the device is
shown as connected.
White symbol: device active as audio source.
If connection was unsuccessful: What to do if...,
see page 62.
60
Online Edition for Part no. 01 40 2 912 836 - 07 12 510
Page 61

External devices Entertainment
Connecting a certain device
An already connected device can be connected
as an active audio source.
Connection not possible if data is exchanged
using a mobile phone equipped with Bluetooth.
Requirements
If necessary, activate the audio connection of
the desired device from the list of connected
devices.
1. "Settings"
2. "Connections"
3. "Bluetooth"
4. Call up "Options".
5. "Configure device"
6. "Audio"
7. "OK"
Connecting a device
"Settings"
1.
2. "Connections"
3. "Bluetooth"
4. Select the device to be connected.
White symbol: device active as audio source.
Playback
General
▷ The following functions are dependent on
the device: display of track information, fast
forward/rewind, random playback.
▷ Can be operated using the device or iDrive.
▷ Playback is interrupted if data is exchanged
using a mobile phone equipped with Blue‐
tooth.
Starting play
Connecting a device.
1.
2. "Multimedia"
3. "External devices"
4. Select the symbol.
Playback is automatically started.
Changing the track
Not all functions may be available, depending on
the device.
Symbol Function
Next track
Previous title
Fast forward/rewind
Keep button pressed.
Random playback
"Multimedia"
1.
2. "External devices"
3. Select the symbol.
4. Call up "Options".
5. "Random"
Disconnecting audio connection
"Settings"
1.
2. "Connections"
3. "Bluetooth"
4. Highlight the desired device.
5. Call up "Options".
6. "Configure device"
Online Edition for Part no. 01 40 2 912 836 - 07 12 510
61
Page 62

Entertainment External devices
7. "Audio"
8. "OK"
Disconnecting a device
1. "Settings"
2. "Connections"
3. "Bluetooth"
4. Highlight the mobile phone to be discon‐
nected.
5. Call up "Options".
6. "Delete device"
What to do if...
Visit www.bmw.com/bluetooth for more infor‐
mation on compatible devices.
Compatible mobile phones, see page 78
Device not supported by the vehicle.
▷ If applicable, perform a software update, see
page 62.
Device not registered or paired.
▷ Do the Bluetooth passkeys for device and
vehicle match. Enter the same passkey on
the device and using iDrive.
▷ Duration for passkey input longer than
30 seconds. Repeat the connection at‐
tempt.
▷ Is the mobile phone in power-save mode or
is the battery low? Charge the mobile phone
using the snap-in adapter or the charging
cable.
▷ Is the device no longer responding. Switch
the device off and on again.
▷ Repeat the connection attempt.
No music can be played back.
▷ Start the program for playing back music
files on the device and if necessary, select a
track via the device.
▷ Switch the radio off and on again.
Music files are played back, but only at low vol‐
ume.
▷ Adjust the volume controls on the device.
Playback is disrupted when a button is pressed
on the device or if other messages are issued via
the device.
▷ Switch off keypad acknowledgement tones
and other audio output at the device.
Playback is interrupted by phone calls or traffic
announcements and does not resume automat‐
ically.
▷ Switch the radio off and on again.
Playback is not possible if the mobile phone is
connected via Bluetooth Audio and via the USB
interface or snap-in adapter at the same time.
▷ Disconnect one of the two pairing connec‐
tions, for example disconnect audio connec‐
tion, see page 61, and restart playback.
If all the points on the list have been reviewed
and the desired function cannot be run, contact
Hotline or Service Centre.
Software update
Depending on the current software, the vehicle
supports different external devices. A software
update may be supported, for example, by a new
mobile phone or new external devices of the ve‐
hicle, which may improve compatibility with the
vehicle.
The software is updated via:
▷ USB.
Updates and related, up-to-date informa‐
tion is available on the website
www.bmw.com/update.
▷ BMW TeleServices
The available software can be updated di‐
rectly through the vehicle.
Note
The installation must only be done when sta‐
tionary. To complete the installation, the ignition
must be switched off.
62
Online Edition for Part no. 01 40 2 912 836 - 07 12 510
Page 63

External devices Entertainment
Show current version
The information about the version of the soft‐
ware currently installed is displayed.
1. "Settings"
2. "Software update"
3. "Show current version"
If an update has already been applied, select the
desired version to show additional information.
Update software via USB
Do not attempt to update the software unless
the vehicle is at a standstill.
Store the file for the software update onto a
1.
USB data store in the main folder.
2. Connect USB drive to the USB interface in
the centre armrest.
3. "Settings"
4. "Software update"
5. "Update software"
6. If applicable, "USB"
7. "Install software"
8. "OK"
9. Switch of ignition and wait until the control
display is switched off.
software must only be done when stationary.
There must be mobile reception for the update.
1. Switch on ignition.
2. "Settings"
3. "Software update"
4. "Update software"
5. "BMW TeleServices"
6. "Transfer software"
7. Interrupt the trip as necessary, the installa‐
tion must only be done when stationary.
8. "Install software"
9. "OK"
10. Switch of ignition and wait until the control
display is switched off.
Restore software version
The software version before the last software
update or the version before the first software
update can be restored.
Do not attempt to restore the software unless
the vehicle is at a standstill.
"Settings"
1.
2. "Software update"
3. "Restore software"
4. "Previous version" or "Software factory
settings"
5. "Remove software"
6. "OK"
7. Switch of ignition and wait until the control
display is switched off.
Update software via BMW TeleServices
It is possible to transfer the software when trav‐
elling and is also automatically continued after
the trip is interrupted. The installation of the
Online Edition for Part no. 01 40 2 912 836 - 07 12 510
63
Page 64

Entertainment Television, TV
Television, TV
Vehicle Equipment
This chapter describes all standard, national and
special equipment provided in the model series.
Therefore equipment not available in a vehicle is
also described, for example the selected special
equipment or national version. That also applies
to safety-relevant functions and systems.
General
For your own safety, the TV picture is only dis‐
played up to approx. 3 km/h. On some national
versions, it is only displayed when the parking
brake is engaged or gear position P is engaged.
Selecting program
All receivable TV channels and radio station are
shown in a list. The radio stations are shown at
the end of the list.
In certain circumstances, the list of channels
that can be received might not be updated au‐
tomatically. Update the list with station search,
see page 64, if necessary.
Symbol Meaning
Digital TV channel
No symbol Analogue TV channel
Digital radio station
1. "Multimedia"
2. "TV"
3. "All stations"
The channel last seen is displayed.
4. Select the desired channel.
After a short time, the display changes to full
screen mode. To continue showing the naviga‐
tion bar: press controller.
Information box
After changing to a new channel, a box with in‐
formation on the selected channel is shown
briefly.
Symbol Meaning
Channel information available
Digital TV channel
TV radio station
Multiple sound tracks available
Sound track in multi-channel repro‐
duction, surround, available
Subtitles available
Station search
The station search takes up to 2 minutes de‐
pending on the number of channels offered. If
not all offered channels are listed, it might be
64
Online Edition for Part no. 01 40 2 912 836 - 07 12 510
Page 65

Television, TV Entertainment
necessary to reset the TV region, see
page 66.
1. "Multimedia"
2. "TV"
3. Call up "Options".
4. "Station scan"
Cancelling the station search
"Cancel station search"
Changing the channel
"Multimedia"
1.
2. "TV"
3. Carry out one of the following points:
▷ "Next programme" or "Previous
programme"
▷
▷ Turn the controller.
The next or previous programme from the last
selected list of all programmes or saved pro‐
grammes is displayed.
Press the button.
Saving the channel
"Multimedia"
1.
2. "TV"
3. "All stations"
4. Select the desired channel.
5. Call up "Options".
6. "Save programme"
7. Select the desired memory location.
The saved channels are stored for the remote
control currently in use.
Electronic Programme Guide
Many stations provide and electronic program
guide.
1. "Multimedia"
2. "TV"
3. "Programme"
The TV schedule for the programme on now and
next is shown.
If some characters are not correctly displayed
adjust TV region, see page 66.
Displaying daily schedule
Depending on the information the station trans‐
mits, the entire daily schedule of the station is
shown
Select station names to display the daily sched‐
ule.
Show programme information
Depending on the information a station trans‐
mits, more detailed information on a programme
can be shown.
Select programme to show the more detailed
information.
Or this can be change directly in the programme:
select symbol.
Online Edition for Part no. 01 40 2 912 836 - 07 12 510
65
Page 66

Entertainment Television, TV
Saved channels
Twenty-five channels can be saved.
1. "Multimedia"
2. "TV"
3. "Saved programmes"
4. Select the desired channel.
Deleting channels
1. "Multimedia"
2. "TV"
3. "Saved programmes"
4. Highlight the channel to be deleted.
5. Call up "Options".
6. "Delete"
Adjusting TV
Brightness and contrast
"Multimedia"
1.
2. "TV"
3. Select the or symbol.
4. "Colour"
5. Adjusting: turn the controller.
6. Saving: press the controller.
Zoom
Showing an enlarged TV image.
"Multimedia"
1.
2. "TV"
3. Call up "Options".
4. "Zoom mode"
TV Region
The TV region is not the same in every country.
The TV receiver can be adjusted to the desired
region.
For more information: www.bmw.com/tvregion
"Multimedia"
1.
2. "TV"
3. Call up "Options".
4. "TV region"
5. Select the desired region.
The setting is saved for the remote control cur‐
rently in use.
4. Turn the controller until the desired setting
is reached and press the controller.
Colour
"Multimedia"
1.
2. "TV"
3. Call up "Options".
66
Online Edition for Part no. 01 40 2 912 836 - 07 12 510
Selecting the audio track
The range of audio tracks available depends on
the TV programme and time of day.
"Multimedia"
1.
2. "TV"
3. Call up "Options".
Page 67

4. "Audio track"
5. Select the desired audio track.
Show subtitles
Showing subtitles depends on the TV channel
and time.
1. "Multimedia"
2. "TV"
3. Call up "Options".
4. "Subtitles"
5. Select the desired language or "Subtitles
off".
Television, TV Entertainment
Online Edition for Part no. 01 40 2 912 836 - 07 12 510
67
Page 68

Entertainment Audio remote control in the rear
Audio remote control in the rear
Vehicle Equipment
This chapter describes all standard, national and
special equipment provided in the model series.
Therefore equipment not available in a vehicle is
also described, for example the selected special
equipment or national version. That also applies
to safety-relevant functions and systems.
Principle
The following audio functions at the front can be
controlled using the audio remote control in the
rear:
▷ "Radio"
▷ "Multimedia"
The operation is the same as for the corre‐
sponding keys on the CD/DVD player.
The remote control is accommodated in the
centre armrest in the back.
Menu guidance
Press the button Function
Turn the wheel: adjusts the
volume.
Press middle button:
switches the sound on/off.
turning the relevant button again allows a func‐
tion to be executed again.
Changing the batteries
No rechargeable batteries
Do not use rechargeable batteries, other‐
wise their contents can cause damage.◀
1. Remove the cover. To do so, press the
cover, arrow 1, and push forwards, arrow 2.
2. Insert batteries of the same type.
3. Close the cover.
Dispose of old batteries at an authorised
collecting point or hand them in to a
Service centre.
Switches entertainment
sources.
Switches stations, tracks or
chapters.
Keep button pressed: fast
forward/rewind.
The send time of the remote control is limited in
accordance with legal regulations. Pressing or
68
Online Edition for Part no. 01 40 2 912 836 - 07 12 510
Page 69

Rear entertainment
Rear entertainment Entertainment
Vehicle Equipment
This chapter describes all standard, national and
special equipment provided in the model series.
Therefore equipment not available in a vehicle is
also described, for example the selected special
equipment or national version. That also applies
to safety-relevant functions and systems.
Control functions
Control Place of installation
Screens On the backrest of
the front seats.
CD/DVD player in the rear
Controller in the rear Between the rear
Remote control In the centre armrest
On the centre con‐
sole.
seats.
in the rear
CD/DVD player in the rear
5 Cinch sockets
6 Headphone connection, left
Switching system on/off
Press the button on the lower edge of
the screen.
The rear entertainment and relevant screens are
switched on/off.
After the ignition is switched off the system
must be switched on again.
Screens
Adjusting
Risk of sustaining burns with the screen
folded out
Do not reach behind the screen; otherwise
burns could result. The back of the screen can
get very hot.◀
1 CD/DVD compartment
2 Ejecting CD/DVD
3 Headphone connection, right
4 USB interface
Online Edition for Part no. 01 40 2 912 836 - 07 12 510
▷ To fold out: pull the lower edge.
▷ To fold in: press against the lower edge.
Notes
▷ When loading the rear seats and adjusting
the backrests of the front seat, fold in the
screens.
69
Page 70

Entertainment Rear entertainment
▷ Please fold in the display screens when
making use of the through-loading system.
▷ Fold in the display screens before folding
down the rear backrest.
▷ To clean the screens, comply with the infor‐
mation regarding care, see Owner's
Handbook for the vehicle.
Controller in the rear
Operation is the same as for iDrive at the front.
▷ To adjust the volume: turn, arrow 1.
▷ Activate the controller and switch between
the screens: press the button, arrow 2.
A green LED indicates which side is active
and can be operated using the iDrive in the
rear.
Menu guidance
Press the but‐
ton
Function
Operating principle as front
controller.
Turn the wheel: highlights a
menu item.
Press middle button: confirm
selection.
Pressing the arrow buttons
corresponds to tipping the
Controller, change between
screens.
Call up the main menu.
Displays the previous menu.
Calls up the "Options" menu.
Switches stations, tracks or
chapters.
Keep button pressed: fast
forward/rewind.
Adjusts the volume.
Remote control
In the centre armrest in the rear
The remote control is in the centre armrest.
70
Online Edition for Part no. 01 40 2 912 836 - 07 12 510
Toggling between the
screens.
The send time of the remote control is limited in
accordance with legal regulations. Pressing or
turning the relevant button again allows a func‐
tion to be executed again.
Changing the batteries
No rechargeable batteries
Do not use rechargeable batteries, other‐
wise their contents can cause damage.◀
Page 71

1. Remove the cover. To do so, press the
cover, arrow 1, and push forwards, arrow 2.
2. Insert batteries of the same type.
3. Close the cover.
Dispose of old batteries at an authorised
collecting point or hand them in to a
Service centre.
Controls
Almost all functions can be operated in the same
way as at the front. Special features of operation
in the rear are listed in the following section.
Audio/video playback
Audio and video can be played in the rear from
the following sources:
▷ Radio
▷ DVD changer
▷ Music collection
▷ Television, TV
▷ CD/DVD player in the rear
▷ USB audio interface in the rear
▷ AUX-In port in the rear
Radio
If the same radio source is selected at the front
and in the rear (for example FM/AM), the same
radio station is played.
Operation is the same as for the radio at the
front.
Rear entertainment Entertainment
Multimedia
CD/DVD
The same thing is shown in the front and rear
when the same box of the DVD changer is se‐
lected.
Operation is same as in front.
Symbol Meaning
... DVD changer
CD/DVD player in the rear
Music collection
It is only possible to save music or export and
import data via the CD/DVD player at the front or
via the USB interface in the centre armrest.
If the music collection is selected at the front and
in the rear, playback is independent.
Operation is the same as for music collection at
the front.
TV
If TV is selected at the front and in the rear, the
same channel is played.
Operation is the same as for TV at the front.
Sound
For headphones in the rear, only treble and bass
can be set. The setting is made separately for
the headphones on the left and right.
Operation is the same as for the sound settings
at the front.
Multi-channel playback, set surround
for headphones
"Settings"
1.
2. "Sound"
3. "Headphones surround"
Telephone
Telephoning via the telephone in the rear.
Online Edition for Part no. 01 40 2 912 836 - 07 12 510
71
Page 72

Entertainment Rear entertainment
An incoming call can be accepted or rejected
without a telephone in the rear. Operation same
as front telephone.
Navigation
Route planning is possible separately in the rear
left/right. It is only possible to start the route
guidance at the front.
Operation is the same as for navigation at the
front.
Suggesting a destination
A destination or trip can be forwarded to the
front as a suggestion. The suggestion can be
accepted at the front and saved or cancelled.
This function is not available with the following
setting: "Driver has priority"
Enter destination.
1.
2. "Suggest destination"
ConnectedDrive
Operation is the same as for ConnectedDrive at
the front.
Settings
The following settings are possible:
▷ "Rear display"
▷ "Language/units": the language can be set
jointly for all screens.
▷ "Sound"
▷ "Climate"
▷ "Connections"
Vehicle information
Content of the on-board computer can be dis‐
played. Operation is only possible at the front.
Enabling
Enabling the rear
Only possible using the iDrive at the front.
1. "Settings"
2. "Rear controller mode"
3. Select the desired priority.
Enable options
Driver has priority
▷ The source selected at the front with iDrive
is played over the vehicle loudspeakers. It
can be selected from the rear passenger
compartment but it cannot be operated from
there. Other audio or video sources may be
operated.
▷ Sound output in the rear is only possible via
headphones.
▷ iDrive at the front can be used to select the
source that is to be displayed in the rear.
Setting the source in the rear using the iDrive at
the front:
"Multimedia" or "Radio"
1.
2. "Rear"
3. Select the desired audio or video source.
Options menu
No split screen possible.
Operation is the same as for the options menu
at the front.
72
Online Edition for Part no. 01 40 2 912 836 - 07 12 510
Same priority
▷ All the audio and video sources can be op‐
erated via the iDrive in the front or in the rear.
Page 73

Rear entertainment Entertainment
▷ Sound output in the rear via headphones:
the source selected using the iDrive at the
front is output via the vehicle loudspeakers.
▷ Sound output via loudspeakers: the source
last selected using the iDrive at the front or
in the rear is output via the vehicle loud‐
speakers.
Rear has priority
▷ The source that was selected in the rear can
be selected from the front using iDrive.
However, it cannot be operated from there.
Other audio or video sources may be oper‐
ated.
▷ Sound output in the rear via headphones:
the source selected using the iDrive at the
front is output via the vehicle loudspeakers.
▷ Sound output via loudspeakers: the source
selected in the rear is output via the vehicle
loudspeakers. No audio or video sources
can be selected using the iDrive at the front.
Switching off the rear DVD
▷ The rear entertainment is switched off.
▷ Switching on rear entertainment again: se‐
lect another priority using the iDrive at the
front and switch on the system, see
page 69.
Volume limit for headphones
The maximum possible volume for the head‐
phones in the rear can be set.
"Settings"
1.
2. "Rear controller mode"
3. "Volume limitation"
Headphones, vehicle loudspeakers
Connecting headphones
Normal headphones
Connection is via jack connector 3.5 mm, see
page 69, on the CD/DVD player in the rear
Wireless headphones
You can get suitable wireless headphones from
your Service centre.
Connect headphones
Up to 3 sets of wireless headphones can be
connected.
Switch on headphones.
1.
2. "Settings"
3. "Connections"
4. "Headphones/remote"
5. Hold down on button on headphones, LED
on the headphones flashes rapidly.
6. "Add new device"
7. Select with which side the headphones are
to be connected.
The headphones are shown on the list of con‐
nected devices. Information regarding the con‐
nected headphones is displayed.
Symbol Meaning
Headphones
Battery charge state
L Connection to left side
R Connection to right side
Online Edition for Part no. 01 40 2 912 836 - 07 12 510
73
Page 74

Entertainment Rear entertainment
Rename headphones
The name shown with the headphones can be
changed.
1. "Settings"
2. "Connections"
3. "Headphones"
4. Highlight the headphones you want to re‐
name.
5. Call up "Options".
6. "Rename"
7. Enter desired names.
Deleting connection of the headphones
The connection with the vehicle may be deleted.
"Settings"
1.
2. "Headphones"
3. Highlight the headphones you want to de‐
lete.
4. Call up "Options".
5. "Delete device"
Selecting page
A set of headphones can be connected to the
left or right side of the rear entertainment. The
side can be changed at any time. The head‐
phones need to be switched on.
"Settings"
1.
2. "Headphones"
3. Highlight the headphones for which you
want to change sides.
4. Call up "Options".
5. "Switch side"
Sound output via headphones of
vehicle loudspeakers
Operation is only possible in the rear.
Call up "Options".
1.
2. "Headphones" or "Loudspeakers"
With the following setting, sound output in the
rear is not possible using the vehicle loud‐
speaker: "Driver has priority".
External devices
General
▷ Connection of external audio or video devi‐
ces or digital cameras using Cinch termi‐
nals, see page 69, to the CD/DVD player in
the rear. The operation is done via the ex‐
ternal device.
▷ Connection of external devices via USB au‐
dio interface to the CD/DVD player in the
rear. Operation is the same as front, see
page 57.
Due to the large number of audio and video de‐
vices available on the market, faultless playback
via the screen cannot be ensured for every audio
and video device.
Connecting an external device
Fold down the cover of the cinch sockets on
1.
the CD/DVD player.
2. Connect the external device to the cinch
sockets.
▷ Video: yellow socket.
▷ Audio: white and red socket.
Starting play
"Multimedia"
1.
2. "External devices"
3. "AUX rear"
Volume control
The volume of the sound output depends on the
audio device. If this volume differs significantly
from other audio sources, it makes sense to bal‐
ance the volumes.
74
Online Edition for Part no. 01 40 2 912 836 - 07 12 510
Page 75

Adjust volume
1. "Multimedia"
2. "External devices"
3. "AUX rear"
4. "Volume"
5. Turn the controller until the desired volume
setting is reached and press the controller.
What to do if...
You can only see a black screen.
▷ Switch on system.
Nothing can be detected on the screen.
▷ Toggling between the screens.
Radio or TV channels are greyed out and cannot
be selected.
▷ Function is restricted based on the selected
priority. Change priority.
DVD does not play back.
▷ The disk does not begin to play automati‐
cally. Start DVD manually.
Vehicle loudspeaker volume cannot be adjusted
in the rear.
▷ Sound output in the rear is done over the
headphones. Change any priority and out‐
put the sound over the vehicle loudspeak‐
ers.
Rear entertainment Entertainment
Online Edition for Part no. 01 40 2 912 836 - 07 12 510
75
Page 76

Online Edition for Part no. 01 40 2 912 836 - 07 12 510
Page 77

Communication
All of the possibilities available for mobile
communication with your family, friends, business
partners or service providers are summarised in
this chapter.
Online Edition for Part no. 01 40 2 912 836 - 07 12 510
Page 78

Communication Telephone
Telephone
Vehicle Equipment
This chapter describes all standard, national and
special equipment provided in the model series.
Therefore equipment not available in a vehicle is
also described, for example the selected special
equipment or national version. That also applies
to safety-relevant functions and systems.
Principle
Mobiles or other external devices, e.g. audio
player, can be connected to the vehicle by Blue‐
tooth.
After single registration, these devices are au‐
tomatically detected with the ignition switched
on. As soon as they are in the vehicle, they can
be operated through iDrive, the buttons on the
steering wheel and by voice.
General
External devices can be used depending on
functionality of the device as a telephone or as
an audio source through the vehicle.
Up to four external devices can be registered. If
the rear telephone is registered, three more ex‐
ternal devices can be registered.
Notes
Using the telephone while the vehicle is in
motion
Only make inputs when traffic activity permits.
As the driver, do not make telephone calls with
the mobile phone in your hand while the vehicle
is in motion; use the hands-free speaking sys‐
tem. The vehicle occupants and other road
users could otherwise be endangered.◀
It might be necessary to have certain functions
enabled by the mobile phone or service pro‐
vider.
At high temperatures, the charging function of
the mobile can be restricted and no longer op‐
erate.
When using the mobile through the vehicle, fol‐
low the user manual of the mobile.
Compatible mobile phones
Visit www.bmw.com/bluetooth for detailed in‐
formation about the mobile phones and external
devices with Bluetooth interface that are sup‐
ported by the mobile phone preparation option.
Viewing vehicle identification number
(VIN) and software part number
The vehicle identification number (VIN) and soft‐
ware part number are necessary so that you can
check which mobile phones are supported by
the mobile phone preparation option. You might
also need details about the mobile phone's soft‐
ware version.
"Settings"
1.
2. "Connections"
3. Call up "Options".
4. "Bluetooth info"
5. "Display system information"
These suitable mobile phones have a certain
software version that supports the functions of
the vehicle described below.
Malfunctions may occur when using other mo‐
bile phones or software versions.
Do not operate a connected mobile phone with
the keypad of the phone to avoid malfunctions.
You have the option of performing a software
update, see page 62.
78
Online Edition for Part no. 01 40 2 912 836 - 07 12 510
Page 79

Telephone Communication
Functions
The following functions can be assigned to a
mobile when registering.
Telephone and additional telephone
A mobile phone can be assigned the telephone
or supplementary telephone function.
Data transfer
A mobile phone assigned the telephone or sup‐
plementary telephone function may also be as‐
signed the data transmission function. For data
transmission, this can result in call charges, for
example, with a roaming connection.
A data transmission is displayed in the status
box, see Owner's Handbook for the vehicle.
The services breakdown assistance, hotline, tel‐
eservice call, automatic teleservice call, Internet
and BMW Live can be used via the mobile
phone. Using the services does not require a
valid BMW Assist contract.
The availability of the function depends on the
country and is series-specific. The mobile
phone must be compatible with and support the
required Bluetooth radio standards, equipped
with a corresponding mobile tariff and have suit‐
able Internet settings.
An existing data transmission can be terminated
immediately, for example, to avoid roaming
costs.
Call up "Options".
1.
2. "Transferring data via device"
The data transfer supplementary function is de‐
activated and can be assigned to another tele‐
phone.
Bluetooth audio
A mobile phone can be assigned the Bluetooth
Audio function. The mobile phone can then be
used as an audio source, see page 60.
Connecting/disconnecting the mobile phone
Operating requirements
▷ Suitable mobile phone.
▷ Mobile phone operational.
▷ Ignition switched on.
▷ Bluetooth in the vehicle and mobile phone
activated.
▷ Bluetooth presettings must be made on the
mobile phone, for example connect without
confirmation or visibility; see Owner’s
Handbook of the device.
▷ If applicable deactivate Bluetooth audio.
▷ Any number with a minimum of 4 and a max‐
imum 16 positions is specified as the Blue‐
tooth passkey. Only required for non-recur‐
ring registration.
▷ Vehicle is at rest.
Activating/deactivating Bluetooth
connection
Bluetooth use is not permitted everywhere.
Comply with relevant local laws.
"Settings"
1.
2. "Connections"
3. "Bluetooth"
4. "Bluetooth"
Enabling/disabling functions
Activate functions before registering, to be able
to assign these to a mobile phone.
Information about suitable mobile phones that
support this function, see page 78.
"Settings"
1.
2. "Connections"
3. "Bluetooth"
4. Call up "Options".
5. "Configure Bluetooth"
Online Edition for Part no. 01 40 2 912 836 - 07 12 510
79
Page 80

Communication Telephone
6. Select desired functions.
▷ "Bluetooth audio"
▷ "Office"
▷ "Secondary telephone"
▷ "Show pictures"
7. Tilt the controller to the left.
Connecting
Connecting the mobile phone
Only connect the mobile phone when the
vehicle is stationary. Otherwise, you may be‐
come distracted and endanger the vehicle oc‐
cupants and other road users.◀
Perform the connection in full at either the front
or rear control display.
"Settings"
1.
2. "Connections"
3. "Bluetooth"
4. "Add new device"
The Bluetooth name of the vehicle is dis‐
played in the control display.
5. Perform other operations on the mobile
phone, see the Owner's Handbook of the
mobile phone: for example finding/connect‐
ing Bluetooth device or new device.
The Bluetooth name of the vehicle is shown
on the display of the mobile phone.
6. Select the Bluetooth name of the vehicle on
the display of the mobile phone.
7. Enter the same passkey on the mobile
phone and via iDrive and confirm.
Or
Compare the control number on the control
display with the control number in the mo‐
bile phone display. Confirm the control num‐
ber in the mobile phone and on the control
display.
"OK"
8. Select the function for which you would like
to use the mobile phone.
9. "OK"
The mobile phone is connected and shown
in the first position on the list of mobile
phones.
Up to three mobile phones can be connected to
the vehicle at the same time.
If the registration was unsuccessful: What to do
if..., see page 81.
Display of supported functions
Functions supported by the mobile phone are
shown as a symbol when registering.
White symbol: function is active.
Grey symbol: function is inactive.
Symbol Function
Telephone.
Additional telephone.
Data transfer.
Audio source.
After connecting for the first time
The mobile phone is paired in the vehicle after a
short delay when the engine is running or the
ignition switched on.
Phonebook entries on the telephone's SIM card
or the mobile phone itself are transferred to the
vehicle after it has been detected, depending on
the mobile phone.
For a few mobile phones, certain settings are
needed, for example, authorisation or secure
connection, see instruction manual of the mo‐
bile phone.
Connecting a certain mobile phone
"Settings"
1.
2. "Connections"
80
Online Edition for Part no. 01 40 2 912 836 - 07 12 510
Page 81

Telephone Communication
3. "Bluetooth"
4. Select the mobile phone to be connected.
Functions assigned to the mobile phone before
disconnection are reassigned to the mobile
phone upon reconnection. If applicable, this
function was deactivated for a previously con‐
nected mobile phone.
Configuring mobile phone
Functions can be activated or deactivated with
a registered and connected mobile phone.
1. "Settings"
2. "Connections"
3. "Bluetooth"
4. Highlight mobile phone to be configured.
5. Call up "Options".
6. "Configure device"
7. At least one function must be selected.
▷ "Telephone"
▷ "Secondary telephone"
▷ "Data transfer"
▷ "Audio"
8. "OK"
If a function is assigned to a mobile phone, then
this is deactivated for the already connected
mobile phone and the mobile phone is logged
off.
Switching telephone and additional
telephone
The function of the telephone and additional tel‐
ephone can be switched automatically.
"Settings"
1.
2. "Connections"
3. "Bluetooth"
4. "Swap phone/second. phone"
Disconnecting a mobile phone
1. "Settings"
2. "Connections"
3. "Bluetooth"
4. Highlight the mobile phone to be discon‐
nected.
5. Call up "Options".
6. "Delete device"
What to do if...
Information about suitable mobile phones, see
page 78.
Mobile phone not registered or paired.
▷ Is Bluetooth activated in the vehicle and the
mobile phone? Activate Bluetooth in the ve‐
hicle and the mobile phone.
▷ Do the Bluetooth passkeys for the mobile
phone and vehicle match. Enter the same
passkey on the mobile phone and using
iDrive.
▷ Duration for passkey input longer than
30 seconds. Repeat the connection at‐
tempt.
▷ Does the control number on the mobile
phone and vehicle agree? Repeat the con‐
nection attempt.
▷ Too many Bluetooth devices paired to the
mobile phone or the vehicle? If necessary
delete the pairing information for some
other device.
▷ Is Bluetooth audio activated? Deactivate
Bluetooth audio.
▷ Is the mobile phone in power-save mode or
is the battery low? Charge the mobile phone
using the snap-in adapter or the charging
cable.
▷ If appropriate, only one mobile phone can be
connected to the vehicle, depending on the
mobile phone. De-register the mobile phone
from the vehicle and only register and con‐
nect one mobile phone.
The mobile phone is no longer responding.
Online Edition for Part no. 01 40 2 912 836 - 07 12 510
81
Page 82

Communication Telephone
▷ Switch the mobile phone off and on again.
▷ Too high or low ambient temperatures? Do
not subject the mobile phone to extreme
ambient conditions.
Telephone functions not possible.
▷ Configure mobile phone and connect with
the telephone or additional telephone func‐
tion.
No phone book entries, not all entries or incom‐
plete entries are displayed.
▷ Transfer of the phone book entries has not
completed.
▷ Under certain circumstances only the phone
book entries saved in the mobile phone or
on the SIM card are transferred.
▷ It might be that phone book entries with spe‐
cial characters cannot be displayed.
▷ Number of phone book entries to be stored
is too high.
▷ Data volume of the contact too large, e.g.
due to stored information such as notes?
Reduce data volume of the contact.
▷ Mobile phone connected as audio source?
Configure mobile phone and connect with
the telephone or additional telephone func‐
tion.
Quality of the phone connection is poor.
▷ Bluetooth signal strength can be adjusted
on mobile phone, depends on the model.
▷ Place the mobile phone in the snap-in
adapter or close to the centre console.
▷ Adjust the volume of the microphone and
speaker separately.
If all the points on the list have been reviewed
and the desired function cannot be run, contact
Hotline or Service Centre.
Controls
Adjusting the volume
Turn the knob until the desired volume is
reached. The setting is saved for the remote
control currently in use.
Automatic volume equalisation
The vehicle adjusts the volume of the micro‐
phone on the telephone and the volume of the
other party automatically. Depending on the
mobile phone, it may be necessary to adapt the
volumes. Settings are possible only during a call
and must be adjusted separately for each mobile
phone. The settings are deleted as soon as the
mobile phone is de-registered.
"Settings"
1.
2. "Sound"
3. "Volume settings"
4. Select desired setting: "Microphone" or
"Loudspeak."
5. Adjusting: turn the controller.
6. Saving: press the controller.
Incoming call
Receiving a call
If the number of the caller is saved in the tele‐
phone book and is transferred from the network,
the name of the contact and the telephone num‐
ber is displayed. Otherwise, only the phone
number is displayed.
Accepting a call
Using iDrive
"Accept"
82
Online Edition for Part no. 01 40 2 912 836 - 07 12 510
Page 83

Via button on the steering wheel
Press the button.
Via instrument cluster
"Accept"
Rejecting a call
Using iDrive
"Reject"
Via instrument cluster
"Reject"
Ending a call
Using iDrive
"Hang up"
Telephone Communication
Via instrument cluster
"Hang up"
Dialling a number
1. "Telephone"
2. "Dial number"
3. Select the digits individually.
4. Select the symbol. The call is made using
the mobile phone assigned to the telephone
function.
If a call is to be made through the supplementary
telephone:
Select the digits individually.
1.
2. Call up "Options".
3. "via"
The phone number can also be entered using
the voice control system. The call is made using
the mobile phone assigned to the telephone
function.
Via button on the steering wheel
Press the button.
Online Edition for Part no. 01 40 2 912 836 - 07 12 510
Calls with a number of participants
General
It is possible to switch between calls or merge
two calls to set up a conference. The functions
must be supported by the mobile phone and
service provider.
Accepting a call during another call
If there is a second call during an ongoing call
you hear a call waiting signal, if applicable.
"Accept"
The call is accepted and the existing call is held.
83
Page 84

Communication Telephone
Setting up a second call
Set up another call during a call.
1. "Telephone"
2. "Active calls"
3. Dial a new phone number or select from a
list.
Switching between two calls,
alternating
You can switch between two calls. The calls can
be made using both connected mobile phones.
Active call is displayed in colour.
Call on hold is displayed in grey.
"Swap calls"
The phone switches to the call that is in pro‐
gress.
Setting up a conference
Two calls can be merged to set up a telephone
conference. The calls must be made through a
mobile phone.
Setting up two calls.
1.
2. "Place conference call"
On termination, both calls are always termina‐
ted. If one call is terminated by another sub‐
scriber, the other call is continued, if required.
DTMF overlap dialling
Using DTMF overlap dialling to access network
services or to control devices, e.g. remote an‐
swer phone access. This requires the DTMF
code.
1. "Telephone"
2. Selecting a contact from a list or "Dial
number".
3. "DTMF suffix dialling"
4. Enter DTMF code via iDrive.
Phone book
General
The phone book has access to the contacts
stored in the vehicle and contacts of the mobile
phones assigned the function telephone or sup‐
plementary telephone. All contacts for which a
phone number is entered are displayed. The
contacts saved with BMW Online are also
shown.
Displays
"Telephone"
1.
2. "Phone book"
The symbols mark the storage location of the
contacts.
Setting the microphone to mute
The microphone can be muted during active
calls.
"Telephone"
1.
2. "Active calls"
3. "Microphone muted"
The mute microphone is automatically activa‐
ted:
▷ When a new call is set up.
▷ When alternating between call parties.
84
Online Edition for Part no. 01 40 2 912 836 - 07 12 510
Symbol Storage location
Vehicle.
Mobile phone.
BMW Online address book.
Page 85

Telephone Communication
Making a call
The entries can be selected and a call set up.
Symbol Meaning
Contact with a stored number.
Contact with more than one stored
number.
Call not possible, mobile phone with‐
out reception or network, Teleser‐
vice Call or data transfer active.
Phone book entries with a stored phone num‐
ber: select desired entry.
Phone book entries with more than one stored
phone number: select desired entry and then
phone number.
The call is made using the mobile phone as‐
signed to the telephone function.
If the call is to be made using the mobile phone
assigned to the supplementary telephone func‐
tion:
Highlight contact, and highlight the desired
1.
phone number if there are more than one.
2. Call up "Options".
3. "via"
Editing contacts
Changing the entries in the "Contacts" menu. If
a contact is changed, the changes are not saved
on the mobile phone. A copy of the entry is saved
in the vehicle.
Highlight the contact.
1.
2. Call up "Options".
3. "Edit entry"
The contact can be edited.
Redialling
tary telephone, are transferred to the vehicle.
The last 20 numbers dialled are displayed for
each mobile phone.
Dialling numbers via the instrument
cluster
Possible if no call is currently active.
1.
2. Select the desired phone number.
The call is made through the mobile phone from
the list of which the number comes.
Press key on the steering wheel.
Dial number using iDrive
"Telephone"
1.
2. "Last number redial"
3. Select the desired entry and telephone
number as necessary.
The call is made using the mobile phone as‐
signed to the telephone function.
If the call is to be made using the mobile phone
assigned to the supplementary telephone func‐
tion:
Mark entry.
1.
2. Call up "Options".
3. "via"
Saving an entry in Contacts
Mark entry.
1.
2. Call up "Options".
3. "Save as contact" or "Add to contact"
4. If necessary, select contact.
5. Select the type of number: "Home", "Work",
"Mobile" or "Others"
6. If necessary, complete the entries.
7. "Save contact"
General
Lists of number dialled on the mobile phones
assigned the function telephone or supplemen‐
Online Edition for Part no. 01 40 2 912 836 - 07 12 510
85
Page 86

Communication Telephone
Incoming calls
General
Lists of incoming calls on the mobile phones as‐
signed the function telephone or supplementary
telephone, are transferred to the vehicle. The
last 20 incoming calls are displayed for each
mobile phone.
Dial number using iDrive
1. "Telephone"
2. "Received calls"
3. Select the desired entry and telephone
number as necessary.
The call is made using the mobile phone as‐
signed to the telephone function.
If the call is to be made using the mobile phone
assigned to the supplementary telephone func‐
tion:
Mark entry.
1.
2. Call up "Options".
3. "via"
Saving an entry in Contacts
Mark entry.
1.
2. Call up "Options".
3. "Save as contact" or "Add to contact"
4. If necessary, select contact.
5. Select the type of number: "Home", "Work",
"Mobile" or "Others"
6. If necessary, complete the entries.
7. "Save contact"
Hands-free system
General
Calls taken via the hands-free system can be
continued via the mobile phone and vice versa.
From mobile phone to the hands-free
system
Calls that were started outside the Bluetooth
range of the vehicle can be continued via the
hands-free system when the ignition is switched
on.
Depending in the mobile phone, there is an au‐
tomatic switch to the hands-free mode.
If it is not automatically toggled, follow what is
displayed on the mobile phone screen, and also
see the instruction manual for the mobile phone.
From the hands-free system to the
mobile phone
Calls taken via the hands-free system can also
be continued via the mobile phone, depending
on the mobile phone.
Then follow what is displayed on the mobile
phone, and also see the instruction manual of
the mobile phone.
Snap-in adapter
Principle
The snap-in adapter enables:
▷ Storage of the mobile phone.
▷ Charging of the battery.
▷ Connection to the external aerial of the ve‐
hicle.
This ensures better network reception and uni‐
form reproduction quality.
General
More detailed information on the snap-in adapt‐
ers which compatibly support the functions of
the handy can be obtained from the Service cen‐
tre.
Notes
At high temperatures, the charging functions of
the mobile can be restricted and no longer op‐
erate.
86
Online Edition for Part no. 01 40 2 912 836 - 07 12 510
Page 87

Telephone Communication
Installed position
In the front centre armrest. The direction of in‐
stallation in the centre armrest varies from vehi‐
cle to vehicle.
Inserting the snap-in adapter
1. Press the button and take out the cover.
2. Insert snap-in adapter at the front, arrow 1,
and press to the bottom, arrow 2, until the
adapter engages.
nections, arrow 1, and push down, arrow 2,
until it engages.
Removing the mobile phone
Press the button and pick up the mobile phone.
Inserting the mobile phone
Depending on the mobile phone, remove
1.
the protective cap from the aerial connector
and from the USB port of the mobile phone
if necessary.
2. Push the mobile phone with buttons up‐
wards in the direction of the electrical con‐
Online Edition for Part no. 01 40 2 912 836 - 07 12 510
87
Page 88

Communication Office
Office
Vehicle Equipment
This chapter describes all standard, national and
special equipment provided in the model series.
Therefore equipment not available in a vehicle is
also described, for example the selected special
equipment or national version. That also applies
to safety-relevant functions and systems.
Principle
Contacts, appointments, tasks, notes, text mes‐
sages and e-mails from the mobile phone can be
viewed on the control display if the mobile phone
supports these functions and is compatible with
the corresponding Bluetooth standards. Func‐
tions have to be released separately as required.
Transmission can take a few minutes after the
first time a mobile phone is paired.
General
Information on which mobile phones support
which Office functions can be found under
www.bmw.com/bluetooth.
Contents are completely displayed when the
vehicle is at standstill.
Operating requirements
▷ Office is activated, see page 79.
▷ A compatible mobile phone is registered
and connected to the vehicle. The mobile
phone is assigned the function telephone or
supplementary telephone.
▷ For some mobile phones, data access must
be confirmed on the mobile phone.
▷ Time, time zone and date are correctly set
on the Control Display and on the mobile
phone, for example to display appointments
correctly.
Updating
The data is updated every time the mobile
phone is connected to the vehicle. Appoint‐
ments, tasks, notes and reminders can be up‐
dated separately.
"Office"
1.
2. "Office today", "Calendar", "Tasks",
"Notes/voice memos" or "Reminders"
3. Call up "Options".
4. "Update data"
Data from the mobile phone is transferred to
the vehicle again.
Notes
Do not operate Office while the vehicle is
in motion.
Only make adjustments if the traffic conditions
are appropriate. Otherwise, you may become
distracted and endanger the vehicle occupants
and other road users.◀
88
Online Edition for Part no. 01 40 2 912 836 - 07 12 510
Office update
The number of unread messages and active
tasks as well as appointments coming up are
displayed.
"Office"
1.
2. "Office today"
Page 89

Office Communication
3. Select the desired entry to display details.
Contacts
General
Contacts can be created and edited. The con‐
tacts from the mobile phone assigned the func‐
tion telephone or supplementary telephone are
also shown, as are the contacts from the BMW
Online address book. The addresses can be
used as navigation destinations and the phone
numbers dialled directly.
Displaying contacts
"Office"
1.
2. "Contacts"
All contacts are listed in alphabetical order.
The A-Z search function is offered, depend‐
ing on the number of contacts.
It can be selected whether the contacts are to
be transferred from a mobile. The contacts can
also be transferred from both connected mo‐
biles.
Call up "Options".
1.
2. Select mobile from which the contacts are
to be transferred.
A symbol indicates the storage location of the
contacts:
Symbol Storage location
Vehicle.
Mobile phone.
BMW Online address book.
Displaying contacts from BMW Online
To display contacts from BMW Online, when
logging on to BMW Online the function "Log in
automatically" must be enabled.
Dial a phone number
Select the desired contact.
1.
2. Select the phone number.
The connection is established.
If a call is to be made through the supplementary
telephone:
Select the desired contact.
1.
2. Highlight phone number.
3. Call up "Options".
4. "via"
Editing contacts
Note
If a contact that comes from the mobile phone
or BMW Online is edited, the changes are not
saved on the mobile phone or at BMW Online. A
copy of the entry is saved in the vehicle.
Online Edition for Part no. 01 40 2 912 836 - 07 12 510
89
Page 90

Communication Office
Edit
1. Select the desired contact.
2. "Edit contact"
3. Change entries.
4. "Save contact in veh."
Selecting a contact as navigation
destination
Select the desired contact.
1.
2. Select address.
In the case of contacts from the mobile
phone and BMW Online address book, the
address might have to be matched to the
navigation data in the vehicle. If that is the
case:
Correct the address.
3. "Start guidance" or "Add as another
destination"
Checking address as destination
An address that is to be added to the route guid‐
ance must match the navigation data contained
in the vehicle. Here, the address can be
checked.
Select the desired contact.
1.
2. Highlight address.
3. Call up "Options".
4. "Check as destination"
5. If necessary, correct and save the address.
If the address is corrected and saved, a copy is
created in the vehicle. The address is not
changed on the mobile phone or BMW Online.
Display the Internet address of a
contact
The Internet address stored for a contact can be
called up.
1. Select the desired contact.
2. Select Internet address.
The selected Internet address is displayed
in the browser.
Displaying additional information from
BMW Online
Display of additional information for a contact if
present at BMW Online.
Select the desired contact.
1.
2. Call up "Options".
3. "Addit. info (BMW Online)"
New contact
Attaching
"Office"
1.
2. "Contacts"
3. Call up "Options".
4. "New contact"
5. Input boxes still show previous input: "Clear
fields"
6. Complete input boxes: select input box.
7. Enter text and make any assignment.
8. In the navigation system: enter address.
Only addresses that are present in the car's
navigation data can be entered. This en‐
sures that route guidance is possible for all
addresses.
If applicable, "Accept"
9. "Save contact in veh."
The entries for a contact are assigned by the
following symbols.
90
Online Edition for Part no. 01 40 2 912 836 - 07 12 510
Page 91

Office Communication
Symbol Meaning
Private phone number
Work phone number
Mobile phone number
Other phone number
Private address
Work address
E-mail address
Internet address
Specifying home address
A home address can be saved in memory. This
home address appears at the top of the list of
contacts.
"Office"
1.
2. "Contacts"
3. "Home address"
4. Create contact.
5. "Save contact in veh."
Selecting sort order for names
Names can be displayed in a different order.
"Office"
1.
2. "Contacts"
3. Call up "Options".
4. "Display surname first" or "Display first
name first"
The sort order for names might not be the same
as the selected sort order, depending on how
contacts are saved on your mobile phone.
Display contact images
Photos saved for contacts are saved in the ve‐
hicle when the mobile phone is connected to the
vehicle.
1. "Settings"
2. "Connections"
3. "Bluetooth"
4. Call up "Options".
5. "Configure Bluetooth"
6. "Show pictures"
Displaying all contact images is activated or de‐
activated.
Exporting/importing contacts
Contacts can be exported and imported via Per‐
sonal Profile. The contacts stored in the vehicle
are exported, not the contacts from the mobile
phone or BMW Online.
Deleting contacts
Only contacts saved in the vehicle are deleted.
The contacts from the mobile phone or BMW
Online cannot be deleted.
"Office"
1.
2. "Contacts"
3. Highlight the contact.
4. Call up "Options".
5. "Delete contact" or "Delete all contacts".
6. If applicable, "Yes"
Messages
General
Messages are only displayed when they are
complete.
Displaying messages
"Office"
1.
2. "Messages"
Online Edition for Part no. 01 40 2 912 836 - 07 12 510
91
Page 92

Communication Office
The latest messages are shown.
It can be selected whether the messages are to
be transferred from a mobile. The messages can
also be transferred from both connected mo‐
biles.
If a mobile phone is assigned to more than one
e-mail account, the desired e-mail account must
be selected.
1. Call up "Options".
2. Select mobile and which account from
which the messages are to be transferred.
A Symbol designated the message type.
Symbol Message type
SMS.
My Info
Message from information service.
E-mail from mobile phone
Select this to display a message.
Filter message list
The message list can be filtered if more than one
type of message is available. Filtering can be
combined between message type and message
status.
"Filter:"
1.
2. Select type of message.
▷ "All message types"
All messages are displayed.
▷ "E-mail"
Only E-mails from the mobile phone are
displayed.
▷ "Text message"
Only SMS messages are displayed.
▷ "Service messages"
Only service messages are displayed.
Select message status.
▷ "Unread messages"
Only unread messages are shown.
▷ "Since start of journey"
All SMS and E-mails received since the
start of the trip are shown.
▷ "All messages"
All messages are displayed.
Deleting messages
General
All message types can be deleted in the vehicle.
SMS and E-mails transferred from the mobile to
the vehicle are also deleted on the mobile.
Deleting a service message
Select the desired service message.
1.
2. Call up "Options".
3. "Delete message"
Delete all service messages
Call up "Options".
1.
2. "Delete all messages" or "Delete
messages"
SMS
General
SMS messages transferred from the mobile
phone to the vehicle.
Additional functions
The following functions are available when an
SMS message is selected:
92
Online Edition for Part no. 01 40 2 912 836 - 07 12 510
Page 93

Office Communication
Symbol Function
Browse in the SMS
"Play", see page 97.
"Call sender"
"Use contact data", see page 97.
"Mark as unread"
"Delete message"
E-mail
General
E-mail messages transferred from the mobile
phone to the vehicle.
Deactivate complete display
Opening an E-mail in the vehicle completely
transfers it to the vehicle. This may be subject
to charges.
"Office"
1.
2. "Messages"
3. Call up "Options".
4. "Fully download e-mails"
Only part of the E-mail is loaded from the
mobile phone into the vehicle.
Additional functions
The following functions are available when an email message is selected:
Symbol Function
Browse in the e-mail
"Play", see page 97.
Symbol Function
"Mark as unread"
"Delete e-mail"
My Info
General
My Info messages from the BMW Assist Portal.
Replying
Send a predefined reply.
Select the desired message.
1.
2. Call up "Options".
3. "Answer"
Additional functions
The following functions are available when a
message is selected:
Symbol Function
"Start guidance" or "Add as another
destination"
"Call"
A phone connection is established if
the message contains a number.
"Select phone number"
Select the desired number from the
list if the message contains more
than one number. Telephone con‐
nection is set up.
"Send e-mail (BMW Online)"
"Open link in browser"
"Sender/recipient"
Contact data are shown
"Use contact data", see page 97.
Online Edition for Part no. 01 40 2 912 836 - 07 12 510
Message from information service
General
Messages from BMW information service.
93
Page 94

Communication Office
Saving an address
1. Select the desired message.
2. Call up "Options".
3. "Save contact in veh."
Additional functions
The following functions are available when a
message is selected:
Symbol Function
"Start guidance" or "Add as another
destination"
"Call"
A phone connection is established if
the message contains a number.
"Select phone number"
Select the desired number from the
list if the message contains more
than one number. Telephone con‐
nection is set up.
"Send e-mail (BMW Online)"
"Open link in browser"
Call up Internet address.
It can be selected whether the appointments are
to be transferred from a mobile. The appoint‐
ments can also be transferred from both con‐
nected mobiles.
1. Call up "Options".
2. Select mobile phone from which the ap‐
pointments are to be transferred.
Scroll to the current week, or
"Previous days": shows the last 7 days.
"Next days": shows the next 7 days.
Show calendar month
Select date.
1.
The current month is shown. Appointments
are entered on the highlighted calendar
dates.
2. Turn controller until the previous or next
month is shown.
Show calendar day
Show calendar month.
1.
2. Select desired day.
The appointments of the selected day are
shown.
"Further information"
Display additional information
Calendar
Principle
The last 30 days and the next 90 days can be
displayed.
Displays
"Office"
1.
2. "Calendar"
Yesterday, today and the next five days are
shown.
94
Online Edition for Part no. 01 40 2 912 836 - 07 12 510
Appointment
Displays
Select the desired appointment.
Additional functions
The following functions are available for the ap‐
pointment entry selected:
Page 95

Office Communication
Symbol Function
Browse in the appointment
"Read out", see page 97.
"Use contact data", see page 97.
Tasks
Display task list
"Office"
1.
2. "Tasks"
It can be selected whether the tasks are to be
transferred from a mobile. The tasks can also be
transferred from both connected mobiles.
Call up "Options".
1.
2. Select mobile phone from which the tasks
are to be transferred.
Sort task list
Select headers in the task list.
1.
Additional functions
The following functions are available when a
task is selected:
Symbol Function
Browse in the task
"Read out", see page 97.
"Use contact data", see page 97.
Notes
Display notes
"Office"
1.
2. "Notes/voice memos"
All text memos from the mobile phone and
voice memos recorded in the vehicle are
shown.
It can be selected whether the notes are to be
transferred from a mobile. The notes can also be
transferred from both connected mobiles.
Call up "Options".
1.
2. Select mobile phone from which the memos
are to be transferred.
2. Select sort criterion:
▷ "Priority (!)"
▷ "Subject"
▷ "Due date"
Display task
Select the desired task.
Online Edition for Part no. 01 40 2 912 836 - 07 12 510
Text memos
Show text memos
Select desired text memo.
Additional functions
The following functions are possible with a se‐
lected text memo:
Symbol Function
Browse in the memo
"Read out", see page 97.
"Use contact data", see page 97.
95
Page 96

Communication Office
Voice memos
General
A voice memo can be recorded. These are
stored in the vehicle and can be exported
through the USB interface.
Record voice note
1. "Office"
2. "Notes/voice memos"
3. "New voice memo"
4. "Record voice memo"
Function selection
Symbol Function
"Record"
Start recording. After the voice
memo can be recorded after the
tone.
"Pause"
Pressing again restarts the record‐
ing.
"Play"
The recording cannot be continued
after starting playback.
"To beginning"
"Fast reverse"
"Fast forward"
"Delete"
"OK"
Finish recording.
Displaying voice memo
Select desired voice memo.
Additional functions
The following functions are possible with a se‐
lected voice memo:
Symbol Function
"Play"
"Pause"
"To beginning"
"Fast reverse"
"Fast forward"
"Delete"
Export voice note
To export voice memos through the USB con‐
nection in the centre console, a suitable medium
must be connected to the USB interface.
▷ Suitable media: USB mass storage facilities,
for example USB memory sticks or MP3
players with USB interface.
▷ Unsuitable media: USB hard disks, USB
hubs, USB memory card readers with a
number of bays, Apple iPod/iPhone.
▷ File systems: current file systems for USB
devices are supported. FAT 32 format is
recommended.
1. Connect USB medium to the USB interface
in the centre armrest, see page 57.
2. "Office"
3. "Notes/voice memos"
4. Highlight desired voice memo.
5. Call up "Options".
6. "Export all memos (USB)" or "Export voice
memo (USB)"
All voice notes are exported and/or the pre‐
viously-marked voice note is exported.
Delete voice note
Mark desired voice note.
1.
2. Call up "Options".
96
Online Edition for Part no. 01 40 2 912 836 - 07 12 510
Page 97

Office Communication
3. "Delete all voice memos" or "Delete voice
memo"
4. "OK"
Reminders
General
Reminders connected to appointments and
tasks are displayed. After an appointment or
task deadline has elapsed, the reminder is no
longer displayed.
Display reminders
"Office"
1.
2. "Reminders"
3. Select the desired reminder.
The relevant appointment or task is dis‐
played.
It can be selected whether the reminders are to
be transferred from a mobile. The reminders can
also be transferred from both connected mo‐
biles.
Call up "Options".
1.
2. Select mobile phone from which the remind‐
ers are to be transferred.
Activate/deactivate pop-up reminder
"Office"
1.
2. Call up "Options".
3. "Reminder pop-up"
All reminders for appointments and tasks
are shown in a list on the control display
when they are due.
Close all reminders
"Office"
1.
2. "Reminders"
3. "Close all reminders"
Use contact data
General
Contact data from appointments, tasks, SMS,
E‑mails and notes can be stored or selected.
Display contact or dial telephone
number
1. "Use contact data"
2. Display contact or dial telephone number:
▷ Select contact to display a detailed view
of the contact.
▷ Select telephone number to make a di‐
rect connection.
Store contact data
"Use contact data"
1.
2. Highlight telephone number or e-mail ad‐
dress.
3. Call up "Options".
4. "Add to contact" or "Save as contact"
Reading out
General
SMS, E-mails, appointments, tasks, memos and
voice memos can be read out or played back.
Reading out
Select desired element.
1.
2. "Read out"
The following possibilities are available when
reading out or playing back:
▷ "Pause"
Interrupt reading out. Select again to restart
reading out.
▷ "To beginning"
Read out again from the beginning.
▷ "Next paragraph"
Skip paragraph.
Online Edition for Part no. 01 40 2 912 836 - 07 12 510
97
Page 98

Communication Office
▷ "Previous paragraph"
Return to last paragraph.
▷ To end reading out or playback, tip the con‐
troller to the left.
What to do if...
Information about suitable mobile phones, see
page 78.
Appointments, tasks, reminders, memos, or
messages from the mobile phone are not dis‐
played?
▷ Mobile phone is not suitable for the missing
function or it is not connected correctly?
▷ Mobile phone is also connected by WLAN.
▷ Office function is deactivated.
▷ Mobile phone is not selected for transferring
the desired elements.
▷ Appointments are more than 30 days old/
more than 90 days ahead.
▷ Tasks are marked as done.
▷ Not all stored appointments, tasks, notes,
messages in the mobile phone are displayed
in the vehicle, depending on the number of
stored appointments.
Are not all appointments, tasks and reminders
from the mobile phone displayed at the correct
time?
▷ Time zone, time or date is not correctly set
on the control display and the mobile phone.
The E-mail attachment is not displayed.
▷ E-mails are transferred without attach‐
ments.
Texts of entries are not fully displayed.
▷ Texts are abridged before they are transfer‐
red from the mobile phone.
▷ Synchronisation between mobile phone and
vehicle might take several minutes to com‐
plete.
Contact photos are not displayed.
▷ For each mobile phone connected, a maxi‐
mum of 200 contact images are transferred
to the vehicle.
Are E-mails displayed with a delay?
▷ Check E-mail settings on the mobile phone
and adjust, if applicable.
If all the points on the list have been reviewed
and the desired function cannot be run, contact
Hotline or Service Centre.
98
Online Edition for Part no. 01 40 2 912 836 - 07 12 510
Page 99

Contacts
Contacts Communication
Vehicle Equipment
This chapter describes all standard, national and
special equipment provided in the model series.
Therefore equipment not available in a vehicle is
also described, for example the selected special
equipment or national version. That also applies
to safety-relevant functions and systems.
General
Contacts can be created and edited. The con‐
tacts from the mobile are also shown. Addresses
can be used as navigation destinations and the
phone numbers dialled directly.
Operating requirements
This description of the contacts applied with
equipment with hands-free system with USB in‐
terface or without a mobile phone provision.
New contact
Attaching
"Contacts"
1.
2. "New contact"
4. To complete the input fields: select the sym‐
bol beside the input field.
5. Enter text.
6. If equipped with navigation system: Enter
address. Only addresses that are present in
the car's navigation data can be entered.
This ensures that route guidance is possible
for all addresses.
7. If applicable, "Save"
8. "Save contact in veh."
Specifying home address
A home address can be saved in memory. This
home address appears at the top of the list of
contacts.
"Home address"
1.
2. Create contact.
3. "Save contact in veh."
3. Input boxes still show previous input: "Clear
fields"
Online Edition for Part no. 01 40 2 912 836 - 07 12 510
My contacts
General
List of all contacts saved in the vehicle.
Displaying contacts
"Contacts"
1.
99
Page 100

Communication Contacts
2. "My contacts"
All contacts are listed in alphabetical order. The
A-Z search function is offered, depending on the
number of contacts.
A symbol indicates the storage location of the
contacts:
Symbol Storage location
Vehicle.
Mobile phone.
Dial a phone number
Select the desired contact.
1.
2. Select the phone number.
The connection is established.
Editing contacts
Select the desired contact.
1.
2. "Edit contact"
If a contact that comes from the mobile phone is
edited, the changes are not saved on the mobile
phone. A copy of the entry is saved in the vehicle
and only the copy is displayed. Under certain
circumstances an identical contact entry is cre‐
ated.
Selecting a contact as navigation
destination
1. Select the desired contact.
2. Select address.
In the case of contacts from the mobile
phone, the address might have to be
matched to the navigation data in the vehi‐
cle. In this case: correct the address.
3. "Start guidance" or "Add as another
destination"
Checking address as destination
An address that is to be added to the route guid‐
ance must match the navigation data contained
in the vehicle. Here, the address can be
checked.
Select the desired contact and highlight the
1.
address.
2. Call up "Options".
3. "Check as destination"
4. If necessary, correct and save the address.
If the address is corrected and saved, a copy is
created in the vehicle. The address is not
changed on the mobile phone.
3. Change entries.
4. Tilt the controller to the left.
5. "Yes"
100
Online Edition for Part no. 01 40 2 912 836 - 07 12 510
Selecting sort order for names
Names can be displayed in a different order.
"My contacts"
1.
2. Call up "Options".
3. "Display surname first" or "Display first
name first"
The sort order for names might not be the same
as the selected sort order, depending on how
contacts are saved on your mobile phone.
 Loading...