

Page 1

Contents
Owner's Manual
A-Z
The Ultimate Driving
Machine
NAVIGATION,
NAVIGATION,
ENTERTAINMENT,
ENTERTAINMENT,
COMMUNICATIONS.
COMMUNICATIONS.
OWNER'S MANUAL.
OWNER'S MANUAL.
Online Edition for Part no. 01 40 2 912 857 - 07 12 490
Page 2

Page 3

Owner's Manual for Vehicle
Thank you for choosing a BMW.
The more famliar you are with the systems of your BMW, the more
easily you will be able to take full advantage of them. We therefore
strongly suggest:
Read this Owner's Manual before starting off in your new BMW.
Also use the Integrated Owner's Manual in your vehicle. It con‐
tains important information on the operation of your navigation
system, the entertainment and communication systems that will
help you make full use of the technical features they offer.
Any updates made after the editorial deadline for the printed or
integrated Owner's Manual are located in the appendix of the
printed quick reference for the vehicle.
Supplementary information can be found in the additional bro‐
chures in the onboard literature.
We wish you a safe and enjoyable drive.
BMW AG
Online Edition for Part no. 01 40 2 912 857 - 07 12 490
Page 4

© 2012 Bayerische Motoren Werke
Aktiengesellschaft
Munich, Germany
Reprinting, including excerpts, only with the written
consent of BMW AG, Munich.
US English VI/12, 07 12 490
Printed on environmentally friendly paper, bleached
without chlorine, suitable for recycling.
Online Edition for Part no. 01 40 2 912 857 - 07 12 490
Page 5

Contents
The fastest way to find information on a partic‐
ular topic or item is by using the index, refer to
page 130.
Navigation
8 Navigation system
9 Destination input
18 Destination guidance
22 Map view
25 Traffic bulletins
29 Navigation data
30 What to do if ...
Entertainment
34 Tone
37 Radio
45 CD/multimedia
68 Rear entertainment
Communication
78 Telephone
88 Office
100 Contacts
103 ConnectedDrive
110 Telephone in the rear
Reference
130 Everything from A to Z
Online Edition for Part no. 01 40 2 912 857 - 07 12 490
Page 6
Online Edition for Part no. 01 40 2 912 857 - 07 12 490
Page 7
Navigation
This chapter contains various examples of how
the navigation system can guide you reliably to
your destination.
Online Edition for Part no. 01 40 2 912 857 - 07 12 490
Page 8

Navigation Navigation system
Navigation system
Vehicle equipment
All standard, country-specific and optional
equipment that is offered in the model series is
described in this chapter. Therefore, equipment
is also described that is not available in a vehicle,
e. g., because of the selected optional equip‐
ment or country variant. This also applies for
safety-related functions and systems.
General information
The navigation system can determine the pre‐
cise position of the vehicle, with the aid of sat‐
ellites and vehicle sensors, and can reliably
guide you to every entered destination.
Navigation data are stored in the vehicle and can
be updated.
Entries in stationary vehicle
Enter data only when the vehicle is sta‐
tionary, and always give priority to the applicable
traffic regulations in the event of any contradic‐
tion between traffic and road conditions and the
instructions issued by the navigation system.
Failure to take to this precaution can place you
in violation of the law and put vehicle occupants
and other road users in danger.◀
Starting navigation system
1.
2. "Navigation"
troller.
Press the button on the controller.
The navigation system can also be ac‐
cessed directly with the button on the con‐
8
Online Edition for Part no. 01 40 2 912 857 - 07 12 490
Page 9
Destination input
Destination input Navigation
Vehicle equipment
All standard, country-specific and optional
equipment that is offered in the model series is
described in this chapter. Therefore, equipment
is also described that is not available in a vehicle,
e. g., because of the selected optional equip‐
ment or country variant. This also applies for
safety-related functions and systems.
Manual destination entry
General information
The system supports you in entering city or
street names e.g. by automatically completing
the entry.
Stored town/city and street names can be called
up quickly.
▷ If the existing entries should not be changed,
the entries for the state/province and town/
city can be skipped.
▷ Destination guidance is started to the town/
city center if no street is entered.
▷ If part of an address has not been entered,
or not entered unambiguously, a list of cor‐
responding options will be displayed after
the destination has been accepted. If cities
or addresses are included in the list multiple
times, they will be displayed in splitscreen.
Entering a state/province
"Navigation"
1.
2. "Enter address"
3. Select "State/Province" or the displayed
state/province.
Entering a town/city
Select "Town/City/Postal Code" or the dis‐
1.
played town/city.
2. Select letters, if applicable.
The list is narrowed down further with each
entry.
3. Move the controller to the right.
4. Select the town/city name from the list.
If there are several towns/cities with the same
name:
Change to the list of town/city names.
1.
2. Highlight the town/city.
3. Select the town/city.
Online Edition for Part no. 01 40 2 912 857 - 07 12 490
9
Page 10
Navigation Destination input
Entering the postal code
1. Select "Town/City/Postal Code" or the dis‐
played town/city.
2. Select the symbol.
3. Select the numbers.
4. Change to the list of postal codes and towns/
cities.
5. Highlight the entry.
6. Selecting an entry.
Entering a street and intersection
Select "Street" or the displayed street.
1.
2. Enter a street and intersection in the same
way as you would enter a town/city.
If there are several streets with the same name:
Change to the list of street names.
1.
2. Highlight the street.
3. Select the street.
Alternative: enter the street address
and house number
Select "Street" or the displayed street.
1.
2. Enter the street as you would the town/city.
3. "House number"
4. Select the numbers.
5. Change to the list of house numbers.
6. Select a house number or range of house
numbers.
All streets of the selected state/province are
offered. The associated town/city is dis‐
played after the street name.
6. Select the letters.
7. Change to the list of street names.
8. Highlight the street.
9. Select the street.
Starting destination guidance after
entering the destination
1. "Accept destination"
2. "Start guidance" or "Add as another
destination"
Add, refer to page 16, a destination as a
further destination.
Address book
Selecting a destination from the
address book
"Navigation"
1.
2. "Address book"
Contacts with addresses are displayed if
these have been checked as destinations
from among the Contacts.
Street does not exist in the destination
city/town
The desired street does not exist in the specified
city/town because it belongs to another part of
the city/town.
"Navigation"
1.
2. "Enter address"
3. Select "Street" or the displayed street.
4. Change to the list of street names.
5. Select "In" the displayed country.
10
Online Edition for Part no. 01 40 2 912 857 - 07 12 490
3. Select a contact in the list or, if desired, with
"A-Z search".
4. If necessary, "Business address" or "Home
address"
Page 11
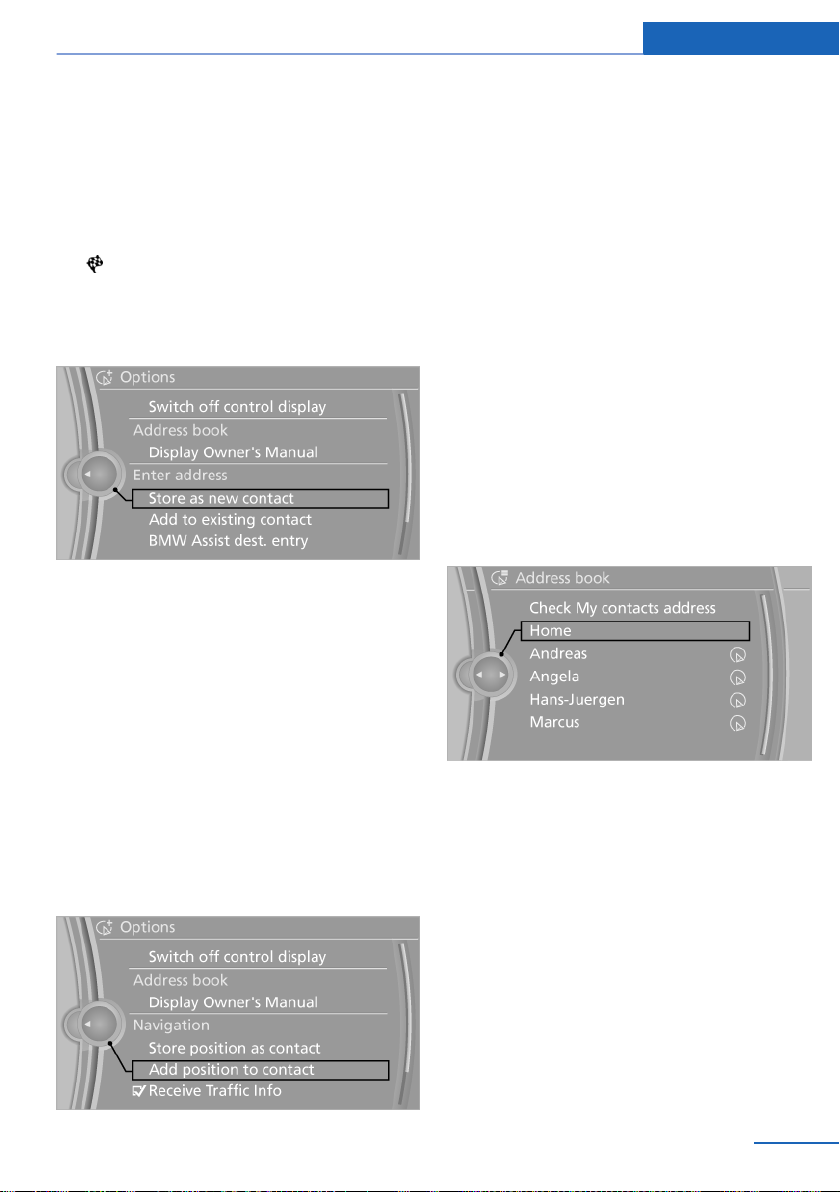
Destination input Navigation
Storing the destination in the address
book
After entering the destination, store the desti‐
nation in the address book.
1. "Navigation"
2. "Map"
3. "Guidance"
4. Open "Options".
5. "Store as new contact" or "Add to existing
contact"
6. Select an existing contact, if available.
7. "Business address" or "Home address"
8. Enter "Last name" and, if applicable, "First
name".
9. "Store contact in vehicle"
4. Depending on the selection, choose an ex‐
isting contact from the list. Select the type
of address and enter the first and last names.
5. "Store in vehicle"
Editing or deleting an address
1. "Navigation"
2. "Address book"
3. Highlight the entry.
4. Open "Options".
5. "Edit in Contacts" or "Delete entry"
Using the home address as the
destination
The home address must be stored.
"Navigation"
1.
2. "Address book"
3. "Home"
Storing the position
The current position can be stored in the ad‐
dress book.
"Navigation"
1.
2. Open "Options".
3. "Store position as contact" or "Add position
to contact"
Online Edition for Part no. 01 40 2 912 857 - 07 12 490
4. "Start guidance"
Last destinations
At a glance
The destinations previously entered are stored
automatically.
The destinations can be called up and used as a
destination for destination guidance.
Calling up the last destination
"Navigation"
1.
11
Page 12

Navigation Destination input
2. "Last destinations"
Starting destination guidance
1. "Navigation"
2. "Last destinations"
3. Select the destination.
4. "Start guidance"
Editing the destination
"Navigation"
1.
2. "Last destinations"
3. Highlight the destination.
4. Open "Options".
5. "Edit destination"
Deleting the last destinations
"Navigation"
1.
2. "Last destinations"
3. Highlight the destination.
4. Open "Options".
5. "Delete entry" or "Delete all last
destinations"
Special destinations
General information
Even with the most current navigation data, in‐
formation regarding particular individual desti‐
nations may have changed. For instance, certain
gas stations may not be operating.
Opening the search for special
destinations
To select special destinations such as hotels or
tourist attractions:
1. "Navigation"
2. "Points of Interest"
3. Select the search function.
Online Search
"Google™ Local Search"
1.
2. Select a special destination.
3. Select the symbol.
4. "Start guidance"
A-Z search
"A-Z search"
1.
2. "Town/City"
Select or enter the town/city.
3. "Category"
4. Select the category.
5. "Category details"
Some special destinations permit selection
of multiple category details. Move the con‐
troller to the left to leave the category de‐
tails.
6. "Keyword"
7. Enter the keyword.
A list of the special destinations is displayed.
8. Select a special destination.
Details are displayed.
12
Online Edition for Part no. 01 40 2 912 857 - 07 12 490
Page 13

Destination input Navigation
If multiple details are stored, you can browse
through the pages.
If a phone number has been stored, a
connection can be established if necessary.
Several special destinations can be
stored in the address book as a contact.
9. Select the symbol.
"Start guidance" or "Add as another
destination"
Add a destination as a further destination,
refer to page 16.
"Start search": if a search term is not entered,
the search is repeated with the previous search
term.
Category search
"Category search"
1.
2. "Town/City"
Select or enter the town/city.
3. "Category"
4. Select the category.
5. "Category details"
Some special destinations permit selection
of multiple category details. Move the con‐
troller to the left to leave the category de‐
tails.
6. "Start search"
A list of the special destinations is displayed.
7. Select a special destination.
Details are displayed.
If multiple details are stored, you can browse
through the pages.
If a phone number has been stored, a
connection can be established if necessary.
Several special destinations can be
stored in the address book as a contact.
8. Select the symbol.
"Start guidance" or "Add as another
destination"
Add a destination as a further destination,
refer to page 16.
Display of special destinations
List of special destinations: special destinations
are organized by distance and are displayed with
a directional arrow to the special destination.
Special destinations of the selected category
are displayed as symbols in splitscreen in the
map view. The display depends on the scale of
the map and the category.
Displaying special destinations in the
map
The special destination categories can be dis‐
played on the map as symbols.
The display of categories can be programmed
as follows:
"Navigation"
1.
2. "Map"
3. Open "Options".
4. "Display Points of Interest"
5. Select the setting.
▷ "All"
▷ "None"
▷ "Custom": up to five categories can be
predefined.
The display in the map view can be switched on
and off, refer to page 23.
Destination entry by map
Selecting the destination
"Navigation"
1.
2. "Map"
The current position of the vehicle is indi‐
cated on the map.
Online Edition for Part no. 01 40 2 912 857 - 07 12 490
13
Page 14
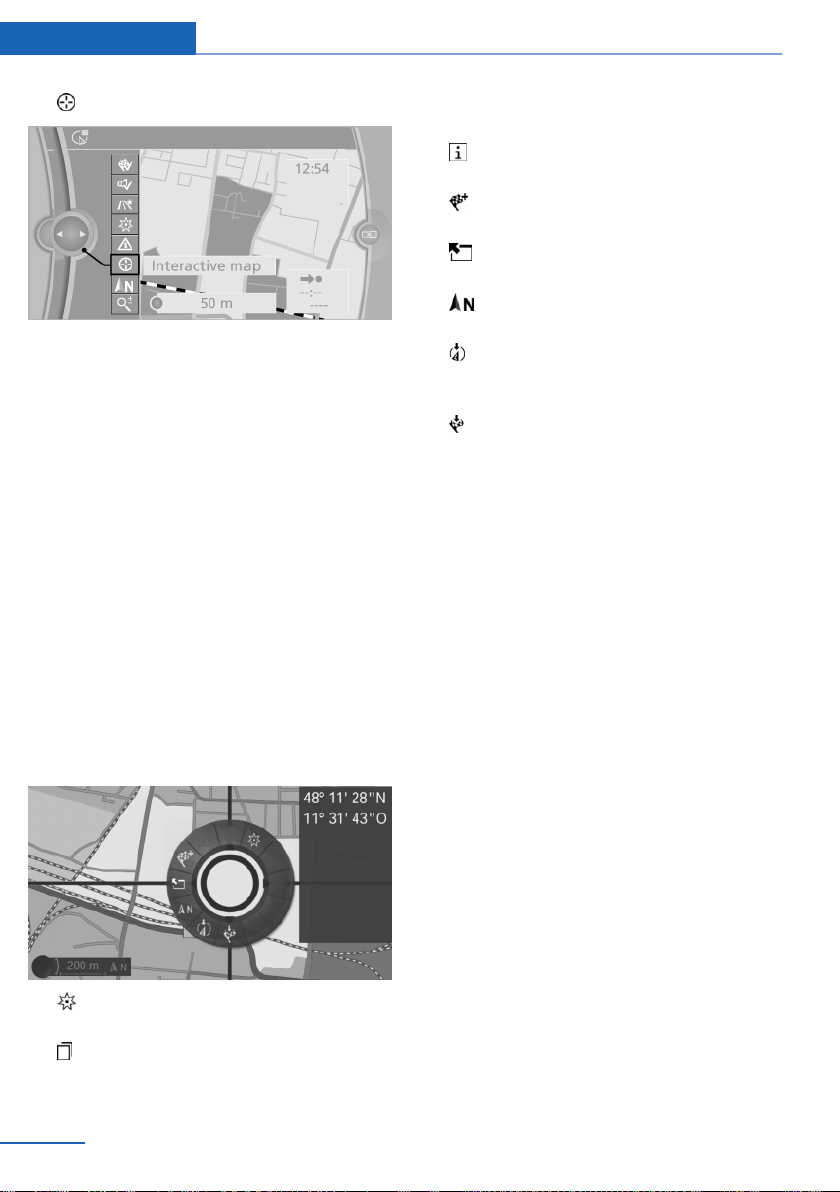
Navigation Destination input
3. "Interactive map"
4. Select the destination with crosshairs.
▷ To change the scale: turn the controller.
▷ To shift the map: move the controller in
the required direction.
▷ To shift the map diagonally: move the
controller in the required direction and
turn it.
Specifying the street
If the system does not recognize a street, one of
the following is displayed:
▷ The name of a street nearby.
▷ The county.
▷ The coordinates of the destination.
Additional functions
Additional functions are available on the inter‐
active map after the controller is pressed.
▷ "POI near current location": the search
for special destinations is started.
▷ "Show list": if the crosshairs are posi‐
tioned over a place with multiple special
destinations, these destinations will be dis‐
played in a list.
▷ "Show details": details about the desti‐
nation can be displayed as necessary.
▷ "Start guidance": destination guidance
is started.
▷ "Exit interactive map": switches back to
the map view.
▷ "Map facing north": switches to the
northwards-oriented map view.
▷ "Display current location": the map sec‐
tion around your current location is dis‐
played.
▷ "Show destination": the map section
around the destination is displayed.
Destination entry by voice
General information
▷ Instructions for the voice activation system,
see vehicle owners' manual.
▷ When making a destination entry by voice,
you can change between voice operation
and iDrive.
▷ To have the available spoken instructions
read out loud: ›Voice commands‹
Saying the entries
▷ The town/city, street, and house number
can be entered as a single command.
▷ Countries, towns and cities, streets, and in‐
tersections can be said as whole words or
spelled in the language of the system.
Example: to enter a town/city in a US state
as a whole word, the language of the system
must be English.
▷ Spell the entry if the spoken language and
the language of the system differ.
▷ Say the letters smoothly, and avoid exag‐
gerating the pronunciation and inserting
lengthy pauses between the letters.
14
Online Edition for Part no. 01 40 2 912 857 - 07 12 490
Page 15

Destination input Navigation
▷ The options available for entering data de‐
pend on the navigation data and the country
and language settings.
Entering an address in a command
1. Press the button on the steering
wheel.
2. ›Enter address‹
3. Wait for a request from the system.
4. Say the address in the suggested order.
5. Continue making the entry as prompted by
the system.
If necessary, individually name the separate
components of the address, such as the town/
city.
Entering a town/city separately
The name of the town/city can be spoken as a
word or spelled out.
With the destination entry menu displayed:
1.
2. ›City‹ or ›Spell city‹.
3. Wait for the system to prompt you for the
4. Say the name of the town/city, or say at least
5. Select the town/city.
6. Continue making the entry as prompted by
Press the button on the steering
wheel.
town/city.
the first three letters.
Depending on the entry, up to 20 towns/cit‐
ies may be suggested.
▷ To select a recommended town/
city: ›Yes‹
▷ To select a different town/city: ›New
entry‹
▷ Select an entry: ›Entry ...‹ e.g., entry 2
▷ To spell an entry: ›Spell city‹
the system.
If there are several towns/cities with the same
name:
Towns/cities of the same name are grouped in a
list and displayed as one location followed by an
ellipsis.
1. Select an entry: ›Yes‹ or ›Entry ...‹ e.g., en‐
try 2.
2. Select the desired town/city.
Entering a street or intersection
separately
Enter a street and intersection in the same way
as you would enter a town/city.
Entering a house number separately
Depending on the data in the navigation system,
house numbers up to number 2,000 can be en‐
tered.
›House number‹
1.
2. Say the house number.
Say each digit separately.
3. Continue making the entry as prompted by
the system.
Planning a trip with intermediate destinations
New trip
A trip can be planned with several intermediate
destinations.
"Navigation"
1.
2. "Map"
3. Move the controller to the left if necessary.
4. "Guidance"
5. "Enter new destination"
Online Edition for Part no. 01 40 2 912 857 - 07 12 490
15
Page 16
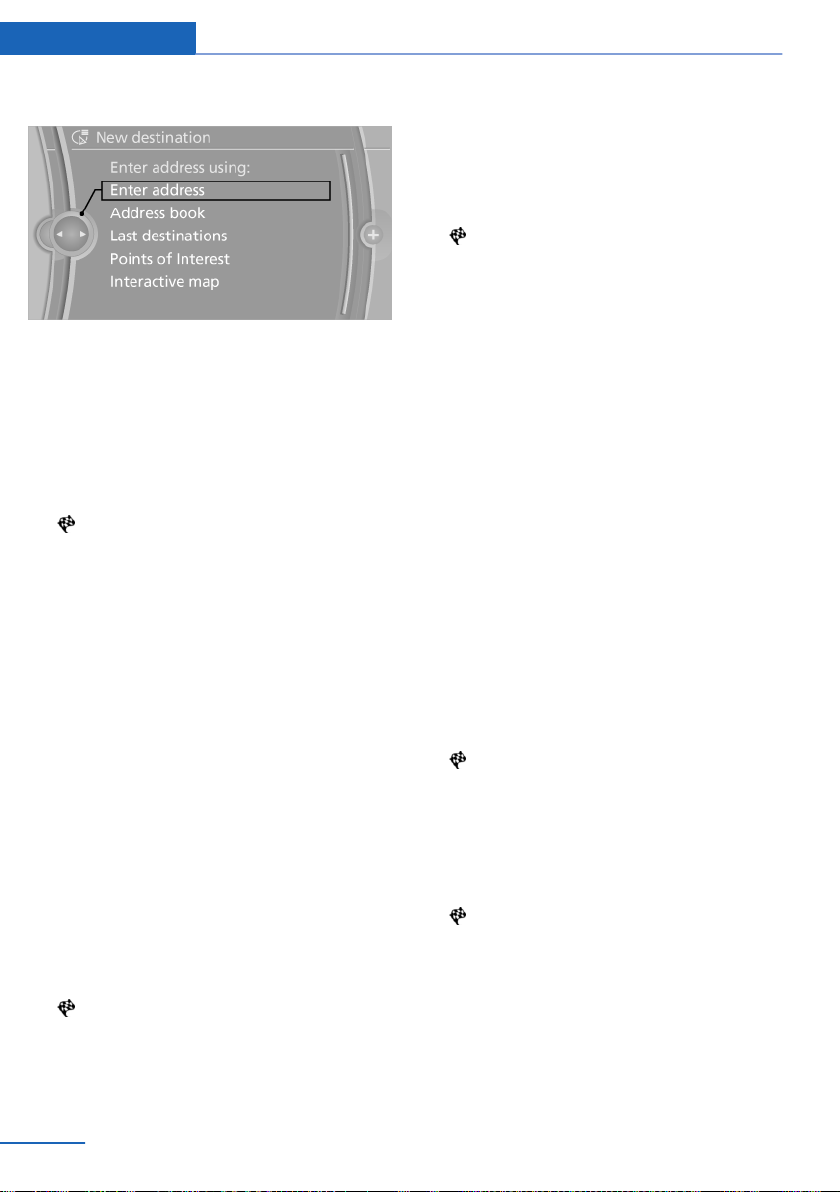
Navigation Destination input
6. Select the type of destination entry.
7. Enter the intermediate destination.
8. "Start guidance"
Entering intermediate destinations
A maximum of 30 intermediate destinations can
be entered for one trip.
"Map"
1.
2. "Guidance"
3. "Enter new destination"
4. Select the type of destination entry.
5. Enter the intermediate destination.
6. "Add as another destination"
The intermediate destination is entered in
the destination list and is highlighted.
7. Turn the controller until the intermediate
destination is located in the desired position
in the list.
8. Press the controller.
Starting the trip
After all intermediate destinations are en‐
1.
tered, highlight the first destination.
If the second destination, for example, is
highlighted when destination guidance is
started, the first destination is skipped.
2. "Start guidance"
This symbol marks the active leg of the
trip.
Storing a trip
Up to 30 trips can be stored in the trip list. If
necessary, delete existing trips to be able to
store new trips.
1. "Map"
2. "Guidance"
3. Open "Options".
4. "Save in My Trips"
5. Enter the name.
6. "OK"
Selecting a stored trip
"Navigation"
1.
2. "Stored trips"
Until the route category is opened, the num‐
ber of newly entered routes is displayed af‐
ter the respective category.
3. Select a route category.
4. Select a stored trip.
5. "Start guidance"
Reversing the direction of travel
Intermediate destinations are displayed in re‐
verse order in the list.
"Map"
1.
2. "Guidance"
3. Open "Options".
4. "Reverse order of trip dest."
Intermediate destination options
"Map"
1.
2. "Guidance"
3. "Display all trip destinations"
4. Select an intermediate destination.
▷ "Edit destination"
▷ "Reposition dest. in the trip": move an
intermediate destination to another po‐
sition in the list.
▷ "Delete dest. in the trip"
16
Online Edition for Part no. 01 40 2 912 857 - 07 12 490
Page 17

▷ "Go to next dest. in the trip"
Some options are not available for certain trips.
Deleting a stored trip
1. "Stored trips"
2. Highlight the desired trip.
3. Open "Options".
4. "Delete all trips" or "Delete trip"
Importing trips via a USB device
1. Switch on the ignition.
2. Connect USB medium to the USB interface
in the center console.
3. "Navigation"
4. "Stored trips"
5. "Import trips"
6. "USB"
7. "OK"
A maximum total of 30 trips may be stored on
the USB medium and in the navigation system;
otherwise, an import is not possible.
Destination input Navigation
Calling up the last trip
"Navigation"
1.
2. "Stored trips"
3. "Last trip"
4. If desired, select an intermediate destina‐
tion.
5. "Start guidance"
Online Edition for Part no. 01 40 2 912 857 - 07 12 490
17
Page 18

Navigation Destination guidance
Destination guidance
Vehicle equipment
All standard, country-specific and optional
equipment that is offered in the model series is
described in this chapter. Therefore, equipment
is also described that is not available in a vehicle,
e. g., because of the selected optional equip‐
ment or country variant. This also applies for
safety-related functions and systems.
Starting destination guidance
"Navigation"
1.
2. Enter the destination, refer to page 9.
3. "Accept destination"
4. "Start guidance"
▷ The route is shown on the Control Display.
▷ The distance to the destination/intermedi‐
ate destination and the estimated time of ar‐
rival are displayed in the map view.
▷ An arrow view is shown in the instrument
cluster, and on the Control Display and in the
Head-up Display if desired. Arrow view, refer
to page 19.
Continuing destination guidance
If the destination was not reached during the last
trip, destination guidance can be resumed.
"Resume guidance"
Route criteria
General information
▷ The route calculated can be influenced by
selecting certain criteria.
▷ The route criteria can be changed when the
destination is entered and during destina‐
tion guidance.
▷ Road types are part of the navigation data
and are taken into consideration when plan‐
ning a route, such as when avoiding high‐
ways.
▷ The recommended route may differ from the
route you would take based on personal ex‐
perience.
▷ The settings are stored for the remote con‐
trol currently in use.
▷ Destination guidance with traffic bulletins,
refer to page 27.
Terminating destination guidance
"Navigation"
1.
2. "Map"
3. "Guidance"
4. "Stop guidance"
18
Online Edition for Part no. 01 40 2 912 857 - 07 12 490
Changing the route criteria
"Navigation"
1.
2. "Map"
3. "Route preference"
4. "Route preference"
5. Select the criterion:
▷ "Fast": time-optimized route, being a
combination of the shortest possible
route and the fastest roads.
▷ "ECO PRO": fuel consumption-op‐
timized route, being a combination of
Page 19
Destination guidance Navigation
the route requiring low consumption
and fast roads.
▷ "Short": distance-optimized route,
being a combination of the shortest pos‐
sible route and the fastest roads.
6. Specify additional criteria for the route, if
necessary:
▷ "Dynamic guidance": traffic information
is automatically included, refer to
page 27, in the calculation for destina‐
tion guidance.
▷ "Avoid highways": highways are
avoided wherever possible.
▷ "Avoid ferries": ferries are avoided
where possible.
▷ "Avoid toll roads": toll roads are avoided
wherever possible.
▷ "Prefer express roadways": express
roads are preferred where possible.
▷ "Prefer HOV roadways": carPool lanes
are preferred where possible.
Alternative routes
: if possible, alternative routes are suggested
during active route guidance.
"Route preference"
1.
2. "Alt. route(s)"
An overview showing the current route and
the suggested alternative routes is dis‐
played. In addition, details such as travel
time and route length, and for the alternative
routes information about fuel consumption
compared with the current route may be dis‐
played if required The routes are shown in
color on the spitscreen.
3. To accept an alternative route, select it and
press the controller.
Accepting an online alternative
If alternative route suggestions have been
downloaded to the vehicle from online, these
can be accepted. For system-related reasons, it
may take a little while before online alternatives
are available.
1. "Route preference"
2. "Online alternat."
An overview showing the current route and
the suggested alternative routes is dis‐
played. In addition, details such as travel
time and route length, and for the alternative
routes information about fuel consumption
compared with the current route may be dis‐
played if required The routes are shown in
color on the spitscreen.
3. To accept an alternative route, select it and
press the controller.
Route
Different views of the route are available during
destination guidance:
▷ Arrow view in the instrument cluster and on
the Control Display.
▷ List of route sections.
▷ Map view, refer to page 22.
▷ Depending on how the vehicle is equipped,
arrow view in the Head-up Display.
Arrow view
The following information is displayed during
destination guidance:
▷ Symbol for active destination guidance
with remaining travel time and distance to
destination.
Online Edition for Part no. 01 40 2 912 857 - 07 12 490
19
Page 20

Navigation Destination guidance
▷ Small arrow: instruction for example about
the next turn with information about the dis‐
tance to the turn and the name of the new
road.
▷ Large arrow: indicates the current direction
of travel.
▷ Street name of the currently traveled street.
▷ Traffic bulletins.
The display changes to a view of the intersection
depending the road routing. Lane information
may also be displayed here if applicable.
Display, refer to page 24, arrow view in
splitscreen.
Lane information
On multi-lane roads, the recommended lanes
are marked in the arrow view by a triangle.
▷ Best lane.
▷ Lane also possible. However, another
lane change may be needed shortly.
Displaying list of route sections
When destination guidance is activated, a list of
route sections can be displayed. The driving dis‐
tances and traffic bulletins are displayed for
each route section.
"Navigation"
1.
2. "Route information"
3. Highlight route section.
The route section is displayed in the
splitscreen.
Resuming the original route
If the route section should no longer be by‐
passed:
1. "Navigation"
2. "Route information"
3. "New route for:"
4. "Remove blocking"
Gas station recommendation
The remaining range is calculated, and if nec‐
essary gas stations along the route are dis‐
played.
Even with the most current navigation data, in‐
formation regarding individual gas stations may
have changed. For instance, certain gas stations
may not be operating.
"Navigation"
1.
2. "Route information"
3. "Recommended refuel"
A list of the gas stations is displayed.
4. Highlight a gas station.
The location of the gas station is displayed
in the splitscreen.
5. Select the gas station.
6. Select the symbol.
7. "Start guidance": destination guidance to
the selected gas station is started.
"Add as another destination": the gas sta‐
tion is added to the route.
Bypassing a section of the route
Calculate a new route for a route section.
"Navigation"
1.
2. "Route information"
3. "New route for"
4. Turn the controller. Enter the number of
miles within which you would like to return
to the original route.
5. Press the controller.
20
Online Edition for Part no. 01 40 2 912 857 - 07 12 490
Switching spoken instructions on/off
The setting is stored for the remote control cur‐
rently in use.
"Navigation"
1.
2. "Map"
3. "Voice instructions"
Page 21

Repeating spoken instructions
1. "Navigation"
2. "Map"
3. Highlight the symbol.
4. Press the controller twice.
Volume of spoken instructions
Turn the volume button while giving an instruc‐
tion until the desired volume is set.
Saving the spoken instructions on the
programmable memory buttons
The function for switching the spoken instruc‐
tions on/off can be stored on a programmable
memory button for quick access.
Destination guidance Navigation
Online Edition for Part no. 01 40 2 912 857 - 07 12 490
21
Page 22
Navigation Map view
Map view
Vehicle equipment
All standard, country-specific and optional
equipment that is offered in the model series is
described in this chapter. Therefore, equipment
is also described that is not available in a vehicle,
e. g., because of the selected optional equip‐
ment or country variant. This also applies for
safety-related functions and systems.
Selecting the map view
1. "Navigation"
2. "Map"
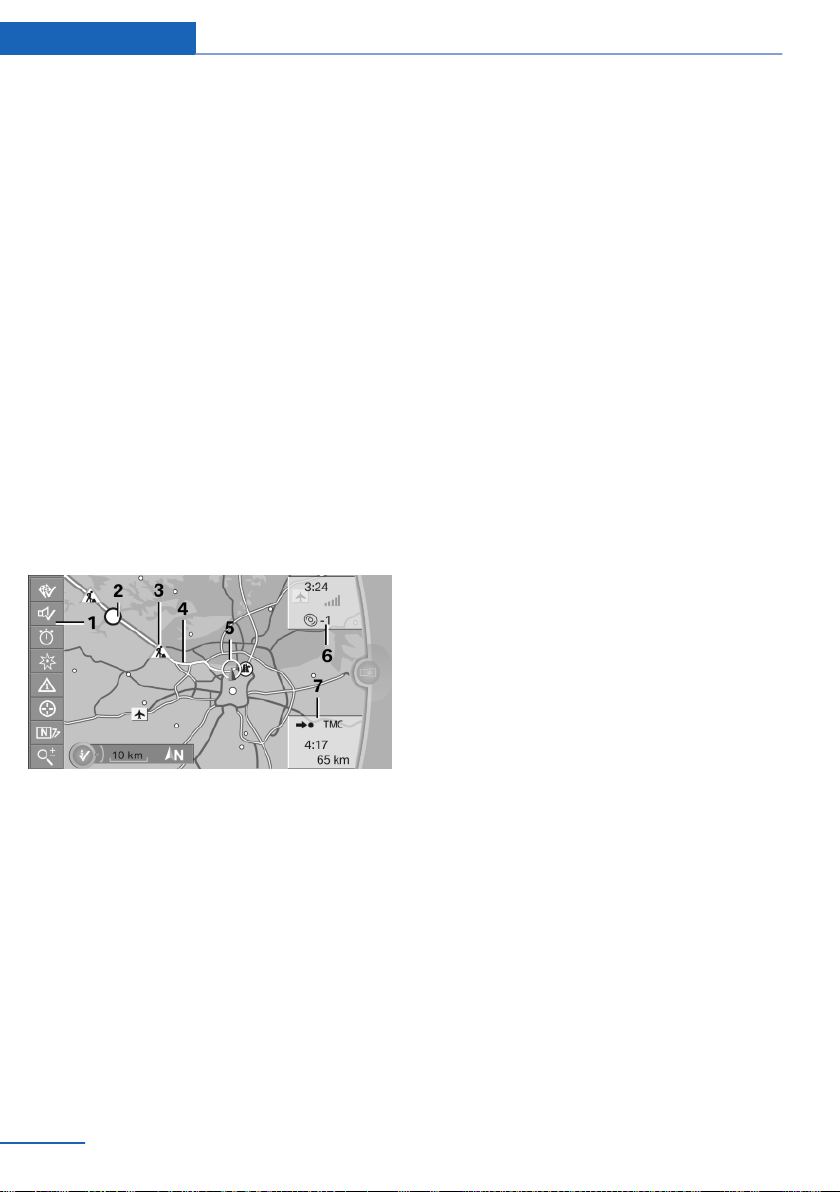
At a glance
1 Function bar
2 Route section with traffic obstruction
3 Traffic sign for traffic obstruction
4 Planned route
5 Current location
6 Upper status field
7 Lower status field
Lines in the map
Streets and routes are displayed in different col‐
ors and styles depending on their classification.
Dashed lines represent railways and ferry con‐
nections. Country borders are indicated by thin
lines.
Traffic obstructions
When traffic information is received from a radio
station, traffic obstructions can be displayed on
the map. Lines along the planned route indicate
route sections with traffic obstructions, depend‐
ing on the map scale. The position of the lines
on the route shows the direction of the obstruc‐
tion.
The traffic signs indicate the significance of the
obstruction.
▷ Red traffic sign: the obstruction affects the
planned route or direction.
▷ Gray traffic sign: the obstruction does not
affect the planned route or direction.
Traffic information in the navigation system, re‐
fer to page 25.
Planned route
After destination guidance is started, the plan‐
ned route is displayed on the map.
Status fields
Show/hide: press the controller.
▷ Upper status field: time, telephone, and en‐
tertainment details.
▷ Lower status field: symbol for active desti‐
nation guidance, status of traffic bulletins,
time of arrival, and distance to destination.
Function bar
The following functions are available in the func‐
tion bar:
22
Online Edition for Part no. 01 40 2 912 857 - 07 12 490
Page 23

Map view Navigation
Symbol Function
Destination guidance active/in‐
active.
Voice output active/inactive.
Change the route criteria.
Search for a special destination.
Traffic information functions.
Detour suggestions are availa‐
ble.
Interactive map.
Set the map view.
To change to the function bar, move the con‐
troller to the left.
Change the scale.
Changing the map section
"Interactive map"
▷ To shift the map: move the controller in the
required direction.
▷ To shift the map diagonally: move the con‐
troller in the required direction and turn it.
Settings for the map view
The settings are stored for the remote control
currently in use.
"Navigation"
1.
2. "Map"
3. "Map views"
Set the map view.
▷ "View facing north"
▷ "Direct. of travel"
▷ "Perspective view"
▷ "Traffic info map": map is optimized for
the display of traffic information, refer to
page 25.
▷ "Additional Info"
▷ "Points of Interest": symbols for spe‐
cial destinations are displayed. Adjust
display, refer to page 13.
▷ "Traffic Info": symbols for traffic in‐
formation, refer to page 25, are dis‐
played.
▷ "Traffic flow map": depending on the
map scale, a traffic obstruction's length,
direction, and impact are displayed in
the map using traffic signs or colored
lines along the calculated route. Infor‐
mation about traffic flow in the map view,
refer to page 27.
▷ "Weather": weather symbols are
displayed on the map.
Displayed symbols: clear skies, cloudy
skies, rain, thunder shower, and snow‐
fall, each with the highest and lowest
temperature.
The weather information is updated au‐
tomatically.
The symbols are displayed in several se‐
lected scales.
▷ "Satellite images": depending on
availability and resolution, in some
scales satellite images are displayed as
the background.
▷ 3D "Persp. view in 3D": prominent areas
that are present in the navigation data
are displayed on the map in 3D.
▷ "Map mode": select and make settings
depending on the light conditions.
▷ "Day"
▷ "Night"
▷ "Automatic"
▷ "Status info": show/hide status fields.
Status fields, refer to page 22.
Online Edition for Part no. 01 40 2 912 857 - 07 12 490
23
Page 24

Navigation Map view
Changing the scale
1. Select the symbol.
2. To change the scale: turn the controller.
Automatically scaled map scale
"Auto scale": in the north-oriented map view,
the entire route from the starting location to the
destination is displayed. This view is also se‐
lected if the scale is adjusted until the following
appears: "AUTO".
"Auto zoom": the map scale is adapted to the
situation before the next driving manouver.
Map view for split screen
The map view can be selected for the split
screen independently from the main screen.
Open "Options".
1.
2. "Split screen"
3. Move the controller to the right repeatedly
until the split screen is selected.
4. Press the controller.
5. Select the map view.
▷ "Arrow display"
▷ "Map facing north"
▷ "Map direction of travel"
▷ "Map perspective view"
▷ "Position"
▷ "Guiding Plus": selected journey sec‐
tions, e.g., major road intersections, are
shown in perspective view.
▷ "Traffic conditions/gray map": the map
is optimized for displaying traffic bulle‐
tins.
6. To change the scale: select the split screen
and turn the controller.
Display images of the destination
When destination guidance is active, photos can
be viewed of some destinations.
1. "Navigation"
2. "Map"
3. "Guidance"
4. "Pictures at destination"
5. Depending on availability, a selection of
photos is available for viewing.
24
Online Edition for Part no. 01 40 2 912 857 - 07 12 490
Page 25

Traffic bulletins
Traffic bulletins Navigation
Vehicle equipment
All standard, country-specific and optional
equipment that is offered in the model series is
described in this chapter. Therefore, equipment
is also described that is not available in a vehicle,
e. g., because of the selected optional equip‐
ment or country variant. This also applies for
safety-related functions and systems.
At a glance
General information
▷ Display the traffic bulletins from radio sta‐
tions that broadcast the TI Traffic Informa‐
tion of a traffic information service. Informa‐
tion on traffic obstructions and hazards is
updated continuously.
Certain BMW models equipped with navi‐
gation have the capability to display realtime traffic information. If your system has
this capability the following additional terms
and conditions apply:
An End-User shall no longer have the right
to use the Traffic Data in the event that the
End-User is in material breach of the terms
and conditions contained herein.
A. Total Traffic Network, a division of Clear
Channel Broadcasting, Inc. (“Total Traffic
Network”) holds the rights to the traffic in‐
cident data and RDS-TMC network through
which it is delivered. You may not modify,
copy, scan or use any other method to re‐
produce, duplicate, republish, transmit or
distribute in any way any portion of traffic in‐
cident data. You agree to indemnify, defend
and hold harmless BMW of North America,
LLC. (“BMW NA”) and Total Traffic Net‐
work, Inrix, Inc (and their affiliates) against
any and all claims, damages, costs or other
expenses that arise directly or indirectly out
of (a) your unauthorized use of the traffic in‐
cident data or the RDS-TMC network, (b)
your violation of this directive and/or (c) any
unauthorized or unlawful activities by you in
connection herewith.
B. Total Traffic Network traffic data is infor‐
mational only. User assumes all risk of use.
Total Traffic Network, BMW NA, and their
suppliers make no representations about
content, traffic and road conditions, route
usability, or speed.
C. The licensed material is provided to li‐
censee “as is,” and “where is”. Total Traffic
Network, including, but not limited to, any
and all third party providers of any of the li‐
censed material, expressly disclaims, to the
fullest extent permitted by law, all warranties
or representations with respect to the li‐
censed material (including, without limita‐
tion, that the licensed material will be errorfree, will operate without interruption or that
the traffic data will be accurate), express, im‐
plied or statutory, including, without limita‐
tion, the implied warranties of merchanta‐
bility, non-infringement fitness for a
particular purpose, or those arising from a
course of dealing or usage of trade.
D. Neither Total Traffic Network, Inrix, Inc. or
BMW NA will be liable to you for any indirect,
special, consequential, exemplary, or inci‐
dental damages (including, without limita‐
tion, lost revenues, anticipated revenues, or
profits relating to the same) arising from any
claim relating directly or indirectly to use of
the traffic data, and even if Total Traffic Net‐
work, Inrix, Inc., or BMW NA are aware of the
possibility of such damages. These limita‐
tions apply to all claims, including, without
limitation, claims in contract and tort (such
as negligence, product liability and strict li‐
ability). Some states do not allow the exclu‐
sion or limitation of incidental or consequen‐
Online Edition for Part no. 01 40 2 912 857 - 07 12 490
25
Page 26

Navigation Traffic bulletins
tial damages, so those particular limitations
may not apply to you.
▷ The traffic bulletins are indicated on the map
by symbols.
▷ The traffic bulletins for the surrounding area
are stored in a list.
The symbol in the function bar of the map
view turns yellow, if there are traffic bulletins
that affect the calculated route, and the pre‐
dicted delay is less than 20 minutes. The
symbol turns red if the predicted delay is
more than 20 minutes or if there is a road
block or a hazard warning for the route.
The symbol indicates that there are suit‐
able diversions in keeping with the traffic
bulletins.
Traffic information via ConnectedDrive
In some countries, realtime traffic information,
RTTI is transmitted by ConnectedDrive.
With a valid ConnectedDrive contract, the traffic
information by ConnectedDrive is displayed in‐
stead of the traffic information from the radio
stations.
In countries in which traffic bulletins are not
transmitted by ConnectedDrive, the traffic bul‐
letins of the radio stations are still displayed.
With the traffic bulletins from ConnectedDrive,
the precise location of traffic obstructions can
be pinpointed. In addition, for example, routes
with clear roads within a radius of approx. around
the current position are precisely displayed.
Switching the reception on/ off
"Navigation"
1.
2. Open "Options".
3. "Receive Traffic Info"
Opening the traffic bulletins
1. "Navigation"
2. "Map"
3. "Traffic Info"
4. "Traffic Info"
With active destination guidance, first the
traffic bulletins for the calculated route are
displayed with red symbols. Then, the traffic
bulletins that do not affect the route, are
shown with gray symbols. The traffic bulle‐
tins are sorted by their distance from the
current position of the vehicle.
5. Select a traffic bulletin.
"More information": display additional
information.
6. Scroll to the next or previous traffic
bulletin if required.
Display detour recommendations
"Navigation"
1.
2. "Map"
3. "Detour": a list of detour recommenda‐
tions is displayed.
Traffic bulletins on the map
Traffic bulletin map
"Traffic info map" Active: indication on the con‐
trol display is switched to shades of gray. This
enables a better view of the traffic bulletins. Day/
night mode is not taken into account in this set‐
ting.
Activate/deactivate traffic info map:
"Navigation"
1.
2. "Map"
3. "Traffic Info"
4. "Traffic info map"
26
Online Edition for Part no. 01 40 2 912 857 - 07 12 490
Page 27

Traffic bulletins Navigation
Or:
1. "Map views"
2. "Traffic info map"
Symbols in the map view
Depending on the scale of the map and the lo‐
cation of the traffic obstruction along the route,
the symbols for the traffic obstructions are dis‐
played.
Information about traffic flow in the
map view
Depending on the map scale, a traffic obstruc‐
tion's length, direction, and impact are displayed
in the map using traffic signs or colored lines
along the calculated route.
▷ Red: congestion.
▷ Orange: stop-and-go traffic.
▷ Yellow: heavy traffic.
▷ Green: clear roads.
▷ Gray: general traffic bulletins, e.g., construc‐
tion site.
The displayed information depends on the par‐
ticular traffic information service.
Destination guidance with traffic bulletins
General information
Detour suggestions from the navigation system
can be manually accepted in the semi-dynamic
destination guidance. In the dynamic destina‐
tion guidance, they are automatically accepted
in the route guidance.
Semi-dynamic destination guidance
When traffic bulletin reception is switched on,
semi-dynamic destination guidance is active.
The destination guidance system takes the
available traffic information into account. A mes‐
sage is displayed depending on the route, the
traffic bulletins, and the possible detour routes.
When there is a traffic obstruction, if possible, a
detour is offered.
In the event of special hazards, e. g., objects on
the road, a message is displayed without a de‐
tour suggestion.
The top part of the message displays:
▷ The symbol of the first traffic obstruction,
including the distance at which the traffic
obstruction first occurs, if applicable.
▷ Distance to start of the diversion.
The bottom part of the message displays:
▷ Remaining driving distance and arrival time
on the original route, with white symbol.
▷ Difference between the journey lengths and
time savings offered by the diversion com‐
pared with the original route, with colored
symbol.
The following appears in the splitscreen:
▷ Original route, white.
▷ Detour, colored.
Accepting the detour
In the message:
"Detour"
Via the function bar:
"Navigation"
1.
2. "Map"
3. "Traffic Info"
4. "Detour"
5. Open the desired detour.
6. "Detour"
Dynamic destination guidance
The route is automatically changed in the event
of traffic obstructions.
▷ The system does not point out traffic ob‐
structions along the original route.
▷ Traffic bulletins continue to be displayed on
the map.
Online Edition for Part no. 01 40 2 912 857 - 07 12 490
27
Page 28

Navigation Traffic bulletins
▷ Depending on road type and the kind and
extent of the traffic obstruction, the calcu‐
lated route may lead through the traffic ob‐
struction.
▷ Dangerous situations are displayed regard‐
less of the setting.
Activating dynamic destination
guidance
1. "Navigation"
2. "Map"
3. "Route preference"
4. "Route preference"
5. "Dynamic guidance"
28
Online Edition for Part no. 01 40 2 912 857 - 07 12 490
Page 29

Navigation data
Navigation data Navigation
Vehicle equipment
All standard, country-specific and optional
equipment that is offered in the model series is
described in this chapter. Therefore, equipment
is also described that is not available in a vehicle,
e. g., because of the selected optional equip‐
ment or country variant. This also applies for
safety-related functions and systems.
Information on the navigation data
"Navigation"
1.
2. Open "Options".
3. "Navigation system version": information on
the data version is displayed.
Updating the navigation data
General information
Navigation data are stored in the vehicle and can
be updated from a USB medium or DVD.
Current navigation data and the authorization
code are available from your service center.
▷ Depending on the data volume, the data up‐
date may take several hours.
▷ Update during the trip to preserve battery.
▷ During the update, only the basic functions
of the navigation system are available.
▷ The status of the update can be queried.
the DVD player with the labeled side upper‐
most.
2. Follow the instructions on the Control Dis‐
play.
3. Enter the relesat code for the navigation
data.
The navigation data will be updated. After a
journey is interrupted, follow the instruc‐
tions on the Control Display.
4. If necessary, change the Navigation DVD.
After the data is updated, a message will ap‐
pear prompting you to restart the system.
5. Remove the USB medium or Navigation
DVD.
6. Restart the navigation system.
Viewing the status
1.
2. "Navigation update"
Press the button.
Perform the update
Connect the USB medium with the new nav‐
1.
igation data to the USB interface in the cen‐
ter console or insert the Navigation DVD in
Online Edition for Part no. 01 40 2 912 857 - 07 12 490
29
Page 30

Navigation What to do if ...
What to do if ...
Vehicle equipment
All standard, country-specific and optional
equipment that is offered in the model series is
described in this chapter. Therefore, equipment
is also described that is not available in a vehicle,
e. g., because of the selected optional equip‐
ment or country variant. This also applies for
safety-related functions and systems.
▷ The current transmission position cannot be
displayed?
The vehicle is located in an unrecognized
region, is in a poor reception area, or the
system is currently determining the posi‐
tion. Reception is usually best when you
have an unobstructed view of the sky.
▷ The destination without street information is
not used for route guidance?
When city has been input, no downtown can
be determined.
Input any street in the selected city and start
destination guidance.
▷ The destination is not used for route guid‐
ance?
The destination data is not contained in the
navigation data. Select a destination that is
as close as possible to the original.
▷ Letters for destination input cannot be se‐
lected?
The stored data do not contain the data of
the destination.
Select a goal that is as close as possible to
the original.
▷ Is the map displayed in shades of gray?
"Traffic info map" Active: indication on the
control display is switched to shades of gray.
This enables a better view of the traffic bul‐
letins. Deactivate the traffic info map, refer
to page 26.
▷ Spoken instructions are no longer output
during route guidance in front of intersec‐
tions?
The area has not yet been fully recorded, or
you have left the recommended route and
the system requires a few seconds to cal‐
culate a new route suggestion.
30
Online Edition for Part no. 01 40 2 912 857 - 07 12 490
Page 31

What to do if ... Navigation
Online Edition for Part no. 01 40 2 912 857 - 07 12 490
31
Page 32

Online Edition for Part no. 01 40 2 912 857 - 07 12 490
Page 33

Entertainment
The chapter helps assure your enjoyment when
receiving radio and television stations and playing
CDs, DVDs and tracks from the music collection.
Online Edition for Part no. 01 40 2 912 857 - 07 12 490
Page 34

Entertainment Tone
Tone
Vehicle equipment
All standard, country-specific and optional
equipment that is offered in the model series is
described in this chapter. Therefore, equipment
is also described that is not available in a vehicle,
e. g., because of the selected optional equip‐
ment or country variant. This also applies for
safety-related functions and systems.
General information
The sound settings are stored for the remote
control currently in use.
Treble, bass, balance, and fader
▷ "Treble": treble adjustment.
▷ "Bass": depth adjustment.
▷ "Balance": left/right volume distribution.
▷ "Fader": front/rear volume distribution.
Setting treble, bass, balance, and fader
"Multimedia", "Radio" or "Settings"
1.
2. "Tone"
3. Select the desired tone settings.
4. To adjust: turn the controller.
5. To store: press the controller.
Equalizer
Setting for individual audio frequency ranges.
Adjusting the equalizer
"Multimedia", "Radio" or "Settings"
1.
2. "Tone"
3. "Equalizer"
4. Select the desired setting.
34
5. To adjust: turn the controller.
6. To store: press the controller.
Online Edition for Part no. 01 40 2 912 857 - 07 12 490
Page 35

Tone Entertainment
Multi-channel playback, surround
Choose between stereo and multi-channel play‐
back, surround.
Setting multi-channel playback,
surround
1. "Multimedia", "Radio" or "Settings"
2. "Tone"
3. "Surround" or"L7 Surround"
When surround is activated, multi-channel play‐
back is simulated when a stereo audio track is
played.
LOGIC7 and LOGIC7 logo are registered trade‐
marks of Lexicon, Inc., a Harman International
Group company.
Bang & Olufsen High End Surround Sound System
The settings for the speaker lighting are being
stored for the currently used remote control.
Tone control
"Multimedia", "Radio" or "Settings"
1.
2. "Tone"
3. "Bang & Olufsen"
4. Select the desired tone settings.
▷ "Studio": studio tone settings.
▷ "Expanded": open space tone settings.
Volume
▷ "Speed volume": speed-dependent volume
control.
▷ With Bang & Olufsen High End Surround
Sound System: Automatic adjustment of
the volume depending on the driving noises,
e. g. wind noises, that can be heard in the
interior, no further adjustment using Speed
Volume is necessary.
▷ "PDC": volume of the PDC signal compared
to the entertainment sound output.
▷ "Gong": volume of the signal, e. g., the safety
belt reminder, compared to the entertain‐
ment sound output.
▷ "Microphone": volume of the microphone
during a phone call.
▷ "Speakers": volume of the loudspeakers
during a phone call.
The following volumes are only stored for the
respective paired telephone: "Microphone",
"Speakers".
Adjusting the volume
"Multimedia", "Radio" or "Settings"
1.
2. "Tone"
3. "Volume settings"
4. Select the desired volume setting.
Center speaker
An additional speaker is present on the dash‐
board. When Entertainment is switched on, it
switches off automatically and is illuminated ac‐
cording to the lighting setting.
If Entertainment is switched off or muting is ac‐
tivated, the speaker breaks back in.
Online Edition for Part no. 01 40 2 912 857 - 07 12 490
5. To adjust: turn the controller.
6. To store: press the controller.
35
Page 36

Entertainment Tone
Resetting the tone settings
1. "Multimedia", "Radio" or "Settings"
2. "Tone"
3. "Reset"
Opening the tone settings in the Options menu
1. "Multimedia" or "Radio"
2. If necessary, select additional entries, for ex‐
ample, "FM" or "CD/DVD".
3. Open "Options".
4. "Tone"
5. Set the desired tone.
36
Online Edition for Part no. 01 40 2 912 857 - 07 12 490
Page 37

Radio
Radio Entertainment
Vehicle equipment
All standard, country-specific and optional
equipment that is offered in the model series is
described in this chapter. Therefore, equipment
is also described that is not available in a vehicle,
e. g., because of the selected optional equip‐
ment or country variant. This also applies for
safety-related functions and systems.
Controls
Press the button Function
Press: switches radio on/
off. Turn: adjusts the vol‐
ume.
Changes the entertainment
source.
Change station/track.
Programmable memory
buttons.
Change waveband.
Muting
When the ignition is switched on or the engine
is running: press the ON/OFF button on the
radio.
AM/FM station
Selecting a station
1. "Radio"
2. "FM" or "AM"
The last station played will be played and
displayed.
3. "FM stations", "AM stations" or
"Presets".
4. Select the desired station.
Eject CD/DVD.
Sound output
Switching on/off
When the ignition is switched off: press ON/OFF
button on the radio.
Online Edition for Part no. 01 40 2 912 857 - 07 12 490
All saved stations are stored for the remote con‐
trol currently in use.
Changing the station
On the Control Display:
37
Page 38

Entertainment Radio
or select symbol .
Via buttons on the radio
Press the button.
Storing a station
1. "Radio"
2. "FM" or "AM"
3. "FM stations" or "AM stations"
4. Highlight the desired station.
5. Press the controller for an extended period.
6. Highlight the desired storage location and
press the controller.
The stations are stored for the remote control
currently in use.
The stations can also be stored on the program‐
mable memory buttons.
With navigation system: the stations can also be
stored on the programmable memory buttons.
Selecting a station manually
Station selection via the frequency.
"Radio"
1.
2. "FM" or "AM"
3. "FM stations" or "AM stations"
4. "Manual"
5. To select the frequency: turn the controller.
To store the frequency: press and hold the con‐
troller.
Renaming a station
A station with changing station names can be
renamed.
"Radio"
1.
2. "FM"
3. Select the desired station.
4. Open "Options".
5. "Rename to:"
If necessary, wait until the desired name ap‐
pears.
The selected station name is copied to the list
of current stations and stored stations.
Displaying additional information
If a radio station broadcasts radio text or tadio
text plus, this information cam be displayed, e.g.
the title or performer of a piece of music. Avail‐
ability, content and sequence are determined by
the radio station.
"Radio"
1.
2. "FM"
3. "FM stations"
4. Select a station.
5. Open "Options".
6. "Station info"
38
Online Edition for Part no. 01 40 2 912 857 - 07 12 490
Page 39

Radio Entertainment
RDS
RDS broadcasts additional information, such as
the station name, in the FM wave band.
Switching the RDS on/off
It is recommended to switch on RDS.
1. "Radio"
2. "FM"
3. "FM stations"
4. Open "Options".
5. "RDS"
The setting is stored for the remote control cur‐
rently in use.
HD Radio™ reception
Many stations broadcast both analog and digital
signals.
License conditions
HD Radio™ technology manufactured under li‐
cense from iBiquity Digital Corp. U. S. and For‐
eign Patents. HD Radio™ and the HD and HD
Radio logos are proprietary trademarks of iBiq‐
uity Digital Corp.
This symbol is displayed in the status line
when the audio signal is digital.
When setting a station with a digital signal, it may
take a few seconds before the station plays in
digital quality.
In areas in which the station is not continuously
received in digital mode, the playback switches
between analog and digital reception. In this
case, switch off digital radio reception.
Displaying additional information
Some stations broadcast additional information
on the current track, such as the name of the ar‐
tist.
Select the desired station.
1.
2. Open "Options".
3. "Station info"
Satellite radio
General information
The channels are offered in predefined pack‐
ages. The packages must be enabled by tele‐
phone.
Navigation bar overview
Symbol Function
List of channels
Stored stations
Select a channel directly.
Activating/deactivating digital radio
reception
"Radio"
1.
2. "FM" or "AM"
3. Open "Options".
4. "HD Radio reception"
The setting is stored for the remote control cur‐
rently in use.
Online Edition for Part no. 01 40 2 912 857 - 07 12 490
Time Shift
Favoritea/Active Favorites
Manage the favorites.
Ad to Favorites.
The functions of the navigation bar symbols can
also be stored on the programmable memory
buttons.
39
Page 40

Entertainment Radio
Managing a subscription
To be able to enable or unsubscribe from the
channels, you must have reception. It is usually
at its best when you have an unobstructed view
of the sky. The channel name is displayed in the
status line.
Enabling channels
The Unsubscribed Channels category contains
all disabled channels.
1. "Radio"
2. "Satellite radio"
3. "Satellite radio channel list"
4. "Category" or select the displayed category.
5. Select the Unsubscribed Channels cate‐
gory.
6. Select the desired channel.
The phone number and an electronic serial
number, ESN, are displayed.
7. Select the phone number to have the chan‐
nel enabled.
4. "Manage subscription"
5. The phone number and an electronic serial
number, ESN, are displayed.
6. Call Sirius to unsubscribe from the chan‐
nels.
Selecting channels
You can only listen to enabled channels.
The selected channel is stored for the remote
control currently in use.
"Radio"
1.
2. "Satellite radio"
3. "Satellite radio channel list" or
"Presets"
4. Select the desired channel.
You can unsubscribe from the channels again
via this phone number.
Unsubscribing from channels
"Radio"
1.
2. "Satellite radio"
3. Open "Options".
40
Online Edition for Part no. 01 40 2 912 857 - 07 12 490
Select a channel directly
"Radio"
1.
2. "Satellite radio"
3. "Set channel"
4. Turn the controller until the desired channel
is highlighted and press the controller.
Changing the channel
On the Control Display:
or select symbol .
Via buttons on the radio
Press the button.
Page 41

Radio Entertainment
Storing a channel
1. "Radio"
2. "Satellite radio"
3. If necessary, "Satellite radio channel
list".
4. Select the desired channel.
5. Press and hold the controller until the list of
stored stations is displayed.
6. Select the desired memory location.
The channels are stored for the remote control
currently in use.
The channels can also be stored on the pro‐
grammable memory buttons.
With navigation system: the stations can also be
stored on the programmable memory buttons.
Selecting a category
"Radio"
1.
2. "Satellite radio"
3. "Satellite radio channel list"
4. "Category" or select the displayed category.
5. Select the desired category.
Timeshift
The channel you are currently listening to can be
stored in a buffer for up to about an hour.
Prerequisite: the signal must be available.
The stored audio track can be played with a de‐
lay following the live broadcast. When the mem‐
ory is full, the older tracks are overwritten. The
memory is cleared when a new channel is se‐
lected.
Opening the timeshift function
1. "Radio"
2. "Satellite radio"
3. "Time shift"
▷ The red arrow shows the current playback
position.
▷ The time difference to the live broadcast is
displayed next to the bar.
For live transmissions: "live".
Timeshift menu
Symbol Function
Go to the live broadcast
Automatic timeshift deactivated/ac‐
tivated
Fast forward
Reverse
Playback/pause
Next track
Previous track
Automatic timeshift
With automatic timeshift, audio playback is
paused for the following events.
▷ Incoming and outgoing telephone calls.
▷ Activation of the voice activation system.
▷ Muting.
Online Edition for Part no. 01 40 2 912 857 - 07 12 490
41
Page 42

Entertainment Radio
The audio playback then continues with a time
delay.
To activate:
1. "Radio"
2. "Satellite radio"
3. "Replay - Time shift"
4. "Automatic time shift"
To deactivate: "Automatic time shift".
Storing favorites
A performer, a track, a game, a league or a team
can be stored as a Favorite. If the stored Favorite
is played on a channel, a message appears on
the Control Display. Up to 30 Favorites can be
stored.
Storing the artist, track, or game
It is only possible to store favorites that are cur‐
rently being broadcast. The channel information
must be available.
"Radio"
1.
2. "Satellite radio"
3. "Add to favorites"
4. Highlight the performer, track or game and
press and hold the controller.
5. Store the desired favorite.
Storing the league or team
Leagues or teams can be added to the favorites
from a selection list.
"Radio"
1.
2. "Satellite radio"
3. "Favorites"
4. Stern with horizontal lines icon"Manage
favorites"
5. "Add sports information"
6. Select the league.
7. Select "Add all teams" or the desired team.
Opening the favorites
If an activated favorite is played back, the fol‐
lowing message is displayed for approx. 20 sec‐
onds: "Favorite alert!".
"Favorites"
Select the symbol while the message is shown.
The displayed favorite is played.
If there is no message, the system displays the
My Favorites category. All Favorites currently
being played can be selected.
Managing the favorites
Activating/deactivating the favorites
Favorites can be activated and deactivated
globally and individually.
"Satellite radio"
1.
2. "Favorites"
3. "Manage favorites"
4. Select "Activate alert" or the desired favor‐
ites.
The setting is stored for the remote control cur‐
rently in use.
42
Deleting favorites
"Satellite radio"
1.
2. "Favorites"
3. "Manage favorites"
Online Edition for Part no. 01 40 2 912 857 - 07 12 490
Page 43
Radio Entertainment
4. Highlight the desired favorite.
5. Open "Options".
6. "Delete entry"
Traffic Jump
Traffic and weather information for a selected
region is broadcast every few minutes.
Selecting a region
1. "Radio"
2. "Satellite radio"
3. Open "Options".
4. "Set jump"
5. Select the desired region.
The region is stored for the remote control cur‐
rently in use.
Activating/deactivating the jump
"Radio"
1.
2. "Satellite radio"
3. Options
4. "Jump to:"
Information for the selected region is broadcast
as soon as it is available.
or near trees, mountains or other powerful
sources of radio interference.
Stored stations
General information
It is possible to store up to 40 stations.
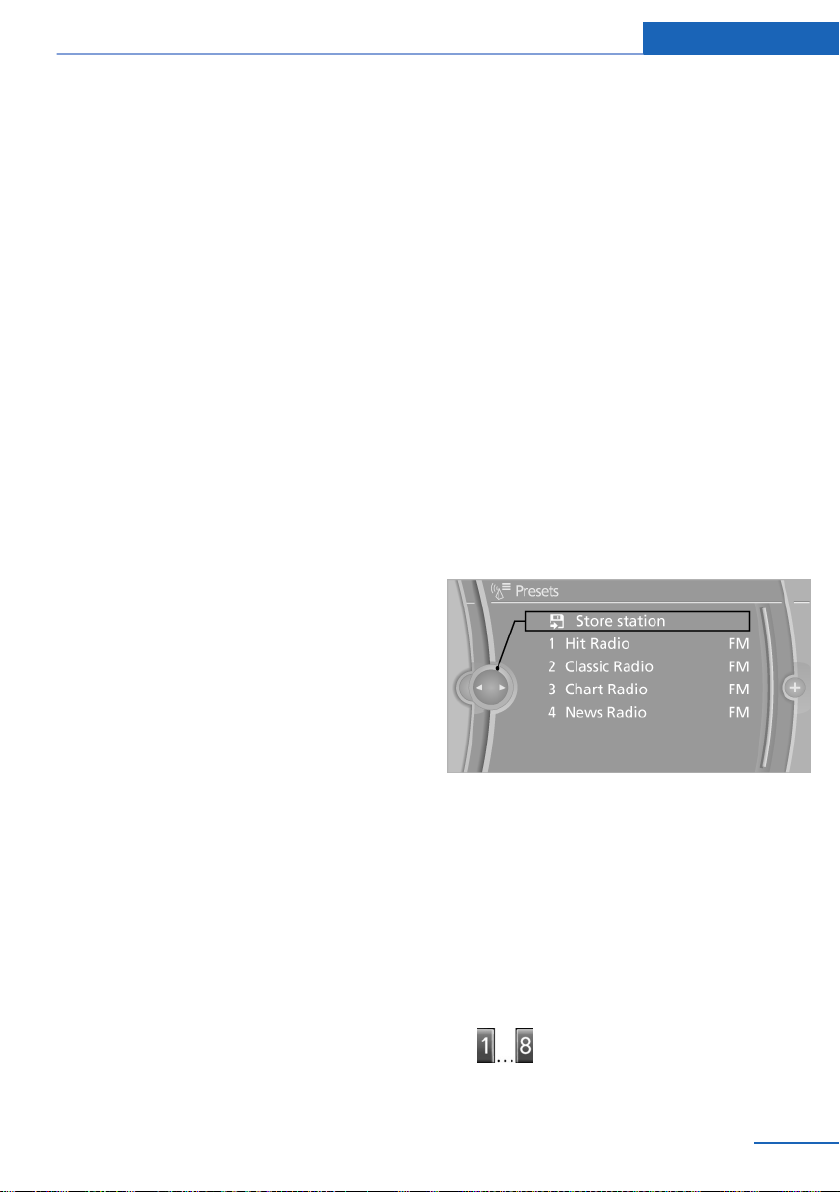
Calling up a station
1. "Radio"
2. "Presets"
3. Select the desired station.
Storing a station
The station currently selected is stored.
"Radio"
1.
2. "Presets"
3. "Store station"
Cancellikng a jump
"Cancel"Traffic Jump is deactivated.
Automatic update
About twice a year, Sirius performs an update of
the channel names and positions. The update
takes place automatically and may take several
minutes.
Notes
▷ Reception may not be available in some sit‐
uations, such as under certain environmen‐
tal or topographic conditions. The satellite
radio has no influence on this.
▷ The signal may not be available in tunnels or
underground garages; next to tall buildings;
Online Edition for Part no. 01 40 2 912 857 - 07 12 490
4. Select the desired memory location.
The list of stored stations is stored for the re‐
mote control currently in use.
The stations can also be stored on the program‐
mable memory buttons.
Without navigation system or
telephone: save station on radio station
buttons
Select the desired station.
1.
2. Press the desired button for more
than 2 seconds.
43
Page 44

Entertainment Radio
In order to call up a stored station, briefly press
corresponding button.
Deleting a station
1. "Radio"
2. "Presets"
3. Select the desired station.
4. "Options" Open.
5. "Delete entry"
44
Online Edition for Part no. 01 40 2 912 857 - 07 12 490
Page 45

CD/multimedia
CD/multimedia Entertainment
Vehicle equipment
All standard, country-specific and optional
equipment that is offered in the model series is
described in this chapter. Therefore, equipment
is also described that is not available in a vehicle,
e. g., because of the selected optional equip‐
ment or country variant. This also applies for
safety-related functions and systems.
Controls
Press the button Function
Press: switches radio on/
off. Turn: adjusts the vol‐
ume.
Changes the entertainment
source.
Change station/track.
Programmable memory
buttons.
Muting
When the ignition is switched on or the engine
is running: press the ON/OFF button on the
radio.
CD/DVD
Playback
Loading the CD/DVD player
Insert the CD/DVD with the printed side up.
Playback begins automatically.
Reading can take a few minutes with com‐
pressed audio files.
Starting playback
A CD/DVD is located in the CD/DVD player or
DVD changer.
"Multimedia"
1.
2. "CD/DVD"
3. Select the desired CD or DVD.
Change waveband.
Eject CD/DVD.
Sound output
Switching on/off
When the ignition is switched off: press ON/OFF
button on the radio.
Online Edition for Part no. 01 40 2 912 857 - 07 12 490
Symbol Meaning
CD/DVD player
... DVD changer
Rear CD/DVD player
45
Page 46

Entertainment CD/multimedia
Playable formats
▷ DVD: DVD-ROM, DVD-R, DVD+R, DVD-
RW, DVD+RW, DVD-R DL, DVD+R DL, DVD
audio (video part only), DVD video.
▷ CD-ROM, CD-R, CD-RW, CD-DA, VCD,
SVCD.
▷ Compressed audio files: MP3, WMA, AAC,
M4A.
CD/DVD removal
1. Press the button.
The CD/DVD is partially ejected.
2. Remove the CD/DVD.
Audio playback
Selecting the track using the button
Press the button repeatedly until the
desired track is played.
Selecting a track via iDrive
Audio CDs
To go up a level in the directory: move the
controller to the left.
2. Select the desired track to begin playback.
Displaying information on the track
Select the desired track to begin playback.
CDs/DVDs with compressed audio files
Depending on the data, some letters and num‐
bers of the CD/DVD may not be displayed cor‐
rectly.
Select the directory if necessary.
1.
46
Online Edition for Part no. 01 40 2 912 857 - 07 12 490
If information about a track has been stored, it is
displayed automatically:
▷ Interpret.
▷ Album track.
▷ Number of tracks on the CD/DVD.
▷ File name of track.
▷ Cover picture of the CD/DVD
Page 47

CD/multimedia Entertainment
Random playback
1. "Multimedia"
2. "CD/DVD"
3. Select the desired CD or DVD.
4. Open "Options".
5. "Random"
All tracks of the CD/DVD are played back in ran‐
dom order.
Fast forward/reverse
Press and hold the button.
Video playback
Country codes
Only DVDs with the code of the home region can
be played back; also refer to the information on
the DVD.
Code Region
1 USA, Canada
2 Japan, Europe, Middle East, South Af‐
rica
3 Southeast Asia
4 Australia, Central and South America,
New Zealand
5 Northwest Asia, North Africa
6 China
0 All regions
Playback
The video image is displayed on the front Con‐
trol Display up to a speed of approx.
2 mph/3 km/h; in some countries, it is only dis‐
played if the parking brake is set or if the auto‐
matic transmission is in position P.
DVD video
1. "Multimedia"
2. "CD/DVD"
3. Select a DVD with video content.
4. "DVD menu"
VCD/SVCD
"Multimedia"
1.
2. "CD/DVD"
3. Select a CD with video content.
4. "Select track"
5. Select the desired track.
Video menu
To open the video menu: turn the controller dur‐
ing playback.
Press the controller when "Back" is displayed.
Symbol Function
Open the DVD menu.
Start playback.
Pause
Stop
Next chapter
Online Edition for Part no. 01 40 2 912 857 - 07 12 490
47
Page 48

Entertainment CD/multimedia
Symbol Function
Previous chapter
Fast forward
Reverse
In fast forward/reverse: the speed increases ev‐
ery time the controller is pressed. To stop, start
playback.
DVD menu
1. If necessary, turn the controller to open the
video menu.
2. "DVD menu"
The DVD menu is displayed. The display de‐
pends on the contents of the DVD.
3. To select menu items: move the controller
and press it.
To change to the video menu: turn the controller
and press it.
DVD/VCD settings
For some DVDs, settings can only be made via
the DVD menu; refer also to the information on
the DVD.
3. "Audio/language"
4. Select the desired language.
Selecting the subtitles
The subtitles that are available depend on the
DVD.
Turn the controller during playback.
1.
2. Open "Options".
3. "Subtitles"
4. Select the desired language or "Do not
display subtitles".
Selecting the language
The languages that are available depend on the
DVD.
Turn the controller during playback.
1.
2. Open "Options".
48
Online Edition for Part no. 01 40 2 912 857 - 07 12 490
Setting the brightness, contrast and color
Turn the controller during playback.
1.
2. Open "Options".
3. "Display settings"
Page 49

CD/multimedia Entertainment
4. "Brightness", "Contrast" or "Color"
5. Turn the controller until the desired setting
is reached and press the controller.
Selecting the zoom
Display the video image on the entire screen.
Turn the controller during playback.
1.
2. Open "Options".
3. "Additional options"
4. "Zoom mode"
Selecting the camera angle
The availability of a different camera angle de‐
pends on the DVD and the current DVD track.
1. Turn the controller during playback.
2. Open "Options".
3. "Additional options"
4. "Viewing angle"
5. Select the desired camera angle.
Opening the main menu, back
These functions are not contained on every
DVD. Therefore, they may not be available for
use.
DVD changer
Depending on the vehicle, the DVD changer is
located in the glove compartment, above the
glove compartment, or behind the left side trim
in the cargo area.
Controls and displays
Selecting a track
DVD video:
Turn the controller when the DVD menu is
1.
displayed.
2. Open "Options".
3. "Additional options"
4. "Select title"
5. Select the desired track.
VCD/SVCD:
"Select track"
1.
2. Select the desired track.
Online Edition for Part no. 01 40 2 912 857 - 07 12 490
1 Empty DVD compartments
2 LED on DVD slot
3 Buttons for DVD compartments
4 DVD slot
5 Load DVD compartments
Loading the DVD compartments
individually
1.
Press the button once.
49
Page 50
Entertainment CD/multimedia
The LED on the first empty compartment
flashes.
2. Select another compartment if necessary.
3. Wait for the LEDs on the DVD slot to flash.
4. Insert a single CD or DVD in the middle.
The CD/DVD is drawn in automatically and
placed into the selected compartment.
Sliding in CDs/DVDs
Do not insert the CD/DVD until the LEDs
on the DVD slot are flashing; otherwise, the CD/
DVD or the DVD changer could be damaged.
Do not continue to push on the CD/DVD; this
may cause it to jam and prevent it from being
able to eject again.◀
Loading all empty DVD compartments
1.
2. Wait for the LEDs on the DVD slot to begin
on the DVD slot are flashing; otherwise, the CD/
DVD or the DVD changer could be damaged.
Do not continue to push on the CD/DVD; this
may cause it to jam and prevent it from being
able to eject again.◀
After they are inserted, it may take several mi‐
nutes for the CDs/DVDs to be read in.
Press the button once and hold it
down.
The LEDs on the empty CD compartments
flash.
flashing and then insert each CD or DVD into
the center of the slot.
The CDs/DVDs are drawn in automatically
and placed into the empty compartments.
Sliding in CDs/DVDs
Do not insert the CD/DVD until the LEDs
Removing a single CD/DVD
1.
2. Select the DVD compartment.
Press the button once.
The CD/DVD is partially ejected.
3. Remove the CD/DVD.
Removing all CDs/DVDs
1. Press the button once and hold it down.
2. Remove the CDs/DVDs.
Cancelling a function
Filling the DVD compartments or removing CDs/
DVDs can be canceled.
Press the corresponding button.
▷
▷
Malfunctions
If the LEDs on the DVD slot and on the com‐
partments are flashing rapidly, a malfunction has
occurred.
To eliminate the malfunction:
Press one of the following buttons:
1.
▷
▷
The CD/DVD last inserted is ejected.
2. Remove the CD/DVD.
The DVD changer is functional again after the
LEDs stop flashing rapidly.
Audio playback
The audio track of a DVD can be played back
even if video playback is not possible in the ve‐
hicle.
Only the main film without the previews or extras
can be played back.
Starting playback
A DVD is located in the DVD changer.
"Multimedia"
1.
50
Online Edition for Part no. 01 40 2 912 857 - 07 12 490
Page 51

CD/multimedia Entertainment
2. "CD/DVD"
3. Select the desired DVD.
Selecting a chapter using the button
Press the button repeatedly until the
desired chapter is played.
Selecting a chapter using iDrive
1. "Multimedia"
2. "CD/DVD"
3. Select the desired DVD.
4. Select the desired chapter.
Fast forward/reverse
Press and hold the button.
Selecting the language
The languages that are available depend on the
DVD.
"Multimedia"
1.
2. "CD/DVD"
3. Select the desired DVD.
4. Open "Options".
5. "Audio/language"
6. Select the desired language.
Notes
CD/DVD player and changer
Do not remove the cover
BMW CD/DVD players and changers are
officially designated Class 1 laser products. Do
not operate if the cover is damaged; otherwise,
severe eye damage may occur.◀
CDs and DVDs
Use of CDs/DVDs
▷ Do not use self-recorded CDs/DVDs
with labels applied, as these can be‐
come detached during playback due
to heat buildup and can cause irrepar‐
able damage to the device.
▷ Only use round CDs/DVDs with a standard
diameter of 4.7 in/12 cm and do not play
CDs/DVDs with an adapter, e.g., single CDs;
otherwise, the CDs or the adapter may jam
and no longer eject.
▷ Do not use combined CDs/DVDs, e.g., DVD
Plus, as the CDs/DVDs can jam and will no
longer eject.◀
General malfunctions
▷ CD/DVD changers and players have been
optimized for performance in vehicles. In
some instances they may be more sensitive
to faulty CDs/DVDs than stationary devices
would be.
▷ If a CD/DVD cannot be played, first check
whether it has been inserted correctly.
Humidity
High levels of humidity can lead to condensation
on the CD/DVD or the laser's scan lens, and
temporarily prevent playback.
Malfunctions involving individual CDs/
DVDs
If malfunctions occur only with particular CDs/
DVDs, this can be due to one of the following
causes:
Home-recorded CDs/DVDs
▷ Possible reasons for malfunctions with
home-recorded CDs/DVDs are inconsistent
data creation or recording processes, or
poor quality or old age of the blank CD/DVD.
▷ Only label CDs/DVDs on the upper side with
a pen intended for this purpose.
Online Edition for Part no. 01 40 2 912 857 - 07 12 490
51
Page 52

Entertainment CD/multimedia
Damage
▷ Avoid fingerprints, dust, scratches and
moisture.
▷ Store CDs/DVDs in a sleeve.
▷ Do not subject CDs/DVDs to temperatures
over 122 ℉/50 ℃, high humidity or direct
sunlight.
CDs/DVDs with copy protection
CDs/DVDs are often provided with a copy pro‐
tection feature by the manufacturer. This can
mean that some CDs/DVDs cannot be played or
can only be played to a limited extent.
MACROVISION
This product contains copyrighted technology
that is based on multiple registered US patents
and the intellectual property of the Macrovision
Corporation and other manufacturers. The use
of this copy protection must be approved by
Macrovision. Media protected by this product unless otherwise agreed with Macrovision - may
only be used for private purposes. Copying of
this technology is prohibited.
DTS Digital Surround™
Manufactured under license under U.S.
Patent Numbers: 5,451,942;
5,956,674; 5,974,380; 5,978,762; 6,487,535 &
and other patents granted and registered in the
USA and worldwide. DTS and the logo are reg‐
istered trademarks & DTS Digital Surround and
the DTS logos are trademarks of DTS Inc. ©
DTS, Inc. All rights reserved.
Music collection
Storing music
▷ Audio CD: tracks are converted into a com‐
pressed audio format. If available, informa‐
tion on the album, such as the artist, is
stored as well.
▷ CD/DVD or USB device with compressed
audio files: the entire content of the CD/DVD
or the USB device is stored in the vehicle as
an album. The WMA, MP3, M4A, and AAC
formats are stored. Individual tracks and di‐
rectories can be deleted later, Deleting a
track and directory, refer to page 57.
Tracks with DRM copy protection can be
stored but cannot be played back.
Backing up music data
Regularly back up the music data; other‐
wise, it could be lost if there is a fault on the hard
disk.◀
Music recognition technology and re‐
lated data are provided by Gracenote®.
Gracenote is the industry standard in music rec‐
ognition technology and related content deliv‐
ery. For more information, please visit
www.gracenote.com.
CD and music-related data from Gracenote, Inc.,
copyright © 2000-2009 Gracenote. Gracenote
Software, copyright © 2000-2009 Gracenote.
This product and service may practice one or
more of the following U.S. Patents: #5.987.525;
#6.061.680; #6.154.773, #6.161.132,
#6.230.192, #6.230.207, #6.240.459,
#6.330.593, and other patents issued or pend‐
ing. Some services supplied under license from
Open Globe, Inc. for U.S. Patent: #6.304.523.
Storing from a CD/DVD
Insert a CD or DVD into the CD/DVD player.
1.
2. "Multimedia"
3. "CD/DVD"
General information
Music tracks from CDs/DVDs and USB devices
can be stored in the music collection on a hard
disc in the vehicle and played from there.
52
Online Edition for Part no. 01 40 2 912 857 - 07 12 490
Page 53

CD/multimedia Entertainment
4. Select the symbol for the CD/DVD player.
5. "Store in vehicle"
The music collection is displayed and the first
track of the CD/DVD is played back. During the
storage process, the tracks are played in se‐
quence.
Observe the following during the storage proc‐
ess:
Do not switch to the CD/DVD player and do not
remove the CD/DVD from the CD/DVD player as
this will interrupt the storage process. You can
switch to the other audio sources without inter‐
rupting the storage process. Tracks from the
current CD/DVD that have already been stored
can be called up.
Interrupting storage
"Multimedia"
1.
2. "CD/DVD"
3. "Storing..."
4. "Cancel storing"
The storage process is interrupted and can be
continued at any time.
Continuing the storage process
1. "Multimedia"
2. "CD/DVD"
3. Select the symbol for the CD/DVD player.
4. "Continue storing"
Storage of the CD/DVD continues at the begin‐
ning of the track at which storage was inter‐
rupted.
Album information
During storage, information such as the name of
the artist is stored with the track, if this informa‐
tion is available in the vehicle database or on the
CD.
To update the database, contact your service
center.
Storing from a USB device
To store music, a suitable device must be con‐
nected to the USB interface in the center arm‐
rest.
▷ Suitable devices: USB mass storage devi‐
ces, such as USB flash drives or MP3 players
with a USB interface.
▷ Unsuitable devices: USB hard drives, USB
hubs, USB memory card readers with mul‐
tiple inserts, Apple iPod/iPhone. Music from
the Apple iPod/iPhone can be played via the
AUX-IN port or the USB port in the center
armrest.
▷ File systems: popular file systems for USB
devices are supported. FAT 32 is the rec‐
ommended format.
1. Connect USB medium to the USB port in the
center armrest.
2. "Multimedia"
3. "Music collection"
4. Open "Options".
Online Edition for Part no. 01 40 2 912 857 - 07 12 490
53
Page 54

Entertainment CD/multimedia
5. "Import/Export music"
6. "Import music (USB)"
Playing music
Music search
All tracks for which additional information has
been stored can be accessed by the music
search. Tracks that have been saved without
additional information can be called up via the
music directory.
"Multimedia"
1.
2. "Music collection"
3. "Music search"
▷ Select "A-Z search" and input the de‐
sired entry.
▷ Select the desired entry from the list.
6. Select other categories if you wish.
The tracks found are listed in alphabetical
order.
7. "Start play"
Restarting the music search
"Reset search"
Music search using spoken instructions
Instructions for the voice activation system, see
vehicle owners' manual.
1.
2. ›Music search‹
3. Open the desired category, e.g., ›Select
4. Say the desired entry in the list.
5. Select other categories if you wish.
To select a track directly: ›Title ...‹.
Say the voice command and the name of the
desired track in a single command.
Press the button on the steering
wheel.
artist‹.
4. Select the desired category.
5. Select the desired entry:
54
Online Edition for Part no. 01 40 2 912 857 - 07 12 490
Music directory
All stored albums are listed in the music direc‐
tory.
"Multimedia"
1.
2. "Music collection"
3. "Music search"
4. "Browse directory"
All stored directories are displayed in a list.
5. Select the desired directory.
To go up a level in the directory: move the
controller to the left.
Page 55

CD/multimedia Entertainment
Symbol Format
Audio CD
Compressed audio files
Sorting a music directory
The list can be sorted alphabetically by name or
by the date saved.
1. "Sorting"
2. "By name" or "By date"
Current playback
List of tracks that are currently being played. For
example, the list of tracks that were found using
music search, a playlist or the list of similar
tracks found.
"Multimedia"
1.
2. "Music collection"
3. "Now playing"
4. Select the desired track, if necessary.
Classical view
With classical music, a track usually includes
additional information, such as the name of the
composer or the conductor. This information
can be displayed.
Open "Options".
1.
2. "Classic view"
Playback lists
"Multimedia"
1.
2. "Music collection"
3. "Music folder"
The following lists are displayed:
▷ "My favorites"
All tracks that have been marked as favor‐
ites.
▷ "Top 50"
The 50 most frequently played tracks.
▷ "Similar music"
All tracks that have been found in a search
for similar music.
▷ "Playlists"
Playlists that have been imported or stored
as playlists in the vehicle.
Storing playlists
The favorites and similar music lists can be
stored in the vehicle as a playlists.
"My favorites" or"Similar music"
1.
2. Open "Options".
3. "Save as playlist"
Deleting a playlist
"Music folder"
1.
2. Highlight a playlist that is to be deleted.
3. Open "Options".
4. "Delete playlists"
Deleting all playlists
"Music folder"
1.
2. Open "Options".
3. "Delete all playlists"
Similar music
You can carry out a search for music stored in
the vehicle that is similar to the track currently
being played.
"Multimedia"
1.
2. "Music collection"
Online Edition for Part no. 01 40 2 912 857 - 07 12 490
55
Page 56

Entertainment CD/multimedia
3. "Similar titles (HDD)"
The tracks found are stored temporarily in the
list of similar tracks.
Up to 30 tracks can be stored. The tracks found
can be stored in the vehicle as a Playlist, refer to
page 55.
Favorites
If a track is currently being played, it can be
marked and stored as a favorite.
Saving a track as a favorite
A track can only be stored as a favorite if it is
currently being played.
"Multimedia"
1.
2. "Music collection"
3. "Add to favorites"
Calling stored favorites
"Multimedia"
1.
2. "Music collection"
3. "Music folder"
4. "My favorites"
5. Select the desired track.
The favorites can be stored in the vehicle as a
Playlist, refer to page 55.
Deleting single tracks from favorites
Call the track you want to delete from the list
1.
of favorites.
2. "Delete from favorites"
Deleting tracks from favorites
Individual or all tracs can be deleted from the fa‐
vorites.
"Music folder"
1.
2. "My favorites"
3. Open "Options".
4. "Delete tracks from favorites" or "Delete
tracks from favorites"
Audio books and podcasts
Audio books and podcasts can be called sepa‐
rately.
1. "Add'l media"
2. Call the desired medium:
▷ "Audio books"
▷ "Podcasts"
3. Call the desired file.
Random playback
All tracks of the selection are played back in ran‐
dom order.
"Multimedia"
1.
2. "Music collection"
3. Open "Options".
4. "Random"
Managing music
Music directory
Renaming folders or tracks
The name of the album, if available, is automat‐
ically entered when the album is stored. If the
name is not available, it can be changed later if
desired.
"Multimedia"
1.
2. "Music collection"
3. "Music search"
4. "Browse directory"
5. Highlight the desired folder or track.
56
Online Edition for Part no. 01 40 2 912 857 - 07 12 490
Page 57
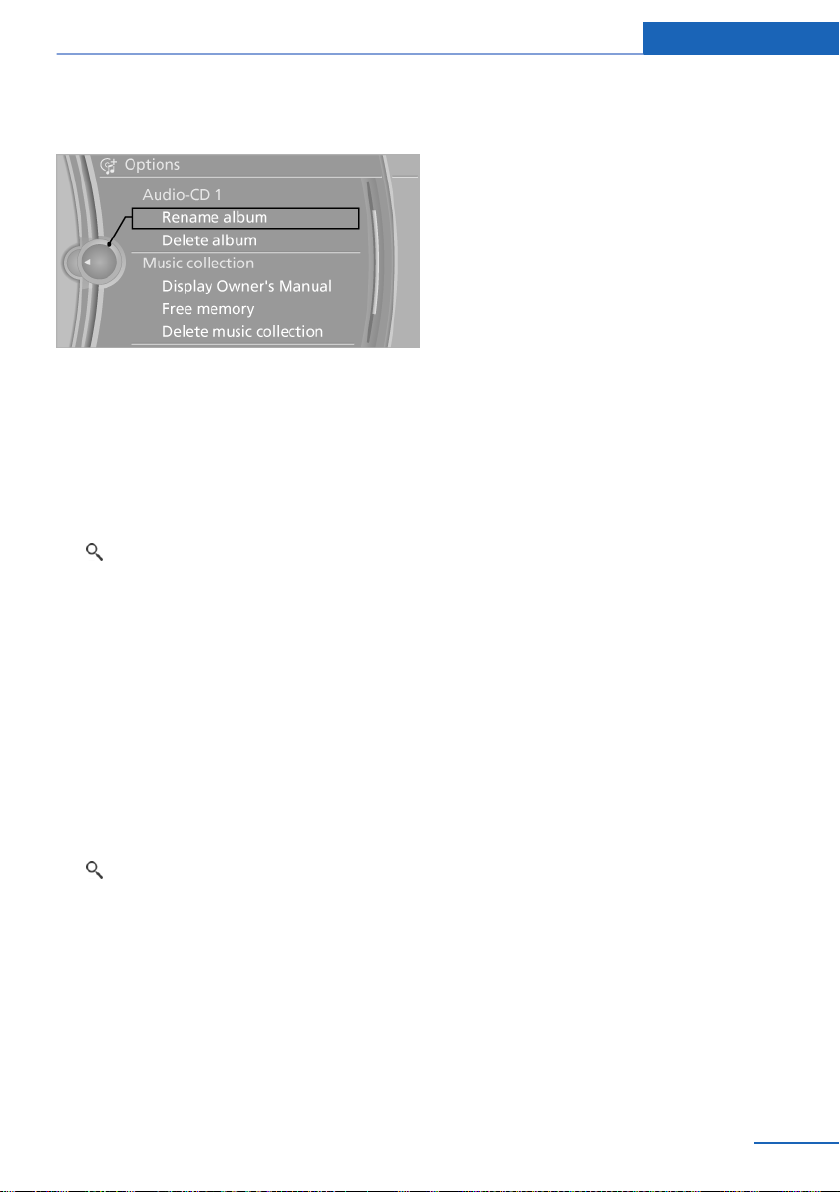
CD/multimedia Entertainment
6. Open "Options".
7. "Rename track" or "Rename folder"
8. Select the letters individually.
Deleting a directory
A directory cannot be deleted while a track from
that directory is being played.
"Multimedia"
1.
2. "Music collection"
3. "Music search"
4. "Browse directory"
5. Mark the desired directory.
6. Open "Options".
7. "Delete directory"
Deleting tracks and folders
A track cannot be deleted while it is being
played. A folder cannot be deleted while a track
from that folder is being played.
"Multimedia"
1.
2. "Music collection"
3. "Music search"
4. "Browse directory"
5. Highlight the folder or track.
6. Open "Options".
7. "Delete folder" or "Delete track"
Free memory capacity
Display the free memory capacity in the music
collection.
1. "Multimedia"
2. "Music collection"
3. Open "Options".
4. "Manage music collection"
5. "Free memory"
Music collection
Backing up the music collection
The entire music collection can be stored on a
USB device. Make sure there is enough free
memory capacity on the USB device.
Depending on the number of tracks, backing up
the music collection may take several hours.
Therefore, it is best to perform the backup dur‐
ing a long trip.
Starting the engine.
1.
2. Connect USB medium to the USB port in the
center armrest.
3. "Multimedia"
4. "Music collection"
5. Open "Options".
Online Edition for Part no. 01 40 2 912 857 - 07 12 490
57
Page 58

Entertainment CD/multimedia
6. "Import/Export music"
7. "Backup music on USB"
Storing the music collection in the vehicle
When storing the music collection in the vehicle
from a USB device, the existing music collection
in the vehicle is replaced.
"Multimedia"
1.
2. "Music collection"
3. Open "Options".
4. "Import/Export music"
5. "Restore music from USB"
Deleting the music collection
"Multimedia"
1.
2. "Music collection"
3. Open "Options".
4. "Manage music collection"
5. "Delete music"
External devices
The concept
Various external devices can be connected to
the vehicle. The sound is output through the ve‐
hicle loudspeakers. The system can be oper‐
ated via iDrive, depending on how the external
device is connected to the vehicle.
Symbol Meaning
AUX-IN port
USB audio interface
Music interface for smartphones
WLAN
Bluetooth audio
AUX-IN port
At a glance
▷ For connecting audio devices, e.g., MP3
player. The sound is output on the vehicle
loudspeakers.
▷ Recommendation: use medium tone and
volume settings on the audio device. The
tone depends on the quality of the audio
files.
Connecting
The AUX-IN port is located in the
center armrest.
Connect the headphones or lineout connector of the device to the
jack plug.
Playback
Connect the audio device, switch it on and
1.
select a track on the audio device.
2. "Multimedia"
3. "External devices".
4. "AUX front"
58
Online Edition for Part no. 01 40 2 912 857 - 07 12 490
Page 59
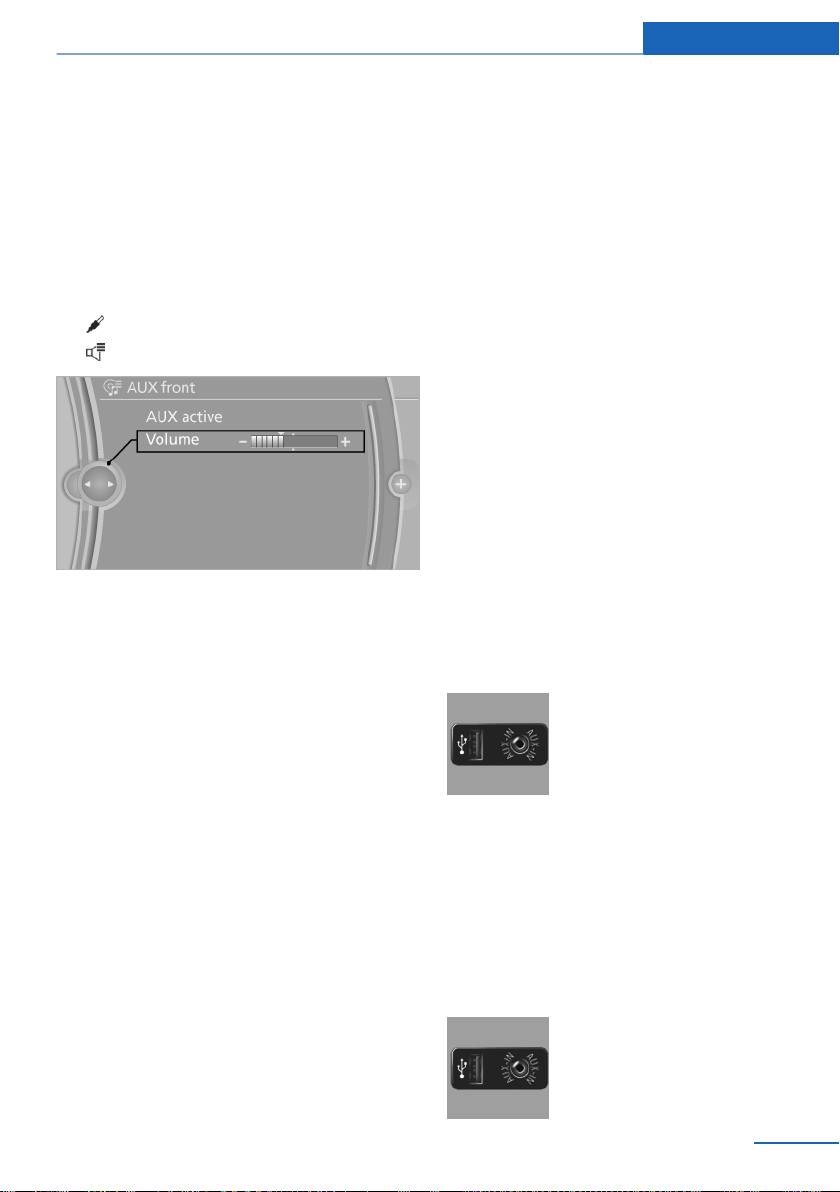
CD/multimedia Entertainment
Volume
The volume of the sound output is dependent
on the audio device. If this volume differs mark‐
edly from the volume of the other audio sources,
it is advisable to adjust the volumes.
Adjusting the volume
1. "Multimedia"
2. "External devices".
3. "AUX front"
4. "Volume"
5. Turn the controller until the desired volume
is set and press the controller.
USB audio interface/Music interface
for smartphones
At a glance
It is possible to connect external audio devices.
Operation can be performed via iDrive. The
sound is output on the vehicle loudspeakers.
Due to the large number of different audio devi‐
ces available on the market, it cannot be ensured
that every audio device/mobile phone is opera‐
ble on the vehicle.
Ask your service center about suitable audio de‐
vices/mobile phones.
Audio files
Standard audio files can be played back:
▷ MP3.
▷ WMA.
▷ WAV (PCM).
▷ AAC, M4A.
▷ Playback lists: M3U, WPL, PLS.
File systems
Popular file systems for USB devices are sup‐
ported. FAT 32 is the recommended format.
Connection of Apple iPod/iPhone via
USB audio interface
The USB audio interface is located in the center
armrest.
Connect using a flexible adapter cable.
Connect the Apple iPod/iPhone
to the USB interface.
The Apple iPod/iPhone menu
structure is supported by the
USB audio interface.
Connectors for external devices
▷ Connection via USB audio interface: Apple
iPod/iPhone, USB devices, e.g., MP3 play‐
ers, USB flash drives, or mobile phones that
are supported by the USB audio interface.
▷ Connection via snap-in adapter, if the vehi‐
cle is equipped with a music interface for
smartphones: Apple iPhone or mobile
phones.
Playback is only possible when there is no
audio device attached to the AUX-IN port.
Online Edition for Part no. 01 40 2 912 857 - 07 12 490
Connection of a USB device via the
USB audio interface
The USB audio interface is located in the center
armrest.
Connect using a flexible adapter cable to protect
the USB audio interface and the USB device
against physical damage.
Connect the USB device to the
USB interface.
59
Page 60

Entertainment CD/multimedia
After connecting for the first time
Information on all music tracks, e.g. artist or type
of music, as well as playback lists are transmit‐
ted into the vehicle. This may take some time,
depending on the USB device and the number
of tracks.
During transmission, the tracks can be called up
via the file directory.
Number of tracks
Information from up to four USB devices or for
approx. 36,000 tracks can be stored in the ve‐
hicle. If a fifth device is connected or if more than
36,000 tracks are stored, information on exist‐
ing music tracks may be deleted.
Copy protection
Music tracks with integrated Digital Rights Man‐
agement, DRM, cannot be played.
Playback
"Multimedia"
1.
2. "External devices"
3. Select symbol or .
Track search using information
1. Select the desired category, e.g., "Genre" or
"Artist".
All entries are displayed in a list.
▷ Open "A-Z search" and input the de‐
sired entry. When a letter is entered, the
results are filtered using this letter as the
first letter. If multiple letters are entered,
all results that contain that sequence are
displayed.
▷ Select the desired entry from the list.
2. Select other categories if you wish.
Not all categories need to be selected. For
example, if all of the tracks by a certain artist
are to be displayed, call up that artist only.
All of the tracks by that artist are then dis‐
played.
3. "Play"
The playback starts with the first track.
Track search
Tracks are displayed if they have been saved in
the Latin alphabet.
"Multimedia"
1.
2. "External devices"
3. Select the or symbol.
4. "Music search"
60
Online Edition for Part no. 01 40 2 912 857 - 07 12 490
Restarting a track search
"Reset search"
Browsing a directory
If connection is via the USB audio interface in the
centre console, the file directory of the device
can be displayed.
"Browse directory"
A list of directories and tracks is displayed.
This symbol identifies directories.
Select a track:
Select the desired track or directory.
To go up a level in the directory, move the con‐
troller to the left.
Page 61

CD/multimedia Entertainment
Playback lists
Calling up playback lists.
1. "Multimedia"
2. "External devices"
3. Select the or symbol.
4. "Playlists"
5. Select the desired playlist.
More media, audio books, podcasts,
videos
Audio books, podcasts and videos on the device
can be called separately.
"Multimedia"
1.
2. "External devices"
3. Select the or symbol.
4. "More media"
5. Call the desired medium:
▷ "Audio books"
▷ "Podcasts"
▷ "Video"
Video playback
The video image is displayed on the front Con‐
trol Display up to a speed of approx.
2 mph/3 km/h; in some countries, it is only dis‐
played if the parking brake is set or if the auto‐
matic transmission is in position P.
Current playback
List of tracks that are currently being played. For
example the list of tracks that were found in the
track search or a playlist.
"Multimedia"
1.
2. "External devices"
3. Select the or symbol.
4. "Now playing"
Random playback
The current list of tracks is played back in ran‐
dom order.
1. "Multimedia"
2. "External devices"
3. Open "Options".
4. "Random"
Fast forward/reverse
Press and hold the button.
Notes
Do not expose the audio device to extreme en‐
vironmental conditions, such as very high tem‐
peratures; refer to the audio device operating
instructions.
Depending on the configuration of the audio
files, e.g., bit rates greater than 256 kbit/s, the
files may not play back correctly in each case.
Information on connection
▷ The connected audio device is supplied with
a max. power of 500 mA if supported by the
device. Therefore, do not additionally con‐
nect the device to a socket in the vehicle;
otherwise, playback may be compromised.
▷ Do not use force when plugging the con‐
nector into the USB interface.
▷ Do not connect devices such as fans or
lamps to the USB audio interface.
▷ Do not connect USB hard drives.
▷ Do not use the USB audio interface to re‐
charge external devices.
Bluetooth audio
At a glance
▷ Music files on external devices such as audio
devices or mobile phones can be played
back via Bluetooth.
Online Edition for Part no. 01 40 2 912 857 - 07 12 490
61
Page 62

Entertainment CD/multimedia
▷ The sound is output on the vehicle loud‐
speakers.
▷ The volume of the sound output is depend‐
ent on the device. If necessary, adjust the
volume on the device.
▷ Up to four external devices can be paired
with the vehicle.
Requirements
▷ The device is suitable. Information under
www.bmwusa.com/bluetooth.
▷ The device is ready for operation.
▷ The ignition is switched on.
▷ Bluetooth is activated on the vehicle and on
the device.
▷ Bluetooth presettings must be made on the
device, such as for a connection without
confirmation or visibility; refer to the device
operating instructions.
▷ A number with at least four and a maximum
of 16 digits is defined as the Bluetooth pass‐
key. It is only required once for pairing.
Pairing and connecting
Pairing a device
To avoid becoming distracted and posing
an unnecessary hazard both to your own vehi‐
cle's occupants and to other road users, only
pair the device while the vehicle is stationary.◀
"Settings"
1.
2. "Connections"
3. "Bluetooth®"
4. "Add new device"
The Bluetooth name of the vehicle is dis‐
played in the Control Display.
5. To perform additional steps on the device,
refer to the device operating instructions:
e.g. search for Bluetooth device or connect
a new device.
The Bluetooth name of the vehicle appears
on the device display.
6. Select the Bluetooth name of the vehicle on
the device display.
7. You are prompted by the iDrive or mobile
phone to enter the same Bluetooth passkey.
Enter the passkey and confirm.
Or
Compare the control number in the display
of the vehicle to the control number in the
display of the mobile phone. Confirm the
control number in the mobile phone and in
the vehicle.
"OK"
8. Select functions for which the device is to be
used, e.g. "Bluetooth® audio".
9. "OK"
If pairing was successful, the device is displayed
as connected.
White symbol : the device is active as an audio
source.
If pairing was unsuccessful: What to do if..., refer
to page 63.
Connecting a specific device
A device that has already been paired can be
connected as an active audio source.
Connecting is not possible when data is ex‐
changed via a mobile phone connected via Blue‐
tooth.
Requirements
If necessary, activate the audio connection of
the desired device from the list of paired devi‐
ces.
"Settings"
1.
2. "Connections"
3. "Bluetooth®"
4. Open "Options".
5. "Configure device"
6. "Audio"
7. "OK"
62
Online Edition for Part no. 01 40 2 912 857 - 07 12 490
Page 63

CD/multimedia Entertainment
Connecting the device
1. "Settings"
2. "Connections"
3. "Bluetooth®"
4. Select the device that is to be connected.
White symbol : the device is active as an audio
source.
Playback
General information
▷ The display of music track information de‐
pends on the device.
▷ Operation can takes place on the device or
iDrive.
▷ Playback is interrupted when data is ex‐
changed via a mobile phone connected via
Bluetooth.
Starting playback
Connect the device.
1.
2. "Multimedia"
3. "External devices"
4. Select the symbol.
Symbol Function
Next track
Previous music track
Fast forward/reverse
Press and hold the button.
Random playback
1. "Multimedia"
2. "External devices"
3. Select the symbol.
4. Open "Options".
5. "Random"
Disconnecting the audio connection
"Settings"
1.
2. "Connections"
3. "Bluetooth®"
4. Highlight the desired device.
5. Open "Options".
6. "Configure device"
7. "Audio"
8. "OK"
Playback is started automatically.
Changing the track
Depending on the particular device, some of the
functions may not be available.
Online Edition for Part no. 01 40 2 912 857 - 07 12 490
Unpairing a device
"Settings"
1.
2. "Connections"
3. "Bluetooth®"
4. Highlight the mobile phone that is to be un‐
paired.
5. Open "Options".
6. "Remove device"
What to do if...
Information on suitable devices can be found at
www.bmwusa.com/bluetooth.
Suitable mobile phones, refer to page 78.
63
Page 64

Entertainment CD/multimedia
The device is not supported by the vehicle.
▷ Perform a software update, refer to
page 66, if needed.
The device could not be paired or connected.
▷ Do the Bluetooth passkeys on the device
and the vehicle match? Enter the same
passkey on the device and via iDrive.
▷ Did it take longer than 30 seconds to enter
the passkey? Repeat the pairing procedure.
▷ Are too many Bluetooth devices connected
to the device or vehicle? Delete connections
with other devices if necessary.
▷ Is the mobile phone in power-save mode or
does it have only a limited remaining battery
life? Charge the mobile phone in the snapin adapter or via the charging cable.
▷ Depending on the mobile phone, it is possi‐
ble that only one device can be connected
to the vehicle. Unpair the connected device
from the vehicle and pair and connect only
one device.
▷ The device no longer reacts? Switch the de‐
vice off and on again.
▷ Repeat the pairing procedure.
Music cannot be played back.
▷ Start the program for playing back music
data on the device and select a track on the
device if necessary.
▷ Switch the radio off and on again.
Music files can only be played back softly.
▷ Adjust the volume settings on the device.
Playback is disturbed when buttons are pressed
or by other messages on the device.
▷ Switch off the button tones and other signal
tones on the device.
Playback is interrupted by a telephone call or
traffic bulletin and is not resumed automatically.
▷ Switch the radio off and on again.
Playback is not possible if the mobile phone is
connected both via Bluetooth Audio and via the
extended connectivity of the music player in the
mobile phone.
▷ Disconnect one of the two connections; for
example, disconnect the audio connection,
refer to page 63, and restart playback.
If all points in this list have been checked and the
required function is still not available, contact
the hotline or service center.
WLAN
The concept
Playback of audio or video files from external
devices, e.g., PCs or smartphones that are con‐
nected to the vehicle via WLAN. The sound is
output through the vehicle loudspeakers.
General
The volume of the sound output is dependent
on the device. If necessary, adjust the volume on
the device.
Up to four external devices can be paired with
the vehicle.
Requirements
▷ bmwusa.com
▷ DLNA app must have been installed on the
device.
▷ The device is ready for operation.
▷ The ignition is switched on.
▷ WLAN activated on the vehicle and on the
device.
▷ WLAN presettings must be made on the de‐
vice, such as for a connection without con‐
firmation or visibility; refer to the device op‐
erating instructions.
Activating/deactivating the WLAN on
the vehicle
"Settings"
1.
2. "Connections"
64
Online Edition for Part no. 01 40 2 912 857 - 07 12 490
Page 65

CD/multimedia Entertainment
3. "Wi-Fi®"
4. "Vehicle Wi-Fi®"
Pairing an external device
1. "Settings"
2. "Connections"
3. "Wi-Fi®"
The WLAN network name and the WLAN
key are displayed.
4. "Connect new device"
5. Search for WLAN networks on the external
device and select the WLAN network that is
displayed on the control display.
6. Enter the WLAN key that is displayed on the
Control Display on the external device, or
connect the external device using the WPSPIN function.
If pairing is successful, a message appears on
the Control Display. The device appears in the
list of connected devices.
If multiple devices are connected, the active de‐
vice is identified by the following symbols.
Activating a specific device
If multiple devices are connected to the vehicle
via the WLAN, the device that is to be available
as the active audio and video source can be se‐
lected.
Mark the device in the list of connected de‐
1.
vices.
2. "Options"
3. "Use as Wi-Fi® media source"
Playback
Audio playback
1. "Multimedia"
2. "External devices"
3. Select the symbol.
4. "Search for audio"
5. Select the desired directory if necessary.
6. Select the desired audio file.
Video playback
1. "Multimedia"
2. "External devices"
3. Select the symbol.
4. "Search for video"
5. Select the desired folder if necessary.
6. Select the desired video file.
Current playback
List of tracks that are currently being played.
"Multimedia"
1.
2. "External devices"
3. Select the symbol.
4. "Current playback"
Changing tracks or video
Symbol Function
Next file
Previous file
Fast forward/reverse
Press and hold the button.
Starting playback
"Multimedia"
1.
2. "External devices"
3. Select the symbol.
Online Edition for Part no. 01 40 2 912 857 - 07 12 490
Unpairing a device
"Settings"
1.
2. "Connections"
3. "Wi-Fi®"
65
Page 66

Entertainment CD/multimedia
The WLAN network name and the WLAN
key are displayed.
4. Highlight the device that is to be unpaired.
5. "Options"
6. "Delete" or "Delete all"
What to do if ...
Information on suitable devices can be found at
www.bmw.com/bluetooth.
WLAN device can not be displayed in the list of
external devices.
▷ Check whether the device is switched on.
▷ Check whether the WLAN connection on
the device is switched on.
▷ Check whether the DLNA app has been ac‐
tivated.
▷ Check whether the device is in standby
mode.
Software Update
The vehicle supports various external devices
depending on the current software version. With
a software update, the vehicle can support new
cell phones or new external device, for example.
The updating of the software is done via:
▷ USB.
Updates and related current information is
available at www.bmw.com/update.
Note
Installation must only be carried out while the
vehicle is stationary. The ignition must be
switched off to complete the installation.
Displaying the current version
The currently installed software is displayed.
"Settings"
1.
2. "Software update"
3. "Show current version"
Select Desired version to display Additional in‐
formation.
Updating software via USB
The software may only be updated when the ve‐
hicle is stationary.
1. Store the file for the software-update in the
main director of a USB flash drive.
2. Connect USB data memory to the USB in‐
terface in the center armrest.
3. "Settings"
4. "Software update"
5. "Update software"
6. "Install software."
7. "OK"
8. Switch off the ignition and wait until the Con‐
trol Display has shut down.
All listed software updates are installed.
Restoring the software version
The software version before the last software
update or the factory version can be restored.
The software may only be restored when the
vehicle is stationary.
"Settings"
1.
2. "Software update"
3. "Restore previous version"
4. "Previous version" or "Default SW status"
5. "Remove software"
6. "OK"
7. Switch off the ignition and wait until the Con‐
trol Display has shut down.
All listed software updates are removed.
66
Online Edition for Part no. 01 40 2 912 857 - 07 12 490
Page 67

Rear audio remote control
The concept
The rear audio remote control can be used to
control the following audio functions in the front:
▷ "Radio"
▷ "Multimedia"
The unit is operated in the same manner as the
corresponding buttons on the CD/DVD player.
The remote control is housed in the rear center
armrest.
Menu navigation
Press the button Function
Turn the wheel: adjusts the
volume.
Press the center knob:
switches the sound on/off.
Changes the entertainment
source.
CD/multimedia Entertainment
Remove cover. Press on the cover, arrow 1,
1.
and push forward, arrow 2.
2. Insert batteries of the same type.
3. Close the cover.
Take the used battery to a recycling cen‐
ter or to your service center.
Changes the station, track
or chapter.
Press and hold the button:
fast forward/reverse.
The transmission time of the remote control is
limited by law. To execute a function again,
press or turn the required button again.
Replacing the batteries
No rechargeable batteries
Do not use rechargeable batteries, as
damage may result from the substances in the
batteries.◀
Online Edition for Part no. 01 40 2 912 857 - 07 12 490
67
Page 68

Entertainment Rear entertainment
Rear entertainment
Vehicle equipment
All standard, country-specific and optional
equipment that is offered in the model series is
described in this chapter. Therefore, equipment
is also described that is not available in a vehicle,
e. g., because of the selected optional equip‐
ment or country variant. This also applies for
safety-related functions and systems.
Controls
Control Installation location
Screens In the front seat backr‐
ests.
Rear CD/DVD player On the center console.
Rear controller Between the rear seats.
Remote control In the center armrest in
the rear
Rear CD/DVD player
Switching the system on/off
Press the left or right side of the button
on the CD/DVD player in the rear for the
respective page.
Rear entertainment and screens are switched
on/off.
After switching off the ignition, the system must
be switched on again.
Screens
Adjusting
Danger of burns when screen is folded out
Do not reach behind the screen; other‐
wise, there is the danger of getting burned. The
back of the screen can become very hot.◀
1 CD/DVD slot
2 Eject CD/DVD
3 Headphone connection, right
4 USB interface
5 RCA sockets
6 Headphone connection, left
68
Online Edition for Part no. 01 40 2 912 857 - 07 12 490
▷ To fold out: pull at the bottom edge.
▷ To fold in: press against the bottom edge.
Notes
▷ Do not cover lower screen edge, since this
is where the sensors and the infrared inter‐
face are installed.
▷ When loading the rear seats and adjusting
the backrest of the front seat, fold in the
screens.
▷ When using the through-loading system,
fold the screens down.
Page 69

Rear entertainment Entertainment
▷ Before the rear seat backrest is folded down,
fold away the down.
▷ When cleaning the screen, follow the care
instructions.
Rear controller
Operation is the same as for the front iDrive.
▷ To adjust the volume: turn, arrows 1.
▷ To activate the controller and switch be‐
tween the screens: press the buttons, ar‐
rows 2.
A green LED indicates which screen is active
and can be operated via the iDrive in the rear.
Menu navigation
Press the but‐
ton
Function
Operating concept as for the
front controller.
Turn the wheel: highlight a
menu item.
Press the center knob: con‐
firm the selection.
Pressing arrow keys corre‐
sponds to moving controller:
switching between panels.
Open the main menu.
Displays the previous menu.
Opens the "Options" menu.
Changes the station, track or
chapter.
Press and hold the button:
fast forward/reverse.
Remote control
In the center armrest in the rear
The remote control is located in the center arm‐
rest.
Online Edition for Part no. 01 40 2 912 857 - 07 12 490
Adjusts the volume.
Switches the volume adjust‐
ment to the left/right.
With Professional rear enter‐
tainment: Toggles between
the screens.
The transmission time of the remote control is
limited by law. To execute a function again,
press or turn the required button again.
Replacing the batteries
No rechargeable batteries
Do not use rechargeable batteries, as
damage may result from the substances in the
batteries.◀
69
Page 70

Entertainment Rear entertainment
Radio
When the same radio source is selected in the
front and rear (e.g., FM/AM), the same radio sta‐
tion is played.
Operation is the same as for the front radio.
CD/multimedia
1. Remove cover. Press on the cover, arrow 1,
and push forward, arrow 2.
2. Insert batteries of the same type.
3. Close the cover.
Take the used battery to a recycling cen‐
ter or to your service center.
Controls
Almost all functions can be operated in the same
manner as they are in the front. Special features
of operating the system in the rear are described
here.
Audio/video playback
Audio
Audio can be played back via rear entertainment
from any source in the vehicle.
Operation is the same as for the front audio play‐
back.
Video
Video can be played back in the rear from the
following sources:
▷ DVD changer.
▷ Rear CD/DVD player.
▷ External device in rear.
If a video image is being played back in the rear,
the rear CD/DVD player cannot be selected in
the front.
Operation is the same as for the front video play‐
back.
CD/DVD
When the same audio source (front CD/DVD
player, rear CD/DVD player, DVD changer) is se‐
lected in the front and rear, the same material is
played.
Operation is the same as for the front CD/DVD.
Music collection
Music can only be stored and data can only be
exported and imported via the front CD/DVD
player or the USB interface in the glove com‐
partment.
When music collections are selected in the front
and rear, they are played back separately.
Operation is the same as for the front music col‐
lection.
Tone
Only treble and bass can be set in the rear for
headphones. The settings are made separately
for the left and right headphones.
Operation is the same as for the front tone.
Adjusting multichannel playback,
surround for headphones
"Settings"
1.
2. "Tone"
3. "Surround headphones"
Telephone
Use the rear telephone.
Telephone
An incoming call can be accepted or rejected.
70
Online Edition for Part no. 01 40 2 912 857 - 07 12 490
Page 71

Rear entertainment Entertainment
Operation is the same as for Telephone in front.
Navigation
Route planning can be performed separately on
the left and right sides in the rear. Destination
guidance can only be started from the front.
Operation is the same as for the front navigation.
Suggesting a destination
A destination or trip can be sent to the front as
a suggestion. The suggestion can be adopted,
stored, or declined in the front. This function is
not available with the following setting: "Driver
control".
Enter the destination.
1.
2. "Suggest destination"
ConnectedDrive
Operation is the same as for the front Connec‐
tedDrive.
Adjusting
The following settings are available:
▷ "Rear display"
▷ "Language/Units": language can be set
globally for all screens.
▷ "Tone"
▷ "Climate"
Vehicle information
Computer content can be displayed. Operation
is only possible in the front.
Options menu
The split screen is not available and there is no
Integrated Owner's Manual.
Operation is the same as for the front menu op‐
tions.
Enabling
Enabling operation in the rear
Only possible via the iDrive in the front.
1. "Settings"
2. "Rear controls"
3. Select the desired priority.
Priority options
The driver has priority
▷ The source selected via iDrive in the front is
output on the vehicle loudspeakers and can
be selected but not operated from the rear.
Other audio or video sources can be oper‐
ated.
▷ Sound can only be output in the rear via
headphones.
▷ The source that is to be displayed in the rear
can be set via the iDrive in the front.
To set the source in the rear via the iDrive in the
front:
"Multimedia" or "Radio"
1.
2. Open "Options".
3. "Select rear source"
4. Select the desired audio or video source.
Same priority
▷ All audio and video sources can be operated
via the iDrive in the front and rear.
Online Edition for Part no. 01 40 2 912 857 - 07 12 490
71
Page 72

Entertainment Rear entertainment
▷ Sound is output in the rear via headphones:
the source selected via the iDrive in the front
is output on the vehicle loudspeakers.
▷ Sound is output via loudspeakers: the
source selected last via the iDrive in the front
or rear is output via the vehicle loudspeak‐
ers.
The rear has priority
▷ When the source selected in the rear is
played on headphones, it can be selected
but not operated via iDrive in the front. Other
audio or video sources can be operated.
▷ Sound is output in the rear via headphones:
the source selected via the iDrive in the front
is output on the vehicle loudspeakers.
▷ Sound is output via loudspeakers: the
source selected in the rear is output on the
vehicle loudspeakers. Audio or video sour‐
ces cannot be selected via the iDrive in the
front.
Switching off the rear DVD
▷ Rear entertainment is switched off.
▷ To switch rear entertainment back on: select
a different priority via the iDrive in the front
and switch on the system, refer to page 68.
Volume limit for headphones
The maximum possible volume for the rear
headphones can be adjusted.
"Settings"
1.
2. "Rear controls"
3. "Volume limit"
Headphones, vehicle loudspeakers
Connecting the headphones
Normal headphones
Connect via the jack 1/8"/3.5 mm, refer to
page 68, on the rear CD/DVD player.
Wireless headphones
Compatible wireless headphones are available
from your service center.
Connecting headphones
Up to 3 sets of wireless headphones can be
connected.
Switch on the headphones.
1.
2. "Settings"
3. "Connections"
4. "Headphones/remote"
5. Open "Options".
6. Press the activation switch, the LED on the
headphones will flash rapidly.
7. "Add new device"
The headphones will appear in the list of con‐
nected devices. Information about the con‐
nected headphones will be displayed.
Symbol Meaning
Headphones
Battery charge state
L Connection with the left side
72
R: Connection with the right side
Renaming headphones
The name with which the headphones are dis‐
played can be changed.
"Settings"
1.
2. "Headphones"
Online Edition for Part no. 01 40 2 912 857 - 07 12 490
Page 73

Rear entertainment Entertainment
3. Open "Options".
4. "Rename"
5. Enter the desired name.
Deleting the headphones connection
The connection with the vehicle can be deleted.
1. "Settings"
2. "Headphones"
3. Open "Options".
4. "Remove device"
Selecting a page
A set of headphones can be connected to the
left or right side of the rear entertainment sys‐
tem. The side can be changed at any time.
"Settings"
1.
2. "Headphones"
3. Open "Options".
4. "Switch side"
Sound output on the headphones or
vehicle loudspeakers
Operation is only possible in the rear.
Open "Options".
1.
2. "Headphones" or"Speakers"
With the following setting, sound output in the
rear is not possible via the vehicle speakers:
"Driver control".
Connecting an external device
1. Fold down the cover in front of the cinch
sockets on the CD/DVD player.
2. Connect the external device to the RCA
sockets.
▷ Video: yellow socket.
▷ Audio: white and red socket.
Starting playback
1. "Multimedia"
2. "External devices"
3. Select the or symbol.
Volume
The volume of the sound output is dependent
on the audio device. If this volume differs mark‐
edly from the volume of the other audio sources,
it is advisable to adjust the volumes.
Adjusting the volume
The volume can only be adjusted if no external
video device is connected.
"Multimedia"
1.
2. "External devices"
3. Select the or symbol.
4. "Volume"
External devices
General information
External audio and video devices and digital
cameras can be connected to cinch sockets, re‐
fer to page 68, on the CD/DVD player. Operation
takes place on the external device.
Due to the large number of different audio and
video devices available on the market, it cannot
be ensured that every audio and video device
will be displayed correctly on the screen.
Online Edition for Part no. 01 40 2 912 857 - 07 12 490
5. Turn the controller until the desired volume
is set and press the controller.
What to do if...
Only a black screen is visible.
73
Page 74

Entertainment Rear entertainment
▷ Switch on the system.
There are no options available on the screen.
▷ Switch over between the display screens.
Radio stations or TV channels are grayed out
and cannot be selected.
▷ Function is limited due to the selected pri‐
ority. Change priority.
The DVD does not play.
▷ Playback does not begin automatically.
Start DVD manually.
The volume of the rear vehicle speakers cannot
be adjusted.
▷ Sound in the rear is output via the head‐
phones. Change priority if necessary and
output sound via vehicle speakers.
74
Online Edition for Part no. 01 40 2 912 857 - 07 12 490
Page 75

Rear entertainment Entertainment
Online Edition for Part no. 01 40 2 912 857 - 07 12 490
75
Page 76

Online Edition for Part no. 01 40 2 912 857 - 07 12 490
Page 77

Communication
All of the options available to you for mobile
communication with family, friends, business
partners, and service providers are described in
this chapter.
Online Edition for Part no. 01 40 2 912 857 - 07 12 490
Page 78

Communication Telephone
Telephone
Vehicle equipment
All standard, country-specific and optional
equipment that is offered in the model series is
described in this chapter. Therefore, equipment
is also described that is not available in a vehicle,
e. g., because of the selected optional equip‐
ment or country variant. This also applies for
safety-related functions and systems.
At a glance
The concept
Mobile phones or other external devices such as
audio players can be connected to the vehicle
via Bluetooth.
After these devices are paired once, they are
recognized automatically when the ignition is
switched on as soon as they are inside the ve‐
hicle and can be operated via iDrive, the buttons
on the steering wheel, and via voice activation.
Depending on their functionality, external devi‐
ces can be used via the vehicle as a telephone
or as an audio source. The telephone functions
are described in the following.
Up to four external devices can be paired. If the
telephone in the rear is paired, another three ex‐
ternal devices can be paired.
Certain functions may need to be enabled by the
mobile phone provider or service provider.
Using the mobile phone while driving
Make entries only when traffic and road
conditions allow. Do not hold the mobile phone
in your hand while you are driving; use the
hands-free system instead. If you do not ob‐
serve this precaution, you can endanger the ve‐
hicle occupants and other road users.◀
Functions
The following functions can be assigned to a
mobile phone.
Telephone and additional telephone
A mobile phone can be used as a telephone or
an additional telephone.
Bluetooth audio
A mobile phone can be used as an audio source,
refer to page 61.
Office
A mobile phone can be used for the Office func‐
tion, refer to page 88.
This function can only be assigned to a mobile
phone that is connected as a telephone or an
auxiliary phone.
Snap-in adapter
The snap-in adapter is used to:
▷ Hold the mobile phone.
▷ Recharge the battery.
▷ Connect the mobile phone to an outside an‐
tenna of the vehicle.
This provides for better network reception
and consistent sound quality.
Approved mobile phones
Details on which mobile phones and external
devices with a Bluetooth interface are sup‐
ported by the mobile phone preparation pack‐
age can be obtained at www.bmwusa.com/blue‐
tooth.
Displaying the vehicle identification
number and software part number
The vehicle identification number and software
part number are needed to determine which mo‐
bile phones are supported by the mobile phone
78
Online Edition for Part no. 01 40 2 912 857 - 07 12 490
Page 79

Telephone Communication
preparation package. The software version of
the mobile phone may also be required.
1. "Settings"
2. "Connections"
3. Open "Options".
4. "Bluetooth® info"
5. "Display system information"
These approved mobile phones with a certain
software version, support the vehicle functions
described below.
Malfunctions may occur with other mobile
phones or software versions.
Do not operate a mobile phone that is connected
to the vehicle on the mobile phone keypad, as
this may lead to a malfunction.
A software update can be performed if neces‐
sary.
Notes
At high temperatures, the charge function of the
mobile phone can be limited where appropriate
and the functions are no longer executed.
When the mobile phone is used via the vehicle,
heed the operating manual of the mobile phone.
Pairing/unpairing the mobile phone
Requirements
▷ The mobile phone is suitable.
▷ The mobile phone is ready for operation.
▷ The ignition is switched on.
▷ Bluetooth is activated in the vehicle and on
the mobile phone.
▷ Bluetooth presettings may need to be made
on the mobile phone, e.g., for a connection
without confirmation or visibility, refer to the
mobile phone operating instructions.
▷ Deactivate Bluetooth audio if necessary.
▷ A number with at least four and a maximum
of 16 digits should be defined as the Blue‐
tooth passkey. It is only required once for
pairing.
▷ Vehicles is in sand.
Activating/deactivating Bluetooth
Bluetooth is not permitted everywhere. Comply
with all safety guidelines and regulations.
1. "Settings"
2. "Connections"
3. "Bluetooth®"
4. "Bluetooth®"
Activating/deactivating the functions
Activate functions before registering, so that
they can be assigned to a mobile phone.
Information on suitable mobile phones that sup‐
port these functions, refer to page 78.
"Settings"
1.
2. "Connections"
3. "Bluetooth®"
4. Open "Options".
5. "Configure Bluetooth®"
6. Select the desired functions.
▷ "Bluetooth® audio"
▷ "Office"
▷ "Additional telephone"
7. Move the controller to the left.
Pairing and connecting
Pairing the mobile phone
To avoid becoming distracted and posing
an unnecessary hazard both to your own vehi‐
cle's occupants and to other road users, only
pair the mobile phone while the vehicle is sta‐
tionary.◀
Online Edition for Part no. 01 40 2 912 857 - 07 12 490
79
Page 80

Communication Telephone
Pair the vehicle entirely on the front or rear Con‐
trol Display.
1. "Settings"
2. "Connections"
3. "Bluetooth®"
4. "Add new device"
The Bluetooth name of the vehicle is dis‐
played in the Control Display.
5. To perform additional steps on the mobile
phone, refer to the mobile phone operating
instructions: e.g. search for or connect the
Bluetooth device or a new device.
The Bluetooth name of the vehicle appears
on the mobile phone display.
6. Select the Bluetooth name of the vehicle on
the mobile phone display.
7. Enter the same passkey on the mobile
phone and via iDrive, and then confirm.
Or
Compare the control number in the display
of the vehicle to the control number in the
display of the mobile phone. Confirm the
control number in the mobile phone and in
the vehicle.
"OK"
8. Select the functions for which the mobile
phone is to be used.
9. "OK"
If the pairing was successful, the mobile phone
appears at the top of the list of mobile phones.
Functions supported by the mobile phone are
shown as a symbol during pairing.
Symbol Function
Telephone.
Additional telephone.
Audio source.
White symbol: the function is active.
Gray symbol: the function is inactive.
Four mobile phones can be paired with the ve‐
hicle at once. Up to three mobile phones can be
connected with the vehicle at once.
If pairing was unsuccessful: What to do if..., refer
to page 81.
Following the initial pairing
▷ The mobile phone is detected/connected in
the vehicle within a short period of time
when the engine is running or the ignition is
switched on.
▷ The phone book entries of the telephone
stored on the SIM card or mobile phone are
transmitted to the vehicle after detection,
depending on the mobile phone.
▷ Four mobile phones can be paired. If the tel‐
ephone in the rear is paired, another three
mobile phones can be paired.
▷ Specific settings may be necessary in some
mobile phones, e.g., authorization or a se‐
cure connection; refer to the mobile phone
operating instructions.
Connecting a particular mobile phone
"Settings"
1.
2. "Connections"
3. "Bluetooth®"
4. Select the mobile phone that is to be con‐
nected.
The functions assigned to the mobile phone be‐
fore unpairing are assigned to the mobile phone
when it is reconnected. If the mobile phone is
already connected, these functions are deacti‐
vated.
80
Online Edition for Part no. 01 40 2 912 857 - 07 12 490
Page 81

Telephone Communication
Configuring cell phone
Functions can be activated or deactivated for
paired and connected mobile phones.
1. "Settings"
2. "Connections"
3. "Bluetooth®"
4. Highlight the mobile phone to be config‐
ured.
5. Open "Options".
6. "Configure device"
7. At least one function must be selected.
▷ "Telephone"
▷ "Additional telephone"
▷ "Audio"
8. "OK"
If a function is assigned to a mobile phone, the
function will be deactivated where appropriate
for a mobile phone that is already connected and
the mobile phone will be unpaired.
Swapping the telephone and additional
telephone
The function of the telephone and additional tel‐
ephone can be swapped automatically.
"Settings"
1.
2. "Connections"
3. "Bluetooth®"
4. "Swap telephone/add. tel."
Unpairing the mobile phone
"Settings"
1.
2. "Connections"
3. "Bluetooth®"
4. Highlight the mobile phone that is to be un‐
paired.
5. Open "Options".
6. "Remove device"
What to do if...
Information on suitable mobile phones, refer to
page 78.
The mobile phone could not be paired or con‐
nected.
▷ Is Bluetooth activated in the vehicle and on
the mobile phone? Activate Bluetooth in the
vehicle and on the mobile phone.
▷ Do the Bluetooth passkeys on the mobile
phone and the vehicle match? Enter the
same passkey on the mobile phone and via
iDrive.
▷ Did it take longer than 30 seconds to enter
the passkey? Repeat the pairing procedure.
▷ Do the control numbers on the mobile phone
and vehicle match? Repeat the pairing pro‐
cedure.
▷ Are too many Bluetooth devices connected
to the mobile phone or vehicle? Delete con‐
nections with other devices if necessary.
▷ Is Bluetooth Audio activated? Deactivate
Bluetooth audio.
▷ Is the mobile phone in power-save mode or
does it have only a limited remaining battery
life? Charge the mobile phone in the snapin adapter or via the charging cable.
▷ Depending on the mobile phone, it is possi‐
ble that only one cell phone can be con‐
nected to the vehicle. Unpair the connected
cell phone from the vehicle and pair and con‐
nect only one cell phone.
The mobile phone no longer reacts.
▷ Switch the mobile phone off and on again.
▷ Ambient temperatures too high or too low?
Do not subject the mobile phone to extreme
ambient temperatures.
The telephone functions are not available.
▷ Configure the mobile phone and connect it
with the telephone or auxiliary phone func‐
tion.
No or not all phone book entries are displayed,
or they are incomplete.
Online Edition for Part no. 01 40 2 912 857 - 07 12 490
81
Page 82

Communication Telephone
▷ Transmission of the phone book entries is
not yet complete.
▷ It is possible that only the phone book en‐
tries of the mobile phone or the SIM card are
transmitted.
▷ It may not be possible to display phone book
entries with special characters.
▷ The number of phone book entries being
stored is too high.
▷ Is the data volume of the contact too large,
e.g., due to stored information such as
notes? Reduce the data volume of the con‐
tact.
▷ Is the mobile phone connected as an audio
source? Configure the mobile phone and
connect it with the telephone or auxiliary
phone function.
The phone connection quality is poor.
▷ The strength of the Bluetooth signal on the
mobile phone can be adjusted, depending
on the mobile phone.
▷ Insert the mobile phone into the snap-in
adapter or place it in the area of the center
console.
▷ Adjust the volume of the microphone and
loudspeakers separately.
If all points in this list have been checked and the
required function is still not available, contact
the hotline or service center.
telephone. The settings are deleted when the
telephone is unpaired.
1. "Settings"
2. "Tone"
3. "Volume settings"
4. Select the desired setting: "Microphone" or
"Speakers"
5. To adjust: turn the controller.
6. To store: press the controller.
Incoming call
Receiving calls
If the number of the caller is stored in the phone
book and is transmitted by the network, the
name and telephone number of the contact is
displayed. Otherwise, only the phone number is
displayed.
Accepting a call
Via iDrive
"Accept"
Controls
Adjusting the volume
Turn the knob until the desired volume is se‐
lected. The setting is stored for the remote con‐
trol currently in use.
The vehicle automatically adjusts the volume of
the microphone on the telephone and the vol‐
ume of the called party. Depending on the mo‐
bile phone, the volumes may need to be ad‐
justed. The settings can only be created during
a call and must be adjusted separately for each
82
Online Edition for Part no. 01 40 2 912 857 - 07 12 490
Via the button on the steering wheel
Press the button.
Via the instrument cluster
"Accept"
Page 83

Telephone Communication
Rejecting a call
Via iDrive
"Reject"
Via the instrument cluster
"Reject"
Ending a call
Via iDrive
"End call"
Via the button on the steering wheel
Press the button.
3. Select the digits individually.
4. Convert to letters as required.
Select the symbol.
Select the letters individually.
5. Select the symbol.
Select symbol to convert to numbers.
The phone number can also be entered by voice.
Only numbers can be spoken.
The number is dialed via the mobile phone to
which the telephone function has been as‐
signed.
Letter/number assignment
Letter Number
Via the instrument cluster
"End call"
Entering a phone number
Dialing a number
When entering phone numbers, you can switch
between entering letters and numbers.
Service numbers can be entered more easily,
e. g. 1-888-BMW-CARD.
"Telephone"
1.
2. "Dial number"
Online Edition for Part no. 01 40 2 912 857 - 07 12 490
ABC 2
DEF 3
GHI 4
JKL 5
MNO 6
PQRS 7
TUV 8
WXYZ 9
Calls with multiple parties
General information
You can switch between calls or connect two
calls to a single conference call. These functions
83
Page 84

Communication Telephone
must be supported by the mobile phone and
service provider.
Accepting a call while speaking to
another party
This function might have to be activated by the
service provider and the mobile phone must be
adjusted accordingly.
If a second call comes in during an ongoing call,
a call waiting signal sounds where appropriate.
"Accept"
The call is accepted and the existing call is put
on hold.
Establishing a second call
Establish an additional call during an active call.
"Telephone"
1.
2. "Active calls"
3. Dial the new phone number or select it from
a list.
Switching between two calls, hold call
The active call is displayed in color.
The call on hold is displayed in gray.
"Swap calls"
The call on hold is resumed.
Establishing a conference call
Two calls can be connected to a single tele‐
phone conference call.
Initiating two calls via the same mobile
1.
phone.
2. "Conference call"
When terminating a conference call, both calls
are ended. If one call is terminated by another
party, the other call can be continued.
Switching the microphone to mute
When a call is active, the microphone can be
muted.
1. "Telephone"
2. "Active calls"
3. "Microphone mute"
A microphone that has been switched to mute
is automatically reactivated:
▷ When a new connection is established.
▷ When switching between call parties.
DTMF suffix dialing
DTMF suffix dialing can be used for gaining ac‐
cess to network services or for controlling devi‐
ces, e.g., to make a remote inquiry of an answer‐
ing machine. The DTMF code is needed for this
purpose.
"Telephone"
1.
2. Select the contact from a list or "Dial
number".
3. "Keypad dialing"
4. Enter the DTMF code via iDrive.
Phone book
Displays
The phone book accesses the contacts of the
telephone and the auxiliary phone and shows all
contacts for which a phone number has been
stored. The entries can be selected to make a
call.
"Telephone"
1.
2. "Phone book"
A symbol indicates the storage location of the
contacts.
84
Online Edition for Part no. 01 40 2 912 857 - 07 12 490
Page 85

Symbol Storage location
No symbol In the vehicle; the address has not
been checked as a destination.
In the vehicle; the address has
been checked as a destination.
Mobile phone.
Telephone Communication
on the mobile phone. A copy of the entry is
stored in the vehicle.
1. Highlight the contact.
2. Open "Options".
3. "Edit entry"
The contact can be edited.
Redialing
General information
Lists of selected numbers are transferred to the
vehicle from the telephone and the auxiliary
phone. The 20 phone numbers dialed last are
displayed. The transfer and sorting order of the
phone numbers depends on the particular mo‐
bile phone.
Calling a contact
Symbol Meaning
Contact with one stored phone num‐
ber.
Contact with more than one stored
phone number.
Call not possible; mobile phone with‐
out reception or network, or Service
Request is active.
For contacts with one stored phone number: se‐
lect the required contact. The connection is be‐
ing established.
For contacts with more than one stored phone
number: select the required contact and the
phone number. The connection is being estab‐
lished.
Editing a contact
Changing the entries in "Contacts". When a
contact is changed, the changes are not stored
Dialing the number via the instrument
cluster
This is possible when there is no active call.
1.
2. Select the desired phone number.
The connection is established.
Press the button on the steering
wheel.
Dialing a number via iDrive
"Telephone"
1.
2. "Redial"
3. Select the desired entry and the phone num‐
ber if necessary.
The connection is established.
Deleting a single entry or all entries
The erasure of entries depends on the mobile
phone.
Highlight the entry.
1.
2. Open "Options".
3. "Delete entry" or"Delete list"
Online Edition for Part no. 01 40 2 912 857 - 07 12 490
85
Page 86

Communication Telephone
Saving an entry in the contacts
1. Highlight the entry.
2. Open "Options".
3. "Store as new contact" or "Add to existing
contact"
4. Select the contact, if necessary.
5. Select the type of number: "Home",
"Business", "Mobile" or "Other"
6. Complete the entries if necessary.
7. "Store contact"
Received calls
Displaying calls
Lists of calls received by the telephone and the
auxiliary phone are transferred to the vehicle.
The 20 telephone calls that were last received
are displayed. The transfer and of phone num‐
bers and their sorting order and display depends
on the particular mobile phone.
"Telephone"
1.
2. "Received calls"
Calling a number from the list
Selecting an entry.
The connection is established.
Deleting a single entry or all entries
The erasure of entries depends on the mobile
phone.
Highlight the entry.
1.
2. Open "Options".
3. "Delete entry" or"Delete list"
5. Select the type of number: "Home",
"Business", "Mobile" or "Other"
6. Complete the entries if necessary.
7. "Store contact"
Hands-free system
General information
Calls that are being made on the hands-free
system can be continued on the mobile phone
and vice versa.
From the mobile phone to the handsfree system
Calls that were begun outside of the Bluetooth
range of the vehicle can be continued on the
hands-free system with the ignition switched
on.
Depending on the mobile phone, the system au‐
tomatically switches to the hands-free system.
If the system does not switch over automatically,
follow the instructions on the mobile phone dis‐
play; refer also to the mobile phone operating
instructions.
From the hands-free system to the
mobile phone
Calls that are made on the hands-free system
can in some cases be continued on the mobile
phone; this depends on the mobile phone.
Follow the instructions on the mobile phone dis‐
play; refer also to the mobile phone operating
instructions.
Snap-in adapter
Saving an entry in the contacts
Highlight the entry.
1.
2. Open "Options".
3. "Store as new contact" or "Add to existing
contact"
4. Select the contact, if necessary.
86
Online Edition for Part no. 01 40 2 912 857 - 07 12 490
General information
Detailed information about snap-in adapter,
which supports the functions of the mobile
phone, available from the service center.
Page 87

Telephone Communication
Notes
At high temperatures, the charge functions of
the mobile phone can be limited under certain
circumstances, and functions are no longer exe‐
cuted.
Installation position
In the front center armrest. The direction of in‐
stallation in the center armrest varies according
to the vehicle.
Inserting the snap-in adapter
1. Press the button and remove the cover.
2. Insert the snap-in adapter at the front, ar‐
row 1, and press down, arrow 2, until it en‐
gages.
nections, arrow 1, and push downward, ar‐
row 2 until it engages.
Removing the mobile phone
Press the button and remove the mobile phone.
Inserting the mobile phone
Depending on the mobile phone, remove
1.
the protective cap from the antenna con‐
nector and from the USB connection of the
mobile phone.
2. Slide the mobile phone with the buttons fac‐
ing up in the direction of the electrical con‐
Online Edition for Part no. 01 40 2 912 857 - 07 12 490
87
Page 88

Communication Office
Office
Vehicle equipment
All standard, country-specific and optional
equipment that is offered in the model series is
described in this chapter. Therefore, equipment
is also described that is not available in a vehicle,
e. g., because of the selected optional equip‐
ment or country variant. This also applies for
safety-related functions and systems.
At a glance
General information
Contacts, appointments, tasks, notes, text mes‐
sages, and e-mails from the mobile phone can
be displayed on the Control Display if the mobile
phone provides compatible support of these
functions and the necessary Bluetooth stand‐
ards. Some functions may have to be enabled
individually.
Information about which mobile phones support
Office functions can be found at
www.bmwusa.com/bluetooth. A limited number
of compatible mobile phones is available for Of‐
fice.
Contents are only displayed in full length when
the vehicle is stationary.
Data are updated every time the mobile phone
is connected to the vehicle.
Do not use Office while driving
To avoid becoming distracted and posing
an unnecessary hazard to your vehicle's occu‐
pants and to other road users, never attempt to
use the controls or enter information unless traf‐
fic and road conditions allow this.◀
phones, data access must be confirmed on
the mobile phone.
▷ The time, time zone, and date are correctly
set on the Control Display and on the mobile
phone to correctly display appointments, for
example.
▷ Office is activated, refer to page 79.
Updating
Data are updated every time the mobile phone
is connected to the vehicle. Appointment en‐
tries, tasks, notes and reminders can be updated
separately.
"Office"
1.
2. "Current office", "Calendar", "Tasks",
"Notes" or "Reminders"
3. Open "Options".
4. "Update data"
Cell phone data are transmitted again to the
vehicle.
Office information
The number of unread messages and active
tasks as well as the upcoming appointments are
displayed.
"Office"
1.
2. "Current office"
3. Select the desired entry to display details.
Requirements
▷ A suitable mobile phone is paired with the
vehicle and connected. In some mobile
88
Online Edition for Part no. 01 40 2 912 857 - 07 12 490
Page 89

Office Communication
Write new
General information
SMS, e-mail, audio notes and audio e-mails can
be recorded and sent or saved by speech rec‐
ognition.
Essential for sending e-mails or SMS: a con‐
nected mobile phone; mobile phone with e-mail
account configured on the mobile phone.
Write new
1. "Office"
2. "New"
3. "Type"
Select element:
▷ "Text message"
▷ "E-mail"
▷ "Audio e-mail"
▷ "Voice memo"
4. Select recipient:
▷ Enter the phone number for the SMS or
Move the controller to the right and se‐
lect a recipient and optionally also a
phone number from Contacts.
The Contacts for which a phone number
has been saved will be displayed.
▷ For e-mails, enter an e-mail address or
Move the controller to the right and se‐
lect a recipient and optionally also an email address from Contacts.
The Contacts for which an e-mail ad‐
dress has been saved will be displayed.
5. From (Textref fehlt noch): if more than one
mobile phone is paired, the transmitting mo‐
bile phone must be selected.
6. (Symbol) Record voice note, refer to
page 89, (Link). Approximately 2 minutes
of spoken text can be recorded.
7. To send SMS, e-mails or audio e-mail:
"Send"
Voice notes are stored in the vehicle.
Voice note
The concept
In order to be able to use this function, the mo‐
bile phone must support the corresponding BT
standards and contract must have been pur‐
chased with a service provider. The service pro‐
vider must be read out from the MMI (when an
attempt is made to run this service, a table ap‐
pears in which the name of the service provider
is written. This speech-to-text services costs
extra.)
Recording a voice note
If a new audio note (or SMS...) has been se‐
lected, you must click on “"New voice memo".
Write new
1.
2. Audio e-Mail or voice note
3. Recording a voice note
4. REC symbol: start recording
5. PAUSE symbols: stop or pause recording;
REC again: resume recording
6. PLAY symbol: playback
7. DE symbol: set the language in which re‐
cording is to be made
Loudspeaker symbol: have recorded text read
out
Correcting a recording
X symbol: delete text
Pencil symbol: edit text
Online Edition for Part no. 01 40 2 912 857 - 07 12 490
89
Page 90

Communication Office
Contacts
At a glance
Contacts can be created and edited. The con‐
tacts from the mobile phone are displayed as
well if this function is supported by the mobile
phone. Addresses can be adopted as destina‐
tions for navigation and the phone numbers can
be dialed.
Displaying contacts
General information
"Office"
1.
2. "Contacts"
All contacts are listed in alphabetical order.
Depending on the number of contacts, an AZ search is offered.
You can choose whether the Contacts are to be
transferred from a mobile phone. The Contacts
can also be transferred from both connected
mobile phones.
"Options"
1.
2. Highlight the mobile phone from which the
Contacts are to be transferred, and select.
A symbol indicates the storage location of the
contacts:
Symbol Storage location
No symbol In the vehicle; the address has not
been checked as a destination.
In the vehicle; the address has
been checked as a destination.
Mobile phone.
Dialing a phone number
Select the desired contact.
1.
2. Select the phone number.
The connection is established.
Editing a contact
1. Select the desired contact.
2. "Edit contact"
3. Change the entries.
4. "Store contact in vehicle"
When a contact is edited, the changes are not
stored on the mobile phone. A copy of the entry
is stored in the vehicle.
Selecting the contact as a navigation
destination
Select the desired contact.
1.
2. Select the address.
When contacts from the mobile phone are
used, the address may need to be matched
to the navigation data contained in the vehi‐
cle. In this case:
Correct the address.
3. "Start guidance" or "Add as another
destination"
Checking the address as a destination
An address that is to be used for destination
guidance must match the navigation data con‐
tained in the vehicle. The address can be
checked for this purpose.
Select the desired contact and highlight the
1.
address.
2. Open "Options".
3. "Check as destination"
4. Correct and store the address if necessary.
90
Online Edition for Part no. 01 40 2 912 857 - 07 12 490
Page 91

Office Communication
If the address is corrected and stored, a copy of
it is stored in the vehicle. The address is not
changed on the mobile phone.
New contact
Create a new contact
1. "Office"
2. "Contacts"
3. Open "Options".
4. "New contact"
5. The entry fields are still filled with the previ‐
ous entries: "Delete input fields"
6. Fill in the entry fields: select the symbol next
to the entry field.
7. Enter text and make assignment as neces‐
sary.
8. In the navigation system: enter address.
Only addresses contained in the navigation
data in the vehicle can be entered. This en‐
sures that destination guidance is possible
for all addresses.
If necessary, "Accept address".
9. "Store contact in vehicle"
The entries for a Contact are assigned using the
following symbols.
Symbol Meaning
Home phone number.
Business phone number.
Mobile phone number.
Other phone number.
Home address.
Business address.
E-Mail address.
Internet address.
Specifying the home address
A home address can be stored. It appears at the
top of the contact list.
1. "Home"
2. Create a contact.
3. "Store contact in vehicle"
Selecting the sorting order of the
names
Names can be displayed in a different order.
1. "Office"
2. "Contacts"
3. Open "Options".
4. "Display last name first" or "Display first
name first"
Depending on how the contacts were stored on
the mobile phone, the sorting order of the names
may differ from the selected sorting order.
Show contact pictures
Pictures stored with the contacts are stored in
the vehicle when the mobile phone is connected
to the vehicle. The number of transmitted pic‐
tures depends on the mobile phone. The mobile
phone must support this function.
"Settings"
1.
2. "Connections"
3. "Bluetooth®"
4. Open "Options".
5. "Configure Bluetooth®"
6. "Show images"
Display of all contact pictures is activated or de‐
activated.
Exporting/importing contacts
Contacts can be exported and imported via the
Personal Profile. The contacts stored in the ve‐
hicle are exported, but not those from the mobile
phone or from BMW Search.
Online Edition for Part no. 01 40 2 912 857 - 07 12 490
91
Page 92

Communication Office
Deleting contacts
Only contacts that are stored in the vehicle are
deleted. The contacts on the mobile phone can‐
not be deleted.
1. "Office"
2. "Contacts"
3. Highlight the contact.
4. Open "Options".
5. "Delete contact"or "Delete all contacts".
6. If necessary, "Yes"
Messages
General information
After the mobile phone is first paired, transmis‐
sion may take several minutes. Messages are
only displayed in full length when the vehicle is
stationary.
Displaying messages
"Office"
1.
2. "Messages"
All messages are displayed.
You can choose whether the Messages are to
be transferred from a mobile phone. The Mes‐
sages can also be transferred from both con‐
nected mobile phones.
"Options"
1.
2. Highlight the mobile phone from which the
Messages are to be transferred, and select.
Symbol Message type
Text messages.
E-mail from mobile phone.
To display a message, select it.
Filtering the message list
The message list can be filtered when more than
one type of message exists.
1. "Filter:"
2. Filtering can consist of a combination of the
message type and the message status.
Select the type of message.
▷ "All messages"
All messages are displayed.
▷ "E-mail"
Only e-mails from the mobile phone are
displayed.
▷ "Service message"
Only service messages are displayed.
▷ "Text message"
Only text messages from the mobile
phone are displayed.
Select message status.
▷ "Unread"
Only unread messages as displayed.
▷ "Since starting trip"
All SMS and e-Mails received since the
start of the journey are displayed.
▷ "All"
All messages are displayed.
A symbol identifies the type of message.
92
Online Edition for Part no. 01 40 2 912 857 - 07 12 490
Deleting messages
General information
All message types can be deleted in the vehicle.
SMS and e-Mails that have been transferred
from the mobile phone to the vehicle are also
deleted in the mobile phone.
Page 93

Office Communication
Deleting a service message
1. Select the desired service message.
2. Open "Options".
3. "Delete message"
Deleting all service messages
1. Open "Options".
2. "Delete all messages" or"Delete service
messages"
Deleting SMS or e-Mails
1. Select the desired SMS or e-Mail.
2. "Delete message" or "Delete e-mail"
3. YES (Textref fehlt noch)
Text messages
Calling the sender of a text message
Select the desired message.
1.
2. "Call sender"
Saving the sender in the contacts
Highlight the desired message.
1.
2. Open "Options".
3. "Store as new contact" or "Add to existing
contact"
Marking SMS as unread
Select the desired SMS.
1.
2. "n. y. t. (03-2012)"
Using contact data
Contact data from appointments, tasks, text
messages and notes can be stored or selected,
refer to page 98.
Answering/forwarding a message
An SMS or e-Mail can be answered or for‐
warded.
1. Select the desired message.
2. "Reply"
3. Select from:
▷ "Forward"
Forwarding the message.
▷ "Reply to all"
Sending a reponse to all recipients and
the sender of an e-Mail.
▷ "Reply"
Sending a response to the message
sender.
4. "Send"
5. If forwarding, it may be necessary to enter a
new recipient.
My Info
Selecting additional functions
Additional functions are available when a mes‐
sage is selected:
Reading out loud
Text messages, e-mails, appointment entries,
tasks, and notes can be read out loud, refer to
page 98.
Online Edition for Part no. 01 40 2 912 857 - 07 12 490
93
Page 94

Communication Office
Symbol Function
"Start guidance" or "Add as another
destination"
"Call"
If the message contains a number,
the connection is established.
"Select phone number"
If the message contains more than
one number, select the desired num‐
ber from the list. The connection is
established.
Message from the Concierge service
Storing an address
Select the desired message.
1.
2. Open "Options".
3. "Store contact in vehicle"
Selecting additional functions
Additional functions are available when a mes‐
sage is selected:
Symbol Function
"Start guidance" or "Add as another
destination"
"Call"
If the message contains a number,
the connection is established.
"Select phone number"
If the message contains more than
one number, select the desired num‐
ber from the list. The connection is
established.
"Further information"
Displaying additional information.
BMW Info
General information
Messages from BMW regarding service actions
and news from BMW.
Selecting additional functions
The following functions are available when a
message is selected:
Symbol Function
"Start guidance" or "Add as another
destination"
"Call"
If the message contains a number,
the connection is established.
"Select phone number"
If the message contains more than
one number, select the desired num‐
ber from the list. The connection is
established.
"Further information"
Detailed information about a mes‐
sage is displayed. This does not re‐
sult in any costs.
Read aloud the contents of the mes‐
sage.
E-mail
Displaying e-mail contacts
If the sender and recipient of an e-mail are trans‐
mitted by the mobile phone, this information is
displayed in the e-mail.
"Sender/Recipient"
If the e-mail addresses are stored in the con‐
tacts, the contact is displayed. Select the con‐
tact to display details.
If the e-mail addresses are not stored in the con‐
tacts, only the e-mail address is displayed.
94
Online Edition for Part no. 01 40 2 912 857 - 07 12 490
Page 95

Office Communication
Deactivating the full display
When an e-mail is opened in the vehicle, the email is fully transmitted to the vehicle. This may
result in charges.
1. "Office"
2. "Messages"
3. Open "Options".
4. "Fully download e-mails"
Only a part of the e-mail from the cell phone
is loaded into the vehicle.
Marking e-Mail as unread
Select the desired e-mail.
1.
2. "Mark as unread"
Using contact data
Contact data from appointments, tasks, text
messages and notes can be stored or selected,
refer to page 98.
Reading out loud
Text messages, e-mails, appointment entries,
tasks, and notes can be read out loud, refer to
page 98.
Calendar
Display the calendar
Appointments during the last 20 and the next 50
days can be displayed.
"Office"
1.
2. "Calendar"
3. The current calendar week is displayed.
You can choose whether the Appointments are
to be transferred from a mobile phone. The Ap‐
pointments can also be transferred from both
connected mobile phones.
"Options"
1.
2. Highlight the mobile phone from which the
Appointments are to be transferred, and se‐
lect.
Displaying the calendar week
Scroll in the current calendar week, or
"Previous": displays the previous 7 days.
"Next": displays the next 7 days.
Displaying the calendar day
Select the date.
1.
The current month will be displayed.
2. Select the desired day.
The appointments on the selected day are
displayed.
Displaying the calendar month
Select the date.
1.
The current month will be displayed.
2. Turn the controller until the previous or next
month is displayed.
Online Edition for Part no. 01 40 2 912 857 - 07 12 490
95
Page 96

Communication Office
Symbol/Representa‐
tion
Date displayed in blue Today's date.
Orange dot Appointment on to‐
Blue dot Appointment.
Turning the controller displays the next or the
previous month.
Meaning
day's date.
Display the appointment
Select the desired appointment.
1.
2. Scroll through the appointment if neces‐
sary:
▷ Turn the controller.
▷ Select the symbol.
Transferring a meeting location to
destination guidance
Select the desired appointment.
1.
2. Select the symbol.
3. Select the desired entry from the hitlist.
The selected entry is transferred to desti‐
nation guidance.
4. "Start guidance"
Using contact data
Contact data from appointments, tasks, text
messages and notes can be stored or selected,
refer to page 98.
Reading out loud
Text messages, e-mails, appointment entries,
tasks, and notes can be read out loud, refer to
page 98.
Tasks
Displaying the task list
1. "Office"
2. "Tasks"
Pending tasks that must be completed
within the next 90 days are displayed.
You can choose whether the Tasks are to be
transferred from a mobile phone. The Tasks can
also be transferred from both connected mobile
phones.
1. "Options"
2. Highlight the mobile phone from which the
Tasks are to be transferred, and select.
Sorting the task list
Select the header in the task list.
1.
2. Select the sorting criterion:
▷ "Priority (!)"
▷ "Subject"
▷ "Due date"
Displaying the task
Select the desired task.
1.
2. Scroll in the task if necessary:
▷ Turn the controller.
▷ Select the symbol.
96
Using contact data
Contact data from appointments, tasks, text
messages and notes can be stored or selected,
refer to page 98.
Online Edition for Part no. 01 40 2 912 857 - 07 12 490
Page 97

Office Communication
Reading out loud
Text messages, e-mails, appointment entries,
tasks, and notes can be read out loud, refer to
page 98.
Notes
Displaying notes
1. "Office"
2. "Notes"
All notes from the mobile phone and the
voice notes recorded in the vehicle are dis‐
played.
You can choose whether the Notes are to be
transferred from a mobile phone. The Notes can
also be transferred from both connected mobile
phones.
"Options"
1.
2. Highlight the mobile phone from which the
Notes are to be transferred, and select.
Displaying the note
Select the desired note.
1.
2. Scroll in the note if necessary:
▷ Turn the controller.
▷ Select the symbol.
3. "Send as message"
Using contact data
Contact data from appointments, tasks, text
messages and notes can be stored or selected,
refer to page 98.
Reading out loud
Text messages, e-mails, appointment entries,
tasks, and notes can be read out loud, refer to
page 98.
Recording and sending a voice note
"Office"
1.
2. "Notes"
3. "New voice memo"
“Send as note”: write new>audio e-Mail (preas‐
signed)
Exporting a voice note
Voice notes can be exported, for further proc‐
essing on a PC for example, via the USB con‐
nection in the center armrest.
1. Connect a USB stick in the center armrest.
2. "Office"
3. "Notes"
4. "Options"
5. "Export all notes (USB)" or "Export voice
memo (USB)"
All voice notes will be exported or the previ‐
ously marked voice note will be exported.
Deleting a voice note
HIghlight the desired voice note.
1.
2. "Options"
3. "Delete all voice memos" or "Delete voice
memo"
4. OK (Textref fehlt noch)
Reminders
General information
You can choose whether the Reminders are to
be transferred from a mobile phone. The Re‐
minders can also be transferred from both con‐
nected mobile phones.
"Office"
1.
2. "Reminders"
3. "Options"
4. Highlight the mobile phone from which the
Reminders are to be transferred, and select.
Online Edition for Part no. 01 40 2 912 857 - 07 12 490
97
Page 98

Communication Office
Activating/deactivating a Reminder
pop-up
1. "Office"
2. "Reminders"
3. "Options"
4. "Activate pop-up reminders"
All Reminders for appointments and tasks
are displayed in a list on the Control Display
when they are due.
In the case of appointments and tasks for which
the reminder was due before the mobile phone
was connected to the vehicle, the Reminder
pop-up will be displayed as soon as Office is
called for the first time.
Displaying reminders
Reminders of pending appointments and tasks
are displayed. After an appointment or after a
task is due, the reminder is no longer displayed.
"Office"
1.
2. "Reminders"
3. Select the desired reminder.
The corresponding appointment or the task are
displayed.
Using contact data
At a glance
Contact data from appointments, tasks, text
messages, e-mails and notes can be saved or
selected.
Displaying contact or selecting phone
number
1. "Use contact data"
2. Display the contact or select the phone
number:
▷ Select the contact to display contact de‐
tails.
▷ Select the phone number to establish a
connection directly.
Storing contact data
"Use contact data"
1.
2. Highlight the phone number or e-mail ad‐
dress.
3. Open "Options".
4. "Add to existing contact" or "Store as new
contact"
Closing Reminders
Closing a Reminder
"Office"
1.
2. "Reminders"
3. Highlight the desired Reminder.
4. "Options"
5.
Closing all Reminders
"Office"
1.
2. "Reminders"
3. "Close all reminders"
98
Online Edition for Part no. 01 40 2 912 857 - 07 12 490
Reading out loud
Text messages, e-mails, appointment entries,
tasks, and notes can be read out loud.
Select the desired message, appointment,
1.
task, or note.
2. "Play"
The following options are available during read‐
ing:
▷ "Pause"
Interrupt reading. Select again to restart
reading.
▷ "Back to beginning"
Start reading message again from the be‐
ginning.
Page 99

Office Communication
▷ Select the symbol.
Skip a paragraph.
▷ Select the symbol.
Go back one paragraph.
▷ To end reading, tilt the controller to the left.
What to do if...
Information on suitable mobile phones, refer to
page 78.
Appointments, tasks, notes, text messages, or
e-mails from the mobile phone are not dis‐
played.
▷ The mobile phone is not capable of the
missing function or is not connected cor‐
rectly.
▷ The Office function is deactivated.
▷ The mobile phone is connected as an addi‐
tional phone.
▷ Appointments are older than 20 days or are
more than 50 days in the future.
▷ The tasks have been marked as completed
or have a due date that lies more than
90 days in the future.
▷ Depending on the number of stored ap‐
pointments, task notes, and messages in
the mobile phone, not all are displayed in the
vehicle.
Not all appointments and tasks from the mobile
phone are displayed at the right time?
▷ The time zone, time or date is incorrectly set
on the Control Display and mobile phone.
The e-mail attachment is not displayed.
▷ E-mails are transmitted without an attach‐
ment.
Entries are not displayed in full length.
▷ Text were already transmitted from the mo‐
bile phone in a shortened form.
▷ Synchronization between the mobile phone
and vehicle may take several minutes.
The contact pictures are not being displayed?
▷ Up to 200 contact pictures can be stored in
the vehicle.
The E-mail is displayed with a delay?
▷ Check the e-mail settings on the mobile
phone and adjust if necessary.
If all points in this list have been checked and the
required function is still not available, contact
the hotline or service center.
Online Edition for Part no. 01 40 2 912 857 - 07 12 490
99
Page 100

Communication Contacts
Contacts
Vehicle equipment
All standard, country-specific and optional
equipment that is offered in the model series is
described in this chapter. Therefore, equipment
is also described that is not available in a vehicle,
e. g., because of the selected optional equip‐
ment or country variant. This also applies for
safety-related functions and systems.
Note
If the vehicle is equipped with a hands-free de‐
vice with USB interface or without a mobile
phone preparation package.
General information
New contact
"Contacts"
1.
2. "New contact"
4. Fill in the entry fields: select the symbol next
to the entry field.
5. Enter the text.
6. If the vehicle is equipped with a navigation
system: Enter the address. Only addresses
contained in the navigation data in the vehi‐
cle can be entered. This ensures that desti‐
nation guidance is possible for all ad‐
dresses.
7. If necessary, "Store".
8. "Store contact in vehicle"
Specifying the home address
A home address can be stored. It appears at the
top of the contact list.
"Home"
1.
2. Create a contact.
3. "Store contact in vehicle"
3. The entry fields are still filled with the previ‐
ous entries: "Delete input fields"
100
Online Edition for Part no. 01 40 2 912 857 - 07 12 490
My contacts
General information
List of all contacts stored in the vehicle.
Displaying contacts
"Contacts"
1.
 Loading...