

Page 1
Truck Infotainment with 7” screen
Radio with
navigation system
This manual can be downloaded at: www.scania.com/manuals
Page 2
Buttons
and
In radio mode:
Short
preset (radio) or next track (media)
Long
station on station list (radio)
In media mode:
Select title (press)
Start quick scan (long press)
Button
Return to previous view
Right rotary encoder/press button
Select menu item, change setting (rotate);
call up menu
Confirm setting (press)
Display/touch screen
SD slot 1:
Navigation data
Left rotary encoder/push button
Adjust volume (rotate)
Mute audio signals (press)
Turn unit on/off (long press)
SD slot 2
Media, audio, video playlists, POIs
NAVI button
Navigation function
PHONE button
Phone functions
TRAFFIC button
Traffic information
CAMERA button
Camera functions
MEDIA button
Media mode
DISPLAY button
RADIO button
Radio mode
SETUP button
Approach Sensor
If
activated, approaching the
sensor will activate and deactivate
display.
BUTTONS AND CONTROLS
press: Switch to next/previous
press: Switch to next/previous
this function is
the
Page 3

3 *) Optional features/ settings
CONTENT
Buttons and controls ................................................ 2
Important information ............................................... 5
This must be observed! ............................................... 5
Notes on handling SD cards ....................................... 6
Usable navigation SD cards ........................................ 6
Notes on these instructions ......................................... 6
Formatting conventions .......................................... 7
Introduction ............................................................... 8
Feature List ................................................................. 8
Radio reception ........................................................... 9
Operating modes ......................................................... 9
Radio settings ........................................................ 9
Media settings ........................................................ 9
Navigation settings ................................................. 9
Phone settings ....................................................... 9
Operation ..................................................................... 9
Controls .................................................................. 9
Multifunction knob ................................................ 10
Scroll through a list of menu items ....................... 11
Home icon ............................................................ 11
Turning on the system ......................................... 11
Adjust the volume ................................................. 11
Customise settings .................................................... 12
Sound settings ..................................................... 12
Volume settings ......................................................... 14
Adjusting volumes ................................................ 14
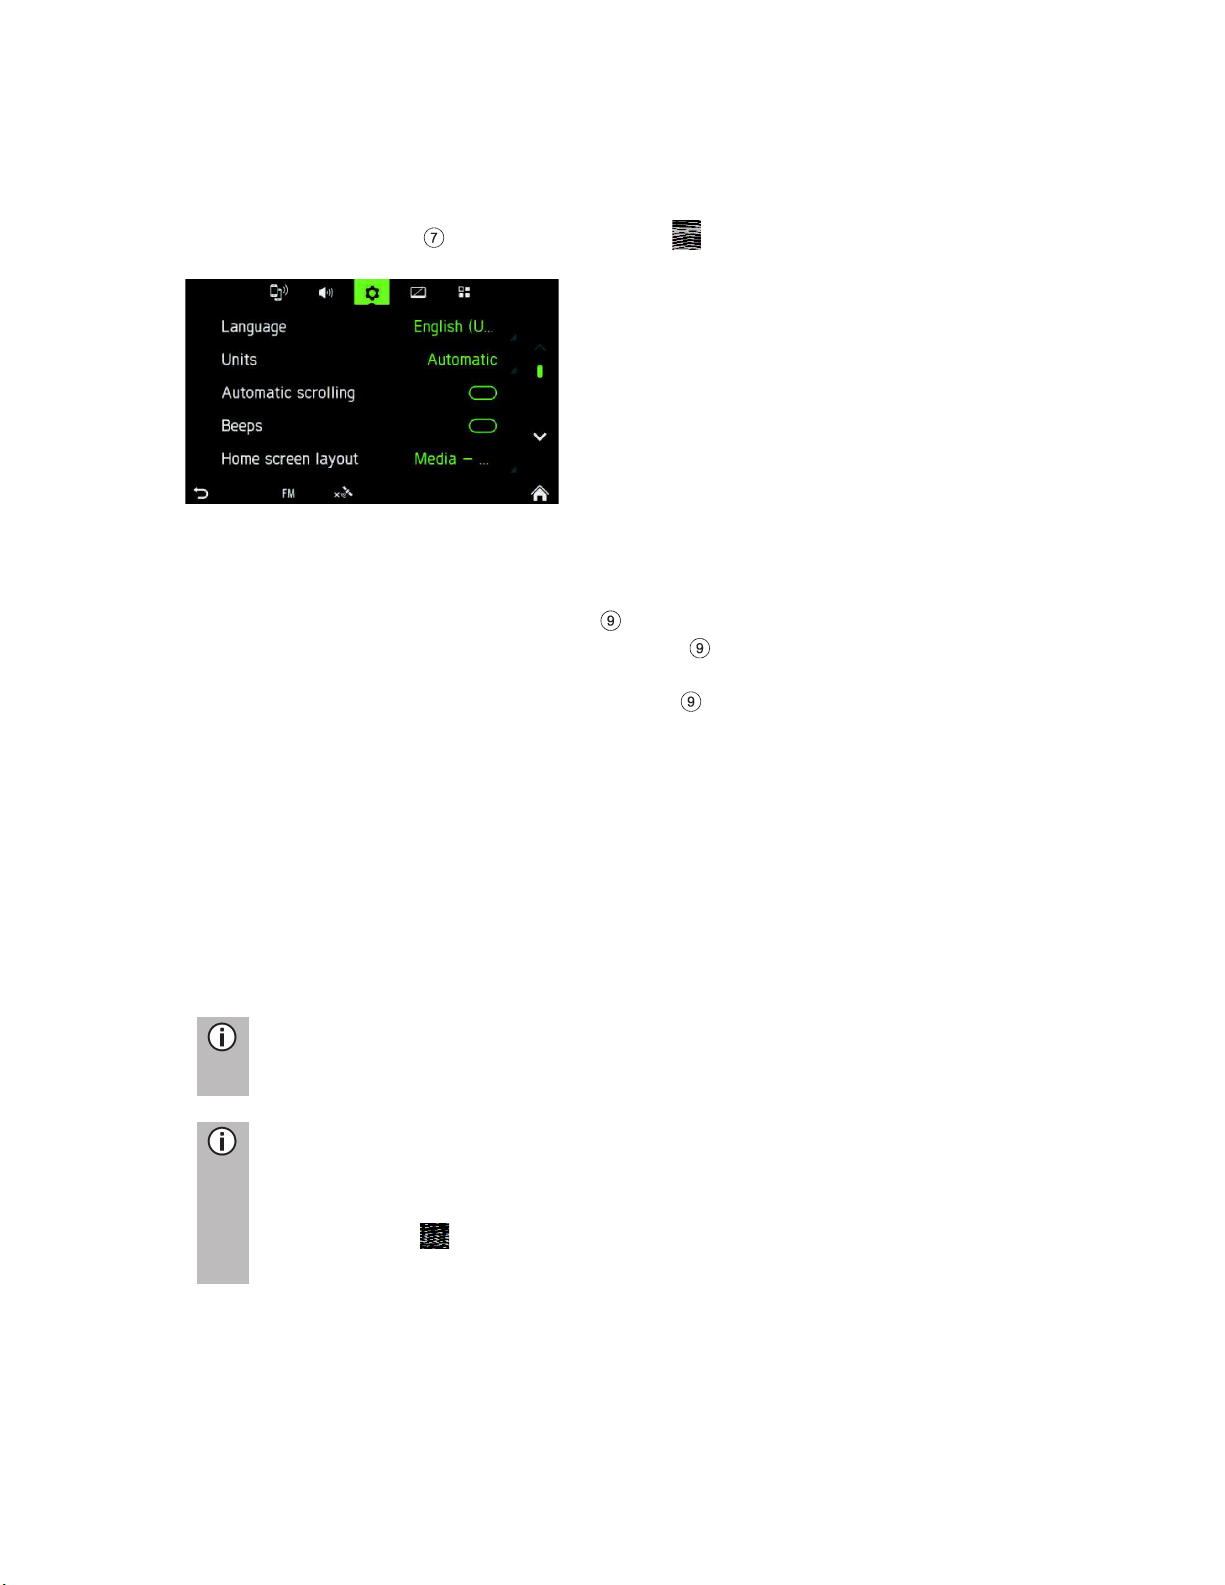
System settings ......................................................... 16
Select the language ............................................. 16
Units ..................................................................... 17
Automatic text scrolling ........................................ 17
Bluetooth and phone ................................................. 18
Display settings ......................................................... 19
Customising the display ....................................... 19
Driver Profiles ............................................................ 19
Theft protection ......................................................... 20
Speech DialogUe System – SDS* ............................ 20
Supported commands .......................................... 21
Dialogue session .................................................. 22
Radio ........................................................................ 24
Activating the radio .................................................... 24
Select BAND ............................................................. 24
Traffic announcements (TA) ...................................... 25
Priority for traffic announcements ........................ 25
Station search ........................................................... 26
Automatic station search ...................................... 26
Manual tuning ....................................................... 27
Store radio stations ................................................... 27
Retrieving radio stations ............................................ 27
Radio settings............................................................ 28
Media ........................................................................ 29
General information ................................................... 29
Important information ................................................ 29
Media sources........................................................... 30
Audio files on an MP3 player or USB drive ......... 30
Playing audio files from an SD card .................... 30
Playing files from a USB mass storage device .... 30
Connecting a TV/EXT device on AUX 2*............. 30
Media Player ........................................................ 31
Bluetooth audio connection ...................................... 32
Important information ........................................... 32
Connecting a Bluetooth device ............................ 33
Bluetooth music mode .............................................. 34
Aux port ..................................................................... 36
Media settings ........................................................... 37
Phone* ...................................................................... 38
General information .................................................. 38
Bluetooth profiles ................................................. 38
Bluetooth connection ........................................... 39
Pairing a Bluetooth device ................................... 40
Connection to another paired device ................... 40
Management of two phones ................................ 40
Disconnecting a paired device ............................. 41
Emergency call ......................................................... 41
Making an emergency call ................................... 41
Operation .................................................................. 42
Control elements on the control panel ................. 42
Hands-free mode ...................................................... 42
Using the phone book .......................................... 43
Search for a phone number ................................. 43
Using call lists ...................................................... 43
Select a phone number again .............................. 43
Enter a phone number ......................................... 44
Access to the voice mailbox ................................ 44
Incoming call ........................................................ 44
Functions during the call ........................................... 46
Temporarily deactivate hands-free mode ............ 46
Temporarily deactivate the microphone .............. 46
Add call - Teleconference .................................... 46
Ending call ........................................................... 46
Phone book setup ..................................................... 47
Update the phone book ....................................... 47
Sort the phone book ............................................ 47
Phone book on the SIM card or
in the phone memory ........................................... 47
Add favourites ...................................................... 48
Delete favourites .................................................. 48
Display text messages ......................................... 48
Read text messages ............................................ 49
Phone settings .......................................................... 50
Navigation* .............................................................. 51
Functions of the navigation system .......................... 51
Traffic information system and dynamic
navigation .................................................................. 51
Advantages of TMC/TPEG .................................. 52
Current coverage ................................................. 52
Map data ................................................................... 52
Information on the map display................................. 53
NAVI button and menu navigation ............................ 55
Page 4

4 *) Optional features/ settings
Destination entry .................................................. 55
Enter address ....................................................... 55
Alternative routes ................................................. 58
POI - Point of Interest........................................... 59
Geo Coordinates .................................................. 60
Home address ...................................................... 61
Emergency ........................................................... 61
Contacts ............................................................... 62
Search in map ........................................................... 62
Select a point on map ............................................... 62
Display location information ................................. 62
Save position information ..................................... 63
Map view when route guidance is inactive .......... 63
DESTINATION MEMORY ......................................... 64
Recent Destinations .................................................. 64
Saved destinations .................................................... 64
Saved routes ............................................................. 64
Received destinations* .............................................. 64
Options during route guidance .................................. 65
Add destination .................................................... 66
Vehicle profiles ..................................................... 67
Avoid options ........................................................ 69
Blocking ................................................................ 70
Voice guidance ..................................................... 71
Setup button and menu Navigation and Traffic ......... 73
Map settings ......................................................... 73
Route Guidance ................................................... 74
Import POIs .......................................................... 76
Map Version ......................................................... 77
Navigation Database ................................................. 78
Navigation SD card .............................................. 78
Replacing a navigation SD card ........................... 78
Traffic messages* ..................................................... 79
Camera ..................................................................... 81
Choose camera .................................................... 81
Camera settings ................................................... 82
Steering wheel remote control* ............................. 83
Functions of the steering wheel remote control ........ 83
MirrorLink ................................................................. 85
Turn on MirrorLink ..................................................... 85
Start MirrorLink application ....................................... 86
CARPLAY® .............................................................. 87
Turn on CARPLAY .................................................... 87
LAUNCH CARPLAY APPS ....................................... 88
Launch voice recognition (Siri) .................................. 88
Eyes Free Function (Siri) ..................................... 88
Fleet Management Services* .................................. 89
Start Scania Fleet ...................................................... 89
Appendix .................................................................. 90
Optional features/settings ......................................... 90
Wi-Fi connection .................................................. 90
Sound settings - Subwoofer level ........................ 91
END USER LICENSE AGREEMENT ....................... 92
Certification Information ........................................ 95
Page 5

IMPORTANT INFORMATION
Note
-
Read these instructions carefully and completely before first use.
-
Keep these instructions where they will be accessible
times.
Road safety
Road safety is of highest priority. Inattentive driving or not observing traffic
situations can cause serious accidents.
-
Familiarise yourself with the device before driving.
-
Only operate your device if the traffic situation permits. Stop at a suitable
-
navigation device gives driving recommendations during route
-
recommendations.
You must always be able to hear the audible signals from the police, fire and
rescue services in the vehicle in a timely manner.
- Therefore, listen to media at appropriate volumes while driving.
Risk of injury
You must not open or modify the device.
Refrain from repairing the device.
Repairs and maintenance should only be performed by trained personnel.
Risk to the device
We accept no liability for damage to the SD slots caused by inappropriate
SD cards.
This radio navigation device was manufactured with the latest technology and in
accordance with recognised safety regulations. However, it may be dangerous if you
do not observe the safety information in these instructions.
THIS MUST BE OBSERVED!
The device is designed to operate in a commercial vehicle with a 24 V vehicle system
voltage and for installation in a 2-DIN slot.
The traffic guidance accompanying the navigation SD card is designed for
commercial vehicles. The navigation SD card contains specific information about the
navigation of commercial vehicles, such as height restrictions or maximum permitted
road load.
to all users at all
location before entering a new destination into the device or changing
system settings.
The radio-
guidance. Only follow these if they do not contravene traffic regulations.
Traffic signs and traffic regulations always have priority over driving
5
Page 6

Do not dispose of your old
device in the household waste!
-
Take advantage of the
available return and collection
systems.
Notes
-
Do not expose the SD card to strong magnetic or electric fields.
Data
-
Do not expose to direct sunlight or high humidity.
-
Do not expose to dirt, water or other liquids.
-
Always insert the SD card in the correct position.
- Only insert or remove the SD card when the unit is switched off.
Note
The radio-navigation unit is not designed for the use of third-party navigation
SD cards. The resultant functional limitations of navigation are not covered
by the warranty.
Note
-
Read these instructions carefully and completely before first use.
-
times.
Cleaning
Do not use solvents or abrasives, as these may attack and damage the surface of the
device.
- Clean the device with a dry or slightly damp cloth and, if necessary, with suitable
cleaning or maintenance products.
Disposal of old units (EU countries only)
NOTES ON HANDLING SD CARDS
To ensure proper functionality, use clean SD cards that are not damaged.
Contamination or damage of an SD card may cause difficulties in reading the card.
We recommend that you handle SD cards carefully.
can be lost or the SD card may be destroyed.
USABLE NAVIGATION SD CARDS
This radio-navigation device may only be used with original SCANIA data storage
media.
NOTES ON THESE INSTRUCTIONS
These instructions will familiarise you with the functions of the radio navigation unit
and ensure its safe and successful operation.
Keep these instructions where they will be accessible to all users at all
6
Page 7

Formatting conventions
Note
The order and availability of the menu items are dependent on the inserted
navigation SD card and may therefore differ from the illustrations in these
instructions.
Safety instructions are highlighted with a grey bar and the symbol:
Helpful hints are highlighted with a grey bar and the symbol:
You will also find items in these instructions, clearly marked as illustrated here:
Action steps:
· Press ...
Device buttons:
e.g.
SETUP
button
Buttons:
e.g. Navigation
7
Page 8

Mode
Feature
Radio
FM (18 stations)
AM (18 stations)
DAB (18 stations)
*)
every
region.
USB port
2 USB ports:
- Media data
- Charging external media
Provides current up to 0.5 A
SD slot
SD slot 1:
- Navigation data
SD slot 2:
- Media data
Connection
to external
(storage)
media
- MP3 player
- USB flash memory
- 2 Video
- External audio sources via AUX-In
Navigation
system
Dynamic directions to avoid traffic jams or
other traffic problems.
Phone
link
Connection with Bluetooth-enabled mobile
phones
Notes
-
system while the vehicle is at
-
should not
proper and attentive driving behaviour in traffic. Traffic regulations
), stop your vehicle at a safe location and then perform
-
areas. Traffic regulations should be followed here.
INTRODUCTION
FEATURE LIST
LW (6 stations)
MW (6 stations)
SW (6 stations)
DAB may not be receivable in
USB port 1:
USB port 2:
*
Provides current up to 1.5 A
-In
The system must be used so that the vehicle can be driven in a safe
manner at all times.
If in doubt, stop your vehicle and operate the
a standstill.
8
The use of the navigation system does not mean that the driver
display
must always be followed. If you have to interact with the system (e.g. to
enter a destination
the necessary function.
Some areas where entrance is forbidden, such as one-way streets,
entrances and other pedestrian areas, may not be marked on the
navigation map. The system will not issue a warning message in such
Page 9

9
RADIO RECEPTION
Radio reception can be affected by atmospheric interference, noise, distortion or
other reception interference, such as:
- Increased distance from the transmitter
- Multipath reception due to reflection or shadowing
In such conditions the radio reception is affected. However, this not due to faulty
behaviour of the unit.
OPERATING MODES
Settings options in main menus are displayed by tapping the icon.
Radio settings
· Press the
RADIO
button to switch to the RADIO function.
See the "Radio" chapter for further details.
Media settings
· Press the
MEDIA
button to start an SD card, USB, BLUETOOTH AUDIO or
AUX function.
See the "Media" chapter for further details.
Navigation settings
· Press the
NAVI
button to start the NAVIGATION function.
See the "Navigation*" chapter for further details.
Phone settings
· Press the Phone button to start the phone function.
See the "Navigation**" chapter for further details.
OPERATION
Controls
The system can be operated using the rotary encoder/knob, buttons and menus
displayed on the touch screen.
Page 10

Risk of damage to the touch screen
The unit is equipped with a capacitive touch display. Only use your fingers.
Do not use sharp or hard objects such as pens or pencils
touch screen.
Note
-
Before a system function is executed, you are often asked via a message
to confirm whether the selected system function should really be executed.
-
Press the
if you want to suppress such a message without
triggering a system function.
Multifunction knob
To navigate through the menu options:
· Rotate the right rotary encoder/push button clockwise or anti-clockwise.
To activate the selected menu item:
· Press the right rotary encoder/push button .
> The corresponding system function is activated or a message or a view with
additional options is displayed.
Note
In the main audio and phone menus, only the screen switch in the lower part
of the menu can be selected/activated via the touch screen.
Touch screen
to operate the
The screen of the system has a sensory interface that enables direct selection of
displayed menu options. For example, it is possible to activate a menu option on the
screen by tapping the button with a finger or to change the position of the sliding
element on the screen by sliding with a finger.
In menus with several views (several buttons in the upper part of the menu), you can
change between views from left-to-right or right-to-left by swiping with your finger.
You can then instruct the unit to
complete the function.
button
10
Page 11

11
Scroll through a list of menu items
With the touch screen:
· Tap on the button at the top or bottom of the slider.
or
· Move the slider of the slider bar up or down with your finger.
or
· Swipe your finger up or down to scroll through the list of menu items.
With the right rotary encoder/push button :
· Rotate the right rotary encoder/push button clockwise or anti-clockwise to
scroll through the list of menu items.
Home icon
When the Home icon is tapped, the last active tab of the home screen is shown. If
the last active tab is not available, the 2nd tab is shown. As soon as the user
navigates to another tab in the home screen, a back button is available in the
bottom left corner.
Note
The home screen layout can be selected via the
SETUP
button and
tapping on the
For more details, see the “Introduction; System settings” chapter.
Note
If the unit is turned off manually using the left rotary encoder/push button
it needs to be turned on again by pressing the left rotary encoder/push
button .
Automatic shut down
If the system is turned on while the vehicle ignition is turned off, the system will turn
off automatically after one hour.
Adjust the volume
· Rotate the left rotary encoder/push button .
> The current setting is displayed.
When the system is turned on, the last selected volume is set.
· Press the left rotary encoder/push button to mute the unit or return to the
original volume.
> If the volume is muted, the icon is displayed on the screen.
icon.
Turning on the system
· Switch on the vehicle ignition.
> The system turns on automatically.
Page 12

Note
To change the settings you can proceed as follows:
· Move the slider by rotating the right rotary encoder/push button .
Bass:
Use this setting to modify the low frequencies of your audio source.
CUSTOMISE SETTINGS
The following examples describe the method of changing the settings available in the
different menus using the menu options on the screen or the right rotary
encoder/push button .
Sound settings
· Press the
SETUP
button.
· Tap on the icon.
> The AUDIO SETTINGS menu is displayed.
There are two available options
- Simple Equalizer for Bass/Mid/Treble settings (standard)
- Advanced Equalizer for advanced sound settings
· Tap on one of the screen buttons ( / ) to change the audio
settings.
· Move the slider on the touch screen.
12
Page 13
13
Mid:
Use this setting to modify the middle frequencies of the audio source.
Treble:
Use this setting to modify the high frequencies of the audio source.
· Tap on Advanced to open the Advanced Equalizer.
Advanced Equalizer:
The Advanced Equalizer includes ten sliders (-9 to 9) to edit audio frequency ranges.
Customised settings can be stored.
Balance:
Use this setting to adjust the volume balance between the left and right speakers of
the vehicle.
Fader (optional):
Use this setting to adjust the volume balance between the front and rear speakers of
the vehicle.
Adjusting the speed-dependent volume
If speed-dependent volume is activated, the volume is adjusted automatically to
compensate for road and wind noise while driving.
· Press the
SETUP
button.
· Tap on the icon.
> The AUDIO SETTINGS menu is displayed.
Page 14
Note
-
If the setting for speed-dependent volume is set to "Off", the volume does
not increase at higher vehicle speeds.
-
If the setting for speed
"High", the volume is
increased to the maximum at higher vehicle speeds.
Note
Tap on Reset, to align the intersection centrally.
I.e. Balance = 0, Fader = 0
VOLUME SETTINGS
Adjusting volumes
· Press the
SETUP
button.
· Tap on the icon.
· Tap on Volume settings.
· Select the list entry you want to modify.
· Adjust the Volume to the desired level.
> The selected volumes are adjusted.
-dependent volume is set to
Change settings
Via touch screen:
· Tap with your finger on the intersection of both lines and then hold and move
the finger to the desired position.
> Values for Balance and Fader change according to the position of the
intersection.
Setting range: -9 to 9
14
Page 15

Adjusting the phone volume
Note
The phone volume can also be adjusted during a call using the left rotary
encoder/push button .
Once the volume is set, the customised setting is saved by the system and is used as
a default for all future calls until the setting is changed again.
If the volume of the phone is changed, the ringtone volume also changes.
Adjusting the volume of the traffic announcements (TA)
The volume of the traffic announcements can be adjusted during the message using
the left rotary encoder/push button . When the message has been completed or is
cancelled, the volume is automatically reset to the original setting.
Modifying the volume of the voice guidance (Navigation)
The volume of the voice prompts can be adjusted during the direction messages
using the left rotary encoder/push button or via the NAVIGATION SETUP menu.
The setting is saved by the system and is used automatically for all future voice
prompts until the setting is changed again.
Adjusting the volume of beeps
The volume of the traffic announcements can be adjusted, when Beeps are activated
in system settings.
Adjusting the volume of voice (SDS)
The volume of voice announcements can be adjusted when the Speech Dialogue
System - SDS is available.
Volume mixing
Sets the relative background volume of all audio sources (radio or media) during
voice guidance, ongoing call, traffic announcement, system notification or speech
recognition dependent on vehicle speed.
- If the value is set to “off”, then radio/media sounds are quiet during other sound
events.
- If the value is set to “max”, radio/media volume will still be reduced.
15
Page 16
16
SYSTEM SETTINGS
The default settings for the system can be changed via the SYSTEM SETTINGS
menu.
· Press the
SETUP
button and tap on the icon.
With the touch screen:
· Tap on a menu item to change the setting.
With the right rotary encoder/push button :
· Rotate the right rotary encoder/push button clockwise or anti-clockwise to
select a menu item.
· Press the right rotary encoder/push button to change the setting.
Select the language
Different languages can be selected for the menu display. Voice output (optional)
also occurs in this language.
· Select the menu item Language.
> A list of the languages is displayed.
· Select the desired language.
> You have successfully changed the language settings.
Note
If Automatic is selected, the language is set via the instrument cluster.
Note
Voice recognition is not available for every language. To activate the voice
re
sub-
section
cognition feature, see the “Steering wheel remote control*” chapter,
“Button ” on page 83.
Page 17

Units
Note
If Automatic is selected, the units are set via the instrument cluster.
Automatic text scrolling
· Activating or deactivating automatic text scrolling (touch-click):
If this option is activated, list entries which are too long to fit on the current screen will
first be displayed with three dots at the end and afterwards they will scroll
automatically from right to left, so that the user can read the rest of the text on the
respective entries.
Beeps
Activating or deactivating beeps (touch-click):
If the Beeps option is activated, a sound is emitted every time you tap the screen.
If the Sounds option function is activated, the following actions of the user or the
system are acknowledged with a beep:
· Radio function:
When a station is stored on a station button.
· Media function:
When activating the fast forward or rewind.
· Navigation function:
When activating/deactivating the voice announcements in navigation mode.
Home screen layout
· Select the menu item Home screen layout.
> A list of possible layouts is displayed.
· Select the desired layout.
Media - Navi - Phone
Media - Navi
Media - Phone
· Select the menu item Units.
> A list of the Units is displayed.
· Select the desired system of units:
Automatic
Metric (km, m, t, kmh)
Imperial (mi, yd, t, mph)
17
Page 18

18
Factory reset
This menu entry allows the deletion of all personal data.
· Select the menu item Factory reset.
> A popup requests user acknowledgement.
Yes = Deletes all personal data
Another popup informs the user that all personal data has been deleted
No = Cancels the query
Goes back to the menu
SW vers.
This menu entry displays the current software version installed.
BLUETOOTH AND PHONE
For details, see the "Media" chapter, sub-chapter "Bluetooth audio connection" on
page 32 or the "Phone*" chapter, sub-chapter "General information" on page 38.
Page 19
DISPLAY SETTINGS
Note
There
the
system.
If you select
instrument panel.
you can set your own
brightness level.
Note
The dots under a setting indicate that additional options are still available.
Press the dots to see the other options.
With right rotary encoder/push button
· Rotate the right rotary encoder/push button clockwise or anti-clockwise to
select a menu item.
· Press the right rotary encoder/push button to change the setting.
Approach Sensor Feature
If the approach sensor feature has been enabled. When a screensaver or Display
off is currently shown, approaching the screen turns the display on temporarily. When
the approach sensor is no longer detecting anything, the display will be turned off
again after a pre-set time.
DRIVER PROFILES
If a new driver card is inserted, all settings will be updated per the settings stored on
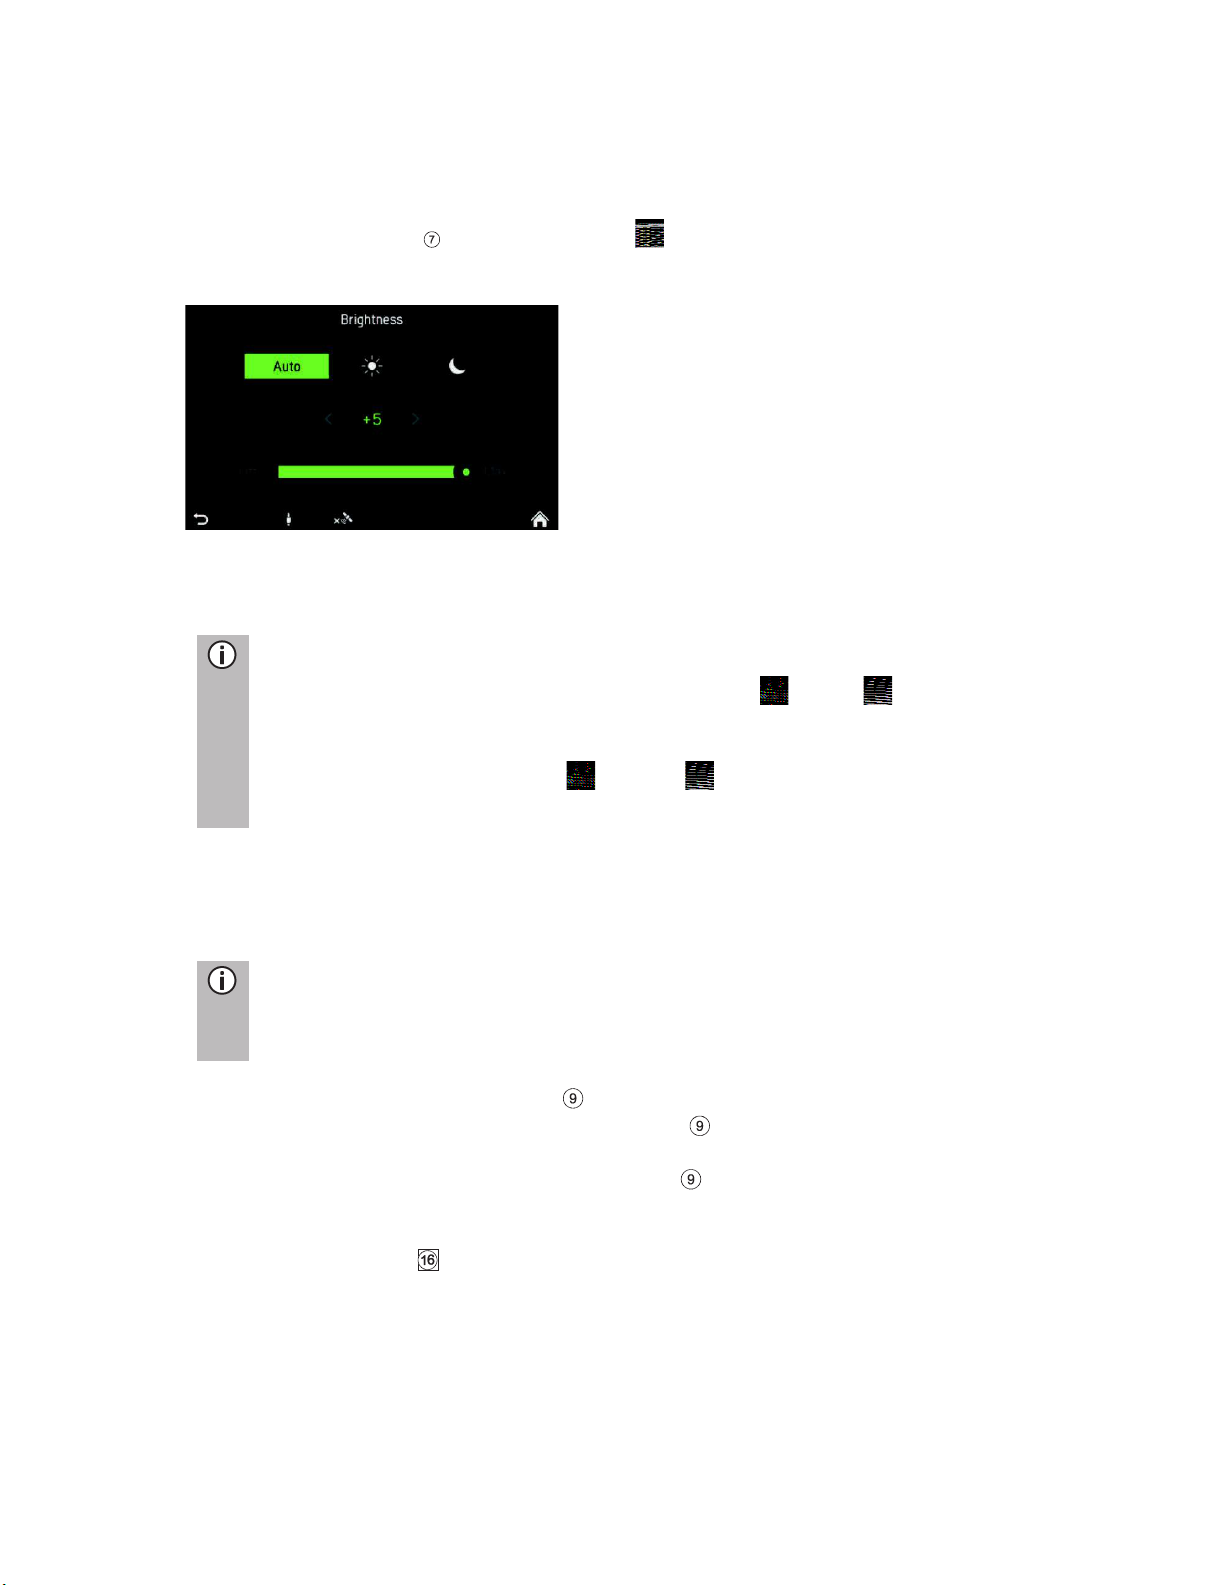
Customising the display
· Press the
SETUP
button and tap the icon.
· Tap on Brightness.
· Select the appropriate option to adjust the Brightness of the screen and to
adjust the display to match the light conditions of your surroundings.
are one automatic and two manual modes ( day or night) in
Auto, the system will follow the brightness level for the
If you select (day) or (night)
· Select the appropriate option to activate/deactivate a Screen saver.
· Select the appropriate option to activate/deactivate the Approach sensor
feature.
19
Page 20

20
the driver card. If no settings are stored on the driver card, the previously active
settings will still be used. If a driver card is removed, all settings are kept as they are.
If the user changes any setting without a driver card being inserted, these changes
will not be stored to any driver ID.
THEFT PROTECTION
Theft protection is activated when the vehicle identification number (VIN) of the
vehicle does not match the device VIN number.
> A popup appears.
Please contact your local SCANIA dealer
SPEECH DIALOGUE SYSTEM – SDS*
*) The voice recognition feature is dependent on vehicle configuration, the language
set and the region in which the vehicle was sold.
Note
Speech Dialogue System - SDS is not available in every region.
The on-board voice recognition system is designed to achieve complex tasks using
voice commands.
· Press the Push to Talk button on the steering wheel to initiate voice
recognition
> A beep is heard. The speech session has started.
· The user may issue a command after the beep. For more details see
Example 2.
Page 21

Supported commands
Commands
Album <Name>
Genre <Name>
Artist <Name>
Playlist <Name>
Song
Play <Artist> <Album or
song>
Search for music
Dial by number
Dial <Phone Number>
Call <name>
Redial
Enter Country < Country
name >
Enter state < State name >
Enter city < city name >
Enter ZIP Code <ZIP code>
Enter Street <Street Name>
Enter house
number <house
number>
Favorite < Name>
Find Next <POI Brand>
New destination
Repeat instructions
Show map
Station <Name>
Navigation, Media, Phone and Radio are the four major areas supported by the
speech dialogue system. Below is the list of major commands supported by the onboard Voice Recognition system.
Europe:
The following commands are supported by the on-board voice recognition system:
<Name>
21
Page 22
Commands
Tune to < Frequency >
Seek Up
Seek Down
Next preset
Previous preset
FM/AM
Next Track
Previous Track
Album <Name>
Genre <Name>
Artist <Name>
Playlist <Name>
Song <Name>
Play <Artist> <Album or
song>
Search for music
Dial by number
Dial <Phone Number>
Call <name>
Redial
Other regions (outside Europe):
The following commands are supported by the on-board voice recognition system:
Dialogue session
A dialogue session starts with a short press of the Push to Talk button and end
upon a system action or cancellation based on the state of the system. During an
active dialogue session, there could be multiple speech interactions between the user
and the main unit.
In order to assist the user, some information is displayed on the screen. This is
particularly useful when there is some confusion as to what the user has said.
22
Page 23
23
Example 1:
Disambiguation between two similar artists:
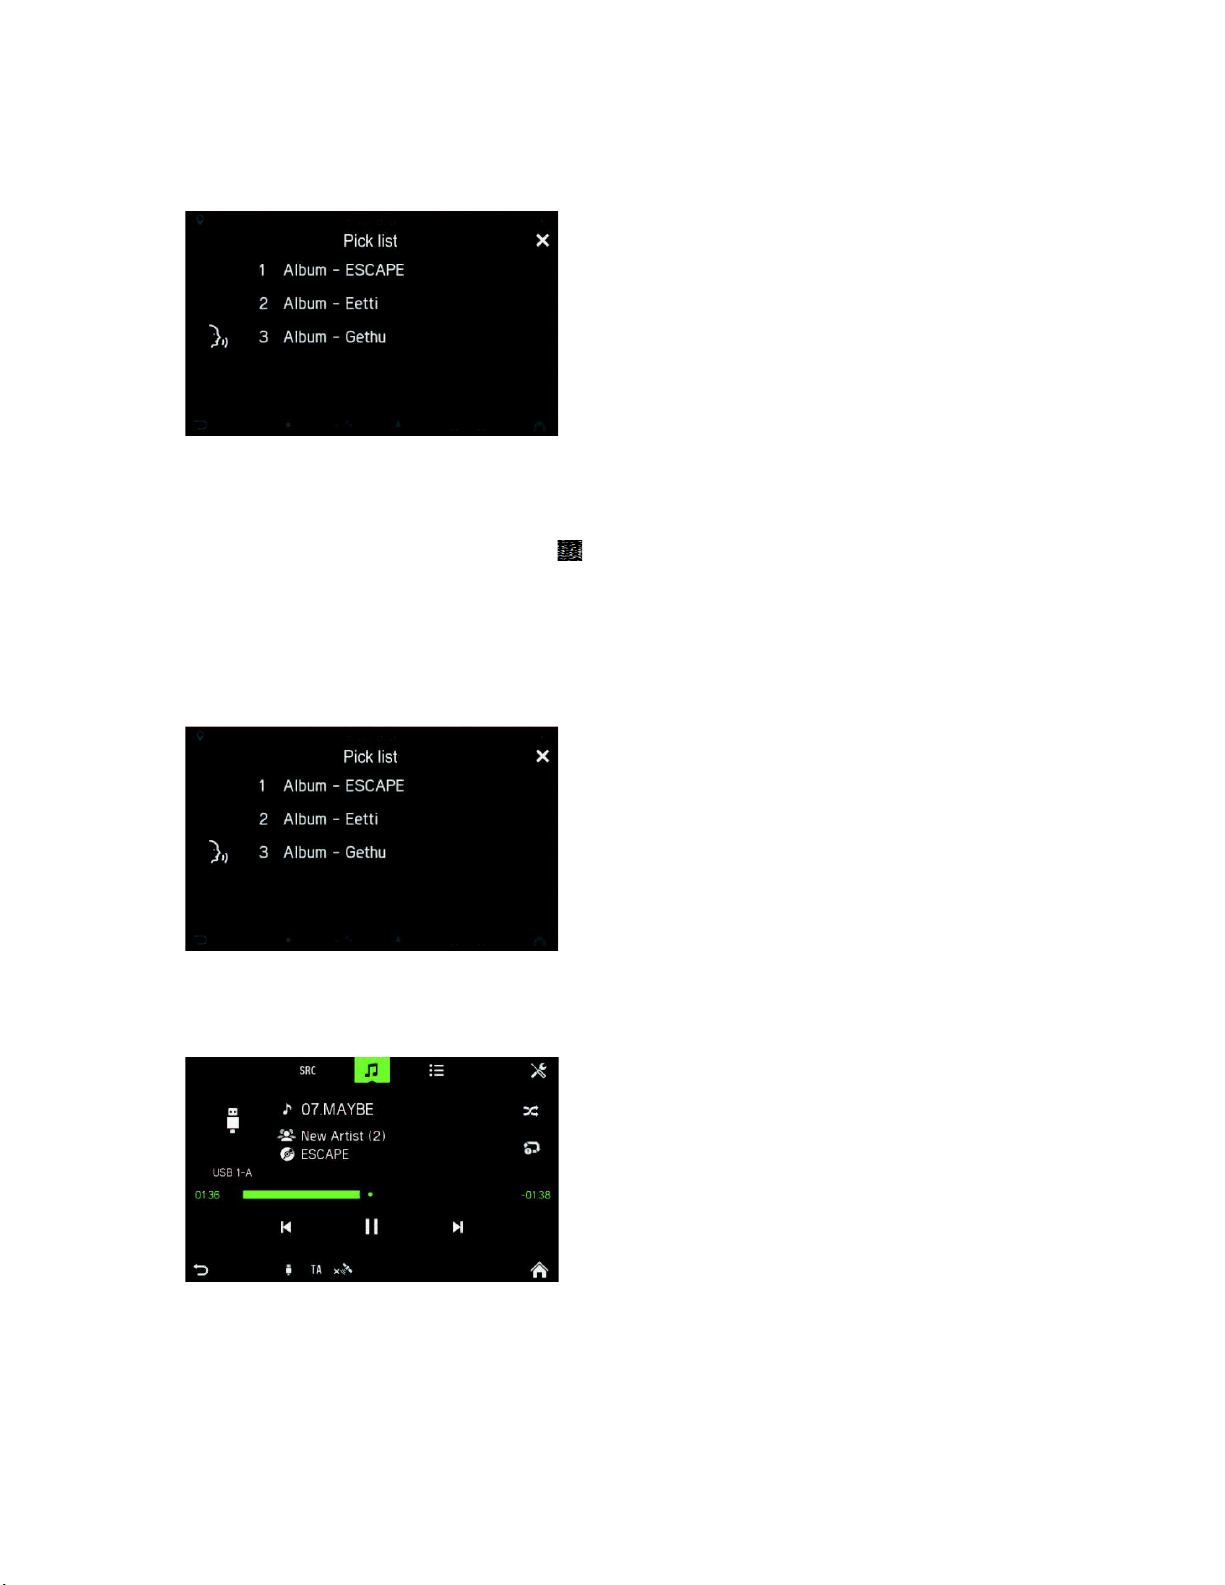
Example 2:
To select an album and play it:
· Press the Push to Talk button on the steering wheel to initiate voice
recognition
> A beep is heard. The speech session has started.
> Say the album title to be played.
> A pop-up appears with a list of albums the system associates with the user’s
command. The list is arranged in order of recognition confidence.
· Say the desired list entry e.g. “Line one” or select it via the touch screen.
> The radio navigation device plays the selected title.
Help system
The voice recognition system comes with an on-board Help system. If no command
is uttered, the help dialogue is initiated, in which the system reads out some of the
supported commands. You could also say "more commands" or "all commands" to
trigger a help dialogue.
Page 24

Note
If an RDS station is being played, information about the station name and
the programme will be displayed.
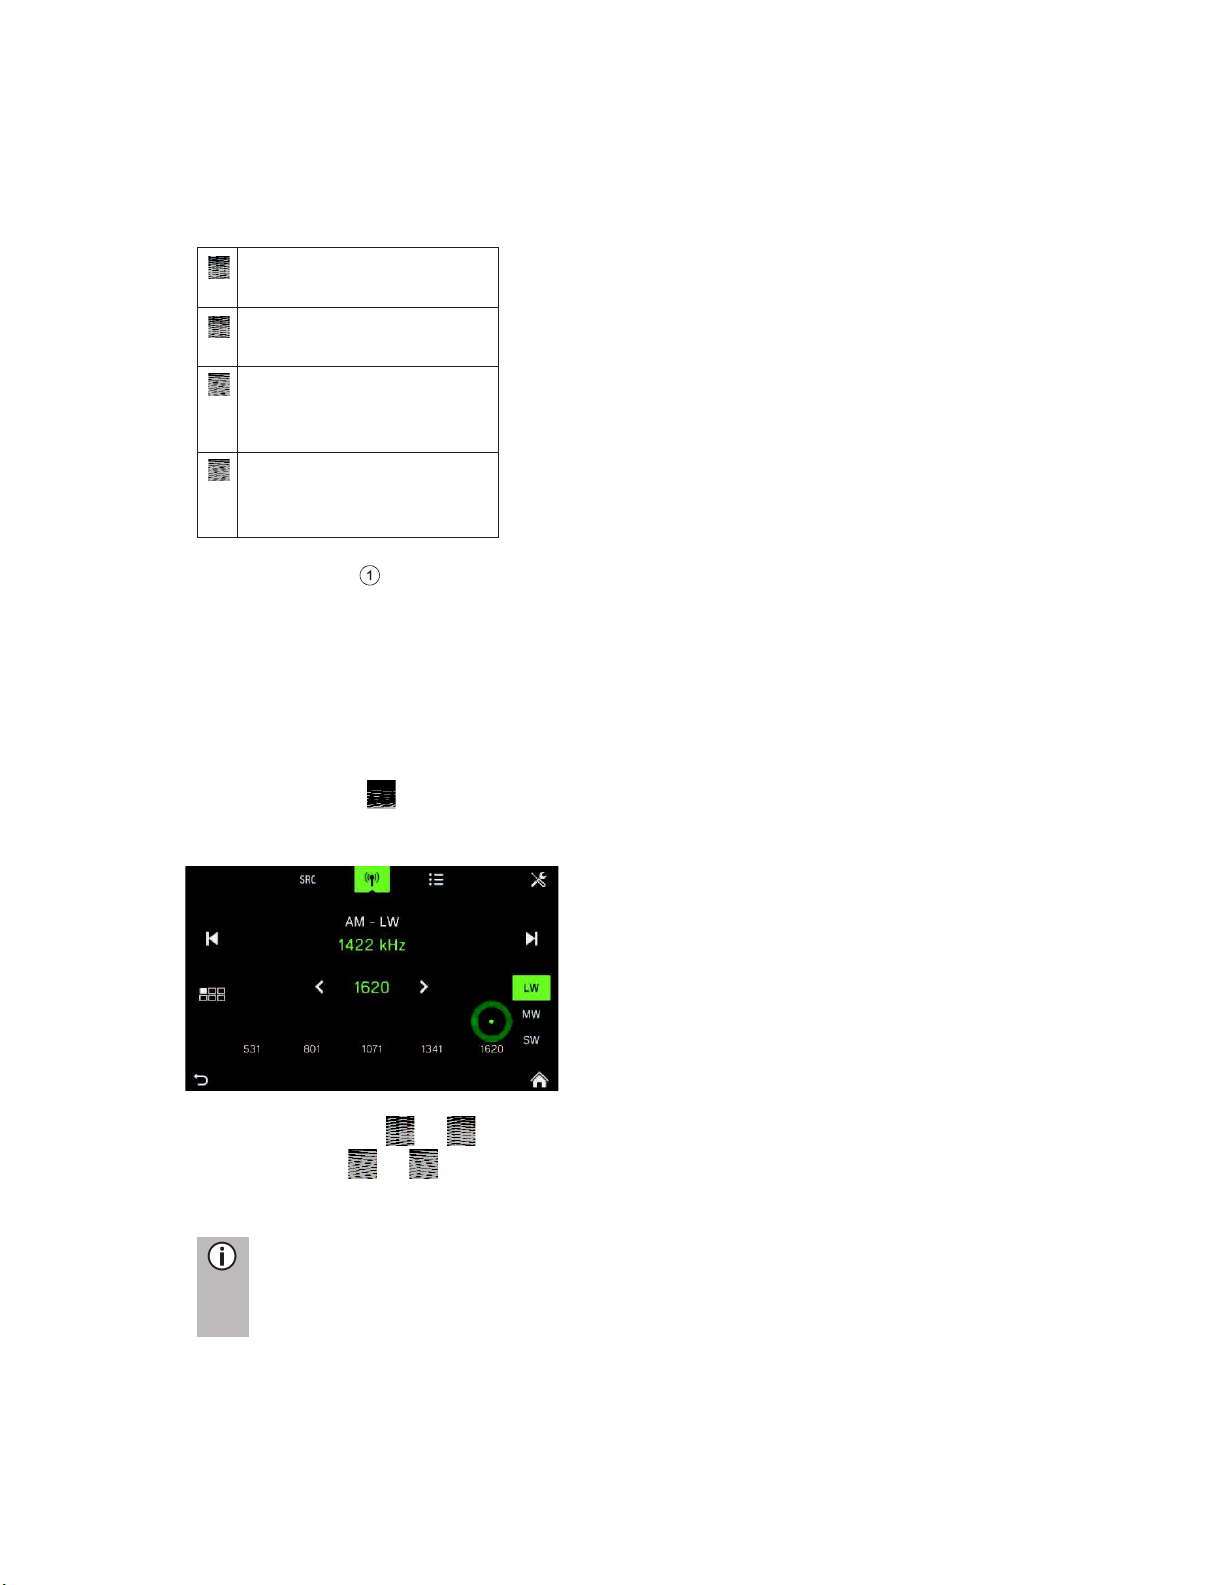
SELECT BAND
· Press the
RADIO
button.
· Tap on the SRC button.
· Select the desired band.
FM, AM or DAB*
*) DAB cannot be received in every region.
RADIO
You can only use the touch screen to select or activate the menu items in the Radio
menu.
ACTIVATING THE RADIO
· Turn on the system.
· Press the
> The radio function is activated.
The last station you listened to is played after activating the radio.
RADIO
button
.
24
Page 25

Note
-
If the band is changed from FM to DAB, to AM or vice versa, the currently
-
-
There is an AM band menu. You can store 6 AM stations for each band:
- If DAB is available, you can store 18 DAB stations.
Note
-
If traffic announcements are activated, the radio is enabled in the
-
traffic announcements, the system automatically tunes to a radio station
been selected beforehand. This ensures that local traffic announcements
can be received at any time, regardless of the selected operating mode.
Priority for traffic announcements
Activating or deactivating (TA)
The TA function is only available in FM radio mode.
If the TA function is activated and the system receives a traffic announcement from
an RDS station, the currently active audio source is interrupted.
To activate/deactivate traffic announcements (TA) see "Radio", sub-chapter "Radio
settings”.
> The last station played on the selected band is played.
received station remains active.
There is a FM band menu. You can store 18 FM stations.
LW, MW and SW
TRAFFIC ANNOUNCEMENTS (TA)
A message is displayed and the announcement is played.
During the announcement, the volume can only be changed using the left rotary
encoder/push button .The traffic announcement can be cancelled by tapping on
Skip. When the traffic announcement is finished or is cancelled, the volume is
automatically restored to the original setting.
background, even if Media or Navigation is activated.
If you have previously selected a radio station that does not broadcast
that broadcasts traffic announcements.
The traffic announcements are activated even if the AM waveband has
25
Page 26
Auto seek to previous
available station
Auto seek to next
available station
Manual tune to
previous frequency by
specific step
Manual tune to next
frequency
by specific
step.
Note
If no other receivable station is found, the last received station is selected
again.
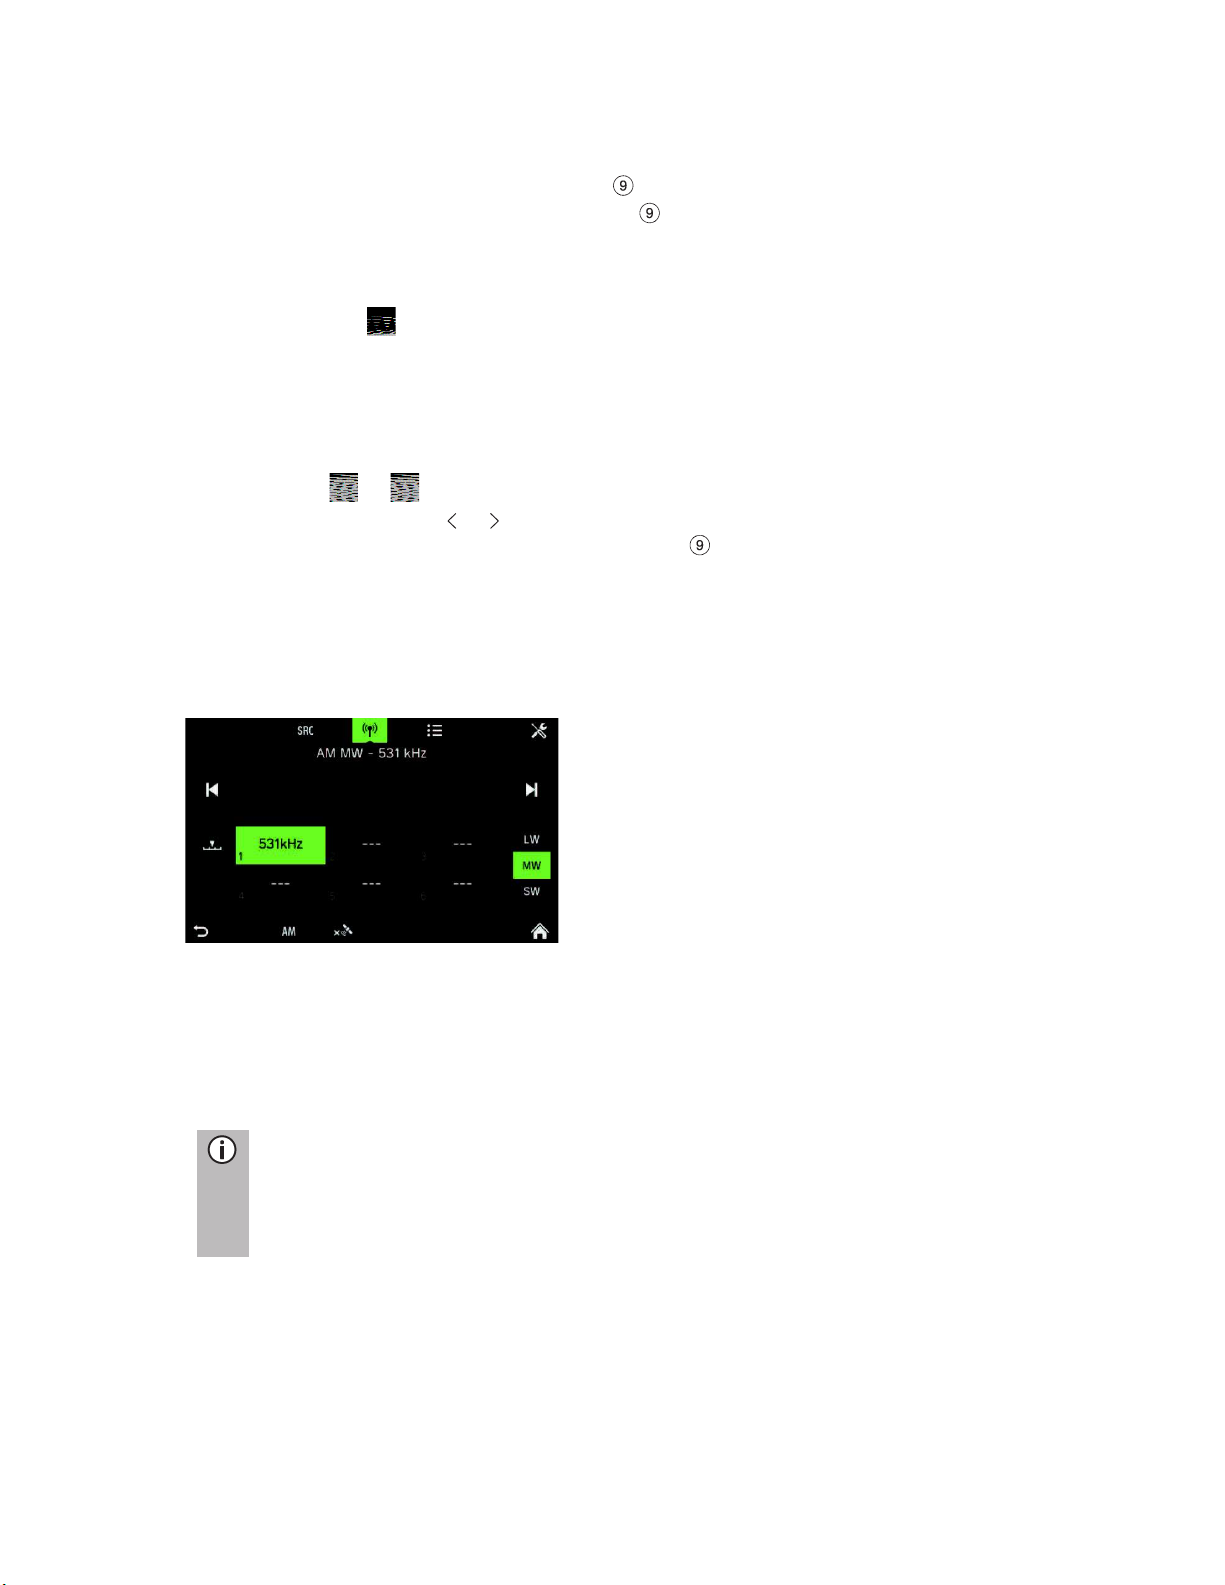
STATION SEARCH
You can set the desired radio station either automatically or manually.
Via the touch screen:
Via push buttons :
- Short press:
Switch to next/previous preset (radio) or next track (media)
- Long press:
Switch to next/previous station in station list (radio)
Automatic station search
· Tap on the icon.
> A frequency scale is displayed.
· Press on the or button
or on the or button on the touch screen.
> The next available station is received and played automatically.
26
Page 27
27
Manual tuning
Using the right rotary encoder/push button :
· Rotate the rotary encoder/push button in the RADIO menu; clockwise or
anti-clockwise to change the receiving frequency.
Using the frequency display:
· Tap on the icon.
> A frequency scale is displayed.
Perform one of the following steps to set the desired station manually.
· Tap the frequency scale.
· Tap on or .
· Press and hold the or button.
· Rotate the right rotary encoder/push button clockwise or counter-clockwise.
STORE RADIO STATIONS
Radio stations can be stored on each band (AM, FM and DAB) using the station
buttons.
· Select the desired band.
· Select the desired station.
· Press and hold one of the station buttons until you hear a beep.
> Pressing the corresponding station button retrieves the station from the station
memory.
Note
If you do not hear a beep when saving the radio station, it may be that the
system sounds
deactivated. To activate system sounds, see the
"Introduction" chapter, sub-chapter "Customise settings".
RETRIEVING RADIO STATIONS
· Select the desired band.
· Press a station button.
> The corresponding radio station is played.
have been
Page 28
28
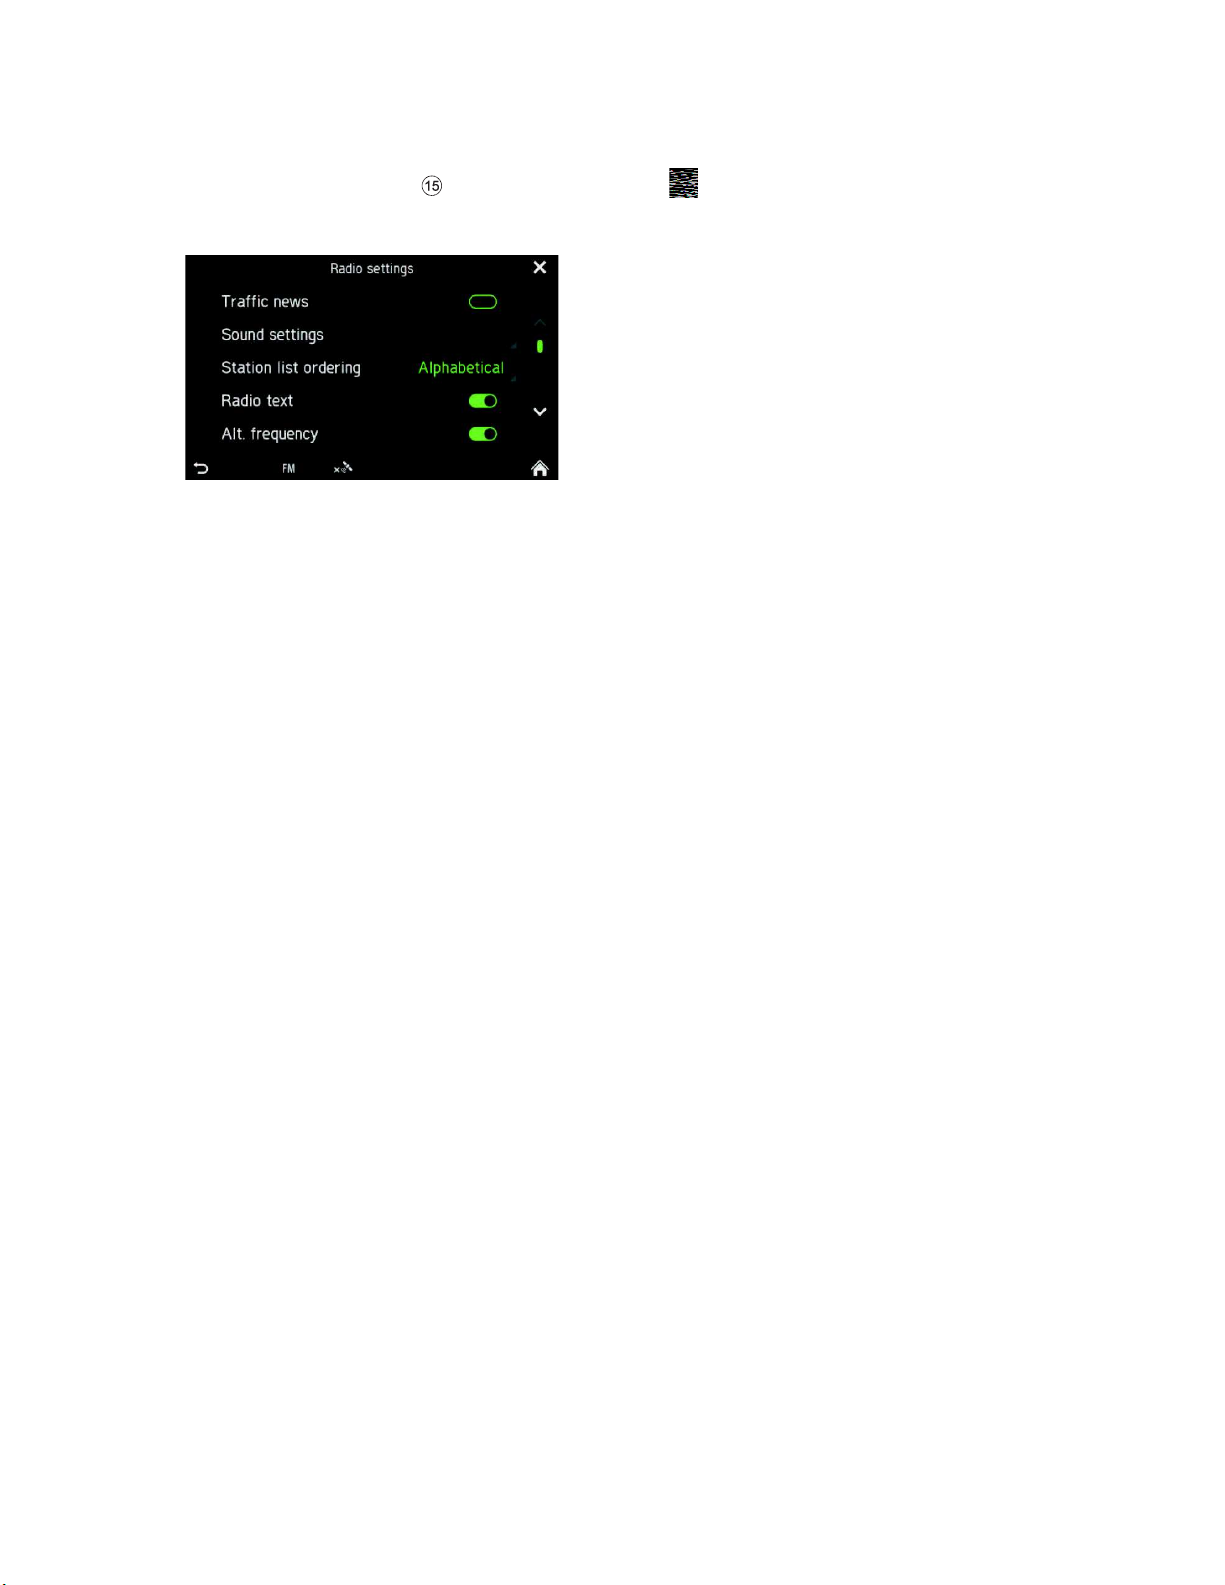
RADIO SETTINGS
· Press the
RADIO
button and tap on the icon.
> The Radio settings menu is displayed.
The following menu items are available:
- Traffic news
Enables or disables traffic announcements.
- Sound settings
SOUND SETTINGS Menu opens. For more details see the "Introduction" chapter,
sub-chapter "Sound settings".
- Station list ordering
STATION LIST ORDER menu opens. Select if you want to order the saved stations
alphabetically (A-Z) or By frequency
- Alt. frequency
Enables or disables the alternative frequency function
- Regional (REG)
Regionalisation can only be enabled if Alternative Frequency is activated.
If this feature is switched on there will be no moving around between the different
regional programs of any given station.
Page 29

MEDIA
Note
The USB port must always be kept clean and dry.
Note
-
The system does not support all MP3 players, USB drives, SD cards, hard
- An Apple iPad cannot be charged via the USB port.
IMPORTANT INFORMATION
- External devices that are connected to the USB port must comply with the USB
mass storage specification (MSC).
- Devices that are connected via USB are supported by the USB 2.0 specification.
The maximum supported speed is 12 Mbit/s.
- Devices without the FAT16 / FAT32 file systems are not supported.
- Hard disk drives (HDD) are not supported in general.
The following restrictions apply to data stored on external devices which are
connected to the USB port:
- Max. number of folders / playlists: 5,000
- Max. number of files / songs: 15,000
- Max. number of files / songs per
folder / playlist: 6,000
- A hierarchy depth of at least 8 folders is supported.
- WMA files with Digital Rights Management (DRM) from online music shops cannot
be played.
- WMA files can only be played if they were created with Windows Media Player
version 9. Support for later versions cannot be guaranteed.
- Compatible playlist extensions: m3u, .pls, wpl.
- The system supports bit rates up to 320 kbps at 48 kHz for MP3 and up to 192 kbps
for WMA.
The last selected Media source can always be selected by pressing the
MEDIA
button.
GENERAL INFORMATION
For the position of the USB port, see the vehicle documentation.
An MP3 player, USB drive or an SD card (via the USB port/adapter) can be
connected to the USB port.
A USB port can be connected to a hub of 4 USB slots.
If the abovementioned devices are connected to the USB port, you can operate them
using the controls and the system menus.
drives or Apple devices.
29
Page 30

30
MEDIA SOURCES
Audio files on an MP3 player or USB drive
· Connect the MP3 player/USB drive to the USB port via a USB cable.
> Audio files are played automatically.
Supported media files: MP3, WMA, AAC, Flac
Playing audio files from an SD card
· Slide the SD card into the SD slot 2.
> The unit starts playing audio files from the SD card.
Playing files from a USB mass storage device
· Connect the USB device to the designated USB port.
> The unit starts playing files from the USB device.
Connecting a TV/EXT device on AUX 2*
*) Additional AUX interface shown on media screen if vehicle is configured with TV
preparation.
The unit controls the sound of the TV/EXT source only. The TV picture is shown on
another unit.
Page 31

31
Media Player
Picture Viewer
The orientation of each picture depends on the source medium. There is no option for
the user to rotate pictures. The user can select an image from within the USB
browsing menu, then the picture viewer will be shown. Buttons are shown on the
picture viewer to switch to the previous and next picture and to close the picture
viewer. The file name of the picture (without file name extension) is also shown on
the screen.
- Pressing anywhere on the screen causes the buttons and file name to re-appear.
- Switching between pictures is possible with the next picture/previous picture buttons
or by swiping left/right.
- Turning the right encoder clockwise or anti-clockwise switches to the next or
previous picture.
- Selecting the close button shows the USB browsing menu again.
Video Player
The USB browsing menu for videos shows the name of the video file, the total play
time, a play icon, and a progress bar if available showing the streaming position
where the video was stopped.
If you select a video file with no resume information, the video player is shown
directly and the video starts playing from the beginning. Subtitles (Captions) and
Chapter Browsing are not supported.
Page 32

Media
Containers
ASF
M3u
WAV
3GP
MP4
FLAC
AVI
Audio Codec
MP3 (MPEG-1 Layer 3, MPEG-2 Layer 3)
WMA 9 (standard;
Waveform (WAV
AAC (MPEG
HE-AAC
Video Codec
H.263 (v1)
MPEG
MPEG
10; profiles: baseline,
main, high)
DIVX 5.x and higher.
VC-1/WMV9: SP/MP/AP
Note
Please refer to the operating instructions for your Bluetooth device before
connecting the Bluetooth device to the system.
Supported Media Files
lossless; voice), WMA9.1, WMA9.2
– PCM Windows format)
-4 AAC, Low Complexity Profile)
-4 Part 2 (ISO/IEC 14496-2; profiles: simple, advanced)
-4 Part 10 / H.264 (ISO/IEC 14496-
BLUETOOTH AUDIO CONNECTION
Important information
- The system only supports Bluetooth devices with support for A2DP (Advanced
Audio Distribution Profile) version 1.2 or later.
- The Bluetooth device must support AVRCP (Audio Video Remote Control Profile)
version 1.0 or later. If the device does not support AVRCP, only the volume can be
controlled via the system.
32
Page 33

33
Connecting a Bluetooth device
Important information
- A maximum of 2 devices can be connected to the system at the same time.
- A maximum of 10 devices can be paired to the system.
- Only one connected device can be attached to the system at any given time.
Perform the following procedure to pair a Bluetooth device with the system.
· Activate the Bluetooth function on your Bluetooth device.
- Set the visibility of your Bluetooth device to "On".
(Consult the user handbook for the Bluetooth device).
· Press the
SETUP
button and tap on the icon.
· Tap on the menu item Bluetooth.
> The BLUETOOTH SETTINGS menu is displayed.
· Set Bluetooth to "On".
· Tap on Search for Bluetooth devices.
> Bluetooth devices within range are displayed.
· Select a Bluetooth device.
> A 6-digit code is generated and displayed.
> The system displays a message asking whether the code displayed matches
the one on your Bluetooth device.
· Confirm the security query with "Yes".
· Confirm the connection request on your Bluetooth device.
> The Bluetooth device is connected.
> The functions of the connected Bluetooth device are displayed on the touch
screen.
> The Bluetooth device appears in the List of paired devices.
Note
-
If other Bluetooth devices were previously connected to the system, the
-
again or
refer to the user handbook for the Bluetooth device.
previously connected device is disconnected.
If the Bluetooth connection fails, follow the procedure to connect
Page 34

34
BLUETOOTH MUSIC MODE
Activating Bluetooth music mode
· Press the
MEDIA
button.
· Tap on the SRC button.
· Select the Bluetooth button to activate Bluetooth music mode.
> The external audio source can now be operated via the system.
· Tap on .
> Audio track is played.
Play the next audio track:
· Tap on .
> The next audio track is played.
Play the previous audio track:
· Tap on .
> The previous audio track is played.
Pause audio playback:
· Tap on .
Resume playback:
· Tap again on .
Note
Depending on the Bluetooth device, activation of Bluetooth music mode and
control of playback may differ.
Page 35

Requirements
The following requirements must be met to use the Bluetooth music mode of the
system:
- Bluetooth functionality of the system must be activated.
- Bluetooth functionality of the external Bluetooth audio source must be activated (see
user handbook for the Bluetooth device).
- Depending on the external Bluetooth audio source, it may be necessary to set the
Bluetooth device to "visible", see user instructions of the Bluetooth device).
- The external Bluetooth audio source must be paired to the system.
35
Page 36

Note
-
Not all vehicles have an AUX port.
-
-
the AUX input with a
3.5 mm plug.
The gain level is adjustable with 3 buttons:
- Quiet
- Medium
- High
Use
· Press the
MEDIA
button.
· Tap on the SRC button.
· Select the
AUX 1
button to activate AUX mode.
> The audio signal from the connected audio source is now transmitted through
the speakers of the system.
The volume is controlled via left rotary encoder/push button .
AUX PORT
You can connect external audio sources at the AUX jack. Look at the vehicle
documents to find the location of the AUX port.
The AUX socket must always be kept clean and dry.
For example, you can connect a portable CD player to
36
Page 37

37
MEDIA SETTINGS
· Press the
MEDIA
button and tap on the icon.
> The Media settings menu is displayed.
The following menu items are available:
- Traffic news
Enables or disables traffic announcements.
- Sound settings
SOUND SETTINGS Menu opens. For more details see the "Introduction" chapter,
sub-chapter "Sound settings" on page 12.
Bluetooth
BLUETOOTH Menu opens.
For more details see the "Phone*" chapter, sub-chapter "Bluetooth connection" on
page 39.
Page 38

Note
You can only connect Bluetooth mobile phones to the system when a
hands-free device is installed in the vehicle.
Note
Some of the phone features may not be supported. The supported functions
depend on the phone and the service provider. For more information about
supported functions, see the operating manual of your mobile phone.
Note
You should be familiar with the safety regulations and the instructions for
your phone before you use the phone function.
Traffic safety
The use of hands-free calling while driving can be dangerous because your
attention is reduced during a phone call. Park your vehicle before
the
hands-free function.
Note
Follow the guidelines in areas where interference or other hazards can
occur due to the mobile phone.
Bluetooth profiles
The Bluetooth profiles HFP, PBAP, A2DP, PAN, SPP and MAP are used in
accordance with the Bluetooth standard. The Bluetooth phone connection of the
system is certified by the Bluetooth Special Interest Group (SIG).
For more information about the information available on the Internet, go to the link:
http://www.bluetooth.com.
PHONE*
*) Phone and related settings are optional features for your device.
The phone function is also related to media streaming via Bluetooth.
You can use your mobile phone through the system. For this, the mobile phone must
be connected via Bluetooth to the system.
If the Bluetooth connection is established between the system and the phone, you
can make calls using the microphone and the loudspeaker in the car.
GENERAL INFORMATION
using
38
Page 39

39
Bluetooth connection
Bluetooth is a radio standard for the wireless connection of devices such as a mobile
phone or an MP3 player.
To establish a Bluetooth connection to the system, the Bluetooth function of the
Bluetooth device must be activated and the Bluetooth device is set to visible
(detection mode).
For more information on the required settings of the Bluetooth device, refer to the
instructions of the Bluetooth device. You can connect the Bluetooth device and the
system via the BLUETOOTH SETTINGS menu (PIN codes between the Bluetooth
device and the phone line exchange).
Perform the following steps to open the BLUETOOTH SETTINGS menu:
· Press the
SETUP
button and tap on the icon.
· Tap on the menu item Bluetooth.
> The BLUETOOTH SETTINGS menu is displayed.
The following menu items are available:
- Bluetooth
Enable or disable Bluetooth for the main unit.
- System is visible
This menu entry makes the main unit listen to incoming pairing requests as long as
the checkbox is switched to on. This checkbox has a countdown timer, which is
counting down from 3:00 minutes.
- Search for Bluetooth devices
Searches for non-paired devices only. If Bluetooth devices are currently connected,
they have to be disconnected while searching. A popup informs the user.
- List of paired devices
This is a list of paired devices. Each device is shown with its device name. The list is
stored in the main unit.
- Set system name
This option allows you to set the system name of the main unit. The current name is
included in the menu entry. After selection of Set system name a keyboard is
shown. As default text the current name is shown.
- Set PIN for pairing
This option allows you to set the 4 digit PIN which will be used for each pairing
procedure. The current PIN is included in the menu entry. After selection of Set PIN
for pairing a keyboard with numbers only is shown. As default text the current PIN is
shown.
Page 40

40
Pairing a Bluetooth device
For details, see the "Media" chapter, sub-chapter "Bluetooth audio connection”,
“Connecting a Bluetooth device".
Connection to another paired device
· Tap on List of paired devices in the BLUETOOTH SETTINGS menu.
> A list of all Bluetooth devices paired with the system is displayed.
> The Bluetooth device currently connected to the system is displayed by the
icon.
· Select the desired Bluetooth device.
> The selected Bluetooth device is connected to the system.
> A confirmation is displayed when the Bluetooth connection is successfully
established.
Note
-
If another Bluetooth device was previously connected to the system, it is
now separated.
-
There can be up to 2
regardless of whether they are audio streaming devices, mobile phones or
combination devices (e.g. mobile phones with integrated MP3 player).
-
If the Bluetooth connection fails, perform the pairing process again or read
the instructions for the Bluetooth device.
Bluetooth devices connected to the system,
Management of two phones
It is possible to connect 2 phones at the same time. One is the primary phone, one is
the secondary phone. The left side of the Favourites tab shows information about the
two phones. Favourites, Call list, Phonebook and Messages will always come from
the primary phone. On the Favourites tab, it is possible to switch the primary and
secondary phone.
On the Favourites tab, it is also possible to select the phone to be used for outgoing
calls when dialling from favourites, call lists, phonebook or messages. On the keypad
the required phone can be directly selected to establish the call.
Page 41

Disconnecting a paired device
Note
-
Sometimes it is not possible to make an emergency call due to a weak
signal. Therefore, you should not rely on the mobile phone for essential calls
(e.g.
properly set up SIM card in the phone. Under certain circumstances,
emergency calls cannot be made via the mobile network. Sometimes
emergency calls are not possible when certain network services and/or
phone functions are activated. For details, contact your network operator.
-
The emergency number varies, depending on the region and country.
Please ask for the correct emergency call number for the relevant region.
· Tap on List of paired devices in the BLUETOOTH SETTINGS menu.
> A list of all Bluetooth devices paired with the system is displayed.
· Select the desired Bluetooth device.
· Tap on Delete pairing.
· Tap on Yes to confirm the deletion.
> The device is removed from the list of paired devices.
EMERGENCY CALL
a medical emergency). On some networks, you will need a valid,
Making an emergency call
· Select the emergency number (for example, 112).
> You are connected to the emergency call centre.
· Inform service personnel about the emergency.
Do not hang up until you are prompted by the emergency call centre to do so.
41
Page 42

Note
You can use the mobile phone in hands-free mode.
Note
Not all mobile phones support the functions of the phone connection.
Control elements on the control panel
- Left rotary encoder/push button for volume control.
- The
PHONE
button displays the phone menu.
HANDS-FREE MODE
· Make sure that the Bluetooth feature is activated on the system.
· Make sure that the Bluetooth function is activated on the phone (To activate
Bluetooth, see instructions for use of the device).
· The mobile phone must be set to "visible" (see instructions for the device).
· The mobile phone must be connected to the system. For details, see the
"Media" chapter, sub-chapter "Bluetooth audio connection”, “Connecting a
Bluetooth device".
· Activate hands-free mode
· Press the
PHONE
button
.
> The PHONE menu is displayed.
Note
If "No phone" continually appears, check whether Bluetooth is activated and
the phone is connected to the system.
> The mobile phone is now connected to the system via Bluetooth and the
hands-free function is activated.
OPERATION
When the Bluetooth connection has been established, you can perform the functions
using your phone through the system.
When Bluetooth connection is established between the mobile phone and the
system, the mobile phone data is sent to the system. This process may take some
time. The period depends on the mobile phone and the amount of data being sent.
The operation of mobile phones on the system may be restricted during this time.
42
Page 43

43
Using the phone book
The contacts in the phone book are stored with multiple phone numbers (up to 4),
address, notes and images.
To make a call using the phone book:
· Tap the PHONE menu in the phone book.
> The PHONE BOOK menu is displayed.
· Go through the list of phone book entries, and select the desired contact.
> The phone number/s of the selected contact is/are displayed.
· To initiate a call, select the desired phone number.
Search for a phone number
If the phone book contains many entries, you can search for the desired contact
using the search option.
· Tap on Search in the PHONE menu.
> The SEARCH menu is displayed.
· To view all the entries that begin with a certain letter, enter the letter.
Note
Tap on Delete to delete an entry from the display. The entry will still exist in
your phone.
Using call lists
Incoming, outgoing and missed calls are recorded in the call list.
· Tap on Call lists in the PHONE menu.
> The CALL LISTS menu is displayed.
· To make a call, select the desired number from the list.
Select a phone number again
The last phone number selected can be repeated.
· Tap on Call in the PHONE menu.
> The displayed phone number is selected
Page 44

44
Enter a phone number
Tap on the button in the PHONE menu.
> The following screen is displayed.
· To initiate a call, enter the desired phone number.
· Use the icon to delete incorrect entries.
· Tap on Call.
> The entered phone number is selected.
Show matching contacts
If the user enters a number, matching contacts from the phonebook or favourites are
shown with their contact names. The number of matching contacts is shown on the
list button . This list is updated with every newly entered number.
As soon as the user selects a matching contact, a call to that contact is established.
Access to the voice mailbox
Enter the phone number of the connected mobile phone by hand.
See chapter "Enter a phone number".
· Select the voicemail entry with the phone number of the connected mobile
phone.
Note
You may need to enter a voice mailbox passcode on the mobile phone to
access the voice mailbox.
Incoming call
When a call is received in Audio mode (e.g. when the radio is on), the active audio
source is muted and remains so until the call ends.
A message with the phone number or name (if available) of the caller is displayed.
Answering the call:
· Tap the green Answer button on the screen.
Reject call:
· Tap the red Hang up button on the screen.
Page 45

A second incoming call
Note
If your provider offers this service, you can hear call waiting for the second
call.
If you receive a second call during an active call, a message with the phone number
or name (if available) is displayed.
To answer the second call and to end the first call:
· Tap the green button on the screen.
To reject the second call and continue the first call:
· Tap the red button on the screen.
45
Page 46

46
FUNCTIONS DURING THE CALL
The PHONE menu is displayed during the current call.
Temporarily deactivate hands-free mode
· Tap on the icon
> The call can only be continued through the mobile phone.
To return to hands-free mode,
· Tap again on the icon.
Temporarily deactivate the microphone
· Tap on the icon.
> The microphone is muted and the caller can no longer hear you.
To turn on the microphone again:
· Tap on the icon again.
If the microphone of the phone portal is deactivated, the icon on the screen turns
green.
Note
If the ignition is switched off during a phone call, the connection remains
active until the end of the conversation.
Add call - Teleconference
This option allows the user to dial a second number. It is possible to type a number,
to select a contact from the phonebook or from the favourites list and to select a
contact from call lists. The ongoing call is put on hold as soon as a new call is
established.
· In the ONGOING CALL menu tap on the icon.
> The ADD A CALL WITH menu appears.
· Select the desired option.
· Tap on Call.
Ending call
Select the screen button to end the call.
Page 47

47
PHONE BOOK SETUP
If you have connected a mobile phone with the system, your mobile phone book with
phone numbers and names (if available) is downloaded to the system automatically.
Depending on how many numbers are in your phone book and the connected phone,
this may take several minutes.
As long as the mobile phone is connected with the unit, the phone numbers are
continuously stored on the system.
If you save new phone book entries on your mobile phone, you can transfer these to
the system via PHONE SETTINGS menu.
Each phone book entry (contact) can include a first and last name and up to 4 phone
numbers in different categories: "Office", "Private", "Other" and "Mobile". The mobile
phone book can contain certain information that is not downloaded to the system.
You can store up to 2,500 contacts.
Update the phone book
· Press the
SETUP
button.
· Tap on the icon.
· Tap on Update contact list.
> The data download from the connected mobile phone begins.
Note
Depending on how many numbers are in your phone book and the
connected mobile phone, this may take several minutes.
Sort the phone book
· Press the
SETUP
button.
· Tap on the icon.
· Tap on Sorting the contact list.
· Choose a type of sorting.
> The contact list is sorted.
Phone book on the SIM card or in the phone memory
There are two different phone books on mobile phones - the one on the SIM card and
the other directly on the mobile phone.
Note
For details, see the mobile phone instructions.
Both phone books of the connected mobile phone are downloaded to the system.
You can display the entries of both downloaded phone books (which is available).
Page 48

Note
Some mobile phones do not allow access to the phone book of the SIM card
and/or the mobile phone.
Add favourites
You can add 20 contacts from the phone book as favourites.
· Press the
PHONE
button.
· Tap on Favourites.
· Tap on Add favourite.
> The PHONE BOOK menu is displayed.
· Select a contact from the phone book.
· The selected contact is added as a favourite.
Delete favourites
· Press the
PHONE
button.
· Tap on Favourites.
· Select a favourite.
> The contact is displayed.
· Tap on the icon.
· Confirm the security query with Yes.
> The favourite is deleted.
Display text messages
Note
This function is not provided by every mobile phone.
Note
You can call the sender from a displayed text message.
· Tap on Call.
· Press the
PHONE
button.
· Tap on Text messages.
> The TEXT MESSAGES menu is displayed.
· Select a text message from the list.
> The text message is displayed.
48
Page 49

49
Read text messages
· Press the
PHONE
button.
· Tap on Text messages.
> The TEXT MESSAGES menu is displayed.
· Select a text message from the list.
> The text message is displayed.
· Tap on the icon.
> The text message is read aloud.
Page 50

Note
The PHONE SETTINGS menu is only available if a Bluetooth device is
connected to the radio with navigation system.
· Press the
PHONE
button and tap on the icon.
> The PHONE SETTINGS menu is displayed.
Following menu items are available:
Bluetooth
BLUETOOTH SETTINGS menu opens. For more details see the "Phone*" chapter,
sub-chapter "Bluetooth connection".
- Ringtone
For both the primary and secondary phones, the user can choose between the
phone’s ringtone and 3 ringtones available on the radio with navigation system and
can adjust the ringtone volume. The default for the ringtones is the phone’s ringtone
for both.
- Phonebook sorting
Choose between the sorting options “First name, Last name “ and “Last name, First
name“
- Show contact image
Enables or disables a deposited image for a contact. If the function is turned off, for
all screens a placeholder graphic is shown instead of the contact images.
- Update contact list
Allows a manual updated of the phone book of the connected phone. Update contact
list is greyed out as long as the system is not ready for phone book download (sync
not finished).
PHONE SETTINGS
50
Page 51

NAVIGATION*
Road safety
This unit is designed for use in commercial vehicles.
Specifications that are required for route guidance of commercial vehicles,
such as height restrictions or maximum permissible loads, are considered in
the route calculations, to the extent that these specifications are stored in
the navigation data.
-
Pay attention to restrictions in road traffic at all times during the trip, even if
you follow the recommendations of the driving unit. The information stored
-
Only use current navigation SD cards that contain relevant information for
-
The map data
some roads are
not included or names and addresses differ from those that were in use at
the time of card production.
-
Make sure that the characteristics of your vehicle and the current load are
always stored in the unit in order to avoid unsuitable or dangerous routes.
-
correspond to traffic rules, always observe traffic rules first.
*) Available functionality of the navigation system is dependent on the map data
content and may differ depending on the respective region.
in the navigation data may be incorrect, incomplete or outdated.
commercial vehicles when updating the navigation data.
Use of the navigation system does not mean that the driver should not
display responsible and proper driving behaviour. You must always
observe the relevant traffic rules. If the navigation instructions do not
on the SD card is sometimes not up to date -
FUNCTIONS OF THE NAVIGATION SYSTEM
The system will direct you to your desired destinations, even if you are unfamiliar with
the local area.
The orientation and movement of the vehicle is detected by several sensors. The
reception is based on GPS but will also work under poor signal conditions (e.g. inside
a tunnel) due to dead reckoning mechanisms. Depending on environment conditions
in individual cases the reception could be too poor to detect the current location
correctly. After entering the destination address or a contact point (e.g. nearest petrol
station, hotel, etc.), the route is calculated from the current location to the selected
destination. The navigation system provides voice- and textual guidance including
direction arrows on the colour map display.
TRAFFIC INFORMATION SYSTEM AND DYNAMIC NAVIGATION
The system is capable of receiving traffic information made available by TMC and
TPEG broadcasting radio stations (available with optional DAB radio function). TMC
and/or TPEG coverage is available in selected countries.
Traffic information is displayed detailed in the TRAFFIC menu and as icons in the
navigation map. If dynamic rerouting is active, the system takes on-route traffic
information into account when calculating a route, depending on selected criteria and
traffic information type.
Also see the "Traffic messages" chapter for further options.
51
Page 52

52
Advantages of TMC/TPEG
- Stress reduction and time saving
- Money saving through more efficiency
- Less impact on environment with more efficient driving
- Daily benefit of navigation system, also on familiar roads
- Safety increase through SRTI (Safety Related Traffic Information)
- Weather alerts e.g. strong side wind
Current coverage
- DAB TPEG:
Germany, Belgium, The Netherlands, Luxembourg, Norway
- RDS TMC Premium:
Bulgaria, Ireland, Finland, France, United Kingdom, Greece, Croatia, Hungary, Italy,
Poland, Portugal, Romania, Slovenia, Sweden, Turkey
- Public TMC Services:
Austria, Czech Republic, Denmark, Spain, Switzerland.
TMC/TPEG coverage is constantly increasing.
MAP DATA
The map data is stored on a SD card delivered with the navigation system.
Note
-
A 5-year subscription to SCANIA Map Updater is included.
Visit
- Map data of additional regions is available commercially.
· Use SD slot 1 for an SD card with map data.
http://scania.com/ for more information.
Page 53

53
INFORMATION ON THE MAP DISPLAY
If the navigation system is activated, the following information is displayed:
Navigation menu
Destination/ next stopover
Remaining distance to the destination/next stopover
Estimated time of arrival or remaining travel time to destination/next stopover.
Tap the time display to toggle between the arrival time and the remaining travel
time.
Navigation settings
POI cluster:
Indicates that there are more POIs around the icon. After tapping the icon a list
button appears, showing the respective POIs listed.
Specific POIs, e.g. petrol stations, car parks or restaurants, are shown by the
corresponding icons.
Current vehicle position icon
Compass:
Red arrow pointing north if the map view is in the direction of travel.
Tap on the compass to adjust the display of the map view: 2D north-up, 2,5D or 3D
direction of travel
The currently selected map scale:
· To change the scale on the map, rotate the right rotary encoder/push
automatically by the navigation system (increases/decreases).
Lane recommendation
Shows all lanes of the current street. The recommended lanes to follow the
calculated route are shaded in blue.
button or use the touch screen.
o Pinch gesture:
Touch surface with 2 fingers and bring them closer together.
o Spread gesture:
Touch surface with 2 fingers and move them apart.
· When the auto-zoom mode is activated, the map scale is adjusted
Page 54

The Route Overview button opens a screen which shows the entire route on
the map. This screen is zoomable and scrollable. Pressing the
button goes back to the normal map view.
Vehicle profile is compared with the route data. If there is a discrepancy
between
vehicle attributes (e.g. vehicle height is
too high for the tunnel that the truck is approaching) the system displays a
warning
to view detailed
attribute warnings on the route, if available.
Icon
Status
Commercial vehicle-specific
information about the road available;
the road is suitable for the
characteristics currently set.
Commercial vehicle-specific
information on the current road not
available! Please monitor street type.
No vehicle profile violation warnings
will be shown.
Route
Displays the calculated route on the map. The route status will be shown in one
of several colours:
· Dark blue route – Remaining route without active vehicle profile or without
vehicle profile violation
· Dark red route - Remaining route which is not suitable for the active vehicle
profile
· Bright red route – Route into/coming from off-road area
· Light blue route – Distance already travelled
The route contains following indicators for destinations:
· Chequered flag – Destination
· Yellow flag – Intermediate destination
Turn-by-turn manoeuvre icon, with distance to the next manoeuvre and the next
road name. Tapping the icon repeats the voice guidance from the last manoeuvre.
Button to open the ROUTE OVERVIEW:
Status of the current road for your vehicle
the route and the permitted
. The ROUTE OVERVIEW option gives you a button
vehicle
Resume
54
Page 55

55
NAVI BUTTON AND MENU NAVIGATION
· Press on the
NAVI
button to open the Navigation Screen.
> The Navigation Screen provides access to all system functions for destination
entry and navigation.
Destination entry
· Tap on the icon.
> The following screen is displayed:
The following menu options are available:
· Address
· Point of interest (e.g. petrol stations, car parks etc.)
· Geo coordinates
· Go Home
· Emergency
· Contacts (if a mobile phone with valid contacts is connected to the system)
Destination memory
· Recent destinations
· Saved destinations
· Saved Routes
Note
If navigation to a destination is already active, you can add up to 9 additional
stopovers, replace the destination or change the order of the
destination/stopovers.
Enter address
· Tap on Address.
> The ADDRESS ENTRY menu is displayed.
Page 56

Note
The system only displays the letters which can be used for destination input.
If there are different keyboard pages available for additional/special letters,
they are selectable by using the lower page selection button (e.g. 1/
etc.).
It also predicts the input and simplifies input by interpreting for example an o
input as ö and a as å or ä, dependent on
Use the icon to delete incorrect entries.
· Fill in all address fields using the letter keys.
4, 2/4
the available possible input.
Use one of the following entry sequences:
· Tap on Country.
· Enter the desired country names.
· Tap on City or Postal code.
· Enter the city name or postal code of the destination.
· Tap on Street.
· Enter the name of the destination street.
56
Page 57

Note
If you do not enter any characters in the street name, you can skip the
address input.
> The destination is then set to the city centre.
Note
If you do not enter a house number, you can skip the address input.
> The destination is then set to the middle of the selected street.
· Tap on Confirm.
The system displays a map view of the area around the address previously
entered.
The destination is indicated by a red marker.
· Tap on Confirm destination.
· The CONFIRM ROUTE menu is displayed.
· Tap on Options.
· The OPTIONS menu is displayed.
Confirm Route
· Tap on Confirm route.
· The route is calculated and route guidance will be started.
· Tap on Alternative routes.
> The ALTERNATIVE ROUTES menu is displayed.
· Tap on OK.
· Enter the desired house number or intersection.
· Tap on OK.
57
Page 58

Note
Only if a mobile phone is connected to the system via Bluetooth and the POI
is equipped with a phone number.
Options
This menu is available for an entered destination address or a selected POI.
· Tap the CONFIRM DESTINATION menu in Options.
> The destination or POI Options is shown.
· Save destination
Tap this option to save the displayed destination data in the address book.
· Set as Home Address
Tap this option to save the displayed destination as home address.
· Phone number (only if a POI is selected)Tap on the phone number to make
an outgoing phone call to the POI.
Alternative routes
Use this menu to calculate alternative routes (Eco route, Shortest route or Fastest
route).
· Tap on Alternative routes.
> Alternative routes are calculated.
58
Page 59

Notes
· Every alternative route is displayed with a star rating, a distance and
colour of the different route types.
· Tap on the desired alternative route (Eco route, Shortest route or Fastest
route).
· Route guidance is started.
POI - Point of Interest
· In Navigation Screen press the
NAVI
button and tap on the icon.
· Tap on Point of interest.
> The FIND POI menu is displayed.
· Around me
Searches for POIs around your current position.
· Around address
Use this option to search for POIs around an entered address.
· Along route
If route guidance is active this option becomes visible. Searches for POIs
along the current route.
· Choose if you want to search for the POI by name (text input) or category
(Regular POIs, Truck POIs, Dealers).
· Regular POIs
Use this option to display regular POIs (e.g. parking, night stop, restaurants
etc.).
· Truck
Use this option to display truck specific POIs (e.g. truck parking, truck repair
shops, petrol/gasoline stations etc.).
· Dealer
Use this option to display Scania dealer specific POIs.
> POIs will be displayed in the POI RESULTS menu.
driving time. The highest rated route is the one with the most
economical fuel consumption.
· The map displays the overview of the alternative routes with the
59
Page 60

60
· Tap on By Name or By Distance to sort the determined POIs.
· Select a POI from the list.
> The system displays a map view of the area around the previously-entered
address.
The new destination is indicated by a red marker.
The information bar contains the POI name, street name and city of the
destination.
· Tap on Confirm Destination.
> The route is calculated.
Geo Coordinates
· In the Navigation Screen press the
NAVI
button and tap on the icon.
> The DESTINATION INPUT menu is displayed.
· Tap on Geo coordinates
Note
Tap on Format to choose between DMS and decimal input.
· Insert the geo coordinates (Latitude and Longitude) via the numeric keypad.
· Press Confirm.
> The street name and city name will be shown on screen if the entered geo
coordinates match with these.
Page 61

61
Home address
You can use this option to save your own address and/or select the already stored
home address as a new destination.
Create home address
· In Navigation Screen press the
NAVI
button and tap on the icon.
> The DESTINATION INPUT menu is displayed.
· Tap on Go Home.
· Confirm the security query with Yes.
> The Add destination menu is displayed.
· Enter an address or select a destination.
> Home address is created.
Enter and select the home address
· In Navigation Screen press the
NAVI
button and tap on the icon.
> The Destination input menu is displayed.
· Tap on Go Home.
> The current home address or GPS coordinates are displayed in CONFIRM
DESTINATION screen.
Note
If no home address has previously been set, the address field in the menu
remains blank.
Emergency
This menu entry consists of an information area and the selectable Hospital and
Police station search. The information area shows the current location (country, city,
current street name and geo coordinates).
· In Navigation Screen press the
NAVI
button and tap on the icon.
> The DESTINATION INPUT menu is displayed.
· Tap on Emergency.
> The EMERGENCY menu is displayed.
· Tap on Hospital or Police station.
> A list of the nearest Hospitals or Police stations is shown.
· Select a list item.
> The confirm destination screen is shown.
Page 62

Note
Only if a mobile phone is connected to the system via Bluetooth and
contains contact address data in a valid format
· Country name Sweden
· In the Navigation Screen press the
NAVI
button and tap on the icon.
> The DESTINATION INPUT menu is displayed.
· Tap on Contacts.
> The contact list of your mobile phone is shown together with address
information.
· Select one contact.
> The street name and city name will be shown on screen.
SEARCH IN MAP
If no route guidance is active:
· Tap on the button to start a free text search for a destination.
· Enter and confirm the search text (e.g. “electronics”).
> The radio with navigation system starts searching for possible matches in the
navigation database.
> The results will be shown in as list entries as soon as they are found.
SELECT A POINT ON MAP
If no route guidance is active:
· Select any point on the map by touching the desired destination for 2 seconds.
> The map centres on this position.
> The confirm destination screen for the selected position is shown.
Display location information
Select this option to display the address/GPS coordinates of the current position.
· Press on the
NAVI
button and tap on the icon.
Contacts
such as:
· Street + House number e.g.: Granparksvägen 10
· Postal code and/or City name 151 48 Södertälje
62
Page 63

63
Save position information
Select this option to store the address/GPS coordinates of your current position.
· Press the
NAVI
button.
· Tap on the icon.
· Tap on Save current position.
Map view when route guidance is inactive
The following elements are shown on the map when no route guidance is active:
· Name of the current street
· button: Search for cities, streets and POIs next to the entered search
keyword
· An icon representing the current map view. This icon works as a compass for
map views
· An icon representing the current zoom level.
Page 64

Note
Up to 20 recent destinations are stored automatically. If more than 20
destinations are stored, the oldest will be deleted from the list and the
newest will be added automatically.
SAVED DESTINATIONS
· Tap on Saved destinations.
· The list of saved destinations is displayed.
SAVED ROUTES
· Tap on Saved routes.
· The list of saved routes is displayed.
RECEIVED DESTINATIONS*
· Tap on Received destinations.
· The list of received destinations is displayed.
*) Available with optional fleet management services.
DESTINATION MEMORY
Use this option to manage your destinations.
Selecting a destination from the memory
· In Navigation Screen press the
NAVI
· Tap on the icon.
· The destination memory appears
or Navigation menu button.
RECENT DESTINATIONS
· Tap on Recent destinations.
· The list of the previous used navigation destinations is displayed.
64
Page 65

Note
The system receives text, address and geo-coordinates.
Depending on whether the address is available, the list entry will show either
the address or the geo
address or geo
hand side of the
destination options screen.
Selecting a destination from the memory
· Select any list from which you want to select a destination memory entry.
· Select any list item which you want to use as a destination for route guidance.
Edit a destination from the memory
· Select any list from which you want to select a destination memory entry.
· Select the icon from behind a previous destination.
The following menu options are available depending on the type of selected memory:
· Save destination (not for saved destinations)
Tap this option to save the displayed destination data in the address book.
· Set as Home Address
Tap this option to save the displayed destination as your home address.
· Edit name (only for saved destinations and routes)
Tap this option to edit the name of a saved destination or route.
· Edit route (only for saved routes)
Tap this option to edit the list of destinations on a route.
· Delete destination (only for saved destinations)
Tap on this option to delete the displayed destination from the list of previous
destinations.
· Delete all destinations (only for saved destinations)
Tap this option to delete the entire list of saved destinations.
· Delete route (only for saved routes)
Tap this option to delete the displayed route.
· Delete saved routes (only for saved routes)
Tap this option to delete the entire list of saved routes.
OPTIONS DURING ROUTE GUIDANCE
Use this option to adjust the settings for route calculation/recalculation and
navigation.
· Press the
NAVI
button during a currently active route.
· Tap on the icon.
> The ROUTE OPTIONS menu is displayed.
-coordinates. If a text string is available for the
-coordinates, this will be shown on the left-
65
Page 66

66
The following menu options are available:
· Stop RG
Tap on this option to cancel the current route guidance or remove a stopover
from route.
· Add destination
Tap on this option to add a stopover or a new destination.
· Vehicle Profile
Tap on this option to display, select and edit different vehicle profiles.
· Avoid options
Tap on this option to avoid or use certain roads (motorways, toll roads, ferries)
during navigation.
· Block ahead
Tap on this option to exclude a defined length of the road in front of the
vehicle.
· Voice Guidance
Tap on this option to turn voice guidance on and off.
· Manoeuvre list
Tap this option to display all the roads on the calculated route.
· Manage route
Tap on this option to manage the destinations if at least one stopover has
been entered.
Add destination
· In the CONFIRM ROUTE menu tap on Add stopover.
· The ADD DESTINATION menu is shown.
· Enter a stopover by address or select other option to add a stopover.
> The ADD STOPOVER menu is shown.
· Choose whether the new destination is be added as the first destination, as
the final destination or replace the current route.
> The route is calculated.
Page 67

> The CONFIRM ROUTE menu is shown.
Note
Even if system tries to avoid using roads which do not meet the
characteristics,
complying with local traffic regulations.
Note
Settings have to be confirmed by
otherwise
they will not be stored.
> Stopovers are indicated by a yellow flag.
· Tap on Confirm route to start route guidance
Vehicle profiles
The navigation system is optimised for heavy vehicles. The vehicle profiles can be
changed all the time, even during active route guidance.
You can store the characteristics of different vehicle combinations in up to 4 different
profiles (e.g. with and without a trailer or with a specific hazardous load).
Based upon these characteristics the system will calculate the best possible route.
this cannot be guaranteed. The driver is responsible for
· Press the
SETUP
button and tap on the icon.
· Tap on Navigation and traffic.
· Tap on Vehicle profiles.
· Select a profile.
· Tap on the icon to edit it.
> The vehicle profile to be edited is opened.
the button or icon -
67
Page 68

68
The navigation system is optimised for heavy vehicles. Therefore the supported
navigation map data contains truck-related street limitations.
Set the following vehicle properties:
· Width
· Height
· Length
· Number of axles
· Single axle weight
· Current weight
· Maximum weight
· Trailer usage
· Hazardous load
· Tunnel restrictions
Vehicle profiles can be changed all the time, even during active route guidance.
You can store the characteristics of different vehicle combinations in up to 4 different
profiles (e.g. with and without a trailer or with specific hazardous load).
Based upon these characteristics the system will calculate the best possible route.
Please be aware that the driver has to obey local traffic regulations.
The following countries are covered with vehicle attributes which are taken into
account in route calculation (no liability assumed):
Europe:
Albania, Austria, Belgium, Bosnia and Herzegovina, Bulgaria, Croatia, Czech
Republic, Denmark, Estonia, Finland, France, Georgia, Germany, Greece, Hungary,
Iceland, Ireland, Italy, Latvia, Lithuania, Luxembourg, Macedonia, Moldova,
Montenegro, Netherlands, Norway, Poland, Portugal, Romania, Russia, Serbia,
Slovakia, Slovenia, Spain, Sweden, Switzerland, Ukraine, United Kingdom
Middle East:
Oman, Qatar, Turkey, United Arab Emirates
Israel:
Israel
Africa:
Morocco, Namibia, South Africa
Asia:
Malaysia, Singapore
South America:
Argentina, Brazil, Chile, Mexico
Oceania:
Australia, New Zealand
Page 69

Note
You can also find the vehicle characteristics in the NAVIGATION menu
under the settings icon > Vehicle profiles.
Hazardous Load
In the HAZARDOUS LOAD menu you can select hazardous material by classes.
Tapping an icon opens a description of the respective hazardous material class.
If your vehicle is carrying a hazardous load, activate the respective checkboxes. It is
possible to activate more than one class if several hazardous loads are transported.
Avoid options
Use this menu to avoid certain areas or road segments. The route calculation will try
to avoid the selected options in route calculation as much as possible.
· Press the
NAVI
button.
· Tap on the icon.
· The NAVIGATION SETTINGS menu is displayed.
· Tap on Route Guidance
· Tap on Avoid options.
· The AVOID OPTIONS menu is displayed.
The following avoidance options are available:
· Motorways
· Urban areas
· Small roads
· Ferries
· Toll roads
· Vignette roads
69
Page 70

Note
Toll and vignette roads are a form of road pricing for vehicles in addition to
road tax.
· Vignette: Permission to use a road for a certain period of time
Note
Sometimes (depending on the route) it is not possible to match every set
truck profile and avoid
a vehicle
attribute warning screen which displays the distance to the ignored option.
You should always observe local traffic regulations.
· Select the desired avoidances.
> The selected avoidances are each indicated by a red prohibition sign.
Blocking
Use this menu to exclude a part of the route ahead during active route guidance.
· Press the
NAVI
button during a currently running route.
· Tap on the icon.
> The ROUTE OPTIONS menu is displayed.
· Tap on Block road ahead
> The BLOCK ROUTE SECTION menu is displayed.
The following menu options are available:
· off
· Block the next 500 m.
· Block the next 2 km.
· Block the next 5 km.
· Block the next 20 km.
· Select an option.
> The route is recalculated.
· Toll roads: Road pricing calculated on distance travelled
ance option. You will be informed of this with
70
Page 71

Note
A blocked route will be marked on the map. After the blocked route has been
avoided, the block road function will be automatically deactivated.
Voice guidance
Use this menu to turn voice guidance on and off.
· Press the
NAVI
button during a running route.
· Tap on the icon.
> The ROUTE OPTIONS menu is displayed.
· Tap on Voice guidance.
> The VOICE GUIDANCE menu is displayed.
The following menu options are available:
· Detailed
· Brief
· Beep
· Off
Manoeuvre list
· In the Navigation Screen press the
NAVI
button.
· Tap on the icon.
> The ROUTE OPTIONS menu is displayed.
· Tap on Manoeuvre list.
> The Manoeuvre list is displayed.
71
Page 72

72
The Manoeuvre list displays all manoeuvres in the calculated route, starting from the
current location.
The following information can be displayed on each list:
· Name of street, motorway or slip road
· Directional arrow or motorway symbol
· Border crossings
· Distance to next manoeuvre on the route
Show or avoid manoeuvre
· Tap on the list entry in the Manoeuvre List which you want to see in the map
or avoid.
· Select the desired option in the popup.
· Tap on Avoid street.
> The route will be recalculated avoiding the selected street.
· Tap on Map.
> The selected list entry will be displayed on the navigation map.
Manage route
Note
Manage Route is enabled if you have entered more than one destination.
Use this menu to manage your route, for example to change the order of your
destinations on your route.
This option shows you a list with all stopovers and the final destination.
· Press the
NAVI
button during an active route.
· Tap on the icon.
> The ROUTE OPTIONS menu is displayed.
· Tap on Manage route.
> The EDIT ROUTE menu is displayed.
· Tap on the Move button.
> Arrow buttons appear to move the list entries (stopovers) up or down in the
list.
Page 73

73
· Change the sequence of the list entries by tapping on the Arrow buttons.
· Tap on the icon to go back to route guidance.
> The route will be recalculated.
SETUP BUTTON AND MENU NAVIGATION AND TRAFFIC
· Press on the
SETUP
button to open the SETTINGS menu.
· Tap on the icon.
· Tap on Navigation and Traffic.
> The NAVIGATION SETTINGS menu is displayed.
The NAVIGATION SETTINGS menu offers several settings for adjusting the
navigation system.
The following settings/options are available:
· Map settings
· Route guidance
· Vehicle profiles
· Import POIs
· Map version
Map settings
The following settings/options are available under Map settings:
· Show Traffic information
Use this checkbox to enable or disable traffic event icons.
· Map display mode
Use this option to switch the back light between Light (day), Dark (night)
and Automatic (automatic switching).
· Map view:
2D map view north-up/driving direction
The angle between the camera and the terrain is always a right angle
(90 degrees), no height/elevation-data is used for map rendering.
Whenever this mode is active, changing the angle of the camera is not
allowed.
2,5D map view driving direction
The angle of the camera can go under 90 degrees. It gives the illusion
of having a 3D map.
Page 74

Note
POI icons are displayed depending on the map scale.
Traffic Safety
Traffic signs and traffic regulations always have priority over the driving
recommendations.
3D map view driving direction
In 3D mode the terrain is rendered with height/elevation-data included
(3D terrain) and the angle of the camera is adjusted to ground level.
· Auto-zoom
If you select this option, the map scale is adjusted automatically by the
navigation system (increases and decreases) in order to ensure reliable
navigation. You can choose between far, normal, near and off. If you zoom
manually the zoom will switch back to auto zoom automatically after 8
seconds.
· POI Icons
Use this menu to display and hide various points of interest, for example,
petrol stations, car parks or restaurants, with the appropriate symbols on
map.
· 3D Landmarks
Use this checkbox to enable or disable 3D Landmarks on the map.
· 3D Cities
Use this checkbox to enable or disable 3D Cities on the map.
· Digital terrain model
Use this checkbox to enable or disable a digital terrain model on the map.
· Park areas
Use this checkbox to enable or disable park areas on the map.
· Railways
Use this checkbox to enable or disable railways on the map.
· City areas
Use this checkbox to enable or disable city areas on the map.
Route Guidance
The following settings/options are available under Route guidance:
· Voice guidance prompts
Use this option to adjust the degree of detail of voice guidance.
· Voice guidance volume
Use this option to change the volume of the voice prompts.
· Show turn-by-turn symbol
Use this option to display the turn-by-turn symbols and written instructions
during route guidance.
74
Page 75

75
· Show lane guidance
Use this menu to display lane guidance.
· Show speed limit
Use this menu to display speed limits and warnings
· Arrival information
Use this option to toggle between displaying the estimated time of arrival and
the estimated remaining travel time.
· Default route
Use this menu to toggle between ECO route, Fastest route and Shortest
route.
· Junction view
Use this option to display junctions in the lane guidance.
· Avoid
Use this menu to avoid certain areas or road segments.
Page 76

Note
· You can find the necessary GPS coordinates, for example, in a
The GPS coordinates must be expressed in degrees with decimal
"-".
· Enter the latitude and longitude coordinates into the text file, separated by a
comma (e.g. 9.9800000, 52.0150000).
· Enter an arbitrary name for the contact point (e.g. “David's hangout”).
· Save the text file (e.g. on the hard drive on your PC or notebook).
Import POIs
You can define special destinations in addition to the special destinations stored on
map database SD card.
Your created special destinations (POIs) can be downloaded to the system.
You can create the following:
· Destination contact points
Create POIs:
To create special destinations, perform the following steps:
· Create a text file with an arbitrary name and the file extension .kml (e.g.
SamsContactPoint.kml).
topographical map.
·
places.
· Coordinates of western longitude and southern latitude must be
entered with an initial minus sign
76
Page 77

77
Example:
<kml>
<Document>
<name>My POIs</name>
<Placemark>
<name>My POI 1</name>
<metadata>
<telephone>1234567890</telephone>
</metadata>
<Point>
<coordinates>Longitude,Lattitude</coordinates>
</Point>
</Placemark>
<Placemark>
<name>My POI 2</name>
<metadata>
<telephone>1234567890</telephone>
</metadata>
<Point>
<coordinates>Longitude,Lattitude</coordinates>
</Point>
</Placemark>
<Placemark>
<name>My POI 3</name>
<metadata>
<telephone>1234567890</telephone>
</metadata>
<Point>
<coordinates>Longitude,Lattitude</coordinates>
</Point>
</Placemark>
</Document>
</kml>
Storing text files on a USB mass storage device or SD card
· Create a folder with the name "MyPOIs" in the root directory of a USB drive
(e.g. "L:\MyPOIs", where "L:" is the root directory of the USB drive).
· Save the text file with the destination contact points in the folder "MyPOIs".
Download the user-defined special destinations
· Plug the USB mass storage device or SD card with your special destination
data into the USB port or SD slot 2 of the system.
· To start the download, press the
SETUP
button.
· Tap on Navigation and traffic.
· Tap Import POIs.
· Select Import new POIs.
· Select source USB or SD/MMC.
· Select a file to import or select all files.
> The special destination data is downloaded onto the system.
Map Version
Under Map version you can display the version of the stored map data on the SD
card.
Page 78

Risks to the unit
Do not use a SD card which has cracks, is deformed or has been repaired
with tape. Damaged SD cards can damage the system.
Note
Maps and map updates are obtained from your vehicle dealer.
Note
When you remove the SD card with map data while navigation is active, a
popup informs you that navigation will not be available anymore until you
re
the home screen will
be shown. If a SD card with map data is re
shown
as for
system start up).
· Press on the inserted SD card to unlock it.
· Pull the SD card out of its connector.
· Gently slide the new SD card into the SD card slot with the label side up and
the cut-outs to the right.
NAVIGATION DATABASE
The map data required for navigation is stored on an SD card that comes with the
system.
Navigation SD card
You can order new navigation SD cards to obtain the most recent map data.
· Handle the SD card carefully. Be especially careful to not touch or
contaminate the contacts.
· Do not use any conventional cleaner, benzene, thinner, or antistatic spray to
clean the SD card or its contacts.
· Do not bend or compress the SD card. Do not use a bent or broken SD card.
· To ensure easy insertion of the SD card into the card slot and its removal, do
not stick a label to the SD card.
· Do not expose the SD card to direct sunlight, high temperatures or humidity.
· Always keep the SD card out of the device in a protective box, to protect it
from dirt, moisture and mechanical influences.
Replacing a navigation SD card
-insert the SD card with map data. After confirming,
-inserted, a loading popup is
if you are still in the navigation application (same behaviour
78
Page 79

TRAFFIC MESSAGES*
Note
Traffic messages shows you information about events received by RDSTMC or (available with optional DAB radio function) DAB
Based on this information
avoiding traffic.
· Press on the
TRAFFIC
button to open the TRAFFIC INFO menu.
> If the navigation system is activated, then the TRAFFIC INFO menu displays
all traffic incidents on the current route and/or in the surroundings.
· Tap on the icon to display the menu options.
The following menu options are available:
· Dynamic redirection
You can set the following options:
Automatic
Select this option to activate the route calculation/recalculation based
on TMC.
By time delay
Select this option to start the route calculation/recalculation with time
delay. Time delay is according to the calculated time the traffic event
may take (e.g. traffic jam delays for 15 minutes.)
Set time to adjust the time delay.
Ask first
Select this option to allow or not allow route calculation only after a call
from the system.
Off
Select this option to deactivate the route calculation/recalculation
based on TMC/TPEG.
*) Only available if navigation map data is inserted.
-TPEG.
, the system is capable of recalculating routes
79
Page 80

Colour
Status
transparent
Unknown traffic flow
green
Free traffic flow
ochre
Slow, heavy traffic
orange
Queuing traffic
red Stationary traffic
dark red
Blocked roads, no
traffic flow
· Show traffic events
You can enable or disable the visibility of selected event types in the
navigation screen. The following options, among others, are possible:
Lane restrictions
Traffic flow
Accidents
Closures
Other
The Show traffic info navigation setup option completely enables/disables visibility.
Traffic flow information
In active route guidance the route may be displayed in different colours. These
colours give information about the immediate traffic flow of streets/route segments.
80
Page 81

CAMERA
Note
The camera system is optional and depends on the vehicle configuration.
Please contact dealer for more information.
Traffic safety
The camera system is used to support visibility during forward and backward
movement of your vehicle.
general camera and install it at a reasonable location around the vehicle.
This is to ease different types of work (e.g. working with crane)
It does not relieve you of responsible and proper driving behaviour. You still
have a duty to drive carefully as well as to look around when reversing.
Always pay particular attention to pedestrians and all other road users.
Note
· No system notifications are displayed as long as the camera
Depending on the environmental conditions, it is possible that the
not always present persons or objects correctly.
If strong light falls directly onto the lens of the camera, objects may
Please check this and perform any necessary readjustment of the
documentation if this function is used in your vehicle.
Note
Depending on the vehicle configuration, one camera can be set as a
reversing
ing
camera will be shown.
The unit offers the option to connect and alternately display two cameras.
Choose camera
You can use this option to select one of the two cameras.
· Press the
CAMERA
button and tap on the icon.
> The Camera settings menu is displayed.
· Select a camera by tapping on Preview.
· Tap the icon to change the view into Full mode.
> The selected camera is displayed in Full mode.
But the camera can also be configured as a
function is activated.
·
camera and unit will
·
be outshone and not displayed clearly.
· After cleaning a vehicle in a car wash, the detection range of the
camera may have been changed due to mechanical influences.
camera. For more information on the required settings of the
camera, refer to the instructions of your vehicle.
· The system has a video input, which enables the display of e.g.
camera images on the display. If necessary, consult the vehicle
camera. When the driver put the vehicle into reverse the revers
81
Page 82

Note
Switch between two cameras via the Camera preview button.
Tap on
The top bar displays the name of the currently used camera.
To leave full screen mode tap any hard key or use the
on the
bottom bar.
Camera settings
You can use this option to select a camera, to change the names of the cameras,
and to display a preview of the two cameras.
· Press the
CAMERA
button and tap on the icon.
> The Camera settings menu is displayed.
· Tap on the icon behind the camera that you would like to rename.
· Enter a descriptive name using the onscreen keyboard and confirm your entry
with OK.
> The Home page is displayed.
the Arrows icon to enter full screen mode.
or icons
82
Page 83

STEERING WHEEL REMOTE CONTROL*
Note
The steering wheel remote control function is optional and depends on the
vehicle configuration.
See the separate remote control unit manual for connection details.
You can operate the unit with the buttons on the steering wheel.
FUNCTIONS OF THE STEERING WHEEL REMOTE CONTROL
Button +
· Increase volume
Button -
· Decrease volume
Button
· Radio:
Skip to previous pre-set station (short press);
automatic tuning (long press).
· Storage medium:
Select previous title, restart the current title (short press);
fast search backward (long press)
Button
· Radio:
Retrieve next storage space
(short press); automatic tuning (long press).
Storage medium:
Select next title, (short press); quick search forward (long press)
SRC
button
· Select media source
Button
· Switch to mute
Button
· Push To Talk (hold button during phone calls as long as you talk)
· Activate SDS- Speech Dialogue System
(short press)
· Siri Eyes Free can be started if an iPhone has been connected via Bluetooth
(long press). Use natural language commands to control your iPhone.
*) Steering wheel remote control is dependent on vehicle configuration.
83
Page 84

Button
· Settings
Button
· Back
OK
button
· Confirm
Button
· Up
Button
· Down
Button
· Left
· Reject an incoming call
Button
· Right
· Ignore an incoming call (mutes the incoming call signal)
84
Page 85

MIRRORLINK
Note
MirrorLink appears only when a MirrorLink-supported Android device is
connected to the
A l
shown in the APPS menu.
Note
To present an incoming call via MirrorLink the phone must be connected to
the
certified MirrorLink Phone
App must
Most phones currently do not support phone calls via MirrorLink.
MirrorLink is interrupted during a system update, e.g. traffic info, and is
started up again after the system update is completed.
MirrorLink integrated Android devices with the vehicle, so that the screen and
common Android applications are shown in the display.
main unit via USB.
ong press on the
T
URN ON MIRRORLINK
· Tap on the icon to open the HOME menu.
· Tap on the icon in order to display the APPS menu.
PHONE
button activates MirrorLink. The icon is
· Tap on the MirrorLink button.
> The MirrorLink function starts.
> The following screen appears.
Upon successful connection, supported MirrorLink applications (phone, music, maps,
news) can be controlled using the touch surface.
main unit as primary phone via Bluetooth. A
also be installed.
85
Page 86

START MIRRORLINK APPLICATION
· Tap on the icon to open the HOME menu.
· Tap on the icon in order to display the APPS menu.
· Tap on the MirrorLink button.
· Tap on the desired application e.g. Music, Internet Radio etc.
8
6
Page 87

CARPLAY®
Note
CarPlay® only appears when an Apple device is connected to the device's
USB connection via a Lightning connection.
TURN ON CARPLAY
· Tap on the icon to open the HOME menu.
· Tap on the icon in order to display the APPS menu.
· Tap on the CarPlay button.
> The CarPlay® function starts.
Note
All Bluetooth connections are terminated as soon as CarPlay® is activated.
The internal phone, Bluetooth and Bluetooth Audio do not function together
with CarPlay®.
> The following screen appears.
CarPlay® enables Apple devices in the vehicle to be integrated on the screen as well
as shared applications from Apple devices to be shown on the display.
Once a connection has been successfully established, the supported CarPlay apps
(phone, music, maps and news) can be accessed via the touchscreen or via voice
input (Siri).
CarPlay® enables Apple devices in the vehicle to be integrated on the screen as well
as shared applications from Apple devices to be shown on the display.
87
Page 88

Note
Once CarPlay® has been activated, pressing the
PHONE
button will open
the phone function of the CarPlay menu. This will also switch automatically
to CarPlay when there are incoming calls.
CarPlay® is interrupted when there are system messages (e.g.
information). CarPlay® is
finished.
In order to
Note
If Siri functionality is unavailable, e.g. if the network is down, this is not a
fault of the radio/navigation device.
reactivated after the system message has
exit CarPlay®, select Scania.
LAUNCH CARPLAY APPS
· Tap on the icon to open the HOME menu.
· Tap on the icon to display the APPS menu.
· Tap on the CarPlay button.
traffic
> The CarPlay® function starts.
· Tap on the desired application e.g. Phone.
> The selected application is launched.
LAUNCH VOICE RECOGNITION (SIRI)
· In order to activate Siri, press the button on the steering wheel for a longer
time.
Eyes Free Function (Siri)
An extension of the Siri functionality that enables the user to operate an iOS mobile
device connected to the radio/navigation device. Using the Siri Eyes Free Function
you can use natural language commands to control the mobile device or the
radio/navigation device.
88
Page 89

FLEET MANAGEMENT SERVICES*
Note
The Scania Fleet popup is not shown on top of incoming call popups. It will
be shown after the call has ended.
START Scania Fleet
· Tap on the icon to open the HOME menu.
· Tap on the icon in order to display the APPS menu.
· Tap on the Scania Fleet button.
> Fleet Manager is started.
Open Scania Fleet on your Scania radio and enter your user credentials. You can
stay in touch with your fleet manager and colleagues in a convenient way. Within
your fleet you can send and receive messages as well as access the fleet address
book. Receive a destination and navigate to it directly. Receive a phone number and
initiate a call from your received message. On the Fleet Management Portal your
estimated time of arrival (ETA) will be displayed in the Fleet Position service.
89
Page 90

90
APPENDIX
OPTIONAL FEATURES/SETTINGS
Optional features and settings might not be supported by your vehicle configuration
and the state of your device.
Wi-Fi connection
· Press the
SETUP
button and tap on the icon.
· Tap on the menu item Wi-Fi.
> The WLAN menu is displayed.
· Set Wi-Fi to "On".
> The system searches for available networks.
> If there is a Wi-Fi connection available, a list entry with the network name, the
signal strength icon and password protection information is displayed.
· Select the desired network.
> The system may ask for the password of the selected WLAN network.
· Enter the password of the selected WLAN network and tap on OK.
Page 91

Note
Special characters can be selected by using the lower page selection button
(1/4, 2/4 etc.)
It also predicts the input and simplifies input by interpreting an
example,
selected
Use the icon to delete incorrect entries.
Note
To change the settings you can proceed as follows:
· Move the slider by rotating the right rotary encoder/push button .
·
Use the Subwoofer level setting to modify the subwoofer level of the audio
source.
“o”, for
as an “ö” and “a” as “å” or “ä”, depending on the input options
.
A popup informs you that connection is in progress.
>
> If connection was successful, a green tick is displayed on the left of the WLAN
network connected. Otherwise, a popup appears, informing you that the
password was incorrect.
“Connection Details” submenu
This submenu shows the MAC address of the Head Unit and the IP address of the
connected network.
The “Connected IP address” information is only displayed if a network is connected.
Sound settings - Subwoofer level
· Press the
SETUP
button.
· Tap on the icon.
· Tap on one of the screen buttons ( / ) to change the audio
settings.
· Move the slider via the touch screen.
91
Page 92

92
END USER LICENSE AGREEMENT
FOR THE USE OF THE TRAVEL AND TRAFFIC INFORMATION SERVICES
PROVIDED IN EUROPE
1 SCOPE
1.1 This End User License Agreement ("EULA") contains the terms and conditions regarding your use
of the Services (as defined below in section 2.6) provided by the Service Provider (as defined below
in section 2.7) in the Territory (as defined below in section 2.8) and material limitations to your
rights in that regard. If you are acting as an agent or other representative of a company or another
legal person, such as an officer or other employee acting for your employer, then "you" and "your"
mean your principal, the entity or other legal person for whom you are acting.
1.2 This EULA has been made publicly available in the Service Provider Traffic web service on the
Service Provider’s official website (http://www.Service Providertraffic.com/eula/). Howe ver, if you
have not reviewed this EULA prior to opening the sales package of the Product (as defined below
in section 2.5), you should read this printed version of the EULA carefully as it is a legal agreement
between you and the Service Provider as if the Service Provider and you physically signed this
EULA. If you would like to get an unofficial translation of this EULA from English to your respective
local language in the Territory, please visit the above-mentioned website. By opening the sales
package of the Product that you’ve purchased containing this EULA and thereafter commencing
the use of the Services, you automatically accept and agree to be bound by the terms and
conditions contained in this EULA. However, if you do not agree to all of the terms and conditions
contained in this EULA, you may not use the Services.
2 DEFINITIONS
2.1 “Act” shall mean the applicable local consumer protection laws and regulations.
2.2 “Data” shall mean collectively the travel and traffic information and the related location data made
available to you through the Services by the Service Provider.
2.3 “Intellectual Property Rights” shall mean all copyrights, trademarks, trade secrets, patents and
other intellectual property rights recognized in any jurisdiction worldwide, including all applications
and registrations with respect thereto.
2.4 “Manufacturer” shall mean the manufacturer of the Product and its affiliates.
2.5 “Product” shall mean the personal navigation device enabled to receive the Services
manufactured, marketed, sold and distributed by the Manufacturer.
2.6 “Services” shall mean the provision of the Data to you by the Service Provider.
2.7 “Service Provider” shall mean Service Provider Mediamobile SA with the French corporate ID B
403334 618 and registered address 27, boulevard Hippolyte Marquès, 94200 Ivry sur Seine France
2.8 “Territory” shall mean the countries of Belgium, Bulgaria, Croatia, Finland, France, Germany,
Greece, Hungary, Ireland, Italy, Luxembourg, Netherlands, Norway, Poland, Portugal, Romania,
Slovenia, Sweden, Turkey and United Kingdom.
3 LICENSE GRANT
3.1 The Service Provider hereby grants to you a non-exclusive right to use the Services in the Territory
for the life of the Product, or when the third party licenses, services and information required for
providing the Services become unavailable on commercially reasonable terms, or until the Service
Provider discontinues providing the Services in the form as they were provided when you
purchased the Product, whichever is the shortest.
Page 93

93
3.2 There are no implied licenses granted under this EULA, and all rights save for those expressly
granted to you above, shall remain with the Service Provider.
4 INTELLECTUAL PROPERTY AND OTHER RIGHTS
Title and all Intellectual Property Rights to or associated with the Services and/or the Data shall always
be vested in the Service Provider, its licensors or other suppliers.
5 WARRANTY DISCLAIMER
5.1 The Service Provider shall provide the Services with due care and professional skill in the Territory
until the expiry or termination of the license grant as agreed in section 3.1 above. For the avoidance
of any doubt, the Service Provider’s warranty provided hereunder shall cover only the Services
expressly excluding the Product.
5.2 NOTWITHSTANDING THE FOREGOING, YOU UNDERSTAND AND AGREE THAT THE
SERVICES, DUE TO THEIR NATURE AND CONTENT, MIGHT NOT ALWAYS BE FREE FROM
DEFECTS, COMPLETE, REAL-TIME OR AVAILABLE, AND THAT THEY ARE PROVIDED ON
“AS IS” BASIS IN LIEU OF ALL OTHER SERVICE PROVIDER OBLIGATIONS ARISING FROM
THE ACT OR OTHER APPLICABLE STATUTORY LAWS, TRADE USAGE, GENERAL
PRINCIPLES OR OTHER SOURCES OF LAW, WHICH ARE HEREBY EXCLUDED TO THE
FULLEST EXTENT PERMITTED BY THE MANDATORY OBLIGATIONS IMPOSED ON THE
SERVICE PROVIDER IN THE ABOVE-REFERRED SOURCES OF LAW. NO ORAL OR
WRITTEN INFORMATION OR ADVICE GIVEN BY THE MANUFACTURER, ITS DISTRIBUTORS
AND/OR RESELLERS SHALL IN ANY WAY EXTEND THE SCOPE OF THIS WARRANTY.
5.3 IN CASE THE SERVICES HAVE NOT BEEN PERFORMED WITH DUE CARE AND
PROFESSIONAL SKILL AS AGREED IN SECTION 5.1 ABOVE, YOUR SOLE REMEDY IS REPERFORMANCE OF THE SERVICES EXPRESSLY EXCLUDING OTHER REMEDIES ARISING
FROM THE ACT OR OTHER APPLICABLE STATUTORY LAWS, TRADE USAGE, GENERAL
PRINCIPLES OR OTHER SOURCES OF LAW, WHICH ARE HEREBY EXCLUDED TO THE
FULLEST EXTENT PERMITTED BY THE MANDATORY REMEDIES AVAILABLE TO YOU
UNDER THE ABOVE-REFERRED SOURCES OF LAW.
6 LIMITATION OF LIABILITY
6.1 FOR THE AVOIDANCE OF ANY DOUBT, YOU HAVE A RIGHT TO CLAIM DAMAGES FROM
THE SERVICE PROVIDER ONLY IN SITUATIONS IN WHICH SUCH RIGHT CANNOT BE
EXCLUDED BASED ON SECTION 5.3.
6.2 EXCLUDING THE SITUATIONS IN WHICH LIABILITY FOR (A) INDIRECT DAMAGES CANNOT
BE LIMITED BASED ON THE MANDATORY PROVISIONS IN THE ACT AND OTHER
APPLICABLE LOCAL LAWS, THE SERVICE PROVIDER SHALL NOT BE LIABLE FOR
INDIRECT DAMAGES; AND (B) DIRECT DAMAGES CANNOT BE LIMITED BASED ON THE
MANDATORY PROVISIONS IN THE ACT AND OTHER APPLICABLE LOCAL LAWS, THE
SERVICE PROVIDER SHALL NOT BE LIABLE FOR DIRECT DAMAGES TO THE EXTENT THEY
EXCEED THE FEES, WHICH YOU HAVE ACTUALLY PAID FOR THE SERVICES EXPRESSLY
EXCLUDING THE PRICE OF THE PRODUCT.
6.3 TO THE EXTENT PERMITTED BY THE MANDATORY PROVISIONS IN THE ACT AND OTHER
APPLICABLE LOCAL LAWS, THE LIMITATION PERIOD FOR YOUR CLAIMS FOR DAMAGES
SHALL BE TWO (2) YEARS FROM THE POINT IN TIME WHEN THE CLAIM AROSE AND YOU
BECAME AWARE THEREOF. REGARDLESS OF YOUR KNOWLEDGE THE LIMITATION
PERIOD SHALL ALWAYS BE THREE (3) YEARS FROM THE DAMAGING EVENT.
6.4 WITH THE EXCEPTION OF LIABILITY FOR PERSONAL INJURY OR PROPERTY UNDER THE
APPLICABLE LOCAL PRODUCT LIABILITY LAWS, THE ABOVE LIMITATIONS SHALL APPLY
TO ALL CLAIMS FOR DAMAGES, IRRESPECTIVE OF THEIR LEGAL BASIS.
Page 94

9
4
7 GENERAL TERMS
7.1 This EULA constitutes the entire agreement and understanding by and between you and the
Service Provider. This EULA supersedes any prior and contemporaneous proposals, purchase
orders, advertisements, and all other communications in relation to the subject matter of this EULA,
whether oral or written. Any additions or modifications hereto must be made in writing and signed
by a duly authorized Service Provider representative. This also applies to any waiver of this
requirement of written form. For the avoidance of any doubt, the Manufacturer and their distributors
do not have a permission to modify this EULA on behalf of the Service Provider.
7.2 If for any reason a court finds any provision of this EULA, or any portion thereof, to be
unenforceable, that provision of this EULA will be enforced to the maximum extent permissible so
as to affect the intent of the parties, and the remainder of this EULA will continue in full force and
effect.
7.3 Subject to section 6.3 above, a failure of a party to insist upon the performance of one or more of
the terms of this EULA will not be deemed to be a waiver of its right to enforce such term, or of any
rights or remedies that party may have under this EULA.
7.4 This EULA shall be governed in all respects by the laws of the country within the European
Economic Area (EEA) in which you are domiciled. If you are domiciled outside the European
Economic Area (EEA), this EULA shall be governed in all respects by the laws of the country in the
European Economic Area (EEA) from which you purchased the license to use the Services. The
United Nations Convention on Contracts for the International Sale of Goods, done at Vienna April
11, 1980, is excluded.
All disputes arising under this EULA shall be brought in the public court in the country within the
European Economic Area (EEA) in which you are domiciled. If you are domiciled outside the European
Economic Area (EEA), the forum for all disputes shall be the public court in the country within the
European Economic Area (EEA) from which you purchased the license to use the Services.
Page 95

10R
CERTIFICATION INFORMATION
EC-Declaration of Conformity
Harman Becker Automotive Systems GmbH hereby declares that this unit,
AUS467$1'$5', is in compliance with the essential requirements and other
provisions of
Directive (8
ECE type approval
The AUS4 67$1'$5'unit was reviewed by the directive UN/ECE R10 and registered
approved by the SNCH authority in Luxembourg. This is shown by type approval
type
number as follows.
- 05 13782
Radio Equipment Directive – Declaration of Conformity
Hereby, Harman Becker Automotive Systems GmbH declares that the radio
equipment type AUS4 Standard is in compliance with Directive 2014/53/EU.
The full text of the EU declaration of conformity is available at the following internet
Address: (*1)
relevant
and
Bluetooth: 2400-2483,5 MHz <10 dBm
WLAN: 2400-2483,5 MHz <20 dBm
(*1) http://www.harman.com/compliance
Manufacturer:
Harman Becker Automotive Systems GmbH
Becker-Goering-Strasse 16
76307 Karlsbad,
Germany
86$&$1$'$
)&&,'7*$8667'
7KLVGHYLFHFRPSOLHVZLWK3DUWRIWKH)&&5XOHV2SHUDWLRQLVVXEMHFWWRWKHIROORZLQJWZR
FRQGLWLRQV
WKLVGHYLFHPD\QRWFDXVHKDUPIXOLQWHUIHUHQFHDQG
WKLVGHYLFHPXVWDFFHSWDQ\LQWHUIHUHQFHUHFHLYHGLQFOXGLQJLQWHUIHUHQFHWKDWPD\FDXVH
XQGHVLUHGRSHUDWLRQ
&KDQJHVRUPRGLILFDWLRQVQRWH[SUHVVO\DSSURYHGE\WKHSDUW\UHVSRQVLEOHIRUFRPSOLDQFHFRXOG
YRLGWKHXVHUVDXWKRULW\WRRSHUDWHWKHHTXLSPHQW
This device has been designed and complies with the safety requirements for portable (<20cm)
RF exposure in accordance with FCC rule part 2.1093 and KDB 447498 D01 as demonstrated in
the RF exposure analysis. Installers must ensure that this device must not be co-located or
95
operated in conjunction with any other antenna or transmitter except in accordance with FCC
multi-transmit-ter product procedures.
Page 96

%OXHWRRWKDSSURYDO
%OXHWRRWKDSSURYDOIRU6&$1,$$8667$1'$5'
Bluetooth® Qualified Design
ID Number '
MirrorLink certification
MirrorLink certification for SCANIA AUS4 67$1'$5'
MirrorLink
Qualified DesignDesign
ID Number CLxxxx
CarPlay certification
CarPlay certification for SCANIA AUS4
96
CarPlay
Qualified Design
ID Number CCNPxxxx
 Loading...