

Page 1

MIB Global
ENTRY / STANDARD / STANDARD PLUS
Composition Audio (PQ):
Radio
Status: September 20, 2013
German: April 2015
Part no.: SGB012901CA
SGB012901CA
Page 2
Explanation of symbols
Identifies a reference to a section with
important information and safety notes
in a chapter, which should always be
observed.
This arrow shows that the section
continues on the next page.
This arrow shows the section end.
This symbol identifies situations, in which
the vehicle has to be stopped as quickly
as possible.
® ™ This symbol identifies a trademark. If this
symbol is m is sing, this does not
guarantee that the terms may be used
freely.
· Symbols of this kind re fe r to
warningswithin the same sectionor on
the give n page to point out possible
accident and injury dangers and how
they can be avoided.
· Cross-reference to possible material
damage within the same section or on
the give n page.
DANGER
Texts with this symbol refer to dangerous situations, which will result in death or severe injuries if not noted.
WARNING
Texts with this symbol refer to dangerous situations, which could result in death or severe injuries if not noted.
CAUTION
Texts with this symbol refer to dangerous situations,
which could result in slight or severe injuries if not
noted.
NOTE
Texts with this symbol refer to situations, which could
result in vehicle damage if not noted.
Texts with this symbol contain not es about environmental
p
rotection.
Texts with this symbol contain addi tional information.
Volkswagen AG is continual
development of all types and models. We thank
you for your understanding that changes in the
scope of supply, equipment and technology are
possible at any time as a result. The information
concerning scope of supply, appearance,
performance, dimensions, weight, fuel
consumption, standards and functions of the
vehicl e c orrespond to the informa t ion state at t he
time of going to press. It might only be possible to
deliver some of the equipment later (your local
Volkswagen Partner can provide information ab out
this) or i t m ight only be of f ered in specific markets.
No claims c an be derived from the information,
illust rations or des criptions in these instructions.
ly working on further
Copying, reproduction or translation, even of
excerpts, is not permitted without written consent
of Volkswagen AG.
Volkswagen AG expressly reserves all rights
pursuant to the copyright law. Subject to change
without notice.
Produced in Germany.
© 2014 Volkswagen AG
Printed on paper made of chlorinebleached cellulose.
free
Page 3
User Instructions
1 Homologation- and Certification texts
1.1 Material compliance
The MIB GLOBAL Headunit
(infotainment headunit for vehicular use only) is compliant with the ELV directive (2000/53/EC).
1.2 Declaration of Conformity to EC directive “R&TTE” (1999/5/EC)
Česky [Czech]:
Dansk [Danish]:
Deutsch [German]:
Eesti [Estonian]:
English:
Español [Spanish]:
Ελληνική [Greek]:
Français [French]:
Italiano [Italian]:
Latviski [Latvian]:
Lietuvių [Lithuanian]:
Nederlands [Dutch]:
Malti [Maltese]:
Magyar [Hungarian]:
Polski [Polish]:
Português
[Portuguese]:
Slovensko
[Slovenian]:
Slovensky [Slovak]:
Suomi [Finnish]:
Svenska [Swedish]:
Íslenska (Icelandic):
Norsk [Norwegian]:
HARMAN tímto prohlašuje, že tento MIB GLOBAL Headunit je ve shodě se základními požadavky a
dalšími příslušnými ustanoveními směrnice 1999/5/ES.
Undertegnede HARMAN erklærer herved, at følgende udstyr MIB GLOBAL Headunit overholder de
væsentlige krav og øvrige relevante krav i direktiv 1999/5/EF.
Hiermit erklärt HARMAN, dass sich das Gerät MIB GLOBAL Headunit in Übereinstimmung mit den
grundlegenden Anforderungen und den übrigen
einschlägigen Bestimmungen der Richtlinie 1999/5/EG befindet.
Käesolevaga kinnitab HARMAN seadme MIB GLOBAL Headunit vastavust direktiivi 1999/5/EÜ
põhinõuetele ja nimetatud direktiivist tulenevatele teistele asjakohastele sätetele.
Hereby, HARMAN, declares that this MIB GLOBAL Headunit is in compliance with the essential
requirements and other relevant provisions of Directive 1999/5/EC.
Por medio de la presente HARMAN declara que el MIB GLOBAL Headunit cumple con los requisitos
esenciales y cualesquiera otras disposiciones aplicables o exigibles de la Directiva 1999/5/CE.
ΜΕ ΤΗΝ ΠΑΡΟΥΣΑ HARMAN ∆ΗΛΩΝΕΙ ΟΤΙ MIB GLOBAL Headunit ΣΥΜΜΟΡΦΩΝΕΤΑΙ ΠΡΟΣ ΤΙΣ
ΟΥΣΙΩ∆ΕΙΣ ΑΠΑΙΤΗΣΕΙΣ ΚΑΙ ΤΙΣ ΛΟΙΠΕΣ ΣΧΕΤΙΚΕΣ ∆ΙΑΤΑΞΕΙΣ ΤΗΣ Ο∆ΗΓΙΑΣ 1999/5/ΕΚ.
Par la présente HARMAN déclare que l'appareil MIB GLOBAL Headunit est conforme aux exigences
essentielles et aux autres dispositions pertinentes de la directive 1999/5/CE.
Con la presente HARMAN dichiara che questo MIB GLOBAL Headunit è conforme ai requisiti essenziali
ed alle altre disposizioni pertinenti stabilite dalla direttiva 1999/5/CE.
Ar šo HARMAN deklarē, ka MIB GLOBAL Headunit atbilst Direktīvas 1999/5/EK būtiskajām prasībām un
citiem ar to saistītajiem noteikumiem.
Šiuo HARMAN deklaruoja, kad šis MIB GLOBAL Headunit atitinka esminius reikalavimus ir kitas
1999/5/EB Direktyvos nuostatas.
Hierbij verklaart HARMAN dat het toestel MIB GLOBAL Headunit in overeenstemming is met de
essentiële eisen en de andere relevante bepalingen van richtlijn 1999/5/EG.
Hawnhekk, HARMAN, jiddikjara li dan MIB GLOBAL Headunit jikkonforma mal-ħtiġijiet essenzjali u ma
provvedimenti oħrajn relevanti li hemm fid-Dirrettiva 1999/5/EC.
Alulírott, HARMAN nyilatkozom, hogy a MIB GLOBAL Headunit megfelel a vonatkozó alapvetõ
követelményeknek és az 1999/5/EC irányelv egyéb elõírásainak.
Niniejszym HARMAN oświadcza, że MIB GLOBAL Headunit jest zgodny z zasadniczymi wymogami oraz
pozostałymi stosownymi postanowieniami Dyrektywy 1999/5/EC
HARMAN declara que este MIB GLOBAL Headunit está conforme com os requisitos essenciais e outras
disposições da Directiva 1999/5/CE.
HARMAN izjavlja, da je ta MIB GLOBAL Headunit v skladu z bistvenimi zahtevami in ostalimi
relevantnimi določili direktive 1999/5/ES.
HARMAN týmto vyhlasuje, že MIB GLOBAL Headunit spĺňa základné požiadavky a všetky príslušné
ustanovenia Smernice 1999/5/ES.
HARMAN vakuuttaa täten että MIB GLOBAL Headunit tyyppinen laite on direktiivin 1999/5/EY oleellisten
vaatimusten ja sitä koskevien direktiivin muiden ehtojen mukainen.
Härmed intygar HARMAN att denna MIB GLOBAL Headunit står I överensstämmelse med de väsentliga
egenskapskrav och övriga relevanta bestämmelser som framgår av direktiv 1999/5/EG.
Hér með lýsir HARMAN yfir því að MIB GLOBAL Headunit er í samræmi við grunnkröfur og aðrar kröfur,
sem gerðar eru í tilskipun 1999/5/EC
HARMAN erklærer herved at utstyret MIB GLOBAL Headunit er i samsvar med de grunnleggende krav
og øvrige relevante krav i direktiv 1999/5/EF.
„MIB GLOBAL Headunit“ stands for the variants:
MIB GLOBAL
ENTRY / STANDARD / STANDARD PLUS
USER Instructions - MIB GLOBAL – certification texts 2015-03-10
page 1 of 3
Page 4
User Instructions
USER Instructions
- MIB GLOBAL
– certification texts
2015-03-10
1.3 FCC statements (North America)
(§15.19)
"This device complies with Part 15 of the FCC Rules. Operation is subject to the
following two conditions:
(1) this device may not cause harmful interference, and
(2) this device must accept any interference received, including interference that may
cause undesired operation”
and (§15.21)
“CAUTION TO USERS” / “FCC WARNING”
“Changes or modifications not expressly approved by the party responsible for
compliance could void the user's authority to operate the equipment “
This device complies with FCC radiation exposure limits set forth for an uncontrolled environment and
meets the FCC radio frequency (RF) Exposure Guidelines.
This equipment has been tested and found to comply with the limits for a Class B digital device, pursuant to
part 15 of the FCC Rules. These limits are designed to provide reasonable protection against harmful
interference in a residential installation. This equipment generates, uses and can radiate radio frequency
energy and, if not installed and used in accordance with the instructions, may cause harmful interference to
radio communications. However, there is no guarantee that interference will not occur in a particular
installation. If this equipment does cause harmful interference to radio or television reception, which can be
determined by turning the equipment off and on, the user is encouraged to try to correct the interference by
one or more of the following measures:
- Reorient or relocate the receiving antenna.
- Increase the separation between the equipment and receiver.
- Connect the equipment into an outlet on a circuit different from that to which the receiver is
connected.
- Consult the dealer or an experienced radio/TV technician for help.
1.4 Industry Canada (IC) statement
This Class B digital apparatus complies with Canadian ICES-003.
Cet appareil numérique de la classe B est conforme à la norme NMB-003 du Canada.
Le présent appareil est conforme aux CNR d'Industrie Canada applicables aux appareils radio exempts de
licence. L'exploitation est autorisée aux deux conditions suivantes:
(1) l'appareil ne doit pas produire de brouillage, et
(2) l'utilisateur de l'appareil doit accepter tout brouillage radioélectrique subi, même si le brouillage est
susceptible d'en compromettre le fonctionnement.
1.5 Brasil
“Este equipamento opera em caráter secundário, isto é, não tem direito a proteção contra interferência
prejudicial, mesmo de estações do mesmo tipo, e não pode causar interferência a sistemas operando em
caráter primário.”
Page 5

User Instructions
USER Instructions
- MIB GLOBAL
– certification texts
2015-03-10
1.6 Mexico
For equipment subject to the NOM-121 (spread spectrum devices) it is necessary to follow the next
indications:
'Para cumplimiento de la Cofetel:
La operación de este equipo está sujeta a las siguientes dos condiciones:
(1) es posible que este equipo o dispositivo no cause interferencia perjudicial y
(2) este equipo o dispositivo debe aceptar cualquier interferencia, incluyendo la que pueda causar su
operación no deseada”
1.7 Taiwan
本產品符合低功率電波輻射性電機管理辦法 第十二條、第十四條等條文規定
1.
經型式認證合格之低功率射頻電機,非經許可,公司、商號或使用者均不得擅自變更頻率、加大功率或變更
原設計之特性及功能。
2.
低功率射頻電機之使用不得影響飛航安全及干擾合法通信;經發現有干擾現象時,應立即停用,並改善至無
干擾時方得繼續使用。
前項合法通信,指依電信法規定作業之無線電通信。
低功率射頻電機須忍受合法通信或工業、科學及醫療用電波輻射性電機設備之干擾。
本模組於取得認證後將依規定於模組本體標示審驗合格標籤,並要
求最終產品平台廠商(OEM Integrator)於最終產品平台
(End Product)上標示” 本產品內含射頻模組,其NCC 型式認證號碼
為:CCXXxxYYyyyZzW
1.8 Thailand
This telecommunication equipment conforms to NBTC technical requirement!
1.9 United Arabian Emirates
TRA
REGISTERED No.:
XXXXXX/XX
DEALER No.:
0028019/10
Page 6

SGB012901CA
Contents
About these instructions ................. 2
Function description ......................... 3
Introduction
– Before initial use
– Safety notes ........................................... 3
– Overview of control elements .................... 5
– Basic operating principles ......................... 7
Audio and media mode
– Radio mode
– Media mode ......................................... 14
..................................... 3
.......................................... 10
Phone control (PHONE)
– Introduction to phone control
– Description of phone control ................... 27
Settings
– Menu and system settings
(SETUP)
.............................................. 31
................... 23
Abbreviations used ......................... 34
Index .................................................... 35
Table of contents 1
SGB012901CA
Page 7

About these Instructions
● You can find an alphabetical index at the end of
the instructions.
● An abbreviation index explains technical
abbreviations and designations.
● Direction information normally refer t o the
travel d irection.
● Illustrations serve for orientation and are to be
understood as depictions of principles.
They describe all equipment and models without
entifying them as special equipment or model
id
variants. As a result, equipment can be described,
which your vehicle might not have. Your local
Volkswagen partner can provide more detailed
information about this.
All information in t hese instructions correspond to
th
e information state at the time of going to press
and only apply to devices built-in ex-works. Due to
the on-going further development of devices and
possible upgrades in device software, deviations
between device displays and function and the
information in these instructions are possible. No
claims can be derived from information, illustrations
or descr iptions differing in these instructions.
If you want to sell or lend the vehicle, please ensure
that these instructions are in the vehicle and that the
data and files saved in the device are deleted.
2 About these Instructions
Page 8
SGB012901CA
Description of functions
Introduction
Before initial use
Checklist
Before initial use, you should carry out the following steps to operate the device safely and be able to use the complete
scope of the provided functions:
Observe basic safety notes ⇒Page 3.
Become familiar with the overview of control elements⇒Page 5.
Reset the device system and function settings to the ex-works state⇒Page 31.
Only use appropriate data carriers fo r media mo de
⇒Page 14.
Safety notes
WARNING
If the driver is distracted, this can cause accidents and injuries. Operating the radio system, a cellphone or phoning can distract from traffic conditions.
● Always drive attentively and
responsibly.
● Only connect, insert or withdraw data
carriers in a standing vehicle at a safe
distance from traffic.
● Select loudspeaker levels so that acoustic
signals from outside can be heard well at an
t
ime, e. g., the siren of rescue services
Com
ply with legal regulations.
● A too-high volume can damage hearing.
This also applies in the case of high
volumes of brief duration.
.
WARNING
At operation of a cellphone or radio device
without connection to an external antenna,
the limiting value for electromagnetic
radiation can be exceeded in the vehicle and
consequently endanger the healt h of driver
and passengers. This also applies if an
exterior antenna is not installed properly.
WARNING (continuation)
● Keep a minimum distance of 20 centimeters between antenna of a cellphone and an active medical implant, e.g., a cardiac pacemaker, because cellphones can negatively influence the func ti on of ac ti v e medical implants.
● Do not keep a cellphone directly adjacent
to an active medical implant or directly above
it, e.g., in your chest pocket.
● If you suspect that a cellphone is interring
with an active medical implant or other
y
medical d evice, swit ch it off immediately.
WARNING
Unattached or incorrectly secured external
devices, e. g., cellphones, ca n be thrown
about the vehicle interior at a sudden
braking maneuver or accident and cause
injuries. Never arrange or atta c h external
devices on the doors, the front windshield,
above or near the area marked "AIRBAG"
on the steering wheel, the dashboard, seat
backs or between these areas and
passengers. External devices can result in
severe injuries in the case of accidents,
especially when the airbags open.
Introduction 3
Page 9
WARNING
Connection lines of external devices can hinder the driver.
● Lay connecti on lines, so that the driver is
not hindere
d.
WARNING
A too-high volume can damage hearing.
This also applies in the case of high
volumes of brief duration.
WARNING
Sudden loudness changes can occur at
change or connection of an audio source.
● Reduce the volume level before you
change or connect an audio source.
WARNING
An armrest can hinder the freedom of
movement of a driver and consequently
cause accidents and severe injuries.
● Always keep armrests closed during
rides.
WARNING
When the housing of a CD player is opened,
injuries can be caused due to invisible laser
beams.
● Only have CD players repaired by a
specialist company.
NOTE
In areas of no or deficient cellphone netw ork
supply and possibly in tunnels, garage s and
undergrounds passageways, a phone call
might be interrupted and it might be impossible
to reestablish connection – including any
emergency calls!
NOTE
● A cellphone must always be swi tched off in environments with special regula ti ons a nd if the use of cellphones is prohibited.
NO
TE (continuation)
The radiation emitted from a switchedoncellphone can interfere with sensitive
technical and medical devices, which can
result in malfunction or damage to the device.
● High speeds, poor weather and road
conditions as well as network quali t y ca
hi
nder or interrupt a phone call in a vehicle.
n
NOTE
Incorrect insertion of a data carrier or an
unsuitable data carrier can damage the
device.
● Pay attention to the correct insertion
position ⇒Page 14 .
● Strong pressing can destroy the lock in
the SD card slot.
● Only use suitable SD cards.
● Always insert or withdraw CDs edgewise at
a right angle to the device front without
bending them and consequently scra tchi
t
hem. ⇒Page 14.
● Inserting a second CD when there is
already one inserted or is being ejecte d ca
de
stroy the CD drive. Always wait until the
data carrier has been ejected completely!
ng
n
NOTE
Foreign particles sticki ng to a data carr ie r a nd
data carriers that are not round can damage the
CD drive.
● Only use clean 12 cm standard CDs!
– Do not glue any stickers or similar
things onto a data carrier. Stickers can
detach from and damage the drive.
– Do not use any imprinted data carriers.
Layers and imprints can detach a
mage the CD drive.
da
– Do not insert any 8 cm single CDs or
non-circular CDs (shape CDs).
– Do not insert any DVD plus, dual disc or
flip disc, because these are thicker than
normal CDs.
nd
NOTE
The vehicle loudspeakers can be damaged by too
loud or distorted playback.
OTE (continua ti o n)
N
4 Function descr i pt i o n
Page 10
SGB012901CA
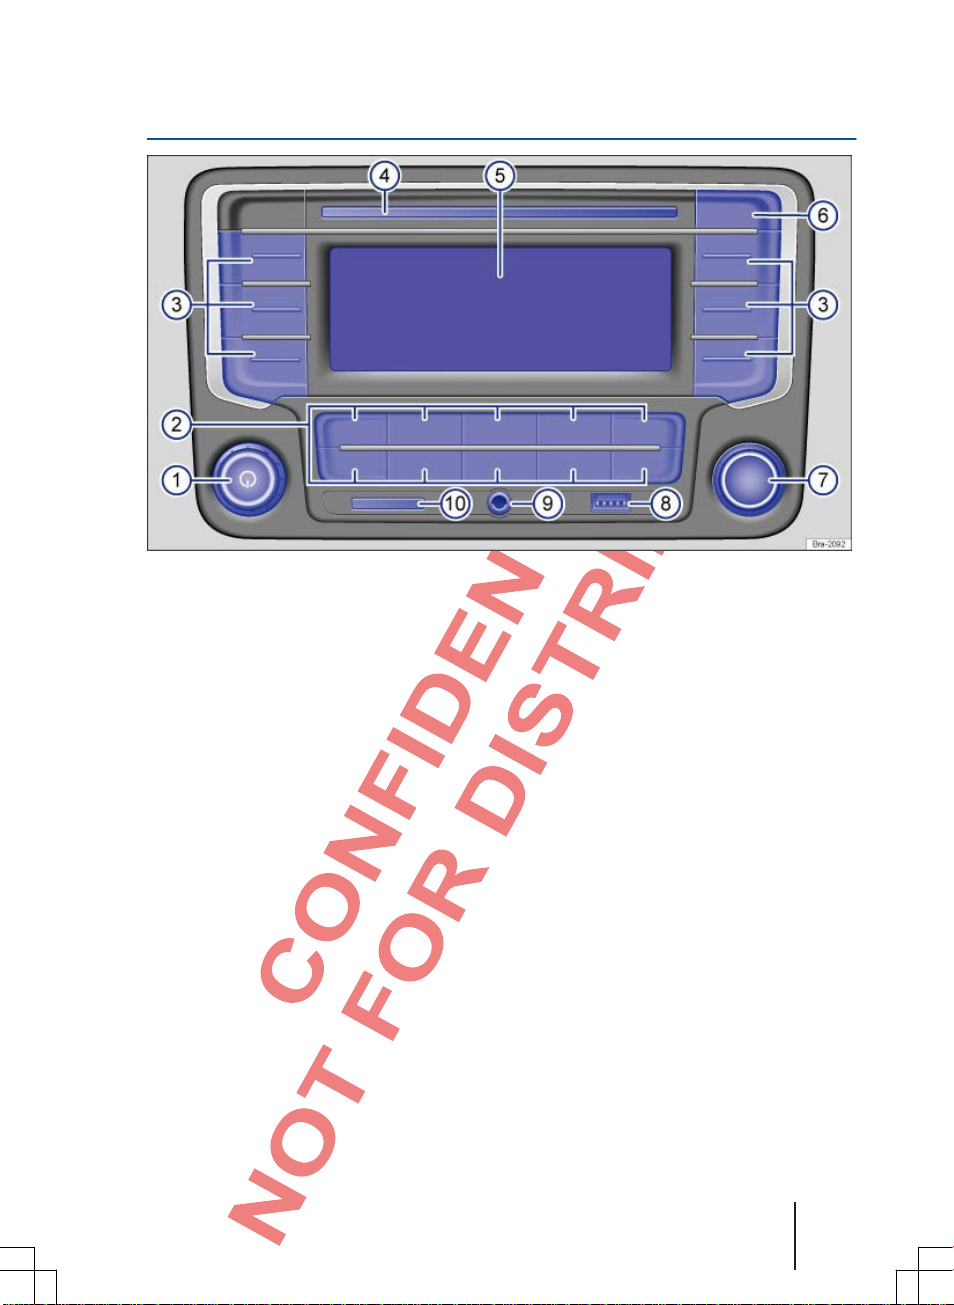
Overview of control elements
Fig. 1 Overview of control elements.
The device is supplied in different models, which can have different labeling and functions of device
uttons.
b
1
Rot ar y and pus h but t on:
– To switch on or off, press ⇒Page 7.
– To change the volume, rotate ⇒ Page 7.
2
Device buttons: To call a function area, press.
PHONE : Open phone function
–
LIST : Open station list in radio mode
–
⇒Page 14.
and : Arrow keys also affect the currently active audio source.
–
: Switch sub-menus step-by-step back to the main menu or undo entries made .
–
FM : Switch to FM radio mode. Switch to display of the station keys in FM radio modes
–
⇒Page 10.
AM : Switch to AM radio mode. Switch to display of the station keys in AM radio modes
–
⇒Page 10
MEDIA : Switch to med i a mode. In med i a mode, swi tch to another me d i a source
–
⇒Page 14.
MUTE : The current audio source is muted
–
SETUP : Open system and function settings
–
3
Function keys: The function depends on the respective operating state. To execute the respective
function, press ⇒Page 7.
4
CD drive: For inserting and ejecting CDs ⇒Page 14.
5
Screen: You can adjust the bright ness ⇒Page 31.
: Eject CD ⇒Page 14.
6
⇒Page 23.
⇒Page 10. Open song list in media mode
⇒Page 8.
⇒Page 31.
Introduction 5
Page 11

7
Adjustment knob: The function depends on the res pective oper ating state.
– In all radio operating types for manual station or channel setting, rotate and press for starting
and stopping the intro check (SCAN).⇒Page 10.
– In media mode for opening the song list, rotate ⇒Page 14.
– To mark menu items in long lists, rotate and press to call the ma rked item, e . g., station se lection
from station list.
– To change your own settings, rotate, e. g., volume adjustment (GALA).
8
USB connection: For connecting external data carriers ⇒Page 14.
9
AUXIN multimedia jack: For connecting external audio sources ⇒Page 14.
10 SD card slot: To insert S D cards ⇒Page 14. Insert SD card with the cut-off corner first and with the
label face up (contact area face down) carefully into the slot.
6 Function descr i pt i o n
Page 12
SGB012901CA
Basic operating principles
Topic introduction
You can find information about the following
specific to p ics in this ch a pter:
Rotary and push buttons, device and
function keys ......................................................
Switch on or off ................................................... 7
Change the basic volume ................................... 8
Additional displays and display options
Screen displays can vary due to setting changes,
and
the device can behave in part differently
from the descriptio n in these instructions.
Station, song change and volume settings can
also be made via the multifunction steering
wheel dependent on the vehicle ⇒Manual
Operating instructions.
................. 9
7
Supplementary information and warnings:
● Safety notes ⇒Page 3
● Overview of c ontrol elements ⇒Page 5
Rotary and push buttons, device a n d fu n ction keys
Due to market-specific device software,
possibly not alllisted displays and functions
are available. The lack of a function is not a
device d efect.
Due to national legal requirements, a few
fu
nctions can no longer be selected starting
from a specific speed.
Using a cellphone i
noise in loudspeakers.
In a few vehicles with ParkPilot, the volume
of
the current audio source is reduced
automatically when the reverse gear is
engaged.
n the vehicle can cause
First read and observe the safety
notes on page 3 and the introducto ry
information on page 7.
Rotary and push buttons
The left rotary and push button
⇒Fig. 1
on and off switch.
The right rotary and push button
⇒Fig. 1
1 is designated a v olume control or
7 is designated as s etting button.
Device buttons
The labeled buttons on the device are designated
as "device buttons" and displayed by a button
symbol with blue contents, e. g., device button
MEDIA ⇒Fig. 1 2 .
On/off switching
First read and observe the safety noteson page 3 and the intr oduc tor y information on page 7.
You operate device buttons by pressing or
olding down.
h
Function keys
There are six keys not labeled next to the screen.
⇒Fig. 1
keys", because their function changes t
c
Which function is assigned to a function key
is displayed on the screen directly next t
t
To switch the device on or off manually,
⇒ Fi
button for short time.
3 . These keys are called "funct ion
urrent operating state correspondingly.
he respective key.
1 press the rotary or push
g. 1
Introduction 7
he
o
Page 13

After st a rt-up, the system starts with the most
recently set volume if this does not exceed the
default maximum volume when it is switched on.
⇒Page 31.
Dependent on the country and device, the device
is switched off automatically when t he engine is
turned off or the vehicle key is removed from the
ignition lock. When t he device is switched on
again, it is switched off again automatically after
approx. 30 minutes (timeout).
Energy management
If batte ry voltage decreases below the minimum
on-board voltage supply with ignition switched
off, an alarm sounds and
displayed. The device should be switche d of f.
If the battery voltage decreases further,
is displayed for a short time, and the device
switches off automatically.
LOW BATTERY is
RADIO OFF
Anti-theft encoding
Dependent on the country and device, the device
is protected against theft and unauthorized use
by a security code.
The security code of anti-theft encoding remains
saved in the vehicle af ter initial entry (comf ort
radio encoding). If the anti-theft encoding must be
canceled manually, e.g., when the device is
installed in a different vehicle, please contact a
Volkswagen Partner.
If the vehicle battery is disconnected, switch on the
ignition before you switch the device on again.
Change the basic volume
First read and observe the safety notes on page 3 and the introductory information on page 7.
Volume changes are displayed on the screen by a
"ba
r". The device is blocked against operation
during that time.
Increase, reduce or mute the volume
lume control ⇒ Fig. 1 Rotate clockwise.
Vo
OR
ess the
Increase th e volume
Decrease the volume
Mute
If the basic volume was increased greatly for
an
audio source, reduce the volume before
you switch to another audio source.
: Pr
⇒Manual Operatin g instructions.
Volume co ntrol
button on the multifunction steering wheel ⇒ Manual Operating
instructions.
Volume co ntrol
g. 1 Rotate counterclockwise until
⇒Fi
OR: Press the
When the device is muted, the currently played media source is
is displayed on the screen.
paused.
A few volume settings and adjustments can be set
as default values Page 31.
⇒
button on the multifunction steering wheel
⇒ Fi
g. 1 Rotate counterclockwise. OR: Press the
is displayed.
MUTE dev ice button.
8 Function descr i pt i o n
Page 14

SGB012901CA
Additional displays and display options
Fi
rst read and observe the safety notes
on page 3 and the introductory in formation
on page 7.
All displays can only be shown after the
co
mplete system st art of the radi o.
Vehicle-dependent, changes to climate settings or
displays o f d r iver assistance systems built-in exworks are shown on the screen temporarily. The
displays are closed automatically when they are no
longer required for support.
With a few devices, the current time can also be
displayed in the status line of the screen. The
station or song display is then displayed above
or below it.
Introduction 9
Page 15

Audio and media mode
Radio mode
Topic introduction
You can find information about the following
topics in this chapter:
Radio main menu ............................................... 10
Statio n list 11 ..................................................... 11
Select, set and store station ............................... 11
Intro check (SCAN)13 ........................................ 13
The radio system is supplied in various models
dep
endent on the country and equipment. All
possible device models are listed in the overview
of control elements ⇒Fig. 1.
The retrieval of radio mode and control are
dependent on the device in part.
Radio main menu
Fig. 2 RADIO main menu.
First read and observe the safety
s on page 3 and th e introductory
note
information on page 10.
Press
FM or AM device button to start radio mode
in the respective frequency range.
The currently set station is displayed in the
middle of the screen. ⇒Fig . 2.
The screen area on the side shows the station
frequency, with which the respective station
button next to it is assigned. Cf. ⇒Page 11,
Select, set and store station.
Supplementary information and warnings:
● Safety notes
● ⇒Page 3
● Overvie w of control elements
● ⇒Page 5
● Basic ope rating prin ciples
● ⇒Page 7
Parking garages, tunnels, high buildings
or mountains can interfere with reception
of a radio signal.
Foil or metal-co
hinder reception in vehicles with glass-mount
antennas.
If RDS is av ailable, the station name can be
displayed in addition to the station frequency
ated stickers on windows can
1 .
Switch the frequency range and memory level
The currently selected frequency range w ith memory
level is displayed below the station display
The respe ctive frequency range is called when
you press the device button
You switch the memory levels of the r e spective
frequency range when you repeatedly press the
device b ut ton
Frequency range: Memory levels
:
FM
AM:
FM or AM .
FM 1, FM 2.
AM 1, AM 2.
FM or AM .
2 (FM 1).
10 Function descr i pt i o n
Page 16

Press the or device button for
SGB012901CA
Station list
Fig. 3 Radio mode: Station list (FM).
First read and observe the safety notes on page 3 and the introductory information on page 10.
All stations are displayed, whic h can currently be
ceived in the selected frequency range.
re
Open station list.
● Press the LIST device button to open the
station list ⇒Fig. 3.
Select, set and save station
Close station list
● Press the LIST device button to close the
station list.
If not operated, the station list is closed
tomaticall y after so me time.
au
Displays and symbols in the station list
⇒Fig. 3 Di splay: M eaning
1 Display of the selected frequency range
2 Currently broadcasted station.
3 Update display: Update the station list.
4
5 Scroll bars are only displayed if more than
FM station list).
(e. g.,
FM2M4: Display of a saved station.
The displayed station is saved on
the memory level FM2 on function key 4.
three stations are received.
Fig. 4 Radio mode: Frequency range FM1. Fig. 5 Radio mode: Station list (FM).
First read and observe the safety
note
introductory informati on on page 10.
Select the desired frequency range ⇒Page 10
Select station
Function
Select station via arrow keys
/
s on page 3 and the
Handling
short time.
Corresponding to the setting for the arrow keys, there is a switch
between saved stations and receivable stations. Setting for the arrow
A saved st ation can only be played if it c an be
received at the current location.
.
Audio and media mode 11
Page 17

Function Handling
Press the
adjustment knob to search through the list and press to select the desired
station.
Select a station from the station
list.
Press the
automati ca l l y after som e time.
LIST device button to open the station list ⇒Fig. 5. Rotate the
device button to close the station list. If not operated, the station list is closed
Select a sav ed station on t he
Press the function key next to the saved station frequency for short time.
s
tation buttons.
Set station frequency manually
Function Handling
Change frequency incrementally. Rotate adjustment knob.
Go through the frequency
range quickly.
Keep the device button
next receivable stati o n is set auto matically.
Store a station manually
Function Handling
Select a frequency range and memory level ⇒Page 10. Select a
station.
Keep the desired function key pressed down until a signal sounds.
Store a station manually on
station buttons.
The currently heard station is saved on this function key. A station
saved on a function key is shown by a white frame ⇒Fig. 4
Storing a station on an already assigned function key deletes the
station saved previously on it.
Press the
LIST device button for a short time to open the
station list.
Stations already saved on a station button are identified in the station
Store a station from the
tation li s t on a station bu t ton.
s
list (e. g., ⇒Fig. 5
memory level FM1 on func tion key 1.
Rotate the adjustment knob to search through the list and press to
FM1M1). The displayed station is saved on the
select t he desired st ation.
Press the
device button to close the station list. Keep the desired
function key pressed down until a signal sounds. The currently heard
station is saved on this function key.
or pressed down. After you release it, the
1 .
Store a station automatically (AUTOSAVE)
Using the Autosave function, the s trongest r eceived stations are automatically saved on the station
buttons on memory level
Function Ha
FM 1/FM 2 or AM 1/AM 2.
ndling
Select desired frequency range ⇒Page 10.
Store a station autom atically
on station buttons.
12 Function de scr iption
Keep device button
Storing automatically is displayed on the screen during the
storing process. This process can take a few seconds.
If no receivable station is found, the message
middle of the screen.
FM or AM pressed down for approx. five seconds and then release it.
No Stations available appears in the
Page 18

SGB012901CA
Intro check (SCAN)
Fig. 6 Radio mode: Intro check (SCAN).
read and observe the safety
First
notes on page 3 and the
introductory information on page 10.
If the Intro check is running, all receivable stations in
t
he current frequency range are played for approx.
five secon ds.
Select the desired frequency range
⇒Page 10.
Function Ha
Start the Intro check. Press the adjustment knob briefly.
End the Intro check.
a)
The Scan display blinks device-independent while the Intro check is active.
ndling
Scana) is displayed on the screen
⇒Fig. 6
The Intro check is also stopped if a station is selected manually
via the st ation butto ns .
1 .
Press the adjustment knob again.
Audio and media mode 13
Page 19

Media mode
Topic introduction
You can find information about the following
specific to p ics in this ch a pter:
Requirements of media sources and
Playback sequence of audio data carriers
MEDIA main menu ............................................ 16
Switch media source ......................................... 17
Manual song switch ........................................... 17
Folder and song selection from list ..................... 18
Switch display mode ........................................... 18
Switch playback mode (M IX, REPEAT) 19
Insert or e ject CD ............................................... 19
Insert or withdraw SD card ................................ 20
External audio source on multimedia jack
AUXIN ............................................................... 20
Connect external audio source, data carrier or
iPod™ to USB .................................................... 21
Connect external audio source via Bluetooth
.......................................................................... 21
The following audio sources are called "media
sources" in the following; they are found on
different data carriers, e. g., CD, or external MP3
player, which contain audio files. These audio
files can be played via the corresponding drives
or audio inputs of the radio system (internal CD
drive, USB port, Bluetooth
multimedia jack AUXIN).
audio files ... 14
........... 16
®
® interf ace or
Copyright
Audio and video files saved on data carriers are
normally subject to copyright protection pursuant
to the respectively applicable international and
national regulations. Comply with legal
regulations!
Supplementary information and warnings:
● Safety no tes ⇒Page 3
● Overview of control elements ⇒Page 5
● Basic ope rating prin ciples ⇒ Page 7
This product is protected by specific
industrial property rights and copyright of
Microsoft Corporation. The use or distribution
of such technology external to this product
and without a license from Microsoft or an
authorized Microsoft branch is prohibited.
Requirements of media sources and audio files
First read and observe the safety notes on page 3 and the introductory informati on on page 14.
Ex-w
orks built-in CD players correspond to safety
class 1 according to DIN IEC 76 (CO) 6/ VDE 0837.
14 Function de scr iption
Only 12 cm standard CDs may be inserted into
t
he device.
The listed, playable file formats are hereafter
collectively call ed "audio files". A CD with s uch an
audio file is called an "audio data CD".
Page 20

SGB012901CA
Media source Requirements for playing
Audio CD (up to 80 min). – CD digital audio specification.
CDROM, CDR, CDRW audio data
CD to max. 700 MB (megabyte)
accordi ng to ISO 9660, U D F or in Joliet
file system.
– MP3 files (.mp3) with bit rates of 48 to 320 kbit/s or
variable bit rates.
– WMA files (.wma) to 9.2 mono/stereo to 192 kbit/s without
copy protection.
– Playlists in PLS and M3U formats.
– Playlists not bigger than 20 kB and with no more than 25
inks.
l
– Max. 32 playlists on one data carrier.
– Max. 256 folders and max. 512 files on one data carrier.
– Folder trees with maximum eight levels.
0
USB storage media in file system
T32.
FA
SD memory cards in file system
FAT12, FAT16, FAT32 or VFAT to
max. 2 GB (gigabyte) and SDHC
memory cars to max. 32 G B (SD
®
and SDHC®)a).
– MP3 files (.mp3) with bit rates of 48 to 320 kbit/s or
variable bit rates.
– WMA files (.wma) to 9.2 mono/stereo to 192 kbit/s without
copy protection.
– Playlists in PLS and M3U formats.
– Playlists not bigger than 20 kB and with no more than 250
links.
– Max. 32 playlists on one data carrier.
– Max. 1024 folders and max. 65,535 files on one dat
arrier.
c
– Folder trees with max. eight levels.
– Max. size of a single file in FAT32 file system 4 GB.
Playback of audio files vi
Bluetooth
®b).
Playback of external audio sources via
UXIN multimedia jack.
A
Playback of external audio sources via
USB connection.
a)
SD®, SDHC® and SDXC® are brands or registered trademarks of SD 3C, LLC in the USA and/or other countries.
b)
Bluetooth® is a registered trademark of Bluetooth SIG, Inc.
Restrictions and notes
Soiling, high temperatures and mechanical
damages can make a data carrier unusable.
Pay attention to the n otes of the dat a c arrier
manufacturer.
Quality differences between data carriers from
different manufacturers can result in malfunctions
during playback.
Observe legal regulations concerning copyrights!
Ds are not played when they are recorded in
DirectCD format. Pay attention to the format
under Windows
®.
a
– The external audio source must support the A2DP or
AVRCP Bluetooth
® profile V 1.3 and be coupled with the
radio ⇒Page 21.
– 3.5 mm jack plug connectible for audio output ⇒Page 20.
– USB media source connectible for audio output ⇒Page 21.
You can find information about how audio files
a
nd data carriers are best created (compressions
rate, ID3 tag, etc.) in the Internet , fo r example.
Reading a data carrier with compressed audio
files (MP3 , WMA, etc.) takes longer due to the
larger data volume than the reading of a "normal"
audio CD. Complex folder trees can delay reading
additionally.
Playlists only set one specific playback sequence.
No files are saved in play lists. Play lists are not
played if the files are not saved there on the data
carrier where the playlist references (relative path
information).
The configuration of a data carrier or devices and
programs used for recording can result in the
impossibility to read individual songs or the data
carrier.
a
Audio and media mode 15
Page 21

Playback sequence of audio data carriers
Sub-folders are handled like folders and
numbered correspondingly in the sequence on
the data carrier.
Figure ⇒Fig. 7 shows a typical MP3 CD as an
example, which contains song
sub-folder.
The song and folder of this CD are consequently played and di
the following order:
1. S
2. Song
3. Song
4. Song
5. Song
g. 7 Possible structure of an MP3 CD.
Fi
First read and observe the safety
es on pa ge 3 and the
not
introductory informati on on page 14.
On a data ca rr
via file folders and playlists to set a specific
playback sequence.
Song, folders and playlists are sorted numerically
and alphabetically corresponding to their names
on the data carrier.
ier, audio files are often s o rted
6. Song
, folder
ong 1 and 2 in root directory (ROOT) of the CD.
3 and 4 in first folder F1 in the root
directory of the CD (display:
5 in first sub-folder F1.1 of the
folder F1 (display:
6 in firstsub-folder F1.1.1 of the
sub-folder F1.1 (display:
7 in second sub-folder F1.2 of the
folder F1 (display:
8 and 9 in second folder F2
(display:
05).
The playback sequence can be changed via
s
election of different playback modes
(REPEAT, MIX) ⇒Page 19.
02).
04).
01).
03).
and
splayed in
MEDIA main menu
Fig. 8 MEDIA main menu.
First read and observe the s
noteson page 3 and the introductory
information on page 14.
You can select and control different media
s
ources in media mode.
16 Function de scr iption
afety
ress the MEDIA device button to switch to
● P
media mode.
If the most recently played media source is still
ailable, playback of this media source is continued
av
automatically.
In running media mode, the selected media source is
always displayed in the bottom screen line
.
⇒Fig. 9
5
Page 22

SGB012901CA
®
Possible disp l ays in media mode
⇒Fig. 8 Di splay: M eaning
1
Song, album, artist, etc. Cf.
⇒Page 18, Switch display mode.
2
Song name.
3
Song playing time in minutes and seconds.
4
Mix and Repeat playback mode.
Cf.⇒Page 19, Switch playback
mode(MIX, REPEAT).
5 Currently selected media source.
Switch media source
Fig. 9 M
edia mode: selection menu.
First read and observe the safety
not
es on page 3 and the introductory
information on page 14.
Select media source
● In the MEDIA main menu, press the MEDIA
device b ut ton again to s how the selection menu
⇒Fig. 8.
● The selectable media sources are displayed i
t
he side areas of the screen. In a few operating
states, e. g., while t he device is re ading a media
source, no media sources can be selected.
● Press the function key next to the respective
display
⇒Fig. 8 for a short time to select the desired
media source.
⇒Fig. 9 Available media sources
CD A udio CD or audio data CD in int ernal
CD drive⇒Page 19.
SD SD card in internal SD card slot
⇒Page 20.
USB USB stick or iPod in internal
USB connection ⇒Page 21.
AUX External audio source on the
multimedia jack AUXIN ⇒Page 20.
BTA External audio source via Bluetooth
Audio source connected ⇒Page 21.
n
®
Manual song switch
First read and observe the safety
notes on page 3 and the
introductory information on page 14.
You can switch through the songs of the media
s
ources heard.
playback sequence of audio data
Note the
carries ⇒Page 16.
Switch throu gh the songs one after anot her
Press the
●
or device button.
Audio and media mode 17
Page 23

Handling effect
Press the
Press the
Keep the
Keep the
device button once for short time. At the start of the current song. If the song duration is fewer
than three seconds, there is a switch to the start of the
previous song.
device button once for short time. To the next song. There is a switch from the last song to the
first song of the data carrier played.
devic e button pres sed down. Fast rewind.
devic e button pres sed down. Fast forward.
Folder and song selection from list
Fig. 10 Media mode: Song list of a media source.
First read and observe the safety notes
ge 3 and the introductory
on pa
information on page 14.
Open the folder and song list
● Press the LIST device button to open the song
list.
● OR: Rotate adjustment knob.
● Rotate the adjustment knob to scroll
through the list.
● Press the adjustment knob for a short time to
open a folder or play a song.
● Press the
select a superordinate level.
device butto n fo r a short ti me to
Close the folder and song list
● Press the LIST dev ice button aga in.
● OR: Press the
● OR: Do not make any settings for longer than
approx. one minute.
MEDIA device button.
Displays and symbols in the folder and song
list
⇒Fig. 10 Di spla y: Meaning
1 Display of the position in the directory
of the media sou rce.
2 : Currently played song.
3 : Displays a superordinate folder.
4 : Playlist.
5 Scroll bars are only displayed if more than
three songs, folders or playlists exist.
Switch display mode
Fig. 11 Media mode: Switch display mode.
18 Function de scr iption
First read and observe the sa fety
es on page 3 and the
not
introductory information on page 14.
Additional information, which audio files contain
(
CD text , ID3 tag with MP3 files), can be
displayed in this screen.
⇒Fig. 11.
Page 24

SGB012901CA
When ther e are audio CDs without CD text, only
TRACK and the song number corresponding to the
sequence on the data carrier are displayed in the
middle screen line.
Switch playback mode (MIX, REPEAT)
Fi
g. 12 Media mode: Switch playback mode.
First read and observe the safety
es on page 3 and the
not
introductory informati on on page 14.
Note the playback sequence of files and folders
⇒P
age 16.
MIX (shuffle) playback mode
● Press the function key next to the display
⇒Fig. 12 1. The activated function is
displayed by a frame around the symbol.
Press the function key next to the
to display the existing information.
Display: Meaning
Random playback of all songs in the current
folder and sub-folder.
Info 1 display
REPEAT playback mode
● Press the function key next to the display 2
again to select the corresponding playback mode.
The activated function is displayed by a frame
around the symbol.
Display: Meaning
ll songs are repeated after they have been
A
played once.
Current song is repeated.
Insert or eject CD
First read and observe the safety notes
on page 3 and the introductory
information on page 14.
The internal CD drive can play both audio CDs
a
nd audio data CDs.
When ther e are audio CDs without CD text, only
TRACK and the song number corresponding to the
sequence on the data carrier are displayed in the
middle screen line. Additional information, which
audio files contain (CD text , ID3 tag with MP3
files), can be displayed in this screen.
⇒Page 18, Switch display mode.
Insert CD
● Hold the CD with the imprinted side up.
● Only inser t t he CD into the CD s lot until it is
drawn in automatically.
● Playback starts automaticall y after insert ion.
Eject CD
With convertibles and dependent on the country,
the car key m ust be in the ign ition for CD ejection
(anti-theft protection).
● P
ress the device button.
● The inserted CD is moved to the output position
and must be removed within approx. 10 seconds.
Audio and media mode 19
Page 25

If the CD is not removed within approx. 10 seconds,
it is drawn in again for security reasons without the
CD being played ag ai n.
CD not readable or defect
If the data on an inserted CD cannot be read or the
CD is defect, a corresponding note is displayed on
the screen.
On bad roads and when there are severe
v
ibrations, playback jumps can occur.
Insert or withdraw SD card
If the int ernal temperature of the device is too high, no CDs are
acceptedor played anymore.
ERROR is displayed after insertion of different
If
CDs, consult a specialist company.
First read and observe the safety
notes on page 3 and the
introductory informati on on page 14.
The SD card slot is on the front of the device.
10 .
ig. 1
⇒F
Only audio files, which can be played, are
displayed and played. Other files are ignored.
An inserted SD card is shown by a
bottom screen line.
in the
Insert SC card
● Insert compatible SD card with the cut-off
corner first and with the imprinting face up
(contact area face down) carefully into the SD
card slot until it catches.
If you cannot insert an SD card, check the insertion
osition and SD card.
p
Playback starts automatically if audio files are saved
nd readable on the SD card.
a
Withdraw SC card
● Press the inserted SD card. The SD card
"jumps " i nto the outpu t position.
● Withdraw SC card.
SD card cannot be read
When an SD card is inserted, the data of which cannot
be read, there is no switch to playing the SD card after
the loading process.
A corresponding message appears.
External audio source on multimedia jack AUXIN
First read and observe the safety notes on page 3 and the introductory information on page 14.
The multimedia jack AUXIN is on the front of the
evice
d
⇒Fig. 1
3.
The connected external audio source is played
over the vehicle loudspeakers and cannot be
controlled via the radio system.
A connected external audio source is
displayed by
9 and can only be connected us ing a
5 mm jack plug.
AUX on the screen.
External audio source on multimedia jack Connect AUXIN
● Connect external audio source on multimedia
jack AUXIN.
● Reduce basic volume of radio system.
● Start playback of the external audio source.
The p
layback volume of the external audio source
should be adjusted to the volume of the other audio
sources ⇒Page 31.
20 Function de scr iption
Page 26

SGB012901CA
Special features at operation of an external audio source via the multimedia jack AUXIN
Handling effect
Selection of another audio source on the radio
system.
Ending playback of an external audio source.
External audio source continues to run in the background.
The device remains in t he
AUX menu.
Pulling out the plug of the multimedia jack AUXIN.
Read and observ
of the manufacturer of the external audio
source.
e the operating instructions
The device switches to playback of the last played
audio source.
If the external audio source is operated via the
12 volt plug of the vehicle, interference
noise is possible.
Connect external audio source, data carrier or iPod™ to a USB
First read and observe the safety notes on page 3 and the introductory informati on on page 14.
The USB connection is on t
⇒Fig. 1
Only audio files, which can be played, are
displayed and played. Other files are ignored.
A connected external audio source or data carrier
is shown by
8 .
in the bottom screen line.
he front of the device.
Connect external audio source to USB.
● Reduce basic volume of radio system.
● Connect external audio source to USB.
● Start playback of the external audio source.
The p
layback volume of the external audio
source should be adjusted to the volume of the
other audio sources.
Connect iPod™ to USB.
● Reduce basic volume of radio system.
● Connect iPod™ to USB.
the bottom screen lin e.
● Playback starts automatically.
LIST devic e button, the iPod-specific list
Via the
views (
playlists, artists, albums, etc.) can
be displayed.
The iPod s election men u is operated as is
normally done. The playback volume of a
connected iPod™ should be adjusted to the
volume of the other audio sources ⇒Page 32.
is displayed in
Connect external data carrier to the USB.
● Reduce basic vol ume of radio sys tem.
● Connect external data carrier to the USB.
Playback starts automatically if playable files are
n the data carrier.
o
Connect external audio source via Bluetooth®
First read and observe the safety
notes on page 3 and the introductory
information on page 14.
Bluetooth
screen line.
® audio mode is shown by in the bottom
Requirements
● Die Bluetooth® audio source must support
the A2DP Bl uetooth
®
profile.
Start Bluetooth® audio transmission
● Switch on Bluetooth® visibility on an external
Bluetooth
● Reduce basic volume of radio system
⇒Page 7.
● Couple and connect Bluetooth
with radio system ⇒Page 25.
Playbac k of the Bluetooth
to be started manually.
® audio source (e. g., cellphone).
® audio source
® audio source might have
Audio and media mode 21
Page 27

When playback of the Bluetooth® audio source is
ended, the radio sys tem remains in the
Bluetooth
® Audio menu.
Control playback
The extent to which a Bluetooth® audio source
can be controlled via the radio system depends on
the connected Bluetooth
® audio source.
With media players that support the AVRCP
Bluetooth
® profile, playback of the Bluetooth®
audio source can be started or stopped
automatically if there is a switch to Bluetooth
®
audio mode or to another audio source. In
addition, song display of a song switch via the
radio system is possi ble.
Due to the great numbe
Bluetooth
® audio sources, it cannot be
r of possible
ensured for all that the functions described
function perfectly.
On a connected Bluetooth
® audio source,
switch off the alarms and service signals, e.
g., the key sounds on a cellphone, on
principle to avoid interference noise and
malfunctions.
Dependent on the device, Bluetooth
® audio
connection is disconnected automatically if an
external media player is connected at the same time
via Bluetooth
with the radio system.
® and the USB connection is connected
22 Function de scr iption
Page 28

SGB012901CA
Phone control (PHONE)
Introduction to phone control
Topic introduction
You can find information about the following
specific to p ics in this ch a pter:
General information ........................................... 24
Sites with special regulations ............................. 24
Bluetooth
Couple and connect cellphone with radio ........... 25
You can retrieve the phone functions described
i
coupled and connected with it.
A prerequisite for a connection between a
cellphone and the radio is that the cellphone
supports the Bluetooth
If no cellphone is connected, no phone functions can
be retrieved via the radio.
Observe the instructions about using a cellphone
in a vehicle without connection to an external
antenna ⇒Manual Operating Instructions, Chapter
Vehicle care maintenance and service.
® ........................................................ 25
n the following via the radio if a cellphone is
® function.
Supplementary information and warnings:
● Safety notes ⇒Page 3
● Sites with special regulations ⇒Page 24
● Overview of c ontrol elements ⇒Page 5
● Basic oper ating principles ⇒ Page 7
WARNING
Phoning and operating phone control while driving can distract from traffic conditions and result in accidents.
● Always drive attentively and
responsibly.
● Select loudspeaker levels so that acoustic signals from outside can be hear d well at any time, e. g., the siren of rescue services.
● In areas of no or deficient cellphone network supply and possibly in tunnels, garages and undergrounds passageways, a phone call might be interrupted and it might be impossible to reestablish connect ion – including any emergency calls!
WARNING
An unattached or not correctly attache d
cellphone can be thrown about the vehicle
interior a t a su dden braking maneuver or
accident and cause injuries.
● Remove or stow securely cellphones
o
ther devices such as phone accessories, e.
g., phone cradles, notepads, port abl e
infotainment systems, during a trip properly
and outside of the inflation areas of air bags.
,
WARNING
At operation of a cellphone or radio device
without connection to an external antenna, the
limiting value for electroma gne ti c radia t ion can
be exceeded in the vehicle and consequently
endanger the health of driver and passengers .
This also applies if an exterior antenna is not
installed properly.
● Keep a minimum distance of 20
centimeters between antenna of a cellphone
and an active medical implant, e.g., a cardiac
pacemaker, because cellphones can
negatively influence the func ti on of ac ti v e
medical implants.
● Do not keep a cellphone directly adjacent
to an active medical implant or directly above
it, e.g., in your chest pocket.
● If you suspect that a cellphone is interring
with an active medical implant or other
medical device, switch it off immediately.
WARNING
An open armrest can hinder the freedom of
movement of a driver and consequently caus e
accidents and severe injuries.
● Always keep armrests closed during rides.
hone control (PHONE) 23
P
Page 29

NOTE
High speeds, poor weather and road conditions as well as network quali t y can hinder or interrupt a phone call in a vehicle.
Observe operating instructions of the
ellphone and accessory suppliers as well
c
as possible regulations concerning the use
of headsets.
General information
R
ecepti on interference and interruption of a
call are possible in dead zones.
Most electronic devices are shielded
against RF signals (high frequency).
However, electronic devices cannot be shielded from RF signals in rare
cases. Malfunctio ns c an occur.
First read and observe the safety notes on page 3 and the introductory informati on and safe ty notes on page 23.
Observe the instructions about using a cellphone
i
n a vehicle without connection to an external
antenna ⇒Manual Operating Instructions.
Only use compatible Bluetooth
obtain information about compatible Bluetooth
products from a Volkswagen Partner or via the
Internet.
Observe operating instructions of the cellphone
and accessory suppliers.
Reception interference and interruption of a call
are possible in dead zones.
® d evices . You can
®
Sites with special regulations
First read and observe the safety notes on page 3 and the introductory informati on and safe ty notes on page 23.
Switch off cellphones and cellphone adapters in
e
xplosion-endangered locations. Although these
locations are often signposted, the information is
not always clear⇒ . For example, this includes :
● Areas around lines and tanks, in which there
are chemicals.
● Lower decks on ships and ferries.
● Areas around vehicles, which are run on
liquefied petroleum gas (e. g., propane or butane).
Most electronic devices are shielded against RF
s
ignals (high frequency). However, electronic
devices cannot be shielded from the RF signals of
phone control in rare cases. Malfunctions can
occur.
Restrictions concerning use of Bluetooth
devices c an exist in som e countries . You
can obtain information from local authorities.
When you connect phone c ontrol with a
d
evice via Bluetooth
operating instructions to obtain detailed
safety notes. Only use compatible
Bluetooth
reas where chemicals or particles such as
● A
flour, dust or metal powder are in the air.
● Every other place where the vehicle engine is
to be switched off.
® products.
® technology, read the
®
WARNING
Switch off cellphones at explosionendangered locations!
NOTE
A cellphone must always be switched off in
environments with spe ci a l re gula ti ons a nd if
the use of cellphones is prohibited. The
radiation emitted by a switched-on cellphone
can cause interference to sensitive technical
and medical
24 F
unction descr i pt i o n
Page 30

SGB012901CA
NOTE (continu ation)
devices, which can result in malfunction or damage to the device.
Bluetooth®
First read and observe the safety notes on page 3 and
the introductory information and safety notes
on page 23.
Bluetooth®
Bluetooth® technology serves for connecting a
cellphone to the phone control of a vehicle. A onetime coupling process is required to use phone
control with a Bluetooth
Some Bluetooth
® cellphone.
® cellphones are detected and
connected automatically when they are switched
on if there was already a connection previously. In
this context, the cellphone as well as Bluetooth
®
on the cellphone must be switched on and all
active Bluetooth
® connections to other devices
must be disconnected.
The Bluetooth
Bluetooth
Bluetooth
® radio link is free of charge.
® is a regist e red trademark of
® SIG, Inc.
Couple and connect cellphone with radio
First read and observe the safety notes
on page 3 and
information and safety notes on page 23.
To operate a cellphone via the radio, one-ti
coupling of both devices is required.
Coupling should only be performed in standing
vehicles.
Requirements
● Ignition is switched on.
● If required, disconnect a connected
headset f rom the cellphone.
● Bluetooth
visible on the cellphone and radio.
● The key lock on the cellphon e sh oul d be
unlocked.
the the introductory
me
® function must be activated and
Bluetooth profile
When a cellphone is connected with phone control,
data exchange is via one of the Bluetooth
● Bluetooth
cellphone connection via HFP with phone control,
you can phone cordlessly via the hand-free
installation. Many other functions of phone control
are not available. The external antenna of the
vehicle cannot be used with it . Observe the
instructions about using a cellphone in a vehicle
without connection to an external antenna
® Hands-Free Profile (HFP): If a
® profiles.
● ⇒ Manual Operating ins tructions.
● Advanced Audio Distribution Profile (A2 DP )
B
luetooth
® profile for transmission of audio signals in
:
stereo quality.
Observe the operating instructions of the cellphone.
D
uring the coupling process, entries via the
keyboard of the cellphone are required. The
cellphone must be available for this.
Start cellphone coupling.
● Press the PHONE dev ice button.
● Press the function key next to the
telephone
display.
Find
Once the search process has completed, the names of
the found Bluetooth
® devices are displayed.
● Retrieve the cellphone to be coupled from
the list of found Bluetooth
® devices.
The radio and the cellphone are then connected
w
ith each other. To complete the connection of
both devices, among other things, additional
entries on the cellphone and radio are required.
P
hone control (PHONE) 25
Page 31

● Confirm coupling to the cellphone is required.
Dependent on the cellphone:
● E
nter and confirm the PIN code shown on the
radio screen.
OR:
ompare the PIN code displayed on the
● C
radio screen with that displayed on the
cellphone. If they match, it must be conf i rmed
on both devices.
Once the coupling ha s be en co mpl ete d su cces sfully ,
he PHONE main menu is displayed and the
t
telephone directory and call logs saved in the
cellphone are loaded automatically. A confirmation
on the cellphone might be required.
The duration of the loading process depends on
the volume of saved data in the cellphone. The
data are longer avail able in the radio after
completion of the loading process.
Coupling and connecting cellphones
Several cellphones can be coupled with a radio
system, but only one cellphone can be connected
with the rad i o at the same time.
When you switch on the radio, a connection to the
last connected cellphone is established
automatically. If no connection can be established
to that cellphone, the phone control automatically
tries to establish connection to the next cellphone
from the list of coupled devices.
The maximum range of a Bluetooth
is approx. 10 meters. An existing B luetooth
® connection
®
connection is interrupted when this distance is
exceeded. The connection is reestablished
automatically as soon as the device is again i n
the Bluetooth
® range.
Contact a Volkswagen Partner for additional
i
nformation about coupling and connecting
cellphones.
26 Function de scr iption
Page 32

SGB012901CA
Description of phone control
Topic introduction
You can find information about the following
topics in this chapter:
Radio main menu .............................................. 27
Take or reject a call ........................................... 28
During a phone call ........................................... 28
Language mode menu ...................................... 29
Telephone directory menu ................................. 29
Call logs menu .................................................. 30
A few functions and settings are only possible i
standing vehicles and are not supported by all
cellphones.
Dependent on the country, device and vehicle
equipment, the selection of possible settings
varies.
Up to 20 devices can be detected by phone
control.
One device each can be connected via the handsfree profile (HFP) and audio playback profile
(A2DP) ⇒Page 26.
n
Assignment of a user profile
A connected cellphone is saved in the phone
contro l as user profile.
A maximum of four user profiles can be saved
for cellphones in the phone control. If another
cellphone is coupled, the user profile, which has
not been used for the longest time, is
automatically deleted from the user profile.
Telephone directory, call logs and settings in the
Bluetooth menu are saved in the user profile.
When a cellphone is reconnected with the phone
control, the data and settings are available again.
If telephone directory entries of the cellphone are
changed during an existing connection, you can
trigger manual updating of the telephone directory
data via the
reestablishment of connection of a cellphone
(e.g, at the next trip), the telephone directory
is updated automatically.
Bluetooth menu ⇒Page 33. After
Supplementary information and warnings:
● Safety no tes ⇒Page 3
● Overvie w of control elements ⇒Page 5
● Basic ope rating prin ciples ⇒Page 7
● Requirements and mode of functioning
⇒Page 23
Using a cellphone in the vehicle can cause
noise in loudspeakers.
Phone main menu
Fig. 13 PHONE main menu.
First read and observe the safety
es on page 3 and the
not
introductory information on page 27.
After the initial coupling process, it can take a few
inutes until the telephone directory data of the
m
coupled cellphone are available on the radio.
ress the PHONE device button to retrieve th e
● P
PHONE main menu
● ⇒ Fig. 13. The current audio playback
continues.
Phone control (PHONE) 27
Page 33

cellphone is registered.
Name of the connected cellphone.
: Display of an active Bluetooth®
: Charge state of the connected
Displays and functions in the PHONE
main menu
⇒Fig. 13 Displays and functions
Name of the cellphone provider, with
1
which the SIM card of the connected
2
connection.
3
cellphone.
: Signal strength of the currently received
cellular network station.
Take or reject a call
⇒Fig. 13 Displays and functions
Open call logs of the connected cellphone
⇒Page 30.
Open the telephone directory of the
connected cellphone ⇒Page 29.
The language selection mode is retrieved
⇒Page 29.
Couple and connect cellphone with radio.
When you take a call, the s creen display is switching
to call mode ⇒Page 28.
Displays and functions
⇒Fig. 14 Displays and functions
1
Display of incoming call.
2
Display of the phone number or saved
name.
Fig. 14 Incoming call.
First read and observe the safety notes
on pa
ge 3 and the introductory information
on page 27.
An incoming phone call is displayed in the middle
o
f the screen by the phone number of the caller
⇒Fig. 14
If the phone number of the caller is saved in the
telephone directory, the name of t he caller is
displayed.
2 .
During a phone call
Fig. 15 During a phone call.
28 Function de scr iption
Press the function key next to the display to
mute the ring tone during a call
function key again to cancel muting of the ring
tone.
Press the function key of the display to
take a call.
P
ress the
reject a call.
function key of the display to
First read and observe the safety
es on page 3 and the
not
introductory information on page 27.
During a phone call, the following
. Press the
Page 34

fo
SGB012901CA
Displays and functions
⇒Fig. 14 Displays and functions
1
Display of the call duration.
2
Display of the phone number or saved
name.
Press the function key next to the display to
witch off the microphone of the cellphone
s
adapter during a call. Press the function key
again to cancel muting of the ring tone.
Press the functio
conduct the call via the cellphone. Press the
function key again to conduct the call via the
cellphone adapter.
Press the function key of the display to end
a call.
n key next to the display to
Language mode menu
Fig. 16 PHONE main menu.
st read and observe the safety
Fir
notes on page 3 and the introductory
information on page 27.
Telephone directory menu
If the coupled and connected cellphone has the
function language selection mode, this function
can be retrieved via the function key next to the
display
⇒Fig. 16.
If the cellphone does not have the function language
selection mode, nothing is done.
ress the function key next to the display.
● P
The communication channel to the cellphone is
opened.
● Follow the cellphon e instructions.
Fig. 17 PHONE main menu. Fig. 18 Telephone directory menu.
Phone control (PHONE) 29
Page 35

First read and observe the safety notes on page 3 and the introductory informati on on page 27.
After the initi al couplin g process, it can take a few
m
inutes until the telephone directory data from
the cellphone are available on the radio.
Open and search thr ough telephone directory
● Press the function key next to the display
⇒Fig. 17 to retrieve the tel
rectory.
di
● Rotate the adjustment knob on the right to
scroll up or down in the telephone directory. A
telephone directory entry is always marked when
you do this.
● OR: Search through entries using the device
buttons
or .
● Press the adjustment button on the right for a
short time to select the desired telephone
directory entry.
If only a phone number is saved fo
telephone directory entry, dialing starts
immediately.
ephone
r the selected
Call logs menu
If two or more phone numbers are saved for the selected
t
elephone directory entry, a sub-menu with all saved phone
numbers opens. Select the desired phone number to start dialing.
Exit the sub-menu or telephone directory.
● Press the device button fo r a short ti me.
● OR: Press the
The display always switches back one level, from
a
sub-menu into the telephone directory and from
the telephone directory into the
PHONE device button for a s hort time.
PHONE main menu.
Displays in the telephone directory menu
⇒Fig. 18 Displays and functions
1
Menu display (Contacts).
Shows that two or more
2
phone numbers are saved for a
telephone directory entry.
3
Scroll bars are only displayed if more than
three entries exist .
Fig. 19 PHONE main menu. Fig. 20 Call logs menu.
First read and observe the safety
not
es on pa ge 3 and the
introductory informati on on page 27.
If a phone number is saved as contact, the saved
n
ame is displayed in the call log instead of the phone
number.
Open Call logs menu
● Press the function key next to the display
⇒Fig. 19 to retrieve the Call logs menu.
● Rotate the adjustment knob on the right t
croll up or down in the Call logs. The entry is
s
always marked when you do this.
o
: Search through entries using the device buttons
● OR
or Press t he adjustment knob on the ri ght for a short
time to select the desired entry and start dialing.
Displays in the Call logs menu
⇒Fig. 20 Di spla ys and signi fica nce
Displays phone numbers, which were dialed
via the cellphone and phone control.
Displays phone numbers, which were taken via the
cellphone and phone control.
Displays phone numbers of missed and not
taken calls.
30 Function de scr iption
Page 36

SGB012901CA
Settings
Menu and system settings (SETUP)
Topic introduction
You can find information about the following
specific to p ics in this ch a pter:
Main menu
Sound
Radio
Media settings .............................................. 33
Bluetooth settings ...................................... 33
System settings .......................... 31
settings ............................................... 31
settings ................................................ 32
Supplementary information and warnings:
● Safety notes ⇒Page 3
● Overvie w of control elements ⇒ Page 5
● Basic ope rating prin ciples ⇒ Page 7
Main menu System settings
First read and observe the safety notes on page 3 and the introductory information on page 31.
Open the System settings main menu
Press the SETUP device button.
Rotate adjustment knob to select the desired menu item.
Display: Meaning
Sound: Make sound and volume settings ⇒Page 31.
Radio: Make radio settings ⇒Page 32.
Media: Make media settings ⇒Page 33.
Screen: Make screen setting s .
Brightness: Select the screen brightness.
Language: Selected the desired device language.
Bluetooth: Make Bluetooth settings ⇒Page 33.
Reset all: Reset the device to the ex-works state. All entries and settings made are deleted.
System information: Display of system information (device number, hardware and software versions).
Copyright information
Sound settings
First read and observe the safety notes on page 3 and the introductory information on page 31.
Open the Sound settings menu
Press the SETUP device button.
Rotate adjustment knob and select
Sound menu item.
Settings 31
Page 37

Display: Meaning
Volume: Set volume settings.
Max. start-up volume: Set maximum start-up volume.
Speeddep. vol. contr.: Set the strength of the speed-dependent volume control. The
audio volume is incre ased automatically with increasing vehicle speed.
Audio lowering
AUX volume: Set the playback volume of audio sources, which are connected via the
multimedia jack AUXIN. See also ⇒ Page 32, Adjust playback volume of external audio
sources.
Bluetooth audio
Bluetooth
a)
®. Cf. ⇒Page 32, Adjust playback volume of external audio sources.
: Reduct ion of the audio volume when P arkPilot is ac t ive.
a)
: Set the playback volume of audio sources, which are connected via
E
qualizer
Balance Fader: Set the sound focus.
a)
Dependent on country and device.
Adjust playback volume of external audio sources
If the playback volume of an external audio
source must be increased, reduce the basic
volume on the device beforehand.
If the connected audio source is played back at a
volume too low, increase the start-up volume on
the external audio source. If that does not suffice,
set the start-up volume to
: Set sound properties (bases, mid-tones, trebles) manually or select a default sound profile.
If the connected audio source is played back at a
v
olume too high or distorted, decrease the start-up
volume on the external audio source. If that does not
suffice, set the start-up volume to medium or
minimum.
medium or maximum.
Radio settings
First read and observe the safety notes on page 3 and the introductory information on page 31.
Open the Radio settings menu
Press the SETUP device button.
Rotate adjustment knob and select
Display: Meaning
Station name: Station name display is activated.
Traffic program: TP function (radi o traffic mon itoring) is activated.
Seek mode: Specify setting for the arrow keys < and >.
Stations: There is switching to all saved stations of the selected frequency range with the arrow
keys.
Presets: There is switching to all receivable stations of the selected frequency range with the
arrow keys.
Delete Presets: Delete all saved stations.
Alternative Frequency (AF): Automatic sta ti on tracking is activated. There is a switch to the frequency
of the set station, which currently has the best reception
Radio menu item.
32 Function de scr iption
Page 38

SGB012901CA
Media settings
First read and observe the safety notes on page 3 and the introductory information on page 31.
Open the Media settings menu
Press the SETUP device button.
Rotate adjustment knob and select the Media menu item.
Display: Meaning
Media: Make media settings.
Mix/Rpt incl. sub-folders: Sub-folders are included in the selected playback mode ⇒Page
16.
Bluetooth settings
First read and observe the safety notes on page 3 and the introductory information on page 31.
Open the Bluetooth settings menu
Press the SETUP device button.
Rotate adjustment knob and select the Bluetooth menu item.
Display: Meaning
Name: VW Radio
Visibility: Switching Bluetooth® visibility on and off.
Visible: Bluetooth® visi bility is activated.
Hidden: Bluetooth® visibility is deactivated. Bluetooth® visibility must be switched on for external
coupling of a Bluetooth® device with the radio.
Select telephone: D isplay of coupled devices . Disconnec ting and conn ecting of ind ividual Blu etooth® devices and
Bluetooth® profiles.
Find telephone: Search for Bluetooth® devices switched to visible, which are in the range of the radio.
The maximum range is approx. 10 meters.
Delete paired devices: Delete individual or all user profiles.
Import contacts: Import the address book of the connected phone or update an already imported address book.
Sort by: Set the sort sequence of the telephone directory entries (first name or last name).
Ring tonea): Select a ring tone from the list of default tones. The selected ring tone is played and saved
when you exit the sub-menu.
Cellphone reminder: If there is a Bluetooth® connection to a cellphone, the following message appears
when you turn off the ignition: "Please do not forget your cellphone"
a)
Dependent on the cellphone use, the selected or set ring tone in the cellphone is played.
Settings 33
Page 39

Abbreviations used
Abbreviation Meaning
A2DP
AM
UX
A
AUXIN
AVRCP
BTAudio
Manufacturer-independent technology for transmi s sion of audio sign als via Bluetooth
(Advanced Audio Distribution Profile).
Amplitude modulation (medium frequency , M W).
AUX input on devices of entertainment electronics.
Multimedia jack AUXIN (auxiliary Input).
Manufacturer-independent technology for remote control of audio signals via Bluetooth
Control Profile).
Cf. A2DP or AVRCP.
®
® (Audio Video Remote
CD
EON
FM
GSM
HFP
MP3
RDS
SD
SDHC
SDXC
Ultra short-wave
VBR
WMA
Compact Disk (CD) is an optical storage device for storing digital music.
upport of other networks (Enhanced Other Network).
S
Frequency modulation (ultrashort wave, FM).
The Global System for Mobile Communications (GSM) is a standard for completely
digital cellular networks.
Cordless telephony in cars (Hands-Free Profile).
Format for compressing audio files.
Radio data system.
SecureDigital Memory Card, storage volume between 8 MB and 2 GB.
SecureDigital Memory Card, storage volume between 4 GB and 32 GB.
SecureDigital Memory Card, storage volume between 48 GB and max. 2 TB.
Ultrashort wave (FM), frequency modulation.
Variable bit rate.
Format for compressing audio files.
34 Abbreviations used
Page 40

SGB012901CA
Index
A
Requirements
Of CDs ........................................................ 14
Of data carriers and files .............................. 14
Of SD cards ................................................ 14
Of USB data carriers .................................... 14
Intro check (SCAN)
RADIO ........................................................ 13
Anti-theft encoding8 ............................................
Switching off ...................................................... 7
AUXIN
cf. external audio sources ............................ 20
Select........................................................... 17
B
Operation
Rotary and push buttons ............................... 7
Switching on and off ...................................... 7
Function keys ................................................. 7
Device buttons .............................................. 7
Change the volume ........................................ 8
PHONE ....................................................... 23
Mute .............................................................. 8
Additional displays ......................................... 9
Control elements ............................................... 5
Special features:
Anti-theft encoding ......................................... 8
Display .......................................................... 9
AUX mode .................................................. 21
Volume reduction .......................................... 7
Radio encoding .............................................. 8
Screen ............................................................... 5
Bluetooth
Profile ......................................................... 25
Bluetooth audio
cf. external audio sources ............................ 21
Select........................................................... 17
C
CD
Eject ............................................................ 19
Operation .................................................... 19
Insert ........................................................... 19
Faulty .......................................................... 20
Not readable ............................................... 20
Select........................................................... 17
Checklist
Before initial use............................................. 3
Code number ..................................................... 8
Copyright
Information .................................................. 31
D
Theft protection .................................................. 8
Rotary and push buttons
...................... 5, 7
E
Introduction ........................................................ 3
Switch on ............................................................ 7
Eject
cf. CD ........................................................... 19
Energy management .......................................... 8
Explosion endangered sites
Phone ................................................................................................... 24
External audio source
Bluetooth audio ............................................. 21
iPod .............................................................. 21
USB .............................................................. 21
External audio source
Multimedia jack AUXIN ................................. 20
SD card ........................................................ 20
Adjust playback volume ................................ 32
External data carrier
SD card ........................................................ 20
F
Frequency range
AM ................................................................ 10
FM ................................................................ 10
Select ........................................................... 10
Change ......................................................... 10
Function settings ............................................. 31
Function keys ..................................................... 7
G
Device buttons ............................................... 5, 7
Device overview ................................................. 5
Device models
Overview ........................................................ 5
Device locked
Unlock device ................................................. 8
Basic volume ...................................................... 8
Change ........................................................... 8
Mute ............................................................... 8
H
Main menu
MEDIA .......................................................... 16
PHONE......................................................... 27
RADIO .......................................................... 10
Index 35
Page 41

I
iPod .................................................................. 21
K
Quick guide ........................................................ 3
L
Silent .................................................................. 8
Volume
Change ........................................................... 8
Set external audio sources ........................... 32
Basic volume .................................................. 8
Volume reduction ........................................... 7
LOW BATTERY .................................................. 8
Media source .................................................... 17
AUXIN .......................................................... 17
Bluetooth audio............................................. 17
CD ................................................................ 17
SD card ........................................................ 17
USB ............................................................. 17
Select ........................................................... 17
Cellular network
Provider ............................................ 28, 29, 30
Multimedia jack AUXIN
cf. external audio sources ............................ 20
ute .................................................................... 8
M
N
Timeout .............................................................. 7
M
MEDIA
Playback sequence ...................................... 16
Requirements .............................................. 14
Display modes ............................................. 18
Show ................................................... 16, 17
Audio data CD ............................................. 14
Audio data structure ..................................... 16
Media sources selection menu ..................... 17
Bit rate ......................................................... 14
Bluetooth audio ............................................. 21
CD mode ..................................................... 19
Eject CD ...................................................... 19
Insert CD ..................................................... 19
CD faulty ...................................................... 20
CD cannot be read ....................................... 20
Select data carrier ........................................ 17
Restrictions .................................................. 15
Main menu .................................................... 16
Media mode .................................................. 14
Switch media source .................................... 17
MP3 files ...................................................... 14
Multimedia jack AUXIN ................................. 20
Playlists ....................................................... 15
Rewind ........................................................ 17
Insert SC card .............................................. 20
Withdraw SC card ........................................ 20
SD card cannot be read ............................... 20
Song information ..................................................... 18
Song list ................................................................... 18
Select song .............................................................. 18
Switch so ng ................................................. 17
Copyright ..................................................... 14
USB ............................................................. 21
Fast forward ................................................................... 17
Playback modes ........................................... 19
Repeat ......................................................... 19
WMA files .................................................... 14
Shuffle (Mix) ................................................. 19
O
Sites with special regulations ......................... 24
P
PHONE
A2DP ............................................................ 25
General information ...................................... 24
Take call ....................................................... 28
Call logs ....................................................... 30
Bluetooth profile............................................ 25
Explosion endangered sites .......................... 24
Description of function .................................. 25
Mode of functioning ...................................... 23
Conduct call.................................................. 28
GSM network ................................................ 25
Main menu ................................................... 27
HFP .............................................................. 25
Cellphone coupling ....................................... 25
Couple cellphone with radio .......................... 25
Connect cellphone with radio ........................ 25
Sites with special regulations ........................ 24
Select phone numbers .................................. 27
Safety notes ................................................. 23
Language selection mode ............................. 29
Telephone directory ........................................................................... 29
Phone .................................................................................................... 28
Phone control ...................................................................................... 23
Overview ...................................................... 27
Requirements ................................................................ 23
Redial ........................................................................30
Provider
Cellular network ................................ 28, 29, 30
R
RADIO ............................................................... 10
Intro check (SCAN) ....................................... 13
Frequency ranges ......................................... 10
Frequency switch .......................................... 10
36 Index
Page 42

SGB012901CA
Main menu ................................................... 10
Radio mode ................................................. 10
Set station frequency ................................... 11
Statio n list ................................................... 11
Select, set and store station ........................ 11
Memory levels .............................................. 10
Switch memory level ................................... 10
Radio encoding ................................................. 8
Repeat .............................................................. 19
S
SCAN
cf. Intro check (SCAN) .................................. 13
SD card
Requirements .............................................. 14
Insert ........................................................... 20
Withdraw ..................................................... 20
Compatibility and specifications ................... 14
Not readable ............................................... 20
Supported SD cards .................................... 14
Select........................................................... 17
Sender
Intro check (SCAN) ...................................... 13
Set .............................................................. 11
Store ........................................................... 11
Select .......................................................... 11
Station search
cf. Intro check (SCAN) .................................. 13
SETUP ............................................................. 31
Enter security code
Security code ................................................ 8
Safety notes ...................................................... 3
Phone .................................................................................................... 23
Memory card
Insert ........................................................... 20
cf. SD card .................................................. 20
Language selection mode ............................... 29
Interference from cellphone .............................. 7
Mute .................................................................... 8
System settings................................................ 31
T
Phone control
cf. PHONE .................................................... 23
Timeout .................................................................. 7
Song list
cf. MEDIA .................................................... 18
U
Copyright .......................................................... 14
USB
cf. external audio sources ............................ 21
Supported USB data carriers......................... 14
Select ........................................................... 17
W
Playback
AUXIN .......................................................... 20
CD ................................................................ 19
MEDIA .......................................................... 16
SD card ........................................................ 16
USB .............................................................. 21
Repeat function ................................................... 19
Z
Shuffle (Mix) .................................................... 19
Ignition off
Timeout .......................................................... 7
Additional displays ............................................ 9
Index 37
 Loading...