

Page 1

MMI Navigation System plus
MMI Navigation System plus
Operating Manual
Englisch 06.2012
131.566.3MH.20
1315663MH20 www.audi.com
MMI Navigation System plus Englisch 06.2012
Oper
ating Manual
V
orsprung durch Technik
Audi
Page 2

© 2012 AUDI AG
AUD
I AG works continuously to develop and
further improve all models. You will appreciate that we must therefore reserve the right
to alter any part of the vehicle and its equipment or technical specifications at any time.
No legal commitment can therefore be implied by the information, illustrations or descriptions in this Manual.
No part of this publication may be reprinted,
reproduced or translated without the written
permission of AUDI AG. All rights under the
laws of copyright are expressly reserved by
AUDI AG. Subject to alteration and amendment. Printed in Germany.
Date of publication: 20.04.2012
For the sake of the environment
This paper was bleached without use of
chlorine.
Page 3

Foreword
statements FCC part 15.19 and 15.21:
"This device complies with part 15 of the FCC Rules. Operation
is subject to the following two conditions: (1) This device may
not cause harmful interference, and (2) this device must accept
any interference received, including interference that may
cause undesired operation."
"Changes or modifications not expressly approved by the party
responsible for compliance could void the user's authority to
operate the equipment."
This Class B digital apparatus complies with Canadian ICES-003.
Cet appareil numérique de la classe B est conforme à la norme
NMB-003 du Canada.
Thank you for choosing the MMI Navigation System plus
Your new Audi is designed with the latest technology, enabling you to control all
on-board electronic systems and other settings centrally via the MMI.
We recommend that you read this Operating Manual carefully so that you quickly become familiar with all the available functions of the MMI and can take full
advantage of them in everyday use.
Please note that this Operating Manual is intended to supplement the information in the Owner's Manual for your vehicle, so it should only be used in conjunction with the current edition of the Owner's Manual.
We wish you safe and enjoyable motoring with your Audi.
AUDI AG
.
1315663MH20
Page 4

2 Table of Contents
Notes about this Operating
Manual . . . . . . . . . . . . . . . . . . . . . . . . 4
Controls . . . . . . . . . . . . . . . . . . . . . . . 5
Overview . . . . . . . . . . . . . . . . . . . . . . 5
Controls and displays at a glance . . . . 5
Notes on traffic safety . . . . . . . . . . . . . 5
Cleaning and care . . . . . . . . . . . . . . . . . 6
Notes on software licences . . . . . . . . . 6
MMI control console . . . . . . . . . .
Switching the MMI system on/off . . . .
Adjusting the volume . . . . . . . . . . . . .
How to use the controls . . . . . . . . . . . .
MMI touch . . . . . . . . . . . . . . . . . . . . . .
Speller for letters/numbers . . . . . . . .
Menus and symbols . . . . . . . . . . . . . . .
Multi-function steering wheel
How to use the controls . . . . . . . . . . . .
Using the telephone . . . . . . . . . . . . . .
Navigation . . . . . . . . . . . . . . . . . . . . . .
Listening to the radio . . . . . . . . . . . . . .
Playing media . . . . . . . . . . . . . . . . . . . . 15
Speech dialogue system . . . . . . 17
How to use the speech dialogue
system
. . . . . . . . . . . . . . . . . . . . . . . . . 16
Notes on the overviews of commands 18
Global commands . . . . . . . . . . . . . . . . 18
Telephone . . . . . . . . . . . . . . . . . . . . . . . 18
Navigation . . . . . . . . . . . . . . . . . . . . . . 19
Radio . . . . . . . . . . . . . . . . . . . . . . . . . . 21
Media . . . . . . . . . . . . . . . . . . . . . . . . . . 21
Media drives/connections . . . . 22
Introduction . . . . . . . . . . . . . . . . . . . . . 22
Notes . . . . . . . . . . . . . . . . . . . . . . . . . . 22
Jukebox . . . . . . . . . . . . . . . . . . . . . . . . . 23
DVD drive . . . . . . . . . . . . . . . . . . . . . . . 24
SD card readers . . . . . . . . . . . . . . . . . . 24
Bluetooth audio players . . . . . . . . . . . . 25
Audi music interface . . . . . . . . . . . . . . 25
10
12
12
13
14
15
Supported media and file formats . . . 27
Troubleshooting . . . . . . . . . . . . . . . . . . 28
System settings . . . . . . . . . . . . . . . 29
Setting the time/date . . . . . . . . . . . . . 29
Adjusting the sound . . . . . . . . . . . . . . . 29
Adjusting the system volume . . . . . . . 30
Restarting the MMI system (Reset) . . 31
Speed display on driving school
. . . . . . . . . . . . . . . . . . . . . . . . . 31
vehicles
7
7
7
7
8
9
Other settings . . . . . . . . . . . . . . . . . . .
Communication . . . . . . . . . . . . . . .
Telephone . . . . . . . . . . . . . . . . . . . . .
Introduction . . . . . . . . . . . . . . . . . . . . .
Bonding a mobile phone . . . . . . . . . . .
Calling up the telephone . . . . . . . . . . .
Dialling a telephone number . . . . . . . .
Answering/ignoring telephone calls . .
During a telephone call . . . . . . . . . . . .
Storing a telephone number . . . . . . . .
Other settings . . . . . . . . . . . . . . . . . . .
Audi Phone Box . . . . . . . . . . . . . . . . . .
Directory . . . . . . . . . . . . . . . . . . . . . . 41
Calling up the directory . . . . . . . . . . . . 41
Storing a contact . . . . . . . . . . . . . . . . . 41
Using a contact . . . . . . . . . . . . . . . . . . 42
Editing/deleting a contact . . . . . . . . . . 43
Importing/exporting contacts . . . . . . 43
Other settings . . . . . . . . . . . . . . . . . . . 44
Navigation . . . . . . . . . . . . . . . . . . . . . 45
Navigation . . . . . . . . . . . . . . . . . . . . . 45
Calling up the navigation menu . . . . . 45
Entering a destination . . . . . . . . . . . . . 45
Starting/stopping route guidance . . . . 48
How to use the map . . . . . . . . . . . . . . . 49
Calling up traffic information . . . . . . . 50
Other settings . . . . . . . . . . . . . . . . . . . 50
Entertainment . . . . . . . . . . . . . . . . 54
Listening to the radio . . . . . . . . . 54
Calling up the radio . . . . . . . . . . . . . . . 54
Radio functions . . . . . . . . . . . . . . . . . . 54
31
33
33
33
33
35
35
36
37
37
38
39
Page 5

Other settings . . . . . . . . . . . . . . . . . . . 55
Troubleshooting . . . . . . . . . . . . . . . . . . 57
Playing media . . . . . . . . . . . . . . . . . 58
Calling up the media menu . . . . . . . . . 58
Media centre . . . . . . . . . . . . . . . . . . . . 59
Other settings . . . . . . . . . . . . . . . . . . . 60
Index . . . . . . . . . . . . . . . . . . . . . . . . . . 62
3Table of Contents
ControlsCommunicationNavigationEntertainment
Page 6
4 Notes about this Operating Manual
This Operating Manual contains important information, tips
Please ensure that this Operating Manual is
always kept in the vehicle. It should always be
available to anyone else driving the vehicle,
i.e. anyone renting, borrowing or buying the
vehicle from you.
Some sections of this Operating Manual do
not apply to all vehicles. If this is the case, a
text at the start of the section indicates which
vehicles it applies to, e.g. “Applies to vehicles:
with phone pre-installation”. This optional or
vehicle-specific equipment is also marked
with an asterisk “*”.
Illustrations are intended as a general guide,
and may vary from the equipment fitted in
your vehicle in some details.
At the beginning of this Operating Manual,
you will find a table of contents showing all
the items described in this manual in the order in which they appear. An alphabetical in-
dex is included at the end of the Operating
Manual.
All references to positions such as “left”,
“right”, “front” or “rear” are given as seen facing in the direction of travel.
*
Optional or vehicle-specific equipment.
The section is continued on the following
page.
®
Registered trademarks are marked ®.
However, the absence of this symbol does
not constitute a waiver of the rights concerning any proprietary name.
Refers to a “WARNING” within the same
ð
section. If the
by a page number the warning text referred to
is included in a different section.
, suggestions and warnings.
WARNING symbol is followed
CAUTION
Texts with this symbol draw your attention
to a possible risk of damage to your vehi-
cle.
For the sake of the environment
Texts with this symbol refer to points rele-
vant to the pr
otection of the environment.
Note
Texts with this symbol contain additional
information of a mor
e general nature.
WARNING
Texts with this symbol contain safety information.
They warn you of serious dangers,
possibly involving accident or injury.
Page 7
Overview
trols and displays at a glance
Con
The Multi Media Interface (MMI) combines different communication, navigation* and entertainment systems in your Audi.
5Overview
ControlsCommunicationNavigationEntertainment
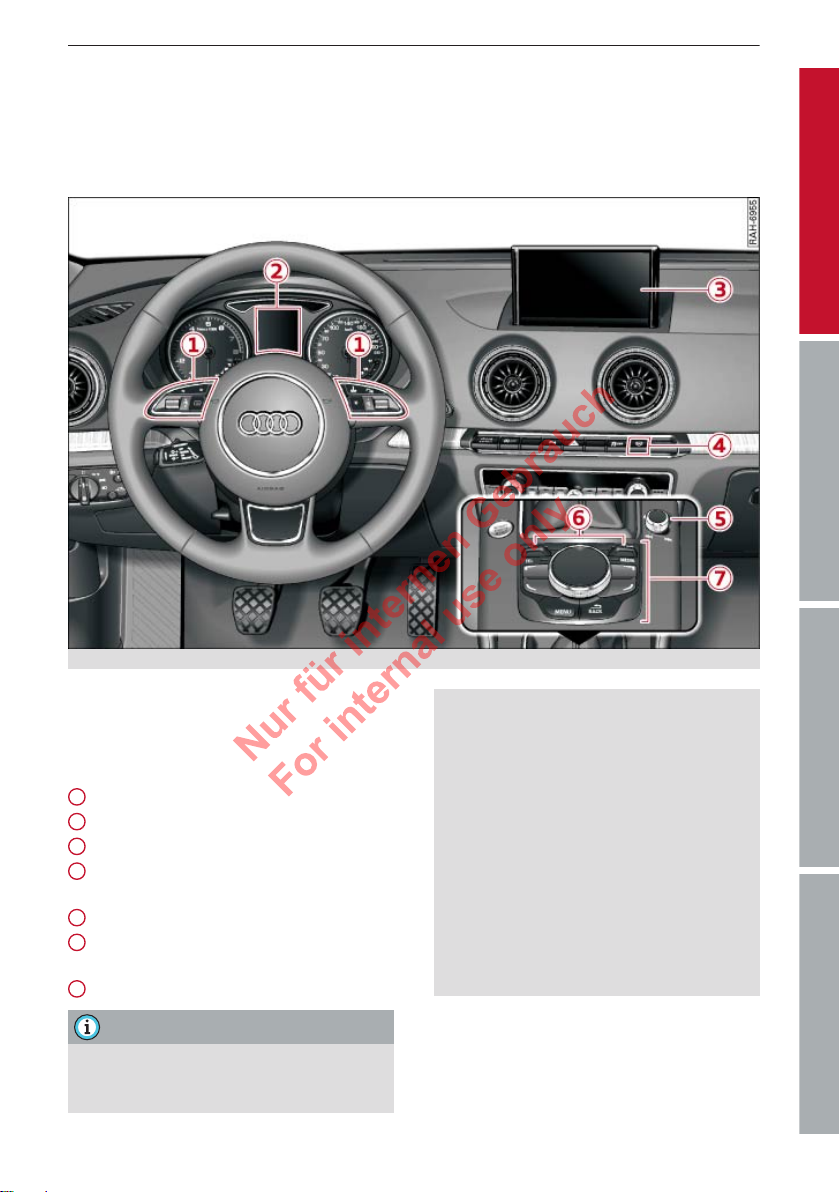
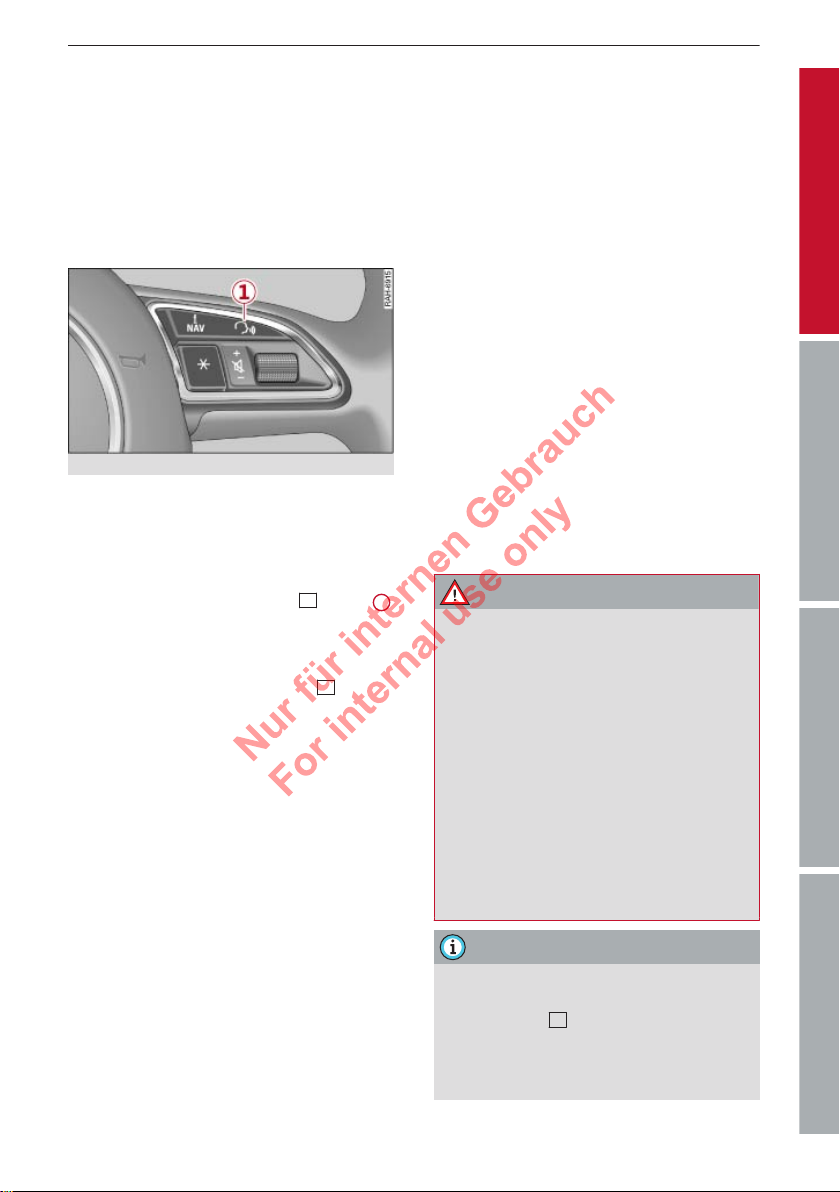
Fig. 1 MMI controls and displays
You can operate your MMI system via the MMI
contr
ol console, the multi-function steering
wheel* or the speech dialogue system*
ð Fig. 1:
1
Multi-function steering wheel . 12
2
Driver information system . . . . 12
3
MMI display
4
Button for folding the MMI display in and out
5
ON/OFF button . . . . . . . . . . . . . .
6
Buttons for calling up menus di-
ectly . . . . . . . . . . . . . . . . . . . . . .
r
7
MMI control console . . . . . . . . .
Note
– Please note that only the MMI and its
components ar
ing Manual. For more information about
e described in this Operat-
your vehicle's equipment and features,
please r
efer to your Owner's Manual.
– This manual describes the equipment
available for the vehicle at the time of
going to print. Some of the equipment
described here will not be available until
a later date, or may only be available in
certain markets.
– The arrangement of the system compo-
7
7
7
nents on right-hand drive models* may
be slightly different from the layout
shown in ð Fig. 1. However, the symbols
used to identify the controls are the
same.
Notes on traffic safety
ou should only perform important functions,
Y
e.g. enter a destination, while the vehicle is
stationary. Please always be prepared to stop
Page 8
6 Overview
operating the system in the interest of your
safety and that of other r
WARNING
– T
oday's driving conditions require your
full attention. As the driver, you have full
responsibility for the safety of the vehicle and other road users. For this reason,
only operate the MMI system when the
traffic conditions allow you to do so safely and when you can maintain proper
control of your vehicle - risk of accident.
– The volume of the audio sources (radio,
CD player, etc.) should only be set at a
level which enables you to hear distant
police and emergency vehicles clearly –
failure to do so could result in an accident.
–
Please observe the laws regulating the
use of telephones in vehicles
Cleaning and care
oad users.
.
For information on the car
the infotainment system's controls and displays, please refer to the Cleaning and care
chapter of your car's Owner's Manual.
e and cleaning of
Notes on software licences
For information on the MMI system's software
and its licence conditions, select:
ton > contr
formation > section Software info; or go to
www.audi.com/softwareinfo.
ol button Setup MMI > Version in-
MENU
but-
Page 9
7MMI control console
MMI control console
Switching the MMI
system on/
The MMI system is switched on/off automatically when the ignition is switched on/off. In
addition it can be switched on/off manually.
– To switch on manually: Briefly press the
ON/OFF button
o switch off manually: Press and hold the
– T
ON/OFF button until the MMI is switched
off. The MMI system will not be switched on
automatically when the ignition is switched
on if it was turned off manually the last
time it was operated.
When the system is switched on, the last selected menu will be displayed, and the last selected audio source will be played.
The MMI system remains in operative mode
for approximately ten minutes after the ignition is switched off. If you do not press any
button or the rotary pushbutton on the MMI
control console within this period, the MMI
system will be switched off automatically.
off
5
ð page 5, Fig. 1
.
Note
When you switch on the MMI system, very
high/
very low volume levels are automati-
cally reduced/increased to a preset level.
How to use the
trols
con
You can easily call up the various functions of
the MMI system with its intuitive and standardised control layout.
ControlsCommunicationNavigationEntertainment
Note
– If the engine is switched of
tery charge level is low, the MMI system
will be switched off automatically.
– You can also switch on the MMI system
manually by pressing the
or one of the buttons for calling up me-
ectly
6
ð page 5, Fig. 1.
nus dir
f and the bat-
MENU
button
Adjusting the volume
Using the ON/OFF button, you can adjust the
volume of an audio source or system message
(e.g. during a speech dialogue) directly while
it is being played.
olume up/down: Turn the ON/OFF button
– V
clockwise or anti-clockwise.
– Mute: Briefly press the ON/OFF button.
– Unmute: Briefly press the ON/OFF button or
turn the ON/OFF button clockwise.
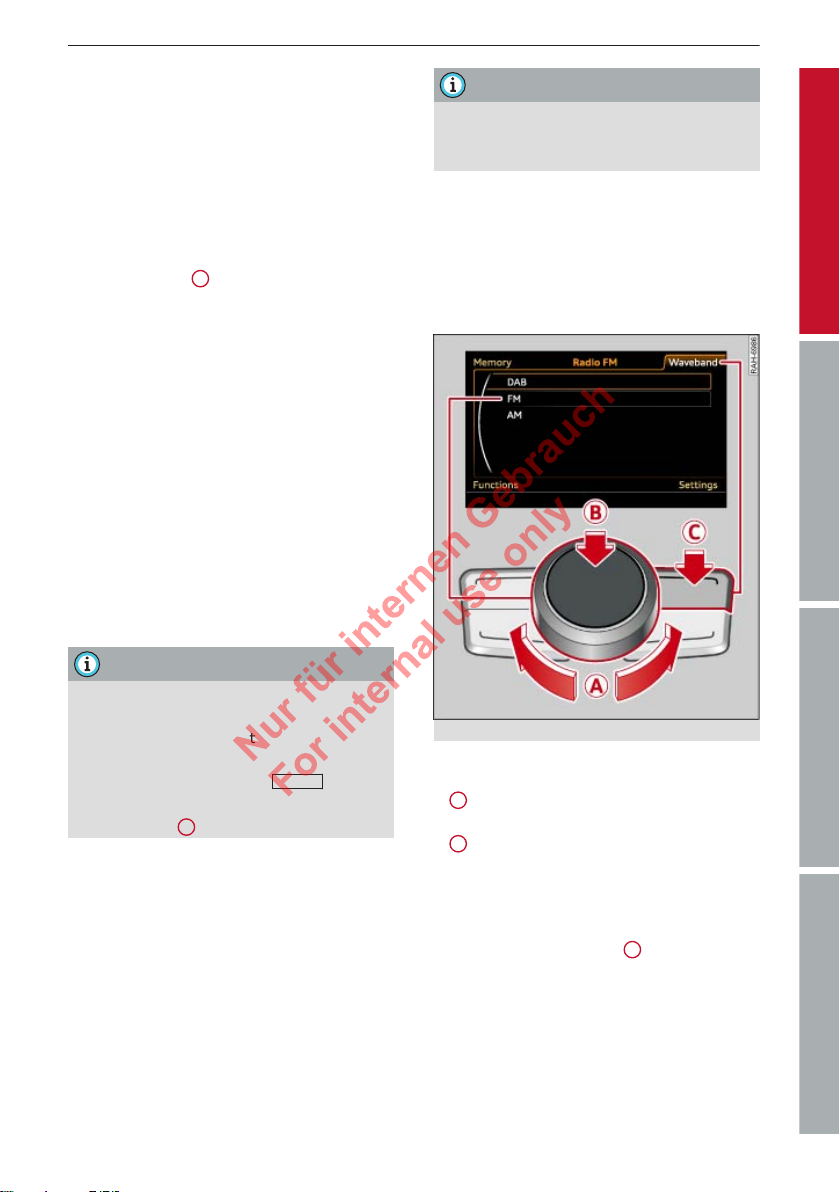
Fig. 2 How to use the controls
Selecting and confirming a function
►
A
o select a function: Turn the rotary
T
pushbutton to the desired function.
►
B
o confirm the function: Press the rotary
T
pushbutton.
Calling up a function in a corner of the
display
►
Press the control button
sponds to the corner of the displa
stance, the top right control button corresponds with the top right corner of the display.
C
that corre-
y. For in-
Page 10
8 MMI control console
Calling up the main menu
►
Press the
(
e.g. Radio) are displayed.
MENU
button. The MMI menus
Calling up a menu directly
►
Press the corresponding button
ð page 5, Fig. 1 towar
to open (e.g.
R
eturning to the previous function level
CK
►
Press the
BA
ds the menu you wish
or
MED
RADIO
button.
IA
6
).
MMI touch
The MMI touch pad is located on the surface
of the rotary pushbutton.
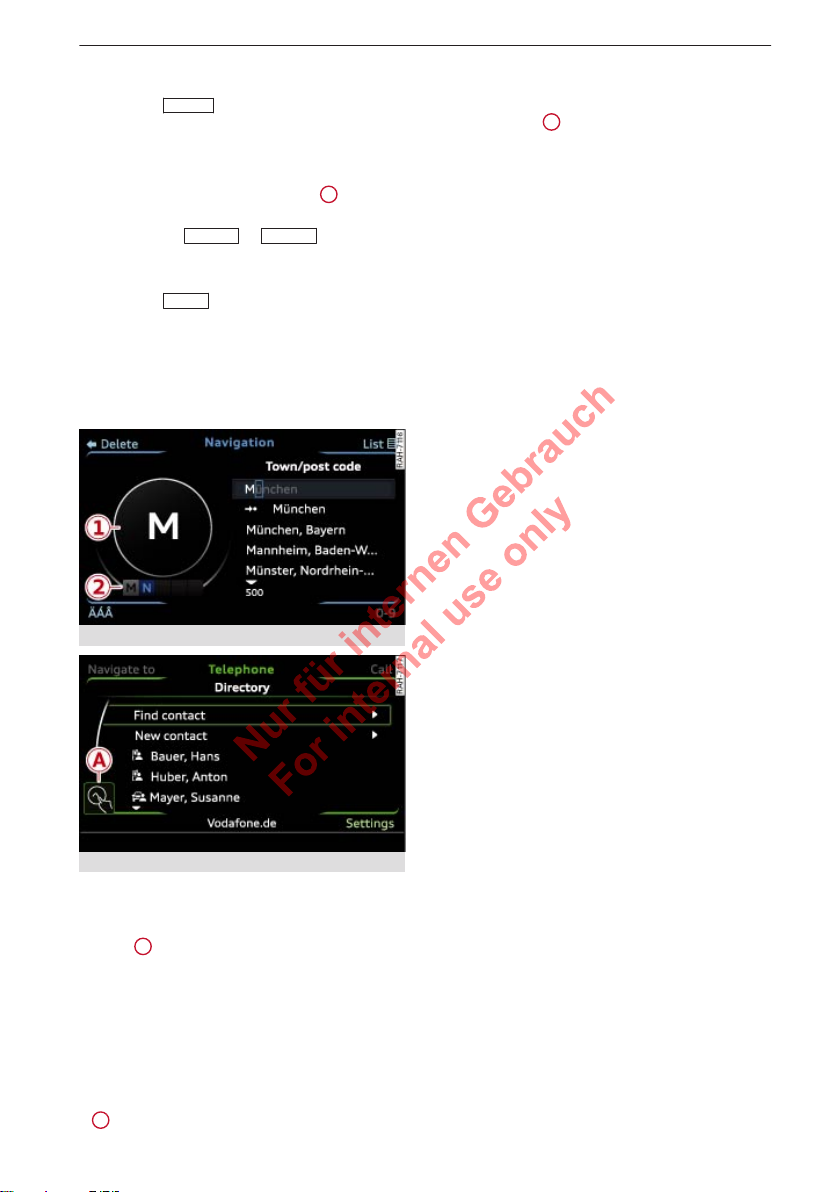
Entering a navigation destination
Fig. 3
Display when MMI touch is active
Fig. 4
When you can operate the system using the
MMI touch pad, the MMI scr
A
symbol
and the ring on the outside
ð Fig. 4
of the touch pad on the r
lights up.
Entering letters, numbers and symbols
– Write the character on the touch pad using
your finger. When the system recognises the
character, it will show it on the MMI display
1
ð Fig. 3 and r
ead it out loud.
een shows the
otary pushbutton
– T
o select a different character: Turn the ro-
tary pushbutton clockwise or anti-clockwise
2
and press it
– T
o enter a space: Move your finger from left
.
to right across the touch pad.
– To delete a character: Move your finger from
right to left across the touch pad.
– To end the entry: Press the rotary pushbut-
ton.
In navigation* mode you can stop entering
characters (e.g. for a destination) and jump directly to the selection list (of e.g. the towns
found) by pressing the rotary pushbutton.
Finding a contact in the directory
– To jump to a particular initial letter in the
list: Write the desired letter on the touch
pad with your finger.
– To narrow your search: Write further letters
on the touch pad with your finger.
You can select the function Find contact if you
want to stop entering letters for the contact;
you can then jump directly to the selection list
of the contacts found by pressing the rotary
pushbutton.
Moving the map/adjusting the sound
focus
– To move the crosshairs on the map: Press
the rotary pushbutton. The crosshairs will
appear on the map. To move the crosshairs,
move your finger in the desired direction on
the touch pad.
– Alternatively: Put your finger on the corre-
sponding area at the edge of the touch pad.
– To move the crosshairs of the sound focus:
Move your finger in the desired direction on
the touch pad.
Browsing through album covers/selecting
an album cover
– To browse through the album covers: Move
your finger to the left or right on the touch
pad.
– To select an album cover: Press the rotary
pushbutton.
Page 11

9MMI control console
Operating the DVD main menu
o select a menu option: Move your finger
– T
up/down or to the left/right on the touch
pad.
Speller for letters/numbers
Applies to vehicles: with phone pr
Fig. 5 Speller
o enter a letter/number: Turn the rotary
– T
pushbutton and use the pointer
to select the desir
lected character will appear larger in the se-
2
lection ring
. Press the rotary pushbutton
to confirm the letter
will appear in the entry field
ha
ve entered all characters, select and con-
5
firm OK
– T
o delete a letter/number: Using the rotary
.
pushbutton, turn the pointer to
ess the rotary pushbutton. To delete all
pr
characters in the entry field, select and
press and hold the rotary pushbutton until
all characters have been deleted.
e-installation or navigation system
1
ð Fig. 5
ed letter/number. The se-
/number. Your entry
13
. When you
9
and
– T
o confirm your selection: Press the rotary
pushbutton.
– T
o enter a special character: Press the con-
7
trol button for 0-9
desir
ed special character (such as a hyphen
ð Fig. 5 and enter the
or full stop) using the speller for numbers.
– Input help: In some cases (such as the navi-
gation function) certain letters are not available for selection if they are an illogical option. This means that you can only select
those letters that are offered as a logical
possibility for this entry.
Overview of the symbols in the speller
The symbols of the speller for letters/numbers are explained in the following table:
ControlsCommunicationNavigationEntertainment
Symbol / marking Explanation
1
2
3
4
5
Pointer
Selection ring The character selected with the pointer appears larger.
OK To confirm the entry.
The selected character is highlighted in white and appears larger
in the selection ring.
To enter a space in the entry field.
To move the cursor in the entry field forwards and backwards.
Page 12
10 MMI control console
Symbol / marking Explanation
6
7
8
9
10
11
List of suggestions
12
13
0-9/A-Z To switch the speller from letters to numbers and vice versa.
List To display a list of suggestions.
/Delete To delete the character to the left of the cursor.
No. of entries The number of list entries found is displayed.
Cursor The position that is currently being edited is marked.
Entry field The current entry is displayed.
To switch from lower case to upper case letters and vice versa.
E.g. while entering a destination, a list of large towns first and
then other towns in alphabetical or
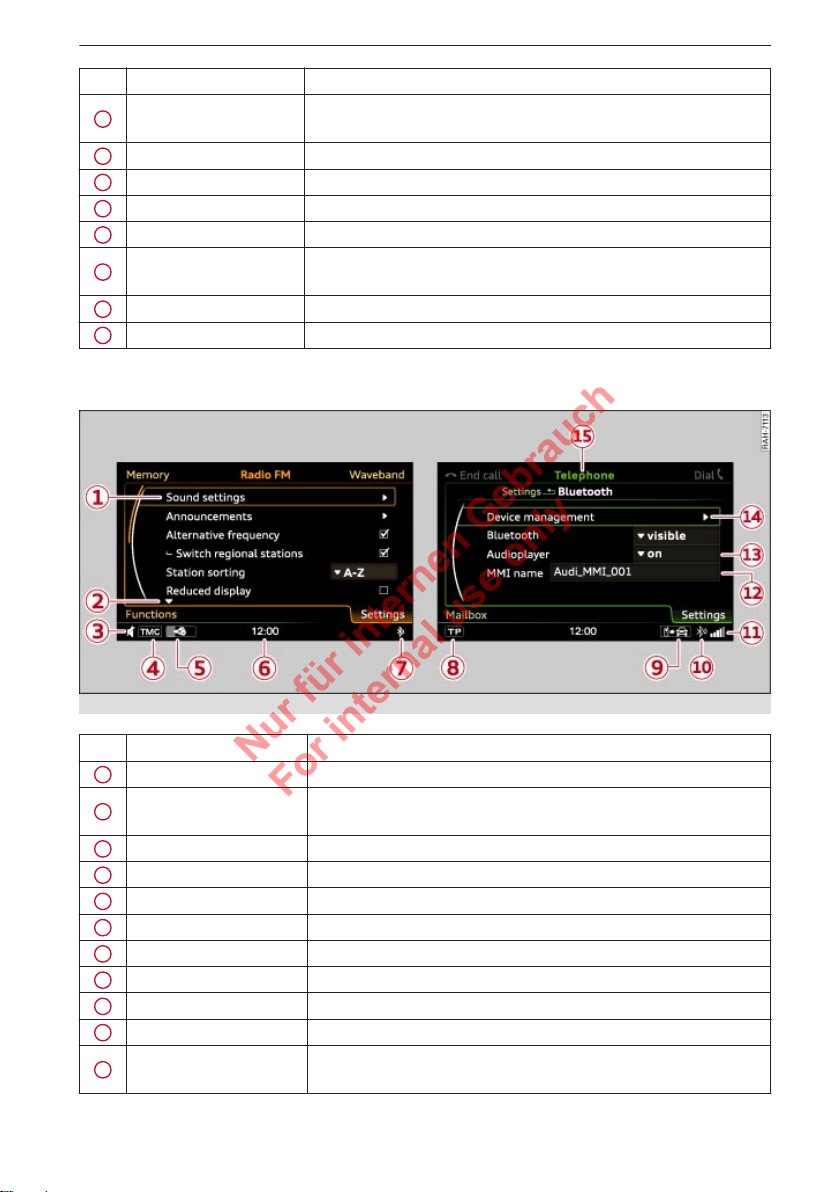
Menus and symbols
der is displayed.
Fig. 6 Menus and symbols
Symbol / marking Explanation
1
2
3
4
5
6
7
8
9
10
11
Selected option Selected function
Arrow
up/
down
Further available functions
Mute Audio source muted ð page 7
TMC Reception of TMC traffic information
Copying procedure Copying of audio/video files to the jukebox
Time Time setting ð
Bluetooth* Bluetooth activated on the MMI ð page 38
TP Reception of traffic announcements ð table on page 56
Import process Import/update of contacts in the directory/call list
Bluetooth* Bluetooth device connected ð page 25 / ð page 33
Signal strength indica-
tor
Reception strength of mobile phone network of a connected mobile phone ð page 33
page 29
Page 13
Symbol / marking Explanation
12
13
14
15
Entry field
Selection list
Arrow
Heading Selected menu (e.g. T
Entries that can be changed using the speller for letters/numbers ð page 9
Settings for the selected function that can be called up by press-
otary pushbutton
ing the r
Submenu with additional functions that can be called up by
essing the rotary pushbutton
pr
11MMI control console
elephone)
ControlsCommunicationNavigationEntertainment
Page 14
12 Multi-function steering wheel
Multi-function steering wheel
w to use the
Ho
controls
Applies to vehicles: with multi-function steering wheel
You can use the multi-function steering wheel
to operate a number of MMI functions, adjust
the volume and switch the speech dialogue
system on/off.
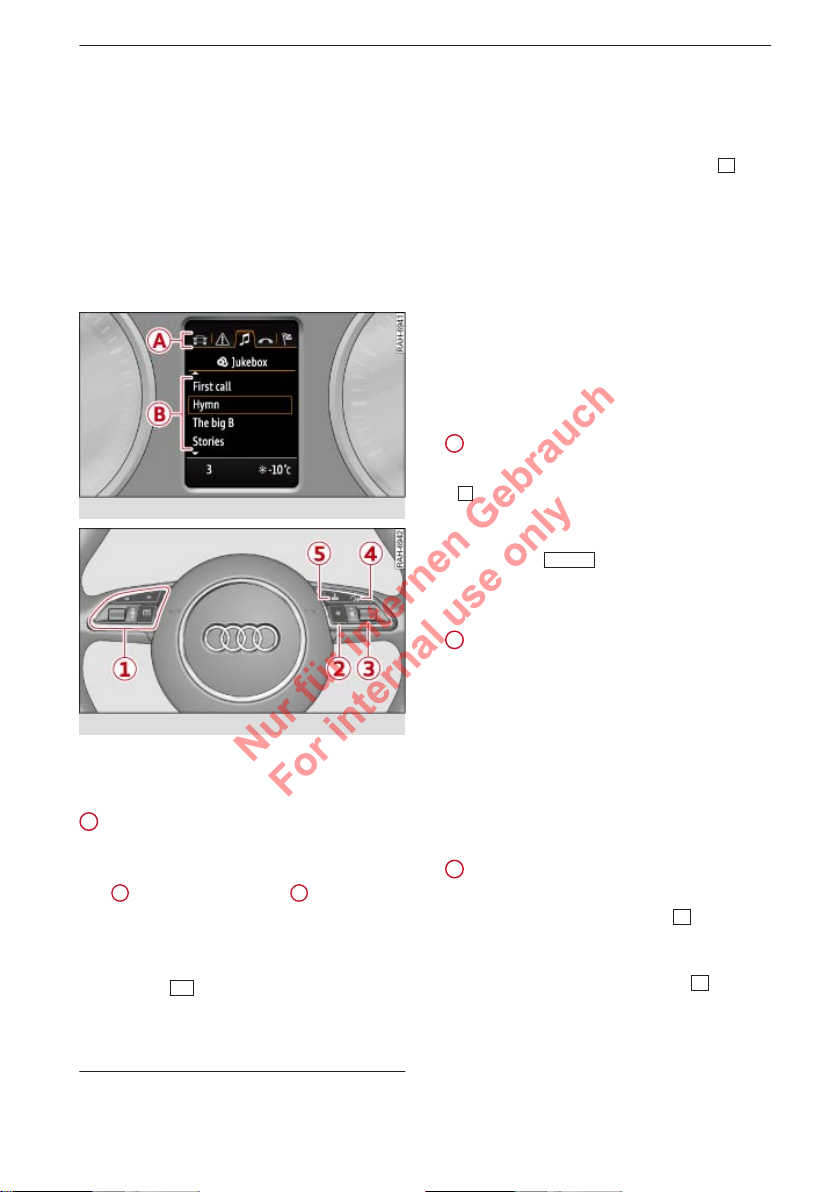
Fig. 7 Driver information system
– T
o confirm your selection: Press the left
thumbwheel.
– To scroll through lists rapidly: Scroll the
left thumbwheel quickly.
– To open/leave a submenu: Press the
but-
ton.
The equipment installed on your vehicle determines which of the following tabs ar
e avail-
able:
– 1st tab: Information on car, assist systems
– 2nd tab1): Warning/indicator lamps, driver
messages, speed warning
– 3rd tab: Radio/media ð page 15
– 4th tab: Telephone* ð page 13
– 5th tab: Navigation* ð page 14
2
Steering wheel button
o call up the assigned function: Press the
– T
button on the multi-function steering
.
wheel
– To change the assigned function: On the
MMI, select
MENU
button > Car > contr
ol
button Car systems* > Vehicle settings >
Steering wheel button.
Fig. 8 Controls on the multi-function steering wheel
Important: The ignition and the MMI system
must be switched on ð page 7.
1
How to use the driver information
system
The driver information system shows information B in several display tabs A. The driver
information system can be oper
ated using the
multi-function steering wheel:
– To switch between tabs: Press the left/right
side of the
o select a function: Scroll the left thumb-
– T
button.
wheel to the desired function.
1)
The second tab is only visible if one or more warning/
indicator lamps or driver messages ar
the relevant system is switched on.
e displayed or if
3
Adjusting the volume
ou can adjust the volume of an audio source
Y
or system message (e.g. during a speech dialogue) directly while it is being played.
– Volume up/down: Scroll the right thumb-
wheel up/down.
– Mute: Press the right thumbwheel.
– Unmute: Scroll the right thumbwheel up or
press the right thumbwheel.
4
Switching the speech dialogue system
off
on/
– To switch on: Briefly press the
ti-function steering wheel. Give a
the mul
button on
spoken command after the beep signal.
– To switch off: Press and hold the
for sever
al seconds. Or: Say the command
button
CANCEL.
Page 15
13Multi-function steering wheel
For more information about the speech dialogue system, r
5
Navigation cue during active route
efer to ð page 17.
guidance*
o have the last navigation cue repeated:
– T
Press the
– T
o adjust the volume of the navigation
button.
cues: Scroll the right thumbwheel up/down
while a navigation cue is being played.
Using the telephone
Overview
Applies to vehicles: with mul
and phone pre-installation
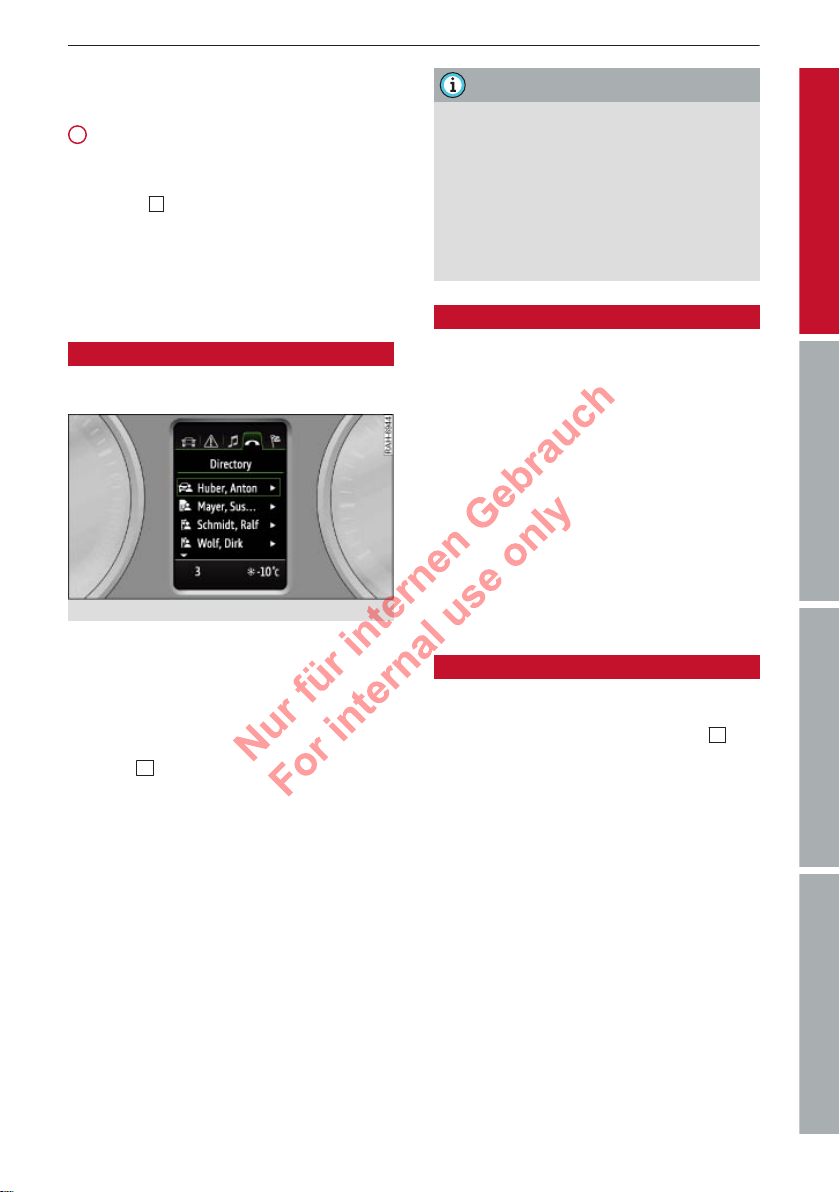
Fig. 9 Directory
Important: A mobile phone must be connected to the MMI ð
phone display tab must be displayed
ð page 12.
The following options are available when you
press the
– T
button:
o call a directory contact: Select Directory.
Select and confirm a contact.
– To call a contact in the call list: Select Call
list. Select and confirm a contact.
Directory contacts: Only directory contacts for
which a telephone number is stored are displayed in the driver information system. If
several telephone numbers are stored for one
contact, the list of stored telephone numbers
is displayed first when the contact is selected.
For more information on the symbols displayed, refer to ð page 41, Fig. 33.
Call list: The call lists contain all received,
placed and missed calls ð page 35, Fig. 26.
ti-function steering wheel
page 33, and the tele-
Note
– The functions of the telephone can be
oper
ated using the multi-function steer-
ing wheel only if the telephone equipment was installed at the factory.
– The functions of the telephone depend
on your mobile phone and whether they
are supported by your mobile network
service provider.
Incoming call
Applies to vehicles: with mul
and phone pre-installation
►
To answer a call: Press the left thumbwheel
ti-function steering wheel
when there is an incoming call.
►
To ignore a call: Select and confirm Ignore
when there is an incoming call.
►
To end a call: Select and confirm End call.
Caller information: Depending on whether
the caller is stored in the directory and whether the telephone number is transmitted with
the call, the name, the telephone number or
Unknown will appear on the display of the
driver information system.
During a call
Applies to vehicles: with mul
and phone pre-installation
– To make a further call: Select Hold >
ti-function steering wheel
but-
ton > Directory or Call list > entry in list.
o answer a further call when you are talk-
– T
ing on the phone and have another call on
hold: Select Replace. The current call will be
replaced by the incoming call.
Other functions are:
Microphone off: If you select and confirm this
option, the caller will no longer be able to
hear you; you will still be able to hear the caller.
Hold/Resume: You can put a call on hold and
retrieve it from the hold queue later.
Switch: You can switch between two phone
calls (one of them will be on hold at any given
time). Select End call to end whichever call is
ControlsCommunicationNavigationEntertainment
Page 16
14 Multi-function steering wheel
active. The call on hold will remain in the hold
queue and can be r
etrieved by selecting Re-
sume.
Conference: Up to five callers and one caller
on hold can take part in a conference (depending on the network service). To set up a further call, select Hold to place all the members
of an existing conference on hold. You can
then press the
to a contact in the dir
button to place another call
ectory or the call list. Select Resume if you want to retrieve all participants in an existing conference from the hold
queue.
Note
The option Call waiting must be activated
on your mobile phone for you to be made
a
ware of incoming calls during a conversation. The call options depend on your mobile network service provider. For more information, contact your service provider.
Navigation
Overview
Applies to vehicles: with mul
and navigation system
Important: A destination or tour plan must
have been entered ð page 45, the route
guidance function must have been started
ð page 48, and the navigation display tab
must be open ð page 12.
The following options are available when you
press the
– T
button:
o display the navigation screen when
route guidance is active: Select Route guidance.
– To display the compass when route guid-
ance is not active: Select Compass.
– To cancel the active route guidance: Select
Stop route guidance.
– To switch off the navigation cues: Select
Voice guidance off.
– To start route guidance to the stored home
address: If applicable, select Stop route
guidance, and then select Home address.
ti-function steering wheel
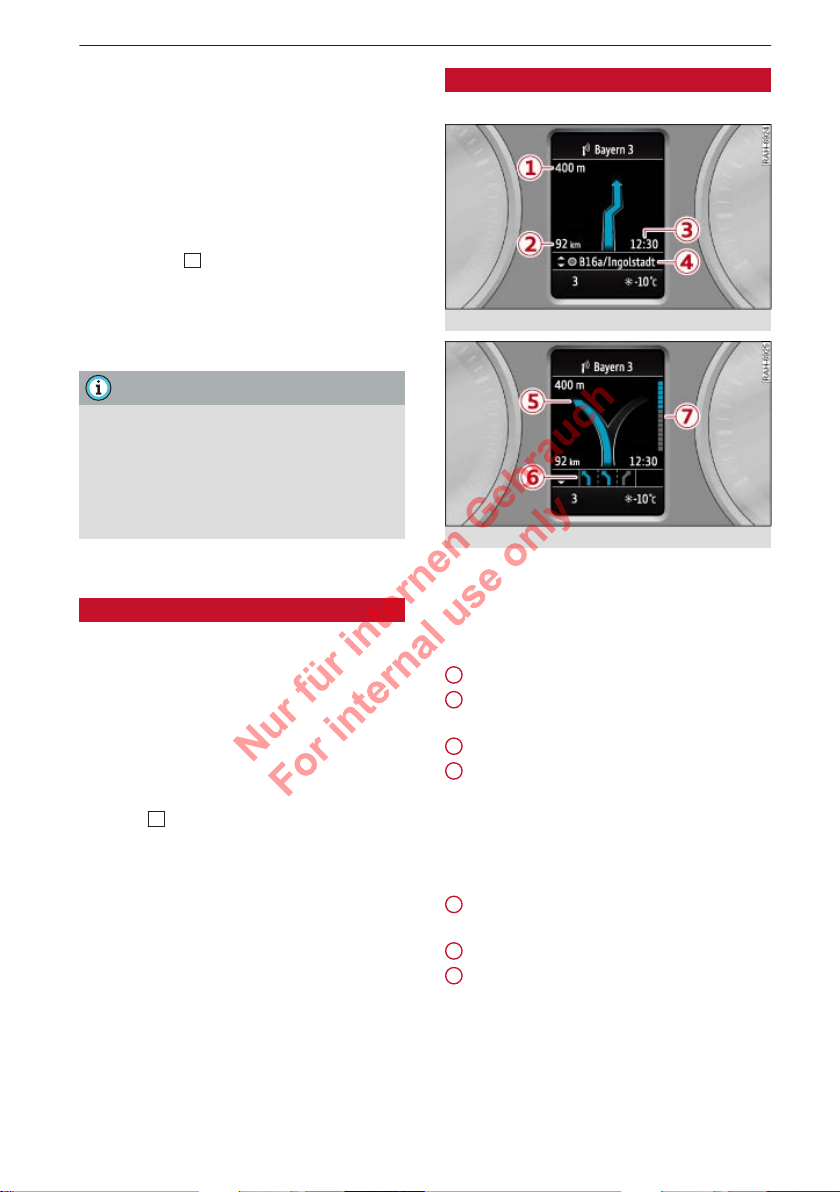
Display when route guidance is active
Applies to vehicles: with na
Fig. 10 Display when a lane change is required
Fig. 11 Display when a turn-off is required
vigation system
After you have entered a destination or a tour
ve started route guidance, the naviga-
and ha
tion display tab is opened in the driver information system:
1
Distance to turn-off
2
Total distance to destination/
next stopover
3
Estimated time of arrival
4
Name of motorway, major road
or street you are driving on. If
the symbol is displayed in
front of the street name, you are
being directed to turn into the
street.
5
Arrow indicating direction of upcoming turn-off
6
Lane recommendation
7
If an arrow is displayed, a bar
graph will also appear. The fewer bars are displayed, the shorter the distance to the turn-off
point.
If route guidance has not been started, a compass is shown in the navigation display tab.
Page 17
15Multi-function steering wheel
WARNING
The route calculated by the navigation system is a r
ecommendation of how best to
reach a destination. Pay attention to traffic
lights, no-stopping signs, lane change restrictions, one-way streets, etc.
Note
An exclamation mark “!” in fr
ont of the
street name indicates that the navigation
data of the MMI system do not contain all
the information on this street or street
section. Pay attention to traffic rules such
as one-way streets or pedestrian zones.
Listening to the radio
Applies to vehicles: with mul
ti-function steering wheel
Playing media
Applies to vehicles: with multi-function steering wheel
Important: A media drive must contain audio
files ð page 22, and the media display tab
must be displayed ð page 12.
►
To play an audio file: Select and confirm a
ack.
tr
►
To pause/resume playback: Press the right
thumbwheel. To continue playback, press
the right thumbwheel again.
The following options are available when you
press the
– T
source, e.g. Audi music interface.
– To call up the radio via the overview of
sources: Select and confirm a waveband.
The MMI media drives do not support
DRM-pr
marked with the symbol .
button:
o select a source: Select and confirm a
Note
otected files; these files are
ControlsCommunicationNavigationEntertainment
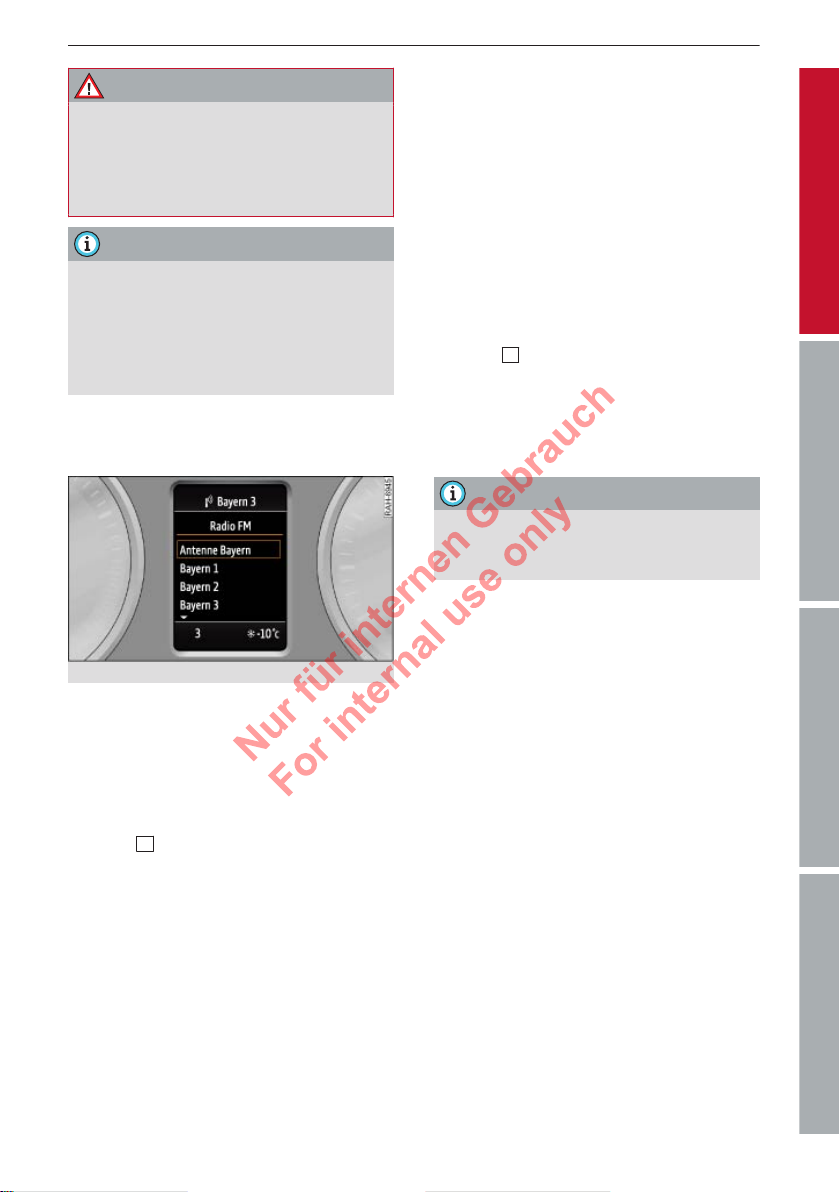
Fig. 12 Radio menu
Important: The radio/media display tab must
be displa
►
yed ð page 12.
To tune to a station from the station list:
Select and confirm a radio station.
The following options are available when you
press the
– T
button:
o tune to a station from the memory list:
Select and confirm Memory and then select
and confirm a radio station.
– To set the waveband: Select and confirm
the waveband.
– To call up media via the overview of sour-
ces: Select and confirm an audio source.
Page 18
16 Speech dialogue system
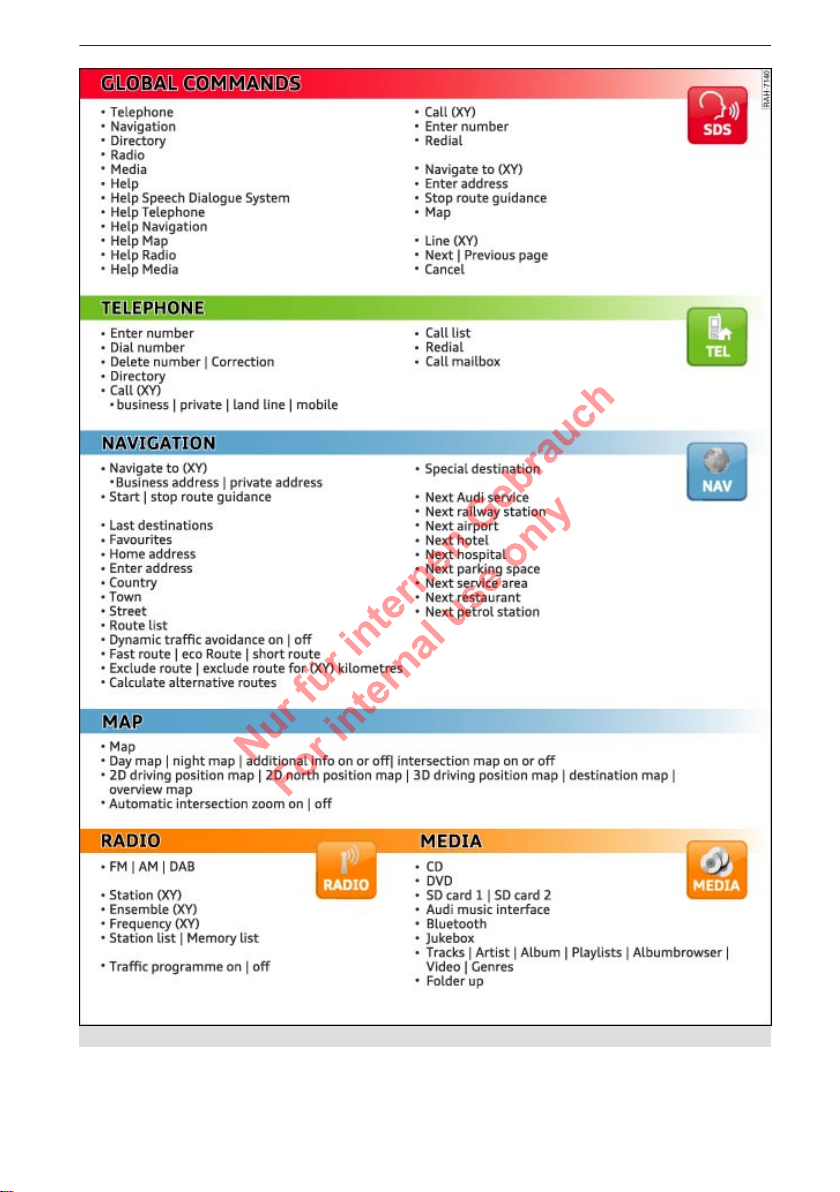
Fig. 13 Overview of commands
Page 19
17Speech dialogue system
Speech dialogue system
w to use the speech
Ho
dialogue system
Applies to vehicles: with speech dialogue system
You can operate many infotainment functions conveniently by voice.
Fig. 14 Talk button and right thumbwheel
Important: The ignition and the MMI system
must be switched on ð page 7, you must not
be talking on the phone, and the parking aid
must not be active.
►
To switch on: Briefly pr
ð Fig. 14 on the mul
wheel* and give a spoken command after
the beep signal.
►
To switch off: Pr
for sever
CANCEL.
al seconds. Or: Say the command
ti-function steering
ess and hold the
Input help
The system guides you through the input routine with cues and messages.
– Input help messages on screen: After the
speech dialogue system is switched on, the
MMI display will show a selection of possible commands.
– Spoken input help cues: To have the system
play the commands currently possible,
switch on the speech dialogue system and
say Help.
How to help the system understand you
Speak clearly in a normal volume. Speak louder if you are driving fast.
ess the
button
button
Speak in a normal tone without long pauses.
void speaking when the speech dialogue sys-
A
tem is saying a cue.
Close doors, windows and sun roof* to reduce
background noise. Make sure that passengers
are not talking when you say a command.
Keep the air outlets of the air distribution system pointed away from the microphone,
which is fitted in the vicinity of the front interior lights in the headliner.
The system should only be operated by the
driver, since the handsfree microphone is directed towards the driver.
Other settings
Press the Setup MMI control button to access
the main menu if you would like to change
other settings, e.g. for the individual speech
training to adapt the system to your voice,
the Command display or the volume of the
navigation cues ð page 31.
1
WARNING
– Please dir
road at all times! As the driver, you have
full responsibility for the safety of the
vehicle and other road users. For this reason, you should only use the functions in
a manner that allows you to maintain
control of the vehicle in all situations accident risk!
– The speech dialogue system must not be
used in cases of emergency, since the
voice changes in stressful situations. This
could result in a failed or delayed telephone connection. Always dial emergency numbers manually!
ect your full attention to the
Note
ou can interrupt a spoken cue from the
– Y
speech dialogue system any time by
pressing the
ter a new command.
– The speech dialogue system can be can-
celled and deactivated by pr
button; you can now en-
essing any
ControlsCommunicationNavigationEntertainment
Page 20

18 Speech dialogue system
one of the buttons on the MMI control
console (
– The dialogue is paused when an incom-
ing telephone call is received; you can
continue the dialogue by ignoring the
call. If you answer the call, the dialogue
will be cancelled.
– No navigation cues* or traffic announce-
ments are given when a dialogue is running.
–
The command display can be switched
on/
MMI control button.
except the rotary pushbutton).
off in the main menu via the Setup
– Y
ou can select an entry from a list both
via the speech dialogue system and using the rotary pushbutton.
Notes on the overviews of commands
The following over
mands that you can give to operate the MMI
via the speech dialogue system.
Alternative commands are separated by the
symbol “|”; for example you can say: Tele-
phone | (or) Navigation | (or) Radio.
Commands that belong together and should
be spoken as a sequence are marked with the
symbol “>”; for example you can say: Enter
address > (and subsequently) Enter country.
views show you the com-
Global commands
Applies to vehicles: with speech dialogue system
You can give global commands any time, irrespective of the menu curr
Function Say:
Calling up the menu Telephone | Directory | Navigation | Radio | Media
Having the system play the possible commands
Telephone functions Call (XY), e.g. Call John Smith |
Navigation functions Navigate to (XY), e.g. Navigate to John Smith |
Selecting an entry from a list Line (XY)
Scrolling through a list Next page | Previous page
Switching off the speech dialogue
system
ently selected.
Help | Help speech Dialogue System | Help Telephone | Help
Navigation | Help Map | Help Radio | Help Media
Enter number | Redial | Directory
Enter address | Stop route guidance | Map
Cancel
Telephone
Applies to vehicles: with speech dialogue system and phone pr
Important: A mobile phone must be connected to the MMI ð page 33, and the T
phone menu must be open ð page 35.
ele-
e-installation
Page 21
Function Say:
Calling a contact from the director
y
Dialling a specific number stored
for a contact
Dialling a phone number when an
address card is open
Displaying call list Call list
Calling the last number dialled Redial
Dialling a telephone number Enter number > phone number in blocks of individual digits
Correcting an entered phone
number
Displaying contact information Directory > desired contact when requested, e.g. John Smith
Listening to voice mail messages Call mailbox
Note
If you have a mobile phone that transmits
first names and surnames separ
Call (XY), e.g. Call John Smith
Call (XY) business | private | land line | mobile,
e.g. Call John Smith private
Call | Call business number | Call private number | Call land
line | Call mobile business number
when requested, e.g. 0744 12 345 67 > Dial
Delete number | Correction
can select directory contacts both by entering the full name (“first name, sur
ately, you
name” and “surname, first name”) and by
saying only the first name or surname.
-
Navigation
Applies to vehicles: with speech dialogue system and na
Important: The Navigation must be open
ð page 45.
vigation system
You can say the following commands to enter
a destination:
19Speech dialogue system
ControlsCommunicationNavigationEntertainment
Function Say:
Calling up a navigation list Last destinations | F
Entering an address with assistance from the system
Entering an address directly Enter address > name of town, street and house number,
Individual commands for entering
a destination
Entering a town centre as the destination
Navigating to a contact Navigate to (XY), e.g. Navigate to John Smith
Navigating to a specific address
stored for a contact
Starting route guidance when an
address card is open
Changing the address while route
guidance is active
Enter address > follow the directions given by the system
e.g. “London, Edgware Road 132”.
Enter address > Country | Town | Post code | Street | House
number
Enter address > town when requested > Centre > Start route
guidance
Navigate to (XY) business address | Private address,
e.g. Navigate to John Smith business address
Navigate | Navigate to private address | Navigate to business address
Enter address > desired address when requested > confirm
new destination when requested
avourites | Home address
Page 22

20 Speech dialogue system
Function Say:
Adding a stopover while route
guidance is active
Starting route guidance after
entering a destination
Cancelling the active route guidance
Calculating three alternative
r
outes
The following special destinations
can be set directly as the destination
Changing the search area for
entering a special destination
Entering a special destination
in the selected search area with
assistance from the system
Entering a special destination
in the selected search area directly
You can say the following commands to make
additional na
vigation settings:
Enter address > desired address when requested > No > con-
firm address as new stopover when requested
Start route guidance
Stop route guidance
Calculate alternative routes
Next Audi Service | Next railway station | Next airport |
Next hotel | Next hospital | Next parking space | Next service area | Next restaurant | Next petrol station
Special destination > Change search area >
In immediate vicinity | In vicinity of route | In vicinity of
destination | In vicinity of stopover | In new town | Nationwide | In new country
Enter special destination > Audi Service | Railway station |
Airport | Hotel | Hospital | Parking space | Service area |
Restaurant | Petrol station
Enter special destination > special destination and search
area, e.g. “Find petrol station in immediate vicinity”
Function Say:
General map options Map | Day map | Night map | Additional info off | Intersec-
tion map on/off
Map type 2D driving position map | 2D north position map | 3D driv-
ing position map | Destination map | Overview map
Automatic map zoom Automatic zoom | Automatic zoom off
Displaying the route list Route list
Displaying remaining distance/
time
during active route guidance
Switching the navigation cues on/
off during active route guidance
Dynamic traffic avoidance Dynamic traffic avoidance on | Dynamic traffic avoidance
Route criteria Fast route | Eco route | Short route
Excluding the next section
of the route
Excluding a certain section of the
route
Destination info
Voice guidance on | Voice guidance off
off
Exclude route
Exclude route for (XY) km
Page 23

21Speech dialogue system
Note
– Depending on the selected menu lan-
guage and the countr
y you are in, you
may have to spell destinations to enter
them for route guidance.
– You can also switch on the speech dia-
logue system and say a command when
Radio
Applies to vehicles: with speech dialogue system
Important: The Radio menu must be open
ð page 54.
Function Say:
Selecting a waveband FM | AM | DAB*
Tuning to a station from the station list
Tuning to a station from the
memory list
Setting the frequency Frequency (XY)
Switching the traffic announcements on/off
a)
Applies for the DAB* waveband.
Station (XY) | Ensemble (XY)a) | Station list > Line (XY)
Memory list > Line (XY)
Traffic programme on | Traffic programme off
route guidance is active and a navigation
cue is being pla
yed.
– Navigation cues are not played during a
running dialogue.
ControlsCommunicationNavigationEntertainment
Media
Applies to vehicles: with speech dialogue system
Important: The Media must be open
ð page 58.
Function Say:
Selecting a source directly Jukebox | CD | SD card | Audi music inter
DVD
To select an audio/video* file
from the jukebox:
Selecting an audio/video* file
from an iPod® (source: Audi music interface)
Navigating in a structure of folders/list
Video | Playlists | Artist | Album | Tracks | Genres | Album
browser
Video* | Playlists | Artist | Album | Tracks | Podcasts | Genres
| Composers | Audiobooks
Folder up | Line (XY)
face | Bluetooth |
Page 24

22 Media drives/connections
Media drives/ connections
troduction
In
The MMI system includes various media drives
and connections. For example, you can play
audio/video* files from the jukebox or connect
a portable player to the Audi music interface
and operate it via the MMI.
Notes
General notes
Media and format limitations:
tem (including the SD card reader and the
connection for the USB mass storage device*)
has been tested for use with many of the
products and media currently available on the
market. However, there may be some devices/
media and audio/video* files that are not supported or cannot be played, or the functionality may be limited under certain circumstances.
Copyright: Please note that audio/video* files
are copyright-protected.
The MMI media drives do not support DRMprotected files; these files are marked with
the symbol .
Data storage: Never store important data on
SD cards, the jukebox, CDs/DVDs or portable
players. Audi shall not accept any liability
whatsoever for the loss of files or data and
media.
Loading times: The more files, folders or playlists are stored on a storage device, the longer
it will take to load the audio files/video* files.
We recommend using a storage device which
contains only audio/video* files. If you want
to reduce the time it takes to load the audio/
video* files, you can create subfolders (e.g. for
an artist or album). The loading time will be
extended additionally if you are importing data.
Additional information: Additional information stored on audio files (e.g. artists, tracks,
The MMI sys-
album covers) will be displayed automatically
when the files ar
is not stored on the relevant medium, the
MMI system will use Gracenote®. Nevertheless, additional information may not be displayed in some cases.
Restricted functionality: If you experience restricted functionality, reset the Media settings to the factory defaults ð page 31.
For information on the characteristics of the
supported media and file formats, please refer to ð page 27.
e played. If this information
CD/DVD mode
/DVD and format limitations: In view of
CD
the variety of CDs/DVDs and the difference in
memory capacities, the functionality may be
restricted in the case of some storage devices.
Under certain circumstances, audio CDs/video
DVDs that are copy-protected or CDs/DVDs
that do not comply with the standard audio
format, and multisession CDs cannot be
played at all, or the functionality may be limited. We recommend always finalising the
burning process when creating multisession
CDs. Multisession is not supported for DVDs.
Handling CDs/DVDs and the DVD drive: To
ensure perfect, high-quality playback and
avoid read error messages or damage to the
media drive, always store unused CDs/DVDs in
a suitable case and do not expose them to direct sunlight. Do not use:
– Damaged, dirty or scratched CDs/DVDs
– Single CDs/DVDs (diameter 8 cm / 3 inches)
– Non-circular CDs/DVDs (shape CDs)
– CDs/DVDs with stickers
– Protective rings
– Cleaning disks
Thermal cut-out: In the case of extremely hot
or cold outside temperatures, it is possible
that the playback of a CD/DVD will temporarily not function. A thermostat switch is installed to protect the CD/DVD and the reading laser.
Page 25

23Media drives/connections
Laser devices: Laser devices ar
e divided into
the safety classes 1 to 4, as specified by DIN
IEC 76 (CO) 6/VDE 0837. The optical readers
installed in your vehicle are classified as safety class 1. Lasers used in devices that fall into
this category are very weak and well screened,
so there is no danger if used correctly.
Device cover: Never remove the device cover.
The device has no components that can be
serviced by the owner.
Jukebox
Audio/video files on a CD/DVD-ROM, on a USB
mass storage device or on an SD card can be
copied onto the jukebox.
IA
►
The used/free space in the jukebox memory
(max. 10 GB) and the number of stored tracks
are shown on the MMI display.
Filling the jukebox
– To select files/folders: Select Copy data to
– To start the copying procedure: Press the
– To hide the copying procedure: Select and
– To cancel the copying procedure: Select and
During the copying procedure, the audio files
are automatically sorted according to the categories in the media centre based on the additional information stored for the files
MED
Select:
Settings > Fill
jukebox >
button > control button
/delete jukebox.
>
source
files/folders
. To select
all files/folders, press the control button for
All. Or: Select and confirm a folder, and
press and hold the rotary pushbutton for
several seconds. All files in the folder will be
selected for copying.
control button for Copy. The status of the
copying procedure will be shown on the MMI
display, and the corresponding symbol will
appear in the status line.
confirm Continue copying in background.
The copying procedure will be hidden.
confirm Cancel copying procedure. Or: Remove the source you are importing files
from. Files that have already been copied
will remain stored.
ð page 59.
Video files are copied into the
Videos category in the media centre.
Deleting the jukebox
Important: The jukebox must contain audio/
video files.
– To select files/folders: Select Delete data
from jukebox > structure of folders in juke-
box > files/folders. To select all files/folders, press the control button for All. Or: Select and confirm a folder, and press and hold
the rotary pushbutton for several seconds.
All files in the folder will be selected for deletion.
– To delete files/folders: Select the control
button for Start deletion > Yes, delete files.
The status of the deletion process will be
shown on the MMI display. During the deletion process the playback of the jukebox is
interrupted; it is started again automatically
once the deletion process has been completed.
The jukebox is started and operated via the
MMI ð page 58.
CAUTION
Only copy audio/video files while the engine is running; other
wise the vehicle bat-
tery will be discharged.
Note
– For legal r
easons it is not possible to
copy tracks from audio CDs onto the
jukebox.
– Files that have already been copied are
recognised and greyed out automatically; they will not be copied again.
– It is not possible to copy and play audio/
video files in the DVD drive at the same
time.
–
For legal reasons there is no export function for the juk
–
Files or tracks that do not include stored
ebox.
additional information are listed as un-
known. We recommend marking the audio files with the corresponding additional information (e.g. ID3 tags).
ControlsCommunicationNavigationEntertainment
Page 26

24 Media drives/connections
– When handing over your vehicle e.
new buyer, reset the jukebox to the factory settings ð page 31.
g. to a
DVD drive
The DVD drive is located in the glove box.
Fig. 15 DVD drive
o load a CD/DVD: Insert the CD/DVD (text
– T
facing upwards) into the DVD slot
ð Fig. 15, holding it str
– To eject a CD/DVD: Press button
fter it has been ejected, the CD/DVD will be
A
pulled back into the DVD drive automatically
after about ten seconds if it is not removed
from the DVD slot.
The DVD drive is started and operated via the
MMI ð page 58.
aight.
CAUTION
– Never use any force to push a CD
to the drive. The CD/DVD will be drawn
into the slot automatically.
– Do not insert any CDs/DVDs with stickers
into the media drive. The stickers could
become detached from the CD/DVD and
damage the drive.
Note
It is possible that the playback of the CD/
D
VD may stutter if it contains audio/video
files with a high data rate.
2
1
.
/DVD in-
SD card readers
The SD card readers are located in the glove
box.
Fig. 16 Inserting SD card
o insert an SD card: Insert the SD card
– T
(printed side facing up, contact surface facing down) into the slot of the card reader
ð Fig. 16.
card should be at the front right. Then push
the SD card into the slot until you feel it engage.
– To remove the SD card: Briefly press the SD
card to release it.
The SD card reader is started and operated via
the MMI ð page 58.
Only use one-piece SD cards. If you use
adapter car
SD card can become detached from the
adapter (e.g. caused by jolting, etc). Parts
could then get stuck in the drive, impairing
the functionality of the system.
– W
formance category 4 or higher to access
the audio files as quickly as possible.
– Store the SD cards in a suitable case to
protect them from dirt and dust and to
avoid damage.
The cut-away corner of the SD
CAUTION
ds (more than one piece), the
Note
e recommend using SD cards with per-
1
Page 27

Bluetooth audio
yers
pla
Applies to vehicles: with phone pre-installation
Bluetooth audio players (e.g. mobile phones
with integrated audio players) can be connected to the MMI system via Bluetooth.
Important: The vehicle must be stationary,
and the Bluetooth function of your portable
player and the Audio player of the MMI system must be switched on ð page 38.
– To bond a Bluetooth audio player: Select
MEDIA
button > control button Source >
Bluetooth audio player > Connect new B
audio player. The available Bluetooth audio
players are displayed. Select and confirm
the desired Bluetooth audio player and then
select and confirm the Audio player profile.
A 4-digit PIN code will appear on the display. Select and confirm Yes and enter this
PIN code on the Bluetooth audio player.
– To enter any 4 to 16-digit PIN code, select
and confirm No when the PIN code is displayed and enter your own personal PIN
code on the MMI and then on the Bluetooth
audio player.
– Fast bonding (secure simple pairing): If
your Bluetooth audio player supports this
function, a 6-digit PIN code will be shown
on your audio player and on the MMI display
simultaneously. Confirm this PIN code on
the Bluetooth audio player and on the MMI.
Depending on the device you are using, the
media are started and operated using the
portable player or the MMI system
ð page 58.
Note
– P
ay attention to any connection queries
on your Bluetooth audio player.
– You have to enter the PIN code once on-
ly. Any Bluetooth devices that have already been bonded to the MMI system
once are connected automatically when
they are within range.
T
– Y
ou can bond several Bluetooth audio
players to the MMI system; however only
one connection is active at a time.
– The system supports the Bluetooth pro-
tocols A2DP and AVRCP (1.0/1.3).
– Which media functions are supported
depends on the Bluetooth audio player
you are using.
– For more information on which devices
are supported, please go online (e.g.
www.audi.com/mp3 or www.audi.com/
bluetooth) or contact an Audi dealer.
Audi music interface
Introduction
You can connect your portable player (e.g.
MP3 player) to the Audi music interface using
special adapter cables*. The adapter cables*
are available from Audi dealers or specialist
retailers.
Fig. 17 Adapter cable
A
iPod® adapter cable*/iPod® adapter cable
plus*
B
Stereo adapter cable with 3.5 mm jack
plug*
C
Mini USB adapter cable*
D
Micro USB adapter cable*
E
USB adapter cable*
F
AV adapter cable*
CAUTION
Handle the adapter cable with care. Make
sur
e the cable does not become pinched or
trapped.
25Media drives/connections
ControlsCommunicationNavigationEntertainment
Page 28

26 Media drives/connections
Setup
The Audi music interface is located in the centre console beneath the centre armrest.
Fig. 18 Connecting a portable player
o connect an adapter cable: Connect the
– T
adapter cable*
on the Audi music interface
necting the por
o disconnect the adapter cable from the
– T
3
Fig. 18 to the interface
ð
1
before con-
table player
5
(e.g. iPod®).
Audi music interface: With the release tab
2
pressed, pull the connector off the Audi
music inter
face.
– To disconnect the iPod® adapter cable
(plus)* from the iPod®: With the release
4
tabs
pressed, pull the iPod® connector
out of the iP
od®.
Depending on the device you are using, the
media are started and operated using the
portable player or the MMI system
ð page 58.
CAUTION
– T
o avoid damaging the connection,
please take care when detaching the connector from the Audi music interface.
– Very high or very low temperatures (a
common occurrence in a car's interior)
can cause damage to portable players
and/or impair their performance. Please
do not leave your portable player in the
vehicle in case of extreme temperatures.
Note
– Do not use USB extension cables or
adapters as these impair the functionality
.
– It cannot be guar
anteed that portable
players which do not meet the specification USB 2.0 will function via the MMI.
– USB hubs are not supported.
– The iPod®/iPhone®/iPad® battery is
charged via the iPod® adapter cable
(plus)* when the device is connected to
the Audi music interface and the ignition
is switched on.
–
Use only the iPod® adapter cable (plus)*
ed/blue markings to connect an
with r
iPod®/iPhone®/iPad®.
–
Some iPod® versions (e.g. iPod shuffle®)
cannot be connected with the iPod®
adapter cable (plus)*. You can connect
these devices using the optional adapter
cable with 3.5 mm jack plug*.
–
Some of the iPod®'s control functions
are not supported, such as rating tracks,
Cover Flow or adding tracks to “on-thego” playlists. The iPod® can only display
covers and play videos if it is connected
via an iPod® adapter cable plus* (red
marking).
– If you would like to play videos, you can
also connect your iPod® with the AV
adapter cable*; you will also need an Apple AV cable. Please refer to the iPod®
operating instructions for more information on Apple AV cables.
– For more information on the Audi music
interface and on which devices are supported, please go online (e.g.
www.audi.com/mp3 or www.audi.com/
bluetooth) or contact an Audi dealer.
– iPod®/iPhone®/iPad® malfunctions also
affect the operation of the MMI. In this
case, please reset your iPod®/iPhone®/
iPad®.
– Please refer to the iPod®/iPhone®/iPad®
operating instructions for important information on how to use your iPod®/
iPhone®/iPad®. We recommend that you
update the iPod®/iPhone®/iPad® software to the latest status.
Page 29

Supported media and file formats
The following audio/video file specifications are supported by the DVD drive, the jukebox, the SD
card readers and the connection for the USB mass storage device*:
Audio files Video files
File extension .mp3 .wma;
.asf
Format MPEG-1/-
2
La
yer 3
Playlists .M3U; .PLS; .WPL; .M3U8; .ASX
File system SD/SDHC/SDXC/MMC memory cards
Specifications
Number
of files
Supported
media
Album covers Album covers up to 800x800 px.
Up to max. 320 kbit/sec and 48
USB mass storage device and memory cards: max. 1000 files per directory and
700 MB; DVD±R/RW; standard video DVD and audio DVD compatible with video
Audi music interface: portable players (e.g. iPod® ð page 25, MTP players, USB
mass storage devices belonging to “USB Device Subclass 1 and 6” compatible
with USB 2.0: USB sticks, USB MP3 players that do not require special driver soft-
(GIF, JPG, PNG): depending on
availability the album cover will
be displayed using the corresponding medium or Gracenote®.
Windows
Media Audio 9 and
10
USB mass storage device: exFAT, FAT/FAT32, NTFS file system
kHz sampling frequency
Jukebox (max. 10 GB memory capacity): max. 3000 files can be copied;
DVD drive: audio CDs (up to 80 minutes), CD-ROMs with a capacity of up to
ware, external USB flash memories and external USB hard drives)
Note
– The format
Voice is not supported by the media
drives.
– We recommend a bit rate of at least 160
kbit/sec for compressing MP3 files. In
the case of audio files with variable bit
Windows Media Audio 9
.m4a;
.m4b;
.aac
MPEG-2/-4MPEG-1/-2ISO-
USB mass storage device: max. 4 partitions
DVD drive: ISO9660, Joliet, UDF
DVD drive: max. 1000 files per directory and
max. 1000 files per playlist;
SD cards: with a capacity of up to 64 GB;
.mpg;
.mpeg
Up to max. 2000 kbit/sec, 720x576 px. and
max. 1000 files per playlist
DVD;
– The display of country-specific characters
.avi .mp4;
MPEG-4;
DivX 3, 4
and 5;
Xvid
rate, the display of remaining playing
time ma
y differ from the actual figure.
(e.g. for ID3 tag information) depends
on the language set on the system; it
cannot be ensured that these characters
are displayed correctly.
.m4v;
.mov
ISOMPEG-4 H.
264
(MPEG-4
AVC)
25 fps
.wmv
Windows
Media
Video 9
27Media drives/connections
ControlsCommunicationNavigationEntertainment
Page 30

28 Media drives/connections
– The manufactur
information on the “USB Device Subclass” of a USB memory device.
er will provide you with
Troubleshooting
Subject Advice
Audi music interface/Bluetooth
audio player*: The portable
player/Bluetooth audio player is
not supported.
Audi music interface: When
starting playback via the adapter cable with 3.5 mm jack plug*
or AV adapter cable*, the volume is too high/low.
Audi music interface: Problems
during audio playback via an
iPod®/iPhone®/iPad®.
Audi music interface: Interference audible when plugging in
or unplugging the adapter cable
with 3.5 mm jack plug*/AV
adapter cable* or when connecting or disconnecting the portable player to the adapter cable
with 3.5 mm jack plug*/AV
adapter cable*.
Jukebox: The tracks in the imported playlist are greyed out.
Media centre: Imported tracks
cannot be played or cannot be
found.
Please observe the notes on the Audi music interface
ð page 25/Bluetooth audio player* ð page 25. For information
on which devices are supported, please see the Audi mobile device database (www.audi.com/bluetooth).
Set the volume of the portable player to about 70 percent of
maximum (Input level) ð page 60.
The Audio player function is switched on. Switch the function
off ð page 38 when you are not using a Bluetooth audio
player*.
Audi music interface is already selected as the source when
connecting/disconnecting the adapter cable/portable player.
Activate the mute function or another audio source (e.g. radio
ð page 54) before connecting and disconnecting the porta-
ble player.
When importing playlists, you must copy all files yourself.
If you cannot find imported tracks via the media centre, this
could mean that they are not supported and have been moved.
To free up some memory space, select the control button for
Settings > Fill/delete jukebox > Delete, folder: Unplayable
files.
– Some functions of MTP pla
video playback and the rating of tracks
are not supported.
yers such as
Page 31

29System settings
System settings
Setting the time/
The time can be set manually or via GPS*.
Setting the time zone
Fig. 19
Select:
Time.
MENU
button > control button
►
Time source*
manual: All time settings ar
ually.
GPS : The time and date are set via GPS de-
pending on the time zone (selected manually). If you take your vehicle into a different
time zone, the time zone will have to be adjusted manually on the MMI.
date
e adjusted man-
Time zone
When selecting the correct time zone, a list of
corresponding countries is displayed as an example.
Date
The Date can be set manually. The Time
source must be set to manual.
Date format
When this option is set to TT.MM, for example
31.12. will be displayed as the date. When it
is set to MM/TT, for example 12/31 will be
displayed.
Adjusting the sound
You can adjust the sound and volume of the
MMI individually.
ControlsCommunicationNavigationEntertainment
Time
The Time can be set manually. The Time
source* must be set to manual.
Time format
When this option is set to 24h, for example
13:00 will be displayed as the time. When it
is set to AM/PM, for example 1:00 PM will be
displayed.
Auto summer time*
When the automatic summer time option is
on, the time will be set one hour forward or
back automatically when summer or winter
time starts.
Manual summer time
If this function is on, an hour is added to the
Time set.
Fig. 20 Sound settings
Fig. 21 Adjusting balance/fader
Select:
Systems
MENU
button > T
one.
elephone* and Navigation
►
1
The volume of the T
functions*, the Speech dialogue system, the
Traffic announcements and the Parking aid*
can be adjusted individually ð page 30.
Page 32

30 System settings
2
Subwoofer1) / 3 Bass / 4 Treble
ou can adjust the Subwoofer*, Bass and Tre-
Y
ble settings by turning the rotary pushbutton.
New settings apply only to the currently activated audio source, allowing the settings of
each audio source to be adjusted individually.
5
Balance/fader (sound focus)
The settings depend on the equipment fitted
in your vehicle:
o set the left/right volume ratio: Select
– T
and confirm Balance. Turn the rotary pushbutton clockwise or anti-clockwise to the desired position.
– To set the front/rear volume ratio: Select
and confirm Fader. Turn the rotary pushbutton clockwise or anti-clockwise to the desired position.
– To set the volume ratio using MMI touch:
Move your finger in the desired direction on
the MMI touch pad.
– To set the sound focus*: Select and confirm
Focus > all (evenly distributed sound focus)/
front/rear (sound focus distributed evenly in
front/rear interior of vehicle).
6
GALA (speed-dependent volume
control)
ou can adjust the automatic volume adaption
Y
to the interior noise level by turning the rotary
pushbutton.
Surround
2)
Turn the rotary pushbutton to adjust the volume of the surround effect.
Ring tone volume/V
olume of telephone call:
The volume of the selected ring tone/the volume of the telephone call can by adjusted by
turning the rotary pushbutton.
Systems
Speech dialogue system volume*: Turn the
rotary pushbutton to adjust the volume of the
spoken cues.
MMI touch volume: Turn the rotary pushbutton to adjust the volume of the spoken cues
for MMI touch.
Announcements
Traffic programme: see ð page 55
DAB announcements*: see ð page 55
Traffic programme volume/Announcement
volume: You can adjust the volume of a traffic
announcement by turning the rotary pushbutton.
Navigation*
Voice guidance: see ð page 52
Navigation cues during call: see ð page 52
Volume of spoken cues/In-car entertainment
fader: Volume of navigation cues while route
guidance is active. The in-car entertainment
fader is an option that reduces the volume of
the current audio source when the parking aid
is active or a navigation cue is being played.
Parking aid*
Turn the rotary pushbutton to adjust the volume of the beeps.
Adjusting the system volume
►
Telephone*
Ring tone: see
1)
2)
MENU
Select:
button > T
one > Systems.
ð page 38
Applies to vehicles with Bang & Olufsen Sound System
and Audi Sound System (6-channel)
Applies to vehicles with Bang & Olufsen sound system
Page 33

31System settings
Restarting the MMI
system (R
Fig. 22 Combination of buttons for restart
ess and briefly hold the
– Pr
otary pushbutton and the top right con-
the r
trol button ð Fig. 22 simultaneously and
then release the buttons again.
eset)
MENU
button,
Speed display on driving school vehicles
Applies to vehicles: with equipment for driving schools
►
When this function is on, the speed of the vehicle and the direction indicated by the turn
signals will appear on the MMI display.
When the mode is switched (e.g. to radio),
the vehicle speed and indicated direction will
appear again on the display after five seconds.
MENU
Select:
ton Car systems* > Driver assist > Driving
school mode.
button > Car > contr
ol but-
Note
– The additional speed displa
able for driving school vehicles.
– The value indicated in the speedometer
is the relevant speed.
y is only avail-
Other settings
Select:
up MMI.
MENU
button > control button Set
►
Language
The language of texts shown on the MMI display and the driver information system as well
as the language of the navigation cues* and
speech dialogue system* can be al
The number of languages available depends
on the market.
Measurement units
The following measurement units can be set
in the MMI display and the driver information
system:
– Speed (km/h or mph)
– Distance (km or miles)
– Temperature (°C or °F)
– Consumption (ltr/100 km, mpg (US), mpg
(UK) or km/ltr)
– Capacity (litres, gallons (UK) or gallons
(US))
Speech dialogue system*
Command display: The display of possible
commands during a speech dialogue can be
switched on/off.
Short dialogue: This option can be switched
on/off; when it is activated, the spoken cues
played by the system are abbreviated.
Volume settings: Turn the rotary pushbutton
to adjust the volume of the spoken cues.
Individual speech training (only possible
when the vehicle is stationary): You can use
the individual speech training to adapt the
speech dialogue system to your voice or pronunciation so that the speech dialogue system
can then better recognise what you are saying.
The individual speech training prompts you to
repeat 20 spoken phrases that consist of certain commands and blocks of digits. If you
would like to delete the stored speech training setup, you can use the function Reset
speech training.
Display brightness
-
You can adjust the brightness of the MMI display by turning the rotary pushbutton.
Factory settings
You can reset the following functions to the
factory settings:
tered.
ControlsCommunicationNavigationEntertainment
Page 34

32 System settings
– Sound settings
– Radio
– Media
– Juk
ebox
– Directory*
– Telephone*
– Bluetooth*
– Navigation settings*
– Navigation memory*
– Speech dialogue system*
You can select the desired options individually
or mark Select all entries. Select and confirm
Restore factory settings.
System update
The system update function can be used to
update the MMI software via USB or an SD
card.
For further information on the System up-
date, please go online (e.g. www.audi.com/
bluetooth) or ask an Audi dealer.
Version information
The software version of the MMI and the navigation database* are displayed. In addition,
you can use the Software info function to display information on the MMI's software and licence conditions.
Page 35

Telephone
troduction
In
Applies to vehicles: with phone pre-installation
After connecting your mobile phone to the
MMI system via Bluetooth, you can operate
the telephone functions conveniently via the
MMI.
WARNING
– Accor
ding to health organisations, mobile phones may interfere with the function of pacemakers. A minimum distance
of 20 cm should be kept between the
mobile phone aerial and the pacemaker.
– Do not carry a mobile phone in your
breast pocket directly over the pacemaker when the phone is switched on.
– If you suspect interference, switch the
mobile phone off immediately.
–
The speech dialogue system ð
must not be used in cases of emergency,
since the voice changes in stressful situations. This could result in a failed or delayed telephone connection. Always dial
emergency numbers manually!
–
Switch off your mobile phones in all
areas where there may be a risk of explosion. Remember that these areas may
not always be adequately marked. Such
places are filling stations, fuel and chemical storage facilities or transport
vehicles and other places where fumes,
chemicals (e.g. from leaking propane or
fuel vapours in vehicles or buildings) or
large quantities of dust particles (e.g.
from flour, wood or metal) could accumulate in the air. This warning also applies to all other places where you would
normally switch off your engine.
– Today's driving conditions require the full
attention of drivers. Please see ð page 5,
Notes on traffic safety.
page 17
– Y
ou must switch off the telephone in
areas where the use of mobile telephones is prohibited. Please observe all
relevant caution notices and regulations.
Note
– The telephone functions will depend on
the mobile network ser
the mobile phone used. For further information, please contact your mobile network service provider, see the operating
instructions for your mobile phone, or go
online (e.g. www.audi.com/bluetooth).
– The maximum range of the Bluetooth
connection is limited to the interior of
the vehicle.
ceptible to interference with other electronic devices.
The connection can be sus-
vice provider and
Bonding a mobile phone
Applies to vehicles: with phone pr
Searching for new mobile phones
Fig. 23
Fig. 24 Device management
e-installation
33Telephone
ControlsCommunicationNavigationEntertainment
CAUTION
– Please obser
use of telephones in vehicles.
ve the laws regulating the
Requirements for bonding
– The vehicle must be stationar
tion must be switched on.
y, and the igni-
Page 36

34 Telephone
– The Bluetooth function and the discover
abil-
ity of the MMI system ð page 38 and the
mobile phone must be activated.
– The on-board phone system and the mobile
phone you would like to bond must not be
connected actively to any other Bluetooth
device.
Searching for a mobile phone
– To find a new mobile phone: Select
TEL
button > Connect mobile phone > Find new
devices. Or: Select
TEL
button > control
button Settings > Bluetooth > Device man-
agement > Find new devices.
The available
Bluetooth devices are shown on the MMI
display.
Bonding a mobile phone
– To bond a mobile phone with PIN entry: Se-
lect and confirm the mobile phone you wish
to use. Select and confirm Handsfree. A PIN
code for establishing the connection will appear on the MMI display. Select and confirm
Yes. When the phone requests it, enter the
PIN code shown into your mobile phone. Or:
To enter any 4 to 16-digit PIN code, select
and confirm No when the PIN code is displayed and enter your own personal PIN
code on the MMI and then on the mobile
phone.
– Fast bonding (secure simple pairing): If
your mobile phone supports this function, a
6-digit PIN code will be shown on your mobile phone and on the MMI display simultaneously. Confirm this PIN code on your mobile phone and in the MMI.
Please confirm any connection queries on your
mobile phone.
After bonding: The signal strength bar
ð page 10, Fig. 6 and Bluetooth symbol
11
10
will appear in the status line of the MMI dis-
y when the mobile phone has successfully
pla
bonded. In addition, the contacts on the mobile phone are automatically loaded into the
directory of the MMI. This may take several
minutes, depending on how many contacts
are stored on the mobile phone.
If there is no memory capacity left for directories and you bond another mobile phone, a
message will appear asking you to r
eplace the
contacts from one of the phones. If you select
the option Restricted use of telephone, only
the contacts from the mobile phone or SIM
card and the local MMI memory (public) will
be available ð page 41.
Note
– Y
ou have about 30 seconds to enter the
PIN code.
– Bluetooth devices only have to be bon-
ded once; any devices that have already
been bonded to the MMI system once
are connected automatically when they
are within range and the ignition is on.
– You can speed up the automatic connec-
tion by authorising MMI bonding on your
mobile phone.
–
For further information, contact your
mobile network ser
vice provider or refer
to the operating instructions for your
mobile phone.
–
You can bond several mobile phones to
the MMI system; however only one connection is active at a time.
–
Any Bluetooth device that is already connected to the MMI system is disconnected when another device is bonded to
the system.
–
The Bluetooth connection between the
system and the mobile phone is automatically terminated when you leave the
car.
– For further information on using a phone
in your car, please go online (e.g.
www.audi.com/bluetooth) or ask an Audi
dealer.
Page 37

35Telephone
Calling up the telephone
Applies to vehicles: with phone pr
Fig. 25 Telephone functions
Important: A mobile phone must be connected to the MMI system ð page 33.
Select:
TEL
button.
y will show the telephone
►
The MMI displa
menu that was last activated. You can call up
the telephone functions by pressing the
button again while the T
open.
The following telephone functions are available ð Fig. 25:
1
Call list ð page 35
2
Directory ð page 41
3
Favourites ð page 38
4
Enter number ð page 36
Note
The telephone functions will depend on
the mobile network ser
the mobile phone used. For further information, contact your mobile network service provider or refer to the operating instructions for your mobile phone.
e-installation
TEL
elephone menu is
vice provider and
From a list
Applies to vehicles: with phone pr
Fig. 26 Selecting a telephone number from the call
list
e-installation
Important: A telephone number must be stored in the call list, the fa
vourites or in the di-
rectory.
Select:
TEL
button.
►
Call list
o dial a telephone number: Select and con-
– T
firm the desired telephone number in the
call list. Select and confirm Call.
Symbols in the call list ð Fig. 26:
1
Numbers dialled
2
Missed calls
3
Received calls
Directory
– To dial a telephone number: Select and con-
firm the desired contact in the directory. The
address card will appear on the MMI display.
Select and confirm the desired telephone
number.
Favourites
– To dial a telephone number: Select and con-
firm a favourite. Select and confirm Call.
ControlsCommunicationNavigationEntertainment
Dialling a telephone number
From the directory
Applies to vehicles: with phone pr
You can dial a telephone number directly from
the directory ð page 41.
e-installation
Note
You can also call up the call list by pressing
the contr
ol button for Dial in the Tele-
phone menu.
Page 38

36 Telephone
Via the speller
Applies to vehicles: with phone pr
Fig. 27 Entering a telephone number via the speller
for numbers
Entering a telephone number via the speller
Fig. 28
for letters
Select:
TEL
button > Enter number.
►
e-installation
Listening to voice mail messages
Applies to vehicles: with phone pr
Select:
bo
x.
TEL
button > control button Mail-
►
e-installation
– To enter the mailbox number: Select and
confirm List and select and confirm the desired number. Or: Enter the mailbox number
using the speller. Select and confirm OK.
– To dial the mailbox number: Press the con-
trol button for Mailbox.
Note
– This ser
vice must be set up and activated
on your mobile network before you can
use it. For more information, contact
your service provider.
– The mailbox number depends on your
service provider.
Answering/ignoring
telephone cal
Applies to vehicles: with phone pre-installation
ls
o enter a telephone number using num-
– T
bers: Enter a telephone number using the
speller for numbers ð Fig. 27.
– To enter a telephone number using letters:
Press the control button for A-Z. Enter a series of letters, e.g. AUDISERVICE using the
speller for letters.
– To dial a telephone number: Select and con-
firm OK. Or: Press the control button for Di-
al. The current audio source is muted while
the connection is established.
If you have entered incorrect digits, select and
confirm . You can delete all characters entered at once by turning the speller to and
pressing and holding the rotary pushbutton.
Note
You can enter D
TMF tones ("touch-tones")
using the speller while you are talking on
the phone.
Fig. 29 Incoming call
Important: There must be an incoming call,
an active call
, or the phone must be establish-
ing a connection.
– To answer a call: Press the control button
for Answer.
– To ignore a call: Press the control button for
Ignore.
– To end a call/cancel the dialling process:
Press the control button for End call.
To answer a further call: If you are already
talking on the phone when someone else
calls, select Answer to place the current call
Page 39

37Telephone
on hold and to answer the incoming call. If
you select Ignore, the incoming call will be
declined.
Caller information: Depending on whether
the caller is stor
er the telephone number is transmitted with
the call, the name, the telephone number or
Unknown will appear on the MMI display and
on the driver information system.
ed in the directory and wheth-
Note
– Depending on your mobile phone and
ser
vice provider, you may be able to an-
swer incoming calls while you are already
talking on the phone ð page 37. The
active telephone call will then be placed
on hold automatically.
– The audio source is muted automatically
when you make or receive telephone
calls.
–
If the MMI display was switched off, it
will be switched on automatically when
e is an incoming call.
ther
During a telephone call
Applies to vehicles: with phone pre-installation
Important: You must be talking on the phone.
►
Select: Control button Options.
– To make a further call: Select Further call >
Directory or Call list > entry in list.
– To answer a further call when you are talk-
ing on the phone and have another call on
hold: Select Replace. The current call will be
replaced by the incoming call.
Other functions are:
Switch microphone off: If you select and confirm this option, the caller will no longer be
able to hear you; you will still be able to hear
the caller.
Hold/Resume: You can put a call on hold and
retrieve it later from the hold queue. On hold
appears on the MMI display, together with the
amount of time the call has been on hold.
You can switch between two phone
Switch:
calls (one of them will be on hold at any given
time). Select End call to end whichever call is
active. The call on hold will remain in the hold
queue and can be continued by pressing the
control button for Options and selecting Re-
sume.
Conference: Up to five callers and one caller
on hold can take part in a conference (depending on the network service). To set up a further call, select Hold to place all the members
of an existing conference on hold. Press the
Options control button. Select and confirm
Further call and choose a telephone number
from the Call list or the Directory. Alternatively, select Enter number. To add this caller
to the existing conference, select Conference.
Select Resume if you want to retrieve all participants in an existing conference from the
hold queue. Show conference participants allows you to display the participants.
Note
– The option Call waiting must be activa-
ted on your mobile phone for you to be
made a
ware of incoming calls during a
conversation.
– The options available during a call may
vary depending on the mobile network
service provider and the mobile phone
you are using. For more information,
contact your service provider.
–
The display for the incoming call may remain for sever
depends on the type of mobile phone
you are using. Should you use the function Replace or Ignore in the MMI system during this time, it is possible that
the active call will be ended.
al seconds afterwards; this
Storing a telephone number
Storing a new telephone number
Applies to vehicles: with phone pr
You can store a new telephone number as a
contact in the directory ð page 41.
e-installation
ControlsCommunicationNavigationEntertainment
Page 40

38 Telephone
Storing from the call list
Applies to vehicles: with phone pr
e-installation
You can store telephone numbers from the
call list in the directory.
Fig. 30 Storing a telephone number in the directory
Important: A telephone number must be stored in the call list.
Select:
TEL
button > Call list > Phone num-
►
ber > Store in directory.
o store a telephone number as a new ad-
– T
dress card: Select and confirm New contact.
Enter a Surname. Enter additional data if
desired. Select and confirm Store contact.
– To assign a telephone number to an exist-
ing address card: Select and confirm a con-
tact in the list. Select and confirm Store
contact.
Note
– The contacts ar
e only stored in the MMI
directory.
– You can edit the directory ð page 41.
Storing in the favourites
Applies to vehicles: with phone pr
e-installation
In addition to the mailbox number, you can
store up to nine contacts in the list of favourites.
Select:
TEL
button > F
avourites.
►
– To store a new telephone number as a fa-
vourite: Select and confirm Create favourite
> New contact. Enter a Surname and further
data if required. Enter a Phone number. Select and confirm Store contact.
– T
o store an existing telephone number as a
favourite: Select and confirm Create favourite > a contact in the list. If applicable, se-
lect and confirm the desired telephone
number.
– To delete a stored favourite: Select and con-
firm the favourite > Delete.
Other settings
Applies to vehicles: with phone pr
Select:
TEL
button > control button Set
►
tings.
Telephone settings
Ring tone settings1): Ring tones are played
when you select the function Ring tone. Press
the rotary pushbutton to store the selected
ring tone. For the settings Ring tone volume/
Volume of telephone call see ð page 30.
Mailbox number: You can enter or edit the
mailbox number using the speller via the entry field Number. The mailbox number can be
deleted with the option Delete mailbox num-
ber.
Bluetooth
Device management: All Bluetooth devices
bonded to the MMI system are displayed in a
list. The device that is currently connected is
marked with a Bluetooth symbol. To switch
between the Handsfree profile and the Audio
player profile while a mobile phone is connected, select the Bluetooth device and change
the profile via the function connect (the vehicle must be stationary). Use the function dis-
connect to disconnect the active profile. To
delete bonded Bluetooth devices one at a
time, select a device and delete it by selecting
the function Delete Bluetooth device. The
Find new devices function searches for all
Bluetooth devices within range and displays
them in a list.
e-installation
-
1)
Depends on the connected mobile phone
Page 41

39Telephone
Bluetooth:
tooth symbol
on the MMI displa
When this function is on, the Blue-
5
ð page 10, Fig. 6 will appear
y. The Bluetooth discoverability of the MMI can be switched on/off using
the settings visible/invisible. Devices which
have already been bonded can connect via
Bluetooth even when discoverability is deactivated. Once you have bonded your mobile
phone, you should switch Bluetooth to invisi-
ble to prevent the on-board phone system
from being discovered by third parties. You
can switch off the Bluetooth function. It will
then not be possible to establish a Bluetooth
connection.
Audio player: In order to be able to use the
Bluetooth audio player as a source in the Me-
dia menu ð page 58, the function must be
switched on. To avoid problems in Telephone
or Media mode, switch the Audio player function off when you are not using the Bluetooth
audio player.
MMI name: The Bluetooth name of the MMI
system (e.g. "AUDI MMI 2613") is displayed
and can be changed.
Note
– Y
ou can bond several mobile phones to
the MMI system; however only one connection is active at a time.
– All bonded Bluetooth devices can be de-
leted by resetting the Bluetooth function to the factory settings ð page 31.
– When you play audio files via the Blue-
tooth audio player, the Bluetooth discoverability is automatically switched to in-
visible.
Audi Phone Box
Applies to vehicles: with phone pr
Phone Box
The Audi Phone Box is located in the centre
console beneath the centre armrest.
Fig. 31 Audi Phone Box
Fig. 32 Available charging adapters
o establish a connection: Place your mo-
– T
bile phone into the Audi Phone Box with the
display facing upwards. A mobile phone that
has already been bonded ð page 33 will au-
tomatically be connected to the MMI.
– To charge the battery: Connect your mobile
phone to the 5 Volt socket
USB charging adapter* ð Fig. 32.
ing the
The following USB charging adapters are currently available:
1
Apple Dock Connector®
2
Sony-Ericsson Fast Port®
3
Mini USB (angled)
4
Mini USB (straight)
5
2 mm Nokia® adapter
A mobile phone in the Audi Phone Box sends
and receives call signals and data via the external car aerial. An additional aerial amplifier
ensures good transmission quality.
e-installation and Audi
A
ð Fig. 31 us-
ControlsCommunicationNavigationEntertainment
Page 42

40 Telephone
WARNING
Loose objects can be flung around in the
passenger compar
sudden driving or braking manoeuvres.
This could result in serious injuries and also cause you to lose control of the vehicle.
Always keep the centre armrest closed
when driving.
Note
– The Audi Phone Bo
countries. Your Audi dealer will be able
to provide you with more detailed information.
– To avoid malfunctions, ensure that the
mobile phone is correctly placed inside
the Audi Phone Box. The mobile phone
should ideally be placed centrally on the
telephone symbol.
–
If the mobile phone is placed in the Audi
Phone Bo
this may interfere with the connection to
the external aerial.
–
A Bluetooth connection between your
mobile phone and the on-board phone
system is also necessary when you are
using the Audi Phone Box.
–
USB charging adapters are available
from Audi dealers or specialist retailers.
tment in the event of
x is not available in all
x in a bag or a protective case,
Page 43

41Directory
Directory
ling up the directory
Cal
Applies to vehicles: with phone pre-installation
After a mobile phone has been bonded successfully, the contacts from the mobile phone
are automatically imported into the directory
of the MMI system.
Fig. 33 List of contacts
►
– T
The contacts are displayed in alphabetical order; they can be sorted according to first
name/surname ð page 44 and are displayed
together with a symbol indicating where they
are stored ð Fig. 33:
1
2
3
4
You can bond up to four different mobile
phones to the MMI system, allowing you to
manage up to four private directories in addition to the public directory.
If there is no memory capacity left for directories and you bond another mobile phone, a
message will appear asking you to replace the
contacts from one of the phones. If you select
the option Restricted use of telephone, only
TEL
Select:
button > Directory.
o select a contact: Select and confirm a
contact in the directory. The address card
will be displayed.
Public MMI directory: These contacts can
be seen and used by any user, irrespective
of which mobile phone is connected.
Private MMI directory: These contacts are
only visible if the corresponding mobile
phone is connected.
SIM card
Mobile phone
the contacts from the mobile phone or SIM
car
d and the local MMI memory (public) will
be available.
You can open the directory via the Telephone*
menu and via the Navigation* menu.
Note
– Please pa
y attention to any synchronisation queries on your mobile phone. You
must confirm any synchronisation queries from the directory before the contacts can be loaded from your mobile
phone into the MMI directory.
– Which contacts are displayed on the
MMI depends on the mobile phone you
are using. For more information on
which mobile phones are supported,
please go online (e.g. www.audi.com/
bluetooth) or contact an Audi dealer.
–
In certain cases, contacts from a mobile
phone ma
y not be transmitted in alphabetical order. If there are too many entries, contacts with certain initial letters
may not be displayed on the MMI system.
–
The contacts in the local MMI memory
(public) are visible anytime and are
therefore not protected against access
by other users.
Storing a contact
Applies to vehicles: with phone pr
Creating new contact
Fig. 34
Select:
TEL
button > Directory
►
tact.
e-installation
> New con-
ControlsCommunicationNavigationEntertainment
Page 44

42 Directory
Surname/First name
Enter the surname and first name using the
.
speller
Phone numbers
You can store up to five telephone numbers
for each address card. In addition, you can assign a type (business or private) and a cate-
gory (land line, mobile or fax) to each telephone number. You can also select a telephone number that you use frequently as pre-
ferred number. This number is then displayed
first when the address card is opened.
You can import a telephone number from the
Call list into an address card by selecting the
option New number and then pressing the
control button for List.
Business addresses/Private addresses
You can store a business address and a private
address in an address card. To delete the business or private address, select the function
Delete postal address.
The function Create navigation destination
can be used to create a Navigation destination* from the selected address. The input
menu will appear on the MMI display so that
you can add any necessary address details.
Structured addresses from a mobile phone
that include details of the country, post code,
town and street are imported into the directory directly.
– C
ontacts that have been edited in the
MMI directory cannot be updated automatically on the connected mobile
phone. We recommend that you edit
contacts on a mobile phone directly on
the mobile phone.
Using a contact
Finding
Applies to vehicles: with phone pr
Select:
TEL
button > Directory.
►
– Select and confirm Find contact. Enter the
name using the speller
firm the contact via List.
The system searches for both the first name
and surname within a name.
Note
You can scroll rapidly through long lists by
turning the r
otary pushbutton quickly.
Calling
Applies to vehicles: with phone pr
e-installation
. Or: Select and con-
e-installation
Note
– The contacts in the local MMI memor
y
(public) are visible anytime and are
therefore not protected against access
by other users.
– The new contact you have created is stor-
ed in the local memory (private) of the
directory you are currently using.
– Whether addresses can be imported de-
pends on your mobile phone.
–
You can store up to 500 contacts in the
local memor
y of each public or private
directory.
Calling a contact
Fig. 35
Select:
TEL
button > Directory.
ed contact in
►
– Select and confirm the desir
the directory. Select and confirm the desired
telephone number. Or: Select the telephone
number you would like to call and press the
control button for Call.
Page 45
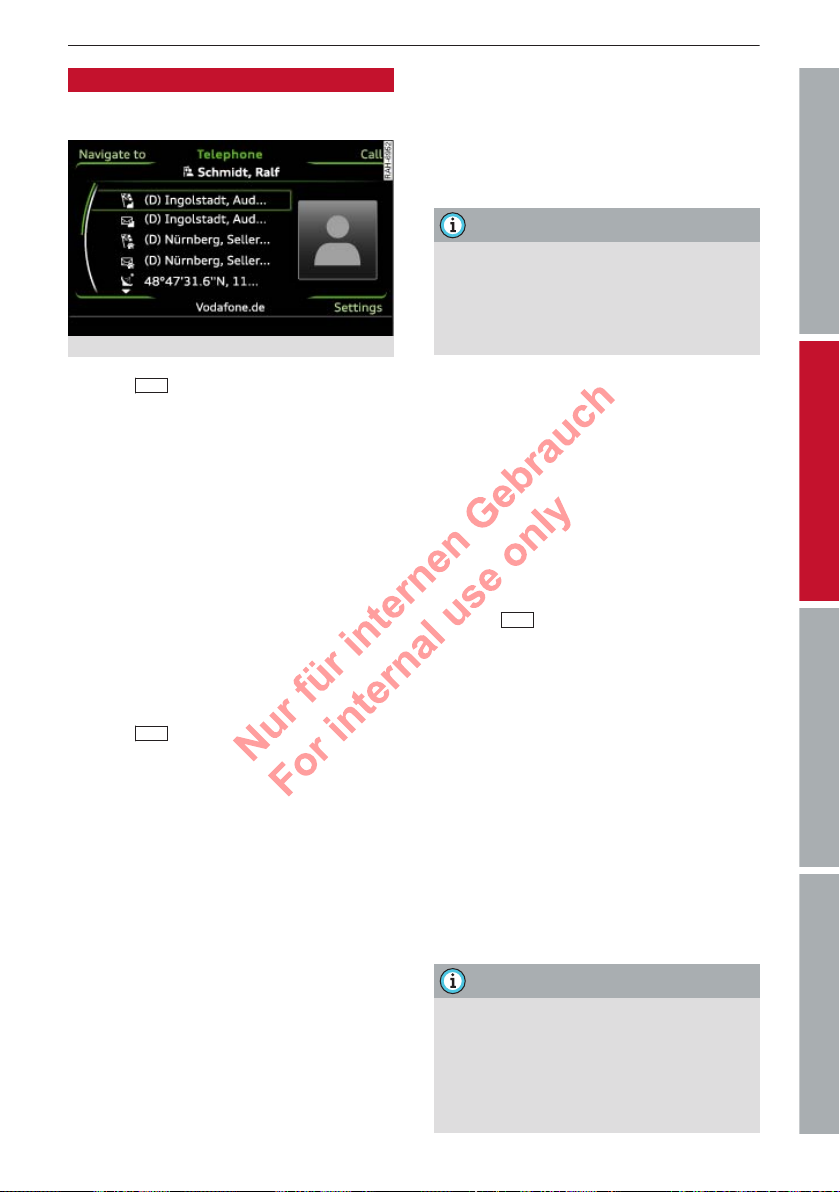
43Directory
Navigating
Applies to vehicles: with phone pr
gation system
Selecting a destination
Fig. 36
Select:
TEL
button > Directory.
►
– Select and confirm the desir
e-installation and navi-
ed contact in
the directory. Select and confirm the desired
destination. Or: Select the destination you
would like to navigate to and press the control button for Navigate to. To start navigating, select and confirm Start route guid-
ance.
Editing/deleting a contact
Applies to vehicles: with phone pre-installation
You can edit/delete contacts in the local MMI
memory (private/public) any time.
►
Visible to all
ou can mark a contact so it is Visible to all
Y
. The contact will then be stored in the local
MMI memory (public) and can be accessed by
all directory users.
Read contact
The MMI system automatically creates a name
tag for each contact in the directory, which
you can have the system read to you.
Copy contact
To edit a contact, select and confirm Copy
contact. A copy of the contact will be stored in
the local MMI memory (private).
TEL
Select:
button > Directory > contact
from directory.
You can now change the details in the entry
fields using the speller ð page 41.
Delete contact
Y
ou can delete only the contacts in the local
MMI memory (private/public).
Note
Contacts that have been edited in the MMI
dir
ectory cannot be updated automatically
on the connected mobile phone. We recommend that you edit contacts on a mobile phone directly on the mobile phone.
Importing/exporting
con
tacts
Applies to vehicles: with phone pre-installation
You can import or export contacts in the
vCard format (.vcf) into or from the directory.
Important: An SD card must be inserted in the
SD card reader ð page 24, or a USB mass stor-
age device must be connected to the Audi music interface ð page 25.
►
button Settings.
– To import contacts from a storage device:
Select and confirm Import contacts > SD
card or USB storage device > desired con-
tacts > Import.
– To export contacts to a storage device: Se-
lect and confirm Export contacts > SD card
or USB storage device > desired contacts >
Export.
– To select all contacts at once for import/ex-
port: Select and confirm Import contacts/
Export contacts > SD card or USB storage
device > control button All > Import/Export.
– The impor
– You can import up to 500 contacts. You
TEL
Select:
button > Directory > contr
Note
ted contacts are stored in the
local memory of the directory you are using.
can call up the memory capacity of the
directory any time ð page 44.
ol
ControlsCommunicationNavigationEntertainment
Page 46

44 Directory
– Never stor
e important data on SD cards
or USB mass storage devices. Audi shall
not accept any liability whatsoever for
the loss of data or media.
Other settings
Applies to vehicles: with phone pr
Select:
TEL
button > Directory > contr
►
button Settings.
Memory capacity
The Memory capacity of the directory will be
displayed.
You can manage up to 10500 contacts with
the directory. Up to 2000 contacts can be loaded from your mobile phone into each private
directory. Additionally, you can create up to
500 contacts in the local MMI memory (private), as well as 500 in the local MMI memory
(public).
Sort order
You can sort the contacts in your directory alphabetically according to the surname or first
name.
e-installation
ol
(public) can be deleted by selecting Delete
public contacts.
Public contacts
You can choose to activate or deactivate the
display of public contacts. Select yes to show
all contacts in the local MMI memory (public);
if you select no they are hidden if a mobile
phone is connected to the MMI.
Download phone book
To update the contacts in the MMI, you can
download the contacts from your mobile
phone manually. Depending on the mobile
phone you are using, the Bluetooth connection may have to be disconnected and re-established before you can update the contacts.
Delete contacts
You can delete all contacts in the local memory at once by selecting the option Delete all
contacts. Select Delete private contacts to
delete all contacts stored in the local memory
(private). The contacts in the local memory
Page 47

Navigation
ling up the
Cal
navigation menu
Applies to vehicles: with navigation system
The navigation system guides you directly to
your destination, avoiding traffic obstructions and using alternative routes if desired.
NA
►
Select:
A
fter calling up the navigation, the menu that
was last open will be displayed.
– To switch between the map and the desti-
nation entry screen: Press the
again.
– T
oday's driving conditions require the full
attention of drivers. Please see ð page 5,
Notes on traffic safety.
– Pay attention to traffic rules when driv-
ing.
– The route calculated by the navigation
system is a recommendation of how best
to reach a destination. Pay attention to
traffic lights, no stopping signs, lane
change restrictions, one-way streets, etc.
– Should the na
dict the current traffic regulations, you
must always follow the traffic regulations.
– The volume should only be set at a level
which enables you to hear distant police
and emergency vehicles clearly - failure
to do so could result in an accident.
– Snow or other obstructions on the GPS
aerial or inter
large buildings could affect the reception
of the satellite signals and make positioning difficult. GPS reception and vehicle positioning can also be adversely affected by deactivation or a malfunction
of several satellites.
V
button.
WARNING
CAUTION
Note
NAV
button
vigation directions contra-
ference caused by trees or
– Str
eet and town names can change;
therefore the names stored on the MMI
can in exceptional cases be different
from the actual names.
– For information on updating the naviga-
tion data, please contact your Audi dealer.
Entering a destination
Entering an address
Applies to vehicles: with na
Enter destination
Fig. 37
NA
►
Select:
V
> Address.
o change the country: Select and confirm
– T
Country and enter a country.
– To enter a destination via the town/post
code: Select and confirm Town/post code.
Enter a town or a post code. Now you can select the town from the list and confirm it.
Select and confirm additional details for the
destination such as the Street, House num-
ber, Special destination in town or Centre.
Start the route guidance function.
– To enter a destination via the street: Select
and confirm Street. Select a town from the
list and confirm it. Enter a street. Select and
confirm additional details for the destination such as the House number or an Inter-
section. Start the route guidance function.
Help entering an address: While you are en-
tering an address, suggestions based on your
previous entries are made in the entry field for
the town. You can set the suggested town as
the destination by pressing the control button
for List. Further towns matching your entry
vigation system
button > control button Dest.
45Navigation
ControlsCommunicationNavigationEntertainment
Page 48

46 Navigation
are listed below the entry field (large towns
first and then other towns in alphabetical or
der). In addition, the total number of towns
1
found is displayed
ð Fig. 37.
Setting a destination from the map
Applies to vehicles: with na
vigation system
A point on the map can be set as the destination or stored in the directory.
Setting a destination from the map
Fig. 38
Fig. 39 Setting map position as destination
o call up the map: Press the
– T
epeatedly until the map appears.
r
NAV
button
– To set a convenient map scale (in order to
be able to move the crosshairs faster): Turn
the rotary pushbutton clockwise/anti-clockwise.
– To move the crosshairs: Press the rotary
pushbutton. Move the crosshairs onto the
destination using MMI touch ð page 8.
– To use the destination for route guidance:
Press the
the legend menu. Select and confirm Star
BACK
button. Select symbol 1 in
t
route guidance.
Additional information on the point selected
with the crosshairs: If you use the crosshairs
to select a location on the map, any existing
information on this location (e.g. address or
-
affic information) will be displayed
tr
Stack
ed map content: If several special desti-
nations are located close to each other, their
symbols are stacked on the map
Entering a special destination
Applies to vehicles: with na
Entering a special destination
Fig. 40
NA
►
Select:
V
vigation system
button > control button Desti-
nation > Special destinations.
o change the search area: Select Search
– T
area. Now you can select a search area from
the list and confirm it.
– To find the name of a special destination in
the selected search area: Select Find entry.
Enter the name of the special destination.
– To find a special destination in a certain
category: Select Select category. Select and
confirm a category, for example Airport.
– To find a special destination in the selected
search area: Select and confirm a category
directly (fast access
1
ð Fig. 40).
now select and confirm a special destination.
The following search categories are available:
In immediate vicinity: You can select special
destinations from different categories. The
special destinations are displayed in a list,
starting with destinations in the immediate
vicinity and going up to destinations within a
radius of 200 km.
In vicinity of route: Special destinations
along the route can only be selected when the
route guidance function is active. The special
3
.
2
.
You can
Page 49

47Navigation
destination is located directly on or in the immediate vicinity of your r
oute.
In vicinity of destination: You can select special destinations from different categories; for
example, you can look for a hotel at the destination.
In new town: Enter the name of the town in
the speller. You can select special destinations
from different categories. This function can be
used to find special destinations in a town irrespective of the destination.
Nationwide: You can either find the special
destination by entering the name or by selecting it from different categories. A special destination can be found irrespective of your current position and your destination. You can
use this function, for example, to navigate to
an airport in the country currently selected.
In new country: Enter the name of the country in the speller. A special destination can be
found irrespective of your current position and
destination. You can use this function to find
special destinations that you already know in
a new country.
Note
– The distances to special destinations ar
e
shown as the crow flies from your cur-
rent location (arrow not filled in). The actual driving distance between your current position and the special destination
is updated automatically (filled in arrow).
– Sometimes there are destination entries
in the list that cannot be displayed completely because they are too long. If you
select one of these entries with the rotary pushbutton, detailed information on
the selected entry will be displayed automatically after a few seconds.
Setting a favourite/home address as the destination
Applies to vehicles: with na
vigation system
Using the favourites makes it easier to enter
destinations that you use often.
Important: A favourite or home address must
be stored ð page 50.
NA
►
Select:
nation
►
Select and confirm a favourite/your home
addr
V
button > control button Desti-
> Favourites.
ess. Start the route guidance function.
Loading the last destination
Applies to vehicles: with na
vigation system
The last destinations are stored automatically and can be loaded again directly as a new
destination.
Select:
NA
button > control button Desti-
►
V
nation > Last destinations.
►
Select a last destination from the list and
confirm it. Star
t the route guidance func-
tion.
Note
You can delete the list of last destinations
ð page 52.
Setting a destination from the directory
Applies to vehicles: with na
vigation system
You can navigate directly to entries in the directory.
Important: The directory must contain contacts with private/business addresses stored
as destinations ð page 41.
Select:
NAV
button > control button Desti-
►
nation > Directory.
►
Select and confirm a private/business ad-
ess and start route guidance.
dr
ControlsCommunicationNavigationEntertainment
Page 50

48 Navigation
Entering a destination via the coordinates
Applies to vehicles: with na
V
Select:
NA
►
vigation system
button > control button Desti-
nation > Address > Coordinates.
►
Select and confirm the Latitude and Longi-
tude coor
dinates. Start the route guidance
function.
Entering a stopover/tour plan
Applies to vehicles: with na
vigation system
You can enter up to nine stopovers directly in
the tour plan or using the various ways of entering destinations.
Tour plan
Fig. 41
Important: You must have entered a destination ð
page 45.
Select:
NAV
button > control button T
our.
►
– To enter a destination as a stopover: Select
and confirm the symbol for entering a stop-
2
over
ð Fig. 41. Enter a destination
page 45. Select and confirm Set as stop-
ð
over in the Destination details menu.
– To change a tour plan: Press the control
button for Tour. Select and confirm the destination/stopover and then select Change,
Move, Delete or Start tour plan from here.
– To store a tour plan: Press the control but-
ton for Tour. Select and confirm Tour mem-
ory and then Store tour plan. Enter a name.
– To load/delete a tour plan: Press the control
button for Tour. Select and confirm Tour
memory and then Load tour plan/Delete
tour plan.
The following information is displayed in the
legend menu of the tour plan ð Fig. 41:
1
Location of the vehicle
2
Symbol for entering a stopover
3
Stopover enter
4
Destination
ed
Starting/stopping
oute guidance
r
Applies to vehicles: with navigation system
– To enter a new destination and start route
guidance: Select
ton Destination >
route guidance.
– To restart/stop the last route guidance: Se-
NAV
lect
tion > Star
When you enter a new destination, the following additional functions are available in the
Destination details menu
Calculate alternative routes: Three suggested
routes are calculated for the destination currently entered. The legend menu will show information on the alternative route, such as
the distance to the destination and the calculated arrival time.
Enter special destination in town: With this
option you can look for e.g. tourist attractions
or public buildings (hospital, cinema, recreation areas, etc.) in the vicinity of the town entered. The special destination can be set directly as the destination.
Select centre: The navigation system calculates a route leading to the centre of the selected town/district.
Destination on map: The destination is shown
on the map.
NAV
button > control but-
enter destination
> Star
button > control button Destina-
t/Cancel.
ð page 46, Fig. 39
t
:
Page 51

How to use the map
Applies to vehicles: with na
Map with crosshairs switched off
Fig. 42
Map with crosshairs switched on
Fig. 43
– T
o call up the map: Press the
epeatedly until the map appears.
r
– To switch on the crosshairs: Press the rotary
pushbutton while the map is being displayed.
– To switch off the crosshairs: Press the
BACK
button.
vigation system
NAV
button
8
Display of upcoming turn-off
9
Additional information ð page 52
Crosshairs switched on:
10
Additional information on the point selec
ted with the crosshairs: If you use the
crosshairs to select a point on the map,
any existing information on this location,
e.g. the address, will be displayed.
11
Display of position coordinates of the
crosshairs (longitude/latitude)
12
Moving along the route: This function can
be used while route guidance is activated.
Turn the rotary pushbutton clockwise/anti-clockwise to move the map along the
current route.
13
Destination details menu: If available, details on the point selected with the crosshairs are displayed (e.g. address). The
point on the map selected with the crosshairs can be set as a destination or stopover, stored in the directory and called up
on the telephone.
14
Calculating alternative routes
ð page 53
15
Map contents such as traffic information,
favourite destinations or restaurants
49Navigation
-
ControlsCommunicationNavigationEntertainment
Crosshairs switched of
1
Orientation: The map is displayed either
f:
from the north position or from the driving position.
2
Scale: Turn the rotary pushbutton clockwise/anti-clockwise to zoom in or out.
3
Distance to destination/stopover
4
Calculated time of arrival at destination/
stopover
5
Speed display
6
Altitude display
7
Location of the vehicle
1)
Applies to vehicles without camera-based speed limit
y only.
displa
1)
Page 52

50 Navigation
Calling up traffic
formation
in
Applies to vehicles: with navigation system
When the traffic avoidance function is activated, the MMI system uses the traffic information to guide you around traffic obstructions
whenever possible.
Calling up traffic information
Fig. 44
Displaying traffic information on the map
Fig. 45
Important: The traffic avoidance function
must be switched on ð page 51.
NA
►
Select:
fic.
– To call up the detail view for traffic infor-
mation: Select a piece of traffic information
from the list and confirm it.
– To call up the next piece of traffic informa-
tion: Press the rotary pushbutton.
– To call up traffic information on the map:
Select and confirm Show on map.
– To display the next piece of traffic informa-
tion on the map: Press the rotary pushbut-
ton.
1
Traffic information on your route
An immediately upcoming tr
comes up in the first position and is displayed
V
button > control button T
affic obstruction
raf-
with a red warning symbol. Any other traffic
obstructions which ar
e relevant for your route
are sorted by distance to your current location. Traffic obstructions that you have avoided on your route are marked with the symbol .
2
Other traffic information
raffic obstructions that are not relevant for
T
your route are shown with a greyed-out warning symbol. They are sorted according to road
category (motorways, major roads, other
roads), country and road number.
Note
Urgent traffic information, such as a car
tr
avelling in the wrong direction on the
motorway, is displayed automatically. To
hide the traffic information, simply press
BACK
the
button or the rotary pushbut-
ton.
Other settings
Storing a favourite/home address
Applies to vehicles: with na
The favourites you store are automatically
displayed as a contact in the directory.
Select:
nation
NAV
> Favourites.
►
– To store a favourite: Select Create favour-
ite. Select and confirm a favourite with the
functions displayed.
– To store your home address: Select Home
address. Select and confirm the home ad-
dress with the functions displayed.
Other functions are:
– Call: Select and confirm a favourite/your
home address. Select and confirm Call.
– Change: Select and confirm a favourite/your
home address. Select and confirm Assign
new favourite/Reassign home address.
– Show on map: Select and confirm a favour-
ite/your home address. Select and confirm
Destination on map.
vigation system
button > control button Desti-
Page 53

51Navigation
– Delete: Select and confirm a fa
vourite/your
home address. Select and confirm Delete fa-
vourite/home address.
Storing a destination in the directory
Applies to vehicles: with na
vigation system
Two addresses (private/business) can be stored as a destination for each contact in the directory.
NA
►
Select:
nation >
V
button > control button Desti-
enter destination
> Store in direc
tory.
– To store a destination as a new address
card: Select New contact. Enter a name. En-
ter additional data if desired. Select and
confirm Store contact.
– To assign a destination to an existing ad-
dress card: Select and confirm an address
card. Select and confirm Store contact. If a
destination is already stored in an existing
address card, the old destination will be
overwritten automatically.
Show as favourite: If you would like to be
able to access the destination quickly, you can
add it to the list of favourites when this function is switched on
ð page 47
.
General settings
Applies to vehicles: with na
V
Select:
NA
►
vigation system
button > control button Set
-
tings.
Route criteria
Dyn. traffic avoidance: When the dynamic
traffic avoidance function is on, the route is
automatically optimised using the current
traffic information. If the MMI system does
not display a detour route although the dynamic traffic avoidance function is on and a
traffic jam has been reported on the planned
route, this is because the estimated time required for the detour is longer than the estimated time required for remaining on the
route with the traffic jam.
Route type:
You can select a short, fast or
economical (eco) route.
Motorway/Vignette/Toll road/Tunnel/Ferry/
Motorail: If you do not want the navigation
system to include motorways, vignette/toll
roads, tunnels, ferries or motorail transit
routes in the route calculation, you can set the
option avoid.
Closed certain times: Select avoid to exclude
roads that are closed at certain times of the
day (e.g. pedestrian zones) from the route cal-
-
culation. When auto is selected, the MMI system will determine whether the restricted
road can be included in the route calculation
based on the entries stored in the navigation
data.
Seasonally restricted: Select avoid to exclude
roads that are closed during certain seasons
(e.g. mountain passes) from the route calculation. When auto is selected, the MMI system
will determine whether the seasonally restricted road can be included in the route calculation based on the entries stored in the navigation data.
Map colours
day/night: The map is displayed with a light/
dark background colour.
auto: When the lights are on, the map
scheme will switch from day to night.
Map type
destination: The map indicates the destina-
tion and is set to face north.
2D driv. pos./2D north pos.: The map depicts
the vehicle's current location and is set to face
the direction of travel or north.
3D driv. pos.: When this function is activated,
the current vehicle position is displayed in a
three-dimensional map, and the map is set to
face the direction of travel. If the map scale is
more than 100 km, the map is set to face
north.
overview: The entire route from the vehicle
position to the final destination is displayed
ControlsCommunicationNavigationEntertainment
Page 54

52 Navigation
on the map. The map scale varies according to
the length of the r
north.
oute. The map is set to face
Map content
The display of map contents such as traffic information, favourite destinations or restaurants can be switched on and off.
Additional info
Important: The route guidance function must
have been started ð page 48.
Route info: During route guidance, the next
three manoeuvres together with the calculated distances and arrival times are displayed
9
ð page 49, Fig. 42. In addition, the str
you are currently on, upcoming turn-offs, traffic information or special destinations on the
current route are displayed. The next upcoming turn-off is shown in the bottom line.
Overview map: The entire route from the vehicle position to the final destination is displayed in the additional info.
off: No additional info is shown.
eet
Intersection map
When this option is on, a detail view of the intersection is displayed temporarily in the additional info when there is an upcoming turnoff.
Auto zoom
on: The map scale is selected automatically
according to the category of the road you are
on (motorway, major road, other road). When
there is an upcoming turn-off, the map display
will automatically zoom in for a better view of
the details. This will be indicated in the map's
legend menu
Intersection:
and there are upcoming turn-offs, the map
display will temporarily switch to a more detailed scale so that the road layout can be
identified more easily.
off: The map scale you have set will remain
unaltered.
2
ð page 49, Fig. 42
When route guidance is active
.
Petrol station msg
When the fuel gauge is below the reserve
zone, a message will appear when this function is on. Confirm this message, and a list of
petrol stations in the vicinity will be displayed.
When you select one of the petrol stations,
the route to this station will be calculated
based on the current position of your car.
Speed display
You can switch the display of the maximum
speed limit on motorways, dual carriageways
and other major roads on and off if it is stored
in the navigation data.
Voice guidance
Voice guidance: The navigation cues can be
played in complete or compact form. You can
use the traffic option to have the system play
only those announcements on traffic obstructions that are relevant for your route. Select
off if you do not want the system to play any
navigation cues.
Navigation cues during call: You can switch
the navigation cues while you are on the
phone on or off.
Delete favourites
You can delete stored favourites individually
or all at once.
Delete last destinations
The destinations that were last entered are
stored automatically. You can delete them individually or all at once.
Presentation mode
Use the Presentation mode to plan and display a route effectively by displaying map contents or route criteria. You can enter your
start location manually (Set start location) if,
for example, you would like to calculate a
route starting from a different position than
the current position of the vehicle. Start the
Presentation mode to simulate a route guidance.
Page 55

Tour settings
Applies to vehicles: with na
V
Select:
NA
►
vigation system
button > control button T
our.
Calculate alternative routes
Up to three suggested routes and their characteristics are displayed in the map's legend
menu.
The route which was calculated on the basis of
your criteria is highlighted. In addition the
distance to the destination and the estimated
time of arrival will be displayed. You can use
the rotary pushbutton to select the possible
alternative routes.
You can use the Via function to determine the
course of the alternative route yourself.
Route list
The route list is only visible when the route
guidance function is active; it contains information on the route, street names and the
length of the route sections.
Exclude route
When route guidance is activated, a section of
the calculated route that you have set will be
avoided if possible. The navigation system will
calculate an alternative route.
The blocking of the route that you have entered applies only to the current route guidance; if required, the route section to be avoided must be re-entered.
If you exclude a route section, this section will
be hatched in red and white on the map.
53Navigation
ControlsCommunicationNavigationEntertainment
Information on country
With this option you can view the speed limits
for towns and country roads in the country
you have selected. This information is displayed automatically when you cross a border.
Page 56

54 Listening to the radio
Listening to the radio
ling up the radio
Cal
The radio supports the wavebands DAB* (digital radio), FM and AM.
Fig. 46 FM station list
ADIO
►
fter calling up the radio, the menu that was
A
last open will be displayed.
– To display the station list: Press the
– To tune to a station from the station list:
– To store a station: Select a station from the
– To tune to a stored station: Press control
– To set the waveband: Press the control but-
R
Select:
button.
RADIO
button again. The stations which are cur-
ently within reception range are displayed
r
in the station list ð Fig. 46 and can be selec-
ted.
Select and confirm a station from the station list (FM: max. 200 stations; AM: max.
200 stations; DAB*: max. 250 stations).
station list ð Fig. 46 and confirm it. Press
and hold the rotary pushbutton until Store
station name here appears in the memory
list. Select and confirm the desired memory
position.
button Memory. Now you can select a station from the memory list and confirm it.
ton for Waveband. Select and confirm the
desired waveband. The current waveband
will then appear in the display header. Or:
Press the
the desir
RADIO
button repeatedly until
ed waveband appears.
Note
– If you lea
ve the range of DAB* reception,
radio stations of the selected ensemble
ð page 56 are marked with a crossed-
out signal reception signal. The symbol
disappears as soon as the radio station
can be received again.
– The DAB waveband* also supports the
transmission standards DAB+ and DMB
Audio. Please not that these transmis-
sion standards are not available in all
countries.
Radio functions
Fig. 47 FM waveband functions
Fig. 48 DAB waveband functions
ADIO
►
Depending on the wa
select the following functions:
1
The selected station will appear at the next
fr
R
Select:
button > control button
Functions.
veband setting, you can
Storing a station
ee position in the memory list
8
ð Fig. 48.
1)
1)
Applies for the DAB waveband* when the station sorting setting is set to ensemble.
Page 57

Select and confirm the desired memory position.
2
Displaying the radio text (FM, DAB*)
Additional information as a supplement to
the normal pr
3
Tuning to previous/next station
The system will select the pr
ogramme is displayed.
evious or next
available frequency. Or: Move the ON/OFF
button to the left/right (
4
Setting the frequency manually (FM,
AM)
equency bar will appear. Select and con-
The fr
firm the desired station frequency.
5
Freezing/releasing station names
(FM)*
ent name of the selected station will
The curr
be frozen in the memory list and marked with
the symbol
station names ar
A
ð page 54, Fig. 46. Changing
e not displayed. To release
the station name, select and confirm Freeze
station names again.
6
Displaying the slide show (DAB*)
Additional information as a supplement to
the normal pr
ogramme (such as images from
the studio, current photographs of artists or
covers of music albums) is shown if available.
7
Displaying the programme guide (EPG)
AB*)
(D
If available, an overview of the radio stations
within reception range and the current and
following radio programmes will be shown.
Select and confirm a radio programme. Detailed information on the radio programme
will now be displayed.
8
Info box
Depending on whether it is a
tion on the selected station (e.g. station
name, ensemble, type of programme etc.) will
be shown.
/
).
vailable, informa-
9
Memory list
The memor
y list can contain up to 50 stations
from all wavebands.
– To store a station: Select control button
Memory > station name store. The selected
station will appear at the next free position
in the memory list. Select and confirm the
desired memory position.
– To tune to a stored station: Press control
button Memory. Now you can select a station from the memory list and confirm it.
– To move a stored station: Press control but-
ton Memory. Select and the station in the
memory list and then select station name
move. Select and confirm the desired memory position.
Other settings
R
►
Select:
tings.
Depending on the waveband setting (FM, AM
or DAB*), you can select the following functions:
Sound settings
Refer to
Announcements*
Traffic programme (TP): Traffic announce-
ments can be received via FM and played by
the system irrespective of the selected waveband. The function DAB and FM can be used
to have the system play traffic announcements from both wavebands while the DAB*
waveband is selected. If, for example, no traffic announcements are available from the selected DAB* station, these are received in the
FM waveband. The display of the TP symbol
ð page 10, Fig. 6
fic programme is switched on
page 56
DAB announcements: When the DAB announcements are on, information on the se-
lected station (e.g. news or weather information) is played.
ADIO
ð page 29
.
button > control button Set
.
shows you whether the tr
af-
ð table on
55Listening to the radio
ControlsCommunicationNavigationEntertainment
-
8
Page 58

56 Listening to the radio
Volume of announcements: see ð page 30.
TP symbol Meaning
Displayed The traffic programme func-
tion is switched on and tr
announcements will cut in.
Greyed out The traffic programme func-
tion is switched on, but traffic
announcements cannot be received.
Not displayed
The traffic programme function is switched off.
affic
Alternative frequency (FM, DAB*)
The tuner attempts to switch to an alter-
on:
native frequency of the current station when
the reception quality becomes weaker. When
the reception is lost in the DAB* waveband,
the system will automatically switch to an alternative station in the FM waveband, if there
is one available.
off: The tuner will not switch to alternative
frequencies in the FM waveband. The current
frequency will be maintained, and in some cases may no longer be received. The Alternative
frequency function is automatically switched
on again when the station is changed. When
the DAB waveband is set, the tuner will not
switch to alternative stations in the FM waveband.
Switch regional stations (FM)
Important: The Alternative frequency function
must be switched on.
Some FM stations split up their transmission
and provide different regions with regional
programmes with differing content. When the
function is on , the system switches to alternative region-specific frequencies.
L band (DAB*)
There are two wavebands for the digital radio:
Band III and L band. Ensembles in the band
III usually have a larger range extending into
several regions. They can be received at all
times. In some regions DAB is broadcast in
the L band. When this option is on, stations
om the L band will also be received.
fr
Station sorting (FM)
A-Z: The stations are displayed in the station
list in alphabetical order. Radio stations with
variable station names are displayed after the
alphabetical list; radio stations without station names appear at the end of the list.
ID: The stations in the station list are sorted
according to the station's ID (e.g. all BBC radio stations are sorted together). Radio stations without station names are displayed at
the end of the list.
Station sorting (DAB*)
A-Z: The stations are displayed in the station
list in alphabetical order.
Ensemble: Ensembles comprise various radio
stations of a specific area (e.g. a town or region); they are listed together as an ensemble
in the station list. To open/close the list of radio stations in an ensemble, select and confirm the ensemble. Available sub-programmes* (additional services provided by
DAB* radio stations) are listed beneath the radio station (indented).
Station information (DAB*)
When this function is switched on , detailed
programme information on the selected radio
station is displayed in the station list.
Reduced display
When this function is switched on and the
station or memory list is open, information on
the selected station (e.g. the station name,
artist, track, DAB slide show, radio text/DAB
slide show availability) is shown after approx.
ten seconds.
Delete stored stations
Important: A station must be stored in the
memory list
You can delete stored stations individually or
all at once.
ð page 54
.
Page 59

57Listening to the radio
Note
If the T
raffic programme or DAB an-
nouncements* function is switched on,
Troubleshooting
Subject Advice
A station with poor reception is no longer listed in the station list after switching to another station.
You can store the station in advance and call it up via
the memory list ð page 54.
playback is interrupted for announcements
. You can cancel an announcement
while it is being played by briefly pressing
the ON/OFF button.
ControlsCommunicationNavigationEntertainment
Page 60

58 Playing media
Playing media
ling up the media
Cal
menu
You can start and operate various media
drives via the MMI control console.
Possible sources
Fig. 49
o access the next level up in the structure
– T
of folders: Press the
BACK
button. Or: Se-
lect and confirm Go up.
– T
o access the top level in the structure of
folders: Press the
– T
o select the previous/next track/title/
MEDIA
button.
chapter: Move the ON/OFF button to the
left/right briefly ( / ).
– To fast forward/rewind an audio/video file:
Move and hold the ON/OFF button to the
left/right (
/
) until the desired play-
ing position has been reached.
– To pause/resume playback: Briefly press the
ON/OFF button.
– To show the playlist: Press the control but-
ton for Now playing.
Possible sources are ð Fig. 49:
1
Jukebox ð page 23
2
SD card reader ð page 24
3
DVD drive ð page 24
4
Audi music interface (e.g. iPod®, USB or
external audio/video input*) ð page 25
5
Bluetooth audio player* ð page 25
Fig. 50 Playlist
Important: A media drive must contain audio/
video files ð page 22.
Select:
MED
button.
►
fter calling up the media, the display will
A
IA
show an overview of the sources, or the file
will be played that was playing last.
– To select a source: Press the control button
for Source. Select a source from the list and
confirm it. Or: Press the
peatedly until the desir
MEDIA
button re-
ed source appears.
– To play an audio/video file: Select control
button Media centre > category (e.g. Ar-
tists) > folder > track/title. Depending on
availability, the playlist will show the track/
1
title
3
Fig. 50, artist
ð
and album cover 4.
2
, playback time
Note
– Y
ou can scroll rapidly through long folder/track lists by turning the rotary pushbutton quickly. The scroll speed depends
on the number of folders/tracks.
– If the Traffic programme (TP) or DAB
announcements* function is switched
on, playback is interrupted for announcements ð page 55. You can cancel an an-
nouncement while it is being played by
briefly pressing the ON/OFF button.
–
For safety reasons, the video picture is
vailable while the vehicle is moving.
not a
While you are driving, only the sound is
played.
–
Video playback via an iPod®/iPhone®/
iPad® will not continue automatically
when you switch on the engine after it
was switched off completely.
Page 61

59Playing media
Media centre
In the media centre several categories for selecting audio/video files are available.
Fig. 51 SD card categories (level 1)
Fig. 52 SD card categories (level 2)
IA
►
Depending on the active source, you can select audio/
gories and copy them into the playlist
ð page 58, Fig. 50:
1
All a
confirm a track.
2
All a
confirm an artist, an album and then a track.
3
All a
confirm an album and then a track.
4
All a
lect and confirm an album cover from the
MED
Select:
button > control button Me-
dia centre.
video files from the following cate-
Tracks
vailable tracks are displayed. Select and
Artists
vailable artists are displayed. Select and
Albums
vailable albums are displayed. Select and
Album browser
vailable album covers are displayed. Se-
overview. The first track of the selected album
will be pla
5
The folder structur
yed.
Folders
e or the track/chapter list
of the selected source will be displayed. Select a folder (if applicable) and select and confirm a track.
6
Playlists
vailable playlists are displayed. Select and
All a
confirm a playlist and then a track.
7
More
The second level of the media centr
e is dis-
played.
8
Back
The first level of the media centr
e is dis-
played.
9
Genres
vailable genres are displayed. Select and
All a
confirm a genre (e.g. Pop), an artist, an album
and then a track.
10
Find music
Enter a search term (
artist, album or track)
using the speller. Select and confirm OK, and
then select and confirm an audio file.
11
Videos
vailable video files are displayed. Select a
All a
video file from the list and confirm it.
Repeat
Important: A category (e.g. Albums) must be
selected.
Press the control button for Repeat to narrow
down the playlist. If you would like to copy
e.g. all tracks of a selected genre into the
playlist, select a
sired genre
(e.g. Pop) > control button Re-
category
(e.g. Genres) >
de-
peat.
ControlsCommunicationNavigationEntertainment
Page 62

60 Playing media
Note
– Only the categories suppor
medium used are available. For example,
CD/DVD-ROM tracks cannot be selected
via categories such as Artists, Albums or
Genres. When you are using an iPod®
(source: Audi music interface), the categories Podcasts, Audiobooks and Com-
posers are available additionally.
– For safety reasons, the video picture is
not available while the vehicle is moving.
While you are driving, only the sound is
played.
–
Video playback via an iPod®/iPhone®/
ad® will not continue automatically
iP
when you switch on the engine after it
was switched off completely.
–
On some video DVDs it is not possible to
select e.g. the audio track, subtitles or
track/chapter while they are being
played.
–
If you synchronise an iPod/iPhone/iPad
with "cloud" services (iCloud), the playlists may not be displayed correctly on
the MMI. Use the Apple device's local
media library.
ted by the
Other settings
tant: A source must be selected.
Impor
Select:
Settings.
MEDIA
button > control button
►
Depending on the active source and the stor
age device used, you can select the following
settings:
Sound settings
Refer to ð page 29.
Input level
Important: A portable player must be connected via an adapter cable with 3.5 mm jack
plug*/AV adapter cable*/iPod® adapter cable
(plus)* ð page 26.
The volume of the portable player will be
adapted to the MMI system. We recommend
setting the volume of the portable player to
about 70 percent of the maximum volume.
Random playback
When the function is switched on , all the
files in the pla
random order.
ylist will be played and shown in
Repeat track
When the function is switched on , the current track in the playlist will be repeated.
Video picture settings
Important: A portable player must be connected via an iPod® adapter cable plus*/AV
adapter cable* ð page 26
Picture format: The picture format can be adjusted automatically. The width of the picture
will vary depending on the film format. Alternatively you can select the formats 4:3 and
16:9. The zoom function can be used to expand the picture to the full MMI screen; select
original if you would like to view the picture in
the stored format. You can set the cinema-
scope option to display the picture in the format 47:20.
AV standard: PAL, NTSC or auto can be set as
the standard for an externally connected player. The same standard must also be set on the
player. If you select the wrong AV standard,
the following problems can occur: no picture
or a poor picture or no colour picture.
Brightness: The brightness can be increased/
-
reduced.
Contrast: The picture contrast can be increased/reduced.
Colour: The colour intensity can be increased/
reduced.
Reduced display
When this function is switched on and the
playlist is open, information on the selected
track (e.g. the artist, album, embedded album
cover*) as well as the total and remaining
playing time will be displayed. When this display is active, you can also select and confirm
Page 63

61Playing media
a new track or the desired playing position for
the curr
ent track by pressing the rotary push-
button.
Display full screen
Important: A video must be playing, and the
vehicle must be stationary.
The video picture will expand to the full
screen. To switch off the full screen display,
press the
The chapter list will be displa
BACK
button or any control button.
yed.
Display DVD menu
Important: A video DVD must be playing, and
the vehicle must be stationary.
The DVD main menu will appear on the MMI
display. To select a menu option, move your
finger on the MMI touch pad and press the rotary pushbutton.
Audio track
Important: A video DVD must be playing.
The audio track (language and audio format)
can be adjusted manually. It depends on the
video DVD whether different languages and
audio formats are available.
Subtitles
Important: A video DVD must be playing.
You can select the subtitle setting manually.
It depends on the video DVD whether different languages are available.
Use the function Change password for child
lock if you would lik
word.
e to edit the current pass-
Fill/delete jukebox
Refer to ð page 23.
Note
– For safety r
not available while the vehicle is moving.
While you are driving, only the sound is
played.
– If you change the source while the Media
menu is open, the Repeat track and Ran-
dom playback functions are deactivated
automatically.
– The DTS audio format (Digital Theater
Systems) is only supported by the DVD
drive ð page 24.
–
The child lock safety levels comply with
the US standar
Association of America (MPAA). Please
note that DVD classifications may differ
in European countries.
–
Not all video DVDs have a child lock feature.
–
If you enter the wrong child lock password three times in a row, you will not be
able to enter a password for approximately one minute. The password can
only be reset by an Audi workshop.
easons, the video picture is
ds of the Motion Picture
ControlsCommunicationNavigationEntertainment
Child lock
Important: A video DVD must be playing, and
the password must have been entered (password set at the factory: "1234").
You can use the child lock to restrict video
DVD playback. Select and confirm a safety level (e.g. Level 5). Eight safety levels are available for the child lock function. If you select
child lock level 5, for example, all DVDs with
safety levels 1-5 can be played. Playback of
DVDs with a higher safety level will be
blocked. To cancel all restricted access settings select off.
Page 64

62 Index
A
Adapter cable for Audi music inter
Address
Entering as a destination . . . . . . 43, 45, 47
see also Destination, entering . . . . . . . . 45
see also Managing contacts
(directory) . . . . . . . . . . . . . . . . . . . . . 41, 43
Address card
see Managing contacts (directory) . 41, 43
Album browser . . . . . . . . . . . . . . . . . . . . . . 59
Alternative routes, calculating . . . . . . 48, 53
AM . . . . . . . . . . . . . . . . . . . . . . . . . . . . . . . . 54
Announcements (traffic programme) 30, 55
Audi music interface . . . . . . . . . . . . . . . . . . 25
Connecting/disconnecting adapter cable 26
see also Media, playing . . . . . . . . . . . . . . 58
Audio/video files
Copying . . . . . . . . . . . . . . . . . . . . . . . . . . . 23
Deleting . . . . . . . . . . . . . . . . . . . . . . . . . . 23
Playing . . . . . . . . . . . . . . . . . . . . . . . . . . . 58
Audio player
Settings . . . . . . . . . . . . . . . . . . . . . . . . . . 38
see also
Audi Phone Box . . . . . . . . . . . . . . . . . . . . . . 39
Automatic zoom . . . . . . . . . . . . . . . . . . . . . 51
Bluetooth . . . . . . . . . . . . . . . . . . 25
face . . . 25
B
Balance (sound) . . . . . . . . . . . . . . . . . . . . . 29
Bass (sound) . . . . . . . . . . . . . . . . . . . . . . . . 29
Battery, charging . . . . . . . . . . . . . . . . 26, 39
Bluetooth . . . . . . . . . . . . . . . . . . . . . . . . . . 38
Audio player . . . . . . . . . . . . . . . . . . . . . . . 25
Bonding mobile phone . . . . . . . . . . . . . . 33
see also
Business address (storing a contact) . . . . . 41
Media, playing . . . . . . . . . . . . . . 58
C
Call lists . . . . . . . . . . . . . . . . . . . . . . . . . . . 35
Calls
Answering/ignoring . . . . . . . . . . . . . . . . . 36
Ending . . . . . . . . . . . . . . . . . . . . . . . . . . . 36
Holding . . . . . . . . . . . . . . . . . . . . . . . . . . . 37
Missed calls (call list) . . . . . . . . . . . . . . . . 35
Options during a call . . . . . . . . . . . . . . . . 37
see also
Telephone . . . . . . . . . . . . . . . . . 33
Centre of town, selecting . . . . . . . . . . . . . . 48
Char
ging the battery . . . . . . . . . . . . . 26, 39
Cleaning and care . . . . . . . . . . . . . . . . . . . . . 6
Commands (speech dialogue system) . . . . 18
Compact voice guidance . . . . . . . . . . . . . . . 30
Conference calling . . . . . . . . . . . . . . . . . . . 37
Connections
see Media drives . . . . . . . . . . . . . . . . . . . . 22
Control buttons . . . . . . . . . . . . . . . . . . . . . . 7
Controls
Multi-function steering wheel . . . . . . . . . 12
Controls and displays
MMI control console . . . . . . . . . . . . . . . . . 7
Overview . . . . . . . . . . . . . . . . . . . . . . . . . . . 5
Coordinates . . . . . . . . . . . . . . . . . . . . . . . . . 48
Crosshairs, moving . . . . . . . . . . . . . . . . . . . 46
D
DAB (digital radio) . . . . . . . . . . . . . . . . . . . 54
Data
Copyright (media drives) . . . . . . . . . . . . . 22
Data protection (storing a contact) . . . . . 41
Data storage (media drives) . . . . . . . . . . 22
Date . . . . . . . . . . . . . . . . . . . . . . . . . . . . . . . 29
Deleting
Bluetooth devices . . . . . . . . . . . . . . . . . . 38
Characters (speller) . . . . . . . . . . . . . . . . . 36
Contacts . . . . . . . . . . . . . . . . . . . . . . 43, 44
Favourites (navigation) . . . . . . . . . . . . . . 51
Favourites (telephone) . . . . . . . . . . . . . . . 38
Last destinations . . . . . . . . . . . . . . . . . . . 51
Radio station . . . . . . . . . . . . . . . . . . . . . . 55
Demo mode (navigation) . . . . . . . . . . . . . . 51
Destination details . . . . . . . . . . . . . . . . . . . 48
Destination on map
Displaying . . . . . . . . . . . . . . . . . . . . . . . . . 48
Setting as destination . . . . . . . . . . . . . . . 46
Destination, entering . . . . . . . . . . . . . . . . . 45
Destination, entering (special destination) 46
Destination, storing . . . . . . . . . . . . . . . . . . 51
Device management (Bluetooth) . . . . . . . . 38
Dialling telephone number . . . . . . . . . . . . 36
Digital radio (DAB) . . . . . . . . . . . . . . . . . . . 54
Directory . . . . . . . . . . . . . . . . . . . . . . . . . . . 41
Settings . . . . . . . . . . . . . . . . . . . . . . . . . . 44
Page 65

63Index
Display
Na
vigation display . . . . . . . . . . . . . . . . . . 49
Settings (video) . . . . . . . . . . . . . . . . . . . . 60
Speller . . . . . . . . . . . . . . . . . . . . . . . . . . . . 9
see also Map display . . . . . . . . . . . . 49, 51
Driver information system . . . . . . . . . . . . . 12
Drives
see Media drives . . . . . . . . . . . . . . . . . . . . 22
Driving school mode . . . . . . . . . . . . . . . . . . 31
DTMF tones . . . . . . . . . . . . . . . . . . . . . . . . . 36
DVD drive . . . . . . . . . . . . . . . . . . . . . . . . . . 24
Loading/ejecting . . . . . . . . . . . . . . . . . . . 24
Notes (CD/DVD mode) . . . . . . . . . . . . . . . 22
see also Media, playing . . . . . . . . . . . . . . 58
Dynamic traffic avoidance
see Traffic avoidance . . . . . . . . . . . . . . . . 51
Dynamic volume control
see In-car entertainment fader . . . . . . . . 30
E
Ending calls . . . . . . . . . . . . . . . . . . . . . . . . . 36
Ensemble (station sorting) . . . . . . . . . . . . 55
Entering (using the speller) . . . . . . . . . . . . . 9
Excluding route . . . . . . . . . . . . . . . . . . . . . . 53
Exporting/importing contacts . . . . . . . . . . 43
External players
Connecting/disconnecting . . . . . . . . . . . . 26
Video picture settings . . . . . . . . . . . . . . . 58
F
Factory settings . . . . . . . . . . . . . . . . . . . . . 31
Fader (sound) . . . . . . . . . . . . . . . . . . . . . . . 29
Fast forward (track) . . . . . . . . . . . . . . . . . . 59
Favourites
As destination . . . . . . . . . . . . . . . . . . . . . 47
Calling . . . . . . . . . . . . . . . . . . . . . . . 35, 50
Deleting . . . . . . . . . . . . . . . . . . . . . . 38, 51
Editing . . . . . . . . . . . . . . . . . . . . . . . . . . . 50
Storing . . . . . . . . . . . . . . . . . . . . . . . 38, 50
File formats . . . . . . . . . . . . . . . . . . . . . . . . 27
Files
Copying . . . . . . . . . . . . . . . . . . . . . . . . . . . 23
Deleting . . . . . . . . . . . . . . . . . . . . . . . . . . 23
Finding
Bluetooth audio pla
Contact . . . . . . . . . . . . . . . . . . . . . . . . . . . 42
Mobile phone . . . . . . . . . . . . . . . . . . . . . . 33
FM . . . . . . . . . . . . . . . . . . . . . . . . . . . . . . . . 54
Folder, selecting . . . . . . . . . . . . . . . . . . . . . 58
Frequency . . . . . . . . . . . . . . . . . . . . . . . . . . 54
yer . . . . . . . . . . . . . . 25
G
GALA (speed-dependent volume control) . 29
GPS . . . . . . . . . . . . . . . . . . . . . . . . . . . . . . . 29
H
Handsfree . . . . . . . . . . . . . . . . . . . . . . . . . . 33
Handsfree Profile . . . . . . . . . . . . . . . . . . . . 33
Holding calls . . . . . . . . . . . . . . . . . . . . . . . . 37
Home address . . . . . . . . . . . . . . . . . . . . . . . 47
see also
How to use the MMI
MMI control console . . . . . . . . . . . . . . . . . 7
Multi-function steering wheel . . . . . . . . . 12
Speech dialogue system . . . . . . . . . . . . . 17
Favourites . . . . . . . . . . . . . . . . . 50
I
Importing/exporting contacts . . . . . . . . . . 43
In-car entertainment fader . . . . . . . . . . . . 30
Individual speech training . . . . . . . . . . . . . 31
Info box . . . . . . . . . . . . . . . . . . . . . . . . . . . . 54
Information on country . . . . . . . . . . . . . . . 53
Input level . . . . . . . . . . . . . . . . . . . . . . . . . . 60
iPod®
Connecting/disconnecting . . . . . . . . . . . . 26
Input level . . . . . . . . . . . . . . . . . . . . . . . . 60
Video picture settings . . . . . . . . . . . . . . . 60
see also
Media, playing . . . . . . . . . . . . . . 58
J
Jack plug
Audi music interface . . . . . . . . . . . . . . . . 25
Jukebox . . . . . . . . . . . . . . . . . . . . . . . . . . . . 23
Copying files . . . . . . . . . . . . . . . . . . . . . . . 23
Deleting files . . . . . . . . . . . . . . . . . . . . . . 23
Memory status . . . . . . . . . . . . . . . . . . . . . 23
see also
Media, playing . . . . . . . . . . . . . . 58
ControlsCommunicationNavigationEntertainment
Page 66

64 Index
L
Language, setting
Last destinations
Deleting . . . . . . . . . . . . . . . . . . . . . . . . . . 51
Loading . . . . . . . . . . . . . . . . . . . . . . . . . . . 47
L band (radio) . . . . . . . . . . . . . . . . . . . . . . . 55
Letters, entering (using the speller) . . . . . . 9
Licence conditions . . . . . . . . . . . . . . . . . . . . 6
Loading times (media drives) . . . . . . . . . . . 22
. . . . . . . . . . . . . . . . . . . . 31
M
Mailbox . . . . . . . . . . . . . . . . . . . . . . . . . . . . 36
Mailbox number . . . . . . . . . . . . . . . . . . . . 38
Managing contacts (directory)
Editing . . . . . . . . . . . . . . . . . . . . . . . . . . . 43
Favourites . . . . . . . . . . . . . . . . . . . . . . . . . 38
Importing/exporting . . . . . . . . . . . . . . . . 43
Reading . . . . . . . . . . . . . . . . . . . . . . . . . . 43
Storing . . . . . . . . . . . . . . . . . . . . . . . . . . . 41
Using . . . . . . . . . . . . . . . . . . . . . . . . . . . . 42
Map
Calling up . . . . . . . . . . . . . . . . . . . . . . . . . 45
Entering a destination . . . . . . . . . . . . . . . 46
Map display . . . . . . . . . . . . . . . . . . . . . 49, 51
Measurement units . . . . . . . . . . . . . . . . . . 31
Media centre . . . . . . . . . . . . . . . . . . . . . . . . 59
Media drives
Audi music interface . . . . . . . . . . . . . . . . 25
Bluetooth audio player . . . . . . . . . . . . . . 25
DVD drive . . . . . . . . . . . . . . . . . . . . . . . . . 24
File formats . . . . . . . . . . . . . . . . . . . . . . . 27
Jukebox . . . . . . . . . . . . . . . . . . . . . . . . . . . 23
Notes . . . . . . . . . . . . . . . . . . . . . . . . . . . . 22
SD card reader . . . . . . . . . . . . . . . . . . . . . 24
Troubleshooting . . . . . . . . . . . . . . . . . . . . 28
Media, playing . . . . . . . . . . . . . . . . . . . . . . 58
Multi-function steering wheel . . . . . . . . . 15
Other settings . . . . . . . . . . . . . . . . . . . . . 60
Speech dialogue system . . . . . . . . . . . . . 21
Memory capacity (directory) . . . . . . . . . . . 44
Memory list (radio) . . . . . . . . . . . . . . . . . . . 54
Memory status (jukebox) . . . . . . . . . . . . . . 23
Menu language . . . . . . . . . . . . . . . . . . . . . . 31
Menus . . . . . . . . . . . . . . . . . . . . . . . . . . . . . 10
Microphone on/off . . . . . . . . . . . . . . . . . . . 37
Missed calls (call list) . . . . . . . . . . . . . . . . . 35
MMI
ontrols and displays . . . . . . . . . . . . . . . . . 5
C
How to use the MMI . . . . . . . . . . . . . . . . . . 7
Restart . . . . . . . . . . . . . . . . . . . . . . . . . . . 31
Switching on/off . . . . . . . . . . . . . . . . . . . . 7
Symbols/menus . . . . . . . . . . . . . . . . . . . . 10
System update . . . . . . . . . . . . . . . . . . . . . 31
MMI touch
Adjusting balance/fader . . . . . . . . . . . . . . 8
Adjusting sound focus . . . . . . . . . . . . . . . . 8
Browsing through album covers . . . . . . . . 8
Confirming entry . . . . . . . . . . . . . . . . . . . . 8
Deleting entry . . . . . . . . . . . . . . . . . . . . . . 8
DVD main menu . . . . . . . . . . . . . . . . . . . . . 8
Entering letters/numbers/symbols . . . . . 8
Moving map . . . . . . . . . . . . . . . . . . . . . . . . 8
Mobile phone
As audio player (other settings) . . . . . . . 38
Bonding . . . . . . . . . . . . . . . . . . . . . . . . . . 33
Inserting in Audi Phone Box . . . . . . . . . . 39
MP3 player, connecting/disconnecting . .25, 26
Multi-function steering wheel
How to use the controls . . . . . . . . . . . . . . 12
Listening to the radio . . . . . . . . . . . . . . . . 15
Navigation . . . . . . . . . . . . . . . . . . . . . . . . 14
Phoning . . . . . . . . . . . . . . . . . . . . . . . . . . 13
Playing media . . . . . . . . . . . . . . . . . . . . . . 15
Mute . . . . . . . . . . . . . . . . . . . . . . . . . . . . 7, 12
N
Navigation . . . . . . . . . . . . . . . . . . . . . . . . . . 45
Multi-function steering wheel . . . . . . . . . 14
Speech dialogue system . . . . . . . . . . . . . 19
see also
Navigation cue (voice guidance) . . . . . . . . . 51
Navigation destination
Storing . . . . . . . . . . . . . . . . . . . . . . . . . . . 51
see also
Navigation display
Driver information system . . . . . . . . . . . . 14
MMI display . . . . . . . . . . . . . . . . . . . . . . . 49
New contact
see
New destination
see
Noise compensation (GALA) . . . . . . . . . . . . 29
Route guidance . . . . . . . . . . . . . 45
Destination, entering . . . . . . . . 45
Managing contacts (directory) . 41, 43
Destination, entering . . . . . . . . . . . . 45
Page 67

65Index
Notes
Cleaning and car
Data protection (storing a contact) . . . . . 41
DVD drive . . . . . . . . . . . . . . . . . . . . . . . . . 22
Media drives . . . . . . . . . . . . . . . . . . . . . . . 22
Software licences . . . . . . . . . . . . . . . . . . . . 6
Traffic safety . . . . . . . . . . . . . . . . . . . . . . . . 5
Numbers dialled . . . . . . . . . . . . . . . . . . . . . 35
Numbers, entering (using the speller) . . . . 9
e of MMI control console 6
O
Orientation
see Map display . . . . . . . . . . . . . . . . 49, 51
P
Pause
Pausing/resuming playback . . . . . . . 59
see
Pausing/resuming playback . . . . . . . . 15, 59
Petrol station recommendation . . . . . . . . . 51
Phone pre-installation
Telephone . . . . . . . . . . . . . . . . . . . . . 33
see
Picture format . . . . . . . . . . . . . . . . . . . . . . 60
Playing position (media) . . . . . . . . . . . . . . . 59
Playing possible commands . . . . . . . . . . . . 18
Portable player, connecting/disconnect-
ing . . . . . . . . . . . . . . . . . . . . . . . . . . . . 25, 26
Presentation mode . . . . . . . . . . . . . . . . . . . 51
Private address (storing a contact) . . . . . . 41
Programme guide (radio) . . . . . . . . . . . . . . 54
Public contacts, displaying . . . . . . . . . . . . . 44
R
Radio . . . . . . . . . . . . . . . . . . . . . . . . . . . . . . 54
Multi-function steering wheel . . . . . . . . . 15
Other settings . . . . . . . . . . . . . . . . . . . . . 55
Speech dialogue system . . . . . . . . . . . . . 21
Troubleshooting . . . . . . . . . . . . . . . . . . . . 57
Radio station
Deleting . . . . . . . . . . . . . . . . . . . . . . . . . . 55
Storing . . . . . . . . . . . . . . . . . . . . . . . . . . . 54
Tuning . . . . . . . . . . . . . . . . . . . . . . . . . . . . 54
Radio text . . . . . . . . . . . . . . . . . . . . . . . . . . 54
Random playback . . . . . . . . . . . . . . . . . . . . 60
Reduced display
. . . . . . . . . . . . . . . . . . . . . . . . . . . . 60
Media
Radio . . . . . . . . . . . . . . . . . . . . . . . . . . . . 55
Repeat (audio file) . . . . . . . . . . . . . . . . . . . 60
Reset . . . . . . . . . . . . . . . . . . . . . . . . . . . . . . 31
Restart (MMI) . . . . . . . . . . . . . . . . . . . . . . . 31
Rewind (track) . . . . . . . . . . . . . . . . . . . . . . . 59
Ring tone settings . . . . . . . . . . . . . . . 30, 38
Rotary pushbutton . . . . . . . . . . . . . . . . . . . . 7
Route criteria . . . . . . . . . . . . . . . . . . . . . . . 51
Route guidance
In driver information system . . . . . . . . . 14
On display . . . . . . . . . . . . . . . . . . . . . . . . . 49
Starting/stopping . . . . . . . . . . . . . . . . . . 48
Route list . . . . . . . . . . . . . . . . . . . . . . . . . . . 53
Route plan
see Tour plan . . . . . . . . . . . . . . . . . . . . . . 48
S
Safety
While navigating . . . . . . . . . . . . . . . . . . . 45
While using telephone . . . . . . . . . . . . . . . 33
SD card reader
Inserting/removing SD card . . . . . . . . . . 24
see also
Search areas (special destinations) . . . . . . 46
Secure Simple Pairing . . . . . . . . . . . . . . . . . 33
Security
Copyright/data storage (media drives) . . 22
Data protection (storing a contact) . . . . . 41
Selecting a waveband (radio) . . . . . . . . . . . 54
Settings
Directory . . . . . . . . . . . . . . . . . . . . . . . . . . 44
Media . . . . . . . . . . . . . . . . . . . . . . . . . . . . 60
Navigation . . . . . . . . . . . . . . . . . . . . . . . . 50
Radio . . . . . . . . . . . . . . . . . . . . . . . . . . . . 55
System . . . . . . . . . . . . . . . . . . . . . . . . . . . 31
Telephone . . . . . . . . . . . . . . . . . . . . . . . . . 38
Setup MMI (system settings) . . . . . . . . . . . 31
Short dialogue . . . . . . . . . . . . . . . . . . . . . . 31
Showing as favourite (navigation destina-
tion) . . . . . . . . . . . . . . . . . . . . . . . . . . . . . . . 51
Slide show (radio) . . . . . . . . . . . . . . . . . . . . 54
Software licences . . . . . . . . . . . . . . . . . . . . . 6
Software version . . . . . . . . . . . . . . . . . . . . . 31
Sound adjustment (Tone) . . . . . . . . . . . . . . 29
Media, playing . . . . . . . . . . . . . . 58
ControlsCommunicationNavigationEntertainment
Page 68

66 Index
Source, selecting (media) . . . . . . . . . . . . . . 58
Special destination
Speech dialogue system . . . . . . . . . . . . . . . 17
Adapting to pronunciation . . . . . . . . . . . 31
Global commands . . . . . . . . . . . . . . . . . . 18
Help commands . . . . . . . . . . . . . . . . . . . . 18
Input help . . . . . . . . . . . . . . . . . . . . . . . . 17
Interrupting a spoken cue . . . . . . . . . . . . 17
Settings . . . . . . . . . . . . . . . . . . . . . . . . . . 31
Speed display . . . . . . . . . . . . . . . . . . . . . . . 51
Speed display on driving school vehicles . . 31
Speller . . . . . . . . . . . . . . . . . . . . . . . . . . . . . . 9
Spoken cues
Settings . . . . . . . . . . . . . . . . . . . . . . 30, 31
Speech dialogue system . . . . . . . . . . . . . 17
Station (radio)
Alternative frequency . . . . . . . . . . . . . . . 55
Station information . . . . . . . . . . . . . . . . . 55
Station list . . . . . . . . . . . . . . . . . . . . . . . . 54
Station sorting . . . . . . . . . . . . . . . . . . . . . 55
see also Radio station . . . . . . . . . . . . . . . 54
Steering wheel button . . . . . . . . . . . . . . . . 12
Stopover . . . . . . . . . . . . . . . . . . . . . . . . . . . 48
Stored telephone number, dialling . . . . . . 35
Subwoofer (sound) . . . . . . . . . . . . . . . . . . . 29
Summer time . . . . . . . . . . . . . . . . . . . . . . . 29
Switching between calls . . . . . . . . . . . . . . . 37
Switching on/off . . . . . . . . . . . . . . . . . . . . . . 7
Symbols . . . . . . . . . . . . . . . . . . . . . . . . . . . 10
System settings . . . . . . . . . . . . . . . . . . . . . 29
System update . . . . . . . . . . . . . . . . . . . . . . 31
. . . . . . . . . . . . . . . 46, 48
T
Telephone . . . . . . . . . . . . . . . . . . . . . . . . . . 33
Multi-function steering wheel . . . . . . . . . 13
Options during a call . . . . . . . . . . . . . . . . 37
Settings . . . . . . . . . . . . . . . . . . . . . . . . . . 38
Speech dialogue system . . . . . . . . . . . . . 18
Telephone number, storing . . . . . . . . . . . . 37
Time . . . . . . . . . . . . . . . . . . . . . . . . . . . . . . 29
Tone (sound) . . . . . . . . . . . . . . . . . . . . . . . . 29
Tour plan . . . . . . . . . . . . . . . . . . . . . . . . . . . 48
Tour settings . . . . . . . . . . . . . . . . . . . . . . . . 53
TP (traffic programme) . . . . . . . . . . . . . . . . 55
Track
ast forward/rewind . . . . . . . . . . . . . . . . 59
F
Pausing/resuming . . . . . . . . . . . . . . . . . . 59
Playing . . . . . . . . . . . . . . . . . . . . . . . . . . . 58
Track display . . . . . . . . . . . . . . . . . . . . . . . . 60
Traffic announcements
Speech dialogue system . . . . . . . . . . . . . 21
Traffic avoidance . . . . . . . . . . . . . . . . . . . . . 51
Traffic information
Showing on map . . . . . . . . . . . . . . . . . . . 50
Volume . . . . . . . . . . . . . . . . . . . . . . . . . . . 30
Traffic programme (TP) . . . . . . . . . . . . . . . 55
Traffic safety . . . . . . . . . . . . . . . . . . . . . . . . . 5
Treble (sound) . . . . . . . . . . . . . . . . . . . . . . . 29
Troubleshooting
Media drives . . . . . . . . . . . . . . . . . . . . . . . 28
Radio . . . . . . . . . . . . . . . . . . . . . . . . . . . . 57
U
Units . . . . . . . . . . . . . . . . . . . . . . . . . . . . . . 31
Updating MMI software . . . . . . . . . . . . . . . 31
V
Version information . . . . . . . . . . . . . . . . . . 31
Video picture settings . . . . . . . . . . . . . . . . 60
Volume
Adjusting using multi-function steering
wheel . . . . . . . . . . . . . . . . . . . . . . . . . . . . 12
Adjusting using ON/OFF button . . . . . . . . 7
In-car entertainment fader . . . . . . . . . . . 30
Input level . . . . . . . . . . . . . . . . . . . . . . . . 60
Media volume . . . . . . . . . . . . . . . . . . . . . . . 7
Parking aid . . . . . . . . . . . . . . . . . . . . . . . . 30
System volume . . . . . . . . . . . . . . . . . . . . . 30
W
Waveband
Selecting a waveband (radio) . . . . . . 54
see
Z
Zoom (automatic) . . . . . . . . . . . . . . . . . . . . 51
Zoom (scale)
Map display . . . . . . . . . . . . . . . . 49, 51
see
 Loading...