

Page 1

Owner's Manual
Page 2

User Instruction Manual
NTG5 Infotainment System
NTG5 HU - head unit
G5 FU - fond unit
NT
NTG5 P104 - wireless headphone
Commercial name:
COMAND Online
rsion: 1.0 - english
Ve
Date: 2013-03-07
NT
G5_UserManual-SV_130307-english.docx
Page 3

Symbols
In
this manual, you will find the following sym-
bols:
WARNING
G
Warning notices draw your attention to hazards
that may endanger your health or life, or
the health or life of others.
Environmental note
H
Environmental notes provide you with information on environmentally aware actions or
disposal.
!
Notes on material damage alert you to
dangers
that could lead to damage to your
vehicle.
i
These symbols indicate useful instructions or further information that could be
helpful to you.
X
This symbol designates an instruction you must follow.
X
Several consecutive symbols indicate an instruction with several
steps.
(Y page)
This symbol tells you where you
can find further information on a
topic.
YY
This symbol indicates a warning or
an
instruction that is continued on
the next page.
Display
This text indicates a message on
the multifunction/COMAND display.
Parts of the software in the vehicle are protected by copyright © 2005
The FreeType Project
http://www.freetype.org. All rights
reserved.
Page 4

Thank you for buying Mercedes-Benz
Before you first drive off, read this Owner's
Manual carefully
and familiarise yourself with
your vehicle. For your own safety and a longer
vehicle life, follow the instructions and warning notices in this manual. Disregarding them
may lead to damage to the vehicle or personal
injury.
The equipment or model designation of your
vehicle may vary according to:
R
Model
R
Order
R
Country variant
R
Availability
The illustrations in this manual show a lefthand-drive vehicle. On right-hand-drive vehicles, the layout of components and controls
differs accordingly.
Mercedes-Benz is constantly updating its
vehicles to the state of the art.
Mercedes-Benz therefore reserves the right
to introduce changes in the following areas:
R
Design
R
Equipment
R
Technical features
The equipment in your vehicle may therefore
differ from that shown in the descriptions and
illustrations.
The following are integral components of the
vehicle:
R
Owner's Manual
R
Service Booklet
R
Equipment-dependent supplements
Keep printed copies of the documents in the
vehicle at all times. If you sell the vehicle,
always pass the documents on to the new
owner.
i
You can get to know the important features of your vehicle in the interactive Owner's Manual on the Internet at:
http://www.mercedes-benz.de/
betriebsanleitung
The technical documentation team at
Daimler AG wishes you safe and pleasant
motoring.
xxxxxxxxxx
ÉxxxxxxxxxxÌËÍ
Page 5
Contents
3
Index ....................................................... 4
Introduction ......................................... 31
At a glance ........................................... 37
Safety ................................................... 49
Opening and closing ........................... 93
Seats, steering wheel and mirrors .. 119
Lights and windscreen wipers ......... 143
Climate control ................................. 157
Driving and parking .......................... 185
On-board computer and displays .... 293
COMAND Online ................................ 357
Stowing and features ....................... 565
Maintenance and care ...................... 595
Breakdown assistance ..................... 611
Wheels and tyres .............................. 635
Technical data ................................... 661
Page 6

Operating safety ............................... 358
At a glance ......................................... 361
System settings ................................ 373
Vehicle functions .............................. 381
Navigation ......................................... 395
Telephone .......................................... 423
Online and Internet ........................... 463
Radio .................................................. 484
Media ................................................. 491
Sound ................................................. 533
Rear Seat Entertainment System .... 536
357
COMAND Online
Page 7

Operating safety
358
Operating safety
Important safety notes
WARNING
G
Your attention must always be focused on the
traffic conditions.
Only use COMAND Online or the telephone
when the road and traffic conditions permit.
Bear in mind that, at a speed of only
50 km/h
nearly 14 m per second. The navigation system does not provide you with information
about stop signs, give way signs, traffic regulations or road safety features. It is up to you
to pay attention to these while driving the
vehicle. Only enter a new destination when
the vehicle is stationary.
, your vehicle covers a distance of
COMAND Online
Declarations of conformity
Wireless vehicle components
The following information applies to all components of the vehicle and the COMAND
system which receive and/or transmit
Online
radio waves:
The components of this vehicle which receive
and/or transmit radio waves are compliant
with the basic requirements and other relevant provisions of Directive 1999/5/EC. You
can obtain further information from a
Mercedes-Benz Service Centre.
Electromagnetic compatibility
The electromagnetic compatibility of the vehicle
components has been checked and certified according to the currently valid version
of Directive ECE-R 10.
Correct use
Observe
the following information when using
COMAND Online:
R
the safety notes in this manual
R
traffic rules and regulations
R
laws and safety standards pertaining to
motor vehicles
i
Improper work on electronic components
or other systems (e.g. radio, DVD changer)
and their software may result in malfunction or failure. Even systems that have not
been modified could be affected because
the electronic systems are connected.
Electronic malfunctions can seriously jeopardise the operational safety of your vehicle.
i
The functionality of a roof aerial (telephone, GPS) may be impaired if roof carrier
systems are used.
Attaching metallised retrofit film to the
windscreen may affect radio reception and
have a negative impact on all other aerials
(e.g. emergency aerial) in the vehicle interior.
i
Only have work or changes to electronic
components carried out at a qualified specialist workshop. This workshop should
have the necessary specialist knowledge
and tools to carry out the work required.
Mercedes-Benz recommends that you use
a Mercedes-Benz Service Centre. In particular, work relevant to safety or on safetyrelated systems must be carried out at a
qualified specialist workshop.
i
Protection against theft: this device is
equipped with technical provisions to protect it against theft. Further information on
protection against theft can be obtained
from a Mercedes-Benz Service Centre.
Data stored in the vehicle
A wide range of electronic components in
your vehicle contain data memories.
Page 8

Operating safety
359
These data memories temporarily or permanently store technical information about:
R
the vehicle's operating state
R
events
R
faults
In general, this technical information documents
the state of a component, a module, a
system or the surroundings.
These include, for example:
R
operating conditions of system components, e.g. fluid levels
R
the vehicle's status messages and those of
its individual components, e.g. number of
wheel revolutions/speed, deceleration in
movement, lateral acceleration, accelerator pedal position
R
malfunctions and defects in important system components, e.g. lights, brakes
R
vehicle reactions and operating conditions
in special driving situations, e.g. airbag
deployment, intervention of stability control systems
R
ambient conditions, e.g. outside temperature
This data is of an exclusively technical nature
and can be used to:
R
assist in recognising and rectifying faults
and defects
R
analyse vehicle functions, e.g. after an accident
R
optimise vehicle functions
The data cannot be used to trace the vehicle's
movements.
When your vehicle is serviced, technical information can be read from the event data memory and fault data memory.
Services include, for example:
R
repair services
R
service processes
R
warranties
R
quality assurance
It is read by employees of the service network
(including manufacturers) using special diag-
nostic testers. More detailed information is
obtained from it, if required.
After a fault has been rectified, the information is deleted from the fault memory or is
continually overwritten.
When operating the vehicle, situations are
conceivable in which this technical data, in
connection with other information (if necessary, under consultation with an authorised
expert), could be traced to a person.
Examples include:
R
accident reports
R
damage to the vehicle
R
witness statements
Further additional functions that have been
contractually agreed upon with the customer
allow certain vehicle data to be conveyed by
the vehicle as well. The additional functions
include, for example, vehicle location in case
of an emergency.
Qualified specialist workshop
Read the information on qualified specialist
workshops in the vehicle Owner's Manual.
Copyright information
General notes
You can find information on licences for free
and open-source software used in your vehi-
and its electronic components on the fol-
cle
lowing website: http://www.mercedes-
benz.com/opensource.
Features of your COMAND Online
These operating instructions describe all
standard and optional equipment available
for your COMAND Online system at the time
purchase. Country-specific differences are
of
possible. Please note that your
COMAND Online system may not be equipped with all the features described. This is
COMAND Online
Z
Page 9

Operating safety
360
also the case for systems and functions relevant to safety. Therefore, the equipment on
your
COMAND Online system may differ from
that in the descriptions and illustrations.
Should you have any questions concerning
equipment and operation, please consult a
Mercedes-Benz Service Centre.
Function restrictions
safety reasons, some COMAND functions
For
are restricted or unavailable while the vehicle
is in motion. You will notice this, for example,
because either you will not be able to select
certain menu items or COMAND Online will
display a message to this effect.
COMAND Online
Page 10

At a glance
At a glance
Overview
Components
:
COMAND display
;
DVD changer/single DVD drive
=
Controller and buttons
COMAND Online consists of:
R
the COMAND display
The COMAND display has 1440 x 540 pixels.
R
the DVD changer/single DVD drive
R
the controller
R
the buttons
R
the touch-sensitive telephone keypad
R
ports in the centre console (2 x USB, AUX)
An iPod® is connected via USB cable.
R
a universal telephone interface for the driver's mobile phone or equipment with SAP telephone module
R
headphones
jack in the footwell)
i
COMAND Online can be operated from the front-passenger side using the corresponding
remote control if your vehicle is equipped with the Rear Seat Entertainment System. The
front passenger views the display in SPLITVIEW. The COMAND display can show separate
information for the driver and the front passenger.
for the front passenger (cordless or connected by means of a cable to the audio
361
COMAND Online
Z
Page 11

362
At a glance
Functions
R
Radio/DAB radio
R
Media
Media support: audio CD, MP3 CD, DVD
video, 2 x USB, SD card, iPod®, Bluetooth
audio
Music search using all media
Digital TV reception for TV and radio stations
with the electronic programme guide
(EPG), data services, subtitles and language selection options
R
Sound system
Burmester high-end sound system for ultimate listening pleasure
R
Navigation system
Destination entry using keyword search
Realistic 3D map
COMAND Online
Personal POIs
Travel guide with GPXD data
Navitainment for passengers, e.g. Driveshow, Routeflight, Google Maps, Services
Premium Traffic
R
Communication
Telephony via Bluetooth interface/SAP
telephone module
Messaging functions (text messages,
email)
Address book
Internet browser
Mercedes-Benz Apps with Google™ Local
Search, Destination/Route Download,
Weather, Facebook, Google™ Street View
WLAN interface for the connection of a
smartphone to COMAND Online and the
option of remote control for the front
passenger (SPLITVIEW)
Mercedes-Benz emergency call system
R
Vehicle functions
Setting the multicontour seat with new
massage programmes
Climate control functions
Controlling ambient light: several colour
and brightness level options
360° camera
R
Favourites button
access of frequently used functions
Faster
R
Multi-user entertainment
All passengers have access to entertainment options via COMAND Online
Business telephony in the rear compartment
Digital remote control operation and digital
cordless headphones
Page 12
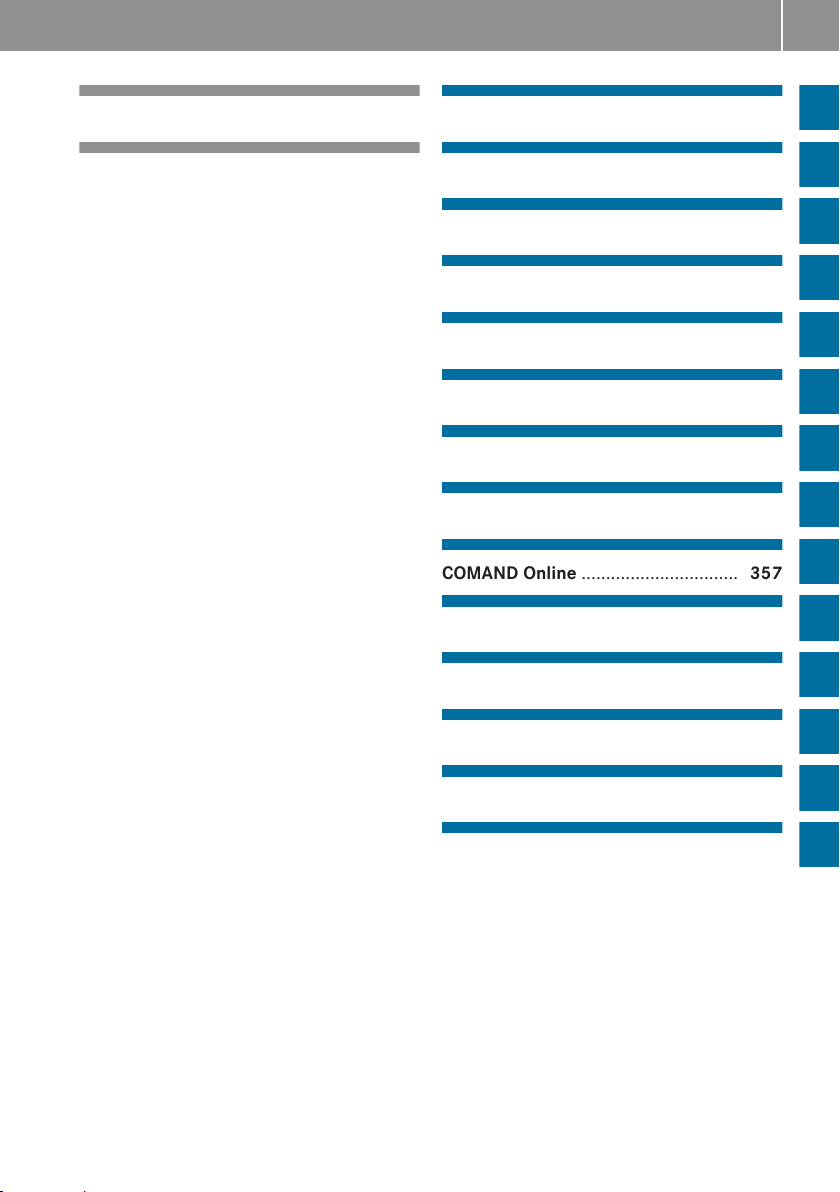
COMAND display
Example: radio display
:
Status bar with active traffic announcements
;
Main function bar with active radio function
=
Main display field with available stations in carousel view
?
Radio station currently set
A
Radio menu bar
B
Air-conditioning function bar
C
Context display with additional radio text information
At a glance
363
COMAND Online
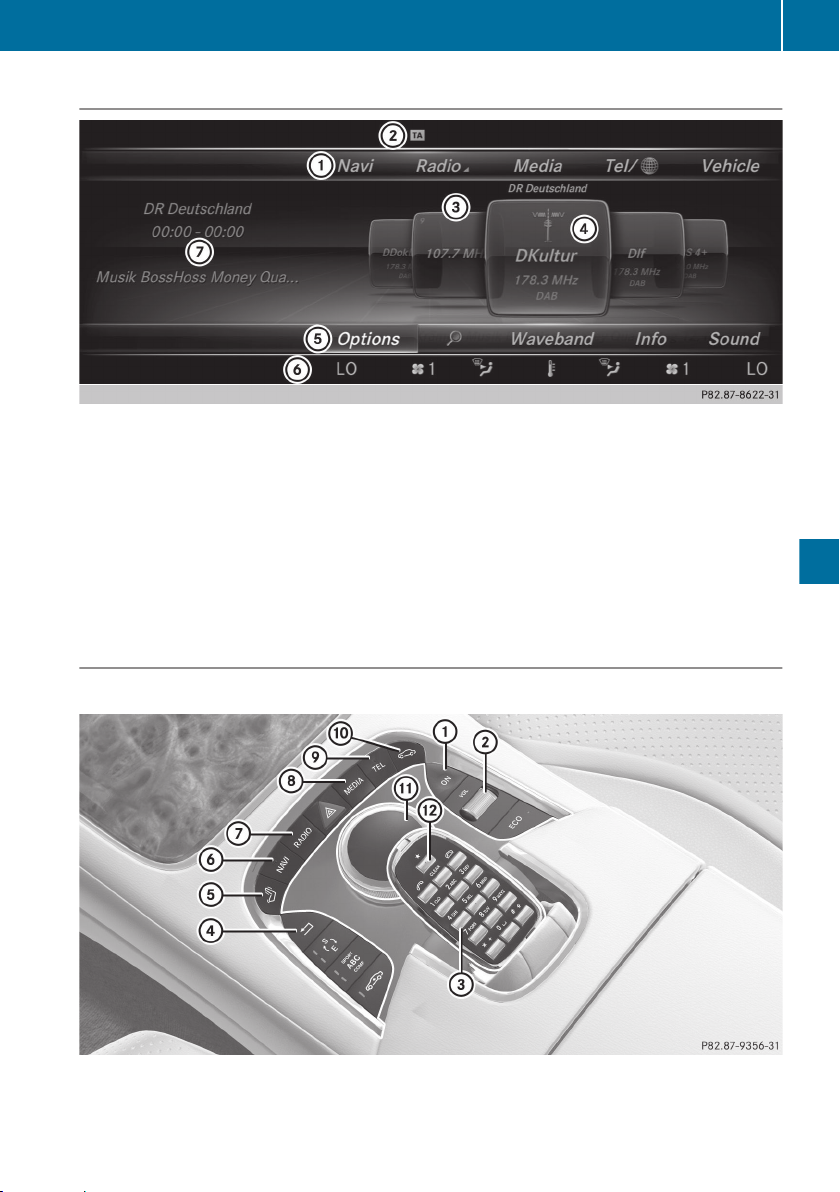
Buttons and controller
Overview
:
Switches COMAND Online on/off
;
Sets the volume or mutes
=
Telephone keypad
Z
Page 13

364
At a glance
?
Back button
A
Seat adjustment button
B
Navigation button
C
Radio button
D
Media button
E
Telephone, address book, online and Internet button
F
Vehicle and system settings button
G
Controller
H
g Favourites button
Back button
You can use the % back button to exit a
menu or to call up the basic display of the
current operating mode.
X
To exit the menu: briefly press the %
back button.
COMAND Online changes to the next
higher menu level in the current operating
COMAND Online
mode.
X
To call up the basic display: press and
hold the % back button.
COMAND Online changes to the basic display of the current operating mode.
Telephone keypad
The telephone keypad is touch-sensitive: as
as one or several of the keys are gently
soon
touched, the telephone keypad is shown in
the COMAND Online display. The key being
touched is highlighted.
Controller
The controller is used to:
R
select menu items from the COMAND display
R
enter characters
R
enter a destination on the map
R
save entries
The controller can be:
R
turned
R
slid left or right XVY
R
slid forwards or back ZVÆ
R
slid diagonally aVb
R
pressed briefly or pressed and held
Components
SplitView
Method of operation
SPLITVIEW allows you to simultaneously use
different COMAND Online
functions on the
front-passenger side and on the driver's side.
Different content is seen depending on your
perspective when viewing the display.
The "Navi" function, for example, can be used
from the driver's side while a video is watched
from the front-passenger side.
SPLITVIEW is operated with the COMAND
remote control from the front-passenger
side.
To do so, use the cordless headphones. Using
the headphones on the correct sides ensures
an optimal sound.
You can connect your own headphones to a
special headphones jack. You can use the
COMAND remote control to operate them.
Page 14

At a glance
365
Points to remember
R
You can only adjust the volume for the
headphones
supplied, directly on the head-
phones.
R
Only entertainment functions, i.e. audio,
TV, video and Internet, for example, may be
used with SPLITVIEW.
R
If media from different sources are used,
they can be used separately from the driver's and front-passenger sides. Example: if
a medium from the DVD changer is being
played on the driver's side. Then, no other
medium can be used separately on the
front-passenger side that is also played
from the DVD changer. However, other
media can be used at the same time on the
front-passenger side, including radio,
memory card, MUSIC REGISTER, Media
Interface, USB or AUX.
R
If you use the same medium on both sides,
you can both carry out the respective settings.
R
The Internet can be separately used by both
the driver and front passenger at the same
time. A corresponding message appears on
the display.
R
Internet can only be used, if it is set and
connected via a telephone on the driver's
side.
R
The multifunction steering wheel can only
be used for functions which relate to the
driver's side.
Switching SPLITVIEW on/off
From the driver's side
:
SPLITVIEW symbol
;
SPLITVIEW mode
Activating
X
Press the vehicle button on the controller.
The carousel view for the vehicle settings
appears.
X
Slide V¬ the controller.
The menu bar appears.
X
To select ùOn in the menu bar (as illus-
in ;): turn and press the controller.
trated
SPLITVIEW switches on. The ù display
changes to Off.
In the status bar, the SPLITVIEW symbol
appears (as illustrated in :).
The front passenger sees the display of the
function last activated. If the switch-on
time was longer than 30 minutes previously, the display from the driver's side is
shown.
X
Deactivating
select ùOff in the menu bar: turn and
To
press the controller.
The ù display changes to On.
The SPLITVIEW symbol is hidden in the status bar.
From the front-passenger side
X
Activating
To select the SPLITVIEW display using the
COMAND remote control: turn thumbwheel : until the SPLITVIEW symbol
appears in the window.
X
Press the u button on the COMAND
remote control.
X
Deactivating
Press the u button on the COMAND
remote control again.
The ù display changes to On.
SPLITVIEW symbol is hidden in the sta-
The
tus bar.
The menu called up on the driver's side is
shown.
COMAND Online
Z
Page 15

At a glance
366
The SPLITVIEW display remains on for approximately 30 minutes after the key has been
turned to position 0 in the ignition lock. After
this time or after the key has been removed,
COMAND Online
the settings on the front-passenger side are
saved for approximately 30 minutes longer.
After this period, reactivation on the frontpassenger side means that the settings from
the driver's side will be used.
From media mode
SPLITVIEW can be switched on from any
media mode.
Activating
X
To switch on from any media mode, e.g.
Media Interface Options: press the controller.
A menu appears.
X
To select Start this application in
other location: turn and press the con-
troller.
A menu appears.
X
Select SplitView.
A window with the message Starting
source in SplitView… appears.
SPLITVIEW switches on. The ù symbol
appears in the status bar.
X
Deactivating
X
From the driver's side via vehicle settings.
X
From the front-passenger side using the
COMAND remote control.
Transferring a destination to the driver
Using SPLITVIEW you can select a destination
from the front-passenger side and transfer
this to the driver's side.
X
To activate SPLITVIEW: press the vehicle
button on the controller.
X
To select ùOn in the menu bar: turn and
press the controller.
The SPLITVIEW symbol appears in the display, and the ù display switches to Off.
X
Select ®
in the main function bar with the
COMAND remote control.
The carousel view appears.
X
Select Mercedes-Benz Apps with the
COMAND remote control.
You see the selection of Mercedes-Benz
Apps.
X
Select Google Local Search with the
COMAND remote control.
a menu you can select a category for
Using
the destination.
Page 16

X
Select At current location, for example.
Using a menu you can determine the type
of search enquiry.
X
Select Enter search term, for example.
An input field appears.
X
Enter the destination with the COMAND
remote control and confirm the entry with
b.
You see the results list from Google.
X
Select the exact destination with the
COMAND remote control.
An additional menu appears.
X
Select Navigate to.
X
A pop-up window appears on the driver's
side with the message: Should the nav‐
igation data from Mercedes-Benz
Apps be accepted?
Features of your COMAND Online
These operating instructions describe all
standard and optional equipment available
for your COMAND Online system at the time
purchase. Country-specific differences are
of
possible. Please note that your
COMAND Online system may not be equipped with all the features described. This is
also the case for systems and functions relevant to safety. Therefore, the equipment on
your COMAND Online system may differ from
that in the descriptions and illustrations.
Should you have any questions concerning
equipment and operation, please consult a
Mercedes-Benz Service Centre.
At a glance
Operating COMAND Online
Selecting a main function
Situation: switching from navigation mode
(address
X
X
X
X
X
X
entry menu) to the system settings.
To switch on navigation mode: press the
Ø function button.
To show the menu:
press W the COMAND
controller.
Select Destination by sliding VÆ and
turning cVd the COMAND controller and
press W to confirm.
Select Address entry and press W to
confirm.
The address entry menu appears.
Slide ZV the COMAND controller and
switch to main function bar :.
Select System in the main function bar by
turning cVd the COMAND controller and
press W to confirm.
The system menu appears.
367
COMAND Online
Z
Page 17

At a glance
368
Selecting the menu of a main function
If one of the navigation, audio, telephone or
video main functions is switched on, triangle : appears next to the entry in the main
function bar. You can now select an associated menu.
The example shows how to call up the audio
menu from audio CD mode (an audio CD is
COMAND Online
playing).
X
Select Audio in the main function bar by
sliding ZV the COMAND controller and
press W to confirm.
The Audio menu appears.
The # dot indicates the currently selected
audio mode.
X
Select another audio mode, e.g. Radio, by
turning cVd the COMAND controller and
press W to confirm.
Radio mode is activated.
X
Select the station by turning cVd the
COMAND controller and press W to confirm.
The station is set.
Basic functions of COMAND Online
Switching COMAND Online on/off
X
Press the u button on the centre con-
to the right of the COMAND controller.
sole
When you switch on COMAND Online, a
warning message will appear.
COMAND Online calls up the previously
selected menu.
If you switch off COMAND Online, playback
of the current audio or video source will
also be switched off.
Adjusting the volume
Adjusting the volume for the audio or
video source
Selecting a menu item
X
To adjust: turn thumbwheel :.
or
X
Press the W
or X button on the mul-
tifunction steering wheel.
The volume of the currently selected audio
or video source changes.
You can also adjust the volume for the following:
R
traffic announcements
R
navigation announcements
Page 18

At a glance
369
R
phone calls
R
LINGUATRONIC voice control (see the separate operating instructions)
Adjusting the volume for traffic
announcements and navigation
announcements
During traffic or navigation announcements:
X
Turn dial :.
or
X
Press the W
or X button on the mul-
tifunction steering wheel.
i
You
can set the volume of traffic and navigation announcements relative to the volume of the audio or video source.
Adjusting the volume for phone calls
You can adjust the volume for hands-free
mode during a telephone call.
X
Turn dial :.
or
X
Press the W
or X button on the mul-
tifunction steering wheel.
Adjusting the sound settings
X
Call up the input menu with data fields
(Y page 441).
X
Select S
and confirm W with the COMAND
controller.
S appears in the data field.
X
Select c
and confirm W with the COMAND
controller.
The letter c is added to S in the data field.
X
Repeat the process until the name has
been entered in full.
Other input menu functions:
R
Deleting a character/entry
R
Switching between upper/lower-case let-
(Y page 370)
ters (Y page 370)
R
Changing the character set (Y page 370)
R
Moving the cursor to the next data field
(Y page 370)
X
To enter a phone number: select the digits one by one in the corresponding data
field by turning cVd and sliding ZVÆ the
COMAND controller and press W to confirm.
Switching data fields
COMAND Online
Character entry (telephony)
Example: entering characters
The example describes how to enter the surname "Schulz".
In the input menu, if you want to enter a first
name after you have entered a surname, for
example, proceed as follows to switch
between the data fields:
Option 1
X
Select 4 or 5 in the character bar and
press W to confirm.
The
input menu shows the data field selec-
ted.
Z
Page 19

370
At a glance
Option 2
X
Slide ZV the COMAND controller repeatedly until the character bar disappears.
X
Select the data field by sliding ZVÆ and
press W to confirm.
Saving an entry
X
After making an entry in the input
menu, to create a new entry, for example (Y page 441): select the ¬ symbol
in the character bar by turning cVd the
COMAND controller and press W to confirm.
The entry is stored in the address book.
Further functions available in the character bar
COMAND Online
Changing the language of the character
bar
X
Select the * (upper case) or E
(lower case) symbol and press W to confirm.
Changing the character set
While making an entry in the input menu
(Y page 441):
X
Select the p symbol and press W to
confirm.
R
ABC (upper/lower case)
R
123 (digits)
R
Other (special characters such as @, €,
etc.)
Moving the cursor to the next data field
While making an entry in the input menu
(Y page 441):
X
Select B and press W to confirm.
X
Select the language by turning cVd the
COMAND controller and press W to confirm.
Switching the character bar to letters
While making an entry in the input menu, to
create a new entry, for example
(Y page 441):
While making an entry in the input menu
(Y page 441):
X
Select the 2 or 3 symbol and press W
to confirm.
Deleting a character/entry
While making an entry in the input menu
(Y page 441):
X
To delete characters: press
the $ but-
ton on the control panel.
or
X
Select the F symbol by sliding VÆ and
turning cVd the COMAND controller and
press W to confirm.
or
X
Press the j button next to the
COMAND controller.
Page 20

At a glance
371
X
To delete an entry: press and hold the
$ button on the control panel until the
entire entry has been deleted.
or
X
Select the F symbol and press and hold
W the COMAND controller until the entire
entry has been deleted.
or
X
Press and hold the j button next to the
COMAND controller until the entire entry is
deleted.
Character entry (navigation)
General notes
The following paragraphs describe how to
enter characters using town input for BER‐
LIN as an example.
you want to use the address entry menu to
If
enter a town, a street or a house number, for
example, COMAND Online offers you:
R
a list with a character bar (option 1)
R
a selection list (option 2)
You can enter the characters using either the
character bar or the number keypad. In the
selection list, you select an entry to copy it to
the address entry menu.
Option 1: list of towns/streets with
character bar
X
Call up the town list with the character bar
(Y page 401).
The alphabetically sorted town list shows
the first available entries.
:
Character entered by the user B
;
Characters automatically added by
COMAND Online AABE
=
List entry that most closely resembles the
current entry by the user
?
To switch to the selection list
A
To delete an entry
B
To change the character set (Latin/Cyrillic)
C
Characters not currently available
D
Characters currently available
E
Character bar
F
To cancel an entry
G
Currently selected character
H
List
Entering characters using the character
bar
X
Select B
by turning cVd the COMAND con-
troller and press W to confirm.
List H shows all available town names
beginning with a B. List entry most closely
resembling current entry by user = is
always highlighted at the top of the list
(BAABE in the example).
All of the characters that have been
entered so far are shown in black (letter
B: in the example). Letters added by
COMAND Online are shown in grey ;
(AABE in the example).
COMAND Online
Z
Page 21

372
At a glance
Character bar E shows the letters still
available for selection in black D. These
can be selected. In the example, the letter
A is highlighted G. The characters availa-
ble depend on the entry made by the user
so far and the data contained in the digital
map. Characters that are no longer available are shown in grey C.
COMAND Online
X
Select E, R, L, I, N in succession, confirming
each by pressing W.
Entering characters using the number
keypad
X
To enter the letter B: press the l number key twice in quick succession.
character appears at the bottom of the
The
display when the key is pressed. The first
available letter is highlighted.
You see which characters you can enter
with that key. Each time the key is pressed,
the next character is selected.
Example: key l:
R
press once = A
R
press twice = B
R
press three times = C
X
Wait until the character display goes out.
entries matching your input are shown
The
in the list.
X
Enter E, R, L, I, N using the corresponding
keys.
Further functions in the list with character bar
X
To delete characters: press
the $ but-
ton on the control panel.
or
X
Press the j button next to the
COMAND controller.
or
X
Select the F symbol in the character bar
by sliding VÆ and turning cVd the
COMAND controller and press W to confirm.
X
To delete an entry: press $ on the
control panel.
or
X
Press and hold the j
button next to the
COMAND controller until the entire entry is
deleted.
or
X
Select the F symbol in the character bar
and press and hold W the COMAND controller until the entire entry is deleted.
X
To switch the character set: select
B and press W to confirm.
will switch the character set from Latin
This
to Cyrillic and back.
Page 22

X
To cancel an entry:
select the & symbol
in the bottom left of the character bar and
press W to confirm.
or
X
Press the % back button.
The address entry menu appears.
X
To accept the first list entry: press and
hold W the COMAND controller until the
address entry menu appears.
The accepted list entry is shown there.
Calling up the list as a selection list
It is also possible to switch from the town list
with character bar to the town selection list
at any time during character input.
X
Slide ZV the COMAND controller repeatedly until the town list appears as a selection list.
the desired town from the selection
Select
list.
or
X
Select¬in the character bar by turning
cVd the COMAND controller and press
W to confirm.
If there are several entries for a town or if
several towns of the same name are stored,
then ¬
X
Press W the COMAND controller.
is highlighted in the character bar.
System settings
COMAND Online either shows the selection
list
automatically or you can call up the selec-
tion list from the list with the character bar.
The example shows the selection list after the
town BERLIN has been entered. The entry is
highlighted automatically.
X
Confirm BERLING by pressing W the
COMAND controller.
You see the available entries.
X
Confirm BERLIN(1XXXX) by pressing W
the COMAND controller.
The address entry menu appears.
373
COMAND Online
Option 2: town list as selection list
Observe the information relating to destination entry (Y page 400).
System settings
Features of your COMAND Online
These operating instructions describe all
standard and optional equipment available
for your COMAND Online system at the time
of
purchase. Country-specific differences are
possible. Please note that your
Z
Page 23

System settings
374
COMAND Online system may not be equipped with all the features described. This is
also
the case for systems and functions relevant to safety. Therefore, the equipment on
your COMAND Online system may differ from
that in the descriptions and illustrations.
Should you have any questions concerning
equipment and operation, please consult a
Mercedes-Benz Service Centre.
Display settings
Setting the brightness
The brightness detected by the display light
sensor affects the setting options for this
function.
COMAND Online
X
Press W.
X
To select Options:
troller.
X
Select Display.
X
Select Brightness.
X
Select brightness with the COMAND controller.
Display design
Your COMAND Online display features optimised designs for operation during daytime
and night-time hours. You can customise the
design by manually selecting day or night
design, or opt for an automatic setting.
X
Press W.
X
To select Options:
troller.
turn and press the con-
turn and press the con-
X
Select Display.
X
Select Day design, Night design or
Automatic.
A dot indicates the current setting.
Design Explanation
Day design
The display is set permanently to day design.
Night design
The display is set permanently to night design.
Automatic If the Automatic setting
is selected,
COMAND Online evaluates the readings from
the automatic vehicle
light sensor and automatically switches
between the display
designs.
Time settings
General notes
If COMAND Online is equipped with a naviga-
system and has GPS reception, COMAND
tion
Online automatically sets the time and date.
You can also adjust the time yourself in 30minute increments, but the date cannot be
changed.
i
If you set the time in 30-minute increments, any time zone settings and settings
for changing between summer and standard time are lost. Switching between summer and standard time (Y page 375).
i The following navigation system functions
require the time, time zone and summer/
standard time to be set correctly in order
to work properly:
R
route guidance on routes with timedependent traffic guidance
R
calculation of expected time of arrival
i
Use this function to set the time for all
displays in the vehicle.
Page 24

System settings
375
Setting the time
X
Press W.
X
Select Time by turning cVd the COMAND
controller and press W to confirm.
X
Select Set time and press W to confirm.
X
Set the time by turning cVd
the COMAND
controller and press W to confirm.
The time is accepted.
Setting the time/date format
X
Press W.
X
Select Time by turning cVd the COMAND
controller and press W to confirm.
X
Select Format and press W to confirm.
The # symbols show the current settings.
X
Set the format by turning cVd the
COMAND controller and press W to confirm.
Abbreviation Meaning
DD . MM . YY
Day . Month . Year
(date format, two
digits)
MM / DD / YYYY
Month/Day/Year
format, year (all
date
four digits)
YY / MM / DD
Year/Month/Day
date format, year
(two digits)
Abbreviation Meaning
HH : MM (24 hrs)
Hours : Minutes
(24 hour time format)
HH : MM (AM/PM)
Hours : Minutes
(AM/PM time format)
Adjusting the time zone and switching
to summer time
X
Press W.
X
Select Time by turning cVd the COMAND
controller and press W to confirm.
X
Select Time
zone and press W to confirm.
A list of countries or time zones appears.
The # dot indicates the current setting.
X
Select the country or time zone by turning
cVd the COMAND controller and press
W to confirm.
A time zone list may also be displayed,
depending on the country selected.
X
Select the time zone and press W to confirm.
The entry for the Automatic time set‐
tings is accepted.
Subsequent operation depends on whether
navigation system has GPS reception and
the
whether the changeover function to summer
time is available.
X
To switch manually:
select On or Off and
press W to confirm.
X
To switch automatically: select Auto‐
matic and press W to confirm.
The entry for the Automatic time set‐
tings is accepted.
X
To switch the automatic time setting
off/on: press the W button.
X
Select Time by turning cVd the COMAND
controller and press W to confirm.
COMAND Online
Z
Page 25

System settings
376
X
Press W
to confirm the Automatic time
settings.
Switch the automatic time setting off ª or
on again O.
To switch on: the menu item is switched
on as the default setting. If Automatic
time settings is reactivated, the previ-
ous settings for time zone and summer
time changeover are selected.
To switch off: the time zone is deselected
and the summer time is switched off. If
Automatic is set for the summer time
changeover, a prompt will appear asking
whether this should be maintained.
X
Select Yes or No and press W to confirm.
If you select Yes, the settings will not be
changed.
If you select No, the settings will be
switched Off.
COMAND Online
Text reader settings
X
Press the vehicle button.
X
Slide VÆ the controller.
X
To select System settings: turn and
press the controller.
X
Select Text reader speed.
list appears. The # dot indicates the cur-
A
rent setting.
X
Select the setting.
LINGUATRONIC settings
Opening/closing the help window
The help window provides information in addition to the audible instructions during individualisation
and during the subsequent voice
control.
X
Press W.
X
Select Settings by turning cVd the
COMAND controller and press W to confirm.
X
Select Linguatronic
and press W to con-
firm.
X
Select Help window and press W to confirm.
You have switched the help window on
O or off ª.
Individualisation
Using individualisation, you can fine-tune LINGUATRONIC to your own voice and thus
improve voice recognition. See the separate
operating instructions.
WLAN
Overview
Prerequisite for establishing a connection
between COMAND Online and a WLAN-enabled device, such as a tablet computer or
smartphone:
R
WLAN must be activated at COMAND
Online and at the device to be connected.
Page 26

System settings
377
Prerequisites for using COMAND Online as a
WLAN hotspot:
R
COMAND Online must be connected to a
mobile phone via Bluetooth or USB.
R
The Internet access data for the mobile
phone network provider must be selected
or set for COMAND Online.
R
There must be an Internet connection to
COMAND Online.
Activating WLAN
X
To select Vehicle
in the main function bar:
turn the controller and press to confirm.
X
To switch to the menu bar: slide V¬ the
controller.
X
To select System settings: turn and
press the controller.
The system settings menu is shown.
X
To select WLAN:
turn and press the controller.
The WLAN menu appears.
X
Select Activate and press the controller.
Switch the connection on O or off ª,
depending on the previous setting.
Connecting the device via WPS pin
A prerequisite for this type of connection is
that the device to be connected supports a
connection via WPS pin.
X
To select Vehicle
in the main function bar:
turn the controller and press to confirm.
X
To switch to the menu bar: slide V¬ the
controller.
X
To select System settings: turn and
press the controller.
The system settings menu is shown.
X
To select WLAN:
turn and press the controller.
The WLAN menu appears.
X
To select Connect
via WPS pin: turn and
press the controller.
X
Select the vehicle from the device to be
connected and establish a connection via
WPS pin. The vehicle is displayed with the
SSID MB WLAN XXXXX.
X
The device to be connected usually generates a pin. Enter this pin into COMAND
Online also.
i
The exact procedure taken varies
between the different devices. Follow the
instructions that are shown in the display.
Further information can be found on the
operating instructions for the device you
wish to connect.
COMAND Online
Z
Page 27

System settings
378
Connecting the device by pressing a
button (push button)
A prerequisite for this type of connection is
that the device to be connected supports a
connection via push button.
X
To select Vehicle
in the main function bar:
turn the controller and press to confirm.
X
To switch to the menu bar: slide V¬ the
COMAND Online
controller.
X
To select System settings: turn and
press the controller.
The system settings menu is shown.
X
To select WLAN:
turn and press the controller.
The WLAN menu appears.
X
To select Connect
via WPS PBC: turn and
press the controller.
X
Select the vehicle from the device to be
connected and establish a connection via
WPS PBC pin. The vehicle is displayed with
the SSID MB WLAN XXXXX.
X
Select Continue on COMAND Online.
i
The exact procedure taken varies
between the different devices. Follow the
instructions that are shown in the display.
Further information can be found on the
operating instructions for the device you
wish to connect.
Connecting the device via SSID and
security key
X
To select Vehicle
in the main function bar:
turn the controller and press to confirm.
X
To switch to the menu bar: slide V¬ the
controller.
X
To select System settings: turn and
press the controller.
The system settings menu is shown.
X
To select WLAN:
turn and press the controller.
The WLAN menu appears.
X
To select Connect via security key:
turn and press the controller.
X
Select the vehicle from the device to be
connected. The vehicle is displayed with
the SSID MB WLAN XXXXX.
X
Enter the security key that is to be displayed in COMAND Online into the device
and confirm the entry.
i
The exact procedure taken varies
between the different devices. Follow the
instructions that are shown in the display.
Further information can be found on the
operating instructions for the device you
wish to connect.
Page 28

System settings
379
Generating a new security key
X
To select Vehicle
in the main function bar:
turn the controller and press to confirm.
X
To switch to the menu bar: slide V¬ the
controller.
X
To select System settings: turn and
press the controller.
The system settings menu is shown.
X
To select WLAN:
turn and press the controller.
The WLAN menu appears.
X
To select Generate a new security
key: turn and press the controller.
X
Select Generate new.
A dialogue for entering the security key
appears.
X
Enter the new security key, select ¬
press the controller.
The new security key will now be displayed
and verified when a connection is established via the security key.
Changing the name of the SSID
X
To select Vehicle
in the main function bar:
turn the controller and press to confirm.
X
To switch to the menu bar: slide V¬ the
controller.
X
To select System settings: turn and
press the controller.
The system settings menu is shown.
X
To select WLAN:
turn and press the controller.
The WLAN menu appears.
X
To select Change the SSID name: turn
and press the controller.
A dialogue for entering the SSID appears.
X
Enter the new SSID, select ¬
the controller.
The vehicle with the new SSID will now be
shown on the device when a connection is
established.
Bluetooth® settings
General information about Bluetooth
Bluetooth® technology is a standard for
short-range
wireless data transmissions up to
approximately 10 metres. Bluetooth® allows,
for example, the exchange of vCards.
and
Bluetooth® is a registered trademark of Bluetooth Special Interest Group (SIG) Inc.
Activating/deactivating Bluetooth
X
Press the W button.
The system menu appears.
X
To select Options:
turn and press the con-
troller.
X
Select Activate Bluetooth.
This switches Bluetooth® on O or off ª.
and press
COMAND Online
®
®
Setting the system language
This
function allows you to determine the lan-
guage for the menu displays and the naviga-
Z
Page 29

System settings
380
tion announcements. The selected language
affects the characters available for entry.
The
navigation announcements are not available in all languages. If a language is not available, the navigation announcements will be in
English.
If you change the system language, the language for LINGUATRONIC will be also be
changed. If the selected language is not supported by LINGUATRONIC, English will be
selected.
X
Press the W button.
X
Select Settings by turning cVd the
COMAND controller and press W to confirm.
X
Select Language and press W to confirm.
The list of languages appears. The # dot
indicates the current setting.
COMAND Online
X
Select the language by turning cVd the
COMAND controller and press W to confirm.
COMAND
loads the selected language and
sets it.
i
you are using Arabic map data, the text
If
information can also be shown in Arabic on
the navigation map. To do this, select Eng‐
lish (Arabic map) as the language from
the list of languages. Navigation announcements are then made in Arabic.
Assigning a favourites button
X
To assign a favourites button: press the
W button.
X
To select Options: turn the controller and
press to confirm.
X
Select Assign as favourite.
The list of predefined functions appears.
The dot # indicates the currently selected
function.
X
Select the desired function.
favourites button is assigned the selec-
The
ted function.
X
Example: to call up a favourite: press the
g favourites button.
This calls up the predefined function.
You can select the following predefined functions in a menu:
R
Display off/on: you can switch the dis-
play off or on.
R
Full screen: 'Clock': you can call up
the full screen with clock.
R
®Menu: you can call up the COMAND
Online and Internet functions.
R
Full screen: 'Map':
you can call up the
full screen with map.
R
Spoken driving tip: you can call up the
current driving recommendation.
R
Display traffic messages: you can call
up traffic reports.
R
Navigate to 'Home address': you can
start route guidance to your home address
if you have already entered and saved the
address (Y page 402).
R
Detour menu: you can call up the Detour
menu and then avoid a section of the route
and recalculate the route (Y page 414).
R
Compass screen: you can call up the com-
pass.
R
Driver’s seat massage, Front-pas‐
senger's seat massage or Massage:
both front seats: you can start the mas-
sage function, depending on which seats
are selected (Y page 387).
Importing/exporting data
Reset function
You
can completely reset COMAND Online to
the factory settings. Amongst other things,
this will delete all personal COMAND data.
This includes the station presets, entries in
Page 30

Vehicle functions
381
the destination memory and in the list of previous destinations in the navigation system
and
address book entries. In addition, an activated PIN protection, which you have used to
protect your data against unwanted export,
will be deactivated. Resetting is recommended before handing over or selling the vehicle,
for example.
Data on the internal hard drive, e.g. music
files in the MEDIA REGISTER, will be deleted.
You can also delete music files from the
MEDIA REGISTER using the "Delete all music
files" function.
X
Press the W function button.
X
To select Options:
turn and press the con-
troller.
X
Select Reset.
prompt appears asking whether you wish
A
to reset.
X
Select Yes or No.
you select No, the process will be cancel-
If
led.
If you select Yes, a prompt will appear again
asking whether you really wish to reset.
X
Select Yes or No.
you select Yes, a message will be shown.
If
COMAND Online is reset and restarted.
If you select No, the process will be cancel-
led.
Vehicle functions
Features of your COMAND Online
These operating instructions describe all
standard and optional equipment available
for your COMAND Online system at the time
purchase. Country-specific differences are
of
possible. Please note that your
COMAND Online system may not be equipped with all the features described. This is
also the case for systems and functions relevant to safety. Therefore, the equipment on
your COMAND Online system may differ from
that in the descriptions and illustrations.
Should you have any questions concerning
equipment and operation, please consult a
Mercedes-Benz Service Centre.
Vehicle settings
Calling up vehicle settings
X
Press the vehicle button on the controller.
The vehicle menu appears.
X
To select Vehicle settings: turn and
press the controller.
The carousel view for the vehicle settings
is active.
X
To select the desired vehicle setting: turn
and press the controller.
The main area with the setting element is
active.
Selecting a different vehicle setting:
X
To activate the carousel view for selecting
the vehicle setting: slide Z the controller.
Exiting the vehicle settings:
X
To select &: slide ¬ the controller and
press to confirm.
COMAND Online
Z
Page 31

Vehicle functions
382
Ambient lighting
Setting the colour
X
Call up vehicle settings (Y page 381).
X
To select Ambient lighting: colour:
turn and press the controller.
The setting element is active.
X
To select a colour: turn the controller.
For further information, see (Y page 152).
COMAND Online
Setting the brightness
X
Call up vehicle settings (Y page 381).
X
To select Ambient lighting: bright‐
ness: turn and press the controller.
The setting element is active.
X
To change the brightness: turn the controller.
For further information, see (Y page 152).
Setting the zone
X
Call up vehicle settings (Y page 381).
X
To select Ambient lighting: zone: turn
and press the controller.
The setting element is active.
X
To select a zone: turn the controller.
For further information, see (Y page 152).
Activating/deactivating the ambient
lighting display
This display lighting adjustment function is
only available if the vehicle is not equipped
with the adjustment functions for ambient
lighting: colour, brightness and zone.
X
Call up vehicle settings (Y page 381).
X
To select Ambient lighting: display:
turn and press the controller.
function switches on or off, depending
The
on the previous setting.
For further information, see (Y page 152).
Setting the EASY-ENTRY/EXIT feature
The EASY-ENTRY/EXIT feature makes getting
in and out of your vehicle easier.
Page 32

Vehicle functions
383
X
Call up vehicle settings (Y page 381).
X
To select Easy Entry/Exit: turn and
press the controller.
The setting element is active.
X
To change the setting: turn the controller.
For further information, see (Y page 136).
Activating/deactivating
the panel heat-
ing
The panel heating function warms the surfaces with which the vehicle occupants frequently come into contact.
X
Call up vehicle settings (Y page 381).
X
To select Panel heating: turn and press
the controller.
X
To change the setting: turn the controller.
Activating/deactivating the acoustic
locking confirmation
X
Call up vehicle settings (Y page 381).
X
To select Acoustic lock feedback: turn
and press the controller.
function switches on or off, depending
The
on the previous setting.
For further information, see (Y page 95).
Activating/deactivating the seat-belt
adjustment function
The seat-belt adjustment function adjusts the
driver's and front-passenger seat belt to the
upper body of the occupants.
X
Call up vehicle settings (Y page 381).
X
To select Belt adjustment: turn and
press the controller.
The
function switches on or off, depending
on the previous setting.
For further information, see (Y page 62).
Activating/deactivating the automatic
folding mirror function
COMAND Online
You can also set an audible signal to confirm
that the vehicle has been locked.
If the function "Automatic folding mirror func-
is switched on, the exterior mirrors fold
tion"
in automatically as soon as you lock the vehi-
Z
Page 33

Vehicle functions
384
cle from the outside and then fold out again
when you unlock it.
X
Call up vehicle settings (Y page 381).
X
To select Automatic mirror-folding
function: turn and press the controller.
function switches on or off, depending
The
on the previous setting.
For further information, see (Y page 138).
Switching the locator lighting on/off
COMAND Online
If the locator illumination (surround lighting)
is
switched on, as well as the turn signals, the
headlamps will also light up briefly when the
vehicle is unlocked.
X
Call up vehicle settings (Y page 381).
X
To select Locator illumination: turn
and press the controller.
function switches on or off, depending
The
on the previous setting.
For further information, see (Y page 95).
Switching the automatic locking feature on/off
When the automatic locking feature is activated, the vehicle is locked automatically
when
the ignition is switched on and the vehi-
cle is travelling faster than walking pace.
X
Call up vehicle settings (Y page 381).
X
To select Automatic locking feature:
turn and press the controller.
function switches on or off, depending
The
on the previous setting.
For further information, see (Y page 102).
Setting the delayed switch-off time
Interior lighting delayed switch-off time
The interior lighting is activated for the duration of the delayed switch-off time when the
key is removed from the ignition lock.
X
Call up vehicle settings (Y page 381).
X
To select Interior lighting delayed
shut-off: turn and press the controller.
The setting element is active.
X
To change the delayed switch-off time: turn
the controller.
For further information, see (Y page 152).
Page 34

Vehicle functions
385
Exterior lighting delayed switch-off time
The surround lighting is activated for the duration of the delayed switch-off time when the
vehicle is unlocked using the remote control
key.
X
Call up vehicle settings (Y page 381).
X
To select Exterior lighting delayed
shut-off: turn and press the controller.
The setting element is active.
X
To change the delayed switch-off time: turn
the controller.
For further information, see (Y page 95).
Priming/deactivating
tow-away protec-
tion
X
Call up vehicle settings (Y page 381).
X
To select Tow-away protection: turn and
press the controller.
The function switches on or off, depending
on the previous setting.
Priming/deactivating the interior
motion sensor
When the interior motion sensor is primed, a
visual
and audible alarm is triggered if movement is detected in the vehicle interior. This
can occur if someone reaches into the vehicle
interior, for example.
X
Call up vehicle settings (Y page 381).
X
To select Interior motion sensor: turn
and press the controller.
function switches on or off, depending
The
on the previous setting.
COMAND Online
An audible and visual alarm is triggered if your
vehicle's angle of inclination is altered while
tow-away
protection is primed. This can occur
if the vehicle is jacked up on one side, for
example.
Activating/deactivating the boot lid
opening limiter
The boot lid opening limiter makes it easier to
close the boot lid manually.
Z
Page 35

Vehicle functions
386
X
Call up vehicle settings (Y page 381).
X
To select Boot opening-height
restriction: turn the controller.
X
To activate/deactivate the function: press
the controller.
Seats
Overview
Using the T button next to the controller
or the seat settings menu item in the vehicle
menu, you can call up the following adjustment functions:
R
backrest side bolsters
R
lumbar
R
shoulder section
R
massage
COMAND Online
R
driving dynamics
R
seat heating balance
i
You also can save and recall the current
settings of a seat function using the memory button and the corresponding memory
position switch; see the separate vehicle
Owner's Manual.
The
massage function cannot be started or
stopped using the memory button.
Selecting the adjustment function and
seat
X
To select Vehicle
in the main function bar:
turn the controller and press to confirm.
X
To select Seat settings from the carousel: turn the controller and press to confirm.
carousel for selecting the seat function
The
is activated.
The settings for the driver's seat appear in
the left of the display; those for the front
passenger in the right.
X
To select the desired seat function: turn the
controller and press to confirm.
X
To switch between the Driver
and Front
passenger: slide XVY the controller.
Adjustment functions
Setting the backrest side bolsters
X
Call up the seat functions (Y page 386).
X
To select Backr. sides: turn and press
the controller.
X
To select a seat: slide XVY the controller.
X
To change the setting: turn the controller.
change can be seen in the settings dis-
The
play.
X
To exit the menu: press the % button.
X
Press the T button.
The menu for the seat settings appears.
or
Page 36

Vehicle functions
387
Adjusting the seat contour in the lumbar
region of the seat backrest
This function allows you to adjust the air
cushions
in the lumbar region of the backrest
(4-way lumbar support).
X
Call up the seat functions (Y page 386).
X
To select Lumbar: turn the controller and
press to confirm.
X
To select a seat: slide XVY the controller.
X
To activate the setting element: press the
controller.
X
To change the setting: slide ZV¬ or
XVY the controller.
change will be visible in the setting ele-
The
ment.
X
To exit the menu: press the % button.
Setting the shoulder section
X
Call up the seat functions (Y page 386).
X
To select the Shoulders: turn the controller and press to confirm.
X
To select a seat: slide XVY the controller.
X
To change the setting: turn the controller.
The
change can be seen in the settings dis-
play.
X
To exit the menu: press the % button.
Massage function
X
Call up the seat functions (Y page 386).
X
To select Massage: turn the controller and
press to confirm.
X
To select a seat: slide XVY the controller.
X
To select the massage function (1 to 6):
turn the controller and press to confirm.
The massage function runs for approx-
15 to 25 minutes, depending on the
imately
setting.
You may select the following massage
options:
R
1: Hot relaxing massage for back
R
2:Hot relaxing massage for should‐
ers
R
3: Activating Massage
R
4: Classic Massage
R
5: Mobilizing Massage
R
6: Active Workout
X
To change the massage intensity: turn the
controller to ? and press to confirm.
The intensity becomes stronger or weaker
each time the controller is pressed.
X
To exit the menu: press the % button.
COMAND Online
Z
Page 37

Vehicle functions
388
Setting the driving dynamics
X
Call up the seat functions (Y page 386).
X
To select a seat: slide XVY the controller.
X
To select Dynamic seat: turn the controller and press to confirm.
You can select:
R
0: Off
R
1: Level 1 (weak)
COMAND Online
R
2: Level 2 (strong)
X
To select the setting: turn the controller.
X
To exit the menu: press the % button.
Seat heating balance
The Balance function controls the distribution
of heat on the seat backrest and cushion.
The
Balance function influences the currently
set heating level of the seat heating; see the
separate vehicle Owner's Manual.
X
Call up the seat functions (Y page 386).
X
To select Seat heating balance: turn
and press the controller.
X
To select a seat: slide XVY the controller.
X
To change the setting: turn the controller.
change can be seen in the settings dis-
The
play.
The settings represent the following:
R
0 — the backrest and seat cushion are
evenly heated according to the setting
selected with the seat heating button.
R
to 3 — the heat output to the seat cushion
1
is reduced one level at a time.
R
-1 to -3 — the heat output to the backrest
is reduced one level at a time.
X
To exit the menu: press the % button.
Resetting all adjustments
X
Call up the seat functions (Y page 386).
X
Select a seat (Y page 386).
X
To select Reset: turn the controller and
press to confirm.
X
To select a seat: slide XVY the controller.
X
To reset: press the controller.
A query appears.
X
Select Yes or No and turn the controller.
you select No, the process will be cancel-
If
led.
After you select Yes, all seat adjustments
are reset to the default values (factory setting).
Page 38

Vehicle functions
389
Climate control settings
Basic settings
Climate control bar
Climate control bar
:
Adjusts temperature, airflow and air distribution, left
;
Calls up the climate control menu
=
Adjusts temperature, airflow and air distribution, right
Calling up the climate control menu:
X
To switch to the climate control bar: slide
V¬ the controller.
X
To select the thermometer symbol E in
the climate control bar: turn and press the
controller.
The carousel for selecting climate control
functions is activated.
X
To select the desired climate control function: turn and press the controller.
The selected climate control function
appears.
The following climate control functions can
also be called up directly from the climate
control bar:
R
Temperature
left and right, displayed as the
actual temperature, e.g. 20 °C.
R
Airflow left and right, displayed as J and
the current setting, e.g. 1.
R
Air distribution left and right, displayed by
the current setting, e.g. O.
Switching climate control on/off
X
Call up the climate control menu
(Y page 389).
X
To switch to the footer: slide V¬
the con-
troller.
X
To select Climate
ctrl on: turn and press
the controller.
X
Switch the climate control function on O
or off ª. If climate control is switched off,
the adjustment functions are deactivated.
Synchronising the climate control settings
With the synchronise option, you can decide
whether
you wish to activate the climate control settings for all zones together or separately.
X
Call up the climate control menu
(Y page 389).
X
To switch to the footer: slide V¬
the con-
troller.
X
To select Sync:
turn and press the control-
ler.
X
Switch the synchronisation function on
O (left and right synchronised) or off ª
(left and right separate).
COMAND Online
Z
Page 39

Vehicle functions
390
With the synchronisation function switched
off, you can alternate between driver and
front passenger.
X
To switch from the footer to the main area:
slide VZ the controller.
X
To switch between left and right: slide
XVY the controller.
Not all climate control functions allow
switching between the driver and front
passenger.
i
The synchronise function can also be
deactivated by sliding the controller to the
left or right in the setting area. The setting
elements
for the driver and front passenger
are then shown separately once again.
Further information (Y page 168)
Switching climate control functions from
COMAND Online
front to rear
X
Call up the climate control menu
(Y page 389).
X
To switch to the footer: slide V¬
the con-
troller.
X
To select the Rear setting: turn and
press the controller.
X
The climate control function is switched
the front to the rear. The vehicle inte-
from
rior display changes accordingly.
X
To switch the setting back to the front
again: select Exit rear climate con‐
trol.
After a short time, COMAND Online automatically switches the adjustment functions back to the front.
X
To select A/C: turn and press the controller.
X
Switch cooling with air dehumidification on
O or off ª.
Setting the temperature
X
To select the current temperature in the
climate
control bar on the left or right: turn
and press the controller.
The temperature setting scale appears.
X
To change the setting: turn the controller.
X
To close the temperature setting scale:
press the controller.
i
You can also set the temperature using
climate control menu, i.e. as described
the
for setting the footwell temperature
(Y page 391).
Setting the airflow
Activating/deactivating cooling with air
dehumidification
Activating the cooling with air dehumidifica-
facilitates the cooling of the vehicle inte-
tion
rior even with high outside temperatures.
X
Call up the climate control menu
(Y page 389).
X
To switch to the footer: slide V¬
the con-
troller.
X
To select J on the left or right in the
climate
control bar: turn and press the controller.
The airflow setting scale appears.
X
To change the setting: turn the controller.
X
To close the temperature setting scale:
press the controller.
Page 40

Vehicle functions
391
i
You
can also set the airflow using the climate control menu, i.e. as described for
setting the footwell temperature
(Y page 391).
Setting the air distribution
X
To select the current air distribution display
on
the left or right in the climate control bar,
e.g. O: turn and press the controller.
The air distribution setting scale appears.
X
To change the setting: turn the controller.
X
To close the temperature setting scale:
press the controller.
i
can also set the air distribution using
You
the climate control menu, i.e. as described
for setting the footwell temperature
(Y page 391).
Further settings
Adjusting the footwell temperature
X
If necessary, change sides: slide XVY the
controller.
X
To change the setting: turn and press the
controller.
Exiting a menu
X
Slide V¬ the controller.
X
To select &: turn and press the controller.
Setting the climate mode
Setting the climate mode determines the
strength of the airflow (force).
X
Call up the climate control menu
(Y page 389).
X
To select Climate mode: turn and press
the controller.
X
If necessary, change sides: slide XVY the
controller.
X
To change the setting: turn and press the
controller.
Exiting a menu
X
Slide V¬ the controller.
X
To select &:
turn and press the controller.
COMAND Online
X
Call up the climate control menu
(Y page 389).
X
To select Adjust footwell: turn and
press the controller.
Starting/stopping the perfume atomizer
Z
Page 41

Vehicle functions
392
X
Call up the climate control menu
(Y page 389).
X
To select Air freshener: turn and press
the controller.
Depending
on the previous status, you start
or stop the perfume atomizer.
X
Setting the intensity: turn the controller
when the atomizer is switched on.
Exiting a menu
X
Slide V¬ the controller.
X
To select &:
turn and press the controller.
COMAND Online
You can connect the perfume atomiser with
the pre-entry climate control, i.e. the atomiser switches on together with the pre-entry
climate control.
X
To activate the control element on the right:
slide VY the controller.
X
To switch the connection on/off: turn the
controller.
The connection is switched on O or off
ª, depending on the previous setting.
Further information (Y page 172)
X
Call up the climate control menu
(Y page 389).
X
To select Ionisation: turn and press the
controller.
You switch it on or off, depending on the
previous status.
Exiting a menu
X
Slide V¬ the controller.
X
To select &:
turn the controller and press
to confirm.
You can connect the ionisation function with
the pre-entry climate control, i.e. the ionisation function switches on together with the
pre-entry climate control.
X
To activate the control element on the right:
slide VY the controller.
X
To switch the connection on/off: turn the
controller.
The connection is switched on O or off
ª, depending on the previous setting.
Pre-entry climate control
Switching the ionisation on/off
Page 42

X
Call up the climate control menu
(Y page 389).
X
To select Pre-entry climate control:
turn and press the controller.
X
To switch on or off: turn the controller and
press to confirm.
You switch it on or off, depending on the
previous status.
Exiting a menu
X
Slide V¬ the controller.
X
To select &:
turn the controller and press
to confirm.
Further information (Y page 174)
Auxiliary heating
Vehicle functions
X
To select the required setting element (analogue clock, hours or minutes): slide VZ
and VY the controller.
X
To change the setting: turn the controller.
X
To exit the menu: press the controller.
360° camera
Important safety notes
WARNING
G
Make sure that no persons or animals are in
the manoeuvring range. Otherwise, they
could be injured.
393
COMAND Online
You can pre-set three departure times for
automatic activation of the auxiliary heating.
To select the pre-set time:
X
Call up the climate control menu
(Y page 389).
X
To select Auxiliary heating: turn and
press the controller.
X
Turn the controller.
Changing the pre-set time:
X
Call up the climate control menu
(Y page 389).
X
To select Auxiliary heating: turn and
press the controller.
X
To select the departure time that will be
changed: turn and press the controller.
A menu for changing the time opens.
Overview
The 360° camera covers the immediate surroundings of the vehicle and assists you, for
instance when parking or at exits with
reduced visibility. It detects moving objects
and displays these objects on the ground
using bars.
For a detailed description of the 360° camera, see the separate vehicle Owner's Manual.
Settings for the COMAND Online 360°
camera
Activating/deactivating using the reverse
gear:
X
Press the vehicle button on the controller.
The vehicle menu appears.
Z
Page 43

Vehicle functions
394
X
To switch to the menu bar: slide ¬ the
controller.
X
To select Settings: turn and press the
controller.
X
To select the 360°
camera: turn and press
the controller.
X
To select Activation by R gear: turn
and press the controller.
The function is switched on O or off ª,
depending on the previous status.
i
function must only be switched on if
This
you want the image from the 360° camera
to be displayed when the reverse gear is
engaged. The other activation options are
always available.
Switching object detection on/off:
X
To select Object detection: turn and
press the controller.
COMAND Online
The function is switched on O or off ª,
depending on the previous status.
Opening the camera cover:
X
To select Open camera cover: turn and
press the controller.
Image of the 360° camera
The 360° camera image can be displayed if:
R
your vehicle is equipped with a 360° camera
R
COMAND Online is switched on
(Y page 368)
R
the 360° camera function is activated
Displaying the image of the 360° camera:
X
To select the 360°
camera from the vehicle
carousel: turn and press the controller.
The split view of the 360° camera appears.
or
X
Engage reverse gear (only possible if the
Activation by R gear option is activa-
ted)
The 360° camera in split view and the
reverse drive image appears.
If the function is activated, the COMAND dis-
will automatically switch back to the pre-
play
viously selected display as soon as you shift
out of the forward or reverse gear, or if the
vehicle exceeds a speed of approx. 3 km/h.
You can also switch the display by selecting
the & symbol in the display and pressing
W the COMAND controller to confirm.
Reversing camera
The reversing camera is only an aid. It is not
a substitute for your attention to the imme-
surroundings. The responsibility for safe
diate
manoeuvring and parking remains with you.
Make sure that there are no persons, animals
or objects in range while manoeuvring and
parking.
The image from the reversing camera is
shown in the COMAND display when reverse
gear is engaged if:
R
your vehicle is equipped with a reversing
camera
R
COMAND Online is switched on
R
the Activation by R gear function is
activated.
If the function is activated, the COMAND display will automatically switch back to the previously selected display as soon as you shift
out of reverse gear.
i
For further information on the reversing
camera, see separate vehicle Owner's
Manual.
X
Press the vehicle button.
The vehicle carousel appears.
X
Slide VÆ the controller.
X
To select System settings: turn and
press the controller.
X
Select Reversing camera.
X
Select Activation by R gear.
The function is switched on O or off ª,
depending on the previous status.
Page 44

Navigation
395
Navigation
Features of your COMAND Online
These operating instructions describe all
standard and optional equipment available
for your COMAND Online system at the time
purchase. Country-specific differences are
of
possible. Please note that your
COMAND Online system may not be equipped with all the features described. This is
also the case for systems and functions relevant to safety. Therefore, the equipment on
your COMAND Online system may differ from
that in the descriptions and illustrations.
Should you have any questions concerning
equipment and operation, please consult a
Mercedes-Benz Service Centre.
Introduction
Important safety notes
WARNING
G
For safety reasons, only enter a new destination when the vehicle is stationary. You may
otherwise be distracted from the traffic conditions,
cause an accident and injure yourself
and others.
COMAND Online calculates the route to the
destination without taking account of the following, for example:
R
traffic lights
R
stop and give way signs
R
parking or stopping restrictions
R
road narrowing
R
other road and traffic rules and regulations
COMAND Online may give incorrect driving
recommendations if the data on the digital
map does not correspond to actual conditions. For example, a route may have been
diverted or the direction of a one-way street
may have changed.
For this reason, you must always observe road
and traffic rules and regulations during your
journey. Road and traffic rules and regulations
always have priority over the system's driving
recommendations.
General notes
Operational readiness of the navigation
system
In vehicles for certain countries, the navigation system is not operational immediately
after delivery. The digital map is not preinstalled.
If this is the case, the following message
appears
in the display after you switch to nav-
igation mode:
Please insert DVD number
<<xxxxx_xx>>.
X
To install the digital map:(Y page 420).
The navigation system must determine the
position of the vehicle before first use or
whenever operational status is restored.
Therefore, you may have to drive for a while
before precise route guidance is possible.
GPS reception
Correct functioning of the navigation system
depends, amongst other things, on GPS
reception. In certain situations, GPS reception may be impaired, there may be interference
or there may be no reception at all, e.g.
in tunnels or multi-storey car parks.
i
The functionality of a roof aerial (telephone, GPS) may be impaired if roof carriers are used.
Entry restriction
For vehicles in certain countries, there is a
data entry restriction.
The restriction is active above a vehicle speed
of about 5 km/h. The restriction is deactivated as soon as the vehicle speed drops below
about 3 km/h.
When the restriction is active, certain entries
cannot be made. This will be indicated by the
fact that certain menu items are greyed out
and cannot be selected.
COMAND Online
Z
Page 45

Navigation
396
The following entries are not possible, for
example:
R
entering the destination town and street
R
entering a destination via the map
R
entering
POIs in the vicinity of a town or via
a name search
R
editing entries
R
direct entry using the number keypad
Other entries are possible, however, such as
entering POIs in the vicinity of the destination
or current position.
COMAND Online
Page 46

Switching to navigation mode
X
Press the ß button.
The map displays the current vehicle position.
FURTHER ACTIVATION OPTION:
X
To activate the menu: slide ZV the controller (e.g. in radio mode).
X
To select Navi: turn and press the controller.
Showing/hiding the menu
Navigation
397
COMAND Online
You can, for example, make a destination entry or select navigation settings using the menu.
X
To show: press the controller when the map appears.
Route
guidance not active: Destination is marked. Route guidance is active: y is high-
lighted.
X
To hide: press the % button.
or
X
Slide ZV and then press the controller.
i
Route guidance is not active: no destination entered yet, no route has been calculated.
Z
Page 47

Navigation
398
Route guidance is active: the destination has been entered, the route has been calculated.
The display shows the route, changes of direction and lane recommendations. Navigation
announcements guide you to your destination.
Moving the map
REQUIREMENT: the map is in full screen mode, the menu is faded out (Y page 397).
COMAND Online
X
Slide XVY, ZVÆ or aVb the controller.
crosshair is shown. The map moves in the corresponding direction under the crosshair.
The
Setting the map scale
REQUIREMENT: the map is in full screen
mode, the menu is faded out
X
Turn the controller until the desired scale
(Y page 397).
is set.
Basic settings
Setting route type and route options
X
To switch to navigation mode: press the
ß button.
X
To show the menu: press the controller.
X
To select Settings: turn and press the
controller.
X
Select Route settings.
X
Select a route type.
Route type is switched on O or off ª,
depending on the previous status.
R
Active route guidance: COMAND Online
calculates a new route.
R
Inactive route guidance: COMAND
Online uses the new setting for the next
route guidance process.
i
Route guidance active: a destination has
been entered and the route has been calculated.
Route guidance inactive: no destination
has
been entered yet and no route has been
calculated yet.
Page 48

Fast route COMAND Online calculates
a route with the shortest
journey time.
Dynamic
route
The same route type as
Fast
route. To avoid a traf-
fic jam, for example, any
traffic reports received with
regard to the route are
taken into account. If possible, it will bypass blocked
roads.
Dynamic
route after
query
Dynamic route, querying if
you wish to adopt the new
route or prefer to continue
along the original route.
Economic
route
Economic route is a variant
of the route type Fast
COMAND Online will
route.
attempt to minimise the
journey distance at the
expense of a slightly
increased journey time.
Navigation
i
The route calculated may, for example,
include ferry connections, even if the
Avoid ferries route option is switched
on.
In some cases, e.g. when calculating particularly
not be able to take all the selected route
options into account.
i
sticker: route calculation is performed
excluding route networks (e.g. a country's
motorway network) which require you to
pay a fee (vignette). A vignette allows temporary use of the route network. Example
time limits are 10 days, 2 months or 1 year.
To avoid toll roads: route calculation is
performed excluding sections (e.g. tunnels,
stretches of motorway, inner cities) which
require you to pay a fee (toll).
X
To exit a menu: slide XVY the controller.
long routes, COMAND Online may
To avoid routes requiring a special toll
399
COMAND Online
Short route COMAND Online calculates
a route covering the shortest distance.
X
To calculate alternative routes: select
Calculate alternative routes.
Switch the function on O or off ª.
When this function is activated, all route
types are calculated.
X
To avoid/use route options: select one
of the options:
R
Avoid motorways
R
Avoid ferries
R
Avoid motorail trains
R
Avoid tunnels
R
Avoid unpaved roads
R
R
routes requiring special toll sticker
Avoid
Avoid toll roads
The option is then avoided O or used ª.
i
RDS-TMC
is not available in all countries.
Z
Page 49

Navigation
400
Entering a destination
Important safety notes
WARNING
G
For safety reasons, only enter a new destination when the vehicle is stationary. You could otherwise
be distracted from the traffic conditions, cause an accident and injure yourself and others.
As an address
Calling up the address entry menu
COMAND Online
X
To switch to navigation mode: press the ß button.
X
To show the menu: press the controller.
X
Select Destination.
Route guidance not active: press the controller. Route guidance active: turn and press the
controller.
X
Select Address entry.
Address entry options
Examples of how you can enter an address:
R
Town/postcode, street, house number
R
Town/postcode, street
R
Town/postcode, centre
R
Town/postcode, street, junction
R
Street, town/postcode, house number
R
Street, town/postcode, junction
i
Entering
the street before the town is use-
While entering an address, you can also
switch to other destination entry options:
R
Keyword Search
R
Map
R
POI
ful if the address has an unusual street
name.
Page 50

Entering an address
The example shows you how to enter a town,
and house number for an address, e.g.
street
for your home address.
X
In the address entry menu, select Town:
press the controller (Y page 400).
X
Enter BERLIN. Character entry
(Y page 371).
X
To call up the list: select OK
or slide ZV the
controller repeatedly until the character
bar disappears.
The entry for BERLIN has additional selection options. This is indicated by the G
icon.
X
Select BERLING: turn and press the controller.
Navigation
X
Select GERMANY(1XXXX).
The address entry menu transfers the
entry.
X
To select Street: press the controller.
X
Enter the street, e.g. UNTER DEN L. Then
up the list and select an entry. Proceed
call
in the same way as when entering a town.
X
To select House no.: press the controller.
X
Enter the house number. Then call up the
list and select an entry. Proceed in the
same way as when entering a town.
The address entry menu shows the
address.
the destination.
i
postcodes,
ital map. However, postcodes are not available for some countries.
Country and town are sufficient to start
navigating. You can enter either a town or
a postcode. The street and house number
complete the destination address.
The map section on the left shows
You can enter any of the towns, streets,
etc. which are stored in the dig-
401
COMAND Online
Z
Page 51

Navigation
402
Entering additional address data
You can enter additional address data:
R
Country
R
Postcode
Entering
a postcode will delete a previously
entered town.
R
Centre
Entering a centre will delete a previously
entered street.
R
Junction
Entering a junction will delete a previously
entered house number.
X
In the address entry menu, select Coun‐
try, Postcode, Centre or Junc‐
tion(Y page 400).
X
Select an entry. Proceed as described
under "Entering an address" (Y page 401).
COMAND Online
Saving an address
You can store the address you have entered
either as your home address or as another
navigable contact in the address book.
X
Call up the address entry menu
(Y page 400).
X
To select Save: slide VÆ, turn and press
the controller.
X
To save as your home address: select
As "My address".
COMAND
Online stores your home address
under My address in the list of contacts.
Own address
X
To save as a contact: select As a new
address book entry.
X
Select Not classified, Home or Work.
X
Enter a surname and first name. Character
entry
X
To select OK:
turn and press the controller.
The destination address is saved in the
address book as a navigable contact.
Page 52

Navigation
Starting route calculation
The entered destination appears in the address entry menu.
X
To confirm Start: press the controller.
Calculating
to your destination. Once the route has been calculated, route guidance begins. If the vehicle
is travelling on a non-digitised road, the system displays the linear distance to the destination, the direction to the destination and the Road off map message.
If route guidance is already active: a prompt appears asking whether you wish to end
the current route guidance. Confirm the prompt with Yes or No.
If you select Yes, the current route guidance is stopped and route calculation to the new
destination is started.
If you select No, the currently active route guidance is continued.
route. While route calculation is in progress, an arrow will indicate the direction
403
COMAND Online
i
The route is calculated using digital map data. The calculation time depends on the dis-
tance from the destination, for example.
The calculated route may differ from the ideal route, e.g. due to roadworks or incomplete
map data. Please also refer to the notes about the digital map
Using keyword search
The keyword search supports Latin fonts. You
(Y page 420).
can search for an address, a POI or a syno-
Entering keywords
nym. For example, you can search for the
of Parliament or Big Ben. The keyword
Houses
search finds geographically tolerant hits. If,
for example, you are searching for a street
located on the edge of a city, the search will
also cover adjacent smaller towns.
X
To switch to navigation mode: press the
ß button.
X
To show the menu: press the controller.
X
Select Destination.
Z
Page 53

404
Navigation
Route guidance not active: press the controller. Route guidance active: turn and
press the controller.
X
Select Keyword search.
X
Enter the first few letters of the town and
street, e.g. STUT and KÖN.
The hits are displayed in the following
order: exact hits/total hits.
---/--- is displayed if fewer than three
characters have been entered.
is displayed if there are too many hits.
999+
X
Select OK.
COMAND Online
The search results are divided into categories, e.g. town, street. The number of exact/
total hits is shown in brackets.
X
Select Town,
street: press the controller.
X
Select an entry: turn and press the controller.
The address entry menu appears, showing
the destination address.
X
To start route calculation: select Start.
Selecting search options
X
To switch to navigation mode: press the
ß button.
X
To show the menu: press the controller.
X
Select Destination.
Route guidance not active: press the controller. Route guidance active: turn and
press the controller.
X
Select Keyword search.
X
Select Search options.
X
Select Error-tolerant search, POI
search or Online search.
Switch the setting on O or off ª.
Error-tolerant search: useful if parts of the
address are incomplete or the spelling is
unclear.
search: points of interest are taken into
POI
account in the search.
Online search: the search is performed via
the online functions.
Exact hits appear at the very top of the list;
hits are sorted alphabetically in the list. The
search term that you entered is highlighted in
orange in the entries.
Selecting the country
X
To switch to navigation mode: press the
ß button.
X
To show the menu: press the controller.
X
Select Destination.
Route guidance not active: press the controller. Route guidance active: turn and
press the controller.
X
Select Keyword search.
X
Select Country .
The alphabetical list of countries is displayed.
X
Select a country: turn and press the controller.
Page 54

Navigation
405
Searching via COMAND Online
X
To switch to navigation mode: press the
ß button.
X
To show the menu: press the controller.
X
Select Destination.
Route guidance not active: press the controller. Route guidance active: turn and
press the controller.
X
Select Keyword search.
X
Select Online search.
The search switches to the online functions.
Selecting a destination from the list of
last destinations
COMAND Online automatically stores the last
100 destinations.
X
To switch to navigation mode: press the
ß button.
X
To show the menu: press the controller.
X
Select Destination.
Route guidance not active: press the controller. Route guidance active: turn and
press the controller.
X
Select From last destinations.
X
Select the destination.
The address entry menu appears, showing
the destination address.
X
To start route calculation: select Start.
Selecting an address book contact as a
destination
You can select navigable address book contacts as the destination. These are identified
the L symbol. If you have already entered
by
and saved your home address, you can select
this as the destination by using My address.
X
To switch to navigation mode: press the
ß button.
X
To show the menu: press the controller.
X
Select Destination.
Route guidance not active: press the controller. Route guidance active: turn and
press the controller.
X
Select From contacts.
X
Select the destination.
The address entry menu appears, showing
the contact and associated destination
address.
X
To start route calculation: select Start.
Selecting a destination from POIs
Calling up the POI menu
COMAND Online
Z
Page 55

Navigation
406
X
To switch to navigation mode: press the
ß button.
X
To show the menu: press the controller.
X
Select Destination.
Route guidance not active: press the controller. Route guidance active: turn and
press the controller.
X
Select From POIs.
COMAND Online
Page 56

Defining the position for the POI search
Selection Characteristic Instructions
Near destina‐
tion
Route guidance is active
X
In the POIs menu, select In
ity of the destination.
X
Select a POI category (Y page 407).
Navigation
the vicin‐
407
Current posi‐
tion
Other town
Search by name
Search by phone
number
Search in the vicinity of
the current vehicle position
After entering a town,
the search is performed
within the town's boundaries
Search for all POIs on the
digital map or around
one of the three previously
specified positions
This function gives you
access to all POIs that
have a phone number.
X
In the POIs menu, select Current
position.
X
Select a POI category (Y page 407).
Option 1
X
In the POIs menu, select Other town.
X
Select the country, if desired
(Y page 402).
X
Enter the town (Y page 401).
X
Select a POI category (Y page 407).
Option 2
X
Enter a town in the address entry menu
(Y page 401).
X
Select POIs.
X
Select a POI category (Y page 407).
X
In the POIs menu, select Search by
name.
X
Select All
POIs or one of the three pre-
viously selected positions.
The POI list with character bar appears.
X
Enter a name.
X
Select Search by phone number.
You will see a list of phone numbers.
X
Enter the telephone number.
COMAND Online
Selecting a POI category
After entering a town, POI categories appear
after choosing the menu item Near desti‐
nation, Current
position or Other town.
Z
Page 57

Navigation
408
X
Select a POI category: turn and press the
controller.
The G symbol after an entry shows that
further categories are available.
X
Select a sub-category.
The search for POIs begins within a radius
of approximately
position.
Once the search is completed, the POI list
is displayed.
The search results display the following
information:
R
an arrow that shows the linear direction
to the POI
R
the linear distance to the POI
R
the name of the POI
X
Selecting a POI.
The complete address of the POI is shown.
COMAND Online
100 km of the selected
Page 58

Selecting a POI
The complete address of the POI is shown.
X
To start route calculation: select Start.
X
To save the POI: select Save.
The POI can be saved as a navigable address book contact or as "My address".
X
To call up the map: select Map.
X
You can move the map, change the map scale and select POIs (Y page 410).
X
To call a POI: select Call.
COMAND Online switches to telephone mode .
X
To load data from the Internet: select www.
Available data are loaded from the Internet.
X
To view the surrounding area in Street View:
select the icon on the left hand side, next
to Map.
The street in the vicinity of the destination address is shown.
Navigation
409
COMAND Online
Z
Page 59

Navigation
410
Using map
:
Current vehicle position
;
Crosshair
=
Distance of crosshair position from current vehicle position
X
To switch to navigation mode: press the ß button.
COMAND Online
X
To show the menu: press the controller.
X
Select Destination.
Route guidance not active: press the controller. Route guidance active: turn and press the
controller.
X
Select Using map.
The map with crosshair is shown.
X
To move the map: slide XVY, ZVÆ or aVb the controller.
X
To change the map scale: turn the controller until the desired map scale is set.
The scale is displayed at the bottom. Turning clockwise zooms out from the map; turning
anti-clockwise zooms in.
X
To select a destination: press the controller.
If the digital map provides navigable address data, you will see the destination address in
the address entry menu. If not, the Destination from map entry is shown.
X
To start route calculation: select Start.
Entering way points
Introduction
You can map the route yourself by entering
up to four waypoints. The sequence of the
waypoints can be changed at any time.
COMAND Online provides a selection of predefined destinations in eight categories for
this
purpose, e.g. FILLING STATION or COF‐
FEE SHOP. You can also use the destination
entry options to enter waypoints.
Creating waypoints
Page 60

X
To switch to navigation mode: press the
Ø button.
X
To show the menu: press the controller.
X
To select Destination:
turn and press the
controller.
X
Select Way points.
The destination is entered into the waypoints menu. The waypoints are not yet
entered.
X
To select Add: press the controller.
X
To select the category or Other: turn and
press the controller.
After selecting a category, the POIs which
are available along the route and in the
vicinity are displayed.
COMAND
Online first searches for destinations along the route. If there are no destinations available there, it then continues
searching for destinations within a radius
of approximately 100 km of the vehicle
position.
X
After selecting Other, select one of the
destination entry options from the list.
Selection Step
X
Address entry
Enter a destination by address
(Y page 401).
X
Keyword Search
Select a destination
by means of a
keyword search.
X
From last desti‐
nations
Select a destination from the list
of last destinations
(Y page 405).
X
From POIs
Select a POI
(Y page 405).
X
Using map
Enter a destination
using the map
(Y page 410).
Navigation
Selection Step
X
From the memory
card
From MercedesBenz Apps
Using geo-coor‐
dinates
X
To select a POI: turn the controller and
press to confirm.
After
selecting a POI or entering a destination, the address of the waypoint is displayed.
After entering a destination using the map,
the address entry menu is displayed. OK is
highlighted.
X
To accept the waypoint: select OK.
you have accepted the waypoint, it is
When
entered in the waypoint menu.
X
To select details: turn and press the controller.
X
To make a call: select Call.
i
COMAND Online switches to telephone
mode (Y page 435).
This menu item is available if the waypoint
has a telephone number and a mobile
phone is connected to COMAND Online
(Y page 426).
X
To call up the map: select Map.
X
You can move the map and select the destination.
X
To store a waypoint in the destination
memory: select Presets.
Select a destination from the SD
card.
X
Enter a destination from
Mercedes-Benz
Apps.
X
Enter a destination
using the geocoordinates
(Y page 413).
411
COMAND Online
Z
Page 61

412
Navigation
Editing waypoints
You can:
R
change waypoints
R
change
the sequence in the waypoint menu
R
deleted
To change the sequence, at least one waypoint and the destination must be entered.
X
To select a waypoint in the waypoint menu:
COMAND Online
turn the controller and press to confirm.
A menu appears.
X
To change the waypoint: in the menu,
select Edit.
X
Change the address, e.g. the town and
street. Then confirm with OK.
The waypoint menu appears and displays
the modified waypoint.
You can change the sequence of the waypoints and the destination.
X
To change the order: in the menu, select
Move.
X
Turn the controller and move the waypoint
destination to the desired position. Then
or
press the controller.
X
To delete waypoints: In the menu, select
Delete.
Accepting waypoints for the route
X
In the waypoints menu, select Start.
The route is calculated with the entered
waypoints.
i
Continue is displayed instead of Start
when Calculate alternative routes
is activated in the navigation menu .
i
If a waypoint has been passed during
route guidance, the waypoint will be displayed in the waypoint menu with a green
arrow. Once the route has been recalculated, the waypoint is deleted from the waypoint menu.
Searching for a filling station when the
fuel level is low
If the reserve fuel warning is displayed, you
will see the message: Fuel tank reserve
level. Do you want to start the
search for filling stations?.
X
Select Yes or No.
If you select Yes, the filling station search
starts. When the search is complete, a list
of the filling stations available along the
route or in the vicinity is displayed.
If you select No, the search is cancelled.
X
To select a filling station: turn the controller
and press to confirm.
The address of the filling station is displayed.
X
To select Start: press the controller.
The selected filling station is entered into
position 1 of the waypoints menu. Route
guidance begins.
If the waypoints menu already contains
waypoints, a prompt will be displayed,
four
asking you whether you wish to enter the
filling station into position 1. If you select
Yes, the filling station is transferred into the
list and waypoint 4 is deleted.
Entering a destination from MercedesBenz Apps
X
To switch to navigation mode: press the
Ø button.
X
To show the menu: press the controller.
X
To select Destination:
turn and press the
controller.
Page 62

X
Select From Mercedes-Benz Apps.
an Internet connection is established, you
If
will see the message Do you want to
accept the navigation data sent
via Mercedes-Benz Apps?
Using geo-coordinates
X
To switch to navigation mode: press the
ß button.
X
To show the menu: press the controller.
X
Select Destination.
Route guidance not active: press the controller. Route guidance active: turn and
press the controller.
X
Select Using geo-coordinates.
Entering the latitude and longitude coordinates
X
To change the value: turn the controller.
X
To move the selection within the line: slide
XVY the controller.
X
To move the selection between lines: slide
ZVÆ the controller.
X
To confirm the value: press the controller.
X
To save the destination: select Save.
destination can be saved as a navigable
The
address book contact or as "My address".
X
To start route calculation:
select Start
route guidance.
Travel guide
Text
Route guidance
Changing direction
Lane recommendations
Navigation
413
COMAND Online
Personal POIs
General notes
i
The use of personal POIs to display traffic
monitoring installations is not permitted in
all countries. Please observe the countryspecific regulations and always drive at a
suitable speed.
Motorway information
Displays
Z
Page 63

414
Navigation
You can use this function to display upcoming
motorway exits, filling stations, restaurants
and similar types of information.
X
To switch to navigation mode: press the
Ø button.
X
To show the menu: press the controller.
X
Select Settings: turn and press the controller.
X
Select Map content.
X
Select Motorway information.
Depending on the previous status, motorway information is switched on or off.
Using for route guidance
COMAND Online
Destination or area of destination
reached
Navigation announcements
Route information
Destination information
Alternative routes
Route list
Traffic jam function
Recording the route
Dynamic route guidance
Introduction
An RDS-TMC radio station transmits RDSTMC traffic reports in addition to the radio
programme. COMAND Online can receive
RDS-TMC traffic reports and take them into
consideration for dynamic (traffic-dependent) route guidance. The navigation system
can, for example, guide you around a traffic
jam.
Germany, COMAND Online uses high-qual-
In
ity traffic data for the TMCpro traffic jam
warning system. TMCPro provides exclusive
traffic data that is detected with an automated sensor network, in addition to the messages generated by the TMC service. The traffic data received from the traffic jam warning
services named above could differ.
There may also be differences between the
traffic reports received and the actual road
and traffic conditions.
The respective traffic data being received
appears at the bottom right of the display with
the symbols "TMCPro" or "TMC". If there is no
reception, no symbol is displayed.
i
RDS-TMC is not available in all countries.
Cancelling/continuing route guidance
Page 64

Switching dynamic route guidance on/
off
X
To switch on: select the Dynamic route
or Dynamic route only after
request route type (Y page 398).
X
To switch off: select the Fast route or
Short route route type (Y page 398).
Navigation
415
i
COMAND
Online calculates a new route if
you change the route type setting with
route guidance active. If you change the
route type setting when route guidance is
inactive, COMAND Online uses the new
setting for the next route guidance.
RDS-TMC traffic reports on the map
COMAND Online can show certain traffic incidents
on the map. The displays can be shown
in map scales of 50 m to 20 km.
X
To set the map scale: turn the controller
until the desired map scale is selected.
The display shows the entire affected route
section with the corresponding symbols,
regardless of how long the incident actually
is. The symbols are placed on the side of the
carriageway affected by the incident.
RDS-TMC symbols on the map
:
Traffic jam on the route
;
Slow-moving traffic on the route
=
Road blocked
?
Road blocked
A
Slow-moving traffic (yellow line along the
affected route)
B
Traffic jam (red line along the affected
route)
Displaying RDS-TMC traffic reports
Starting a search for traffic reports
X
To switch to navigation mode: press the
Ø button.
X
To show the menu: press the controller.
X
To select TMC: turn the controller in the
menu bar and press.
A menu appears. COMAND Online first
searches for RDS-TMC stations within
receiver range. If RDS-TMC stations are
found, a search for traffic reports is then
started.
If
no RDS-TMC stations are found, or there
are no traffic reports, you will see a message to this effect.
X
To close the report: press the controller.
COMAND Online
Traffic symbol information
:
Affected section of road
;
Symbol for incident (traffic jam in the
example shown)
=
Line indicating the affected section of
road
Z
Page 65

416
Navigation
X
To switch to navigation mode: press the
Ø button.
X
To show the menu: press the controller.
X
To select Traffic
symbol information:
turn the controller in the menu bar and
press.
X
Select Traffic symbol information.
X
To display the next/previous incident:
select Next or Previous (if available).
X
To display details: select Details.
X
To scroll the map: select Map.
You can move the map to enable further
traffic reports to be displayed
(Y page 398).
Displaying reports on the route
:
Country designation, road number, direc-
and number/total number of reports
tion
COMAND Online
for the affected road (1/2)
;
Section of the road to which the traffic
report applies
=
Traffic report
?
Type of traffic report (warning)
X
To switch to navigation mode: press the
Ø button.
X
To show the menu:
press W the COMAND
controller.
X
To select TMC: turn the controller in the
menu bar and press.
X
Select Reports on the route.
The traffic report is displayed. If there is
than one traffic report for a section of
more
the route, this is indicated by 1/2, for
example.
X
To scroll within a report or to access
the next report: turn the controller.
X
To close the report: slide XVY the con-
troller one or more times.
Displaying all traffic reports
X
To switch to navigation mode: press the
Ø button.
X
To show the menu:
press W the COMAND
controller.
X
To select TMC: turn the controller in the
menu bar and press.
X
Select Show all reports.
A list is shown containing all roads, areas
or regions affected by traffic reports.
Roads, areas or regions not on the route
also appear in the list.
X
To show a traffic report:
select a road, an
area or a region and press W to confirm.
The traffic report is displayed. If there is
more than one traffic report for a section of
the route, this is indicated by 1/2, for
example.
You can find an example of a traffic report
here: (Y page 416).
X
To close the report: slide XVY the con-
troller one or more times.
Reading out traffic reports on the route
Calling up traffic reports
can select from the following text reader
You
properties:
R
Language (Y page 379)
R
Text reader speed (Y page 376)
X
To switch to navigation mode: press the
Ø button.
X
To show the menu: press the controller.
X
To select TMC:
turn the controller and press
it.
X
Select Read out reports on the
route.
COMAND Online reads out the messages
in sequence.
No reports on the route: the Read out
reports
on the route function does not
work.
Page 66

X
To cancel the text reader function:
select Cancel text reader function.
The
current traffic report is read out to the
end and then the function is deactivated.
or
X
Briefly press the 8 button.
The function is deactivated immediately.
i
COMAND Online interrupts the readaloud function automatically as it recalculates the route following a new RDS-TMC
traffic report.
Automatic read-aloud function
Navigation
Map functions
General notes
Company logos displayed on the map are
trademarks
used solely for the purpose of indicating the
locations of these companies. The use of such
logos on the map does not indicate approval
of, support of or advertising by these companies for the navigation system itself.
of the respective companies and
417
COMAND Online
Traffic reports can be read out automatically
on the route. Announcements are made as
you approach traffic incidents.
X
To switch on/off: press the Ø button.
X
To show the menu: press the controller.
X
To select TMC:
turn the controller and press
it.
X
Select Read out traffic reports
automatically.
X
The function is activated O
or deactivated
ª.
Saving destinations
Overview
Z
Page 67

Navigation
418
Map settings
Rotating the 3D map
You can use this function to explore the area of the map. The function is available in all map
scales.
REQUIREMENT: the 3D map display must be switched on.
COMAND Online
X
To switch to navigation mode: press the Ø button.
X
To show the menu: press the controller.
X
To select Settings: turn and press the controller.
X
Select Map orientation.
X
Select 3D map rotation.
X
Turn the controller.
MORE FUNCTIONS:
R
Moving the map (Y page 398)
R
Changing the map scale
(Y page 398)
Page 68

Navigation
Map display
Globe scrolling
COMAND Online displays globe satellite images. This allows for a realistic map display free
from distortion in all map scales.
current position of the vehicle can be moved on the globe up to a map scale of 20 km. If
The
the 3D map setting has been activated, up to a scale of 10 km.
MORE FUNCTIONS:
R
Moving the map (Y page 398)
R
Changing the map scale (Y page 398)
419
COMAND Online
Building images
With small map scales, important buildings are depicted realistically; other buildings are shown
as models.
Z
Page 69

Navigation
420
Elevation model
Cities located in mountainous regions are
realistically depicted using an elevation
model.
Speed Limit Assist
COMAND Online
Avoiding an area
Compass function
Showing the map data version
Updating the digital map
Navigation functions
Page 70

Navigation
Problems with the navigation system
Problem Possible causes/consequences and M Solutions
421
COMAND Online is
unable to continue
route guidance after
the journey has been
interrupted.
Route guidance is cancelled if you interrupt the journey for more
than two hours.
"Interrupting the journey" refers to stopping the vehicle.
"Continuing route guidance" refers to switching COMAND Online
back on and driving on.
X
Continue route guidance (Y page 414).
Problem Possible causes/consequences and M Solutions
COMAND Online is
unable to determine
the vehicle's position.
COMAND Online has to redetermine the position of the vehicle if
the vehicle has been transported.
Examples:
R
after transporting the vehicle by ferry
R
after transporting the vehicle by motorail
R
after the vehicle has been towed
X
Start the vehicle and pull away.
COMAND Online determines the vehicle's position. Depending
on the driving situation, this may take some time.
Route guidance may be restricted during the determination of
the vehicle's position.
When positioning is complete, route guidance is resumed with
navigation announcements and route guidance displays.
COMAND Online
Z
Page 71

Navigation
422
Problem Possible causes/consequences and M Solutions
The Navigation
unavailable message
appears.
COMAND Online has an integrated hard drive on which the digital
map is stored.
To protect the integrated hard drive against damage,
COMAND
Online deactivates it at very high and low temperatures.
The navigation system will then be temporarily unavailable.
X
Let the vehicle and COMAND Online cool down.
X
To hide the message: switch COMAND Online off and then on
again.
If an area of the hard disk has a fault, COMAND Online can no
longer access the map data in this area. This may occur when
calculating a route, for example.
X
To hide the message:
switch COMAND Online off and then on
again.
The navigation system will be operational again until it has to
access the faulty area of the hard drive once more. The message
COMAND Online
will then reappear.
X
Consult a Mercedes-Benz Service Centre.
Problem Possible causes/consequences and M Solutions
You see a message
informing you that the
DVD containing the digital map is incompatible
with the system software.
The DVD containing the digital map cannot be used for the update.
X
To confirm the message: press the COMAND controller.
X
Eject the DVD.
X
Have the system database checked at a Mercedes-Benz Service
Centre.
Problem Possible causes/consequences and M Solutions
The map software
update has failed.
The DVD is dirty.
X
Clean the DVD.
X
Restart the update.
The DVD is scratched.
X
Consult a Mercedes-Benz Service Centre.
Page 72

Telephone
Problem Possible causes/consequences and M Solutions
There is overheating due to excessive temperatures in the vehicle
interior.
X
Wait until the vehicle interior has cooled down.
X
Restart the update.
COMAND Online's integrated hard disk is defective.
X
Consult a Mercedes-Benz Service Centre.
Problem Possible causes/consequences and M Solutions
423
COMAND Online asks
for an activation code
the map update.
during
The digital map is secured with an activation code.
X
Consult a Mercedes-Benz Service Centre.
Telephone
Features of your COMAND Online
These operating instructions describe all
standard and optional equipment available
for your COMAND Online system at the time
of
purchase. Country-specific differences are
possible. Please note that your
COMAND Online system may not be equipped with all the features described. This is
also the case for systems and functions relevant to safety. Therefore, the equipment on
your COMAND Online system may differ from
that in the descriptions and illustrations.
Should you have any questions concerning
equipment and operation, please consult a
Mercedes-Benz Service Centre.
General notes
Important safety notes
WARNING
G
Operating communications equipment integrated into the vehicle while driving will distract you from traffic conditions. You could
then
lose control of the vehicle. There is a risk
of an accident.
Only operate these devices if road traffic conditions permit. If you are unsure about the
surrounding conditions, pull over to a safe
location
cle is stationary.
G
If you use the RF transmitter in the vehicle in
an improper way, its electromagnetic radiation can disrupt vehicle electronics, e.g. if:
R
R
This
vehicle. There is a risk of an accident.
Have the low-reflection exterior aerial fitted at
a qualified specialist workshop. When operating in the vehicle, always connect the RF
transmitter to the low-reflection exterior aerial.
and make entries only while the vehi-
WARNING
the RF transmitter is not connected to an
exterior aerial
the exterior aerial is fitted incorrectly or is
not a low-reflection aerial
can jeopardise the operating safety of the
You must observe the legal requirements for
the country in which you are currently driving
when operating mobile communications
equipment in the vehicle.
COMAND Online
Z
Page 73

424
Telephone
Excessive levels of electromagnetic radiation
may cause damage to your health and to the
health of others.
There
is scientific discussion surrounding the
possible health risks posed by electromagnetic fields. You can reduce this risk by using
an exterior aerial.
Therefore, only use mobile communication
equipment if it is connected to the exterior
aerial of the vehicle.
Introduction
COMAND Online allows you to use the following modes of telephony:
R
Telephony via the Bluetooth® interface
using COMAND Online
R
permanently
in conjunction with a data-enabled MB
COMAND Online
SAP module)
R
Business telephony via the Bluetooth
installed/SAP telephony (only
interface of the Rear Seat Entertainment
System.
i
Business telephony is only available if the
vehicle is equipped with a Rear Seat Entertainment System and the business telephony option.
In telephony via Bluetooth® interface
mode, the mobile phone is connected directly
to COMAND Online via Bluetooth®.
Enhancing this operating mode with the
optional mobile phone bracket allows you to:
R
connect the mobile phone to the exterior
aerial on the vehicle
R
charge the mobile phone
In the permanently installed/SAP teleph-
ony mode, the optional data-enabled MB
SAP module is inserted into the fitting in the
armrest designed for housing the mobile
phone bracket.
When connecting Bluetooth®-capable mobile
phones with PBAP (Phone Book Access
Profile), the contacts are automatically downloaded to COMAND Online or the Rear Seat
Entertainment System.
You can use the text message and e-mail
function under the following conditions:
R
the mobile phone supports the MAP Bluetooth® profile (Message Access Profile).
Further information on the following topics
can be obtained from your Mercedes-Benz
Service Centre or on the Internet at http://
www.mercedes-benz.com/connect:
R
suitable mobile phones
R
available mobile phone brackets
R
connecting Bluetooth®-capable mobile
phones to COMAND Online
R
overview
of the functions for the operating
modes
Business telephony
If your vehicle is equipped with a Rear Seat
Entertainment System, you can also select
®
the business telephony option.
The following scenarios are possible:
R
Operation of two telephones:
-
A mobile phone is connected to
COMAND Online as the COMAND Telephone. COMAND Online is generally
used as a hands-free system here when
making
calls. A call can be transferred to
the business telephone in the rear compartment.
-
A second mobile phone is connected as
a business telephone with the Rear Seat
Entertainment System. With the business telephony option, a passenger in
the rear compartment uses the handset
when making calls. He can transfer the
call to the COMAND telephone.
Both telephones can be used independently of each other.
R
Operation with one telephone
A mobile phone is either connected with
COMAND Online as a COMAND telephone
or with the Rear Seat Entertainment System as a business telephone. A call can be
transferred from front to rear or from rear
Page 74

Telephone
425
to front. Only one call can be made at a
time.
Disconnecting
a call while the vehicle is
in motion
A call may be disconnected if:
R
is insufficient GSM network coverage
there
in certain areas
R
you move from one GSM or UMTS transmitter/receiver area (GSM/UMTS cell) into
another and no channels are free
R
you use a SIM card that is not compatible
with the network available
R
you are using a mobile phone with "Twincard" and the mobile phone with the second SIM card is logged into the network at
the same time
Operating options
You can operate the telephone by:
R
using the controller:
turning
sliding XVY or ZVÆ
pressing
R
using the 6 or ~ button and using
the telephone keypad on COMAND Online
R
the 6 or ~ button on the mul-
using
tifunction steering wheel
R
using LINGUATRONIC (see the separate
LINGUATRONIC operating instructions)
Unless stated otherwise, the descriptions and
illustrations in this section refer to
COMAND Online.
R
the Bluetooth® function is switched off on
if
the mobile phone while you are using Bluetooth® interface telephony
R
if the mobile phone is not logged into a
mobile phone network
i
The telephone automatically tries to log
on to a network. If no network is available,
you may not be able to make a "999" or
"112" emergency call. If you attempt to
make an outgoing call, the No service
message will appear for a short while.
If you switch COMAND Online off during a call
in hands-free mode, the call will be terminated. You can prevent this as follows:
Telephony via the Bluetooth® interface
X
Switch the mobile phone to private mode
before switching off COMAND Online (see
the mobile phone operating instructions).
"999" or "112" emergency call
The following conditions must be fulfilled in
order
to make a 999 or 112 emergency call:
R
the mobile phone must be switched on
R
a network must be available
R
a valid and operational SIM card must be
inserted in the mobile phone
R
the PIN must have been entered
If you cannot make an emergency call, you
must arrange rescue measures yourself.
i
The 999 or 112 emergency call number
is a public service. Any misuse is punishable by law.
COMAND Online
Function restrictions
You will not be able to use the telephone, will
longer be able to use the telephone, or you
no
may have to wait before using it in the following situations:
R
if the mobile phone is switched off
R
if the "Bluetooth®" function is switched off
in COMAND Online
Telephony via the Bluetooth® interface
Conditions
For telephony via COMAND Online's Bluetooth® interface, a Bluetooth®-capable
mobile phone is required.
Z
Page 75

426
Telephone
On COMAND Online
X
Activate the Bluetooth® function in
COMAND Online (Y page 379).
On the mobile phone
X
Switch on the mobile phone and enter the
PIN when prompted to do so (see the
mobile phone operating instructions).
X
Activate Bluetooth® functions and, if necessary, Bluetooth® visibility on the mobile
phone (see the mobile phone operating
instructions).
The battery of the mobile phone should
always be kept sufficiently charged in order
to prevent malfunctions.
In preparation for telephoning via the Bluetooth® interface, you should check the following items on your mobile phone (see the
mobile phone operating instructions):
COMAND Online
R
Hands-Free Profile
The mobile phone must support HandsFree Profile 1.0 or above.
R
Bluetooth® visibility
certain mobile phones, the device itself
On
must be made "visible" to other devices, as
well as activating the Bluetooth® function
(see the mobile phone operating instructions).
This visibility is for restricted periods of
time on some mobile phones.
R
Bluetooth® device name
Every Bluetooth® device has a Bluetooth
device name. This device name is freely
definable, but can be identical for all devices from the same manufacturer. It is
therefore recommended that you change
this name so that you can easily recognise
your mobile phone (see the mobile phone
operating instructions).
i
Not all mobile phones available on the
market are equally suitable. Further information on suitable mobile phones and
mobile phone brackets can be obtained at
your Mercedes-Benz Service Centre or on
the Internet at http://www.mercedes-
benz.com/connect.
i
Not all mobile phones available on the
market are equally suitable. Further information on suitable mobile phones can be
obtained from a Mercedes-Benz Service
Centre.
i
Some displays (e.g. the signal strength)
depend on the supported version of the
Hands-Free Profile.
Connecting a mobile phone
General notes
Before using your mobile phone with
COMAND Online for the first time, you will
need to:
R
search(Y page 426) and then
R
authorise (register) it (Y page 428).
Device-specific information on authorising
and connecting Bluetooth®-capable mobile
phones can be found on the Internet at
http://www.mercedes-benz.com/
connect.
When you authorise a new mobile phone, it is
connected automatically.
You can authorise up to 15 mobile phones.
If the mobile phone supports PBAP (Phone
Book Access Profile) and MAP (Message
Access Profile), the following contacts and
messages are downloaded into COMAND
Online when connecting:
®
R
the phone book
R
the call lists
R
the messages (text and e-mail)
Further information on the conditions for connecting (Y page 425).
Searching for a mobile phone
X
Press the % button.
X
To switch to the menu bar in the telephone
basic menu: slide VÆ the controller.
X
To select Connect device: turn the controller and press to confirm.
Page 76

If your vehicle is equipped with a Rear Seat
Entertainment System, you can decide
whether you wish to connect the mobile
phone
as a COMAND telephone or a business
telephone. Further information on business
telephony .
X
To select the COMAND
telephone or Busi‐
ness phone: turn and press the controller.
If you select the COMAND telephone, the
mobile phone will be connected with
COMAND Online. If you select the Busi‐
ness phone, the mobile phone will be con-
nected with the Rear Seat Entertainment
System.
Telephone
427
COMAND Online
X
To select Search for phones: turn the
controller and press to confirm.
A message appears.
X
To select Start search:
slide the control-
ler VY and press to confirm.
The Searching for Bluetooth devi‐
ces message appears. COMAND Online
looks for Bluetooth® telephones within
range and adds them to the Bluetooth® telephones list.
If a new phone is found, it appears in the
list with the Ï symbol.
The duration of the search depends on the
number of Bluetooth® telephones within
range and their characteristics.
Z
Page 77

428
Telephone
Symbols in the Bluetooth® phone list
Sym-
Explanation
bol
Ï
New mobile phone in range, but
not yet authorised
Y
#
Authorised mobile phone
Currently connected mobile
phone
Ñ
Mobile phone in range and
authorised
Ñ
(grey)
Mobile phone not in range, but
already authorised
The Bluetooth® telephones list shows all
phones within range and all previously
mobile
authorised mobile phones, whether or not
COMAND Online
they are in range.
i
Mobile phones that are connected to the
optional data-enabled MB SAP module are
shown in a separate phone list. These are
found below the entry Telephones of
the SAP module.
i
COMAND Online cannot recognise
mobile phones on which Bluetooth® visibility has not been activated, even if they are
within range.
i
If the Bluetooth® telephones list is already
full, you will be requested to de-authorise a
mobile phone (Y page 430). If COMAND
Online does not find your mobile phone,
external authorisation may be necessary
(Y page 429).
i
When you call up the phone list again, deauthorised devices will be removed from
the list. In this case, start a new search to
update the Bluetooth® telephone list.
Authorising (registering) a mobile phone
Option 1: using the passkey (access number)
X
To select the mobile phone with the Ï
symbol in the Bluetooth® telephones list:
turn the controller and press to confirm.
The input menu for the passkey appears.
The passkey is any one to sixteen-digit number
combination which you can choose yourself. You must enter the same number combination in COMAND Online and in the Bluetooth®-capable mobile phone (see the mobile
phone operating instructions).
i
Some mobile phones require a passkey
with four or more digits.
i
If you wish to re-authorise the mobile
phone after de-authorising it, you can
choose another passkey for it.
i
Mercedes-Benz recommends de-authori-
sation in COMAND Online and on the
mobile phone (Y page 430). Subsequent
authorisation may otherwise fail.
X
To enter a passkey in COMAND Online:
press the number keys in turn.
¬ is highlighted after the first number
has been entered.
X
To select ¬ after entering all numbers:
turn the controller and press to confirm.
FURTHER ENTRY OPTIONS:
R
Using the character list in the input menu
X
To enter the passkey on the mobile
phone:
if the Bluetooth® connection is suc-
cessful, you will be requested to enter the
Page 78

Telephone
429
passkey (access code, passkey; see the
mobile phone operating instructions).
X
Enter the same passkey in the mobile
phone as the one already entered in
COMAND Online.
The Connecting profiles... message
appears.
The Authorisation successful message appears once authorisation is completed.
i
After entering the passkey, you may also
to enter a confirmation in your mobile
need
phone in order to make calls. Please check
your mobile phone display. On some mobile
phones, this confirmation can be saved. In
this case, you do not need to enter it again.
If the COMAND Online display shows the
Authorisation failed message, you
may have exceeded the prescribed time
period. Repeat the procedure.
The mobile phone is authorised and connected to COMAND Online. You can now make
phone calls using the COMAND Online handsfree system.
Option 2: using Secure Simple Pairing
PREREQUISITE:
To connect via Secure Simple Pairing, the
mobile phone (or Bluetooth® audio equipment) must support Bluetooth® Version 2.1.
COMAND Online creates a six-digit code,
which
is displayed on both devices that are to
be connected.
If the number code is the same on both devices:
X
To select Yes: press the controller.
you select Yes, authorisation is continued
If
and the mobile phone is connected.
If you select No, the process will be cancel-
led.
X
Confirm the message on the mobile phone.
External authorisation
If COMAND Online does not detect your
mobile phone, this may be due to particular
security
settings on your mobile phone. In this
case, you can test if your mobile phone can
find COMAND Online. The Bluetooth® device
name of COMAND Online is "MB Bluetooth".
After entering the passkey, you must reestablish the connection to COMAND Online
on some mobile phones (see mobile phone
operating instructions). The mobile phone
cannot otherwise be authorised.
X
Press the %
X
To switch to the menu bar in the telephone
button on COMAND Online.
basic menu: slide VÆ the controller.
X
To select Connect device:
turn and press
the controller.
The Bluetooth® telephones list appears.
X
To select Search via telephone: turn
and press the controller.
A message appears.
COMAND Online
Z
 Loading...