

Page 1
JBL OnBeat™ aWake
Quick Setup Guide
FPO
WeLCOme
Thank you for purchasing the JBL OnBeat™
aWake iPad dock. This quick setup guide will
show you how to connect and set up your
dock. To download the free JBL Amp-Up
App and JBL Entertainment App, please go
to www.jbl.com.
COnneCtIOnS
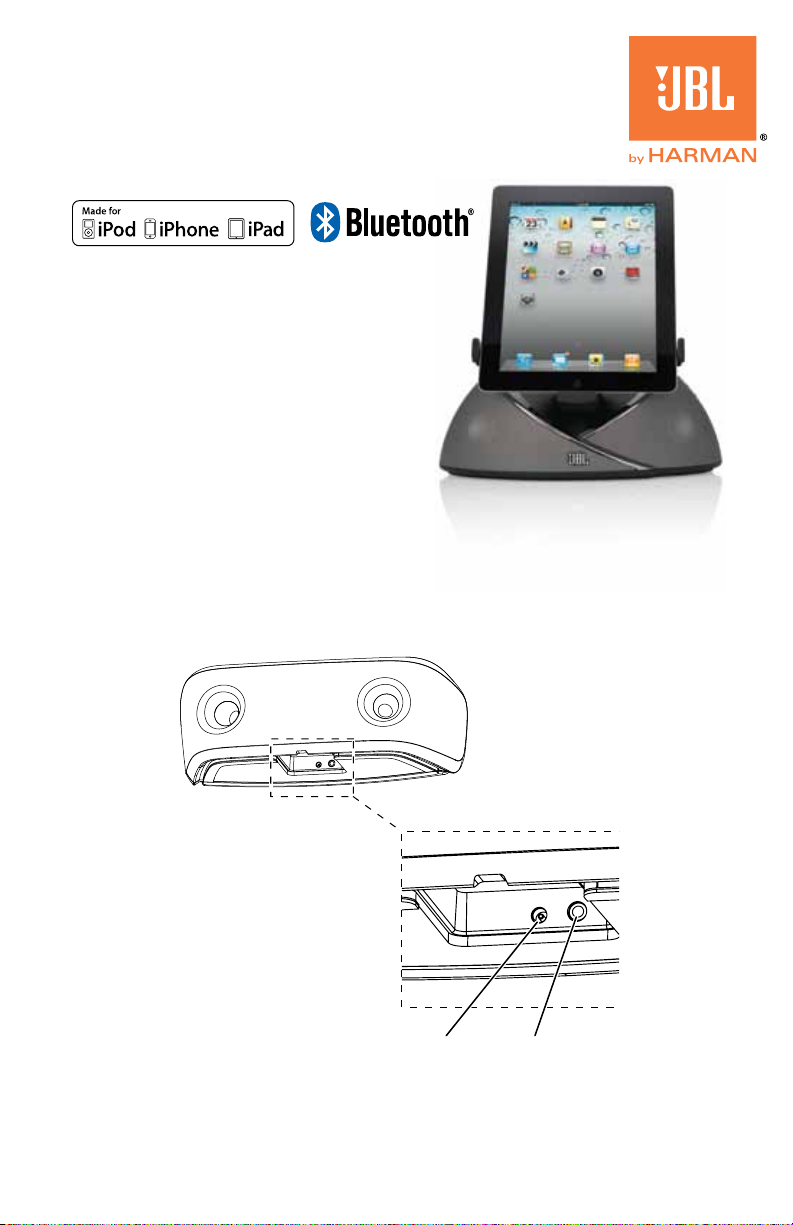
1. Plug the JBL OnBeat aWake’s power supply into the DC-In connector on the unit and
into a working AC power outlet. The JBL OnBeat aWake will automatically turn on. The
clock display screen will read “On” for 3 seconds and will then show “--:--”. When you
dock your device the OnBeat aWake’s clock display will synchronize with the device’s
clock and will display the current time.
PHOTO TK
DC-In Aux-In
2. If you are going to use your JBL OnBeat aWake with another audio source, plug one
end of a 3.5mm (1/8") stereo cable (not supplied) into the JBL OnBeat aWake’s Aux-In
connector, and plug the other end into the audio source’s audio out or headphone out
connector.
Page 2
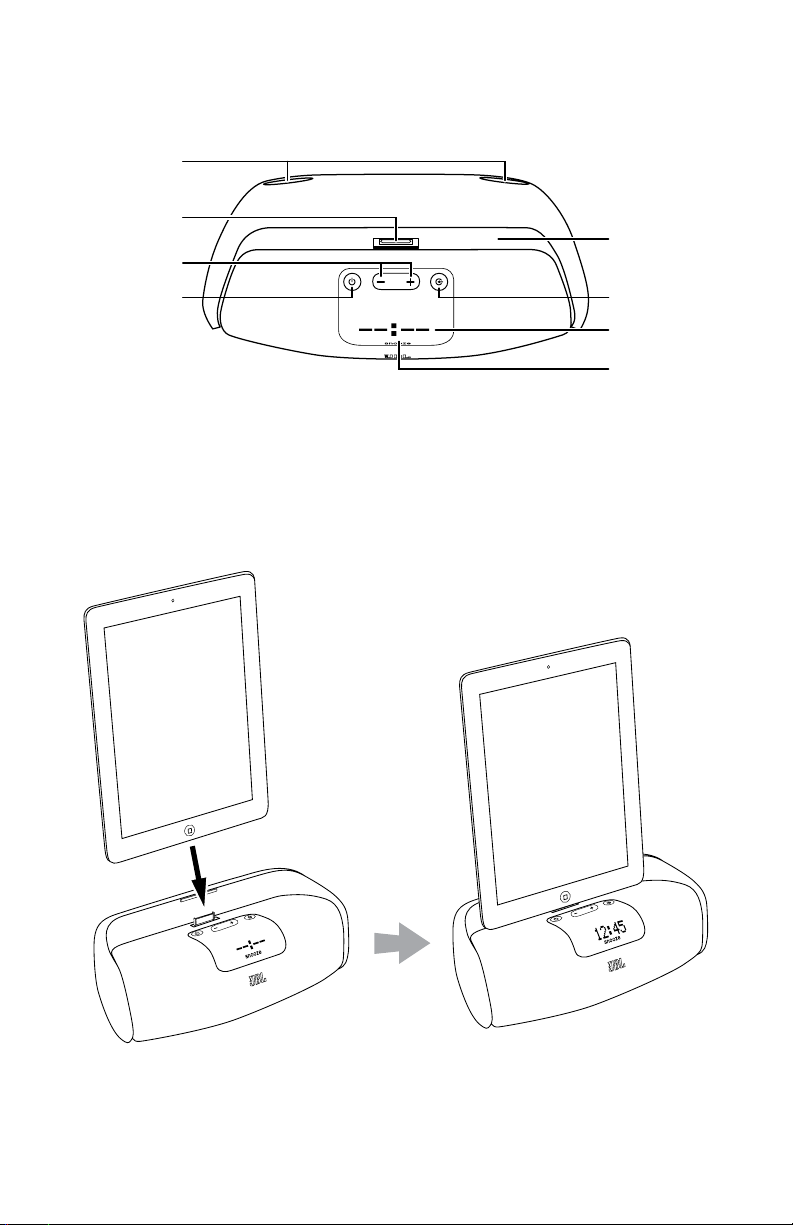
COntROLS anD InDICatORS
Source Button
Display Screen
Snooze Button
Docking Groove
Bass Ports
Docking Connector
Volume Up/Down
Buttons
Power Button
Bass ports: Place the OnBeat aWake so that the rear of its enclosure is at least 3" (76mm)
away from a wall or other surface to allow the bass ports to operate properly.
Docking groove and docking connector: Place your device into the OnBeat aWake’s
docking groove so that it is firmly seated on the docking connector.
Docking Groove
Source Button
Display Screen
Snooze Button
2
Page 3

Volume Up/Down buttons: Press these buttons to raise and lower the OnBeat aWake’s
volume. To mute the sound, press both buttons at the same time. (The clock display will
show “00:00” for three seconds when the mute is on.) To restore the sound press either
Volume button.
Power button: When the OnBeat aWake is on, press the Power button to put it into the
standby mode. (The clock display will dim in the standby mode.) When the OnBeat aWake
is in standby, press the Power button to turn it on. (The clock display will illuminate at full
brightness when the unit is on.)
When the OnBeat aWake is in the standby mode it will automatically turn on when it
detects audio playing from a Bluetooth-connected device, a docked device or a device
connected to the Aux input, or when it detects wake-up alarm audio from a docked device.
When the OnBeat aWake is on, it will automatically enter the standby mode after 10
minutes of inactivity (no audio input and no user-control operation).
When the alarm is active, press the Power button to turn the alarm off.
Note: When the OnBeat aWake enters the standby mode it will also bring a docked device
into standby mode.
Source button: Each press of this button cycles the active source between a paired
Bluetooth device, a docked device and a device connected to the Aux input. An icon that
indicates the active source will appear on the display screen.
If you begin to play audio from a docked device while you’re listening to audio on a device
connected to the Aux input, the OnBeat aWake will automatically switch sources to the
docked device. If you begin streaming audio from a paired Bluetooth-enabled device while
you’re listening to any other source, the OnBeat aWake will automatically switch sources
to the Bluetooth-enabled device.
Display screen: When a device is docked in the OnBeat aWake the Display screen will
show the current time and an icon indicating the active source.
Snooze button: When you are using the JBL Amp-Up App in a docked device, press the
Snooze button to stop the alarm for a predetermined amount of time. To download the
JBL Amp-Up App go to www.jbl.com.
When the OnBeat aWake is in standby, you can press the Snooze button to turn it on.
BLUETOOTH WIReLeSS StReamInG
To wirelessly stream audio to the OnBeat aWake from a Bluetooth-enabled device:
1. Press the OnBeat aWake’s Source button until the Bluetooth icon appears on the
display.
2. Place the device in the pairing mode, then hold down the OnBeat aWake’s Source
button until its Bluetooth icon begins flashing. This will put OnBeat aWake in the
Bluetooth pairing mode. Use the device’s Bluetooth pairing menu to pair with OnBeat
aWake. (If the device requires a pairing code, it is 0000.)
3. When OnBeat aWake’s Bluetooth icon illuminates constantly, it is paired with the
device and you can stream audio via Bluetooth from the device to the OnBeat aWake.
To disconnect the Bluetooth device, press and hold the Source button. To pair OnBeat
aWake with a different Bluetooth-enabled device, repeat Steps 2 and 3 with the new
device.
www.jbl.com
3
Page 4

 Loading...