

Harman Oakwood Cast Installation & Operating Manual
Installation & Operating Manual
!
NOTICE: SAVE THESE INSTRUCTIONS
Model(s):
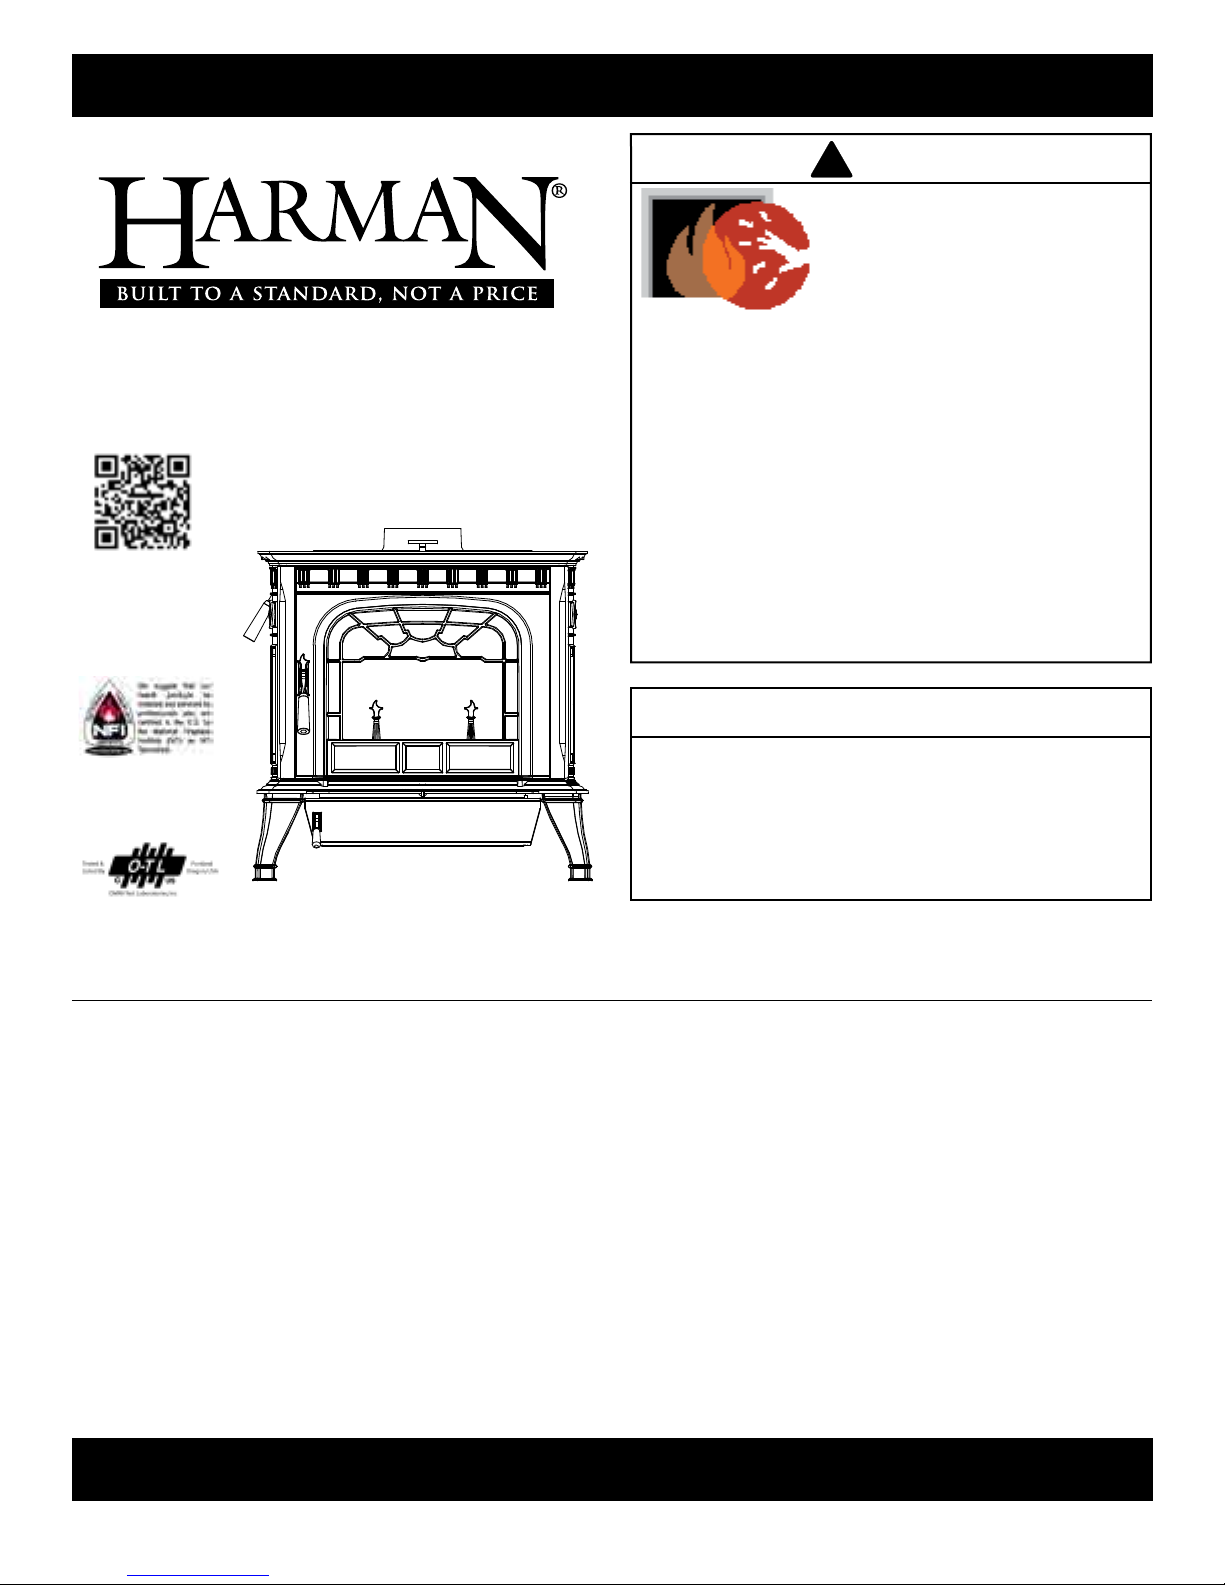
Oakwood Cast Iron Wood Stove
Wood Stove
Use & Care Video
WARNING
HOT SURFACES!
Glass and other surfaces are hot during
operation and cool down.
Hot glass will cause burns.
• Do not touch glass until it is cooled
• NEVER allow children to touch glass
• Keep children away
• CAREFULLY SUPERVISE children in same room as
stove.
• Alert children and adults to hazards of high temperatures.
High temperatures may ignite clothing or other
ammable materials.
• Keep clothing, furniture, draperies and other ammable
materials away.
NOTE
To obtain a French translation of this manual, please
contact your dealer or visit www.harmanstoves.com
Pour obtenir une traduction française de ce manuel, s’il
vous plaît contacter votre revendeur ou visitez www.
harmanstoves.com
EPA Certied by
OMNI-Test Laboratories
Contact your local dealer with questions on installation,
operation or service.
SAFETY NOTICE
PLEASE READ THIS ENTIRE MANUAL BEFORE YOU INSTALL AND USE YOUR NEW ROOM HEATER. FAILURE TO
FOLLOW INSTRUCTIONS MAY RESULT IN PROPERTY DAMAGE, BODILY INJURY, OR EVEN DEATH.
FOR USE IN THE U.S. AND CANADA. THE OAKWOOD IS NOT APPROVED FOR MOBILE HOME INSTALLATION.
IF THIS HARMAN® STOVE IS NOT PROPERLY
INSTALLATION DIRECTIONS.
CONTACT LOCAL BUILDING OR FIRE OFFICIALS ABOUT RESTRICTIONS AND INSTALLATION INSPECTION
REQUIREMENTS IN YOUR AREA.
CONTACT YOUR LOCAL AUTHORITY (SUCH AS MUNICIPAL BUILDING DEPARTMENT, FIRE DEPARTMENT, FIRE
PREVENTION BUREAU, ETC.) TO DETERMINE THE NEED FOR A PERMIT.
INSTALLED, A HOUSE FIRE MAY RESULT. FOR YOUR SAFETY, FOLLOW
CETTE GUIDE D'UTILISATION EST DISPONIBLE EN FRANCAIS. CHEZ VOTRE CONCESSIONNAIRE DE HARMAN®
HOME HEATING.
SAVE THESE INSTRUCTIONS.
3-90-08327R26_03/14

Table of Contents
Introduction ..........................4
Specications ........................5
Operations / Building a Fire .............7
Installation ..........................11
Venting .............................16
Maintenance .........................25
Options .............................27
Service Parts List ....................28
Warranty ............................32
= Contains updated information
NOT APPROVED FOR MOBILE HOME INSTALLATIONS
Please read this entire manual before you install and use your new heating appliance. Failure to follow instructions may
result in property damage, bodily injury, or even death.
3-90-08327R26_03/14
352 Mountain House Road
Halifax, PA 17032
U.S.A.
Harman Oakwood 3
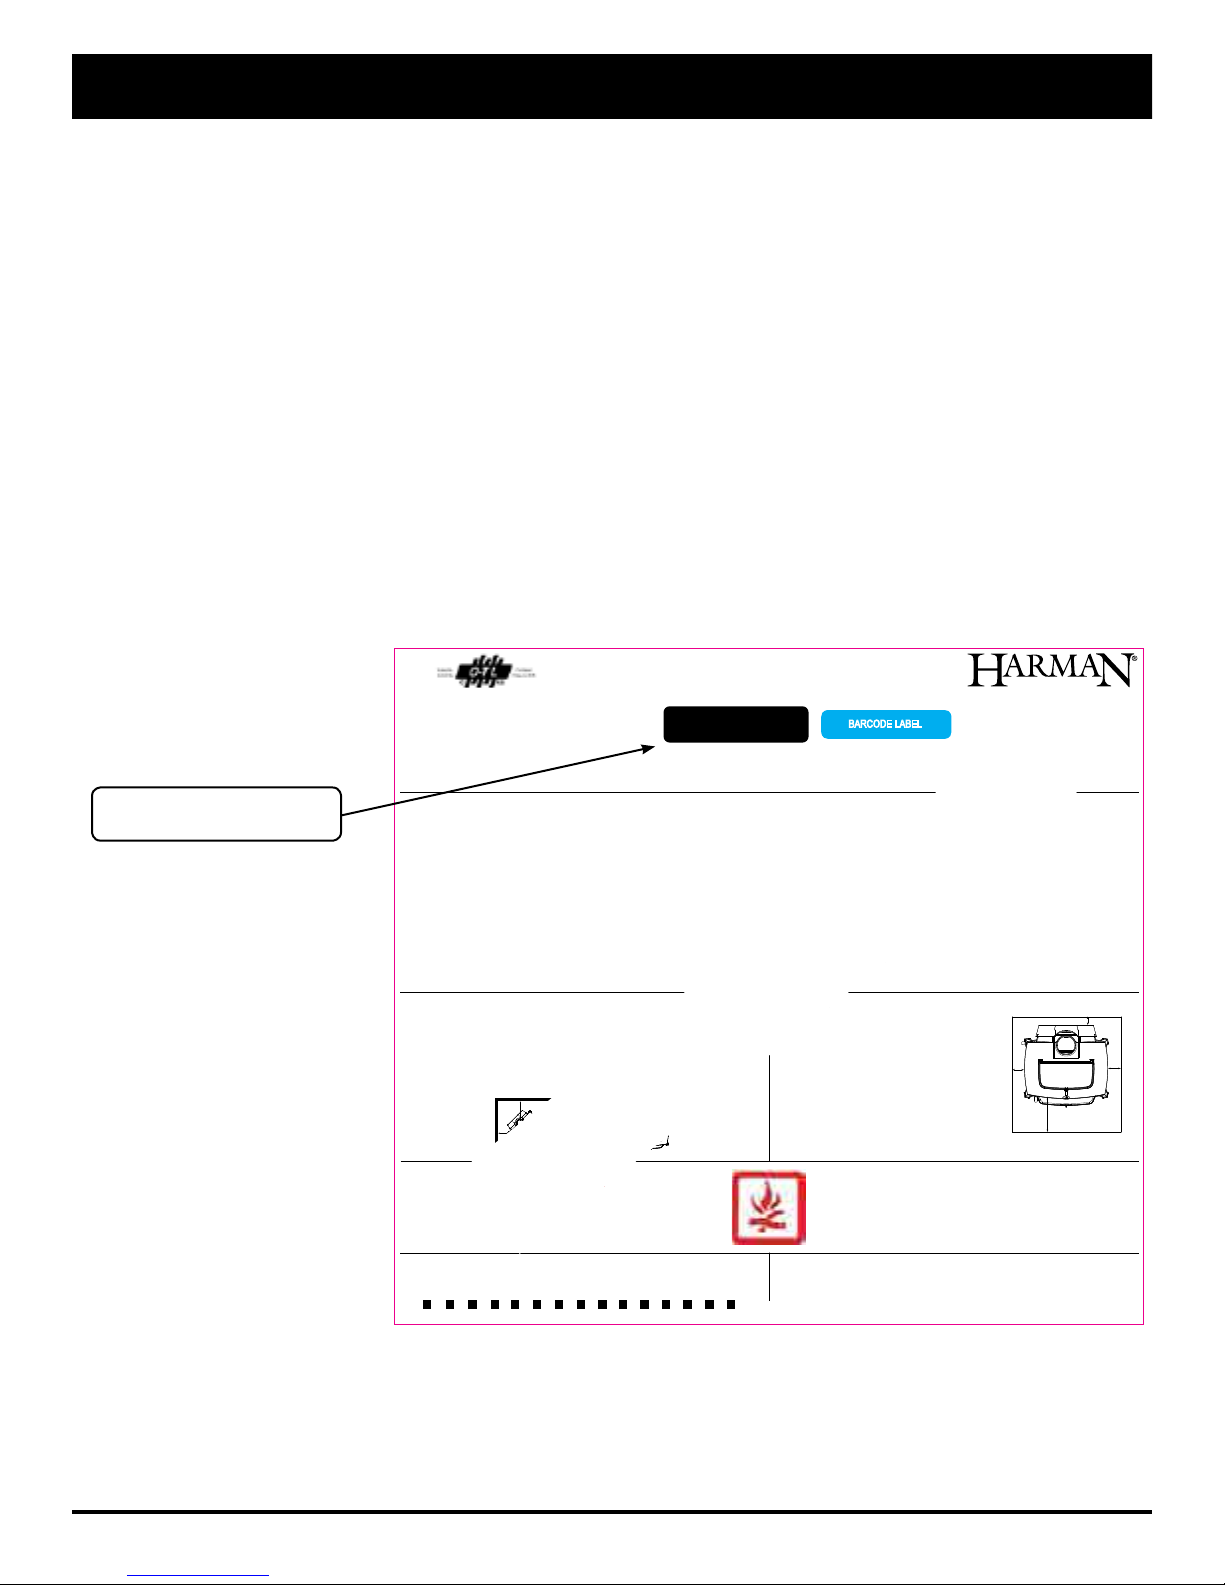
Harman Oakwood Wood Stove
Label Measures: 7" high X 7.75" wide
BACKWALL
SIDEWALL
A
C
B
D
ADJACENT WALL
8”
8”
8”
16”
BACKWALL
SIDEWALL
8”
Thank you for purchasing the Harman® Oakwood. We are condent that you will enjoy the warmth and convenience of your
Harman® Stove for decades to come.
The Harman® Oakwood will heat your home while also being multi-functional and visually appealing. When building your
Oakwood, we used only the best precision castings that were designed, so accurately, that gaskets are used (instead of
furnace cement) for assembly.
Harman’s special FireDome, Non-Catalytic, Combustion System was created specically for the Oakwood to promote clean
burning and even heat output. What this equates to is unvarying heat throughout your home over a longer period of time
without the peaks and valleys of other wood stoves. The FireDome attains Harman’s reputation of high efciency while
saving you the expense associated with catalytic stoves. Top loading makes adding wood easier and allows you to view
your beautiful re through the extra large glass door. The glass stays cleaner because of specially coated glass and the
exclusive Harman® Air Wash System.
The Harman® Oakwood has an ash pan with its own ash door that is used to remove ashes while the stove is in operation.
This means you can keep one re all winter if you desire.
The Harman® Oakwood offers a cooking grill that can be placed in the top of the stove while in operation. This allows you
to grill steaks and burgers etc. all year long, even when the weather is not suitable for outside grilling. If you haven't already
purchased the cooking grill, you can do so through your Harman® Dealer.
Due to the fact that the Oakwood is hot while in operation, gloves should be worn while tending to the re.
For your reference, please copy
the serial number from the label on
your stove to the box below.
SERIAL NUMBER
This appliance is also
approved for installation into a
shop.
INTRODUCTION
LISTED SOLID FUEL FIREPLACE STOVE OR ROOM HEATER/
APPAREIL DE CHAUFFAGE OU POELE A COMBUSTIBLE SOLIDE
Tests réalisés par OMNI-Test Laboratories, Inc.
Report #/Rapport #135-S-11-2
Tested to/Testé selon: August 2002, UL 1482-1996,
UL 737-1996 and ULC-S627-00
Certied for U.S.A. and Canada/Certié pour les
États-Unis et le Canada
PREVENT HOUSE FIRES:
Install and use only in accordance with manufacturer’s installation and operation instructions and local
building codes. In absence of any local codes, installation must meet minimum requirements of NFPA 211
in USA. Refer to manufacturer’s instructions and local codes for precautions required for passing chimney
through a combustible wall or ceiling.
FOR USE WITH SOLID WOOD FUEL ONLY.
Don’t connect this stove to a chimney serving another appliance.
Flue connector pipe must be 6” diameter, minimum 24 MSG black or 26 MSG blue steel.
Chimney must be factory built UL 103HT or masonry.
NOTE: Replace glass only with 5mm ceramic glass available from your dealer.
Inspect and clean chimney frequently. Under certain conditions of use, creosote buildup may occur rapidly.
DO NOT OVERFIRE - IF HEATER OR CHIMNEY CONNECTOR GLOWS, YOU ARE OVERFIRING.
DO NOT obstruct the space beneath the appliance.
CLEARANCE TO COMBUSTIBLE SURFACE
A - Unit to Side Wall 26” (660mm)
B - Unit to Back Wall 28” (711mm)
C - Chimney Connector to Side Wall 38” (965mm)
D - Chimney Connector to Back Wall 32” (813mm)
E - Unit to Adjacent wall 24” (610mm)
Chimney Connector to Adjacent wall 32” (813mm)
F -
*See manual for additional installation congurations.
CONTACT YOUR LOCAL BUILDING OR FIRE OFFICIALS ABOUT RESTRICTIONS AND INSTALLATION INSPECTION IN YOUR AREA/
CONTACTEZ LE BUREAU DE LA CONSTRUCTION OU LE BUREAU DES INCENDIES AU DES RESTRICTIONS ET DE L’INSPECTION
D’INSTALLATION DANS VOTRE VOISINAGE
F
E
ADJACENT WALL
Serial No.
o
de série:
N
ESPACES LIBRES AUX COMBUSTIBLES
A - Du mur de côté à l’appareil 26” (660mm)
B - Du mur arrière àl’appareil 28” (711mm)
C - Du tuyau de cheminée au mur de côté 38” (965mm)
D - Du tuyau de cheminée au mur arrière 32” (813mm)
E - Entre le mur adjacent et l’appareil 24” (610mm)
F - Entre la tuyau et le mur adjacent 32” (813mm)
* Voir le manuel pour d’autres congurations d’installation
C
A
The label shown here is for reference only. For
CAUTION: HOT WHILE IN OPERATION. DO NOT TOUCH. KEEP
CHILDREN AND CLOTHING AWAY. CONTACT MAY CAUSE SKIN BURNS.
SEE NAMEPLATE AND INSTRUCTIONS. KEEP FURNISHINGS AND OTHER
COMBUSTIBLE MATERIALS A CONSIDERABLE DISTANCE AWAY FROM
THIS APPLIANCE.
CERTIFIED TO COMPLY WITH JULY 1990 PARTICULATE EMISSIONS STANDARD
2013 2014 2015 JAN FEB MAR APR MAY JUN JUL AUG SEP OCT NOV DEC
specic information on clearances and testing,
consult the actual label on the rear of the unit.
U.S. ENVIROMENTAL PROTECTION AGENCY
Date of Manufacture / Date de fabrication
MODEL/Modèle: OAKWOOD
008
B
D
BARCODE LABEL
PRÉVENTION DES INCENDIES:
Respectez scrupuleusement les instructions du constructeur pour l’installation et l’utilisation. Respectez
les règles et normes applicables dans votre région. Dans tous les cas, l’installation devra au minimum
satisfaire aux exigences de NFPA 211 AUX Etats-Unis.
Reportez vous aux instructions du fabricant et aux règles locales pour les précautions nécessaires lors
du passage des tuyaux de fumée à travers un mur ou un plafond combustible. contrôlez et nettoyez
fréquemment la cheminée et les tuyaux de fumée selon les instructions du fabricant.
N’UTILISEZ QUE DU BOIS EN BUCHES:
Ne pas raccorder ce poêle à un conduit de fumée utilisé pour un autre appareil.
Le tuyau de fumée doit avoir 6” de diamètre minimum, et être en acier de qualité 24MSG noir ou 26
MSG bleu.
La conduit de fumée peut être maçonné ou de fabrication industrielle type ULC S629.
Nota: Ne remplacer la vitre qu’avec une vitre céramique de 45 mm disponible chez votre fournisseur.
Contrôlez et nettoyez fréquemment la cheminée et les tuyaux de fumée. Dans certaines conditions
d’utilisation, des accumulations de créosote peuvent se produire rapidement.
NE PAS SUR CHAUFFER - SI LE POELE OU LE TUYAU ROUGISSENT, VOUS SURCHAUFFEZ!
Ne pas obstruer l’espace en dessous du bruleur.
Floor protection must be a 3/4” min. thickness, non-combustible
material having an equal or better insulating value (lower k
value) of k=.84 BTU/In Ft
and to front/sides/rear as indicated. In Canada, required oor
protection must be 18” (450mm) in front.
Leprotecteur de plancher doit être d’une epaisseur minimum de
3/4” d’un material incombustible ayant une valeur d’isolation de
k=.84 BTU/in Ft
Il doit s’etendre et à l’arriêre de l’appareil comme indiquè.
‘Au Canada, la preotection du plancher doit s’étendre de 18”
(450mm) en avant.
2
Hr °F, extending beneath heater
2
Hr °F.
ATTENTION: CHAUD-NE PAS TOUCHER. TENIR LES ENFANTS
ET LES VENTEMENTS A L’ECART. RISQUE DE BRULURE. VOIR
INSTRUCTIONS SUR LA PLAQUE. LAISSER UNE DISTANCE SUFFISANTE
ENTRE L’APPAREIL ET LES MEUBLESOU AUTRES OBJECT A RISQUE.
Manufactured by/Fabriqué par: Hearth and Home Technologies
352 Mountain House Road
Halifax, Pa 17032
FLOOR PROTECTOR
8”
8”
8”
16”
FRONT
Rev CP.N. 3-90-249
4 Harman Oakwood
3-90-08327R26_03/14
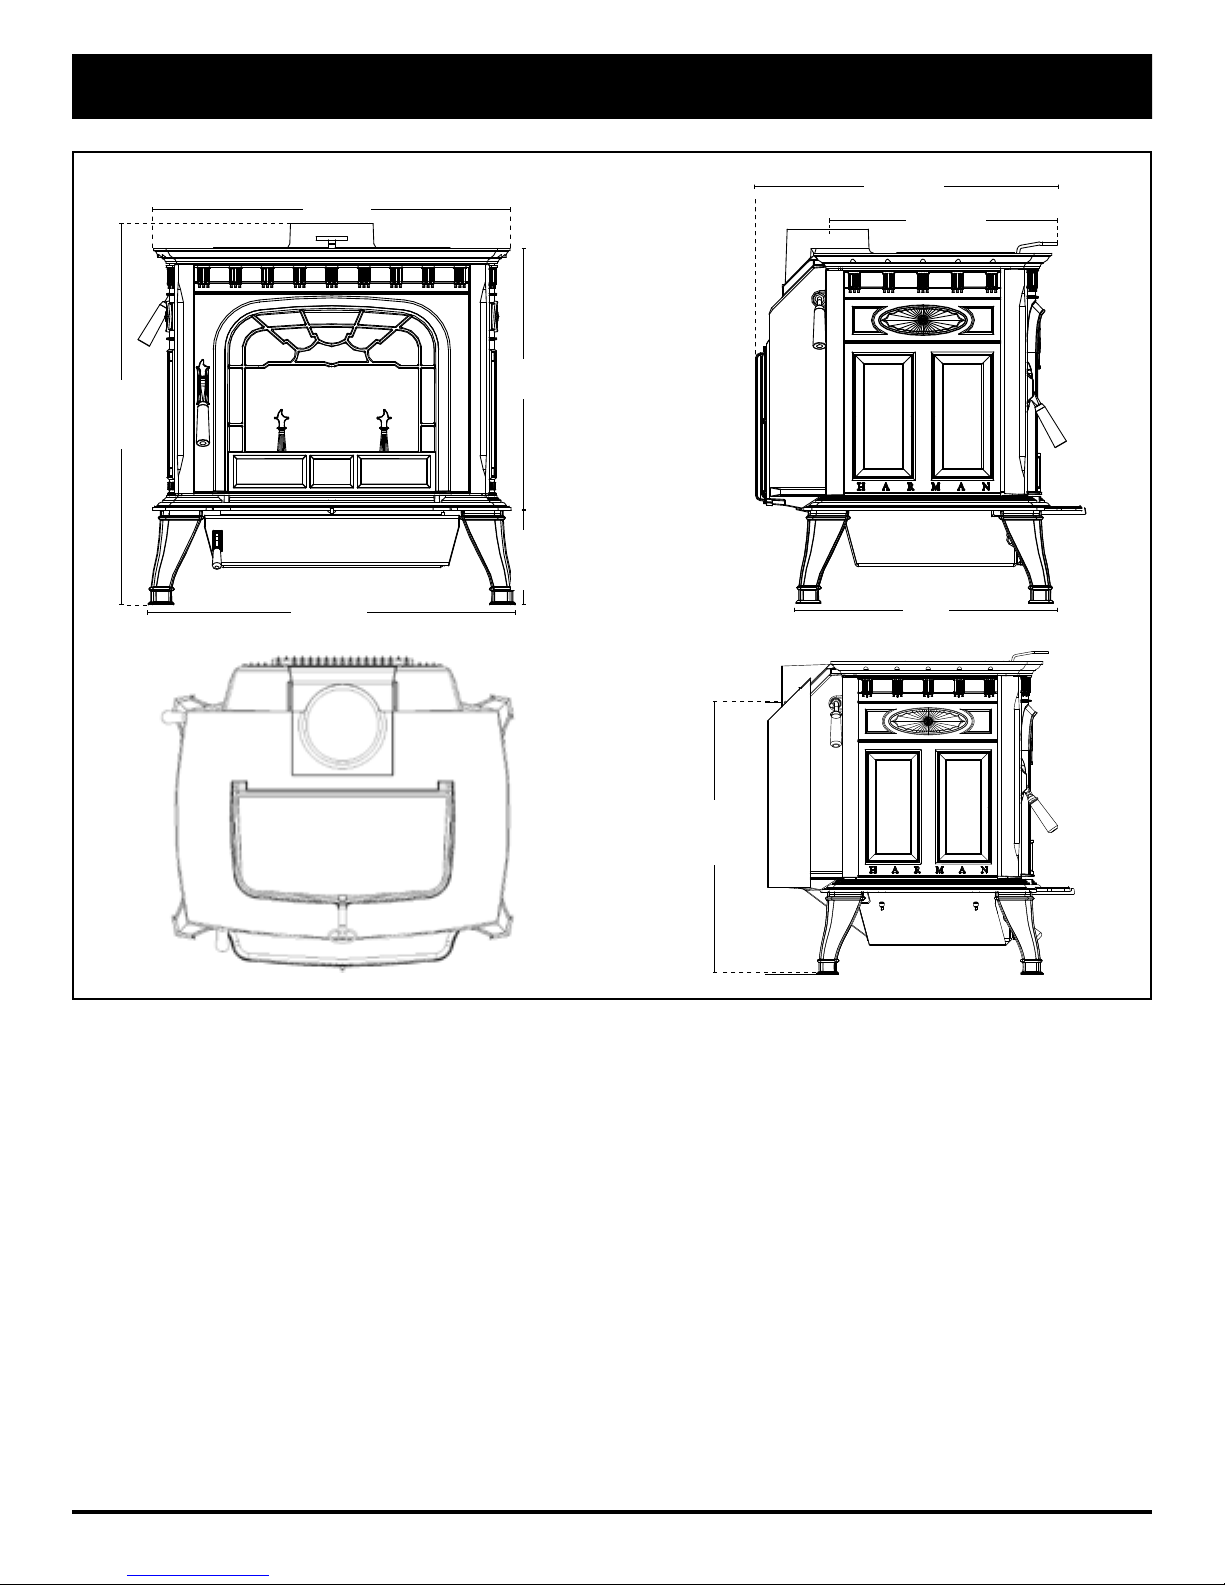
30 1/2"
26 1/4"
SPECIFICATIONS
24 15/16"
18 1/16"
21"
7 1/2"
30 1/4"
24 3/4"
To center of ue
when rear vented
The Harman® Oakwood meets the U.S. Environmental Protection Agency’s emission limits for wood heaters sold after
July 1, 1990.
Weight ....................................... 470 lbs
Flue Size ..................................... 6 Inch
Firebox Size. . . . . . . . . . . . . . . . . . . . . . . . . . . . . . . . . . . 2.3 cu. ft.
Average Emissions ............................. 2.32 Grams Per Hour
Emissions on Low .............................. 0.8 Grams Per Hour
Log Length Recommended ....................... 21" Maximum
BTU/Hour Input ................................ 42,000
Heating Capacity* .............................. 1,400 - 3,600 sq. ft
Outside Air Size ................................ 3 or 4 Inch
21"
*Heating capacity to be used as a guide only. See your local dealer for help in determining the product that best
suits your heating needs based on climate and home efciency.
3-90-08327R26_03/14
Harman Oakwood 5
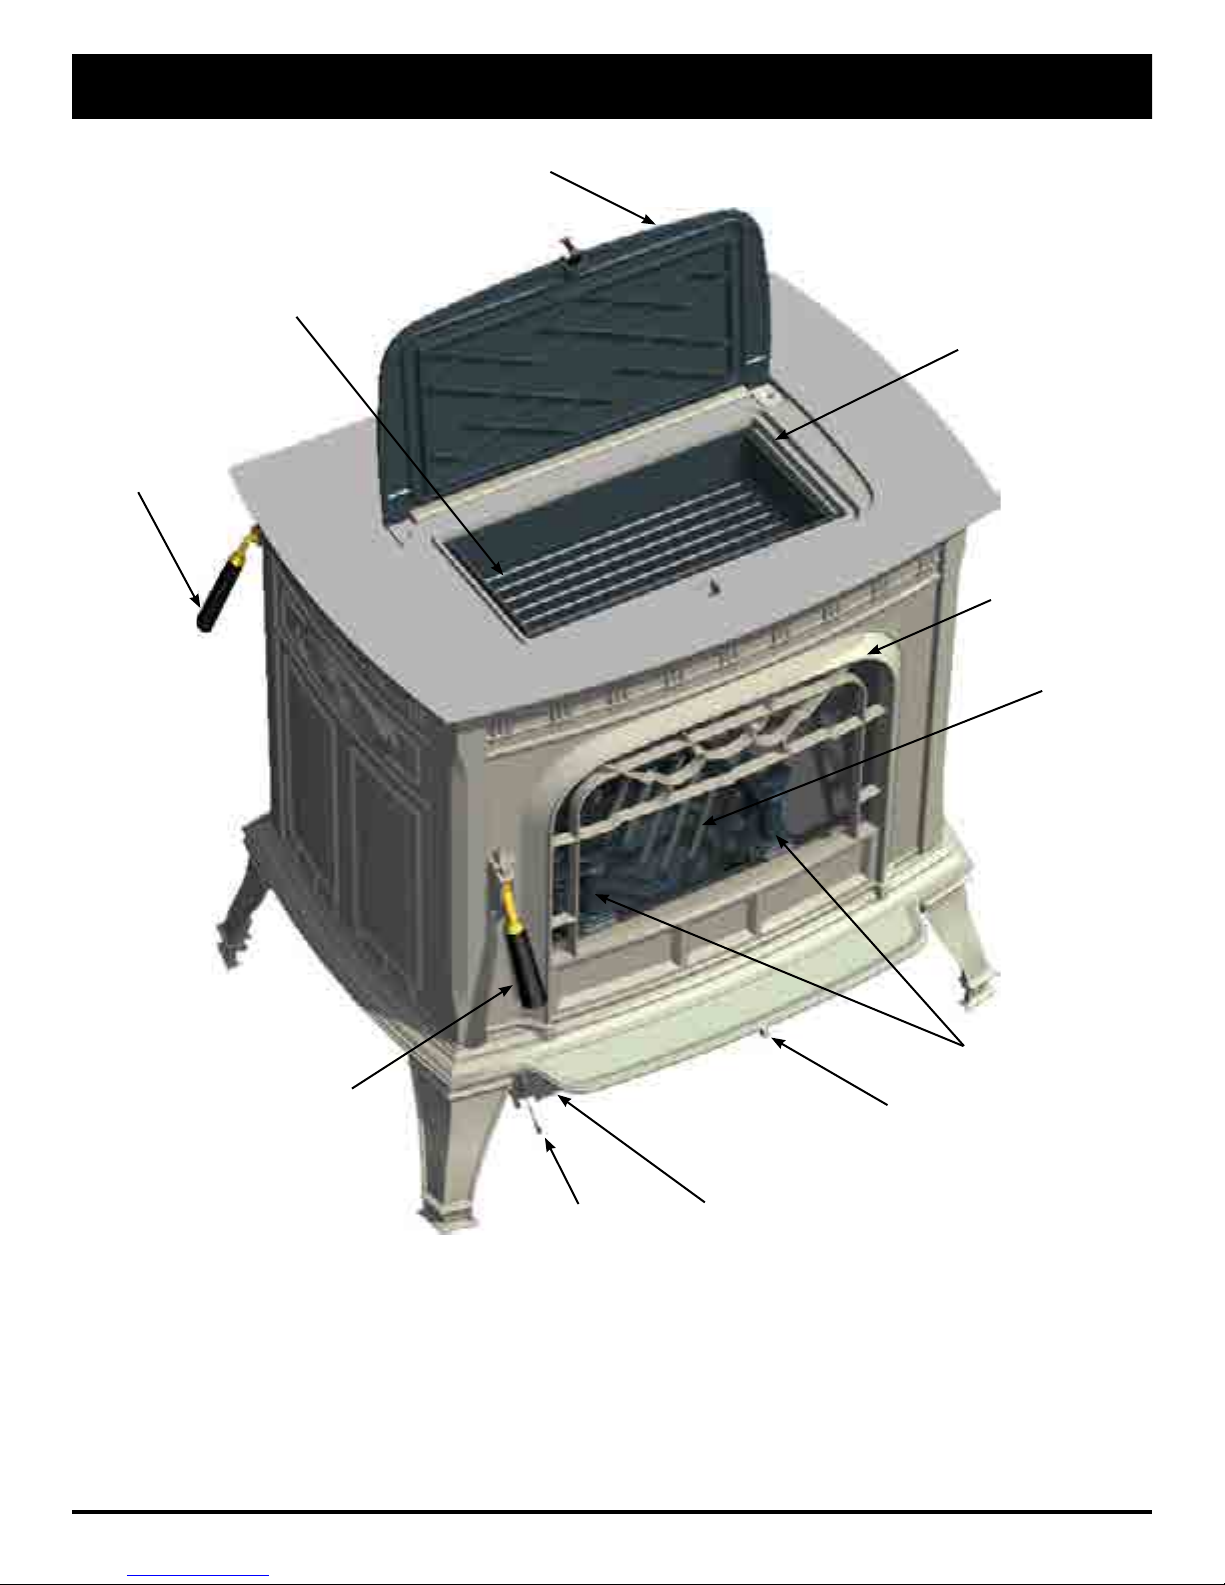
Cooking Grill
Bypass Damper
Control Handle
SPECIFICATIONS
Top Load Door
Optional
Top Load Opening
Front Load Door
Front Load Door Latch
Ash Door Latch
Grate
Andirons
Air Control
Ash Door
6 Harman Oakwood
3-90-08327R26_03/14
Always wear gloves when
!
operating the stove.
OPERATION
Do not burn wet wood!
General Considerations
Draft
Before you install and operate your Oakwood wood stove, please
read the entire contents of this manual. Pay particular attention
to the explanation of draft and its effect on stove performance in
the Installation section. By following the installation and
operating guidelines, you will ensure proper draft and gain
maximum efciency and enjoyment from your stove.
Fuel
Your Oakwood burns wood very efciently. Here are some
guidelines that will help you achieve the best performance.
Select only dry, seasoned wood. Wood for burning should
never be exposed to rain or extremely damp conditions.
Hardwoods are favored because they are heavier and
contain more heating capacity (BTU’s) per load than do
softwoods. Fuel wood should be split and stored under cover
for “seasoning” - at least a year is recommended. Your stove
is not an incinerator - do not burn garbage, painted or treated
wood, plastic, or other debris.
Keep the area around the stove free from clutter. Keep
all combustibles, including fuel, beyond the code-required
clearance distance (48" or 1215 mm in the U.S., 1525 mm or
60" in Canada). Never store fuel in front of the stove where
it could interfere with door operation, safe loading, and ash
removal.
Do not burn garbage or flammable fluids such as
gasoline, naptha, or engine oil.
CAUTION
Always wear re retardant gloves when operating
the stove.
SAFETY NOTICE
IF THIS APPLIANCE IS NOT PROPERLY INSTALLED,
OPERATED AND MAINTAINED, A HOUSE FIRE MAY
RESULT. FOR YOUR SAFETY, FOLLOW INSTALLATION
DIRECTIONS. CONTACT LOCAL BUILDING OR
FIRE OFFICIALS ABOUT RESTRICTIONS AND
INSTALLATION INSPECTION REQUIREMENTS IN
YOUR AREA.
The Stove
Doors
Your stove has a large glass-paneled door for loading and
re viewing, a separate smaller door for removing ashes and
a top loading door.
Front Door
Before opening, always check for wood, embers, or ash that
may be ready to fall out of the door.
To open the glass door, open the bypass damper rst, then
lift the handle and pull out; to close the door, push the door
closed with the handle in the open position, then push the
handle down to engage the latch.
Ash Door
To open the ash door, lift up the handle and pull out. Close the
door by pushing in and pushing the handle all the way down.
Top Load Door
To open the top load door, open the bypass damper and then
lift to open the top load door.
All doors must be closed while the stove is in normal
operation, and the gaskets routinely examined for wear and
replaced when necessary. Good door seals are important
for maintaining control of the stove. Never operate with the
ash door open. Operating the stove with the ash door open,
or with a door inadequately sealed, could create a serious
overring condition (discussed later in this section).
NEVER OPERATE WITH MORE THAN ONE DOOR OPEN
AT A TIME
The glass used in your Oakwood is manufactured to exact
standards to withstand the high heat of the re, but like all
glass, it must be treated with common sense and care. Never
abuse the glass by slamming the door shut or striking the
glass with a heavy object. If the glass is broken or damaged,
do not operate the stove until it has been replaced
(See instructions in the Maintenance section.)
Grates
The Harman® Oakwood's unique grate system consists of
one at bottom grate, and two front andirons. The bottom
grate has slots which allow the ash to fall into the ash pan
by passing a poker back and forth across the grate. The
andirons keep the fuel from coming into direct contact with
the glass, and keep hot coals and embers from spilling out
while reloading. Never build a re directly against the glass.
The grates and andirons must remain in place at all times.
Do not tamper with or change the conguration of this grate
system.
3-90-08327R26_03/14
Harman Oakwood 7
Always wear gloves when
operating the stove.
OPERATION
Do not burn wet wood!
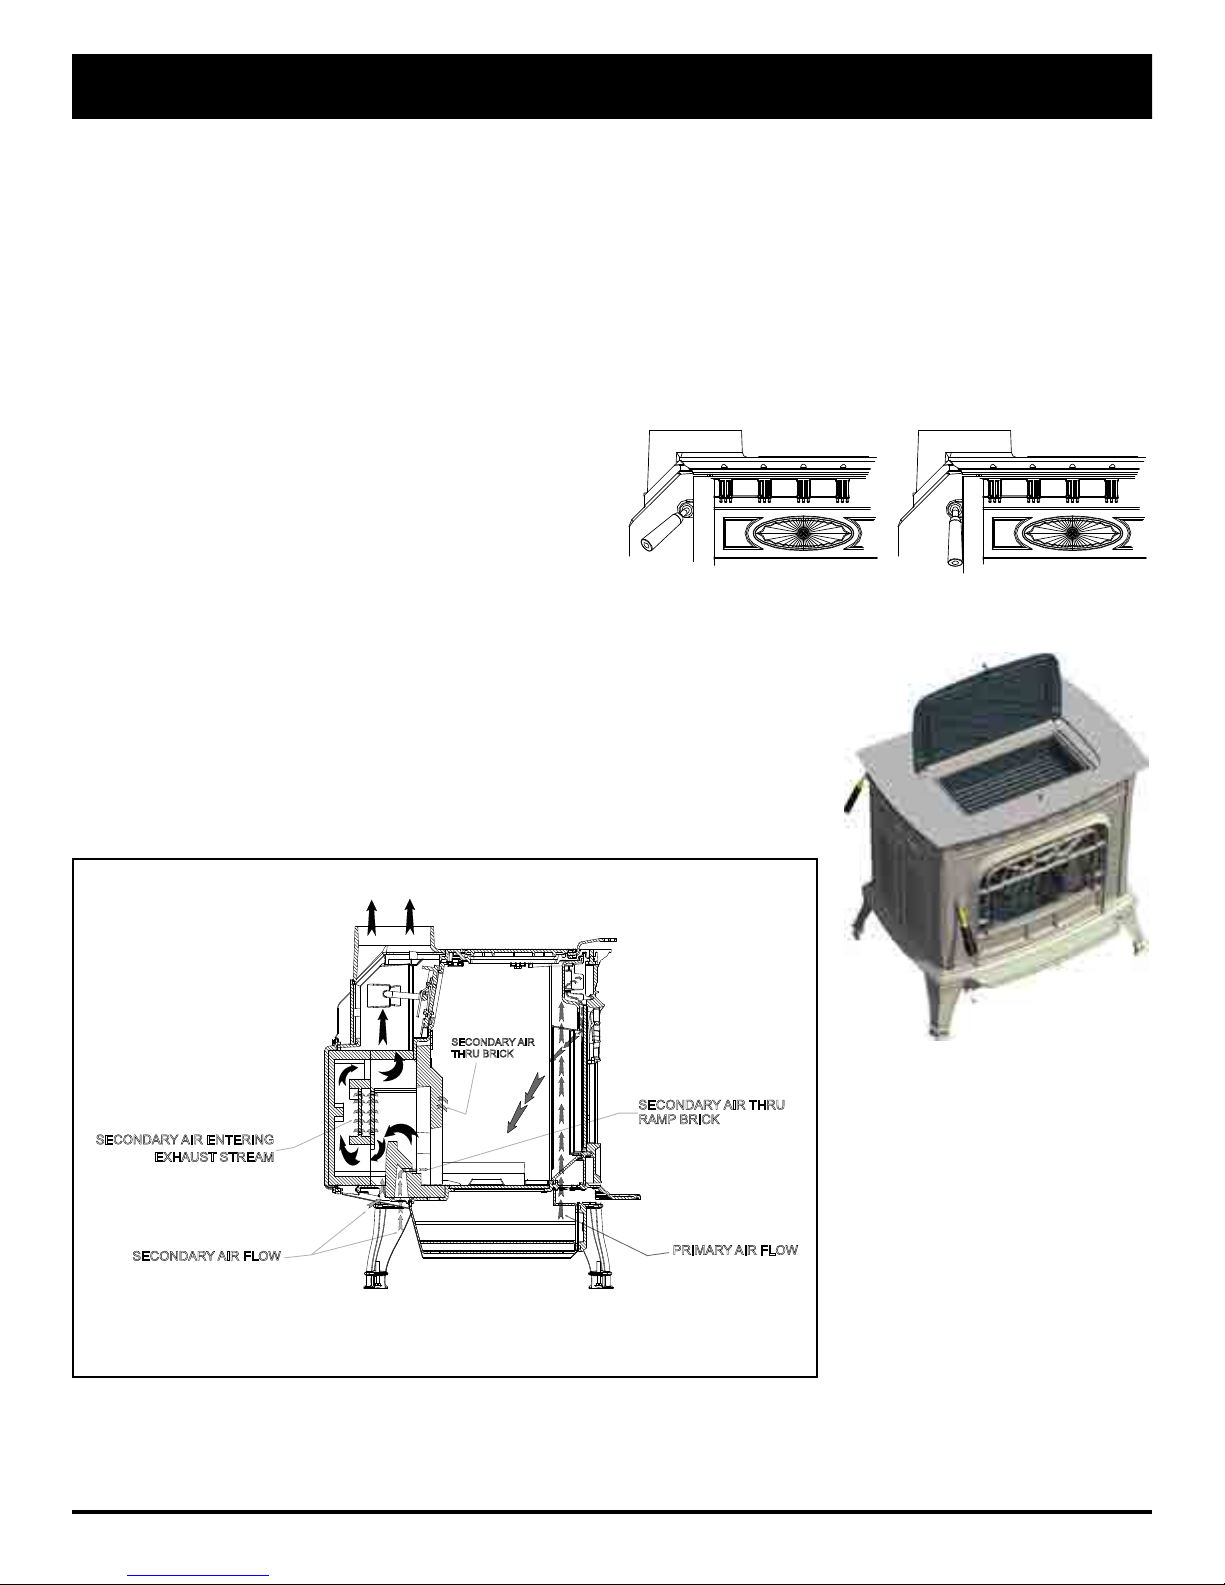
The Combustion Process
Combustion in the Harman® Oakwood is precisely controlled
and is best explained in two parts.
During a wood re, combustion air enters at the bottom front
of the stove where it travels upward through channels at either
side of the front door. From the manifold located above the
front door, it is directed into the rebox as a sheet of air owing
between the glass and the wood. This concept helps to keep
the glass clean, while providing the oxygen needed to sustain
burning. This is what is known as "Primary Combustion".
Additional air enters at the bottom rear of the stove body.
Some of this air enters through holes in the rear bricks
where it is used to revitalize the re at the rear of the rebox.
The remainder is delivered into the "Firedome" combustion
package where the "Secondary Combustion", or re-burning
of the smoke, occurs.
During combustion, the burning of wood proceeds through
several stages. The initial or evaporation stage is where
the moisture in the wood is driven off in the form of steam.
A second stage is where the volatile gases contained in the
wood are released and burned. This represents most of the
wood's heating capacity. The nal stage is the charcoal stage
where the charcoal burns the remaining heat content in the
wood fuel. Ash remains after the burning is complete. Within
the primary rebox two or more of these stages of combustion
are occurring at once.
Two important controls - the damper bypass handle and the
air control lever regulate the operation and output of the stove.
To open the top or front loading door, you must open the
damper bypass, or smoke will come in the room. In this
mode of operation the combustion gases go directly from
the main combustion chamber to the ue collar and exit into
the chimney.
NOTE: The bypass damper must be open for smokeless
loading. Open the bypass damper by turning the handle
clockwise while facing handle.
Bypass Damper
Open
Bypass Damper
Closed
EXHAUST STREAM
SECONDARY AIR ENTERING
EXHAUST STREAM
SECONDARY AIR FLOW
SECONDARY AIR
THRU BRICK
PRIMARY & SECONDARY AIR FLOW
SECONDARY AIR THRU
RAMP BRICK
PRIMARY AIR FLOW
Top Load Door Open
Harman Oakwood8
3-90-08327R26_03/14
Always wear gloves when
operating the stove.
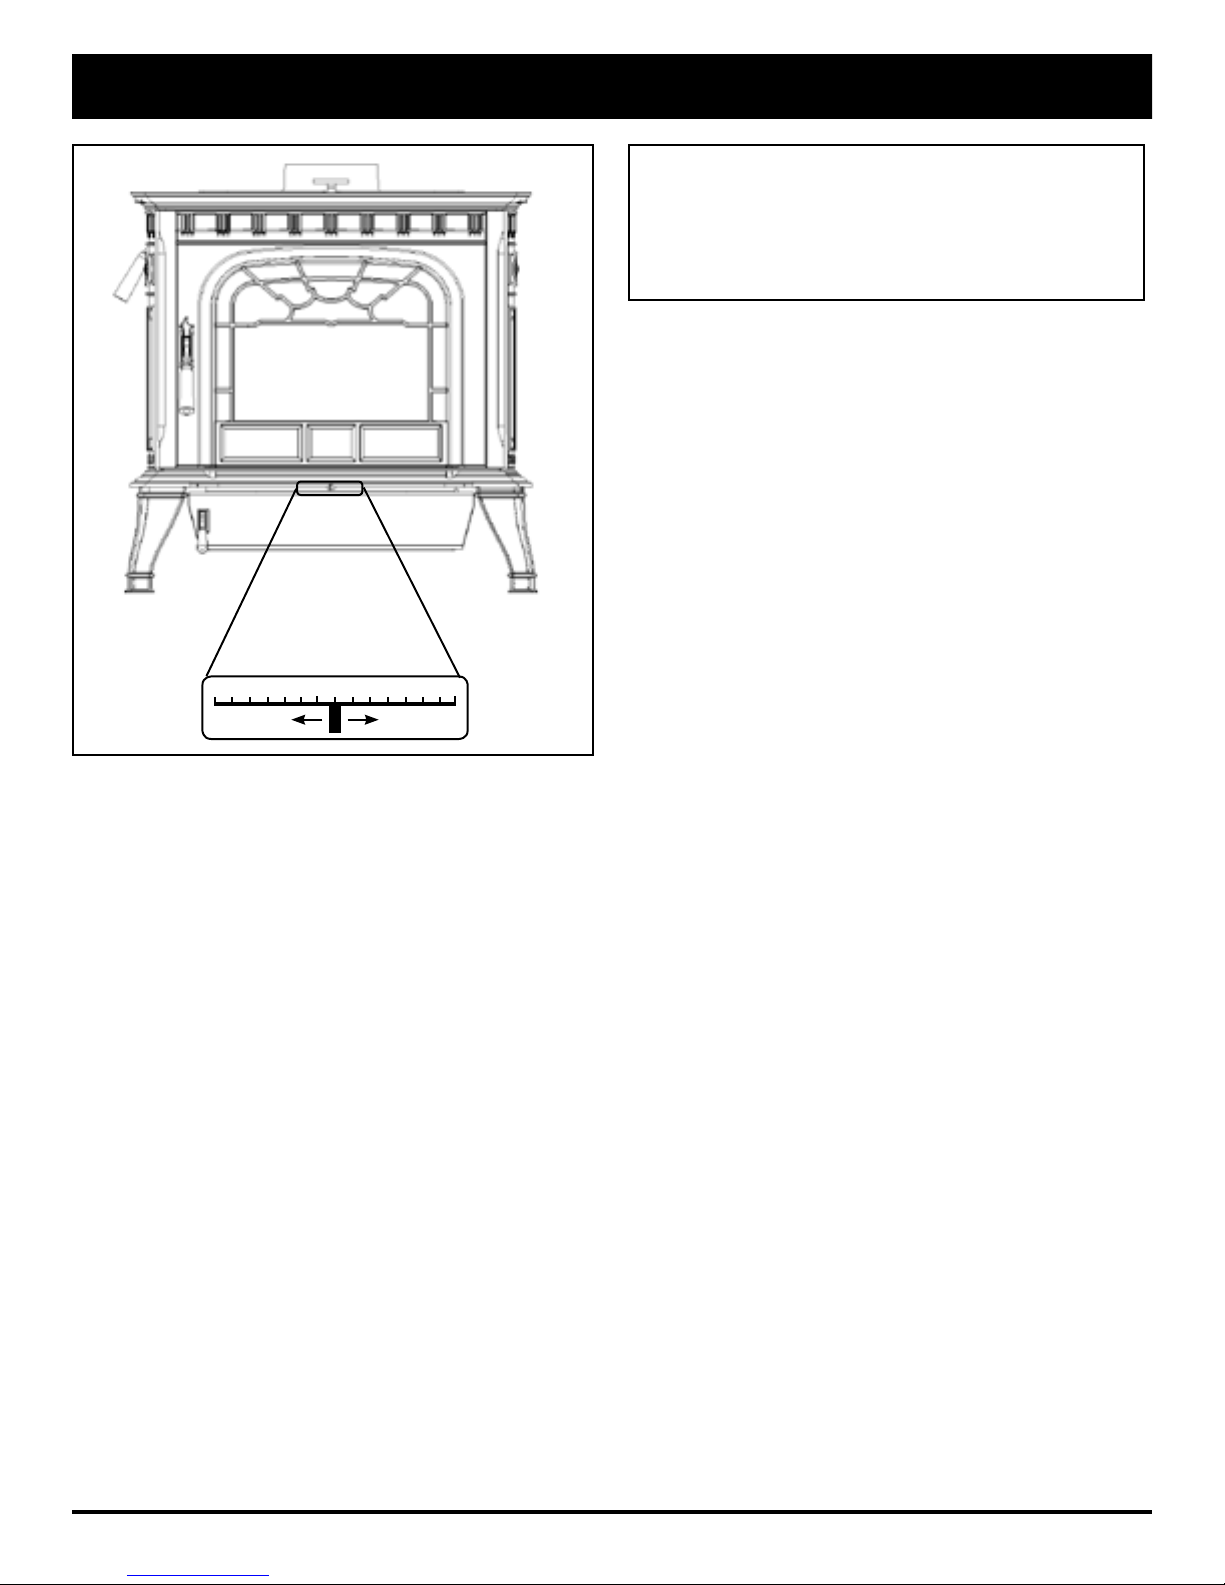
Minimum
Primary Air
BUILDING A FIRE
Maximum
Primary Air
Air Control
The air control lever is located directly below the ash lip of
the stove. Sliding this lever allows you to vary the amount of
air to the re, creating a range of heat outputs. The lowest
heat output setting is to the left, and the highest is to the right.
The notches are provided as a reference for your comfortable
heat settings. Do not, under any circumstances, alter the
conguration or operation of the air control lever.
For low burn, slide the air control to the left. For medium
burns, use notches 4,5 & 6. Maximum heat is attained with
the air control all the way to the right. Do not burn the stove
continuously at the maximum setting. If maximum heat is
required day after day, the stove is too small for the area
you are trying to heat.
If your wood is not seasoned long enough or is high in
moisture content, you may need to adjust the primary air 1 or
2 notches higher to sustain a low burn rate with the cleanest
possible exhaust.
Do not burn wet wood!
Do not use chemicals or uids to start the re.
Never use gasoline, gasoline-type lantern fuel, kerosene,
charcoal lighter uid, or similar liquids to start or “freshen
up” a re in this heater. Keep all such liquids well away
from the heater while it is in use.
Building and Maintaining the Fire
Building a Fire
Begin with the bypass damper open, and the air control lever
at the maximum setting, all the way to the right. Be sure the
ash pan door is closed and latched.
Start with a bed of crumpled paper and kindling sized about
nger width; place several 1" - 2" (25mm - 50mm) split pieces
of dry wood on top of the kindling, followed by a few 2" - 3"
(50 mm - 80 mm) split pieces. Lay the wood in a crossed
pattern to allow maximum air ow. Ignite the paper and close
the loading door(s). Allow this start-up re to burn for a few
minutes, keeping the bypass damper open. Add about ve
more pieces of wood in the 2 to 3 inch (50 - 80mm) size
range, making sure that the fuel bed is all the way across
the rebox and staggered to allow airow. Close the door
and allow this loading to burn a few minutes.
Add increasingly larger pieces of wood to the re until you
have a thick bed of hot embers, approximately 2 to 3 inches
deep at the back of the grate and at least an inch deep at
the front. You must have this charcoal bed established
before you close the bypass damper.
Providing you have the charcoal bed described above,
close the bypass damper by pulling the handle toward the
front of the stove. This will begin the highly efcient mode
of operation where the exhaust gases get re-burned in the
secondary combustion package. If you cannot achieve a
charcoal bed within the rst 15 to 20 minutes, your wood
is likely too wet, and you may need to burn the re longer
and/or hotter to compensate for the extra energy needed to
drive out the moisture.
If, after ve minutes of burning with the damper closed,
smoke is visible coming from the chimney, you probably
do not have the proper coal bed. Open the bypass damper
and continue with the process until a signicant coal bed
is formed.
Always remember to open the bypass damper when you are
loading, this allows the exhaust gases to pass directly into
the ue outlet and reduces the chance of smoke spillage
into the room.
3-90-08327R26_03/14
BUILDING A FIRE
!
!
!
Reloading: Once you have prepared and maintained a thick
charcoal bed, and the secondary combustion is established,
you should be able to reload the stove at any time by simply
opening the bypass damper, then the load door, adding fuel
and closing the door then the damper. This depends on coal
bed size, load size and moisture content of fuel.
Removing Ashes: Before reloading, empty the ash pan
(remember to close the ash door while emptying the pan).
The ashes should be the coolest at this time. Remove ashes
from the re chamber periodically by raking a poker across
the bottom grates.
Excessive ash buildup can prevent proper venting of exhaust
gases. Do not allow the ash pan to over-ll. Ash buildup
between the ash pan and the bottom of the grate can cause
the grate to overheat and wear out prematurely.
The Oakwood was designed to provide access to the ash pan
without the need for opening the main door. Before opening
the ash door and removing the ash pan, open the bypass
damper. Wearing heavy protective gloves, open the ash door
and remove the ash pan by pulling it forward by the handle.
Close the ash door and damper bypass before taking the
ashes outside for safe disposal.
Ashes should be placed in a metal container with a tight
tting lid. The closed container of ashes should be placed
on a noncombustible oor or on the ground, well away from
all combustible materials, pending nal disposal. If the ashes
are disposed of by burial in soil or otherwise locally dispersed,
they should be retained in the closed container until all cinders
have thoroughly cooled.
Never use the ash disposal container for other trash. Wood
ash can be added to your garden or compost.
CAUTION
The stove is hot while in operation. Keep children,
clothing and furniture away. Contact may cause skin
burns.
CAUTION
Risk of Excessive Temperatures. Keep Ash Door
Closed During Firing of the Heater.
CAUTION
Never leave the stove unattended if either the ash or
load door is open. Overring may result.
Overring
Avoid overfiring your stove. Overfiring is a potentially
hazardous situation which can lead to overheating of
combustible materials nearby, damage to the stove, and
in extreme cases, cause a re. Overring is caused by: 1.
Too much air owing through the stove too quickly. 2. You
may have positioned the primary air control lever too far to
the right. 3. Inadvertently leaving the damper open or 4. Not
keeping up with routine maintenance, such as checking door
gaskets for wear.
Overring results in excessive fuel consumption, and may
cause parts of the stove or chimney connector to glow red.
If you notice signs of overring, reduce the air supply to the
re, and review the Maintenance section in this manual.
In the event of a chimney re, call your local re department;
make sure everyone is safely out of the house. Reduce the
air intake of the stove as much as possible using the air
control lever; close the bypass damper to further restrict air
ow. Do not throw water on the re; this can cause stove
damage and create an even more dangerous situation. Have
your chimney professionally cleaned and inspected before
resuming burning in your stove.
As you begin to operate your stove at higher temperatures,
you will notice a “hot” or unpleasant smell; this is just the
paint going through the curing process, and will disappear
after a few res.
10 Harman Oakwood
3-90-08327R26_03/14
INSTALLATION
Floor Protection Requirements
The Oakwood must be installed on a non-combustible oor
or a non-combustible oor protector. Floor protection, when
not using the optional bottom heat shield, must be a minimum
3/4" (19mm) thickness of material having an insulating value
equal to or better than 0.84k/in. (The lower the k value, the
better the protection.)
Another method for calculating oor protection is in R value.
This requirement would be for an R value of 0.89 or higher.
(The higher the R value, the better the protection).
In all installations, the area under and around the stove must
be protected from falling ash and live coals. The area under a
horizontal run of chimney connector must also be protected,
extending two (2) inches beyond the measurement of the
horizontal connector.
Further guidelines for oor protection are as follows:
In the U.S. the oor protector must be completely under the
stove, and extending 16" in front of the door opening, 8" to
each side and 8" to the back.
In Canada, the oor protection must extend 18" (457mm)
in front of the door opening, 8" (203mm) to each side and
extend to the wall behind the stove.
Clearances
Clearance is the empty space required between the stove or
chimney connector and the nearest combustible surface or
object, such as walls, ceilings, oors, or furniture. Clearance
distances may only be reduced by using methods approved
by either the CAN/CSA B365 standard (Canada) or NFPA
211 (U.S.) Contact your building authority for information if
you are interested in reducing clearance distances other than
those presented here.
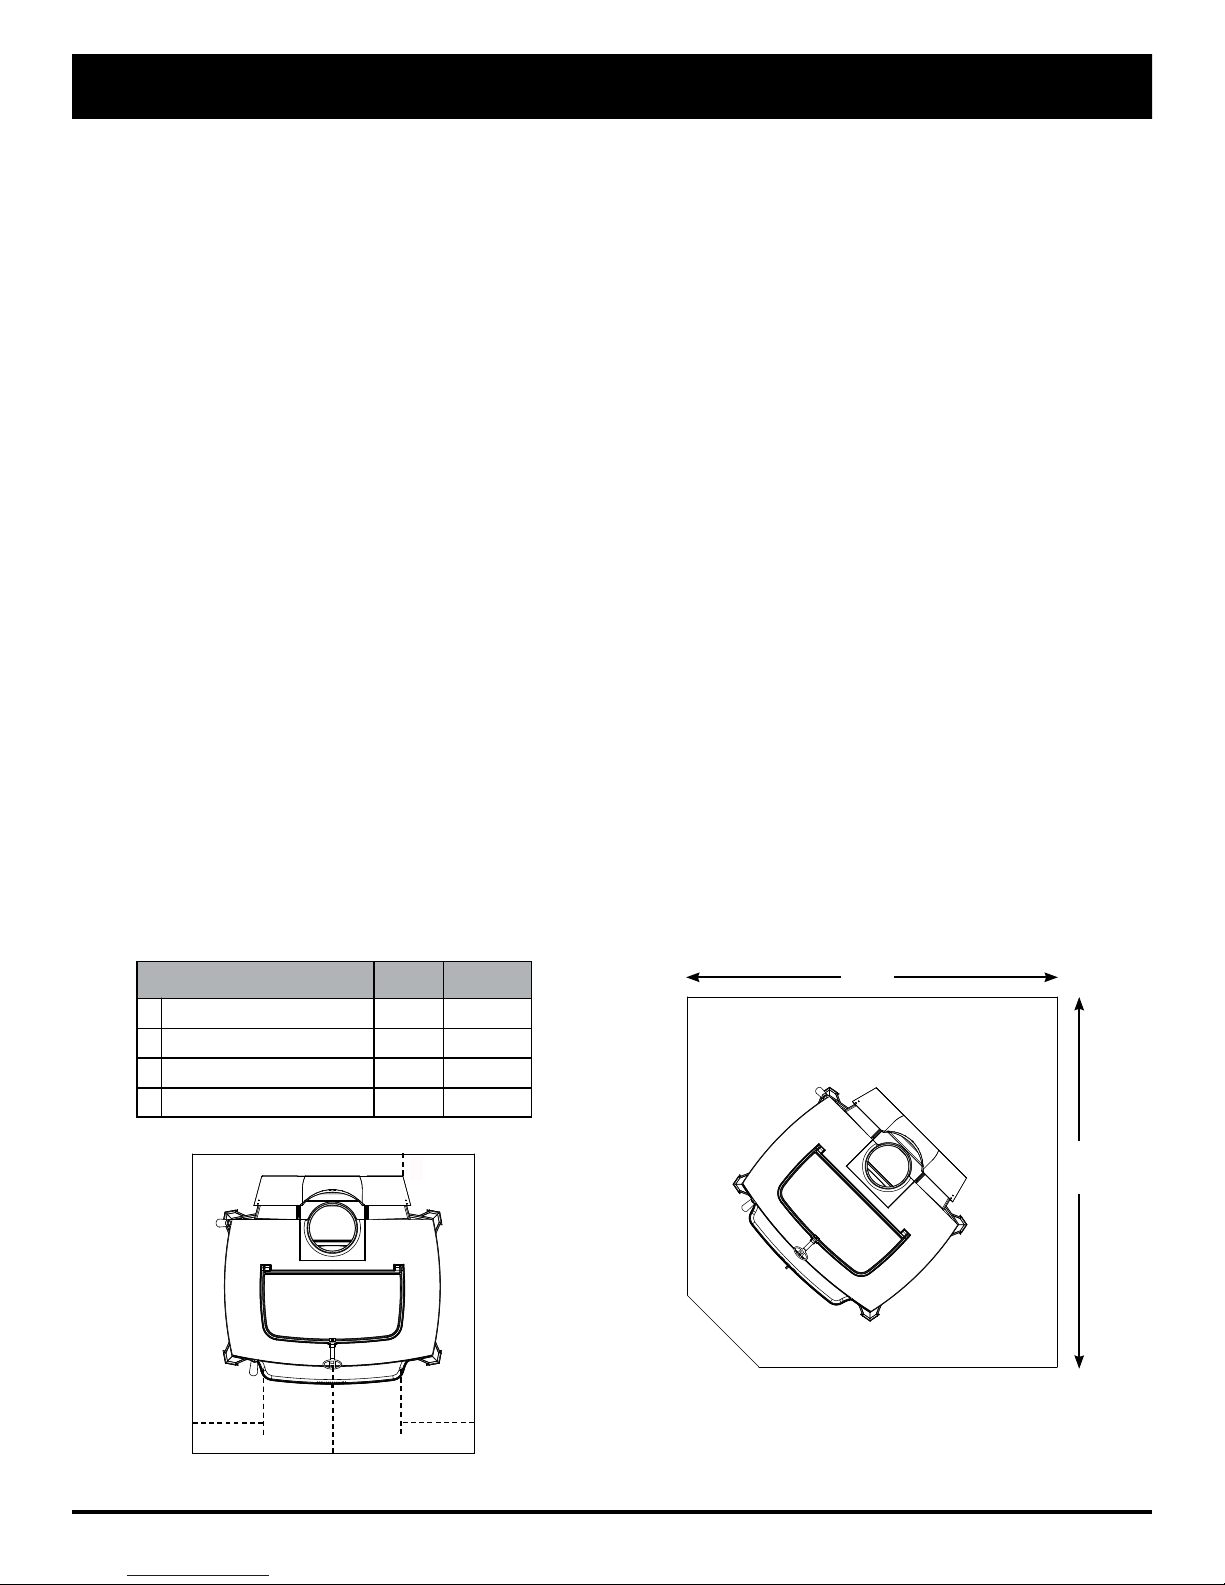
Parallel versus Corner Installations
A parallel installation is one in which the back and sides of
the stove are parallel to the walls behind and to the side of
the stove. A corner installation is one in which the back of the
stove is positioned diagonally across a corner of the room.
Each installation requires its own set of clearances.
For parallel installations, the required clearance distances
from the stove are: (see next pages for more details, including
the use of double walled pipe and optional heat shields)
1. to the side wall, 26" (661 mm);
2. to the back wall, 28" (712 mm).
3. From the ue connector to the wall, 33" (839mm)
4. Horizontal pipe to the ceiling, 15"(381 mm).
NOTE: For a vertical chimney connector in a parallel
installation the distance of the connector to the side wall
must be 32"(813 mm), due to the required side clearance of
the stove itself. Fireplace installations must meet these same
clearance requirements; specically follow these guidelines
for mantel and trim clearances.
For corner installations, the clearance distances from
the stove are 24"(609 mm) from each corner of the stove
measured straight back to the nearest combustible material,
and 32" (813 mm) from the chimney connector to the walls.
From the front of the stove, clearance to combustible
materials such as furniture, curtains, fuel, etc., is: 48"(1220
mm) in the U.S. and 60"(1524 mm) in Canada.
Alternate oor protector dimension may be used as long as they satisfy
the measurement requirements shown above.
Minimum size oor protection for a corner installation hearth pad is
54" x 54" (USA ONLY).
Floor Protection
Requirements
J
Sides- USA /CANADA *
K Front- USA /CANADA *
Rear- USA
L
Rear- CANADA
L
Inches Millimeters
8
16
8
Wall
L
K
3-90-08327R26_03/14
54"
203
457
203
Wall
54"
JJ
Harman Oakwood 11
 Loading...