


SPORT WIRELESS TRAIN- PROJECT ROCK EDITION
ON - EAR SPORT HEADPHONES - ÉCOUTEURS SPORTIFS
1.
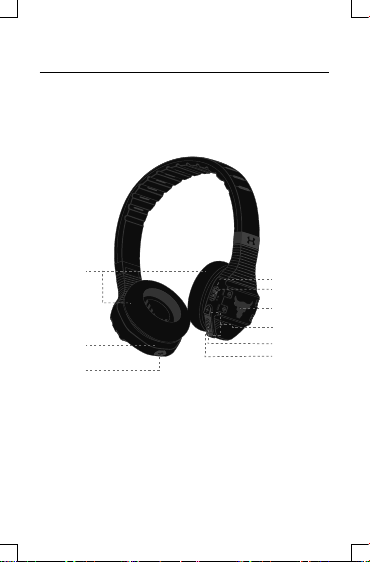
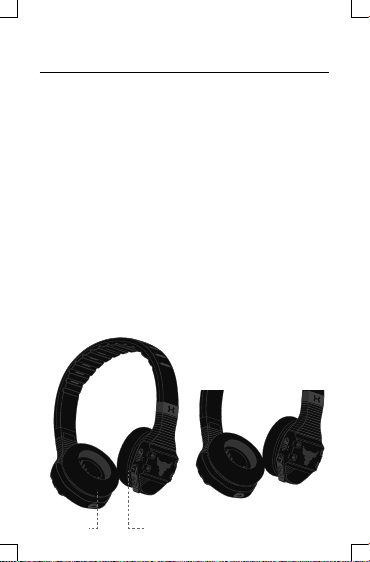
OVERVIEW: CONTROLS AND FEATURES
SuperVent
Cushions
Charge LED
Charge
Connector
Status Light
Power
Multifunction:
TalkThru
Siri®/Google Now
Volume &Track
Play/Pause,
Answer/Hangup
Audio Connector
™
2.
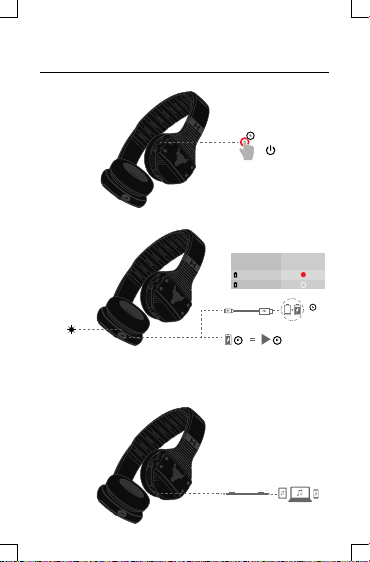
POWER & CABLE CONNECTIONS
2.1 Power
2.0s
2.2 Charge
LEDStatus LEDBehaviors
Chargingbattery
Fullbattery
Charge
LED
2.3 Cable Connection
Connect optional audio cable to listen without using
battery, or when Bluetooth is not allowed.
Note: TalkThru does not function when using
cable connection
Speed Charge
5min 1hr
3hr
3.
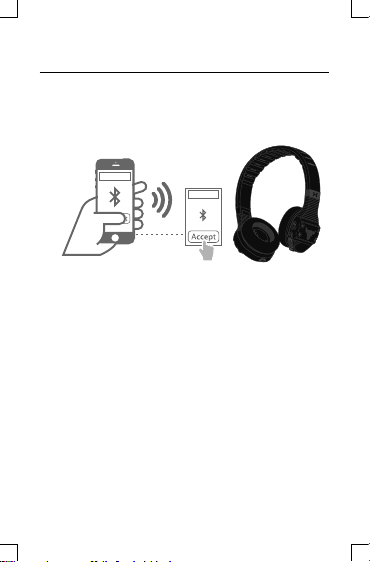
PAIRING TO YOUR DEVICE
3.1 Turnthe headphone on by holding the power slider for
three seconds, Your headphone is now in pairing mode.
UA|JBL Train
3.2
Go to your device’s settings menu and enable Bluetooth.
UA|JBL Train
3.3 Select “UA | JBL Train” to connect.
After rst time set up, your headphone will automatically
reconnect if your device is nearby with BluetoothON.
To connect to a new device, press and hold the play/pause
button for three seconds.
4.
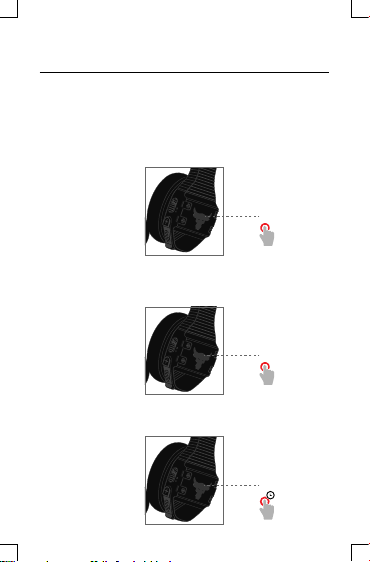
BUTTON COMMANDS
4.1 Multifunction button
Tal k T h r u :
Press to turn on TalkThru Technology.
Your music will pause and voices around you will be amplied.
Press again to return tomusic and exit TalkThru Technology.
TalkThru On/Off
Mic Mute:
If you’re on a phone call, press tomute.
Press again to unmute.
Mute On/Off
Siri®/Google Now
Press and hold to trigger Siri® or Google Now
™
:
™
.
Siri®/Google Now
>2.0s
™
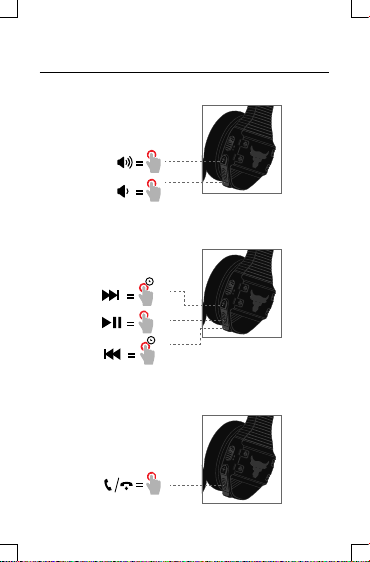
4. BUTTON COMMANDS
4.2 Volume Control:
4.3 Music Control:
3.0 sec
FPO
3.0 sec
FPO
4.4 Phone Control:
x1
5. WASHABLE EAR CUSHIONS
5.1 Remove cushions
Gently peel cushion away from earcup center.
5.2 HAND WASH ONLY
Soak in water & 2-3 drops of liquid soap for
ve minutes. Swish in soapy water, then swish
through clean water until there areno more soap suds.
5.3 Dry
PRESS against a towel.
DO NOT twist or wring.
5.4 Reattach
Gently stretch the Cushion, inserting the Cushion Ring
into the Earcup Slot, and working your way around.
Rotate until the L or R indicator is in the correct position.
Cushion Ring
Earcup Slot
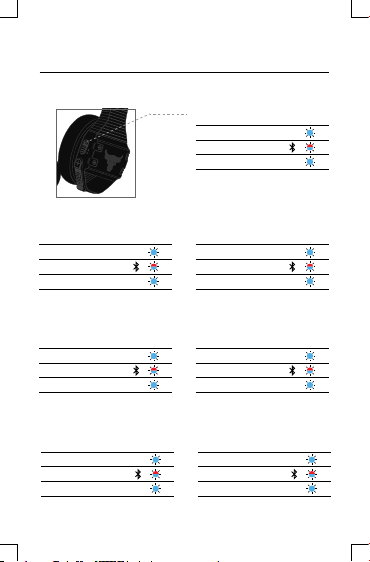
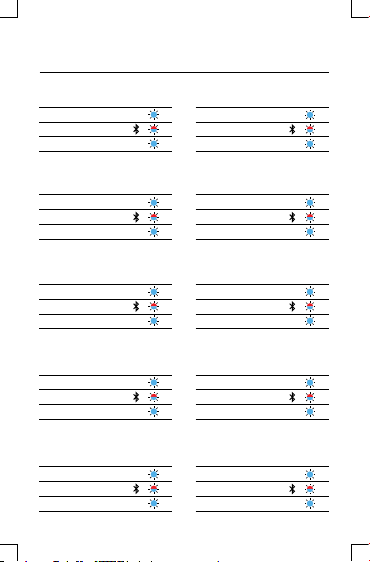
6.
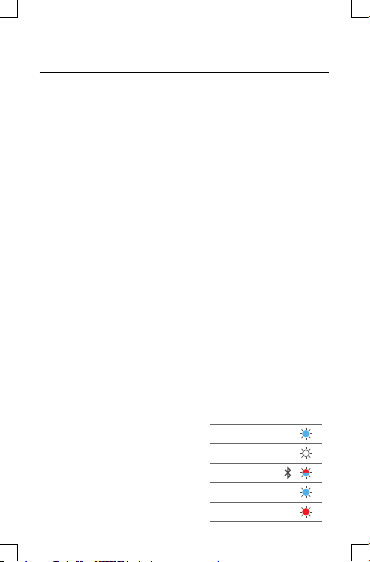
LED BEHAVIORS
État
Aucun appareil connecté
Mode d'association
Appareil connecté
Estado
Nenhum dispositivo ligado
Modo de emparelhamento
Dispositivo ligado
Stato
Nessun dispositivo connesso
Modalità di accoppiamento
Dispositivo connesso
Comportement
de laDEL
Comportamentos
LED
Comportamenti
LED
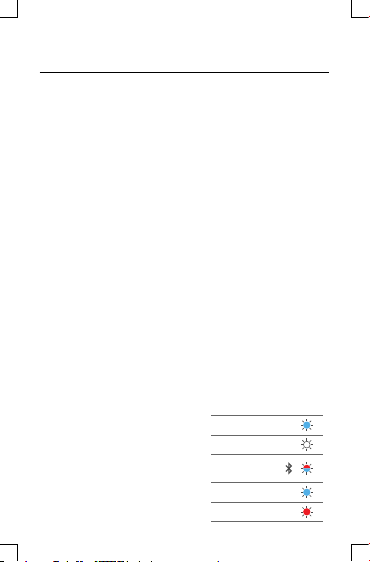
State
No device connected
Pairing mode
Device connected
Estado
No hay ningún dispositivo conectado
Modo emparejamiento
Dispositivo conectado
X2
Status
Kein Gerät verbunden
Pairing-Modus
Gerät verbunden
X2
Status
Geen apparaat aangesloten
Verbinden modus
Apparaat aangesloten
X2
LED
Behaviors
Comportamientos
del LED
LED-
Verhalten
LED
gedrag
X2
X2
X2
X2
6.
LED BEHAVIORS
Tilstand
Ingen enhet tilkoblet
Paringsmodus
Enhet tilkoblet X2
LED
virkemåter
Tila
Laitetta ei ole kytkettynä
Paritustila
Laite kytketty X2
LED-valojen
merkitykset
Status
Ingen enhet ansluten
Länkningsläge
Enhet ansluten
状態
機器が接続されていない
配对模式
機器が接続されている
Stan
Brak podłączonych urzadzeń
Tryb parowania
Urządzenie podłączone
상태
연결된 장치없음
페어링 모드
장치 연결됨
LED
beteenden
LED
の働き
Stan wskaźnika
LED
LED
동작
X2
X2
X2
X2
Stednavn
Ingen enhed forbundet
Parringstilstand
enhed forbundet
狀態
未連接裝置
配對模式
已連接裝置
状态
未连接设备
配对模式
已连接设备
Status
Nessun dispositivo connesso
Mode Pairing
Dispositivo connesso
LED-
adfærd
LED
行為
LED
变化模式
Warna
LED
X2
X2
X2
X2
FRANÇAIS
1. CHOISISSEZ VOTRE TAILLE
Les oreilles de chacun sont différentes. Essayez toutes les tailles de stabilisateurs
et d'embouts auriculaires pour déterminer ce qui vous correspond le mieux.
Embouts auriculaires : S M L
Stabilisateurs: Taille 4 Taille 5 Taille 6 Taill
1.1 Le stabilisateur de bonne taille remplira le creux de votre oreille et se cale
contre le bord de ce creux.
1.2 L’embout de bonne taille fournira de manière confortable une isolation
acoustique.
Vous avez besoin d’aide pour trouver la bonne taille ? "Contactez les spécialistes
*
aux États-Unis : 1-(800) 336-4525 / ua.jblsupport@harman.com
RU : +44 1707278113 / ua.jblsupport.eu@harman.com"
2. ATTACHEZ LES STABILISATEURS
3. COMMENT LES PORTER
4. APPAIRAGE/PUISSANCE/RECHARGE
5. TÉLÉCOMMANDE 3 TOUCHES
tement le stabilisateur sur l'écouteur.
2.1 Fixer délica
2.2
Aligner l'encoche et fixer doucement le bout de l'embout sur l'écouteur.
2.3
Insérer les écouteurs dans vos oreilles et faites-les pivoter pour les mettre en
place. Ajuster pour le confort.
Pour des conseils sur l’ajustement : http://underarmour.custhelp.com
3.1 Le cordon doit être porté en position avant pour un ajustement sécuri
des performances optimales.
3.2 Le clip sport en option offre un stabilité du cordon accrue, et améliore la
sécurité des écouteurs.
3.3
Pour une meilleure connectivité, porter votre appareil mobile dans un brassard.
4.1 Commencez avec le casque éteint, et
votre appareil audio Bluetooth allumé et
en mode recherche.
4.2 Port de recharge et état de la batterie
5.1 Commande de la musique
5.2 Commande du téléphone
5.3 Commande du volume
e 7 (Pré-installé) Taille 8
ÉTAT
MARCHE
ARRÊT
MODE APPAIRAGE
PÉRIPHÉRIQUE CONNECTÉ
BATTERIE FAIBLE
ACTIVITÉ
taire et
DE LED
X2
ESPAÑOL
1. ELIJE TU TALLA
Cada persona tiene unos oídos distintos. Prueba todas las tallas de
adaptadores y puntas para el oído a fin de determinar el ajuste correcto.
Puntas para el oído: P M G
Talla 4 Talla 5 Talla 6 Talla 7
Adaptador:
1.1 El adaptador de tamaño c
ajustado cómodamente contra el borde del hueco.
1.2 La talla correcta de punta para el oído proporciona un buen aislamiento del
sonido con comodidad.
Necesitas ayuda para encontrar la talla correcta? Ponte en contacto con un
*
especialista en ajuste
Estados Unidos: 1-(800) 336-4525 / ua.jblsupport@harman.com
Reino Unido: +44 1707278113 / ua.jblsupport.eu@harman.com
2. MONTAJE DE LOS ADAPTADORES
2.1 Encaja con suavidad el adaptador en el auricular.
Alinea la muesca y enganche con suavidad la punta para el oído en el auricular.
2.2
2.3 Inserta los auriculares en el oído y gíralos para ajustarlos en su lugar.
Ajústalos de forma que resulten cómodos.
Si deseas consejos de ajuste: http://underarmour.custhelp.com
3. CÓMO SE LLEVAN
3.1 El cable debe llevarse por delante para asegurar un ajuste seguro y un
funcionamiento óptimo.
3.2 El clip deportivo opcional mejora la estabilidad del cable y la seguridad de
los botones auriculares.
Para disfrutar de la mejor conectividad, lleve su dispositivo móvil en un
3.3
brazalete.
4. EMPAREJAR/ALIMENTACIÓN/CARGA
4.1 Empieza con los auriculares apagados y
el dispositivo de audio Bluetooth
encendido y en modo de búsqueda.
4.2 Puerto de carga y estado de la batería
5. COMANDO DE 3 BOTONES
5.1 Control de la música
5.2 Control del teléfono
5.3 Control del volumen
(Preinstalado) Talla 8
orrecto debe llenar el hueco del oído y quedar
COMPORTAMIENTOS
ESTADO
ENCENDIDO
APAGADO
MODO DE
EMPAREJAMIENTO
DISPOSITIVO CONECTADO
BATERÍA BAJA
DEL LED
X2

PORTUGUÊS ( BRAZILIAN)
1. SELECIONE O TAMANHO APROPRIADO PARA VOCÊ
Cada pessoa possui ouvidos diferentes. Experimente todos os tamanhos de
expansores e ponteiras para escolher a melhor combinação para você.
Ponteiras: P, M e G
Tamanho 4 Tamanho 5 Tamanho 6 Tamanho 7 (Pré-instalado) Tamanho 8
Expansor:
1.1 O expansor do tamanho correto preenche toda a concha da orelha e fica
rente à superfície da pele.
A ponteira de tamanho correto é aquela que isola o som sem causar desconforto.
1.2
*
Precisa de ajuda para escolher o tamanho correto? Procure um especialista
EUA: 1-(800) 336-4525 / ua.jblsupport@harman.com
Reino Unido: +44 1707278113 / ua.jblsupport.eu@harman.com
2. ENCAIXE DOS EXPANSORES
2.1 Encaixe o expansor nos fones sem aplicar força excessiva.
2.2 Alinhe o sulco e empurre a ponteira contra o fone até encaixar.
2.3 Coloque os fones nos ouvidos e gire-os para colocá-los na posição correta.
Ajuste até ficar confortável.
O site http://underarmour.custhelp.com contém dicas sobre como encaixar os fones.
3. MODO DE USAR
3.1 O cabo deve ser colocado na posição frontal para que se encaixe com
segurança e proporcione o melhor desempenho.
3.2 O Clipe Esportivo (opcional) melhora a estabilidade dos fios e mantém as
ponteiras mais seguras.
Para melhorar a conectividade, coloque seu dispositivo móvel em uma
3.3
braçadeira.
4. EMPARELHAR, LIGAR E CARREGAR
4.1 Inicialmente, deixe os fones desligados e
o dispositivo Bluetooth ligado e no modo
de busca.
4.2 Porta de carregamento e nível da bateria
5. COMANDO COM 3 BOTÕES
5.1 Controle de música
5.2 Controle do telefone
5.3 Controle de volume
COMPORTAMENTOS
ESTADO
LIGA
DESLIGA
MODO DE
EMPARELHAMENTO
DISPOSITIVO CONECTADO
BATERIA FRACA
DO LED
X2

DEUTSCH
1. WÄHLE DEINE GRÖSSE AUS
Ohren sind unterschiedlich. Probiere deshalb alle Größen der Ohrpo
Ohrstöpsel aus, um deine passende Größe zu finden.
Ohrstöpsel: S M L
Ohrpolster: Größe 4 Größe 5 Größe 6 Größe 7 (Vorinstalliert) Größe 8
1.1 Das Ohrpolster mit der richtigen Größe füllt die Ohrmuschel aus und
schmiegt sich angenehm an sie an.
1.2 Der Ohrstöpsel mit der richtigen Größe sorgt für bequeme Schallisolation.
*
Brauchst du Hilfe, um deine richtige Größe zu finden? "Wende dich an unsere Spezialisten
USA: +1-(800) 336-4525 / ua.jblsupport@harman.com
UK: +44 1707278113 / ua.jblsupport.eu@harman.com"
2. OHRPOLSTER BEFESTIGEN
2.1 Stecke das Ohrpolster vorsichtig auf den Kopfhörer.
2.2 Richte die Einkerbung aus und stecke den Ohrstöpsel vorsichtig auf den
Kopfhörer.
2.3 Setze den Kopfhörer in dein Ohr und rücke ihn zurecht, bis er bequem sitzt.
Tipps für den richtigen Sitz: http://underarmour.custhelp.com
3. WIE TRAGE ICH DEN KOPFHÖRER RICHTIG
3.1 Das Kabel sollte vorne getragen werden, um einen stabilen Sitz und die
optimale Funktion zu gewährleisten.
3.2 Der optionale Sport-Clip bietet dem Kabel zusätzlichen Halt und erhöht den
sicheren Sitz der Ohrhörer.
3.3
Für eine optimale Konnektivität solltest du dein Mobilgerät an einem Armband tragen.
4. KOPPELN/EINSCHALTEN/LADEN
4.1 Beginne mit ausgeschaltetem Kopfhörer
und eingeschaltetem Bluetooth-Audiogerät im Suchmodus.
4.2 Ladeanschluss und Akkustatus
5. 3-TASTEN-STEUERUNG
5.1 Steuerung der Musikwiedergabe
5.2 Steuerung des Telefons
5.3 Lautstärkeregler
STATUS
EINGESCHALTET
AUSGESCHALTET
VERBINDUNGSMODUS
GERÄT ANGESCHLOSSEN
NIEDRIGER AKKUSTAND
lster und
LED-ANZEIGE
X2

ITALIANO
1. SCEGLI LA TUA MISURA
Le orecchie di ciascuno di noi sono differenti. Prova tutte le misure di inserti
auricolari per scegliere quello più adatto a te.
Inserti auricolari: S M L
Inserti auricolari sportivi:
1.1 L'inserto auricolare sportivo di dimensione corretta riempirà la parte interna
del vostro padiglione auricolare e vi aderirà per bene.
1.2
L'inserto auricolare di dimensione corretta fornirà un isolamento acustico confortevole.
*
Ti serve aiuto per trovare la misura corretta? Contatta l'esperto delle misure
US: 1-(800) 336-4525 / ua.jblsupport@harman.com
UK: +44 1707278113 / ua.jblsupport.eu@harman.com"
2. POSIZIONAMENTO DEGLI INSERTI
2.1 Posizionare delicatamente l'inserto sportivo sull'auricolare
2.2 Allineare le tacche, e posizionare delicatamente l'inserto sull'auricolare.
2.3 Inserire gli auricolari nelle orecchie e ruotarli per fissarli. Regolarli in una
posizione comoda.
Per suggerimenti: http://underarmour.custhelp.com
3. COME INDOSSARLI
avo dovrebbe essere tenuto davanti al corpo per una vestibilità sicura e
3.1 Il c
prestazioni ottimali.
3.2 La Clip Sportiva opzionale fornisce una maggiore stabilità del cavo, e
migliora la sicurezza degli auricolari.
3.3
Per una migliore connessione, posizionare il telefono in una fascia da braccio.
4. ABBINAMENTO/ACCENSIONE/RICARICA
4.1 Iniziare con le cuffie spente, ed il
dispositivo Bluetooth acceso ed in
modalità di ricerca.
4.2
Ingresso per la ricarica & Stato della batteria
5. COMANDO A 3 PULSANTI
5.1 Controllo della musica
5.2 Controllo del telefono
5.3 Controllo del volume
Misura 4 Misura 5 Misura 6 Misura 7 (Pre-Installata) Misura 8
COMPORTAMENTO
STATO
ACCENSIONE
SPEGNIMENTO
MODALITA' DI
ACCOPPIAMENTO
DISPOSITIVO CONNESSO
BATTERIA SCARICA
DEI LED
X2

NEDERLANDS
1. KIES JE MAAT
Iedereen heeft verschillende oren. Probeer alle maten van enhancers en
oordopjes om de juiste maat te bepalen.
Oordopje: S M L
Enhancer: Maat 4 Maat 5 Maat 6 Maat 7 (Voorgeïnstalleerd) Maat 8
1.1 De juiste maat enhancer vult je oorschelp en ligt goed tegen de rand van de
oorschelp.
1.2 Een oordopje van de juiste maat biedt comfortabele geluidsisolatie.
Hulp nodig om de juiste maat te vinden? Neem contact op met een specialist
*
VS: 1-(800) 336-4525 / ua.jblsupport@harman.com
VK: +44 1707278113 / ua.jblsupport.eu@harman.com
2. ENHANCERS BEVESTIGEN
2.1 Klem de enhancer voorzichtig op de oortelefoon.
2.2 De inkeping uitlijnen en de oordopjes voorzichtig op de oortelefoon klemmen.
2.3 Steek de oortelefoon in je oor en draai deze op zijn plaats. Aanpassen voor
comfort.
Voor tips over goede plaatsing: http://underarmour.custhelp.com
3. TIP VOOR GEBRUIK
3.1 Het snoer moet aan de v
optimale prestaties.
3.2 De optionele Sport Clip biedt meer koordstabiliteit en houdt de oordopjes op
hun plaats.
3.3 Draag je mob
4. KOPPELING/VOEDING/OPLADEN
4.1 Schakel de hoofdtelefoon uit en schakel
je Bluetooth audio-apparaat in, en zet
deze in de zoekmodus.
4.2 Oplaadaansluiting & Batterijstatus
5. 3-TOETS BEDIENING
5.1 Muziekregelaar
5.2 Telefoonregelaar
5.3 Volumeregelaar
oorkant worden gedragen voor gebruikscomfort en
iele apparaat in een armband voor optimale connectiviteit.
STATUS
INGESCHAKELD
UITGESCHAKELD
KOPPELINGSMODUS
APPARAAT GEKOPPELD
ZWAKKE BATTERIJ
LED-INDICATIES
X2

NORWEGIAN
1. VELG DIN STØRRELSE
Alles ører er forskjellige. Prøv alle størrelser av enhancer og ørepropper for å
finne riktig passform.
Ørepropper: S M L
Enhancer: Størrelse 4 Størrelse 5 Størrelse 6 Størrelse 7 (Forhåndsinstallert)
Størrelse 8
tørrelse enhancer vil fylle bollen av øret og ligger tett mot kanten av
1.1 Riktig s
bollen.
1.2 Riktig størrelse på øreproppen vil gi komfortabel lydisolasjon.
Trenger du hjelp til å finne riktig størrelse? Kontakt en tilpasningsspesialist
*
USA: 1-(800) 336-4525 / ua.jblsupport@harman.com
STORBRITANNIA: +44 1707278113 / ua.jblsupport.eu@harman.com
2. FEST ENHANCERE
2.1 Fest forsiktig enhanceren på øretelefonene.
2.2 Juster hakket og fest forsiktig øreproppen på øretelefonen.
2.3 Sett øretelefonene i øret og vri på plass. Juster for komfort.
Tips for tilpasning: http://underarmour.custhelp.com
3. HVORDAN DE BRUKES
3.1 Ledningen skal brukes
3.2 Det valgfrie Sportsklipset gir økt ledningsstabilitet og forbedrer sikkerheten på
ørepluggene.
3.3 For best tilkobling kan du ha den mobile enheten i
4. PAR / KRAFT / LADING
4.1 Start med hodetelefonene avslått og
Bluetooth-lydenheten påslått og i
søkemodus.
4.2 Ladeport og batteristatus
5. 3-KNAPPERS KOMMANDO
5.1 Musikkontroll
5.2 Telefonstyring
5.3 Volumkontroll
i frontposisjon for sikker passform og optimal ytelse.
et armbånd.
STATUS
STRØM PÅ
STRØM AV
PARINGSMODUS
TILKOBLET ENHET
LAVT BATTERINIVÅ
LED VIRKEMÅTER
X2

SUOMI
1. VALITSE KOKO
Jokaisen korvat ovat erilaiset. Määritä sopiva istuvuus kokeilemalla eri kokoisia
sovittimia ja tehostimia.
Korvasovitin: S M L
Tehostin: Koko 4 Koko 5 Koko 6 Koko 7 (Esiasennettu) Koko 8
1.1 Oikea koko täyttää korvasi ja istuu napakasti korvaasi vasten.
1.2 Oikean kokoinen korvasovitin eristää äänen miellyttävästi.
* Tarvitsetko apua oikean koon löytämisessä? Ota yhteyttä sopivan koon
määrittäjään
llat: 1-(800) 336-4525 / ua.jblsupport@harman.com
Yhdysva
Iso-Britannia: +44 1707278113 / ua.jblsupport.eu@harman.com
2. TEHOSTIMIEN KIINNITTÄMINEN
2.1 Napsauta tehostin varovasti kuulokkeeseen.
2.2 Sovita muotoon ja napsauta korvasovitin varovasti kuulokkeeseen.
2.3 Aseta kuulokkeet korvaasi ja kierrä paikoilleen. Säädä tuntuma miellyttäväksi.
Vinkkejä istuvuuteen: http://underarmour.custhelp.com
3. KÄYTTÖOHJE
3.1 Jos haluat varmistaa optimaalisen tuloksen, pidä johtoa edessä.
3.2 Valinnainen Sport-sovitin tehostaa johdon vakautta ja parantaa
korvanappien istuvuutta.
3.3 Saat parhaimman yhdistettävyyden käyttämällä mobiililaitetta
rannekkeessa.
4. YHDISTÄMINEN/VIRTA/LATAUS
4.1 Aloita, kun kuulokkeista on virta pois
päällä ja Bluetooth-laite on hakutilassa ja
siinä on virta päällä.
4.2 Latausaukko ja pariston tila
5. 3-PAINIKKEINEN KOMENTO
5.1 Musiikin säätö
5.2 Puhelun säätö
5.3 Äänenvoimakkuuden säätö
TILA
VIRTA PÄÄLLÄ
VIRRAN KATKAISU
PARINMUODOSTUSTILA
LAITE KYTKETTY
MATALA AKKUVIRTA
LED-VALOJEN
TOIMINTA
X2

SVENSKA
1. VÄLJ STORLEK
Alla öron är olika. Pröva olika storlekar av förstärkare och öronproppar för att hitta
bästa passform.
Öronpropp: S M L
Storlek 4 Storlek 5 Storlek 6 Storlek 7 (Förmonterade) Storlek 8
Förstärkare:
1.1 Förstärkare med rätt storlek fy
hörselgången.
1.2 Öronproppar med rätt storlek ger en bekväm ljudisolering.
* Behöver du hjälp med att hitta rätt storlek? Kontakta vår passformsspecialist
USA: 1-(800) 336-4525 / ua.jblsupport@harman.com
Storbritannien:
2. MONTERA FÖRSTÄRKARE
2.1 Kläm försiktigt fast förstärkaren på hörluren.
2.2 Rikta in skåran och kläm försiktigt fast öronproppen på hörluren.
2.3 Sätt in hörlurarna i örat och vrid dem på plats. Justera tills de si
Passformstips: http://underarmour.custhelp.com
3. ANVÄND SÅ HÄR
3.1 Sladden ska hänga framtill för att sitta säkert på plats och fungera optimalt.
3.2 Sportklämman som finns som tillval gör sladden stabilare och propparna
säkrare.
3.3 Bäst anslutning får du om du har mobilenheten i ett armband.
4. PARKOPPLA/SLÅ PÅ/LADDA
4.1 Låt hörlurarna vara avstängda med
Bluetooth-enheten påslagen i sökläge.
4.2 Laddningsport och batteristatus
5. 3-KNAPPSSTYRNING
5.1 Styra musiken
5.2 Styra telefonen
5.3 Justera volymen
ller hörselgången och ligger tätt mot kanten på
+44 1707278113 / ua.jblsupport.eu@harman.com
STATUS
STRÖMMEN PÅ
STRÖMMEN AV
PARKOPPLINGSLÄGE
ENHET ANSLUTEN
LÅG BATTERILADDNING
tter bekvämt.
LED VISAR
X2

DANSK
1. VÆLG DIN STØRRELSE
Folks ører er forskellige. Prøv alle størrelser af ørespidser for at finde den, der
passer bedst.
Ørespids: S M L
Ørespids:
Størrelse 4 Størrelse 5 Størrelse 6 Størrelse 7 (Forud-monteret) Størrelse 8
1.1 Den korrekte størrelse fylder det ydre øre og passer nøjagtig imod kanten af
øregangen.
1.2 Den korrekte størrelse vil sidde bekvemt og holde lyden fra omgivelserne ude.
* Har du brug for hjælp til at finde den korrekte størrelse? Kontakt en
tilpasnings-specialist
USA: 1-(800) 336-4525 / ua.jblsupport@harman.com
Storbritannien: +44 1707278113 / ua.jblsupport.eu@harman.com"
2. PÅSÆT ØRESPIDSER
2.1 Sæt forsigtigt ørespidsen på øretelefonen.
2.2 Tilpas mærket og klem forsigtigt ørespidsen på øretelefonen.
2.3
Indsæt øretelefonerne i dine ører og drej dem på plads. Juster dem, så de
sidder bekvemt.
For at tilpasse ørespidserne: http://underarmour.custhelp.com
3. SÅDAN BÆRES ØRETELEFONERNE
3.1 Kablet bør bæres foran, så det ikke hænger løst og for at opnå en optimal
ydeevne.
3.2 Den valgfrie sportsklemme giver en forbedret kabelstabilitet og forbedrer
grebet af ørespidserne.
3.3 For at opnå den bedste forbindelse bør du bære din mobile enhed i et
armbånd.
4. PAR / TÆND OG SLUK / OPLAD
4.1 Sluk først for øretelefone
derefter din Bluetooth-lydenhed og sæt
den i søgetilstand.
4.2 Opladningsstik og batteristatus
5. 3-KNAPS STYRING
5.1 Styring af musik
5.2 Styring af telefon
5.3 Lydstyrkekontrol
rne, og tænd
TILSTAND
TÆNDT
SLUKKET
PARRINGSTILSTAND
ENHED FORBUNDET
LAVT BATTERINIVEAU
LYSDIODE,
FUNKTIONER
X2

日本語
1. サイズを選ぶ
耳のサイズは人により異なります。正しいフィット感でご使用いただくため
に、全サイズのイヤチップをお試しください。
イヤーチップ:S M L
エンハンサー:
1.1 適切なサイズのエンハンサーは耳のくぼみにぴったりはまり、くぼ
1.2 適切なサイズのイヤーチップは外部からの音が侵入しにくくなりま
2. エンハンサーの装着
2.1 イヤホンにエンハンサーをやさしくはめてください。
2.2 突起部にフィットするように、イヤホンにイヤーチップをやさしくはめてく
2.3 耳にイヤホンを差し込み、ぴったりはまるまでひねります。快適にフィット
3. 装着方法
3.1 確実なフィット感と最適なパフォーマンスを得るためには、コードはフロ
3.2 オプションのスポーツクリップを使用するとコードが揺れにくくなり、イ
3.3
4. ペアリング/電源/充電
4.1 ヘッドホンの電源を切り、Bluetooth対
応オーディオデバイスの電源を入れ、サー
チモードにしてください。
5. 3ボタン・コマンド
5.1 曲操作
5.2 通話の操作
5.3 音量調整
サイズ4 サイズ5 サイズ6 サイズ7 (あらかじめセット) サイズ8
みの端に快適にフィットします。
す。
ださい。
するように調整します。
ント・ポジションで装着します。
ヤチップのフィット感が安定します。
ベストな接続状態を得るために、アームバンドにモバイル機器を装着して
ください。
LED
状態
電源オン
電源オフ
ペアリング・モード
デバイス接続済み
バッテリー残量少
表示
X2

POLSKI
1. WYBIERZ PREFEROWANY ROZMIAR
Ucho każdego człowieka jest nieco inne. Wypróbuj wkładki elastyczne i końcówki
we wszystkich rozmiarach, aby wybrać odpowiednie dla siebie.
Końcówka: S M L
Wkładka elastyczna: Rozmiar 4 Rozmiar 5 Rozmiar 6 Rozmiar 7 (Wstępnie
mocowane) Rozmiar 8
1.1 Wkładka o odpowiednim rozmiarze wypełni przestrzeń w uchu i będzie się
opierać na krawędzi małżowiny.
1.2 Odpowiedni rozmiar końcówki zapewni dokładną izolację dla dźwięku.
Masz problem z wybraniem odpowiedniego rozmiaru? Skontaktuj się z naszym specjalistą
*
USA: 1-(800) 336-4525 / ua.jblsupport@harman.com
Wielka Brytania: +44 1707278113 / ua.jblsupport.eu@harman.com
2. REGULATORY MOCOWANIA
2.1 Delikatnie przymocuj wkładkę do słuchawki.
2.2 Odpowiednio nakieruj i delikatnie wsuń końcówkę do słuchawki.
2.3 Umieść słuchawki w uszach i obróć, aby weszły na swoje miejsce. Dostosuj,
aby uzyskać pełny komfort.
Wskazówki dotyczące mocowania: http://underarmour.custhelp.com
3. JAK KORZYSTAĆ ZE SŁUCHAWEK
3.1 Przewód należy nosić z przodu dla komfortu obsługi i bezpieczeństwa.
3.2 Opcjonalny klips sportowy zapewnia większą stabilność przewodu i poprawia
bezpieczeństwo słuchawek dousznych.
3.3 Aby zapewnić sobie najlepszą łączność, należy nosić urządzenie
przymocowane do opaski na rękę.
4. PAROWANIE/ZASILANIE/ŁADOWANIE
4.1 Słuchawki powinny być odłączone od
zasilania, zaś urządzenie Bluetooth do
odtwarzania muzyki włączone i ustawione
w trybie wyszukiwania.
4.2 Port ładowania i stan baterii
5. STEROWANIE 3 PRZYCISKAMI
5.1 Sterowanie odtwarzaniem muzyki
5.2 Sterowanie funkcjami telefonu
5.3 Sterowanie głośnością
STAN
WŁ. ZASILANIA
WYŁ. ZASILANIA
TRYB PAROWANIA
PODŁĄCZONO URZĄDZENIE
BATERIA BLISKA
WYCZERPANIA
DZIAŁANIE DIODY
X2

한국어
1. 원하는 크기 선택
사람의 귀 모양은 모두 다릅니다. 모든 크기의 인핸서 및 이어팁으로
알맞은 크기를 결정하세요.
이어팁:SML
크기 4 크기 5 크기 6 크기 7 (사전 장착) 크기 8
인핸서:
올바른 크기의 인핸서를 선택하면 편안하게 외이를 감싸는 착용감을 느낄
1.1
수 있습니다.
1.2
올바른 크기의 이어팁을 선택하면 효과적으로 잡음을 차단할 수 있습니다.
* 올바른 크기를 찾는 데 도움이 필요하세요? 피팅 전문가 연락처
미국: 1-(800) 336-4525/ua.jblsupport@harman.com
영국: +44 1707278113/ua.jblsupport.eu@harman.com
2. 인핸서 장착
2.1 이어폰에 부드럽게 인핸서를 끼웁니다.
2.2 노치(홈)를 맞춘 다음 이어폰에 이어팁을 부드럽게 끼웁니다.
2.3 이어폰을 귀에 삽입하고 제 위치로 돌립니다. 편안하도록 조정합니다.
착용 팁: http://underarmour.custhelp.com
3. 착용 방법
3.1 안전한 착용과 최적의 성능을 위해 코드는 앞쪽에 두어야 합니다.
3.2 스포츠 클립 옵션을 사용하면 코드를 안전하게 착용하고 이어버드가
빠지지 않도록 고정할 수 있습니다.
3.3최상의연결을 위해모바일장치를암밴드에착용하는 것이 좋습니다.
4. 페어링/전원/충전
4.1 헤드폰 전원을 끄고 블루투스 오디오
장치를 켠 다음 검색 모드로 갑니다.
4.2 충전 포트 및 배터리 상태
5. 3 버튼 명령
5.1 음악 제어
5.2 전화 제어
5.3 볼륨 제어
상태
전원 켜기
전원 끄기
페어링 모드
기기가 연결되어 있음
배터리 부족
LED 동작
X2

CHINESE (SIMPLIFIED)
1. 选择尺寸
每个人的耳朵大小不一, 请试戴增强器和耳塞以确定最贴合耳
朵的一种尺寸。
耳塞:S M L
增强器:尺寸 4 尺寸 5 尺寸 6 尺寸 7 (预装) 尺寸 8
1.1 选择正确尺寸的增强器塞入耳朵,与耳洞边缘舒适贴合。
1.2 正确尺寸的耳塞会提供舒适良好的隔声。
* 是否需要帮忙以找到最合适的尺寸?联系贴合专家
美国: 1-(800) 336-4525 / ua.jblsupport@harman.com
英国: +44 1707278113 / ua.jblsupport.eu@harman.com
2. 连接增强器
2.1 轻轻将增强器固定在耳机上。
2.2 对齐凹口,轻轻将耳塞夹在耳机上。
2.3 将耳机插入耳朵并旋转到位。 调整至舒适即可。
如需了解佩戴的提示,请访问: http://underarmour.custhelp.com
3. 如何佩戴
3.1 耳机线应佩戴在前方以确保紧密贴合并发挥最佳性能。
3.2 可选的运动耳夹可使线缆更加稳固,并改善耳机安全性。
3.3 要获取最佳连接,请将移动设备佩戴到臂带上。
4. 配对/电源/充电
4.1 先关闭耳机,然后打开蓝牙音响设
备并进入搜索模式。
4.2 充电端口和电池状态
5. 三键式命令
5.1 音乐控制
5.2 手机控制
5.3 音量控制
状态
开启
关闭
配对模式
已连接设备
电池电量低
LED
变化模式
X2

CHINESE (TRADITIONAL)
1. 選擇您的尺寸
每個人的耳朵都各不相同。 嘗試全部尺寸的加固器及耳套,以
確定適合您的尺寸。
耳套: 小號、中號、大號
加固器:4號5號6號7號(預安裝)8號
1.1 正確尺寸的加固器將填滿耳腔,並舒適地貼合耳腔邊緣。
1.2 正確尺寸的耳套舒適地提供隔音。
* 尋找正確尺寸時需要協助?請聯絡貼合專家
美國: 1-(800) 336-4525 / ua.jblsupport@harman.com
英國: +44 1707278113 / ua.jblsupport.eu@harman.com
2. 安裝加固器
2.1 輕輕將加固器扣在耳機上。
2.2 對齊凹槽,然後輕輕將耳套扣上耳機上。
2.3 將耳機插入耳朵並扭轉到位。 調節舒適為宜。
如需貼合技巧: http://underarmour.custhelp.com
3. 如何佩戴
3.1 佩戴時線應置於前位,達到穩固貼合和最佳效能。
可選的運動卡扣提供更高的耳機線穩定性,並提高耳塞的穩定性。
3.2
3.3 為達到最佳連接,佩帶行動裝置時採用臂環。
4. 配對/電源/充電
4.1 首先將耳機斷電,然後對
Bluetooth 音訊裝置通電並進入搜
尋模式。
4.2 充電連接埠和電池狀態
5. 3 鍵指令
5.1 音樂控制
5.2 手機控制
5.3 音量控制
狀態
通電
斷電
配對模式
裝置已連接
電池電量低
LED
行為
X2

BAHASA INDONESIA
1. PILIH UKURAN ANDA
Ukuran telinga setiap orang berbeda-beda. Cobalah semua ukuran enhancer dan
ear tip untuk mengetahui mana yang paling pas.
Ear tip: S M L
Ukuran 4 Ukuran 5 Ukuran 6 Ukuran 7 (Pra-Pemasangan) Ukuran 8
Enhancer:
1.1 Ukuran enhancer yang tepat akan memenuhi cuping telinga Anda dan
terpasang dengan cocok pada ujung cuping telinga.
1.2 Ukuran ear tip yang tepat akan menghasilkan isolasi suara yang baik.
Perlu bantuan dalam menemukan ukuran yang tepat? Hubungi spesialis pengepasan
*
AS: 1-(800) 336-4525 / ua.jblsupport@harman.com
Inggris: +44 1707278113 / ua.jblsupport.eu@harman.com
2. PASANG ENHANCER
2.1 Jepitkan perlahan enhancer ke earphone.
2.2 Sejajarkan takik, dan jepitkan perlahan ear tip ke earphone.
2.3 Masukkan earphone ke dalam telinga dan puntir ke dalam tempatnya.
Sesuaikan hingga Anda merasa nyaman.
Untuk kiat pengepasan: http://underarmour.custhelp.com
3. CARA PEMAKAIAN
3.1 Kabel harus diletak
optimal.
3.2 Sport Clip opsional membuat kabel lebih stabil dan meningkatkan keamanan
earbud.
3.3 Untuk konektivitas terbaik pakailah perangkat mobile Anda pada sebuah
gelang tangan.
PENYAMBUNGAN/DAYA/PENGISIAN DAYA
4.
4.1 Mulailah dengan mematikan headphone,
nyalakan perangkat Bluetooth Anda
dalam mode pencarian.
4.2 Port Pengisian Daya & Status Baterai
5. 3-TOMBOL PERINTAH
5.1 Kontrol Musik
5.2 Kontrol Telepon
5.3 Kontrol Volume
kan di depan demi kenyamanan dan performa yang
KONDISI
POWER ON (MENYALA)
POWER OFF (MATI)
MODE PENYAMBUNGAN
PERANGKAT TERHUBUNG
DAYABATERAI LEMAH
POLA LED
X2

TECH SPECS
EN
• Impedance: 32Ω
• Premium 40mm Dynamic Driver
• Frequency Response: 20–20,000Hz
• Connection: M
•
• Bluetooth profiles: HFP v1.6, HSP v1.2,A2DP v1.3, AVRCP v1.5
• Bluetooth transmitter frequency range: 2.402 - 2.480GHz
• Bluetooth transmitter power: < 4dBm
• Bluetooth transmitter modulation: GFSK, π/4 DQPSK, 8DPSK
• Battery type: Rechargeable Lithium Ion Cylindrical Cell (3.7V, 610mAh)
•
•
FR
• Impedance: 32Ω
• Haut-parleur dynamique haut de gamme 40 mm
• Réponse en fréquence : 20–20,000Hz
• Connexion : câble micro USB pour la recharge
•
• Bluetooth profiles: HFP v1.6, HSP v1.2,A2DP v1.3, AVRCP v1.5
• Plage de fréquences de l'émetteur Bluetooth : 2,402 - 2,480 GHz
• Puissance de l'
• Modulation de l'émetteur Bluetooth : GFSK, π/4 DQPSK 8DPSK
• Type de batterie : Cellule cylindrique lithium-ion rechargeable (3.7V, 610mAh)
•
•
ES
• Impedance: 32Ω
• Unidad dinámica premium de 40 mm
• Respuesta en frecuencias: 20–20,000Hz
• Conexiones
•
• Bluetooth profiles: HFP v1.6, HSP v1.2,A2DP v1.3, AVRCP v1.5
• Intervalo de frecuencias del transmisor Bluetooth: 2.402 – 2.480 GHz
• Potencia del transmisor Bluetooth: < 4 dBm
• Modulación del transmisor Bluetooth: GFSK, π/4 DQPSK, 8DPSK
• Tipo de batería: Celda cilíndrica de ion litio recargable (3.7V, 610mAh)
•
• Battery charge time; Speed Charge: 5 mins = 1 hour play; 2 hours from empty
icro USB cable for charging
Bluetooth Version: 4.1
Battery life: up to 16 hours
Battery charge time; Speed Charge: 5 mins = 1 hour play; 2 hours from empty
Bluetooth Version: 4.1
émetteur Bluetooth : < 4 dBm
Battery life: up to 16 hours
Battery charge time; Speed Charge: 5 mins = 1 hour play; 2 hours from empty
: Cable de carga micro USB
Bluetooth Version: 4.1
Battery life: up to 16 hours

TECH SPECS
PT(BR)
• Impedance: 32Ω
• Driver dinâmico premium de 40 mm
• Resposta de frequência: 20–20,000Hz
• Conexão: Cabo micro-USB para carregamento
•
Bluetooth Version: 4.1
• Bluetooth profiles: HFP v1.6, HSP v1.2,A2DP v1.3, AVRCP v1.5
• Intervalo de frequência do transmissor Bluetooth: 2,402 a 2,480 GHz
• Potência do transmissor Bluetooth: < 4 dBm
• Modulação do transmissor Bluetooth: GFSK, π/4 DQPSK e 8DPSK
• Tipo de bateria: Íon de lítio recarregável com célula cilíndrica (3.7V, 610mAh)
Battery life: up to 16 hours
•
Battery charge time; Speed Charge: 5 mins = 1 hour play; 2 hours from empty
•
DE
• Impedance: 32Ω
• Hochwertiger dynamischer 40mm-Lautsprecher
• Frequenzgang: 20–20,000Hz
• Anschluss: Mikro-USB-Ladekabel
•
Bluetooth Version: 4.1
• Bluetooth profiles: HFP v1.6, HSP v1.2,A2DP v1.3, AVRCP v1.5
• Frequenzbereich für die Bluetooth-Übertragung: 2.402 – 2.480 GHz
• Bluetooth-Übertragungsleistung: < 4dBm
• Bluetooth-Übertragungsmodulation: GFSK, π/4 DQPSK, 8DPSK
• Akku: Wiederaufladbarer Lithium-Ionen-Akku (zylindrisch) (3.7V, 610mAh)
Battery life: up to 16 hours
•
•
Battery charge time; Speed Charge: 5 mins = 1 hour play; 2 hours from empty
IT
• Impedance: 32Ω
• Driver Dinamico Premium da 40mm
• Risposta in Frequenza: 20–20,000Hz
• Connettore: Cavo Micro USB per la ricarica
•
Bluetooth Version: 4.1
• Bluetooth profiles: HFP v1.6, HSP v1.2,A2DP v1.3, AVRCP v1.5
• Intervallo di frequenza del trasmettitore Bluetooth: 2,402 - 2,480 GHz
• Potenza del trasmettitore Bluetooth: <4 dBm
• Modulazione del trasmettitore Bluetooth: GFSK, π/4 DQPSK, 8DPSK
• Tipo di b
atteria: Batteria Ricaricabile agli Ioni di Litio Cilindrica (3.7V, 610mAh)
•
Battery life: up to 16 hours
• Battery charge time; Speed Charge: 5 mins = 1 hour play; 2 hours from empty

TECH SPECS
NL
• Impedance: 32Ω
Hoogwaardige 40mm Dynamische driver
•
• Frequentiebereik: 20–20,000Hz
• Aansluiting: Micro USB-kabel voor opladen
•
Bluetooth Version: 4.1
• Bluetooth profiles: HFP v1.6, HSP v1.2,A2DP v1.3, AVRCP v1.5
• Bluetooth transmitter frequentiebereik: 2.402 - 2.480GHz
• Bluetooth® transmittervermogen: <4dBm
• Bluetooth® transmitter modulatie: GFSK, π/4 DQPSK, 8DPSK
• Type batterij: Oplaadbare Lithium Ion cilindrische cel (3.7V, 610mAh)
Battery life: up to 16 hours
•
Battery charge time; Speed Charge: 5 mins = 1 hour play; 2 hours from empty
•
NO
• Impedance: 32Ω
• Premium 40mm Dynamisk Driver
• Frekvensrespons: 20–20,000Hz
• Forbindelse Mikro-USB kabel for lading
•
Bluetooth Version: 4.1
• Bluetooth profiles: HFP v1.6, HSP v1.2,A2DP v1.3, AVRCP v1.5
• Bluetooth-transmitter frekvensområde: 2,402 - 2,480 GHz
• Bluetooth-transmitter strøm: < 4dBm
• Bluetooth-transmitter modulering: GFSK, π/4 DQPSK, 8DPSK
• Batteritype: Ladbare Lithiumion sylindriske batterier (3.7V, 610mAh)
Battery life: up to 16 hours
•
•
Battery charge time; Speed Charge: 5 mins = 1 hour play; 2 hours from empty
FI
• Impedance: 32Ω
• Ensiluokkainen 40mm:n dynaaminen kaiutinelementti
• Taajuusvaste: 20–20,000Hz
• Liitin: Mikro-USB-kaapeli latausta varten
• Bluetooth Version: 4.1
• Bluetooth profiles: HFP v1.6, HSP v1.2,A2DP v1.3, AVRCP v1.5
• Bluetooth-lähettimen taajuusalue: 2,402-2,480 GHz
• Bluetooth-lähettimen teho: < 4 dBm
• Bluetooth-lähettimen modulaatio: GFSK, π/4 DQPSK, 8DPSK
• Akkutyyppi: Uudelleenladattava sylinterikennolla varustettu litiumioniakku
(3.7V, 610mAh)
• Battery life: up to 16 hours
Battery charge time; Speed Charge: 5 mins = 1 hour play; 2 hours from empty
•

TECH SPECS
SV
• Impedance: 32Ω
• Premium 40mm dynamiska element
• Frekvensomfång: 20–20,000Hz
• Anslutningar: 1 x Micro USB-kabel för laddning
Bluetooth Version: 4.1
•
• Bluetooth profiles: HFP v1.6, HSP v1.2,A2DP v1.3, AVRCP v1.5
• Bluetooth-sändarens frekvensomfång: 2.402 - 2.480GHz
• Bluetooth-sändarens effekt: <4 dBm
• Bluetooth-sändarens modulering: GFSK, π/4 DQPSK, 8DPSK
Batterityp: Laddningsbart litiumbatteri med cylindriska battericeller (3.7V, 610mAh)
•
• Battery life: up to 16 hours
Battery charge time; Speed Charge: 5 mins = 1 hour play; 2 hours from empty
•
DA
• Impedance: 32Ω
• 40 mm førsteklasses dynamiske drivere
• Frekvensområde: 20–20,000Hz
• Tilslutning: Micro USB-kabel til opladning
•
Bluetooth Version: 4.1
• Bluetooth profiles: HFP v1.6, HSP v1.2,A2DP v1.3, AVRCP v1.5
• Bluetooth-sendefrekvensområde: 2.402-2.480 GHz
• Bluetooth-sendeeffekt: < 4 dBm
• Bluetooth-sendermodulation: GFSK, π/4 DQPSK, 8DPSK
• Batteritype: Genopladelig cylindrisk litiumionc
•
Battery life: up to 16 hours
Battery charge time; Speed Charge: 5 mins = 1 hour play; 2 hours from empty
•
JP
• Impedance: 32Ω
• 40mmプレミアム・ダイナミック・ドライバー
• 周波数特性:20〜20,000Hz
• 接続:充電用マイクロUSBケーブル
•
Bluetooth Version: 4.1
• Bluetooth profiles: HFP v1.6, HSP v1.2,A2DP v1.3, AVRCP v1.5
• Bluetoothトランスミッター周波数帯域:2.402GHz〜2.480GHz
• Bluetooth トランスミッター出力:4dBm未満
• Bluetoothトランスミッター変調:GFSK、π/4 DQPSK、8DPSK
• バッテリータイプ:再充電可能リチウムイオン円筒形電池
(3.7V, 610mAh)
•
Battery life: up to 16 hours
•
Battery charge time; Speed Charge: 5 mins = 1 hour play; 2 hours from empty
elle (3.7V, 610mAh)

TECH SPECS
PL
• Impedance: 32Ω
• Najwyższej jakości dynamiczne przetworniki 40 mm
• Pasmo przenoszenia: 20‒20,000Hz
• Złącze: Kabel Micro USB do ładowania
Bluetooth Version: 4.1
•
• Bluetooth profiles: HFP v1.6, HSP v1.2,A2DP v1.3, AVRCP v1.5
• Zakres częstotliwości nadajnika Bluetooth: 2,402 – 2,480GHz
• Moc nadajnika Bluetooth: <4 dBm
• Modulacja nadajnika Bluetooth: GFSK, π/4 DQPSK, 8DPSK
• Bateria: Cylindryczny akumulator litowo-jonowy (3.7V, 610mAh)
•
Battery life: up to 16 hours
Battery charge time; Speed Charge: 5 mins = 1 hour play; 2 hours from empty
•
KO
• Impedance: 32Ω
• 프리미엄 40mm 다이내믹 드라이버
• 주파수 응답: 20~20,000Hz
• 연결: 마이크로 USB 충전 케이블
Bluetooth Version: 4.1
•
• Bluetooth profiles: HFP v1.6, HSP v1.2,A2DP v1.3, AVRCP v1.5
• Bluetooth 송신기 주파수 범위: 2.402 ~ 2.480GHz
• Bluetooth 송신기 출력: <4dBm
블루투스 송신기 변조: GFSK, π/4 DQPSK, 8DPSK
•
• 배터리 유형: 충전식 리튬 이온 원통형 셀 (3.7V, 610mAh)
• Battery life: up to 16 hours
•
Battery charge time; Speed Charge: 5 mins = 1 hour play; 2 hours from empty
CHS
• Impedance: 32Ω
• 顶级 40mm 动态驱动器
• 频率响应: 20‒20,000Hz
• 连接: 1 条 Micro USB 充电电缆
•
Bluetooth Version: 4.1
• Bluetooth profiles: HFP v1.6, HSP v1.2,A2DP v1.3, AVRCP v1.5
•
蓝牙发射器频率范围: 2.402 - 2.480GHz
• 蓝牙发射器功率: < 4dBm
•
蓝牙发射器调制: GFSK, π/4 DQPSK, 8DPSK
• 电池类型: 圆柱型锂离子充电电池 (3.7V, 610mAh)
• Battery life: up to 16 hours
• Battery charge time; Speed Charge: 5 mins = 1 hour play; 2 hours from empty

TECH SPECS
CHT
• Impedance: 32Ω
• 優質 40mm 動態驅動器
• 頻率回應: 20‒20,000Hz
連接: 用於充電的 Micro USB 纜線
•
• Bluetooth Version: 4.1
• Bluetooth profiles: HFP v1.6, HSP v1.2,A2DP v1.3, AVRCP v1.5
• Bluetooth 發射機頻率範圍: 2.402 - 2.480GHz
• Bluetooth 發射機功率: <4dBm
• Bluetooth 發射機調變: GFSK、π/4 DQPSK、8DPSK
• 電池類型: 可充電圓柱型鋰離子電池 (3.7V, 610mAh)
• Battery life: up to 16 hours
•
Battery charge time; Speed Charge: 5 mins = 1 hour play; 2 hours from empty
ID
• Impedance: 32Ω
• Driver Dinamis Premium 40mm
• Respons Frekuensi: 20–20,000Hz
• Koneksi: Kabel Micro USB untuk pengisian daya
• Bluetooth Version: 4.1
• Bluetooth profiles: HFP v1.6, HSP v1.2,A2DP v1.3, AVRCP v1.5
• Rentang frekuensi pemancar Bluetooth: 2,402 - 2,480GHz
• Daya pemancar Bluetooth: < 4dBm
• Modulasi pemancar Bluetooth: GFSK, π/4 DQPSK, 8DPSK
• Tipe baterai: Baterai Silindris Ion Lithium yang dapat diisi ulang (3.7V, 610mAh)
• Battery life: up to 16 hours
• Battery charge time; Speed Charge: 5 mins = 1 hour play; 2 hours from empty

Торговая марка : JBL
Назначение товара : Пользовательские наушники
Изготовитель : Харман Интернешнл Индастриз Инкорпорейтед,
Страна происхождения : Китай
Импортер в Россию : OOO “ХАРМАН РУС СиАйЭс“, Россия, 127018,
Гарантийный период : 1 год
Информация о
сервисных центрах : www.harman.com/ru тел. +7-800-700-0467
Срок службы : 2 года
США, 06901 Коннектикут, г.Стэмфорд, Атлантик
Стрит 400, офис 1500
г.Москва, ул. Двинцев, д.12, к 1
Товар сертифицирован :
Дата производства : Дата изготовления устройства определяется по двум
The Bluetooth®word mark and logos are registered trademarks owned by
Bluetooth SIG, Inc. and any use of such marks by HARMAN International Industries,
Incorporated is under license. Other trademarks and trade names are those of their
respective owners.
буквенным обозначениям из второй группы символов
серийного номера изделия, следующих после
разделительного знака «-». Кодировка соответствует
порядку букв латинского алфавита, начиная с января
2010 года: 000000-MY0000000, где «M» - месяц
производства (А - январь, B - февраль, C - март и т.д.)
и «Y» - год производства
(A - 2010, B - 2011, C - 2012 и т.д.).

Esteequipamentooperaemcarátersecundário,istoé,
nãotemdireitoaproteçãocontrainterferênciaprejudicial,
mesmodeestaçõesdomesmotipo,enãopodecausar
interferênciaasistemasoperandoemcaráterprimário”
EsteprodutoestáhomologadopelaANATEL,deacordo
comosprocedimentosregulamentados pela Resolução
242/2000,eatendeaosrequisitostécnicosaplicados.
Paramaioresinformações,consulteositedaANATEL–
www.anatel.gov.br
TR04126_B

SPORT WIRELESS TRAIN
 Loading...