

Page 1
S
ubwoofer Owner's Manual
Reference Flex 8D / 8S
Page 2
Reference Flex 8D / 8S
THANK YOU for choosing an
Infinity Reference Flex subwoofer.
These subwoofers are designed to suit a
broad range of car audio applications
and serve as an ideal direct replacement
and upgrade to a wide variety of
factory-original (OEM) applications.
Based on their superior design and
performance, the Infinity Flex
subwoofers will deliver increased
performance in virtually every situation.
To get the most performance from your
new subwoofer, it is strongly
recommended that you have a qualified
professional install it. Although this
manual does provide general instructions
about installing these Flex subwoofers,
it does not include exact installation
methods for any particular vehicle. If
you do not feel that you have the
necessary experience, do not attempt
the installation yourself, but instead ask
your authorized Infinity dealer about
professional installation options.
Remember to keep your sales receipt in
a safe place, along with this manual, so
that both are available for future
reference.
WARNING
Playing loud music in a vehicle can
hinder your ability to hear traffic and
permanently damage your hearing. The
maximum volume levels achievable by
Infinity speakers when combined with
high-power amplification may exceed
safe levels for extended listening. Using
low volume levels is recommended when
driving. Harman accepts no liability for
hearing loss, bodily injury, or property
damage as a result of use or misuse of
this product.
REPRODUCING
BASS IN VEHICLES
Depending on the size of your vehicle’s
interior listening space, reproduced bass
frequencies below 80Hz could be
boosted by nearly 12dB per octave as
frequency decreases. This phenomenon,
known as the vehicle’s transfer function
(or cabin gain), and it plays an important
role in shaping the subwoofer’s
frequency response in your vehicle.
Features of your Reference
Flex subwoofer
Both Reference Flex 8D and Reference
Flex 8S subwoofers include a unique,
adjustable sliding flange that allows
mounting height and mounting depth to
be traded off against each other to fit
multiple installation situations. It’s a
convenient way to achieve excellent
bass response while preserving your
vehicle’s cargo space by allowing you to
take advantage of your vehicle’s factory
subwoofer enclosure, rather than having
to use a separate subwoofer box.
Mounting the subwoofer
When you’re ready to install the
subwoofer, mount it from the outside of
the enclosure. Use the included foam
mounting gasket to ensure a leak-free
seal between the subwoofer frame and
the enclosure.
With the flange, you can adjust the
mounting depth of the Reference Flex
subwoofer in order to accommodate
mounting in your vehicle’s specific OEM
enclosure.
• If your vehicle’s OEM subwoofer
location is sufficiently deep, you
can keep the mounting flange
even with the subwoofer’s
surround.
• If you’re working with a more
shallow OEM subwoofer location,
you can position the flange lower
on the subwoofer, closer to the
magnet. This will prevent the
magnet from extending too far
into the enclosure when you
mount the subwoofer (and will
increase mounting height).
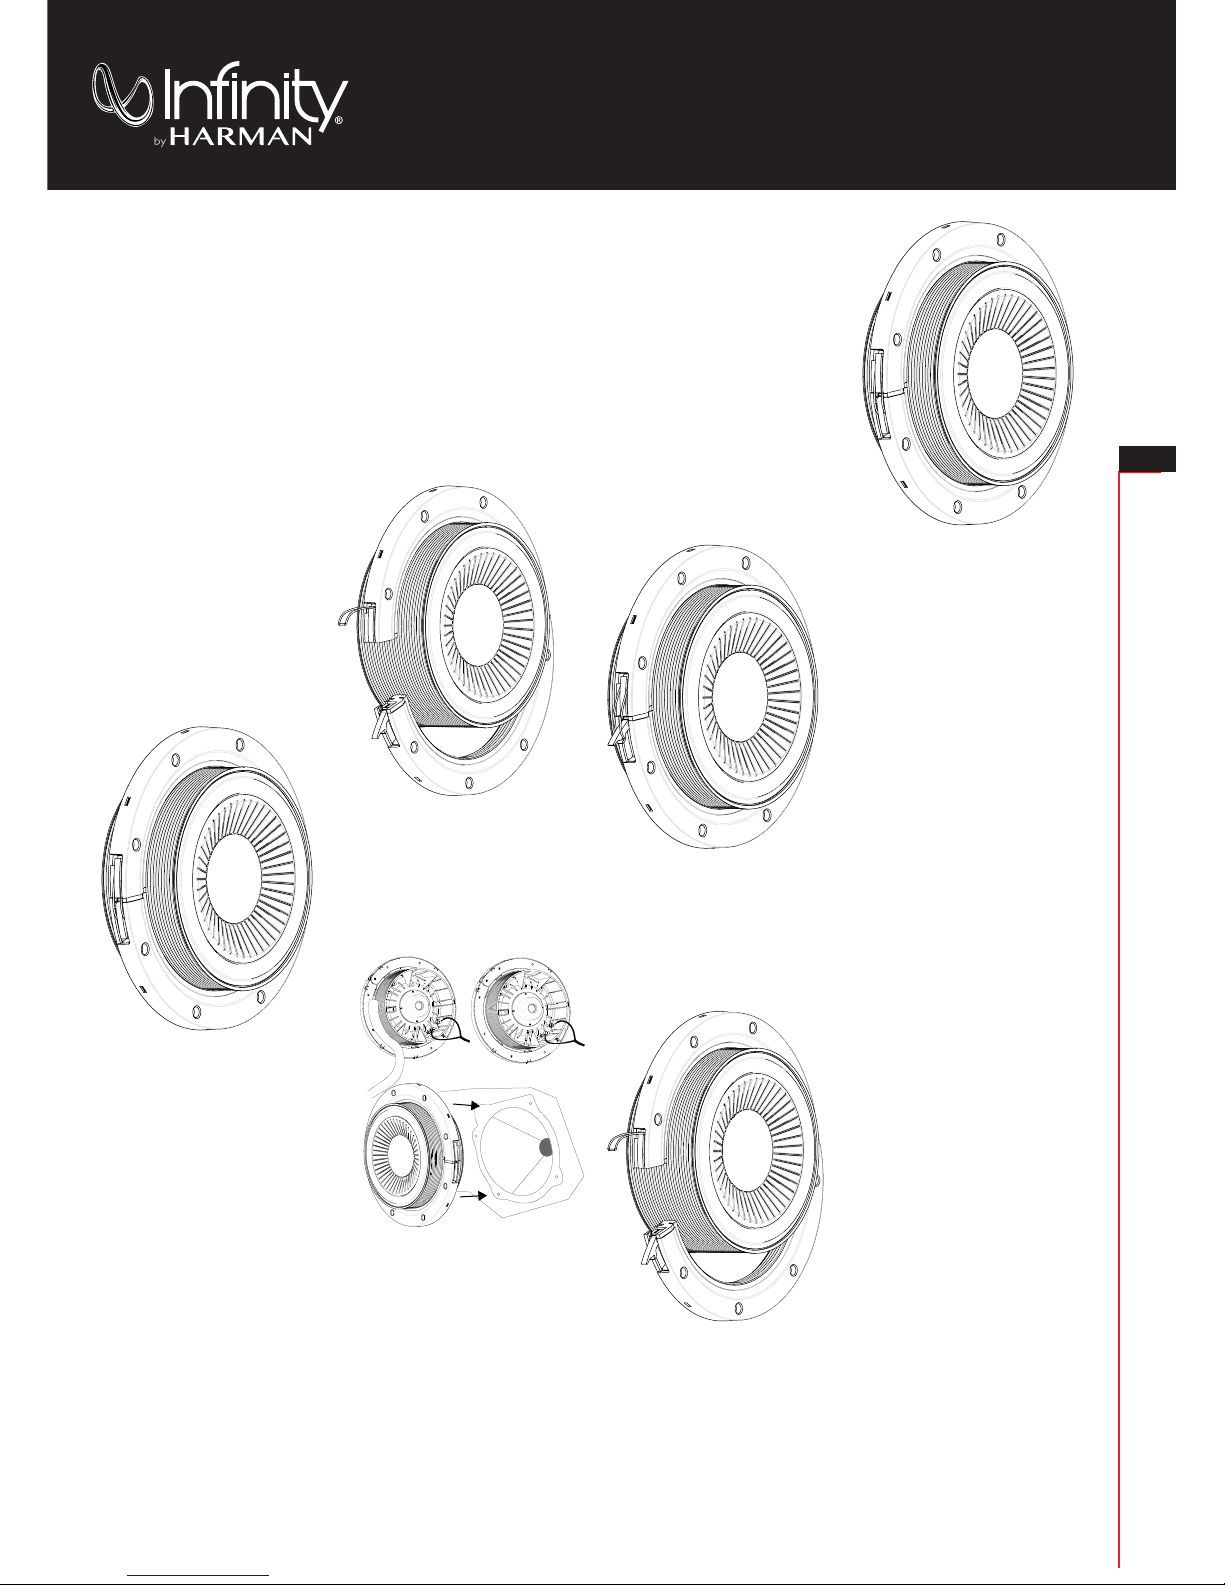
Adjusting the flange
To adjust the flange and set the
Reference Flex subwoofer to your
desired mounting depth/height, follow
these three steps:
RELEASE THE FLANGE
On the side of the flange, you’ll find a
copper clip connected to a bracket. To
open the flange, pull out the copper clip,
then spread both sides of the flange
open.
ADJUST THE MOUNTING
DEPTH
Lower the flange to the desired location;
how far toward the magnet you position
the flange depends on the amount of
depth available in the OEM subwoofer
location in your vehicle.
LOCK THE FLANGE
To secure the flange, align it with the
grooves on the sides of the subwoofer.
Close both sides of the flange, making
sure the bracket slides under the
flange’s clip. Complete the process by
pushing the copper tab clip into place,
flush with the side of the flange.
Securing the subwoofer to
the enclosure
Mount the subwoofer from the top; the
flange will rest against the surface of
the OEM enclosure. Use the included
foam gasket to ensure an airtight seal
between subwoofer and enclosure.
If possible, align the screw holes of the
flange with the mounting holes of the
OEM enclosure, and secure with the
original mounting screws.
NOTE: In some cases, you might have
to drill one or more new screw holes to
mount the subwoofer securely. Carefully
mark the necessary hole locations on the
surface of the OEM enclosure, and drill
pilot holes smaller than the screws you
use to secure the subwoofer.
CONNECTING THE
AMPLIFIER
The Reference Flex subwoofer can work
with your factory subwoofer output
wires. The subwoofer connectors are
compatible with bare or tinned wires; if
your factory wires connect to the
factory subwoofer with a plug, you’ll
need to cut the plug off and strip away
some of the wires’ insulating jackets to
reveal bare wire ends. Use a 2.5 mm hex
driver to open the connectors, then
insert the wire ends into the “+” and “-“
connector openings. Use the hex driver
to secure the wires in the connectors, as
shown in the illustration to the left.
NOTE: You might have to consult
with an installation professional to
determine which of the factory wires is
“+” and which is “-“.
If you’re using an external amplifier, the
recommended wire gauge is between
14AWG and 12AWG, depending on the
length of the wire run between the
amplifier and woofer. Heavier gauge
wire is preferred for runs over 6' (2m).
NOTE: If using untinned bare wire, be
sure that no stray “+”and “–”strands
touch each other. Touching strands can
cause a short-circuit, which can damage
your amplifier.
Lock the clip
Unlock the clip
Adjust the
mounting depth by
sliding the ange
EN
Page 3

VOICE-COIL DC RESISTANCE:
EVC
(OHMS) . . . . . . . . . . . . . . . . . . . . . 2.29
VOICE-COIL INDUCTANCE @ 1KHZ:
EVC
(MH) . . . . . . . . . . . . . . . . . . . . . .0.576
DRIVER RADIATING AREA:
D
(IN2) . . . . . . . . . . . . . . . . . . . . . . . . 31.16
S
D
(CM2). . . . . . . . . . . . . . . . . . . . . . 201.06
MOTOR FORCE FACTOR:
. . . . . . . . . . . . . . . . . . . . . . . 5.236
COMPLIANCE VOLUME:
VAS (FT3) . . . . . . . . . . . . . . . . . . . . . . .0.484
V
AS
(LITERS) . . . . . . . . . . . . . . . . . . . . 13.694
SUSPENSION COMPLIANCE:
MS
(µM/N) . . . . . . . . . . . . . . . . . . . .226.00
MOVING MASS, AIR LOAD:
MS
(GRAMS). . . . . . . . . . . . . . . . . . . . 61.976
FREE-AIR RESONANCE:
FS (HZ) . . . . . . . . . . . . . . . . . . . . . . . 41.3
MECHANICAL Q:
QMS. . . . . . . . . . . . . . . . . . . . . . . . . . 6.071
ELECTRICAL Q:
QES. . . . . . . . . . . . . . . . . . . . . . . . . . 1.345
TOTAL Q:
QTS. . . . . . . . . . . . . . . . . . . . . . . . . . 1.101
MAGNETIC-GAP HEIGHT:
AG
(IN) . . . . . . . . . . . . . . . . . . . . . . . . 0.33
H
AG
(MM) . . . . . . . . . . . . . . . . . . . . . . . 8.5
VOICE-COIL HEIGHT:
HVC (IN) . . . . . . . . . . . . . . . . . . . . . . . . 0.70
H
VC
(MM) . . . . . . . . . . . . . . . . . . . . . . . 17.8
MAXIMUM EXCURSION:
X
MAX
(IN) . . . . . . . . . . . . . . . . . . . . . . . 0.18
X
MAX
(MM) . . . . . . . . . . . . . . . . . . . . . . 4.65
2Ω
Flex 8S
BL (TM)
VOICE-COIL DC RESISTANCE: R
EVC
(OHMS) . . . . . . . . 1.89 . . . . . . . . . 3.67
VOICE-COIL INDUCTANCE @ 1KHZ:
L
EVC
(MH).. . . . . . . . .0.4......... 1.62
DRIVER RADIATING AREA:
SD (IN2) . . . . . . . . . . 31.16 . . . . . . . . 31.16
S
D
(CM2)......... 201.06....... 201.06
MOTOR FORCE FACTOR:
BL . . . . .. . . . . . . 4.5 . . . . . . . . 8.846
COMPLIANCE VOLUME:
VAS (FT3) . . . . . . . . . 0.432 . . . . . . . . 0.444
V
AS
(LITERS)...... 12.228....... 12.571
SUSPENSION COMPLIANCE:
CMS (µM/N)......214.00....... 220.00
MOVING MASS, AIR LOAD:
MMS (GRAMS). . . . . . 71.32 . . . . . . . 71.557
FREE-AIR RESONANCE:
FS (HZ) . . . . . . . . . . 40.8 . . . . . . . . . 40.1
MECHANICAL Q:
QMS. . . . . . . . . . . . . 6.794 . . . . . . . . . 7.17
ELECTRICAL Q:
QES. . . . . . . . . . . . . . . . . . . . . 0.846
TOTAL Q:
QTS. . . . . . . . . . . . . . . . . . . . . 0.757
MAGNETIC-GAP HEIGHT:
HAG (IN) . . . . . . . . . . . . . . . . . . . . 0.33
H
AG
(MM) . . . . . . . . . . . 8.5. . . . . . . . . . 8.5
VOICE-COIL HEIGHT:
HVC (IN)...........0.58 . .. ...... 0.58
H
VC
(MM) . . . . . . . . . . 14.7 . . . . . . . . . 14.7
MAXIMUM EXCURSION:
X
MAX
(IN) . . . . . . . . . . 0.12 . . . . . . . . . 0.12
X
MAX
(MM) . . . . . . . . . . 3.1 . . . . . . . . . . 3.1
2Ω 4Ω
TECHNICAL DATA
Flex 8D
THIELE-SMALL PARAMETERS
(TM)
1.704
1.363
0.33
SEALED-BOX VOLUME (INCLUDES DRIVER DISPLACEMENT)
V
BOX
= 0.4 ft3 (11.03 liters)
(side view)
VENTED-BOX VOLUME (INCLUDES DRIVER/PORT DISPLACEMENTS)
Port
fB= 32.62Hz
diameter = 76mm
length = 255mm
V
BOX
= 1.08 ft3 (30.73 liters)
(side view)
V
BOX
= 0.93 ft3 (26.35 liters)
(side view)
VENTED-BOX VOLUME (INCLUDES DRIVER/PORT DISPLACEMENTS)
Port
fB= 34.44Hz
diameter = 76mm
length = 255mm
V
BOX
= 0.9 ft3 (25.11 liters)
(side view)
DIAMETER: 8" (200mm)
SENSITIVITY (2.0V @ 1M): 84 dB
POWER HANDLING: 150W RMS (600W Peak)
FREQUENCY RESPONSE:
25 Hz - 500Hz
NOMINAL IMPEDANCE: 2+2 ohms
VOICE-COIL DIAMETER: 1-9/16" (38.9mm)
DIMENSIONS:
DIAMETER:
SENSITIVITY (2.0V @ 1M):
POWER HANDLING:
FREQUENCY RESPONSE:
NOMINAL IMPEDANCE:
VOICE-COIL DIAMETER:
DIMENSIONS:
SPECIFICATIONS
outer diameter
10-1/4" (260.0mm)
cutout diameter
7-9/16" (192.0mm)
3-3/8" (84.8mm)
mounting depth
2-1/2" (63.3mm)
mounting height
7/8" (21.5mm)
8" (200mm)
83dB
150W RMS (600 W Peak)
25 Hz - 500Hz
2 ohms
SPECIFICATIONS
1-9/16" (38.9mm)
outer diameter
10-1/4" (260.0mm)
cutout diameter
7-9/16" (192.0mm)
3-3/8" (84.8mm)
mounting depth
2-1/2" (63.3mm)
mounting height
7/8" (21.5mm)
SEALED-BOX VOLUME (INCLUDES DRIVER DISPLACEMENT)
THIELE-SMALL PARAMETERS
Discover other subwoofers on our website.
 Loading...