

Page 1
HK3700/HK3770
1
Place the Stereo Receiver
• Place the Stereo receiver on a firm and level surface. Be certain that the surface and any mounting hardware can support the
Stereo receiver’s weight.
• Provide proper space above, below, behind and to the sides of the Stereo receiver for ventilation. Maintain a clearance of at least 12"
(30cm) on each side of, above and behind the unit.
• If you install the Stereo receiver in a cabinet or other enclosed area, provide cooling air within the cabinet. Under some circumstances,
a fan may be required.
• Do not obstruct the ventilation slots on the top of the Stereo receiver or place objects directly over them.
• Do not place the Stereo receiver directly on a carpeted surface.
• Do not place the Stereo receiver in moist or humid locations, in extremely hot or cold locations, in areas near heaters or heat registers,
or in direct sunlight.
NOTE: For complete information about using all of your HK3700 and HK3770, download the HK3700 and HK3770 Owner’s Manual from
www.harmankardon.com.
Quick Start Guide
2
Connections
CAUTION: Before making any connections to the Stereo receiver, ensure that the Stereo receiver’s AC cord is unplugged from the
Stereo receiver and the AC outlet. Making connections with the Stereo receiver plugged in and turned on could damage the speakers.
HK 3700
1
5 6 7 8
2 3 4
RIGHT LEFT
REC OUT PREOUT
RIGHT LEFT
9
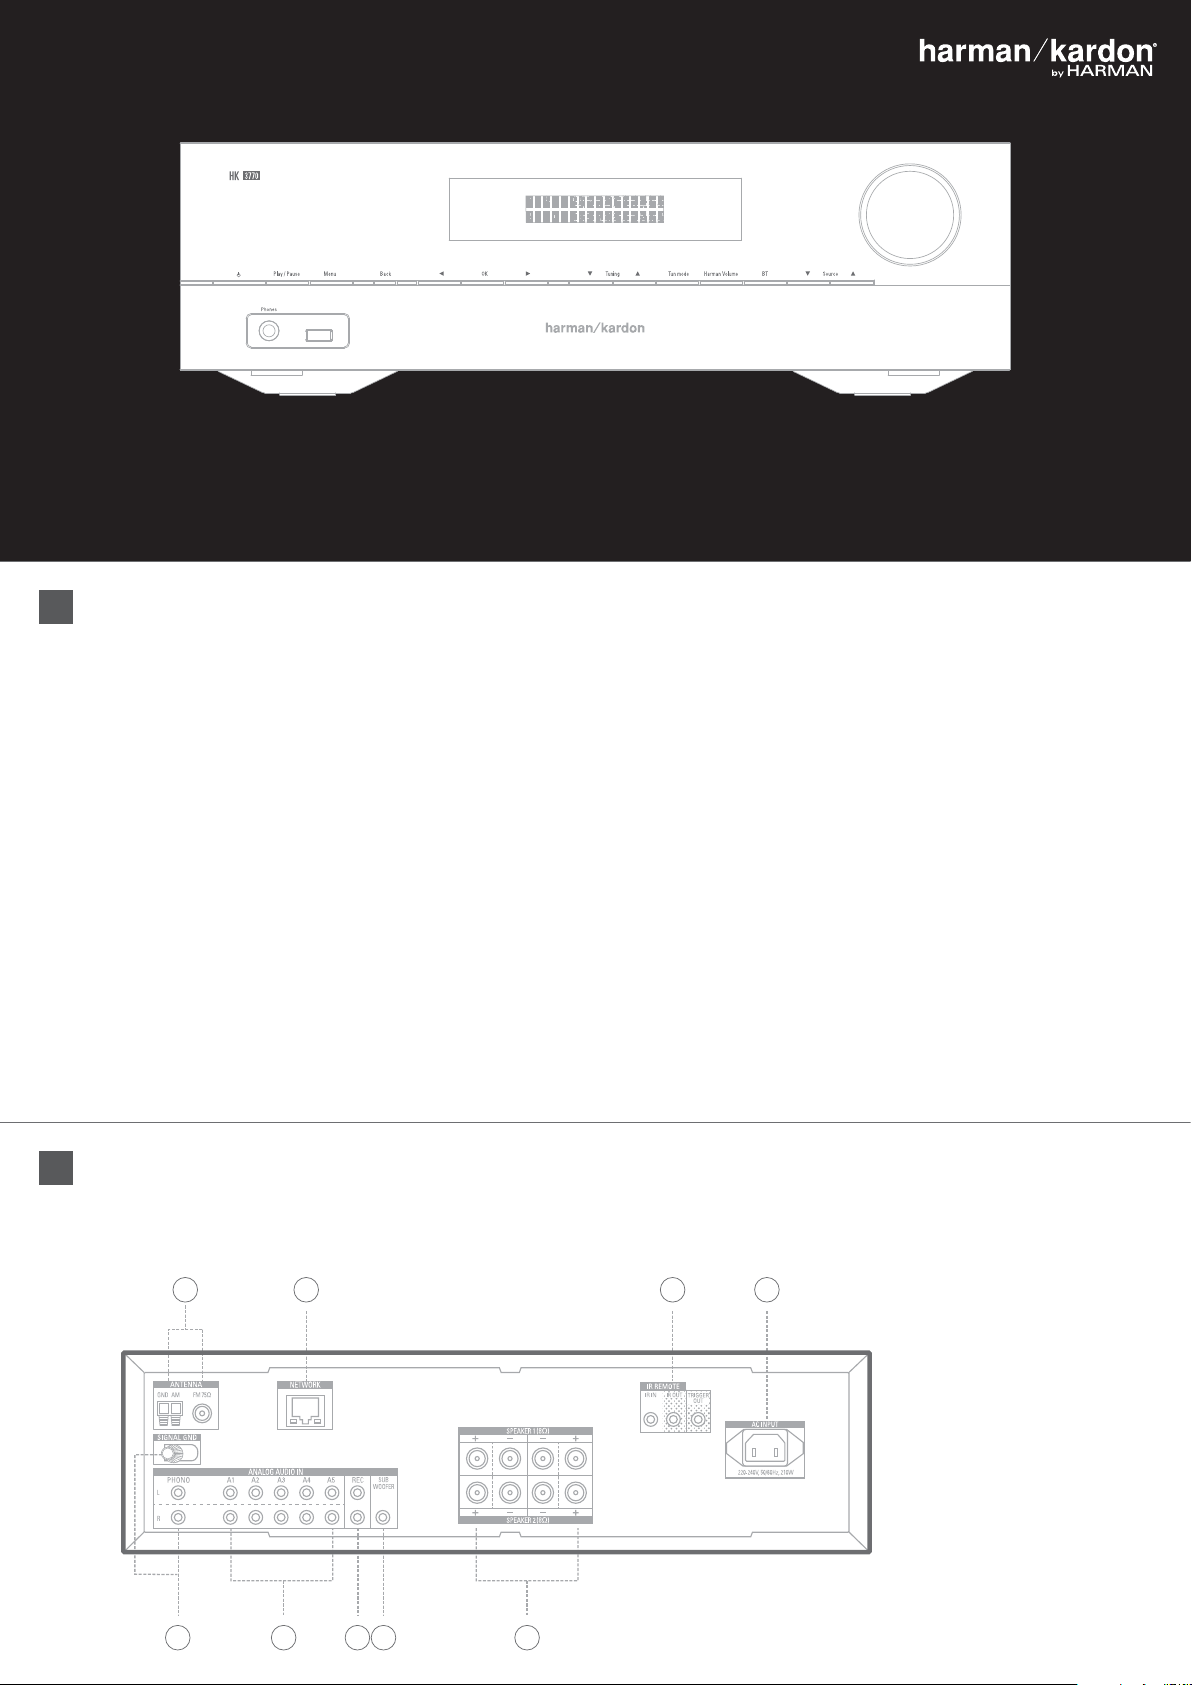
1) FM and AM radio antenna
connectors
2) RJ45 Network connector
3) Remote IR and subwoofer
trigger connectors
4) AC input connector
5) Phono input
6) Analog audio inputs
7) Rec Out output
8) Subwoofer output
9) Speaker 1 & 2 outputs
Page 2
HK 3770
1
6 7 8 9
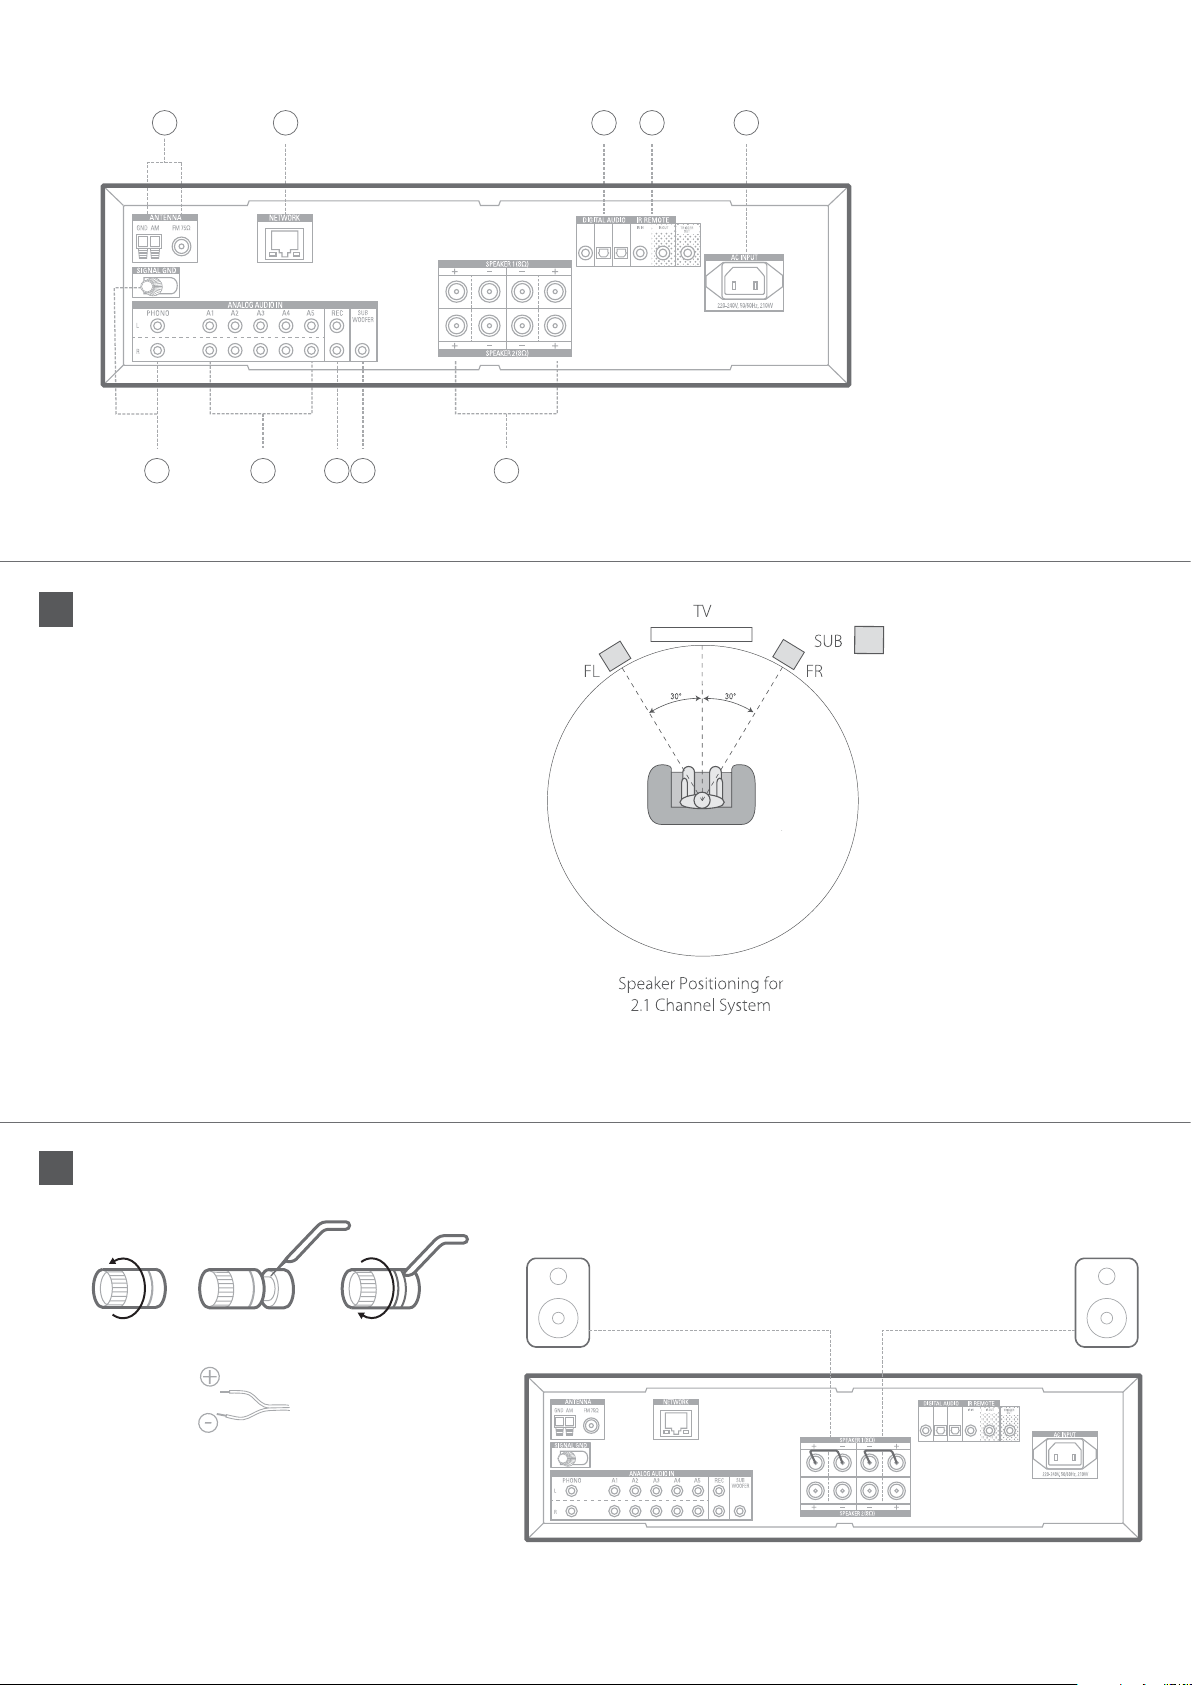
Place Your Speakers
3
2 43 5
REC OUT PREOUT
Determine the locations for your system’s speakers
according to their manufacturer’s directions and
the layout of your listening room.
Use the illustrations below as a guide for
2.1 channel system.
For more detailed speaker placement information,
download the complete Stereo receiver Owner’s
Manual from www.harmankardon.com.
RIGHT LEFT
RIGHT LEFT
10
1) FM and AM radio antenna
connectors
2) RJ45 Network connector
OPTICAL 1COAXIAL
OPTICAL 2
3) Digital audio input
connector
4) Remote IR and subwoofer
trigger connectors
5) AC input connector
6) Phono input
7) Analog audio inputs
8) Rec Out output
9) Subwoofer output
10) Speaker 1 & 2 outputs
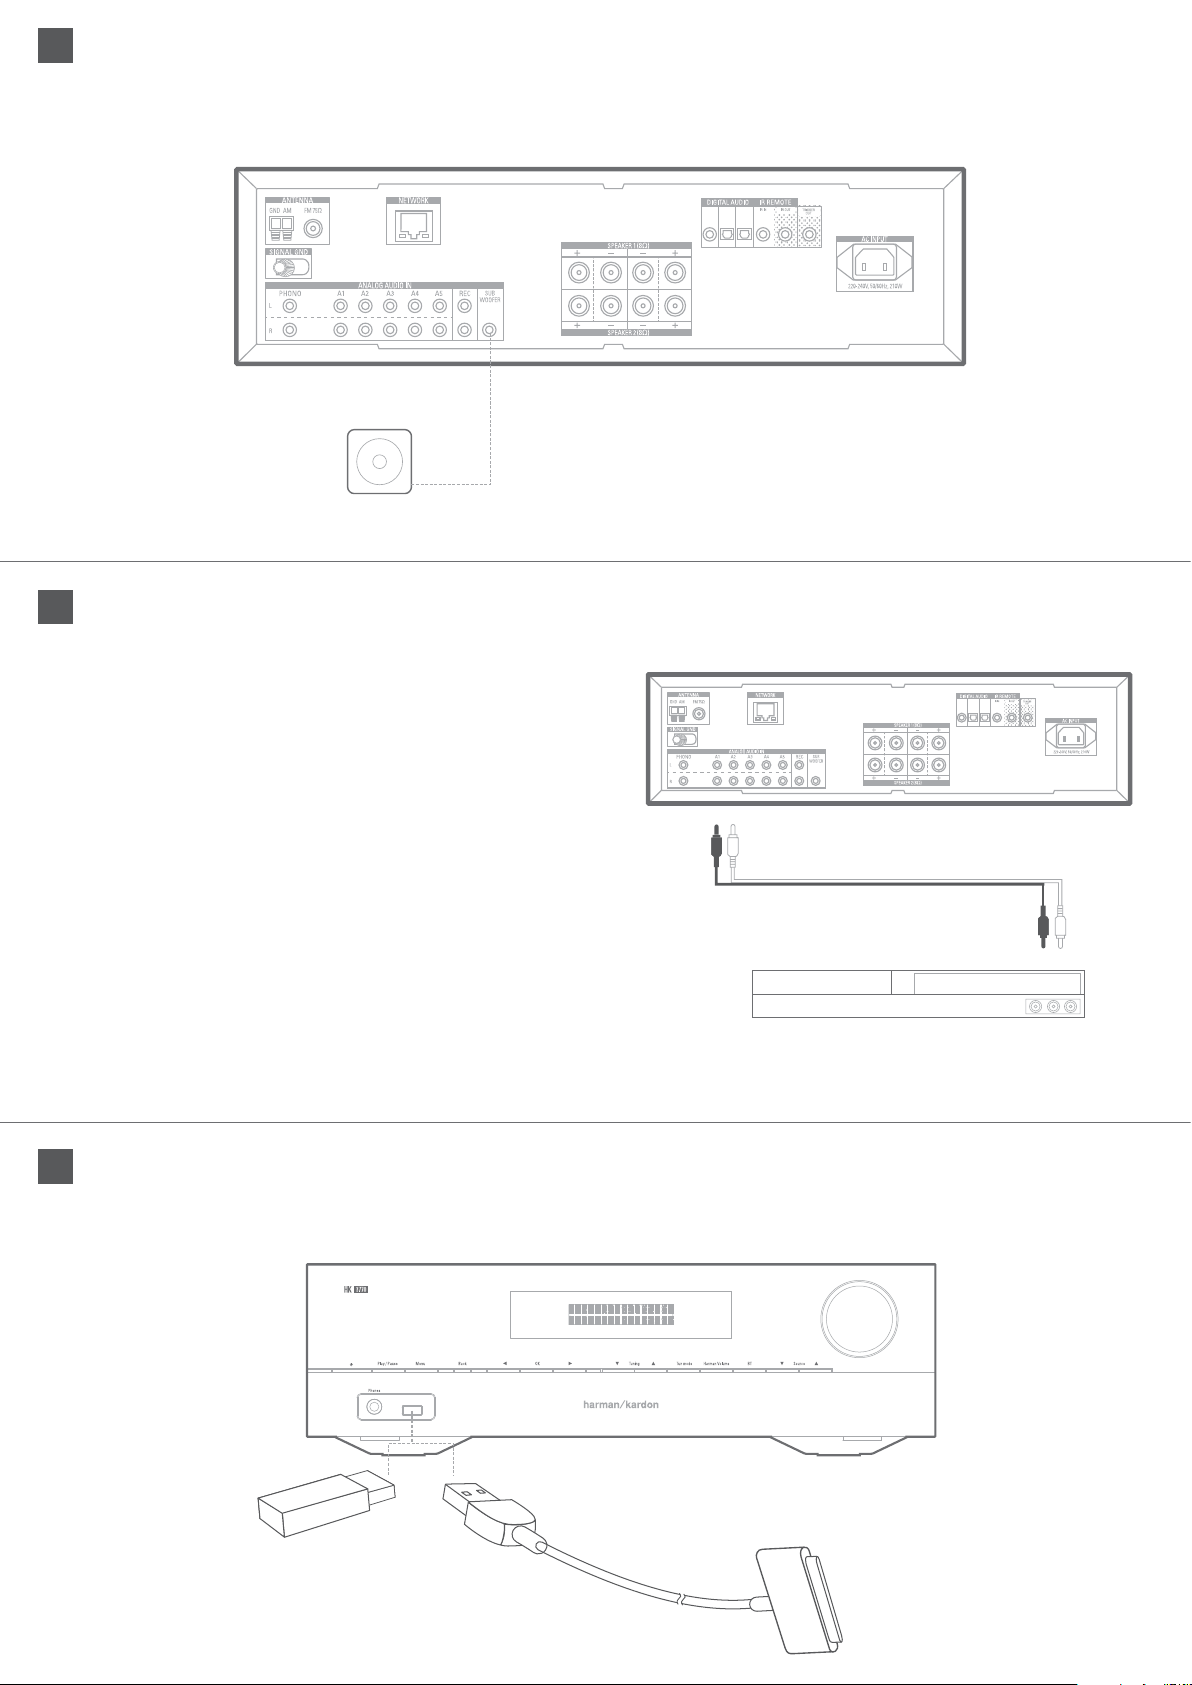
Connect Your Speakers
4
How to use the Stereo receiver speaker terminals:
1. Unscrew Cap 2. Insert Bare Wire 3. Tighten Cap
Wire with black
stripe is ‘_’ terminal
Always connect the colored (+) terminal on the Stereo
receiver to the (+) terminal on the speaker (usually
red), and the black (–) terminal on the Stereo receiver
to the (–) terminal on the speaker (usually black).
IMPORTANT: Make sure the ( + ) and ( – ) bare wires do
not touch each other or the other terminal. Touching
wires can cause a short circuit that can damage your
Stereo receiver. Connect the speakers as shown in the
illustration.
Front Right
speaker
RIGHT LEFT
RIGHT LEFT
OPTICAL 1COAXIAL OPTICAL 2
Front left
speaker
Page 3
Connect a subwoofer (optional)
5
Use a single RCA audio cable to connect subwoofer to your Stereo receiver’s Subwoofer Pre-Out connector, as shown in the illustration below.
Consult your subwoofer’s user manual for specific information about making connections to it.
OPTICAL 1COAXIAL
OPTICAL 2
RIGHT LEFT
RIGHT LEFT
Subwoofer
Connect your audio source device
6
A source device is a component where an audio playback signal originates
from, like a CD player, DVD player, Cable, Satellite or HDTV boxes, Tuner,
etc. Your Stereo receiver has several different types of input connectors to
accommodate to those different components: Phono input, analog audio
inputs, optical digital audio inputs (HK3770 only) and coaxial digital audio
input (HK3770 only). The Analog audio input are not labeled for specific
types of source devices but they are labeled numerically from A1 to A5
(AUX inputs)
Your Stereo receiver's various auxiliary (AUX) analog inputs can be selected
by the remote control using the AUX button. Simply press the AUX button
to cycle between the various inputs:
AUX 1 --> AUX 2 --> AUX3 ... AUX5 --> AUX1
KH 3770 only: Your Stereo receiver's digital audio inputs label on the
back panel of the stereo receiver COAXIAL, OPTICAL 1 and OPTICAL 2 can
be selected by the remote control using the DIGITAL button. Simply press
the Digital button to cycle between the various inputs:
COAXIAL --> OPTICAL 1 --> OPTICAL 2 --> COAXIAL
Note: the other sources of the Stereo receiver like Phono input, FM/AM
tuner, Internet radio Vtuner, USB audio play back, Bluetooth and Network
DLNA have direct access buttons on the remote control.
RIGHT LEFT
RIGHT LEFT
OPTICAL 1COAXIAL
OPTICAL 2
USB and iOS Devices
7
Use the Stereo receiver’s front-panel USB port to connect an iPod, iPhone or iPad using an Apple cable (not supplied) or to connect a USB flash
drive with music content (MP3, AAC, WMA or WAV format only). You can play audio files from your apple device or USB flash drive, and use the
Stereo receiver’s remote to control playback.
Page 4

Connect Your Home Network
8 9
Use a Cat. 5 or Cat. 5E cable (not supplied) to connect the Stereo
receiver’s Network connector to your home network to enjoy
Internet radio and content from DLNA®-compatible devices that
are connected to the network. Download the full owner's manual
at www.harmankardon.com for network setup information.
To Internet
Network Modem
Connect the Radio Antennas
AM Antenna (supplied)
RIGHT LEFT
FM Antenna (supplied)
OPTICAL 1COAXIAL
OPTICAL 2
RIGHT LEFT
RIGHT LEFT
Connect to AC Power
11
Stereo receiver :
Connect the supplied AC power cord to non-switched AC
power outlet.
RIGHT LEFT
RIGHT LEFT
OPTICAL 1COAXIAL
OPTICAL 2
OPTICAL 1COAXIAL
OPTICAL 2
AC Power Cord
RIGHT LEFT
NOTE: To connect, remote IR and trigger equipment, please
download the Stereo receiver Owner’s Manual from
www.harmankardon.com.
Set Up the Stereo receiver
12
Install the Batteries in the Remote Control
Remove the remote control’s battery cover, insert the two
supplied AAA batteries as shown in the illustration, and replace
the battery cover.
1. Remove
Cover
2. Insert
Batteries
3. Replace
Cover
NOTE: Remove the protective
plastic from the Stereo
receiver’s front panel so it
doesn’t reduce the remote
control’s effectiveness.
Using the Remote Control
You will be using the following remote-control buttons to
configure your Stereo receiver:
POWER
1
5
8
11
14
16
17
ON
OFF
Cable/Sat
Stereo
TV
USB BluetoothPhono FM/AM
AUX DigitalvTuner Network
OK
Clear
Speaker 1 Speaker 2
Vol CH/Tuner
Sleep DIM
P-Scan
A-Preset
MEM RDS
Mute
2
CD
3
4
MENUHarman Volume
6
7
9
ExitTone Control
10
Direct
12
13
15
18
Prev.CH
19
20
1) Power On / Off
2) Mute
3) External device direct remote
control (programmable)
4) Source selection
5) Harman Volume
6) Menu access
7) Navigation pad
8) Tone control
9) Exit
10) Numeric keys
11) Volume control
12) Speaker 1 / 2 selection
13) Preset selection
14) Sleep
15) Dimmer
16) Preset scan
17) Auto preset
18) RDS function
19) Memory
20) External device control
Turn On the Stereo receiver
Press the front-panel Power button or push the ON button on the remote
control.
Power Button Remote Power Button
ON
Stereo
POWER
OFF
Cable/Sat
Mute
TV
CD
Page 5

[HK 3770 only]
The Bluetooth® word mark and logos are registered trademarks owned by Bluetooth SIG, Inc. and any use of such marks by HARMAN International
Industries, Incorporated is under license. Other trademarks and trade names are those of their respective owners.
DLNA®, the DLNA Logo and DLNA CERTIFIED® are trademarks, service marks, or certification marks of the Digital Living Network Alliance.
“Made for iPod,” “Made for iPhone,” and “Made for iPad” mean that an electronic accessory has been designed to connect specifically to iPod,
iPhone, or iPad, respectively, and has been certified by the developer to meet Apple performance standards. Apple is not responsible for the
operation of this device or its compliance with safety and regulatory standards. Please note that the use of this accessory with iPod, iPhone, or iPad
may affect wireless performance.
iPad, iPhone, iPod, iPod nano, and iPod touch are trademarks of Apple Inc., registered in the U.S. and other countries.
Made for iPhone 5, iPhone 4S, iPhone 4, iPhone 3GS, iPad (3rd and 4th generation), iPad 2, iPad, iPad mini, iPod touch (2nd through 5th generation),
and iPod nano (4th through 7th generation).
Feature Description HK 3700 Stereo Receiver HK 3770 Stereo Receiver
GENERAL FEATURES
Output Power at 8Ω 85W @ 8Ω 120W @ 8Ω
Amplification Type Class A/B Class A/B
Internet Radio Yes Yes
Ethernet Connectivity via RJ-45 Yes Yes
MP3/WMA File Play from USB Use built-in 192 kHz/24-bit DAC decoder Use built-in 192 kHz/24-bit DAC decoder
USB Upgrade Yes Yes
iPod/Phone/Pad®/Touch Play from USB Use built-in 192 kHz/24-bit DAC decoder Use built-in 192 kHz/24-bit DAC decoder
DLNA 1.5 Certified (Audio Streaming Only) Yes Yes
Speaker Assign 1/2 Yes Yes
KEY COMPONENTS/COST FACTORS
Audio DSP / Harman Volume Yes Yes
Power supply SMPS SMPS
CONNECTIVITY
AUDIO INPUTS
iPod® audio Yes thru USB Yes thru USB
Front USB Input Yes Yes
AM/FM Yes Yes
Analog Input on Rear 5 5
Analog Input on Front No No
Phono input Yes Yes
AUDIO OUTPUTS
Analog Outputs Yes x 1 Yes x 1
Subwoofer Outputs One One
DIGITAL INPUTS/OUTPUTS
Digital Audio Inputs, Rear No 1 coax/2 optical
ETHERNET /USB /STREAMING FEATURES
Ethernet Connectivity via RJ-45 Yes Yes
Internet Radio Yes Yes
USB ….MP3, WMA, AAC, WAV Yes Yes
DLNA® 1.5 Certified (Audio Streaming Only) Yes Yes
Metadata to VFD Yes Yes
WIRELESS
Bluetooth® No Yes
Page 6

HK 3700 Stereo Receiver
HK 3770 Stereo Receiver
General Specifications
Power requirement: 120V AC / 60Hz
Power consumption: <0.5W (standby); 170W maximum
Dimensions: (H x W x D): 4-3/4" x 17-5/16" x 11-13/16"
(121mm x 440mm x 300mm)
Weight: 6kg
Built-in 24bits/192kHz DAC
Phono input
HARMAN GreenEdge™ technology
New, compact design
vTuner (Internet radio) streaming
Multi-device, programmable/learning remote control
Harman Kardon® Remote app for compatible iOS® and
Android™ smartphones and tablet
Front-panel USB port for connection to compatible Apple®
products or USB flash drive
Power
Stereo power: 85 watts per channel, two channels driven @
6/8 ohms, 20Hz – 20kHz, <0.07% THD
Input sensitivity/impedance: 250mV/27k ohms
Signal-to-noise ratio (IHF-A): 100dB
Frequency response (@ 1W): 10Hz – 130kHz (+0dB/–3dB)
High instantaneous-current capability (HCC): ±XX amps
General Specifications
Power requirement: 120V AC / 60Hz
Power consumption: <0.5W (standby); 240W maximum
Dimensions (H x W x D): 4-3/4" x 17-5/16" x 11-13/16"
(121mm x 440mm x 300mm)
Weight: 6kg
Bluetooth®
Optical and coaxial inputs
Built-in 24bits/192kHz DAC
Phono input
HARMAN GreenEdge™ technology
New, compact design
vTuner (Internet radio) streaming
Multi-device, programmable/learning remote control
Harman Kardon® remote app for compatible iOS® and
Android™ smartphones and tablet
Front-panel USB port for connection to compatible Apple®
products or USB flash drive
Power
Stereo power: 120 watts per channel, two channels driven
@ 6/8 ohms, 20Hz – 20kHz, <0.07% THD
Input sensitivity/impedance: 250mV/27k ohms
Signal-to-noise ratio (IHF-A): 100dB
Frequency response (@ 1W): 10Hz – 130kHz (+0dB/–3dB)
High instantaneous-current capability (HCC): ±XX amps
FM Tuner
Frequency range: 87.5MHz – 108.0MHz
Usable sensitivity IHF: 1.3μV/13.2dBf
Signal-to-noise ratio (mono/stereo): 70dB/68dB
Distortion (mono/stereo): 0.2%/0.3%
Stereo separation: 40dB @ 1kHz
Selectivity (±400kHz): 70dB
AM Tuner Section
Frequency range: 520kHz – 1,710kHz
Signal-to-noise ratio: 38dB
Usable sensitivity (loop): 500μV
Distortion (1kHz, 50% mod): 1.0%
Selectivity (±10kHz): 30dB
Page 7

IMPORTANT SAFETY INSTRUCTIONS
For All Products:
1. Read these instructions.
2. Keep these instructions.
3. Heed all warnings.
4. Follow all instructions.
5. Do not use this apparatus near water.
6. Clean only with a dry cloth.
7. Do not block any ventilation openings.
Install this apparatus in accordance with
the manufacturer’s instructions.
8. Do not install this apparatus near any heat
sources such as radiators, heat registers,
stoves or other apparatus (including
amplifiers) that produce heat.
9. Do not defeat the safety purpose of
the polarized or grounding-type plug. A
polarized plug has two blades with one
wider than the other. A grounding-type
plug has two blades and a third grounding
prong. The wide blade or the third prong
is provided for your safety. If the provided
plug does not fit into your outlet, consult an
electrician for replacement of the obsolete
outlet.
10. Protect the power cord from being walked
on or pinched, particularly at plugs,
convenience receptacles and the point
where they exit from the apparatus.
11. Use only attachments/accessories specified
by the manufacturer.
12. Use only with the cart, stand,
tripod, bracket or table
specified by the manufacturer
or sold with the apparatus.
When a cart is used, use caution when
moving the cart/apparatus combination to
avoid injury from tip-over.
13. Unplug this apparatus during lightning
storms or when unused for long periods
of time.
14. Refer all servicing to qualified service
personnel. Servicing is required when the
apparatus has been damaged in any way,
such as when the power-supply cord or
plug is damaged, liquid has been spilled or
objects have fallen into the apparatus, or
the apparatus has been exposed to rain or
moisture, does not operate normally or has
been dropped.
15. Do not expose this apparatus to dripping or
splashing, and ensure that no objects filled
with liquids, such as vases, are placed on
the apparatus.
16. To disconnect this apparatus from the AC
mains completely, disconnect the powersupply cord plug from the AC receptacle.
17. The mains plug of the power-supply cord
shall remain readily operable.
18. Do not expose batteries to excessive heat
such as sunshine, fire or the like.
CAUTION
RISK OF ELECTRIC SHOCK. DO NOT OPEN.
THE LIGHTNING FLASH WITH AN ARROWHEAD
SYMBOL, WITHIN AN EQUILATERAL TRIANGLE,
IS INTENDED TO ALERT THE USER TO THE
PRESENCE OF UNINSULATED “DANGEROUS
VOLTAGE” WITHIN THE PRODUCT’S ENCLOSURE
THAT MAY BE OF SUFFICIENT MAGNITUDE TO
CONSTITUTE A RISK OF ELECTRIC SHOCK TO
PERSONS.
THE EXCLAMATION POINT WITHIN AN
EQUILATERAL TRIANGLE IS INTENDED TO
ALERT THE USER TO THE PRESENCE OF
IMPORTANT OPERATING AND MAINTENANCE
(SERVICING) INSTRUCTIONS IN THE LITERATURE
ACCOMPANYING THE PRODUCT.
WARNING: TO REDUCE THE RISK OF FIRE
OR ELECTRIC SHOCK, DO NOT EXPOSE THIS
APPARATUS TO RAIN OR MOISTURE.
FCC AND IC STATEMENT FOR
USERS (USA AND CANADA
ONLY)
This device complies with part 15 of the FCC Rules. Operation is subject to the following two conditions: (1) This
device may not cause harmful interference, and (2) this
device must accept any interference received, including
interference that may cause undesired operation.
This Class B digital apparatus complies with Canadian
ICES-003.
Cet appareil numérique de la classe B est conforme à la
norme NMB-003 du Canada.
Federal Communication Commission Interference Statement
This equipment has been tested and found to comply with
the limits for a Class B digital device, pursuant to Part
15 of the FCC Rules. These limits are designed to provide reasonable protection against harmful interference
in a residential installation. This equipment generates,
uses and can radiate radio frequency energy and, if not
installed and used in accordance with the instructions,
may cause harmful interference to radio communications.
However, there is no guarantee that interference will not
occur in a particular installation. If this equipment does
cause harmful interference to radio or television reception, which can be determined by turning the equipment
off and on, the user is encouraged to try to correct the
interference by one or more of the following measures:
• Reorient or relocate the receiving antenna.
• Increase the separation between the equipment and
receiver.
• Connect the equipment into an outlet on a circuit different from that to which the receiver is connected.
• Consult the dealer or an experienced radio/TV technician for help.
Caution: Changes or modifications not expressly approved by HARMAN could void the user’s authority to operate the equipment.
For Products That Transmit RF
Energy:
FCC AND IC INFORMATION FOR USERS
This device complies with Part 15 of the FCC rules and
Industry Canada license-exempt RSS 210. Operation is
subject to the following two conditions: (1) This device
may not cause harmful interference; and (2) this device
must accept any interference received, including interference that may cause undesired operation.
FCC/IC Radiation Exposure Statement
This equipment complies with FCC/IC RSS-102 radiation
exposure limits set forth for an uncontrolled environment. This equipment should be installed and operated
with minimum distance 20cm between the radiator &
your body.
For Products with Radio Receivers That Can Use an External Antenna (USA ONLY):
CATV (Cable TV) or Antenna Grounding
If an outside antenna or cable system is connected to
this product, be certain that it is grounded so as to provide some protection against voltage surges and static
charges. Section 810 of the National Electrical Code
(NEC), ANSI/NFPA No. 70-1984, provides information with
respect to proper grounding of the mast and supporting
structure, grounding of the lead-in wire to an antenna discharge unit, size of grounding conductors, location of antenna discharge unit, connection to grounding electrodes
and requirements of the grounding electrode.
Note to CATV System Installer:
This reminder is provided to call the CATV (cable TV)
system installer’s attention to article 820-40 of the NEC,
which provides guidelines for proper grounding and, in
particular, specifies that the cable ground shall be connected to the grounding system of the building, as close
to the point of cable entry as possible.
 Loading...