

Page 1

Model: PV602
TOYOTA
Page 2

Audio and multimedia
6
6-1. Basic operation
Multimedia system ................... 2
Main system controls ............... 4
Touch controls ......................... 5
6-2. FM and AM radio
Selecting a radio station ........... 6
Storing a radio station .............. 7
6-3. USB memory sticks / iPod
Compatible extensions ............. 8
Playing audio ........................... 9
6-4. Bluetooth®
Compatible devices ............... 14
Smartphone pairing ............... 15
Playing an audio file via
Bluetooth® ......................... 19
Voice call via Bluetooth® ...... 20
6-5. SDL
SDL function
(Smart Device Link) ............ 22
6-6. Updates
Software updates .................. 24
6-7. Regulatory
USA ....................................... 25
Canada ................................. 26
1
Page 3
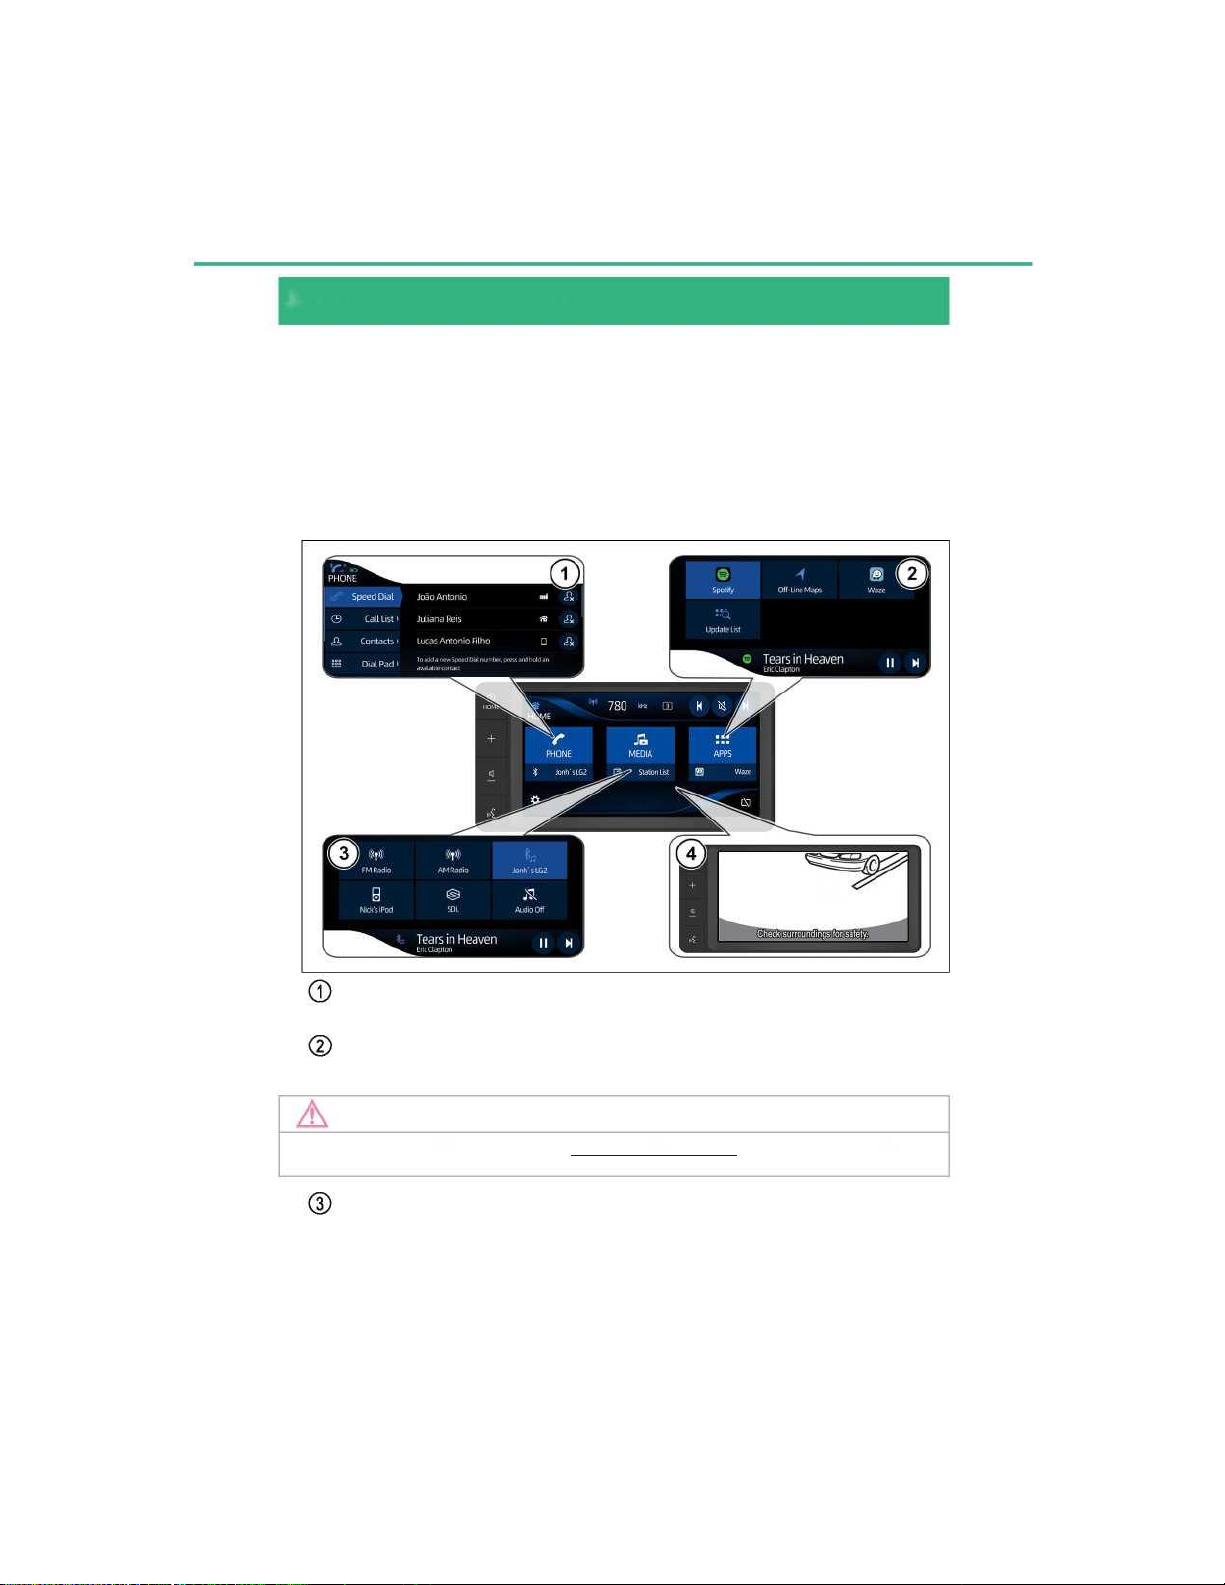
2 6-1. Basic operation
The multimedia system is composed of audio and video systems, hands-free
telephone system, connection of smartphones via Bluetooth® and USB cable,
parking assistance with back-up camera and system updates via Wi-Fi.
The main screen of the multimedia system displays 3 keys to access the
hands-free telephone system [PHONE], audio system [MEDIA] and
applications [APPS].
Hands-free cellphone
Bluetooth®
Applications - APP
Music, street map.
Audio system
AM/FM radio, iPod, USB, Bluetooth and SDL
Check the list of available apps at www.toyota.com.usa
Multimedia system
NOTE
Page 4
6-1. Basic operation 3
Audio
and multimedia
ATTENTION
For more information, see the "Multimedia System Manual" for this model at
www.toyota.com.usa
NOTE
For safety reasons, the driver must not operate the multimedia system while
driving. Lack of attention on the road and in transit can cause accidents.
Always obey traffic laws and be aware of road conditions when driving.
Page 5

4 6-1. Basic operation
Main system controls
It is possible to operate the multimedia system from the side keys on the
device, using the touch screen or the remote control switches on the steering
wheel.
On/Off and Home button (Main Screen)
Press and hold the button to turn the multimedia system on/off; with the
system on, press to access the main screen.
Button
Press the button to adjust the volume.
Hands-Free System.
Press the button for cellular voice recognition.
Page 6
6-1. Basic operation 5
Audio
and multimedia
Controls operated by touch
The multimedia system can be operated
by directly pressing the markers and
elements displayed on the touch panel with
your fingers.
Page 7
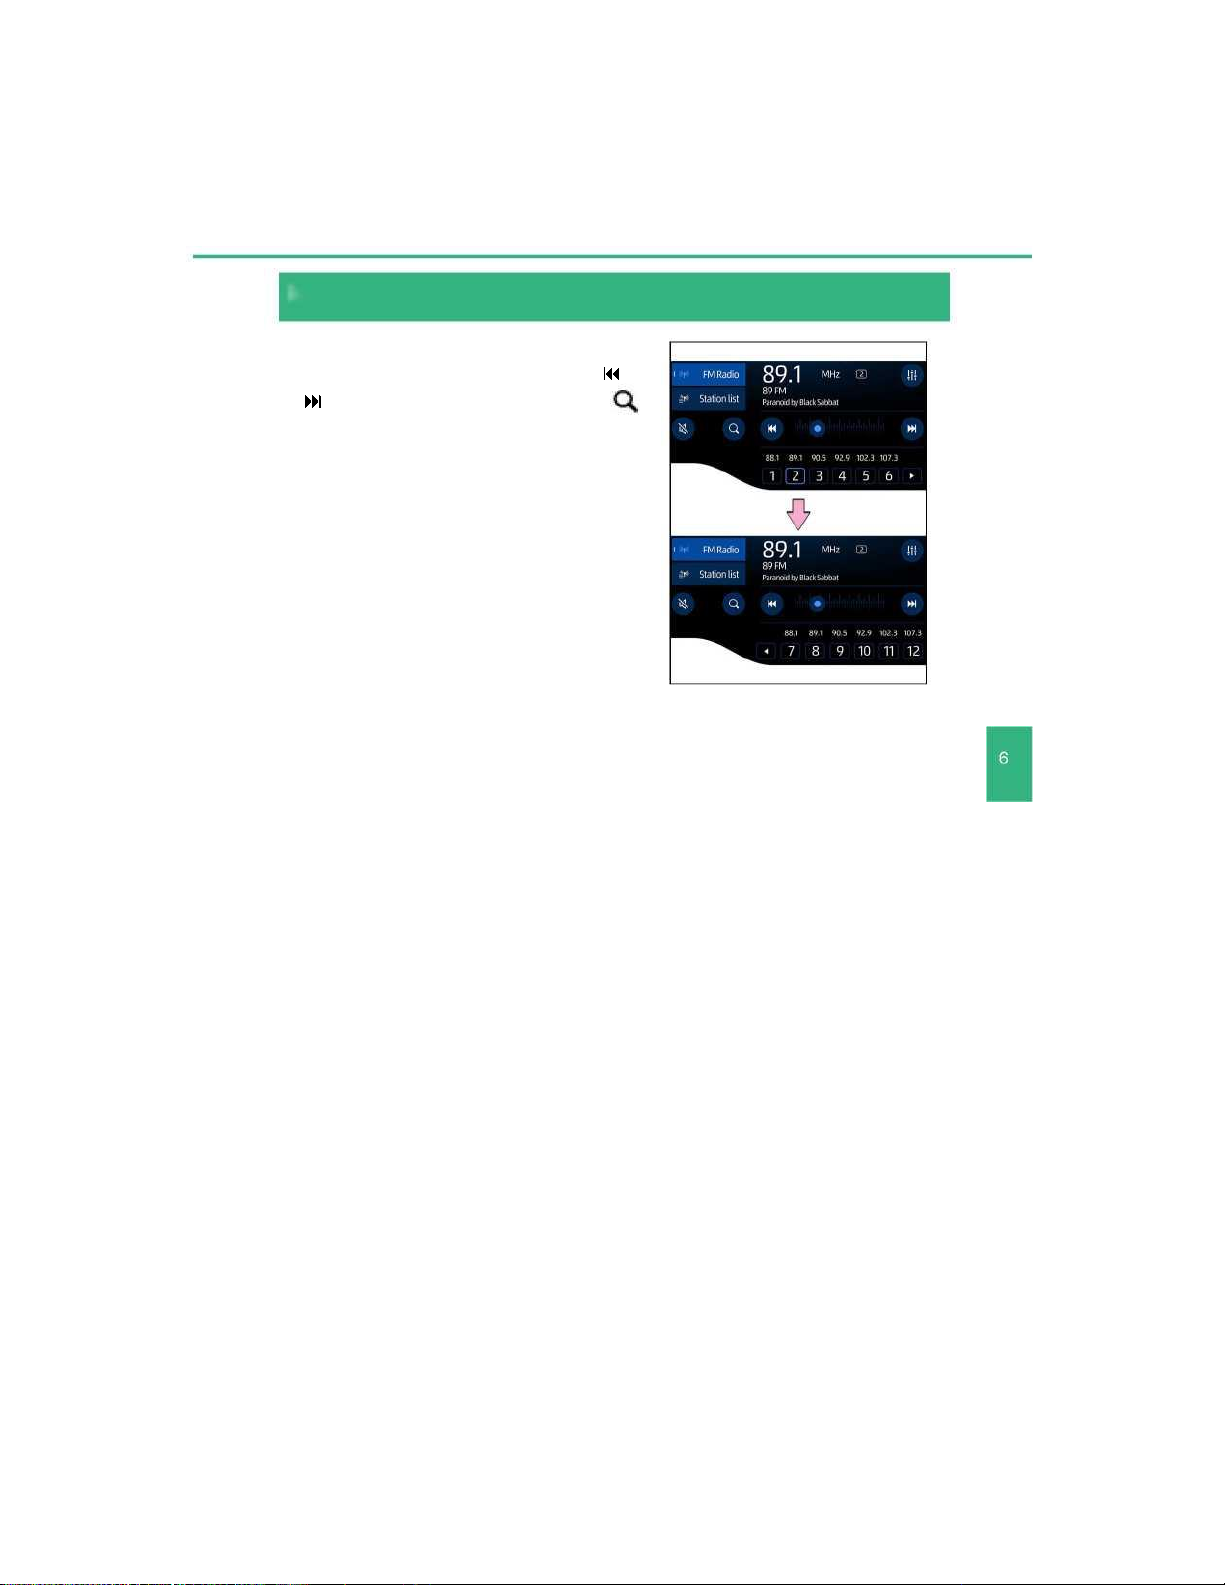
6 6-2. FM and AM radio
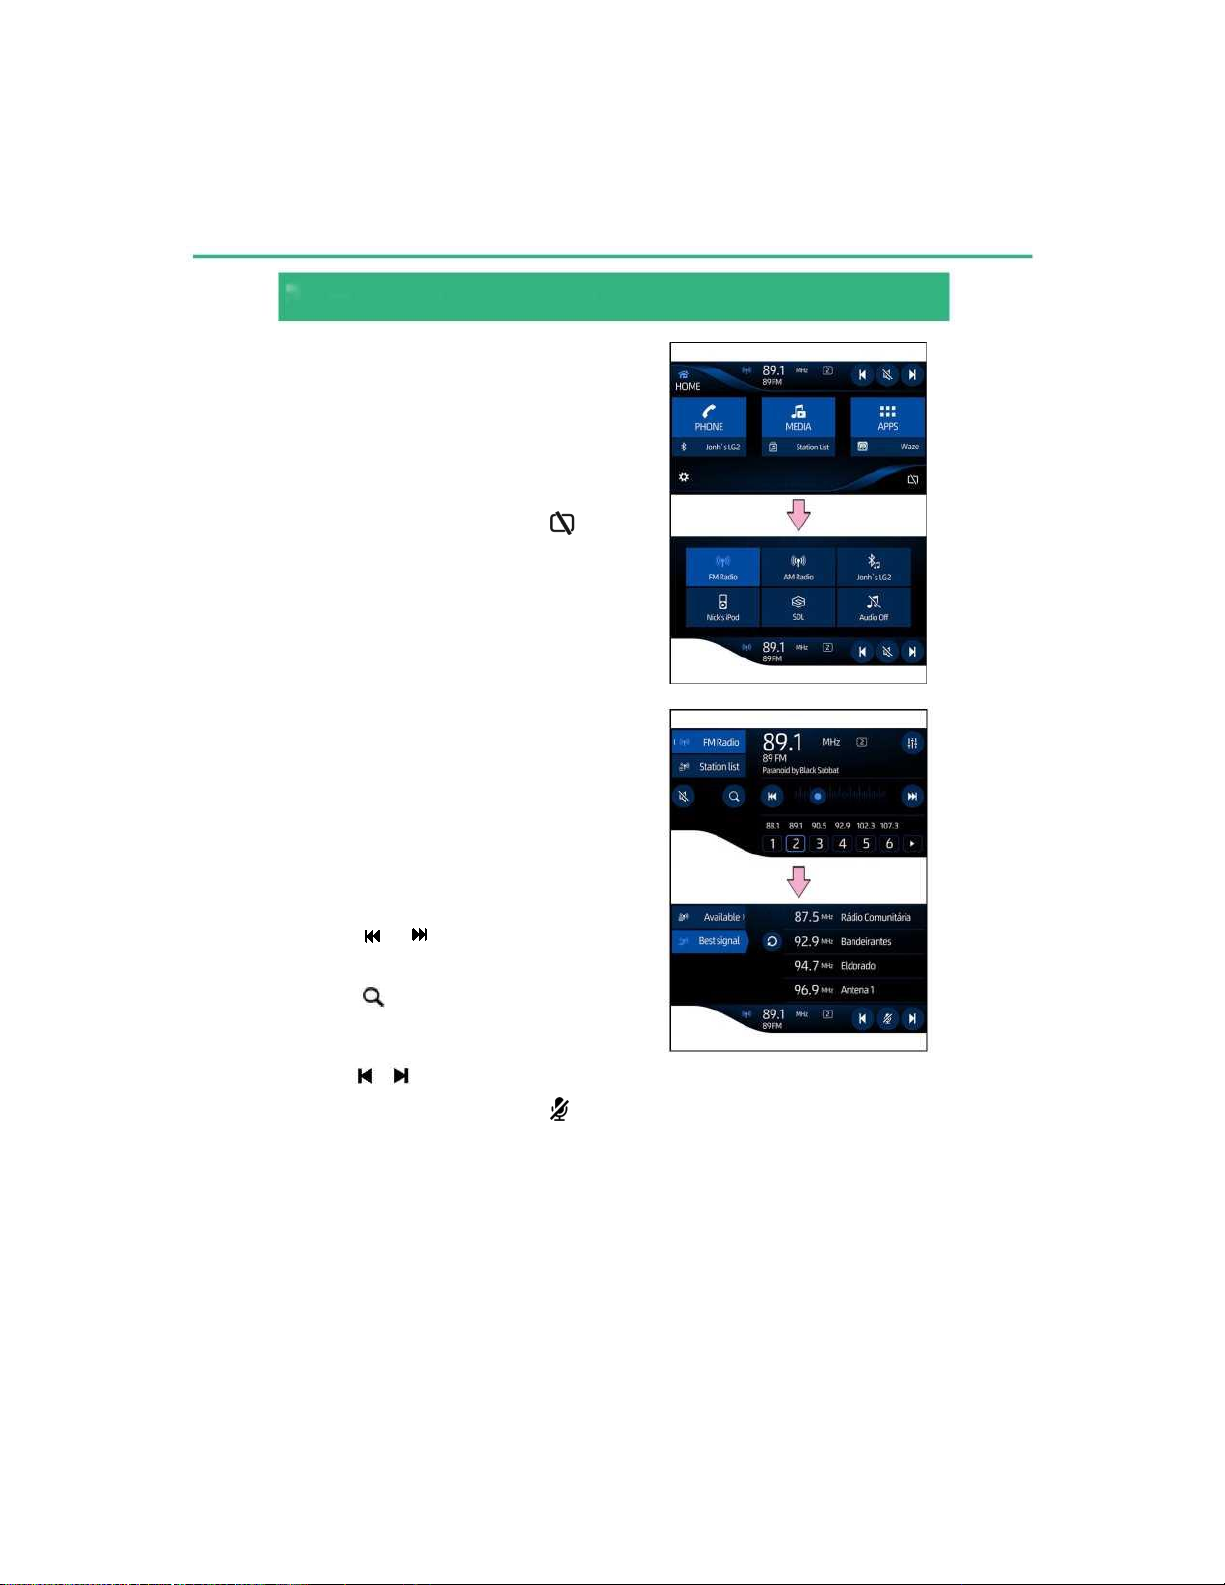
Select a radio station
To select the AM, FM mode, press the
[HOME] key from any screen and/or press
the [MEDIA] key to display the audio
modes on the screen.
Select the desired option, AM or FM, in the
lower menu.
To turn off the screen, press [ ]
To select a radio station, press
[StationList] to see a list of the available
stations [Available] or press [Best signal]
to display a list of the stations with the
strongest signal.
Press an item on the list to select the
station.
Press [ or ] to tune a radio station
manually, backwards and forwards.
Press [ ] to Start an automatic station
search, press again to Interrupt.
To select one of the memorized stations,
press [ o ].
To turn off the volume, press [ ].
Page 8
6-2. FM and AM radio 7
Audio
and multimedia
Store a radio station
To store a station, manually select the
desired radio station using the keys [ ] or
[ ] or automatically using the key [ ]
and then press and hold on one of the
12 available cells to store the new station.
The stored station will be displayed above
the selected cell.
Page 9
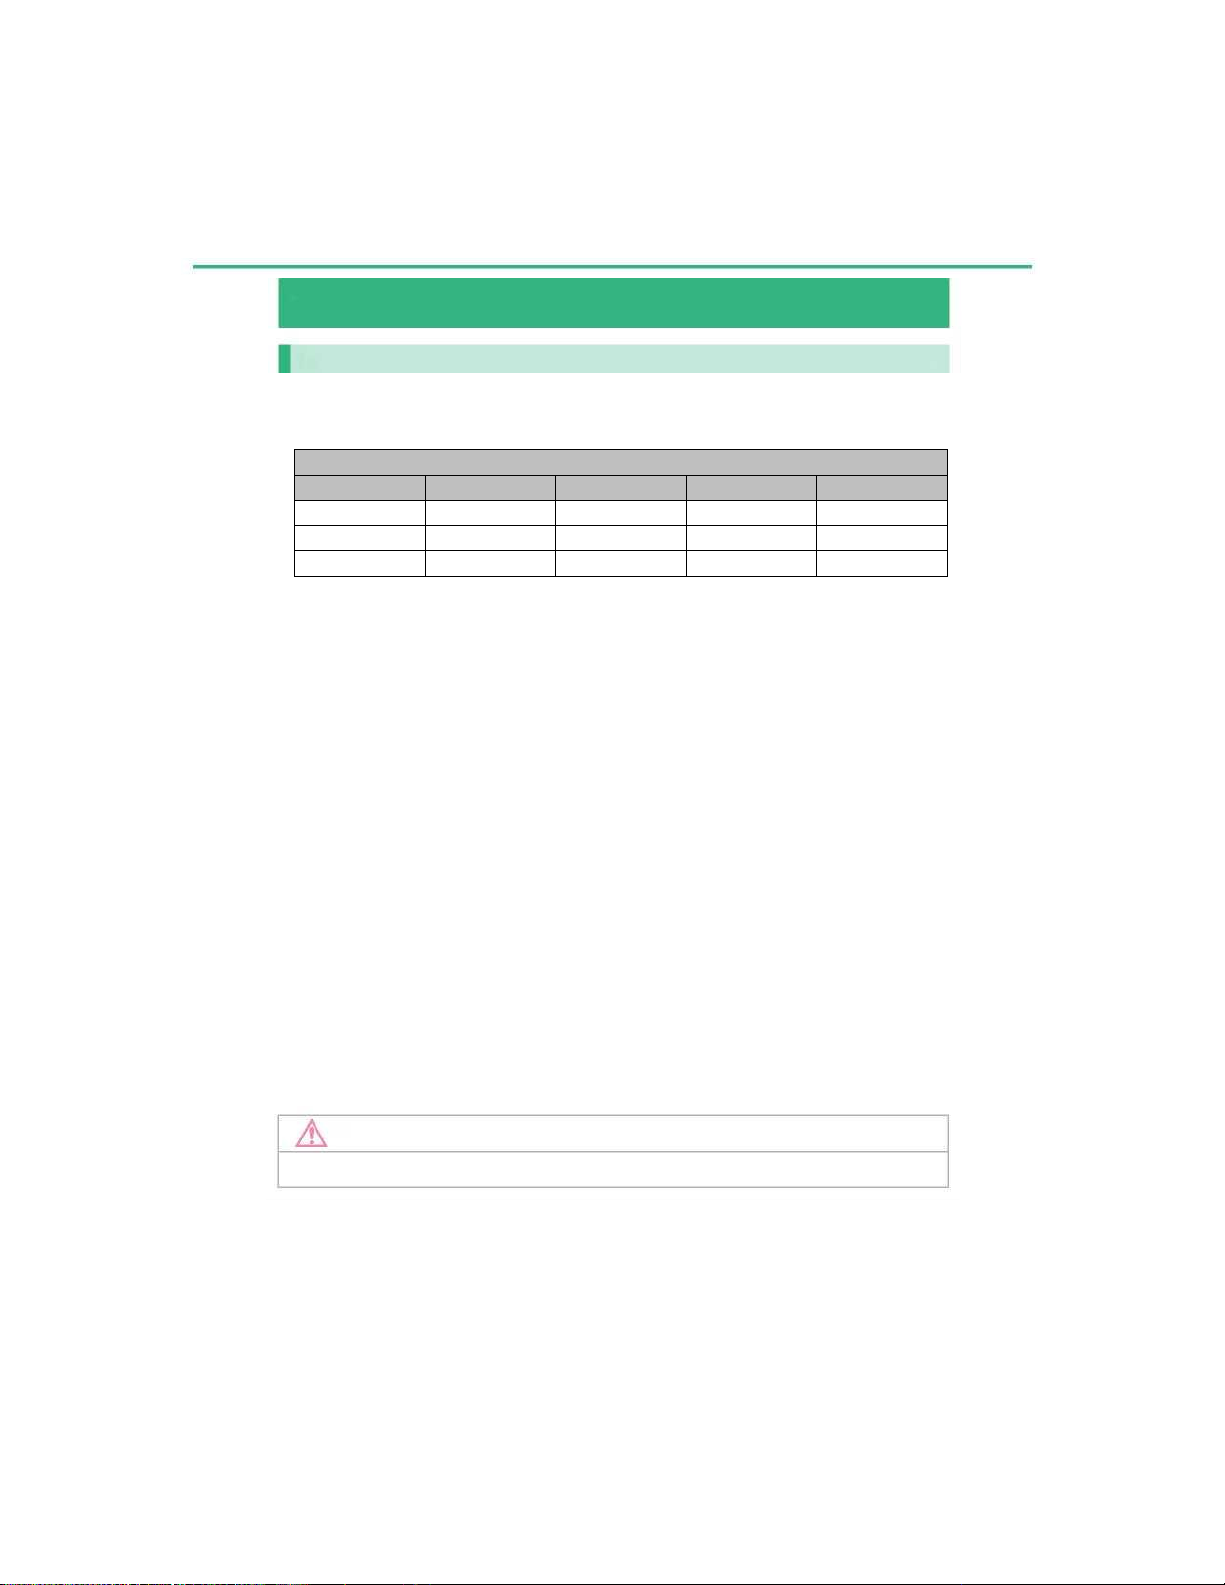
8 6-3. USB memory sticks / iPod
Compatible extensions
Types of media and files that can be run in this multimedia system
This device plays the main types of files and audio available on the market.
The types and formats are described in the following table:
Audio
Format
Extension
USB
iPod/IOS
Android
WMA
.wma
Yes
No
Yes
MP3
.mp3
Yes
Yes
Yes
AAC
.m4a
Yes
No
Yes
NOTE
Files in formats not listed may or may not be playable.
Page 10

6-3. USB memory sticks / ¡Pod 9
Audio
and multimedia
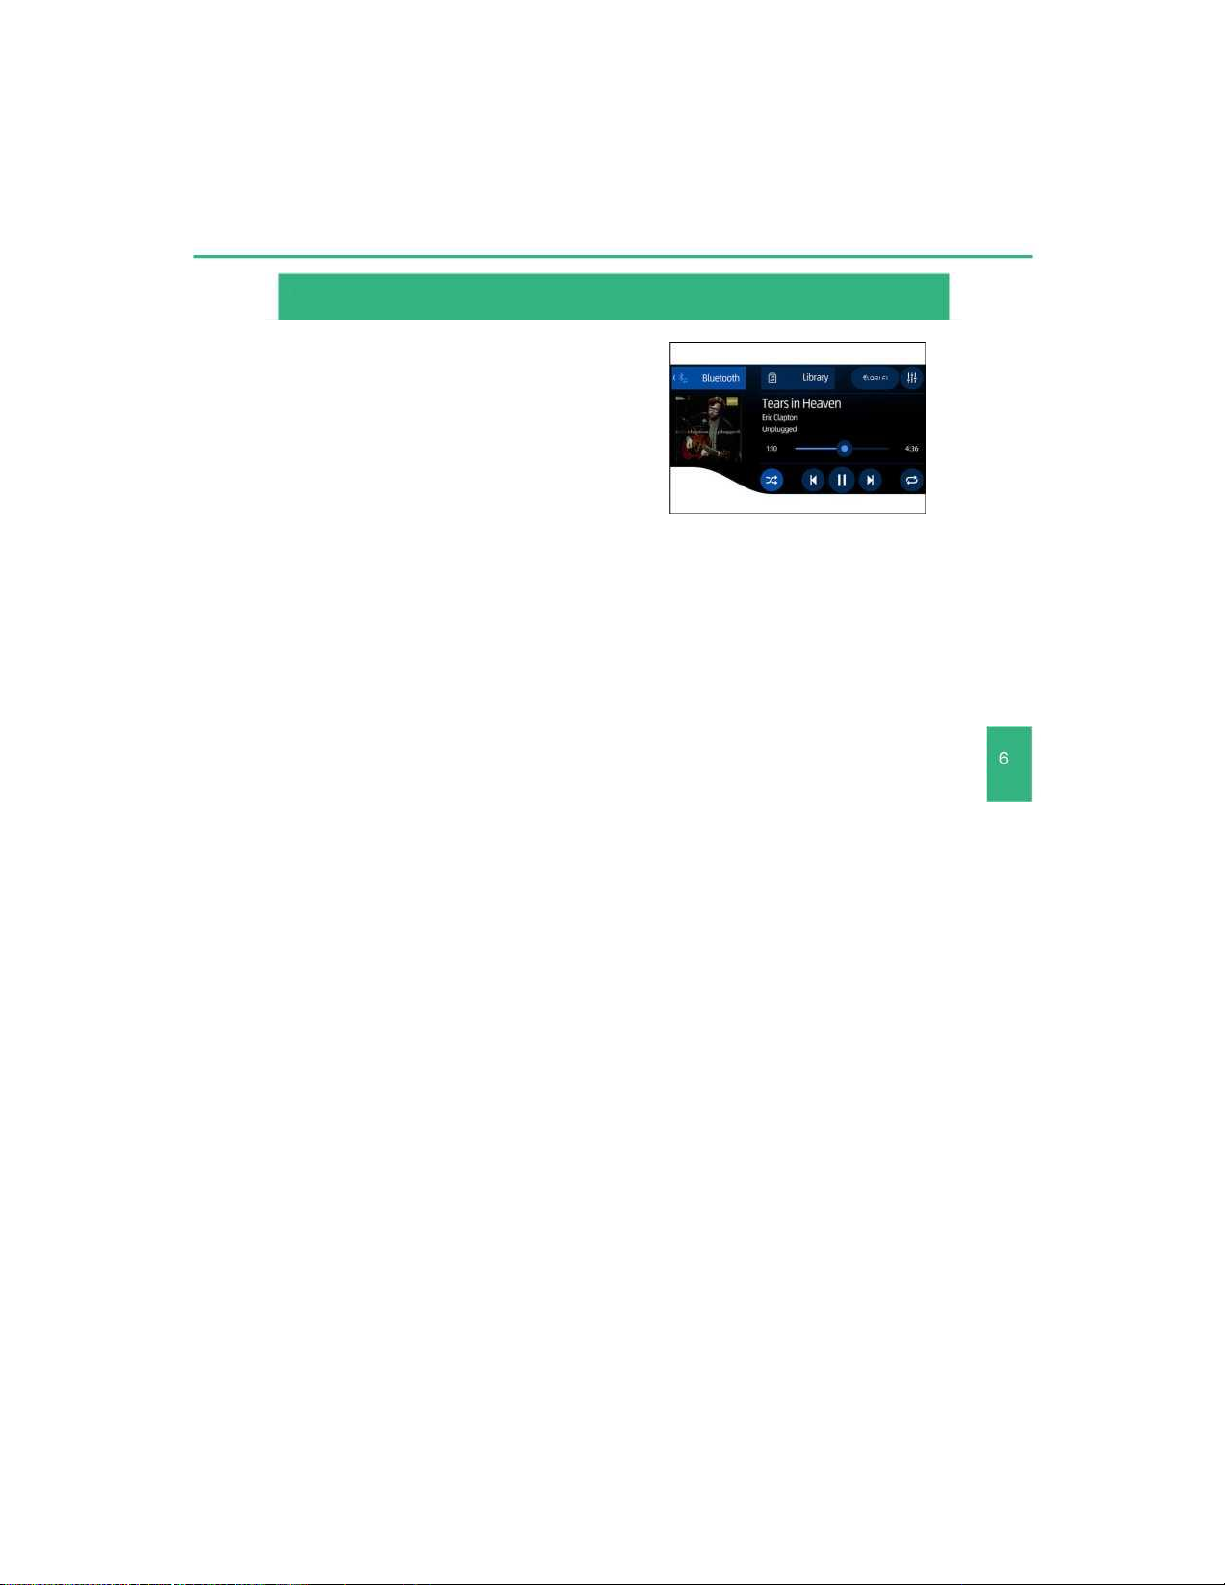
Playing Audio
USB memory stick / iPod
To select the mode [USB/iPod], open the
USB port cover in the central console and
connect a compatible memory device.
To select the memory device [USB/iPod],
press the [HOME] key from any screen
and/or press the [MEDIA] key to see the
audio modes on the screen.
To clear the screen, press [ ].
The device connected to the USB port
appears on the screen.
Page 11

10 6-3. USB memory sticks / iPod
For [iPod]
Press [Library] to see the library of
available audio, videos, images and
folders. Move the library up or down to
locate the folder or the song list, press on a
track to start playback.
Press [ ] to play/pause.
Press [ or ] to play the next or previous
track.
Press [ ] to select one of the repeat 1 /
repeat all modes. Press [ ] for shuffle.
Press [ ] to recover the quality
of the audio source.
For [USB]
Press [Library] to see the library of
available audio, videos, images and
folders. Move the library up or down to
locate the folder or the song list, press on a
track to start playback.
Press [ ] to play/pause.
Press [ or ] to play the next or
previous track.
Press [ ] to select one of the repeat
1 / repeat all modes. Press [ ] for
shuffle.
Press [ ] to recover the quality
of the audio source
Page 12

11 6-3. USB memory sticks / iPod
Press [Library] to see the library of
available audio, folders. Using your finger,
move the library up or down to locate the
folder or list of videos; press a track to start
playback.
Press [ ] to play/pause.
Press [ or ] to play the next or
previous video.
Press [ ] to select one of the repeat
1 / repeat all modes.
Press [ ] for shuffle.
Press [ ] to recover the quality
of the audio source.
Page 13

6-3. USB memory sticks / iPod 12
Audio
and multimedia
After selecting the video, press the screen
(arrow) to display the video in full screen
mode.
Press [ ] to play/pause.
Press [ or ] for fast forward and
rewind.
Press [ or ] to play the next or
previous video.
Press [ ] to return to the previous screen.
Page 14

6-3. USB memory sticks / iPod 13
Audio
and multimedia
For [USB]
Press [Library] to see the library of
available audio, videos, images and
folders. Using your finger, move the library
up or down to locate the folder or list of
images; tap an image to view in full screen.
Press [ ] to play/pause.
Press [ or ] to play the next or
previous track.
Press [ ] to select one of the repeat
1 / repeat all modes.
Press [ ] for shuffle.
Press [ ] to recover the quality
of the audio source.
Page 15

14 6-4. Bluetooth®
Compatible devices
iPhone*
Samsung
7
S8 6 S7
5
S6
The Bluetooth connection makes it possible to connect a smartphone to the
multimedia system to play audio files and make calls via the vehicle's
hands-free system.
Compatibility
This product accepts connections with the listed smartphones that have been
updated with the latest version of the operating system.
Other models may not function correctly.
Page 16

6-4. Bluetooth® 15
Smartphone pairing
Audio
and multimedia
Use the cellphone manufacturer's user guide for the pairing procedure.
NOTE
To make the pairing, press the [HOME]
key from any screen and/or press the
settings key [ ] to display the functions
menu.
Press on the guide [Bluetooth].
To activate the system, press [ON]
(arrow). To start the pairing device search,
press the key [ ].
The system automatically searches for
Bluetooth® devices for a maximum of
20 seconds.
Page 17

16
6-4. Bluetooth®
At the end of the search, a list of the
located devices is displayed.
Press on the Bluetooth® device you want
to register.
On the cellphone, access the settings menu and then select the Bluetooth
option in the menu.
For iPhone
For Android
Page 18

6-4. Bluetooth®
17
For iPhone
For Android
The search will be initiated to locate devices.
For iPhone
For Android
Audio
and multimedia
Activate the Bluetooth function so that the cellphone is visible and it can be
located by the vehicle's multimedia system.
Page 19

18 6-4. Bluetooth®
Turn on the multimedia system and the Bluetooth® device so that they can be
paired, checking the security code on both.
For iPhone
For Android
Press [PAIR] for pairing
This system is compatible with phones
that have hands-free systems, contact list
transfers and Bluetooth® audio players.
At the end, a completion message is
displayed.
Press [OK].
The multimedia system will automatically
initiate the transfer of accounts and call
history.
Page 20

6-4. Bluetooth® 19
Audio
and multimedia
Playing Bluetooth® audio files
To select the [Bluetooth] device, press
the [HOME] key from any screen and/or
press the [MEDIA] key to display the audio
modes on the screen.
Press Bluetooth [ ] to display the list
of tracks.
Press [Library] to display the audio library
and available folders. Using your finger,
move the library up or down to locate the
folder or audio list, press a track to start
playback.
Press [ ] to play/pause.
Press [ or ] to play the next or previous
file.
Press [ ] to select one of the repeat
1 / repeat all modes.
Press [ ] for shuffle.
Press [ ] to recover the quality
of the audio source.
Page 21

20 6-4. Bluetooth®
When a smartphone paired in the
multimedia system receives a call, the call
reception screen is displayed. To accept
the call, press [ ] on the multimedia
system screen. To reject it, press [ ] on
the multimedia system screen.
Voice call via Bluetooth®
Receiving calls
Making calls
To select the hands-free function, press
the [HOME] key from any screen.
Press Bluetooth [PHONE] to display the
functions of the hands-free system.
Using your finger, move the guides up or
down to the keypad guide on the screen.
Press [Dial Pad] to display the keypad and
dial the call number.
Press [ ] to start the call.
Page 22

6-4. Bluetooth® 21
■ Using the contact list
To make a call through the contact list,
press [Contacts].
Tap the name of the person you want to
call.
■ Using the hands-free system
■ Making calls via the hands-free system
Audio
and multimedia
Press to make a voice call using the
names in your contact list [Contacts].
Say the name of the contact you want
to call.
Follow the instructions on the audio
system to start the voice call.
Page 23

22 6-5. SDL
SDL (Smart Device Link) function
SDL (Smart Device Link) technology is a
communication system that connects the
driver's smartphone apps to the vehicle's
multimedia system.
It allows drivers to keep their eyes on the
road and their hands on the steering wheel
while staying connected to their favorite
apps.
The control can be operated via the touch
screen and/or voice recognition of the
vehicle.
■ Preparation
To select the function [SDL], open
the USB port cover on the central console
and connect the smartphone via the
USB cable.
NOTE
Android smartphones need to be paired with Bluetooth.
Page 24

6-5. SDL 23
Audio
and multimedia
Press the [SDL] key to display the
authorized applications available for
projection on the multimedia system.
To enable the SDL function, press the
[HOME] key from any screen and/or press
the settings key [ ] to display the
functions menu.
Press on the [SDL] guide. To activate the
system, press [ON] (arrow).
To start searching for available applications,
press [Update list].
The system searches for the available
applications and displays them on the
screen.
■ Select SDL function
To select the SDL app projection function,
press the [HOME] key from any screen.
When the function is disabled, the initial
screen displays the [APPS] key; when the
function is enabled, the key displays
[Toyota SDL].
By pressing the [MEDIA] key, the audio
modes and the SDL function are displayed
on the screen.
Page 25

24 6-6. Updates
ATTENTION
In case of any doubts about the update process, contact a Toyota Authorized
Dealer.
Software Updates
The multimedia system allows software
updates through an Internet connection.
On your smartphone, enable network
sharing over Wi-Fi or USB memory device.
In the multimedia system, press the
[HOME] key from any screen and/or press
the settings key [ ] to display the
functions menu.
Press on the [System] guide.
To start the search for available updates,
press [Check Updates Now].
The system displays available updates on the sc
Page 26

25 6-7. Regulatory
Regulatory
Model: PV602
USA
o This device complies with part 15 of the FCC Rules.
Operation is subject to the following two conditions:
(1) This device may not cause harmful interference, and
(2) This device must accept any interference received, including
interference that may cause undesired operation.
o FCC WARNING
Changes or modifications not expressly approved by the party
responsible for compliance could void the user’s authority to
operate the equipment.
o CAUTION: Radio Frequency Radiation Exposure
This equipment complies with FCC radiation exposure limits
set forth for an uncontrolled environment and meets the FCC
radio frequency (RF) Exposure Guidelines. This equipment
should be installed and operated keeping the radiator at
least 20cm or more away from person’s body in normal use
position.
o Co-location: This transmitter must not be co-located or
operated in conjunction with any other antenna or transmitter.
Page 27

26 6-7. Regulatory
Canada
o This device complies with Industry Canada’s licence exempt RSSs.
Operation is subject to the following two conditions:
(1) This device may not cause interference; and
(2) This device must accept any interference, including interference that
may cause undesired operation of the device.
Le présent appareil est conforme aux CNR d’Industrie Canada
applicables aux appareils radio exempts de licence. L’exploitation est
autorisée aux deux conditions suivantes:
(1) l’appareil ne doit pas produire de brouillage;
(2) l’utilisateur de l’appareil doit accepter tout brouillage radioé lectrique
subi, même si le brouillage est susceptible d’en compromettre le
fonctionnement.
o CAUTION: Radio Frequency Radiation Exposure
This equipment complies with IC radiation exposure limits set forth for an
uncontrolled environment and meets RSS-102 of the IC radio frequency
(RF) Exposure rules. This equipment should be installed and operated
keeping the radiator at least 20cm or more away from person’s body
(excluding extremities: hands, wrists, feet and ankles).
o ATTENTION: l’exposition aux rayonnements radiofréquence
- Cet équipement est conforme aux limites d’exposition aux
rayonnements énoncées pour un environnement non contrôlé et
respecte les règles d’exposition aux fréquences radioélectriques (RF)
CNR-102 de l’IC. Cet équipement doit être installé et utilisé en gardant
une distance de 20cm ou plus entre le dispositif rayonnant et le corps (à
l’exception des extrémités: mains, poignets, pieds et chevilles).
 Loading...