

Page 1
Winch LokHead 500 KIT.US
Instruction Manual
Please read these instructions carefully before operating equipment.
INLH500KIT.US
Original Instructions
UINLH500KIT.US-00 28-05-2019
Page 2

Page 3

Index
Index ..................................................................................................................................... 3
Introduction .......................................................................................................................... 5
About This Manual ����������������������������������������������������������������������������������������������������������������������������5
Glossary and Symbols �����������������������������������������������������������������������������������������������������������������������5
General Information .............................................................................................................. 6
Identification Data on the Device �������������������������������������������������������������������������������������������������������6
Technical Support Information �����������������������������������������������������������������������������������������������������������7
Safety Information ................................................................................................................ 8
General Advice �����������������������������������������������������������������������������������������������������������������������������������8
Intended Use ��������������������������������������������������������������������������������������������������������������������������������������8
Improper Use �������������������������������������������������������������������������������������������������������������������������������������8
Safety Information ................................................................................................................ 9
Personal Protective Equipment (PPE) ������������������������������������������������������������������������������������������������9
Residual Risks �����������������������������������������������������������������������������������������������������������������������������������9
Winch LokHead 500 KIT HL (INLH500KITHL) ................................................................... 10
System Description ��������������������������������������������������������������������������������������������������������������������������10
Parts Description ���������������������������������������������������������������������������������������������������������������������������������������10
Outline ���������������������������������������������������������������������������������������������������������������������������������������������11
Standard Configuration ����������������������������������������������������������������������������������������������������������������������������� 11
Tripod Use Configuration �������������������������������������������������������������������������������������������������������������������������� 12
Minimum Breaking Strenght (MBS) ������������������������������������������������������������������������������������������������13
Maximum Working Load (MWL) ������������������������������������������������������������������������������������������������������������13
Rope Requirements ��������������������������������������������������������������������������������������������������������������������������13
Technical Data ���������������������������������������������������������������������������������������������������������������������������������13
Lokhead Winch Installation��������������������������������������������������������������������������������������������������������������14
Mounting Surface �������������������������������������������������������������������������������������������������������������������������������������14
Winch Entry Angle of Lifting Rope ������������������������������������������������������������������������������������������������������������ 14
Winch Location ����������������������������������������������������������������������������������������������������������������������������������������� 14
Mounting Template - Plate Adapter ���������������������������������������������������������������������������������������������������������� 14
Installation Procedure ������������������������������������������������������������������������������������������������������������������������������� 15
Positing the control lever �����������������������������������������������������������������������������������������������������������������19
Using The Device - Checking The Device Before Use ���������������������������������������������������������������������20
Lifting Load ��������������������������������������������������������������������������������������������������������������������������������������21
Lowering Load ���������������������������������������������������������������������������������������������������������������������������������23
Maintenance ������������������������������������������������������������������������������������������������������������������������������������24
Wash ��������������������������������������������������������������������������������������������������������������������������������������������������������� 24
Maintenance Schedule ����������������������������������������������������������������������������������������������������������������������������� 24
Handling ������������������������������������������������������������������������������������������������������������������������������������������24
Storage���������������������������������������������������������������������������������������������������������������������������������������������24
Maintenance Schedule ���������������������������������������������������������������������������������������������������������������������25
Worldwide Limited Warranty .............................................................................................. 29
3ENGLISH28-05-19
Page 4

4 ENGLISH 28-05-19
Page 5

Introduction
ABOUT THIS MANUAL
This User Manual is an integral part of the device and aims to provide all the information needed for its safe and correct use
and for proper maintenance�
If there are instructions you do not understand, contact Harken�
Keep the manual in a safe place for future consultation� This manual may be modified without notice� Updated versions are
available on www�harkenindustrial�com�
This manual is for qualified operators (refer to the Safety Information chapter for more information)� Improper use of the device
or incorrect maintenance could cause severe damage or death�
Harken accepts no responsibility for damage, personal injury or death caused by failure to observe the safety information and
instructions in this Manual�
The manufacturer cannot be liable for damage, injury or consequential loss resulting from installation or servicing by unqualified
personnel�
The manufacturer will also not be liable for damage, injury, or consequential loss resulting from incorrect operation or
modification of the equipment�
GLOSSARY AND SYMBOLS
Intended Use - use of the device according to the information supplied in the instructions for use�
Improper Use - use of the device in a way different from that indicated in the instructions for use�
Qualified Operator - people who have attended specialisation, training, courses, etc� and are qualified for using lifting people
devices to the current regulations of the Nation in which the device is used for rescue�
General User - a user that use the device to lifting loads
Text preceded by the following symbols contains very important information or instructions, especially in regards to safety�
Failure to observe these may lead to:
- danger for operators
- invalidity of the contract warranty
- refusal of the manufacturer to accept responsability
WARNING!
this denotes the existence of the potential danger, which could cause injury or damage if the
information or instructions are not followed
NOTE!
this denotes important information concerning the device
5ENGLISH28-05-19
Page 6
General Information
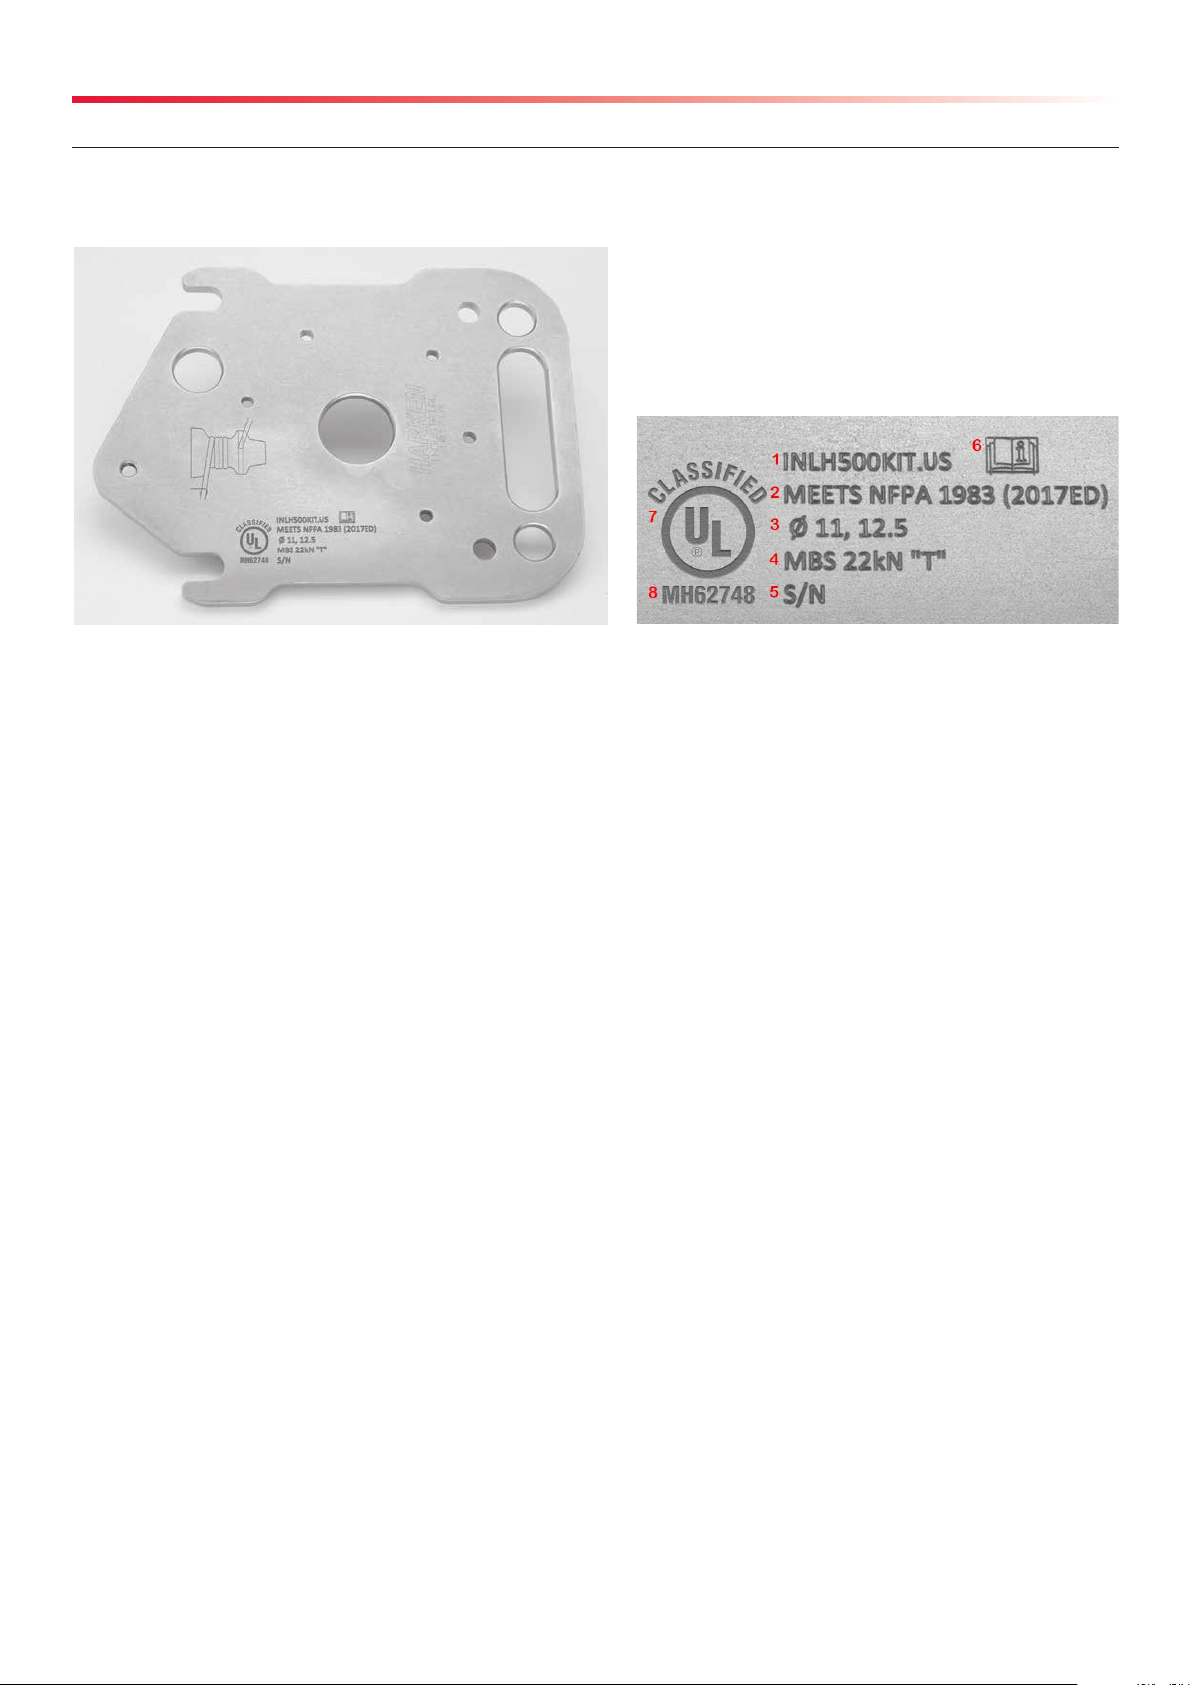
IDENTIFICATION DATA ON THE DEVICE
Each device is identified by a laser marking on plate of the winch�
Always quote these references when contacting the manufacturer or service centres�
1� Name of product/model
2� Standard
3� Safety information on the diameter of the rope to use: minimum 11 mm, maximum 12,5 mm: this rope must be EN 1891
certified
4� Indicator of the Minimum Breaking Strength (MBS) of the device (reference to the NFPA certification from UL), with specific
load for lifting load and lifting person
5� Serial number; the last two numbers are used for the year of manufacture of the device (e�g� 15 = the year 2015)
6� Pictogram instructing you to read the manual before using the device
7� Certification laboratory mark
8� UL file number
6 ENGLISH 28-05-19
Page 7
General Information
TECHNICAL SUPPORT INFORMATION
LokHead Winch is covered by a warranty, as laid down in the general conditions of sale� If during the warranty period the device
proves defective or suffers breakages, as indicated in the warranty, the manufacturer, after checking the device, will repair or
replace the defective components� You are reminded that modifications carried out by the user, without explicit written
authorisation from the manufacturer, will invalidate the warranty and relieve the manufacturer of any responsibility for damage
caused by the defective product� The same considerations apply when spare parts that are not original or different from those
explicitly indicated by the manufacturer� For all these reasons we advise customers to contact Harken Technical Support�
WARNING!
read the instructions in this manual attentively and carefully follow the indications it contains
before using the LokHead Winch.
THE INLH500KIT�US MEETS THE AUXILLARY EQUIPMENT REQUIREMENTS
OF NFPA 1983, STANDARD ON LIFE SAFETY ROPE AND EQUIPMENT FOR
EMERGENCY SERVICES, 2017 EDITION�
TO BE COMPLIANT WITH NFPA 1983, THE FOLLOWING ADDITIONAL
COMPONENTS MUST BE USED IN CONJUNCTION WITH THIS WINCH: Any
NFPA UL Certified Carabiner and Strap�
Emergency Service Auxilliary Equipment In Accordance with NFPA 1983-2017
NOTE!
The user can find additional information regarding auxiliary equipment in NFPA 1500 and NFPA 1983�
MBS 22kN "T"
7ENGLISH28-05-19
Page 8

Safety Information
GENERAL ADVICE
Use of the LokHead Winch for lifting people, in rescue situation, is restricted to qualified operators who have attended specialist,
training, courses, etc� and are qualified for using rescue lifiting devices to the current regulations of the Nation in which the
device is used for rescue�
Use of the LokHead Winch for lifting loads is permitted to a general user in accordance with National Regulations & Working
Guidelines/Practices�
Harken is not responsible for damage caused by the LokHead Winch to people, animals or property in the case of:
- use of the LokHead Winch by operators not qualified operators for liting people
- improper use of the LokHead Winch
- lack of proper maintenance, as indicated in the Maintenance chapter of this Manual
- unauthorised modifications or changes
- use of spare parts that are not original or specific for the model
- total or partial failure to observe the instructions
- usage contrary to specific national regulations
INTENDED USE
This winch is designed to be used as a manually powered, rope-handling winch for lifting, lowering, and pulling loads�
Moreover the LokHead Winch is designed and compliant to be used in rescue operation, by a qualified operator�
The LokHead Winch must be used after being mounted on a suitable anchorage point�
All the equipment and anchor devices used in conjunction with the Lokhead winch to lift person in rescue operation , must be
certified for their intended use in the rescue operation�
IMPROPER USE
The winch must not be used:
- for purposes different from those outlined in “Intended use” chapter, or for purposes not mentioned in this manual or
different from those mentioned
- if unauthorised modifications or interventions have been carried out
- in an explosive atmosphere
- after it has fallen from a height of more than 1 meter onto a hard surface� In this case the device must be returned to the
manufacturer or to a Harken authorised repair centre
- with wire rope
- with loads in excess of the Minimum Breaking Strength (MBS) of 22 kN (reference to the NFPA certification from UL) for
lifting persons in rescue operation
WARNING!
Subjecting the winch to loads above the Minimum Breaking Strength (MBS) can cause the winch to fail
or pull off the mounting surface suddenly, possibly resulting in severe injury or death.
8 ENGLISH 28-05-19
Page 9

Safety Information
PERSONAL PROTECTIVE EQUIPMENT (PPE)
It is necessary use gloves when operating the device�
RESIDUAL RISKS
You must pay attention to the following residual risks present when using LokHead Winch:
WARNING! Rotating Parts Trapping Risk
Always wear clothing and protective gloves that are form fitting. Avoid loose gloves or
clothing and always follow the instructions in the manual.
9ENGLISH28-05-19
Page 10

SYSTEM DESCRIPTION
Parts Description
Winch LokHead 500 KIT.US (INLH500KIT.US)
12
1
2 3
4
16
5 6
7
8 9
10
Pos. Description
1 Control Lever
2 Knob
3 Stripper Arm
4 Drum
5 Removable Skirt
6 Plate
7 Handle Socket
8 Tripod Adapter
13 15
14
Pos. Description
9 Clamping Plate
10 U-Bolt Kit
11 Self-locking Nut
12 Anchor Device
13 Connector
14 Handle Lock
15 Winch Handle
16 Pigtail
11
10 ENGLISH 28-05-19
Page 11

Winch LokHead 500 KIT.US (INLH500KIT.US)
292
11864
25
OUTLINE
Standard Configuration
11864
292
25
255
Note: all dimensions are in mm�
56
Ø157
11ENGLISH28-05-19
Page 12

Tripod Use Configuration
Winch LokHead 500 KIT.US (INLH500KIT.US)
300
Note: all dimensions are in mm�
12 ENGLISH 28-05-19
Page 13

Winch LokHead 500 KIT.US (INLH500KIT.US)
MINIMUM BREAKING STRENGHT (MBS)
The Minimum Breaking Strength (MBS) of the Winch LokHead 500 KIT�US is:
- 22 kN (reference to the NFPA certification from UL) for lifting person in rescue operation
MAXIMUM WORKING LOAD (MWL)
The Max Working Load (MWL) of the Winch LokHead 500 KIT�US is:
- 500 kg (1102,31 lb) for lifting loads
- 220 kg (485�02 lb) for lifting person in rescue operation
WARNING!
Do not apply a load greater than the Max Working Load (MWL) to the Winch LokHead 500KIT.US
ROPE REQUIREMENTS
WARNING!
Use only EN1891 certified ropes with a diameter of between 11 - 12.5 mm (7/16" - 1/2") for lifting
person.
WARNING!
Use only ropes in good condition.
WARNING!
For correct maintenance of ropes consult the rope Usage Manual.
WARNING!
Do not use with wire rope.
TECHNICAL DATA
Rope Semi static 11mm-12�5mm (7/16"-1/2") EN1891 rope for lifting
person in rescue operation�
Minimum Breaking Strength (MBS) 22 kN lifting loads (reference to the NFPA certification from UL)
Max Working Load 500 kg (1102,31 lb) - lifting loads
220 kg (485,02 lb) - lifting person in rescue operation
Power Ratio 13,50:1 - 1st speed / 39,90:1 - 2nd speed
Gear Ratio 2,13:1 - 1st speed / 6,28:1 - 2nd speed
Winch Weight 4,2 kg (9,25 lb)
Winch Handle Weight 0,5 kg (1,10 lb)
Plate + Plate Adapter Weight 2,8 kg (6,17 lb)
Tripod Adapter 2,2 kg (4,85 lb)
Winch Dimensions 311 x Ø157 mm (12,24" x Ø6,18")
Recommended working temperature range -20°C +50°C
13ENGLISH28-05-19
Page 14

Winch LokHead 500 KIT.US (INLH500KIT.US)
LOKHEAD WINCH INSTALLATION
Mounting Surface
Winch must be installed on a flat surface, reinforced if necessary, to withstand a load equal of 22 kN�
Winch Entry Angle of Lifting Rope
Winch entry angle must be 8° with a tolerance of ±2° to avoid rope overrides�
WARNING!
Verify entry angle of rope. It must be 8° with tolerance of ±2°, to avoid
rope overrides and damaging winch or making winch inoperable,
leading to loss of control, possibly resulting in severe injury or death.
8°
drive gear
Mount winch so drive gear is positioned where rope enters winch drum�
ROPE
Note: on winch skirt identifies location of drive gear�
WARNING!
Mount winch so that drive gear is positioned where rope enters winch
drum. Incorrect positioning of drive gear can weaken winch leading to
failure, possibly resulting in severe injury or death.
Winch Location
Winch must be installed in a position to allow sufficient working space around unit, so not to
impede operation of handles�
Winch must be installed in a position to ensure visibility of the lift trajectory by operator at all times�
WARNING!
Incorrect installation of winch may cause severe injury or death. Consult equipment supplier if in
doubt about correct position of winch.
Harken® accepts no responsibility for defective installation or reassembly of its winches� If you have questions or concerns,
Harken® Tech Service is at your disposal at techservice@harken�it�
Mounting Template - Plate Adapter
49 102 49
11
78
11
Drilling template of the holes provided for fastening with M12 screws� All dimensions are in mm�
14 ENGLISH 28-05-19
Ø13
Page 15

Winch LokHead 500 KIT.US (INLH500KIT.US)
Installation Procedure
Install the LokHead winch and plate adapter fixing the plate with four (4) M12 bolts, washers and nuts on a flat surface, which
whithstand a load equal of 22 kN�
It is installer's responsibility to choose correct bolts, taking into account loads they will have to withstand�
Harken assumes no responsibility to incorrect installation of winch and plate adapter or for use of incorrect mounting bolts�
WARNING!
Failure to use correct number and type of mounting fasteners or failure to ensure correct mounting
surface strength can result in winch pulling off suddenly and unexpectedly during high loads,
possibly resulting in severe injury or death.
Fixing with M12 bolts
to the load
Only for lifting loads:
- It is possible to fix the plate using ratchet strap,
connectors, anchor devices�
- It is the installer's responsibility to carry out all
structural tests needed to ensure that the mounting
surface can withstand the load�
Ensure the plate is securely attached to the mounting
surface, so that it can operate under load without significant
movement�
Fixing with Ratchet Strap
Only for lifitng loads
to the anchorage
point
30°
max. deflection
to the load
The winch plate must be installed so that the line can be led
through the pigtail to the winch drum, with no more than 30°
30°
max. deflection
of line deflection in any plane� The installation should use
pulley deflectors if necessary to ensure a fair lead to the
winch� The pigtail should not take any angle load�
The winch plate must be installed in a position to allow sufficient working space around unit, so not to impede operation of
handles�
Winch plate must be installed in a position to ensure visibility of the lift trajectory by operator at all times�
WARNING!
Incorrect installation of winch plate may cause severe injury or death. Consult equipment supplier
if in doubt about correct position of winch plate.
15ENGLISH28-05-19
Page 16

Winch LokHead 500 KIT.US (INLH500KIT.US)
The LokHead winch can be installed on a variuos type of tripods, refer to the following table for compatibility list�
WARNING!
Before installing the plate on the leg tripod check the dimensional compatibility between them.
A
Adapter plate
D
Clamping wing-nut
PARALLEL
see note below
Clamping plate
A
Round section diameter range: Ø40-Ø65 mm
NOTE: Set the adjusting nut according to "B" dimension to mantain parallelism between plates in clamping position (clamping wing-nut tightened)
A B
35 35 40 45 50 55 60 65
40 40 45 50 55 60 65
45 45 50 55 60 65
50 50 55 60
55 55 60
60 60
Note: all dimensions are in mm�
16 ENGLISH 28-05-19
Page 17

Winch LokHead 500 KIT.US (INLH500KIT.US)
1� Position the tripod adapter on the tripod
3� Tighten the 2 wing nuts�
2� Tighten the two nuts with a wrench�
Planes must be parallel
D
WARNING!
Make sure that the plates of the Tripod Adapter are locked and parallel as shown above.
17ENGLISH28-05-19
Page 18

Winch LokHead 500 KIT.US (INLH500KIT.US)
4� Position the winch and plate on the tripod adapter� 5� Fix surely the plate with the self-locking nut�
6� Insert the winch handle into the socket�
To the Anchorage Point
18 ENGLISH 28-05-19
7� Engage the connector and the anchor device to the plate on the
winch side, and to a safe anchorage point on the opposide side�
To the load
Page 19
Winch LokHead 500 KIT.US (INLH500KIT.US)
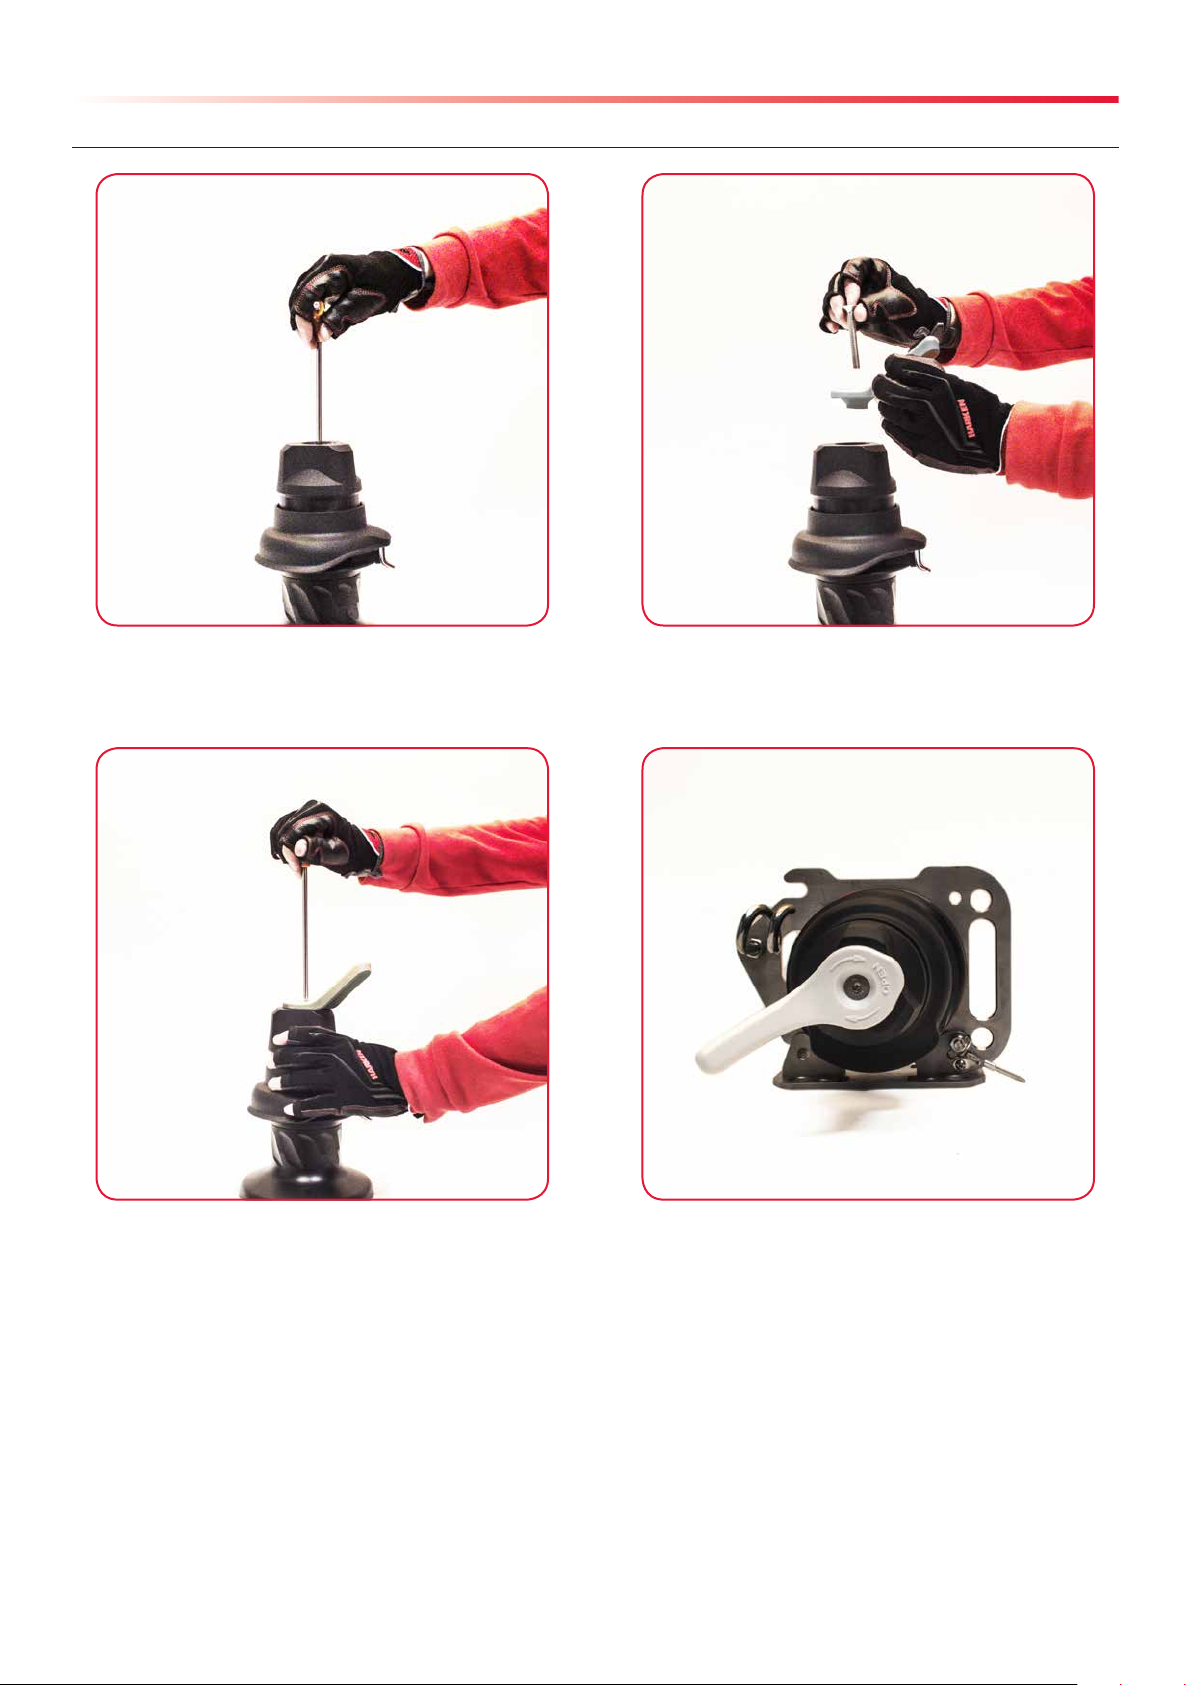
Positing the control lever
1� Untighten the knob screw� 2� Position the control level using the screw supplied with
transformation kit�
3� Tighten the control lever screw� Fix surely the plate to the plate adapter with the self-locking nut�
19ENGLISH28-05-19
Page 20

Winch LokHead 500 KIT.US (INLH500KIT.US)
USING THE DEVICE - CHECKING THE DEVICE BEFORE USE
Before and after every use, visually inspect the Winch LokHead and plate for signs of wear, damage or failure� If such signs are
present, do not use the device� If the worn or defective parts are not immediately replaced, the manufacturer will assume no
responsibility for resulting damage or accidents�
Check the movement of the rope grab cover� Check that the rope grab knob is working by rotating the knob and
releasing it�
WARNING!
Before each use, visuallly inspect the LokHead winch for signs of wear, damage or failure. If such
signs are present, do not use the device. if the worn or defective parts are not immediately replaced,
the manufacturer will assume no responsibility for resulting damage or accidents.
WARNING!
Before each use inspect winch and self-tailing jaws for degradation, cracks, or wear that may affect
locking strength and operation. Check lifting rope to make sure that it is free from wear. If in doubt,
replace with a suitably strong rope.
WARNING!
Before each use check winch base securely fastened to plate.
Failure to use correct number and length of mounting fasteners and/or failure to tighten them
correctly can result in winch pulling off suddenly and unexpectedly during high loads which may
cause load to drop, possibly resulting in severe injury or death.
WARNING!
Before each use check the winch drum cannot be turned by hand counter-clockwise.
20 ENGLISH 28-05-19
Page 21

Winch LokHead 500 KIT.US (INLH500KIT.US)
LIFTING LOAD
WARNING!
Keep fingers, loose clothing, hair etc away from winch. Area around winch handle shouldd be kept
clear of people and objects at all times.
1� Feed the rope through the pigtail� Start at base and wind rope
onto drum in a clockwise direction�
WARNING!
Take at least two turns of the rope around the winch drum, and if it slips under load increase the
number of turns to a maximum of four, taking care not to overlap the rope.
NOTE!
The number of turns needed round the winch drum depends on the load and the condition of the
rope. Check the device's descending capacity in its working configuration.
In case of difficulties unwind the rope, and reduce the turns to not less than 2 wraps, until you have
the optimal configuration.
WARNING!
Never allow rope to (override) overlap on winch drum. This can cause rope to jam and can prevent
load from being lifted/lowered. Tension on rope to load must be relieved to clear override (overlap).
This procedure carries a risk of serious injury or death if load drops or becomes uncontrollable.
2� Ensure that the rope does not override (overlap) on winch�
21ENGLISH28-05-19
Page 22

Winch LokHead 500 KIT.US (INLH500KIT.US)
3� Pull rope through to take up any slack, then pass the rope on
the stripper arm by winding rope clock-wise and pulling tight to
engage�
4� Fit the rope into the rope grab� Raise the cover to make this
easier� Position the rope inside the stopper�
CORRECT INCORRECT
WARNING!
Ensure correct placement of the rope on the stripper arm and into the spring loaded selftailing
jaws.
22 ENGLISH 28-05-19
Page 23

Winch LokHead 500 KIT.US (INLH500KIT.US)
1st Gear
Faster = Less Power
2nd Gear
Slower = More Power
5� Begin turning handle counterclock-wise� Gears engage
automatically depending on direction handle is rotated�
1st gear: rotate handle counterclock-wise� 2nd gear: rotate handle
clock-wise�
6� When the handle becomes difficult to rotate in 1st gear, reverse
the direction to engage 2nd� A higher power ratio makes a heavier
load easier to lift with the same effort�
NOTE!
The maximum input speed of the LokHead Winch is 60 rpm.
LOWERING LOAD
To lower the load with one hand grasp the rope�
With the other hand, turn the knob (or Control Lever if installed) clockwise to allow the rope to slip on the winch drum and permit
a controlled descent� To adjust descent speed, manually control the speed at which the rope leaves the winch by holding rope
with arm out and bringing it in towards the winch drum�
To stop the descent, release the knob�
WARNING!
To lower the load, in case of difficulties,
unwind the rope, and reduce the turns
to not less than 2 wraps, until you have
the optimal configuration. Do not take
rope turns off winch drum until rope is
completely unloaded.
23ENGLISH28-05-19
Page 24

Winch LokHead 500 KIT.US (INLH500KIT.US)
MAINTENANCE
NOTE!
A formal inspection of the winch must be performed at least annually by trained personell. The
inspection should be recorded in an inspection and maintenance log.
Wash
Wash winch frequently with fresh water�
Do not allow cleaning products or other caustic solutions to come into contact with winch, especially anodized, chrome-plated,
or plastic parts� Do not use solvents, polishes, or abrasive pastes on logos or winch stickers�
Maintenance Schedule
Winch must be completely overhauled, cleaned, and lubricated at least every 12 months� Maintenance of winches must be
carried out exclusively by trained personnel. Harsh environment and/or heavy use may require more frequent maintenance�
NOTE!
Do not replace or modify winch with a part that was not designed for it.
WARNING!
Periodic maintenance must be carried out regularly. Lack of adequate maintenance shortens the
life of the winch, can cause serious injury and also invalidate the winch warranty. Maintenance of
winches must be carried out exclusively by trained personnel.
WARNING!
Remove auxiliary equipment from service if the equipment does not pass inspection or if there is
any doubt about the safety or serviceability of equipment.
WARNING!
Return the winch, auxiliary equipment, to the manufacturer or to a qualified service center if the
equipment is dropped or impact-loaded.
WARNING!
Repair the auxiliary equipment only in accordance with the manufacturer’s instructions.
HANDLING
Protect against extreme temperatures: less then -20° C or more then +50° C
Extreme heat may distort composite parts�
Extreme cold can cause the material to become brittle and cause the lubrication to congeal�
WARNING!
Do not expose the software of the auxiliary equipment to flame or high temperature and carry the
equipment where it will be protected as it could melt or burn and fail if exposed to flame or high
temperature.
STORAGE
Store in clean/dry place
Avoid impact which could damage jaws and skirt; ensure good packaging when shipping�
24 ENGLISH 28-05-19
Page 25

Winch LokHead 500 KIT.US (INLH500KIT.US)
MAINTENANCE SCHEDULE
Owner name
Product name and Model
Serial Number
Year of manufacture
Date of purchase
Date of first use
Maintenance interval Annual
25ENGLISH28-05-19
Page 26

Winch LokHead 500 KIT.US (INLH500KIT.US)
Date of Service Description of Service
Name and Signature of
Maintanance Operator
Date of Next
Intervention
26 ENGLISH 28-05-19
Page 27

Winch LokHead 500 KIT.US (INLH500KIT.US)
Date of Service Description of Service
Name and Signature of
Maintanance Operator
Date of Next
Intervention
27ENGLISH28-05-19
Page 28

Page 29

Manufacturer
Harken USA
N15W24983 Bluemound Rd., Pewaukee, WI 53072-4974 USA
Tel: (262) 691-3320, Fax: (262) 701-5780,
Web: www.harken.com
Email: harken@harken.com
Worldwide Limited Warranty
Refer to the Harken World Limited Warranty on the website at:
http://www.harkenindustrial.com/
The product warranty is accepted only if it has been maintained as specified in this Manual by Harken authorized personnel and is accompanied by
Maintenance Schedule properly compiled
 Loading...