

Page 1
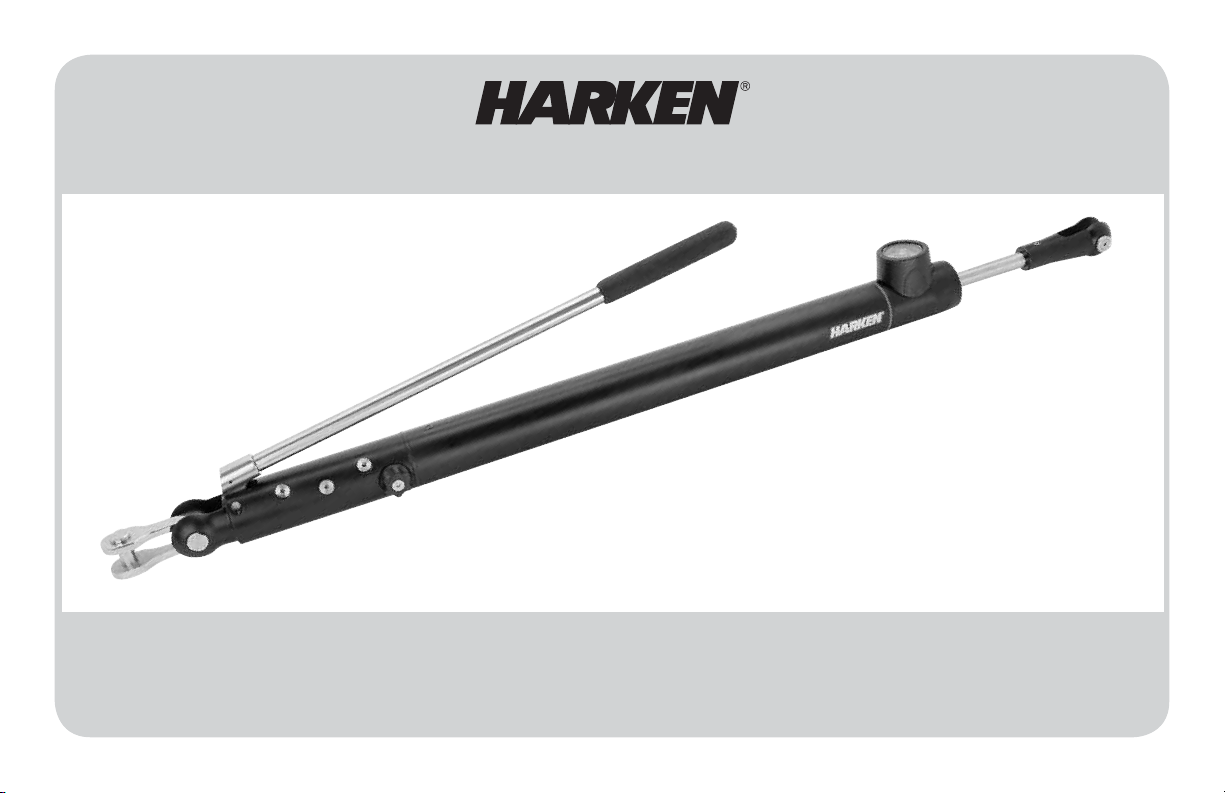
Integral Hydraulic Cylinder
Installation and User Manual
Please read these instructions carefully before using or servicing the equipment.
This manual may be modified without notice. See: www.harken.com/manuals for updated versions.
PLEASE SAVE THESE INSTRUCTIONS
Page 2
Introduction
This user manual contains important information for the
correct use of the Integral Hydraulic Cylinder. Read all
instructions carefully before use. If you do not understand
these instructions, contact Harken. Do not use the Integral
Hydraulic Cylinder unless you have a sufficient level of
sailing training and experience.
CAUTION! Strictly follow all instructions to
avoid an accident, damage to your vessel,
personal injury or death. See harken.com/
manuals for additional safety information.
Description
The Harken Integral Hydraulic Cylinder is designed for use
on sailboats and is sized according to boat and rigging.
When ordering, always have your choice confirmed by
a Harken representative or other sailing professional. The
limited warranty does not cover use of product outside
of normal sailboat applications.
Parts ordered separately
Standard eye/jaw toggle
Tools Required
Hex driver, 3 mm
®
Loctite
, Blue 242
WARNING! Cylinders are capable of exerting
very high loads and can break associated
components. Inspect all standing backstay
and forestay rigging components to ensure
they are in good condition. Failure to inspect
components may result in sudden breakage
at high loads.
2
Page 3

Installation
Installation
Review all instructions carefully prior to installation of your
new Integral Hydraulic Cylinder.
1. Carefully unpack the cylinder and check for visible
defects. If any signs of damage are present, contact
your dealer at point of purchase or Harken.
2. Extend cylinder to prepare for installation.
Turn release knob counterclockwise completely.
Attach the bottom (end) clevis to the deck, and attach
the upper (rod) clevis to the main halyard. Pull rod
clevis as necessary to fully extend the cylinder.
When cylinder is extended, detach from deck
and main halyard.
3. Check installation site for clearance.
Attach a standard eye/jaw toggle to the cylinder’s
bottom clevis before securing to the chainplate.
• Install two pins in different orientation to accommodate
stay movement so the aluminum won’t fatigue during use.
• Standard toggles fit all Harken cylinders.
NOTICE: Be sure to include toggle length in cylinder
length for deduction from stay.
4. Mount cylinder rod end up.
When mounting, orient pump handle to your preference.
3
Page 4

Installation
5. Check to see if gauge is aligned to your preference. If
necessary, you may loosen set screws on bottom of
cylinder tube (above release knob) completely. Rotate
cylinder tube to adjust gauge to 1 of 4 positions as
noted in diagram.
6. When gauge is in preferred position, re-tighten set
screws. Make sure screws install into pump housing
dimples.
CAUTION! Limit cylinder rotation to avoid
problems or damage.
7. Attach cylinder to backstay.
• Use 3 mm hex driver to remove screw from clevis
pins.
• Attach lower clevis to toggle/chainplate. Open the
release valve and extend the cylinder.
• Attach upper clevis to backstay.
8. Use Blue 242 Loctite
®
when installing screws to
prevent loosening.
Pump Handle
Gauge
Cylinder
Possible Gauge
Position
Gauge/Cylinder Rotation Direction Limit of Rotation Relative to Pump Housing
Clockwise* 1/4-turn (90°)
Counter-Clockwise** 1/2-turn (180°)
*O-ring will expand and bulge.
**Overturning may lead to thread engagement issues.
Set Screws
Possible Gauge Position
Possible Gauge
Position
Bleed Pump
All Harken Integral Hydraulic Cylinders are cycled and
tested at factory prior to shipment. However, oil can
become displaced inside cylinder during shipment or
storage. Bleed pump prior to use.
1. With cylinder in vertical position, rod end up, fully
extend the cylinder.
2. Open release valve and pump for one (1) minute.
When complete, the pump and cylinder are bled.
4
Page 5

Operation
The Harken Integral Hydraulic Cylinder is easy to use and offers unique, double-acting pump action to move oil twice as
fast as a single-acting pump. Follow these simple steps for cylinder operation.
Increase tension
1. Turn pressure release knob clockwise to close.
The resting position for the pressure release knob is
closed.
2. Move pump handle in and out until desired tension is
Pressure Gauge
achieved.
Notice: It is impossible to over-tighten the knob or
damage the valve by hand.
Decrease tension
1. Turn release knob counterclockwise to open. Release
speed depends on how far the knob is turned.
WARNING! Backstay cylinders can overload
jib halyard and jib luff components including
furlers. Be sure to check and/or ease jib
halyard before tensioning backstay.
Pressure Release Knob
5
Page 6

Operation
Relief Valve Settings
The Integral Hydraulic Cylinder relief valve is preset at
our factory to limit the tension to the maximum load of
the recommended cable of the rigging for which it is
used. Each cylinder is set to provide a specific
maximum pull force.
FACTORY-SET MAXIMUM PULL FORCE BY CYLINDER
Type Cylinder Part No.
-6 HCI025110345 3500 1590
-10 HCI035130345 5000 2270
-12 HCI040160385 6500 2950
-17 HCI045160385 8700 3950
Maximum Pull Force
lb kg
IMPORTANT: If release is set beyond max factory set
pressure relief, warranty may be voided.
Max wire
Part
No. - Size
HCI025110345BCC -6
HCI035130345BCC -10
HCI040160385BCC -12
HCI045160385BCC -17
*For pin center length open add stroke length to pin center length closed. **Rod ends (forks) included in weights. *** Max relief setting is 5,000 psi/345 bar.
Ø Stroke
in mm in mm in mm lb kg in mm lb kg lb kg lb kg lb kg lb kg lb kg
7
/325.5 13.6 345 29.8 758 7.3 3.327/1611.1 1236 561 2473 1122 3500 1587 — — — — 7000 3175
9
/327 13.6 345 29.8 758 7.3 3.321/212.7 1236 561 2473 1122 3709 1682 4946 2243 6182 2804 12364 5608
5
/168 15.2 385 32.8 834 10.8 4.925/815.9 2098 952 4197 1904 6295 2855 8394 3807 10492 4759 20984 9518
3
/89.5 15.2 385 32.8 834 10.8 4.925/815.9 2098 952 4197 1904 6295 2855 8394 3807 10492 4759 20984 9518
Pin center
length
(closed)* Weight**
Gap/pin
Reading Cylinder Gauge
The easy-to-read analog gauge
displays oil pressure in thousands
of pounds per square inch. Refer
to the table below to convert oil
pressure to pull force.
Notice: Gauge needle may go beyond specified relief setting
during pump action then return to the maximum specified
relief setting. This is normal and is part of the cylinder design.
Cylinder tension can be increased by adjusting the pressure
relief setting. Contact your Harken Service Representative
for assistance.
@ 1000 psi
Ø
69 bar
6
@ 2000 psi
138 bar
Pull force***
@ 3000 psi
207 bar
@ 4000 psi
276 bar
@ 5000 psi
345 bar
Breaking
load
Page 7

Inspection
Perform a visual inspection of the Integral Hydraulic Cylinder prior to each use to ensure clean, unobstructed
working conditions.
Care and Maintenance
Harken cylinders should give years of reliable service. If cylinder is properly bled, and clean environment is
maintained, no regular maintenance is required. Seals should be changed every ten years (dependent on use)
unless cylinder eases without pressure relief valve releasing the pressure first. If you experience any problems
with your Harken Integral Hydraulic Cylinder, contact your Harken Service Representative.
Warranty
Harken warrants that each Harken product, when properly used and maintained, will be free from defects in
material and workmanship from the date of receipt of the product by the final customer. Harken products are
covered by two different kinds of warranties, on the basis of the purchaser and use made of them.
For complete warranty or for information relating to a specific warranty concern, please refer to the following:
Harken Catalog, Website: www.harken.com/manuals
Call or Email the Nearest Harken Distributor or
Harken Corporate Headquarters
®
Loctite
is a registered trademark of Henkel AG & Company KGaA
7
Page 8

N15W24983 Bluemound Rd., Pewaukee, WI 53072-4974 USA, Tel: (262) 691-3320, Fax: (262) 701-5780,
Web: harken.com, Online Catalog: www.harkenstore.com, Email: harken@harken.com
Harken Adriatik d.o.o.: Obala 107, 6320, Portoroz, Slovenia, Tel/Fax: (386) 5-6774122
Web: www.harken.si, Email: info@harken.si
Harken Australia Pty, Ltd: 1B Green Street, Brookvale, N.S.W. 2100, Australia, Tel: (61) 2-8978-8666, Fax: (61) 2-8978-8667,
Web: www.harken.com.au, Email: info@harken.com.au
Harken France: ZA Port des Minimes, BP 3064, 17032, La Rochelle Cedex 1, France, Tel: (33) 05.46.44.51.20 • Fax: (33) 05.46.44.25.70,
Harken Italy S.p.A.: Via Marco Biagi, 14, 22070 , Limido Comasco (CO) Italy, Tel: (39) 031.3523511, Fax: (39) 031.3520031
Harken New Zealand, Ltd: 30-36 Fanshawe Street, P.O. Box 1951, Auckland 1001, New Zealand, Tel: (64) 9-303-3744, Fax: (64) 9-307-7987,
Web: www.harken.co.nz, Email: harken@harken.co.nz
Harken Polska SP ZOO: ul. Rydygiera 8, budynek 3A, lokal 101, I piętro, 01-793, Warszawa, Poland, Tel: +48 22 561 93 93, Fax: +48 22 839 22 75,
Web: www.harken.pl, Email: polska@harken.com
Harken Sweden AB: Main Office and Harken Brandstore: Västmannagatan 81B, SE-113 26 Stockholm Sweden, Tel: +46 303 618 75, Fax: +46 303 618 76,
Mailing address: Harken Sweden AB, Box 64, SE -440 30 Marstrand, Email: harken@harken.se
Harken UK, Ltd: Bearing House, Ampress Lane, Lymington, Hampshire S041 8LW, England, Tel: (44) 01590-689122, Fax: (44) 01590-610274,
Web: www.harken.co.uk., Email: enquiries@harken.co.uk
Corporate Headquarters
Web: www.harken.fr, Email: info@harken.fr
Web: www.harken.it, Email: info@harken.it
Please visit: http//www.harken.com/dealers/dealers.php
for an up-to-date list of Harken dealers and distributors
Printed in USA 4342 03/14
 Loading...