

Page 1
CARBO
®
RACING FOIL
Unit 0, 1, 2, 3
Installation Manual – Intended for specialized personnel or expert users
4364 09/14
Preassembly
Specifications, parts, tools, feeder height,
measuring and cutting foil, drilling trim cap hole. 2-3
Installation
Upper spacer tube, foil and trim cap,
feeder, bottom spacer tube and prefeeder,
halyard lead, chafe guard. 4-6
Operation
Using foil, raising sail, quieting bare foil, misfeads. 6
Troubleshooting
For installation and use. 7
Maintenance, storing, warranty 8
WARNING!: Strictly follow all instructions
to avoid an accident, damage to your vessel,
personal injury or death. See www.harken.com
for additional safety information.
Please read these instructions carefully before installing, servicing, or
operating the equipment.This manual may be modified without notice.
See: www.harken.com/manuals for updated versions.
PLEASE SAVE THESE INSTRUCTIONS
Page 2
Pre-Assembly
Size Check
Max Unit 0 Unit 1 Unit 2 Unit 3
Wire
1/4" (6 mm) 5/16" (8 mm) 3/8" (10 mm) 7/16" (11 mm)
Rod
-10 (6.35 mm) -17 (8.38 mm) -25 (10.31 mm) -30 (11.1 mm)
Unit 0 Foil Length Max. Headstay
7000.9 m 29'6" (9 m) 32' 9 " (10 m)
7000.12 m 39' 4" (12 m) 42' 8" (13 m)
7000.15 m 49' 2" (15 m) 52' 6" (16 m)
Unit 1 Foil Length Max. Headstay
7001.12 m 39'4" (12 m) 42' 8" (13 m)
70 01.16 m 52' 6" (16 m) 55' 9" (17 m)
7001.2 0 m 65' 7" (20 m) 68' 11"(21 m)
Unit 2 Foil Length Max. Headstay
70 02.16 m 52'6 " (16 m) 56'6" (17.2 m)
7002.20 m 65'7" (20 m) 69'7" (21.1 m)
7002.24 m 78'9 " (24 m) 82'9" (25.2 m)
Unit 3 Foil Length Max. Headstay
7003.24 m 78' 8-1/2" (24 m) 82' 8" (25.2 m)
7003.28 m 91' 10" (28 m) 95' 9" (29.2 m)
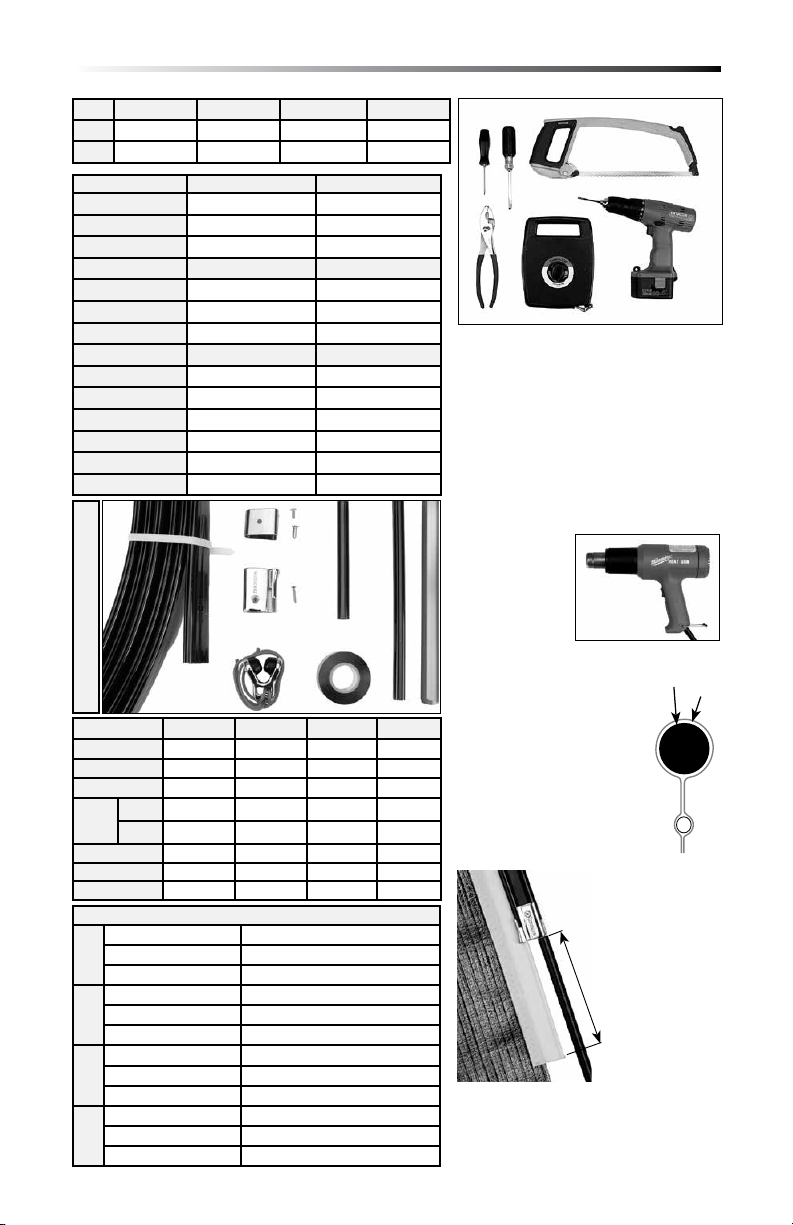
Parts
Tools
Required
Phillips head screwdriver
Flat-bladed screwdriver
Hacksaw
Pliers
Tape measure
Drill with 5 mm (3/16") bit
or 6 mm (1/4") Unit 3 only.
Recommended
Heat gun for
cool weather.
Sail Specifications
Luff rope dimensions listed.
Actual luff tape dimensions
Description Unit 0 Unit 1 Unit 2 Unit 3
Extrusion H -37931B H-36 315B H-37820B H-41360
Tri m c ap H-37932B H-34427B H-37833B H-413 37
Feeder H-37934C H-34394C H-37838C H -41315
Upper H-37935A H-34433A H-37879A H- 41339
tube
Lower H-37936A H-34432A H-37880A H -413 38
Spacer
Prefeeder 7006 7006 7006 7006
PVC tape H CP 1748 HC P174 8 HC P174 8 H CP174 8
Chafe guard 7000.30 7001.3 0 7002.30 —
HFS1048 6-32x.375 Truss-head screw
HFS1049 6-32 x.375 Barr el nuts
Unit 0
Unit 1
Unit 2
Unit 3
2 Unit 0, 1, 2, 3 Carbo Racing Foil
HFS699 6-32 x.625 Flat-head s crew
HFS1048 6-32x.375 Truss-head screw
HFS1049 6-32 x.375 Barr el nuts
HFS1047
HFS1094 6-32x.5 Truss-head screw
HFS1049 6-32 x.375 Barr el nuts
HFS1093 6-32x.875 Flat-head screw
HFS347 8-32x.5 Truss-head screw
HF S1139 8-32 x.5 Barrel nuts
HFS1138 8x32x1 Flat-head screw
Fasteners
6-32 x.75 Flat-h ead screw
are larger.
Unit Luff Size
#0 #5– 4 mm (5/32" )
#1 #6 – 5 mm (3/16")
#2 #6 – 5 mm (3/16")
#3 #6 – 5 mm (3/16")
#7– 6 mm (7/32")
Recommended height above deck:
Feeder: 110 cm (42")
Prefeeder: 76 cm (30")
Rope
Tape
Sail luff tape must
be 15-25 cm (6-10")
below feeder when
sail is raised.
15-2 5 cm
(6-10")
Page 3
Pre-Assembly
1. Lay Out Foil
Unroll foil and let it relax for a day
or so before installing.
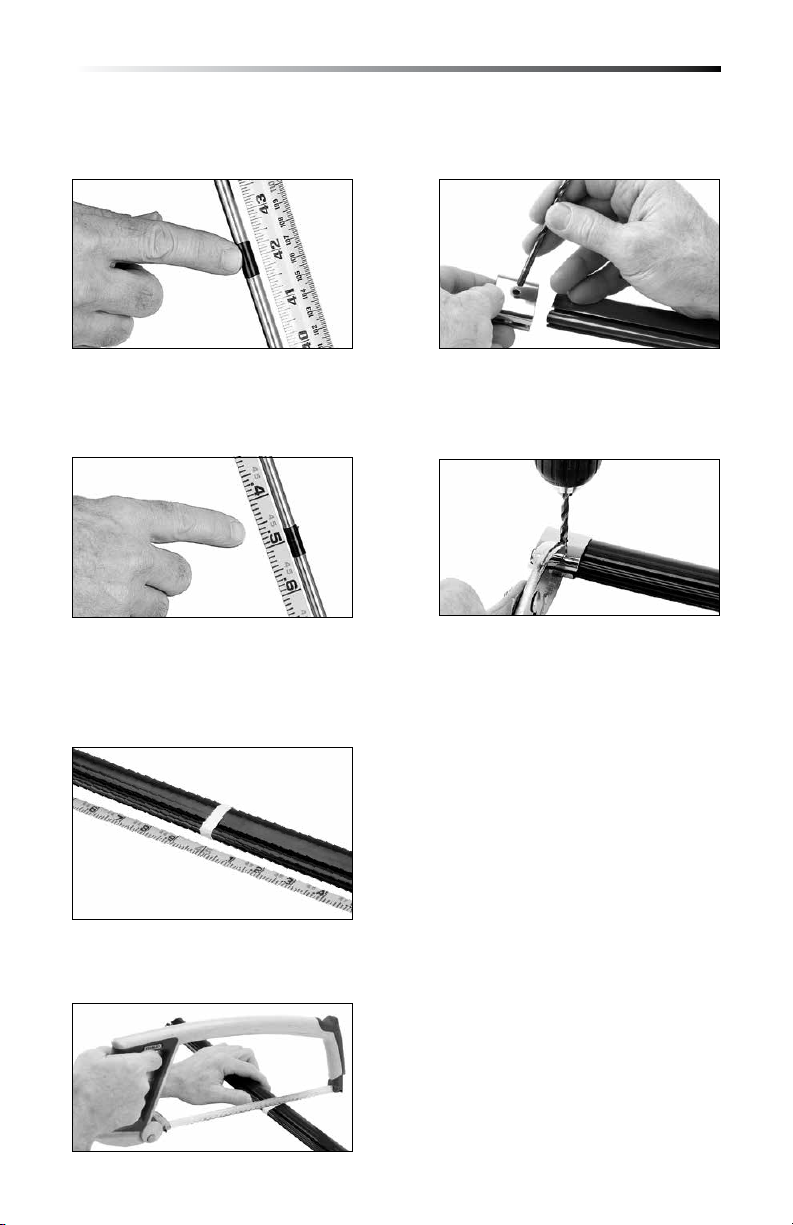
2. Feeder Height
5. Trim Cap Hole
Place foil so side grooves face up.
Slip cap on foil so split end is over groove
and large hole faces up.
Measure 110 cm (42") from deck
and mark stay.
3. Foil Length
Attach tape measure to halyard.
Measure exposed portion of stay from
underside of terminal aloft to mark made
in Step 2. Deduct 127 mm (5") for upper
spacer tube.
4. Cutting Foil
Mark foil using measurement from Step 3.
CUT TOP END ONLY. Don't cut bottom of
foil with Harken labels and feeder hole.
Cut upper end of foil with hacksaw.
Tip: Trim cap holes are different diameters.
Make sure 5 mm (3/16") drill bit fits
through hole and foil-side grooves face up.
Squeeze cap with pliers. Keep drill straight
and drill a 5 mm (3/16") hole part way
through foil. Remove cap and finish
drilling. Check fit of trim cap, screw,
and barrel nut. Adjust hole as needed.
Make sure headstay is taut on boat
or stretched taut on ground before
installation.
Unit 0, 1, 2, 3 Carbo Racing Foil 3
Page 4

Installation
1. Upper Spacer Tube
Splay 5" (127 mm) upper spacer tube with flat
bladed screwdriver, slip onto stay and tape.
Important: Tape full length of spacer tube.
2. Foil Start
Identify top of foil. Side groove will be
on starboard.
Tip: In cool
weather, us e
a heat gun
to warm foil.
Tip: Foil installs easier if excess is held out
to starboard side of boat.
3. Trim Cap
Place trim cap on foil so slot is aft, with
large hole on starboard. Squeeze together
with pliers. Put blue Loctite® in barrel nut.
Install two-piece screw and barrel nut with
Phillips screwdriver.
4. Foil
Snap foil into place by pulling aft with one
hand, while sliding foil up with the other.
Use heat gun.
Tip: Use liquid soap to lubricate headstay
and foil.
Splay foil with screwdriver and pull onto
stay. Once foil is started, stop to install
trim cap.
IMPORTANT! Do not use McLube
to lubricate headstay and foil.
See Maintenance on Page 8
for details.
Locti te is a tradem ark of Henkel AG & C ompany KGaA .
4 Unit 0, 1, 2, 3 Carbo Racing Foil
Page 5

Installation
5. Feeder
Slip feeder into place and firmly push upwards.
Coat screw with blue Loctite® and tighten.
If screw does not thread, check alignment.
6. Bottom Tube
Push foil up as far as it will go.
Cut, splay, and snap tube into place.
Tape full length of lower spacer tube.
7. Prefeeder
Measure 12" (300 mm) below feeder and
lash prefeeder to tube.
Measure length from feeder to bottom of
exposed stay for lower spacer tube length.
Tape prefeeder in place.
Locti te is a tradem ark of Henkel AG & C ompany KGaA .
Unit 0, 1, 2, 3 Carbo Racing Foil 5
Page 6

Installation
Halyard Lead
Halyard must be parallel to stay. If halyard pulls at an aft angle, it will pull out luff tape
and damage foil grooves.
Chafe Guard
Before installing, sail with spinnaker a few times to produce wear marks. Chose location
to cover marks. Squeeze bead of silicone sealant up length of each inside edge of guard.
Press in place. Use supplied PVC tape to hold guard securely for 24-hours before using.
Using Carbo Racing Foil
Raising Sail
Use prefeeder when raising sail. Raise sail completely and tension
halyard before sheeting. Sheeting sail too soon can damage luff tape
and foil.
Quieting Bare Foil in Strong Wind
While motoring or moored in high wind, bare foil oscillates, creating
an annoying noise. To prevent this, wrap jib halyard around foil four
(4) to six (6) times, secure to deck fitting (foreguy bail), and hand
tension at winch.
Sail Misfeed
To prepare for the rare occasion when a sail misfeeds,
some Grand Prix sailors drill a small exit por t (shown at
right). If sail jams on hoist, lower until misfeed runs down
into gap, then rehoist.
6 Unit 0, 1, 2, 3 Carbo Racing Foil
Page 7

Troubleshooting
Installation
Problem Probable Cause Solution
Foil is difficult to
start onto stay.
Foil is curved
when unrolled.
Trim cap does not fit.
Difficult to snap
foil on stay.
Feeder does not fit.
Problem Probable Cause Solution
Bare foil is noisy in wind. Needs to be stabilized.
Sail luff tape comes out
of groove.
Top of luff tape does
not feed into feeder
or catches.
Bottom of luff tape pulls
out of plastic foil.
Top of luff tape pulls out
of plastic foil.
Top of sail has pulled out
of foil above feeder.
Sail will not raise or lower
easily, too much friction.
Luff tape damaged after
raising sail
McLube is a registered trademark of McGee Industries, Inc.
Unit 0, 1, 2, 3 Carbo Racing Foil 7
Foil is stiff from cold. Heat foil to improve flexibility.
Too much friction
from stay.
Foil has taken set. Unroll foil and let it relax in warm conditions.
Trim cap is incorrectly
aligned.
Hole drilled incorrectly. Examine hole and ream out so it fits.
Stay is too loose.
Needs more upward
movement.
Feeder is on
upside down.
Check diameter of stay. See specifications
on Page 2.
Place cap on foil with split side on groove
side and large hole on starboard.
Tension stay. If on ground stretch
taut between two solid attachments.
Pull foil in and up. Push down on foil if
installing on land.
Remove feeder and install so side groove
is on starboard.
Use
Wrap jib halyard around foil 4-6 times,
secure to deck, and hand tension at winch.
Luff tape too small.
Luff tape is frayed.
Luff tape is cut
too short.
Halyard angles too
far aft.
Halyard has yanked luff
tape out of foil.
Halyard sheave
is jammed.
Dirt or other material in
foil grooves.
Luff tape is too large.
Luff tape is damaged
or dirty.
Luff tape needs
lubrication.
Load put on sail before
it is raised
Check to see if luff tape is #6, 5 mm (3/16")
in diameter.
Trim loose material with hot knife. Smooth
with sandpaper.
Install longer luff tape so it protrudes
15 cm (6") below feeder.
Change location of halyard sheave
so halyard is parallel to stay.
Remove feeder to refeed. Drill hole in foil
just above feeder to refeed future pull-outs.
Check sheave bearings and sideload bearings.
Make a cleaner out of piece of luff tape
and grommets.
Install correct luff tape. System 7000 uses
#5, 4 mm (5/32"); System 7001, 7002 uses
#6, 5 mm (3/16").
Clean sail luff tapes and lubricate with thin
film of McLube
away from Carbo Racing Foil and boat.
Replace or repair as necessary.
Clean sail luff tapes and lubricate with thin
film of McLube Sailkote. Spray on shore, away
from Carbo Racing Foil and boat. Let McLube
Sailkote dry completely before feeding sail into
foil. McLube or other toluene- or acetone-based
lubricants must not be sprayed near foil. Use
McLube on sails but not on Carbo Foil.
Raise sail and tension halyard before sheeting
®
Sailkote™. Spray on shore,
Page 8

Maintenance
01
Harken equipment requires minimal maintenance, but some is required to give
the best service and to comply with Harken's limited warranty.
It is important to keep equipment clean by frequently flushing with fresh water.
In corrosive atmospheres, stainless parts may show discoloration around holes,
rivets, and screws. This is not serious and may be removed with a fine abrasive.
Sails—Keep sail luff clean and inspect for signs of damage and fraying.
Repair if necessary.
The Carbo foil material is slippery. If more lubrication is required, spray a thin coat
of McLube
®
Sailkote™ on sail luff tapes away from Carbo Racing Foil and boat deck.
Be sure to let sail dry before feeding sail into foil.
WARNING! Do not spray sail while it is on boat. McLube
Sailkote overspray will cause slippery decks which may
result in loss of footing, falling overboard and personal
injury or death.
CAUTION! Read instructions on McLube can before using.
Spray McLube Sailkote on sails in a well-ventilated area.
IMPORTANT! Spray sail away from the Carbo Racing Foil. Let McLube Sailkote
dry completely before feeding sail into foil. McLube Sailkote or other toluene-
or acetone-based lubricants must not be sprayed on or near foil. Spraying
McLube Sailkote directly on Carbo Racing Foil may damage it.
If storing mast down, foil should be reasonably straight with foil groove down to avoid
water and ice buildup.
Before stepping mast, use soap and water to clean Carbo Racing Foil grooves.
For additional safety, maintenance and warranty information: www.harken.com/manuals
or the Harken catalog.
McLube™ is a registered trademark of McGee Industries, Inc.
N15W24983 Bluemound Rd., Pewaukee, WI 53072
Telephone: (262) 691-3320 • Fax: (262) 701-5780
Web: www.harken.com • Email: harken@harken.com
8
Storing
Warranty
97653 14879
Printed in USA 4364 09/14
 Loading...