

Page 1
Sailmaker Instructions
Consult specifications for swivel and drum pin-to-pin lengths to determine luff length deductions. If using
optional hoistable halyard swivel, make sure to deduct for this.
Use a zippered luff sleeve or small snap straps so that the sail can be hoisted onto a permanent stay or
removed with the headstay left in place. Make sure the head and tack thimbles are secured to the sail to
handle furling loads.
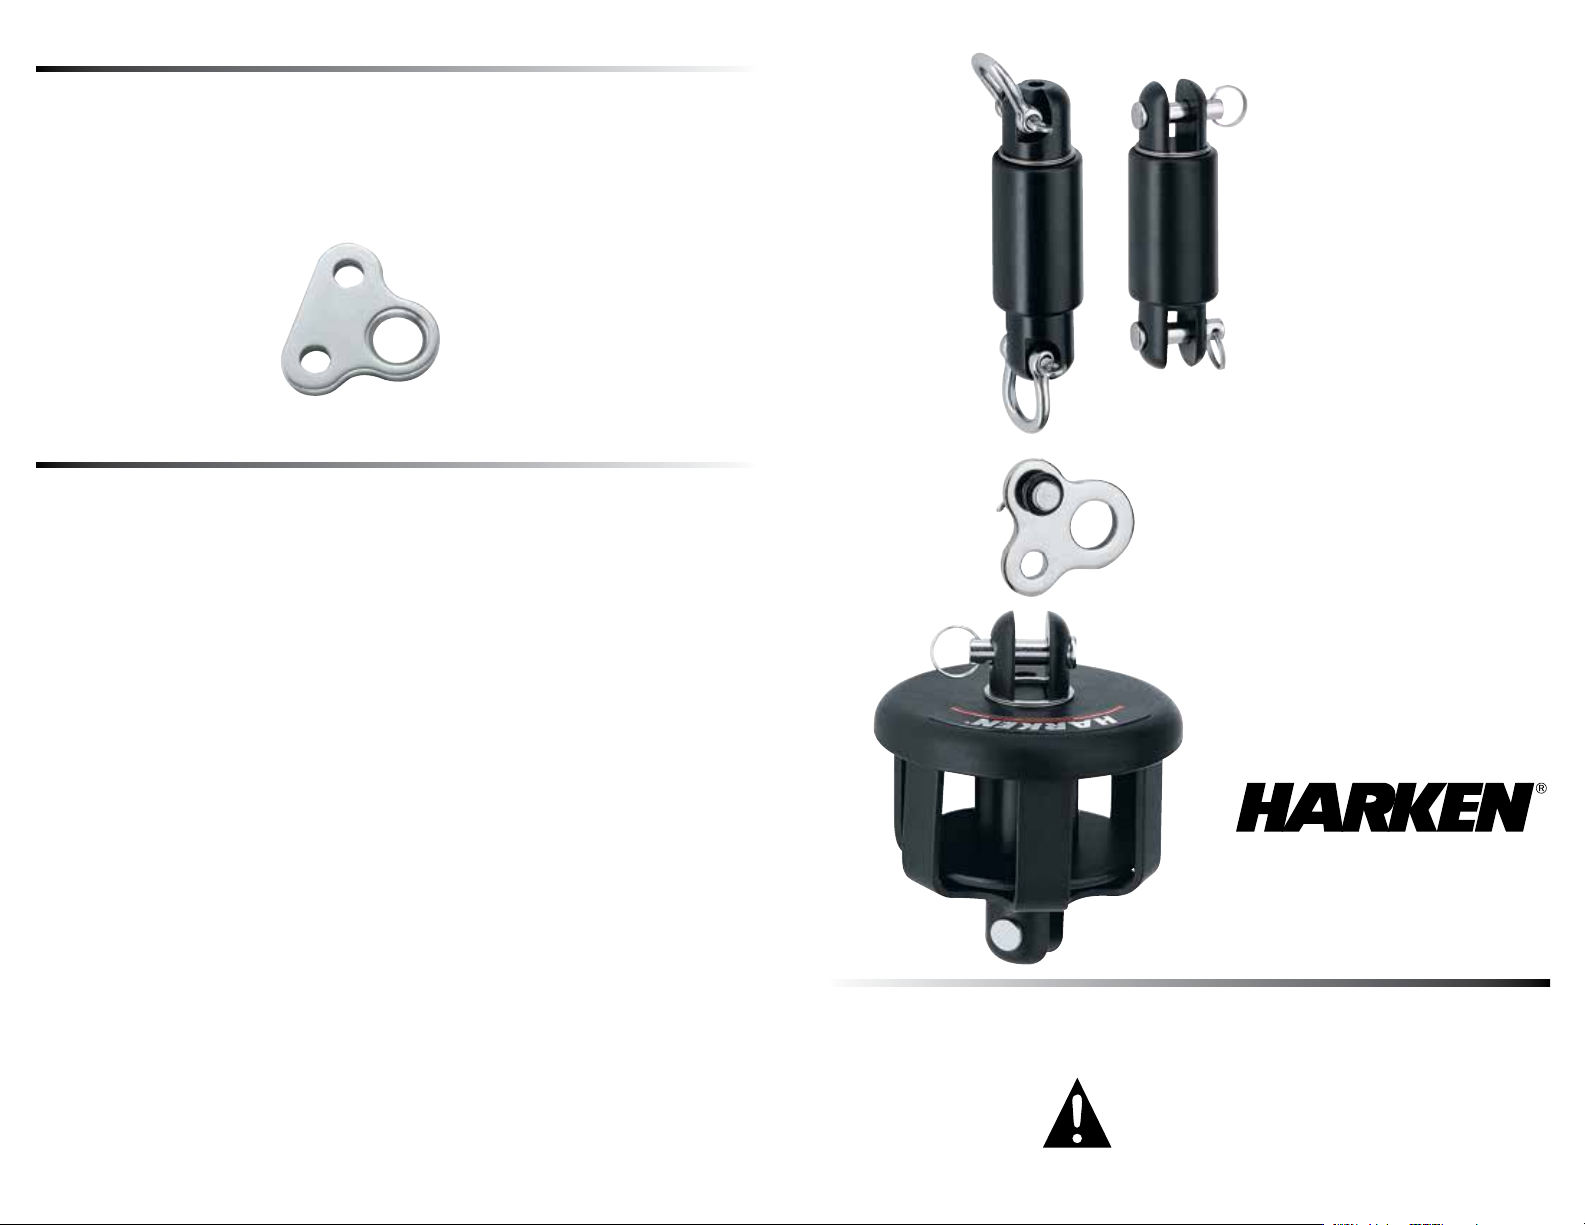
Use tangs to provide a sail attachment to lower furler. A sailmaker eye may also be used.
Attach headstay
to upper hole
Attach furler
Secure sail here
to this hole
Commissioning
Attaching furling components to mast and boat
Attach the tang assembly to fork at top of drum using
¼" clevis pin. Attach drum assembly to boat’s chainplate using ¼" clevis pin.
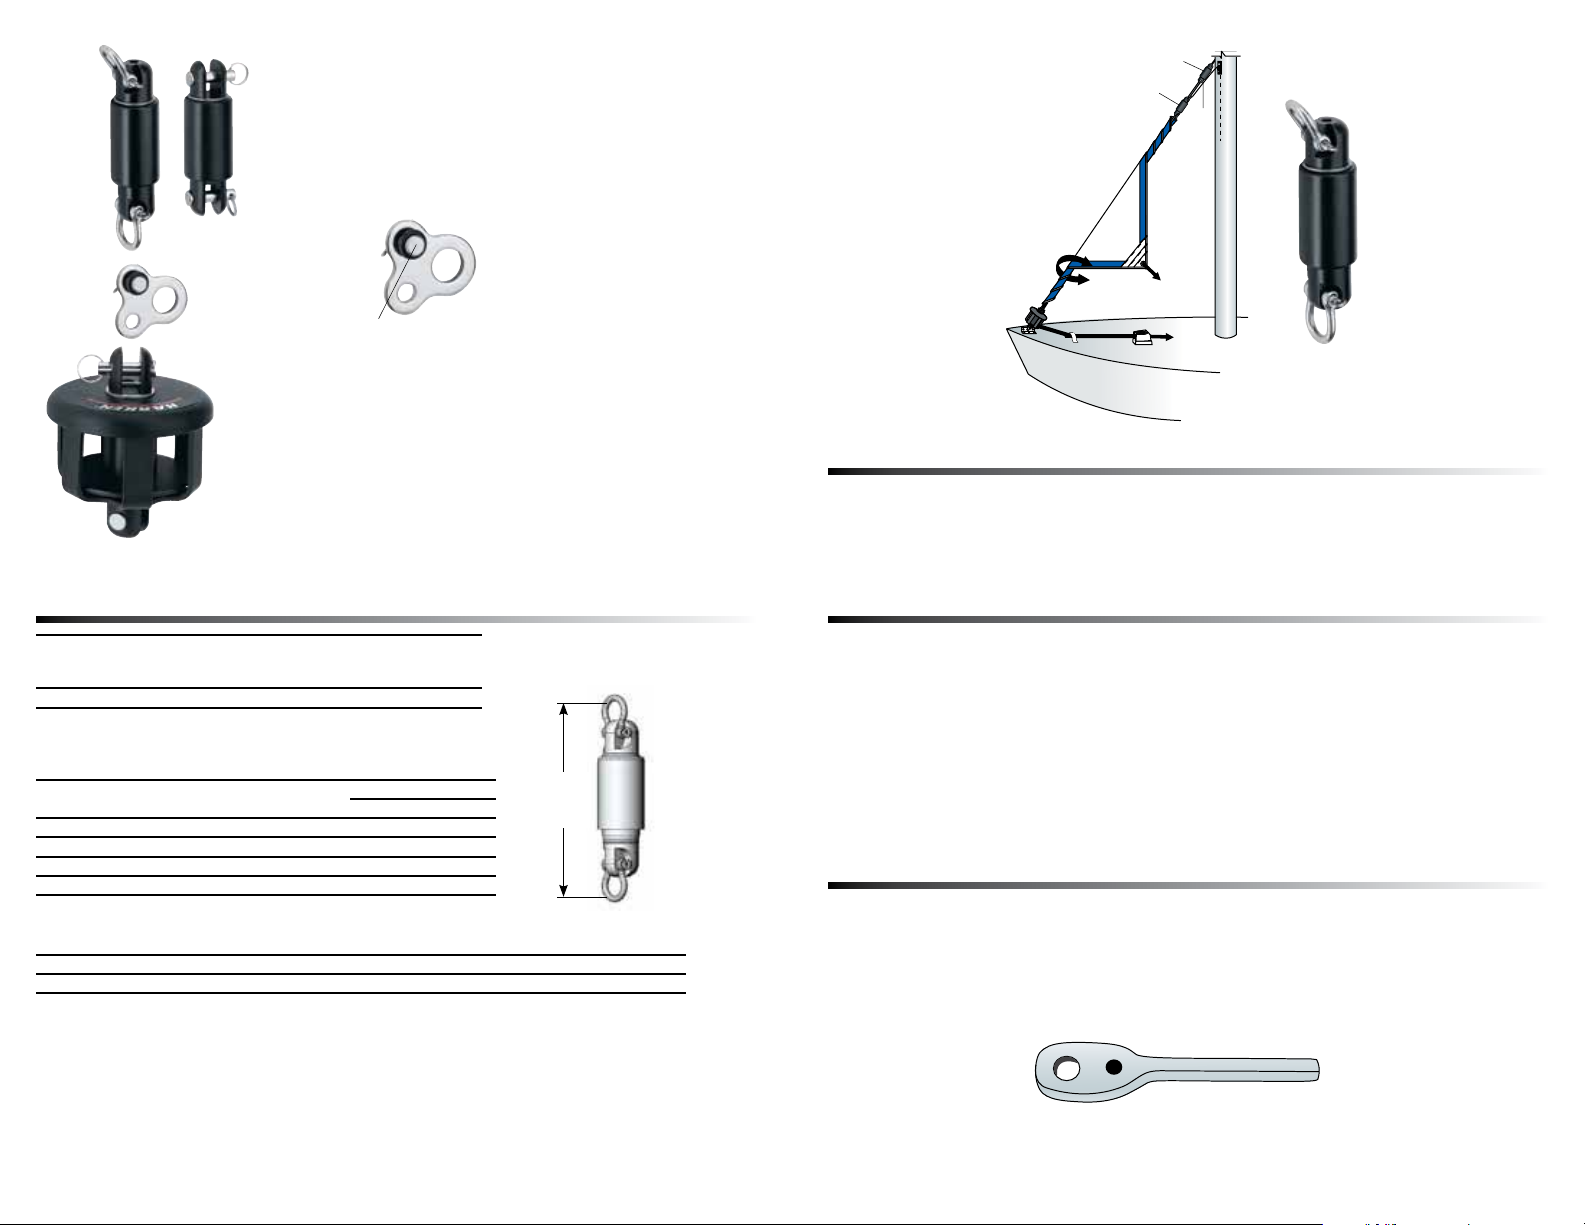
As part of raising mast, attach upper halyard swivel to a tang on mast. Attach headstay wire with
hoistable swivel to upper swivel assembly. Attach fork fitting on lower end of wire to tack adapter
tang. Use “O” rings between tang and inside fork so clevis pin stays square to plate.
Furling Line Lead and Cleat
Feed line through one of openings in drum so it does not rub and through small hole in top of drum.
Tie a tight figure “8” knot in end of line and draw it tight onto drum.
Spin drum and wind up about 10' (3 m) of line. Furling line can be led down center on either side of boat.
Mount a 237 bullseye or 349, 29 mm Carbo block assembly placed so that furling line is perpendicular to
forestay. Lead line aft and mount a 238 cam cleat with fairlead. Tie a figure “8” knot in end of line. Charge
system by rotating furler spool to wrap line on drum. Tension line while charging. If you are using a suncover note which side of sail is exposed.
Tip: Sun cover to starboard—turn clockwise to charge. Sun cover to port—turn counter-clockwise.
If you need to change direction sail furls, disconnect tack of sail. Pull line off spool and charge line in
other direction.
Raising Sail
Make sure that spool is charged with line as directed above. Attach tack of sail to adapter tang or
sailmaker eye. Attach head of sail to shackle on halyard swivel. Attach halyard to upper shackle. Hoist
sail and trial furling. Check furling line length. To change amount of line on drum, disconnect tack from
lower unit and rotate drum to add or remove line. Re-attach tack.
Check Halyard Angle
Make sure halyard has a slight pull to the rear. The lower pin in the upper swivel spins. If halyard is too
close to this pin, halyard can wrap causing sail to jam. There may be room to add a pendant between
head of sail and hoistable swivel to raise it. Alternatively it may be necessary to put a halyard restrainer
on the mast or lower halyard sheave. Use a modified 2129 eyestrap.
USA – Tel: (+01) 262-691-3320 • Web: www.harken.com • Email: harken@harken.com
Italy – Tel: (+39) 031.3523511 • Web: www.harken.it • Email: techservice@harken.it
Printed in USA 4350 6-12-13
SMALL BOAT
FURLER KIT
Installation Manual
483
WARNING! Strictly follow all instructions
to avoid an accident, damage to your vessel,
personal injury, or death. See www.harken.
com for additional safety information.
Page 2
164 Upper Swivel Assembly
Upper swivel
Hoistable swivel
Halyard
Adapter Tang Assembly
464 Hoistable Swivel Assembly
Adapter Tang
HCP650 2 Neoprene O-ring
HFS118 1 Cotter pin 1/16 X .500 18-8
HSB99 2 Clevis pin 1/4 X .672 SS
165 Drum Assembly
Specifications
Maximum
Part
No.
483 950 431
working load
lb kg in mm in mm in mm
Pin to Pin Lengths
Use for determining sail luff length.
Part
No. Description
164
464
HCP649
165
Line (Not Included)
Swivel Assembly 2.5 64
Hoistable Swivel Assembly 5.696 145
Tack Adapter Tang .75 19
Drum Assembly 2.5 64
Line Ø Measure distance from furler to cleat and add
5/32" (4 mm) 10' (3 m)
Max luff
wire Ø
5
/3245/1681/46
Jaw
width
Clevis pin
Ø
Length
in mm
HCP649 Tang
464
511/16"
(145 mm)
464 Hoistable Swivel Assembly
Unfurl
Furl
How It Works
The hoistable ball bearing swivel is installed on headstay so you can raise or lower sail without removing
headstay. The hoistable swivel is independent of the headstay, allowing you to tension the luff separately from
the mast rake. The adapter tang assembly provides a “Y” attachment to connect both stay and sail tack to the
lower unit.
Assembly Checklist
Furling Attachment to Boat
Check mast fitting to make sure there is a tang to fit the clevis pin and jaw width of the upper halyard swivel.
Check the chainplate to make sure the drum assembly will fit.
Rigging work
Make sure you have a stay made up with the correct hardware and with swivel correctly captured on stay.
Consult Sailmaker to make sure sail is compatible with hardware. See below.
• Have fairleads or block and cleat to secure line.
• Purchase furling line per specifications above.
• Check halyard clearance of upper swivel.
Preassembly
Headstay Wire
Consult the pin-to pin-lengths for the upper swivel, adapter tang and the drum assembly. Make up wire
so that it has an ¼" eye to mate with the upper swivel assembly. The lower end requires a fork to mate
with the HCP649 Tack Adapter Tang. A sailmaker eye may be used as an alternative. The eye consists
of a swage marine eye with a hole designed for lashing or shackling the tack to the terminal. Sailmaker
eyes are available from rigging supply companies.
Sailmaker Eye
Important! Make sure to have the hoistable halyard swivel installed on the wire before ends are
swaged in place. Make sure the top side of the halyard swivel with circlip ring facing is towards the
top as shown.
 Loading...