

Page 1
INSTRUCTIONS
Trigger Cleat 418
N15W24983 Bluemound Road • Pewaukee, WI 53072 U.S.A.
Telephone: (262) 691-3320 • Fax: (262) 701-5780
Web: www.harken.com • Email: harken@harken.com
Strictly follow all instructions to avoid an accident, damage to
your vessel, personal injury, or death. See www.harken.com
for additional safety information.
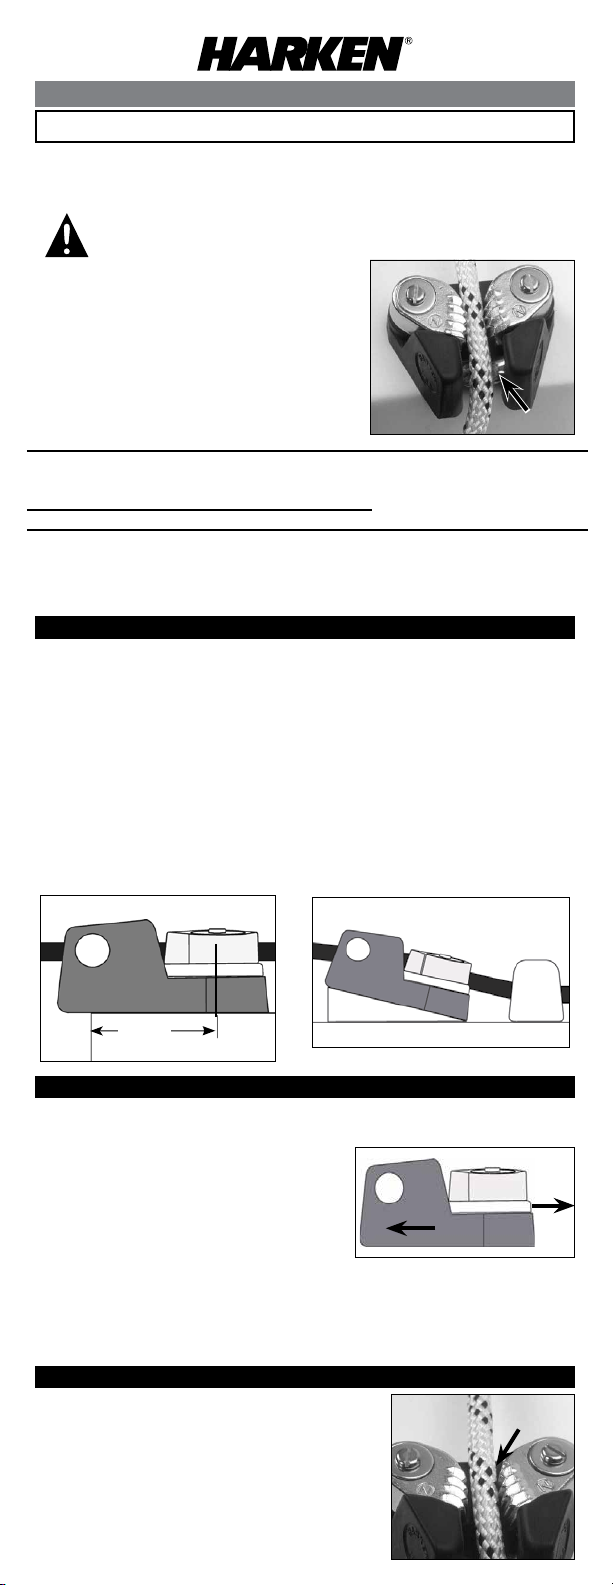
The 418 Trigger cleat allows easy
release of highly-loaded lines with
complete control. Pulling line down
on the trigger mechanism opens
cleat. Line never comes off cleat.
The trigger serves as a snubbing
surface to control release.
Trigger
Max line ØMin line ØMaximum
Part
No.
in mm in mm lb kg in mm
3
418
/16 5 1/2 12 500 227 2 51
working load
Fastener
spacing
Fastener size/
comments
5 mm (#10) PH/RH–ships w/1
screws and nuts to hold assembly.
OPTIONS: 419 eyestrap; 355 mounting bracket to attach cleat to Harken
Classic blocks: 052, 064, 152, and 411. See reverse side for mounting to
Carbo triple blocks.
Installing 418 Trigger Cleat
Placement
The angle of line from cleat to operator is important for efficient
release. For best operation, mount cleat at waist or chest height
in your normal operating position. If possible, mount cleat on
edge of deck, cockpit, or cabin.
3
Place mounting holes back 35 mm (1
13
Drill size 5 mm (
/64") or #12.
If line angle is too low, or if cleat cannot be mounted near an edge, mount
cleat on pad or bracket inclined 25°. Install bullseye fairlead or turning
block on the loaded side of the cleat to lead line into cleat parallel to cams.
35 mm
(13/8")
/8") from edge so cleat overhangs.
5
/8"
Adjusting Cleat to Fit Line Size
The Trigger cleat will accept most lines up to 12 mm (
To adjust cleat to fit larger size line,
loosen screws and lift cam cleat and
its platform slightly from base. Slide
base toward you, against spring
tension. Press cleat and platform
down and hold in place until screws
are tight.
Tip: Mount screws through cleat and deck with nuts loosely threaded.
Screws should be ready to tighten before adjusting for larger line.
Cam base and cam platform have ridges and interlocking grooves
to help hold them in place until screws are tight.
1
/2").
Check for Proper Adjustment
With lever fully depressed, cam gap should be
slightly larger than line size. If gap is too small,
shift base to position for larger line size.
With line loaded in cams, lever should not
contact top of lever cavity. This will prevent
cams from closing tightly against line. If rope
slips when loaded, shift base to position for
smaller rope size.
Cam gap
Page 2
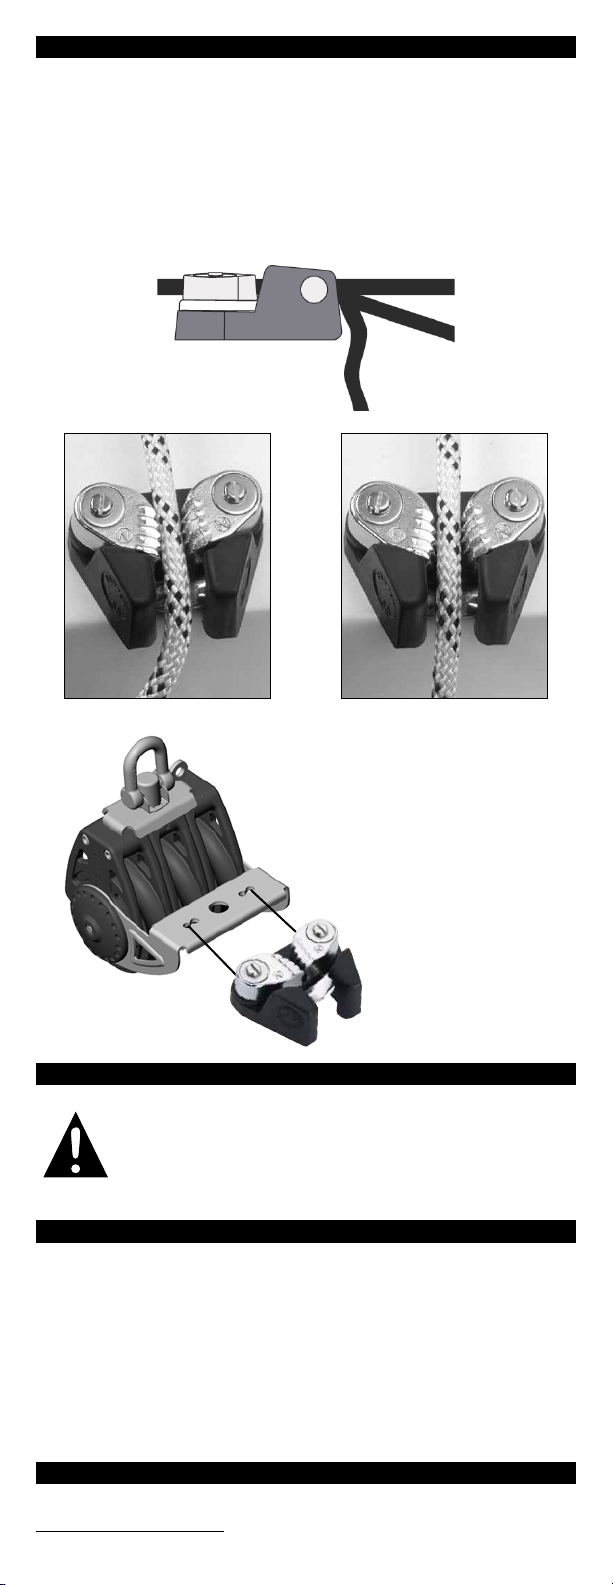
How Trigger Cleat Works
Pull line tail downward as in position B. The release lever opens cams so
line may be eased. By holding a downward angle, lever acts as a snubbing
surface for better control of heavily loaded lines.
Raise line tail (position C), or simply release line (position A).
Spring-loaded cams close to cleat line again.
Fairings around release lever allow cleating when tail leaves cleat at up
to 45° to either side of cleat axis. Line stays between cams at all times.
C
B
A
A B
Fitting triple carbo blocks
Use outer holes for mounting
57 mm or 75 mm Carbo block
triple cam arms.
Inspect Parts Each Time you Sail
WARNING! Parts must be inspected each time you sail.
If parts are under load during long passages, it is important
to inspect them carefully while in use. Failure to inspect and
correct block and loop or lashing can result in block breaking
under load causing an accident, or damage to your vessel.
Maintenance
Harken equipment is designed for minimal maintenance. However, some
upkeep is required to give the best service and comply with the Harken
limited warranty.
Keep your equipment clean and free-running by frequently flushing with
fresh water. Periodically clean with mild detergent and water solution.
Spin sheaves to distribute soap solution evenly. Flush with fresh water.
Important! Exposure to some teak cleaners and other caustic solutions can
result in discoloration of part and is not covered under the Harken warranty.
Warranty
For additional safety, maintenance and warranty information see
www.harken.com/manuals or the Harken catalog.
Printed in USA. 4527/12-14
 Loading...